1
SMC7004VBR_QS.joint.qxd
19/9/02
12:42 pm
Page 1
Barricade
Broadband Router
10/100Mbps Broadband Router
10/100-MBit/s-Breitbandrouter
Routeur haut débit 10/100Mbps
Router de banda ancha de 10/100 Mbps
Router a banda larga a 10/100 Mbps
Quick Start Guide
Installationskurzanleitung
Guide d'installation
Manual de instalación rápida
Guida rapida di installazione
V1.0
SMC7004VBR
SMC7004VBR_QS.joint.qxd
19/9/02
12:42 pm
Page 3
10/100Mbps Broadband Router
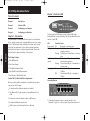
Chapter 2. Indicator LEDs
Table of Contents
Chapter 1
Introduction
Chapter 2
Indicator LEDs
Chapter 3
Configuring your Computer
Chapter 4
Configuring your Barricade
Chapter 1. Introduction
This Package Contains
•
•
•
•
•
One SMC Barricade
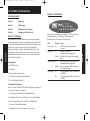
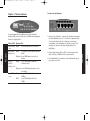
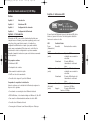
LED
Power (green)
WAN (green)
Link/Act
(green)
One Power Adapter
This Quick Installation Guide
One CD with Complete Documentation
One Category 5 Fast Ethernet Cable
Confirm That You Meet Installation Requirements
Speed (green)
Condition Status
On
Barricade is receiving power.
On
The WAN port has established a valid
network connection.
Flashing The WAN port is transmitting or receiving
data.
On
The indicated LAN port has established a
valid network connection.
Flashing The indicated LAN port is transmitting or
receiving data.
On
The indicated LAN port is operating at
100Mbps.
Off
The indicated LAN port is operating at
10Mbps.
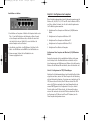
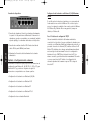
Connecting Devices
Before proceeding with the installation of your Barricade, please be
sure you have the following:
• A computer with an Ethernet network card installed
• Your Windows CD, if your computer is running Windows 95, 98,
or ME
• An Internet connection through a cable or xDSL modem
• An additional Ethernet network cable
• A Web browser such as Internet Explorer or Netscape
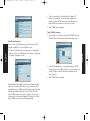
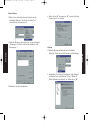
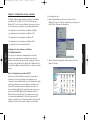
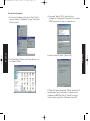
1. Connecting Computers: Connect computers directly to the
Barricade on ports 1-4 on the rear panel. If you have more than 4
English
English
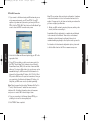
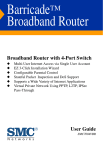
The SMC Barricade is a Broadband Router designed to share Internet
Access, provide security, and to network multiple devices for a variety
of users. The Barricade’s simple installation and setup can be carried
out by the least experienced of users, while providing networking
professionals with easy to configure advanced features. Please read
the User Guide for advanced features of this product.
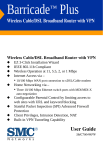
The front panel of the Barricade provides indicator LEDs (Light
Emitting Diodes) for easy monitoring. The following table defines the
function of each LED.
SMC7004VBR_QS.joint.qxd
19/9/02
12:43 pm
Page 5
computers to plug in, connect a hub or a switch (using its uplink
port) and connect additional computers to that device.
2. Connecting a Cable Modem or DSL Modem: Connect your Cable or
DSL modem to the WAN port on the rear panel.
3. Power: Plug the power cord into the power jack.
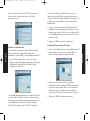
known as a static IP address. How your ISP assigns your IP address
determines how you will configure your computer.
Here is what to do:
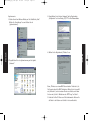
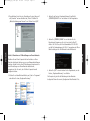
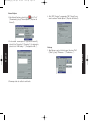
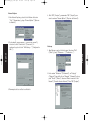
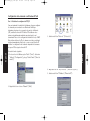
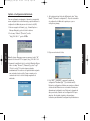
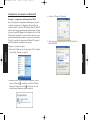
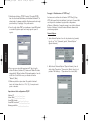
1. From the Windows desktop, click the "Start" button. Choose
"Settings," then click "Control Panel."
Chapter 3. Configuring Your Computer
•
•
•
•
•
Configuring Your Computer with Windows 95/98/Me.
Configuring Your Computer with Windows 2000.
English
English
This Quick Installation Guide provides configuration instructions for
Windows 95, 98, ME, NT 4.0, 2000 and XP, and for Macintosh OS 7.x
and above. Please be sure that you are following the proper
instruction set for your operating system.
Configuring Your Computer with Windows XP.
Configuring Your Computer with Windows NT 4.0.
Configuring Your Macintosh Computer.
Configuring Your Computer in Windows 95/98/Millennium Edition
You may find that the instructions here do not exactly match your
version of Windows. This is because these steps and screenshots were
created from Windows 98. Windows 95 and Windows Me are very
similar, but not identical, to Windows 98.
Step 1. Configure TCP/IP Settings
After you have completed the hardware setup by connecting your
devices, you need to configure your computer to connect to your
Barricade. You need to determine how your ISP issues your IP
address. Many ISPs issue these numbers automatically using a
networking technology known as Dynamic Host Configuration
Protocol, or DHCP. Other ISPs will specify your IP address and
associated numbers, which you must enter manually. This is also
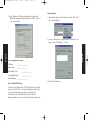
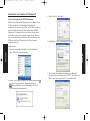
2. From "Control Panel," double-click the "Network" icon.
SMC7004VBR_QS.joint.qxd
19/9/02
12:43 pm
Page 7
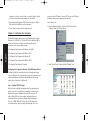
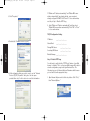
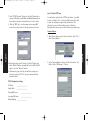
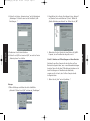
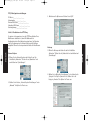
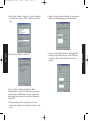
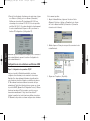
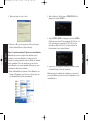
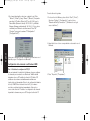
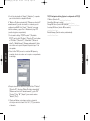
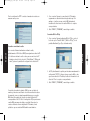
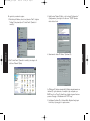
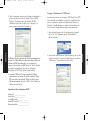
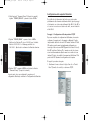
3. In the "Network" window, under the "Configuration" tab, doubleclick the "TCP/IP" entry that is listed with your network card.
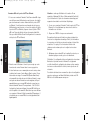
If "Obtain an IP address automatically" is already selected, your
computer is already configured for DHCP. Click "Cancel" to close each
window, and skip to Step 2. Disable HTTP Proxy.
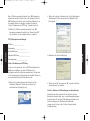
5. Locate your IP address and Subnet Mask. Record them in the
spaces provided after step 9 in this section.
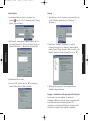
7. Click the "DNS Configuration" tab. Locate the DNS servers listed
under "DNS Server Search Order." Record the listed addresses.
English
English
4. Select the "IP Address" tab.
6. Click the "Gateway" tab and record the numbers listed under
"Installed gateways."
SMC7004VBR_QS.joint.qxd
19/9/02
12:43 pm
Page 9
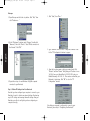
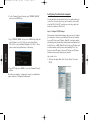
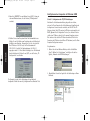
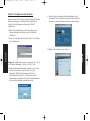
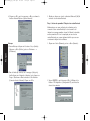
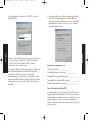
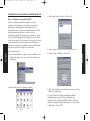
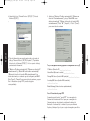
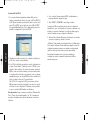
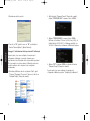
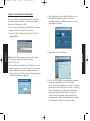
8. After writing down your settings, check to make sure you have
recorded them correctly. Click the "IP Address" tab and then
click "Obtain an IP address automatically." Click OK.
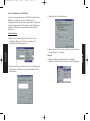
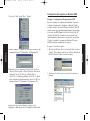
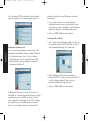
2. In the "Internet Options" window click the "Connections" tab.
Next, click the "LAN Settings…" button.
9. Windows may need your Windows 95/98/ME CD to copy some files.
After it finishes copying, it will then prompt you to restart your
system. Click "Yes" and your computer will shut down and restart.
IP Address
____.____.____.____
Subnet Mask
____.____.____.____
Primary DNS Server
____.____.____.____
Secondary DNS Server
____.____.____.____
3. Clear all the checkboxes.
4. Click "OK," and then click "OK" again to close the "Internet
Options" window.
Default Gateway ____.____.____.____
Step 2. Disable HTTP Proxy
You will need to verify that the "HTTP Proxy" feature of your Web
browser is disabled. This is so that your Web browser will be able
to view the configuration pages inside your Barricade. The
following steps are for Internet Explorer and for Netscape.
Determine which browser you use and follow the appropriate steps.
Internet Explorer
1. Open Internet Explorer and click the stop
"Tools," then "Internet Options."
button. Click
English
English
TCP/IP Configuration Setting
SMC7004VBR_QS.joint.qxd
19/9/02
12:43 pm
Page 11
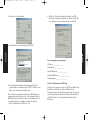
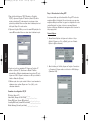
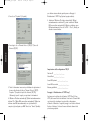
Netscape
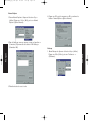
1. Open Netscape and click the stop button. Click "Edit," then
click "Preferences…"
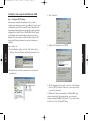
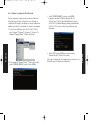
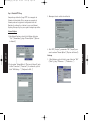
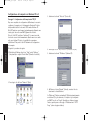
1. Click "Start," then "Run…"
2. In the "Preferences" window, under "Category" double-click
"Advanced," then click "Proxies." Select "Direct connection to
the Internet." Click "OK."
English
English
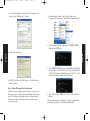
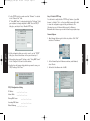
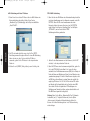
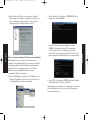
2. Type "WINIPCFG" and click "OK." It may take a minute or two
for the "IP Configuration" window to appear.
3. Repeat these steps for each Windows 95/98/Me computer
connected to your Barricade.
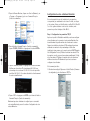
3. From the drop-down menu, select your network card. Click
"Release" and then "Renew." Verify that your IP address is now
192.168.2.xxx, your Subnet Mask is 255.255.255.0 and your
Default Gateway is 192.168. 2.1. These values confirm that your
Barricade is functioning. Click "OK" to close the "IP
Configuration" window.
Step 3. Obtain IP Settings from Your Barricade
Now that you have configured your computer to connect to your
Barricade, it needs to obtain new network settings. By releasing
any old IP settings and renewing them with settings from your
Barricade, you will also verify that you have configured your
computer correctly.
Now that your computer is configured to connect to your
Barricade, please skip to "Configuring Your Barricade".
SMC7004VBR_QS.joint.qxd
19/9/02
12:43 pm
Page 13
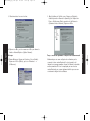
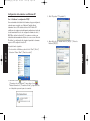
Configuring Your Computer with Windows 2000
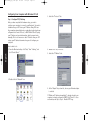
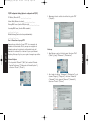
3. Click "Properties."
Step 1. Configure TCP/IP Settings
After you have completed the hardware setup, you need to
configure your computer to connect to your Barricade. You also need
to determine how your ISP issues your IP address. Many ISPs issue
these numbers automatically, using a networking technology known
as Dynamic Host Control Protocol, or DHCP. Other ISPs will specify
your IP address and associated numbers, which you must enter
manually. This is also known as a static IP address. How your ISP
assigns your IP address determines how you will configure your
computer.
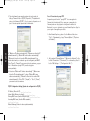
4. Double-click "Internet Protocol (TCP/IP).
1. From the Windows desktop, click the "Start" button. Choose
"Settings," then click "Network and Dial-Up Connections" icon.
"
English
English
Here is what to do:
2. Double-click the icon that corresponds to the connection to
your Barricade.
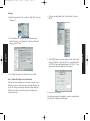
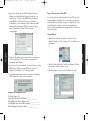
5. All the information that you need to record is on the "Internet
Protocol (TCP/IP) Properties" dialog box. Use the spaces below
to record the information.
If "Obtain an IP address automatically" and "Obtain DNS server
address automatically" are already selected, your computer is
already configured for DHCP. Click "Cancel" to close each window,
and skip to to Step 2. Disable HTTP Proxy.
SMC7004VBR_QS.joint.qxd
19/9/02
12:43 pm
Page 15
Internet Explorer
6. Select "Obtain an IP address automatically" and then select
"Obtain DNS server address automatically." Click "OK" or "Close"
to close each window
1. Open Internet Explorer and click the stop button. Click "Tools,"
then "Internet Options."
English
English
2. In the "Internet Options" window click the "Connections" tab.
Next, click the "LAN Settings…" button.
TCP/IP Configuration Setting
IP Address
____.____.____.____
Subnet Mask
____.____.____.____
Primary DNS Server
____.____.____.____
Secondary DNS Server
____.____.____.____
Default Gateway ____.____.____.____
3. Clear all the checkboxes.
Step 2. Disable HTTP Proxy
You will need to verify that the "HTTP Proxy" feature of your Web
browser is disabled. This is so that your Web browser will be able
to view the configuration pages inside your Barricade. The
following steps are for Internet Explorer and for Netscape.
Determine which browser you use and follow the appropriate steps.
SMC7004VBR_QS.joint.qxd
19/9/02
12:43 pm
Page 17
Step 3. Obtain IP Settings From Your Barricade
4. Click "OK," and then click "OK" again to close the "Internet
Options" window.
Now that you have configured your computer to connect to your
Barricade, it needs to obtain new network settings. By releasing
any old IP settings and renewing them with settings from your
Barricade, you will also verify that you have configured your
computer correctly.
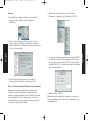
1. From the Windows desktop, click the "Start" button, then
"Programs," then "Accessories," and then click "Command Prompt."
1. Open Netscape and click the stop button. Click "Edit," then
click "Preferences…"
2. In the "Command Prompt" window, type "IPCONFIG /RELEASE"
and press the <ENTER> key.
2. In the "Preferences" window, under "Category" double-click
"Advanced," then click "Proxies." Select "Direct connection to
the Internet." Click "OK."
English
English
Netscape
SMC7004VBR_QS.joint.qxd
19/9/02
12:43 pm
Page 19
3. Type "IPCONFIG /RENEW" and press the <ENTER> key. Verify that
your IP address is now 192.168.2.xxx (2-254), your Subnet Mask
is 255.255.255.0 and your Default Gateway is 192.168.2.1.
These values confirm that your Barricade is functioning.
Configuring Your Computer with Windows XP
Step 1. Configure TCP/IP Settings
After you have completed the hardware setup, you need to configure
your computer to connect to your Barricade. You also need to
determine how your ISP issues your IP address. Many ISPs issue these
numbers automatically, using a networking technology known as
Dynamic Host Configuration Protocol, or DHCP. Other ISPs will specify
your IP address and associated numbers, which you must enter
manually. This is also known as a static IP address. How your ISP
assigns your IP address determines how you will configure your
computer.
Here is what to do:
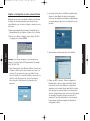
1. From the Windows desktop, click the "start" button. Choose
"Control Panel."
Now that your computer is configured to connect to your
Barricade, please skip "Configuring Your Barricade".
English
English
4. Type "EXIT" and press <ENTER> to close the "Command Prompt"
window.
2. Select the "Network and Internet Connections" icon
,then
click the "Network Connections" icon
,and and double-click
on the adapter you will use for this connection.
SMC7004VBR_QS.joint.qxd
19/9/02
12:43 pm
Page 21
3. Click "Properties."
If "Obtain an IP address automatically" and "Obtain DNS server
address automatically" are already selected, your computer is
already configured for DHCP. Click "Cancel" to close each window,
and skip to Step 2. Disable HTTP Proxy.
6. Select "Obtain an IP address automatically" and then select
"Obtain DNS server address automatically." Click "OK" or "Close"
to close each window.
TCP/IP Configuration Setting
4. Double-click "Internet Protocol (TCP/IP)."
IP Address
____.____.____.____
Subnet Mask
____.____.____.____
Primary DNS Server
____.____.____.____
Secondary DNS Server
____.____.____.____
English
Step 2. Disable HTTP Proxy
5. All the information that you need to record is on the "Internet
Protocol (TCP/IP) Properties" dialog box. Use the spaces
provided after step 7 in this section to record the information.
You will need to verify that the "HTTP Proxy" feature of your Web
browser is disabled. This is so that your Web browser will be able to
view the configuration pages inside your Barricade Plus. The
following steps are for Internet Explorer. Determine which browser
you use and follow the appropriate steps.
1. Open Internet Explorer and click the stop button. Click "Tools,"
then "Internet Options."
English
Default Gateway ____.____.____.____
SMC7004VBR_QS.joint.qxd
19/9/02
12:43 pm
Page 23
2. In the "Internet Options" window click the "Connections" tab.
Next, click the "LAN Settings…" button.
1. From the Windows desktop, click the "Start" button, then
"Programs," then "Accessories," and then click "Command Prompt."
2. In the "Command Prompt" window, type "IPCONFIG /RELEASE"
and press the <ENTER> key.
English
English
3. Clear all the checkboxes.
3. Type "IPCONFIG /RENEW" and press the <ENTER> key. Verify that
your IP address is now 192.168.2.xxx (2-254), your Subnet Mask
is 255.255.255.0 and your Default Gateway is 192.168.2.1. These
values confirm that your Barricade is functioning.
4. Click "OK," and then click "OK" again to close the "Internet
Options" window.
Step 3. Obtain IP Settings From Your Barricade
Now that you have configured your computer to connect to your
Barricade, it needs to obtain new network settings. By releasing
any old IP settings and renewing them with settings from your
Barricade, you will also verify that you have configured your
computer correctly.
4. Type "EXIT" and press <ENTER> to close the "Command Prompt"
window.
Now that your computer is configured to connect to your Barricade,
please skip to please skip to "Configuring Your Barricade".
SMC7004VBR_QS.joint.qxd
19/9/02
12:43 pm
Page 25
Configuring Your Computer with Windows NT 4.0
3. Select the "Protocols" tab.
Step 1. Configure TCP/IP Settings
After you have completed the hardware setup, you need to
configure your computer to connect to your Barricade. You need to
determine how your ISP issues your IP address. Many ISPs issue
these numbers automatically using a networking technology known
as Dynamic Host Control Protocol, or DHCP. Other ISPs will specify
your IP address and associated numbers, which you must enter
manually. This is also known as a static IP address. How your ISP
assigns your IP address determines how you will configure your
computer.
Here is what to do:
4. Double-click "TCP/IP Protocol."
5. Select the "IP Address" tab.
2. Double-click the "Network" icon.
6. In the "Adapter" drop-down list, be sure your Ethernet adapter
is selected.
If "Obtain an IP address automatically" is already selected, your
computer is already configured for DHCP. Click "Cancel" to close
each window, and skip to Step 2. Disable HTTP Proxy.
English
English
1. From the Windows desktop click "Start," then "Settings," and
click "Control Panel."
SMC7004VBR_QS.joint.qxd
19/9/02
12:43 pm
Page 27
Step 2. Disable HTTP Proxy
7. In the "TCP/IP Properties" dialog box, click the IP address tab to
locate your IP address, subnet Mask, and Default Gateway. Record
these values in the space provided after step 10 in this section.
8. Click the "DNS" tab to see the primary and secondary DNS
servers. Record these values in the appropriate spaces below.
You will need to verify that the "HTTP Proxy" feature of your Web
browser is disabled. This is so that your Web browser will be able
to view the configuration pages inside your Barricade. The
following steps are for Internet Explorer and for Netscape.
Determine which browser you use and follow the appropriate steps.
Internet Explorer
9. After writing down your IP settings, click the IP address tab.
Select "Obtain IP address automatically" and click OK. Click OK
again to close the "Network" window.
10. Windows may copy some files, and will then prompt you to
restart your system. Click "Yes" and your computer will shut
down and restart.
TCP/IP Configuration Setting
IP Address
____.____.____.____
Subnet Mask
____.____.____.____
Primary DNS Server
____.____.____.____
Secondary DNS Server
____.____.____.____
Default Gateway ____.____.____.____
2. In the "Internet Options" window click the "Connections" tab.
Next, click the "LAN Settings…" button.
English
English
1. Open Internet Explorer and click the stop button. Click "Tools,"
then "Internet Options."
SMC7004VBR_QS.joint.qxd
19/9/02
12:43 pm
Page 29
3. Clear all the checkboxes.
Netscape
1. Open Netscape and click the stop button. Click "Edit," then
click "Preferences…"
Step 3. Obtain IP Settings From Your Barricade
Now that you have configured your computer to connect to your
Barricade, it needs to obtain new network settings. By releasing
any old IP settings and renewing them with settings from your
Barricade, you will also verify that you have configured your
computer correctly.
1. From the Windows desktop, click the "Start" button, then
"Programs," and then select "Command Prompt."
English
English
4. Click "OK," and then click "OK" again to close the "Internet
Options" window.
2. In the "Preferences" window, under "Category" double-click
"Advanced," then click "Proxies." Select "Direct connection to
the Internet." Click "OK."
SMC7004VBR_QS.joint.qxd
19/9/02
12:43 pm
Page 31
2. In the "Command Prompt" window, type "IPCONFIG /RELEASE"
and press the <ENTER> key.
Configuring Your Macintosh Computer
You may find that the instructions here do not exactly match your
screen. This is because these steps and screenshots were created
using Mac OS 8.5. Mac OS 7.x and above are all very similar, but
may not be identical to Mac OS 8.5.
Step 1. Configure TCP/IP Settings
Here is what to do:
1. Pull down the Apple Menu. Click "Control Panels" and select
TCP/IP.
4. Type "EXIT" and press <ENTER> to close the "Command Prompt"
window.
Now that your computer is configured to connect to your Barricade,
please continue to "Configuring Your Barricade".
English
English
3. Type "IPCONFIG /RENEW" and press the <ENTER> key. Verify that
your IP address is now 192.168.2.xxx, your Subnet Mask is
255.255.255.0 and your Default Gateway is 192.168.2.1. These
values confirm that your Barricade is functioning.
After you have completed the hardware setup, you need to configure
your computer to connect to your Barricade. You need to determine
how your ISP issues your IP address. Many ISPs issue these numbers
automatically using a networking technology known as Dynamic Host
Control Protocol, or DHCP. Other ISPs will specify your IP address and
associated numbers, which you must enter manually. This is also
known as a static IP address. How your ISP assigns your IP address
determines how you will configure your computer.
SMC7004VBR_QS.joint.qxd
19/9/02
12:43 pm
Page 33
2. In the TCP/IP dialog box, make sure that "Ethernet" is selected
in the "Connect Via:" field.
If "Using DHCP Server" is already selected in the "Configure:" field,
your computer is already configured for DHCP. Close the TCP/IP
dialog box, and skip to Step 2. Disable HTTP Proxy.
Step 2. Disable HTTP Proxy
You will need to verify that the "HTTP Proxy" feature of your Web
browser is disabled. This is so that your Web browser will be able
to view the configuration pages inside your Barricade. The
following steps are for Internet Explorer and for Netscape.
Determine which browser you use and follow the appropriate steps.
Internet Explorer
3. All the information that you need to record is on the "TCP/IP"
dialog box. Record these values in the space below step 5.
4. After writing down your IP settings, select "Using DHCP Server"
in the "Configure" field and close the window.
5. Another box will appear asking whether you want to save your
TCP/IP settings. Click "Save."
TCP/IP Configuration Setting
IP Address
____.____.____.____
Subnet Mask
____.____.____.____
Primary DNS Server
____.____.____.____
Secondary DNS Server
____.____.____.____
Default Gateway ____.____.____.____
2. In the Internet Explorer Preferences window, under Network,
select Proxies.
3. Uncheck all checkboxes and click OK.
English
English
1. Open Internet Explorer and click the stop button. Click "Edit"
and select "Preferences."
SMC7004VBR_QS.joint.qxd
19/9/02
12:43 pm
Page 35
Netscape
1. Open Netscape and click the stop button. Click "Edit" and select
"Preferences."
1. Pull down the Apple Menu. Click "Control Panels" and select
TCP/IP.
2. In the TCP/IP window, your new settings will be shown. Verify
that your IP address is now 192.168.2.xxx, your Subnet Mask is
255.255.255.0 and your Default Gateway is 192.168.2.1. These
values confirm that your Barricade is functioning.
3. Select "Direct Connection to the Internet" and click OK
Step 3. Obtain IP Settings From Your Barricade
Now that you have configured your computer to connect to your
Barricade, it needs to obtain new network settings. By releasing
any old IP settings and renewing them with settings from your
Barricade, you will also verify that you have configured your
computer correctly.
3. Close the TCP/IP window.
Now that your computer is configured to connect to your Barricade,
please skip to "Configuring Your Barricade".
English
English
2. In the "Preferences" dialog box, In the left-hand column
labeled "Category," select "Advanced." Under the "Advanced"
category, select "Proxies."
SMC7004VBR_QS.joint.qxd
19/9/02
12:43 pm
Page 37
Chapter 4. Configuring Your Barricade
Now that you have successfully configured your computer and
retrieved your new network settings from your Barricade, you are
ready to configure the Barricade’s settings for your LAN.
4. On the home page of the Barricade Web console, click "Setup
Wizard." The automated setup process of the Barricade will take
you through each step for setting up your gateway.
1. Open your Web browser (i.e., Internet Explorer or Netscape
Navigator) and click the stop button.
2. In the "Address" field type "http://192.168.2.1" and press
<ENTER>.
English
English
5. Select your time zone from the list.
Note: For some browsers it may be necessary to include ":88" after
the management IP address. For example, http://192.168.2.1:88
3. The Barricade login screen will appear. Leave the Password field
empty and click on "Login." There is no password by default. For
security reasons, you should assign a password as soon as
possible. Note that the login password is case-sensitive.
6. Click on "NEXT," and the "Broadband Type" setup screen will
display.
There are three different general configurations for high-speed
Internet connections. You need to know about your Internet
connection to determine which configuration to use. You found
out most of what you need to know when you recorded your IP
settings in earlier steps. There are some guidelines to determine
which configuration you should use in the following section.
For PPTP setup refer to the section "Advanced Setup" in the
full manual.
SMC7004VBR_QS.joint.qxd
19/9/02
12:43 pm
Page 39
2. If you are connecting to the Internet with a dynamic IP
address, you probably do not need to enter anything here.
However, if there is a DNS server that you would rather use,
enter the DNS server addresses in the spaces provided.
3. Click "FINISH" when completed.
Fixed-IP xDSL Connection
1. If you connect to the Internet using a Fixed-IP xDSL, click the
"Fixed-IP xDSL" radio button on the Broadband Type screen.
Cable Modem Connection
1. If you use a cable modem or you know you use a dynamic IP
address, click on the "Cable Modem" radio button to display the
IP address configuration screen.
English
English
If you connect to the Internet using a cable modem, your ISP
probably uses DHCP to issue an IP address to you.
2. Your ISP probably requires you to manually enter your TCP/IP
settings. If you have an xDSL connection or if you know you use
a static IP address, enter the IP address information in the
spaces provided.
3. Click "FINISH" when completed.
A Domain Name Server (DNS) is like an index of names and Web
addresses. If you type a Web address into your browser, such as
www.whitehouse.gov, a DNS server will find that name in its index
and find the matching IP address: 198.137.240.92. Most ISPs
provide a DNS server for speed and convenience. Since you are
connecting to the Internet with dynamic IP settings, it is likely
that your DNS servers are also provided dynamically.
SMC7004VBR_QS.joint.qxd
19/9/02
12:43 pm
Page 41
PPPoE xDSL Connection
1. If you connect to the Internet using an xDSL modem and you use
a login name and password, your ISP uses PPPoE. If your ISP
requires a login name and a password or you know your ISP uses
PPPoE, click the "PPPoE xDSL" radio button on the Broadband Type
screen to show the PPPoE connection setup screen.
Many ISPs use modems that provide auto-configuration. Sometimes
connection information is stored on the modem and needs to be
updated. You may need to shut down and restart your modem after
you have configured your Barricade.
6. Restart your xDSL modem by removing the power, waiting a few
seconds, and then reconnecting it.
Congratulations! Basic configuration is complete and your Barricade
is now connected to the Internet. There are also some advanced
configuration options that may be configured, but we do not
recommend making any changes to these options unless you need to.
2. Enter the User Name and Password required by your ISP in the
appropriate fields.
3. If your ISP has provided you with a service name, enter it in
the PPPoE "Service Name" field, otherwise, leave it blank. A
Domain Name Server (DNS) is like an index of names and Web
addresses. If you type a Web address into your browser, such as
www.whitehouse.gov, a DNS server will find that name in its
index and find the matching IP address: 198.137.240.92. Most
ISPs provide a DNS server for speed and convenience. Since you
are connecting to the Internet with dynamic IP settings, it is
likely that your DNS servers are also provided dynamically.
Note: Please be aware that the setting "Maximium Idle Time" to
"0" and/or "Auto-Reconnect" enabled can cause increased
telephone bills. For further information please visit www.smceurope.com or contact SMC's technical support team.
4. If you are connecting to the Internet through PPPoE, you
probably do not need to enter anything here.
5. Click "FINISH" when completed.
English
English
For instructions for the advanced configuration options, please refer
to the User Guide found on the CD or on www.smc-europe.com.
SMC7004VBR_QS.joint.qxd
19/9/02
12:43 pm
Page 43
10/100-MBit/s-Breitbandrouter
Kapitel 2. LED-Anzeigen
Inhaltsverzeichnis
Kapitel 1
Einführung
Kapitel 2
LED-Anzeigen
Kapitel 3
Konfigurieren des Computers
Kapitel 4
Konfigurieren Ihres Barricade
Der SMC Barricade ist ein Breitbandrouter, der gemeinsame Nutzung
des Internetzugangs, Sicherheit sowie Vernetzung mehrerer Geräte für
eine Vielzahl von Benutzern bereitstellt. Die einfache Installation und
Konfiguration des Barricade kann auch von sehr unerfahrenen
Benutzern durchgeführt werden, während Netzwerktechniker leicht
konfigurierbare erweiterte Funktionen vorfinden. Bitte lesen Sie das
Benutzerhandbuch, um Informationen zu den erweiterten Funktionen
dieses Produkts zu erhalten.
Packungsinhalt
•
•
•
•
•
LED
Power (grün)
Zustand
Ein
WAN (grün)
Ein
Blinken
Link/Act (grün) Ein
Ein SMC Barricade
Ein Netzteil
Blinken
Speed (grün)
Ein
Diese Installationskurzanleitung
Eine CD mit der kompletten Dokumentation
Ein Fast-Ethernet-Kabel (Kat. 5)
Installationsanforderungen
Bevor Sie mit der Installation Ihres Barricade fortfahren, vergewissern
Sie sich, dass Folgendes vorhanden ist:
•
•
•
•
•
Auf der Vorderseite des Barricade befinden sich LEDs zur einfachen
Geräteüberwachung. In der folgenden Tabelle werden die
Bedeutungen der verschiedenen LEDs dargestellt:
Ein Computer mit installierter Ethernet-Netzwerkkarte
Ihre Windows-CD, wenn Sie mit Windows 95, 98 oder ME arbeiten
Eine Internetverbindung über ein Kabel- oder xDSL-Modem
Ein weiteres Ethernet-Netzwerkkabel
Ein Webbrowser, z. B. Internet Explorer oder Netscape
Aus
Status
Der Barricade wird mit Spannung
versorgt.
Der WAN-Port hat eine
Netzwerkverbindung hergestellt.
Der WAN-Port überträgt oder empfängt
Daten.
Der entsprechende LAN-Port hat eine
Netzwerkverbindung hergestellt.
Der entsprechende LAN-Port überträgt
oder empfängt Daten.
Der entsprechende LAN-Port arbeitet mit
100 MBit/s.
Der entsprechende LAN-Port arbeitet mit
10 MBit/s.
Deutsch
Deutsch
Kapitel 1. Einführung
SMC7004VBR_QS.joint.qxd
19/9/02
12:43 pm
Page 45
Anschließen von Geräten
Kapitel 3. Konfigurieren des Computers
Diese Installationskurzanleitung bietet Konfigurationsanweisungen für
Windows 95, 98, ME, NT 4.0, 2000 und XP sowie für Macintosh OS 7.x
und höher. Achten Sie darauf, dass Sie die korrekte Vorgehensweise
für Ihr Betriebssystem verwenden.
• Konfigurieren Ihres Computers mit Windows 95/98/Millennium
1. Anschließen von Computern: Schließen Sie Computer direkt an den
Ports 1-4 auf der Rückseite an den Barricade an. Wenn Sie mehr
als vier Computer anschließen wollen, schließen Sie einen Hub
oder Switch (über dessen Uplink-Port) an und schließen Sie
weitere Computer an dieses Gerät an.
3. Stromversorgung: Stecken Sie das Netzkabel in eine
Stromversorgungsbuchse ein.
•
•
•
•
Konfigurieren des Computers mit Windows 2000
Konfigurieren Ihres Computers mit Windows XP
Konfigurieren des Computers mit Windows NT 4.0
Konfigurieren Ihres Macintosh-Computers
Konfigurieren Ihres Computers mit Windows 95/98/Millennium
Edition
Eventuell entsprechen die hier aufgeführten Schritten nicht genau
den Schritten, die für Ihre Windows-Version erforderlich sind, da
diese Anweisungen und Abbildungen aus Windows 98 erstellt wurden,
Windows 95 und Windows ME zwar ähnlich, aber nicht identisch sind.
Schritt 1. Konfigurieren der TCP/IP-Einstellungen
Nachdem Sie die Hardwareeinrichtung durch Anschließen Ihrer Geräte
abgeschlossen haben, müssen Sie Ihren Computer für die Verbindung
mit dem Barricade konfigurieren. Sie müssen zuerst ermitteln, wie Ihr
ISP (Internet Service Provider) Ihre IP-Adresse absetzt. Viele ISPs
weisen die IP-Adresse automatisch mit einer Netzwerktechnologie
namens DHCP (Dynamic Host Configuration Protocol) zu. Andere
Provider stellen eine IP-Adresse bereit, die Sie manuell eingeben
müssen. Dies wird auch als statische IP-Adresse bezeichnet. Die Art
der Zuweisung der IP-Adresse durch Ihren ISP bestimmt, wie Sie
Ihren Computer konfigurieren müssen.
Deutsch
Deutsch
2. Anschließen eines Kabel- oder DSL-Modems: Schließen Sie Ihr
Kabel- oder DSL-Modem an den WAN-Port auf der Rückseite an.
Edition
SMC7004VBR_QS.joint.qxd
19/9/02
12:43 pm
Page 47
Vorgehensweise:
4. Wählen Sie die Registerkarte „IP-Adresse" aus.
Deutsch
Deutsch
1. Klicken Sie auf dem Windows-Desktop auf die Schaltfläche „Start".
Wählen Sie „Einstellungen" aus und klicken Sie auf
„Systemsteuerung".
3. Doppelklicken Sie im Fenster „Netzwerk" auf der Registerkarte
„Konfiguration" auf den Eintrag „TCP/ IP" für Ihre Netzwerkkarte.
2. Doppelklicken Sie in der Systemsteuerung auf das Symbol
„Netzwerk".
Wenn „IP-Adresse von einem DHCP-Server beziehen" aktiviert ist, ist
Ihr Computer bereits für DHCP konfiguriert. Klicken Sie in diesem Fall
auf „Abbrechen", um die einzelnen Fenster zu schließen, und fahren
Sie dann mit „Schritt 2. Deaktivieren des HTTP-Proxy" auf Seite 5.
5. Ermitteln Sie Ihre IP-Adresse und Ihre Subnetzmaske. Notieren Sie
die Werte in den Feldern nach Schritt 9 in diesem Abschnitt.
SMC7004VBR_QS.joint.qxd
19/9/02
12:43 pm
Page 49
6. Klicken Sie auf die Registerkarte „Gateway" und notieren Sie die
unter „Installierte Gateways" aufgelisteten Zahlen.
9. Windows muss eventuell einige Dateien von Ihrer Windows
95/98/ME-CD kopieren. Nach dem Kopieren werden Sie
aufgefordert, Ihr System neu zu starten. Klicken Sie auf „Ja". Ihr
Computer fährt herunter und startet neu.
7. Klicken Sie auf die Registerkarte „DNS-Konfiguration". Ermitteln
Sie die unter „Suchreihenfolge für DNS-Server" aufgelisteten
DNS-Server. Notieren Sie die aufgelisteten Adressen.
IP-Adresse ____.____.____.____
Subnetzmaske ____.____.____.____
Primärer DNS-Server ____.____.____.____
Sekundärer DNS-Server ____.____.____.____
Standardgateway ____.____.____.____
Schritt 2. Deaktivieren des HTTP-Proxy
Sie müssen sich vergewissern, dass die HTTP-Proxy-Funktion Ihres
Web-Browsers deaktiviert ist, damit Ihr Webbrowser die
Konfigurationsseiten Ihres Barricade anzeigen kann. Im Folgenden
sind die Vorgehensweisen für Internet Explorer und für Netscape
aufgeführt. Führen Sie die entsprechenden Schritte für Ihren
Browser aus.
Internet Explorer
1. Öffnen Sie den Internet Explorer und klicken Sie auf die
Schaltfläche „Abbrechen"
. Klicken Sie auf „Extras" und
anschließend auf „Internetoptionen".
8. Prüfen Sie dann, ob Sie sich Ihre Einstellungen korrekt notiert
haben. Klicken Sie auf die Registerkarte „IP-Adresse" und
anschließend auf „IP-Adresse automatisch beziehen". Klicken Sie
auf „OK".
Deutsch
Deutsch
TCP/IP-Konfigurationseinstellungen
19/9/02
12:43 pm
Page 51
2. Klicken Sie im Fenster „Internetoptionen" auf die Registerkarte
„Verbindungen". Klicken Sie dann auf die Schaltfläche „LANEinstellungen…".
2. Doppelklicken Sie im Fenster „Einstellungen" unter „Kategorie"
auf „Erweitert" und anschließend auf „Proxies". Wählen Sie
„Direkte Verbindung zum Internet" aus. Klicken Sie auf „OK".
3. Deaktivieren Sie alle Kontrollkästchen.
3. Wiederholen Sie diese Schritte für jeden Windows 95/98/MEComputer, der an Ihren Barricade angeschlossen ist.
4. Klicken Sie auf „OK" und erneut auf „OK", um auch das Fenster
„Internetoptionen" zu schließen.
Schritt 3. Beziehen von IP-Einstellungen von Ihrem Barricade
Nachdem Sie nun Ihren Computer für den Anschluss an Ihren
Barricade konfiguriert haben, muss er neue Netzwerkeinstellungen
beziehen. Indem Sie alle alten IP-Einstellungen freigeben und sie
durch Einstellungen von Ihrem Barricade aktualisieren,
vergewissern Sie sich auch, dass Sie Ihren Computer korrekt
konfiguriert haben.
1. Klicken Sie auf „Start" und auf „Ausführen…".
Netscape
1. Öffnen Sie Netscape und klicken Sie auf die Schaltfläche
„Abbrechen". Klicken Sie auf „Edit" und dann auf „Einstellungen".
Deutsch
Deutsch
SMC7004VBR_QS.joint.qxd
SMC7004VBR_QS.joint.qxd
19/9/02
12:43 pm
Page 53
3. Wählen Sie aus dem Dropdown-Menü Ihre Netzwerkkarte aus.
Klicken Sie auf die Option zum Freigeben und anschließend auf
die Option zum Erneuern. Vergewissern Sie sich, dass jetzt für
Ihre IP-Adresse 192.168.2.xxx, für Ihre Subnetzmaske
255.255.255.0 und für Ihr Standardgateway 192.168.2.1
angegeben wird. 2.1. Diese Werte bestätigen, dass Ihr Barricade
korrekt funktioniert. Klicken Sie auf „OK", um das Fenster „IPKonfiguration" zu schließen.
Konfigurieren des Computers mit Windows 2000
Schritt 1. Konfigurieren der TCP/IP-Einstellungen
Nachdem Sie die Hardwareeinrichtung abgeschlossen haben,
müssen Sie Ihren Computer für die Verbindung mit dem Barricade
konfigurieren. Sie müssen auch ermitteln, wie Ihr ISP Ihre IPAdresse absetzt. Viele ISPs weisen die IP-Adresse automatisch mit
DHCP (Dynamic Host Configuration Protocol) zu. Andere Provider
stellen eine IP-Adresse bereit, die Sie manuell eingeben müssen.
Dies wird auch als statische IP-Adresse bezeichnet. Die Art der
Zuweisung der IP-Adresse durch Ihren ISP bestimmt, wie Sie Ihren
Computer konfigurieren müssen.
Vorgehensweise:
1. Klicken Sie auf dem Windows-Desktop auf die Schaltfläche
„Start". Wählen Sie „Einstellungen" und klicken Sie auf das
Symbol „Netzwerk- und DFÜ-Einstellungen".
2. Doppelklicken Sie auf das Symbol für die Verbindung zu Ihrem
Barricade.
Ihr Computer ist jetzt für die Verbindung mit dem Barricade
konfiguriert. Fahren Sie nun mit „Konfigurieren Ihres Barricade" fort.
Deutsch
Deutsch
2. Geben Sie „WINIPCFG" ein und klicken Sie auf „OK". Es kann ein
oder zwei Minuten dauern, bis das Fenster „IP-Konfiguration"
erscheint.
SMC7004VBR_QS.joint.qxd
19/9/02
12:43 pm
Page 55
3. Klicken Sie auf „Eigenschaften".
6. Wählen Sie „IP-Adresse automatisch beziehen" und „DNSServeradresse automatisch beziehen" aus. Klicken Sie auf „OK"
oder „Schließen", um die einzelnen Fenster zu schließen.
TCP/IP-Konfigurationseinstellungen
IP-Adresse ____.____.____.____
Subnetzmaske ____.____.____.____
Primärer DNS-Server ____.____.____.____
Sekundärer DNS-Server ____.____.____.____
Standardgateway ____.____.____.____
5. Alle erforderlichen Informationen finden Sie im Dialogfeld
„Eigenschaften von Internetprotokoll (TCP/IP)". Notieren Sie die
Werte in den entsprechenden Feldern unten..
Wenn „IP-Adresse automatisch beziehen" und „DNS-Serveradresse
automatisch beziehen" aktiviert sind, ist Ihr Computer bereits für
DHCP konfiguriert. Klicken Sie in diesem Fall auf „Abbrechen", um
die einzelnen Fenster zu schließen, und fahren Sie dann mit
„Schritt 2. Deaktivieren des HTTP-Proxy" fort.
Schritt 2. Deaktivieren des HTTP-Proxy
Sie müssen sich vergewissern, dass die HTTP-Proxy-Funktion Ihres
Web-Browsers deaktiviert ist, damit Ihr Webbrowser die
Konfigurationsseiten Ihres Barricade anzeigen kann. Im Folgenden
sind die Vorgehensweisen für Internet Explorer und für Netscape
aufgeführt. Führen Sie die entsprechenden Schritte für Ihren
Browser aus.
Deutsch
Deutsch
4. Doppelklicken Sie auf „Internetprotokoll (TCP/IP)".
SMC7004VBR_QS.joint.qxd
19/9/02
12:43 pm
Page 57
Internet Explorer
1. Öffnen Sie den Internet Explorer und klicken Sie auf die
Schaltfläche „Abbrechen". Klicken Sie auf „Extras" und
anschließend auf „Internetoptionen".
2. Klicken Sie im Fenster „Internetoptionen" auf die Registerkarte
„Verbindungen". Klicken Sie dann auf die Schaltfläche „LANEinstellungen…".
4. Klicken Sie auf „OK" und erneut auf „OK", um auch das Fenster
„Internetoptionen" zu schließen.
Netscape
Deutsch
2. Doppelklicken Sie im Fenster „Einstellungen" unter „Kategorie"
auf „Erweitert" und anschließend auf „Proxies". Wählen Sie
„Direkte Verbindung zum Internet" aus. Klicken Sie auf „OK".
3. Deaktivieren Sie alle Kontrollkästchen.
Deutsch
1. Öffnen Sie Netscape und klicken Sie auf die Schaltfläche
„Abbrechen". Klicken Sie auf „Edit" und dann auf „Einstellungen".
SMC7004VBR_QS.joint.qxd
19/9/02
12:43 pm
Page 59
Schritt 3. Beziehen von IP-Einstellungen von Ihrem Barricade
Nachdem Sie nun Ihren Computer für den Anschluss an Ihren
Barricade konfiguriert haben, muss er neue Netzwerkeinstellungen
beziehen. Indem Sie alle alten IP-Einstellungen freigeben und sie
durch Einstellungen von Ihrem Barricade aktualisieren,
vergewissern Sie sich auch, dass Sie Ihren Computer korrekt
konfiguriert haben.
3. Geben Sie „IPCONFIG /RENEW" ein und drücken Sie die
Eingabetaste. Vergewissern Sie sich, dass jetzt für Ihre IPAdresse 192.168.2.xxx (2-254), für Ihre Subnetzmaske
255.255.255.0 und für Ihr Standardgateway 192.168.2.1
angegeben wird. Diese Werte bestätigen, dass Ihr Barricade
korrekt funktioniert.
1. Klicken Sie auf dem Windows-Desktop auf „Start -> Programme ->
Zubehör" und klicken Sie dann auf „Eingabeaufforderung".
Deutsch
2. Geben Sie im Fenster „Eingabeaufforderung" den Befehl
„IPCONFIG /RELEASE" ein und drücken Sie die Eingabetaste.
Ihr Computer ist jetzt für die Verbindung mit dem Barricade
konfiguriert. Fahren Sie nun mit „Konfigurieren Ihres Barricade"
fort.
Deutsch
4. Geben Sie „EXIT" ein und drücken Sie die Eingabetaste, um das
Fenster „Eingabeaufforderung" zu schließen.
SMC7004VBR_QS.joint.qxd
19/9/02
12:43 pm
Page 61
Konfigurieren des Computers mit Windows XP
3. Klicken Sie auf „Eigenschaften".
Schritt 1. Konfigurieren der TCP/IP-Einstellungen
Nachdem Sie die Hardwareeinrichtung abgeschlossen haben, müssen
Sie Ihren Computer für die Verbindung mit dem Barricade
konfigurieren. Sie müssen auch ermitteln, wie Ihr ISP Ihre IP-Adresse
absetzt. Viele ISPs weisen die IP-Adresse automatisch mit DHCP
(Dynamic Host Configuration Protocol) zu. Andere Provider stellen
eine IP-Adresse bereit, die Sie manuell eingeben müssen. Dies wird
auch als statische IP-Adresse bezeichnet. Die Art der Zuweisung der
IP-Adresse durch Ihren ISP bestimmt, wie Sie Ihren Computer
konfigurieren müssen.
4. Doppelklicken Sie auf „Internetprotokoll (TCP/IP)".
1. Klicken Sie auf dem Windows-Desktop auf die Schaltfläche
„Start". Wählen Sie „Systemsteuerung".
Deutsch
Deutsch
Vorgehensweise:
5. Alle erforderlichen Informationen finden Sie im Dialogfeld
„Eigenschaften von Internetprotokoll (TCP/IP)". Notieren Sie die
Werte in den Feldern nach Schritt 7 in diesem Abschnitt.
2. Wählen Sie das Symbol „Netzwerk- und Internetverbindungen"
aus, klicken Sie auf das Symbol „Netzwerkverbindungen"
und doppelklicken Sie auf die Netzwerkkarte, die Sie für
diese Verbindung verwenden wollen.
SMC7004VBR_QS.joint.qxd
19/9/02
12:43 pm
Page 63
Wenn „IP-Adresse automatisch beziehen" und „DNS-Serveradresse
automatisch beziehen" aktiviert sind, ist Ihr Computer bereits für
DHCP konfiguriert. Klicken Sie in diesem Fall auf „Abbrechen", um
die einzelnen Fenster zu schließen, und fahren Sie dann mit
„Schritt 2. Deaktivieren des HTTP-Proxy" (relevante Seite) fort.
2. Klicken Sie im Fenster „Internetoptionen" auf die Registerkarte
„Verbindungen". Klicken Sie dann auf die Schaltfläche „LANEinstellungen…".
6. Wählen Sie „IP-Adresse automatisch beziehen" und „DNSServeradresse automatisch beziehen" aus. Klicken Sie auf „OK"
oder „Schließen", um die einzelnen Fenster zu schließen.
TCP/IP-Konfigurationseinstellungen
IP-Adresse ____.____.____.____
Subnetzmaske ____.____.____.____
Sekundärer DNS-Server ____.____.____.____
3. Deaktivieren Sie alle Kontrollkästchen.
Standardgateway ____.____.____.____
Schritt 2. Deaktivieren des HTTP-Proxy
Sie müssen sich vergewissern, dass die HTTP-Proxy-Funktion Ihres
Web-Browsers deaktiviert ist, damit Ihr Webbrowser die
Konfigurationsseiten Ihres Barricade anzeigen kann. Im Folgenden
ist die Vorgehensweise für Internet Explorer aufgeführt. Führen Sie
die entsprechenden Schritte für Ihren Browser aus.
1. Öffnen Sie den Internet Explorer und klicken Sie auf die
Schaltfläche „Abbrechen". Klicken Sie auf „Extras" und
anschließend auf „Internetoptionen".
4. Klicken Sie auf „OK" und erneut auf „OK", um auch das Fenster
„Internetoptionen" zu schließen.
Schritt 3. Beziehen von IP-Einstellungen von Ihrem Barricade
Nachdem Sie nun Ihren Computer für den Anschluss an Ihren
Barricade konfiguriert haben, muss er neue Netzwerkeinstellungen
beziehen. Indem Sie alle alten IP-Einstellungen freigeben und sie
durch Einstellungen von Ihrem Barricade aktualisieren,
vergewissern Sie sich auch, dass Sie Ihren Computer korrekt
konfiguriert haben.
Deutsch
Deutsch
Primärer DNS-Server ____.____.____.____
SMC7004VBR_QS.joint.qxd
19/9/02
12:43 pm
Page 65
1. Klicken Sie auf dem Windows-Desktop auf „Start -> Programme ->
Zubehör" und klicken Sie dann auf „Eingabeaufforderung".
Konfigurieren des Computers mit Windows NT 4.0
Schritt 1. Konfigurieren der TCP/IP-Einstellungen
2. Geben Sie im Fenster „Eingabeaufforderung" den Befehl
„IPCONFIG /RELEASE" ein und drücken Sie die Eingabetaste.
Nachdem Sie die Hardwareeinrichtung abgeschlossen haben,
müssen Sie Ihren Computer für die Verbindung mit dem Barricade
konfigurieren. Sie müssen zuerst ermitteln, wie Ihr ISP (Internet
Service Provider) Ihre IP-Adresse absetzt. Viele ISPs weisen die IPAdresse automatisch mit DHCP (Dynamic Host Configuration
Protocol) zu. Andere Provider stellen eine IP-Adresse bereit, die
Sie manuell eingeben müssen. Dies wird auch als statische IPAdresse bezeichnet. Die Art der Zuweisung der IP-Adresse durch
Ihren ISP bestimmt, wie Sie Ihren Computer konfigurieren müssen.
Vorgehensweise:
Deutsch
Deutsch
1. Klicken Sie auf dem Windows-Desktop auf „Start ->
Einstellungen -> Systemsteuerung".
3. Geben Sie „IPCONFIG /RENEW" ein und drücken Sie die
Eingabetaste. Vergewissern Sie sich, dass jetzt für Ihre IP-Adresse
192.168.2.xxx (2-254), für Ihre Subnetzmaske 255.255.255.0 und
für Ihr Standardgateway 192.168.2.1 angegeben wird. Diese Werte
bestätigen, dass Ihr Barricade korrekt funktioniert.
2. Sie das Symbol „Netzwerk".
4. Geben Sie „EXIT" ein und drücken Sie die Eingabetaste, um das
Fenster „Eingabeaufforderung" zu schließen.
Ihr Computer ist jetzt für die Verbindung mit dem Barricade
konfiguriert. Fahren Sie nun mit „Konfigurieren Ihres Barricade" fort.
SMC7004VBR_QS.joint.qxd
19/9/02
12:43 pm
Page 67
3. Wählen Sie die Registerkarte „Protokolle" aus.
7. Suchen Sie im Dialogfeld „Eigenschaften von Microsoft TCP/IP" auf
der Registerkarte „IP-Adresse" Ihre IP-Adresse, Ihre Subnetzmaske
und Ihr Standardgateway. Notieren Sie diese Werte in den Feldern
nach Schritt 10 in diesem Abschnitt.
8. Klicken Sie auf die Registerkarte „DNS", um die primären und
sekundären DNS-Server anzuzeigen. Notieren Sie diese Werte in
den entsprechenden Feldern unten.
5. Wählen Sie die Registerkarte „IP-Adresse" aus.
Deutsch
Deutsch
4. Doppelklicken Sie auf „TCP/IP-Protokoll".
9. Nachdem Sie Ihre IP-Einstellungen notiert haben, klicken Sie auf
die Registerkarte „IP-Adresse". Wählen Sie „IP-Adresse von einem
DHCP-Server beziehen" aus und klicken Sie auf „OK". Klicken Sie
erneut auf „OK", um das Fenster „Netzwerk" zu schließen.
10.Windows kopiert eventuell einige Dateien und fordert Sie dann
auf, das System neu zu starten. Klicken Sie auf „Ja". Ihr
Computer fährt herunter und startet neu.
6. Vergewissern Sie sich, dass in der Dropdown-Liste
„Netzwerkkarte" Ihr Ethernet-Adapter ausgewählt ist.
Wenn „IP-Adresse von einem DHCP-Server beziehen" aktiviert ist,
ist Ihr Computer bereits für DHCP konfiguriert. Klicken Sie in
diesem Fall auf „Abbrechen", um die einzelnen Fenster zu
schließen, und fahren Sie dann mit „Schritt 2. Deaktivieren des
HTTP-Proxy" fort.
TCP/IP-Konfigurationseinstellungen
IP-Adresse ____.____.____.____
Subnetzmaske ____.____.____.____
Primärer DNS-Server ____.____.____.____
Sekundärer DNS-Server ____.____.____.____
Standardgateway ____.____.____.____
SMC7004VBR_QS.joint.qxd
19/9/02
12:43 pm
Page 69
Schritt 2. Deaktivieren des HTTP-Proxy
Sie müssen sich vergewissern, dass die HTTP-Proxy-Funktion Ihres
Web-Browsers deaktiviert ist, damit Ihr Webbrowser die
Konfigurationsseiten Ihres Barricade anzeigen kann. Im Folgenden
sind die Vorgehensweisen für Internet Explorer und für Netscape
aufgeführt. Führen Sie die entsprechenden Schritte für Ihren
Browser aus.
3. Deaktivieren Sie alle Kontrollkästchen.
Internet Explorer
1. Öffnen Sie den Internet Explorer und klicken Sie auf die
Schaltfläche „Abbrechen". Klicken Sie auf „Extras" und
anschließend auf „Internetoptionen".
Netscape
1. Öffnen Sie Netscape und klicken Sie auf die Schaltfläche
„Abbrechen". Klicken Sie auf „Edit" und dann auf „Einstellungen".
2. Klicken Sie im Fenster „Internetoptionen" auf die Registerkarte
„Verbindungen". Klicken Sie dann auf die Schaltfläche „LANEinstellungen…".
Deutsch
Deutsch
4. Klicken Sie auf „OK" und erneut auf „OK", um auch das Fenster
„Internetoptionen" zu schließen.
SMC7004VBR_QS.joint.qxd
19/9/02
12:43 pm
Page 71
2. Doppelklicken Sie im Fenster „Einstellungen" unter „Kategorie"
auf „Erweitert" und anschließend auf „Proxies". Wählen Sie
„Direkte Verbindung zum Internet" aus. Klicken Sie auf „OK".
2. Geben Sie im Fenster „Eingabeaufforderung" den Befehl
„IPCONFIG /RELEASE" ein und drücken Sie die Eingabetaste.
Deutsch
Deutsch
3. Geben Sie „IPCONFIG /RENEW" ein und drücken Sie die
Eingabetaste. Vergewissern Sie sich, dass jetzt für Ihre IPAdresse 192.168.2.xxx, für Ihre Subnetzmaske 255.255.255.0
und für Ihr Standardgateway 192.168.2.1 angegeben wird. Diese
Werte bestätigen, dass Ihr Barricade korrekt funktioniert.
Schritt 3. Beziehen von IP-Einstellungen von Ihrem Barricade
Nachdem Sie nun Ihren Computer für den Anschluss an Ihren
Barricade konfiguriert haben, muss er neue Netzwerkeinstellungen
beziehen. Indem Sie alle alten IP-Einstellungen freigeben und sie
durch Einstellungen von Ihrem Barricade aktualisieren,
vergewissern Sie sich auch, dass Sie Ihren Computer korrekt
konfiguriert haben.
1. Klicken Sie auf dem Windows-Desktop auf „Start -> Programme"
und wählen Sie dann „Eingabeaufforderung".
4. Geben Sie „EXIT" ein und drücken Sie die Eingabetaste, um das
Fenster „Eingabeaufforderung" zu schließen.
Ihr Computer ist jetzt für die Verbindung mit dem Barricade
konfiguriert. Fahren Sie nun mit „Konfigurieren Ihres Barricade" fort.
SMC7004VBR_QS.joint.qxd
19/9/02
12:43 pm
Page 73
Konfigurieren Ihres Macintosh-Computers
Eventuell entsprechen die hier aufgeführten Schritten nicht genau
den Schritten, die für Ihr Betriebssystem erforderlich sind, da diese
Anweisungen und Abbildungen mit OS 8.5 erstellt wurden, Mac OS
7.x und höher jedoch zwar ähnlich, aber unter Umständen nicht
identisch sind.
2. Vergewissern Sie sich, dass im Dialogfeld „TCP/IP" die Option
„Ethernet" im Bereich „Verbindung" ausgewählt ist.
Wenn die Option für die Verwendung des DHCP-Servers bereits im
Feld „Konfigurieren" ausgewählt ist, ist Ihr Computer bereits für
DHCP konfiguriert. Schließen Sie in diesem Fall das Dialogfeld
„TCP/IP" und fahren Sie mit „Schritt 2. Deaktivieren des HTTPProxy" auf der entsprechenden Seite fort.
Nachdem Sie die Hardwareeinrichtung abgeschlossen haben, müssen
Sie Ihren Computer für die Verbindung mit dem Barricade
konfigurieren. Sie müssen zuerst ermitteln, wie Ihr ISP (Internet
Service Provider) Ihre IP-Adresse absetzt. Viele ISPs weisen die IPAdresse automatisch mit DHCP (Dynamic Host Configuration Protocol)
zu. Andere Provider stellen eine IP-Adresse bereit, die Sie manuell
eingeben müssen. Dies wird auch als statische IP-Adresse bezeichnet.
Die Art der Zuweisung der IP-Adresse durch Ihren ISP bestimmt, wie
Sie Ihren Computer konfigurieren müssen.
Vorgehensweise:
1. Öffnen Sie das Menü „Apple". Klicken Sie auf „Kontrollfelder"
und wählen Sie „TCP/IP" aus.
3. Alle erforderlichen Informationen finden Sie im Dialogfeld
„TCP/IP". Notieren Sie diese Werte in den entsprechenden
Feldern unter Schritt 5.
4. Wählen Sie dann die Option für die Verwendung des DHCP-Servers
im Feld „Konfigurieren" aus und schließen Sie das Fenster.
5. Ein weiteres Fenster wird geöffnet, in dem Sie gefragt werden, ob
Ihre Einstellungen gesichert werden sollen. Klicken Sie auf
„Sichern".
Deutsch
Deutsch
Schritt 1. Konfigurieren der TCP/IP-Einstellungen
SMC7004VBR_QS.joint.qxd
19/9/02
12:43 pm
Page 75
TCP/IP-Konfigurationseinstellungen
IP-Adresse ____.____.____.____
Subnetzmaske ____.____.____.____
Primärer DNS-Server ____.____.____.____
Sekundärer DNS-Server ____.____.____.____
Standardgateway ____.____.____.____
3. Deaktivieren Sie Optionen und klicken Sie auf „OK".
Schritt 2. Deaktivieren des HTTP-Proxy
Internet Explorer
1. Öffnen Sie den Internet Explorer und klicken Sie auf die
Schaltfläche „Abbrechen". Klicken Sie auf „Bearbeiten" und
anschließend auf „Einstellungen".
Netscape
1. Öffnen Sie Netscape und klicken Sie auf die Schaltfläche
„Abbrechen". Klicken Sie auf „Bearbeiten" und anschließend auf
„Einstellungen".
2. Wählen Sie im Dialogfeld „Einstellungen" in der linken Spalte
„Kategorie" die Option „Erweitert" aus. Wählen Sie in der
Kategorie „Erweitert" die Option für Proxies aus.
2. Wählen Sie im Fenster „Internet Explorer-Einstellungen" unter
„Netzwerk" die Option für Proxies aus.
Deutsch
Deutsch
Sie müssen sich vergewissern, dass die HTTP-Proxy-Funktion Ihres
Web-Browsers deaktiviert ist, damit Ihr Webbrowser die
Konfigurationsseiten Ihres Barricade anzeigen kann. Im Folgenden
sind die Vorgehensweisen für Internet Explorer und für Netscape
aufgeführt. Führen Sie die entsprechenden Schritte für Ihren Browser
aus.
SMC7004VBR_QS.joint.qxd
19/9/02
12:43 pm
Page 77
3. Wählen Sie „Direkte Verbindung zum Internet" aus und klicken
Sie auf „OK".
Schritt 3. Beziehen von IP-Einstellungen von Ihrem Barricade
Nachdem Sie nun Ihren Computer für den Anschluss an Ihren
Barricade konfiguriert haben, muss er neue Netzwerkeinstellungen
beziehen. Indem Sie alle alten IP-Einstellungen freigeben und sie
durch Einstellungen von Ihrem Barricade aktualisieren,
vergewissern Sie sich auch, dass Sie Ihren Computer korrekt
konfiguriert haben.
2. Im Fenster „TCP/IP" werden Ihre neuen Einstellungen angezeigt.
Vergewissern Sie sich, dass jetzt für Ihre IP-Adresse
192.168.2.xxx, für Ihre Subnetzmaske 255.255.255.0 und für Ihr
Standardgateway 192.168.2.1 angegeben wird. Diese Werte
bestätigen, dass Ihr Barricade korrekt funktioniert.
3. Schließen Sie das Fenster „TCP/IP".
Ihr Computer ist jetzt für die Verbindung mit dem Barricade
konfiguriert. Fahren Sie nun mit „Konfigurieren Ihres Barricade" fort.
Deutsch
Deutsch
1. Öffnen Sie das Menü „Apple". Klicken Sie auf „Kontrollfelder"
und wählen Sie „TCP/IP" aus.
SMC7004VBR_QS.joint.qxd
19/9/02
12:43 pm
Page 79
Kapitel 4. Konfigurieren Ihres Barricade
Nachdem Sie nun Ihren Computer erfolgreich konfiguriert und Ihre
Netzwerkeinstellungen von Ihrem Barricade bezogen haben,
können Sie die Einstellungen des Barricade für Ihr LAN
konfigurieren.
4. Klicken Sie auf der Homepage der Barricade-Webkonsole auf
„Setup Wizard". Der automatisierte Assistent des Barricade führt
Sie durch die einzelnen Schritte zur Einrichtung Ihres Gateway.
1. Öffnen Sie Ihren Webbrowser (z. B. Internet Explorer oder
Netscape Navigator) und klicken Sie auf die Schaltfläche
„Abbrechen".
2. Geben Sie in das Adressfeld „http://192.168.2.1" und drücken
Sie die Eingabetaste.
Hinweis: Bei einigen Browsern kann es erforderlich sein, „:88" an
die IP-Adresse anzuhängen, z. B. http://192.168.2.1:88.
3. Das Barricade-Anmeldefenster wird angezeigt. Lassen Sie das
Feld für das Kennwort leer und klicken Sie auf „Login"
(Anmelden). Ab Werk ist kein Kennwort definiert. Aus
Sicherheitsgründen sollten Sie so schnell wie möglich ein
Kennwort zuweisen. Beachten Sie, dass beim Anmeldekennwort
Groß- und Kleinschreibung unterschieden werden.
Deutsch
Deutsch
5. Wählen Sie Ihre Zeitzone aus der Liste aus.
SMC7004VBR_QS.joint.qxd
19/9/02
12:43 pm
Page 81
T-Online Zugangsdaten für T-DSL
Um Ihren SMC7404BRB in Kombination mit T-Online zu nutzen,
tragen Sie bitte beim WAN Typ "PPoE" Ihren Usernamen wie folgt ein:
Anschlußkennung ""T-Onlinenummer"" ""Mehrbenutzernummer""
@t-online.de (die Gänsefüsschen bitte weglassen).
Sollte Ihre T-Onlinenummer weniger als 12 Stellen haben, setzen
Sie bitte eine # hinter die T-Onlinenummer. Sollte sie 12 oder
mehr Stellen aufweisen, dann bitte die # weglassen.
Bei Passwort tragen Sie bitte Ihr Zugangspasswort für Ihren TOnline Zugang ein.
Informationen zur PPTP-Einrichtung finden Sie im aktuellen
Handbuch unter www.smc-europe.com.
Kabelmodemverbindung
Wenn Sie Ihre Internetverbindung über ein Kabelmodem herstellen,
nutzt Ihr ISP wahrscheinlich DHCP, um Ihnen eine IP-Adresse
zuzuweisen.
1. Wenn Sie ein Kabelmodem nutzen oder wissen, dass Sie eine
dynamische IP-Adresse verwenden, klicken Sie auf die Option
„Cable Modem" (Kabelmodem), um das Fenster für die IPAdresskonfiguration anzuzeigen.
Ein Domänennamensserver (DNS) ist im Prinzip ein Index mit
Namen und Webadressen. Wenn Sie eine Webadresse wie
„www.bundesregierung.de" direkt in Ihren Browser eingeben, sucht
ein DNS-Server diesen Namen in seinem Index und ermittelt die
zugehörige IP-Adresse: 198.137.240.92. Die meisten ISPs stellen
aus Gründen der Geschwindigkeit und des Komforts einen DNSServer bereit. Da Sie mit dynamischen IP-Einstellungen eine
Verbindung zum Internet herstellen, werden wahrscheinlich auch
Ihre DNS-Server dynamisch bereitgestellt.
2. Wenn Sie mit einer dynamischen IP-Adresse eine
Internetverbindung herstellen, müssen Sie wahrscheinlich hier
nichts eingeben. Wenn Sie jedoch einen speziellen DNS-Server
verwenden wollen, geben Sie die Adresse dieses DNS-Servers in
die vorhandenen Felder ein.
3. Klicken Sie auf „FINISH" (Fertig stellen), wenn Sie fertig sind.
Deutsch
Deutsch
6. Klicken Sie auf „NEXT" (Weiter). Das Einrichtungsfenster
„Broadband Type" (Breitbandtyp) wird angezeigt.
Es gibt drei allgemeine Konfigurationen für HochgeschwindigkeitsInternetverbindungen. Sie müssen Ihre Internetverbindung kennen,
um feststellen zu können, welche Verbindung verwendet werden
muss. Die meisten erforderlichen Informationen davon haben Sie
bereits herausgefunden, wenn Sie Ihre IP-Einstellungen in den
bisherigen Schritten notiert haben. Es gibt einige Richtlinien,
anhand derer bestimmt werden kann , welche Konfiguration Sie im
folgenden Abschnitt verwenden sollten.
19/9/02
12:43 pm
Page 83
xDSL-Verbindung mit fester IP-Adresse
PPPoE-xDSL-Verbindung
1. Wenn Sie mit einer festen IP-Adresse über ein xDSL-Modem eine
Internetverbindung herstellen, klicken Sie im Fenster
„Broadband Type" (Breitbandtyp) auf die Optionsschaltfläche
„Fixed-IP xDSL".
1. Wenn Sie über ein xDSL-Modem eine Internetverbindung herstellen
und einen Anmeldenamen und ein Kennwort verwenden, nutzt Ihr
ISP PPPoE. Wenn Ihr ISP einen Anmeldenamen mit einem
Kennwort erfordert oder wenn Sie wissen, dass Ihr ISP PPPoE
nutzt, klicken Sie im Fenster „Broadband Type" auf die Option
„PPPoE xDSL", um das Fenster für die PPPoEVerbindungseinrichtung aufzurufen.
2. Ihr ISP setzt wahrscheinlich voraus, dass Sie Ihre TCP/IPEinstellungen manuell eingeben. Wenn Sie eine xDSL-Verbindung
haben oder wissen, dass Sie eine statische IP-Adresse
verwenden, geben Sie die IP-Adresse in die entsprechenden
Felder ein.
3. Klicken Sie auf „FINISH" (Fertig stellen), wenn Sie fertig sind.
2. Geben Sie den Benutzernamen und das Kennwort, die Ihr ISP
erfordert, in die entsprechenden Felder ein.
3. Wenn Ihr ISP Ihnen einen Servicenamen mitgeteilt hat, geben Sie
ihn in das PPPoE-Feld „Service Name" ein. Lassen Sie dieses
andernfalls leer. Ein Domänennamensserver (DNS) ist im Prinzip ein
Index mit Namen und Webadressen. Wenn Sie eine Webadresse wie
„www.bundesregierung.de" direkt in Ihren Browser eingeben, sucht
ein DNS-Server diesen Namen in seinem Index und ermittelt die
zugehörige IP-Adresse: 198.137.240.92. Die meisten ISPs stellen
aus Gründen der Geschwindigkeit und des Komforts einen DNSServer bereit. Da Sie mit dynamischen IP-Einstellungen eine
Verbindung zum Internet herstellen, werden wahrscheinlich auch
Ihre DNS-Server dynamisch bereitgestellt.
Achtung: Wenn Sie die Option „Maximium Idle Time" (Maximale
Leerlaufzeit) auf „0" eingestellt haben und/oder die Option
„Autoreconnect (Automatische Neuverbindung) aktiviert ist,
können sich höhere Verbindungskosten in der Telefonrechnung
niederschlagen.
Deutsch
Deutsch
SMC7004VBR_QS.joint.qxd
SMC7004VBR_QS.joint.qxd
19/9/02
12:43 pm
Page 85
10/100-MBit/s-Breitbandrouter
4. Wenn Sie über PPPoE eine Internetverbindung herstellen,
müssen Sie wahrscheinlich hier nichts eingeben.
5. Klicken Sie auf „FINISH" (Fertig stellen), wenn Sie fertig sind.
Viele ISPs nutzen Modems mit automatischer Konfiguration.
Manchmal werden Verbindungsinformationen im Modem gespeichert
und müssen aktualisiert werden. Sie müssen deshalb eventuell Ihr
Modem nach der Konfiguration Ihres Barricade herunterfahren und
neu starten.
Herzlichen Glückwunsch! Sie haben die Grundkonfiguration
abgeschlossen. Ihr Barricade ist jetzt mit dem Internet verbunden. Es
gibt auch einige erweiterte Konfigurationsoptionen, die eingestellt
werden können. Wir empfehlen jedoch, keine Änderungen an diesen
Optionen vorzunehmen, es sei denn, diese Änderungen sind absolut
erforderlich.
Anweisungen für die erweiterten Konfigurationsoptionen finden Sie
im Benutzerhandbuch auf der CD und unter www.smc-europe.com.
Introduction
Chapitre 2
Témoins lumineux
Chapitre 3
Configuration de votre ordinateur
Chapitre 4
Configuration de votre routeur Barricade
Chapitre 1. Introduction
Le routeur Barricade de SMC est un routeur haut débit conçu pour
partager l’accès à Internet, assurer la sécurité et connecter en réseau
plusieurs périphériques pour divers utilisateurs. Les opérations
d’installation et de configuration particulièrement simples du routeur
Barricade peuvent être effectuées par les utilisateurs les moins
expérimentés. Toutefois, les professionnels réseau disposent de
fonctionnalités de configuration avancées simples à utiliser.
Consultez le Manuel d’utilisation pour obtenir des informations sur les
fonctionnalités avancées de ce produit.
Contenu du coffret
•
•
•
•
•
Un routeur Barricade SMC
Un cordon d’alimentation
Ce Guide d’installation rapide
Un CD-ROM contenant la documentation complète
Un câble Fast Ethernet de catégorie 5
Vérifiez que vous disposez de la configuration minimale requise
pour l’installation
Avant d’installer votre routeur Barricade, assurez-vous de disposer des
éléments mentionnés ci-dessous.
• Un ordinateur équipé d’une carte réseau Ethernet
• Votre CD-ROM d’installation de Windows, si votre ordinateur
exécute Windows 95, 98 ou Me
• Une connexion Internet via un modem câble ou xDSL
• Un câble réseau Ethernet supplémentaire
• Un navigateur Web, tel que Netscape ou Internet Explorer
Français
Deutsch
6. Starten Sie Ihr xDSL-Modem neu, indem Sie die Stromversorgung
unterbrechen, einige Sekunden warten und dann die
Stromversorgung wieder anschließen.
Chapitre 1
SMC7004VBR_QS.joint.qxd
19/9/02
12:43 pm
Page 87
Chapitre 2. Témoins lumineux
Témoin (LED) Apparence État
Power Tension) Allumé
Le routeur Barricade est sous tension.
- vert
WAN (Réseau Allumé
La connexion du port WAN au réseau est
étendu)- vert
établie.
Clignotant Le port WAN transmet ou reçoit des
données.
Link/Act
Allumé
Le port LAN indiqué a établi une
(Liaison/
connexion réseau.
activité)- vert
Clignotant Le port LAN indiqué transmet ou reçoit
des données.
Speed (Débit) Allumé
Le port LAN indiqué fonctionne à
- vert
100Mbps.
Éteint
Le port LAN indiqué fonctionne à
10Mbps.
1. Connexion des ordinateurs : connectez les ordinateurs directement
au routeur Barricade aux ports 1 à 4 situés sur le panneau arrière.
Si vous devez brancher plus de 4 ordinateurs, connectez un
concentrateur ou un commutateur (en utilisant son port à lien
montant), puis reliez les ordinateurs supplémentaires à ce
périphérique.
2. Connexion d’un modem câble ou DSL : connectez votre modem
câble ou DSL au port WAN situé sur le panneau arrière.
3. Power (Alimentation) : branchez le cordon d’alimentation dans la
prise prévue à cet effet.
Français
Français
Le panneau avant du routeur Barricade est équipé de témoins
lumineux (LED) pour un contrôle aisé. Le tableau suivant explique la
fonction de chaque témoin :
Connexion des périphériques
SMC7004VBR_QS.joint.qxd
19/9/02
12:43 pm
Page 89
Chapitre 3. Configuration de votre ordinateur
Ce Guide d’installation rapide fournit des instructions d’installation
pour Windows 95, 98, Me, NT 4.0, 2000 et XP, ainsi que pour
Macintosh OS 7.x et les versions ultérieures. Assurez-vous de suivre
les instructions qui correspondent à votre système d’exploitation.
1. Depuis le Bureau Windows, cliquez sur le bouton « Start »
(Démarrer). Choisissez « Settings » (Paramètres), puis cliquez sur «
Control Panel » (Panneau de configuration).
Configuration de votre ordinateur sous Windows 95/98/Me
Configuration de votre ordinateur sous Windows 2000
Configuration de votre ordinateur sous Windows XP
Configuration de votre ordinateur sous Windows NT 4.0
Configuration de votre ordinateur Macintosh
Configuration de votre ordinateur sous Windows
95/98/Millennium Edition
Il se peut que les instructions communiquées dans le présent
document ne correspondent pas exactement à votre version de
Windows. Cela est dû au fait que ces étapes et captures d’écran ont
été créées à partir de Windows 98. Windows 95 et Windows Me sont
très similaires à Windows 98, mais diffèrent de ce dernier par certains
aspects.
Étape 1. Configuration des paramètres TCP/IP
Après avoir procédé à l’installation matérielle en connectant vos
périphériques, vous devez configurer votre ordinateur pour la
connexion à votre routeur Barricade. Vous devez déterminer de quelle
manière votre fournisseur de services Internet vous attribue votre
adresse IP. De nombreux fournisseurs attribuent ces numéros de
façon automatique à l’aide d’une technologie réseau connue sous le
nom de protocole DHCP (Dynamic Host Configuration Protocol).
D’autres fournissent une adresse IP et des numéros associés, que
vous devez entrer manuellement. Il s’agit alors d’une adresse IP
statique. La manière dont votre fournisseur attribue votre adresse IP
détermine la façon dont vous devrez configurer votre ordinateur.
2. Dans le Panneau de configuration, double-cliquez sur l’icône «
Network » (Réseau).
Français
Français
•
•
•
•
•
Voici comment procéder :
SMC7004VBR_QS.joint.qxd
19/9/02
12:43 pm
Page 91
4. Activez l’onglet « IP Address » (Adresse IP).
Si l’option « Obtain an IP address automatically » (Obtenir
automatiquement une adresse IP) est sélectionnée, votre ordinateur
est déjà configuré pour DHCP. Cliquez sur « Cancel » (Annuler) pour
fermer chaque fenêtre et passez à la section Étape 2. Désactivation
du Proxy HTTP.
5. Recherchez votre adresse IP et votre masque de sous-réseau.
Notez-les dans le tableau prévu à cet effet après l’étape 9 de cette
section.
6. Cliquez sur l’onglet « Gateway » (Passerelle) et notez les numéros
affichés sous « Installed gateways » (Passerelles installées).
7. Cliquez sur l’onglet « DNS Configuration » (Configuration DNS).
Consultez les serveurs DNS présents dans la liste « DNS Server
Search Order » (Ordre de recherche DNS). Notez les adresses
présentes.
Français
Français
3. Dans la fenêtre « Network » (Réseau), sous l’onglet « Configuration
», double-cliquez sur l’entrée « TCP/ IP » affichée pour votre carte
réseau.
SMC7004VBR_QS.joint.qxd
19/9/02
12:43 pm
Page 93
Internet Explorer
8. Après avoir noté vos paramètres, contrôlez-les une fois de plus
pour vous assurer que vos notes sont correctes. Cliquez sur
l’onglet « IP Address » (Adresse IP), puis sur « Obtain an IP
address automatically » (Obtenir automatiquement une adresse
IP). Cliquez sur « OK ».
1. Ouvrez Internet Explorer et cliquez sur le bouton « Stop »
(Arrêter)
. Cliquez sur « Tools » (Outils), puis sur « Internet
Options » (Options Internet).
9. Il est possible que votre système Windows ait besoin du CD-ROM
de Windows 95/98/Me pour copier certains fichiers. Une fois la
copie effectuée, vous êtes invité à redémarrer votre système.
Cliquez sur « Yes » (Oui) ; votre ordinateur redémarre.
Paramètres de configuration TCP/IP
Français
Français
2. Dans la fenêtre qui s’affiche, cliquez sur l’onglet « Connections »
(Connexions). Cliquez ensuite sur le bouton « LAN Settings »
(Paramètres LAN).
IP Address (Adresse IP)____.____.____.____
Subnet Mask (Masque de sous-réseau) ____.____.____.____
Primary DNS Server (Serveur DNS principal) ____.____.____.____
Secondary DNS Server (Serveur DNS secondaire) ____.____.____.____
Default Gateway (Passerelle par défaut)____.____.____.____
Étape 2. Désactivation du Proxy HTTP
Vous devez vérifier que la fonctionnalité « Proxy HTTP » de votre
navigateur Web est désactivée. Cela est nécessaire pour que votre
navigateur Web puisse afficher les pages de configuration de votre
routeur Barricade. Les étapes ci-dessous concernent Internet
Explorer et Netscape. Déterminez le navigateur utilisé et suivez les
étapes appropriées.
3. Désactivez toutes les cases à cocher.
SMC7004VBR_QS.joint.qxd
19/9/02
12:43 pm
Page 95
4. Cliquez sur « OK », puis de nouveau sur « OK » pour fermer la
fenêtre « Internet Options » (Options Internet).
3. Répétez ces étapes pour tous les ordinateurs Windows 95/98/Me
connectés à votre routeur Barricade.
Étape 3. Lecture des paramètres IP depuis votre routeur Barricade
Maintenant que vous avez configuré votre ordinateur pour la
connexion à votre routeur Barricade, il est nécessaire de lui
indiquer les nouveaux paramètres réseau. En libérant les éventuels
anciens paramètres IP et en les remplaçant par ceux de votre
routeur Barricade, vous pouvez également vérifier que vous avez
correctement configuré votre ordinateur.
1. Cliquez sur « Start » (Démarrer), puis sur « Run » (Exécuter).
1. Ouvrez Netscape et cliquez sur le bouton « Stop » (Arrêter).
Cliquez sur « Edit » (Edition), puis sur « Preferences… »
(Préférences).
Français
Français
Netscape
2. Dans la fenêtre qui s’affiche, sous « Category » (Catégorie),
double-cliquez sur « Advanced » (Avancées), puis cliquez sur «
Proxy ». Sélectionnez « Direct connection to the Internet »
(Connexion directe à Internet). Cliquez sur « OK ».
2. Tapez « WINIPCFG », puis cliquez sur « OK ». L’affichage de la
fenêtre « IP Configuration » (Configuration IP) peut nécessiter
de une à deux minutes.
SMC7004VBR_QS.joint.qxd
19/9/02
12:43 pm
Page 97
3. Dans la liste déroulante, sélectionnez votre carte réseau, cliquez
sur « Release » (Libérer), puis sur « Renew » (Renouveler).
Vérifiez que votre adresse IP est maintenant 192.168.2.xxx,
votre masque de sous-réseau 255.255.255.0 et votre passerelle
par défaut 192.168.2.1. Ces valeurs attestent du fonctionnement
de votre routeur Barricade. Cliquez sur « OK » pour fermer la
fenêtre « IP Configuration » (Configuration IP).
Voici comment procéder :
1. Depuis le Bureau Windows, cliquez sur le bouton « Start »
(Démarrer). Choisissez « Settings » (Paramètres), puis cliquez
sur l’icône « Network and Dial-Up Connections » (Connexions
réseau et accès à distance).
Maintenant que votre ordinateur est configuré pour se connecter à
votre routeur Barricade, passez à la section « Configuration de
votre routeur Barricade ».
Français
Français
2. Double-cliquez sur l’icône qui correspond à la connexion à votre
routeur Barricade.
Configuration de votre ordinateur sous Windows 2000
Étape 1. Configuration des paramètres TCP/IP
Après avoir procédé à l’installation matérielle, vous devez
configurer votre ordinateur pour la connexion à votre routeur
Barricade. Vous devez également déterminer de quelle manière
votre fournisseur de services Internet vous attribue votre adresse
IP. De nombreux fournisseurs attribuent ces numéros de façon
automatique à l’aide d’une technologie réseau connue sous le nom
de protocole DHCP (Dynamic Host Configuration Protocol). D’autres
fournissent une adresse IP et des numéros associés, que vous
devez entrer manuellement. Il s’agit alors d’une adresse IP
statique. La manière dont votre fournisseur attribue votre adresse
IP détermine la façon dont vous devrez configurer votre ordinateur.
3. Cliquez sur « Properties » (Propriétés).
SMC7004VBR_QS.joint.qxd
19/9/02
12:43 pm
Page 99
5. Toutes les informations que vous devez noter se trouvent dans la
boîte de dialogue « Internet Protocol (TCP/ IP) Properties »
(Propriétés de Protocole Internet (TCP/IP)). Notez ces
informations dans le tableau ci-après.
Si les options « Obtain an IP address automatically » (Obtenir une
adresse IP automatiquement) et « Obtain DNS server address
automatically » (Obtenir les adresses des serveurs DNS
automatiquement) sont sélectionnées, votre ordinateur est déjà
configuré pour DHCP. Cliquez sur « Cancel » (Annuler) pour fermer
chaque fenêtre, et passez à la section Étape 2. Désactivation du
Proxy HTTP.
6. Sélectionnez « Obtain an IP address automatically » (Obtenir
une adresse IP automatiquement) puis « Obtain DNS server
address automatically » (Obtenir les adresses des serveurs DNS
automatiquement). Cliquez sur « OK » ou « Close » (Fermer)
pour fermer chaque fenêtre.
Français
Français
4. Double-cliquez sur « Internet Protocol (TCP/IP) » (Protocole
Internet (TCP/IP)).
Paramètres de configuration TCP/IP
IP Address (Adresse IP) ____.____.____.____
Subnet Mask (Masque de sous-réseau) ____.____.____.____
Primary DNS Server (Serveur DNS principal) ____.____.____.____
Secondary DNS Server (Serveur DNS secondaire) ____.____.____.____
Default Gateway (Passerelle par défaut) ____.____.____.____
Étape 2. Désactivation du Proxy HTTP
Vous devez vérifier que la fonctionnalité « Proxy HTTP » de votre
navigateur Web est désactivée. Cela est nécessaire pour que votre
navigateur Web puisse afficher les pages de configuration de votre
routeur Barricade. Les étapes ci-dessous concernent Internet
Explorer et Netscape. Déterminez le navigateur utilisé et suivez les
étapes appropriées.
SMC7004VBR_QS.joint.qxd
19/9/02
12:44 pm
Page 101
Internet Explorer
1. Ouvrez Internet Explorer et cliquez sur le bouton « Stop »
(Arrêter). Cliquez sur « Tools » (Outils), puis sur « Internet
Options » (Options Internet).
2. Dans la fenêtre qui s’affiche, cliquez sur l’onglet « Connections »
(Connexions). Cliquez ensuite sur le bouton « LAN Settings »
(Paramètres LAN).
4. Cliquez sur « OK », puis de nouveau sur « OK » pour fermer la
fenêtre « Internet Options » (Options Internet).
Netscape
Français
3. Désactivez toutes les cases à cocher.
Français
1. Ouvrez Netscape et cliquez sur le bouton « Stop » (Arrêter).
Cliquez sur « Edit » (Edition), puis sur « Preferences… »
(Préférences).
SMC7004VBR_QS.joint.qxd
19/9/02
12:44 pm
Page 103
Étape 3. Lecture des paramètres IP depuis votre routeur Barricade
2. Dans la fenêtre qui s’affiche, tapez « IPCONFIG/RELEASE » et
appuyez sur la touche <ENTRÉE>.
3. Tapez « IPCONFIG /RENEW » et appuyez sur la touche
<ENTRÉE>. Vérifiez que votre adresse IP est maintenant
192.168.2.xxx (2 à 254), votre masque de sous-réseau
255.255.255.0 et votre passerelle par défaut 192.168.2.1. Ces
valeurs attestent du fonctionnement de votre routeur Barricade.
Maintenant que vous avez configuré votre ordinateur pour la
connexion à votre routeur Barricade, il est nécessaire de lui indiquer
les nouveaux paramètres réseau. En libérant les éventuels anciens
paramètres IP et en les remplaçant par ceux de votre routeur
Barricade, vous pouvez également vérifier que vous avez
correctement configuré votre ordinateur.
1. Depuis le Bureau Windows, cliquez sur « Start » (Démarrer), sur «
Programs » (Programmes), sur « Accessories » (Accessoires), puis
sur « Command Prompt » (Invite de commandes).
4. Tapez « EXIT » et appuyez sur <ENTRÉE> pour fermer la fenêtre
« Command Prompt » (Invite de commandes).
Maintenant que votre ordinateur est configuré pour se connecter à
votre routeur Barricade, passez à la section « Configuration de
votre routeur Barricade ».
Français
Français
2. Dans la fenêtre qui s’affiche, sous « Category » (Catégorie),
double-cliquez sur « Advanced » (Avancées), puis cliquez sur «
Proxy ». Sélectionnez « Direct connection to the Internet »
(Connexion directe à Internet). Cliquez sur « OK ».
SMC7004VBR_QS.joint.qxd
19/9/02
12:44 pm
Page 105
Configuration de votre ordinateur sous Windows XP
Étape 1. Configuration des paramètres TCP/IP
Après avoir procédé à l’installation matérielle, vous devez configurer
votre ordinateur pour la connexion à votre routeur Barricade. Vous
devez également déterminer de quelle manière votre fournisseur de
services Internet vous attribue votre adresse IP. De nombreux
fournisseurs attribuent ces numéros de façon automatique à l’aide
d’une technologie réseau connue sous le nom de protocole DHCP
(Dynamic Host Configuration Protocol). D’autres fournissent une
adresse IP et des numéros associés, que vous devez entrer
manuellement. Il s’agit alors d’une adresse IP statique. La manière
dont votre fournisseur attribue votre adresse IP détermine la façon
dont vous devrez configurer votre ordinateur.
2. Sélectionnez l’icône « Network and Internet Connections »
(Réseau et connexions Internet)
, puis cliquez sur l’icône
«Network Connections » (Connexions réseau)
, et doublecliquez sur la carte qui sera utilisée pour cette connexion.
3. 3. Cliquez sur « Properties » (Propriétés).
Français
Français
Voici comment procéder :
1. Depuis le Bureau Windows, cliquez sur le bouton « Start »
(Démarrer). Choisissez « Control Panel » (Panneau de
configuration).
4. Double-cliquez sur « Internet Protocol (TCP/IP) » (Protocole
Internet (TCP/IP)).
SMC7004VBR_QS.joint.qxd
19/9/02
12:44 pm
Page 107
Étape 2. Désactivation du Proxy HTTP
5. Toutes les informations que vous devez noter se trouvent dans la
boîte de dialogue « Internet Protocol (TCP/ IP) Properties »
(Propriétés de Protocole Internet (TCP/IP)). Utilisez le tableau
situé après l’étape 7 de cette section pour noter ces informations.
Vous devez vérifier que la fonctionnalité « Proxy HTTP » de votre
navigateur Web est désactivée. Cela est nécessaire pour que votre
navigateur Web puisse afficher les pages de configuration de votre
routeur Barricade. Les étapes ci-dessous concernent Internet
Explorer. Déterminez le navigateur utilisé et suivez les étapes
appropriées.
Si les options « Obtain an IP address automatically » (Obtenir une
adresse IP automatiquement) et « Obtain DNS server address
automatically » (Obtenir les adresses des serveurs DNS
automatiquement) sont sélectionnées, votre ordinateur est déjà
configuré pour DHCP. Cliquez sur « Cancel » (Annuler) pour fermer
chaque fenêtre et passez à la section Étape 2. Désactivation du Proxy
HTTP.
6. Sélectionnez « Obtain an IP address automatically » (Obtenir
une adresse IP automatiquement) puis « Obtain DNS server
address automatically » (Obtenir les adresses des serveurs DNS
automatiquement). Cliquez sur « OK » ou « Close » (Fermer)
pour fermer chaque fenêtre.
Paramètres de configuration TCP/IP
IP Address (Adresse IP) ____.____.____.____
Subnet Mask (Masque de sous-réseau) ____.____.____.____
Primary DNS Server (Serveur DNS principal) ____.____.____.____
Secondary DNS Server (Serveur DNS secondaire) ____.____.____.____
Default Gateway (Passerelle par défaut) ____.____.____.____
2. Dans la fenêtre qui s’affiche, cliquez sur l’onglet « Connections
» (Connexions). Cliquez ensuite sur le bouton « LAN Settings »
(Paramètres LAN).
Français
Français
1. Ouvrez Internet Explorer et cliquez sur le bouton « Stop »
(Arrêter). Cliquez sur « Tools » (Outils), puis sur « Internet
Options » (Options Internet).
SMC7004VBR_QS.joint.qxd
19/9/02
12:44 pm
Page 109
3. Désactivez toutes les cases à cocher.
3. Tapez « IPCONFIG /RENEW » et appuyez sur la touche <ENTRÉE>.
Vérifiez que votre adresse IP est maintenant 192.168.2.xxx (2 à
254), votre masque de sous-réseau 255.255.255.0 et votre
passerelle par défaut 192.168.2.1. Ces valeurs attestent du
fonctionnement de votre routeur Barricade.
Étape 3. Lecture des paramètres IP depuis votre routeur Barricade
Maintenant que vous avez configuré votre ordinateur pour la
connexion à votre routeur Barricade, il est nécessaire de lui
indiquer les nouveaux paramètres réseau. En libérant les éventuels
anciens paramètres IP et en les remplaçant par ceux de votre
routeur Barricade, vous pouvez également vérifier que vous avez
correctement configuré votre ordinateur.
1. Depuis le Bureau Windows, cliquez sur « Start » (Démarrer), sur «
Programs » (Programmes), sur « Accessories » (Accessoires), puis
sur « Command Prompt » (Invite de commandes).
Français
Français
4. Cliquez sur « OK », puis de nouveau sur « OK » pour fermer la
fenêtre « Internet Options » (Options Internet).
2. Dans la fenêtre qui s’affiche, tapez « IPCONFIG/RELEASE » et
appuyez sur la touche <ENTRÉE>.
4. Tapez « EXIT » et appuyez sur <ENTRÉE> pour fermer la fenêtre
« Command Prompt » (Invite de commandes).
Maintenant que votre ordinateur est configuré pour se connecter à
votre routeur Barricade, passez à la section « Configuration de votre
routeur Barricade ».
SMC7004VBR_QS.joint.qxd
19/9/02
12:44 pm
Page 111
Configuration de votre ordinateur sous Windows NT 4.0
3. Sélectionnez l’onglet « Protocols » (Protocoles).
Étape 1. Configuration des paramètres TCP/IP
Après avoir procédé à l’installation matérielle, vous devez
configurer votre ordinateur pour la connexion à votre routeur
Barricade. Vous devez déterminer de quelle manière votre
fournisseur de services Internet vous attribue votre adresse IP. De
nombreux fournisseurs attribuent ces numéros de façon
automatique à l’aide d’une technologie réseau connue sous le nom
de protocole DHCP (Dynamic Host Configuration Protocol). D’autres
fournissent une adresse IP et des numéros associés, que vous devez
entrer manuellement. Il s’agit alors d’une adresse IP statique. La
manière dont votre fournisseur attribue votre adresse IP détermine
la façon dont vous devrez configurer votre ordinateur.
1. Depuis le Bureau Windows, cliquez sur « Start » (Démarrer), sur «
Settings » (Paramètres), puis sur « Control Panel » (Panneau de
configuration).
4. Double-cliquez sur « TCP/IP Protocol » (Protocole TCP/IP).
5. Activez l’onglet « IP Address » (Adresse IP).
2. Double-cliquez sur l’icône « Network » (Réseau).
6. Dans la liste déroulante des cartes, assurez-vous que votre carte
Ethernet est sélectionnée.
Si l’option « Obtain an IP address automatically » (Obtenir
automatiquement une adresse IP) est sélectionnée, votre
ordinateur est déjà configuré pour DHCP. Cliquez sur « Cancel »
(Annuler) pour fermer chaque fenêtre et passez à la section Étape
2. Désactivation du Proxy HTTP.
Français
Français
Voici comment procéder :
SMC7004VBR_QS.joint.qxd
19/9/02
12:44 pm
Page 113
Étape 2. Désactivation du Proxy HTTP
7. Dans la boîte de dialogue « TCP/IP Properties » (Propriétés
TCP/IP), cliquez sur l’onglet « IP address » (Adresse IP) afin de
repérer votre adresse IP, votre masque de sous-réseau et votre
passerelle par défaut. Notez ces valeurs dans le tableau prévu à cet
effet après l’étape 10 de cette section.
8. Cliquez sur l’onglet « DNS » pour voir le serveur DNS principal et le
serveur DNS secondaire. Notez ces valeurs dans le tableau ci-après.
Vous devez vérifier que la fonctionnalité « Proxy HTTP » de votre
navigateur Web est désactivée. Cela est nécessaire pour que votre
navigateur Web puisse afficher les pages de configuration de votre
routeur Barricade. Les étapes ci-dessous concernent Internet
Explorer et Netscape. Déterminez le navigateur utilisé et suivez les
étapes appropriées.
Internet Explorer
Français
Français
1. Ouvrez Internet Explorer et cliquez sur le bouton « Stop »
(Arrêter). Cliquez sur « Tools » (Outils), puis sur « Internet
Options » (Options Internet).
9. Après avoir noté vos paramètres IP, cliquez sur l’onglet « IP
address » (Adresse IP). Sélectionnez « Obtain IP address
automatically » (Obtenir automatiquement une adresse IP), puis
cliquez sur « OK ». Cliquez de nouveau sur « OK » pour fermer la
fenêtre « Network » (Réseau).
10.Windows peut alors copier certains fichiers et vous demander de
redémarrer votre système. Cliquez sur « Yes » (Oui) ; votre
ordinateur redémarre.
Paramètres de configuration TCP/IP
IP Address (Adresse IP) ____.____.____.____
Subnet Mask (Masque de sous-réseau) ____.____.____.____
Primary DNS Server (Serveur DNS principal) ____.____.____.____
Secondary DNS Server (Serveur DNS secondaire) ____.____.____.____
Default Gateway (Passerelle par défaut) ____.____.____.____
2. Dans la fenêtre qui s’affiche, cliquez sur l’onglet « Connections
» (Connexions). Cliquez ensuite sur le bouton « LAN Settings »
(Paramètres LAN).
SMC7004VBR_QS.joint.qxd
19/9/02
12:44 pm
Page 115
2. Dans la fenêtre qui s’affiche, sous « Category » (Catégorie),
double-cliquez sur « Advanced » (Avancées), puis cliquez sur «
Proxy ». Sélectionnez « Direct connection to the Internet »
(Connexion directe à Internet). Cliquez sur « OK ».
4. Cliquez sur « OK », puis de nouveau sur « OK » pour fermer la
fenêtre « Internet Options » (Options Internet).
Netscape
Étape 3. Lecture des paramètres IP depuis votre routeur Barricade
1. Ouvrez Netscape et cliquez sur le bouton « Stop » (Arrêter).
Cliquez sur « Edit » (Edition), puis sur « Preferences… »
(Préférences).
Maintenant que vous avez configuré votre ordinateur pour la
connexion à votre routeur Barricade, il est nécessaire de lui
indiquer les nouveaux paramètres réseau. En libérant les éventuels
anciens paramètres IP et en les remplaçant par ceux de votre
routeur Barricade, vous pouvez également vérifier que vous avez
correctement configuré votre ordinateur.
Français
Français
3. Désactivez toutes les cases à cocher.
SMC7004VBR_QS.joint.qxd
19/9/02
12:44 pm
Page 117
1. Depuis le Bureau Windows, cliquez sur « Start » (Démarrer), sur
« Programs » (Programmes), puis sur « Command Prompt »
(Invite de commandes).
Configuration de votre ordinateur Macintosh
Vous noterez peut-être que les instructions de ce manuel ne
correspondent pas exactement à votre écran. En effet, ces étapes
et les captures d’écran ont été effectuées sous Mac OS 8.5. Mac OS
7.x et les systèmes ultérieurs sont tous très similaires, mais
peuvent ne pas être identiques à Mac OS 8.5.
Étape 1. Configuration des paramètres TCP/IP
3. Tapez « IPCONFIG /RENEW » et appuyez sur la touche <ENTRÉE>.
Vérifiez que votre adresse IP est maintenant 192.168.2.xxx,
votre masque de sous-réseau 255.255.255.0 et votre passerelle
par défaut 192.168.2.1. Ces valeurs attestent du fonctionnement
de votre routeur Barricade.
4. Tapez « EXIT » et appuyez sur <ENTRÉE> pour fermer la fenêtre «
Command Prompt » (Invite de commandes).
Maintenant que votre ordinateur est configuré pour se connecter à
votre routeur Barricade, passez à la section « Configuration de votre
routeur Barricade ».
Voici comment procéder :
1. Déroulez le menu Apple. Cliquez sur « Control Panels » (Panneaux
de configuration), puis sélectionnez « TCP/IP ».
Français
Français
2. Dans la fenêtre « Command Prompt » (Invite de commandes),
tapez « IPCONFIG /RELEASE » et appuyez sur la touche <ENTRÉE>.
Après avoir procédé à l’installation matérielle, vous devez configurer
votre ordinateur pour la connexion à votre routeur Barricade. Vous
devez déterminer de quelle manière votre fournisseur de services
Internet vous attribue votre adresse IP. De nombreux fournisseurs
attribuent ces numéros de façon automatique à l’aide d’une
technologie réseau connue sous le nom de protocole DHCP (Dynamic
Host Configuration Protocol). D’autres fournissent une adresse IP et
des numéros associés, que vous devez entrer manuellement. Il s’agit
alors d’une adresse IP statique. La manière dont votre fournisseur
attribue votre adresse IP détermine la façon dont vous devrez
configurer votre ordinateur.
SMC7004VBR_QS.joint.qxd
19/9/02
12:44 pm
Page 119
2. Dans la boîte de dialogue qui s’affiche, vérifiez que l’option «
Ethernet » est sélectionnée dans la zone « Connect via: » (Se
connecter via). Si l’option « Using DHCP Server » (Utiliser un
serveur DHCP) est sélectionnée dans la zone « Configure »
(Configuration) , votre ordinateur est déjà configuré pour DHCP.
Fermez la boîte de dialogue « TCP/IP » et passez à la section
Étape 2. Désactivation du Proxy HTTP (voir la page
correspondante).
Étape 2. Désactivation du Proxy HTTP
Vous devez vérifier que la fonctionnalité « Proxy HTTP » de votre
navigateur Web est désactivée. Cela est nécessaire pour que votre
navigateur Web puisse afficher les pages de configuration de votre
routeur Barricade. Les étapes ci-dessous concernent Internet
Explorer et Netscape. Déterminez le navigateur utilisé et suivez les
étapes appropriées.
Internet Explorer
Français
Français
1. Ouvrez Internet Explorer et cliquez sur le bouton « Stop »
(Arrêter). Cliquez sur « Edit » (Edition), puis sur « Preferences »
(Préférences).
3. Toutes les informations que vous devez noter se trouvent dans
la boîte de dialogue « TCP/IP ». Notez ces valeurs dans le
tableau situé après l’étape 5.
4. Après avoir noté vos paramètres IP, sélectionnez l’option « Using
DHCP Server » (Utiliser un serveur DHCP) dans la zone «
Configure » (Configuration), puis fermez la fenêtre.
5. Un message apparaît vous invitant à enregistrer vos paramètres
TCP/IP. Cliquez sur « Save » pour les enregistrer.
Paramètres de configuration TCP/IP
IP Address (Adresse IP) ____.____.____.____
Subnet Mask (Masque de sous-réseau) ____.____.____.____
Primary DNS Server (Serveur DNS principal) ____.____.____.____
Secondary DNS Server (Serveur DNS secondaire) ____.____.____.____
Default Gateway (Passerelle par défaut) ____.____.____.____
2. Dans la boîte de dialogue qui s’affiche, sous Network (Réseau),
sélectionnez « Proxies » (Serveur proxy).
3. Désactivez toutes les cases à cocher et cliquez sur « OK ».
SMC7004VBR_QS.joint.qxd
19/9/02
12:44 pm
Page 121
Netscape
1. Ouvrez Netscape et cliquez sur le bouton « Stop » (Arrêter).
Cliquez sur « Edit » (Edition), puis sur « Preferences »
(Préférences).
1. Déroulez le menu Apple. Cliquez sur « Control Panels »
(Panneaux de configuration), puis sélectionnez « TCP/IP ».
2. Vos nouveaux paramètres apparaissent dans la fenêtre « TCP/IP
». Vérifiez que votre adresse IP est maintenant 192.168.2.xxx,
votre masque de sous-réseau 255.255.255.0 et votre passerelle
par défaut 192.168.2.1. Ces valeurs attestent du fonctionnement
de votre routeur Barricade.
3. Activez l’option « Direct Connection to the Internet »
(Connexion directe à Internet), puis cliquez sur « OK ».
Étape 3. Lecture des paramètres IP depuis votre routeur Barricade
Maintenant que vous avez configuré votre ordinateur pour la
connexion à votre routeur Barricade, il est nécessaire de lui
indiquer les nouveaux paramètres réseau. En libérant les éventuels
anciens paramètres IP et en les remplaçant par ceux de votre
routeur Barricade, vous pouvez également vérifier que vous avez
correctement configuré votre ordinateur.
3. Fermez la fenêtre « TCP/IP ».
Maintenant que votre ordinateur est configuré pour se connecter à
votre routeur Barricade, passez à la section « Configuration de votre
routeur Barricade ».
Français
Français
2. Dans la boîte de dialogue qui s’affiche, dans la colonne de
gauche « Category » (Catégories), sélectionnez « Advanced »
(Avancées). Dans la zone « Advanced » (Avancées), sélectionnez
« Proxies » (Serveur proxy).
SMC7004VBR_QS.joint.qxd
19/9/02
12:44 pm
Page 123
Chapitre 4. Configuration de votre routeur Barricade
Maintenant que vous avez correctement configuré votre ordinateur
et récupéré vos nouveaux paramètres réseau à partir de votre
routeur Barricade, vous êtes prêt à configurer ce dernier pour votre
réseau local.
4. Sur la page d’accueil de la console Web du routeur Barricade,
cliquez sur « Setup Wizard » (Assistant de configuration).
Le processus de configuration automatisé du routeur Barricade
vous guidera étape par étape lors de la configuration de votre
passerelle.
1. Ouvrez votre navigateur Web (par exemple, Internet Explorer ou
Netscape Navigator), puis cliquez sur le bouton « Stop » (Arrêter).
5. Sélectionnez votre fuseau horaire dans la liste affichée.
Français
Français
2. Dans la zone « Address » (Adresse), tapez « http://192.168.2.1
» et appuyez sur la touche <ENTRÉE>.
Remarque : dans certains navigateurs, il peut être nécessaire
d’ajouter « :88 » après l’adresse IP d’administration. Par exemple,
http://192.168.2.1:88.
3. L’écran d’ouverture de session Barricade s’affiche. Laissez la zone
« Password » (Mot de passe) vierge et cliquez sur « Login » (Se
connecter). Il n’y a aucun mot de passe par défaut. Pour des
raisons de sécurité, il est conseillé de définir un mot de passe le
plus tôt possible. Notez que le mot de passe d’ouverture de
session respecte la distinction entre les minuscules et les
majuscules.
6. Cliquez sur « NEXT » (Suivant) ; l’écran de configuration «
Broadband Type » (Type de connexion haut débit) s’affiche.
Vous disposez de trois choix différents de configurations
générales pour la connexion Internet haut débit. Vous devez
savoir quel type de connexion Internet vous utilisez afin de
choisir la configuration appropriée. Vous disposez de la plupart
des informations nécessaires puisque vous avez noté les
paramètres IP aux étapes précédentes. La section suivante
fournit quelques indications permettant de déterminer la
configuration à utiliser.
SMC7004VBR_QS.joint.qxd
19/9/02
12:44 pm
Page 125
Pour la configuration du protocole PPTP, reportez-vous à la
dernière version du manuel disponible sur le site Web
www.smc-europe.com.
fournisseurs indiquent le serveur DNS à utiliser par souci de
rapidité et de commodité. Étant donné que vous effectuez vos
connexions à Internet à l’aide de paramètres IP dynamiques, il est
probable que vos serveurs DNS vous soient également alloués
dynamiquement.
2. Si vous vous connectez à Internet à l’aide d’une adresse IP
dynamique, il n’est probablement pas nécessaire de saisir des
informations sur cet écran. Toutefois, si vous souhaitez utiliser
un serveur DNS particulier, entrez ses adresses dans les zones
prévues à cet effet.
3. Cliquez sur « FINISH » lorsque vous avez terminé.
Si vous effectuez vos connexions à Internet à l’aide d’un modem
câble, votre fournisseur de services Internet utilise alors
probablement le protocole DHCP pour vous attribuer une adresse IP.
Connexion xDSL via une adresse IP statique
1. Si vous accédez à Internet via une connexion xDSL à adresse IP
statique, cliquez sur la case d’option « Fixed-IP xDSL » sur
l’écran de sélection du type de connexion haut débit.
1. Si vous utilisez un modem câble ou si vous êtes certain
d’utiliser une adresse IP dynamique, cliquez sur la case d’option
« Cable Modem » (Modem câble) pour afficher l’écran de
configuration de l’adresse IP.
2. Votre fournisseur de services Internet vous demande
probablement d’entrer vos paramètres TCP/IP manuellement. Si
vous disposez d’une connexion xDSL ou si vous êtes certain
d’utiliser une adresse IP statique, entrez les informations
relatives à cette dernière dans les zones prévues à cet effet.
Un serveur DNS (Domain Name Server) est comparable à un index
de noms et d’adresses Internet. Lorsque vous tapez une adresse
Internet dans votre navigateur, telle que www.whitehouse.gov, un
serveur DNS recherche ce nom dans son index et détermine
l’adresse IP correspondante : 198.137.240.92. La plupart des
3. Cliquez sur « FINISH » lorsque vous avez terminé.
Français
Français
Connexion via un modem câble
SMC7004VBR_QS.joint.qxd
19/9/02
12:44 pm
Page 127
Connexion xDSL via le protocole PPP sur Ethernet
1. Si vous vous connectez à Internet à l’aide d’un modem xDSL et que
vous utilisez un nom d’utilisateur et un mot de passe, cela signifie
que votre fournisseur de services Internet utilise le protocole PPP
sur Ethernet. Si votre fournisseur vous demande de saisir un nom
d’utilisateur et un mot de passe ou si vous êtes certain qu’il utilise
le protocole PPP sur Ethernet, cliquez sur la case d’option « PPPoE
xDSL » sur l’écran de sélection du type de connexion haut débit.
Cela a pour effet d’afficher l’écran de configuration de la connexion
via le protocole PPP sur Ethernet.
Attention : sachez que l’attribution de la valeur « O » au
paramètre « Maximum Idle Time » (Durée maximale d’inactivité)
et/ou l’activation de l’option de reconnexion automatique peut
augmenter le montant de votre facture téléphonique.
4. Si vous vous connectez à Internet à l’aide du protocole PPP sur
Ethernet, il n’est probablement pas nécessaire de saisir des
informations sur cet écran.
5. Cliquez sur « FINISH » lorsque vous avez terminé.
De nombreux fournisseurs utilisent des modems présentant des
fonctions de configuration automatique. Parfois, les informations
de connexion sont stockées au niveau du modem et doivent être
actualisées. Il se peut qu’il soit nécessaire d’arrêter et de
redémarrer votre modem après avoir configuré votre routeur
Barricade.
Français
2. Entrez le nom d’utilisateur et le mot de passe requis par votre
fournisseur de services Internet dans les zones appropriées.
3. Si votre fournisseur vous a communiqué un nom de service, entrez
ce dernier dans la zone « Service Name » (Nom de service). Sinon,
laissez cette zone vierge. Un serveur DNS (Domain Name Server)
est comparable à un index de noms et d’adresses Internet. Lorsque
vous tapez une adresse Internet dans votre navigateur, telle que
www.whitehouse.gov, un serveur DNS recherche ce nom dans son
index et détermine l’adresse IP correspondante : 198.137.240.92.
La plupart des fournisseurs indiquent le serveur DNS à utiliser par
souci de rapidité et de commodité. Étant donné que vous effectuez
vos connexions à Internet à l’aide de paramètres IP dynamiques, il
est probable que vos serveurs DNS vous soient également alloués
dynamiquement.
Félicitations ! La configuration de base est terminée et votre routeur
Barricade est à présent connecté à Internet. Il est également
possible de modifier la configuration de certaines options avancées,
mais nous vous déconseillons de le faire, à moins que cela ne soit
nécessaire.
Pour obtenir des instructions concernant les options de configuration
avancées, reportez-vous au Manuel d’utilisation présent sur le CDROM et sur le site Web www.smc-europe.com
Français
6. Redémarrez votre modem xDSL en le mettant hors tension, en
attendant quelques secondes, puis en le rebranchant.
SMC7004VBR_QS.joint.qxd
19/9/02
12:44 pm
Page 129
Router de banda ancha de 10/100 Mbps
Capítulo 2. Indicadores LED
Indices
Capítulo 1
Introducción
Capítulo 2
Indicadores LED
Capítulo 3
Configuración del ordenador
Capítulo 4
Configuración del Barricade
El Barricade de SMC es un router de banda ancha diseñado para
compartir acceso a Internet, proporcionar seguridad y poner en red
varios dispositivos para distintos usuarios. La instalación y
configuración del Barricade son simples y las puede realizar el
usuario menos experimentado. Del mismo modo, se facilita a los
profesionales de redes la configuración de opciones avanzadas.
Consulte el manual de instrucciones para ver las funciones avanzadas
de este producto.
Este paquete contiene
• Un Barricade SMC
• Un adaptador de corriente
• Este manual de instalación rápida
• Un CD con toda la documentación
• Un cable de la categoría 5 para Fast Ethernet
Compruebe los requisitos de instalación
Antes de continuar con la instalación del Barricade, asegúrese de
disponer de lo siguiente:
• Un ordenador con una tarjeta de red Ethernet instalada
• El CD de Windows, si el ordenador trabaja con Windows 95, 98 o ME
• Una conexión a Internet mediante módem de cable o xDSL
• Un cable de red Ethernet adicional
• Un navegador de Internet como Internet Explorer o Netscape
El panel frontal del Barricade dispone de indicadores LED (diodos
luminosos) para un fácil control. La tabla siguiente detalla las
funciones de cada uno de ellos.
LED
Condición Estado
Power
Encendido
Barricade recibe corriente.
(Alimentación)
(verde)
WAN
Encendido
El puerto WAN ha
(verde)
establecido una conexión de
red válida.
Intermitente
El puerto WAN está
transmitiendo o recibiendo
datos.
Link/Act
Encendido
El puerto LAN indicado ha
(verde)
establecido una conexión de
red válida.
Intermitente
El puerto LAN indicado está
transmitiendo o recibiendo
datos.
Speed
Encendido
El puerto LAN indicado
(Velocidad)
funciona a 100 Mbps.
(verde)
Apagado
El puerto LAN indicado
funciona a 10 Mbps.
Espanol
Espanol
Capítulo 1. Introducción
SMC7004VBR_QS.joint.qxd
19/9/02
12:44 pm
Page 131
Conexión de dispositivos
Configuración del ordenador con Windows 95/98/Millennium
Edition
Es posible que las instrucciones siguientes no se correspondan de
forma exacta con su versión de Windows. Ello se debe a que los
pasos y las capturas de pantalla se han creado a partir de Windows
98. Windows 95 y Windows Me son muy parecidos, aunque no
idénticos, a Windows 98.
1. Conexión de ordenadores: Conecte los ordenadores directamente a
los puertos 1-4 del panel trasero del Barricade. Si tiene más de 4
ordenadores, conecte un concentrador o un conmutador (mediante
el puerto uplink) y los ordenadores adicionales a este dispositivo.
3. Alimentación: Conecte el cable de alimentación a la toma de
alimentación.
Capítulo 3. Configuración del ordenador
Este manual de instalación rápida proporciona las instrucciones de
configuración para Windows 95, 98, ME, NT 4.0, 2000 y XP, y para
Macintosh OS 7.x y posteriores. Asegúrese de seguir las
instrucciones correspondientes a su sistema operativo.
• Configuración del ordenador con Windows 95/98/Me
• Configuración del ordenador con Windows 2000
• Configuración del ordenador con Windows XP
• Configuración del ordenador con Windows NT 4.0
• Configuración de un ordenador Macintosh
Una vez terminada la instalación del hardware mediante la
conexión de los dispositivos, hay que configurar el ordenador para
conectarlo con el Barricade. Habrá que determinar de qué modo su
proveedor de servicios de Internet (ISP) establece la dirección IP.
Muchos ISP establecen estos números automáticamente mediante
una tecnología de red denominada Protocolo de configuración
dinámica de host, o DHCP. Otros indican la dirección IP y los
números asociados, que deberá introducir manualmente. Este modo
se conoce como dirección IP estática. La configuración del
ordenador dependerá de la manera en que su ISP le asigne la
dirección IP.
Espanol
Espanol
2. Conexión de un módem de cable o DSL: Conecte el módem de
cable o DSL al puerto WAN del panel trasero.
Paso 1: Establecer la configuración TCP/IP
SMC7004VBR_QS.joint.qxd
19/9/02
12:44 pm
Page 133
Proceda del modo siguiente:
3 En la ventana "Network" ("Red"), dentro de la ficha
"Configuration" ("Configuración"), haga doble clic en la entrada
"TCP/IP" que aparece en la lista con su tarjeta de red.
4 Seleccione la ficha "IP Address" ("Dirección IP").
2. En el "Control Panel" ("Panel de control") haga doble clic en el
icono "Network" ("Red").
Si "Obtain an IP address automatically" ("Obtener una dirección IP
automáticamente") ya está seleccionado, su ordenador ya está
configurado para DHCP. Pulse "Cancel" ("Cancelar") para cerrar
todas las ventanas, y vaya a Paso 2: Desactivar el proxy HTTP.
Espanol
Espanol
1. En el escritorio de Windows, pulse el botón "Start" ("Inicio").
Seleccione "Settings" ("Configuración") y luego "Control Panel"
("Panel de control").
SMC7004VBR_QS.joint.qxd
19/9/02
12:44 pm
Page 135
5. Localice su dirección IP y su máscara de subred. Guárdelas en los
espacios dispuestos después del paso 9 de este apartado.
6. Pulse la ficha "Gateway" ("Puerta de enlace") y guarde los
números indicados en "Installed gateways" ("Puertas de enlace
instaladas").
8. Después de anotar la configuración, asegúrese de haberla
recogido correctamente. Pulse la ficha "IP Address" ("Dirección
IP") y a continuación "Obtain an IP address automatically"
("Obtener una dirección IP automáticamente"). Pulse "OK"
("Aceptar").
TCP/IP Configuration Setting (Ajustes de configuración de
TCP/IP)
IP Address (Dirección IP)____.____.____.__.__.
7. Pulse la ficha "DNS Configuration" ("Configuración DNS").
Localice los servidores DNS listados en "DNS Server Search
Order" ("Orden de búsqueda del servidor DNS"). Guarde las
direcciones especificadas.
Subnet Mask (Máscara de subred)____.____.__.__.
Primary DNS Server (Servidor DNS principal) ___.____.____.______.__.
Secondary DNS Server (Servidor DNS secundario)
____.____.____.______.
Default Gateway (Puerta de enlace predeterminada)
__.____.____.______.
Paso 2: Desactivar el proxy HTTP
Compruebe que la función "proxy HTTP" de su navegador de Internet
esté desactivada. Ello es para que su navegador de Internet pueda
ver las páginas de configuración dentro del Barricade. A
continuación, se indican los pasos para Internet Explorer y
Netscape. Siga los pasos según el navegador que utilice.
Espanol
Espanol
9. Windows puede que le solicite el CD de Windows 95/98/ME para
copiar algunos archivos. Después de copiarlos le pedirá que
reinicie el sistema. Pulse "Yes" ("Sí") para reiniciar el ordenador.
SMC7004VBR_QS.joint.qxd
19/9/02
12:44 pm
Page 137
Internet Explorer
1. Abra Internet Explorer y pulse el botón
. Pulse "Tools"
("Herramientas) y luego "Internet Options" ("Opciones de
Internet").
2. En la ventana "Internet Options" ("Opciones de Internet"),
pulse la ficha "Connections" ("Conexiones"). A continuación,
pulse el botón "LAN Settings…" ("Configuración LAN...").
4. Pulse "OK" ("Aceptar") y nuevamente "OK" ("Aceptar") para
cerrar la ventana "Internet Options" ("Opciones de Internet").
Netscape
Espanol
3. Desmarque todas las casillas de verificación.
Espanol
1. Abra Netscape y pulse el botón de parar. Seleccione "Edit"
("Editar") y luego "Preferences…" ("Preferencias...")
SMC7004VBR_QS.joint.qxd
19/9/02
12:44 pm
Page 139
1 Pulse "Start" ("Inicio") y luego "Run…" ("Ejecutar...").
2. Escriba "WINIPCFG" y pulse "OK" ("Aceptar"). La ventana de "IP
Configuration" ("Configuración IP") aparecerá en uno o dos
minutos.
3. Haga lo mismo en todos los ordenadores conectados al Barricade
que utilicen el sistema operativo Windows 95/98/Me.
Paso 3: Obtener la configuración IP del Barricade
Una vez configurado el ordenador para conectarlo al Barricade,
debe establecerse la nueva configuración de red. Liberando la
configuración IP antigua y renovándola por la nueva del Barricade
también comprobará si ha configurado el ordenador correctamente.
Espanol
Espanol
2 En la ventana "Preferences" ("Preferencias"), en "Category"
("Categoría"), haga doble clic en "Advanced" ("Avanzada") y
luego pulse "Proxies" ("Proxies"). Seleccione "Direct connection
to the Internet" ("Conexión directa a Internet"). Pulse "OK"
("Aceptar").
SMC7004VBR_QS.joint.qxd
19/9/02
12:44 pm
Page 141
Proceda del modo siguiente:
3 En el menú desplegable, seleccione su tarjeta de red. Pulse
"Release" ("Liberar") y luego "Renew" ("Renovar"). Compruebe
que ahora la IP address (Dirección IP) sea 192.168.2.xxx, la
Subnet Mask (Máscara de subred) 255.255.255.0 y la Default
Gateway (Gateway predeterminada) 192.168. 2.1. Estos valores
confirman que el Barricade está funcionando. Pulse "OK"
("Aceptar") para cerrar la ventana "IP Configuration"
("Configuración IP").
1 En el escritorio de Windows, pulse el botón "Start" ("Inicio").
Seleccione "Settings" ("Configuración") y pulse el icono
"Network and Dial-Up Connections" ("Conexiones de red y de
acceso telefónico").
Espanol
Espanol
2 Haga doble clic en el icono correspondiente a la conexión con el
Barricade.
Ahora que el ordenador ya está configurado para conectarse con el
Barricade, vaya a "Configuración del Barricade".
Configuración del ordenador con Windows 2000
Paso 1: Establecer la configuración TCP/IP
Una vez terminada la instalación del hardware, hay que configurar
el ordenador para conectarlo con el Barricade. También deberá
determinar cómo su ISP establece la dirección IP. Muchos ISP
establecen estos números automáticamente mediante una
tecnología de red denominada Protocolo de configuración dinámica
de host, o DHCP. Otros indican la dirección IP y los números
asociados, que deberá introducir manualmente. Este modo se
conoce como dirección IP estática. La configuración del ordenador
dependerá de la manera en que su ISP le asigne la dirección IP.
3 Pulse "Properties" ("Propiedades").
SMC7004VBR_QS.joint.qxd
19/9/02
12:44 pm
Page 143
4. Haga doble clic en "Internet Protocol (TCP/IP)" ("Protocolo
Internet (TCP/IP)").
5. Toda la información que necesita anotar está en el cuadro de
diálogo "Internet Protocol (TCP/IP) Properties" ("Propiedades
del protocolo de Internet (TCP/IP)"). Use los espacios de abajo
para anotar la información.
Si "Obtain an IP address automatically" ("Obtener una dirección IP
automáticamente") y "Obtain DNS server address automatically"
("Obtener la dirección del servidor DNS automáticamente") ya
están seleccionados, su ordenador ya está configurado para DHCP.
Pulse "Cancel" ("Cancelar") para cerrar todas las ventanas, y vaya a
Paso 2: Desactivar el proxy HTTP (consulte la página
correspondiente).
Espanol
Espanol
"
6. Seleccione "Obtain an IP address automatically" ("Obtener una
dirección IP automáticamente") y luego "Obtain DNS server
address automatically" ("Obtener la dirección del servidor DNS
automáticamente"). Pulse "OK" ("Aceptar") o "Close" ("Cerrar")
para cerrar todas las ventanas
TCP/IP Configuration Setting (Ajustes de configuración de TCP/IP)
IP Address (Dirección IP) ____.____.____.____
Subnet Mask (Máscara de subred) ____.____.____.____
Primary DNS Server (Servidor DNS principal) ____.____.____.____
Secondary DNS Server (Servidor DNS secundario)
____.____.____.____
Default Gateway (Puerta de enlace predeterminada)
___.____.____.____
Paso 2: Desactivar el proxy HTTP
Compruebe que la función "proxy HTTP" de su navegador de
Internet esté desactivada. Ello es para que su navegador de
Internet pueda ver las páginas de configuración dentro del
Barricade. A continuación, se indican los pasos para Internet
Explorer y Netscape. Siga los pasos según el navegador que utilice.
SMC7004VBR_QS.joint.qxd
19/9/02
12:44 pm
Page 145
Internet Explorer
1. Abra Internet Explorer y pulse el botón Detener. Seleccione
"Tools" ("Herramientas) y luego "Internet Options" ("Opciones
de Internet").
Netscape
1. Abra Netscape y pulse el botón de parar. Seleccione "Edit"
("Editar") y luego "Preferences…" ("Preferencias...")
Espanol
Espanol
2. En la ventana "Internet Options" ("Opciones de Internet"),
seleccione la ficha "Connections" ("Conexiones"). A
continuación, pulse el botón "LAN Settings…" ("Configuración
LAN...").
4. Pulse "OK" ("Aceptar") y nuevamente "OK" ("Aceptar") para
cerrar la ventana "Internet Options" ("Opciones de Internet").
2. En la ventana "Preferences" ("Preferencias"), en "Category"
("Categoría"), haga doble clic en "Advanced" ("Avanzada") y luego
pulse "Proxies" ("Proxies"). Seleccione "Direct connection to the
Internet" ("Conexión directa a Internet"). Pulse "OK" ("Aceptar").
3. Desmarque todas las casillas de verificación.
SMC7004VBR_QS.joint.qxd
19/9/02
12:44 pm
Page 147
Paso 3: Obtener la configuración IP del Barricade
Una vez configurado el ordenador para conectarlo al Barricade,
debe establecerse la nueva configuración de red. Liberando la
configuración IP antigua y renovándola por la nueva del Barricade
también comprobará si ha configurado el ordenador correctamente.
4. Escriba "EXIT" y pulse <INTRO> para cerrar la ventana
"Command Prompt" ("Símbolo del sistema").
2. En la ventana del "Command Prompt" ("Símbolo del sistema"),
escriba "IPCONFIG /RELEASE" y pulse la tecla <INTRO>.
Ahora que el ordenador ya está configurado para conectarse con el
Barricade, vaya a "Configuración del Barricade".
Espanol
Espanol
1. En el escritorio de Windows, pulse el botón "Start" ("Inicio"),
luego "Programs" ("Programas"), "Accessories" ("Accesorios") y
finalmente "Command Prompt" ("Símbolo del sistema").
3. Escriba "IPCONFIG /RENEW" y pulse la tecla <INTRO>.
Compruebe que ahora la IP address (Dirección IP) sea
192.168.2.xxx (2-254), la Subnet Mask (Máscara de subred)
255.255.255.0 y la Default Gateway (Gateway predeterminada)
192.168.2.1. Estos valores confirman que el Barricade está
funcionando.
SMC7004VBR_QS.joint.qxd
19/9/02
12:44 pm
Page 149
Configuración del ordenador con Windows XP
3. Pulse "Properties" ("Propiedades").
Paso 1: Establecer la configuración TCP/IP
Una vez terminada la instalación del hardware, hay que configurar el
ordenador para conectarlo con el Barricade. También deberá
determinar cómo su ISP establece la dirección IP. Muchos ISP
establecen estos números automáticamente mediante una tecnología
de red denominada Protocolo de configuración dinámica de host, o
DHCP. Otros indican la dirección IP y los números asociados, que
deberá introducir manualmente. Este modo se conoce como dirección
IP estática. La configuración del ordenador dependerá de la manera
en que su ISP le asigne la dirección IP.
4. Haga doble clic en "Internet Protocol (TCP/IP)" ("Protocolo
Internet (TCP/IP)").
1. En el escritorio de Windows, pulse el botón "Start" ("Inicio").
Seleccione "Control Panel" ("Panel de control").
Espanol
Espanol
Proceda del modo siguiente:
2. Seleccione el icono
"Network and Internet Connections"
("Conexiones de red e Internet"), luego pulse el icono
"Network Connections" ("Conexiones de red") y haga doble clic
en el adaptador que usará para esta conexión.
SMC7004VBR_QS.joint.qxd
19/9/02
12:44 pm
Page 151
5. Toda la información que necesita anotar está en el cuadro de
diálogo "Internet Protocol (TCP/IP) Properties" ("Propiedades del
protocolo de Internet (TCP/IP)"). Use los espacios dispuestos en el
paso 7 de este apartado para anotar la información.
Paso 2: Desactivar el proxy HTTP
Compruebe que la función "proxy HTTP" de su navegador de
Internet esté desactivada. Ello es para que su navegador de
Internet pueda ver las páginas de configuración dentro del
Barricade. Los pasos siguientes son para Internet Explorer. Siga los
pasos según el navegador que utilice.
Si "Obtain an IP address automatically" ("Obtener una dirección IP
automáticamente") y "Obtain DNS server address automatically"
("Obtener la dirección del servidor DNS automáticamente") ya
están seleccionados, su ordenador ya está configurado para DHCP.
Pulse "Cancel" ("Cancelar") para cerrar todas las ventanas, y vaya a
Paso 2: Desactivar el proxy HTTP (consulte la página
correspondiente).
6. Seleccione "Obtain an IP address automatically" ("Obtener una
dirección IP automáticamente") y luego "Obtain DNS server
address automatically" ("Obtener la dirección del servidor DNS
automáticamente"). Pulse "OK" ("Aceptar") o "Close" ("Cerrar")
para cerrar todas las ventanas.
TCP/IP Configuration Setting (Ajustes de configuración de TCP/IP)
IP Address (Dirección IP) ____.____.____.____
Subnet Mask (Máscara de subred) ____.____.____.____
Primary DNS Server (Servidor DNS principal) ____.____.____.____
Secondary DNS Server (Servidor DNS secundario)
____.____.____.____
Default Gateway (Puerta de enlace predeterminada)
____.____.____.____
2. En la ventana "Internet Options" ("Opciones de Internet"), elija
la ficha "Connections" ("Conexiones"). A continuación, pulse el
botón "LAN Settings…" ("Configuración LAN...").
Espanol
Espanol
1. Abra Internet Explorer y pulse el botón Detener. Seleccione
"Tools" ("Herramientas) y luego "Internet Options" ("Opciones
de Internet").
SMC7004VBR_QS.joint.qxd
19/9/02
12:44 pm
Page 153
3. Desmarque todas las casillas de verificación.
2. En la ventana del "Command Prompt" ("Símbolo del sistema"),
escriba "IPCONFIG /RELEASE" y pulse la tecla <INTRO>.
4. Pulse "OK" ("Aceptar") y nuevamente "OK" ("Aceptar") para
cerrar la ventana "Internet Options" ("Opciones de Internet").
Una vez configurado el ordenador para conectarlo al Barricade,
debe establecerse la nueva configuración de red. Liberando la
configuración IP antigua y renovándola por la nueva del Barricade
también comprobará si ha configurado el ordenador correctamente.
1. En el escritorio de Windows, pulse el botón "Start" ("Inicio"),
luego "Programs" ("Programas"), "Accessories" ("Accesorios") y
finalmente "Command Prompt" ("Símbolo del sistema").
Espanol
Espanol
Paso 3: Obtener la configuración IP del Barricade
3. Escriba "IPCONFIG /RENEW" y pulse la tecla <INTRO>. Compruebe
que ahora la IP address (Dirección IP) sea 192.168.2.xxx (2-254),
la Subnet Mask (Máscara de subred) 255.255.255.0 y la Default
Gateway (Gateway predeterminada) 192.168.2.1. Estos valores
confirman que el Barricade está funcionando.
4. Escriba "EXIT" y pulse <INTRO> para cerrar la ventana "Command
Prompt" ("Símbolo del sistema").
Ahora que el ordenador ya está configurado para conectarse con el
Barricade, vaya a "Configuración del Barricade".
SMC7004VBR_QS.joint.qxd
19/9/02
12:44 pm
Page 155
Configuración del ordenador con Windows NT 4.0
Paso 1: Establecer la configuración TCP/IP
Una vez terminada la instalación del hardware, hay que configurar
el ordenador para conectarlo con el Barricade. Habrá que
determinar de qué modo su proveedor de servicios de Internet
(ISP) establece la dirección IP. Muchos ISP establecen estos
números automáticamente mediante una tecnología de red
denominada Protocolo de configuración dinámica de host, o DHCP.
Otros indican la dirección IP y los números asociados, que deberá
introducir manualmente. Este modo se conoce como dirección IP
estática. La configuración del ordenador dependerá de la manera
en que su ISP le asigne la dirección IP.
3. Seleccione la ficha "Protocols" ("Protocolos").
1. En el escritorio de Windows pulse "Start" ("Inicio"). Seleccione
"Settings" ("Configuración") y luego "Control Panel" ("Panel de
control").
Espanol
Espanol
Proceda del modo siguiente:
4. Haga doble clic en "TCP/IP Protocol" ("Protocolo (TCP/IP)").
5. Seleccione la ficha "IP Address" ("Dirección IP").
2. Haga doble clic en el icono "Network" ("Red").
SMC7004VBR_QS.joint.qxd
19/9/02
12:44 pm
Page 157
6. En la lista desplegable de "Adapter" ("Adaptador"), compruebe
que esté seleccionado su adaptador Ethernet.
Si "Obtain an IP address automatically" ("Obtener una dirección IP
automáticamente") ya está seleccionado, su ordenador ya está
configurado para DHCP. Pulse "Cancel" ("Cancelar") para cerrar
todas las ventanas, y vaya a Paso 2: Desactivar el proxy HTTP
(consulte la página correspondiente).
8. Pulse la ficha "DNS" para ver los servidores DNS primario y
secundario. Anote estos valores en los espacios correspondientes
de más abajo.
9. Después de anotar los valores de IP, pulse la ficha "IP address"
("Dirección IP"). Seleccione "Obtain IP address automatically"
("Obtener una dirección IP automáticamente") y pulse "OK"
("Aceptar"). Pulse "OK" ("Aceptar") para cerrar la ventana
"Network" ("Red").
10. Puede que Windows copie algunos archivos y después le
solicite que reinicie el sistema. Pulse "Yes" ("Sí") para reiniciar
el ordenador.
IP Address (Dirección IP) ____.____.____.____
Subnet Mask (Máscara de subred) ____.____.____.____
Primary DNS Server (Servidor DNS principal) ____.____.____.____
Secondary DNS Server (Servidor DNS secundario)
____.____.____.____
Default Gateway (Puerta de enlace predeterminada)
____.____.____.____
Espanol
Espanol
7. En el cuadro de diálogo "TCP/IP Properties" ("Propiedades
TCP/IP"), pulse la ficha "IP address" ("Dirección IP") para localizar
su "IP address" ("Dirección IP"), "Subnet Mask" ("Máscara de
subred") y "Default Gateway" ("Gateway predeterminada"). Anote
estos valores en los espacios dispuestos después del paso 10 de
este apartado.
TCP/IP Configuration Setting (Ajustes de configuración de TCP/IP)
SMC7004VBR_QS.joint.qxd
19/9/02
12:44 pm
Page 159
Step 2. Disable HTTP Proxy
Compruebe que la función "proxy HTTP" de su navegador de
Internet esté desactivada. Ello es para que su navegador de
Internet pueda ver las páginas de configuración dentro del
Barricade. A continuación, se indican los pasos para Internet
Explorer y Netscape. Siga los pasos según el navegador que utilice.
3. Desmarque todas las casillas de verificación.
Internet Explorer
1. Abra Internet Explorer y pulse el botón Detener. Seleccione
"Tools" ("Herramientas) y luego "Internet Options" ("Opciones
de Internet").
Netscape
1. 1. Abra Netscape y pulse el botón de parar. Seleccione "Edit"
("Editar") y luego "Preferences…" ("Preferencias...").
2. En la ventana "Internet Options" ("Opciones de Internet") pulse
la ficha "Connections" ("Conexiones"). A continuación, pulse el
botón "LAN Settings…" ("Configuración LAN...").
Espanol
Espanol
4. Pulse "OK" ("Aceptar") y nuevamente "OK" ("Aceptar") para
cerrar la ventana "Internet Options" ("Opciones de Internet").
SMC7004VBR_QS.joint.qxd
19/9/02
12:44 pm
Page 161
2. En la ventana del "Command Prompt" ("Símbolo del sistema"),
escriba "IPCONFIG /RELEASE" y pulse la tecla <INTRO>.
3. Escriba "IPCONFIG /RENEW" y pulse la tecla <INTRO>.
Compruebe que ahora la IP address (Dirección IP) sea
192.168.2.xxx, la Subnet Mask (Máscara de subred)
255.255.255.0 y la Default Gateway (Gateway predeterminada)
192.168.2.1. Estos valores confirman que el Barricade está
funcionando.
Espanol
Espanol
2. En la ventana "Preferences" ("Preferencias"), en "Category"
("Categoría"), haga doble clic en "Advanced" ("Avanzada") y
luego pulse "Proxies" ("Proxies"). Seleccione "Direct connection
to the Internet" ("Conexión directa a Internet"). Pulse "OK"
("Aceptar").
Paso 3: Obtener la configuración IP del Barricade
Una vez configurado el ordenador para conectarlo al Barricade,
debe establecerse la nueva configuración de red. Liberando la
configuración IP antigua y renovándola por la nueva del Barricade
también comprobará si ha configurado el ordenador correctamente.
1. En el escritorio de Windows, pulse el botón "Start" ("Inicio"),
luego "Programs" ("Programas") y finalmente "Command Prompt"
("Símbolo del sistema").
4. Escriba "EXIT" y pulse <INTRO> para cerrar la ventana
"Command Prompt" ("Símbolo del sistema").
Ahora que el ordenador ya está configurado para conectarse con el
Barricade, vaya a "Configuración del Barricade".
SMC7004VBR_QS.joint.qxd
19/9/02
12:44 pm
Page 163
Configuración de un ordenador Macintosh
Es posible que las instrucciones siguientes no se correspondan de
forma exacta con su pantalla. Ello se debe a que estos pasos y
capturas de pantalla se han creado usando Mac OS 8.5. Mac OS 7.x
y posteriores son muy parecidos, pero no idénticos a Mac OS 8.5.
Una vez terminada la instalación del hardware, hay que configurar el
ordenador para conectarlo con el Barricade. Habrá que determinar de
qué modo su proveedor de servicios de Internet (ISP) establece la
dirección IP. Muchos ISP establecen estos números automáticamente
mediante una tecnología de red denominada Protocolo de
configuración dinámica de host, o DHCP. Otros indican la dirección IP
y los números asociados, que deberá introducir manualmente. Este
modo se conoce como dirección IP estática. La configuración del
ordenador dependerá de la manera en que su ISP le asigne la
dirección IP.
Proceda del modo siguiente:
1. Abra el menú Apple. Pulse "Control Panels" ("Paneles de
control") y seleccione TCP/IP.
3. Toda la información que necesita anotar está en el cuadro de
diálogo "TCP/IP". Anote estos valores en los espacios
correspondientes del punto 5.
4. Después de anotar los valores de IP, seleccione "Using DHCP
Server" ("Usar servidor DHCP") en el campo "Configure"
("Configurar") y cierre la ventana.
5. Aparecerá otro cuadro pidiendo si desea guardar la
configuración TCP/IP. Pulse "Save" ("Guardar").
Espanol
Espanol
Paso 1: Establecer la configuración TCP/IP
2. En el cuadro de diálogo TCP/IP, compruebe que esté seleccionado
"Ethernet" en el campo "Connect Via:" ("Conectar con:").
Si "Using DHCP Server" ("Usar servidor DHCP") ya está
seleccionado en el campo "Configure:" ("Configurar:"), el
ordenador ya está configurado para DHCP. Cierre el cuadro de
diálogo TCP/IP y vaya a Paso 2: Desactivar el proxy HTTP (consulte
la página correspondiente).
SMC7004VBR_QS.joint.qxd
19/9/02
12:44 pm
Page 165
TCP/IP Configuration Setting (Ajustes de configuración de TCP/IP)
IP Address (Dirección IP) ____.____.____.____
2. Desmarque todas las casillas de verificación y pulse "OK"
("Aceptar").
Subnet Mask (Máscara de subred) ____.____.____.____
Primary DNS Server (Servidor DNS principal) ___.____.____.____
Secondary DNS Server (Servidor DNS secundario)
____.____.____.____
Default Gateway (Puerta de enlace predeterminada)
____.____.____.____
Compruebe que la función "proxy HTTP" de su navegador de
Internet esté desactivada. Ello es para que su navegador de
Internet pueda ver las páginas de configuración dentro del
Barricade. A continuación, se indican los pasos para Internet
Explorer y Netscape. Siga los pasos según el navegador que utilice.
Netscape
1. Abra Netscape y pulse el botón de parar. Seleccione "Edit"
("Editar") y luego "Preferences" ("Preferencias").
Internet Explorer
1. En el apartado "Network" ("Red") de la ventana "Internet
Explorer Preferences" ("Preferencias de Internet Explorer"),
seleccione "Proxies" ("Proxies").
2. En el cuadro de diálogo "Preferences" ("Preferencias"), en la
columna "Category" ("Categoría"), seleccione "Advanced"
("Avanzada"). En la categoría "Advanced" ("Avanzada"),
seleccione "Proxies" ("Proxies").
Espanol
Espanol
Paso 2: Desactivar el proxy HTTP
SMC7004VBR_QS.joint.qxd
19/9/02
12:44 pm
Page 167
3. Seleccione "Direct connection to the Internet" ("Conexión
directa a Internet") y pulse OK (Aceptar).
Paso 3: Obtener la configuración IP del Barricade
Una vez configurado el ordenador para conectarlo al Barricade,
debe establecerse la nueva configuración de red. Liberando la
configuración IP antigua y renovándola por la nueva del Barricade
también comprobará si ha configurado el ordenador correctamente.
2. En la ventana TCP/IP aparecerá la nueva configuración.
Compruebe que ahora la IP address (Dirección IP) sea
192.168.2.xxx, la Subnet Mask (Máscara de subred)
255.255.255.0 y la Default Gateway (Gateway predeterminada)
192.168.2.1. Estos valores confirman que el Barricade está
funcionando.
3. Cierre la ventana TCP/IP.
Ahora que el ordenador ya está configurado para conectarse con el
Barricade, vaya a "Configuración del Barricade".
Espanol
Espanol
1. Abra el menú Apple. Seleccione "Control Panels" ("Paneles de
control") y luego TCP/IP.
SMC7004VBR_QS.joint.qxd
19/9/02
12:44 pm
Page 169
Capítulo 4. Configuración del Barricade
Una vez configurado correctamente el ordenador y recuperada la
nueva configuración de red del Barricade, ya puede establecer la
configuración del Barricade para su red de área local (LAN).
4. En la página principal de la web del Barricade, pulse "Setup
Wizard" ("Asistente de configuración"). El proceso automático
de configuración del Barricade le guiará paso a paso a
configurar su gateway.
1. Abra su navegador de Internet (p. ej., Internet Explorer o
Netscape Navigator) y pulse el botón de detener.
5. Elija su zona horaria de la lista.
Espanol
Espanol
2. En el campo "Address" ("Dirección") escriba
"http://192.168.2.1" y pulse <INTRO>.
Nota: En algunos navegadores quizá sea necesario incluir ":88"
después de la dirección IP. Por ejemplo, http://192.168.2.1:88
3. Aparecerá la pantalla de inicio de sesión del Barricade. Deje en
blanco el campo "Password" ("Contraseña") y pulse "Login"
("Inicio de sesión"). No existe ninguna contraseña
predeterminada. Por cuestiones de seguridad debería asignarle
una contraseña lo antes posible. Tenga en cuenta que la
contraseña de inicio de sesión distingue mayúsculas de
minúsculas.
6. Pulse "NEXT" ("SIGUIENTE") y aparecerá la pantalla de
configuración "Broadband Type" ("Tipo de banda ancha").
Existen tres configuraciones distintas para conexiones a Internet
de alta velocidad. Deberá conocer su conexión a Internet para
determinar qué configuración usar. Ya dispone de la mayoría de
datos que necesita, obtenidos en la configuración IP de pasos
anteriores. En el apartado siguiente se ofrecen algunas
indicaciones para determinar la configuración que deberá usarse.
SMC7004VBR_QS.joint.qxd
19/9/02
12:44 pm
Page 171
Para la configuración PPTP consulte el manual más reciente en
www.smc-europe.com.
2. Si se conecta a Internet con una dirección IP dinámica,
seguramente no deberá introducir ningún dato aquí. Sin
embargo, si prefiere usar un servidor DNS determinado,
introduzca las direcciones del servidor DNS en los espacios
correspondientes.
3. Pulse "FINISH" ("TERMINAR") cuando haya concluido.
Conexión xDSL de IP fija
1. Si se conecta a Internet mediante xDSL de IP fija , pulse el
botón de opción "Fixed-IP xDSL" ("xDSL de IP fija ") de la
pantalla Broadband Type (Tipo de banda ancha).
Si se conecta a Internet mediante un módem de cable,
probablemente su ISP utilice el DHCP para asignarle una dirección IP.
Espanol
Espanol
Conexión con módem de cable
1. Si utiliza un módem de cable o sabe que usa una dirección IP
dinámica, pulse el botón de opción "Cable Modem" ("Módem de
cable") para ver la pantalla de configuración de dirección IP.
2. Su ISP probablemente le pedirá que introduzca manualmente la
configuración TCP/IP. Si dispone de una conexión xDSL o sabe
que usa una dirección IP estática, facilite la información de la
dirección IP en los espacios correspondientes.
3. Pulse "FINISH" ("TERMINAR") cuando haya concluido.
Un servidor de nombres de dominio (DNS) es como un índice de
nombres y direcciones web. Cuando se escribe una dirección web en
el navegador, como por ejemplo www.whitehouse.gov, un servidor
DNS busca dicho nombre en su índice y localiza la dirección IP
correspondiente: 198.137.240.92. La mayoría de ISP proporcionan un
servidor DNS para mayor velocidad y comodidad. Como usted se
conecta a Internet con una configuración IP dinámica, lo más
probable es que sus servidores DNS también sean dinámicos.
SMC7004VBR_QS.joint.qxd
19/9/02
12:44 pm
Page 173
Conexión xDSL de PPPoE
1. Si se conecta a Internet mediante un módem xDSL y usa un
nombre y contraseña para el inicio de sesión, su ISP usa PPPoE. Si
su ISP requiere un nombre y contraseña de inicio de sesión o sabe
que su ISP usa PPPoE, pulse el botón de opción "xDSL de PPPoE "
de la pantalla Broadband Type (Tipo de banda ancha) para ver la
pantalla de configuración de la conexión PPPoE.
4. Si se conecta a Internet mediante PPPoE, probablemente no
tenga que introducir ningún dato aquí.
5. Pulse "FINISH" ("TERMINAR") cuando haya concluido.
La mayoría de ISP usan módems que disponen de configuración
automática. A veces, la información de conexión se almacena en el
módem y es necesario actualizarla. Es posible que deba apagar y
reiniciar el módem una vez configurado el Barricade.
6. Para reiniciar el módem xDSL apague el interruptor de corriente,
espere unos segundos y vuélvalo a conectar.
2. Introduzca el nombre de usuario y la contraseña solicitados por
su ISP en los campos correspondientes.
3. Si su ISP le ha facilitado un nombre de servicio, introdúzcalo en
el campo "Service Name" ("Nombre de servicio") PPPoE; en caso
contrario, déjelo en blanco. Un servidor de nombres de dominio
(DNS) es como un índice de nombres y direcciones web. Cuando
se escribe una dirección web en el navegador, como por ejemplo
www.whitehouse.gov, un servidor DNS busca dicho nombre en su
índice y localiza la dirección IP correspondiente:
198.137.240.92. La mayoría de ISP proporcionan un servidor
DNS para mayor velocidad y comodidad. Como usted se conecta
a Internet con una configuración IP dinámica, lo más probable
es que sus servidores DNS también sean dinámicos.
Nota importante: Tenga en cuenta que establecer "Maximum Idle
Time" ("Tiempo de inactividad máximo") en "O" o determinar la
reconexión automática puede afectar directamente a su factura
telefónica.
Para obtener información sobre las opciones avanzadas de
configuración, consulte el manual de instrucciones del CD en
www.smc-europe.com.
Espanol
Espanol
¡Felicidades! Ya ha realizado la configuración básica y el Barricade ya
está conectado a Internet. Pueden establecerse algunas opciones de
configuración avanzada, aunque se recomienda no realizar ningún
cambio en dichas opciones a menos que sea imprescindible.
SMC7004VBR_QS.IT.qxd
19/9/02
12:38 pm
Page 3
Router a banda larga a 10/100 Mbps
Capitolo 2. LED di indicazione
Indice
Capitolo 1
Introduzione
Capitolo 2
LED di indicazione
Capitolo 3
Configurazione del computer
Capitolo 4
Configurazione del Barricade
SMC Barricade è un router a banda larga progettato per condividere
l'accesso a Internet, fornire protezione e collegare in rete più
periferiche per diversi utenti. L'installazione e la configurazione di
Barricade può essere effettuata anche dagli utenti meno esperti,
fornendo al contempo ai professionisti della rete funzioni avanzate di
facile configurazione. Leggere la Guida dell'utente per conoscere le
funzioni avanzate di questo prodotto.
Contenuto della confezione
•
•
•
•
•
Un SMC Barricade
Una scheda di alimentazione
Una Guida rapida di installazione
Un CD con la documentazione completa
Un cavo Fast Ethernet di categoria 5
Assicurarsi di soddisfare i requisiti di installazione
Prima di procedere all'installazione di Barricade, accertarsi di disporre
di quanto segue:
•
•
•
•
•
Nel computer sia installata una scheda di rete Ethernet
Il CD di Windows, se il computer esegue Windows 95, 98 o ME
Una connessione a Internet mediante un cavo o un modem xDSL
Un cavo di rete Ethernet aggiuntivo
Un browser Web quale Internet Explorer o Netscape
LED
Condizione Status
Alimentazione Acceso
Barricade è alimentato.
(verde)
WAN (verde)
Lampeggiante La porta WAN ha stabilito una
connessione di rete valida.
Lampeggiante La porta WAN sta trasmettendo o
ricevendo dati.
Link/Act (verde)Lampeggiante La porta LAN indicata ha stabilito una
connessione di rete valida.
Lampeggiante La porta LAN sta trasmettendo o
ricevendo dati.
Velocità (verde) Acceso
La porta LAN indicata sta funzionando
a 100 Mbps.
Spento
La porta LAN indicata sta funzionando
a 10 Mbps.
Italiano
Italiano
Capitolo 1. Introduzione
Il pannello anteriore di Barricade è dotato di indicatori LED (Light
Emitting Diodes) per un facile monitoraggio. La seguente tabella
definisce la funzione di ciascun LED.
SMC7004VBR_QS.IT.qxd
19/9/02
12:38 pm
Page 5
Collegamento delle periferiche
Chapter 3. Configurazione del computer
La Guida rapida all'installazione fornisce istruzioni sulla
configurazione per Windows 95, 98, ME, NT 4.0, 2000 e XP e per
Macintosh OS 7.x e versioni successive. Attenersi alle istruzioni
fornite per il sistema operativo in uso.
1. Collegamento dei computer: collegare i computer direttamente a
Barricade sulle porte 1-4 del pannello posteriore. Se si dispone di
oltre 4 computer da collegare, collegare un hub o uno switch
(utilizzando la porta uplink) e collegare i computer aggiuntivi alla
periferica.
3. Alimentazione: collegare il cavo di alimentazione nello jack di
alimentazione.
Configurazione del computer in Windows 95/98/ME
Configurazione del computer in Windows 2000
Configurazione del computer in Windows XP
Configurazione del computer in Windows NT 4.0
Configurazione del computer Macintosh
Configurazione del computer in Windows 95/98/Millennium
Edition
È possibile che le informazioni qui fornite non corrispondano
perfettamente alla versione di Windows in uso. Infatti, le procedure e
le schermate di esempio illustrate sono relative a Windows 98.
Windows 95 e Windows ME sono molto simili, ma non identici a
Windows 98.
Passaggio 1. Configurazione delle impostazioni TCP/IP
Dopo aver completato la configurazione dell'hardware collegando le
periferiche, è necessario configurare il computer per poter collegare
Barricade. È inoltre indispensabile stabilire in che modo l'ISP emette
l'indirizzo IP. Molti ISP emettono questi numeri automaticamente
utilizzando una tecnologia di rete nota come DHCP (Dynamic Host
Configuration Protocol). Altri ISP specificano l'indirizzo IP e I numeri
associati, che devono essere inseriti manualmente. Questi numeri
sono anche noti come indirizzo IP statico. La modalità di
assegnazione dell'indirizzo IP da parte di altri ISP determina la
configurazione del computer.
Italiano
Italiano
2. Collegamento di un modem via cavo o di un modem DSL: collegare
il modem via cavo o DSL alla porta WAN sul pannello posteriore.
•
•
•
•
•
SMC7004VBR_QS.IT.qxd
19/9/02
12:38 pm
Page 7
Di seguito le procedure da seguire:
4. Selezionare la scheda "IP Address" (Indirizzo IP).
2. Dal "Control Panel" (Pannello di controllo), fare doppio clic
sull'icona "Network" (Rete).
Se "Obtain an IP address automatically" (Ottieni automaticamente un
indirizzo IP) è già selezionato, il computer è già configurato per
DHCP. Fare clic su "Cancel" (Annulla) per chiudere ciascuna finestra e
passare a Passaggio 2. Disattivazione di "HTTP Proxy".
5. Individuare l'indirizzo IP e la Subnet Mask. Registrarli negli spazi
forniti dopo il passaggio 9 in questa sezione.
Italiano
Italiano
1. Dal desktop di Windows, fare clic sul pulsante "Start". Scegliere
"Settings" (Impostazioni) nel "Control Panel" (Pannello di
controllo).
3. Nella finestra "Network" (Rete), sotto la scheda "Configuration"
(Configurazione), fare doppio clic sulla voce "TCP/IP" elencata
nella scheda di rete.
SMC7004VBR_QS.IT.qxd
19/9/02
12:38 pm
Page 9
6. Fare clic sulla scheda "Gateway" e registrare i numeri elencati in
"Installed gateways" (Gateway installati).
9. Windows potrebbe richiedere il CD di Windows 95/98/ME per la
copia di alcuni file. Al termine della copia, verrà richiesto di
riavviare il sistema. Fare clic su "Yes" (Sì), il computer verrà
spento e riavviato.
Impostazione della configurazione TCP/IP
Indirizzo IP ____.____.____.____
Subnet Mask ____.____.____.____
Server DNS secondario ____.____.____.____
Gateway predefinito ____.____.____.____
Passaggio 2. Disattivazione di "HTTP Proxy"
Sarà necessario verificare che la funzione "HTTP Proxy" (Proxy
HTTP) del browser Web sia disabilitata. In tal modo il browser Web
sarà in grado di visualizzare le pagine della configurazione
all'interno di Barricade. I seguenti passaggi sono relativi a Internet
Explorer e Netscape. In base al browser utilizzato attenersi alla
procedura appropriata.
8. Dopo aver preso nota delle impostazioni, accertarsi di averle
annotale correttamente. Fare clic sulla scheda "IP Address"
(indirizzo IP), quindi fare clic su "Obtain an IP address
automatically" (Ottieni automaticamente un indirizzo IP). Fare
clic su OK.
Italiano
Italiano
Server DNS primario ____.____.____.____
7. Fare clic sulla scheda "DNS Configuration" (Configurazione DNS).
Individuare i server DNS elencati in "DNS Server Search Order"
(Ordine di ricerca dei server DNS). Registrare gli indirizzi
elencati.
SMC7004VBR_QS.IT.qxd
19/9/02
12:38 pm
Page 11
Internet Explorer
Netscape
1. Aprire Internet Explorer e fare clic sul pulsante stop
(termina)
Fare clic su "Tools" (Strumenti) quindi, "Internet
Options" (Opzioni Internet).
1. Aprire Netscape e fare clic sul pulsante stop (termina) Fare clic
su "Edit" (Modifica), quinidi fare clic su "Preferences…"
(Preferenze…).
2. Nella finestra "Preferences" (Preferenze), in "Category"
(Categoria) fare doppio clic su "Advanced" (Avanzate) quindi
premere "Proxies" (Proxy). Selezionare "Direct connection to the
Internet" (Connessione diretta a Internet). Fare clic su "OK".
Italiano
Italiano
2. Nella finestra "Internet Options" (Opzioni Internet), fare clic
sulla scheda "Connections" (Connessioni). Quindi, fare clic sul
pulsante "LAN Settings…" (Impostazioni rete locale (LAN).
3. Deselezionare tutte le caselle.
4. Fare clic su "OK," quindi di nuovo su "OK" per chiudere la
finestra "Internet Options" (Opzioni Internet).
3. Ripetere questi passaggi per ciascun computer Windows
95/98/Me collegato a Barricade.
Passaggio 3. Individuazione delle impostazioni IP da Barricade
A questo punto, dopo aver configurato il computer per il
collegamento a Barricade, è necessario ottenere nuove impostazioni
di rete. Rilasciando tutte le precedenti impostazioni IP e
rinnovandole con le impostazioni di Barricade, sarà anche possibile
verificare che il computer è stato configurato correttamente.
SMC7004VBR_QS.IT.qxd
19/9/02
12:38 pm
Page 13
1. Fare clic su "Start," quindi "Run…" (Esegui).
Configurazione del computer con Windows 2000
Passaggio 1. Configurazione delle impostazioni TCP/IP
Dopo aver completato la configurazione dell'hardware, è necessario
configurare il computer per il collegamento a Barricade. È anche
necessario stabilire in che modo l'ISP emette l'indirizzo IP. Molti ISP
emettono questi numeri automaticamente utilizzando una tecnologia
di rete nota come DHCP (Dynamic Host Control Protocol). Altri ISP
specificano l'indirizzo IP e i numeri associati, che devono essere
inseriti manualmente. Questi numeri sono anche noti come indirizzo
IP statico. La modalità di assegnazione dell'indirizzo IP da parte
dell'ISP determina la configurazione del computer.
2. Digitare "WINIPCFG" e scegliere "OK". Entro uno o due miniti verrà
visualizzata la finestra "IP Configuration" (Configurazione IP).
3. Dal menu a discesa, selezionare la scheda di rete. Fare clic su
"Release" (Rilascio) quindi su "Renew" (Rinnova). Verificare che
l'indirizzo IP sia ora 192.168.2.xxx, la Subnet Mask sia
255.255.255.0 e il Gateway predefinito sia 192.168. 2.1. Questi
valori confermano che Barricade funziona. Fare clic su "OK" per
chiudere la finestra "IP Configuration" (Configurazione IP).
A questo punto, dopo aver configurato il computer per il
collegamento a Barricade, passare a "Configurazione del Barricade".
1. Dal desktop di Windows, fare clic sul pulsante "Start". Scegliere
"Settings" (Impostazioni) quindi fare clic sull'icona "Network and
Dial-Up Connections" (Rete e connessioni remote).
2. Fare doppio clic sull'icona che corrisponde alla connessione a
Barricade.
Italiano
Italiano
Di seguito le procedure da seguire:
SMC7004VBR_QS.IT.qxd
19/9/02
12:38 pm
Page 15
3. Fare clic su "Properties" (Proprietà).
per chiudere ciascuna finestra, quindi passare a Passaggio 2.
Disattivazione di "HTTP Proxy"(vedere la pagina relativa).
6. Selezionare "Obtain an IP address automatically" (Ottieni
automaticamente un indirizzo IP), quindi selezionare "Obtain
DNS server address automatically" (Ottieni un indirizzo server
DNS automaticamente). Fare clic su "OK" o "Close" (Chiudi) per
chiudere ciascuna finestra.
"
Italiano
Italiano
4. Fare doppio clic su "Internet Protocol (TCP/IP)" (Protocollo
Internet (TCP/IP).
Impostazione della configurazione TCP/IP
Indirizzo IP ____.____.____.____
Subnet Mask ____.____.____.____
Server DNS primario ____.____.____.____
Server DNS secondario ____.____.____.____
5. Tutte le informazioni necessarie per effettuare la registrazione si
trovano nella finestra di dialogo "Internet Protocol (TCP/IP)
Properties" (Proprietà del protocollo Internet (TCP/IP)).
Utilizzare gli spazi di seguito per registrare le informazioni.
Se "Obtain an IP address automatically" (Ottieni automaticamente un
indirizzo IP) e "Obtain DNS server address automatically" (Ottieni un
indirizzo server DNS automaticamente) sono già selezionati, il
computer è già configurato per DHCP. Fare clic su "Cancel" (Annulla)
Gateway predefinito ____.____.____.____
Passaggio 2. Disattivazione di "HTTP Proxy"
Sarà necessario verificare che la funzione "HTTP Proxy" (Proxy
HTTP) del browser Web sia disabilitata. In tal modo il browser Web
sarà in grado di visualizzare le pagine della configurazione
all'interno di Barricade. I seguenti passaggi sono relativi a Internet
Explorer e Netscape. In base al browser utilizzato attenersi alla
procedura appropriata.
SMC7004VBR_QS.IT.qxd
19/9/02
12:38 pm
Page 17
Internet Explorer
1. Aprire Internet Explorer e fare clic sul pulsante stop (termina)
fare clic su "Tools" (Strumenti) quindi, "Internet Options"
(Opzioni Internet).
2. Nella finestra "Internet Options" (Opzioni Internet), fare clic
sulla scheda "Connections" (Connessioni). Quindi, fare clic sul
pulsante "LAN Settings…" (Impostazioni rete locale (LAN).
4. Fare clic su "OK," quindi di nuovo su "OK" per chiudere la finestra
"Internet Options" (Opzioni Internet).
Netscape
Italiano
3. Deselezionare tutte le caselle.
2. Nella finestra "Preferences" (Preferenze), in "Category"
(Categoria) fare doppio clic su "Advanced" (Avanzate) quindi
premere "Proxies" (Proxy). Selezionare "Direct connection to the
Internet" (Connessione diretta a Internet). Fare clic su "OK".
Italiano
1. Aprire Netscape e fare clic sul pulsante stop (termina) Fare clic su
"Edit" (Modifica), quindi fare clic su "Preferences…" (Preferenze…).
SMC7004VBR_QS.IT.qxd
19/9/02
12:38 pm
Page 19
Passaggio 3. Individuazione delle impostazioni IP da Barricade
A questo punto, dopo aver configurato il computer per il
collegamento a Barricade, è necessario ottenere nuove
impostazioni di rete. Rilasciando tutte le precedenti impostazioni
IP e rinnovandole con le impostazioni di Barricade, sarà anche
possibile verificare che il computer è stato configurato
correttamente.
3. Digitare "IPCONFIG/RENEW" e premere il tasto <INVIO>.
Verificare che l'indirizzo IP sia ora 192.168.2.xxx (2-254), la
Subnet Mask sia 255.255.255.0 e il Gateway predefinito sia
192.168.2.1. Questi valori confermano che Barricade funziona.
1. Dal desktop di Windows, fare clic sul pulsante "Start", quindi
"Programs" (Programmi), "Accessories" (Accessori) e fare clic su
"Command Prompt" (Prompt dei comandi).
A questo punto, dopo aver configurato il computer per il
collegamento a Barricade, passare a "Configurazione del Barricade".
2. Nella finestra di "Command Prompt" (Prompt dei comandi),
digitare "IPCONFIG/RELEASE" e premere <INVIO>.
Italiano
Italiano
4. Digitare "EXIT" e premere <INVIO> per chiudere la finestra
"Command Prompt" (Prompt dei comandi).
SMC7004VBR_QS.IT.qxd
19/9/02
12:38 pm
Page 21
Configurazione del computer con Windows XP
3. Fare clic su "Properties" (Proprietà).
Passaggio 1. Configurazione delle impostazioni TCP/IP
Dopo aver completato la configurazione dell'hardware, è necessario
configurare il computer per il collegamento a Barricade. È anche
necessario stabilire in che modo l'ISP emette l'indirizzo IP. Molti ISP
emettono questi numeri automaticamente utilizzando una tecnologia
di rete nota come DHCP (Dynamic Host Configuration Protocol). Altri
ISP specificano l'indirizzo IP e i numeri associati, che devono essere
inseriti manualmente. Questi numeri sono anche noti come indirizzo
IP statico. La modalità di assegnazione dell'indirizzo IP da parte di
altri ISP determina la configurazione del computer.
4. Fare doppio clic su "Internet Protocol (TCP/IP)" (Protocollo
Internet (TCP/IP).
1. Dal desktop di Windows, fare clic sul pulsante "Start". Scegliere
"Control Panel" (Pannello di controllo).
Italiano
Italiano
Di seguito le procedure da seguire:
2. Selezionare l'icona "Network and Internet Connections" (Rete e
connessioni Internet)
, quindi fare clic sull'icona "Network
Connections" (Connessioni di rete) , e fare doppio clic sulla
scheda che verrà utilizzata per questa connessione.
SMC7004VBR_QS.IT.qxd
19/9/02
12:38 pm
Page 23
Passaggio 2. Disattivazione di "HTTP Proxy"
5. Tutte le informazioni necessarie per effettuare la registrazione si
trovano nella finestra di dialogo "Internet Protocol (TCP/IP)
Properties" (Proprietà del protocollo Internet (TCP/IP)).
Utilizzare gli spazi forniti di seguito dopo il passaggio 7 in
questa sezione per registrare le informazioni.
Sarà necessario verificare che la funzione "HTTP Proxy" (Proxy HTTP)
del browser Web sia disabilitata. In tal modo il browser Web sarà in
grado di visualizzare le pagine della configurazione all'interno di
Barricade. I seguenti passaggi sono relativi a Internet Explorer. In
base al browser utilizzato attenersi alla procedura appropriata.
Se "Obtain an IP address automatically" (Ottieni automaticamente un
indirizzo IP) e "Obtain DNS server address automatically" (Ottieni un
indirizzo server DNS automaticamente) sono già selezionati, il
computer è già configurato per DHCP. Fare clic su "Cancel" (Annulla)
per chiudere ciascuna finestra, quindi passare a Passaggio 2.
Disattivazione di "HTTP Proxy" (vedere la pagina relativa).
6. Selezionare "Obtain an IP address automatically" (Ottieni
automaticamente un indirizzo IP), quindi selezionare "Obtain
DNS server address automatically" (Ottieni un indirizzo server
DNS automaticamente). Fare clic su "OK" o "Close" (Chiudi) per
chiudere ciascuna finestra.
Impostazione della configurazione TCP/IP
Indirizzo IP ____.____.____.____
Subnet Mask ____.____.____.____
Server DNS primario ____.____.____.____
Server DNS secondario ____.____.____.____
Gateway predefinito ____.____.____.____
2. Nella finestra "Internet Options" (Opzioni Internet), fare clic sulla
scheda "Connections" (Connessioni). Quindi, fare clic sul pulsante
"LAN Settings…" (Impostazioni rete locale (LAN).
Italiano
Italiano
1. Aprire Internet Explorer e fare clic sul pulsante stop (termina)
fare clic su "Tools" (Strumenti) quindi, "Internet Options"
(Opzioni Internet).
SMC7004VBR_QS.IT.qxd
19/9/02
12:38 pm
Page 25
3. Deselezionare tutte le caselle.
3. Digitare "IPCONFIG/RENEW" e premere il tasto <INVIO>.
Verificare che l'indirizzo IP sia ora 192.168.2.xxx (2-254), la
Subnet Mask sia 255.255.255.0 e il Gateway predefinito sia
192.168.2.1. Questi valori confermano che Barricade funziona.
Passaggio 3. Individuazione delle impostazioni IP da Barricade
A questo punto, dopo aver configurato il computer per il
collegamento a Barricade, è necessario ottenere nuove
impostazioni di rete. Rilasciando tutte le precedenti impostazioni
IP e rinnovandole con le impostazioni di Barricade, sarà anche
possibile verificare che il computer è stato configurato
correttamente.
1. Dal desktop di Windows, fare clic sul pulsante "Start", quindi
"Programs" (Programmi), "Accessories" (Accessori) e fare clic su
"Command Prompt" (Prompt dei comandi).
3.
Italiano
Italiano
4. Fare clic su "OK," quindi di nuovo su "OK" per chiudere la
finestra "Internet Options" (Opzioni Internet).
2. Nella finestra di "Command Prompt" (Prompt dei comandi),
digitare "IPCONFIG/RELEASE" e premere il tasto <INVIO>.
4. Digitare "EXIT" e premere <INVIO> per chiudere la finestra
"Command Prompt" (Prompt dei comandi).
A questo punto, dopo aver configurato il computer per il
collegamento a Barricade, passare a "Configuring Your Barricade".
SMC7004VBR_QS.IT.qxd
19/9/02
12:38 pm
Page 27
Configurazione del computer con Windows NT 4.0
3. Selezionare la scheda "Protocols" (Protocolli).
Passaggio 1. Configurazione delle impostazioni TCP/IP
Di seguito le procedure da seguire:
4. Fare doppio clic su "TCP/IP Protocol." (Protocollo TCP/IP).
1. Dal desktop di Windows, fare clic su "Start," quindi "Settings,"
(Impostazioni) e scegliere "Control Panel" (Pannello di controllo).
5. Selezionare la scheda "IP Address" (Indirizzo IP).
2. Fare doppio clic sull'icona "Network " (Rete).
6. Nell'elenco a discesa "Adapter" (Schede), accertarsi che sia
selezoinata la scheda Ethernet.
Se "Obtain an IP address automatically" (Ottieni automaticamente
un indirizzo IP) è già selezionato, il computer è già configurato
per DHCP. Fare clic su "Cancel" (Annulla) per chiudere ciascuna
finestra, quindi passare a Passaggio 2. Disattivazione di "HTTP
Proxy" (vedere la pagina relativa).
Italiano
Italiano
Dopo aver completato la configurazione dell'hardware, è necessario
configurare il computer per il collegamento a Barricade. È inoltre
indispensabile stabilire in che modo l'ISP emette l'indirizzo IP.
Molti ISP emettono questi numeri automaticamente utilizzando una
tecnologia di rete nota come DHCP (Dynamic Host Control
Protocol). Altri ISP specificano l'indirizzo IP e i numeri associati,
che devono essere inseriti manualmente. Questi numeri sono anche
noti come indirizzo IP statico. La modalità di assegnazione
dell'indirizzo IP da parte di altri ISP determina la configurazione
del computer.
SMC7004VBR_QS.IT.qxd
19/9/02
12:38 pm
Page 29
Passaggio 2. Disattivazione di "HTTP Proxy"
7. Nella finestra di dialogo "TCP/IP Properties" (Proprietà TCP/IP),
fare clic sulla scheda dell'indirizzo per individuare l'indirizzo IP, la
subnet mask e il gateway predefinito. Registrare questi valori negli
spazi forniti dopo il passaggio 10 in questa sezione.
8. Fare clic sulla scheda "DNS" per visualizzare i server DNS primari
e secondari. Registrare questi valori negli appositi spazi di
seguito.
Sarà necessario verificare che la funzione "HTTP Proxy" (Proxy
HTTP) del browser Web sia disabilitata. In tal modo il browser Web
sarà in grado di visualizzare le pagine della configurazione
all'interno di Barricade. I seguenti passaggi sono relativi a Internet
Explorer e Netscape. In base al browser utilizzato attenersi alla
procedura appropriata.
Internet Explorer
Italiano
Italiano
1. Aprire Internet Explorer e fare clic sul pulsante stop (termina)
fare clic su "Tools" (Strumenti) quindi, "Internet Options"
(Opzioni Internet).
9. Dopo aver preso nota delle impostazioni IP, fare clic sulla
scheda IP address (Indirizzo IP). Selezionare "Obtain IP address
automatically" (Ottieni indirizzo IP automaticamente) e fare clic
su OK. Fare clic su OK di nuovo per chiudere la finestra
"Network" (Rete).
10.Windows potrebbe copiare alcuni file, quindi richiedere il
riavvio del sistema. Fare clic su "Yes" (Sì), il computer verrà
spento e riavviato.
Impostazione della configurazione TCP/IP
Indirizzo IP ____.____.____.____
Subnet Mask ____.____.____.____
Server DNS primario ____.____.____.____
Server DNS secondario ____.____.____.____
Gateway predefinito ____.____.____.____
2. Nella finestra "Internet Options" (Opzioni Internet), fare clic
sulla scheda "Connections" (Connessioni). Quindi, fare clic sul
pulsante "LAN Settings…" (Impostazioni rete locale (LAN).
SMC7004VBR_QS.IT.qxd
19/9/02
12:38 pm
Page 31
2. Nella finestra "Preferences" (Preferenze), in "Category"
(Categoria) fare doppio clic su "Advanced" (Avanzate) quindi
premere "Proxies" (Proxy). Selezionare "Direct connection to the
Internet" (Connessione diretta a Internet). Fare clic su "OK".
4. Fare clic su "OK," quindi di nuovo su "OK" per chiudere la
finestra "Internet Options" (Opzioni Internet).
Netscape
Passaggio 3. Individuazione delle impostazioni IP da Barricade
1. Aprire Netscape e fare clic sul pulsante stop (termina) Fare clic
su "Edit" (Modifica), quindi fare clic su "Preferences…"
(Preferenze…).
A questo punto, dopo aver configurato il computer per il
collegamento a Barricade, è necessario ottenere nuove
impostazioni di rete. Rilasciando tutte le precedenti impostazioni
IP e rinnovandole con le impostazioni di Barricade, sarà anche
possibile verificare che il computer è stato configurato
correttamente.
1. Dal desktop di Windows, fare clic sul pulsante "Start", quindi
"Programs" e selezionare "Command Prompt" (Prompt dei
comandi).
Italiano
Italiano
3. Deselezionare tutte le caselle.
SMC7004VBR_QS.IT.qxd
19/9/02
12:38 pm
Page 33
2. Nella finestra di "Command Prompt" (Prompt dei comandi),
digitare "IPCONFIG/RELEASE" e premere il tasto <INVIO>.
Configurazione del computer Macintosh
È possibile che le informazioni qui fornite non corrispondano
perfettamente alla schermata visualizzata. Infatti, questi passaggi
e illustrazioni sono state create utilizzando Mac OS 8.5. Mac OS 7.x
e le versioni successive sono tutte molto simili, ma non identiche
a Mac OS 8.5.
Passaggio 1. Configurazione delle impostazioni TCP/IP
Dopo aver completato la configurazione dell'hardware, è necessario
configurare il computer per il collegamento a Barricade. È inoltre
indispensabile stabilire in che modo l'ISP emette l'indirizzo IP. Molti
ISP emettono questi numeri automaticamente utilizzando una
tecnologia di rete nota come DHCP (Dynamic Host Control Protocol).
Altri ISP specificano l'indirizzo IP e i numeri associati, che devono
essere inseriti manualmente. Questi numeri sono anche noti come
indirizzo IP statico. La modalità di assegnazione dell'indirizzo IP da
parte di altri ISP determina la configurazione del computer.
Di seguito le procedure da seguire:
4. Digitare "EXIT" e premere <INVIO> per chiudere la finestra
"Command Prompt" (Prompt dei comandi).
A questo punto, dopo aver configurato il computer per il
collegamento a Barricade, continuare in "Configurazione del Barricade
1. Visualizzare il menu a discesa di Apple. Fare clic su "Control
Panel" (Pannello di controllo) e selezionare TCP/IP.
Italiano
Italiano
3. Digitare "IPCONFIG/RENEW" e premere il tasto <INVIO>.
Verificare che l'indirizzo IP sia ora 192.168.2.xxx, la Subnet
Mask sia 255.255.255.0 e il Gateway predefinito sia
192.168.2.1. Questi valori confermano che Barricade funziona.
SMC7004VBR_QS.IT.qxd
19/9/02
12:38 pm
Page 35
Passaggio 2. Disattivazione di "HTTP Proxy"
2. Nella finestra di dialogo TCP/IP accertarsi che "Ethernet" sia
selezionata nel campo "Connect Via:" (Connetti tramite). Se
"Using DHCP Server" (Utilizzo del server DHCP) è già selezionata
nel campo "Configure:" (Configura) è già configurata per DHCP.
Chiudere la finestra di dialogo TCP/IP e passare Passaggio 2.
Disattivazione di "HTTP Proxy".
Sarà necessario verificare che la funzione "HTTP Proxy" (Proxy
HTTP) del browser Web sia disabilitata. In tal modo il browser Web
sarà in grado di visualizzare le pagine della configurazione
all'interno di Barricade. I seguenti passaggi sono relativi a Internet
Explorer e Netscape. In base al browser utilizzato attenersi alla
procedura appropriata.
Internet Explorer
3. Tutte le informazioni necessarie per effettuare la registrazione si
trovano nella finestra di dialogo "TCP/IP". Registrare questi valori
negli appositi spazi di seguito al passaggio 5.
4. Dopo aver annotato le impostazioni IP, selezionare "Using DHCP
Server" (Utilizzo del server DHCP) nel campo "Configure"
(Configura) e chiudere la finestra.
5. Verrà visualizzata un'altra casella in cui viene richiesto di
salvare le impostazioni TCP/IP. Fare clic su "Save" (Salva).
Impostazione della configurazione TCP/IP
Indirizzo IP ____.____.____.____
Subnet Mask ____.____.____.____
Server DNS primario ____.____.____.____
Server DNS secondario ____.____.____.____
Gateway predefinito ____.____.____.____
Italiano
Italiano
1. Aprire Internet Explorer e fare clic sul pulsante stop (termina)
Fare clic su "Edit" (Modifica) e selezionare "Preferences"
(Preferenze).
2. Nella finestra Preferences (preferiti) di Internet Explorer, in
Network (Rete), selezionare Proxies (Proxy).
3. Deselezionare tutte le caselle di controllo e fare cli su OK.
SMC7004VBR_QS.IT.qxd
19/9/02
12:38 pm
Page 37
Netscape
1. Aprire Netscape e fare clic sul pulsante stop (termina) Fare clic
su "Edit" (Modifica) e selezionare "Preferences" (Preferenze).
1. Visualizzare il menu a discesa di Apple. Fare clic su "Control
Panel" (Pannello di controllo) e selezionare TCP/IP.
2. Nella finestra TCP/IP, verranno illustrate le nuove impostazioni.
Verificare che l'indirizzo IP sia ora 192.168.2.xxx, la Subnet
Mask sia 255.255.255.0 e il Gateway predefinito sia
192.168.2.1. Questi valori confermano che Barricade funziona.
3. Selezionare "Direct connection to the Internet" (Connessione
diretta a Internet) e scegliere OK.
Passaggio 3. Individuazione delle impostazioni IP da Barricade
A questo punto, dopo aver configurato il computer per il
collegamento a Barricade, è necessario ottenere nuove
impostazioni di rete. Rilasciando tutte le precedenti impostazioni
IP e rinnovandole con le impostazioni di Barricade, sarà anche
possibile verificare che il computer è stato configurato
correttamente.
3. Chiudere la finestra TCP/IP.
A questo punto, dopo aver configurato il computer per il
collegamento a Barricade, passare a "Configurazione del Barricade".
Italiano
Italiano
2. Nella finestra di dialogo "Preferences" (Preferiti), nella colonna
di sinistra con l'etichetta "Category" (Categoria) selezionare
"Advanced" (Avanzate). Nella categoria "Advanced" (Avanzate),
selezionare "Proxies" (Proxy).
SMC7004VBR_QS.IT.qxd
19/9/02
12:38 pm
Page 39
Capitolo 4. Configurazione del Barricade
Dopo aver configurato correttamente il computer e recuperato le
impostazioni di rete da Barricade, si è pronti per configurare le
impostazioni di Barricade per la LAN.
4. Nella home page della console Web di Barricade, fare clic su
"Setup Wizard" (Installazione guidata). Il processo di
installazione automatica di Barricade guida passo passo alla
configurazione del gateway.
1. Aprire il browser Web (ad esempio, Internet Explorer o Netscape
Navigator) e fare clic sul pulsante stop (termina).
5. Selezionare un fuso orario dall'elenco.
Italiano
Italiano
2. Nel campo "Address" (Indirizzo) digitare "http://192.168.2.1" e
premere <INVIO>.
Nota: Per alcuni browser potrebbe essere necessario includere
":88" dopo la gestione dell'indirizzo IP. Ad esempio,
http://192.168.2.1:88
3. Verrà visualizzata la schermata di login di Barricade. Lasciare il
campo Password vuoto e fare clic su "Login". Non esiste alcuna
password predefinita. Per motivi di sicurezza, assegnare una
password prima possibile. Per la password di login viene rilevata
la distinzione tra maiuscole e minuscole.
6. Fare clic su "NEXT" (AVANTI) e verà visualizzata la schermata di
configurazione "Broadband Type" (Tipo a banda larga).
Esistono tre differenti configurazioni generali per le connessioni
Internet ad alta velocità. È necessario conoscere le connessioni
Internet per determinare la configurazione da utilizzare. La
maggior parte delle informazioni necessarie sono già stat
acquisite durante la registrazione delle impostazioni IP nei
passaggi precedenti. Esistono delle indicazioni per determinare
la configurazione da utilizzare nella seguente sezione.
SMC7004VBR_QS.IT.qxd
19/9/02
12:38 pm
Page 41
Per la configurazione PPTP fare riferimento all'ultimo manuale
aggiornato contenuto nel sito Internet www.smc-europe.com.
dinamiche, è probabile che i server DNS vengano forniti anche
dinamicamente.
2. Se ci si collega a Internet con un indirizzo IP dinamico,
probabilmente non sarà necessario inserire null'altro in questa
sede. Tuttavia, se esiste un server DNS che si desidera utilizzare,
immettere gli indirizzi del server DNS negli spazi provvisti.
3. Fare clic su "FINISH" (FINE) una volta completato.
Connessione xDSL con IP fisso
Se si ci collega a Internet utilizzando un modem via cavo, l'ISP
probabilmente utilizza DHCP per mettere un inidrizzo IP all'utente.
Italiano
Italiano
Connessione con modem via cavo
1. Se ci si collega a Internet utilizzando un xDSL con IP fisso, fare
clic sul pulsante d'opzione "Fixed-IP xDSL" (xDSL con IP fisso)
nella schermata Broadband Type (Tipo a banda larga).
1. Se si utilizza un modem via cavo o si sa che si utilizza un
indirizzo IP dinamico, fare clic sul pulsante d'opzione "Cable
Modem" (Modem via cavo) per visualizzare la schermata di
configurazione dell'indirizzo IP.
2. L'ISP probabilmente richiede di inserire manualmente le
impostazioni TCP/IP. Se si dispone di una connessione xDSL o se
si sa che si utilizza un indirizzo IP statico, inserire le
informazioni sull'indirizzo IP negli spazi forniti.
3. Fare clic su "FINISH" (FINE) una volta completato.
Un DNS (Domain Name Server) è come un indice di nomi e di
indirizzi Web. Se si digita un indirizzo Web nel browser, ad esempio
www.whitehouse.gov, un server DNS trova il nome e il relativo
indice e l'indirizzo IP corrispondente: 198.137.240.92. La maggior
parte degli ISP fornisce al server DNS velocità e convenienza.
Siccome ci si sta collegando a Internetcon le impostazioni IP
SMC7004VBR_QS.IT.qxd
19/9/02
12:39 pm
Page 43
Connessione xDSL PPPoE
1. Se ci si collega a Internet utilizzando un modem xDSL e si utilizza
un nome di login e una password, l'ISP utilizza PPPoE. Se l'ISP
richiede un nome di login e una password o si sa che l'ISP utilizza
PPPoE, fare clic sul pulsante d'opzione "PPPoE xDSL" (xDSL PPPoE)
nella schermata Broadband Type (Tipo a banda larga) per
visualizzare la schermata di configurazione della connessione
PPPoE.
4. Se ci si collega a Internet con un indirizzo IP dinamico,
probabilmente non sarà necessario inserire null'altro in questa
sede.
5. Fare clic su "FINISH" (FINE) una volta completato.
Molti ISP utilizzano modem che forniscono la configurazione
automatica. A volte le informazioni sulla connessione vengono
memorizzate sul modem e necessitano di un aggiornamento.
Potrebbe essere necessario spegnere e riavviare il modem dopo
aver configurato Barricade.
Congratulazioni! La configurazione di base è stata completata e ora
Barricade è connesso a Internet. Esistono inoltre alcune opzioni di
configurazione avanzate che è possibile configurare, ma è opportune
non apportare alcuna modifica a queste opzioni, a meno che non sia
necessario.
2. Inserire il Nome utente e la password richiesti dall'ISP nei campi
appropriati.
3. Se l'ISP ha fornito un nome di servizio, digitarlo nel campo
PPPoE "Service Name" (Nome servizio), in caso contrario,
lasciare il campo vuoto. Un DNS (Domain Name Server) è come
un indice di nomi e di indirizzi Web. Se si digita un indirizzo
Web nel browser, ad esempio www.whitehouse.gov, un server
DNS trova il nome e il relativo indice e l'indirizzo IP
corrispondente: 198.137.240.92. La maggior parte degli ISP
fornisce al server DNS velocità e convenienza. Siccome ci si sta
collegando a Internetcon le impostazioni IP dinamiche, è
probabile che i server DNS vengano forniti anche
dinamicamente.
Attenzione: Si noti che l'impostazione di "Maximum Idle Time"
(Tempo Massimo di inattività) su " O " e/o Autoreconnect
(Riconnessione automatica) attivata comportano un notevole
incremento sulla bolletta telefonica.
Per istruzioni sulle opzioni di configurazione avanzata, fare
riferimento alla Guida dell'utente contenuta nel CD e al sito Web
www.smc-europe.com.
Italiano
Italiano
6. Riavviare il modem xDSL rimuovendo l'alimentazione, attendere
pochi secondi e quindi ricollegarlo.
SMC7004VBR_QS.joint.qxd
19/9/02
12:44 pm
Page 175
About SMC
Firmware and Drivers
Copyright
For latest driver, technical information and bug-fixes please visit
www.smc-europe.com (section support).
For detailed information on SMC’s limited lifetime warranty please
check the English full manual on this CD-Rom or visit www.smceurope.com (section support, product registration).
Information furnished by SMC Networks, Inc. (SMC) is believed to
be accurate and reliable. However, no responsibility is assumed by
SMC for its use, nor for any infringements of patents or other
rights of third parties which may result from its use. No license is
granted by implication or otherwise under any patent or patent
rights of SMC. SMC reserves the right to change specifications at
any time without notice.
Contact SMC
Trademarks
Contact details for your relevant countries are available on
www.smc-europe.com and www.smc.com.
SMC is a registered trademark; and EZ Connect is a trademark of
SMC Networks, Inc. Other product and company names are
trademarks or registered trademarks of their respective holders.
Full Installation Manual
About SMC
Limited Lifetime Warranty Statement
Statement of Conditions
In line with our continued efforts to improve internal design,
operational function, and/or reliability, SMC reserves the right to
make changes to the product(s) described in this document
without notice. SMC does not assume any liability that may occur
due to the use or application of the product(s) described herein.
In order to obtain the most accurate knowledge of installation,
bug-fixes and other product related information we advise to visit
the relevant product support page at www.smc-europe.com before
you start installing the equipment. All information is subject to
change without notice.
Limitation of Liability
In no event, whether based in contract or tort (including
negligence), shall SMC be liable for incidental, consequential,
About SMC
Full installation manuals are provided on the Installation CD-Rom.
Manuals in other languages than those included on the CD-Rom are
available on www.smc-europe.com (section support).
indirect, special or punitive damages of any kind, or for loss of
revenue, loss of business or other financial loss arising out of or in
connection with the sale, installation, maintenance, use,
performance, failure or interruption of its products, even if SMC or
its authorized reseller has been adviced of the possiblity of such
damages.