1
COVER0474 with SD doc1.fm Page 1 Wednesday, August 6, 2003 1:23 PM
+LJK'HILQLWLRQ3URMHFWLRQ7HOHYLVLRQ
2SHUDWLQJ,QVWUXFWLRQV
7HOHYLVRUGH3UR\HFFLyQGH$OWD'HILQLFLyQ
,QVWUXFFLRQHVGH2SHUDFLyQ
ATSC CERTIFIED *
DIGITAL TELEVISION
q
POWER
CHANNEL
t
VOLUME
p
u
S-VIDEO
TV/VIDEO
MENU
VIDEO 4 L - AUDIO - R
OK
37:;'
37:;'
7KHSUHVHQFHRIWKH'79FHUWLILFDWLRQPDUNLQGLFDWHVWKDWWKLV
SURGXFWZLOOVXFFHVVIXOO\UHFHLYHGLJLWDOWHOHYLVLRQWUDQVPLVVLRQV
WKDWFRQIRUPWRDQ\DQGDOORIWKHYLGHRIRUPDWVGHVFULEHGLQWKH
$76&'LJLWDO7HOHYLVLRQ6WDQGDUG
377:'
377:'
74%$$
35,17(',186$
,035(62(1((88
P9 0474 E 080403R.fm Page 0 Wednesday, August 13, 2003 8:18 AM
WARNING
RISK OF ELECTRIC SHOCK
DO NOT OPEN
WARNING:
ENGLISH
To reduce the risk of electric shock do not remove cover or back. No
user-serviceable parts inside. Refer servicing to qualified service personnel.
The lightning flash with arrow head
within a triangle is intended to tell the
user that parts inside the product are
a risk of electric shock to persons.
The exclamation point within a triangle
is intended to tell the user that
important operating and servicing
instructions are in the papers with the
appliance.
WARNING: To reduce the risk of fire or electric shock, do not expose this apparatus to rain or
moisture and objects filled with liquids, such as vases, should not be placed on this
apparatus.
The Class II insulation symbol (square within a square) indicates that this product has been evaluated
and tested to comply with Class II insulation requirements.
FCC CAUTION: ANY CHANGES OR MODIFICATIONS TO THIS PTV RECEIVER NOT EXPRESSLY
APPROVED BY MATSUSHITA ELECTRIC CORPORATION OF AMERICA COULD CAUSE
HARMFUL INTERFERENCE, WHICH WOULD VOID THE USER’S AUTHORITY TO
OPERATE THIS EQUIPMENT.
WARNING: AS WITH ANY SMALL OBJECT, SD CARDS CAN BE SWALLOWED BY YOUNG CHILDREN. DO
NOT ALLOW CHILDREN TO HANDLE THE SD CARD.
ENVIRONMENTAL NOTICE:
THIS PRODUCT UTILIZES CATHODE RAY TUBES (CRT) AND OTHER
COMPONENTS THAT CONTAIN LEAD. DISPOSAL OF THESE MATERIALS
MAY BE REGULATED IN YOUR COMMUNITY DUE TO ENVIRONMENTAL
CONSIDERATIONS. FOR DISPOSAL OR RECYCLING INFORMATION
PLEASE CONTACT YOUR LOCAL AUTHORITIES, OR THE ELECTRONICS
INDUSTRIES ALLIANCE: <HTTP://WWW.EIAE.ORG.>
HDMI, the HDMI logo and High Definition Multimedia Interface are
trademarks or registered trademarks of HDMI Licensing LLC.
: SD Logo is a trademark.
Manufactured under license from BBE Sound, Inc.
Licensed by BBE Sound, Inc. under USP4638258, 4482866, 5510752 and
5736897. BBE and BBE symbol are registered trademarks of BBE Sound,
Inc.
High Definition Sound
This product incorporates copyright protection technology that is protected by U.S. patents and other
intellectual property rights. Use of this copyright protection technology must be authorized by
Macrovision Corporation, and is intended for home and other limited viewing uses only unless
otherwise authorized by Macrovision. Reverse engineering or disassembly is prohibited.
U.S. Patents Nos. 4,631,603; 4,577,216; 4,819,098; 4,907,093; 6,381,747; and 6,516,132.
Read these instructions completely before operating television.
Contents are subject to change without notice or obligation.
Copyright 2003 by Matsushita Electric Corporation of America. All rights reserved.
Unauthorized copying and distribution is a violation of law.
P9 0474 E 080403R.fm Page 1 Wednesday, August 13, 2003 8:18 AM
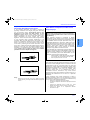
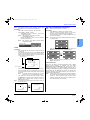
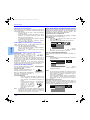
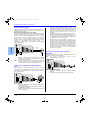
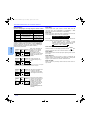
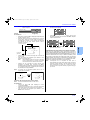
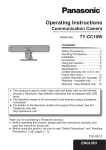
Information Regarding Convergence
In the projection television, the image is formed by
projecting 3 different color images (red, green and blue)
onto the projection screen. Convergence refers to the
alignment of red, green and blue images on the
projection screen. When these images are properly
aligned (converged), you see a sharp and vibrant color
image. Sometimes, the three images may require
alignment. This is due to the effect of earth’s magnetic field
on the projection tubes. Normally, adjustment is not
necessary after the initial alignment at the center of the
screen. It is possible to correct the color fringing on other
areas of the screen by using the buttons on the remote
control and by following the on-screen instructions in the
set-up menu. Please converge the images before using the
television for the first time. The following diagram shows
examples of a misaligned image and a properly aligned
image. Please refer to pages 26 and 27 for detailed
procedure on how to adjust convergence.
WARNING: The marking or retained image on the
picture tube resulting from viewing fixed image is
not an operating defect and as such is not covered
by Warranty.
The projection television is designed to display
constantly moving images on the screen. Continuous
viewing of stationary images such as letterbox pictures
on standard screen TVs (with top/bottom bars), nonexpanded standard (4:3) pictures on wide screen TVs
(with side bars shown on each side of an image), stock
market report bars (ticker running at the bottom of the
screen), video game patterns, fixed scoreboards,
bright station logos, on-line (Internet) or repetitive
computer style patterns should be limited.
The extended use of fixed image program material can
cause a permanent picture tube damage, shown as a
“shadow image” viewable on normal programs. This
type of irreversible picture tube deterioration can be
limited by performing the following steps:
•
•
Misconverged image
Properly aligned image
Notes:
•
Make sure that the set is on for at least 20 minutes
before adjusting convergence as described on pages 26
and 27.
Limit the display of fixed image program material to
no more than 15% of total viewing time per week.
Turn the power off when not in use.
FCC INFORMATION
This equipment has been tested and found to comply with
the limit for a Class B Digital Device in accordance with the
specifications in Part 15 of the FCC Rules. The limits are
designed to provide reasonable protection against radio
and television interference in a residential installation. This
equipment generates, uses and can radiate radio
frequency energy and, if not installed and used in
accordance with the instructions, may cause harmful
interference to radio communications, However, there is no
guarantee that interference will not occur in a particular
installation.
If this equipment does cause interference to radio or
television reception (which you can determine by turning
the equipment off and on), try to correct the interference by
one or more of the following measures.
•
•
•
•
Reorient or relocate the receiving antenna.
Increase the separation between the equipment and the
receiver.
Connect the equipment into an outlet on a circuit
different from that to which the receiver is connected.
Consult the dealer or an experienced radio/TV
technician for help.
1z
ENGLISH
Important Information
IMPORTANT INFORMATION
Important Information Regarding The Use Of
Video Games, Computers, Or Other Fixed
Image Displays.
P9 0474 E 080403R.fm Page 2 Wednesday, August 13, 2003 8:18 AM
TABLE OF CONTENTS
Table of Contents
Important Information ..................................... 1
Information Regarding Convergence.......................... 1
Information Regarding The Use Of Video Games
Computers, Or Other Fixed Image Displays............ 1
ENGLISH
Congratulations ............................................... 3
Customer Record........................................................
Care and Cleaning......................................................
Specifications..............................................................
Feature Chart..............................................................
3
3
3
3
Installation........................................................ 4
Television Location .....................................................
Component Connection Cables..................................
AC Power Supply Cord...............................................
Cable / Antenna Connection.......................................
First Time Setup .........................................................
4
4
4
4
4
Front and Rear View of the High Definition
Projection Television.................................... 5
Optional Equipment Connections.................. 6
VCR Connection .........................................................
Digital Cable Module Connection ...............................
Digital TV - Set-Top Box (DTV-STB) or DVD Players
Front Control Panel......................................................
HDMI Input Connection ..............................................
Digital Audio Out connection ......................................
Program Out Connection ............................................
Amplifier Connection (Analog) ....................................
6
6
6
6
7
8
8
8
PIP Operation ................................................... 9
TV/Video Button .........................................................
Search Button.............................................................
Move Button ...............................................................
PIP MIN and PIP MAX Buttons ..................................
Freeze Button.............................................................
Main Picture Freeze Feature......................................
PIP, Split and Freeze Mode Buttons
Operational Chart ....................................................
Operating Components with Remote Control.............
Programming the Remote ..........................................
Programming Without a Code ....................................
Component Codes .....................................................
14
16
16
16
Basic Menu Navigation................................. 19
Menu Operations........................................... 20
Picture ........................................................................
Audio ..........................................................................
Channel ......................................................................
Photo Viewer™ Operation..........................................
Timer ..........................................................................
Set Up ........................................................................
Lock............................................................................
20
20
21
22
24
25
28
Glossary and Acronyms............................... 31
Troubleshooting Chart ................................. 32
Index............................................................... 34
PIP And Split Operational Buttons................. 9
2z
10
Special Feature of the High Definition
Projection Television ................................ 11
Special Remote Buttons .............................. 12
Remote Control Operation .......................... 13
PIP Operation ............................................................ 9
Split Operation ............................................................ 9
Note:
9
9
9
10
10
10
The warranty and service center information is located in the back of this manual.
P9 0474 E 080403R.fm Page 3 Wednesday, August 13, 2003 8:18 AM
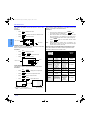
CONGRATULATIONS
Congratulations
DIGITAL CABLE MODULE
(DCM)
Serial
Number
2 RF
ZOOM ADJUST (SIZE AND
POSITION)
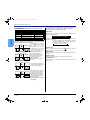
Care and Cleaning
Projection Screen (Turn PTV Off)
The projection screen is a high precision lens system which
has a protective screen. The protective screen is fully
washable with the following precautions:
•
•
•
Note:
Use a mild soap solution or window cleaner and a clean
cloth.
DO NOT USE ABRASIVE CLEANERS.
Do not use laundry detergent or automatic dishwasher
soap.
Do not use alcohol, ammonia, or petroleum based
products.
Avoid excessive moisture and wipe dry.
Prevent solution from running into the receiver below.
Avoid bumping or scraping the screen.
Do not spray any type of cleaning fluid directly on the
screen.
Cabinet and Remote Control
•
•
For cabinets and remote control, use a soft cloth
dampened with water or a mild detergent solution. Avoid
excessive moisture and wipe dry.
Do not use benzene, thinner or other petroleum based
products.
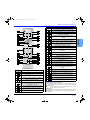
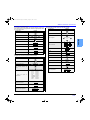
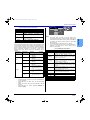
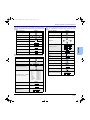
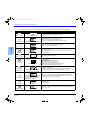
Specifications
•
•
•
•
•
•
•
•
•
•
•
•
•
•
•
•
•
•
PROTECTIVE SCREEN
CLOSED CAPTIONING
V-CHIP CAPABILITY
DIGITAL SCAN RATE
NTSC LINE-DOUBLER
VIDEO NORM
AUDIO NORM
STEREO
AI SOUND
BASS/BALANCE/TREBLE
SURROUND
1080i, 1080i, 1080i, 1080i,
540p 540p 540p 540p
540p 540p 540p 540p
•
•
•
•
•
•
•
•
•
•
•
•
•
•
•
•
BBE VIVA 3D
Specifications are subject to change without notice or
obligation.
Power Source
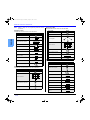
PT-47WXD63
PT-53WXD63
PT-53TWD63
PT-56TWD63
•
•
•
•
•
•
•
•
•
(4.1A)
(4.1A)
(4.1A)
(4.1A)
Channel Capability ATSC/NTSC
HDMI Input jack
Digital Audio Out jack
Component Inputs (Y / PB / PR)
Video Input Jacks
Audio Input Jacks
Video out jack
Audio Output Jacks
S-Video Input Jacks
BBE
HDMI/HDCP INPUT
120V AC, 60Hz
VHF/UHF- 2-69
CATV - 1-136
Type A
PCM / Dolby* Digital Fiber Optic
75 Ohm, Phono Jack Type
1Vp-p, 75 Ohm, Phono Jack Type
500mV RMS 47K Ohm
1Vp-p, 75 Ohm, Phono Jack Type
500mV RMS 4.7K Ohm
S-Video (Y-C) Connector
A/V IN (REAR/FRONT)
DIGITAL AUDIO OUT
S-VHS INPUTS
COMPONENT INPUTS
ENGLISH
PHOTO VIEWER™
2 TUNER PIP/SPLIT
•
PT-56TWD63
ATSC DIGITAL TUNER
Model
Number
•
•
•
•
•
•
•
•
•
•
•
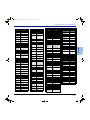
FEATURES
The model and serial number of this product are located on
the back of the TV. You should note the model and serial
number in the space provided and retain as a permanent
record of your purchase. This will aid in identification in the
event of theft or loss. Product registration for U.S. customers
is available at: www.prodreg.com/panasonic.
•
PT-53TWD63
Customer Record
MODELS
PT-53WXD63
Your new High Definition Projection Television (PTV)
features state-of-the-art technology for high quality picture
and sound with complete audio/video connections for your
home theater system. Your PTV is designed to give you
many years of enjoyment. It was thoroughly tested and
tuned at the factory for best performance.
PT-47WXD63
Feature Chart
•
•
•
•
•
•
•
•
•
•
•
•
•
•
•
•
•
•
4
4
4
4
(3/1) (3/1) (3/1) (3/1)
•
•
•
•
•
•
•
•
•
•
•
•
*Manufactured under license from Dolby Laboratories.
“Dolby” and the double-D symbols are trademarks of Dolby Laboratories.
3z
P9 0474 E 080403R.fm Page 4 Wednesday, August 13, 2003 8:18 AM
INSTALLATION
Installation
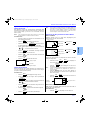
First Time Setup
Television Location
For your convenience, First Time Set up menu will be
displayed on screen when the set is turned on for the first
time. If needed, follow the menus and procedures
displayed on-screen for setting up the features.
Input Setup
To select the configuration of RF input depending on the
signal source.
This unit can be used as part of an entertainment center.
Consult your dealer for available options.
•
•
•
ENGLISH
•
Avoid excessive sunlight or bright lights, including
reflections.
Keep away from excessive heat or moisture. Inadequate
ventilation may cause internal component failure.
Fluorescent lighting may reduce remote control
transmitting range.
Keep away from magnetic equipment, including motors,
fans and external speakers.
Note:
•
•
Component Connection Cables
•
Use 75-ohm coaxial shielded cables.
Use appropriate input and output connectors, that match
your component connectors.
Avoid long cables to minimize interference.
AC Power Supply Cord
CAUTION: TO PREVENT ELECTRIC SHOCK,
MATCH WIDE BLADE OF PLUG TO WIDE SLOT
Polarized plug
OF AC OUTLET AND FULLY INSERT. DO NOT
USE A PLUG WITH A RECEPTACLE OR OTHER
OUTLET UNLESS THE BLADE CAN BE FULLY INSERTED TO
PREVENT BLADE EXPOSURE.
PROTECT POWER CORDS FROM BEING WALKED ON, ROLLED
OVER, CRIMPED, BENT, OR PINCHED, PARTICULARLY AT PLUGS,
CONVENIENCE RECEPTACLES, AND THE POINT WHERE THEY EXIT
FROM THE APPARATUS.
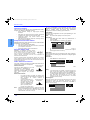
Input Setup
Connect Cable to Antenna (A)
Manual Program
Signal Meter
Change your Input Setup
and press OK
•
75 Ohm ANT A
Antenna Connection
•
•
Note:
4z
For proper reception of digital and analog VHF/
UHF channels, an external antenna is required. For
best
reception
an
outdoor
antenna
is
recommended.
Connect home antenna to
Incoming Cable from
Home Antenna
either ANT (A) or ANT (B)
connection on back of the
television. Select Antenna
mode for ANTENNA (A) or
(B) in Input Setup under
Program CH in Setup menu.
Cable Mode is preset at the factory. Antenna users must
change to ANTENNA Mode for ANTENNA (A) in the Set
Up menu. If you have both Cable and Antenna, the
Cable must be connected to ANT (A).
When the next screen is displayed, press OK button to
start the Auto Scan. All available channels with a signal
will be programmed into memory.
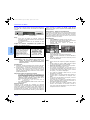
Auto Scan
This feature allows you to selectively auto scan channels.
You can Scan All, Analog only channels or Analog & Digital
channels.
Procedure
•
Press OK button to start Auto Scan.
SELECT
First time setup
For proper reception of analog or digital cable channels, a
cable service connection is required.
Cable Connection
Incoming Cable from
Cable Company
OK
Cable only
Auto Scan
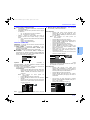
Cable / Antenna Connection
Connect the cable supplied by your local
cable company to ANTENNA (A)
connection on back of television. Select
Cable mode and ANTENNA (A) in SET UP
menu under Program CH (Program
Channels).
Press VOL
to select Cable only, Cable/Antenna or
Antenna only.
Press the OK button to underline your selection.
First time setup
Shielded audio and video cables should be used between
components. For best results:
•
•
No video will be displayed in this setup mode.
Procedure
Input Setup
Scan All
Auto Scan
Antenna (A) Analog
Convergence
Antenna (A) Analog & Digital
MENU
to return
EXIT
Antenna (B) Analog
Antenna (B) Analog & Digital
•
After Auto Scan is completed the PTV tunes to the first
channel found during auto scan.
Notes:
•
If the EXIT button is pressed at anytime during auto
scan, the First Time Setup menu will be cancelled and
the PTV will tune to analog channel 2 on ANTENNA (A).
•
If a DCM (Digital Cable Module) is present during the
First Time Setup and Antenna (A) is set to cable,
Antenna (A) will not be scanned due to the DCM
providing the channel map.
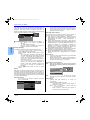
Convergence
This menu lets you set the green CRT alignment and the center
convergence. Follow the instructions on-screen to perform
convergence. After convergence is performed, press EXIT to
return to normal viewing.
SELECT
First time setup
OK
Input Setup
Auto Scan
Convergence
Press OK to go to
Convergence setup
MENU
to return
EXIT
P9 0474 E 080403R.fm Page 5 Wednesday, August 13, 2003 8:18 AM
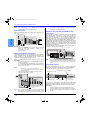
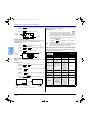
FRONT AND REAR VIEW OF THE HIGH DEFINITION PROJECTION TELEVISION
Front and Rear View of the High Definition Projection Television
Front Panel (PT-47WXD63 and PT-53WXD63)
Rear Panel Jacks
ANT A
Cable In
ON/OFF
Indicator LED
POWER
TV/VIDEO
VOLUME
MENU
10
Front Panel
controls
S-VIDEO VIDEO 4 L - AUDIO - R
OK
1
ANT B
8
7
DCM
INTERFACE
CHANNEL
POWER
TV/VIDEO
VOLUME
S-VIDEO VIDEO 4 L - AUDIO - R
OK
2
MENU
SERVICE
ONLY
VIDEO
HDMI
Y
A/V IN
PB
S-VIDEO
VIDEO
PR
L
AUDIO IN
R
3
3
1
6
5
SD Slot
PC Slot
4
9
Front Panel (PT-53TWD63 and PT-56TWD63)
5
Item #
ON/OFF
Indicator LED
VOL
3
Feature
1 POWER
2
3
CH and CH
VOL and VOL
4 TV/VIDEO
5 OK
6 MENU
7 Photo Viewer™
8 Input 4
9 Eject button
9
Description
DCM INTERFACE (POD INTERFACE)
Insert the DCM (Digital Cable Module) or POD (Point of
Deployment) module from the Cable company to receive
premium digital service.
3
SERVICE ONLY
Card slot used by a certified service technician only. Do not
insert any memory card into this slot.
4
DIGITAL AUDIO OUT
5.1 Dolby Digital surround sound optical output.
5
HDMI (High Definition Multimedia Interface)
Input that accepts uncompressed digital signal and multi
channel digital audio signal.
6
AUDIO IN
Use these audio inputs when DVI devices are connected to
HDMI input using the DVI to HDMI adaptor.
Decrease or increase volume, navigate
left/right in menu, adjust selected feature
in menu.
7
COPONENT VIDEO (Y-PB-PR) INPUTS
Use these jacks for connecting devices such as a DVD
player or Set Top Box.
Changes Input source
8
INPUTS 1, 2 and 3
Composite inputs for connecting VCR and other devices.
9
PROG OUT
Terminals that output fixed audio and NTSC composite
video.
10
Cooling fan
9
VOL
TV / VIDEO
MENU
CH
1
8
2
7
2
OK
7
TO
AUDIO
AMP
1
CH
POWER
6
INPUT INPUT INPUT PROG
1
2
3
OUT
Antenna Inputs
ANT A - Connect Cable Antenna or Terrestrial Antenna to
this input to receive Digital channels.
ANT B - If you have both Cable antenna and Terrestrial
antenna, connect the Terrestrial antenna to ANT B.
8
5
L
R
2
1
AUDIO COMPONENT
VIDEO INPUT
DIGITAL AUDIO OUT
ENGLISH
4
2
CHANNEL
4
6
SD Slot
PC Slot
Description
Toggles power OFF/ON
Tunes to lower or higher channels,
navigate up/down in menus.
Completes channel specification, press to
accepts menu and sub-menu selection.
Display or remove menu or return one
step backward in menus.
Lets you display JPEG images recorded
on memory cards by a digital camera.
The Photo Viewer™ is located behind the
door marked SD.
Analog inputs for external devices
Note: Input 4 for PT-53TWD63 and
PT-56TWD63 is located on the pillar on
the bottom left side of the cabinet.
*The indication on the back panel may change without
notice.
Push this button to eject PC card.
5z
P9 0474 E 080403R.fm Page 6 Wednesday, August 13, 2003 8:18 AM
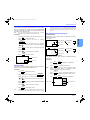
OPTIONAL EQUIPMENT CONNECTIONS
Optional Equipment Connections
Note:
this condition still exists, please call Panasonic Customer
Call Center for further instructions.
The remote control must be programmed with supplied
codes to operate the optional equipment.
VCR Connection
Follow this diagram when connecting your television to a
VCR only.
ANT A
Cable In
ANT B
TERMINALS ON BACK OF PROJECTION TELEVISION
VIDEO
VCR
Y
DCM
INTERFACE
HDMI
PLAY
R
E
W
ENGLISH
FF
STOP
PB
S-VIDEO
AV IN
SERVICE
ONLY
VIDEO OUT
VIDEO
PR
L L
L
R
R
L
AUDIO OUT
R
2
1
AUDIO COMPONENT
VIDEO INPUT
L
INPUT
1
INPUT INPUT PROG
2
3
OUT
R
TO AUDIO
AMP
AUDIO IN
DIGITAL AUDIO OUT
R
Procedure
•
•
Press the TV/VIDEO button on the remote control to
select the video input (VIDEO 1, VIDEO 2, etc.)
connected to your VCR.
Begin the video.
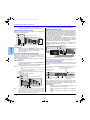
Digital TV - Set-Top Box (DTV-STB) or DVD
Connection
This television is capable of receiving 1080i, 480p, and 480i
DTV signals when connected to a DTV tuner set-top-box
(STB) or a DVD player. In order to view DTV programming, the
STB must be connected to the component video inputs
(Y,PB,PR) of the PTV. A DTV signal must be available in your
area. Select the output of the STB to either 1080i or 480p.
This television also utilizes a progressive scan doubler, which
de-interlaces the NTSC signal and progressively scans the
image. This allows you to sit close to the TV and not see the
thin black horizontal lines (venetian blind effect) associated
with interlaced TV pictures.
Use this diagram to connect the DTV-STB or DVD player to
the back of your projection television.
TERMINALS ON BACK OF PROJECTION TELEVISION
ANT A
Cable In
ANT B
VIDEO
Y
TERMINALS ON BACK OF DTV-STB OR DVD PLAYER
Digital Cable Module Connection
L-AUDIO-R
DIGITAL TV OUTPUT
This module allows you to tune digital and high definition
cable channels through the cable antenna. Consult your
Cable company on the availability of this module (also
called Point of Deployment (POD) module).
Note:
A Digital Cable Subscription is required. (refer to pg. 27)
•
Connect the Cable antenna to ANT A/Cable In input on
the back of the PTV.
Insert the DCM (Digital Cable Module) (upper side facing
left) into the DCM INTERFACE (POD INTERFACE) slot
on the back of the PTV.
Notes:
•
•
•
•
Left side is the upper side of the DCM cards.
Do not insert a PCMCIA card into the DCM INTERFACE
(POD INTERFACE).
Choose Cable mode for Antenna (A) in Input Setup.
Follow the instructions on screen.
Y
SERVICE
ONLY
PB
S-VIDEO
AV IN
VIDEO
PR
L
L L
L
R
R
R
2
1
AUDIO COMPONENT
VIDEO INPUT
INPUT INPUT INPUT PROG
1
2
3
OUT
TO AUDIO
AMP
AUDIO IN
DIGITAL AUDIO OUT
Note:
HDMI
PR
PB
R-AUDIO-L - VIDEO S-VIDEO
NTSC OUTPUT
Procedure
•
MAIN
VIDEO
DCM
INTERFACE
R
There are two set of three video iacks, Y, PB, and PR.
Separate component color inputs provide luminance and
color separation. Use the L (left) and R (right) audio
inputs.
Front Control Panel
The front control panel can be used to access menus and
switch video mode when the remote control is not available.
The ON/OFF indicator LED (red) will be lit when set is on.
Video 4 location for PT-47/53WXD63
ON/OFF Indicator LED
ANT A
Cable In
CHANNEL
POWER
Incoming
cable
signal
ANT B
TV/VIDEO
VOLUME
OK
S-VIDEO VIDEO 4 L - AUDIO - R
MENU
TERMINALS ON BACK OF PROJECTION TELEVISION
VIDEO
Y
DCM
INTERFACE
HDMI
PB
VIDEO
PR
INSE
RT T
H
POWER ON/OFF
S-VIDEO
A/V IN
SERVICE
ONLY
IS EN
DIGIT
AL C
ABL
D
E MO
DUL
L
E
L
L
R
R
2
1
AUDIO COMPONENT
VIDEO INPUT
INPUT
1
INPUT INPUT PROG
2
3
OUT
TO AUDIO
AMP
SD Slot
PC Slot
Press this button to
eject card from PC
slot.
A second VCR, Camcorder, a video disc player, video game
equipment or DSS equipment can also be connected to the
video inputs. See the optional equipment manual for details.
AUDIO IN
DIGITAL AUDIO OUT
Note:
6z
R
Left side (upper side)
of card
If you experience keyboard or remote control function
hang-up when using DCM (Digital Cabe Module), unplug
the PTV and plug it back on and try the controls again. If
Procedure
•
•
•
Connect equipment to front Audio/Video input jacks.
Press TV/VIDEO button to select VIDEO 4 input mode.
Operate optional equipment as instructed in equipment
manual.
P9 0474 E 080403R.fm Page 7 Wednesday, August 13, 2003 8:18 AM
OPTIONAL EQUIPMENT CONNECTIONS
HDMI (High Definition Multimedia Interface)
input connection
ANT A
Cable In
Incoming
Cable
ANT B
VIDEO
PB
1920 x 1080i
59.94 / 60
540p (480p)
720 x 480p
640 x 480p
59.94 / 60
59.94 / 60
540p (480i)
720 x 480i
59.94 / 60
1080i
Audio signal
When digital audio is included in the HDMI connection,
the compatible sampling frequencies are 48 KHz /
44.1Khz / 32 Khz.
S-VIDEO
AV IN
L
L
L
R
R
2
1
AUDIO COMPONENT
VIDEO INPUT
INPUT INPUT INPUT PROG
1
2
3
OUT
ENGLISH
VIDEO
PR
TO AUDIO
AMP
AUDIO IN
DIGITAL AUDIO OUT
R
CABLES NOT INCLUDED
HDMI
OUT
EXTERNAL DIGITAL
COMPONENT
* The connector on the PTV is HDMI Type A connector.
Procedure
•
•
Video signal
Vertical scanning
frequency (Hz)
HDMI
SERVICE
ONLY
•
No of dots
Y
DCM
INTERFACE
This PTV is compatible with following formats. Please set
the connecting device to following format.
Format
TERMINALS ON BACK OF PROJECTION TELEVISION
R
Compatible formats
Follow the diagram below to connect the PTV to a set top box or a
DVD player.
AUDIO OUT
Notes:
1. HDMI/HDCP = High Definition Multimedia Interface /
High-Bandwidth Digital Copy Protection.
2. EIA/CEA-861 Profiles compliance covers profiles for
transmission of uncompressed digital video including
high bandwidth digital content protection.
Connection diagram
L
About HDMI
HDMI is the first all digital consumer electronics A/V
interface that supports several uncompressed standard,
enhanced and high definition video format as well as
existing multi-channel audio format. One jack supports both
video and audio information. The HDMI/HDCP1 input can
be connected to an EIA/CEA 8612 compliant consumer
electronic device, such as a set top box or DVD player
equipped with a HDMI or DVI output connection. By
inputting a High-bandwidth Digital Content Protection
(HDCP) high definition picture source to the HDMI terminal
of this PTV, high definition pictures can be displayed on the
screen in their digital form. The HDMI input terminal is not
intended to be used with personal computers. This PTV is
compatible with 1080i, 480p and 480i formats. Select the
output of the connecting to device to match that of the PTV.
•
Connect the HDMI output from the set top box or a DVD
player to the HDMI input on the back of the PTV.
Press TV/VIDEO button on the remote control to select
HDMI input. The connector on the PTV is HDMI Type A
connector.
If the external device has DVI output only, use a DVI to
HDMI adaptor cable*3 to connect to the HDMI jack on
the PTV. Also, connect the Audio Out signal from the
external device (set top box or DVD player) to the Audio
In*4 jacks below the HDMI input.
If you cannot display the picture because of your Digital
Set Top Box does not have a Digital Out terminal setting,
use the Component Video Input (or the S-Video Input or
Video Input). In this case, the picture will be displayed as
an analog signal.
Notes:
*3. HDMI-DVI conversion cable (TY-SCH03DH) available
on Panasonic Website: www.panasonic.com.
*4. Please refer to pages 20 and 21 for Audio setting detail.
7z
P9 0474 E 080403R.fm Page 8 Wednesday, August 13, 2003 8:18 AM
OPTIONAL EQUIPMENT CONNECTIONS
Digital Audio Out Connection
Use the diagram below to connect the Digital Audio Output of your
HDTV Projection Television to a Dolby Digital decoder.
•
Digital Audio Out
•
ENGLISH
Dolby Digital 5.1 channel surround sound delivers digital-quality
sound. Dolby Digital provides five discrete full-bandwidth
channels for front left, front right, center, surround left and
surround right, plus a LFE (Low Frequency Effect) subwoofer
channel. For a full Home Theater sound experience, an external
Dolby Digital decoder and a multichannel amplifier must be
connected to the Digital Audio Out jack on the PTV.
connected to the HDMI input of the TV, no video or audio
output is allowed.
Program Out signal may not be available when
component input is selected for main picture.
Program Out signal is available when receiving digital
channel. However, all digital formats are down converted
to composite NTSC video.
When receiving digital or analog channels signals and
the analog or digital CC is ON, Program Out connector
will output open caption text in the NTSC video picture. If
CC is OFF, only analog CC closed caption code is
passed out the Program Out connector.
Certain program content output from the Program Out
connector may have the Macrovision signal modification
applied to its signal, preventing VCRs from recording this
video signal.
•
•
ANT A
Cable In
ANT B
TERMINALS ON BACK OF PROJECTION TELEVISION
VIDEO
Y
DCM
INTERFACE
HDMI
PB
SERVICE
ONLY
S-VIDEO
A/V IN
PR
VIDEO
L
L
R
R
Six channel Speaker system
Amplifier
90.7 MHZ
2
1
AUDIO COMPONENT
VIDEO INPUT
L
INPUT INPUT INPUT PROG
1
2
3
OUT
OPTICAL IN
TO AUDIO
AMP
AUDIO IN
R
DIGITAL AUDIO OUT
Procedure
TO AUDIO AMP terminals cannot be connected directly
to external speakers.
ANT A
Cable In
Connect the Digital Audio cable from the Digital Audio
Out jack on the PTV to the Digital Audio In connection on
the Dolby Digital decoder.
When ATSC channel is selected, the output from the
Digital Audio Out jack will be Dolby Digital. But, if NTSC
channel is selected, the output will be PCM.
Note:
To listen the audio through a separate stereo system,
connect an external audio amplifier TO AUDIO AMP
outputs on back of television.
Note:
CABLES NOT SUPPLIED
•
Amplifier Connection (Analog)
ANT B
TERMINALS ON BACK OF PROJECTION TELEVISION
VIDEO
Y
DCM
INTERFACE
HDMI
PB
SERVICE
ONLY
S-VIDEO
A/V IN
VIDEO
PR
L
L
L
R
R
2
1
AUDIO COMPONENT
VIDEO INPUT
INPUT INPUT INPUT PROG
1
2
3
OUT
90.7 MHZ
TO AUDIO
AMP
CABLES NOT SUPPLIED
AUDIO IN
Program Out Connection (PROG OUT)
DIGITAL AUDIO OUT
You can connect a VCR to the PROG OUT terminal to
record the program you are viewing on-screen. An external
monitor can also be connected to the PROG OUT and TO
AUDIO AMP terminals. Connect the VCR as shown below.
ANT A
Digital In
ANT B
TERMINALS ON BACK OF PROJECTION TELEVISION
VCR
PLAY
R
E
W
VIDEO
FF
STOP
Y
DCM
INTERFACE
ANT OUT
HDMI
OUT
PB
SERVICE
ONLY
S-VIDEO
VIDEO L - AUDIO - R
A/V IN
IN
PR
VIDEO
L
L
R
L
2
1
AUDIO COMPONENT
VIDEO INPUT
ANT IN
R
INPUT
1
INPUT INPUT PROG
2
3
OUT
TO AUDIO
AMP
AUDIO IN
DIGITAL AUDIO OUT
R
CABLES NOT SUPPLIED
Procedure
•
•
•
Connect the VCR to PROG OUT and TO AUDIO AMP
terminals
PROG OUT terminal display is the same as on-screen
display.
See the VCR instruction manual for further instructions
for recording the program.
Notes:
•
This TV contains Video and Audio Outputs for the
purpose of recording television programming to VCR.
Due to license restrictions, if a device (STB, DVD, etc.) is
8z
R
Audio Adjustments
•
•
Select Speakers Off in Audio Other Adjust menu.
Set amplifier volume to the preferred level.
P9 0474 E 080403R.fm Page 9 Wednesday, August 13, 2003 8:18 AM
PIP OPERATION
PIP Operation
This television includes a two-tuner Picture In Picture (PIP)
feature. This allows you to watch two (2) live broadcasts at
the same time with or without an external video source
such as a VCR, cable box, etc.
Only the Analog programming from Antenna (A) and video
inputs signal can be viewed in the PIP/SPLIT frame.
TV/VIDEO Button
Procedure
•
Connect incoming cable to ANT (A) input on back of TV.
PIP
•
Press
•
Select channels for the PIP frame by pressing
to display PIP frame.
PIP CH
DVD/VCR CH
•
Press when PIP or Split frame is displayed to select
desired input mode.
Main Picture
CH #
.
CH
SWAP
Press
to switch the PIP and MAIN PICTURE
Main Picture
Press
•
Press
RE
CA
LL
SPLIT Frame
PIP
to cancel PIP frame.
Search Button (PIP and Split)
This feature lets you scan through all available analog
channels.
Procedure
PIP Frame
•
Audio is from Main Picture only.
Press
•
Note:
Procedure
SEARCH
OPEN/CLOSE
to display Split screen.
PIP CH
DVD/VCR CH
•
Select channels for the Split by pressing
•
Select channels for the Main picture by pressing
or
CH
•
Press
again to stop search feature. PIP or
Split frame channel will be the last active search frame.
•
Press
.
or use the remote control numeric keypad.
Press
to switch the SPLIT SCREEN and MAIN
PICTURE source.
•
Press
•
Press
LL
PIP
SPLIT
or
to cancel PIP or Split frame
2
SWAP
•
RE
CA
to display PIP or Split frame.
Press
to display search frames.
When the main picture is ATSC (terrestrial) digital
channel, the search feature is unavailable. Search
feature is available only for analog channels.
SPLIT
CH
SPLIT
or
OPEN/CLOSE
This feature lets you watch two different channels side by
side with or without an external video source.
Press
PIP
SEARCH
Split Operation
•
COMPONENT2
HDMI
VIDEO 1/2/3/4
to view picture source status.
Main Picture
Note:
COMPONENT1
CH #
source.
•
HDMI
PIP Frame
or use the remote control numeric keypad.
or
COMPONENT2
COMPONENT1
VIDEO 1/2/3/4
Select channels for the Main picture by pressing
CH
•
PIP and Split Operational Buttons
ENGLISH
Note:
channel in PIP/SPLIT frame or analog channels in both Main
and PIP/SPLIT frame. Swap is possible when both Main picture
and PIP/SPLIT picture are analog channels or video input
sources.
Main Picture
3
Search Frames
4
to view picture source status.
SPLIT
Note:
to cancel Split screen.
PIP or SPLIT frame cannot display digital channel signal. You
can display digital channel as the Main picture and analog
9z
P9 0474 E 080403R.fm Page 10 Wednesday, August 13, 2003 8:18 AM
PIP OPERATION
Move Button (PIP only)
This feature is used to move PIP frame to one of four
corners.
Procedure
•
Press
PIP
Main Picture Freeze Feature
This feature is used to stop action of the Main Picture and
display it on a Split or PIP freeze frame.
Procedure
FREEZE
to display PIP frame.
•
MOVE
•
•
Press
Press
to position PIP frame to desired corner.
PIP
•
to cancel PIP frame.
To stop action for Main picture, press
TV/VCR
while
PIP or Split frame is not displayed.
Main Picture freeze will be displayed in a PIP or Split
frame, depending on the selection in the Freeze menu
located in Picture Other ADJ. section (refer to page 20).
ENGLISH
FREEZE
•
Main Picture
PIP Frame
PIP MIN and PIP MAX Buttons
While PIP frame is displayed, press PIP MIN or PIP MAX
button to vary the size of PIP frame.
Procedure
•
Press
•
Press
PIP
to display PIP frame.
PIP MIN
•
Press
PIP MAX
or
PIP
to size PIP frame.
to cancel PIP frame.
MAX
Main Picture
Note:
Press
•
Press
•
Press
PIP
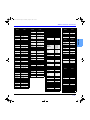
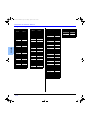
PIP, Split and Freeze Mode Buttons Operational chart
This chart indicates the buttons that are operational with
PIP, Split or Main Picture Freeze mode.
REMOTE
BUTTONS
PIP MODE
SPLIT MODE
MAIN
PICTURE
FREEZE
MODE
PIP MIN
Size Smaller
No Effect
No Effect
PIP MAX
Size Larger
No Effect
No Effect
FREEZE
Freeze PIP
frame
Freeze Split
Frame
Display or
Delete
PIP CH
Change
Channel
Change
Channel
No Effect
SEARCH
Displays
Search Frame
(not available
when Main
picture is
digital)
Displays
Search frame
(not available
when Main
picture is
digital)
No Effect
PIP
Delete PIP
Frame
Displays PIP
frame
No Effect
SPLIT
Displays Split
Frame
Delete Split
frame
No Effect
MOVE
Move PIP
Frame
No Effect
Move PIP
Frame
SWAP
Swap with Main
Picture (not
available when
main picture is
digital channel)
Swap with
Main Picture
(not available
when main
picture is
digital
channel)
No Effect
SPLIT
or
to display PIP or Split frame
FREEZE
TV/VCR
to stop PIP or Split frame action.
FREEZE
•
•
Press
Press
TV/VCR
PIP
again to continue action.
SPLIT
or
to cancel PIP frame.
Main Picture
Main Picture
Note:
10 z
PIP freeze frame
Audio is from Main Picture only.
Split freeze frame
again to cancel Main Picture freeze
frame.
While Main Picture freeze frame is displayed, only
MOVE button is active for PIP, all other PIP and Split
buttons have no effect (see chart).
MIN
Freeze Button (PIP and Split)
This feature is used to stop action in PIP or Split frame.
Procedure
TV/VCR
P9 0474 E 080403R.fm Page 11 Wednesday, August 13, 2003 8:18 AM
SPECIAL FEATURES OF THE HIGH DEFINITION PROJECTION TELEVISION
Special Features of the High Definition Projection Television
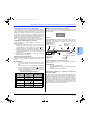
Channel and Program Tuning
Channel Banner: Minimized
Channel and Program tuning in digital television is different from
current conventional television. In DTV, up to six (6) multiple
programs can exist within a single 6MHZ channel. These
channels behave as sub-channels within a single channel. When
tuning to a digital channel, the HDTV Projection Television will
also tune to a program. The HDTV Projection Television will
indicate the channel and program using the on-screen Channel
Banner display.
Note: In order to select channels properly, Auto Scan must be
perormed ( refer to page 25).
The minimized Channel Banner will display the antenna input,
channel number, and the station identification (if available).
You can tune the digital and analog channels in the following
ways:
Direct tuning (0 - 9 keys) - using the numeric keys on the
Remote control to directly input the Channel number. If
necessary, use the
button to enter the program number of
the digital channel.
Channel Up/Down Tuning (CH
or CH
buttons) - Tunes
to the next or previous available channel or program. The
Channel Up/Down tuning depends upon the surfing mode
(see pg. 21) you have set in the Channel menu.
Rapid Tuning (R-TUNE) - Switches between the last two
channels or programs.
Direct Tuning Method
Follow the procedure below to directly enter the channel number
using the Remote Control numeric keys.
Procedure
•
•
Press the numeric keys on the Remote Control to enter
the Channel number. Press OK button.
If tuning a digital channel and your channel contains
more than one program, press the
button and enter
the program # (1, 2, 3 etc.) using the numeric keys.
Press OK button. The following is an example of tuning
to channel 15-1.
Direct Tuning Example
Step
Action
Channel Banner
Display
1
Press 1
1
2
Press 5
15
3
Channel Banner: Maximized
Press the RECALL button to display the maximized channel
banner. While the channel banner is displayed, you can add the
channel to Favorite channel list or delete the channel from the
Favorite channel list.
Antenna designation,
Channel and program #
and Station identifier
A: 15-1
KPBS - HD
Rating
indication
Program Aspect
TV-G
CC
1080i
Picture mode PIP/SPLIT CH# or
setting
Input information
Clock
12:30 pm
HDMI
VIVID
SAP
30
Add FAV
Time remaining
in Sleep Timer
Closed Caption and
SAP indication
Add FAV or
Del FAV button
Audio Track 1 of 1 (English)
Audio Track of
digital channel
Add Fav / Del Fav feature
This feature lets you add channels to Favorite channel list or
delete channels from Favorite channel list.
Procedure
•
•
•
Tune the desired the channel to be added or deleted.
Press the RECALL button to display the Channel
Banner.
Press the OK button to execute your choice.
Emergency Alert System (EAS) Forced Tuning
If a DCM (Digital Cable Module) is installed, the cable MSO
(multiple system owner/operator) may provide an Emergency
Alert System message. These messages are intended to alert the
general public of important local or national emergency situations.
In the event of receipt of one of these messages, the HDTV
Projection Television shall immediately tune to the channel as
directed by the EAS message. If the channel has blocked using
the parental control, the parental blocking has priority over the
forced tune.
15-
Press
4
Press 1
15-1
5
Press OK
15-1
The HDTV Projection Television will tune to channel 15-1.
11 z
ENGLISH
Tuning digital and analog channels
A: 15-1
KPBS-HD
P9 0474 E 080403R.fm Page 12 Wednesday, August 13, 2003 8:18 AM
SPECIAL REMOTE BUTTONS
Special Remote Buttons
BBE Button
ASPECT Button
Customer Options depending on Input Signal Format
INPUT
SIGNAL
DISPLAY ON SCREEN
ASPECT BUTTON
OPTIONS
16:9 only
No options
480p (16:9)
Default to 16:9
4:3, Full or Zoom (see
below)
Press this button to select the next audio track (if available) when
receiving a digital channel.
480p (4:3)
Default to FULL mode.
4:3, Full or Zoom (see
below)
Audio Track 1 of 1 (English)
Default to JUST mode
4:3, Full, Just or
Zoom (see below)
1080i
480i
ENGLISH
Press this button to turn BBE VIVA 3D (available on PT-53TWD63
and PT-56TWD63 only) or BBE sound feature (available on
PT-47WXD63 and PT-53WXD63) On or Off.
The ASPECT button on the remote control lets you choose
one of four display modes, depending on the formats of the
received signal and your preferences.
ASPECT
Input Signal
480i or 480p
Image on
16:9 Screen Size
4
4:3
ASPECT
Input Signal
3
ZOOM
ASPECT
Input Signal
9
FULL
ASPECT
9
Image on
16:9 Screen Size
16
480i
JUST
12 z
This will show picture at full
screen size. (Recommended
for anamorphic pictures.)
Image on
16:9 Screen Size
16
480i or 480p
Input Signal
This will expand the 4:3
picture uniformly (width and
height) to full screen width
and then reposition the
picture vertically.
(Recommended for letterbox
pictures.)
Image on
16:9 Screen Size
16
480i or 480p
This will display a 4:3 picture
at its standard 4:3 size with
gray
side
bars.
(Not
recommended for viewing
4:3 pictures as it may create
a permanent image on
screen if displayed for a
prolonged period of time.)
9
This will stretch the right and
left edges of a 4:3 picture to
fill the screen, The center of
the screen will have aspect
correction applied. The size
of the picture will depend on
the original signal.
(Recommended for regular
TV viewing.)
SAP Button
In analog mode, press this button to cycle through different audio
modes. For example:
•
If receiving STEREO, SAP and MONO or receiving
STEREO and MONO only, pressing SAP button,
the audio will toggle as follows:
STEREO
SAP
MONO
PROG button
When tuning digital channel, press the
PROG
button to enter the
minor number in a compound channel number.
MENU button
Press to display the Main menu or return one step backward in
menus.
RECALL button
Press this button to display or remove the channel banner.
R-TUNE Button
Press to switch to previously viewed channel, Photo Viewer™ or
input modes.
P9 0474 E 080403R.fm Page 13 Wednesday, August 13, 2003 8:18 AM
REMOTE CONTROL OPERATION
Remote Control Operation
BUTTON
NUMBER
18
11
Press to switch to previously viewed channel, Photo
Viewer™ or input modes.
12
PIP MIN - While remote is in TV mode, press to
decrease the PIP size.
REW - While remote is in VCR or DVD mode, press to
rewind.
13
While remote is in VCR or DVD mode, press to play.
19
2
3
20
4
21
5
6
22
14
7
8
23
9
24
10
11
25
12
26
13
27
14
28
15
16
Press to display or delete PIP frame.
17
Press to display or delete Split frame.
18
In analog mode, press to access audio modes (Stereo,
SAP or Mono). In digital mode, press to access next
19
Press to illuminate remote buttons.
20
Press to switch to (A or B) RF antenna input.
21
Press to turn BBE OFF or ON.
22
Press to display or delete Channel banner.
23
Press to exit menus.
24
Press to change channels and navigate in menus.
audio track.
29
15
30
16
31
17
32
25
26
BUTTON
NUMBER
DESCRIPTION
Note:
The ON/OFF indicator LED (red) will be lit
when set is on.
Press after entering major channel numbers to enter
minor (-) channel numbers.
PIP MAX - While in TV mode, press to increase the PIP
size.
FF - While in VCR or DVD mode, press to fast
forward.
27
While remote is in VCR mode, press to record.
28
While remote is in VCR or DVD mode, press to stop.
29
SEARCH - Press to scan available channels in
search frames. Press again to delete search frames.
OPEN/CLOSE - Press to open or close DVD tray.
Press to change channels for PIP or VCR.
Press to turn ON and OFF.
1
While remote is in VCR or DVD mode, press to
pause.
FREEZE - While in TV mode, press to stop action in
the PIP or Split frame.
TV/VCR - Press to switch to TV or VCR.
2
Press to select remote operation.
30
3
Press to select (Component 1or 2), (HDMI),
(Video 1, 2, 3 or 4) input mode or TV mode.
31
Press to swap Main picture with PIP or Split frame.
4
Press to access Photo Viewer™.
Also press while Photo Viewer™ is displayed to
access Photo Viewer™ set up menu.
32
While PIP frame is displayed, press to move to one
of four corners.
5
Press to select picture size (ratio) to match
programming format.
Also used for Photo Viewer™ to change aspect
of the image on-screen.
6
Press to mute sound. Press to display and
cancel CC (Closed Caption).
7
Press to adjust TV sound and navigate in
menus.
8
Press to choose menu and sub-menu entry.
Battery Installation
Use two AA batteries (supplied):
Remove battery cover by pushing the tab while lifting the cover
up. Install batteries matching (+) and (-) polarity signs. Replace
the battery cover.
Note:
Incorrect installation can cause battery leakage and corrosion
that will damage the Remote Control.
Precautions
Replace batteries in pairs. Do not mix battery types (zinc carbon
with alkaline). Do not recharge, heat, short circuit, disassemble, or
burn batteries.
13 z
ENGLISH
10
Press to display Main Menu or return one step
backward in menus.
Press numeric keypad to select any channel or press to
enter alphanumeric input in menus.
9
1
DESCRIPTION
P9 0474 E 080403R.fm Page 14 Wednesday, August 13, 2003 8:18 AM
REMOTE CONTROL OPERATION
Operating Components with Remote Control
Note:
Refer to page 16 for programming Remote Control
procedure.
Operating a VCR
Program the remote control to use with VCR.
TO DO THIS...
Display DBS menu
OK
CH
Menu Navigation
VOL
REC
Select a Channel
PLAY
Play
VOL
CH
PIP CH
DVD/VCR CH
Record
1
2
3
4
5
6
7
8
9
0
STOP
Stop
Program Information
Fast Forward
PIP MAX
FF
Back to previous channel
Rewind the Tape
PIP MIN
REW
Select next page up/down
PAUSE
Exit menus
Pause
TO DO THIS...
RE
CA
On screen VCR Display
LL
R-TUNE
PIP CH
DVD/VCR CH
EXIT
PRESS
POWER
Turn on/off
LL
Operating a CABLE BOX
Program the remote control to use with Cable Box.
TO DO THIS...
RE
CA
Operating a DVD
Program the remote control to use with DVD
FREEZE
TV/VCR
Change to TV or VCR Mode
Next/Previous Chapter
PRESS
CH
CH
POWER
Turn on/off
DVD Display
1
2
3
4
5
6
7
8
9
PIP MIN
REW
Skip Search Fast Forward
PIP MAX
FF
Play
CH
RE
CA
LL
Skip Search Reverse
0
Change Channels Up/Down
POWER
TV/VIDEO
Change Channels up/down
Select a Channel
PRESS
Turn on/off
POWER
Select TV Input mode for VCR
ENGLISH
TO DO THIS...
PRESS
Turn on/off
Operating a DBS
Program the remote control to use with DBS.
DVD Open/Close
PLAY
SEARCH
OPEN/CLOSE
CH
Back to previous channel
R-TUNE
Stop
Still
Slow +/-
14 z
STOP
PAUSE
FREEZE
TV/VCR
P9 0474 E 080403R.fm Page 15 Wednesday, August 13, 2003 8:18 AM
REMOTE CONTROL OPERATION
Operating a Cassette Deck
To operate a cassette deck, the remote control must be in
AUX mode and be programmed with the appropriate code
for your equipment.
TO DO THIS...
PRESS
Operating a PVR (Personal Video Recorder)
Program the remote control to use with a PVR.
TO DO THIS...
PRESS
POWER
Turn on/off
MENU
POWER
Turn on/off
Display PVR menu
VOL
VOL
R-TUNE
Deck A/B
CH
PVR Navigation
VOL
REC
Record
PLAY
Play
STOP
Stop
Select a Channel
PIP MAX
FF
Fast Forward
PIP MIN
REW
Rewind the Tape
Play
PAUSE
Pause
Operating a Receiver
Program the remote to operate audio receiver.
TO DO THIS...
PRESS
POWER
Turn on/off
Back to previous channel
Exit menus
Replay Zones
MU
TE
Audio Mute
RCVR. VOl Up Down
VOL
1
2
3
4
5
6
7
8
9
0
Record
Pause
VOL
CH
ENGLISH
Receiver Volume Up/Down
Quick Skip
PLAY
REC
PAUSE
R-TUNE
EXIT
R-TUNE
SEARCH
OPEN/CLOSE
VOL
PROG
Tuner Pre-set stations Up/
Down
To select AV
Components:
Inputs
or
Return to live
CH
CH
Press Remote numeric Keypad
AV 1
Press 1
AV 2
Press 2
AV 3
Press 3
AV 4
Press 4
CD
Press 5
TUNER Press 6
PHONO Press 7
TAPE
Press 8
AUX
Press 9
Surround VOL Down
PIP MIN
REW
Surround VOL UP
PIP MAX
FF
Center CH VOL Up/Down
PVR CH Up/Down
PIP CH
DVD/VCR CH
PIP CH
DVD/VCR CH
15 z
P9 0474 E 080403R.fm Page 16 Wednesday, August 13, 2003 8:18 AM
REMOTE CONTROL OPERATION
Programming The Remote
POWER
ENGLISH
The Universal Remote Control can be programmed to
operate many manufacturers’ components, using the
component function buttons for VCR, DVD, DBS, RCVR or
AUX. Follow the procedures for programming your Remote
Control with or without a code for the component.
Device
Operates
Default
TV
VCR
DVD/CD
DBS
RCVR
TV (Panasonic Only)
Panasonic Code
•
Note:
Press the Remote Control
to test the
component. If the procedure was successful, the
component will turn on.
Repeat the above steps until the component code is
found. It may take many attempts before the correct
code is found.
•
After the code is found, press
code.
OK
to store the
VCR (Preset)
Panasonic Code
Component Codes
DVD and CD (Preset)
Panasonic Code
DBS STB & CBL STB (Preset)
Panasonic DBS Code
Audio Receiver (Preset)
Panasonic RCVR Code
CBL
Cable (Preset)
Panasonic CABLE
Code
AUX
Personal Video Recorders,
Cassette and VCR2
Panasonic Personal
Video Recorder Code
The Universal Remote Control is capable of operating
many component brands after entering a code. Some
components may not operate because the codes are not
available due to limited memory. The Universal Remote
Control does not control all features found in each model.
Note:
Determine the manufacturer of the component and look
in the table for the code.
Procedure
•
•
Confirm that the external component is plugged and
operating.
Turn the component off.
POWER
•
•
•
OK
Press
and
together, for at
seconds.
Press appropriate component button on the
Control VCR, DVD, DBS, RCVR, CBL or AUX
VCR2)
Enter the 3-digit component code using the
Control numeric keypad (0 ~ 9 buttons).
least 5
Remote
(PVR or
Remote
POWER
•
Note:
Press the Remote Control
to test the component.
If the procedure was successful, the component will
turn on.
If the component does not operate with the Remote
Control, repeat the procedure using another code.
(Some brands have multiple codes). If an incorrect code
is entered, or if the procedure takes longer than 30
seconds, the programming will fail.
Programming Without A Code
This procedure searches all codes and is called the
“sequence method.”
•
•
Confirm that the external component is plugged in
and on.
Turn the component off.
POWER
•
•
•
16 z
OK
Press
and
together, for at least 5
seconds.
Press appropriate component button on the
Remote Control.
Press VOL
to move forward to the next code.
Press VOL to move backward.
Write the code numbers from tables in this space.
This will serve as a reference if you need to program
your Remote Control.
VCR
DVD
DVD (CD)
DBS
RECEIVER
CABLE
AUX (PVR)
AUX (VCR2)
P9 0474 E 080403R.fm Page 17 Wednesday, August 13, 2003 8:18 AM
REMOTE CONTROL OPERATION
Component Codes (cont.)
Brand
Code
Admiral
335
Aiwa
332
Akai
Audio
Dynamic
314, 315, 316, 329
Codes For VCR (Contd.)
Codes For Cable Box
Brand
Brand
Philco
Philips
323, 324, 331
Pioneer
323
Proscan
300, 301, 302, 323,
324, 331, 333, 345,
346
311, 339
Bell & Howell 305, 313
Broksonic
320, 326
Canon
323, 325
CCE
343
Citizen
306
Craig
305, 306, 329
Curtis
Mathes
324, 345
Daewoo
301, 324, 343
DBX
310, 311, 339
Dimensia
345
Emerson
303, 319, 320, 325,
326, 343
Fisher
305, 307, 308, 309,
313
Code
320, 323, 324, 326,
331, 343
Codes For Cable Box (Contd.)
Brand
Code
Code
ABC
124
Universal
Archer
125, 132
Videoway
106
105, 132
Viewstar
129, 130
105, 122
Zenith
100, 117
Curtis
112, 113
100
Diamond
124, 125,
132
Zenith/.Drake
Satellite
Cableview
Citizen
122, 132
Codes For DBS
Quasar
321, 322, 323, 324
Radio Shack
305, 309, 324, 333,
336, 340
Eagle
129
Eastern
134
300, 301, 302, 323,
324, 331, 333, 345,
346
GCbrand
105, 132
Dish Network
(Echostar)
105, 115, 116
RCA
Gemini
122
Echostar
105
Realistic
305, 309, 324, 336,
340
Express VU
105, 115
G. E.
106
Samsung
302, 304, 333
320, 326, 339, 352
G.I. (General
Instrument)
108
Sansui
General
Instrument/
Jerrold
111, 119,
120, 121,
122, 124,
125, 126,
127
Sanyo
305, 309, 313
114
Hitachi
Scott
Hamlin
112, 118,
140, 141,
142, 145
Gradiente
301, 302, 304, 309,
320, 326, 338, 340,
347, 348
103, 111,
112
300, 305, 306, 307,
308
Hitachi
103, 124
HNS (Hughes)
103
Sears
Macom
103, 104,
105
Magnavox
101, 102
Panasonic
104
Magnavox
133
Philips
101, 102
Memorex
130
Primestar
108
Movietime
105, 132
Proscan
Oak
102, 137,
139
106, 109, 110,
113
RCA
Panasonic
109, 110, 114
106, 109,
110, 113
106, 107,
128, 129,
130
Sony
107
Philips
Star Choice
103, 108
Toshiba
100
Pioneer
101, 116
Uniden
101, 102
Pulsar
105, 132
Puser
132
RCA
115
Realistic
132
Denon
100
Ferguson
101
Regal
112, 118,
140, 141,
142, 145,
149
JVC
109
Mitsubishi
105
Nordmende
101
Panasonic
100
Philips
103
Pioneer
102
RCA
101
Saba
101
Samsung
110
Sharp
108
Sony
104
Technics
100
Thomson
101
Toshiba
103
Yamaha
100
Zenith
107
Funai
320, 326, 334
GE
324, 333, 345
Sharp
335, 336
Goldstar
306
Shintom
317
Gradiente
334
Hitachi
300, 323, 345
Signature
2000
335
Instant
Replay
323, 324
Jensen
JVC
Singer
337
Sony
328, 329, 330
339
Sylvania
323, 324, 331
310, 311, 334, 339
Tashiro
306
Kenwood
306, 310, 311, 339
Tatung
310, 311, 339
LXI
300, 305, 306, 307,
308, 309
Teac
310, 311, 339
Technics
321, 322, 323, 324
Magnavox
323, 324, 331
Teknika
324
Marantz
310, 311, 339
Toshiba
301, 346
Marta
306
Memorex
309, 324
Vector
Research
311
MGA
338, 340, 341, 347,
348
Wards
306, 309, 335, 336,
344
Minolta
300, 345
Yamaha
305, 310, 311, 339
Mitsubishi
338, 340, 341, 347,
348
Zenith
306,344
Multitech
304, 347
NEC
310, 311, 334, 339
Olympic
323, 324
Optimus
306, 321, 328, 335
Orion
320, 326
Panasonic
321, 322, 323, 324
Penney
300, 305, 310, 311,
324, 339, 345
Pentax
300, 311, 345
Regency
134
Rembrandt
105, 132,
137
Samsung
105
Scientific Atlanta
111, 112, 113
Slmark
101, 105
Sprucer
105, 110
Stargate
105, 110
Teleview
101, 105
Texscan
144
Tocom
135
Toshiba
104
Unika
125, 232
Brand
Code
Codes For DVD
Brand
Code
17 z
ENGLISH
Codes For VCR
P9 0474 E 080403R.fm Page 18 Wednesday, August 13, 2003 8:18 AM
REMOTE CONTROL OPERATION
Component Codes (Cont.)
Codes For Cassette Decks
ENGLISH
Brand
Code
Aiwa
223, 224, 225
Denon
231
Fisher
203
Jensen
214
JVC
229, 230
Kenwood
200, 207
Marantz
202
Nakamichi
205
Onkyo
Codes For CD Player
Codes For Receivers
(cont.)
Brand
Code
Brand
Code
Admiral
226
Codes For Personal Video
Recorders
Brand
Code
JVC
132, 133
Aiwa
233, 235
Panasonic Replay
TV
100
Kenwood
100, 108
Carver
229
Philips Tivo
102
Magnavox
127
Denon
242
Sony Tivo
101
Marantz
124
Emerson
239
Mclntosh
116
Fisher
205
Nakamichi
106
Onkyo
109, 114
Harman/Kardon
219, 220,
221, 223
Optimus
103, 127, 130,
131
Hitachi
207
208, 209, 213
Jensen
234
Panasonic
216, 218
Panasonic
118, 119, 121
JVC
240, 241, 245
Philips
222
Philips
123
Kardon
223
Pioneer
204
Pioneer
105, 107
RCA
226, 227, 228
Quasar
118, 119, 121
Kenwood
200, 201, 211,
245
Sansui
205, 210
RCA
LXI/Sears
236
Sharp
231
103, 105, 127,
130, 131
Magnavox
229, 232
Sony
219, 220
Sansui
103, 111, 139
Marantz
229
Teac
210, 211, 215
Sharp
134, 137
McIntosh
221
Technics
216, 218
Sony
122
Nakamichi
210
Soundesign
138
Onkyo
214, 215
Teac
111, 112, 113
Technics
118, 119, 121
Optimus
208, 218,
220, 222
Victor
132, 133
Panasonic
224, 225, 227
Yamaha
101, 102
Philips
229, 230
125, 126
Pioneer
208
Denon
134, 135, 136
Quasar
224, 225, 227
Fisher
104
RCA
Garrard
113
231, 237,
238, 247
Harman
Kardon
Sansui
210, 246
115, 123
Sanyo
205
129
Scott
210, 246
Sharp
242, 243
Sherwood
220
Sony
228
Soundesign
244
Teac
212, 216, 218
Technics
224, 225, 227
Victor
240, 241, 245
Yamaha
202, 203, 204
Yamaha
201, 202
Codes For Receivers
Brand
Admiral
Aiwa
Jensen
18 z
Code
120
P9 0474 E 080403R.fm Page 19 Wednesday, August 13, 2003 8:18 AM
BASIC MENU NAVIGATION
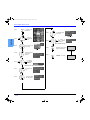
Basic Menu Navigation
Press
MENU
to display the
Main Menu.
Press
CH
VOL OK VOL
to select desired
sub-menu.
CH
CH
Press
VOL OK VOL
ENGLISH
CH
sub sub- Menu
Field
to select
the desired
icon.
CH
Press
VOL OK VOL
CH
to adjust or
select desired
sub-menu.
Picture
PicMode
Press
CH
VOL OK VOL
CH
to enter the submenu field.
Note: To EXIT menus.
Standard
Color
-3
Tint
+1
Brightness
+1
Picture
Sharpness
0
+1
Normal
+1
Other Adj.
Press
MENU
repeatedly until normal
picture is displayed.
sub Menu
Field
or
Press
CH
VOL OK VOL
CH
CH
Press
VOL OK VOL
CH
to select desired
sub-menu
feature.
to adjust or
set desired
sub-menu
feature.
Note: For sub -menu with OTHER ADJ.
Press
CH
VOL OK VOL
to select Other
Adj.
CH
Press
CH
VOL OK VOL
CH
19 z
to access Other
Adj. sub-menu.
Press
EXIT
NORMAL PICTURE
to return to normal
picture.
P9 0474 E 080403R.fm Page 20 Wednesday, August 13, 2003 8:18 AM
MENU OPERATIONS
Menu Operations
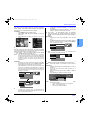
PICTURE
Note:
Note:
While sub-menu features are highlighted, press
or VOL to adjust or activate.
VOL
•
PIC MODE - Lets you choose one of three pre-set
Picture Modes that best suits the program you are
viewing. Selecting this feature will also affect Color
Temperature setting.
ENGLISH
•
•
•
Note:
VIVID - This is the default mode, It provides
enhanced picture contrast and sharpness for
viewing in a well-lit room.
STANDARD - Recommended for normal viewing
conditions with subdued room lighting.
CINEMA - Select this mode for watching movies in
a darkened room. It provides a soft, film-like
picture.
Each mode has its own picture settings (Color, Tint, Brightness,
Picture and Sharpness).
COLOR - Adjusts desired color intensity.
TINT - Adjusts natural flesh tones.
BRIGHTNESS - Adjusts dark areas of picture.
PICTURE - Adjusts white areas of picture.
SHARPNESS - Adjusts clarity of outline detail.
NORMAL - Reset adjustments to factory default
settings.
•
Note:
Color
Note:
Audio
Bass
Treble
31
Brightness
31
Picture
53
Sharpness
31
31
Normal
No
Note:
Set
While sub sub-menu features are highlighted, press VOL
to adjust or activate.
Other Adjust
AI Sound
Off
BBE VIVA
Off
BBE
Off
Surround
Off
Speakers
Other Adjust
•
•
•
•
•
20 z
8
Balance
Other Adjust
While sub sub-menu features are highlighted, press
VOL or VOL to select or activate.
HDMI In
Cool
Natural Color
On
Video NR
Off
3D Y/C
Off
Color Matrix
SD
VM
Off
Freeze
OK
7
Other Adjust
Other Adjust
Color Temp
VOL
31
Other Adjust
Highlight OTHER ADJ. and press OK button to display the
sub sub-menu.
Note:
While sub-menu features are highlighted, press
or VOL to adjust or activate.
BASS - Increase or decrease the bass response.
TREBLE - Increase or decrease the treble response.
BALANCE - Emphasize the left/right speaker volume.
NORMAL - Reset BASS, TREBLE and BALANCE
adjustments to factory default settings.
Standard
Tint
Normal
SWAP, SIZE, SEARCH, PIP MIN and PIP MAX buttons are not
functional in this mode.
AUDIO
Picture
Pic Mode
When viewing a non-standard DTV signal
format, you can change color parameters
manually for the best picture quality.
VM (VELOCITY MODULATION)-To increase picture
sharpness and provides crisp white to black transitions
FREEZE - This feature is used to freeze main picture
and display it in a PIP or SPLIT frame, when the
FREEZE button on the remote control is pressed. Press
FREEZE again to delete frame.
•
•
Split
COLOR TEMP (temperature) - To increase or decrease
WARM (red) and COOL (blue) colors to suit personal
preferences.
NATURAL COLOR - To increase the color reproduction
range with natural color gradation and highly delicate
hues.
VIDEO NR - Reduces noise in the channel, commonly
called snow.
3D Y/C FILTER - Minimizes noise and cross color in the
picture.
COLOR MATRIX - Available only with 480p signal.
Select HD or SD to automatically adjust color
parameters for HD (high definition) and SD (standard
definition). This feature is not selectable when viewing
regular TV (NTSC) program.
•
Note:
On
Auto
AI SOUND - Equalize overall volume levels across all
channels. (AI sound is not available in VIDEO mode).
BBE® - Sound technology enhances speech intelligibility
and restores the dynamic range of musical passages to
provide outstanding natural sound.
BBE VIVA 3D - BBE VIVA provides a musically accurate
natural 3D image with hi-fi sound. The clarity of the
sound is improved by BBE while the width, depth and
height of the sound image are expanded by BBE's
proprietary 3D sound processing. BBE VIVA is
compatible with all TV programs including news, music,
dramas, movies and sports as well as electronic games.
BBE VIVA enhances the surround sound effect, while
maintaining the clarity of dialogue.
BBE VIVA 3D is only used in models PT-53TWD63 and
PT-56TWD63.
P9 0474 E 080403R.fm Page 21 Wednesday, August 13, 2003 8:18 AM
MENU OPERATIONS
AUDIO (cont.)
Other Adjust (cont.)
•
•
Note:
SURROUND - Enhances audio response when listening
to stereo.
SPEAKERS - This feature is used to turn TV speakers
ON or OFF.
•
On - TV speakers operate normally.
•
Off - TV speakers off.
HDMI In - When using HDMI, this feature will let you
switch between Analog Input and Digital Input.
•
Auto - Automatically selects Analog / Digital signal.
•
Digital - Digital Input only.
•
Analog - Analog Input only.
Manual Labels - To enter numbers and captions
manually.
Procedure
•
CHANNEL
Favorite - Allows you to create Favorite channel list from
Antenna (A) or Antenna (B).
Surf Mode - Select FAVORITE or ALL CHANNELS
with remote control VOL or VOL , then press the OK
button.
RF Input - Select Antenna (A) or Antenna (B).
Channel - Use the remote control VOL or VOL to
select desired channels, then press the OK button to
add. To delete channel, press OK again while channel
number is displayed.
Favorite
Surf Mode
Favorites
_______
RF Input
Antenna (A)
Channel
A1
The maximum is 16 favorite channels
Captions - To enter preset and manual labels to desired
stations. Also to enter input label to video inputs.
Preset Labels - To enter channel numbers for popular
TV stations.
Procedure
•
Note:
Captions
Preset Labels
RF Input
Manual Labels
ABC
Input Labels
CBS
Antenna A)
12-1
FOX
Captions
Preset Labels
Manual Labels
Input Labels
15-1
RF input
Channel
Caption
Antenna (A)
CHANGE
15-1
Input Labels - To label video input connections for
onscreen display.
Procedure
•
•
•
Press OK button while Input Labels is selected to
select COMPONENT 1, then press
VOL or
VOL
to select preset INPUT LABEL for
component 1.
Press OK to underline your selection.
Press CH
to select another input, then repeat
procedure for adding more labels to inputs.
Note:
•
•
To delete Input labels, select desired input, then
press VOL or VOL until no label is displayed.
Press OK button to enter your selection.
Captions
Preset Labels
Component 1
DBS
Manual Labels
Component 2
SKIP
HDMI
DVD
Video1
VCR
Input Labels
NBC
PBS
Press OK button while Manual Labels is selected to
select RF Input, then press VOL or VOL
to
select Antenna (A) or Antenna (B).
Note: Only input with signal will be selectable.
•
Press OK button to underline your selection.
•
Press CH
to select Channel, then press VOL
or VOL
to select available channel number.
•
Press CH
to select CAPTION.
•
Press VOL to select first character position, then
press CH
or CH
to select character (refer to
your local TV guide for labeling channels).
•
Repeat until all characters are added, up to (7)
characters can be added for each channel.
•
Press OK button to underline your selection.
To delete the Channel Caption, highlight the first
character and press CH
or CH
until no character is
displayed. Move to the next character and repeat the
process. After all characters have been deleted, press
OK to enter the choice.
Press OK button while Preset Labels is selected to
select RF Input, then press VOL or VOL
to
select Antenna (A) or Antenna (B).
Note: Only input with signal will be selectable.
•
Press OK button to underline your selection.
•
Press CH
to select desired preset caption.
•
Then use the remote numeric keypad to select
desired channel (refer to your local TV guide).
•
Press OK to enter the selection.
To delete a channel number, while highlighted
press
VOL repeatedly until all numbers are
removed, then press OK button.
Video2
CNN
Video3
ESPN
Video4
HBO
21 z
ENGLISH
•
P9 0474 E 080403R.fm Page 22 Wednesday, August 13, 2003 8:18 AM
MENU OPERATIONS
Photo Viewer™ Operation
Photo Viewer™ lets you display JPEG images recorded by digital
camera on SD card or other types of memory card when it is
inserted in the proper card slot.
CHANNEL
POWER
TV/VIDEO
VOLUME
OK
SD Card slot
ENGLISH
S-VIDEO VIDEO 4 L - AUDIO - R
MENU
PCMCIA card slot
Notes:
•
Photo Viewer™ can only show still images recorded by
Digital Still Camera with DCF and EXIF standard JPEG
file.
•
Other types of Memory cards can be inserted into the
PCMCIA card slot by using the appropriate Card
adaptor.
•
Memory cards are not supplied with this television.
and press OK button to display the image on-screen. Use
VOL
or VOL
to select the previous or next picture. Press EXIT
button to exit Photo Viewer™ mode.
Photo Viewer™ - Thumbnail mode
The thumbnail screen is the initial entry screen from the main
menu. It shows the total number of images on the card, Filename
(folder number and the number of the thumbnail that is
highlighted), the date the picture was taken and the pixel
(resolution) of the picture.
Procedure
•
•
•
Press MENU button to display the Main menu.
Highlight Photo Viewer™ Icon using the navigation (Left/
Right/Up/Down) keys.
Press OK button to display the thumbnail screen.
Compatible memory cards that can be viewed with
Photo Viewer™
Card type
Maximum Size
SD, MMC (Multi Media Card),
Smart Media*, Compact Flash*
Memory Stick*, xD-Picture Card*
Flash ATA*, Memory Stick Pro*
*These cards require standard
PCMCIA adaptor. (Some PC card
adaptor will not be compatible).
Note: Photo Viewer™ is not
compatible with card type hard disk
(Micro Drive, Mobile type hard
disk, etc.
SD - 512MB, MMC - 64MB
Smart Media - 128MB,
Compact Flash - 1 GB
Memory Stick - 128MB
xD-Picture Card - 128MB
Flash ATA - 128 MB
Memory Stick Pro - 1GB
Inserting and Removing SD or PCMCIA card
WARNING: As with any small object, SD cards can be
swallowed by young children. Do not allow
children to handle the SD card. Please remove
the SD card immediately after use.
Procedure
SD card - Push in the SD card into the SD card slot until it is
clicked in. Press again on the card to remove it.
PCMCIA card - Push in the card firmly until it is seated. To
release the card, press the release button on the right side of
the card slot. Before inserting or removing the PCMCIA card,
make sure that the TV is turned Off. Otherwise, it may
damage the unit. Do not insert anything other than the
PCMCIA card.
Information Regarding memory cards
•
Memory cards must be formatted with FAT12 or FAT16 in
order to be viewed on TV. If the card is not formatted, it may
cause incompatibility with certain memory card adaptors. If
this happens, reformat the card using your digital camera.
Refer to your camera manual for more information.
Note:
Reformatting the card will erase the images stored in
it.
Basic Operation
Insert either the SD card or the PCMCIA card into the appropriate
slot. The video disappears from the screen while the Photo
Viewer™ access the information from the card. After accessing
the images from the card, a thumbnail screen is displayed onscreen. Use the navigation keys to select the desired thumbnail
22 z
Note:
•
•
•
•
It may take long time to display the thumbnail if there are lots of
files or if the file size is big.
Select the desired thumbnail image by using the
Left/Right/Up/Down navigation keys.
Press OK button to start the Single Picture View mode.
Change the picture by pressing VOL or VOL keys.
Rotate the picture if necessary, by using the CH
or
CH
keys.
Notes:
•
Maximum number of folders that can be displayed: 100.
•
Maximum file size: 3000. Any folder of files larger than
the specified size, will not be displayed.
•
Picture resolution: Compatible in the range 64x64 8192 x 8192 (sub-sampling 4:2:2 or 4:2:0)
•
If the image is imported from a PC, it must follow the
EXIF (Exchangeable image file format) 2.0, 2.1, 2.2 in
addition to the DCF (design rule for Camera File system)
format, or it will not be displayed.
•
If the JPEG is modified using a PC, it will not be
displayed on TV.
•
The Photo Viewer™ cannot display Motion JPEG and
still image not DCF formatted (i.e. TIFF, BMP).
•
If the file is partially corrupted, it may be shown in lower
resolution.
•
If both SD card and PCMCIA card is inserted at the
same time, SD card has the priority. Otherwise, the card
inserted later will have priority.
•
Do not remove the SD card or PCMCIA card while Photo
Viewer™ is accessing the information (when the card
icon is flashing). Such action may damage the memory
card or the unit itself.
P9 0474 E 080403R.fm Page 23 Wednesday, August 13, 2003 8:18 AM
MENU OPERATIONS
Photo Viewer™ Operations (Cont.)
This menu allows you to customize features in the Photo
Viewer™ Setup menu.
Procedure
•
•
•
Highlight Photo Viewer™ icon and press OK button to
display the thumbnail screen.
Press the SD button on the remote control to display the
Setup screen.
Use the CH
,
VOL or VOL
keys to navigate in
the setup menu.
100-001
0001/0066
Return
Setup Menu
Slide Show
Start
Interval
5Sec
Sequence
Order
Repeat
Error messages
Error condition
When inserting Card
If the card is not formatted with
FAT 12 or FAT 16 or if it is not
DCF standard.
Left
Card
SD
SELECT
OK
Slide Show - Allows you to start the slide show by pressing
the OK button while Start is highlighted. Press OK button to
stop the Slide Show.
Note: When you are in the Slide Show mode, you can change
the Aspect of the image on screen by pressing the
ASPECT button on the remote control.
Interval - Allows you to change the length of time that a slide
is being displayed on screen. Available settings are: 5sec,
10sec, 15sec, 30sec, 60sec, 90sec and 10 minutes.
Sequence - Select either Order or Random.
Repeat - Select Off or On.
Note: After setting Interval, Sequence or Repeat, press CH
button to select Start, then press OK to start the Slide
Show.
Rotate - Allows you to rotate the image.
Zoom - Lets you select the magnification of the Single Slide
display.
Photo Viewer™ cannot support over
8192 x 8192 pixels.
If incompatible card is inserted
This type of card is not supported.
Photo Viewer™ Troubleshooting
Symptoms
Solutions
Cannot read the content of
the card
A) Not compatible format. Must be
formatted with FAT 12 or FAT 16.
B) The extension is not “JPG”.
Photo Viewer™ can display EXIF
standard JPEG file, and JPEG
file which is not EXIF standard
cannot be shown.
C) The folders not under DCF
standard.
PC card cannot be ejected
Push the card all the way in, and
eject.
Poor picture quality
If the main image cannot be read
(the file is partially corrupted), the
Photo viewer™ will read the
thumbnail. Please confirm the
format of the image.
Long time to display
It will take long time to display, if
there are lots of images or if the file
size is big.
•
This icon will appear where
thumbnail image will.
Resolution over
Procedure
While in the Single Slide display mode, press SD button
to display Photo Viewer™ Setup Menu. Zoom option will
be displayed in the Setup Menu.
•
Highlight Zoom and press OK button.
•
Press
VOL or VOL button to select To Fit, x2 or x4.
•
Press OK button. To move the image in the picture
frame, press the navigation buttons.
•
Press OK to view the slide in normal magnification.
Card - Select either SD or PC when both cards are inserted in
the slots.
This type of format is not supported.
Photo Viewer™ cannot support over
3000 JPEG files.
EXIT
: 07/04/2002
: 1600 x 2000
No card or Card is not inserted
correctly
Over 3000 image files
CHANGE
Date
Pixel
Error messages displayed
on-screen
If the JPEG file is corrupted
This type of image is not supported.
and cannot be decoded.
If thumbnail and main picture
cannot be shown
OFF
Rotate
Following are some of the error messages that may be displayed
on-screen when certain conditions are not met or exceeds the
Photo Viewer™ specifications.
Notes:
•
If thumbnail screen or a single slide image is displayed
for longer than 10 minutes, Image shift (refer to page 26)
feature will be activated to prevent image retention. The
image on-screen will zoom-in and zoom-out in 4 (four)
steps.To exit this mode, press OK button or select
another slide or press any button.
•
During the Slide show, the Image shift feature will
activate if the image is displayed longer than 5 (five)
minutes. The image will be shifted horizontally (left or
right) in minute increments. Image shift feature will not
activate, if it is turned Off.
23 z
ENGLISH
Photo Viewer™ Setup Menu
P9 0474 E 080403R.fm Page 24 Wednesday, August 13, 2003 8:18 AM
MENU OPERATIONS
Timer
This menu lets you set the sleep timer, Timer (On/Off), clock and
the day of the week.
•
•
Sleep - Select to turn the PTV off in 30, 60, or 90
minutes. Select No to turn the sleep timer off.
Notes:
•
Clock must be set before you can set Timer. Use
navigation buttons to highlight the Timer Icon.
•
The television automatically turns OFF after 90 minutes
when turned ON by the Timer. If the OFF time is selected
or if a key is pressed, the automatic OFF after 90
minutes will be cancelled.
Timer
Sleep
No
Timer
ENGLISH
Clock Set
--:--
----
Day Set
Procedure
•
•
•
•
Turn Off the set.
The television will turn On at the selected time and the
channel will be the channel selected before turning the
TV off.
Press MENU button to display the Main Menu.
Highlight the Timer icon using the navigation buttons.
Press OK button to display the Timer menu.
Press VOL button to select 30, 60, 90 minutes or No.
Clock Set - Select to set the Time of the day.
Timer
OK
Sleep
No
Timer
Timer - Select timer to turn the PTV on and off at
selected times and on selected day.
Timer
OK
Sleep
Clock Set
10 : 10
Procedure
30
•
AM
•
•
Sun
Day Set
Timer
OK
Day
Day Set - Select to set the day of the week.
Sun
Timer
10 : 10
AM
Sleep
Off Time
12 : 10
PM
Timer
Yes
Clock Set
Day Set
Procedure
•
•
•
•
•
•
•
•
•
•
•
24 z
While in Timer menu, press CH
to highlight Clock Set
and press OK button.
Press CH
or CH
button to set the hour (AM or PM).
Press VOL to enter the next field. Press CH
or
CH
button to the minutes. Press MENU or OK to
return to the Timer screen.
On Time
Set
While in the Timer menu, press CH
button to highlight
Timer.
Press OK button to display the Timer sub-menu.
Press VOL or VOL button to select appropriate day
setting.
Press CH
to highlight On Time.
Press OK button to enter the time field. Press CH
or
CH
button to set the hour (AM or PM).
Press VOL and press CH
to set the minutes.
After setting hour and minutes, press OK or MENU
button to quit the settings.
Press CH
to highlight Off Time and repeat the same
procedure as for setting time.
Press CH
to highlight Set and select Yes or No.
Press EXIT button to exit the menus.
Enter the desired channel number using the numeric
keypad and the PROG button (if necessary). The
television will tune to this channel when timer is
activated.
AM
---
Day Set
Timer
Clock Set
10 :00
No
10 :00
AM
SUN
Procedure
•
•
Press CH
to highlight Day Set and select the day of
the week using VOL or VOL button.
Press EXIT button to quit the timer menu screen.
P9 0474 E 080403R.fm Page 25 Wednesday, August 13, 2003 8:18 AM
MENU OPERATIONS
Set Up
Procedure
•
•
•
Press MENU to display the Main Menu.
Press
CH, CH ,
VOL or VOL
to select the
Setup icon.
Press OK button to display the options in the Setup
menu.
•
•
If Cable Only is selected and DCM is in, Auto scan will
be skipped.
If Cable/Antenna is selected and DCM is in, Antenna (B)
Analog & Digital Auto scan will be performed.
Auto Scan - To automatically Scan All available
channels, Antenna (A) Analog, Antenna (A) Analog &
Digital, Antenna (B) Analog and Antenna (B) Analog &
Digital.
Procedure
•
•
Highlight Auto Scan and press OK to enter the sub
menu.
Use
CH and CH
to select and press OK to start the
auto scan. After Auto Scan is completed press MENU to
return to the previous screen.
Program Channel
Program CH
Input Setup - Lets you specify Antenna mode (Cable
only, Cable/Antenna or Antenna only).
Note:
•
In Set Up menu, select Program Channel and press OK.
Press OK to enter sub-menu. Press VOL or VOL to
select Cable Only, Cable/Antenna or Antenna Only.
Press OK button to enter your selection. When the next
screen will be displayed, press OK button to start the
Auto scan. Auto scan must be done when you select the
input signal for the first time or whenever you change the
antenna configuration.
Program Channel
Input Setup
Auto Scan
Antenna (A) Analog
Manual Program
Antenna (A) Analog & Digital
Antenna (A) Analog & Digital
Manual Program - To add or delete channels from
either channels list (A/B) manually.
Program Channel
SELECT
Input Setup
RF Input
Auto Scan
Channel Add
Manual Program
OK
Antenna (A)
Channel Delete
A: 12
MENU
to return
EXIT
Signal Meter
Signal Meter - Displays the signal strength of the ATSC
digital channel in either Antenna (A) or Antenna (B).
Note:
Signal meter feature is not available for analog channels.
Procedure
•
•
•
OK
•
Cable only
Antenna (B) Analog
Press OK to channel scan
all available channels
You can connect either a Cable antenna or a terrestrial
antenna to Ant A. However, if you have both Cable signal
and terrestrial antenna signal, the Cable signal must be
connected to the Ant A input on the back of the
projection television. Connect the antenna signal to the
Ant B input.
Procedure
•
•
Scan All
Signal Meter
This menu allows you set up the antenna, auto scan all available
analog and digital channels, manually add or delete channels and
display the signal strength of the digital channels.
OK
Input Setup
Auto Scan
Highlight Signal Meter and press OK button to enter the
sub-menu.
In the RF Input field, select either Antenna (A) or
Antenna (B).
Select the channel number using
VOL or VOL
buttons.
Press OK button to display the Signal Strength.
Program Channel
Connect Cable to Antenna (A)
Manual Program
Input Setup
Signal Meter
Auto Scan
Change your Input Setup
and press OK
RF Input
RF Channel
Antenna (A)
________
3-1
Manual Program
Signal Meter
Signal Strength: 70%
Peak:
Program Channel
Input Setup
OK
Cable only
Auto Scan
Connect Cable to Antenna (A)
Manual Program
Signal Meter
Auto scan is needed
press OK to start Auto Scan
Note:
: 75%
The color of the signal bar usually indicates the strength
of the received signal.
•
Green - Adequate signal for a good reception.
•
Yellow - Poor signal strength.
•
Red - Very poor signal strength.
Notes:
•
If Cable Only, Antenna Only or Antenna/Cable is
selected and DCM (Digital Cable Module) is not in, the
Auto scan will perform Scan All.
25 z
ENGLISH
This menu lets you select antenna, program channels,
select analog and digital closed caption, Convergence,
Auto Power On, Image Shift and Zoom Adjust.
P9 0474 E 080403R.fm Page 26 Wednesday, August 13, 2003 8:18 AM
MENU OPERATIONS
Closed Caption
The HDTV Projection Television includes a built-in decoder
that is capable or providing a visual display of the audio
portion. The program viewed must provide Closed
Captioning (CC) for the television to display it. You can set
your preferences to both digital and analog Closed
Captioning.
Colors sub-menu
Procedure
•
In digital closed captioning sub-menu, select Colors and
press OK button to display the colors sub-menu.
CC
Colors
CC
CC Mode
Setting
On
Foreground
Fore Opacity
Background
Back Opacity
Outline
Green
Translucent
White
Opaque
Black
Analog
ENGLISH
Digital
Sample CC Text
Note:
CC Mode
Select Off, On or On Mute.
•
•
•
Off - Use when Closed Captioning is not desired.
On - To display Closed Captioning.
On Mute - To display Closed Captioning when
audio is muted.
Analog
This option lets you choose the closed caption service you
desire.
Procedure
•
•
•
•
•
•
•
In Closed Caption menu, highlight Analog and press OK
button to enter the sub-menu.
Press
VOL or VOL
to select the desired setting:
CC1, CC2, CC3, CC4, T1, T2, T3 or T4.
CC1 - For video related information that can be
displayed (up to 4 line of script on the screen, where it
does not disturb the relevant parts of the picture). Script
can be in any language.
CC2 to CC4 - Other modes used for video related
information.
T1 - Blanks out a large portion of the picture on the
television screen, and displays program guide or any
other information currently being transmitted.
T2, T3 and T4 - Other modes that display information
and blank out a large portion of the picture of the
television screen.
Press MENU button to return to the Closed Caption
menu.
Digital
The Digital Closed Captioning menu lets you configure the
way you choose to view the digital captioning. This menu
will let you choose the type of closed captioning service,
font type, font size, font style. The colors sub-menu lets you
set the color of the font (Foreground), color the text box
(Background) on which the closed caption is text is
displayed, the opacity of the font (Fore Opacity), the opacity
of the text box (Back Opacity), and the outline of the
dropshadow (if selected under style).
When digital caption is used on ATSC, the monitor
output (Prog Out) will also output the CC information.
This means, if you tape the program, the CC information
will also be recorded on tape. To avoid this, either turn off
digital CC or turn on analog CC.
Other Adj.
The Other Adjust menu lets you set Auto Power On, adjust
Convergence, select Image Shift On or Off and Zoom
Adjust.
Auto Power On - Select Set to power up the PTV at the
same time as the Cable box or other components or
select Off.
Image Shift - This feature prevents the image retention
associated with viewing fixed image for extended
period of time. The image is shifted left or right in small
increments if a fixed image is left on for a long time.
Selecting On is recommended.
Convergence - This feature is used to adjust the
convergence if needed.
Zoom Adjust - This feature lets you adjust the size of
the zoom picture and position it vertically.
Procedure
•
•
In Set up menu, highlight Other Adj. and press OK
button to display the sub-menu.
Use
CH or CH
to navigate. Press
VOL or
VOL
to select or press OK button to display the submenu for Convergence and Zoom Adjust.
Auto Power On
Off
Image Shift On
On
CHANGE
MENU
to return
EXIT
Convergence
Zoom Adjust
Convergence
Note:
Only use the remote control buttons while adjusting
convergence. The front control panel navigation and
OK buttons have no effect.
SELECT
Set Up
Auto Power On
Off
Image Shift On
On
Convergence
Zoom Adjust
26 z
SELECT
Set Up
OK
CHANGE
MENU
to return
EXIT
P9 0474 E 080403R.fm Page 27 Wednesday, August 13, 2003 8:18 AM
MENU OPERATIONS
Convergence (cont.)
Convergence seldom needs adjusting except after
moving the PTV or to make minor adjustments.
Procedure
•
•
Press OK to enter convergence sub-menu field.
Press CH
or CH
to select:
•
CONVERGENCE ADJ. - Select to correct minor
convergence problem.
Note:
•
After selecting, press OK to continue
CONVERGENCE ADJ.
RESET TO DEFAULT - Select to set convergence
to factory default setting.
Note:
NINE POINT CONVERGENCE CORRECTION
Note:
Remote Control must be in TV mode.
Procedure
•
•
Press OK button to display red correction screen.
Press the 1 through 9 keypad buttons on the remote
control to select the desired convergence position.
Use the navigation buttons to align the RED cross with
the white cross pattern.
An adjusted cross pattern appears white with a minimum
of color protrusion.
•
Note:
After selecting, press OK to activate RESET
TO DEFAULT feature.
SELECT
Convergence
OK
4
•
•
After pressing OK the align Green to Center screen will
be displayed.
Then use the navigation buttons on the remote control
to align the horizontal and vertical green lines on screen,
with the cabinet reference marks on top center and left
center of cabinet, as shown below.
Press “0” on the remote control keypad to display the
BLUE correction screen, then repeat procedure.
1
4
3
•
1
Press
6
8
9
2
3
Press # Key To Select Pos.
Press CH And VOL Key To Corr.
4
“0”
Correcting Red
Press 0ACTION
To Adjust
PRESS
TOBlue
EXIT
Press Ok To Exit
7
Press CH And VOL Key To
Align Green Lines To The
Center Mark On The Cabinet
Up
2
Press # Key To Select Pos.
Press CH And VOL Key To Corr.
Reference Marks
9
8
7
CONVERGENCE ADJ.
Procedure
•
6
Correcting Red
Press 0ACTION
To Adjust
PRESS
TOBlue
EXIT
Press Ok To Exit
EXIT
MENU
to return
3
Press # Key To Select Pos.
Press CH And VOL Key To Corr.
Convergence Adj.
Reset to Default
2
1
ENGLISH
Note:
6
Correcting Blue
Press 0ACTION
To Adjust
PRESS
TORed
EXIT
Press Ok To Exit
7
8
9
To exit convergence screen press OK button, then press
EXIT to quit all menus.
•
Press OK button to display red center correction screen.
•
Use the navigation buttons on the remote control to align
the red cross with the white cross pattern at the center of
the screen.
Cable Module Info
This menu is used to provide information when a DCM
(Digital Cable Module) is inserted into the DCM
INTERFACE (POD INTERFACE) slot on the back of the
projection television. If no DCM is present and you try to
access the Cable Module Info, the message ‘Cable Module
Not present’ will be displayed on screen. To receive the
features offered by your cable company, you may have to
subscribe to those services.
Note:
Note:
Right
Left
Down
Front of cabinet
•
Note:
Press Ok To Continue
To prevent picture tube damage do not leave
test pattern on for an extended period of time.
Then press “0” on the remote control keypad to display
the BLUE center correction screen, repeat procedure for
adjusting blue. If needed press “0” again to return to
RED correction screen.
An adjusted cross pattern appears white with a minimum
of color protrusion.
If Red Is Protruding From
Center Cross, Press CH And
VOL Key To Correct
Press
Up
Left
Down
PRESS 0 To Adjust Blue
Press Ok To Continue
Right
“0”
Please contact your cable company regarding availability
of the DCM (Digital Cable Module). The cable module is
needed to receive premium digital services (where
available) through the cable input. You may also able to
order call-ahead pay per view events.
If Blue Is Protruding From
Center Cross, Press CH And
VOL Key To Correct
Up
Left
Right
Down
PRESS 0 To Adjust Red
Press Ok To Continue
27 z
P9 0474 E 080403R.fm Page 28 Wednesday, August 13, 2003 8:18 AM
MENU OPERATIONS
Lock
ENGLISH
This HDTV Projection Television incorporates V-CHIP technology
to block the viewing of movies and television programs according
to the rating category. There are two (2) Content Advisory
Categories: MPAA (Motion Picture Association of America) and
TV Parental Guidelines Ratings. These categories are used as
guidelines for blocking the programs. The default mode for the
Lock category is the Unlocked state. In this state, you can surf the
various categories of the Lock menu. After you’ve created a
password, you are prompted to enter it before you can make any
changes in the Lock menu.
Creating a Password
The maximum is 4 locked channels
Procedure
•
•
•
A password is created using the New Password menu.
Password
New Password
Channel - Select up to four (4) channels to be blocked
out. These channels will be blocked out regardless of
the program rating.
---MENU
to return
EXIT
•
•
•
Procedure
•
•
•
•
•
Press MENU button to display the Main Menu.
Press navigation buttons to highlight the LOCK icon.
Press OK to display the New Password screen.
Use the numeric keypad to create a 4 digit password.
Press OK to enter the password. Now the PTV is in the
locked state.
Lock Set
Mode - To prevent video games, VCR tapes and all
channels and video modes from being viewed. The
possible modes are:
•
•
•
•
Off - Turns off Lock set functions.
All - All channels are locked regardless of the rating
level.
Game Lock - Locks out CH 3, 4 and Video inputs.
Channel Lock - Locks out specific analog and
digital channels. Password is required to view any
of the locked channels.
Lock set
Mode
OK
Off
CHANGE
MENU
to return
EXIT
Note:
Block Program
This feature allows you block movies and television programs
based on the MPAA and U.S. TV ratings system.
MPAA - The MPAA uses the standard movie ratings to
block the movies from being displayed.
Block Program
•
•
•
While in the Lock menu screen, highlight Lock Set and
press OK button to display the Lock Set sub-menu.
Press
VOL or VOL button to select the option and
press OK button to underline the option.
Press MENU button to return to the previous screen.
Channel Lock
This option lets you select the RF Input (Antenna (A) or Antenna
(B) and block out up to four (4) channels from each input.
Password is required to view these blocked channels.
RF Input - Select either Antenna (A) or Antenna (B).
28 z
MPAA
Mode
Off
U.S.TV
NR
Viewable
G
PG
PG-13
NC-17
X
Viewable
Viewable
Viewable
Viewable
Viewable
OK
Procedure
•
•
Procedure
In Lock Set, choose Channel Lock and press OK button.
Press MENU button to return to the previous menu.
Highlight Channel Lock and press OK button to display
the Channel Lock sub-menu.
Press OK and select Antenna (A) or Antenna (B) using
VOL or VOL button.
Press CH
button and press OK.
Select the channels to be blocked by using the left/right
navigation buttons and press OK to enter your selection.
A maximum of four (4) channels can be blocked from
each input. These channels will be blocked regardless of
the ratings.
To remove the channel # from the list, select the same
channel # and press the OK button.
•
•
Note:
In Lock menu, select Block Program and press OK
button to display the sub-menu.
Press OK button to enter the Mode field and select Off or
On using
VOL or VOL
button. Press OK to enter
the selection.
Press CH
buttons to highlight the desired rating
level.
Press OK button to change the rating limit to “Viewable”
or “Blocked”.
The NR rating is independent of other ratings. Placing a
block on a specific age based rating level, this rating and
any other more restrictive ratings will also be blocked.
P9 0474 E 080403R.fm Page 29 Wednesday, August 13, 2003 8:18 AM
MENU OPERATIONS
U.S. Movies Rating Chart Description
NR
G
Not Rated by MPAA.
PARENTAL GUIDANCE SUGGESTED. Some
material may not be suitable for children.
PG-13
PARENTS STRONGLY CAUTIONED. Some
material may be inappropriate for children under
13.
R
RESTRICTED. Under 17 requires accompanying
parent or adult guardian.
X
NO ONE 17 AND UNDER ADMITTED.
ADULTS ONLY.
U.S. TV Rating
The TV Parental Guidelines has 7 levels of age-based ratings that
can be selected. These 7 levels are split into 2 age-based groups:
Youth Age-based Ratings and Guidance Age-based Ratings.
Some of these age-based ratings can also have content-based
ratings, denoted as D (Dialog), L (Language), S (Sex) and V
(Violence).The table below shows the age-based ratings
selection.
Age-based
Age-based
Possible
Content
Group
Ratings
Selections
NR (Not Rated)
TV-NR
•
•
Viewable
Blocked
TV - Y
•
•
Viewable
Blocked
TV - Y7
•
•
•
FV (Fantasy Violence)
Viewable
Blocked
TV - G
•
•
Viewable
Blocked
TV - PG
•
•
D,L,S,V (all selected)
Any combination of D, L,
S, V
TV - 14
•
•
D, L S, V (all selected)
Any combination of D, L,
S, V
TV - MA
•
•
L, S, V (all selected)
Any combination of L, S,
V
Youth
Guidance
Procedure
•
•
•
•
MPAA
Mode
U.S.TV
TV-NR
Viewable
TV-Y
TV-Y7
Viewable
FV
TV-G
TV-PG
TV-14
TV-MA
Viewable
D L S V
D L S V
L S V
GENERAL AUDIENCES. All ages admitted.
PG
NC-17
Block Program
In Block Program, highlight U.S.TV and press OK button
to enter the Mode.
Press OK button to select Off or On and press OK
button.
Select the desired rating level using CH
or CH
buttons.
Press OK button to choose “Viewable” (GREEN) or
“Blocked” (RED)..
Off
OK
Notes:
•
The ratings such as TV-PG, TV-14 and TV-MA have
content level ratings also. These contents levels can be
individually blocked. Select the rating level, press VOL
to highlight the desired content level and press OK
button to block.
•
The TV-NR rating is independent of other ratings.
•
If TV-Y is blocked, both TV-Y and TV-Y7 will be blocked.
However, if you select TV-Y7, the FV setting can be
blocked or unblocked.
U.S. TV Ratings Description
TV-NR
Not Rated.
TV-Y
All Children. The themes and elements in this
program are specifically disigned for a very young
audience including children from ages 2-6.
TV-Y7
Directed to older children. Themes and
elements in this program may include mild
physical or comedic violence or may frighten
children under the age of 7.
TV-G
General Audience. It contains little or no
violence, no strong language, and little or not
sexual dialogue or situations.
TV-PG
Parental guidance suggested. The program
may contain infrequent coarse language, limited
violence, some suggestive sexual dialogue and
situations.
TV-14
Parents strongly cautioned. This program may
contain sophisticated themes, sexual content,
strong and explicit sexual content.
TV-MA
Mature Audiences only. This program may contain mature themes, profane language, graphic
violence and explicit sexual content.
FV
Fantasy/Cartoon Violence.
V
Violence
S
Sex
L
Offensive Language
D
Dialogue with sexual content.
29 z
ENGLISH
Please see the following chart for the MPAA Ratings Description.
P9 0474 E 080403R.fm Page 30 Wednesday, August 13, 2003 8:18 AM
MENU OPERATIONS
Lock (Cont.)
How long?
About Screen
This feature allows you lock the television input sources for
specific period of time. Available selections are: 12 hours,
24 hours, 48 hours or Always.
The About screen displays assorted information about the HDTV
Projection Television. Please have this information when calling
Customer Care Center.
OK
How Long?
CHANGE
Time
12 hours
________
MENU
to return
EXIT
ENGLISH
The TV will remain locked for
the selected duration
Note:
If you select Always and you forget your password, the
TV must be serviced by a qualified technician to clear the
Lock setup.
Password
This screen lets you change your password. Enter a new 4 digit
password using the numeric keypad and this code becomes your
new password.
Blocking Messages
Various Blocking messages are displayed on-screen depending
upon the type of blocking you have selected in the LOCK menu.
When Game Lock is selected
Following message is displayed when you attempt to select video
inputs..
Video Inputs Locked.
When Channel Lock is selected:
The on-screen display will be displayed when you attempt to tune
the channels that are locked in the Channel Lock menu.
Channel Locked.
Press OK to enter password.
When the rating level is exceeded
If the program you are viewing exceeds the set rating level, a
rating level exceeded message is displayed. You are prompted to
enter your password to view the blocked channel.
Rating Limit Exceeded.
Press OK to enter password.
Note:
30 z
Entering the password will override the block condition.
However, the ratings selection will be retained.
About
Status
1002023014
5226007018
9208007016
MENU
to return
EXIT
P9 0474 E 080403R.fm Page 31 Wednesday, August 13, 2003 8:18 AM
GLOSSARY AND ACRONYMS
Glossary and Acronyms
ATSC (Advanced Television Systems Committee)
Standardization body that developed the Digital Television
Terrestrial formats.
DCF (Design rule for Camera File system)
Unified standard established by Japan Electronics
Information Technology Industries Association (JEITA).
and
ENGLISH
DCM (Digital Cable Module)
A PCMCIA-type card that is provided by the Cable operator.
FAT (File Allocation Table)
FAT 12 or FAT 16: File systems used in formatting the memory
cards.
HDMI (High Definition Multimedia Interface)
Interface that supports every uncompressed digital format as well
as all existing multi-channel audio format on a single cable.
JPEG (Joint Photographic Experts Group)
A system used for compressing/decoding color still pictures.
MPAA (Motion Picture Association of America)
Guild governing rating assignments to movies.
NTSC (National Television Systems Committee)
Standardization body that developed the Analog Television
Terrestrial formats.
Password
A four (4) digit code a user must provide in order to perform a
function.
31 z
P9 0474 E 080403R.fm Page 32 Wednesday, August 13, 2003 8:18 AM
TROUBLESHOOTING CHART
Troubleshooting Chart
Before calling for assistance, determine the symptoms and follow suggested solutions.
AUDIO
VIDEO
Solutions
Adjust Antenna Location and Connection.
ENGLISH
Noisy Audio
Normal Audio
Snowy Video
Multiple Image /
Color shift in picture
Adjust Antenna Location and Connection.
Check Antenna Lead-in Wire.
Adjust Convergence (refer to pages 26 and 27).
Move television from Electrical Appliances, Lights,
Noisy Audio
No Audio
Vehicles and Medical Equipment.
Interference
Normal Video
Increase Volume.
Check Mute.
Check television SPEAKERS on/off. (refer to pages 20 and 21)
Change Channel.
Set TV or Cable Mode Properly.
Noisy Audio
Check Antenna Cables.
No Video with Snow
?
No Audio
No Video / No PIP
Check Power Cord is Plugged into Active Outlet.
Adjust Brightness and Audio Controls.
Change Channel.
Check Cable Connections.
Program the Remote Control Again.
Check Second Video Source Operation.
Poor ATSC signal strength. Re-orient the ATSC antenna.
Re-orient the ATSC antenna.
Audio Break up
Digitalization of image
Image freeze up
Check signal meter (refer to page 25). If the signal is weak, add a signal
booster to boost the signal strength.
This is a normal condition to prevent image burn-in. This feature can be
Picture shifts slightly (horizontally) turned off. However, turning off this feature may result in image retention on
screen. (refer pg. 26)
Normal Audio when turned on, changing channels or
within a duration of two (2) hours of
viewing.
Adjust Color Settings.
Normal Audio
32 z
Change Channel.
No Color
P9 0474 E 080403R.fm Page 33 Wednesday, August 13, 2003 8:18 AM
TROUBLESHOOTING CHART
AUDIO
VIDEO
Solutions
Check Audio is set to Stereo or Mono, not SAP.
Wrong Audio
Normal Video
Change CC (Closed Captioning) from Text Mode.
Black Box on Screen
When HDMI signal is connected.
No Audio
No Video
Make sure that a PC is not connected to HDMI input.
Rarely, the TV will not display video in HDMI input from devices with HDMI or
DVI output due to bad communication between the TV and the devices.
Should this happens, unplug the HDMI/DVI device and plug it back on.
If using HDMI input, change the audio of the HDMI device to Linear PCM.
Check the Audio setting for HDMI (refer to page 21). If there is functional
problem with Digital Audio, please use Analog audio.
Normal Video
Wrong Audio
Intermittent Remote Control Operation
Replace Remote Control batteries.
Normal Audio
Normal Video
33 z
ENGLISH
Normal Audio
P9 0474 E 080403R.fm Page 34 Wednesday, August 13, 2003 8:18 AM
INDEX
ENGLISH
Index
Numerics
3D Y/C Filter 20
A
AC Power Supply Cord 4
Add Fav / Del Fav feature 11
AI Sound 20
Amplifier Connection (Analog) 8
Analog 26
Antenna Connection 4
Aspect Button 12
Audio 20
Auto Power On 26
Auto Scan 4, 25
B
Balance 20
Basic Menu Navigation 19
Bass 20
BBE 20
BBE Button 12
BBE VIVA 3D 20
Block Program 28
Brightness 20
C
Cabinet and Remote Control 3
Cable / Antenna Connection 4
Cable Connection 4
Cable Module Info 27
Captions 21
Care and Cleaning 3
CC Mode 26
Channel and Program Tuning 11
Channel Banner 11
Channel Lock 28
Channels 21
Cinema 20
Clock Set 24
Closed Caption 26
Codes For Cable Box 17
Codes For Cassette Decks 18
Codes For CD Player 18
Codes For DBS 17
Codes For DVD 17
Codes For Personal Video
Recorders 18
Codes For Receivers 18
Codes For VCR 17
Color 20
Color Matrix 20
Color Temp 20
Component Codes 16
Component Connection Cables 4
Convergence 26
Covergence 26
Creating a Password 28
Customer Record 3
D
Day Set 24
Digital 26
Digital Audio Out Connection 8
Digital Cable Module Connection 6
Digital TV - Set-Top Box (DTV-STB) or
DVD Connection 6
Direct Tuning Method 11
34 z
E
Emergency Alert System (EAS)
Forced Tuning 11
F
Favorite 21
Feature Chart 3
First Time Setup 4
Freeze 20
Freeze Button 10
Front and Rear View of the HD
Projection Television 5
Front Control Panel 6
Front Panel (PT-47WXD63 and
PT-53WXD63) 5
Front Panel (PT-53TWD63 and
PT-56TWD63) 5
G
Glossay and Acronyms 31
H
HDMI (High Definition Multimedia
Interface) input connection 7
I
Image Shift 26
Information Regarding Convergence 1
Information Regarding
memory cards 22
Input Labels 21
Input Setup 4, 25
Inserting and Removing SD or
PCMCIA card 22
Installation 4
Interval 23
L
Lock 28
Lock Set 28
M
Main Picture Freeze Feature 10
Manual Labels 21
Manual Program 25
Menu button 12
Menu Operations 20
Move Button 10
MPAA 28
N
Natural Color 20
Nine Point Convergence
Correction 27
Normal 20
O
Operating a Cable Box 14
Operating a cassette deck 15
Operating a DVD 14
Operating a PVR (Personal Video
Recorder) 15
Operating a Receiver 15
Operating a VCR 14
Operating Components with
Remote Control 14
Optional Equipment Connections 6
Other Adj. 20
P
Photo Viewer™ Operation 22
Photo Viewer™ Setup Menu 23
Picture 20
PIP and Split Operational Buttons 9
PIP MIN and PIP MAX Buttons 10
PIP Operation 9
PIP, Split and Freeze Mode Buttons
Operational chart 10
Preset Labels 21
PROG button 12
Program CH 25
Program Out Connection
(PROG OUT) 8
Programming The Remote 16
Programming Without A Code 16
Projection Screen 3
R
Rear Panel Jacks 5
RECALL button 12
Regarding The Use Of Video Games 1
Remote Control Operation 13
Repeat 23
RF Input 21
Rotate 23
S
SAP Button 12
Search Button 9
Sequence 23
Set Up 25
Sharpness 20
Signal Meter 25
Sleep 24
Slide Show 23
Speakers 21
Special Remote Buttons 11
Specifications 3
Split Operaion 9
Standard 20
Surf Mode 21
Surround 21
T
Television Location 4
Thumbnail mode 22
Timer 20
Timer 24
Timer 1 and Timer 2 24
Tint 20
Treble 20
Troubleshooting Chart 32, 33
Tuning digital and analog channels 11
TV/VIDEO Button 9
U
U.S. Movies Rating Chart
Description 29
U.S. TV Rating 29
V
VCR Connection 6
Video NR 20
VIVID 20
VM (Velocity Modulation) 20
Z
Zoom 23
Zoom Adjust 26
P9 0474 E 080403R.fm Page 35 Wednesday, August 13, 2003 8:18 AM
ENGLISH
NOTES
35 z
P9 0474 S doc3 080403R.fm Page 0 Wednesday, August 13, 2003 8:25 AM
ADVERTENCIA
RIESGO DE SACUDIDAS
ELECTRICAS. NO ABRIR.
ADVERTENCIA:
A fin de reducir el riesgo de descargas eléctricas, no
deberán quitarse ni la cubierta ni la tapa posterior. No hay en el interior pieza
alguna que el usuario tenga que reparar. Todo servicio habrá de brindarlo
personal de reparación capacitado.
El propósito del relámpago con punta de
flecha dentro de un triángulo es el de
advertir al usuario de que existen piezas
internas del producto que representan
riesgo de que las personas reciban
descargas eléctricas.
El propósito del signo de exclamación
dentro de un triángulo es el de advertir al
usuario de que los documentos que
acompañan
al
aparato
incluyen
instrucciones
importantes
de
funcionamiento y reparación.
ADVERTENCIA: Con el objeto de prevenir el riesgo de incendio o de descarga eléctrica, este aparato no deberá
verse expuesto a la lluvia ni a la humedad.
El simbolo de insulación Clase II (un cuadro dentro de otro cuadro) indica que este producto a sido evaluado y
probado para cumplir con los requisitos de insulación Clase II.
ESPAÑOL
Aviso de la FCC:
ADVERTENCIA:
Cualquier cambio o modificación a este receptor de TV no aprobado expresamente por
Matsushita Electric Corporation of America podria provocar interferencia dañina, que
nulificaría la autoridad del usuario para operar este equipo.
Como cualquier objeto pequeño, las tarjetas SD pueden ser tragadas por niños
pequeños. No deje la tarjeta SD al alcance de los niños.
AVISO AMBIENTAL:
Este producto utiliza un tubo de rayos catódicos (TRC) así como otros
componentes que contienen plomo. El desecho de estos materiales puede
estar regulado en su comunidad debido a consideraciones ambientales.
Para información de desecho o reciclaje contacte a sus autoridades locales,
o a la alianza de industrias electrónicas: <HTTP://WWW.EIAE.ORG.>
HDMI, el logo HDMI y la interfase multimedia de Alta
Definición son marcas de fábrica o marcas registradas de
HDMI Licensing LLC.
: El logo SD es una marca de fÆbrica
Bajo licencia de BBE Sound, Inc.
Bajo licencia de BBE Sound, Inc. Sobre el numero USP4638258, 4482866,
5510752 y 5736897.
BBE y el simbolo de BBE son marcas registradas de BBE Sound, Inc.
High Definition Sound
Este producto contiene tecnología de protección de derechos que esta protegida por patentes de los EEUU y otros
derechos de propiedad intelectual. El uso de esta tecnología de protección de derechos debe ser autorizada por
Macrovision Corporation, y es para uso en casa y otros casos limitados a menos que sea autorizado por
Macrovision. La ingeniería reversible y desensamble estan prohibidas.
Patentes de los EEUU. 4,631,603; 4,577,216; 4,819,098; 4,907,093; 6,381,747; and 6,516,132.
Lea estas instrucciones completamente antes de operar la Televisión.
El contenido está sujeto a cambios sin previo aviso u obligación.
Derechos Reservados 2003 por Matsushita Electric Corporation of America.
Todos los Derechos Reservados. La copia y distribución sin autorización es violación de la ley.
P9 0474 S doc3 080403R.fm Page 1 Wednesday, August 13, 2003 8:25 AM
INFORMACIÓN IMPORTANTE
Información Importante
En el televisor de proyección la imágen es formada al
proyectar 3 imágenes de color distinto cada una (verde,
rojo y azúl) en la pantalla. La convergencia se refiere a la
alineación de las imágenes verde, roja y azul en la
pantalla. Cuando estas imágenes están alineadas
correctamente (convergen), usted ve una imágen nítida y
de colores vivos. Algunas veces las 3 imágenes requieren
alineación. Esto se debe al efecto del campo magnético de
la tierra en los tubos de proyección. Normalmente no se
requiere de ajuste una vez que el ajuste inicial en el centro
de la pantalla se ha llevado a cabo. Es posible corregir los
bordes de color en otras áreas de la pantalla usando el
control remoto y siguiendo las instrucciones en pantalla del
menú de AJUSTE. Por favor ajuste la convergencia de las
imágenes al usar el televisor por primera vez. El siguiente
diagráma muestra ejemplos de una imágen mal ajustada y
una imágen correctamente ajustada. Favor de hacer
referencia a las páginas 26 y 27 para el procedimiento
en detalle de como ajustar la convergencia.
Información Importante Acerca Del Uso De
Video Juegos, Computadoras, U Otros Tipos
De Imágenes Fijas.
ADVERTENCIA: El marcado o retención de imágen en
los tubos de proyección como resultado del uso de una
imágen fija, no es un defecto de operación y como tal no
está cubierto por la garantía.
El sistema de proyección de video esta diseñado para
desplegar imágenes en movimiento constante en la pantalla.
El uso constante de imágenes fijas tal como peliculas en
formato letterbox en pantallas estándar (con barras arriba y
abajo de la imágen), peliculas estándar no expandidas (4:3)
en TV’s de pantalla ancha (con barras laterales visibles a
cada lado de la imágen), barras de reporte de la bolsa
mercantil (barra con información en movimiento en la parte
inferior de la pantalla), patrones de video juegos,
marcadores deportivos fijos, logos de estación televisora,
patrones de internet u otros patrones de tipo computadora
deben limitarse.
El uso extendido de material de imágen fija puede causar
daño permanente a los tubos de proyección, el cual se
presenta como ‘imágen fantasma” visible en la imágen
normal. Este tipo de desgaste irreversible de los tubos de
proyección puede limitarse mediante los siguientes pasos:
•
•
Imágen con mala convergencia
Imágen correctamente ajustada
Nota:
Asegurese de mantener el televisor encendido por al
menos 20 minutos previo al ajuste de convergencia
descritos en las paginas 26 y 27.
Limite el tiempo de uso de material de imágen fija a no
más del 15% del tiempo de uso total a la semana.
Apague la unidad cuando no se este usando.
Información de la FCC
Este equipo ha sido probado y cumple con el límite para un
equipo digital clase B en acuerdo con las especificaciones
en la parte 15 de las reglas de la FCC. Los límites se
diseñan para proveer protección razonable contra
interferencia de radio y televisión en una instalación
residencial. Este equipo genera, utiliza y puede radiar
energía de radiofrecuencia, y de no ser instalado y
utilizado de acuerdo a las instrucciones, puede ocasionar
interferencia nociva a comunicaciones de radio. Sin
embargo, no existe garantía de que no ocurra interferencia
en alguna instalación en particular.
Si este equipo causa interferencia a recepción de radio o
televisión ( la cual puede ser determinada al encender y
apagar el equipo), intente corregir la interferencia con una
o más de las siguientes medidas.
•
•
•
•
Re-oriente o re-ubique la antena receptora.
Incremente el espacio entre el equipo y el receptor.
Conecte el equipo en un enchufe de c.a. al cual el
receptor no se encuentre conectado.
Consulte al Vendedor o un técnico experimentado en
radio/TV.
1z
ESPAÑOL
Información sobre la Convergencia
P9 0474 S doc3 080403R.fm Page 2 Wednesday, August 13, 2003 8:25 AM
TABLA DE CONTENIDO
Tabla de Contenido
Información Importante.................................. 1
Información sobre la convergencia............................. 1
Información importante acerca del uso de video juegos,
computadoras, y otros tipos de imágenes fijas ....... 1
Felicidades ....................................................... 3
Registro del usuario....................................................
Cuidado y limpieza .....................................................
Especificaciones .........................................................
Tabla de características..............................................
3
3
3
3
ESPAÑOL
Instalación ........................................................ 4
Ubicación de la televisión ...........................................
Cables para la conexión por componentes ................
Cable de suministro de corriente alterna ....................
Conexión de cable / antena ........................................
Programación inicial ...................................................
4
4
4
4
4
Vista Frontal y Posterior del Televisor de
Proyección de Alta Definición...................... 5
Conexiones de Equipo Opcional.................... 6
Conexión de la videocasetera ....................................
Conexión del Módulo de Cable Digital.........................
Conexión del decodificador de televisión digital ..........
Panel de control frontal...............................................
Conexión de entrada HDMI ........................................
Conexión de salida del Digital Audio Out ...................
Conexión de salida del programa (PROG OUT) ........
Conexión del amplificador de sonido (Analogo) .........
6
6
6
6
7
8
8
8
Operación de IDI y Pantalla de SPLIT ............ 9
Operación de IDI ........................................................
Operación de Split ......................................................
Operación de IDI y pantalla de SPLIT Botón..............
Botón TV/VIDEO.........................................................
Botón de Search ........................................................
Nota:
2z
Botón de Move ..........................................................
Botónes PIP MIN y PIP MAX .....................................
Botón de Freeze.........................................................
Función de congelamiento de la imagen principal .....
Tabla operacional de los botónes en modo IDI ó
SPLIT ....................................................................
9
10
10
10
10
Funciones Especiales de la Televisor de
Proyección Alta Definición........................ 11
Botones Especiales del Control Remoto.... 12
Operación del Control Remoto.................... 13
Operación de componentes con el control remoto.....
Programando el control remoto..................................
Programando sin código ............................................
Códigos de componentes...........................................
14
16
16
16
Navegación básica de menú........................ 19
Operación del Menús.................................... 20
Imagen .......................................................................
Audio ..........................................................................
Canales ......................................................................
Operación del Photo Viewer™ ...................................
Cronómetro ................................................................
Ajuste .........................................................................
Bloqueo ......................................................................
20
20
21
22
24
25
28
Glosario y Acrónimos................................... 31
Cuadro de Localización de Fallas ............... 32
Indice.............................................................. 34
9
9
9
9
9
La Información acerca de la garantía y centro de servicio se encuentra al final de este manual.
P9 0474 S doc3 080403R.fm Page 3 Wednesday, August 13, 2003 8:25 AM
FELICIDADES
Registro del Usuario
www.prodreg.com/panasonic.
Número de
Serie
Pantalla de Proyección (Apague el Televisor)
La pantalla de proyección es un sistema de lentes de alta
precisión el cual contiene una pantalla protectora. La pantalla
protectora es completamente lavable, con las siguientes
precauciones:
•
Use una solución de jabón o limpiador de vidrios y un
paño limpio.
•
NO UTILICE LIMPIADORES CORROSIVOS.
•
No use detergente para lavar ropa ó jabón para
lavaplatos automático.
•
No use alcohol, amoniaco, o productos derivados del
petróleo.
•
Evite el exceso de humedad y frote hasta secar.
•
Prevenga que la solución se derrame al interior del
receptor.
•
Evite golpear o rayar la pantalla.
Nota: Evite rociar cualquier tipo de limpiadores directamente
sobre la pantalla.
Gabinete y Control Remoto
•
Para gabinetes y control remoto use un paño
humedecido con agua o una solución detergente suave.
Evite el exceso de humedad y frote hasta secar.
No use benceno, diluyentes u otros productos a base de
petróleo.
Especificaciones
Las especificaciones están sujetas a cambio sin previo aviso ni
obligación alguna.
Fuente de Potencia
PT-47WXD63
PT-53WXD63
PT-53TWD63
PT-56TWD63
PHOTO VIEWER
2RF
Cuidado y Limpieza
•
SINTONIZADOR DIGITAL ATSC
MODULO DE CABLE DIGITAL
(DCM)
IMAGEN EN IMAGEN CON 2
SINTONIZADORES
Número de
Modelo
(4,1A)
(4,1A)
(4,1A)
(4,1A)
Capacidad de Canales ATSC/NTSC
Terminal de entrada HDMI
Terminales de Salida Audio Digital
Componente Entrada de Video
Terminales de Entrada de Vídeo
Terminales de Entrada de Audio
Terminales de Salida de Video
Terminales de Salida de Audio
Terminales de Entrada S-Vídeo
120V CA, 60Hz
VHF/UHF 2-69, Cable-1-125
Tipo A
Fibra óptica Dolby* digital
75 Ohmios, Terminal tipo RCA
1Vp-p, 75 Ohmios, Estilo RCA
500mV RMS 47Kilo Ohmios
1Vp-p, 75 Ohmios, Estilo RCA
500mV RMS 4,7Kilo Ohmios
Conector S-Vídeo (Y-C)
•
•
•
•
•
•
•
•
•
•
•
•
•
•
•
•
•
•
•
•
•
•
•
•
•
•
•
•
•
•
•
•
•
•
•
•
CARACTERISTICAS
AJUSTE DE MAGNIFICACION
(TAMAÑO Y POSICION)
PANTALLA PROTECTORA
SUBTITULOS
CAPACIDAD DEL V-CHIP
VELOCIDAD DEL BARRIDO
DIGITAL
DOBLADOR DE LINEAS NTSC
VIDEO NORM
AUDIO NORM
ESTEREO
SONIDO IA
BAJOS/BALANCE/AGUDOS
SONIDO ENVOLVENTE
1080i 1080i 1080i 1080i
540p 540p 540p 540p
540p
540p
540p
540p
•
•
•
•
•
•
•
•
•
•
•
•
•
•
•
•
•
•
•
•
•
•
•
•
•
•
•
•
•
•
•
•
•
•
BBE VIVA 3D
BBE
ENTRADA HDMI/HDCP
ENTRADA A/V
(POSTERIOR/DELANTERA)
SALIDA AUDIO DIGITAL
ENTRADA S-VHS
ENTRADAS DE VIDEO POR
COMPONENTE
4
4
4
4
(3/1)
(3/1)
(3/1)
(3/1)
•
•
•
•
•
•
•
•
•
•
•
•
*Fabricado bajo autorización de Laboratorios Dolby. “Dolby” y el simbolo
doble-D son marcas registradas de los Laboratorios Dolby.
3z
ESPAÑOL
El modelo y el número de serie de este producto se localizan en
la parte posterior de este televisor. Deberá anotar el modelo y el
número de serie en los espacios que se proveen a continuación y
consérvelos permanentemente como comprobación de su
compra. Esto le ayudará a identificarlo en caso de robo ó pérdida.
Los consumidores en los Estados Unidos de América pueden
registrar su producto en la siguiente dirección electrónica:
PT-56TWD63
MODELOS
PT-53TWD64
Tabla de Características
PT-53WXD63
Su nuevo Televisor de Proyección de Alta Definición (PTV) se
caracteriza por utilizar lo último en tecnología en calidad de
imagen y sonido, cuenta con conexiones completas de Audio y
Video para su Sistema de Teatro en Casa. Su televisión esta
diseñada para brindarle muchos años de entretenimiento, fué
sintonizada y comprobada en su totalidad en la fábrica para su
mejor desempeño.
PT-47WXD63
Felicidades
P9 0474 S doc3 080403R.fm Page 4 Wednesday, August 13, 2003 8:25 AM
INSTALACIÓN
Instalación
Ubicación de la Televisión
First Time Setup (Programación Inicial)
Esta unidad tiene como propósito ser usada como parte de un
centro de entretenimiento. Consulte a su distribuidor para obtener
opciones disponibles.
•
Evite el exceso de luz solar u otras luces brillantes,
incluyendo reflejos.
•
Mantenga alejada la unidad del exceso de calor o
humedad. La ventilación inadecuada puede causar
fallas en componentes internos.
•
La iluminación fluorescente puede reducir el rango de
transmisión del control remoto.
•
Evite el equipo magnético, incluyendo motores,
ventiladores o altavoces externos.
Para su conveniencia, el menú de auto programación será
desplegado en pantalla cuando el set sea encendido por
primera vez. De ser necesario, siga los menús y los
procedimientos para ajustar las caracteristicas.
Programación de la entrada de RF
Para seleccionar la modalidad de TV (antena) o CABLE
dependiendo de la fuente de la señal.
Procedimiento
•
•
First time setup
ESPAÑOL
Cables para la conexión por componentes
Cables blindados de audio y video deben usarse entre los
componentes. Para obtener mejores resultados:
•
Use cable coaxial blindado de 75 ohmios.
•
Use los conectores de entrada y salida apropiados,
iguales a los de su componente.
•
Evite el uso de cables largos para minimizar
interferencia.
Cable de Suministro de Corriente Alterna
PRECAUCION:
PARA
PREVENIR
UNA
DESCARGA ELECTRICA, BUSQUE LA CLAVIJA
ANCHA DEL ENCHUFE E INSERTELA POR Enchufe polarizado
COMPLETO EN LA RENDIJA ANCHA DE LA
TOMA DE CORRIENTE ALTERNA. NO USE ESTE ENCHUFE CON UN
RECEPTACULO U OTRA TOMA DE CORRIENTE SALVO QUE LA
CLAVIJA SE PUEDA INSERTAR POR COMPLETO PREVINIENDO QUE
SE EXPONGA LA CLAVIJA.
PROTEJA EL CABLE DE AC DE SER PISADO, ENROLLADO,
PLEGADO, TROZADO O PERFORADO, PARTICULARMENTE EN LOS
CONECTORES Y EN LOS PUNTOS DONDE SALE DEL APARATO.
Press VOL
para seleccionar Cable only, Cable/
Antenna ó Antenna only.
Presione el botón de OK para subrayar su selección.
Input Setup
Auto Scan
Connect Cable to Antenna (A)
Manual Program
Signal Meter
Change your Input Setup
and press OK
•
Cuando la siguiente pantalla es desplegada, presione
OK para iniciar la auto busqueda. Todos los canales
disponibles serán programados en memoría.
Auto Scan (BUSQUEDA AUTOMATICA)
Para programar automáticamente todos los canales con
señal.
Procedimiento
•
Presione OK para programar automáticamente todos los
canales con señal.
Input Setup
Scan All
Auto Scan
Antenna (A) Analog
Convergence
Antenna (A) Analog & Digital
Cable de Entrada de la
Compañía de Cable
75 Ohmios VHF/UHF en la
parte posterior de la TV
Conexión de Antena
•
•
Nota:
4z
Para una recepción adecuada de canales VHF/
UHF, se requiere de una antena externa. Para la
mejor recepción, se recomienda una antena en el
exterior.
Conecte el cable de la antena a
la conexión ANT A en la parte
posterior de la televisión.
Seleccione la modalidad de
Antenna en el menú Input
Setup bajo Program CH en el
menú Setup.
MENU
to return
EXIT
Antenna (B) Analog
Antenna (B) Analog & Digital
Conexión de cable
Conecte el cable suministrado por su
compañía local de cable a la conexión
ANT A en la parte posterior de la televisión.
Seleccione la modalidad de Cable en el
menú Setup bajo Program CH.
SELECT
First time setup
Conexión de Cable / Antena
Para una recepción adecuada, se requiere
una conexión de cable o de antena.
OK
Cable only
Cable de Entrada de
una Antena de Casa
La Modalidad de Cable está predispuesta de fábrica.
Usuarios de antena deberán cambiar a modalidad de
Antena en el menú de Setup. Si tiene cable y antena, el
cable debe ser conectado al conector ANT A.
•
Una vez terminada la programación, el televisor
sintonizará el primer canal encontrado durante la
busqueda automática.
Notas:
•
Si el botón EXIT es presionado en cualquier momento
durante la busqueda, el menú de Programación Inicial
será cancelado y el televisor sintonizará el canal 2
análogo en la ANTENNA (A).
•
Si el POD esta conectado durante la Programación
Inicial y Antenna (A) esta en Cable, la Antenna (A) no
será buscada ya que el POD proveera el mapa de
canales.
Convergence (Convergencia)
Este menú le permite ajustar la alineación del TRC verde y la
convergencia del centro. Siga las instrucciones en pantalla para
realizar el ajuste de convergencia. Una vez hecho el ajuste de
convergencia presione EXIT para salir del menú.
SELECT
First time setup
OK
Input Setup
Auto Scan
Convergence
Press OK to go to
Convergence setup
MENU
to return
EXIT
P9 0474 S doc3 080403R.fm Page 5 Wednesday, August 13, 2003 8:25 AM
VISTA FRONTAL Y POSTERIOR DEL TELEVISOR DE PROYECCIÓN DE ALTA DEFINICIÓN
Vista Frontal y Posterior del Televisor de Proyección de Alta Definición
Panel de control frontal (PT-47WXD63 y PT-53WXD63)
ANT A
Cable In
Indicador Apagado /
Encendido
POWER
CHANNEL
TV/VIDEO
VOLUME
MENU
Panel de
control forntal
S-VIDEO VIDEO 4 L - AUDIO - R
OK
10
1
ANT B
8
7
DCM
INTERFACE
CHANNEL
TV/VIDEO
VOLUME
OK
POWER
S-VIDEO VIDEO 4 L - AUDIO - R
2
MENU
SERVICE
ONLY
VIDEO
HDMI
Y
A/V IN
PB
S-VIDEO
VIDEO
PR
L
AUDIO IN
R
3
3
1
5
6
Abertura Abertura
PC
SD
4
9
5
Refere
ncia
Indicador
Apagado /
Encender
8
CH
POWER
VOL
OK
VOL
TV / VIDEO
3
Botón
1
2
3
POWER
CH and CH
VOL and VOL
4 TV/VIDEO
5 OK
4
Abertura
SD
SERVICE ONLY
Conector usado por el técnico de servicio para actualizar el
programa.
4
DIGITAL AUDIO OUT
Salida óptica de sonido envolvente Dolby Digital 5.1.
5
HDMI (Interfase Multimedia de Alta Definición)
Entrada que acepta señal digital sin comprimir y señal de
audio digital multicanal.
6
AUDIO IN
Use estos conectores de audio cuando aparatos con DVI
son conectados al conector HDMI usando el adaptador
DVI a HDMI.
7
COMPONENT VIDEO (Y-PB-PR) INPUTS
Use estos conectores para conectar aparatos como un
reproductor de DVD o un Set Top Box.
Selecciona canal siguiente o previo,
navegación arriba/abajo en los menús.
Selecciona la señal de entrada.
Confirma el canal seleccionado, presione
para aceptar la elección del menú o submenú.
Descripción
3
Descripción
Aumenta o disminuye el volúmen, navega
izquierda/derecha en los menús, ajusta la
función seleccionada en el menú.
9
DCM INTERFACE (POD INTERFACE)
Introduzca el módulo POD ( o DCM: Módulo de Cable
Digital) de la compañía de cable para recibir servicio digital
“premium”.
Abertura
PC
Apagado/Encendido
8
2
MENU
6
7
TO
AUDIO
AMP
1
CH
1
6
INPUT INPUT INPUT PROG
1
2
3
OUT
Entradas de antena
ANT A - Conecte una antena terrestre o de cable a esta
entrada para recibir canales digitales.
ANT B - Si tiene ambas antenas, terrestre y cable, conecte
la antena terrestre a ANT B.
9
7
2
5
2
1
AUDIO COMPONENT
VIDEO INPUT
DIGITAL AUDIO OUT
Panel de control frontal (PT-53TWD63 y PT-56TWD63))
L
R
6 MENU
Muestra o elimina el menú o regresa un
nivel en los menús.
8
INPUTS 1, 2 y 3
Entradas Compuestas para conectar una videocasetera u
otros aparatos.
7 Photo Viewer™
Le permite ver las imagenes JPEG
grabadas en las tarjetas de memoria de
una cámara digital.
9
PROG OUT
Conectores de salida de auido fijo y video compuesto.
10
Abanico de enfriamiento
8 VIDEO 4
9 Botón Eject
Entradas análogas para aparátos
externos.
Presione este botón para expulsar la
tarjeta de memoria.
*Las descripciones en el panel de conectores posterior pueden
cambiar sin previo aviso.
5z
ESPAÑOL
4
2
Panel de conectores posteriores
P9 0474 S doc3 080403R.fm Page 6 Wednesday, August 13, 2003 8:25 AM
CONEXIONES DE EQUIPO OPCIONAL
Conexiones de Equipo Opcional
Nota:
El control remoto debe de ser programando con los
codigos suministrados para operar equipo opcional.
Conexión de la Videocasetera
Siga este diagrama cuando conecte en su televisión,
solamente la videocasetera.
ANT A
Cable In
ANT B
TERMINALES EN LA PARTE POSTERIOR DEL SET
VIDEO
Videocasetera
Y
DCM
INTERFACE
HDMI
PLAY
R
E
W
FF
STOP
PB
S-VIDEO
AV IN
SERVICE
ONLY
VIDEO OUT
PR
VIDEO
L
L
L
AUDIO OUT
R
R
2
1
AUDIO COMPONENT
VIDEO INPUT
L
INPUT INPUT INPUT PROG
1
2
3
OUT
R
TO AUDIO
AMP
AUDIO IN
Esta televisión tiene la capacidad de proyectar imágenes en
formato 1080i, 480p y 480i Televisión Digital (DTV) utilizando
un receptor-decodificador (STB). Para ver programación de
Televisión Digital, el STB debe estar conectado a las entradas
de video compuesto (Y, PB, PR) de la televisión. Debe haber
una señal de DTV disponible en su área. Seleccione el
formato del STB a 1080i o 480p.
Esta TV utiliza un doblador de barrido progresivo, el cual barre
la imágen de formato NTSC de manera progresiva. Esto le
permite no ver las delgadas líneas negras (efecto de persiana)
que va relacionado con la imágenes entrelazadas.
Utilice este diagrama para conectar el decodificador de
Televisión Digital Panasonic (DTV-STB) ó DVD a su
Televisor.
Para ver un vídeo
Procedimiento
•
•
ANT A
Cable In
ANT B
Presione el botón de TV/VIDEO en el control remoto
para seleccionar la entrada de vídeo (VIDEO 1, VIDEO
2, etc.) que está conectada a su videocasetera.
Comience el vídeo.
DIGITAL TV OUTPUT
Conexión del Módulo de Cable Digital
Procedimiento
•
Conecte la antena del cable al conector ANT A/Cable In
en la parte posterior del set.
Inserte el módulo DCM al conector DCM INTERFACE
(POD INTERFACE) en la parte posterior del set.
Notas:
•
•
•
•
MAIN
VIDEO
Y
PB
DCM
INTERFACE
SERVICE
ONLY
El lado izquierdo equivale a la parte superior del módulo
POD.
No introduzca una tarjeta PCMCIA en el conector DCM
INTERFACE (POD INTERFACE).
Seleccione el modo de Cable en Antenna (A) en el menú
Input Setup.
Siga las instrucciones en pantalla
Y
HDMI
PB
S-VIDEO
AV IN
VIDEO
PR
PR
L
R-AUDIO-L - VIDEO S-VIDEO
NTSC OUTPUT
Este módulo le permite sintonizar canales digitales y de alta
definición a traves de su antena de cable. Consulte a su
compañía de cable para la disponibilidad de este módulo
(también llamado módulo POD).
Nota: Una suscripción a cable digital es requerida . (refierase a
la página 27)
•
TERMINALES EN LA PARTE POSTERIOR DEL SET
VIDEO
Entradas para Televisi n Digital en laparte posterior del
Decodificador Televisi n Digital DTV-STB o DVD
L-AUDIO-R
ESPAÑOL
Cables no incluidos
R
DIGITAL AUDIO OUT
Conexión del Decodificador de Televisión
Digital (DTV-STB) ó DVD
L L
L
R
R
R
2
1
AUDIO COMPONENT
VIDEO INPUT
INPUT INPUT INPUT PROG
1
2
3
OUT
TO AUDIO
AMP
AUDIO IN
DIGITAL AUDIO OUT
R
CABLES NO INCLUIDOS
El televisor tiene dos grupos de entradas de video compuesto,
cada grupo tiene tres entradas: Y, PB y PR. Los entradas
separadas para las señales compuestas de color, proveen una
mejor separación de luminancia y color.
Panel de Control Frontal
El panel de control frontal puede ser usado para accesar el menú
ó cambiar el modo de video cuando no se disponga del control
remoto.
El indicador de APAGADO/ENCENDIDO (rojo) estará prendido cuando e
esté encendido.
Localización de la entrada Video 4
para PT-47/53WXD63
Indicador Apagado /
Encendido
CHANNEL
POWER
VOLUME
TV/VIDEO
OK
S-VIDEO VIDEO 4 L - AUDIO - R
MENU
ANT A
Cable In
Cable de
entrada
ANT B
TERMINALES EN LA PARTE POSTERIOR DEL SET
VIDEO
DCM
INTERFACE
Y
HDMI
PB
S-VIDEO
A/V IN
SERVICE
ONLY
VIDEO
PR
INSE
RT T
H
DIGIT
AL C
IS EN
D
ABL
E MO
L
DUL
E
L
L
R
R
2
1
AUDIO COMPONENT
VIDEO INPUT
INPUT INPUT INPUT PROG
1
2
3
OUT
TO AUDIO
AMP
AUDIO IN
DIGITAL AUDIO OUT
Nota:
6z
POWER APAGADO/ Abertura
ENCENDIDO
SD
R
Lado izquierdo (cara
superior) de la tarjeta
Si los botones del panel de control frontal o del control remoto
dejar de funcionar cuando utiliza el módulo de cable digital
(DCM), desconecte el cable de CA del televisor, vuelvalo a
conectar y pruebe de nuevo. Si el problema persiste, consulte
al Centro de Atención a Clientes de Panasonic.
Abertura
PC
Presione este botón
para expulsar la tarjeta
de la abertura.
Abra la puerta del panel frontal de la PTV para usar estas
conexiones para su equipo opcional (videocámara, VCR u otros
componentes de vídeo). Seleccione el modo de entrada video 4
presionanado el botón TV/VIDEO.
Procedimiento
•
•
•
Conecte su equipo a las conexiones Audio/Vídeo en la
parte frontal o posterior de la televisión.
Presione TV/VIDEO para seleccionar la entrada de
VIDEO 4.
Opere el equipo como se instruye en el manual del
equipo.
P9 0474 S doc3 080403R.fm Page 7 Wednesday, August 13, 2003 8:25 AM
CONEXIONES DE EQUIPO OPCIONAL
Conexión de entrada HDMI
ANT B
VIDEO
PB
1080i
1920 x 1080i
59.94 / 60
540p (480p)
720 x 480p
640 x 480p
59.94 / 60
59.94 / 60
540p (480i)
720 x 480i
59.94 / 60
Señal de Audio
Cuando audio digital es incluido en la conexión HDMI,
las frecuencias compatibles son 48 KHz / 44.1Khz / 32
Khz.
S-VIDEO
AV IN
VIDEO
PR
L
L
L
R
R
2
1
AUDIO COMPONENT
VIDEO INPUT
INPUT
1
INPUT INPUT PROG
2
3
OUT
TO AUDIO
AMP
AUDIO IN
DIGITAL AUDIO OUT
R
CABLES NO INCLUIDOS
HDMI
OUT
Procedimiento
•
•
•
Presione el botón TV/VIDEO en el control remoto para
seleccionar la entrada HDMI. El conector en este PTV es
HDMI tipo A.
Conecte la salida HDMI del set top box o reproductor de
DVD a la entrada HDMI IN en la parte posterior del PTV.
Si el dispositivo externo solo tiene salida DVI, utilice un
adaptador*3 de DVI a HDMI para conectarse al conector
HDMI en el PTV. Además, conecte la señal de salida de
audio del dispositivo externo (set top box o reproductor
de DVD) a los conectores de Audio In*4 localizados
abajo del conector HDMI.
Si no puede ver la imagen por que su Set Top Box no
tiene una terminal de salida digital, use la entrada de
video por componentes (o el conector de S-Video o
Video). En este caso, la imagen vista será de señal
análoga.
Notas:
*3. El cable convertidor HDMI-DVI (TY-SCH03DH) está
disponible en la página de internet de Panasonic:
www.panasonic.com.
*4. Vea las páginas 20 y 21 para los detalles de ajuste de
audio.
7z
ESPAÑOL
COMPONENTE
DIGITAL EXTERNO
Señal de video
Frecuencia de
barrido vertical (Hz)
Y
HDMI
SERVICE
ONLY
Este PTV es compatible con los siguientes formatos.
Ajuste el aparato conectodo a uno de los siguientes formatos.
Número de
puntos
TERMINALES EN LA PARTE POSTERIOR DEL SET
DCM
INTERFACE
•
Formato
ANT A
Cable In
R
Formatos compatible
Cable de
entrada
AUDIO OUT
Notas:
1. HDMI/HDCP = Interfase Multimedia de Alta Definición /
Protección Digital de Copia con Alto Ancho de Banda.
2. Los perfiles EIA//CEA-861 cubre perfiles para la
transmision de video digital sin compresión incluyendo
contenido digital de protección de alto ancho de banda.
Diagrama de conexión
Siga el diagrama mostrado en la parte inferior para
conectar el PTV a un set top box o a un reproductor de
DVD.
L
Sobre HDMI
HDMI es la primera interfase de A/V para electrónica de
consumidor completamente digital que soporta todos los
formatos de video estándar, mejorados y de alta definición
asi como todos los formatos de audio multicanal
existentes. Un conector soporta la información de video y
de audio. La entrada HDMI/HDCP1 puede ser conectada a
un dispositivo que cumpla con la norma EIA/CEA 8612, tal
como un set top box o reproductor de DVD equipado con
un conector de salida HDMI o DVI. Al conectar una fuente
de imagen de alta definición con protección digital de copia
con alto ancho de banda (HDCP) a la terminal HDMI de
esta unidad, podrá ver en pantalla imagenes de alta
definición en su forma digital. La terminal de entrada HDMI
no es para conectarse con una computadora personal.
Este PTV es compatible con los formatos 1080i, 480p y
480i. Seleccione la salida del dispositivo conectado a uno
de estos formatos.
P9 0474 S doc3 080403R.fm Page 8 Wednesday, August 13, 2003 8:25 AM
CONEXIONES DE EQUIPO OPCIONAL
Digital Audio Out Connection (Conexión de
salida de audio digital)
Utilice el diagrama mostrado en la parte inferior para conectar la
salida de audio digital de su Televisor de Proyección HDTV a un
decodificador Dolby Digital.
Digital Audio Out (Salida de audio digital)
El sonido envolvente Dolby Digital de 5.1 canales le permite tener
sonido de calidad digital. Dolby Digital provee cinco canales
discretos de ancho de banda completo para frontal izquierdo,
frontal derecho, centro, envolvente izquierdo y envolvente
derecho, más un canal de sub-graves LFE (Efecto de Baja
Frecuencia). Para una disfrutar de un sonido de teatro en casa
completo, un decodificador Dolby Digital externo y un
amplificador multicanal deben ser conectados al conector Digital
Audio Out de su PTV.
ANT A
Cable In
ANT B
TERMINALES EN LA PARTE POSTERIOR DEL SET
ESPAÑOL
VIDEO
DCM
INTERFACE
Y
HDMI
PB
SERVICE
ONLY
S-VIDEO
Sistema de sonido de
seis canales
A/V IN
VIDEO
PR
Notas:
•
Este PTV contiene salidas de video y audio con el
propósito de grabar programación de la televisión a una
videocasetera. Debido a las restricciones de licencias, si
un aparato (STB, DVD, etc.) es conectado al conector
HDMI del PTV, la salida de audio y video no es
permitida.
•
La señal de Program Out no estará disponible cuando la
imagen principal sea de la entrada por componentes.
•
La señal Program Out estará disponible cuando reciba
un canal digital. Pero todos los formatos digitales serán
convertidos a video NTSC compuesto.
•
Cuando reciba una canal digitales o análogos y los
subtítulos análogos o digitales estén activados, la salida
del conector de Program Out tendrá subtitulos en la
imágen de video. Si los subtítulos están desactivados,
solo información de subtitulos análogos será transferida.
•
Algunas salidas de contenido de programa de los
conectores de Program Out pueden contener señal de
Macrovision, previniendo así que una videocasetera
puede grabar esta señal.
Amplificador
Externo
90.7 MHZ
L
L
L
R
R
2
1
AUDIO COMPONENT
VIDEO INPUT
INPUT
1
INPUT INPUT PROG
2
3
OUT
OPTICAL IN
TO AUDIO
AMP
AUDIO IN
DIGITAL AUDIO OUT
R
CABLES NO INCLUIDOS
Procedimiento
•
Conecte el cable digital de audio del conector Digital
Audio Out de su PTV al conector Digital Audio In de su
decodificador Dolby Digital.
Nota: Cuando un canal ATSC es seleccionado, la salida del
conector Digital Audio Out será Dolby Digital. Pero si el
canal seleccionado es NTSC, la salida será PCM.
Conexión del Amplificador de Sonido
(Analogo)
Conecte a la entrada de audio de un amplificador externo para
escuchar el sonido en sistema estéreo.
Nota:
Las terminales TO AUDIO AMP no pueden ser usadas
directamente para bocinas externas.
ANT A
Cable In
ANT B
TERMINALES EN LA PARTE POSTERIOR DEL SET
VIDEO
Y
DCM
INTERFACE
HDMI
PB
SERVICE
ONLY
S-VIDEO
A/V IN
VIDEO
PR
Conexión de Salida del Programa (PROG
OUT)
L
L
TERMINALES EN LA PARTE POSTERIOR DEL SET
VIDEOCASETERA
PLAY
R
E
W
FF
STOP
Y
ANT OUT
HDMI
OUT
PB
SERVICE
ONLY
S-VIDEO
VIDEO L - AUDIO - R
A/V IN
IN
L
L
L
R
R
2
1
AUDIO COMPONENT
VIDEO INPUT
ANT IN
VIDEO
PR
INPUT
1
INPUT INPUT PROG
2
3
OUT
TO AUDIO
AMP
AUDIO IN
DIGITAL AUDIO OUT
R
CABLES NO INCLUIDOS
Procedimiento
•
Conecte la videocasetera a las terminales PROG OUT y
TO AUDIO AMP R/L.
•
El desplegado de terminal PROG OUT es el mismo que
el desplegado en pantalla.
•
Véase el manual de equipo opcional para instrucciones
acerca del grabado.
8z
DIGITAL AUDIO OUT
INPUT INPUT PROG
2
3
OUT
90.7 MHZ
TO AUDIO
AMP
CABLES NO INCLUIDOS
R
Ajustes de Sonido (Audio)
•
•
VIDEO
INPUT
1
AUDIO IN
ANT A
Cable In
DCM
INTERFACE
AUDIO
R
2
1
COMPONENT
VIDEO INPUT
Para visualizar en la Televisión el video y el audio con una
videocasetera. Un monitor externo también puede ser conectado
a las terminales de PROG OUT y TO AUDIO AMP. Connect the
VCR as shown below.
ANT B
L
R
Seleccione ALTAVOCES Off en el menú de SONIDO
(AUDIO).
Ajuste el volúmen del amplificador al nivel deseado.
P9 0474 S doc3 080403R.fm Page 9 Wednesday, August 13, 2003 8:25 AM
OPERACIÓN DE IDI Y PANTALLA DE SPLIT
Operación de IDI y Pantalla de SPLIT
Operación de IDI
Nota:
Esta Televisión incluye una característica de sintonizador dual
para Imagen en Imagen (IDI). Esto permite ver dos (2) canales en
vivo al mismo tiempo, ya sea con o sin una fuente de vídeo
externa (VCR).
Nota: Solo la programación análoga de la Antena (A) y las entradas
Operación de IDI y Pantalla de SPLIT Botón
de video pueden ser vistas en el Marco IDI /SPLIT.
Procedimiento
•
Conecte el cable de la antena a la entrada ANT A en la
parte posterior de televisor.
La IDI o SPLIT no pueden mostrar un canal digital. Puede ver el
canal digital como la imágen principal y un canal análogo en la
IDI ó SPLIT, ó canales análogos en ambos. La función SWAP
funcíona sólo cuando la imágen principal y la IDI ó SPLIT son
canales análogos o señal de entrada de video.
Botón TV/VIDEO
Presione quando la IDI o el Split están desplegados para
seleccionar la entra de video deseada.
Imágen principal
PIP
Presione
Presione los botones
•
IDI esta desplegado para seleccionar los canales.
Escoja canales para la Imagen Principal presionando
CH
•
o usando el teclado numérico.
or
Presione
SWAP
COMPONENTE 1
PIP CH
DVD/VCR CH mientras el marco
•
CH
CA#
para desplegar el marco IDI.
COMPONENTE 2
HDMI
VIDEO 1/2/3/4
Marco IDI
ESPAÑOL
•
Imágen principal
COMPONENTE 1
CA#
para intercambiar la imágen principal
COMPONENTE 2
HDMI.
VIDEO 1/2/3/4
con la imágen dentro del marco IDI.
•
Presione
RE
C
AL
L
Botón Search (IDI y Split)
ambos imágenes
•
Presione
PIP
Imágen SPLIT
para ver la información de fuentes de
para cancelar IDI marco.
Imágen principal
Esta función permite hacer una busqueda de todos los canales
análogos desponibles.
•
PIP
Presione el botón
SPLIT
o
para desplegar el
marco de la IDI o la pantalla Split.
SEARCH
Marco IDI
Nota:
El Audio es sólo de la Imagen Principal.
Operación de SPLIT
Esta función permite ver 2 canales diferentes, uno al lado del otro,
con o sin una fuente de video externa. El audio es de la imagen
principal unicamente (lado izquierdo).
OPEN/CLOSE
•
Presione
busqueda.
Nota:
Cuando la imágen principal es digital ATSC, la busqueda no es
posible. La caraterística de busqueda solo funciona con
canales análogss.
•
Presione SEARCH botón de nuevo para detener la
función de busqueda. El canal de la IDI ó Split será el
último marco activo.
•
Presione
IDI o Split.
Procedimiento
SPLIT
•
•
Presione
para desplegar la imágen SPLIT.
Escoja canales para la Imágen SPLIT presionando
PIP CH
DVD/VCR CH
•
or
CH
SPLIT
•
Presione
para intercambiar la Imágen SPLIT con
la Imagen Principal derecha.
•
Presione
LL
to para verla información imágenes.
Presione
para cancelar el marco de la
3
Imágen
principal
Busqueda el marco
4
Botón Move (sólo IDI)
Esta función es utilizada para mover el marco de la IDI a
una de las cuatro esquinas.
Procedimiento
PIP
SPLIT
•
o
2
o usando el teclado numérico.
RE
CA
SPLIT
PIP
.
Escoja canales para la Imagen Principal presionando
CH
para desplegar los marcos de
para cancelar la pantalla Split.
•
Presione
para desplegar el marco de la IDI.
9z
P9 0474 S doc3 080403R.fm Page 10 Wednesday, August 13, 2003 8:25 AM
OPERACIÓN DE IDI Y PANTALLA DE SPLIT
MOVE
•
Presione
para posicionar el marco de la IDI en
la esquina deseada.
PIP
•
Presione
Función de congelamiento de imagen principal
Esta función se usa para congelar la imagen principal y
desplegarla in la IDI o en SPLIT.
Procedimiento
para cancelar IDI marco.
FREEZE
TV/VCR
•
Imágen
principal
•
Marco IDI
Botóes PIP MIN y PIP MAX
Cuando el marco de la IDI es desplegedo, prisione el botón
PIP MIN ó PIP MAX para variar el tamaño del marco.
Procedimiento
ESPAÑOL
PIP
•
Presione
•
Presione
marco.
•
Presione
para desplegar el marco de la IDI.
PIP MIN
para ajustar el tamaño del
para cancelar IDI marco.
MAX
Imágen
principal
MIN
Botón Freeze (IDI y Split)
Esta función es utilizada para congelar la imágen en la IDI
o Split.
Procedimiento
Presione
la IDI Split.
•
Presione
PIP
FREEZE
•
Nota:
presione
TV/VCR
TV/VCR
para desplegar el marco de
MODO IDI
MODO SPLIT
MODO
IMÁGEN
PRINICIPAL
PIP MIN
PIP MAX
Tamaño pequeño
No funciona
No funciona
Tamaño grande
No funciona
No funciona
FREEZE
Congela marcos
IDI
Desplegar o
Suprimir
PIP CH
Cambiar Canales
de IDI
Congela
marcos IDI
Cambiar
Canales de
SPLIT
Desplegar
marcos de
busqueda
Desplegar marcos de busqueda
SEARCH
(no disponible
cuando la imagen principal es
digital)
PIP
Suprimir marcos
de IDI
SPLIT
Desplegar
marcos de SPLIT
MOVE
Mueve marcos
IDI
de nuevo para descongelar la
de nuevo para descongelar la
SPLIT
PIP
Presione
IDI ó Split.
ó
para cancalar el marco de la
Intercambiar con
imágen principal
SWAP
Imágen
principal
Marco de la imágen
congelada
El Audio es sólo de la Imagen Principal.
Imágen principal
Nota:
10 z
cancelar
Botónes
FREEZE
•
para
la
Tabla operacional de los botones en modo IDI ó SPLIT
Esta tabla muestra los botones que están activos cuando
se encuentra en modo IDI ó SPLIT.
SPLIT
o
imágen.
Presione
imágen.
nuevamente
congelación de imagen.
Mientras la imagen congelada este desplegada, solo el
boton MOVE esta activo para IDI, cualquier otro botón
para IDI o SPLIT no tendra effecto (ver tabla ).
FREEZE
•
TV/VCR
PIP MIN
o
PIP
•
Para congelar la imagen principal, presione
mientras la IDI o SPLIT no esten desplegados.
La imagen principal congelada aparecera en la IDI o en
SPLIT, dependiendo de la opción seleccionada en el
menu FREEZE localizado dentro de Imagen Otros AJ.
(refierase a la pagina 20).
Split imágen
congelada
(no disponible
cuando la
imagen
principal es un
canal digital)
(no
disponible
cuando la
imagen
principal es
digital)
Desplegar
marcos de IDI
Suprimir
marcos de
SPLIT
No funciona
No funciona
No funciona
No funciona
No funciona
Mueve marcos
IDI
Intercambiar
con imágen
principal
(no
disponible
cuando la
imagen
principal es
un canal
digital)
No funciona
P9 0474 S doc3 080403R.fm Page 11 Wednesday, August 13, 2003 8:25 AM
FUNCIONES ESPECIALES DEL TELEVISOR DE PROYECCIÓN DE ALTA DEFINICIÓN
Funciones especiales del Televisor de Proyección de Alta Definición
Sintonización de canales y programas
Barra de información de canal: minimizada
La sintonización de canales y programas en televisión digital es
distinta de la televisión actual. En DTV (Televisión Digital), hasta
seis (6) programas multiples pueden existir en un solo canal de
6MHZ. Estos canales se comportan como sub-canales dentro de
un solo canal. Cuando sintonize un canal digital, el televisor de
proyección de alta definición tambien sintonizará un programa. El
televisor de proyección de alta definición le indicará el canal y el
programa por medio de la barra de información del canal.
Nota: Para seleccionar canales adecuadamente, debe de
llevarse a cabo la auto programación ( ver página 25).
La barra de información de canal minimizada mostrará la antena
utlizada, el número de canal, y la identificación de la estación (si
esta disponible).
Puede sintonizar los canales digitales y análogos de las
siguientes maneras:
Sintonización directa (botones 0 - 9) - usando el teclado
numérico del control remoto para introducir el número de
canal directamente. Si es necesario, use el botón
para
introducir el número de programa del canal digital.
Canal arriba/abajo (botón CH
o CH ) - Sintoniza el canal
o programa siguiente o previo. Esta manera depende del
modo de sintonización (ver pág. 21) que seleccione en el
menú Channel.
Sintonización rápida (R-TUNE) - Cambia entre los dos
últimos canales o programas.
Método de sintonización directa
Siga el procedimiento de abajo para introducir el directamente el
número de canal utilizando el teclado numérico del control
remoto.
Procedimiento
•
•
Presione los botones del telado numérico del control
remoto para introducir el número del canal. Presione
OK.
Si desea sintonizar un canal digital y su canal contiene
más de un programa, presione el botón
e introduzca
el número del programa (1, 2, 3 etc.) usindo el teclado
numérico. Presione OK. El siguiente es un ejemplo de
como sintonizar el canal 15-1.
Ejemplo de sintonización directa
Barra de
información de
canal
Paso
Acción
1
Presione 1
1
2
Presione 5
15
3
Presione
15-
4
Presione 1
15-1
5
Presione OK
15-1
Barra de información de canal: maximizada
Presione RECALL para mostrar la barra de información de canal
maximizada. Mientras la barra de información de canal esta
desplegada, puede adicionar o remover el canal a la lista de
canales favoritos.
Antena en uso, número de
canal y programa e
identificador de la estación
Modo de
imágen
Clasificación
A: 15-1
KPBS - HD
TV-G
CC
1080i
Número de canal de la
IDI/SPLIT ó
información sobre la
entrada de señal
Reloj
12:30 pm
VIVID
HDMI
SAP
30
Add FAV
Indicaciones de
subtitulos y SPA
Botón para añadir o
remover el canal de la
lista de canales
favoritos
Formato de
señal
Tiempo restante en
crónometro de apagado
Audio Track 1 of 1 (English)
Canal de audio
del canal digital.
Función de agregar / remover Favoritos
Esta función le permite agregar o remover canales a la lista de
canales favoritos.
Procedimiento
•
•
•
Sintonize el canal deseado.
Presione RECALL para mostrar la barra de información
de canal.
Presione OK ejecutar su selección.
Sintonización forzada por el Sistema de Alerta de
Emergencia (EAS)
Si tiene un módulo POD instalado, el sistema multiple de dueño/
operador de cable (MSO) podria proveer un mensaje del sistema
de alerta de emergencia. Estos mensajes son para informar al
público en general de situaciones de emergencia locales o
nacionales de importancia. En caso de recibir uno de estos
mensajes, el televisor de proyección de alta definición sintonizará
inmediatamente el canal con el mensaje EAS. Si el canal a sido
bloqueado usando el control de bloqueo del televisor, este control
tiene prioridad sobre la sintonización forzada.
El televisor de proyección de alta definición sintonizará el canal
15-1.
11 z
ESPAÑOL
Sintonizando canales digitales y análogos
A: 15-1
KPBS-HD
P9 0474 S doc3 080403R.fm Page 12 Wednesday, August 13, 2003 8:25 AM
BOTONES ESPECIALES DEL CONTROL REMOTO
Botones especiales del control remoto
Botón ASPECT
Opciones de despliegue de imagen según la señal de entrada
Señal de
entrada
1080i
Formato en pantala
Solo 16:9
480p (16:9)
Default a 16:9
480p (4:3)
Default a modo COMP.
Nota: La imagen es estimada
Horizontalmente.
4:3, Comp o Acerc
(Ver sig. columna)
Default a modo JUSTO
4:3, Comp, Justo o
Acerc
(Ver sig. columna)
480i
ESPAÑOL
Opciones para
botón ASPECT
Sin opción
4:3, Comp o Acerc
(Ver sig. columna)
El botón ASPECT le permite seleccionar uno de los cuatro
modos de imagen, dependiendo del formato de la señal
recibida y preferencias personales. El botón ASPECT le
permite seleccionar uno de los cuatro modos de imagen,
dependiendo del formato de la señal recibida y
preferencias personales.
Señal de
entrada
ASPECT
480i o 480p
Imagen en
formato 16:9
4
4:3
Señal de
entrada
ASPECT
3
Imagen en
formato 16:9
Amplia la imagen 4:3
unifomemente (ancho y
alto).
16
480i o 480p
ACERC
Esta opción despliega una
imagen 4:3 a su tamaño
estandar 4:3 con barras
laterales gris. No es
recomendado para ver
imagenes 4:3, puede causar
imagen permanente en la
pantalla.
9
Nota: Si el menú es desplegado mientras en modo Zoom, el aspecto
cambiará a modo Comp para desplegar el menú completo.
Señal de
entrada
ASPECT
16
480i o 480p
COMP
Señal de
entrada
ASPECT
9
Imagen en
formato 16:9
16
480i
JUSTO
12 z
Esta opción despliega una
imagen en pantalla
completa. (recomendada
para images Anamorficas).
Imagen en
formato 16:9
9
Esta opción estira la parte
izquierda y derecha de una
imagen 4:3 al tamaño de
pantalla. El centro de la
pantall tendra corrección
de aspecto. El tamaño de
la imagen depende del
tamaño original.
(recomendado para uso
normal.)
Botón BBE
Presione este botón para activar la función BBE VIVA 3D
(disponible solo para PT-53TWD63 o PT-56TWD63) o BBE
(disponible solo para PT-47WXD63 o PT-53WXD63).
Botón SAP
Presione este botón para seleccionar el siguiente canal de audio
(si esta disponible) cuando reciba una canal digital.
Audio Track 1 of 1 (English)
En modo análogo, presione este botón para seleccionar
entre los distintos modos de audio. Por ejemplo:
•
Si recibe STEREO, SAP y MONO o recibe
STEREO y MONO solamente, al presionar el botón
SAP, el audio cambiará de la siguiente manera:
STEREO
SAP
MONO
Botón PROG
Cuando sintonize un canal digital, presione el botón
PROG
para
introducir el número menor en un canal de número compuesto.
Botón MENU
Presione para mostrar el menú principal o para regresar un paso
en el menú.
Botón RECALL
Presione este botón para mostrar o quitar el encabezado de
canales. Mientras el encabezado este desplegado, usted puede
agregar o quitar canales a su lista de canales favoritos.
Botón R-TUNE
Press to switch to previously viewed channel, Photo Viewer or
input modes.
P9 0474 S doc3 080403R.fm Page 13 Wednesday, August 13, 2003 8:25 AM
OPERACIÓN DEL CONTROL REMOTO
Operación del Control Remoto
NUMERO DE
BOTON
1
18
10
19
2
11
3
20
4
12
21
5
6
22
7
8
23
9
24
10
13
En modo VCR o DVD, presione para tocar.
14
En modo VCR o DVD, presione para pausar.
17
FREEZE - En modo TV, presione para
congelar la imagen en el marco IDI o SPLIT.
TV/VCR - Presione para seleccionar entre
modo TV o VCR en su videocasetera.
Presione para desplegar o cancelar el marco
IDI.
Presione para desplegar o cancelar la
pantalla SPLIT.
18
Presione para accesar los modos de audio
(Stereo, SAP o Mono).
15
16
25
20
Presione para iluminar los bones del control
remoto.
Presione para seleccionar la entrada de
antena de RF (A o B).
26
21
Presione para encender o apagar.
27
22
Presione para desplegar o cancelar la
información de canal.
23
Presione para salir del menú.
19
11
12
13
14
28
29
15
30
16
31
17
24
25
32
26
NUMERO
DE BOTON
Presione para mostrar el menú principal o
regresar un paso en los menús.
Presione el teclado numérico para seleccionar
cualquier canal o introducir caracteres
alfanuméricos en los menús.
Presione para regresar al canal previamente
visto o modo de video.
PIP MIN - En modo TV, presione para reducir el
tamaño del marco IDI.
REW - En modo VCR o DVD, presione para
regresar.
27
En modo VCR, presione para grabar.
28
En modo VCR o DVD, presione para detener.
DESCRIPCIÓN
Presione para ENCENDER o APAGAR
1
Nota:
2
Presione para seleccionar el modo del control remoto.
3
Presione para seleccionar la modalidad de televisión
o video.
4
Presione para accesar el Photo Viewer.
Dentro del Photo Viewer presione para accesar el
menú del Photo Viewer.
5
Seleccione el tamaño de la imagen (aspecto) para
igualarlo al formato de la programación.
Dentro del Photo Viewer para cambiar el aspecto de la
imagen en pantalla.
6
Presione para silenciar el sonido. Presione para
mostrar y remover el CC (Closed Caption).
7
Presione para ajustar el nivel del audio de la TV y
navegar en los menús.
8
Presione para entrar al menú.
Presione para seleccionar el siguiente canal
y navegar en los menús.
Presione para delimitar entre los canales
mayores y menores.
PIP MAX - Presione el botón para incrementar el
tamaño del marco IDI.
FF - En modo VCR o DVD, presione para
adelantar.
29
El indicador ON/OFF estará encendido (rojo) cuando
el set este encendido.
30
31
32
SEARCH - Presione para explorar todos los
canales disponibles en los marcos de
busqueda. Presione de nuevo para detener
la función de busqueda.
OPEN/CLOSE - Presione para abrir o cerrar
la bandeja del reproductor de DVD.
Presione para cambiar canales el IDI o la
videocasetera.
Presione para intercambiar la imágen IDI/
SPLIT con la imagen Principal.
Esta función es utilizada para mover el
marco de la IDI a una de las cuatro esquinas.
Instalación de Pilas en el Control Remoto
Use dos pilas AA:
Quite la tapa del compartimiento de pilas presionando en
dirección a la flecha. Instale las pilas igualando las marcas
(+) y (-) de la polaridad. Coloque nuevamente la tapa de las
pilas.
Precauciones
Reemplace las pilas por pares. No mezcle tipos de pilas
(carbono de zinc con alcalina). No intente cargar,
hacer,cortocircuito, desarmar, calentar o quemar las pilas.
13 z
ESPAÑOL
9
DESCRIPCIÓN
P9 0474 S doc3 080403R.fm Page 14 Wednesday, August 13, 2003 8:25 AM
OPERACIÓN DEL CONTROL REMOTO
Operación de Componentes con el control remoto
Nota:
Refierase a la página16 para procedimientos de programación
del Control remoto.
Operación de una Videocasetera
Programe el control remoto para utilizar con la Videocasetera.
PARA HACER ESTO...
Programe el control remoto para utilizar con el DBS.
PARA HACER ESTO...
MENU
Desplegar menú DBS
TV/VIDEO
ASPECT
Aspecto DBS
PIP CH
DVD/VCR CH
Cambiar canales arriba/abajo
CH
Navegar en menú
VOL
VOL
CH
REC
Grabar
PLAY
Reproducir
Seleccionar Canal
STOP
Detener
Adelandar
PIP MAX
FF
Regresar
PIP MIN
REW
Sintonizar el Canal previo
PAUSE
Cambiar a la siguiente página
FREEZE
TV/VCR
Cambiar a modo TV o
Videocasetera
RE
CA
Despliegue en pantalla
Salir del menú
PARA HACER ESTO...
Encender/Apagar
POWER
Capitulo anterior/siguiente
1
2
3
4
5
6
7
8
9
Despliega menú del DVD
Arriba/
Sintonizar el canal previo
5
6
7
8
9
RE
CA
LL
R-TUNE
PIP CH
DVD/VCR CH
EXIT
OPRIMA
POWER
CH
CH
R-TUNE
CH
CH
RE
CA
LL
Adelantar
PIP MIN
REW
Retroceder
PIP MIN
REW
0
canal
4
OPRIMA
Encender/Apagar
el
3
Programe el control remoto para utilizar con el DVD.
Programe el control remoto para utilizar con la caja de cable.
Seleccionar un canal
2
Operación de DVD
LL
Operación de decodificador de Cable
PARA HACER ESTO...
1
0
Programar Información
Pausar
Reproducir
Abrir/Carrar
Detener
Pausar
14 z
POWER
POWER
Seleccionar modo de entrada
de TV para la Videocasetera
Cambiar
Abajo
OPRIMA
Encender/Apagar
OPRIMA
Encender/Apagar
ESPAÑOL
Operación de DBS
PLAY
SEARCH
OPEN/CLOSE
STOP
PAUSE
P9 0474 S doc3 080403R.fm Page 15 Wednesday, August 13, 2003 8:25 AM
OPERACIÓN DEL CONTROL REMOTO
Operación de reproductor de casetes
Para operar un reproductor de casetes, el control remoto
debe ser programando en la opción AUX para la marca del
equipo.
PARA HACER ESTO..
OPRIMA
POWER
Encender/Apagar
Vol +/-
VOL
VOL
Para operar Grabadoras Personales de video, el control remoto
debe ser programando en la opción AUX para la marca del
equipo.
PARA HACER ESTO..
MENU
Desplegar menú PVR
CH
Navigación
VOL
PLAY
STOP
Detener
Adelantar
PIP MAX
FF
Regresar
PIP MIN
REW
PAUSE
Pausa
Seleccionar un canal
Operación de receptor de audio
Programe el control remoto para utilizar con el receptor de audio.
Reproducir
Pausar
OPRIMA
POWER
Sintoniza el canal previo
Salir de menú
MU
TE
Mudo
VOL
VOL
CH
CH
1
2
3
4
5
6
7
8
9
0
Grabar
Encender/Apagar
VOL
CH
ESPAÑOL
Reproducir
Estaciones pre-grabadas
POWER
Encender/Apagar
REC
Grabar
Vol +/-
OPRIMA
R-TUNE
Casetera A/B
PARA HACER ESTO..
Operación de PVR (Grabadoras Personales de Video)
Volver a tocar zonas
Saltar rápido
PLAY
REC
PAUSE
R-TUNE
EXIT
R-TUNE
SEARCH
OPEN/CLOSE
PROG
Regresar a vivo
Para Seleccionar la modalidad
de entrada ó componente:
Oprimar el teclado numerico
del control remoto
AV 1
Presione 1
AV 2
Presione 2
AV 3
Presione 3
AV 4
Presione 4
CD
Presione 5
Radio
Presione 6
Phono
Presione 7
Cassette
Presione 8
AUX
Presione 9
Envolvente -
PIP MIN
REW
Envolvente +
PIP MAX
FF
Canal Central +/-
Cambiar canales arriba/abajo
PIP CH
DVD/VCR CH
PIP CH
DVD/VCR CH
15 z
P9 0474 S doc3 080403R.fm Page 16 Wednesday, August 13, 2003 8:25 AM
OPERACIÓN DEL CONTROL REMOTO
Programando El Control Remoto
Programación Sin Código
El Control Remoto Universal puede programarse para
operar componentes de varios fabricantes usando los
botones de función para VCR, DVD, DVD, DBS, RCVR,
CABLE o AUX. Siga los procedimientos para programar su
Control Remoto con o sin código para el componente.
Modos De Default Para El Control Remoto
Equipo
Televisión
VCR
DVD/CD
DBS
Default
Televisión (Solo Panasonic)
Código TV Panasonic
VCR (preajustado)
Código VCR Panasonic
DVD y CD(preajustado)
Código DVD Panasonic
DBS (preajustado)
Código DBS Panasonic
Receptor de audio
(preajustado)
Codigo RCVR
Panasonic
CBL
CABLE (preajustado)
Código CABLE
Panasonic
AUX
Grabadoras Personales de
Video y VCR2
RCVR
ESPAÑOL
Funciona
Nota:
Codigo PVR Panasonic
Determine el fabricante del componente y busque en la
tabla su código,
Procedimiento
• Confirme que el componente esté conectado y en
operación.
• Apague el componente.
Este procedimiento busca todos los códigos y se le llama
“método de secuencia.”
Procedimiento
•
•
Confirme que el componente esté conectado y en
operación.
Apague el componente.
POWER
•
•
•
OK
Presione los botones
y
juntos,
cuando menos 5 segundos.
Presione el botón de la función apropiada del
componente en el Control Remoto.
Presione el botón VOL
para ubicarse en el
siguiente código. Presione el botón
VOL para
regresar al código anterior.
POWER
•
Presione el botón
de el Control Remoto para
probar el componente. Si éste procedimiento ha
sido exitoso, el componente se encenderá.
Nota:
Repita los pasos anteriores hasta que el código del
componente se halla encontrado. Puede tomar varios intentos
hasta encontrar el código correcto.
•
Después de que el código se ha encontrado,
presione el botón
OK
para guardar el código.
POWER
•
•
•
•
OK
Presione los botones de
y
juntos,
cuando menos 5 segundos.
Presione el botón de la función apropiada del
componente en el Control Remoto (VCR, DVD
(CD), DBS, RCVR, CABLE o AUX (Grabadoras
Personales de Video o VCR2).
Ponga el código del componente de 3 dígitos
usando el teclado numérico (botones 0 ~ 9) del
Control Remoto.
Presione el botón
POWER
de el Control Remoto
para probar el componente. Si éste procedimiento
ha sido exitoso, el componente se encenderá.
Nota:
16 z
Si el componente no opera con el Control Remoto, repita el
procedimiento usando otro código. (Algunas marcas tienen
múltiples códigos.)
Si un código se ha puesto incorrectamente, o si el
procedimiento toma más de 30 segundos, la programación ha
fracasado.
Códigos de Componentes
El Control Remoto Universal tiene capacidad de operar
varias marcas de componentes después de introducir el
código apropiado. A causa del límite de memoria no se han
incluido todos los códigos existentes, por lo cual es posible
que algunos componentes no operen. El Control Remoto
Universal no controla todas la funciones y características
disponibles en todos los modelos.
Escriba los números del código en este espacio.
Esto le servirá como referencia cuando necesite
programar su Control Remoto.
DVD
DVD (CD)
DBS
RECEPTOR
CABLE
AUX (PVR)
AUX (VCR2)
Videocasetera
P9 0474 S doc3 080403R.fm Page 17 Wednesday, August 13, 2003 8:25 AM
OPERACIÓN DEL CONTROL REMOTO
Códigos de Componentes (cont.)
Marca
Código
Admiral
335
Aiwa
332
Akai
314, 315, 316,
329
Audio
Dynamic
311, 339
Bell &
Howell
305, 313
Broksonic
320, 326
Canon
323, 325
CCE
343
Citizen
306
Craig
305, 306, 329
Curtis
Mathes
324, 345
Daewoo
301, 324, 343
DBX
310, 311, 339
Dimensia
345
Emerson
303, 319, 320,
325, 326, 343
Fisher
305, 307, 308,
309, 313
Funai
320, 326, 334
GE
324, 333, 345
Goldstar
306
Gradiente
334
Hitachi
300, 323, 345
Instant
Replay
323, 324
Jensen
339
Códigos para VCR (Cont.)
Marca
Código
Códigos para DBS
Códigos para Decodificador de
Cable
Marca
Código
Marca
Código
Orion
320, 326
ABC
124
Panasonic
321, 322, 323,
324
Dish Network
(Echostar)
Archer
125, 132
Echostar
105
Cableview
105, 132
Citizen
105, 122
Express VU
105, 115
Curtis
112, 113
G. E.
106
108
Penney
300, 305, 310,
311, 324, 339,
345
105, 115, 116
Pentax
300,311, 345
Diamond
124, 125, 132
G.I. (General
Instrument)
Philco
320, 323, 324,
326, 331, 343
Eagle
129
Gradiente
114
Eastern
134
Philips
323, 324, 331
GCbrand
105, 132
Hitachi
103, 111,
112
Pioneer
323
Gemini
122
HNS (Hughes)
103
Proscan
300, 301, 302,
323, 324, 331,
333, 345, 346
General
Instrument/
Jerrold
111, 119, 120,
121, 122, 124,
125, 126, 127
Magnavox
101, 102
Panasonic
104
Philips
101, 102
Hamlin
112, 118, 140,
141, 142, 145
Primestar
108
Hitachi
103, 124
Proscan
106, 109, 110,
113
Macom
103, 104, 105
RCA
Magnavox
133
106, 109,
110, 113
Memorex
130
Sony
107
Movietime
105, 132
Star Choice
103, 108
Oak
102, 137, 139
Thoshiba
100
Panasonic
109, 110, 114
Uniden
101, 102
Philips
106, 107, 128,
129, 130
Pioneer
101, 116
Pulsar
105, 132
Denon
100
Puser
132
Ferguson
101
RCA
115
JVC
109
Realistic
132
Mitsubishi
105
Regal
112, 118, 140,
141, 142, 145,
149
Nordmende
101
Panasonic
100
Philips
103
Pioneer
102
RCA
101
Saba
101
Samsung
110
Quasar
321, 322, 323,
324
Radio
Shack
305, 309, 324,
333, 336, 340
RCA
300, 301,302,
323, 324, 331,
333, 345, 346
Realistic
305, 309, 324,
336, 340
Samsung
302, 304, 333
Sansui
320, 326, 339,
352
Sanyo
305, 309, 313
Scott
301, 302, 304,
309, 320, 326,
338, 340, 347,
348
Sears
300, 305, 306,
307, 308
335, 336
Shintom
317
Códigos para DVD
Marca
Código
JVC
310, 311, 334,
339
Sharp
Kenwood
306, 310, 311,
339
Signature
2000
335
LXI
300, 305, 306,
307, 308, 309
Singer
337
Sony
328, 329, 330
Sylvania
323, 324, 331
Scientific
Atlanta
111, 112, 113
Tashiro
306
Slmark
101, 105
Sharp
108
Tatung
310, 311, 339
Sprucer
105, 110
Sony
104
Teac
310, 311, 339
Stargate
105, 110
Technics
100
Technics
321, 322, 323,
324
Teleview
101, 105
Thomson
101
Texscan
144
Teknika
324
Toshiba
103
Tocom
135
Toshiba
301, 346
Yamaha
100
Toshiba
104
Zenith
107
Unika
125, 132
Magnavox
323, 324, 331
Marantz
310, 311, 339
Marta
306
Memorex
309, 324
MGA
338, 340, 341,
347,348
Minolta
300, 345
Mitsubishi
338, 340, 341,
347, 348
Multitech
304, 347
NEC
310, 311, 334,
339
Olympic
323, 324
Optimus
306, 321, 328,
335
Regency
134
Rembrandt
105, 132, 137
Samsung
105
Vector
Research
311
Universal
122, 132
Wards
306, 309, 335,
336, 344
Videoway
106
129, 130
Yamaha
305, 310, 311,
339
Viewstar
Zenith
100, 117
Zenith
306,344
Zenith/.Drake
100
Satellite
17 z
ESPAÑOL
Códigos para VCR
P9 0474 S doc3 080403R.fm Page 18 Wednesday, August 13, 2003 8:25 AM
OPERACIÓN DEL CONTROL REMOTO
Códigos de Componentes (Cont.)
Códigos para Equipos de
Casete
Marca
Marca
Códigos para reproductor de
CD
Código
Admiral
120
Aiwa
223, 224, 225
Aiwa
125, 126
Denon
231
Denon
134, 135, 136
Fisher
203
Fisher
104
Jensen
214
Garrard
113
JVC
229, 230
Kenwood
200, 207
Harman
Kardon
115, 123
202
Jensen
129
Nakamichi
205
JVC
132, 133
Onkyo
208, 209, 213
Kenwood
100, 108
Panasonic
216, 218
Magnavox
127
Philips
222
Marantz
124
Denon
231
Mclntosh
116
Fisher
203
Nakamichi
Jensen
214
JVC
229, 230
Kenwood
200, 207
Marantz
202
Nakamichi
205
Onkyo
208, 209, 213
Panasonic
216, 218
Philips
Marca
Código
Códigos para Grabadoras
Personales de Video
Marca
Código
Admiral
226
Panasonic Replay
TV
100
Aiwa
233, 235
Philips Tivo
102
Carver
229
Sony Tivo
101
Denon
242
Emerson
239
Fisher
205
Harman/Kardon
219, 220,
221, 223
Hitachi
207
Jensen
234
JVC
240, 241, 245
Kardon
223
106
Kenwood
200, 201, 211,
245
Onkyo
109, 114
LXI/Sears
236
Optimus
103, 127, 130,
131
Magnavox
229, 232
Panasonic
118, 119, 121
Marantz
229
Philips
123
McIntosh
221
Pioneer
105, 107
Nakamichi
210
Quasar
118, 119, 121
Onkyo
214, 215
RCA
103, 105, 127,
130, 131
Optimus
222
208, 218,
220, 222
Pioneer
204
Sansui
103, 111, 139
Panasonic
224, 225, 227
RCA
226, 227, 228
Sharp
134, 137
Philips
229, 230
Sansui
205, 210
Sony
122
Pioneer
208
Sharp
231
Soundesign
138
Quasar
224, 225, 227
Sony
219, 220
Teac
111, 112, 113
RCA
231, 237,
238, 247
Teac
210, 211, 215
Technics
118, 119, 121
Sansui
210, 246
Technics
216, 218
Victor
132, 133
Sanyo
205
Yamaha
201, 202
Yamaha
101, 102
Scott
210, 246
Sharp
242, 243
Sherwood
220
Sony
228
Soundesign
244
Teac
212, 216, 218
Technics
224, 225, 227
Victor
240, 241, 245
Yamaha
202, 203, 204
Marantz
ESPAÑOL
Código
Códigos para Receptores
18 z
P9 0474 S doc3 080403R.fm Page 19 Wednesday, August 13, 2003 8:25 AM
NAVEGACION BASICA DEL MENU
Navegación básica del menú
MENU
para desplegar el
menu principal.
Presione
CH
VOL OK VOL
CH
CH
VOL OK VOL
CH
campo para el
sub sub-menu
para
seleccionar el
icono
deseado.
Presione
CH
VOL OK VOL
CH
Picture
CH
Presione
VOL OK VOL
CH
PicMode
para accesar al
campo del
submenu.
Nota: Para salir de menu.
Standard
Color
-3
Tint
+1
Brightness
+1
Picture
Sharpness
0
+1
Normal
+1
Other Adj.
Presione
MENU
campo del
submenu
Presione
para seleccionar
o ajustar el submenu.
repetidamente
hasta que la
imagen normal
sea vista.
o
CH
VOL OK VOL
CH
Presione
CH
VOL OK VOL
CH
para seleccionar
el submenu
deseado.
Presione
EXIT
Imagen normal
para regresar a la
imagen normal.
para seleccionar
o ajustar el
submenu
deseado.
Nota: Para Sub-menu con Other Adjust
Presione
CH
VOL OK VOL
para seleccionar
Other Adj.
CH
CH
Presione
VOL OK VOL
CH
para accesar el
sub-menú de
Other Adj.
19 z
ESPAÑOL
Presione
para seleccionar
el sub-menu
deseado.
P9 0474 S doc3 080403R.fm Page 20 Wednesday, August 13, 2003 8:25 AM
OPERACION DEL MENU
Operación del Menú
Picture (IMAGEN)
puede seleccionar cuando se ve programación regular
de TV (NTSC).
Nota:
Mientras la funciones del sub-menu estan remarcadas,
presione VOL para ajustar o activar.
MODO - Le permite escoger uno de tres modos de
imágen preseleccionados para ver el programa. El
seleccionar esta función también afectara Temp Color.
•
•
•
ESPAÑOL
Nota:
Nota:
VIVIDO - Este el modo de fábrica. Crea una
imágen de contraste y nitidez mejorados para ver
se en un cuarto bien iluminado.
ESTANDAR - Este el modo de fábrica. Crea una
imágen de contraste y nitidez mejorados para ver
se en un cuarto bien iluminado.
CINEMA - Seleccione este modo par ver peliculas
en un cuarto oscuro. Provee una imágen más
suave, tipo cine.
Cada modo tiene sus propios ajustes de imágen (Color, brillo,
tinto, contraste y nitidez).
COLOR - Ajusta la intensidad del color deseada.
TINTE - Ajusta los tonos naturales de la piel.
BRILLO - Ajusta las áreas oscuras para detalles más nítidos.
CONTRASTE - Ajusta las área blancas de la imagen.
NITIDEZ - Ajusta para dar mejor claridad a los detalles de la
silueta.
NORMAL - Reajusta todas las modificaciones de la imagen a
los predispuestos de fábrica.
Picture
Pic Mode
•
•
Nota:
AUDIO
Nota:
Mientras la funciones del sub-menu estan remarcadas,
presione VOL para ajustar o activar.
BAJOS - Aumenta o disminuye los sonidos bajos
ALTOS - Aumenta o disminuye los sonidos altos.
BALANCE - Enfatiza el volumen del altavoz derecho /
izquierdo.
NORMAL - Reajusta BAJOS, ALTOS y BALANCE a los
niveles prefijados de fábrica.
Audio
Standard
Tint
31
Brightness
31
Treble
Picture
53
Balance
31
Normal
No
Bass
31
Set
Other Adjust (Otros Ajustes)
Seleccione OTROS AJ. y presione OK par desplegar el
sub sub-menu.
Mientra las funciones
remarcadas, presione
seleccionar o activar.
del sub sub-menu
VOL o VOL
Nota:
estan
para
Other Adjust
Off
BBE VIVA
Off
BBE
Off
Cool
Surround
Off
Natural Color
On
Speakers
Video NR
Off
3D Y/C
Off
Color Matrix
SD
VM
Off
Freeze
•
20 z
Mientra las funciones del sub sub-menu estan
remarcadas, presione VOL para seleccionar o activar.
AI Sound
Color Temp
•
8
Other Adjust (Otros Ajustes)
Other Adjust
•
7
Other Adjust
Other Adjust
•
OK
31
Sharpness
•
Los botones SWAP, SEARCH, SIZE , PIP MIN y PIP MAX no
funcionan en este modo
Color
Normal
Nota:
Cuando esté viendo una señal de DTV en un
formato no-estándar, puede cambiar los
parámetros de color manualmente para obtener
una mejor calidad de imágen.
MV (Velocidad de modulación) - Incrementa la nitidez de
la imágen y da mejor transición de blancos a negros.
FREEZE - Esta función es usada da para congelar la
imagen principal y desplegarla en la IDI or pantalla
SPLIT cuando el botón FREEZE en el control remoto es
presionado. Presione FREEZE de nuevo para eliminar la
pantalla.
HDMI In
•
SONIDO IA - Automáticamente mantiene el
volumen
constante
entre
programas
y
comerciales.
•
BBE® - La tecnología de sonido BBE® mejora el
entendimiento de los discursos y restaura el rango
dinámico de pasajes musicales para proveer un sonido
natural sobresaliente.
BBE VIVA 3D - BBE VIVA provee una imagen precisa
natural 3D con sonido hi-fi. La claridad del sonido es
mejorada por BBE mientras el ancho, profundidad y
altura de la imagen del sonido 3D BBE. BBE VIVA es
compatible con toda la programación de TV incluyendo
noticias, musica, dramas, peliculas y deportes así como
también juegos electronicos. BBE VIVA mejora el efecto
del sonido envolvente, mientras mantiene la claridad del
dialogo.
BBE VIVA 3D solo esta disponible para los modelos
PT-53TWD63 y PT-56TWD63.
Split
TEMP COLOR (temperatura) - Para aumentar o
disminuir el rojo y e azul para acomodarse a las
preferencias personales.
COLOR NATURAL - Esta función expande el rango de
reproducción del color, lo que resulta en imagenes mas
vivas con una graduación de colores mas nautural y
tonos mas delicados.
REDUC DE RUIDO - Reduce el ruido de canal
normalmente llamado "nieve”.
3D Y/C FILTRO - Minimiza el ruido y cruce de color en la
imágen.
MATRIZ COLOR - Disponible solo con señal 480p.
Seleccione HD o SD para ajuste automático de los
parámetros de color para transmisiones de HD (alta
definición) y SD (definición estándar). Esta función no se
On
Auto
•
Nota:
P9 0474 S doc3 080403R.fm Page 21 Wednesday, August 13, 2003 8:25 AM
OPERACION DEL MENU
AUDIO (cont.)
•
•
SPEAKERS - Esta función le permite encender o apagar
los altavoces.
•
On - Los Altavoces funcionan normalmente.
•
Off - Los altavoces no funcionan.
HDMI In - Cuando se utilice HDMI, esta opción le
permitirá cambiar entre entrada analoga y entrada
digital.
•
Auto - Selecciona automaticamente señal analoga/
Digital.
•
Digital - Solo entrada digital.
•
Analog - Solo entrada Analoga.
Manual Labels (Titulos Manuales) - Para introducir
los números y titulos manualmente.
Procedimiento
•
Nota:
•
•
Channels (CANALES)
•
•
•
FAVORITE - Le permite crear una lista de canales favoritos de
la Antena (A) o Antena (B).
SURF MODE - Seleccione FAVORITE o ALL
CHANNELS con los botones
VOL o VOL , luego
presione el botón OK.
RF Input - Seleccionar Antena (A) o Antena (B).
CHANNEL - Use los botones
VOL o VOL
para
seleccionar los canales, después presione OK para
añadir. Para remover el canal, presione OK mientras el
número del canal este desplegado.
•
•
Favorites
_______
RF Input
Antenna (A)
Channel
A1
Solo entradas con señal podran ser
seleccionadas.
Presione OK para subrayar su selección.
Presione CH
para seleccionar CHANNEL, luego
presione
VOL o VOL
para seleccionar el
número de canal disponible.
Presione OK para subrayar su selección.
Presione CH
para seleccionar CAPTION.
Presione VOL
para seleccionar la posición del
primer caracter, luego presione CH
o CH
seleccionar el caracter.
Repita hasta que todos los caracteres sean
introducidos, hasta siete caracteres pueden ser
introducidos por canal.
Use los botones numéricos del control remoto para
seleccionar el canal deseado.
Captions
Preset Labels
Manual Labels
Input Labels
Favorite
Surf Mode
Presione OK cuando Titulos Manuales esta
seleccionado a la señal de entrada RF, luego
presione VOL o VOL para seleccionar Antena
(A) o Antena (B).
RF input
Channel
Caption
Antenna (A)
CHANGE
15-1
The maximum is 16 favorite channels
Captions - Para añadir etiquetas manuales o
preseleccionadas a canales deseados. Tambien coloca
etiquetas a las entradas de video.
Preset Labels (Prefijado) - Asigne los números de
canal para los títulos/siglas prefijados.
Procedimiento
•
•
Procedimiento
•
Presione el botón OK mientras Preset Labels tiene
seleccionado la entrada RF Input, luego presione
VOL o VOL
para seleccionar Antena (A) o
Antena (B).
•
•
Presione CH
para seleccionar otra entrada,
repita el procedimiento para agregar mas titulos a
las entradas.
•
Para remover los titulos seleccione la entrada
deseada, presione
VOL o VOL
hasta que un
guión (-) sea mostrado.
Presione OK para subrayar el guión (-).
Nota:
•
Captions
Captions
Preset Labels
RF Input
Manual Labels
ABC
Input Labels
CBS
Antenna A)
12-1
FOX
PBS
Preset Labels
Component 1
DBS
Manual Labels
Component 2
SKIP
HDMI
DVD
Video1
VCR
Input Labels
NBC
15-1
Video2
CNN
Nota:
Presione OK mientras Input Labels tiene
seleccionado COMPONENT 1, después presione
VOL o VOL
para seleccionar la etiqueta de
entrada predefinida para COMPONENT 1.
Presione OK para subrayar la selección.
•
Nota:
•
•
Solo entradas con señal podrán ser
seleccionadas.
Presione OK para subrayar su selección.
Presione CH
para seleccionar el titulo prefijado
deseado.
Use los botones numéricos del control remoto para
seleccionar el canal deseado (hacer referencia a
su guía de TV local).
Input Labels (Titulos de entradas de video) - Para
clasificar las conexiones de entrada de video que
se visualizan en la pantalla.
ESPN
Video3
HBO
Video4
Para borrar un canal, presione
seleccionado
VOL cuando el canal está
21 z
ESPAÑOL
Other Adjust (OTROS AJUSTES)
•
SURROUND - Sonido envolvente tridimensional
con dos altavoces.
P9 0474 S doc3 080403R.fm Page 22 Wednesday, August 13, 2003 8:25 AM
OPERACION DEL MENU
Operación del Photo Viewer™
El Photo Viewer le permite mostrar imagenes JPEG grabadas en
una tarjeta SD o PCMCIA cuando es insertada en la abertura
correcta.
CHANNEL
POWER
VOLUME
Photo Viewer™ - Modo de previsualización
TV/VIDEO
OK
S-VIDEO VIDEO 4 L - AUDIO - R
MENU
Abertura SD
mostrar la imagen en pantalla. Use
VOL o VOL
para
seleccionar la imagen previa o siguiente. Presione EXIT para salir
del Photo Viewer.
Abertura PCMCIA
Notas:
•
Otros tipos de tarjetas de memoria pueden ser
insertados en la abertura PCMCIA usando el adaptador
de tarjeta apropiado.
•
Las tarjetas de memoria no son incluidas con este
televisor.
La pantalla de previsualización es la primera pantalla accesada
desde el menú principal. Muestra la cantidad total de imagenes
en la tarjeta, el nombre del archivo (número de folder y el número
de la previsualización seleccionada), la fecha en que la foto fué
tomada y la resolución de la misma.
Procedimiento
•
•
•
ESPAÑOL
Tarjetas de memoria compatibles que pueden ser
usadas con el Photo Viewer™
Tipo de tarjeta
Capacidad máxima
SD, MMC (Multi Media Card),
Smart Media*, Compact Flash*
Memory Stick*, xD-Picture Card*,
Flash ATA*, memory Stick Pro*
*Estas tarjetas requieren de un
adaptador PCMCIA estándar.
Nota: Photo Viewer™ no es
compatible con discos duros tipo
tarjeta (Micro Drive, Mobile type hard
disk, etc.)
SD - 512MB, MMC - 64MB
Smart Media - 128MB,
Compact Flash - 1 GB
Memory Stick - 128MB
xD-Picture Card - 128MB
Flash ATA - 128MB
Memory Stick Pro - 1GB
Insertando y removiendo tarjetas SD o PCMCIA
ADVERTENCIA: Como con cualquier objeto pequeño, las
tarjetas SD pueden ser tragadas por niños
pequeños. Remueva la tarjeta SD inmediatamente
despues de usarla.
Procedimiento
Tarjeta SD - Introduzca la tarjeta SD en la abertura SD hasta
que haga click. Presione la tarjeta de nuevo para removerla.
Tarjeta PCMCIA - Introduzca la tarjeta hasta que asiente
firmemente. Para remover la tarjeta, presione el botón en el
lado derecho de la abertura. Previo a remover la tarjeta
PCMCIA, asegurese de apagar el televisor. De otra manera,
puede dañar el televisor.
Información sobre las tarjetas de memoria
•
Las tarjetas de memoria deben estar formateadas con
FAT12 o FAT16 para que puedan ser accesadas. Si la tarjeta
no esta formateada puede ocasionar incompatibilidad con
algunos adaptadores de tarjetas. Si esto sucede,
reformatee la tarjeta utilizando su cámara digital. Vea el
manual de su cámara para más información.
Nota:
•
Al reformatear la tarjeta se borraran todas las
imagenes en ella.
Si el JPEG es modificado usando una PC, este no sera
visto en el televisor.
Operación básica
Introduzca ya sea la tarjeta SD o PCMCIA en la abertura
correspondiente. La imagen desaparece de la pantalla mientras el
Photo Viewer accesa la información de la tarjeta. Despues de
accesar las imagenes de la tarjeta, aparecera una imagen con
previsualizaciones en pantalla. Use los botones de navegación
para seleccionar la previsualización deseada y presione OK para
22 z
•
•
•
•
Presione MENU para accesar el menú principal.
Seleccione el icono Photo Viewer usando los botones de
navegación (izquierda/derecha/arriba/abajo).
Presione OK para mostrar la pantalla de
previsualizaciones.
Seleccione la previsualización deseada usando los
botones de navegación.
Presione OK para ver la imagen seleccionada.
Cambie la imagen presionando los botones
VOL o
VOL .
Para girar la imagen (en caso de ser necesario), use los
botones CH
o CH .
Notas:
•
Número máximo de carpetas que pueden desplegarse:
100.
•
Tamaño máximo de archivo: 3000. Cualquier carpeta
con archivos más grandes no será mostrada.
•
Resolución de imagen: Compatible en el rango 64x64 8192 x 8192 (sub-muestreo 4:2:2 o 4:2:0)
•
Si la imagen es importada de una PC, debe usar el
formato EXIF (Exchangeable image file format) 2.0, 2.1,
2.2 ademas del formato DCF (design rule for Camera
File system), o no podrá ser desplegada.
•
Si el JPEG es modificado usando una PC, no será
desplegado en el televisor.
•
El Photo Viewer™ no puede mostrar JPEG animado o
imagenes fijas no formateadas con DCF(ejem. TIFF,
BMP).
•
Si el archivo esta parcialmente corrompido, podria ser
mostrado a una resolución menor.
•
Si la tarjeta SD y la PCMCIA son insertadas al mismo
tiempo, la tarjeta SD tiene prioridad. De lo contrario, la
última tarjeta insertada tiene prioridad.
•
No quite la tarjeta SD o PCMCIA mientras el Photo
Viewer™ este accesando la información (cuando el
icono de la tarjeta esta destellando). Esto podría dañar
la tarjeta de memoria o el televisor.
P9 0474 S doc3 080403R.fm Page 23 Wednesday, August 13, 2003 8:25 AM
OPERACION DEL MENU
Operación del Photo Viewer™ (Cont.)
Menú de Setup del Photo Viewer™
Este menú le permite ajustar varios parámetros del Photo Viewer.
Procedimiento
•
•
Seleccione el icono del Photo Viewer y presione OK
para mostrar la pantalla de previsualización.
Presione el botón SD en el control remoto para mostrar
el menú de Setup.
Use los botones CH
,
VOL o VOL
para
navegar en el menú.
100-001
0001/0066
Setup Menu
Slide Show
Return
Interval
5Sec
Sequence
Order
Mensaje mostrado
en pantalla
Error
Al momento de insertar la No hay tarjeta o la tarjeta no fué
tarjeta
insertada correctamente.
Archivo JPEG corrompido y no Este tipo de imágen es válido.
puede decodificarse.
El archivo no esta formateado
con FAT 12 o FAT 16 o no Este tipo de formato no es válido.
cumple con el estándar DCF.
Start
Repeat
Mensajes de error
OFF
Rotate
Left
Card
SD
SELECT
La previsualización o la
imagen principal no pueden
ser mostradas
OK
Aparecerá este ícono donde
debería aparecer la
previsualización.
CHANGE
EXIT
Date
Pixel
: 07/04/2002
: 1600 x 2000
En este menú podrá ajustar las opciones del Photo Viewer.
Slide Show - Le permite comenzar un slide show
presionando OK si la opción Start esta seleccionada.
Presione OK para detener el Slide show.
Nota: Cuando esta en modo de Slide show, puede cambiar el
aspecto de la imagen en pantalla presionando el botón
ASPECT en el control remoto.
Interval - Le permite ajustar el tiempo que la imagen aparece
en pantalla. Los tiempos disponibles son: 5seg, 10seg,
15seg, 30seg, 60seg, 90seg y 10 minutos.
Sequence - Seleccione en órden o aleatorio.
Repeat - Para repetir el Slide show automáticamente.
Nota: Una vez ajustados Interval, Sequence o Repeat,
presione CH
para seleccionar Start, luego presione
OK para salvar los ajustes y empezar el Slide Show.
Rotate - Le permite girar la imagen.
Zoom - Le permite ajustar la magnificación de la imagen en
pantalla. Presione OK aplicar el grado de magnificación
seleccionado. Para mover la imagen presione los botones de
navegación.
Más de 3000 archivos
Photo Viewer™ no puede accesar
más de 3000 archivos JPEG.
Excede la resolución
Photo Viewer™ no puede accesar
imágenes de más 8192x8192
pixels..
Tarjeta no
insertada
compatible
Soluciones
No puede leer el contenido
de la tarjeta
A). Formato incompatible. Debe ser
formateado con FAT 12 o FAT
16.
B) La extensión no es “JPG”. El
Photo Viewer solo puede mostrar
archivos JPEG con el estándar
EXIF.
C) Las carpetas no cuentan con el
estándar DCF.
La tarjeta no puede ser
removida
Presione la tarjeta hasta que quede
insertada completamente y luego
remuevala.
Calidad de imagen pobre
Si la imagen principal no puede ser
accesada (el archivo está
parcialmente corrompido), el photo
viewer accesará la previsualización.
Confirme el formato de la imagen.
Long time to display
It will take long time to display, if
there are lots of images or if the file
size is big.
•
Este tipo de tarjeta no es válido..
Localización de fallas del Photo Viewer™
Síntomas
Procedimiento
Estando en el modo de despliegue de imagen sencilla
(Single Slide display mode), presione SD para accesar
el menú de ajuste del Photo Viewer™. La opción Zoom
será mostrada en el menú de ajuste.
•
Seleccione Zoom y presione OK.
•
Presione
VOL o VOL para elegir To Fit, x2 o x4.
•
Presione OK. Para mover la imagen en el marco de la
imagen utilize los botones de navegación.
Card - Selecciona entre la tarjeta SD o PCMCIA cuando
ambas se encuentran insertadas.
es
Notas:
•
Si las previsualizaciones o una imagen son mostradas
por más de 10 minutos, Movimiento de imagen (Image
shift ver pág. 26) se activará para prevenir la retención
de imagen. La imagen en pantalla se agrandará y
reducirá en cuatro (4) pasos. Para salir de este modo,
presione OK o seleccione otra imagen o presione otro
botón.
•
Durante el Slide show, el movimiento de imagen será
activado si la imagen es mostrada por más de cinco (5)
minutos. La imagen se moverá horizontalmente
(izquierda o derecha) en incrementos de minutos. El
movimiento de imagen no se activará si está apagado.
23 z
ESPAÑOL
•
A continuación se muestran unos de los mensajes de error que
pueden ser mostrados en pantalla cuando algunas condiciones
no se cumplen o exceden las especificaciones del Photo
Viewer™.
P9 0474 S doc3 080403R.fm Page 24 Wednesday, August 13, 2003 8:25 AM
OPERACION DEL MENU
Timer (CRONOMETRO)
•
Este menú le permite ajustar los cronómetros (Sleep y Timer ), la
hora y el día de la semana.
APAGADO (Sleep) - En el menú de Cronómetro,
seleccione Apagado para programar la Televisión en
30, 60 ó 90 minutos. Seleccione NO para desactivar el
Cronómetro.
Timer
Sleep
No
Timer
Clock Set
--:--
----
Day Set
ESPAÑOL
•
•
Notas:
•
El reloj debe ser ajustado antes de programar Timer.
Use los botones de navegación para seleccionar el
icono de Timer.
•
La televisión se activado automáticamente después de
90 minutos cuando se encendió con el CRONOMETRO.
Si se selecciona APAGAR o si se presiona una tecla, el
apagado automático de 90 minutos se cancela.
Ajuste del reloj - Ajuste la hora de la semana. .
Procedimiento
•
•
•
•
Presione MENU para desplegar el menú principal.
Seleccione el icono Timer usando los botones de
navegación.
Presione el botón OK para desplegar el menú Timer
(Cronómetro).
Presione el botón VOL
para seleccionar 30, 60, 90
minutos o No.
Timer (Cronom) - Seleccione cronómetro, para
encender y apagar la televisión a la hora y los días
seleccionados.
Timer
OK
Sleep
30
Timer
Clock Set
Introduzca el canal deseado con los botones numéricos
y el botón PROG (en caso necesario). El televisor
sintonizará este canal cuando el cronómetro se active.
Apague el televisor.
El televisor se encenderá a la hora seleccionada y a el
canal que se tenia al momento de apagar el televisor.
10 : 10
AM
Timer
OK
Sleep
No
Timer
Clock Set
10 :00
AM
---
Day Set
Procedimiento
•
•
•
En el menú de Timer, presione CH
para colocarse en
Clock Set y presione OK.
Presione CH
o CH
para ajustar la hora (AM o PM).
Presione VOL
para pasar al siguiente campo.
Presione CH
o CH
para ajustar los minutos.
Presione MENU o OK para regresar a la pantalla de
Timer.
Day Set - Selecciona el día de la semana.
Sun
Day Set
Timer
Sleep
Timer
OK
Sun
Day
On Time
10 : 10
AM
Off Time
12 : 10
PM
Set
Yes
Procedimiento
•
Dentro del menú Timer, presione CH
para seleccionar
Timer.
•
Presione OK para mostrar el sub-menú de Timer.
•
Presione
VOL o VOL
para seleccionar el día
deseado.
•
Presione CH
para colocarse en On Time.
•
Presione OK para colocar la hora. Presione CH
o CH
para ajustar la hora (AM o PM).
•
Presione VOL y CH
para ajustar los minutos.
•
Presione OK o MENU para grabar los ajustes.
•
Presione CH
para colocarse en Off Time y repita el
mismo procedimiento para colocar la hora.
•
Presione CH
para colocarse en Set y seleccione Yes
o No.
•
Presione EXIT para salir del menú.
24 z
No
Timer
Clock Set
Day Set
10 :00
AM
SUN
Procedimiento
•
Presione CH
para colocarse en Day Set y seleccione
el día de la semana usando VOL o VOL .
•
Presione EXIT para salir del menú.
P9 0474 S doc3 080403R.fm Page 25 Wednesday, August 13, 2003 8:25 AM
OPERACION DEL MENU
El menú de Set Up le permite seleccionar la antena, programar
canales análogos o digitales, seleccionar subtitulos análogos y
digitales, ajustar la convergencia, el auto encendido, movimiento
de imagen y ajuste de magnificación.
Procedimiento
•
Presione el botón MENU para desplegar el menú
principal.
•
Presione
CH , CH
,
VOL o VOL
para
seleccionar el icono de Set Up.
•
Presione OK para mostrar las opciones del menú de
Setup.
Notas:
•
Si selecciona Cable Only, Antenna Only o Antenna/
Cable y el módulo POD no está conectado, la auto
programación hará un Scan All (busqueda completa).
•
Si Cable Only es seleccionado y el módulo POD está
conectado, el Auto scan no se hará.
•
Si Cable/Antenna es seleccionado y el módulo POD está
conectado, Antenna (B) Analog y Digital Auto scan se
llevarán a cabo.
Auto Scan (Auto Programación) - Programa
automáticamente todos los canales disponibles.
Procedimiento
•
Coloquese en Auto Scan y presione OK para entrar al
sub-menú.
•
Use
CH y CH
para seleccionar Scan All y presione
OK para iniciar. Una vez terminada la auto programación
presione MENU para regresar al menú anterior.
Program Channel
Program CH (Programar canales)
Procedimiento
•
En el menú de ajuste (Set Up), seleccione Program
Channel y presione OK.
•
Presione OK para entrar al sub-menú. Presione
VOL
o VOL para seleccionar Cable Only, Cable/Antenna o
Antenna Only.
•
Presione OK. Cuando la siguiente pantalla sea
desplegada, presione OK para iniciar la auto
programación. La auto programación debe hacerse
cuando seleccione la señal de entrada por primera vez o
cuando cambie la configuración de la antena.
Input Setup
Antenna (A) Analog
Manual Program
Antenna (A) Analog & Digital
OK
Cable only
Antenna (B) Analog
Antenna (A) Analog & Digital
Manual Program (Programación Manual) - Para
agregar o borrar canales manualmente.
Program Channel
Puede conectar una antena de cable o terrestre al
conector Ant A. Pero, si tiene ambas, la antena del
Cable debe ser conectada al conector Ant A y la antena
terrestre al conector Ant B.
Program Channel
Auto Scan
Press OK to channel scan
all available channels
Input Setup - Sirve para seleccionar el modo de antena
(Cable Only, Cable/Antenna o Antenna Only).
Nota:
Scan All
Signal Meter
Este menú le permite seleccionar la antena, autoprogramar todos
los canales análogos o digitales disponibles, manualmente
agregar o remover canales y mostrar la fuerza de la señal
recibida de los canales digitales.
OK
Input Setup
SELECT
Input Setup
RF Input
Auto Scan
Channel Add
Manual Program
Channel Delete
OK
Antenna (A)
A: 12
MENU
to return
EXIT
Signal Meter
Signal Meter (Medidor de señal) - Muestra la fuerza de
la señal digital ATSC recibida ya sea en Antena (A) o
Antena (B).
Note:
Esta función no esta disponible para canales análogos.
Procedimiento
•
Coloquese en Signal Meter y presione OK para entrar al
sub-menú.
•
En el campo RF Input, seleccione Antenna (A) o
Antenna (B).
•
Seleccione el canal usando VOL o VOL .
•
Presione OK para mostrar la fuerza de la señal.
Auto Scan
Program Channel
Connect Cable to Antenna (A)
Manual Program
Input Setup
Signal Meter
Auto Scan
Change your Input Setup
and press OK
RF Input
RF Channel
Antenna (A)
________
3-1
Manual Program
Signal Meter
Signal Strength: 70%
Peak:
Program Channel
Input Setup
OK
Cable only
Auto Scan
Connect Cable to Antenna (A)
Manual Program
Signal Meter
Auto scan is needed
press OK to start Auto Scan
Nota:
: 75%
El color de las barras indica usualmente la fuerza de la
señal recibida.
•
Verde - Señal adecuada para buena recepción.
•
Amarillo - Señal pobre.
•
Rojo - Señal muy pobre.
25 z
ESPAÑOL
SET UP (AJUSTE)
P9 0474 S doc3 080403R.fm Page 26 Wednesday, August 13, 2003 8:25 AM
OPERACION DEL MENU
Closed Caption (Subtítulos)
Este televisor incluye un decodificador integrado que es
capaz de mostrar subtítulos del sonido escuchado. El
programa visto debe proveer subtítulos para que el
televisor pueda mostrarlos. Puede ajustar sus preferencias
para los subtítulos digitales y los análogos.
CC
CC Mode
Setting
On
Analog
Digital
CC Mode (Modo CC) - Seleccione On, Off o Mute.
•
ESPAÑOL
•
•
Off - Cuando no se desea le modalidad de
subtitulos.
On - Para desplegar Subtitulos.
On Mute - Active la modalidad de subtitulos en
pantalla cuando el audio es silenciado.
Analog (Análogo)
Le permite ajustar las opciones de los subtítulos análogos.
•
En el menú Closed Caption, seleccione Analog y
presione OK para entrar al sub-menú.
•
Presione
VOL o VOL
para seleccionar la opción
deseada:
•
CC1 - Para que la información relacionada con el
vídeo sea desplegada en hasta 4 líneas en pantalla
a la vez. (No bloquea partes relevantes de la
imagen). El texto puede ser en cualquier idioma.
•
CC2 a CC4 - Otras modalidades de información
relacionada con el video.
•
T1 a T4 - Para que la guía de la programación o
cualquier otra información sea desplegada en
pantalla, cuando este disponible. (Bloquea una
gran porción de la imagen en la pantalla de la
televisión).
•
Presione MENU para regresar al menú de Closed
Caption.
Digital
Este menú le permite configurar el tipo de servicio de los
subtítulos, tipo de letra, tamaño de letra y estilo de letra. El
sub-menú Color le permite configurar el color de la letra, el
color del fondo en que el texto es mostrado, la opacidad de
la letra, la opacidad de la caja de texto y el filo de la sombra
(si esta es seleccionada).
Sub-menú Colors
•
En el sub-menú de subtítulos digitales, seleccione
Colors y presione OK.
CC
Colors
Foreground
Fore Opacity
Background
Back Opacity
Outline
Green
Translucent
White
Opaque
Black
Sample CC Text
26 z
Nota:
Cuando se utilizan los subtítulos digitales, la salida para
monitor (Prog Out) tambien mostrará los subtítulos. Esto
significa que si graba el progama, los subtítulos tambien
serán grabados. Para evitar esto, apague los subtítulos
digitales o utilize los análogos.
Other Adj. (Otros ajustes)
El menú Other Adj. le permite configurar el auto encendido, la
convergencia, el movimiento de imagen y la magnificación.
Auto Power On (Autoencendido) - Seleccione SET
para encender la televisión al mismo tiempo que el
Decodificador de Cable u otros componentes, o
seleccione Off.
Image Shift (Movimiento de imagen) - Esta función
ayuda a evitar la retención de imagen causada por ver
imagenes fijas por un periodo extendido de tiempo. La
imagen es corrida a la izquierda o derecha en
pequeños incrementos si una imagen fija se deja en
pantalla por un periodo extendido de tiempo. Es
recomendado seleccionar On para esta opción.
Convergence (Convergencia) - Esta función le permite
ajustar la convergencia en caso de ser necesario.
Zoom Adjust (Magnificación) - Esta función le permite
ajustar el tamaño de la magnificación y su posición
vertical.
Procedimiento
•
En el menú Set Up, seleccione Other Adj. y presione OK
para entrar al sub-menú.
•
Use
CH o CH
para navegar. Presione
VOL o
VOL para seleccionar o presione OK para mostrar el
sub-menú de Convergence o Zoom Adjust.
Convergence (Convergencia)
Nota:
Solo use los botones del control remoto mientras
ajusta la convergencia. El panel de control frontal no
tiene efecto.
Set Up
SELECT
Auto Power On
Off
CHANGE
Image Shift On
On
MENU
to return
OK
EXIT
Convergence
Zoom Adjust
Nota:
La convergencia no suele necesitar ajuste, excepto
después de mover el televisor o para hacer ajustes
menores.
Procedimiento
•
Presione OK para seleccionar el campo de
Convergence.
•
Presione CH
o CH
para ajustar:
•
Convergence Adj. - Seleccione para realizar el
ajuste de convergencia.
Nota:
•
Una vez seleccionado, presione OK para
continuar el ajuste.
Reset to Default - Seleccione para regresar la
convergencia a su ajuste de fábrica.
P9 0474 S doc3 080403R.fm Page 27 Wednesday, August 13, 2003 8:25 AM
OPERACION DEL MENU
Una vez seleccionado, presione OK para
aplicar el ajuste.
SELECT
Convergence
Nota:
Un patrón de cruz ajustado aparece blanco con un
minímo de color saliente.
EXIT
MENU
to return
4
Procedimiento
•
Después de presionar OK se desplegará la pantalla para
alinear el verde al centro.
•
Después utilice los botones de navegación en el control
remoto para alinear las lineas verdes horizontales y
verticales en la pantalla, con las marcas de referencia
del gabinete en la parte central superior, inferior,
izquierda y derecha.
•
1
4
•
Right
Left
•
Nota:
Down
Press Ok To Continue
Presione OK para msotrar la imagen de corrección de
rojo al centro.
Use los botones de navegación para alinear la cruz
ROJA con el patrón blanco.
PARA PREVENIR DAÑO AL TUBO DE LA IMAGEN,
NO DEJE ENCENDIDO EL PATRON DE PRUEBA
POR UN PERIODO DE TIEMPO PROLONGADO.
Presione “0” en el teclado de control remoto para
desplegar la pantalla para corrección del AZUL,
después repita el procedimiento para ajustar el azul. De
ser necesario presione “0” nuevamente para regresar a
la pantalla para corregir el ROJO.
Un patrón de cruz ajustado aparece blanco con un
minímo de color saliente.
If Red Is Protruding From
Center Cross, Press CH And
VOL Key To Correct
Presione
Up
Left
Down
PRESS 0 To Adjust Blue
Press Ok To Continue
Right
2
3
“0”
1
Press # Key To Select Pos.
Press CH And VOL Key To Corr.
6
8
2
3
Press # Key To Select Pos.
Press CH And VOL Key To Corr.
Correcting Red
Press 0ACTION
To Adjust
PRESS
TOBlue
EXIT
Press Ok To Exit
Press CH And VOL Key To
Align Green Lines To The
Center Mark On The Cabinet
Up
9
Presione “0” en el teclado del control remoto para
desplegar la pantalla para corrección de AZUL, después
repita el procedimiento.
7
Nota:
8
7
Marcas de referencia
•
6
Correcting Red
Press 0ACTION
To Adjust
PRESS
TOBlue
EXIT
Press Ok To Exit
Convergence Adj. (Ajuste de Convergencia)
•
3
Press # Key To Select Pos.
Press CH And VOL Key To Corr.
Reset to Default
Frente del
gabinete
2
1
OK
Convergence Adj.
Presione
4
“0”
9
6
Correcting Blue
Press 0ACTION
To Adjust
PRESS
TORed
EXIT
Press Ok To Exit
7
8
9
Para salir presione el botón OK, después presione EXIT
para salir todos menús.
Cable Module Info (Información del módulo del Cable)
Este menú es usado para proveer información cuando un
módulo DCM (Módulo de Cable Digital) es introducido en el
conector DCM INTERFACE (POD INTERFACE) en la parte
posterior del televisor. Si no hay un DCM conectado y trata
de accesar la información del módulo de cable, el mensaje
‘Cable Module Not present’ se mostrará en pantalla. Para
utilizar las funciones ofrecidas por su compañía de cable,
puede ser requerido suscribirse a esos servicios.
Nota:
Comuniquese con su compañía de cable para la
disponibilidad del módulo DCM. Este módulo le permite
sintonizar canales digitales y de alta definición (donde
esten disponibles) a través de su antena del cable.
También podrá ser posible ordenar programas de pago
por evento.
If Blue Is Protruding From
Center Cross, Press CH And
VOL Key To Correct
Up
Left
Right
Down
PRESS 0 To Adjust Red
Press Ok To Continue
Correción de convergencia en nueve puntos
Nota:
El control remoto debe estar en modo de TV.
Procedimiento
•
Presione el botón OK para desplegar el menú
convergencia ROJO.
•
Presione los botones de 1 al 9 en el control remoto para
seleccionar posición de corrección de convergencia.
•
Use los botones de navegación para alinear la cruz
ROJA con la cruz blanca.
27 z
ESPAÑOL
Nota:
P9 0474 S doc3 080403R.fm Page 28 Wednesday, August 13, 2003 8:25 AM
OPERACION DEL MENU
Lock (Bloqueo)
Channel Lock (Bloqueo de canales)
Este televisor de proyección HDTV contiene tecnología V-CHIP
para bloquear peliculas y programs de televisión de acuerdo a su
clasificación. Existen dos (2) Clasificaciones de Contenido: MPAA
(Motion Picture Association of America) y Guía de Clasificaciones
para TV de los EEUU. Estas clasificaciones son usadas como
guías para bloquear los programas. El modo default para el
bloqueo es Unlocked (desbloqueado). En este modo, usted
puede ver varias categorias del menú Lock. Después de crear
una contraseña, esta le será requerida antes de hacer cualquier
cambio en el menú Lock.
Creando una contraseña
Esta opción le permite seleccionar la señal de entrada por RF
(Antenna (A) o Antenna (B) y bloquear hasta cuatro (4) canales
por cada una. La contraseña es requerida para ver estos canales.
RF Input - Seleccione Antenna (A) o Antenna (B).
Channel - Seleccione hasta cuatro (4) canales para
que sean bloqueados. Estos canales serán
bloqueados independientemente de su clasificación.
The maximum is 4 locked channels
Una contraseña es creada usando el menú New Password.
Password
New Password
----
ESPAÑOL
MENU
to return
EXIT
Procedimiento
•
Presione el botón MENU para desplegar el menú
principal.
•
Use los botones de navegación para seleccionar el
icono de LOCK.
•
Presione OK para mostrar la pantalla Create Password.
•
Use el teclado numérico para introducir su código de
cuatro digitos. (Use un código facil de recorder, y
escribalo en un lugar seguro.)
•
Presione OK para salvar el código. Ahora el televisor
esta bloqueado.
Lock Set (Bloquear el televisor)
Mode - Para prevenir juegos de video y videocasetes
de ser vistos. Las opciones posibles son:
•
•
•
•
Off - Para apagar la función de bloqueo.
All (Todos) - All channels are locked regardless of
the rating level.
Game Lock - Para bloquear las canales 3, 4 y las
entradas de video.
Channel Lock - Bloquea canales análogos y
digitales específicos. La contraseña es requerida
para ver cualquiera de los canales bloqueados.
Lock set
Mode
OK
Off
CHANGE
MENU
to return
EXIT
Procedimiento
•
Estando en el menú de Lock, seleccione Lock Set y
presione OK para mostrar el sub-menú.
•
Presione
VOL o VOL
para seleccionar la opción
deseada y presione OK.
•
Presione MENU para regresar a la pantalla anterior.
28 z
Procedimiento
•
En Lock Set, seleccione Channel Lock y presione OK.
•
Presione MENU para regresar al menú previo.
•
Seleccione Channel Lock y presione OK para mostrar el
sub-menú Channel Lock.
•
Presione OK y seleccione Antenna (A) or Antenna (B)
usando
VOL o VOL .
•
Presione CH
y luego OK.
•
Seleccione los canales que desea bloquear usando los
botones de navegación y presione OK. Un máximo de
cuatro (4) canales pueden ser bloqueados por entrada.
Estos canales serán bloqueados independientemente
de su clasificación.
Nota: Para quitar el canal de la lista, seleccione el mismo
canal y presione OK.
Block Program (Bloquear programa)
Esta funciónle permite bloquear peliculas y programas de
televisión basado en el sistema de clasificación de la MPAA y de
TV de los EEUU.
MPAA - La MPAA usa las clasificaciones estándar
usadas en las peliculas para prevenir que estas se
vean.
Block Program
MPAA
Mode
Off
U.S.TV
NR
Viewable
G
PG
PG-13
NC-17
X
Viewable
Viewable
Viewable
Viewable
Viewable
OK
Procedimiento
•
En el menú Lock, seleccione Block Program y presione
OK para entrar al sub-menú.
•
Presione OK para entrar al campo y seleccione Off o On
usando VOL o VOL . Presione OK para guardar su
elección.
•
Presione los botones CH
para seleccionar el nivel
de clasificación deseado.
•
Presione OK para cambiar el limite a “Viewable” o
“Blocked”.
Nota: La clasificación NR es independiente de las demás
clasificaciones. Al colocar un bloqueo a una clasificación
especifica, bloqueará esta clasificación y todas las de
menor restricción que ella.
P9 0474 S doc3 080403R.fm Page 29 Wednesday, August 13, 2003 8:25 AM
OPERACION DEL MENU
Tabla de Clasificación de MPAA
NR
G
PG
PG-13
R
NC-17
X
PROGRAMA NO CLASIFICADO..
AUDIENCIA GENERAL. Se admiten todas las
edades.
GUIA DE LOS PADRES SUGERIDA. Con
material no aconsejable para niños.
FUERTE SUPERVISION DE LOS PADRES. Con
material que puede ser inapropiado para niños
menores de 13 años.
RESTRINGIDO. Menores de 17 años necesitan ir
acompañados de uno de los padres ó un adulto.
NO SE ADMITE A NADIE DE 17 AÑOS O
MENOS.
SOLO ADULTOS.
U.S. TV Rating (Clasificación de TV de EEUU)
Esta guía tiene 7 niveles de clasificaciones basadas en edades
que pueden ser elegidas. Estos 7 niveles estan divididos en 2
grupos según la edad: clasificaciones basadas en juventud
(Youth) y clasificaciones basadas en orientación (Guidance).
Algunas de estas clasificaciones por edad tambien tienen
clasificaciones por contenido, denominadas como D (Diálogo), L
(Languaje), S (Sexo) y V (Violencia). En la siguiente tabla se
muestra la selección de clasificaciones basadas en edad.
Tabla de Clasificacion de Programas de EEUU
Grupo
basado
edad
Clasificación
Posibles selecciones de
en basada
en
contenido
edad
•
Viewable (Visible)
NR
(Sin
TV-NR
clasificación)
•
Blocked (Bloqueado)
•
Viewable (Visible)
TV - Y
•
Blocked (Bloqueado)
•
FV
(Violencia
Youth
Fantasiosa)
TV - Y7
•
Viewable (Visible)
•
Blocked (Bloqueado)
•
Viewable (Visible)
TV - G
•
Blocked (Bloqueado)
•
D,L,S,V
(Todas
seleccionadas)
TV - PG
•
Cualquier combinación
de D, L, S, V
•
D, L S, V (Todas
Guidance
seleccionadas)
TV - 14
•
Cualquier combinación
de D, L, S, V
•
L,
S,
V
(Todas
seleccionadas)
TV - MA
•
Cualquier combinación
de L, S, V
•
•
•
Presione OK para selccionar Off o On y presione OK.
Seleccione la clasificación deseada usando CH
o
CH .
Presione OK para elegir “Viewable” (VERDE) o
“Blocked” (ROJO)..
Block Program
MPAA
Mode
U.S.TV
TV-NR
Viewable
Off
TV-Y
TV-Y7
Viewable
FV
TV-G
TV-PG
TV-14
TV-MA
Viewable
D L S V
D L S V
L S V
OK
Notas:
•
Las clasificaciones como TV-PG, TV-14 y TV-MA
tambien tienen clasificaciones por contenido. Estas
clasificaciones pueden ser bloqueadas individualmente.
para elegir
Seleccione la clasificación, presione VOL
el nivel de contenido y presione OK para bloquear.
•
La clasificación TV-NR es independiente de las otras
clasificaciones.
•
Si TV-Y esta bloqueada, tanto TV-Y como TV-Y7 serán
bloqueadas. Sin embargo, si selecciona TV-Y7, la
clasificación FV puede ser bloqueada o desbloqueada.
Tabla De Programas De EEUU
NR
No clasificado. VEA CUIDADO DEL CLIENTE en
la página anterior.
TV-Y
Todos los niños. Los temas y elementos en este
programa están especialmente diseñados para un
público infantil, incluyendo niños de 2-6 años.
TV-Y7
Dirigido a niños mayores. Los temas y elementos
en este programa pueden incluir ligera violencia
física o cómica, o puede asustar a niños menores
de 7 años.
TV-G
Audiencia General. Contiene poca o nada de
violencia, nada de lenguaje fuerte, y poco o nada
de diálogo o situaciones con contenido sexual.
TV-PG
Guía de los padres sugerida. El programa puede
contener lenguaje obsceno infrecuente, violencia
limitada, diálogos o situaciones sexualmente
sugestivas.
TV-14
Advertencia a los padres. Este programa puede
contener temas sofisticados, contenido sexual,
lenguaje inapropiado, y violencia más intensa.
TV-MA
Sólo audiencia Madura. Este programa puede
contener temas para adultos, lenguaje profano,
violencia gráfica y contenido sexual explícito.
FV
FANTASIA/ CARICATURAS CON VIOLENCIA
V
VIOLENCIA
S
SEXO
L
LENGUAJE OFENSIVO
D
DIALOGO CON CONTENIDO SEXUAL
Procedimiento
•
En el menú de Block Program, seleccione U.S. TV y
presione OK para accesar el campo.
29 z
ESPAÑOL
Para las conocer la descripción de las clasificaciones de la
MPAA, favor de ver la siguiente tabla.
P9 0474 S doc3 080403R.fm Page 30 Wednesday, August 13, 2003 8:25 AM
OPERACION DEL MENU
How Long? (¿Cuanto tiempo?)
About (Pantalla Sobre)
Esta función le permite bloquear las entradas de señal por un
periodo específico de tiempo. Los tiempos disponibles son: 12
horas, 24 horas, 48 horas o Siempre (Always).
La pantalla sobre muestra información variada sobre el televisor.
Por favor tenga esta información a la maño al llamar al centro de
atención a clientes.
How Long?
OK
About
EXIT
Status
CHANGE
Time
12 hours
________
MENU
to return
The TV will remain locked for
the selected duration
Nota:
Si “Always” ha sido seleccionado, y olvida su código
secreto, la TV debe ser atendida por un técnico
calificado para borrar el ajuste be Bloqueo.
ESPAÑOL
Password (Código secreto)
En esta pantalla puede cambiar su código secreto. Ingrese un
código nuevo de cuatro digitos usando el teclado numérico y este
se convertirá en su nuevo código secreto.
Mensajes de Bloqueo
Varios mensajes de bloqueo son desplegados en pantalla
dependiendo del la opción seleccionada en el menú LOCK.
Cuando Game Lock es seleccionado
El siguiente mensaje es desplegado cuando se intenta
seleccionar entrados de video..
Video Inputs Locked.
Cuando Channel Lock es seleccionado
El siguiente mensaje es desplegado cuando se intenta sintonizar
algún canal bloqueado en el menú Channel Lock.
Channel Locked.
Press OK to enter password.
Cuando el nivel de clasificación se exede
Si el Block Program está activado y el programa excede el limite
de clasificación ajustado por el usuario, aparecerá el mensaje de
bloqueo. Su código secreto le será solicitado para ver el canal
bloqueado.
Rating Limit Exceeded.
Press OK to enter password.
Nota:
30 z
Al ingresar el código, invalidará la condición de bloqueo.
Sin embargo, las clasificaciones elegidas se
mantendrán.
1002023014
5226007018
9208007016
MENU
to return
EXIT
P9 0474 S doc3 080403R.fm Page 31 Wednesday, August 13, 2003 8:25 AM
GLOSARIO Y ACRÓNIMOS
Glosario y Acrónimos
ATSC (Advanced Television System Committee)
Cuerpo regulatorio que desarrolló los formatos terrestres para
televisión digital.
DCF (Design Rule for Camera File System)
Estándar unificado establecido por la Asociación de Industrias
Electrónicas y de Tecnología de Información de Japón (JEITA).
DCM (Módulo de Cable Digital)
Una tarjeta tipo PCMCIA que es suministrada por el operador de
cable.
FAT (File Allocation Table)
ESPAÑOL
FAT 12 o FAT 16: Sistemas de archivo usados para formatear las
tarjetas de memoria.
HDMI (High Definition Multimedia Interface)
Interfase que soporta todos los formatos digitales no comprimidos
asi como todos los formatos de audio multi-canal en un solo
cable.
JPEG (Joint Photographic Experts Group)
Sistema usado para comprimir/decodificar imagenes fijas a color.
MPAA (Motion Picture Association of America)
Gremio que gobierna la asignación de clasificaciones de las
peliculas.
NTSC (National Television Systems Committee)
Cuerpo de estandarización que desarrolló los formatos terrestres
de televisión análoga.
Password
Un código de cuatro (4) digitos que el usuario debe proveer para
poder llevar a cabo una función.
31 z
P9 0474 S doc3 080403R.fm Page 32 Wednesday, August 13, 2003 8:25 AM
CUADRO DE LOCALIZACIÓN DE FALLAS
Cuadro de Localización de Fallas
Antes de solicitar servicio, establezca los síntomas y lleve a cabo las siguientes posibles soluciones
SONIDO
IMAGEN
Soluciones
Ajuste la Ubicación y/o Conexión de la Antena
Sonido Ruidoso
Imagen Moteada
Ajuste la Ubicación y la Conexión de la Antena
Revise el Cable de Entrada de la Antena
Sonido Normal
Imagen Múltiple /
Corrimiento de color en imágen
Ajuste la convergencia de la imágen (ver págs. 26 y 27)
ESPAÑOL
Aleje la TV de los Aparatos Electrodomésticos,
Sonido Ruidoso
Luces, Vehículos y Equipo Médico
Interferencia
Aumente el Volúmen
Revise Mute (Mudo)
Sin Sonido
Imagen Normal
Revise en el Menú de Audio: ALTAVOCES > SI (ver págs. 20 y 21)
Cambie el Canal
Ajuste apropiadamente la modalidad de TV o del Cable
Revise los Cables de la Antena
Sonido Ruidoso
Sin Sonido
Sin Imagen/Con Motas
?
Sin Imagen / Sin IDI
Revise que el Cable de Corriente este Enchufado a una toma de
Corriente Activa
Ajuste los Controles de Brillo y Audio
Cambie el Canal
Revise las Conexiones del Cable
Programe el Control Remoto otra vez
Revise la Operación de la Segunda Fuente de Video
Señal ATSC débil. Redireccione la antena.
Redireccione la antena.
Sonido
Distorsionado
Sonido Normal
Digitalización de la imágen
Congelamiento de la imágen
La imagen se recorre ligeramente
al encender el receptor, cuando
se cambía de canal or dentro de
un periodo de 2 horas.
Revise la fuerza de la señal (ver página 25). Si la señal es débil,
agregue un amplificador de señal para incrementar su fuerza.
Esta es una condición normal. Esta función puede ser desactivada. Sin
embargo, el desactivar esta función puede causar retención en la
imagen por lo cual no es recommendado.
Ajuste el Color
Cambie el Canal
Sonido Normal
Sin Color
Revise en el menú de AUDIO que el Ajuste se encuentre en Estéreo o
Mono, no en SPA
Sonido Erróneo
32 z
Imagen Normal
P9 0474 S doc3 080403R.fm Page 33 Wednesday, August 13, 2003 8:25 AM
CUADRO DE LOCALIZACIÓN DE FALLAS
SONIDO
IMAGEN
Soluciones
Cambie CC (Subtítulos) de la Modalidad de Texto a NO
Caja Negra en Pantalla
Sonido Normal
Imagen Normal
Operación Intermitente del Control Remoto
Cuando la señal HDMI esta concectada
Sin Sonido
Sonido Erróneo
Sin Imagen
Imagen Normal
Reemplace las Pilas del Control Remoto
Asegurese de no conectar la PC a la entrada HDMI.
En algunas ocaciones, el televisor no mostrará imagen por la entrada
HDMI cuando este conectado a aparátos con salida HDMI o DVI debido
a mala comunicación entre el televisor y los aparátos. Si esto sucede,
desconecte el aparáto HDMI/DVI y vuelvalo a conectar.
Si usa la entrada HDMI, cambie el audio del aparáto HDMI a PCM
Lineal.
Revise el ajuste de Audio para HDMI (ver pág. 21). Si hay problema con
el audio digital, cambie a audio análogo.
ESPAÑOL
Sonido Normal
Reemplace las Pilas del Control Remoto
Sonido Normal
Imagen Normal
Operación Intermitente del Control Remoto
33 z
P9 0474 S doc3 080403R.fm Page 34 Wednesday, August 13, 2003 8:25 AM
INDICE
ESPAÑOL
Indice
Numerales
3D Y/C FILTRO 20
A
Add Fav / Del Fav feature 11
Ajuste del reloj 24
Altos 20
Analog (Analogo) 26
Apagado (Sleep) 24
Audio 20
Auto Power On (Autoencendido) 26
Auto Programación 25
Auto Scan (Programa Auto) 4
B
Bajos 20
Balance 20
Basic Operation 22
BBE 20
BBE VIVA 3D 20
Block Program 28
Botóes PIP MIN y PIP MAX 10
Botón ASPECT 12
Botón BBE 12
Botón Freeze (IDI y Split) 10
Botón MENU 12
Botón Move 9
Botón PROG 12
Botón RECALL 12
Botón R-TUNE 12
Botón SAP 12
Botón Search 9
Botón TV/VIDEO 9
Botones especiales del
control remoto 12
Brillo 20
C
Cable de Suministro de Corriente
Alterna 4
Cable Module Info (Información del
módulo del Cable) 27
Canales (Channels) 21
Captions 21
Card 23
CC Mode (Modo CC) 26
Channel 21
Channel and Program Tuning 11
Channel Banner 11
Channel Lock 28
Closed Caption (Subtítulos) 26
Códigos de Componentes 16, 18
Códigos para CD Player 18
Códigos para DBS 17
Códigos para Decodificador
de Cable 17
Códigos para DVD 17
Códigos para Equipos de Casete 18
Códigos para Grabadoras Personales
de Video 18
Códigos para Receptores 18
Códigos para VCR 17
Color 20
Color Natural 20
Colors sub-menu 26
Component connection cables 4
Conexión de Antena 4
Conexión de cable 4
34 z
Conexión de Cable / Antena 4
Conexión de entrada HDMI 7
Conexión de la Videocasetera 6
Conexión de salida de audio digital 8
Conexión de Salida del Programa 8
Conexión del Amplificador de Sonido
(Analogo) 8
Conexión del Decodificador de
Televisión Digital (DTV-STB) ó DVD 6
Conexión del módulo del cable 6
Conexiones de Equipo Opcional 6
Convergence 4, 26
Convergence Adj.
(Fije Convergencia) 27
Correción de convergencia en nueve
puntos 27
Creating a Password 28
Cronom 1 y Cronom 2 24
Cronometro (Timer) 24
Cuadro de Localización
de Fallas 32, 33
Cuidado y Limpieza 3
D
Day Set 24
Digital 26
E
Especificaciones 3
F
Freeze 20
Vista Frontal y Posterior del Televisor
de Proyección de Alta Definición 5
Función de congelamiento de
imagen principal 10
Funciones especiales del Televisor de
proyección de Alta Definición 11
G
Gabinete y Control Remoto 3
H
How Long? (¿Cuanto tiempo?) 30
I
Image Shift 26
Imagen 20
Información Importante Acerca Del
Uso De Video Juegos 1
Información sobre la Convergencia 1
Information Regarding
memory cards 22
Input Labels (Ponga Titulo) 21
Insertando y removiendo
tarjetas SD o PCMCIA 22
Instalación 4
Interval 23
L
Lock (Bloqueo) 28
Lock Set 28
M
Manual Labels (Manual) 21
Matriz Color 20
Medidor de señal 25
Mensaje de Bloqueo 30
Método de sintonización directa 11
MPAA 28
N
Navegación básica del menú 19
Normal 20
O
Operación de Componentes con el
control remoto 14
Operación de DBS 14
Operación de decodificador
de Cable 14
Operación de DVD 14
Operación de IDI 9
Operación de IDI y Pantalla de SPLIT
Botón 9
Operación de PVR (Grabadoras
Personales de Video) 15
Operación de receptor de audio 15
Operación de reproductor
de casetes 15
Operación de SPLIT 9
Operación de una Videocasetera 14
Operación del Control Remoto 13
Operación del Menu 20
P
Panel de Control Frontal 6
Password (Código secreto) 30
Photo Viewer™ - Thumbnail mode 22
Photo Viewer™ Setup Menu 23
Programación Manual 25
Programando El Control Remoto 16
Programación Inicial 4
Programar canales 25
Programming Sin Código 16
R
Reduc de Ruido 20
Registro del Usuario 3
Repeat 23
RF Input 21
RF Input Setup 4
Rotate 23
S
Sequence 23
Set Up (AJUSTE) 25
Sintonización forzada por el Sistema
de Alerta de Emergencia (EAS) 11
Slide Show 23
Sonido IA 20
Surf Mode 21
T
Tabla de Características 3
Tabla de Clasificacion de MPAA 29
Tabla de Clasificacion de Programas
de EEUU 29
Tabla operacional de los botones en
modo IDI ó SPLIT 10
Temp Color 20
TINT 20
Tuning digital and analog channels 11
U
U.S. TV Rating 29
Ubicación de la Televisión 4
V
Velocidad de modulación 20
Z
Zoom 23
Zoom Adjust (Magnificación) 26
P9 0474 S doc3 080403R.fm Page 35 Wednesday, August 13, 2003 8:25 AM
ESPAÑOL
NOTAS
35 z
newprod 0474Warranty and GPL rev.fm Page 2 Wednesday, August 6, 2003 2:24 PM
/,0,7(':$55$17<
3$1$621,&&21680(5(/(&7521,&6&203$1<
',9,6,212)
0$7686+,7$(/(&75,&&25325$7,212)$0(5,&$
2QH3DQDVRQLF:D\
6HFDXFXV1HZ-HUVH\
3$1$621,&6$/(6&203$1<
',9,6,212)
0$7686+,7$(/(&75,&2)38(5725,&2
,1&$YHGH,QIDQWHULD.P
6DQ*DEULHO,QGXVWULDO3DUN
&DUROLQD3XHUWR5LFR
3DQDVRQLF9LGHR3URMHFWLRQ6\VWHP
/LPLWHG:DUUDQW\
/LPLWHG:DUUDQW\&RYHUDJH
,I\RXUSURGXFWGRHVQRWZRUNSURSHUO\EHFDXVHRIDGHIHFWLQPDWHULDOVRUZRUNPDQVKLS3DQDVRQLF
&RQVXPHU(OHFWURQLFV&RPSDQ\RU3DQDVRQLF6DOHV&RPSDQ\FROOHFWLYHO\UHIHUUHGWRDV³WKHZDUUDQ
WRU´ZLOOIRUWKHOHQJWKRIWKHSHULRGLQGLFDWHGRQWKHFKDUWEHORZZKLFKVWDUWVZLWKWKHGDWHRIRULJLQDO
SXUFKDVHZDUUDQW\SHULRGDWLWVRSWLRQHLWKHUDUHSDLU\RXUSURGXFWZLWKQHZRUUHIXUELVKHGSDUWV
RUEUHSODFHLWZLWKDQHZRUDUHIXUELVKHGSURGXFW7KHGHFLVLRQWRUHSDLURUUHSODFHZLOOEHPDGHE\
WKHZDUUDQWRU
79&$7(*25<
$//3URMHFWLRQ79
$//3$576
21(<($5
/$%25
21(<($5
6(59,&(
,1+20(25&$55<,1
'XULQJWKH/DERUZDUUDQW\SHULRGWKHUHZLOOEHQRFKDUJHIRUODERU'XULQJWKH3DUWVZDUUDQW\
SHULRGWKHUHZLOOEHQRFKDUJHIRUSDUWV<RXPXVWFDUU\LQ\RXUSURGXFWRUDUUDQJHIRULQKRPHVHUYLFH
GXULQJWKHZDUUDQW\SHULRG,IQRQUHFKDUJHDEOHEDWWHULHVDUHLQFOXGHGWKH\DUHQRWZDUUDQWHG7KLV
ZDUUDQW\RQO\DSSOLHVWRSURGXFWVSXUFKDVHGDQGVHUYLFHGLQWKH8QLWHG6WDWHVRU3XHUWR5LFR7KLV
ZDUUDQW\LVH[WHQGHGRQO\WRWKHRULJLQDOSXUFKDVHURIDQHZSURGXFWZKLFKZDVQRWVROGDVLV$SXU
FKDVHUHFHLSWRURWKHUSURRIRIWKHRULJLQDOSXUFKDVHGDWHLVUHTXLUHGIRUZDUUDQW\VHUYLFH
&DUU\LQRU,Q+RPH6HUYLFH
)RU,Q+RPHRU&DUU\,Q6HUYLFHLQWKH8QLWHG6WDWHVFDOO9,(:379
)RUDVVLVWDQFHLQ3XHUWR5LFRFDOO3DQDVRQLF6DOHV&RPSDQ\RUID[
,Q+RPHVHUYLFHUHTXLUHVFOHDUFRPSOHWHDQGHDV\DFFHVVWRWKHSURGXFWE\WKHDXWKRUL]HGVHUYLFHU
DQGGRHVQRWLQFOXGHUHPRYDORUUHLQVWDOODWLRQRIDQLQVWDOOHGSURGXFW,WLVSRVVLEOHWKDWFHUWDLQLQ
KRPHUHSDLUVZLOOQRWEHFRPSOHWHGLQKRPHEXWZLOOUHTXLUHWKDWWKHSURGXFWRUSDUWVRIWKHSURGXFW
EHUHPRYHGIRUVKRSGLDJQRVLVDQGRUUHSDLUDQGWKHQUHWXUQHG
/LPLWHG:DUUDQW\FRQWLQXHGRQQH[WSDJH
newprod 0474Warranty and GPL rev.fm Page 3 Wednesday, August 6, 2003 2:24 PM
/,0,7(':$55$17<
/LPLWHG:DUUDQW\FRQWLQXHGIURPSUHYLRXVSDJH
/LPLWHG:DUUDQW\/LPLWV$QG([FOXVLRQV
7KLVZDUUDQW\21/<&29(56IDLOXUHVGXHWRGHIHFWVLQPDWHULDOVRUZRUNPDQVKLSDQG'2(6127
&29(5QRUPDOZHDUDQGWHDURUFRVPHWLFGDPDJHQRUGRHVLWFRYHUPDUNLQJVRUUHWDLQHGLPDJHVRQ
WKHSLFWXUHWXEHUHVXOWLQJIURPYLHZLQJIL[HGLPDJHVLQFOXGLQJDPRQJRWKHUWKLQJVOHWWHUER[SLFWXUHV
RQVWDQGDUGVFUHHQ79¶VRUQRQH[SDQGHGVWDQGDUGSLFWXUHVRQZLGHVFUHHQ79¶VRURQVFUHHQ
GDWDLQDVWDWLRQDU\DQGIL[HGORFDWLRQ7KHZDUUDQW\$/62'2(6127&29(5GDPDJHVZKLFK
RFFXUUHGLQVKLSPHQWRUIDLOXUHVZKLFKDUHFDXVHGE\SURGXFWVQRWVXSSOLHGE\WKHZDUUDQWRURUIDLO
XUHVZKLFKUHVXOWIURPDFFLGHQWVPLVXVHDEXVHQHJOHFWPLVKDQGOLQJPLVDSSOLFDWLRQDOWHUDWLRQ
IDXOW\LQVWDOODWLRQVHWXSDGMXVWPHQWVPLVDGMXVWPHQWRIFRQVXPHU
FRQWUROVLPSURSHUPDLQWHQDQFHSRZHUOLQHVXUJHOLJKWQLQJGDPDJHPRGLILFDWLRQRUFRPPHUFLDOXVH
VXFKDVLQDKRWHORIILFHUHVWDXUDQWRURWKHUEXVLQHVVUHQWDOXVHRIWKHSURGXFWVHUYLFHE\DQ\RQH
RWKHUWKDQD)DFWRU\
6HUYLFHQWHURURWKHU$XWKRUL]HG6HUYLFHURUGDPDJHWKDWLVDWWULEXWDEOHWRDFWVRI*RG
7+(5($5(12(;35(66:$55$17,(6(;&(37$6/,67('81'(5/,0,7(':$55$17<
&29(5$*(7+(:$55$1725,6127/,$%/()25,1&,'(17$/25&216(48(17,$/
'$0$*(65(68/7,1*)5207+(86(2)7+,6352'8&725$5,6,1*2872)$1<
%5($&+2)7+,6:$55$17<$VH[DPSOHVWKLVH[FOXGHVGDPDJHVIRUORVWWLPHFRVWRIKDYLQJ
VRPHRQHUHPRYHRUUHLQVWDOODQLQVWDOOHGXQLWLIDSSOLFDEOHRUWUDYHOWRDQGIURPWKHVHUYLFHURUORVVRI
LPDJHVGDWDRURWKHUPHPRU\FRQWHQW7KHLWHPVOLVWHGDUHQRWH[FOXVLYHEXWDUHIRULOOXVWUDWLRQRQO\
$//(;35(66$1',03/,(':$55$17,(6,1&/8',1*7+(:$55$17<2)0(5&+$17
$%,/,7<$5(/,0,7('727+(3(5,2'2)7+(/,0,7(':$55$17<
6RPHVWDWHVGRQRWDOORZWKHH[FOXVLRQRUOLPLWDWLRQRILQFLGHQWDORUFRQVHTXHQWLDOGDPDJHVRUOLPLWD
WLRQVRQKRZORQJDQLPSOLHGZDUUDQW\ODVWVVRWKHH[FOXVLRQVPD\QRWDSSO\WR\RX
7KLVZDUUDQW\JLYHV\RXVSHFLILFOHJDOULJKWVDQG\RXPD\DOVRKDYHRWKHUVULJKWVZKLFKYDU\IURPVWDWH
WRVWDWH,IDSUREOHPZLWKWKLVSURGXFWGHYHORSVGXULQJRUDIWHUWKHZDUUDQW\SHULRG\RXPD\FRQWDFW
\RXUGHDOHURU6HUYLFHQWHU,IWKHSUREOHPLVQRWKDQGOHGWR\RXUVDWLVIDFWLRQWKHQZULWHWRWKHZDUUDQ
WRU
V&RQVXPHU$IIDLUV'HSDUWPHQWDWWKHDGGUHVVHVOLVWHGIRUWKHZDUUDQWRU
3$576$1'6(59,&(,1&/8',1*&2672)$1,1+20(6(59,&(&$//:+(5(
$33/,&$%/(:+,&+$5(127&29(5('%<7+,6/,0,7(':$55$17<$5(<285
5(63216,%,/,7<
newprod 0474Warranty and GPL rev.fm Page 4 Wednesday, August 6, 2003 2:24 PM
&86720(56(59,&(6',5(&725<
)RU3URGXFW,QIRUPDWLRQ2SHUDWLQJ$VVLVWDQFH/LWHUDWXUH5HTXHVW'HDOHU/RFDWLRQVDQG
DOO&XVWRPHU6HUYLFHLQTXLULHVSOHDVHFRQWDFW
9,(:379 0RQGD\)ULGD\DPSP6DWXUGD\6XQGD\DPSP(67
:HE6LWHKWWSZZZSDQDVRQLFFRP
<RXFDQSXUFKDVHSDUWVDFFHVVRULHVRU
ORFDWH\RXUQHDUHVWVHUYLFHQWHUE\YLVLWLQJ
RXU:HE6LWH
$FFHVVRU\3XUFKDVHV
&XVWRPHU2UGHUV2QO\
3DQDVRQLF6HUYLFHV&RPSDQ\WK$YHQXH6RXWK.HQW:$
DPWRSP0RQGD\)ULGD\DPWRDP6DWXUGD\367
9LVD0DVWHU&DUG'LVFRYHU&DUG$PHULFDQ([SUHVV&KHFN
6HUYLFHLQ3XHUWR5LFR
0DWVXVKLWD(OHFWULFRI3XHUWR5LFR,QF3DQDVRQLF6DOHV&RPSDQ\)DFWRU\6HUYLFHQWHU
$YHGH,QIDQWHULD.P6DQ*DEULHO,QGXVWULDO3DUN&DUROLQD3XHUWR5LFR
3KRQH)D[
newprod 0474Warranty and GPL rev.fm Page 5 Wednesday, August 6, 2003 2:24 PM
127(127$
newprod 0474Warranty and GPL rev.fm Page 6 Wednesday, August 6, 2003 2:24 PM
%\XVLQJWKLV79\RXDUHLQGLFDWLQJDFFHSWDQFHRIWKH*183XEOLF/LFHQVHVLQGLFDWHGEHORZ
7KLVSURGXFWXWLOL]HVWKHIROORZLQJVRFDOOHG³RSHQVRXUFH´VRIWZDUH
WKHVRIWZDUHZKLFKLVOLFHQVHGXQGHUWKH*18*(1(5$/38%/,&/,&(16(
WKHVRIWZDUHZKLFKLVOLFHQVHGXQGHUWKH*18/(66(5*(1(5$/38%/,&/,&(16(DQG
VRIWZDUHGHYHORSHGE\WKHWKLUGSDUWLHVDQGDYDLODEOHXQGHUFHUWDLQWHUPVDQGFRQGLWLRQV
)RUWKHVRIWZDUHFDWHJRUL]HGDVDQGSOHDVHUHIHUWRWKHWHUPVDQGFRQGLWLRQVRIWKHIROORZLQJ*18*(1(5$/
38%/,&/,&(16(DQG*18/(66(5*(1(5$/38%/,&/,&(16(UHVSHFWLYHO\
,I\RXZLVKWRJHWIXUWKHULQIRUPDWLRQDVWRWKHVRIWZDUHSOHDVHFRQWDFWWKHZHEVLWHEHORZ
KWWSZZZIVIRUJOLFHQVHVDQGKWWSZZZDPOLQX[MS
*18*(1(5$/38%/,&/,&(16(
7(506 $1' &21',7,216 )25 &23<,1*',675,%87,21
9HUVLRQ-XQH
&RS\ULJKW&)UHH6RIWZDUH)RXQGDWLRQ,QF
7HPSOH3ODFH6XLWH%RVWRQ0$86$
$1'02',),&$7,21
(YHU\RQH LV SHUPLWWHG WR FRS\ DQG GLVWULEXWH YHUEDWLP FRSLHV RI
WKLVOLFHQVHGRFXPHQWEXWFKDQJLQJLWLVQRWDOORZHG
3UHDPEOH
7KLV /LFHQVH DSSOLHV WR DQ\ SURJUDP RU RWKHU ZRUN ZKLFK FRQWDLQV D
QRWLFH SODFHG E\ WKH FRS\ULJKW KROGHU VD\LQJ LW PD\ EH GLVWULEXWHG XQGHU
WKHWHUPVRIWKLV*HQHUDO3XEOLF/LFHQVH7KH3URJUDPEHORZUHIHUVWR
DQ\ VXFK SURJUDP RU ZRUN DQG D ZRUN EDVHG RQ WKH 3URJUDP PHDQV
HLWKHU WKH 3URJUDP RU DQ\ GHULYDWLYH ZRUN XQGHU FRS\ULJKW ODZ WKDW LV WR
7KHOLFHQVHIRUPRVWVRIWZDUHDUHGHVLJQHGWRWDNHDZD\\RXUIUHHGRPWR
VD\ D ZRUN FRQWDLQLQJ WKH 3URJUDP RU D SRUWLRQ RI LW HLWKHU YHUEDWLP RU
VKDUHDQGFKDQJHLW%\FRQWUDVWWKH*18*HQHUDO3XEOLF/LFHQVHLV
ZLWK PRGLILFDWLRQV DQGRU WUDQVODWHG LQWR DQRWKHU ODQJXDJH +HUHLQDIWHU
LQWHQGHGWRJXDUDQWHH\RXUIUHHGRPWRVKDUHDQGFKDQJHIUHHVRIWZDUHWR
WUDQVODWLRQ LV LQFOXGHG ZLWKRXW OLPLWDWLRQ LQ WKH WHUP PRGLILFDWLRQ (DFK
PDNHVXUHWKHVRIWZDUHLVIUHHIRUDOOLWVXVHUV7KLV*HQHUDO3XEOLF
OLFHQVHHLVDGGUHVVHGDV\RX
/LFHQVHDSSOLHVWRPRVWRIWKH)UHH6RIWZDUH)RXQGDWLRQ¶VVRIWZDUHDQGWR
DQ\RWKHUSURJUDPZKRVHDXWKRUVFRPPLWWRXVLQJLW6RPHRWKHU)UHH
6RIWZDUH)RXQGDWLRQVRIWZDUHLVFRYHUHGE\WKH*18/LEUDU\*HQHUDO
3XEOLF/LFHQVHLQVWHDG<RXFDQDSSO\LWWR\RXUSURJUDPVWRR
:KHQZHVSHDNRIIUHHVRIWZDUHZHDUHUHIHUULQJWRIUHHGRPQRWSULFH
2XU*HQHUDO3XEOLF/LFHQVHVDUHGHVLJQHGWRPDNHVXUHWKDW\RXKDYHWKH
$FWLYLWLHVRWKHUWKDQFRS\LQJGLVWULEXWLRQDQGPRGLILFDWLRQDUHQRWFRYHUHG
E\ WKLV /LFHQVH WKH\ DUH RXWVLGH LWV VFRSH 7KH DFW RI UXQQLQJ WKH
3URJUDPLVQRWUHVWULFWHGDQGWKHRXWSXWIURPWKH3URJUDPLVFRYHUHGRQO\
LI LWV FRQWHQWV FRQVWLWXWH D ZRUN EDVHG RQ WKH 3URJUDP LQGHSHQGHQW RI
KDYLQJEHHQPDGHE\UXQQLQJWKH3URJUDP:KHWKHUWKDWLVWUXHGHSHQGV
RQZKDWWKH3URJUDPGRHV
IUHHGRPWRGLVWULEXWHFRSLHVRIIUHHVRIWZDUHDQGFKDUJHIRUWKLVVHUYLFHLI
\RXZLVKWKDW\RXUHFHLYHVRXUFHFRGHRUFDQJHWLWLI\RXZDQWLWWKDW\RX
FDQFKDQJHWKHVRIWZDUHRUXVHSLHFHVRILWLQQHZIUHHSURJUDPVDQGWKDW
<RX PD\ FRS\ DQG GLVWULEXWH YHUEDWLP FRSLHV RI WKH 3URJUDP
V VRXUFH
FRGH DV \RX UHFHLYH LW LQ DQ\ PHGLXP SURYLGHG WKDW \RX FRQVSLFXRXVO\
\RXNQRZ\RXFDQGRWKHVHWKLQJV
DQG DSSURSULDWHO\ SXEOLVK RQ HDFK FRS\ DQ DSSURSULDWH FRS\ULJKW QRWLFH
7R SURWHFW \RXU ULJKWV ZH QHHG WR PDNH UHVWULFWLRQV WKDW IRUELG DQ\RQH WR
DQG GLVFODLPHU RI ZDUUDQW\ NHHS LQWDFW DOO WKH QRWLFHV WKDW UHIHU WR WKLV
GHQ\\RXWKHVHULJKWVRUWRDVN\RXWRVXUUHQGHUWKHULJKWV7KHVHUHVWULF
/LFHQVHDQGWRWKHDEVHQFHRIDQ\ZDUUDQW\DQGJLYHDQ\RWKHUUHFLSLHQWV
WLRQV WUDQVODWH WR FHUWDLQ UHVSRQVLELOLWLHV IRU \RX LI \RX GLVWULEXWH FRSLHV RI
RIWKH3URJUDPDFRS\RIWKLV/LFHQVHDORQJZLWKWKH3URJUDP
WKHVRIWZDUHRULI\RXPRGLI\LW
<RX PD\FKDUJHD IHHIRUWKHSK\VLFDO DFW RIWUDQVIHUULQJ DFRS\ DQG \RX
)RUH[DPSOHLI\RXGLVWULEXWHFRSLHVRIVXFKDSURJUDPZKHWKHUJUDWLVRU
PD\DW\RXURSWLRQRIIHUZDUUDQW\SURWHFWLRQLQH[FKDQJHIRUDIHH
IRU D IHH \RX PXVW JLYH WKH UHFLSLHQWV DOO WKH ULJKWV WKDW \RX KDYH <RX
PXVW PDNH VXUH WKDW WKH\ WRR UHFHLYH RU FDQ JHW WKH VRXUFH FRGH $QG
\RXPXVWVKRZWKHPWKHVHWHUPVVRWKH\NQRZWKHLUULJKWV
<RXPD\PRGLI\\RXUFRS\RUFRSLHVRIWKH3URJUDPRUDQ\SRUWLRQRILW
WKXVIRUPLQJDZRUNEDVHG RQWKH3URJUDP DQGFRS\ DQGGLVWULEXWHVXFK
:H SURWHFW \RXU ULJKWV ZLWK WZR VWHSV FRS\ULJKW WKH VRIWZDUH DQG RIIHU \RX WKLV OLFHQVH ZKLFK JLYHV \RX OHJDO SHUPLVVLRQ WR FRS\ GLVWULEXWH
DQGRUPRGLI\WKHVRIWZDUH
PRGLILFDWLRQV RU ZRUN XQGHU WKH WHUPV RI 6HFWLRQ DERYH SURYLGHG WKDW
\RXDOVRPHHWDOORIWKHVHFRQGLWLRQV
D <RX PXVW FDXVH WKH PRGLILHG ILOHV WR FDUU\ SURPLQHQW QRWLFHV
VWDWLQJWKDW\RXFKDQJHGWKHILOHVDQGWKHGDWHRIDQ\FKDQJH
$OVR IRU HDFK DXWKRU
V SURWHFWLRQ DQGRXUV ZH ZDQW WR PDNH FHUWDLQ WKDW
E <RX PXVW FDXVH DQ\ ZRUN WKDW \RX GLVWULEXWH RU SXEOLVK WKDW LQ
HYHU\RQH XQGHUVWDQGV WKDW WKHUH LV QR ZDUUDQW\ IRU WKLV IUHH VRIWZDUH ,I
ZKROH RU LQ SDUW FRQWDLQV RU LV GHULYHG IURP WKH 3URJUDP RU DQ\ SDUW
WKH VRIWZDUH LV PRGLILHG E\ VRPHRQH HOVH DQG SDVVHG RQ ZH ZDQW LWV
WKHUHRI WR EH OLFHQVHG DV D ZKROH DW QR FKDUJH WR DOO WKLUG SDUWLHV
UHFLSLHQWVWRNQRZWKDWZKDWWKH\KDYHLVQRWWKHRULJLQDOVRWKDWDQ\SURE
XQGHUWKHWHUPVRIWKLV/LFHQVH
OHPV LQWURGXFHG E\ RWKHUV ZLOO QRW UHIOHFW RQ WKH RULJLQDO DXWKRUV
UHSXWD
F ,I WKH PRGLILHG SURJUDP QRUPDOO\ UHDGV FRPPDQGV LQWHUDFWLYHO\
WLRQV
ZKHQ UXQ \RX PXVW FDXVH LW ZKHQ VWDUWHG UXQQLQJ IRU VXFK
LQWHUDFWLYH XVH LQ WKH PRVW RUGLQDU\ ZD\ WR SULQW RU GLVSOD\ DQ
)LQDOO\ DQ\ IUHH SURJUDP LV WKUHDWHQHG FRQVWDQWO\ E\ VRIWZDUH SDWHQWV
:H ZLVK WR DYRLG WKH GDQJHU WKDW UHGLVWULEXWRUV RI D IUHH SURJUDP ZLOO
LQGLYLGXDOO\
REWDLQ
SDWHQW
OLFHQVHV
LQ
HIIHFW
PDNLQJ
WKH
SURJUDP
SURSULHWDU\7RSUHYHQWWKLVZHKDYHPDGHLWFOHDUWKDWDQ\SDWHQWPXVWEH
OLFHQVHG IRU HYHU\RQH
V IUHH XVH RU QRWOLFHQVHG DW DOO 7KH SUHFLVH WHUPV
DQGFRQGLWLRQVIRUFRS\LQJGLVWULEXWLRQDQGPRGLILFDWLRQIROORZ
DQQRXQFHPHQWLQFOXGLQJDQDSSURSULDWHFRS\ULJKWQRWLFHDQGDQRWLFH
WKDWWKHUHLVQRZDUUDQW\RUHOVHVD\LQJWKDW\RXSURYLGHDZDUUDQW\
DQG WKDW XVHUV PD\ UHGLVWULEXWH WKH SURJUDP XQGHU WKHVH
FRQGLWLRQVDQGWHOOLQJWKHXVHUKRZWRYLHZDFRS\RIWKLV/LFHQVH
([FHSWLRQ LI WKH 3URJUDP LWVHOI LV LQWHUDFWLYH EXW GRHV QRW QRUPDOO\
SULQWVXFKDQDQQRXQFHPHQW\RXUZRUNEDVHGRQWKH3URJUDPLVQRW
UHTXLUHGWRSULQWDQDQQRXQFHPHQW
7KHVH UHTXLUHPHQWV DSSO\ WR WKH PRGLILHG ZRUN DV D ZKROH ,I
LGHQWLILDEOH VHFWLRQV RI WKDW ZRUN DUH QRW GHULYHG IURP WKH 3URJUDP
newprod 0474Warranty and GPL rev.fm Page 7 Wednesday, August 6, 2003 2:24 PM
DQGFDQEHUHDVRQDEO\ FRQVLGHUHG LQGHSHQGHQW DQGVHSDUDWHZRUNV
<RXDUHQRWUHTXLUHGWRDFFHSWWKLV/LFHQVHVLQFH\RXKDYHQRWVLJQHG
LQWKHPVHOYHVWKHQWKLV/LFHQVHDQGLWVWHUPVGRQRWDSSO\WRWKRVH
LW+RZHYHUQRWKLQJHOVHJUDQWV\RXSHUPLVVLRQWRPRGLI\RUGLVWULEXWHWKH
VHFWLRQVZKHQ\RXGLVWULEXWHWKHPDVVHSDUDWHZRUNV%XWZKHQ\RX
3URJUDP RU LWV GHULYDWLYH ZRUNV 7KHVH DFWLRQV DUH SURKLELWHG E\ ODZ LI
GLVWULEXWHWKHVDPHVHFWLRQVDVSDUWRIDZKROHZKLFKLVDZRUNEDVHG
\RXGRQRWDFFHSWWKLV/LFHQVH7KHUHIRUHE\PRGLI\LQJRUGLVWULEXWLQJWKH
RQWKH3URJUDPWKHGLVWULEXWLRQRIWKHZKROHPXVWEHRQWKHWHUPVRI
3URJUDP RU DQ\ ZRUN EDVHG RQ WKH 3URJUDP \RX LQGLFDWH \RXU
WKLV /LFHQVH ZKRVH SHUPLVVLRQV IRU RWKHU OLFHQVHHV H[WHQG WR WKH
DFFHSWDQFH RI WKLV /LFHQVH WR GR VR DQG DOO LWV WHUPV DQG FRQGLWLRQV IRU
HQWLUH ZKROH DQG WKXV WR HDFK DQG HYHU\ SDUW UHJDUGOHVV RI ZKR
FRS\LQJGLVWULEXWLQJRUPRGLI\LQJWKH3URJUDPRUZRUNVEDVHGRQLW
ZURWHLW
7KXVLWLVQRWWKHLQWHQWRIWKLVVHFWLRQWRFODLPULJKWVRUFRQWHVW\RXUULJKWV
WRZRUNZULWWHQHQWLUHO\E\\RXUDWKHUWKHLQWHQWLVWRH[HUFLVHWKHULJKWWR
FRQWURO WKH GLVWULEXWLRQ RI GHULYDWLYH RU FROOHFWLYH ZRUNV EDVHG RQ WKH
(DFK WLPH \RX UHGLVWULEXWH WKH 3URJUDP RU DQ\ ZRUN EDVHG RQ WKH
3URJUDP WKH UHFLSLHQW DXWRPDWLFDOO\ UHFHLYHV D OLFHQVH IURP WKH RULJLQDO
OLFHQVRU WR FRS\ GLVWULEXWH RU PRGLI\ WKH 3URJUDP VXEMHFW WR WKHVH WHUPV
DQG FRQGLWLRQV <RX PD\ QRW LPSRVH DQ\ IXUWKHU UHVWULFWLRQV RQ WKH
3URJUDP
UHFLSLHQWV
H[HUFLVH RI WKH ULJKWV JUDQWHG KHUHLQ <RX DUH QRW UHVSRQVLEOH
,QDGGLWLRQ PHUHDJJUHJDWLRQ RIDQRWKHU ZRUN QRW EDVHG RQ WKH3URJUDP
IRUHQIRUFLQJFRPSOLDQFHE\WKLUGSDUWLHVWRWKLV/LFHQVH
ZLWKWKH3URJUDPRUZLWKDZRUNEDVHGRQWKH3URJUDPRQDYROXPHRID
VWRUDJH RU GLVWULEXWLRQ PHGLXP GRHV QRW EULQJ WKH RWKHU ZRUN XQGHU WKH
,I DV D FRQVHTXHQFH RI D FRXUW MXGJPHQW RU DOOHJDWLRQ RI SDWHQW
LQIULQJHPHQW RU IRU DQ\ RWKHU UHDVRQ QRW OLPLWHG WR SDWHQW LVVXHV
VFRSHRIWKLV/LFHQVH
FRQGLWLRQV DUH LPSRVHG RQ \RX ZKHWKHU E\ FRXUW RUGHU DJUHHPHQW RU
<RXPD\FRS\DQGGLVWULEXWHWKH3URJUDPRUDZRUNEDVHGRQLWXQGHU
RWKHUZLVH WKDW FRQWUDGLFW WKH FRQGLWLRQV RI WKLV /LFHQVH WKH\ GR QRW
6HFWLRQLQREMHFWFRGHRUH[HFXWDEOHIRUPXQGHUWKHWHUPVRI6HFWLRQV
H[FXVH\RXIURPWKHFRQGLWLRQVRIWKLV/LFHQVH,I\RXFDQQRWGLVWULEXWHVR
DQGDERYHSURYLGHGWKDW\RXDOVRGRRQHRIWKHIROORZLQJ
DV WR VDWLVI\ VLPXOWDQHRXVO\ \RXU REOLJDWLRQV XQGHU WKLV /LFHQVH DQG DQ\
D$FFRPSDQ\ LWZLWKWKH FRPSOHWHFRUUHVSRQGLQJ PDFKLQHUHDGDEOH
VRXUFHFRGHZKLFKPXVWEHGLVWULEXWHGXQGHUWKHWHUPVRI6HFWLRQV
DQGDERYHRQDPHGLXPFXVWRPDULO\XVHGIRUVRIWZDUHLQWHUFKDQJH
RWKHUSHUWLQHQWREOLJDWLRQVWKHQDVDFRQVHTXHQFH\RXPD\QRWGLVWULEXWH
WKH 3URJUDP DW DOO )RU H[DPSOH LI D SDWHQW OLFHQVH ZRXOG QRW SHUPLW
UR\DOW\IUHH UHGLVWULEXWLRQ RI WKH 3URJUDP E\ DOO WKRVH ZKR UHFHLYH FRSLHV
GLUHFWO\RULQGLUHFWO\WKURXJK\RXWKHQWKHRQO\ZD\\RXFRXOGVDWLVI\ERWK
RU
E $FFRPSDQ\ LW ZLWK D ZULWWHQ RIIHU YDOLG IRU DW OHDVW WKUHH \HDUV WR
JLYHDQ\WKLUGSDUW\IRUDFKDUJHQRPRUHWKDQ\RXUFRVWRISK\VLFDOO\
SHUIRUPLQJVRXUFHGLVWULEXWLRQDFRPSOHWHPDFKLQHUHDGDEOHFRS\RI
WKH FRUUHVSRQGLQJ VRXUFH FRGH WR EH GLVWULEXWHG XQGHU WKH WHUPV RI
6HFWLRQV DQG DERYH RQ D PHGLXP FXVWRPDULO\ XVHG IRU VRIWZDUH
LQWHUFKDQJHRU
LW DQG WKLV /LFHQVH ZRXOG EH WR UHIUDLQ HQWLUHO\ IURP GLVWULEXWLRQ RI WKH
3URJUDP
,I DQ\ SRUWLRQ RI WKLV VHFWLRQ LV KHOG LQYDOLG RU XQHQIRUFHDEOH XQGHU DQ\
SDUWLFXODU FLUFXPVWDQFH WKH EDODQFH RI WKH VHFWLRQ LV LQWHQGHG WR DSSO\
DQGWKHVHFWLRQDVDZKROHLVLQWHQGHGWRDSSO\LQRWKHUFLUFXPVWDQFHV
,WLVQRWWKHSXUSRVHRIWKLVVHFWLRQWRLQGXFH\RXWRLQIULQJHDQ\SDWHQWVRU
F $FFRPSDQ\ LW ZLWK WKH LQIRUPDWLRQ \RX UHFHLYHG DV WR WKH RIIHU WR
GLVWULEXWH FRUUHVSRQGLQJ VRXUFH FRGH 7KLV DOWHUQDWLYH LV DOORZHG
RQO\ IRU QRQFRPPHUFLDO GLVWULEXWLRQ DQG RQO\ LI \RX UHFHLYHG WKH
SURJUDP LQ REMHFW FRGH RU H[HFXWDEOH IRUP ZLWK VXFK DQ RIIHU LQ
DFFRUGZLWK6XEVHFWLRQEDERYH
RWKHU SURSHUW\ ULJKW FODLPV RU WR FRQWHVW YDOLGLW\ RI DQ\ VXFK FODLPV WKLV
VHFWLRQKDVWKHVROHSXUSRVHRISURWHFWLQJWKHLQWHJULW\RIWKHIUHHVRIWZDUH
GLVWULEXWLRQ V\VWHP ZKLFK LV LPSOHPHQWHG E\ SXEOLF OLFHQVH SUDFWLFHV
0DQ\ SHRSOH KDYH PDGH JHQHURXV FRQWULEXWLRQV WR WKH ZLGH UDQJH RI
VRIWZDUH GLVWULEXWHG WKURXJK WKDW V\VWHP LQ UHOLDQFH RQ FRQVLVWHQW
7KH VRXUFH FRGH IRU D ZRUN PHDQV WKH SUHIHUUHG IRUP RI WKH ZRUN IRU
PDNLQJPRGLILFDWLRQVWRLW)RUDQH[HFXWDEOHZRUNFRPSOHWHVRXUFHFRGH
PHDQVDOOWKHVRXUFHFRGHIRUDOOPRGXOHVLWFRQWDLQVSOXVDQ\DVVRFLDWHG
LQWHUIDFH GHILQLWLRQ ILOHV SOXV WKH VFULSWV XVHG WR FRQWURO FRPSLODWLRQ DQG
LQVWDOODWLRQ RI WKH H[HFXWDEOH +RZHYHU DV D VSHFLDO H[FHSWLRQ WKH
DSSOLFDWLRQ RI WKDW V\VWHP LW LV XS WR WKH DXWKRUGRQRU WR GHFLGH LI KH RU
VKH LV ZLOOLQJ WR GLVWULEXWH VRIWZDUH WKURXJK DQ\ RWKHU V\VWHP DQG D
OLFHQVHHFDQQRWLPSRVHWKDWFKRLFH
7KLVVHFWLRQLVLQWHQGHGWRPDNHWKRURXJKO\FOHDUZKDWLVEHOLHYHGWREHD
FRQVHTXHQFHRIWKHUHVWRIWKLV/LFHQVH
VRXUFH FRGH GLVWULEXWHG QHHG QRW LQFOXGH DQ\WKLQJ WKDW LV QRUPDOO\
GLVWULEXWHG LQ HLWKHU VRXUFH RU ELQDU\ IRUP ZLWK WKH PDMRU FRPSRQHQWV
FRPSLOHU NHUQHO DQG VR RQ RI WKH RSHUDWLQJ V\VWHP RQ ZKLFK WKH
H[HFXWDEOH
UXQV
XQOHVV
WKDW
FRPSRQHQW
LWVHOI
DFFRPSDQLHV
WKH
H[HFXWDEOH
,I WKH GLVWULEXWLRQ DQGRU XVH RI WKH 3URJUDP LV UHVWULFWHG LQ FHUWDLQ
FRXQWULHV HLWKHU E\ SDWHQWV RU E\ FRS\ULJKWHG LQWHUIDFHV WKH RULJLQDO
FRS\ULJKW KROGHUZKRSODFHVWKH3URJUDPXQGHU WKLV/LFHQVHPD\DGG DQ
H[SOLFLW JHRJUDSKLFDO GLVWULEXWLRQ OLPLWDWLRQ H[FOXGLQJ WKRVH FRXQWULHV VR
WKDWGLVWULEXWLRQLVSHUPLWWHGRQO\LQRUDPRQJFRXQWULHVQRWWKXVH[FOXGHG
,I GLVWULEXWLRQ RI H[HFXWDEOH RU REMHFW FRGH LV PDGH E\ RIIHULQJ DFFHVV WR
FRS\IURPDGHVLJQDWHGSODFHWKHQRIIHULQJHTXLYDOHQWDFFHVVWRFRS\WKH
,Q VXFK FDVH WKLV /LFHQVH LQFRUSRUDWHV WKH OLPLWDWLRQ DV LI ZULWWHQ LQ WKH
ERG\RIWKLV/LFHQVH
VRXUFH FRGH IURP WKH VDPH SODFH FRXQWV DV GLVWULEXWLRQ RI WKH VRXUFH
FRGH HYHQ WKRXJK WKLUG SDUWLHV DUH QRW FRPSHOOHG WR FRS\ WKH VRXUFH
DORQJZLWKWKHREMHFWFRGH
7KH )UHH 6RIWZDUH )RXQGDWLRQ PD\ SXEOLVK UHYLVHG DQGRU QHZ
YHUVLRQV RI WKH *HQHUDO 3XEOLF /LFHQVH IURP WLPH WR WLPH 6XFK QHZ
<RXPD\QRWFRS\PRGLI\VXEOLFHQVHRUGLVWULEXWHWKH3URJUDPH[FHSW
YHUVLRQV ZLOO EH VLPLODU LQ VSLULW WR WKH SUHVHQW YHUVLRQ EXW PD\ GLIIHU LQ
DVH[SUHVVO\SURYLGHGXQGHUWKLV/LFHQVH$Q\DWWHPSWRWKHUZLVHWRFRS\
GHWDLOWRDGGUHVVQHZSUREOHPVRUFRQFHUQV
PRGLI\VXEOLFHQVHRUGLVWULEXWHWKH3URJUDPLVYRLGDQGZLOODXWRPDWLFDOO\
WHUPLQDWH \RXU ULJKWV XQGHU WKLV /LFHQVH +RZHYHU SDUWLHV ZKR KDYH
(DFK YHUVLRQ LV JLYHQ D GLVWLQJXLVKLQJ YHUVLRQ QXPEHU ,I WKH 3URJUDP
UHFHLYHG FRSLHV RU ULJKWV IURP \RX XQGHU WKLV /LFHQVH ZLOO QRW KDYH WKHLU
VSHFLILHV D YHUVLRQ QXPEHU RI WKLV /LFHQVH ZKLFK DSSOLHV WR LW DQG DQ\
OLFHQVHVWHUPLQDWHGVRORQJDVVXFKSDUWLHVUHPDLQLQIXOOFRPSOLDQFH
ODWHU YHUVLRQ \RX KDYH WKH RSWLRQ RI IROORZLQJ WKH WHUPV DQG FRQGLWLRQV
HLWKHU RI WKDW YHUVLRQ RU RI DQ\ ODWHU YHUVLRQ SXEOLVKHG E\ WKH )UHH
newprod 0474Warranty and GPL rev.fm Page 8 Wednesday, August 6, 2003 2:24 PM
6RIWZDUH )RXQGDWLRQ ,I WKH 3URJUDP GRHV QRW VSHFLI\ D YHUVLRQ QXPEHU
RI WKLV /LFHQVH \RX PD\ FKRRVH DQ\ YHUVLRQ HYHU SXEOLVKHG E\ WKH )UHH
6RIWZDUH)RXQGDWLRQ
(1'2)7(506$1'&21',7,216
+RZWR$SSO\7KHVH7HUPVWR<RXU1HZ3URJUDPV
,I \RX GHYHORS D QHZ SURJUDP DQG \RX ZDQW LW WR EH RI WKH JUHDWHVW
,I \RX ZLVK WR LQFRUSRUDWH SDUWV RI WKH 3URJUDP LQWR RWKHU IUHH
SURJUDPVZKRVHGLVWULEXWLRQFRQGLWLRQVDUHGLIIHUHQWZULWHWRWKHDXWKRUWR
SRVVLEOH XVH WR WKH SXEOLF WKH EHVW ZD\ WR DFKLHYH WKLV LV WR PDNH LW IUHH
VRIWZDUHZKLFKHYHU\RQHFDQUHGLVWULEXWHDQGFKDQJHXQGHUWKHVHWHUPV
DVN IRU SHUPLVVLRQ )RU VRIWZDUH ZKLFK LV FRS\ULJKWHG E\ WKH )UHH
6RIWZDUH )RXQGDWLRQ ZULWH WR WKH )UHH 6RIWZDUH )RXQGDWLRQ ZH
VRPHWLPHV PDNH H[FHSWLRQV IRU WKLV 2XU GHFLVLRQ ZLOO EH JXLGHG E\ WKH
WZR JRDOV RI SUHVHUYLQJ WKH IUHH VWDWXV RI DOO GHULYDWLYHV RI RXU IUHH
VRIWZDUHDQGRISURPRWLQJWKHVKDULQJDQGUHXVHRIVRIWZDUHJHQHUDOO\
7RGRVRDWWDFKWKHIROORZLQJQRWLFHVWRWKHSURJUDP,WLVVDIHVWWRDWWDFK
WKHP WR WKH VWDUW RI HDFK VRXUFH ILOH WR PRVW HIIHFWLYHO\ FRQYH\ WKH
H[FOXVLRQ RI ZDUUDQW\ DQG HDFK ILOH VKRXOG KDYH DW OHDVW WKH FRS\ULJKW
OLQHDQGDSRLQWHUWRZKHUHWKHIXOOQRWLFHLVIRXQG
12:$55$17<
2QHOLQHWRJLYHWKHSURJUDP
VQDPHDQGDQ LGHDRIZKDWLWGRHV!
%(&$86( 7+( 352*5$0 ,6 /,&(16(' )5(( 2) &+$5*(
&RS\ULJKW&\HDU!QDPHRIDXWKRU!
7+(5( ,6 12 :$55$17< )25 7+( 352*5$0 72 7+( (;7(17
3(50,77(' %< $33/,&$%/( /$: (;&(37 :+(1 27+(5:,6(
67$7(' ,1 :5,7,1* 7+( &23<5,*+7 +2/'(56 $1'25 27+(5
3$57,(63529,'(7+(352*5$0$6,6:,7+287:$55$17<2)
$1<.,1'(,7+(5(;35(66('25 ,03/,(',1&/8',1*%87127
/,0,7(' 72 7+( ,03/,(' :$55$17,(6 2) 0(5&+$17$%,/,7<
$1'),71(66)25$3$57,&8/$5385326(7+((17,5(5,6.$6
72 7+( 48$/,7< $1' 3(5)250$1&( 2) 7+( 352*5$0 ,6 :,7+
<28 6+28/' 7+( 352*5$0 3529( '()(&7,9( <28 $6680(
7+( &267 2) $// 1(&(66$5< 6(59,&,1* 5(3$,5 25 &255(&
7KLVSURJUDPLVIUHHVRIWZDUH\RXFDQUHGLVWULEXWHLWDQGRUPRGLI\LW
XQGHUWKHWHUPVRIWKH*18*HQHUDO3XEOLF/LFHQVHDVSXEOLVKHGE\
WKH )UHH 6RIWZDUH )RXQGDWLRQ HLWKHU YHUVLRQ RI WKH /LFHQVH RUDW
\RXURSWLRQDQ\ODWHUYHUVLRQ
7KLV SURJUDP LV GLVWULEXWHG LQ WKH KRSH WKDW LW ZLOO EH XVHIXO EXW
:,7+287 $1< :$55$17< ZLWKRXW HYHQ WKH LPSOLHG ZDUUDQW\ RI
0(5&+$17$%,/,7<RU),71(66)25$3$57,&8/$5385326(
6HHWKH*18*HQHUDO3XEOLF/LFHQVHIRUPRUHGHWDLOV
7,21
<RXVKRXOGKDYHUHFHLYHGDFRS\RIWKH*18*HQHUDO3XEOLF/LFHQVH
,1 12 (9(17 81/(66 5(48,5(' %< $33/,&$%/( /$: 25
$*5((' 72 ,1 :5,7,1* :,// $1< &23<5,*+7 +2/'(5 25 $1<
27+(5 3$57< :+2 0$< 02',)< $1'25 5(',675,%87( 7+(
DORQJZLWKWKLVSURJUDPLIQRWZULWHWRWKH)UHH6RIWZDUH)RXQGDWLRQ
,QF7HPSOH3ODFH6XLWH%RVWRQ0$86$
352*5$0 $6 3(50,77(' $%29( %( /,$%/( 72 <28 )25
$0$*(6 ,1&/8',1* $1< *(1(5$/ 63(&,$/ ,1&,'(17$/ 25
&216(48(17,$/
'$0$*(6
$5,6,1*
287
2)
7+(
86(
25
,1$%,/,7< 72 86( 7+( 352*5$0 ,1&/8',1* %87 127 /,0,7('
$OVRDGGLQIRUPDWLRQRQKRZWRFRQWDFW\RXE\HOHFWURQLFDQGSDSHUPDLO,I
H SURJUDP LV LQWHUDFWLYH PDNH LW RXWSXW D VKRUW QRWLFH OLNH WKLV ZKHQ LW
VWDUWVLQDQLQWHUDFWLYHPRGH
72 /266 2) '$7$ 25 '$7$ %(,1* 5(1'(5(' ,1$&&85$7( 25
*QRPRYLVLRQYHUVLRQ&RS\ULJKW&\HDUQDPHRIDXWKRU
/266(66867$,1('%<<28257+,5'3$57,(625$)$,/85(2)
*QRPRYLVLRQFRPHVZLWK$%62/87(/<12:$55$17<IRUGHWDLOV
7+(352*5$07223(5$7(:,7+$1<27+(5352*5$06(9(1
,) 68&+ +2/'(5 25 27+(5 3$57< +$6 %((1 $'9,6(' 2) 7+(
3266,%,/,7<2)68&+'$0$*(6
W\SHVKRZZ
7KLV LV IUHH VRIWZDUH DQG \RX DUH ZHOFRPH WR UHGLVWULEXWH LW XQGHU
FHUWDLQFRQGLWLRQVW\SHCVKRZF
IRUGHWDLOV
7KH K\SRWKHWLFDO FRPPDQGV CVKRZ Z
DQG CVKRZ F
VKRXOG VKRZ WKH
DSSURSULDWH SDUWV RI WKH *HQHUDO 3XEOLF /LFHQVH 2I FRXUVH WKH
FRPPDQGV \RX XVH PD\ EH FDOOHG VRPHWKLQJ RWKHU WKDQ CVKRZ Z
DQG
CVKRZF
WKH\FRXOGHYHQEHPRXVHFOLFNVRUPHQXLWHPVZKDWHYHUVXLWV
\RXUSURJUDP
<RXVKRXOGDOVRJHW\RXUHPSOR\HULI\RXZRUNDVDSURJUDPPHURU\RXU
VFKRRO LI DQ\ WR VLJQ D FRS\ULJKW GLVFODLPHU IRU WKH SURJUDP LI
QHFHVVDU\+HUHLVDVDPSOHDOWHUWKHQDPHV
<R\RG\QH ,QF KHUHE\ GLVFODLPV DOO FRS\ULJKW LQWHUHVW LQ WKH SURJUDP
C*QRPRYLVLRQ
ZKLFK PDNHV SDVVHV DW FRPSLOHUV ZULWWHQ E\ -DPHV
+DFNHU
VLJQDWXUHRI7\&RRQ!$SULO
7\&RRQ3UHVLGHQWRI9LFH
7KLV *HQHUDO 3XEOLF /LFHQVH GRHV QRW SHUPLW LQFRUSRUDWLQJ \RXU SURJUDP
LQWRSURSULHWDU\SURJUDPV,I\RXUSURJUDPLVDVXEURXWLQHOLEUDU\\RXPD\
FRQVLGHU LW PRUH XVHIXO WR SHUPLW OLQNLQJ SURSULHWDU\ DSSOLFDWLRQV ZLWK WKH
OLEUDU\,IWKLVLVZKDW\RXZDQWWRGRXVHWKH*18/LEUDU\*HQHUDO3XEOLF
/LFHQVHLQVWHDGRIWKLV/LFHQVH
newprod 0474Warranty and GPL rev.fm Page 9 Wednesday, August 6, 2003 2:24 PM
*18/(66(5*(1(5$/38%/,&/,&(16(
9HUVLRQ)HEUXDU\
&RS\ULJKW&)UHH6RIWZDUH)RXQGDWLRQ,QF
0RVW *18 VRIWZDUH LQFOXGLQJ VRPH OLEUDULHV LV FRYHUHG E\ WKH RUGLQDU\
*18 *HQHUDO 3XEOLF /LFHQVH 7KLV OLFHQVH WKH *18 /HVVHU *HQHUDO
3XEOLF /LFHQVH DSSOLHV WR FHUWDLQ GHVLJQDWHG OLEUDULHV DQG LV TXLWH
GLIIHUHQWIURPWKHRUGLQDU\*HQHUDO3XEOLF/LFHQVH:HXVHWKLVOLFHQVHIRU
7HPSOH3ODFH6XLWH%RVWRQ0$86$
(YHU\RQH LV SHUPLWWHG WR FRS\ DQG GLVWULEXWH YHUEDWLP FRSLHV RI WKLV
FHUWDLQ OLEUDULHV LQ RUGHU WR SHUPLW OLQNLQJ WKRVH OLEUDULHV LQWR QRQIUHH
SURJUDPV
OLFHQVHGRFXPHQWEXWFKDQJLQJLWLVQRWDOORZHG
:KHQ D SURJUDP LV OLQNHG ZLWK D OLEUDU\ ZKHWKHU VWDWLFDOO\ RU XVLQJ D
>7KLVLVWKHILUVWUHOHDVHGYHUVLRQRIWKH/HVVHU*3/,WDOVRFRXQWVDVWKH
VXFFHVVRURIWKH*18/LEUDU\3XEOLF/LFHQVHYHUVLRQKHQFHWKHYHUVLRQ
QXPEHU@
3UHDPEOH
VKDUHG OLEUDU\ WKH FRPELQDWLRQ RI WKH WZR LV OHJDOO\ VSHDNLQJ D FRPELQHG
ZRUN D GHULYDWLYH RI WKH RULJLQDO OLEUDU\ 7KH RUGLQDU\ *HQHUDO 3XEOLF
/LFHQVHWKHUHIRUHSHUPLWVVXFKOLQNLQJRQO\LIWKHHQWLUHFRPELQDWLRQILWVLWV
FULWHULD RI IUHHGRP 7KH /HVVHU *HQHUDO3XEOLF /LFHQVH SHUPLWV PRUH OD[
FULWHULDIRUOLQNLQJRWKHUFRGHZLWKWKHOLEUDU\
7KHOLFHQVHVIRUPRVWVRIWZDUHDUHGHVLJQHGWRWDNHDZD\\RXUIUHHGRPWR
VKDUH DQG FKDQJH LW %\ FRQWUDVW WKH *18 *HQHUDO 3XEOLF /LFHQVHV DUH
LQWHQGHGWRJXDUDQWHH\RXUIUHHGRPWRVKDUHDQGFKDQJHIUHHVRIWZDUHWR
PDNHVXUHWKHVRIWZDUHLVIUHHIRUDOOLWVXVHUV
:H FDOO WKLV OLFHQVH WKH /HVVHU *HQHUDO 3XEOLF /LFHQVH EHFDXVH LW GRHV
/HVV WR SURWHFW WKH XVHU
V IUHHGRP WKDQ WKH RUGLQDU\ *HQHUDO 3XEOLF
/LFHQVH ,W DOVR SURYLGHV RWKHU IUHH VRIWZDUH GHYHORSHUV /HVV RI DQ
DGYDQWDJHRYHUFRPSHWLQJ QRQIUHHSURJUDPV7KHVHGLVDGYDQWDJHV DUH
7KLVOLFHQVHWKH/HVVHU*HQHUDO3XEOLF/LFHQVHDSSOLHVWRVRPHVSHFLDOO\
GHVLJQDWHG VRIWZDUH SDFNDJHVW\SLFDOO\ OLEUDULHVRI WKH )UHH 6RIWZDUH
)RXQGDWLRQDQGRWKHUDXWKRUVZKRGHFLGHWRXVHLW<RXFDQXVHLWWRREXW
WKHUHDVRQZHXVHWKHRUGLQDU\*HQHUDO3XEOLF/LFHQVHIRUPDQ\OLEUDULHV
+RZHYHU WKH /HVVHU OLFHQVH SURYLGHV DGYDQWDJHV LQ FHUWDLQ VSHFLDO
FLUFXPVWDQFHV
ZH VXJJHVW \RX ILUVW WKLQN FDUHIXOO\ DERXW ZKHWKHU WKLV OLFHQVH RU WKH
RUGLQDU\ *HQHUDO 3XEOLF /LFHQVH LV WKH EHWWHU VWUDWHJ\ WR XVH LQ DQ\
SDUWLFXODUFDVHEDVHGRQWKHH[SODQDWLRQVEHORZ
)RU H[DPSOH RQ UDUH RFFDVLRQV WKHUH PD\ EH D VSHFLDO QHHG WR
HQFRXUDJHWKHZLGHVWSRVVLEOHXVHRIDFHUWDLQOLEUDU\VRWKDWLWEHFRPHVD
GHIDFWRVWDQGDUG7RDFKLHYHWKLVQRQIUHHSURJUDPVPXVWEHDOORZHGWR
:KHQ ZH VSHDN RI IUHH VRIWZDUH ZH DUH UHIHUULQJ WR IUHHGRP RI XVH QRW
SULFH 2XU *HQHUDO 3XEOLF /LFHQVHV DUH GHVLJQHG WR PDNH VXUH WKDW \RX
KDYHWKHIUHHGRPWRGLVWULEXWHFRSLHVRIIUHHVRIWZDUHDQGFKDUJHIRUWKLV
VHUYLFHLI\RXZLVKWKDW\RXUHFHLYHVRXUFHFRGHRUFDQJHWLWLI\RXZDQW
XVHWKHOLEUDU\$PRUHIUHTXHQWFDVHLVWKDWDIUHHOLEUDU\GRHVWKHVDPH
MREDVZLGHO\XVHGQRQIUHHOLEUDULHV,QWKLVFDVHWKHUHLVOLWWOHWRJDLQE\
OLPLWLQJWKHIUHHOLEUDU\WRIUHHVRIWZDUHRQO\VRZHXVHWKH/HVVHU*HQHUDO
3XEOLF/LFHQVH
LW WKDW \RX FDQ FKDQJH WKH VRIWZDUH DQG XVH SLHFHV RI LW LQ QHZ IUHH
SURJUDPVDQGWKDW\RXDUHLQIRUPHGWKDW\RXFDQGRWKHVHWKLQJV
,QRWKHUFDVHVSHUPLVVLRQWRXVHDSDUWLFXODUOLEUDU\LQQRQIUHHSURJUDPV
HQDEOHV DJUHDWHU QXPEHURISHRSOH WR XVHD ODUJHERG\RIIUHH VRIWZDUH
7RSURWHFW\RXUULJKWVZHQHHGWRPDNHUHVWULFWLRQVWKDWIRUELGGLVWULEXWRUV
WR GHQ\ \RX WKHVH ULJKWV RU WR DVN \RX WR VXUUHQGHU WKHVH ULJKWV 7KHVH
UHVWULFWLRQV WUDQVODWH WR FHUWDLQ UHVSRQVLELOLWLHV IRU \RX LI \RX GLVWULEXWH
)RU H[DPSOH SHUPLVVLRQ WR XVH WKH *18 & /LEUDU\ LQ QRQIUHH SURJUDPV
HQDEOHV PDQ\ PRUH SHRSOH WR XVH WKH ZKROH *18 RSHUDWLQJ V\VWHP DV
ZHOODVLWVYDULDQWWKH*18/LQX[RSHUDWLQJV\VWHP
FRSLHVRIWKHOLEUDU\RULI\RXPRGLI\LW
)RU H[DPSOH LI \RX GLVWULEXWH FRSLHV RI WKH OLEUDU\ZKHWKHU JUDWLV RU IRU D
$OWKRXJK WKH /HVVHU *HQHUDO 3XEOLF /LFHQVH LV /HVV SURWHFWLYH RI WKH
IHH\RXPXVWJLYHWKHUHFLSLHQWVDOOWKHULJKWVWKDWZHJDYH\RX<RXPXVW
XVHUV
IUHHGRP LW GRHV HQVXUH WKDW WKH XVHU RI D SURJUDP WKDW LV OLQNHG
PDNH VXUH WKDW WKH\ WRR UHFHLYH RU FDQ JHW WKH VRXUFH FRGH ,I \RX OLQN
ZLWKWKH/LEUDU\KDVWKHIUHHGRPDQGWKHZKHUHZLWKDOWRUXQWKDWSURJUDP
RWKHU FRGH ZLWK WKH OLEUDU\ \RX PXVW SURYLGH FRPSOHWH REMHFW ILOHV WR WKH
XVLQJDPRGLILHGYHUVLRQRIWKH/LEUDU\
UHFLSLHQWV VR WKDW WKH\ FDQ UHOLQN WKHP ZLWK WKH OLEUDU\ DIWHU PDNLQJ
FKDQJHVWRWKHOLEUDU\DQGUHFRPSLOLQJLW$QG\RXPXVWVKRZWKHPWKHVH
WHUPVVRWKH\NQRZWKHLUULJKWV
7KHSUHFLVHWHUPVDQGFRQGLWLRQVIRUFRS\LQJGLVWULEXWLRQDQGPRGLILFDWLRQ
IROORZ3D\FORVHDWWHQWLRQWRWKHGLIIHUHQFHEHWZHHQDZRUNEDVHGRQWKH
OLEUDU\ DQG D ZRUN WKDW XVHV WKH OLEUDU\ 7KH IRUPHU FRQWDLQV FRGH
:H SURWHFW \RXU ULJKWV ZLWK D WZRVWHS PHWKRG ZH FRS\ULJKW WKHQ
GHULYHG IURP WKH OLEUDU\ ZKHUHDV WKH ODWWHU PXVW EH FRPELQHG ZLWK WKH
OLEUDU\DQGZHRIIHU\RXWKLVOLFHQVHZKLFKJLYHV\RXOHJDOSHUPLVVLRQ
OLEUDU\LQRUGHUWRUXQ
WRFRS\GLVWULEXWHDQGRUPRGLI\WKHOLEUDU\
7R SURWHFW HDFK GLVWULEXWRU ZH ZDQW WR PDNH LW YHU\ FOHDU WKDW WKHUH LV QR
7(506 $1' &21',7,216 )25 &23<,1* ',675,%87,21
$1'02',),&$7,21
ZDUUDQW\ IRU WKH IUHH OLEUDU\ $OVR LI WKH OLEUDU\ LV PRGLILHG E\ VRPHRQH
HOVHDQGSDVVHGRQWKHUHFLSLHQWVVKRXOGNQRZWKDWZKDWWKH\KDYHLVQRW
WKH RULJLQDO YHUVLRQ VR WKDW WKH RULJLQDO DXWKRU
V UHSXWDWLRQ ZLOO QRW EH
DIIHFWHGE\SUREOHPVWKDWPLJKWEHLQWURGXFHGE\RWKHUV
7KLV /LFHQVH $JUHHPHQW DSSOLHV WR DQ\ VRIWZDUH OLEUDU\ RU RWKHU
SURJUDP ZKLFK FRQWDLQV D QRWLFH SODFHG E\ WKH FRS\ULJKW KROGHU RU RWKHU
DXWKRUL]HG SDUW\ VD\LQJ LW PD\ EH GLVWULEXWHG XQGHU WKH WHUPV RI WKLV
/HVVHU*HQHUDO3XEOLF/LFHQVHDOVRFDOOHG WKLV/LFHQVH(DFK OLFHQVHH
)LQDOO\ VRIWZDUH SDWHQWV SRVH D FRQVWDQW WKUHDW WR WKH H[LVWHQFH RI DQ\
LVDGGUHVVHGDV\RX
IUHH SURJUDP :H ZLVK WR PDNH VXUH WKDW D FRPSDQ\ FDQQRW HIIHFWLYHO\
UHVWULFWWKHXVHUVRIDIUHHSURJUDPE\REWDLQLQJDUHVWULFWLYHOLFHQVHIURPD
SDWHQW KROGHU 7KHUHIRUH ZH LQVLVW WKDW DQ\ SDWHQW OLFHQVH REWDLQHG IRU D
YHUVLRQ RI WKH OLEUDU\ PXVW EH FRQVLVWHQW ZLWK WKH IXOO IUHHGRP RI XVH
$ OLEUDU\ PHDQV D FROOHFWLRQ RI VRIWZDUH IXQFWLRQV DQGRU GDWD SUHSDUHG
VR DV WR EH FRQYHQLHQWO\ OLQNHG ZLWK DSSOLFDWLRQ SURJUDPV ZKLFK XVH
VRPHRIWKRVHIXQFWLRQVDQGGDWDWRIRUPH[HFXWDEOHV
VSHFLILHGLQWKLVOLFHQVH
7KH/LEUDU\EHORZUHIHUVWRDQ\VXFKVRIWZDUHOLEUDU\RUZRUNZKLFKKDV
newprod 0474Warranty and GPL rev.fm Page 10 Wednesday, August 6, 2003 2:24 PM
EHHQGLVWULEXWHGXQGHUWKHVHWHUPV$ZRUNEDVHGRQWKH/LEUDU\PHDQV
7KXVLWLVQRWWKHLQWHQWRIWKLVVHFWLRQWRFODLPULJKWVRUFRQWHVW\RXU
HLWKHUWKH/LEUDU\RUDQ\GHULYDWLYHZRUNXQGHUFRS\ULJKWODZWKDWLVWRVD\
ULJKWV WR ZRUN ZULWWHQ HQWLUHO\ E\ \RX UDWKHU WKH LQWHQW LV WR H[HUFLVH
D ZRUN FRQWDLQLQJ WKH /LEUDU\ RU D SRUWLRQ RI LW HLWKHU YHUEDWLP RU ZLWK
WKH ULJKW WR FRQWURO WKH GLVWULEXWLRQ RI GHULYDWLYH RU FROOHFWLYH ZRUNV
PRGLILFDWLRQV DQGRU WUDQVODWHG VWUDLJKWIRUZDUGO\ LQWR DQRWKHU ODQJXDJH
EDVHGRQWKH/LEUDU\
+HUHLQDIWHU
WUDQVODWLRQ
LV
LQFOXGHG
ZLWKRXW
OLPLWDWLRQ
LQ
WKH
WHUP
PRGLILFDWLRQ
,Q DGGLWLRQ PHUH DJJUHJDWLRQ RI DQRWKHU ZRUN QRW EDVHG RQ WKH
/LEUDU\ ZLWK WKH /LEUDU\ RU ZLWK D ZRUN EDVHG RQ WKH /LEUDU\ RQ D
6RXUFHFRGHIRUDZRUNPHDQVWKHSUHIHUUHGIRUPRIWKHZRUNIRUPDNLQJ
PRGLILFDWLRQV WR LW )RU D OLEUDU\ FRPSOHWH VRXUFH FRGH PHDQV DOO WKH
YROXPH RI D VWRUDJH RU GLVWULEXWLRQ PHGLXP GRHV QRW EULQJ WKH RWKHU
ZRUNXQGHUWKHVFRSHRIWKLV/LFHQVH
VRXUFH FRGH IRU DOO PRGXOHV LW FRQWDLQV SOXV DQ\ DVVRFLDWHG LQWHUIDFH
GHILQLWLRQILOHVSOXVWKHVFULSWVXVHGWRFRQWUROFRPSLODWLRQDQGLQVWDOODWLRQ
RIWKHOLEUDU\
<RX PD\ RSW WR DSSO\ WKH WHUPV RI WKH RUGLQDU\ *18 *HQHUDO 3XEOLF
/LFHQVH LQVWHDG RIWKLV/LFHQVHWR DJLYHQFRS\RIWKH/LEUDU\7R GRWKLV
\RXPXVWDOWHUDOOWKHQRWLFHVWKDWUHIHUWRWKLV/LFHQVHVRWKDWWKH\UHIHUWR
WKH RUGLQDU\ *18 *HQHUDO 3XEOLF /LFHQVH YHUVLRQ LQVWHDG RI WR WKLV
$FWLYLWLHVRWKHUWKDQFRS\LQJGLVWULEXWLRQDQGPRGLILFDWLRQDUHQRWFRYHUHG
/LFHQVH ,I DQHZHUYHUVLRQWKDQYHUVLRQ RIWKHRUGLQDU\*18 *HQHUDO
E\WKLV/LFHQVHWKH\DUHRXWVLGHLWVVFRSH7KHDFWRIUXQQLQJDSURJUDP
3XEOLF/LFHQVHKDVDSSHDUHGWKHQ\RXFDQVSHFLI\WKDWYHUVLRQLQVWHDGLI
XVLQJ WKH /LEUDU\ LV QRW UHVWULFWHG DQG RXWSXW IURP VXFK D SURJUDP LV
\RXZLVK'RQRWPDNHDQ\RWKHUFKDQJHLQWKHVHQRWLFHV
FRYHUHG RQO\ LI LWV FRQWHQWV FRQVWLWXWH D ZRUN EDVHG RQ WKH /LEUDU\
LQGHSHQGHQWRIWKHXVHRIWKH/LEUDU\LQDWRROIRUZULWLQJLW:KHWKHUWKDW
LVWUXHGHSHQGVRQZKDWWKH/LEUDU\GRHVDQGZKDWWKHSURJUDPWKDWXVHV
WKH/LEUDU\GRHV
2QFHWKLVFKDQJHLVPDGHLQDJLYHQFRS\LWLVLUUHYHUVLEOHIRUWKDWFRS\VR
WKHRUGLQDU\*18*HQHUDO3XEOLF/LFHQVHDSSOLHVWRDOOVXEVHTXHQWFRSLHV
DQGGHULYDWLYHZRUNVPDGHIURPWKDWFRS\
<RX PD\ FRS\ DQG GLVWULEXWH YHUEDWLP FRSLHV RI WKH /LEUDU\
V FRPSOHWH
7KLVRSWLRQLVXVHIXOZKHQ\RXZLVKWRFRS\SDUWRIWKHFRGHRIWKH/LEUDU\
VRXUFH FRGH DV \RX UHFHLYH LW LQ DQ\ PHGLXP SURYLGHG WKDW \RX
LQWRDSURJUDPWKDWLVQRWDOLEUDU\
FRQVSLFXRXVO\ DQG DSSURSULDWHO\ SXEOLVK RQ HDFK FRS\ DQ DSSURSULDWH
FRS\ULJKWQRWLFHDQGGLVFODLPHURIZDUUDQW\NHHSLQWDFWDOOWKHQRWLFHVWKDW
UHIHUWR WKLV /LFHQVH DQGWR WKH DEVHQFH RI DQ\ ZDUUDQW\ DQG GLVWULEXWH D
FRS\RIWKLV/LFHQVHDORQJZLWKWKH/LEUDU\
<RXPD\FRS\DQGGLVWULEXWHWKH/LEUDU\RUDSRUWLRQRUGHULYDWLYHRILW
XQGHU 6HFWLRQ LQ REMHFW FRGH RU H[HFXWDEOH IRUP XQGHU WKH WHUPV RI
6HFWLRQVDQGDERYHSURYLGHGWKDW\RXDFFRPSDQ\LWZLWKWKHFRPSOHWH
FRUUHVSRQGLQJ PDFKLQHUHDGDEOH VRXUFH FRGH ZKLFK PXVW EH GLVWULEXWHG
<RX PD\FKDUJHD IHH IRUWKHSK\VLFDODFW RI WUDQVIHUULQJD FRS\ DQG\RX
PD\DW\RXURSWLRQRIIHUZDUUDQW\SURWHFWLRQLQH[FKDQJHIRUDIHH
XQGHUWKHWHUPVRI6HFWLRQVDQGDERYHRQDPHGLXPFXVWRPDULO\XVHG
IRUVRIWZDUHLQWHUFKDQJH
<RX PD\ PRGLI\ \RXU FRS\ RU FRSLHV RI WKH /LEUDU\ RU DQ\ SRUWLRQ RI LW
WKXV IRUPLQJ D ZRUN EDVHG RQ WKH /LEUDU\ DQG FRS\ DQG GLVWULEXWH VXFK
PRGLILFDWLRQV RU ZRUN XQGHU WKH WHUPV RI 6HFWLRQ DERYH SURYLGHG WKDW
\RXDOVRPHHWDOORIWKHVHFRQGLWLRQV
D7KHPRGLILHGZRUNPXVWLWVHOIEHDVRIWZDUHOLEUDU\
E<RXPXVWFDXVHWKHILOHVPRGLILHGWRFDUU\SURPLQHQWQRWLFHVVWDW
LQJWKDW\RXFKDQJHGWKHILOHVDQGWKHGDWHRIDQ\FKDQJH
F<RXPXVWFDXVHWKHZKROHRIWKHZRUNWREHOLFHQVHGDWQRFKDUJH
WRDOOWKLUGSDUWLHVXQGHUWKHWHUPVRIWKLV/LFHQVH
G,IDIDFLOLW\LQWKHPRGLILHG/LEUDU\UHIHUVWRDIXQFWLRQRUDWDEOHRI
GDWD WR EH VXSSOLHG E\ DQ DSSOLFDWLRQ SURJUDP WKDW XVHV WKH IDFLOLW\
RWKHU WKDQ DV DQ DUJXPHQW SDVVHGZKHQ WKH IDFLOLW\ LV LQYRNHG WKHQ
\RX PXVW PDNH D JRRG IDLWK HIIRUW WR HQVXUH WKDWLQ WKH HYHQW DQ
DSSOLFDWLRQ GRHV QRW VXSSO\ VXFK IXQFWLRQ RU WDEOH WKH IDFLOLW\ VWLOO
RSHUDWHV DQG SHUIRUPV ZKDWHYHU SDUW RI LWV SXUSRVH UHPDLQV
PHDQLQJIXO
)RU H[DPSOH D IXQFWLRQ LQ D OLEUDU\ WR FRPSXWH VTXDUH URRWV KDV D
SXUSRVH WKDW LV HQWLUHO\ ZHOOGHILQHG LQGHSHQGHQW RI WKH DSSOLFDWLRQ
7KHUHIRUH 6XEVHFWLRQ G UHTXLUHV WKDW DQ\ DSSOLFDWLRQVXSSOLHG
IXQFWLRQ RU WDEOH XVHG E\ WKLV IXQFWLRQ PXVW EH RSWLRQDO LI WKH
DSSOLFDWLRQ GRHV QRW VXSSO\ LW WKH VTXDUH URRW IXQFWLRQ PXVW VWLOO
FRPSXWHVTXDUHURRWV
7KHVH UHTXLUHPHQWV DSSO\ WR WKH PRGLILHG ZRUN DV D ZKROH ,I
LGHQWLILDEOHVHFWLRQVRIWKDWZRUNDUHQRWGHULYHGIURPWKH/LEUDU\DQG
FDQ EH UHDVRQDEO\ FRQVLGHUHG LQGHSHQGHQW DQG VHSDUDWH ZRUNV LQ
WKHPVHOYHV WKHQ WKLV /LFHQVH DQG LWV WHUPV GR QRW DSSO\ WR WKRVH
VHFWLRQVZKHQ\RXGLVWULEXWHWKHPDVVHSDUDWHZRUNV%XWZKHQ\RX
GLVWULEXWHWKHVDPHVHFWLRQVDVSDUWRIDZKROHZKLFKLVDZRUNEDVHG
RQ WKH /LEUDU\ WKH GLVWULEXWLRQ RI WKH ZKROH PXVW EH RQ WKH WHUPV RI
WKLV /LFHQVH ZKRVH SHUPLVVLRQV IRU RWKHU OLFHQVHHV H[WHQG WR WKH
HQWLUH ZKROH DQG WKXV WR HDFK DQG HYHU\ SDUW UHJDUGOHVV RI ZKR
ZURWHLW
,I GLVWULEXWLRQ RI REMHFW FRGH LV PDGH E\ RIIHULQJ DFFHVV WR FRS\ IURP D
GHVLJQDWHGSODFHWKHQRIIHULQJHTXLYDOHQWDFFHVVWRFRS\WKHVRXUFHFRGH
IURP WKH VDPH SODFH VDWLVILHV WKH UHTXLUHPHQW WR GLVWULEXWH WKH VRXUFH
FRGH HYHQ WKRXJK WKLUG SDUWLHV DUH QRW FRPSHOOHG WR FRS\ WKH VRXUFH
DORQJZLWKWKHREMHFWFRGH
$SURJUDPWKDWFRQWDLQVQRGHULYDWLYHRIDQ\SRUWLRQRIWKH/LEUDU\EXWLV
GHVLJQHG WR ZRUN ZLWK WKH /LEUDU\ E\ EHLQJ FRPSLOHG RU OLQNHG ZLWK LW LV
FDOOHG D ZRUN WKDW XVHV WKH /LEUDU\ 6XFK D ZRUN LQ LVRODWLRQ LV QRW D
GHULYDWLYHZRUNRIWKH/LEUDU\DQGWKHUHIRUHIDOOVRXWVLGHWKHVFRSHRIWKLV
/LFHQVH
+RZHYHUOLQNLQJDZRUNWKDWXVHVWKH/LEUDU\ZLWKWKH/LEUDU\FUHDWHVDQ
H[HFXWDEOHWKDWLVDGHULYDWLYHRIWKH/LEUDU\EHFDXVHLWFRQWDLQVSRUWLRQV
RIWKH/LEUDU\UDWKHUWKDQDZRUNWKDWXVHVWKHOLEUDU\7KHH[HFXWDEOH
LVWKHUHIRUHFRYHUHGE\WKLV/LFHQVH6HFWLRQVWDWHVWHUPVIRUGLVWULEXWLRQ
RIVXFKH[HFXWDEOHV
:KHQDZRUNWKDWXVHVWKH/LEUDU\XVHV PDWHULDOIURPD KHDGHUILOHWKDW
LVSDUWRIWKH/LEUDU\WKHREMHFWFRGHIRUWKHZRUNPD\EHDGHULYDWLYHZRUN
RI WKH /LEUDU\ HYHQ WKRXJK WKH VRXUFH FRGH LV QRW :KHWKHU WKLV LV WUXH LV
HVSHFLDOO\VLJQLILFDQWLIWKHZRUNFDQEHOLQNHGZLWKRXWWKH/LEUDU\RULIWKH
ZRUN LV LWVHOI D OLEUDU\ 7KH WKUHVKROG IRU WKLV WR EH WUXH LV QRW SUHFLVHO\
GHILQHGE\ODZ
,I VXFK DQ REMHFW ILOH XVHV RQO\ QXPHULFDO SDUDPHWHUV GDWD VWUXFWXUH
OD\RXWV DQG DFFHVVRUV DQG VPDOO PDFURV DQG VPDOO LQOLQH IXQFWLRQV WHQ
OLQHV RU OHVV LQ OHQJWK WKHQ WKH XVH RI WKH REMHFW ILOH LV XQUHVWULFWHG
UHJDUGOHVV RI ZKHWKHU LW LV OHJDOO\ D GHULYDWLYH ZRUN ([HFXWDEOHV
FRQWDLQLQJ WKLV REMHFW FRGH SOXV SRUWLRQV RI WKH /LEUDU\ ZLOO VWLOO IDOO XQGHU
6HFWLRQ
2WKHUZLVHLIWKHZRUNLVDGHULYDWLYHRIWKH/LEUDU\\RXPD\GLVWULEXWHWKH
REMHFW FRGH IRU WKH ZRUN XQGHU WKH WHUPV RI 6HFWLRQ $Q\ H[HFXWDEOHV
newprod 0474Warranty and GPL rev.fm Page 11 Wednesday, August 6, 2003 2:24 PM
FRQWDLQLQJ WKDW ZRUN DOVR IDOO XQGHU 6HFWLRQ ZKHWKHU RU QRW WKH\ DUH
D $FFRPSDQ\ WKH FRPELQHG OLEUDU\ ZLWK D FRS\ RI WKH VDPH ZRUN
OLQNHGGLUHFWO\ZLWKWKH/LEUDU\LWVHOI
EDVHG RQ WKH /LEUDU\ XQFRPELQHG ZLWK DQ\ RWKHU OLEUDU\ IDFLOLWLHV
7KLVPXVWEHGLVWULEXWHGXQGHUWKHWHUPVRIWKH6HFWLRQVDERYH
$VDQH[FHSWLRQWRWKH6HFWLRQVDERYH\RXPD\DOVRFRPELQHRUOLQND
ZRUNWKDWXVHVWKH/LEUDU\ZLWKWKH/LEUDU\WRSURGXFHDZRUNFRQWDLQLQJ
E *LYH SURPLQHQW QRWLFH ZLWK WKH FRPELQHG OLEUDU\ RI WKH IDFW WKDW
SRUWLRQVRIWKH/LEUDU\DQGGLVWULEXWHWKDWZRUNXQGHUWHUPVRI\RXUFKRLFH
SDUWRILWLVDZRUNEDVHGRQWKH/LEUDU\DQGH[SODLQLQJZKHUHWRILQG
SURYLGHGWKDWWKHWHUPVSHUPLWPRGLILFDWLRQRIWKHZRUNIRUWKHFXVWRPHU
V
WKHDFFRPSDQ\LQJXQFRPELQHGIRUPRIWKHVDPHZRUN
RZQXVHDQGUHYHUVHHQJLQHHULQJIRUGHEXJJLQJVXFKPRGLILFDWLRQV
<RXPD\QRWFRS\PRGLI\VXEOLFHQVHOLQNZLWKRUGLVWULEXWHWKH/LEUDU\
<RXPXVWJLYHSURPLQHQWQRWLFHZLWKHDFKFRS\RIWKHZRUNWKDWWKH/LEUDU\
H[FHSW DV H[SUHVVO\ SURYLGHG XQGHU WKLV /LFHQVH $Q\ DWWHPSW RWKHUZLVH
LV XVHG LQ LW DQG WKDW WKH /LEUDU\ DQG LWV XVH DUH FRYHUHG E\ WKLV /LFHQVH
WR FRS\ PRGLI\VXEOLFHQVHOLQN ZLWKRUGLVWULEXWHWKH /LEUDU\ LVYRLG DQG
<RX PXVW VXSSO\ D FRS\ RI WKLV /LFHQVH ,I WKH ZRUN GXULQJ H[HFXWLRQ
ZLOODXWRPDWLFDOO\WHUPLQDWH\RXUULJKWVXQGHUWKLV/LFHQVH+RZHYHUSDU
GLVSOD\V FRS\ULJKW QRWLFHV \RX PXVW LQFOXGH WKH FRS\ULJKW QRWLFH IRU WKH
WLHV ZKR KDYH UHFHLYHG FRSLHV RU ULJKWV IURP \RX XQGHU WKLV /LFHQVH ZLOO
/LEUDU\DPRQJWKHPDVZHOODVDUHIHUHQFHGLUHFWLQJWKHXVHUWRWKHFRS\
QRW KDYH WKHLU OLFHQVHV WHUPLQDWHG VR ORQJ DV VXFK SDUWLHV UHPDLQ LQ IXOO
RIWKLV/LFHQVH$OVR\RXPXVWGRRQHRIWKHVHWKLQJV
FRPSOLDQFH
D$FFRPSDQ\WKHZRUNZLWKWKHFRPSOHWHFRUUHVSRQGLQJPDFKLQH
<RXDUHQRWUHTXLUHGWRDFFHSWWKLV/LFHQVHVLQFH\RXKDYHQRWVLJQHG
UHDGDEOH VRXUFH FRGH IRU WKH /LEUDU\ LQFOXGLQJ ZKDWHYHU FKDQJHV
LW+RZHYHUQRWKLQJHOVHJUDQWV\RXSHUPLVVLRQWRPRGLI\RUGLVWULEXWHWKH
ZHUHXVHGLQWKHZRUNZKLFKPXVWEHGLVWULEXWHGXQGHU6HFWLRQV
/LEUDU\RULWVGHULYDWLYHZRUNV7KHVHDFWLRQVDUHSURKLELWHGE\ODZLI\RX
DQGDERYHDQGLIWKHZRUNLVDQH[HFXWDEOHOLQNHGZLWKWKH/LEUDU\
GR QRW DFFHSW WKLV /LFHQVH 7KHUHIRUH E\ PRGLI\LQJ RU GLVWULEXWLQJ WKH
ZLWKWKHFRPSOHWHPDFKLQHUHDGDEOHZRUNWKDWXVHV WKH/LEUDU\DV
/LEUDU\ RU DQ\ ZRUN EDVHG RQ WKH /LEUDU\ \RX LQGLFDWH \RXU DFFHSWDQFH
REMHFW FRGH DQGRU VRXUFH FRGH VR WKDW WKH XVHU FDQ PRGLI\ WKH
RI WKLV /LFHQVH WR GR VR DQG DOO LWV WHUPV DQG FRQGLWLRQV IRU FRS\LQJ
/LEUDU\ DQG WKHQ UHOLQN WR SURGXFH D PRGLILHG H[HFXWDEOH FRQWDLQLQJ
GLVWULEXWLQJRUPRGLI\LQJWKH/LEUDU\RUZRUNVEDVHGRQLW
WKHPRGLILHG/LEUDU\,WLVXQGHUVWRRGWKDWWKHXVHUZKRFKDQJHVWKH
FRQWHQWV RIGHILQLWLRQV ILOHVLQ WKH /LEUDU\ ZLOO QRW QHFHVVDULO\ EH DEOH
(DFK WLPH \RX UHGLVWULEXWH WKH /LEUDU\ RU DQ\ ZRUN EDVHG RQ WKH
WRUHFRPSLOHWKHDSSOLFDWLRQWRXVHWKHPRGLILHGGHILQLWLRQV
/LEUDU\ WKH UHFLSLHQW DXWRPDWLFDOO\ UHFHLYHV D OLFHQVH IURP WKH RULJLQDO
OLFHQVRUWRFRS\GLVWULEXWHOLQNZLWKRUPRGLI\WKH/LEUDU\VXEMHFWWRWKHVH
E 8VH D VXLWDEOH VKDUHG OLEUDU\ PHFKDQLVP IRU OLQNLQJ ZLWK WKH
WHUPVDQGFRQGLWLRQV<RXPD\QRWLPSRVHDQ\IXUWKHUUHVWULFWLRQVRQWKH
/LEUDU\$VXLWDEOHPHFKDQLVPLVRQHWKDWXVHVDWUXQWLPHDFRS\
UHFLSLHQWV
H[HUFLVH RI WKH ULJKWV JUDQWHG KHUHLQ <RX DUH QRW UHVSRQVLEOH
RI WKH OLEUDU\ DOUHDG\ SUHVHQW RQ WKH XVHU
V FRPSXWHU V\VWHP UDWKHU
IRUHQIRUFLQJFRPSOLDQFHE\WKLUGSDUWLHVZLWKWKLV/LFHQVH
WKDQFRS\LQJOLEUDU\IXQFWLRQVLQWRWKHH[HFXWDEOHDQGZLOORSHUDWH
SURSHUO\ZLWKDPRGLILHGYHUVLRQRIWKHOLEUDU\LIWKHXVHULQVWDOOVRQH
,I DV D FRQVHTXHQFH RI D FRXUW MXGJPHQW RU DOOHJDWLRQ RI SDWHQW
DV ORQJ DV WKH PRGLILHG YHUVLRQ LV LQWHUIDFHFRPSDWLEOH ZLWK WKH YHU
LQIULQJHPHQW RU IRU DQ\ RWKHU UHDVRQ QRW OLPLWHG WR SDWHQW LVVXHV
VLRQWKDWWKHZRUNZDVPDGHZLWK
FRQGLWLRQV DUH LPSRVHG RQ \RX ZKHWKHU E\ FRXUW RUGHU DJUHHPHQW RU
RWKHUZLVH WKDW FRQWUDGLFW WKH FRQGLWLRQV RI WKLV /LFHQVH WKH\ GR QRW
F $FFRPSDQ\ WKH ZRUN ZLWK D ZULWWHQ RIIHU YDOLG IRU DW OHDVW WKUHH
H[FXVH\RXIURPWKHFRQGLWLRQVRIWKLV/LFHQVH,I\RXFDQQRWGLVWULEXWHVR
\HDUV WR JLYH WKH VDPH XVHU WKH PDWHULDOV VSHFLILHG LQ 6XEVHFWLRQ
DV WR VDWLVI\ VLPXOWDQHRXVO\ \RXU REOLJDWLRQV XQGHU WKLV /LFHQVH DQG DQ\
DDERYHIRUDFKDUJHQRPRUHWKDQWKHFRVWRISHUIRUPLQJWKLVGLV
RWKHUSHUWLQHQWREOLJDWLRQVWKHQDVDFRQVHTXHQFH\RXPD\QRWGLVWULEXWH
WULEXWLRQ
WKH/LEUDU\DWDOO)RUH[DPSOHLIDSDWHQWOLFHQVHZRXOGQRWSHUPLWUR\DOW\
IUHHUHGLVWULEXWLRQRIWKH/LEUDU\E\DOOWKRVHZKRUHFHLYHFRSLHVGLUHFWO\RU
G,IGLVWULEXWLRQRIWKHZRUNLVPDGHE\RIIHULQJDFFHVVWRFRS\IURPD
LQGLUHFWO\WKURXJK\RXWKHQWKHRQO\ZD\\RXFRXOGVDWLVI\ERWKLWDQGWKLV
GHVLJQDWHG SODFH RIIHU HTXLYDOHQW DFFHVV WR FRS\ WKH DERYH VSHFL
/LFHQVHZRXOGEHWRUHIUDLQHQWLUHO\IURPGLVWULEXWLRQRIWKH/LEUDU\
ILHGPDWHULDOVIURPWKHVDPHSODFH
,I DQ\ SRUWLRQ RI WKLV VHFWLRQ LV KHOG LQYDOLG RU XQHQIRUFHDEOH XQGHU DQ\
H9HULI\WKDWWKHXVHUKDVDOUHDG\UHFHLYHGDFRS\RIWKHVHPDWHULDOV
SDUWLFXODU FLUFXPVWDQFH WKH EDODQFH RI WKH VHFWLRQ LV LQWHQGHG WR DSSO\
RUWKDW\RXKDYHDOUHDG\VHQWWKLVXVHUDFRS\
DQGWKHVHFWLRQDVDZKROHLVLQWHQGHGWRDSSO\LQRWKHUFLUFXPVWDQFHV
)RU DQ H[HFXWDEOH WKH UHTXLUHG IRUP RI WKH ZRUN WKDW XVHV WKH /LEUDU\
,WLVQRWWKHSXUSRVHRIWKLVVHFWLRQWRLQGXFH\RXWRLQIULQJHDQ\SDWHQWVRU
PXVW LQFOXGH DQ\ GDWD DQG XWLOLW\ SURJUDPV QHHGHG IRU UHSURGXFLQJ WKH
RWKHU SURSHUW\ ULJKW FODLPV RU WR FRQWHVW YDOLGLW\ RI DQ\ VXFK FODLPV WKLV
H[HFXWDEOH IURP LW +RZHYHU DV D VSHFLDO H[FHSWLRQ WKH PDWHULDOV WR EH
VHFWLRQKDVWKHVROHSXUSRVHRISURWHFWLQJWKHLQWHJULW\RIWKHIUHHVRIWZDUH
GLVWULEXWHGQHHGQRWLQFOXGHDQ\WKLQJWKDWLVQRUPDOO\GLVWULEXWHGLQHLWKHU
GLVWULEXWLRQ V\VWHP ZKLFK LV LPSOHPHQWHG E\ SXEOLF OLFHQVH SUDFWLFHV
VRXUFH RU ELQDU\ IRUP ZLWK WKH PDMRU FRPSRQHQWV FRPSLOHU NHUQHO DQG
0DQ\ SHRSOH KDYH PDGH JHQHURXV FRQWULEXWLRQV WR WKH ZLGH UDQJH RI
VR RQ RIWKH RSHUDWLQJ V\VWHP RQ ZKLFK WKHH[HFXWDEOHUXQVXQOHVV WKDW
VRIWZDUH GLVWULEXWHG WKURXJK WKDW V\VWHP LQ UHOLDQFH RQ FRQVLVWHQW
FRPSRQHQWLWVHOIDFFRPSDQLHVWKHH[HFXWDEOH
DSSOLFDWLRQRIWKDWV\VWHPLWLVXSWRWKHDXWKRUGRQRUWRGHFLGHLIKHRUVKH
LV ZLOOLQJ WR GLVWULEXWH VRIWZDUH WKURXJK DQ\ RWKHU V\VWHP DQG D OLFHQVHH
,W PD\ KDSSHQ WKDW WKLV UHTXLUHPHQW FRQWUDGLFWV WKH OLFHQVH UHVWULFWLRQV RI
FDQQRWLPSRVHWKDWFKRLFH
RWKHU SURSULHWDU\ OLEUDULHV WKDW GR QRW QRUPDOO\ DFFRPSDQ\ WKH RSHUDWLQJ
V\VWHP 6XFK D FRQWUDGLFWLRQ PHDQV \RX FDQQRW XVH ERWK WKHP DQG WKH
7KLVVHFWLRQLVLQWHQGHGWRPDNHWKRURXJKO\FOHDUZKDWLVEHOLHYHGWREHD
/LEUDU\WRJHWKHULQDQH[HFXWDEOHWKDW\RXGLVWULEXWH
FRQVHTXHQFHRIWKHUHVWRIWKLV/LFHQVH
<RX PD\ SODFH OLEUDU\ IDFLOLWLHV WKDW DUH D ZRUN EDVHG RQ WKH /LEUDU\
,I WKH GLVWULEXWLRQ DQGRU XVH RI WKH /LEUDU\ LV UHVWULFWHG LQ FHUWDLQ
VLGHE\VLGH LQ D VLQJOH OLEUDU\ WRJHWKHU ZLWK RWKHU OLEUDU\ IDFLOLWLHV QRW
FRXQWULHV HLWKHU E\ SDWHQWV RU E\ FRS\ULJKWHG LQWHUIDFHV WKH RULJLQDO
FRYHUHG E\ WKLV /LFHQVH DQG GLVWULEXWH VXFKD FRPELQHG OLEUDU\SURYLGHG
FRS\ULJKW KROGHU ZKR SODFHV WKH /LEUDU\ XQGHU WKLV /LFHQVH PD\ DGG DQ
WKDW WKH VHSDUDWH GLVWULEXWLRQ RI WKH ZRUN EDVHG RQ WKH /LEUDU\ DQG RI WKH
H[SOLFLW JHRJUDSKLFDO GLVWULEXWLRQ OLPLWDWLRQ H[FOXGLQJ WKRVH FRXQWULHV VR
RWKHU OLEUDU\ IDFLOLWLHV LV RWKHUZLVH SHUPLWWHG DQG SURYLGHG WKDW \RX GR
WKDWGLVWULEXWLRQLVSHUPLWWHGRQO\LQRUDPRQJFRXQWULHVQRWWKXVH[FOXGHG
WKHVHWZRWKLQJV
,Q VXFK FDVH WKLV /LFHQVH LQFRUSRUDWHV WKH OLPLWDWLRQ DV LI ZULWWHQ LQ WKH
ERG\RIWKLV/LFHQVH
newprod 0474Warranty and GPL rev.fm Page 12 Wednesday, August 6, 2003 2:24 PM
7KH )UHH 6RIWZDUH )RXQGDWLRQ PD\ SXEOLVK UHYLVHG DQGRU QHZ
(1'2)7(506$1'&21',7,216
YHUVLRQV RI WKH /HVVHU *HQHUDO 3XEOLF /LFHQVH IURP WLPH WR WLPH 6XFK
QHZ YHUVLRQV ZLOO EH VLPLODU LQ VSLULW WR WKHSUHVHQW YHUVLRQ EXW PD\ GLIIHU
LQGHWDLOWRDGGUHVVQHZSUREOHPVRUFRQFHUQV
+RZWR$SSO\7KHVH7HUPVWR<RXU1HZ/LEUDULHV
,I\RXGHYHORSDQHZOLEUDU\DQG\RXZDQWLWWREHRIWKHJUHDWHVWSRVVLEOH
(DFK YHUVLRQ LV JLYHQ D GLVWLQJXLVKLQJ YHUVLRQ QXPEHU ,I WKH /LEUDU\
VSHFLILHV D YHUVLRQ QXPEHU RI WKLV /LFHQVH ZKLFK DSSOLHV WR LW DQG DQ\
ODWHU YHUVLRQ \RX KDYH WKH RSWLRQ RI IROORZLQJ WKH WHUPV DQG FRQGLWLRQV
HLWKHU RI WKDW YHUVLRQ RU RI DQ\ ODWHU YHUVLRQ SXEOLVKHG E\ WKH )UHH
XVH WR WKH SXEOLF ZH UHFRPPHQG PDNLQJ LW IUHH VRIWZDUH WKDW HYHU\RQH
FDQ UHGLVWULEXWH DQG FKDQJH <RX FDQ GR VR E\ SHUPLWWLQJ UHGLVWULEXWLRQ
XQGHU WKHVH WHUPV RU DOWHUQDWLYHO\ XQGHU WKH WHUPV RI WKH RUGLQDU\
*HQHUDO3XEOLF/LFHQVH
6RIWZDUH )RXQGDWLRQ ,I WKH /LEUDU\ GRHV QRW VSHFLI\ D OLFHQVH YHUVLRQ
QXPEHU\RXPD\FKRRVHDQ\YHUVLRQHYHUSXEOLVKHGE\WKH)UHH6RIWZDUH
)RXQGDWLRQ
7RDSSO\WKHVHWHUPVDWWDFKWKHIROORZLQJQRWLFHVWRWKHOLEUDU\,WLVVDIHVW
WR DWWDFK WKHP WR WKH VWDUW RI HDFK VRXUFH ILOH WR PRVW HIIHFWLYHO\ FRQYH\
WKH H[FOXVLRQ RI ZDUUDQW\ DQG HDFK ILOH VKRXOG KDYH DW OHDVW WKH
,I\RXZLVKWRLQFRUSRUDWHSDUWVRIWKH/LEUDU\LQWRRWKHUIUHHSURJUDPV
FRS\ULJKWOLQHDQGDSRLQWHUWRZKHUHWKHIXOOQRWLFHLVIRXQG
ZKRVH GLVWULEXWLRQ FRQGLWLRQV DUH LQFRPSDWLEOH ZLWK WKHVH ZULWH WR WKH
DXWKRU WR DVN IRU SHUPLVVLRQ )RU VRIWZDUH ZKLFK LV FRS\ULJKWHG E\ WKH
)UHH 6RIWZDUH )RXQGDWLRQ ZULWH WR WKH )UHH 6RIWZDUH )RXQGDWLRQ ZH
VRPHWLPHV PDNH H[FHSWLRQV IRU WKLV 2XU GHFLVLRQ ZLOO EH JXLGHG E\ WKH
RQHOLQHWRJLYHWKHOLEUDU\
VQDPHDQGDQ LGHDRIZKDWLWGRHV!
&RS\ULJKW&\HDU!QDPHRIDXWKRU!
WZR JRDOV RI SUHVHUYLQJ WKH IUHH VWDWXV RI DOO GHULYDWLYHV RI RXU IUHH
7KLV OLEUDU\ LV IUHH VRIWZDUH \RX FDQ UHGLVWULEXWH LW DQGRU PRGLI\ LW
VRIWZDUHDQGRISURPRWLQJWKHVKDULQJDQGUHXVHRIVRIWZDUHJHQHUDOO\
XQGHU WKH WHUPV RI WKH *18 /HVVHU *HQHUDO 3XEOLF /LFHQVH DV
SXEOLVKHGE\WKH)UHH6RIWZDUH)RXQGDWLRQHLWKHUYHUVLRQRIWKH
12:$55$17<
/LFHQVHRUDW\RXURSWLRQDQ\ODWHUYHUVLRQ
%(&$86(7+(/,%5$5<,6/,&(16(')5((2)&+$5*(7+(5(
,6 12:$55$17< )25 7+( /,%5$5< 72 7+( (;7(17 3(50,77('
%<
$33/,&$%/(
/$:(;&(37
:+(1
27+(5:,6(
67$7('
,1
:5,7,1* 7+( &23<5,*+7 +2/'(56 $1'2527+(5 3$57,(6
7KLV OLEUDU\ LV GLVWULEXWHG LQ WKH KRSH WKDW LW ZLOO EH XVHIXO EXW
:,7+287 $1< :$55$17< ZLWKRXW HYHQ WKH LPSOLHG ZDUUDQW\ RI
0(5&+$17$%,/,7<RU),71(66)25$3$57,&8/$5385326(
6HHWKH*18/HVVHU*HQHUDO3XEOLF/LFHQVHIRUPRUHGHWDLOV
3529,'(7+(/,%5$5<$6,6:,7+287:$55$17<2)$1<.,1'
(,7+(5 (;35(66(' 25 ,03/,(' ,1&/8',1* %87 127 /,0,7('
72
7+(,03/,('
:$55$17,(6
2)
0(5&+$17$%,/,7<
$1'
),71(66 )25 $ 3$57,&8/$5385326( 7+( (17,5( 5,6. $6 72
7+( 48$/,7< $1' 3(5)250$1&( 2) 7+(/,%5$5< ,6 :,7+ <28
<RXVKRXOGKDYHUHFHLYHGDFRS\RIWKH*18/HVVHU*HQHUDO3XEOLF
/LFHQVH DORQJ ZLWK WKLV OLEUDU\ LI QRW ZULWH WR WKH )UHH 6RIWZDUH
)RXQGDWLRQ,QF7HPSOH3ODFH6XLWH%RVWRQ
0$86$
6+28/' 7+( /,%5$5< 3529( '()(&7,9( <28 $6680(7+(
&2672)$//1(&(66$5<6(59,&,1*5(3$,525&255(&7,21
,1 12 (9(17 81/(66 5(48,5(' %< $33/,&$%/( /$: 25
$*5((' 72 ,1:5,7,1* :,// $1< &23<5,*+7 +2/'(5 25 $1<
27+(5 3$57< :+2 0$< 02',)<$1'25 5(',675,%87( 7+(
/,%5$5<
$6
'$0$*(6
3(50,77('
,1&/8',1*
$%29(
$1<
%(
*(1(5$/
/,$%/(
72
63(&,$/
$OVRDGGLQIRUPDWLRQRQKRZWRFRQWDFW\RXE\HOHFWURQLFDQGSDSHUPDLO
<RXVKRXOGDOVRJHW\RXUHPSOR\HULI\RXZRUNDVDSURJUDPPHURU\RXU
VFKRROLIDQ\WRVLJQ DFRS\ULJKWGLVFODLPHUIRUWKHOLEUDU\LI QHFHVVDU\
+HUHLVDVDPSOHDOWHUWKHQDPHV
<28)25
,1&,'(17$/
25&216(48(17,$/ '$0$*(6 $5,6,1* 287 2) 7+( 86( 25
,1$%,/,7< 72 86( 7+(/,%5$5< ,1&/8',1* %87 127 /,0,7(' 72
<R\RG\QH ,QF KHUHE\ GLVFODLPV DOO FRS\ULJKW LQWHUHVW LQ WKH OLEUDU\
C)URE
D OLEUDU\ IRU WZHDNLQJ NQREV ZULWWHQ E\ -DPHV 5DQGRP
+DFNHU
/266 2) '$7$ 25 '$7$ %(,1*5(1'(5(' ,1$&&85$7( 25
/266(6 6867$,1(' %< <28 25 7+,5' 3$57,(6 25 $)$,/85( 2)
7+( /,%5$5< 72 23(5$7( :,7+ $1< 27+(5 62)7:$5( (9(1
,)68&+ +2/'(5 25 27+(5 3$57< +$6 %((1 $'9,6(' 2) 7+(
3266,%,/,7<2)68&+'$0$*(6
VLJQDWXUHRI7\&RRQ!$SULO
7\&RRQ3UHVLGHQWRI9LFH
7KDW
VDOOWKHUHLVWRLW
newprod 0474Warranty and GPL rev.fm Page 13 Wednesday, August 6, 2003 2:24 PM
127(127$
newprod 0474Warranty and GPL rev.fm Page 14 Wednesday, August 6, 2003 2:24 PM
127(127$
newprod 0474Warranty and GPL rev.fm Page 15 Wednesday, August 6, 2003 2:24 PM
127(127$
newprod 0474Warranty and GPL rev.fm Page 16 Wednesday, August 6, 2003 2:24 PM
3DQDVRQLF&RQVXPHU(OHFWURQLFV&RPSDQ\
3DQDVRQLF6DOHV&RPSDQ\
'LYLVLRQRI0DWVXVKLWD
'LYLVLRQRI0DWVXVKLWD(OHFWULF
(OHFWULF&RUSRUDWLRQRI$PHULFD
RI3XHUWR5LFR,QF³36&´
2QH3DQDVRQLF:D\
$YHGH,QIDQWHUtD.P
6HFDXFXV1HZ-HUVH\
6DQ*DEULHO,QGXVWULDO3DUN&DUROLQD
ZZZSDQDVRQLFFRP
3XHUWR5LFR
7HO
)D[