1
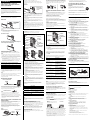
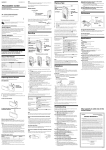
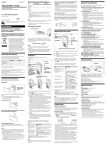
3-259-967-12 (1)
Microcassette™-Corder
Operating Instructions
Manual de instrucciones (en el reverso)
Rechargeable batteries (supplied with
the M-675V only)
Charge the supplied rechargeable batteries only with the
supplied charge adaptor and the supplied AC power adaptor
before using them.
Full charging takes about 12 hours. While charging, the
CHARGE indicator lights up, and when charging is completed,
it goes off. The unit can be used for recording for approximately
12 hours with fully charged rechargeable batteries.
M-675V/673V/670V
© 2004 Sony Corporation
Notes
• Specifications for AC-E30HG vary for each area. Check your local
voltage and the shape of the plug before purchasing.
• Do not touch the AC power adaptor with wet hands.
• Connect the AC power adaptor to an easily accessible AC outlet. Should
you notice an abnormality in the AC power adaptor, disconnect it from
the AC outlet immediately.
Printed in China
To charge
To a wall outlet
Charge
adaptor
For customers in the United States
CHARGE
indicator
Owner’s Record
The model number is located at the back of the unit and the
serial number is located inside the cassette holder. Record
these numbers in the spaces provided below. Refer to these
numbers whenever you call upon your Sony dealer
regarding this product.
Model No._________________ Serial No._________________
Product registration
AC power adaptor
To prevent fire or shock hazard, do not
expose the unit to rain or moisture.
About This Manual
The instructions in this manual are for 3 models.
There is no difference among M-675V, M-673V and M-670V
except for the supplied accessories.
For information about the supplied accessories, see
“Specifications” of this manual.
Preparing Power Sources
Recording with an External Microphone
Connect a microphone firmly to the MIC jack.
Recording from another equipment
Connect another equipment firmly to the MIC jack using the
connecting cord (not supplied).
Set this unit to the recording mode and another equipment to
the playback mode.
Insert the
batteries with
correct polarity.
Playing a Tape
EAR
• When using the supplied charge adaptor, charge the rechargeable
batteries specified on the charge adaptor only. Do not charge any other
batteries.
• When charging, use the supplied AC power adaptor only.
• If there is distortion of sound or excessive noise, or if the unit does not
operate properly, turn off the unit and recharge the two rechargeable
batteries together.
• The rechargeable batteries will discharge gradually even when not in
use. Be sure to charge them before use.
• Charging and operation should be made in temperature ranges 5°C to
40°C (40°F to 104°F).
• The charge adaptor will become warm during charging but this is not a
sign of problem.
• Do not use or leave the charge adaptor, AC power adaptor and
rechargeable batteries in a location near heat sources or in a place
subject to direct sunlight or excessive moisture.
• Unplug the AC power adaptor from the wall outlet when it is not to be
used for long.
• Do not charge dry batteries.
VOL*
MIC (PLUG IN
POWER)*
Insert the
batteries with
correct polarity.
Microphone
EAR
VOR
REC/BATT
> PAUSE
Make sure that nothing is connected to the DC IN 3V jack.
1 Open the battery compartment lid.
2 Insert two size AAA (R03) batteries with correct polarity and
close the lid.
To take out the batteries
TAPE SPEED*
z
Tape counter
FF/CUE m•
M REW/REVIEW
Tape counter
reset button
Tx
* The button/jack
has a tactile dot.
To attach the battery compartment lid if it is
accidentally detached
E (Battery alert
LED)
VOL*
>PAUSE
FF/CUE m•
M REW/REVIEW
n*
TAPE SPEED*
Tx
E (Battery
alert LED)
FAST PB.
* The button has a
tactile dot.
1
2
3
4
You can record right away with the built-in microphone.
Make sure that nothing is connected to the MIC jack.
Dry Batteries
Notes
• When you are going to record something that you may not have an
opportunity to record again, test the unit first before you actually start
recording.
• When recording with an external microphone, the VOR system may not
work properly because of the difference in sensitivity.
To use
Recording
Choose one of the following power sources.
Recording from Various Sound Sources
M-673V : use the supplied microphone.
Other models : use a microphone of low impedance (less than 3
kΩ). When using a plug-in-power system microphone, the
power to the microphone is supplied from this unit.
Proper registration will enable us to send you periodic
mailings about new products, services, and other important
announcements. Registering your product will also allow us
to contact you in the unlikely event that the product needs
adjustment or modification. Thank you.
WARNING
To prevent a cassette from being accidentally recorded
over
Break off and remove the cassette tabs. To reuse the cassette for
recording, cover the tab hole with adhesive tape.
Rechargeable batteries NH-AAA
Recharge the two rechargeable batteries together.
To take out the rechargeable batteries from the charge adaptor,
push the # side of the battery first and then remove the 3 side.
Please register this product on line at www.sony.com/
productregistration
<http://www.sony.com/productregistration>
You are cautioned that any changes or modifications not
expressly approved in this manual could void your authority
to operate this equipment.
To monitor the sound
Connect an earphone (not supplied) firmly to the EAR jack. The
monitor volume cannot be adjusted by VOL.
When to replace the batteries
Replace the batteries with new ones of the same kind when the
REC/BATT lamp dims and the E lamp flashes.
3
Notes
• The unit will play back normally for a while, even after the E lamp
flashes. However, replace the batteries as soon as you can. Otherwise,
the built-in speaker may emit a loud noise and recordings may not be
made correctly.
• In the following cases you do not need to replace the batteries:
– if the E lamp flashes with the playback sound when you turn up the
volume.
– if the E lamp lights momentarily when the tape starts running or at
the end of the tape.
– if the E lamp flashes during FF/REW or CUE/REVIEW.
4
5
Battery life* (Approx. hours)
Batteries
Recording
Playback**
Sony alkaline LR03 (SG)***
14.5
9
Sony manganese R03 (SB)
5
2.5
NH-AAA (M-675V only)
10
6
* Measured valued by the standard of JEITA (Japan Electronics and
Information Technology Industries Association) (Using a Sony
Microcassette)
** Using a tape on which music has been recorded is played at volume
setting 7 using speaker
***When using Sony LR03 (SG) alkaline dry batteries (produced in Japan)
To
Stop playback/stop fast
forward or rewind
Pause playback
Press or slide
Tx
Slide >PAUSE in the direction of the
arrow. REC/BATT lamp goes off.
To release pause playback, release >PAUSE*.
Fast forward** (FF)
Slide FF/CUE m•M REW/REVIEW
toward FF/CUE m during stop.
Rewind** (REW)
Slide FF/CUE m•M REW/REVIEW
toward M REW/REVIEW during stop.
Search forward during
Keep FF/CUE m•M REW/REVIEW
playback (CUE)
pushed toward FF/CUE m during playback
and release it at the point you want.
Search backward during Keep FF/CUE m•M REW/REVIEW
playback (REVIEW)
pushed toward M REW/REVIEW during
playback and release it at the point you want.
Start recording during
z
playback
Note
The battery life may be shorter depending on the operating condition, the
surrounding temperature and battery type.
For maximum performance we recommend that you use
alkaline batteries.
House current
to a wall outlet
AC power adaptor
(supplied with M-675V only)
Press or slide
Tx
Pause recording
Slide >PAUSE in the direction of the arrow.
To release pause recording, release
>PAUSE*.
Start recording during
playback
z during playback (the unit enters the
recording mode)
Review the portion just
recorded
Push up FF/CUEm•MREW/REVIEW
toward MREW/REVIEW during the
recording. Release the button at the point to
start playback.
Take out a cassette
Precautions
On power
• Operate the unit only on 3 V DC.
For AC operation, use the AC power adaptor recommended for the
unit. Do not use any other type. For battery operation, use two size
AAA (R03) batteries.
On the unit
• Use only the
(standard microcassettes) with this unit.
Non-standard cassettes cannot be used because their “L” dimension
(see illustration) is different.
Standard
Non-standard
Only standard microcassettes have a
small indention of side A.
Tx
Approx. 2.5 mm
Approx. 5 mm
• Do not leave the unit in a location near heat sources, or in a place
subject to direct sunlight, excessive dust or mechanical shock.
• Should any solid object or liquid fall into the unit, remove the batteries
or disconnect the AC power adaptor, and have the unit checked by
qualified personnel before operating it any further.
• Keep personal credit cards using magnetic coding or spring-wound
watches, etc. away from the unit to prevent possible damage from the
magnet used for the speaker.
• When you do not use the unit for long, remove the batteries to avoid
damage caused by battery leakage and subsequent corrosion.
• If the unit has not been used for long, set it in the playback mode and
warm it up for a few minutes before inserting a cassette.
* >PAUSE will also be automatically released when Tx is pressed
(stop-pause-release function).
For customers in the USA and Canada
RECYCLING NICKEL METAL HYDRIDE BATTERIES
Note
Nickel Metal Hydride batteries are recyclable.
You can help preserve our environment by returning your
used rechargeable batteries to the collection and recycling
location nearest you.
Select the 2.4 cm tape speed for recording, if you play back the recorded
tape with another unit. Otherwise, the sound quality may be changed.
Notes on VOR (Voice Operated Recording)
Connect the AC power adaptor to DC IN 3V and to a wall outlet.
Use the AC-E30HG AC power adaptor (not supplied)
or the supplied AC power adaptor (M-675V only) .
Do not use any other
Polarity of the plug
AC power adaptor.
To increase the playback speed
Slide the FAST PB. switch in the direction of the arrow. The
playback speed will be increased.
To return to the original speed, slide the FAST PB. switch to
the original position.
At the end of the tape, recording stops and the unit turns off
automatically (Automatic shut-off mechanism).
To
Stop recording
• The VOR system is affected by the environmental recording conditions.
When you use the system in a noisy place, the unit will stay in the
recording mode. If the sound is too soft, on the contrary, the unit will
not start recording. If you cannot get the results you want, set it to OFF.
• The VOR system may not record the beginning of the sound you want
to record because it starts recording only after it catches the sound. For
an important recording, set it to OFF.
Maintenance
Capstan
Pinch roller
If you plug in headphones (not supplied) to the EAR jack, you
will get monaural output from both left and right channels.
If the tape is completely rewound while searching backward during
playback (REVIEW), the FF/CUE m•M REW/REVIEW switch may
not return to the center position when you release the switch. In this case,
push back the switch to the center to start playback.
Press the reset button of the tape counter.
Press Tx and insert a standard microcassette with the side
to start recording facing the lid.
Select the desired tape speed.
2.4 cm for optimum sound (recommended for normal use):
A 30-minute recording can be made using both sides of the
MC-30 microcassette (supplied for the United States and
Europe only). There is a tactile dot on this side.
1.2 cm for longer recording time: A 60-minute recording can
be made using both sides of the MC-30 microcassette
(supplied for the United States and Europe only).
Set VOR to OFF.
If you set VOR to ON, the unit automatically starts
recording the sound and pauses when there is no sound
(you can save tapes and batteries).
When the sound is not loud enough, set it to OFF, or the unit
may not start recording.
Press z. n is pressed simultaneously and recording starts.
While the tape runs, the REC/BATT lamp lights and flashes
depending on the strength of the sound.
Recording level is fixed.
You cannot close the cassette compartment lid.
t The cassette is being inserted in the wrong way.
t n has been already pressed.
t The cassette is not being inserted completely.
The unit does not operate.
t The batteries have been inserted with incorrect polarity.
t The batteries are weak. Replace both batteries with new
ones.
t >PAUSE is slid in the direction of the arrow.
t The AC power adaptor is not firmly connected.
t The unit will not run on dry batteries if the AC power
adaptor is left plugged into the DC IN 3V jack even
though you disconnect the AC power adaptor from the
power source.
Recording cannot be made.
t There is no cassette in the cassette compartment.
t The tab on the tape has been removed. To reuse the tape
for recording, cover the tab hole with adhesive tape.
t The batteries are weak. Replace both batteries with new
ones.
Recording is interrupted.
t The VOR switch is set to ON. When you do not use VOR,
set it to OFF.
Recording cannot be erased completely.
t The head is contaminated. See “Maintenance”.
Playback cannot be made.
t The tape has reached the end. Rewind the tape.
No sound comes from the speaker.
t The earphone is plugged in. Unplug it.
t The volume is turned down completely.
The sound drops out or comes with excessive noise.
t The volume is turned down completely.
t The batteries are weak. Replace both batteries with new
ones.
t The head is contaminated. See “Maintenance”.
t Direct placement of the cassette tape on the speaker
resulted in magnetization and deteriorated tonal quality.
t Use the unit away from radiowave-emitting devices such
as cellular phones.
Tape speed is too fast or too slow or the sound is
distorted in the playback mode.
t Improper setting of the TAPE SPEED switch. Set it to the
same speed as that used for recording.
t The FAST PB. switch is slid in the direction of the
arrow.
t The batteries are weak. Replace both batteries with new
ones.
During CUE/REVIEW the tape stops or does not run.
You cannot fast-forward or rewind.
t The batteries are weak. Replace both batteries with new
ones.
At the end of the tape, playback stops and the unit turns off
automatically (Automatic shut-off mechanism). After the tape
has been wound or rewound, be sure to press Tx.
Note
1
2
Should any problem persist after you have made these checks,
consult your nearest Sony dealer.
Insert a cassette with the side to start playing facing the lid.
Select the tape speed to the same speed as that used for
recording.
Press n.
Turn VOL to adjust the volume. There is a tactile dot beside
VOL on to show the direction to turn up the volume.
* >PAUSE will also be automatically released when Tx is pressed
(stop-pause-release function).
**If you leave the unit after the tape has been wound or rewound, the
batteries will be consumed rapidly. Be sure to press Tx.
Tx
Troubleshooting
For more information regarding recycling of rechargeable
batteries, call toll free 1-800-822-8837, or visit http://
www.rbrc.org/.
Caution: Do not handle damaged or leaking Nickel Metal Hydride
batteries.
If you have any questions or problems concerning your unit, please
consult your nearest Sony dealer.
Head
To clean the tape head and path
Press n and wipe the head, capstan and the pinch roller with a
cotton swab, moistened with alcohol every 10 hours of use.
To clean the exterior
Use a soft cloth slightly moistened in water. Do not use alcohol,
benzine or thinner.
Specifications
Tape
(normal position type)
Recording system
2-track 1-channel monaural
Speaker
Approx. 2.8 cm (11⁄8 in.) dia.
Tape speed
2.4 cm/s (15⁄16 ips), 1.2 cm/s (15⁄32 ips)
Frequency range
300 - 4 000 Hz (with TAPE SPEED switch at 2.4 cm/s)
Input
Microphone input jack (minijack/monaural/PLUG IN POWER)
sensitivity 0.2 mV for 3 kΩ or lower impedance microphone
Output
Earphone jack (minijack/monaural) for 8 - 300 Ω earphone
Power output (at 10% harmonic distortion)
450 mW
Power requirements
3 V DC batteries size AAA (R03) × 2/External DC 3V power sources
Dimensions (w/h/d) (incl. projecting parts and controls)
Approx. 54.8 × 106.8 × 21.5 mm (2 1⁄4 × 4 1⁄4 × 7⁄8 in.)
Mass (main unit only)
Approx. 92 g (3.3 oz)
Supplied accessories
AC power adaptor (1) (M-675V only), Battery charge adaptor (1) (M675V only), Rechargeable batteries NH-AAA, 1.2 V, typ. 800 mAh, NiMH (2) (M-675V only), Microcassette tape MC-30 (1) (for the United
States and Europe only), Alkaline batteries LR03 (SG) (2) (M-673V, M670V for the United States only), Microphone (1) (M-673V only),
Carrying pouch (1) (M-673V only), Battery carrying case (1) (M-675V
only)
Design and specifications are subject to change without notice.
This warranty is valid only in the
United States.
ADVERTENCIA
Para evitar incendios o el riesgo de
electrocución, no exponga la unidad a la
lluvia ni a la humedad.
Recargue las dos pilas recargables a la vez.
Para extraer las pilas recargables del adaptador de carga,
presione primero el extremo # de la pila y luego extraiga el
extremo 3.
Utilización
Fuentes de alimentación
Elija una de las siguientes fuentes de alimentación.
Pilas secas
Inserte las pilas
con la polaridad
correcta.
Compruebe que no se ha realizado ninguna conexión a la toma
DC IN 3V.
1 Abra la tapa del compartimiento de las pilas.
2 Inserte dos pilas tamaño AAA (R03) con la polaridad
correcta y cierre la tapa.
Inserte las pilas
con la polaridad
correcta.
Grabación de distintas fuentes de sonido
Notas
• Si utiliza el adaptador de carga suministrado, cargue únicamente las
pilas recargables especificadas en el adaptador de carga. No cargue
ningún otro tipo de pila.
• Al cargar, utilice únicamente el adaptador de alimentación de ca
suministrado.
• Si se produce distorsión de sonido o ruido excesivo, o si la unidad no
funciona correctamente, apague la unidad y recargue las dos pilas
recargables juntas.
• Las pilas recargables se descargarán gradualmente aunque no se
utilicen. Asegúrese de cargarlas antes de utilizarlas.
• La carga y el uso deberían realizarse en rangos de temperatura desde
5°C a 40°C.
• El adaptador de carga se calentará durante la carga, pero eso no indica
un problema.
• No utilice ni deje el adaptador de carga, adaptador de alimentación de
ca y pilas recargables en una ubicación cercana a fuentes de calor, ni en
lugares expuestos a la luz solar directa o a un exceso de humedad.
• Desenchufe el adaptador de alimentación de ca de la toma de corriente
de pared cuando no vaya a utilizarlo durante un tiempo.
• No cargar pilas secas.
• Cuando vaya a grabar algo que no tendrá oportunidad de grabar otra
vez, realice una prueba antes de iniciar la grabación.
• Cuando grabe con un micrófono externo, el sistema VOR puede no
trabajar adecuadamente debido a la diferencia de sensibilidad.
Grabación con un micrófono externo
Conecte firmemente un micrófono a la toma MIC.
M-673V : utilice el micrófono suministrado.
Otros modelos: utilice un micrófono de baja impedancia (menos
de 3 kΩ). Cuando utilice un micrófono con alimentación a
través de la clavija, la alimentación del mismo la suministrará la
unidad.
Grabación desde otro equipo
Conecte firmemente otro equipo a la toma MIC mediante el
cable de conexión (no suministrado).
Ponga esta unidad en el modo de grabación y el otro equipo en
el modo de reproducción.
Reproducción de cintas
Grabación
EAR
Es posible grabar inmediatamente con el micrófono
incorporado.
Cerciórese de que no haya nada conectado a MIC.
VOL*
>PAUSE
VOL*
VOR
Tx
REC/BATT
E (LED
indicador de
batería baja)
> PAUSE
Para ajustar la tapa del compartimiento de las pilas si
ésta se desprende accidentalmente
TAPE SPEED*
z
Contador de
cinta
FF/CUE m•
M REW/REVIEW
Botón de reinicio
del contador de
cinta
Tx
* El botón/la toma tiene un
punto táctil.
Cuándo reemplazar las pilas
Sustituya las pilas por otras nuevas del mismo tipo si el
indicador REC/BATT se atenúa y el indicador E parpadea.
1
2
Duración de la pila* (número aproximado de horas)
3
Si conecta auriculares (no suministrados) a la toma EAR, los
canales izquierdo y derecho emitirán sonido monofónico.
Reproducción**
14,5
9
Pilas de manganeso R03 (SB) de Sony
5
2,5
NH-AAA (M-675V solamente)
10
6
* Valor determinado por la norma de la JEITA (Japan Electronics and
Information Technology Industries Association) (Utilizando un
microcasete Sony).
** Cuando se utiliza el ajuste de volumen 7 y un altavoz para reproducir
una cinta que contiene música grabada
***Cuando se utilizan pilas secas alcalinas LR03 (SG) de Sony (fabricadas
en Japón).
4
Nota
La duración de la pila puede acortarse dependiendo de las condiciones de
funcionamiento, la temperatura ambiental y el tipo de pila.
Para obtener el máximo rendimiento posible, se recomienda
emplear pilas alcalinas.
Alimentación doméstica
a la toma de alimentación
Conecte el adaptador de alimentación ca a DC IN 3 V y a la toma
de red. Utilice el adaptador de ca AC-E30HG (no suministrado)
o el adaptador suministrado (M-675V solamente). No utilice
ningún otro adaptador de alimentación de ca.
Polaridad del enchufe
Notas
• Las especificaciones del AC-E30HG varían en función de la zona.
Compruebe la tensión local y la forma del enchufe antes de la
adquisición.
• No toque el adaptador de alimentación de ca con las manos mojadas.
• Conecte el adaptador de alimentación de ca a una toma de corriente de
ca de fácil acceso. Si detecta alguna anomalía en el adaptador de
alimentación de ca, desconéctelo inmediatamente de la toma de
corriente de ca.
Pilas recargables (sólo se suministran con el
modelo M-675V)
Antes de utilizar las pilas recargables suministradas, cárguelas
solamente con el adaptador de carga y el adaptador de
alimentación de ca suministrados.
La carga completa tarda unas 12 horas. Durante la carga, se
ilumina el indicador CHARGE y éste se apaga una vez
finalizada la carga. La unidad puede utilizarse para grabar
durante aproximadamente 12 horas con las pilas recargables
completamente cargadas.
Carga
Adaptador de carga
a la toma de pared
Indicador
CHARGE
Pilas recargables
NH-AAA
5
Pulse el botón de reinicio del contador de cinta.
Pulse Tx e inserte una microcinta estándar con la cara que
desea grabar mirando hacia la tapa.
Seleccione la velocidad de cinta que desee.
2.4 cm para obtener un sonido óptimo (recomendado para
uso normal): es posible realizar una grabación de 30 minutos
utilizando las dos caras de una microcinta MC-30
(suministrado solamente para EE.UU. y Europa). Hay un
punto táctil en esta cara.
1.2 cm para mayor tiempo de grabación: es posible realizar
una grabación de 60 minutos utilizando las dos caras de una
microcinta MC-30 (suministrado solamente para EE.UU. y
Europa).
Sitúe VOR en la posición OFF.
Si sitúa VOR en la posición ON, la unidad inicia
automáticamente la grabación del sonido y activa el modo
de pausa si no hay sonido (de este modo, se ahorra cinta y
pilas).
Cuando el sonido no es suficientemente alto, seleccione la
posición OFF o es posible que la unidad no empiece a
grabar.
Pulse z.
Se pulsa n de forma simultánea y comienza la grabación.
Durante la reproducción de la cinta, el indicador REC/BATT
se enciende y parpadea en función de la intensidad del
sonido.
El nivel de grabación es fijo.
Al final de la cinta, la grabación se detiene y la unidad se
desconecta automáticamente (mecanismo de desconexión
automática).
Adaptador de ca (suministrado con
el M-675V solamente)
Adaptador de
alimentación
de ca
2
3
4
Inserte una cinta con la cara que va a reproducir mirando a
la tapa.
Seleccione la velocidad de cinta que se utilizó al grabarla.
Pulse n.
Gire VOL para ajustar el volumen. En la unidad principal
existe un punto táctil junto a VOL que muestra la dirección para
subir el volumen..
Al final de la cinta, la reproducción se detiene y la unidad se
desconecta automáticamente (mecanismo de desconexión
automática). Tras bobinar o rebobinar la cinta, asegúrese de
pulsar Tx.
Tx
Notas
• La unidad reproducirá normalmente durante un momento aunque
parpadee el indicador E. Sin embargo, reemplace las pilas lo antes
posible. En caso contrario, es posible que el altavoz incorporado emita
un ruido intenso y que las grabaciones no se realicen correctamente.
• En los casos siguientes, no necesitará reemplazar las pilas:
– Si el indicador E parpadea con el sonido de reproducción cuando
aumenta el volumen.
– Si el indicador E se enciende momentáneamente cuando la cinta
empieza a funcionar o cuando finaliza.
– Si el indicador E parpadea durante FF/REW o CUE/REVIEW.
FAST PB.
* El botón tiene un punto táctil.
1
E (LED indicador
de batería baja)
FF/CUE m•
M REW/REVIEW
n*
TAPE SPEED*
Micrófono
EAR
Grabación
Para más información sobre el reciclado de baterías, llame al
número gratuito 1-800-822-8837, o visite http://www.rbrc.org/.
Notas
MIC (PLUG IN
POWER)*
Pila alcalina LR03 (SG)*** de Sony
Para clientes en EE UU y Canadá
Las baterías de níquel-hidruro metálico son reciclables.
Usted podrá ayudar a conservar el medio ambiente
devolviendo las baterías usadas al punto de reciclaje más
cercano.
Para extraer las pilas
Pilas
• Si la unidad no se ha utilizado durante un periodo de tiempo
prolongado, active el modo de reproducción y deje que se caliente
durante unos minutos antes de insertar una cinta.
RECYCLADO DE BATERIAS DE NIQUEL-HIDRURO
METALICO
Acerca de este manual
Las instrucciones de este manual corresponden a los 3 modelos.
No existen diferencias entre los modelos M-675V, M-673V y M670V a excepción de los accesorios suministrados.
Si desea obtener información acerca de los accesorios
suministrados, consulte el apartado “Especificaciones” de este
manual.
Para impedir que una cinta se grabe accidentalmente
Rompa y retire las lengüetas de la cinta. Para volver a utilizar la
cinta para grabar, cubra el orificio de la lengüeta con cinta
adhesiva.
Para
Pulse o deslice
Detener la grabación
Tx
Hacer una pausa en la
grabación
Deslice >PAUSE en la dirección de la flecha.
Para quitar la pausa en la grabación, suelte
>PAUSE*.
Iniciar la grabación
durante la reproducción
z durante la reproducción (la unidad activa el
modo de grabación)
Revisar una parte de
cinta recién grabada
Empuje FF/CUEm•MREW/REVIEW hacia
MREW/REVIEW durante la grabación.
Suelte el botón para iniciar la reproducción.
Extraer una microcinta
Tx
* >PAUSE también se quitará automáticamente al pulsar
Tx (función de liberación de pausa con parada).
Nota
Seleccione la velocidad de grabación de cinta de 2,4 cm si reproduce la
cinta grabada en otra unidad. De otro modo, la calidad del sonido puede
modificarse.
Notas acerca de la VOR (Voice Operated Recording,
Grabación activada mediante la voz)
• Las condiciones ambientales de la grabación afectan al sistema VOR. Si
utiliza este sistema en un lugar ruidoso, la unidad permanecerá en el
modo de grabación. Por el contrario, si el sonido es demasiado débil la
unidad no empezará a grabar.
Si no obtiene los resultados deseados, ajústelo en OFF.
• Es posible que el sistema VOR no grabe el principio del sonido que
desea grabar, ya que no empieza a grabar hasta que no capta dicho
sonido. Si se trata de una grabación importante, ajústelo en OFF.
Para controlar el sonido
Conecte firmemente los auriculares o los cascos (no
suministrados) a la toma EAR. No es posible ajustar el volumen
de control con VOL.
Para
Pulse o deslice
Detener la reproducción/
detener el avance o rebobinado
rápido de cinta
Tx
Introducir una pausa en la
reproducción
Deslice >PAUSE en la dirección de la
flecha. El indicador REC/BATT se
apaga.
Para quitar la pausa en la reproducción,
suelte >PAUSE*.
Avanzar rápido** (FF)
Deslice FF/CUEm•MREW/
REVIEW hacia FF/CUEm durante la
detención.
Rebobinar** (REW)
Deslice FF/CUEm•MREW/
REVIEW hacia MREW/REVIEW
durante la detención.
Buscar hacia delante durante
la reproducción (CUE)
Mantenga FF/CUEm•MREW/
REVIEW pulsado hacia FF/CUEm
durante la reproducción y suéltelo en el
punto que desee.
Buscar hacia atrás durante
reproducción (REVIEW)
Mantenga FF/CUEm•MREW/
REVIEW pulsado hacia MREW/
REVIEW durante la reproducción y deje
de pulsarlo en el punto que desee.
Iniciar la grabación durante
la reproducción
z
Precaución: No utilice baterías de niquel-hidruro metálico dañadas o
con fugas.
Si tiene alguna duda o problema referentes a la unidad, póngase en
contacto con el proveedor Sony más cercano.
Solución de problemas
Si sigue teniendo problemas después de revisar esta lista,
consulte al proveedor Sony más cercano.
No puede cerrar la tapa del compartimiento de cintas.
t La cinta se está insertando en la posición incorrecta.
t Ya se ha pulsado n.
t La cinta no se ha insertado completamente.
La unidad no funciona.
t Las pilas se han insertado con la polaridad incorrecta.
t Las pilas disponen de poca energía. Sustituya las pilas por
unas nuevas.
t >PAUSE está deslizado en la dirección de la flecha.
t El adaptador de alimentación de ca no se ha conectado
con firmeza.
t La unidad no funcionará con pilas secas si el adaptador de
alimentación de ca está conectado a la toma DC IN 3V,
aunque dicho adaptador no esté conectado a la fuente de
alimentación.
No es posible grabar.
t No hay ninguna cinta en el compartimiento.
t Se ha retirado la lengüeta de la cinta. Si desea volver a
utilizar la cinta para grabar, cubra el orificio de la
lengüeta con cinta adhesiva.
t Las pilas disponen de poca energía. Sustituya las pilas por
unas nuevas.
La grabación se interrumpe.
t El interruptor VOR está situado en ON. Cuando no utilice
VOR, colóquelo en OFF.
La grabación no puede borrarse por completo.
t El cabezal está sucio. Consulte el apartado
“Mantenimiento”.
No es posible reproducir.
t La cinta ha llegado al final. Rebobínela.
El altavoz no emite sonido alguno.
t Los auriculares están conectados. Desconéctelos.
t El volumen está bajado del todo.
El sonido se pierde o se oye ruido excesivo.
t El volumen está bajado del todo.
t Las pilas disponen de poca energía. Sustituya las pilas por
unas nuevas.
t El cabezal está sucio. Consulte el apartado
“Mantenimiento”.
t La cinta se colocó directamente sobre el altavoz, lo que
causó la magnetización y el deterioro de la calidad tonal.
t No utilice la unidad cerca de dispositivos que emitan
ondas radioeléctricas, como teléfonos celulares (móviles).
La velocidad de la cinta es demasiado rápida o
demasiado lenta en el modo de reproducción.
t Configuración inadecuada del interruptor TAPE SPEED
(velocidad de la cinta). Asígnele la misma velocidad que
utilizó para la grabación.
t El interruptor FAST PB. está deslizado en la dirección
de la flecha.
t Las pilas disponen de poca energía. Sustituya las pilas por
unas nuevas.
Durante la CUE/REVIEW (búsqueda/revisión) la cinta se
detiene o no funciona.
No es posible avanzar rápido ni rebobinar.
t Las pilas disponen de poca energía. Sustituya las pilas por
unas nuevas.
Mantenimiento
Cabrestante
Rodillo de
apriete
Cabezal
* >PAUSE también se liberará automáticamente si se pulsa
Tx (función de liberación de pausa con parada).
**Si deja la unidad encendida después de bobinar o rebobinar la cinta, las
pilas se consumirán con rapidez. Asegúrese de desactivar el botón Tx.
Para limpiar el cabezal y la pista de la cinta
Pulse n y limpie el cabezal, el cabezal móvil y el cilindro de
paso con un bastoncillo de algodón humedecido en alcohol cada
10 horas de uso.
Nota
Para limpiar el exterior
Utilice un paño suave ligeramente humedecido en agua. No
emplee alcohol, bencina ni diluyentes.
Si la cinta se ha bobinado por completo mientras se realiza la búsqueda
hacia atrás durante la reproducción (REVIEW), es posible que el
interruptor FF/CUE m•M REW/REVIEW no vuelva a la posición
central al soltarlo. En este caso, desplace el interruptor a la posición
central para iniciar la reproducción.
Para aumentar la velocidad de reproducción
Deslice el interruptor FAST PB. en la dirección de la flecha.
La velocidad de reproducción aumentará.
Para volver a la velocidad original, deslice el interruptor FAST
PB. hasta la posición original.
Precauciones
Acerca de la alimentación
•Utilice la unidad sólo con 3 V cc.
Para utilizar ca, utilice el adaptador de ca recomendado para la unidad.
No emplee otro tipo de adaptador. Si va a utilizar pilas, emplee dos
pilas tamaño AAA (R03).
Acerca de la unidad
• Utilice sólo
(microcintas estándar) con esta unidad. Las
cintas no estándar no pueden utilizarse porque su dimensión “L”
(consulte la ilustración) es diferente.
Estándar
Sólo las microcintas estándar tienen
una pequeña hendidura en la cara A.
Aprox. 5 mm
No estándar
Aprox. 2,5 mm
• No coloque la unidad cerca de fuentes de calor ni en un lugar expuesto
a la luz del sol, a cantidades de polvo excesivas o a golpes mecánicos.
• Si se introduce algún objeto sólido o se derrama líquido dentro de la
unidad, extraiga las pilas o desconecte el adaptador de alimentación de
ca y haga que personal cualificado revise la unidad antes de volver a
utilizarla.
• Aleje las tarjetas de crédito personales con codificación magnética o los
relojes de cuerda, etc., de la unidad para evitar que se produzcan
posibles daños por el imán del altavoz.
• Si no va a utilizar la unidad durante un periodo de tiempo prolongado,
extraiga las pilas para evitar que se produzcan daños derivados de
fugas del electrolito o corrosión.
Especificaciones
Cinta
(tipo de posición normal)
Sistema de grabación
2 pistas, 1 canal monofónico
Altavoz
Aprox. 2,8 cm de diámetro
Velocidad de cinta
2,4 cm/s , 1,2 cm/s
Gama de frecuencias
300 - 4 000 Hz (con el interruptor TAPE SPEED ajustado en 2,4 cm/s)
Entrada
Toma de entrada para micrófono (minitoma/mono/PLUG IN
POWER)
Sensibilidad de 0,2 mV para micrófono con impedancia de
3 kΩ o menos
Salida
Toma de auricular (minitoma/mono) para auricular de 8 a 300 Ω
Salida de alimentación (al 10% de distorsión armónica)
450 mW
Requisitos de alimentación
Pilas tamaño AAA (R03) de 3 V cc × 2/Fuentes externas de
alimentación de cc de 3 V
Dimensiones (an/al/fn) (incluidos componentes y controles)
Aprox. 54,8 × 106,8 × 21,5 mm
Masa (sólo la unidad principal)
Aprox. 92 g
Accesorios suministrados
Adaptador de alimentación de ca (1) (M-675V solamente)
Adaptador de carga de la pila (1) (M-675V solamente)
Pilas recargables NH-AAA, de 1,2 V, typ. 800 mAh, Ni-MH (2) (M675V solamente)
Cinta de microcasete MC-30 (1) (para los Estados Unidos y Europa
solamente)
Pilas alcalinas LR03 (SG) (2) (M-673V, M-670V para los Estados
Unidos solamente)
Micrófono (1) (M-673V solamente)
Bolsa de transporte (1) (M-673V solamente)
Estuche de transorte de la pila (1) (M-675V solamente)
El diseño y las especificaciones están sujetos a cambio sin previo aviso.