1
Appendix B Printers and Labels
This Appendix describes Loftware-supported standard bar code and RFID printers. It also includes
block and tag configuration information on the RFID HF and UHF tags available for supported RFID
devices.
Label Printers and RFID Printers
Unless otherwise noted, the Loftware-supported RFID printers described in this section are UHF
printers. These are printers that support encoding to UHF tag types.
Avery Information
This section provides information specific to the Avery family of printers. RFID Printers are italicized
in shaded table cells. The Avery printers include:
6404
6404 ALT
6405
6405 ALT
6406
6406 ALT
6408
6408 ALT
ALX 924
ALX 925
ALX 926
AP 4.4
AP 5.4
AP 5.4 ALT
AP 7.t textile
DPM 4
DPM 5
DPM 6
S-262
S-362
S-462
TDI
TDI ALT
TTK
TTK ALT
TTX 1050
TTX 1050 ALT
TTX 300 OFL
TTX 300 OFL-ALT
TTX 300 ONL
TTX 300 ONL-ALT
TTX 350
TTX 350 ALT
TTX 450
TTX 450 ALT
TTX 650
TTX 650 ALT
TTX 674
TTX 674 ALT
TTX 675
TTX 675 ALT
TTX 950
TTX 950 ALT
6404 RFID
6405 RFID
6406 RFID
6408 RFID
ALX 924 RFID
ALX 925 RFID
ALX 926 RFID
DPM 4 RFID
DPM 5 RFID
DPM 6 RFID
Updated printer information is available at Loftware’s website, www.loftware.com. See Printers on the
Technical Support page.
Refer to the RFID Devices and Tag Types section for information on tag types supported by the Avery
RFID printers.
Loftware Label Manager User's Guide
© 2008 Loftware, Inc. All rights reserved.
Appendix B Printers and Labels
B-1
Interface Cables (Parallel, Serial, and USB)
These printers usually have a serial interface and a parallel interface. Some models support USB and
have NIC Ports.
Parallel Interface (standard interface) - Using a standard parallel cable, plug the hardware license key
into a LPT parallel port, and connect the cable between the key and the printer.
Serial Interface (standard interface) – Check with manufacturer for cable information. The hardware
license key is not part of the serial interface since it must always be plugged into an LPT parallel port.
USB Interface (standard or optional interface) – Use a standard USB cable between the printer and
computer (or server), and plug in either a USB or Parallel hardware license key to one of the other ports
on the computer.
Network Port – Included or optional on some printers.
Avery Options
Avery Options may be label-specific or printer-specific. Label Specific Options (LSOs) can be accessed
when you click on the Label Options button from the Label Setup and Properties dialog (F5). Printer
Specific Options (PSOs) can be accessed by clicking on the Options button while configuring the printer
or by selecting the printer from the Device Configuration grid and clicking on the Options button.
(Avery RFID options are also described in this section.)
Avery Label Specific Options
Label Options Section
Print Speed
The range of available print speed varies with the selected printer type.
This setting controls the speed at which the stock moves during printing.
The combinations of print speed and head temperature control the print
quality of the label.
Feed Speed
This setting affects the speed at which the paper is fed when advancing
over non-printing areas. This setting may affect printer throughput.
Head Temp
This allows you to control the darkness of the print.
Job End Flag Label
When this option is set, the last label printed in a batch is longer than the
previous labels, signifying that it is the last label of the batch.
Label Inverse
Inverts the entire label, black prints as white, white space prints as black.
Printer Overrides Section
These settings override the Print Options Section in Printer Specific Options.
Print Mode
° Batch Mode - The whole surface of the label is printable.
° Normal 1:1 Mode - The first 18 mm of the label is not printable. The
printing on the label is automatically shifted past the empty space.
° Real 1:1 Mode - Total surface of the label is printable, and the label is
retracted after each label.
B - 2 Appendix B Printers and Labels
Loftware Label Manager User's Guide
Character Set
Several printer languages are available that can print international
characters that are not available in the U.S. character set. See the
appendix section of your printer guide to find the corresponding hex
codes used to select the desired character
Gap Offset
This command is for determining the beginning of the label when labels
are printed with irregular gaps.
Cut Interval
This sets the number of labels to be printed before the stock is cut.
Dispense Position
This adjusts the distance the label is fed after printing.
Gap Overrides Section
This section, available only for the Avery 300 Offline printer, overrides the Printer Specific Options for
Gap Offset and Gap Length.
Enable Gap Options
When checked, the following Gap settings are enabled:
° Gap Offset - This command determines the beginning of an irregular
gap label.
° Gap Length – For continuous stock, this setting is used to add space
between printed labels. The settings are in increments of 1 mm.
Avery RFID Options Section
These options apply to Avery RFID printers.
Use Label or Printer
Options
This setting determines whether to use the options set in this section or
those set in the Avery RFID Printer Specific Options. From this dialog,
label setup options can be set when the Use Label RFID Options setting is
selected.
RFID Tag Type
Select one of the supported tag types: Autodetect, EPC Class 0, Alien EPC
Class 1, and Philips UCODE EPC 1.19 tags.
Note: If you are using an Avery RFID printer to print your label, from the Avery RFID PSO dialog, set
RFID Tag Type to Autodetect which automatically determines the tag type. Otherwise, you must set the
tag type from the Avery PSO dialog to match what is set in the Block Configuration dialog.
Tag Position From
Start of Label
This is the distance of the chip from the leading edge. This defaults to 60
mm.
Number of Write
Retries per Label
This setting determines the number of times to retry in case of initial
failure.
Number of Labels to
Retry in Case of Tag
Access Failure
This setting determines the number of retries before displaying an error
message and requiring user intervention.
Verify
This is set to Off, by default. When Verify is enabled, it detects whether
the tag about to be written to is an Alien tag or not.
Loftware Label Manager User's Guide
Appendix B Printers and Labels B - 3
Avery Printer Specific Options
Media Options Section
Stock Type
° Die Cut - Stock that has gaps between each label.
° Continuous - No gaps, notches, or perforations between labels.
Media Type
° Thermal Transfer (Ribbon) - Uses ribbon and non-heat sensitive label
stock to print. The print head is activated as the label moves
underneath, heating the ribbon material and melting it onto the label.
To increase the quality of the print, decrease or increase the speed
and/or the heat as necessary.
° Direct Thermal (No Ribbon) - Uses heat sensitive label stock without
the ribbon. The print head is activated as the label moves underneath
heating the label stock and activating the heat sensitive material in the
stock causing darkening of the material. To increase the quality of the
print, decrease/increase the speed and/or heat as necessary.
° Ribbon Autoecon On/Off - This command turns on the ribbon saver
"auto economy" feature in supported printers. Printers that do not
support this feature ignore the command. When this feature is turned
on, the ribbon usage is economized by lifting when the minimum
amount of white space is exceeded.
Gap Offset
This command determines the beginning of the label when printing labels
with irregular gaps.
Gap Length
For continuous stock, this setting is used to add space between printed
labels. The settings are in increments of 1 mm.
Cut Interval
This sets the number of labels to be printed before the stock is cut. This
setting may yield poor results if you use a value that is not an even multiple
of the Quantity and/or Duplicates value. For example: If Quantity = 2,
Duplicates = 3, and Cut Interval = 2, your labels may print/cut in the
following sequence:
Label 1 Duplicate 1
Label 1 Duplicate 2
<CUT>
Label 1 Duplicate 3
Label 2 Duplicate 1
<CUT>
Label 2 Duplicate 2
Label 2 Duplicate 3
<CUT>
Get Printer Status
This returns a message providing status on the printer. If there is a problem
communicating with the printer, a corresponding error message is displayed.
Avery RFID Printer Options are described above.
B - 4 Appendix B Printers and Labels
Loftware Label Manager User's Guide
Print Options Section
Do Not Send Options
When this is checked, Loftware does not send any Printer Specific Options
or Label Specific Options to the printer.
Print Mode
The availability of the Print Modes depends on the printer.
° Batch Mode - The whole surface of the label is printable.
° Normal 1:1 Mode - The first 18 mm of the label are not printable. The
printing on the label is automatically shifted past the empty space.
° Real 1:1 Mode - Total surface of the label is printable, and the label is
retracted after each label.
Character Set
Several printer languages are available to print international characters that
are not available in the U.S. character set. See the appendix section of your
printer guide to find the corresponding hex codes used to select the desired
character.
Dispense Options Section
Dispense Mode
This is only for printers with the dispenser attachment.
° Batch Mode - The entire label is not printable; the label is not retracted
after feeding to the Dispense position.
° 1:1 Mode - The entire label is printable since the label is retracted before
printing the next label.
Dispense Position
Adjusts the distance the label is fed after printing.
Use Single Start
function
Only one label is printed at a time. Printing is then suspended until the
correct action has been taken. The required action depends on the settings
of the printer, and is either the removal of the presented label or the use of a
foot pedal.
Graphics Options Section
Store Images
This setting overrides the normal image behavior and always stores all
images.
Images as Binary
All images are sent to the printer in binary format.
Custom Command Section
The Custom Command option is used when a non-typical printing function is required. Refer to the
printer's programming manual for commands that may be used.
Send to Printer
This instructs the Loftware Label Manager system on when to send the
EasyPlug Command.
Note: Commands are printer model and firmware specific. Contact the appropriate printer
representative for programming language questions.
Loftware Label Manager User's Guide
Appendix B Printers and Labels B - 5
C.Itoh Information
This section provides information specific to the C.Itoh family of printers. Supported printers include:
C4
C4 TT
S4
S4 Plus
T4
T4 300dpi
S4 400dpi
These C.Itoh printers use the same language as Datamax. Please refer to the Datamax Section for error
messages and other information. Updated printer information is available at Loftware’s website,
www.loftware.com. See Printers on the Technical Support page.
Citizen Information
This section provides information specific to the Citizen family of printers. The supported printers
include:
CLP 1001
CLP 2001
CLP 4081
CLP 4121
CLP 6001
CLP 6002
CLP 6401
CLP 7001
CLP 7002
CLP7201E
CLP 7202E
CLP 7401
These printers use the same language as the Datamax printers; therefore, see the next section for options,
error messages, and other information regarding Citizen printers. Updated printer information is
available at Loftware’s website, www.loftware.com. See Printers on the Technical Support page.
Datamax Information
This section provides information specific to the Datamax family of printers, as well as C.Itoh Printers.
(C.Itoh printers use the same language as Datamax. See C.Itoh Printers) section for supported printers.)
RFID Printers are italicized.
The Datamax printers include:
400
430
600
800
A-4212
A-4310
A-4408
A-4606
A-6212
A-6310
Allegro
Allegro 2
E-4203
E-4204
E-4304
H-4212X
H-4310X
I-4206
I-4208
I-4210
I-4212
I-4308
I-4406
I-4604
M-4206
M-4208
M-4306
Ovation
Ovation 2/3
PE4X
Prodigy
Prodigy 6.5
Prodigy Max
Prodigy Max 300
Prodigy+
ST-3210
ST-3306
Titan 6200
W-6208
W-6308
W-8306
XL
A-4212 RFID
A-4310 RFID
A-4408 RFID
A-4606 RFID
A-6212 RFID
A-6310 RFID
H-4212X RFID
H-4310X RFID
I-4210 RFID
I-4212 RFID
I-4308 RFID
I-4406 RFID
I-4604 RFID
B - 6 Appendix B Printers and Labels
Loftware Label Manager User's Guide
Updated printer information is available at Loftware’s website, www.loftware.com. See Printers on the
Technical Support page.
Refer to the RFID Devices and Tag Types section for information on tag types supported by the
Datamax RFID printers.
Interface Cables (Parallel, Serial, and USB)
These printers usually have a serial interface. A parallel interface is available as an option. Generally,
newer models support USB, but this may or may not be standard.
Parallel Interface (optional interface) - Using a standard parallel cable, plug the hardware license key
into a LPT parallel port, and connect the cable between the key and the printer.
Serial Interface (standard interface) - Use an RS232-C null modem cable. The hardware license key is
not part of the serial interface since it must always be plugged into a LPT parallel port. Some Datamax
may require other serial configurations.
USB Interface (standard or optional interface) – Use a standard USB cable between the printer and
computer (or server), and plug in either a USB or Parallel hardware license key to one of the other ports
on the computer.
Supported Features
Image Support - Images are downloaded and stored in the printer’s image memory. Loftware Label
Manager “remembers” images that are sent to the printer and only resends an image if the image is
changed.
Supported Fonts - Datamax printers support a variety of native fonts and certain printers support
TrueType fonts as well. Consult your printer manual for the specific native and TrueType font
information.
Printer Control and Configuration - The Loftware Label Manager Design application allows you to
configure printer settings that are saved in the label format using File | Media Setup.
Individual workstation printer settings may be configured using File | Devices from within the Design or
any of the Print applications: On Demand, Range.
Many of the settings in the printer do not take effect until the printer is re-booted. In the device Options
dialog box, pushing the Send To Printer button sends the currently selected options to the printer. All
Label-Specific options are sent to the printer every time a label is printed.
Datamax Options
Datamax Options may be label-specific or printer-specific. Label Specific Options (LSOs) can be
accessed when you click on the Label Options button from the Label Setup and Properties dialog (F5).
Printer Specific Options (PSOs) can be accessed by clicking on the Options button while configuring the
printer or by selecting the printer from the Device Configuration grid and clicking on the Options
button.
Datamax Label Specific Options
Print Speed
The range of available print speed varies with the selected printer type. This
setting controls the speed at which the stock moves when printing. The
combinations of print speed and head temperature control the print quality of
the label.
Loftware Label Manager User's Guide
Appendix B Printers and Labels B - 7
Slew Rate
Backup Speed
Head Temperature
This setting affects the speed at which the paper is fed when advancing over
non-printing areas. This setting may affect printer throughput.
This controls the rate of label movement during backup positioning for start
of print, cutting, or present distance.
This allows you to control the darkness of the print. 10 is nominal; setting the
temperature higher than 10 causes the label to print darker. Temperature
settings lower than 10 cause the label to print lighter.
Label Overrides Section
This section contains options used for Cutters, Label Presentation, and Symbol Sets.
Advanced Options Section
Symbol Set
The Symbol Set option selects the scaleable font’s symbol set. Consult the
appendix section of your printer manual for a description of the character set.
Double-byte
Symbol Set
This option allows you to choose a variety of Double-byte symbol sets,
assuming your printer has the capability.
Clear Memory
Module
When checked, the memory module is cleared each time a label format is
sent. If unchecked, the memory module is not cleared before each label
format is sent, thus potentially saving time. This option should only be used
if enough memory is present to allow the module to remain uncleared when a
format is sent.
Override Printer
Setup
When checked, this allows you to override the Clear Memory setting in the
PSO. This may be useful if you have a label that uses a lot of memory, and
clearing the memory module is important.
WARNING! Printing Blank Labels? If you are printing labels in thermal transfer mode, and blank
labels are advancing out of the printer, try increasing the head temperature in Label Options (F5) and
test print your label again. This symptom may occur if the ribbon being used requires hotter head
temperatures to transfer the ink from the ribbon onto the paper substrate.
Datamax Printer Specific Options
Label Options Section
Supply Type
° Die Cut - Stock that has gaps between each label.
° Continuous - No gaps, notches, or perforations between labels.
° Mark Stock - Black mark found opposite print side.
Buffer Mode
° Double - Selecting the double buffer mode instructs the printer to erase
and format only incremental fields that have changed.
° Single - Selecting single buffer mode instructs the printer to erase and
format both incremental fields and the rest of the label format.
This feature is only active when the labels being printed are less than half the
maximum size of the printer’s print buffer.
Ribbon Saver
This command turns the ribbon saver feature on in supported printers. The
command is ignored by printers that do not support this feature. When the
ribbon saver feature is turned on, the ribbon saver automatically lifts when the
minimum amount of white space is exceeded.
B - 8 Appendix B Printers and Labels
Loftware Label Manager User's Guide
Forms Control Section
Settings for Tear Off, Form Edge, and Label Gap are in dots. Use the dots per inch (dpi) for your printer
to find the proper value. Datamax settings increment each 1/100 of an inch.
Present Distance
This specifies an additional amount to advance the label after printing.
Tear Off (Label
Retract)
The Tear Off control enables the label retract feature of the printer. The printer
advances the label “tear off” dots after the label is printed so the label can be
torn off. It automatically retracts the label back to the proper start position
before printing the next label.
The length should be set longer than the form edge.
Form Edge (Top of
Form)
The Form Edge control determines where printing begins on your label. If you
want the printer to print nearer to the leading edge of the label, decrease the
form edge offset. If you want to move the start of print position away from the
leading edge of the label (into the body of the label), increase the form edge
offset.
Note: In order for the new form edge settings to take effect, you must download the format 2 or 3 times.
This is an idiosyncrasy of Datamax printers.
Label Gap
For continuous stock, this setting is used to add space between printed labels.
The settings available are in increments of 1/100 of an inch.
Column Offset
This command allows horizontal adjustment of the point where printing
begins. This feature is useful when a single format must be printed on several
different types of labels that already have printed information.
Row Offset
This command allows vertical adjustment of the point where printing begins.
This feature is useful when a single format must be printed on several
different types of labels that already have printed information.
Label Applicator
Enables integration with equipment that picks the label from the printer and
places it on a package.
Label Present
The printer presents each label and waits for the label to be removed before
continuing. While in “label present” mode, Loftware Label Manager receives
status information from the printer indicating that a label is being sensed by
the sensor and the printer does not print labels if a label is detected.
Internal Batch
Mode
Internal batch mode enables communication between the Datamax printers
and a dumb terminal. When internal batch mode is enabled, the Datamax
printer directly sends information that is displayed on the terminal.
Cutter Engaged
This option turns the cutter on or off. Consult your printer manual for
hardware availability.
Download
Truetype Fonts
This option instructs Loftware Label Manager to download TrueType fonts to
the Datamax printer’s memory module. If this option is not enabled (or is not
available for your model) and a TrueType font is selected, the TrueType font
is sent to the Datamax printer in the form of a graphic. To download
TrueTypes into the printer’s memory, you must have the appropriate memory
module and firmware versions, which are 2.01 or higher. Consult your
manufacturer’s manuals for details.
Loftware Label Manager User's Guide
Appendix B Printers and Labels B - 9
Note: The Download TrueType Fonts function when enabled in Printer Setup does not download
TrueType fonts into the printer’s memory module when test-printing label formats from Loftware Label
Manager. When this feature is enabled and TrueType fonts are defined on your label, test printing is
extremely slow. Loftware suggests disabling the “Download TrueTypes” box temporarily while
designing and test printing labels. This downloads TrueTypes as images, speeding up the test printing
process.
Once the label format is designed and you are ready to start using Loftware’s On-Demand or Range
Printing modules, go back into the printer setup dialog box and enable TrueTypes. The very first time
you print a label format using TrueTypes in one of these modules, the initial download time is extended
while fonts are downloaded to the printer’s memory module. Subsequent downloading of these fonts
does not occur again until a new label format is requested.
Note: Refer to your printer manual to determine whether a specific printer has native TrueType font
downloading capabilities.
Set Label Length
When enabled, the label length is sent to the printer. The length of the label is the
height or width value specified in Label Specifications section of the Label Setup
dialog box. Whether height or width is used is dependent on print orientation.
Pre 2.01 Firmware
Changes in firmware affect the commands that the printer accepts. Line properties
including boxes and borders are affected. Check this box if your Firmware is Pre
2.01.
New Firmware
Checked by default. Allows for larger line widths in bar codes.
Advanced Options Section
Memory Module
Clear Memory
Module
Symbol Set
Scaleable Font
Processor
The Memory Module option is used to specify which memory module(s) to
download formats, graphics, and fonts to. The choices are: None, Module A,
Module B, or Module C (Emulation Mode) Prodigy Plus Printers, for example,
have an A or B Memory Module Card Slot in the front of the printer. Citizen
Printers have an internal Memory Module C. If you have a Citizen Printer that
you are running in Prodigy Plus Emulation, you would choose Module C
(Emulation Mode) from the drop down list. Consult your printer manual or
representative for more information about what modules are available for each
printer model.
When checked, the memory module is cleared each time a label format is sent. If
unchecked, this prevents the memory module from being cleared before each
label format is sent, thus potentially saving time. This option should only be used
if enough memory is present to allow the module remain uncleared when a format
is sent.
The Symbol Set option selects the scaleable font’s symbol set. Consult the
appendix section of your printer manual for a description of the character set.
This allocates scaleable font processor memory on the printer, but only if the
option “send to printer” is checked. This option works with the XL, Ovation 2,
Datamax Prodigy Max, Datamax Prodigy Max 300dpi, DMX 300, 800 and PE42.
B - 10 Appendix B Printers and Labels
Loftware Label Manager User's Guide
Custom Command Section
The Custom Command option is used when a non-typical function is required when printing. Refer to
the printer’s programming manual for commands that may be used.
Note: Commands are printer model and firmware specific. Contact the appropriate printer
representative for programming language questions.
6
RFID Options Section
Retry Attempts
This setting determines the number of times to retry in case of initial failure.
Datamax Printer Capabilities and Limits
Faster Throughput
For faster throughput always use a parallel port interface.
Printed Bar Code Does Not
Match the Design
It is possible to define a combination of attributes, such as line width,
ratio, etc., that the printer cannot produce, or might print in one
orientation but not another. Under these conditions, the printer may
print the “closest possible” bar code. This usually occurs when you
define a bar code with line width 1. The printer sometimes
“promotes” this to a line width 2 bar code, resulting in a printed bar
code that is twice as long as desired.
Datamax
Incrementing/Decrementing
Fields
When the printer is capable of doing the incrementing/decrementing
internally, it is instructed to do so. This is called "Native Mode."
When printing in Native Mode, control returns to the PC almost
immediately.
Loftware Label Manager does incrementing/decrementing in software
when the printer cannot do it internally and sends down a different set
of data for each label. This is called "Extended Mode." In Extended
mode, the Printing dialog box shows the line “Printing Label x of y”
and control does not return to the PC until the entire series of labels is
printed.
Datamax: Label Size
The label size is used as a frame of reference. When you rotate your
label, or when you rotate the printing of a label, it is imperative that
Loftware Label Manager Design knows the exact size of the stock on
which you are printing.
Loftware Label Manager User's Guide
Appendix B Printers and Labels B - 11
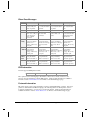
Datamax Error Messages
Printer Turned Off
Cable Disconnected
No Stock
Print Head Up
LPT
Error message. Does not Error message. Does not Error message.
let you retry, label does let you retry, label does Does not let you
not print.
not print.
retry, label does not
print.
COM
Error message. Lets you Error message. Lets you Error message. Lets Error message. Lets you
retry so the label prints retry so the label prints. you retry so the
retry so the label prints.
label prints.
USB
Received ‘port not
Error Message. Printing
found’ error. USB port starts when cable
not shown in Port combo reconnected.
of Printer |Connection
Error Message.
Printing resumes
when stock added.
Received ‘port not
found’ error. Label
prints when head is put
down.
Spooled
Locally
No Loftware printer
error but has a Windows
printer error. Lets you
retry, the label prints.
No Loftware printer
error but has a
Windows printer
error. Lets you
retry, the label
prints.
No Loftware printer
error but has a Windows
printer error. Lets you
retry, the label prints.
Spooled to
Shared
No error message. Prints No error message. Prints No error message.
the labels when the error the labels when the error Prints the labels
is corrected.
is corrected.
when the error is
corrected.
No error message.
Prints the labels when
the error is corrected.
Spooled to
PrintServer
No error message. Prints No error message. Prints No error message.
the labels when the error the labels when the error Prints the labels
is corrected.
is corrected.
when the error is
corrected.
No error message.
Prints the labels when
the error is corrected.
Direct IP
No error message. Prints No error message. Prints No error message.
the labels when the error the labels when the error Prints the labels
is corrected.
is corrected.
when the error is
corrected.
No error message.
Prints the labels when
the error is corrected.
No Loftware printer
error but has a Windows
printer error. Lets you
retry, the label prints.
Error message. Lets you
retry, the label prints
when the error is
corrected.
Eltron Information
This section provides information specific to the Eltron family of printers. The supported Eltron printers
include:
2044/46
2242
2348
2542
2622
2642
2722
2742
2746
2824
2844
3642
3742
Companion+
Eclipse
LP Plus
Orion
Strata
Transport
UPS 2348
UPS 2442
UPS 2443
UPS 2543
Updated printer information is available at Loftware’s website, www.loftware.com. See Printers on the
Technical Support page.
B - 12 Appendix B Printers and Labels
Loftware Label Manager User's Guide
Interface Cables (Parallel, Serial and USB)
These printers usually have a serial interface. A parallel interface is available as an option. Generally,
newer models support USB, but this may or may not be standard.
Parallel Interface (optional interface) - Using a standard parallel cable, plug the hardware license key
into a LPT parallel port, and connect the cable between the key and the printer.
Serial Interface (standard interface) - Use an RS232-C null modem cable. The hardware license key is
not part of the serial interface since it must always be plugged into a LPT parallel port.
USB Interface (standard or optional interface) - Use a standard USB cable between the printer and
computer (or server), and plug in either a USB or Parallel hardware license key to one of the other ports
on the computer.
Supported Features
Image Support - Images are downloaded and stored in the printer’s image memory. Loftware Label
Manager “remembers” images that are sent to the printer and only resends an image if the image is
changed.
Supported Fonts - Some of the native fonts supported by Eltron printers are:
8X12, 10X16, 12X20, 14X24, and 32X48
TrueType fonts are downloaded as graphics on the Eltron printers.
Printer Control and Configuration
The Loftware Label Manager Design application allows you to configure global printer settings, which
are saved in the label format using File | Media Setup | Label Options.
Individual workstation printer settings may be configured using File | Devices | Options from within the
Design or any of the Print applications: On Demand, Range.
Many of the settings in the printer do not take effect until the printer is re-booted. In the Device Options
dialog box, pushing the Send To Printer button sends the currently selected options to the printer. All
Label Options are sent to the printer every time a label is printed.
Eltron Options
Eltron Options may be label-specific or printer-specific. Label Specific Options (LSOs) can be accessed
when you click on the Label Options button from the Label Setup and Properties dialog (F5). Printer
Specific Options (PSOs) can be accessed by clicking on the Options button while configuring the printer
or by selecting the printer from the Device Configuration grid and clicking on the Options button.
Eltron Label Specific Options
Label Options Section
Print Speed
The range of available print speeds varies with the selected printer type. This
setting controls the speed at which the paper is fed when printing. The
combinations of print speed and head temperature control the print quality of the
label. The range of available print speeds varies with the selected printer type.
Loftware Label Manager User's Guide
Appendix B Printers and Labels B - 13
Print Direction
Head Temperature
Form Number
This setting affects the orientation at which the label is printed. The Eltron
printers can internally rotate the label 180 degrees. When Top is selected, the
printer begins printing at the top of the label. When bottom is selected, the label
is rotated 180 degrees and printing begins at the bottom.
Allows you to control the darkness of the print. 5 is nominal, setting the
temperature higher than 5 causes the label to print darker. Setting the
temperature to lower than 5 causes the label to print lighter. Values from 0 to 7
for 2122/2142 and 0 to 15 for 2242/2044/2046/2642.
Eltron printers have the ability to store multiple forms in memory. In order to
store multiple forms, a unique name must be generated for each form. This
option is used to provide a unique form name.
WARNING! Printing Blank Labels? In some instances while printing labels in thermal transfer mode,
blank labels advance out of the printer. If this happens, try increasing the head temperature in Label
Specific Options (F5) and test print your label again. This symptom may occur if the ribbon being used
requires hotter head temperatures to transfer the ink from the ribbon onto the paper substrate.
Label Cut Options Section
Cutter
Use Printer Cut Options uses Cut Options set in the Printer Specific Options
section. When enabled, an optional label cutter is set to cut a label after
printing using settings specified in this dialog.
Cut Every
Allows the cutter to skip a given quantity of labels before cutting.
Cut Position
This command is sent to a printer to provide precise cut placement. The
default is 100 dpi.
Eltron Printer Specific Options
Settings are in dots. Use the dots per inch (dpi) for your printer to find the proper value. For example, if
your printer has 203 dpi and you want to set a skip distance of 1 inch, specify a value of 203 for the skip
distance.
Label Options Section
Stock Type
° Direct Thermal (No Ribbon) - Uses heat sensitive label stock without the
ribbon. The print head is activated as the label moves underneath heating
the label stock and activating the heat sensitive material in the stock causing
darkening of the material. To increase the quality of the print
decrease/increase the speed and increase/decrease the heat as necessary.
° Thermal Transfer (Ribbon) - Uses ribbon and non-heat sensitive label stock
to print. The print head is activated as the label moves underneath, heating
the ribbon material and melting it onto the label. To increase the quality of
the print decrease/increase the speed and increase/decrease the heat as
necessary.
Supply Type
° Die Cut - Stock that has gaps between each label.
° Continuous - No gaps, notches, or perforations between labels.
° Mark Stock - Black mark found opposite print side.
B - 14 Appendix B Printers and Labels
Loftware Label Manager User's Guide
Gap Length
Offset Length
The space in between labels. When printing on continuous stock, this setting can
be used to add space between printed labels.
This is a setting found on Butterfly Labels. It sets the length between the top
edge of the label, and the indented portion of the label. The Offset Length is set
in dots per inch.
Reference Point Section
X Coordinate /
Y Coordinate
These values are measured in dots. This command is used to move the
reference point for the X and Y-axes. The reference point command
functions similarly to the Label Home command found in File | Media Setup.
Default reference points vary depending upon whether the selected print
direction is top or bottom.
Options Section
Set Label Width
This command should be set on when labels narrower than the print head are
printed. If the label width equals the print head width, you may leave Set
Label Width off and the printer automatically centers the printing of the label.
Tear Off Mode
The tear off mode is the default mode.
Form Backup
This command instructs the printer to retract the label before printing.
Sensor Reverse
This option reverses the Through Sensor Operation, which interprets a
blockage of light as a gap. This option allows the through sensor to be used
when printing transparent labels with a black stripe backing.
Dispense Sensor
When enabled, the printer presents each label and waits for the label to be
removed before continuing. On the P2242 printer, the feed button must be
pressed to print the next label. Available on Orion, Strata, and P2242 only.
Dispense Tap
When enabled, the printer presents each label and waits for the feed switch to
be pressed before printing the next label. This mode is commonly used when
printing multiple copies of liner-free labels. Available only on the P2242.
Batch Print & Cut
When enabled, this option uses the “Print Quantity” and “Copies” values to
control the cutter operations. The cut instruction is executed when a batch of
jobs has completed printing.
Enable Dump
Mode
When enabled, the printer is set in diagnostic dump mode. Available on the
P2242 only.
IRDA Interface
Enables optional IRDA Interface. This option is only available on the P2242.
Cut Options Section
Label Cutter
Enables an optional label cutter. When enabled, the cutter is set to cut a label
after printing.
Cut Every
The “Cut Every” settings range from 1 label to 250 + labels. The label is cut
after the number specified. For example, if "2" is specified, the label is cut
after every 2 labels.
Cut Position
This command is sent to the printer to provide precise cut placement. The
default is 100 dpi.
Loftware Label Manager User's Guide
Appendix B Printers and Labels B - 15
Memory Allocation Section
Formats
If you have a very large number of fields on your label, you may need to
increase this value; otherwise, the default of 5k should be fine.
Graphics
To use images on your labels, you may need to increase the memory allocated
for Graphics. This allows the printer to store the image files sent to it by
Loftware Label Manager. If the value set is too small, Loftware Label
Manager displays an error message.
Image Buffer
The image buffer memory is the area where the active print image is
temporarily stored. To calculate the exact memory needed using the following
formula:
Printer Width = 2” - Label height in inches x 12 KB
Printer Width = 4” - Label height in inches x 22 KB
Note: You cannot allocate more memory than is installed in the printer.
Advanced Options Section
Character Set
This command selects a character set for printing. Consult the appendix
section of your printer manual for a more complete description of supported
character sets.
Custom Command Section
The custom command option sends printer commands otherwise not available in the Loftware Label
Manager dialog boxes.
Eltron Printer Capabilities and Limits
Faster Throughput
For faster throughput always use a parallel port interface.
Printed Bar code
Does Not Match
the Design
It is possible to define a combination of attributes, such as line width, ratio, etc.
that the printer cannot produce, or might print in one orientation but not
another. Under these conditions, the printer may print the “closest possible”
bar code. This usually occurs when you define a bar code with line width 1.
The printer sometimes “promotes” this to a line width 2 bar code, resulting in a
printed bar code that is twice as long as desired.
Eltron
Incrementing/
Decrementing
fields
When the printer is capable of doing the incrementing / decrementing
internally, it is instructed to do so. This is called Native Mode. In Native
Mode, control returns to the PC almost immediately.
Loftware Label Manager does incrementing/decrementing in software when
the printer cannot do it internally and sends down a different set of data for
each label. This is called "Extended Mode." In Extended mode the Printing
dialog box shows the line “Printing Label x of y” and control does not return to
the PC until the entire series of labels is printed.
Label Size
The label size is used as a frame of reference. When you rotate your label, or
when you rotate the printing of a label, it is imperative that Loftware Label
Manager design knows the exact size of the stock on which you are printing.
B - 16 Appendix B Printers and Labels
Loftware Label Manager User's Guide
Eltron Error Messages
Printer Turned Off
Cable Disconnected
No Stock
Print Head Up
LPT
Error message. Does
not let you retry, the
label is not printed.
Error message. Does not Error message. Does not Error message. Allows
let you retry, the label is let you retry, the label is you to retry, the label
not printed.
not printed.
prints.
COM
Not Tested
Not Tested
USB
Received ‘port not
Error Message. Printing
found’ error. USB port starts when cable
not shown in Port
reconnected.
combo of Printer
|Connection
Error Message. Printing Error Message. An
resumes when stock
inconsistent result with
added.
printing when head is
put back down.
Spooled
Locally
No Loftware error
message, but displays
Windows error
message. Allows retry,
labels print.
No Loftware error
message, but displays
Windows error message.
Allows retry, labels
print.
No Loftware error
message, but displays
Windows error message.
Allows retry, labels
print.
No Loftware error
message, but displays
Windows error
message. Allows retry,
labels print.
Spooled No Loftware error
to Shared message but has
Windows error
message. Allows retry
so labels print.
No Loftware error
message but has
Windows error message.
Allows retry so the
labels print.
No Loftware error
message but has
Windows error message.
Allows retry so the
labels print.
No Loftware error
message but has
Windows error
message. Allows retry
so the labels print.
Not Tested
Not Tested
Spooled
to Print
Server
No error message. All No error message. All
labels print after the
labels print after the
printer is turn back on. printer is reconnected.
No error message. All
labels print after the
printer is re-stocked.
No error message. All
labels print after the
print head is put down.
Direct IP
No error message. All No error message. All
labels print after the
labels print after the
printer is turn back on. printer is reconnected.
No error message. All
labels print after the
printer is re-stocked.
No error message. All
labels print after the
print head is put down.
EXE Information
Loftware supported EXE printers include:
MR400
MR400e
MR410
MR410e
These printers use the same language as Sato Printers. Please refer to the Sato Section for error
messages and other information regarding EXE printers. Updated printer information is available at
Loftware’s website, www.loftware.com. See Printers on the Technical Support page.
Fastmark Information
This printer guide section provides information specific to the Fastmark family of printers. Since these
printers use both Datamax and Eltron Languages, the following table shows which printer section to
look under regarding PSO’s, error messages, and other information. Updated printer information is
available at Loftware’s website, www.loftware.com. See Printers on the Technical Support page.
Loftware Label Manager User's Guide
Appendix B Printers and Labels B - 17
For printers on this table, refer to the Datamax Printers section.
FM402 PPLA
FM403 PPLA
FM4402 PPLA
FM4602 PPLA
FM4603 PPLA
FM6602
For printers on this table, refer to the Eltron Printers section.
FM402 PPLB
FM403 PPLB
FM4602 PPLB
FM4603 PPLB
FM4402 PPLB
Fox IV Information
This section provides information specific to the Fox family of printers. Since these printers use Sato,
Zebra, Datamax, Intermec and Printronix Printer Languages, the following table helps to know which
printer section to look under regarding PSO’s, error messages, and other information. Updated printer
information is available at Loftware’s website, www.loftware.com. See Printers on the Technical
Support page.
Sato OEM
Datamax OEM
FOXIV Model 6159
FOXIV Model 2000
FOXIV Model 6160
FOXIV Model 2000 300dpi
FOXIV Model 6185
FOXIV Model 3000
FOXIV Model 6190
FOXIV Model 3600
Zebra OEM
Intermec OEM
FOXIV Model 5113
FOXIV Model 4051 203dpi
FOXIV Model 5143
FOXIV Model 4051 406dpi
FOXIV Model 5173
Printronix OEM
FOXIV Model 6210
FOXIV Model 7002
FOXIV Model 6270
FOXIV Model 7003
RFID Printers Printronix OEM
FOXIV SLPA 7204e RFID
FOXIV SLPA 7304e RFID)
See Printronix Options page for LSO and PSO settings.
Refer to the RFID Devices and Tag Types section for information on tag types supported by the FOXIV
RFID printers.
B - 18 Appendix B Printers and Labels
Loftware Label Manager User's Guide
IBM Information
This printer guide section provides information specific to the IBM family of printers. RFID Printers
are italicized in shaded cells. The supported IBM printers include:
IBM 4400-004 (203 dpi)
IBM 4400-004 (300 dpi)
IBM 4400-006 (203 dpi)
IBM 4400-006 (300 dpi)
IBM 4400-008 (203 dpi)
IBM 4400-008 (300 dpi)
Infoprint 6700 Model 5504R40 (203 dpi)
Infoprint 6700 Model 5504R40 (300 dpi)
Infoprint 6700 Model 5504R60 (203 dpi)
Infoprint 6700 Model 5504R60 (300 dpi)
Infoprint 6700 Model 5504R80 (203 dpi)
Infoprint 6700 Model 5504R80 (300 dpi)
Infoprint 6700 Model 5504-R40 Infoprint 6700 Model 5504-R40 Infoprint 6700 Model 5504-R60
(203 dpi) RFID
(300 dpi) RFID
(203 dpi) RFID
Infoprint 6700 Model 5504-R60 Infoprint 6700 Model 5504-R80 Infoprint 6700 Model 5504-R80
(300 dpi) RFID
(203 dpi) RFID
(300 dpi) RFID
These printers use the same language as Printronix Printers. Please refer to the Printronix Section for
error messages and other information regarding IBM printers. Updated printer information is available
at Loftware’s website, www.loftware.com. See Printers on the Technical Support page.
Refer to the RFID Devices and Tag Types section for information on tag types supported by the IBM
RFID printers.
Imtec Information
This section provides information specific to the Imtec family of printers. Imtec Printers utilize the
same Printer and Label Options as some of the other printers described in this appendix. Therefore, the
following table lists Loftware's Imtec printer models, and the corresponding label/printer options used.
The defaults are different, but the options and dialog boxes are the same. Updated printer information is
available at Loftware’s website, www.loftware.com. See Printers on the Technical Support page. For
the printers listed below, consult the section on Zebra printers.
Imtec Apply Pro w/90xiII
Imtec Value Pro w/140xiII
Imtec Apply Pro w/90xiII (600 dpi)
Imtec Value Pro w/3240
Imtec Apply Pro w/140xiII
Imtec Protector w/90xiII
Imtec Apply Pro w/170xiII
Imtec Protector w/90xiII (600 dpi)
Imtec Apply Pro w/4220E
Imtec Protector w/140xiII
Imtec Value Pro w/90xiII
Imtec Protector w/170xiII
Imtec Protector w/3440
Loftware Label Manager User's Guide
Appendix B Printers and Labels B - 19
Intermec Information
This section provides information specific to the Intermec family of printers. RFID Printers are
italicized in shaded cells. Supported Intermec printers include:
3100
4000
4100
4406
4630
8625/38
8635/36
8646
Easy Coder 3240
Easy Coder 3400
Easy Coder 3400B
Easy Coder 3400C
Easy Coder 3400D
Easy Coder 3400E
Easy Coder 3440
Easy Coder 3600
Easy Coder 4400
Easy Coder 4400B
Easy Coder 4400C
Easy Coder 4400D
Easy Coder 4420A/B
Easy Coder 4420e
Easy Coder 4440A/B
Easy Coder 4440e
Easy Coder 4830
Easy Coder 501E
Easy Coder 501XP
Easy Coder 601E
Easy Coder 601XP
Easy Coder 7421
Easy Coder 7422
Easy Coder 91
Easy Coder C4
Easy Coder E4
Easy Coder F2
Easy Coder F4
Easy Coder PC4 (EPL)
Easy Coder PC41 (IPL)
Easy Coder PD4 (203 dpi)
Easy Coder PD4 (300 dpi)
Easy Coder PD41 (FP)
Easy Coder PD41 (IPL)
Easy Coder PF4i (FP)
Easy Coder PF4i (IPL)
Easy Coder PM4i (FP)
Easy Coder PM4i (IPL)
Easy Coder PX4i (FP)
Easy Coder PX4i (IPL)
Easy Coder PX6i (FP)
Easy Coder PX6i (IPL)
Easy Coder PM4i RFID (FP)
Easy Coder PM4i RFID (IPL)
Refer to the RFID Devices and Tag Types section for information on tag types supported by the
Intermec RFID printers.
Interface Cables (Parallel, Serial and USB)
These printers usually have a serial interface. A parallel interface is available as an option. Generally,
newer models support USB, but this may or may not be standard.
Parallel Interface (optional interface) - Using a standard parallel cable, plug the hardware license key
into a LPT parallel port, and connect the cable between the key and the printer.
Serial Interface (standard interface) - Use an RS232-C null modem cable. The hardware license key is
not part of the serial interface since it must always be plugged into a LPT parallel port.
USB Interface (standard or optional interface) - Use a standard USB cable between the printer and
computer (or server), and plug in either a USB or Parallel hardware license key to one of the other ports
on the computer.
B - 20 Appendix B Printers and Labels
Loftware Label Manager User's Guide
Supported Features
Image Support - Images are downloaded and stored in the printer's UDC (image) memory. Loftware
Label Manager “remembers” images that are sent to the printer and only resends an image if the image
is changed.
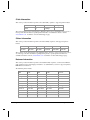
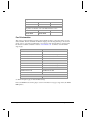
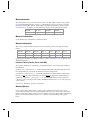
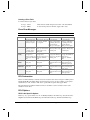
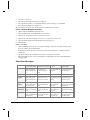
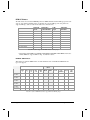
Supported Fonts
Name
Notes
5x7 (1)
Magnify 1 to 90 horz. and vert.
7x9
Magnify 1 to 90 horz. and vert.
7x11
Magnify 1 to 90 horz. and vert.
10x14
Magnify 1 to 90 horz. and vert.
8 Point
Magnify 1 to 33 horz. and vert.
12 Point
Magnify 1 to 20 horz. and vert.
20 Point
Magnify 1 to 20 horz. and vert.
OCR A
Magnify 1 to 33 horz. and vert.
OCR B
Magnify 1 to 33 horz. and vert.
Outline Swiss (2)
0.005" to 2.94" (<1 to 212 points)
Outline Swiss Bold (3)
0.005" to 2.94" (<1 to 212 points)
Dutch Roman (3)
0.005" to 2.94" (<1 to 212 points) 3240 3440 prtrs only
Pointable (4)
Point sizes 8, 10, 12, 16, 20, 24; Magnify 1 to 20 times
Pointable Bold (4)
Point sizes 6, 8, 10, 12, 16, 20, 24; Magnify 1 to 20 times
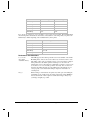
Notes: (1) The 5x7 font is not available for the 4400 and 4406 printers. (2) For the 3400 printer,
firmware version 1.2 or higher and extended memory are required to access the Outline Swiss font. For
the 4100 printer, firmware version 2.4 or higher and extended memory are required to access the
Outline Swiss font. (3) The Outline Swiss Bold and Dutch Roman fonts are currently not available with
the 3100 printer. (4) The Pointable and Pointable Bold fonts are currently available for the 4400C,
3400B, 3600 and 3240 printers.
Intermec - Printer Control and Configuration
The Loftware Label Manager Design application allows you to configure global printer settings that are
saved in the label format using File | Media Setup and File | Media Setup | Label Specific Options.
Individual workstation printer settings may be configured using File | Devices from within the Design or
any of the Print applications: On Demand, Range.
Many of the settings in the printer do not take effect until the printer is re-booted. In the device options
dialog box, pushing the Send Options button sends the currently selected options to the printer. All
label-specific options are sent to the printer every time a label is printed.
For 440x users, the File | Media Setup | Label Specific Options duplicate some of the functionality of the
printers control panel. For 3400 and 4100 users, Loftware Label Manager provides the only way to
configure many of the settings in the printer.
Loftware Label Manager User's Guide
Appendix B Printers and Labels B - 21
Intermec Options
Intermec Options may be label-specific or printer-specific. Label Specific Options (LSOs) can be
accessed when you click on the Label Options button from the Label Setup and Properties dialog (F5).
Printer Specific Options (PSOs) can be accessed by clicking on the Options button while configuring the
printer or by selecting the printer from the Device Configuration grid and clicking on the Options
button.
Intermec Label Specific Options
Format Number
Specifies the areas of RAM in which the label format is to be stored.
Print Speed
The range of available print speeds varies with the selected printer type. Note
that the printer may user a slower print speed than you specify in order to
maintain print quality.
Head Temperature
Head Temperature allows you to control the darkness of the print. 0 is
nominal, setting the temperature higher than 10 causes the label to print darker.
Settings lower than 10 cause the label to print lighter.
Media Sensitivity
This number specifies the amount of heat required by the printhead to image a
label. Look at the sensitivity label located on the label stock, and check the last
three digits of the 15-digit number. These three numbers stamped on the label
give you the number you use for this setting.
Cut Interval
This value is used to determine how many labels to print before cutting. This
option is only used when “Use Label Specific Options Cut Interval” is enabled.
Note: Loftware Label Manager now defaults to using the Cut Immediate command (<SO>) in
conjunction with disabling the cutter (<SI>c0) per Intermec recommendations. Example: The cutter is
enabled, (<SI>c1) and the printer prints a quantity of 5. The job is native, and the printer cuts after
each label. The only way to enable the cutter to cut after a certain number of labels is to either:
1. Set [INT44xx]CutImmediate=0
2. Use custom command of <SI>c1 in the PSOs.
Using #2 and unchecking Force Extended should allow the cutter to cut after the print job.
Read Knowledge Base article #42708 on the Loftware website for more information.
Use Label Specific
Options Cut
Interval
Enabling this feature disables any cutting options enabled in the Printer Options
section under Label Handling. All cutter system information is overridden and
stored directly in the label format.
Use Direct
Graphics
Enables Direct Graphics mode on printers that support this option. The
download time of the image is reduced, but images are sent for each label. This
eliminates the graphic size limitations that are normally encountered when
storing graphics in non-volatile RAM. The only size limitation when using
direct graphics is the amount of memory installed on the printer.
Media Sensitivity
Guide
The sensitivity for a particular type of media and ribbon is critical to achieving
high quality printing. If the Media Type you are using is listed, select it, and
then press "Apply" to achieve the recommended sensitivity setting.
B - 22 Appendix B Printers and Labels
Loftware Label Manager User's Guide
Intermec Printer Specific Options
Advanced Options Section
Language
Enable IBM
Translation
Custom Command
Several printer languages are available to print international characters that are
not available in the U.S. character set. See the appendix section of your printer
guide to find the corresponding hex codes used to select the desired character.
Enabling IBM Translation allows IBM compatible characters to replace
standard ASCII characters based on the current printer language selected.
The custom command option sends printer commands otherwise not available
in the Loftware Label Manager dialog boxes. For example, to switch an
advanced printer to 86xx mode, send the custom command: <ESC>c
Label Options Section
Media Type
° Thermal Transfer (Ribbon) - Uses ribbon and non-heat sensitive label stock to
print. The print head is activated as the label moves underneath heating the
ribbon material and melting it onto the label. To increase the quality of the
print decrease/increase the speed and increase/decrease the heat as necessary.
° Direct Thermal (No Ribbon) - Uses heat sensitive label stock without the
ribbon. The print head is activated as the label moves underneath heating the
label stock and activating the heat sensitive material in the stock causing
darkening of the material. To increase the quality of the print
decrease/increase the speed and increase / decrease the heat as necessary.
° Die Cut - Stock that has gaps between each label
° Continuous - No gaps, notches, or perforations between labels
° Mark Stock – Stock with a black mark found opposite print side
Label Handling Section
Label Stock
Batch
Applicator
Self-Strip
Normal printing mode; labels are continuously printed and fed out of the
printer.
A specialty device that is integrated with the printer that allows labels to be
picked up from the printer and placed on a product. Typical for assembly line
production.
Self-strip handling requires that the stock in the printer be properly fed through
the self-strip attachment on the printer. Consult your Intermec manual or
service technician for further assistance. While in self-strip mode, the printer
presents each label and waits for it to be removed before continuing. The
printer does not print labels if there is a label at the strip pin.
Cut Options Section
Cut or Label Cutter
These options require that a cutter be installed on the printer. With some
Intermec printers, specifically the Intermec 4400, you may have to set certain
options on the printer.
Cut Every
Allows the cutter to skip a given quantity of labels before cutting.
Cut Position
This command is sent to a printer to provide precise cut placement. The settings
range from 70 to 130 dpi, the default is 100 dpi.
Loftware Label Manager User's Guide
Appendix B Printers and Labels B - 23
Forms Control Section
Settings are in dots. Use the dots per inch (dpi) for your printer to find the proper value. For example, if
your printer has 203 dpi and you want to set a skip distance of 1 inch, specify a value of 203 for the skip
distance.
Top of Form
This setting determines how close to the leading edge of the label printing occurs.
Valid values are -20 to 4000, with 20 as the default setting. If you need to move
the printing closer to leading edge of the printer, lower the value. If you need to
move the printing away from the leading edge of the printer, choose a higher
value. This setting is usually only critical when you are using small labels.
Max Label Length
Maximum label length increases the allowed printing length of the label. Valid
values are 200 to 4800 dots. For example, a 203 dpi printer allows you to set a
value from .5" to 24". Setting maximum label length to 2400 allows you to print
a 12" label on an advanced Intermec printer. The default for maximum label
length is 1000 dots.
Image Bands
The Image band setting is used by the printer to decide how much of the label's
format to "image" before starting to print. If the image bands are set correctly,
they can greatly improve printer throughput. However, if they are set incorrectly,
they can degrade performance. The number of image bands available is
determined by the amount of memory installed in your printer. Consult your
printer manual for the available range of image bands. If this parameter is set to
0, the LLM uses the current printer setting.
Retract Distance
If this value is a non-zero value (try 1 or 2), the label is ejected this many “dots”
after printing. The printer retracts, or backfeeds, before printing the next label.
This is useful for advancing labels to the tear bar or cutter. Depending on your
version of printer firmware, the label may only advance/retract a set amount when
you are using die cut or mark stock, regardless of the value specified in the
Retract parameter. Consult Intermec for information on possible firmware
upgrades.
If you are using die cut stock or mark stock and have a 3400 or 4100 printer, you
must also check the “Feed After Print” option to enable the retract feature.
Skip Distance
This setting is the distance to advance the label after all the fields have been
(Continuous Stock
printed. This setting is used to create white space between labels.
Only)
Label Rest Point
Label rest point adjusts the point at which the printer presents the labels for
removal. This command is commonly used with the self-strip option. Label
retract is available to retract the label back to the correct starting position for the
next printed label.
Enable Label
This feature causes the printer stock to move back into the printer under the
Retract
printer head, print the label, then feed the label out to the tear off bar.
Feed After Print
Feed After print instructs the LLM to add a Form Feed (<FF>) after the label is
printed. Generally, this is not necessary but it may be required for certain
applications.
Set Label Width
(440x printers only) The 440x printers have a centered paper path so the label
width is used to position the printing on the label. This option should be enabled
in most cases.
SendOptions
The SendOptions checkbox defaults to checked. If unchecked, options are not
included in the format from all applications (except design).
B - 24 Appendix B Printers and Labels
Loftware Label Manager User's Guide
Intermec RFID Printer Options
Use Label or
Printer Options
This allows you to use either the Intermec Label Specific Options or the
options set in Printer Specific Options (PSOs).
Write Protect
RFID Data
When checked, this protects the RFID data written to the tag from being
overwritten.
Intermec RFID Setup Options Section
Send Setup Options
to Printer
When checked, settings selected in this dialog will be used for printing the
label.
Void Text
This is the text that will be printed across the label after write retries fail.
Labels to Retry on
Tag Access Failure
This sets the number of attempts to write to the label after an unsuccessful
try. Settings range from 0 to 10.
Intermec - Printer Capabilities and Limits
Faster Throughput
Maximum Number
of Fields
Maximum Image
Size
Images Do Not
Print
Printed Bar code
Does Not Match
the Design
Disappearing
Fields
Using CODE 128
For faster throughput always use a parallel port interface.
The maximum number of fields per label format is between 40 and 200, but this
varies between printer models.
The maximum size of any image varies among printers. The physical size of the
image depends on the resolution of your printer. For 203 dpi printers, this is
roughly 3" by 3". Note that the actual size of images that your printer can handle is
determined by the amount of RAM installed in your printer.
If images are displayed in Loftware Label Manager label design but do not print,
the printer probably does not have enough memory to store the image. If you are
using a 440x printer, a "Memory Overflow" message is displayed on the control
panel. If you are going to be working with large images, you may need to add
additional UDC RAM to the printer. Contact Intermec for information on memory
upgrades for your printer.
It is possible to define a combination of attributes, such as line width, ratio, etc,
that the printer cannot produce, or might print in one orientation, but not another.
Under these conditions, the printer may print the "closest possible" bar code. This
usually occurs when you define a bar code with line width 1. The printer
sometimes "promotes" this to a line width 2 bar code, resulting in a printed bar
code that is twice as long as desired.
The Advanced printers do not print any field with an invalid definition. For
example, if you define a UPC-A bar code, which requires exactly 11 digits, and
then provide alphabetic data at print time, the printer does not print the field. If
your label test prints correctly but fields do not print in production printing, check
your data carefully to make sure it is valid.
The Intermec Advanced printers use “auto-discriminating” Code 128 logic. This
means that the printer decides which subset of Code 128 to use based on the data
for the bar code. The printer automatically shifts subsets if necessary. While this
technique produces the densest possible bar codes, it makes it difficult to
implement a specification that requires explicit control of subsets or shifts between
various subsets.
Note: Refer to the section on how to build a UCC-128 symbology in this guide.
Loftware Label Manager User's Guide
Appendix B Printers and Labels B - 25
Intermec
Incrementing /
Decrementing
Fields
Label Size
When the printer is capable of doing the incrementing/decrementing internally,
it is instructed to do so. This is called Native Mode. When printing in Native
Mode, control returns to the PC almost immediately.
Loftware Label Manager does incrementing/decrementing in software when
the printer cannot do it internally and sends down a different set of data for
each label. This is called "Extended Mode." In Extended mode, the Printing
dialog box shows the line “Printing Label x of y” and control does not return to
the PC until the entire series of labels is printed.
The label size is used as a frame of reference when you rotate your label or
when you rotate the printing of a label. It is imperative that Loftware Label
Manager Design knows the exact size of the stock on which you are printing.
Intermec - Font Download and Re-map Instructions
Some Intermec printers are capable of storing fonts. Intermec provides a utility called PrintSet™ that
allows TrueType Fonts (TTF) to be downloaded to a memory location.
Note: Contact Intermec for information regarding your printer’s capability of storing fonts and for the
latest version of PrintSet™.
Loftware Label Manager takes advantage of font re-map by substituting native fonts in the printer and
re-mapping them to pre-downloaded TTF fonts. You may re-map and define up to two different fonts in
the printer by choosing Options | Preferences | Intermec tab.
Note: The Loftware Label Manager Font Re-Map capability is in addition to the True-Type font
category selection in the Loftware Label Manager Design mode Properties Box.
Downloading a True-Type Font from your PC
1.
Determine which system font you wish to download. The fonts are typically stored in the
WINDOWS\FONTS or WINDOWS\SYSTEM directory as .TTF files.
2.
Run the Intermec PrintSet™ utility program. (Make sure all the printer communication settings for
PrintSet™ are the same as the Loftware Label Manager printer connection settings.)
3.
Select the system font that you want to download under the Configuration menu.
4.
Select a user definable font location in printer memory to download this font. (Typically, FONT03
to FONT06 are the first user-definable font locations.)
5.
Select To Printer from the DataXfer menu. This option sends any current update information to the
printer.
Important: Do an Options | Test Print from PrintSet™ to verify that the font is successfully downloaded
to the printer.
Font Remap Instructions
1.
From the Loftware Label Manager Design Mode, Select Options | Preferences.
2.
Double-click on Intermec or click on the + symbol to open the drop-down list.
3.
Click on Remap First Font.
B - 26 Appendix B Printers and Labels
Loftware Label Manager User's Guide
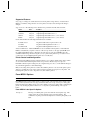
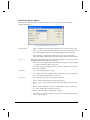
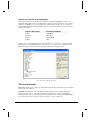
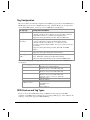
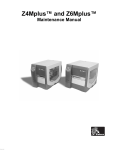
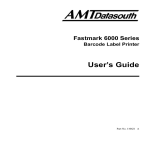
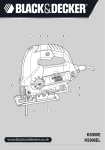
An example of available options is shown to the right in the Preferences dialog box.
Figure B-A: Preferences dialog box
4.
Type in a number from the list, a comma, and the location in the printer where you want the custom
font to be stored.
5.
Click on “Load Defaults,” choose “OK” or "Cancel."
Remapped QR bar codes allow embedding control characters (Barcodes\PDF417 Substitution\Create
QR Symbol Instead of PDF417 setting in the Intermec section of the Preferences dialog). Characters
0x80 to 0x255 used in ASCII formulas are handled properly in the print stream. Low ASCII characters
that work for PDF or Datamatrix also work for per field remapped QR bar codes.
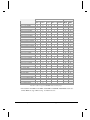
Intermec Error Messages
Printer Turned Off
Cable
Disconnected
No Stock
Print Head Up
LPT
Error message. Does
not let you retry, the
label does not print.
Error message. Does
let you retry so the
label prints.
Error message. Does
let you retry so the
label prints.
Error message. Does
let you retry so the
label prints.
COM
Error message. Does
let you retry, the label
prints.
Error message. Does
let you retry, the label
prints.
Printer stock error.
Does let you retry, the
label prints.
Print head error. Does
let you retry, the label
prints.
Spooled
Locally
No Loftware printer
error, but has a
Windows printer error.
Does let you retry, the
label prints.
No Loftware printer
error, but has a
Windows printer error.
Does let you retry, the
label prints.
No Loftware printer
error, but has a
Windows printer error.
Does let you retry, the
label prints.
No Loftware printer
error, but has a
Windows printer error.
Does let you retry, the
label prints.
Spooled to No error message. The No error message. The No error message. The No error message. The
Shared
labels print when the
labels print when the
labels print when the
labels print when the
error is corrected.
error is corrected.
error is corrected.
error is corrected.
Spooled to No error message. The No error message. The No error message. The No error message. The
PrintServer labels print when the
labels print when the
labels print when the
labels print when the
error is corrected.
error is corrected.
error is corrected.
error is corrected.
Direct IP
No error message. The No error message. The No error message. The No error message. The
labels print when the
labels print when the
labels print when the
labels print when the
error is corrected.
error is corrected.
error is corrected.
error is corrected.
Loftware Label Manager User's Guide
Appendix B Printers and Labels B - 27
Meto Information
This printer guide section provides information specific to the Meto family of printers. These printers
are created with Datamax language; therefore, see the Datamax section for error messages and other
information regarding Meto printers. Updated printer information is available at Loftware’s website,
www.loftware.com. See Printers on the Technical Support page. The supported printers include:
mi-4206
mi-4212
mi-4308
mi-6308
mn-4203
ST3210
mi-6208
Monarch Information
See the Paxar Section, as Monarch is now known as Paxar.
Novexx Information
This section provides information specific to the Novexx family of printers. The supported printers
include:
ALX 924
ALX 925
ALX 926
Chess 4
Chess 5
Chess 6
Chess 8
Cobra OFL
Cobra ONL
DPM 4
DPM 5
DPM 6
Lion
Lion Plus
Ocelot
Puma
Puma Plus
Texxtile
Tiger
Tiger XXL Xxtreme
Updated printer information is available at Loftware’s website, www.loftware.com. See Printers on the
Technical Support page.
Interface Cables (Parallel, Serial, and USB)
These printers usually have a serial interface and a parallel interface. Some models support USB and
have NIC Ports.
Parallel Interface (standard interface) - Using a standard parallel cable, plug the hardware license key
into a LPT parallel port, and connect the cable between the key and the printer.
Serial Interface (standard interface) - Check with manufacturer for cable information. The hardware
license key is not part of the serial interface since it must always be plugged into a LPT parallel port.
USB Interface (standard or optional interface) - Use a standard USB cable between the printer and
computer (or server), and plug in either a USB or Parallel hardware license key to one of the other ports
on the computer.
Network Port - Included or optional on some printers.
Novexx Options
Novexx Options may be label-specific or printer-specific. Label Specific Options (LSOs) can be
accessed when you click on the Label Options button from the Label Setup and Properties dialog (F5).
Printer Specific Options (PSOs) can be accessed by clicking on the Options button while configuring the
printer or by selecting the printer from the Device Configuration grid and clicking on the Options
button.
B - 28 Appendix B Printers and Labels
Loftware Label Manager User's Guide
Novexx Label Specific Options
Label Options Section
Print Speed
Feed Speed
Head Temp
Job End Flag
Label
Label Inverse
The range of available print speed varies with the selected printer type. This
setting controls the speed at which the stock moves when printing. The
combinations of print speed and head temperature control the print quality of
the label.
This setting affects the speed at which the paper is fed when advancing over
non-printing areas. This setting may affect printer throughput.
This allows you to control the darkness of the print.
When this option is set, the last label printed in a batch is longer than the
previous labels, signifying that it is the last label of the batch.
Inverts the entire label, black prints as white, white space prints as black.
Printer Overrides Section
These settings override the Print Options Section in Printer Specific Options.
Print Mode
° Batch Mode - The whole surface of the label is printable.
° Normal 1:1 Mode - The first 18mm of the label are not printable. The
printing on the label is automatically shifted past the empty space.
° Real 1:1 Mode - Total surface of the label is printable, and the label is
Character Set
Gap Offset
Cut Interval
Dispense Position
retracted after each label.
Several printer languages are available that can print international characters
that are not available in the U.S. character set. See the appendix section of
your printer guide to find the corresponding hex codes used to select the
desired character.
This command is for determining the beginning of the label when printing
labels with irregular gaps.
Sets the number of labels to be printed before the stock is cut.
Adjusts the distance the label is fed after printing.
Media Overrides Section
This section overrides the Printer Specific Options for Gap Offset, Cut Interval, and Dispense Position.
Gap Offset
Cut Interval
Dispense Position
This command is for determining the beginning of the label when printing
labels with irregular gaps.
Sets the number of labels to be printed before the stock is cut.
Adjusts the distance the label is fed after printing.
Printer Overrides Section
These settings override the Print Options Section in Printer Specific Options.
Print Mode
° Batch Mode - The whole surface of the label is printable.
° Normal 1:1 Mode - The first 18mm of the label are not printable. The
printing on the label is automatically shifted past the empty space.
° Real 1:1 Mode - Total surface of the label is printable, and the label is
retracted after each label.
Loftware Label Manager User's Guide
Appendix B Printers and Labels B - 29
Dispense Position
Adjusts the distance the label is fed after printing.
Character Set
Several printer languages are available to print international characters that are
not available in the U.S. character set. See the appendix section of your printer
guide to find the corresponding hex codes used to select the desired character.
Novexx Printer Specific Options
Media Options Section
Stock Type
° Die Cut - Stock that has gaps between each label.
° Continuous - No gaps, notches, or perforations between labels.
Media Type
° Thermal Transfer (Ribbon) - Uses ribbon and non-heat sensitive label stock
to print. The print head is activated as the label moves underneath, heating
the ribbon material and melting it onto the label. To increase the quality of
the print, decrease or increase the speed and increase or decrease the heat as
necessary.
° Direct Thermal (No Ribbon) - Uses heat sensitive label stock without the
ribbon. The print head is activated as the label moves underneath heating
the label stock and activating the heat sensitive material in the stock causing
darkening of the material. To increase the quality of the print,
decrease/increase the speed and increase/decrease the heat as necessary.
Ribbon Autoecon
When on, this command turns the ribbon saver "auto economy" feature on in
supported printers. Printers that do not support this feature ignore the command.
When this feature is turned on, the ribbon usage is economized by lifting when
the minimum amount of white space is exceeded.
Gap Offset
This command determines the beginning of the label when printing labels with
irregular gaps.
Gap Length
For continuous stock, this setting is used to add space between printed labels.
The settings are in increments of 1mm.
Cut Interval
This sets the number of labels to be printed before the stock is cut. This setting
may yield unexpected results if you use a value that is not an even multiple of
the Quantity and/or Duplicates value. For example: If Quantity = 2, Duplicates =
3, and Cut Interval = 2, your labels may print/cut in the following sequence:
Label 1 Duplicate 1
Label 1 Duplicate 2
<CUT>
Label 1 Duplicate 3
Label 2 Duplicate 1
<CUT>
Label 2 Duplicate 2
Label 2 Duplicate 3
<CUT>
B - 30 Appendix B Printers and Labels
Loftware Label Manager User's Guide
Print Options Section
Do Not Send
Options
When this is checked, Loftware does not send any Printer Specific Options or
Label Specific Options to the printer.
Print Mode
The availability of the Print Modes depends on the printer.
° Batch Mode - The whole surface of the label is printable.
° Normal 1:1 Mode - The first 18mm of the label are not printable. The
printing on the label is automatically shifted past the empty space.
° Real 1:1 Mode - Total surface of the label is printable, and the label is
retracted after each label.
Character Set
Several printer languages are available to print international characters that are
not available in the U.S. character set. See the appendix section of your printer
guide to find the corresponding hex codes used to select the desired character.
Dispense Options Section
Dispense Mode
This setting applies only to printers with the dispenser attachment.
° Disable – The default setting, dispense mode disabled.
° Batch Mode - The entire label is not printable, the label is not retracted after
feeding to the Dispense position.
° 1:1 Mode - The entire label is printable since the label is retracted before
printing the next label.
Dispense Position
Adjusts the distance the label is feed after printing.
Use Single Start
function
Only one label is printed at a time. Printing is then suspended until the correct
action has been taken. The required action depends on the settings of the
printer, and is either the removal of the presented label, or the use of a foot
pedal.
Graphics Options Section
These settings are mutually exclusive; they cannot both be set at the same time.
Store Images
This setting overrides the normal image behavior and always stores all images.
Images as Binary
All images are sent to the printer in binary format.
Custom Command Section
The Custom Command option is used when a non-typical printing function is required. Refer to the
printer's programming manual for commands that may be used.
Send to Printer
This instructs the Loftware Label Manager system on when to send the
EasyPlug Command.
Note: Commands are printer model and firmware specific. Contact the appropriate printer
representative for programming language questions.
Loftware Label Manager User's Guide
Appendix B Printers and Labels B - 31
Paxar MPCL1 Information
This printer guide provides information specific to the Paxar (formerly Monarch MPCL1) printers:
Loftware’s supported models are:
9425
9445
9474
Updated printer information is available at Loftware’s website, www.loftware.com. See Printers on the
Technical Support page.
Loftware Label Manager takes full advantage of the sophisticated features of the Paxar line of printers.
The fixed portions of the label format are stored in the printer’s memory to increase printing
performance.
In Label Design, when you are test printing, the label format is downloaded every time. However, in
Label Printing, the label format is only downloaded the first time. Afterwards, only the variable fields
and any new variable images are sent to the printer. If you print the same variable image on two labels
in a row, it is stored in the printer for the first label and not downloaded for the second. The image is
deleted from the printer’s memory if the image field is left blank for a printed label.
When doing a range print, or printing incrementing/decrementing fields, there may be a slight pause
between labels while the printer images the new label. When the printer is capable of doing the
incrementing/decrementing internally, it is instructed to do so. If not, all variable data for each label is
sent to the printer each time and Loftware Label Manager does all of the incrementing/decrementing.
Interface Cables (Parallel, Serial and USB)
These printers usually have a serial interface. A parallel interface is available as an option. Generally,
newer models support USB, but this may or may not be standard.
Parallel Interface (optional interface) - Using a standard parallel cable, plug the hardware license key
into a LPT parallel port, and connect the cable between the key and the printer.
Serial Interface (standard interface) - Paxar printers use an RS232-C null modem cable. The hardware
license key is not part of the serial interface since it must always be plugged into a LPT parallel port.
USB Interface (standard or optional interface) - Use a standard USB cable between the printer and PC
(or server), and plug in either a USB or Parallel hardware license key to one of the other ports on the
computer.
Error Messages and Handling
When printing to a Paxar printer or using Printer Status to check the state of a Paxar printer, Loftware
Label Manager may report the following error: Printer Returned <error code>
Refer to your printer documentation to reference these error codes.
Example: "Printer returned: DATA ERROR, error 571"
Error 571 means that a UPC or EAN bar code received data whose length is invalid. You should check
the length of your data.
Supported Features
Image Support - Images are downloaded and stored in the printer’s image memory. Loftware Label
Manager “remembers” images that are sent to the printer and only resends an image if the image is
changed.
B - 32 Appendix B Printers and Labels
Loftware Label Manager User's Guide
Printer Control and Configuration
The Loftware Label Manager Design application allows you to configure printer settings that are saved
in the label format using File | Media Setup and File | Media Setup | Label Options.
Individual workstation printer settings may be configured using File | Devices from within the Design or
any of the Print applications: On Demand, Range.
Many of the settings in the printer do not take effect until the printer is re-booted. All Label-Specific
options are sent to the printer every time a label is printed.
Paxar MPCL1 Options
Note: Paxar is formerly Monarch.
Paxar MPCL1 Label Options
Horizontal Copies
The number of copies to print across the supply.
Cut/Take-Up
° Use PSO Cut Option – Uses the Cut/Takeup option selected in the device
Options dialog box. Setting the cut option in the Label Options dialog box
provides label specific cutting options. Whereas, setting the Cut/Takeup
option in the device Options dialog box produces the same behavior for all
labels printed on that specific printer.
° Cut each label, except last - This option only works with labels 4 to 8 inches
in length.
° Cut each label, including last - This option only works with labels 4 to 8
inches in length.
° No Cut/No Rewind - When enabled, does not allow label to be cut, nor does it
rewind after printing.
Format Number
The number of the Monarch Printer Control Language (MPCL) format to use.
Refer to your MPCL documentation for more information.
Paxar MPCL1 Printer Options
Label Options Section
Cut/Takeup
° Cut After Entire Batch Only – When enabled, cuts after the last label in
the batch has been printed.
° No Cut/No Rewind – When enabled, does not allow label to be cut, nor
does it rewind after printing.
° Cut each label, except last - This option only works with labels 4 to 8
inches in length.
° Cut each label, including last - This option only works with labels 4 to 8
inches in length.
Loftware Label Manager User's Guide
Appendix B Printers and Labels B - 33
Note: There are extensive differences in the cut behavior between Extended and Native Modes with the
98XX Series Printer. Information regarding the expected behaviors for each is found in Loftware
website’s Knowledge Base under LLM | Printing | Printing Problems.
Label Mode
° Separator Off - No separator prints between batch jobs.
° Normal Length Separator – A normal length separator with 3mm black
stripe prints between batch jobs.
° Double Length Separator - A double length separator (typically used for
924 or 925 stacker) prints between batch jobs. On the 920 stacker, a
3mm extra length tag prints between batch jobs.
° Extra Length Tag – A 3mm extra length tag with 6mm stripe prints
between batches.
Paxar MPCL1 - UPC and EAN Bar Codes
Note: Paxar is formerly Monarch.
Using UPC/EAN Extensions
Loftware Label Manager allows you to specify that UPC/EAN bar codes should print with an extension.
In addition, PAXAR printers automatically enable UPC/EAN extensions based on the length of the data.
Note: The user must enter an ‘extra’ character of data when an extension is enabled. This ‘extra’
character is ignored by the printer. For example, using UPC-E with the +2 extension, the user must
enter 9 characters of data, the first 6 of which are encoded in the bar code and the last 2 are encoded in
the extension. The 7th character of data is ignored and replaced with the bar code check digit.
Paxar MPCL2 Information
Note: Paxar is formerly Monarch.
This printer guide provides information specific to the Paxar printers. RFID Printers are italicized. The
Paxar/Monarch printers include:
1465
9401/02/05
9403
9412/13E
9414E
9414M
9416
9433
9446
9460
9490
9494
9805
9820
9825
9830
9835
9840
9850
9855
9856
9860
Monarch 9855 RFID
Monarch 9855 RFMP
Updated printer information is available at Loftware’s website, www.loftware.com. See Printers on the
Technical Support page.
Refer to the RFID Devices and Tag Types section for information on tag types supported by the
Monarch (Paxar) RFID printer.
B - 34 Appendix B Printers and Labels
Loftware Label Manager User's Guide
Loftware Label Manager takes full advantage of the sophisticated features of the Paxar/Monarch line of
printers. The fixed portions of the label format are stored in the printer’s memory to increase printing
performance.
In Label Design, when you are test printing, the label format is downloaded every time. However, in
Label Printing, the label format is only downloaded the first time. Afterwards, only the variable fields
and any new variable images are sent to the printer. If you print the same variable image on two labels
in a row, it is stored in the printer for the first label and not downloaded for the second. The image is
deleted from the printer’s memory if the image field is left blank for a printed label.
When doing a range print or printing incrementing/decrementing fields, there may be a slight pause
between labels while the printer images the new label. When the printer is capable of doing the
incrementing/decrementing internally, it is instructed to do so. If not, all variable data for each label is
sent to the printer each time and Loftware Label Manager does all of the incrementing / decrementing.
Printer Status (Serial only) - If the printer reports that everything is OK, the level of firmware in the
printer is also displayed.
This function can be a very valuable tool. If there is a problem communicating with the printer, a
corresponding error message is displayed.
Interface Cables (Parallel, Serial and USB)
These printers usually have a serial interface. A parallel interface is available as an option. Generally,
newer models support USB, but this may or may not be standard.
Parallel Interface (optional interface) - Using a standard parallel cable, plug the hardware license key
into a LPT parallel port, and connect the cable between the key and the printer.
Serial Interface (standard interface) - For the 9440 and 9494 printers, use the serial cable that came with
your printer. If it did not come with a cable, consult the printer documentation for cable requirements.
USB Interface (standard or optional interface) - Use a standard USB cable, and plug in either a USB or
Parallel hardware license key to one of the other ports on the computer.
For all other Paxar printers, use an RS232-C null modem cable. The hardware license key is not part of
the serial interface since it must always be plugged into a LPT parallel port.
Error Messages and Handling
When printing to a Paxar printer or using Printer Status to check the state of a Paxar printer, Loftware
Label Manager may report the following error:
Printer Returned <error code>
Refer to your printer documentation to reference these error codes.
Example: “Printer returned: DATA ERROR, error 571”
Error 571 means that a UPC or EAN bar code received data whose length is invalid. You should check
the length of your data.
Loftware Label Manager User's Guide
Appendix B Printers and Labels B - 35
Supported Features
Image Support - Images are downloaded and stored in the printer's image memory. Loftware Label
Manager “remembers” images that are sent to the printer, and only resends an image if the image is
changed.
Supported Fonts - The following are the standard fonts provided in the 9446, 9490, and 9494:
Name
Dots
Features
Reduced
Standard
OCR-A
BOLD
8 by 18
16 by 24
16 by 23
32 by 48
magnify height and width from 1 to 7
magnify height and width from 1 to 7
magnify height and width from 1 to 7; no lowercase
magnify height and width from 1 to 7; no lowercase
On the 9490 and 9494, the following additional fonts are available:
Pointable Vector
CG Times
CG Times Bold
height and width values in points from 4 to 90
height and width magnification from 1 to 7
height and width magnification from 1 to 7
Additional ROM Fonts - Additional ROM Font sets are available for Paxar printers. If an additional
ROM set is installed in your printer, select File | Media Setup and choose the appropriate ROM Set in
the Additional Installed Fonts list. Afterwards, the font choices for the selected ROM Set become
available in Label Design. If after doing this, you try to print and the printer beeps or returns an error,
you may have chosen a ROM Set that the printer does not really have.
Printer Control and Configuration
The Loftware Label Manager Design application allows you to configure global printer settings, which
are saved in the label format using File | Media Setup and File | Media Setup | Label Options.
Individual workstation printer settings may be configured using File | Devices from within the Design or
any of the Print applications: On Demand, Range.
Many of the settings in the printer do not take effect until the printer is re-booted. In the printer options
dialog box, pushing the Send To Printer button sends the currently selected options to the printer. All
Label-Specific options are sent to the printer every time a label is printed.
Paxar MPCL2 Options
Note: Paxar is formerly Monarch.
Paxar MPCL2 Options may be label-specific or printer-specific. Label Specific Options (LSOs) can be
accessed when you click on the Label Options button from the Label Setup and Properties dialog (F5).
Printer Specific Options (PSOs) can be accessed by clicking on the Options button while configuring the
printer or by selecting the printer from the Device Configuration grid and clicking on the Options
button.
Paxar MPCL2 Label Specific Options
Print Speed
The range of available print speeds varies with the selected printer type. This
setting controls the speed at which the paper is fed when printing. The
combinations of print speed and head temperature control the print quality of the
label.
B - 36 Appendix B Printers and Labels
Loftware Label Manager User's Guide
Head Temperature
This allows you to control the darkness of the print. 0 is nominal; setting the
temperature higher than 0 causes the label to print darker. Temperature settings
lower than 0 cause the label to print lighter. Values from –390 to 156.
Cut Options
° Use PSO - Uses the cut option selected in the device Options dialog box.
°
°
°
°
°
Setting the cut option in the Label Options dialog box provides label specific
cutting options. Whereas, setting the cut option in the device Options dialog
box produces the same behavior for all labels printed on that specific printer.
Cutter Off - Disables the cut mechanism on the printer.
Cut After Every Tag - Cuts before first tag, cuts each tag and cuts after last
tag.
Cut After Every Batch -Cuts before first tag, cuts after batch. Cuts in strips,
not each tag.
Cut After Last Tag in Batch – Cuts before first tag, cuts each tag, cuts after
the last tag and feeds one or two tags past the printhead when it cuts the last
tag in the last batch.
Cut Every Tag and After Batch – Does not cut before the first tag in a batch,
but cuts between each tag and after the last tag in the batch. The feed key
must be pressed to feed the last tag out far enough to be cut.
Note: When using the cutter with 98x Printers, please review Loftware Knowledge Base Article #49452
for information regarding different behaviors in Modes, Versions, and Cut Intervals.
Backfeed Options
° Use PSO Backfeed - Uses the backfeed option selected in the device
Options dialog box. Selecting a Backfeed Options setting in the Label
Options dialog box applies label specific backfeeding behavior to each
label, that is, all labels printed on that specific printer.
° Disable Backfeed - No backfeed motion occurs.
° Enable Backfeed - Backfeed motion occurs after each printed label. This
option can be used on any printer without a knife.
° Extended Backfeed - An extended backfeed motion occurs after each
printed label. This option is only valid on the 9835 and 9840 printers.
Paxar MPCL2 Printer Specific Options
Label Options Section
Ribbon Type
° Normal Ribbon - The standard ribbon is installed.
° No Ribbon - Ribbon is not installed. Direct thermal stock is required for
this option.
° High Energy Ribbon - High Energy Ribbon is installed. In this mode, the
print head is elevated to a higher temperature and therefore requires a
ribbon that withstands high temperatures. A print speed of 2.5 IPS must
be used with this ribbon. Peel mode should not be used with High
Energy Ribbon. Please consult the Paxar Operator’s Handbook for other
limitations.
Supply Type
° Center Aperture Supply - Hole, gap, or other type of opening found in the
center of the stock.
Loftware Label Manager User's Guide
Appendix B Printers and Labels B - 37
° Continuous - No gaps, notches, or perforations between labels.
° Die Cut Labels - Stock that has gaps between each label.
° Mark Stock - Black mark found opposite print side.
Label Mode
° Continuous operation - Default mode for printing when peel mode is not
desired or a rewind motor is not installed.
° On-demand mode - While in On-Demand mode the next label prints when
the previous label is removed or when the feed button is pressed. The
pause light blinks until all of the labels in the batch are printed. This
option should be used with a peel module.
° Rewind – This option is peel mode with a rewind motor. The label
backing should be properly fed and attached to the take up reel.
Cutter Mode
° Cutter Off - – Disables the cut mechanism on the printer.
° Cut After Every Tag - Cuts before first tag, cuts each tag, and cuts after
last tag.
° Cut After Last Tag in Batch - Cuts before first tag, cuts each tag, cuts after
the last tag and feeds one or two tags past the printhead when it cuts the
last tag in the last batch.
° Cut Every Tag and after Batch – Does not cut before the first tag in a
batch, but cuts between each tag and after the last tag in the batch. The
feed key must be pressed to feed the last tag out far enough to be cut.
Forms Control Section
Horizontal Adjust
Horizontal offset (in printer dots) used during printing.
Supply Position
Supply (label) position at beginning of print job (-99 to 99).
Vertical Adjust
Vertical offset (in printer dots) used during printing.
Cut Adjust
Adjusts where the tag is cut. The printer adjusts the cut position according to the
black marks on the supply. You may need to adjust for aperture supplies.
Increase to move the cut up, decrease to move the cut down.
Slashed Zero
When checked, prints slashes through zeros.
Print Separator
When checked, prints a separator ticket.
° Single - Prints a single separator ticket (all printers).
° Double - Prints 2 separator tickets (9835 V5.0 or 9840 V6.0 only)
Note that Double is disabled in Version 7.0.29 for the 9835, 9840, and 9850
Models.
Old Firmware
Does not send new firmware options if checked. If you are having difficulty
communicating with the printer, try selecting this option. By choosing this
option, you disable status checking and other commands that are only supported
in newer versions of the printer firmware. If using this option allows you to print,
you may wish to consider purchasing a printer firmware upgrade. After your
printer firmware upgrade is installed, you should uncheck this option.
Only Resend Fields
that have changed
When checked, only the data that has been changed is re sent for printing.
B - 38 Appendix B Printers and Labels
Loftware Label Manager User's Guide
Backfeed Control Section
Note: The Paxar 9403, 9805, and 9856 printers do not support backfeed.
Use Backfeed Control to enable or disable the backfeed option, set the dispense position and the
backfeed distance. Backfeed works by advancing each printed label to the desired dispense position.
Once that label is removed, the next label to be printed is backed up underneath the printhead. In
continuous mode, only the last label in the batch is advanced to the dispense position. You may need to
adjust the dispense position to allow labels to be removed, die cut labels to be removed easily, or to
prevent them from falling off.
The dispense position and backfeed distance are optional parameters and do not have to be specified.
However, they allow for greater precision when positioning the supply. You cannot change the
backfeed distance while the printer is active.
Dispense Position
Adjusts the stopping point of the label. 50 to 200 dots (default 65 dots).
Backfeed Distance
Amount to move label backwards. 10 to 200 dots (default 65 dots). Cannot
be greater than the dispense position.
The backfeed distance should equal the dispense position. An exception is if you are tearing instead
of peeling. Then, the backfeed distance must be 30 dots (.150 inches) less than the dispense
position. However, the result is a 30 dot non-print zone on your supply. The 30-dot difference
accounts for improper tearing of butt cut supplies, because you do not want any exposed adhesive
under the printhead. For more information, consult your Printer manual.
Font Style Section
Opaque
The font and its envelope are opaque and blot out any lines or other fields that
it overlaps.
Transparent
The font and its envelope are transparent, and any lines or other fields that it
overlaps are visible.
Advanced Options Section
Language
Selects the language of the country chosen. Defaults to United States.
Symbol Set
Selects the symbol set used for fonts;, see Printer Appendix to determine the
appropriate choice based on the application.
Graphic Storage
Choose Flash or Volatile RAM or Non-Volatile RAM. Flash Memory is a
special type of EEPROM that can be erased and reprogrammed in blocks
instead of one byte at a time. Volatile RAM loses its contents when the
power is turned off, whereas Non-volatile RAM retains its contents.
Note: If the graphic is larger than .5 by .5 inches, the graphic is stored in Temporary Storage in the
printer buffer, regardless of the PSO selected. The image is held only until it is sent.
Custom Command Section
The Custom Command option is used when a non-typical function is required when printing. Refer to
the printer’s programming manual for commands that may be used.
Loftware Label Manager User's Guide
Appendix B Printers and Labels B - 39
Note: Commands are printer model and firmware specific. Contact the appropriate printer
representative for programming language questions.
Paxar MPCL2: More Information
Note: Paxar is formerly Monarch.
Incrementing/Decrementing Fields
When the printer is capable of doing the incrementing/decrementing internally, it is instructed to do so.
This is called "Native Mode." In Native Mode, control returns to the PC almost immediately.
Loftware Label Manager does incrementing/decrementing in software when the printer cannot do it
internally and sends down a different set of data for each label. This is called "Extended Mode." In
Extended mode, the Printing dialog box shows the line “Printing Label x of y” and control does not
return to the PC until the entire series of labels is printed.
Label Size
The label size is used as a frame of reference. When you rotate your label or when you rotate the
printing of a label, it is imperative that Loftware Label Manager Design knows the exact size of the
stock on which you are printing.
UPC and EAN bar codes
Using UPC/EAN
Extensions
Loftware Label Manager allows you to specify that UPC/EAN bar codes
print with an extension. In addition, Paxar printers automatically enable
UPC/EAN extensions based on the length of the data, as shown below
Note: The user must enter an ‘extra’ character of data when an extension is enabled. This ‘extra’
character is ignored by the printer. For example, using UPC-E with the +2 extension, the user must
enter 9 characters of data. The first 6 characters are encoded in the bar code and the last 2 are
encoded in the extension. The 7th character of data is ignored and replaced with the bar code check
digit.
Communications Settings
The communications settings for the Paxar 9490 and 9494 are controlled by software instead of switch
settings.
Note: This feature is not supported on the Paxar 9446 printers.
To set the printer’s communications parameters, use the Send Settings button in the device Connection
dialog box. Setting the printer’s communications parameters is only possible immediately after turning
on the printer.
To print out the current communication settings of these printers shut the printer off, depress the printer
feed button, turn the printer on, and immediately release the feed button when the yellow LED light on
top of the printer blinks. A label feeds out of the printer showing current settings.
For more information, see the “Configuring the Printer” section of your printer manual.
B - 40 Appendix B Printers and Labels
Loftware Label Manager User's Guide
Creating a Price Field
To format a field as a price field:
Example: $19.68
Define field as variable and preface the name of the field with $$.
Example: $$Price
To have $19.68 printed on the label, supply 1968 as data.
Paxar Error Messages
Note: Paxar was formerly known as Monarch.
Printer Turned Off Cable Disconnected No Stock
Print Head Up
LPT
Error message. Does
not let you retry, the
label does not print.
COM
Spooled to
Shared
Error message comes
up when you restart
the printer. Allows
retry, labels print.
No Loftware error
message, but a
Windows printer error
is displayed. All labels
print.
No error message. All
labels print.
No error message.
Behaves as if the labels
are printing. Press feed
to get the first two
labels; press feed again.
Error message comes up
right away. Allows retry,
the labels print.
Spooled to
PrintServer
No error message. All
labels print.
Direct IP
No error message. All
labels print.
Spooled
Locally
Error message. Does not No error message.
let you retry, the label
Behaves as if the labels
does not print.
are printing. Press feed
to get the first two
labels; press feed again.
Error message comes up Error message comes up
when you reconnect the right away. Allows retry,
printer. Allows retry,
the labels print.
labels print.
No Loftware error
No Loftware error
message, but a Windows
message, but a
Windows printer error is printer error is displayed.
displayed. All labels
All labels print.
print.
No error message. All
No error message.
labels print.
Labels print after stock is
added.
No error message. All
No error message.
labels print.
Labels print after stock is
added.
No error message. All
No error message.
labels print.
Labels print after stock is
added.
No Loftware error
message, but a Windows
printer error is
displayed. All labels
print.
No error message.
Labels print after the
print head is put down.
No error message.
Labels print after print
head is down.
No error message.
Labels print after print
head is put down.
PCL5 Information
PCL is not a Printer Family as such but is listed as a Loftware native driver among the available printers.
Hewlett-Packard® created PCL (Printer Control Language), but it is used by a number of other printer
manufacturers as well. Loftware’s PCL driver operates with any printer that supports PCL5.
The native PCL fonts enabled for PCL5 are Univers, CG Times, Courier, and Arial. Univers is the
default font for the driver.
PCL5 Options
PCL5 Label Specific Options
PCL5 Page Size options include: A3, A4, A5, B4(JIS), B5(JIS), Com-10 Envelope, Custom, Executive,
Hagaki Postcard, International B5 Envelope, International C5 Envelope, International DL Envelope,
Loftware Label Manager User's Guide
Appendix B Printers and Labels B - 41
Ledger, Legal, Letter, Monarch Envelope, and Oufuku-Hagaki Postcard. Options supported by different
PCL5 printer models may vary.
The Custom page size option allows printing on custom paper size page stock to a PCL 5 Printer that
supports the custom size.
A label can be designed with specified dimensions and then printed on a target PCL 5 printer that
supports the custom size and has been set up with the custom-sized paper. (These configuration
settings are made from the printer’s configuration interface (Control Panel).) The label dimensions
should correspond to the custom paper size.
A label can also be configured with a page layout of specified label / page width and height, and
then printed on a target PCL 5 printer that supports the custom size and has been set up with the
custom-sized paper. The layout dimensions should correspond to the custom paper size. (Refer to
Chapter 10, Page Layouts for more information on creating and attaching layouts to labels.)
Paper Source – Because of the variety of PCL5 supported page sizes, this setting allows you to
configure the paper source (tray) at the label level. By default, the Paper Source is set to the selection in
the printer's PSO (Use Printer Setup), but you can select any of the other options described in the PCL5
Printer Specific Options section below. If a different option is selected and saved in the label format,
then that option is used whenever that label is printed, UNLESS a job containing a *TRAY command is
submitted through LPS. The *TRAY command overrides both the printer setting and the label setting.
(Refer to the *TRAY command section of the "Print Request Data Structures" topic in Chapter 1 of the
LPS guide.)
Note: Different manufacturer’s printers may implement the handling of the Paper Source selection
differently. For example, one manufacturer may map the Lower Tray command to the printer's Lower
Tray while another manufacturer may map the same command to its Optional Tray. Additionally, these
mappings may be configurable, again depending upon the manufacturer.
When driving printers with PCL5, note that there is typically a ¼” margin on all sides of the page that is
not printable. Additionally, along the top of the page, the unprintable margin area can have label
elements (text, lines, etc.) positioned within it, creating a clipping effect. For this reason, it may be best
to define the label or page layout size in Loftware to be ½” (2 x ¼”) less than the physical paper size.
For example, a label designed for a Letter sized page would be 8” x 10½”.
The optimal settings and dimensions for different PCL5 printer models may vary.
B - 42 Appendix B Printers and Labels
Loftware Label Manager User's Guide
PCL5 Printer Specific Options
Printer Options with PCL5 printers are different from most of the other supported printers. The figure
displays default options:
Figure B-B: PCL5 Printer Options dialog box
Duplex Printing
° Simplex – Simplex mode prints images and characters on one side of a sheet / page.
° Duplex Long Edge – Prints images and characters on two sides of a sheet/page. Long
means that the duplexed pages are bound along the length of the physical page.
° Duplex Small Edge - Prints images and characters on two sides of a sheet/page.
Short means that the duplexed pages are bound along the width of the physical page.
Jogging
Printers that support this feature provide a means of identifying one print job from others
by slightly offsetting the first label of each print job.
° First Label in Job – When a print request is initiated, the paper tray is shifted slightly
or “jogged” before the first label or page prints.
° No Jogging – Jogging is disabled. There is no print job separation even for printers
that support this feature.
Output Tray
° Upper – The default output bin for paper.
° Lower - Prints to the lower output bin. If this command is received by a printer that
does not contain the dual-bin feature, it is ignored.
Paper Source
° Auto – This option feeds paper from a printer-specific tray.
° Current – Prints the current page from the location last used.
° Envelope Feeder – This option prints using stock from an optional envelope feeder
tray.
° Envelope Manual – Prints the envelope as manually inserted on the top of the tray.
° Lower Tray – Prints using stock from the lower tray.
° Manual – This option allows manual insertion of paper.
° Optional Source – This allows insertion of stock from an optional location that may
exist on a specific printer.
Loftware Label Manager User's Guide
Appendix B Printers and Labels B - 43
Use Macros
If this is checked, Loftware uses the PCL5 Macro commands to store fixed fields, lines
and boxes. Depending on your labels, this may significantly speed printing throughput,
especially when there are large fixed images, text, or bar code fields on your label.
PCL5 USB Issues
USB Printing and PCL5
Loftware tested printing to a USB-connected HP LaserJet 1200 series PCL 5+ printer using various
Loftware applications such as Design Mode, On-Demand Print, etc. The results are documented in very
general terms below. Your results depend on the printer manufacturer and printer you are using and are
quite likely to be different.
Loftware Applications are designed to open, write, and then close the USB Printer port when processing
a print request. As long as the USB Printer allows this to happen, printing continues without incident. If
the printer is not connected or is turned off, the Loftware application cannot open the port; a message is
displayed or an error condition is created which states “Error Opening Port (printer name).” If the
printer is out of stock and it shuts the USB port down, the Loftware application cannot write to the port.
A message is displayed, or an error condition is created stating “Error Writing to Port (printer name).”
If the printer is out of stock but the printer has a buffer, an error message may not display until the buffer
is full.
USB Printing and the LPS
Various expected behaviors occur when printing to the LPS using a USB Printer with error conditions
(i.e.; Paper Out, etc.). After the printer buffer is full, jobs stay in pending folder. After about 2 minutes,
the Status displays media problem or “Error writing to/opening port (Printer Name)” message. After
correcting the error condition, the jobs in the buffer print out, and the pending job completes.
It is important to read all available printer manufacturer information on USB Printing with your printer
before attempting to print using Loftware applications. Remember to install any USB Drivers before
connecting, configuring or printing in Loftware.
Pressiza Information
The Pressiza printers supported by Loftware include:
406+
7401 406-400+
F-446
408
808-64
F-464
412-64
F-422
TX408
512-64
F-428
XT-10
610-64
F-438
These printers use the same language as Datamax Printers; therefore, see the Datamax section for error
messages and other information regarding Pressiza printers. Updated printer information is available at
Loftware’s website, www.loftware.com. See Printers on the Technical Support page.
Printronix Information
This printer guide provides information specific to the Printronix printers, and IBM OEM Printronix
printers. (See the IBM Section for a list of IBM printers). RFID Printers are italicized. The supported
Printronix printers include:
B - 44 Appendix B Printers and Labels
Loftware Label Manager User's Guide
L1024
L1524
L5020
L5031
L5035
L5520
L5535
LPA8204r
LPA8304r
P5005B
P5010
P5205B
P5210
P5215
P5220
SL4M
SL5204
SL5204r
SL5304
SL5304r
SLPA5204r
SLPA5304r
SLPA7204e
SLPA7304e
SLPA8204r
SLPA8304r
T4M
T5204
T5204r
T5206
T5206r
T5208
T5208r
T5304
T5304r
T5306
T5306r
T5308
T5308r
LPA8204r RFID
LPA8304r RFID
SL4M RFID
SL5204 RFID
SL5204r RFID
SL5304 RFID
SL5304r RFID
SL5306r RFID
SLPA5204r RFID
SLPA5304r RFID
SLPA7204e RFID
SLPA7304e RFID
SLPA8204r RFID
SLPA8304r RFID
T4M RFID
T5204 RFID
T5204r RFID
T5206r RFID
T5208r RFID
T5304 RFID
T5304r RFID
T5306r RFID
T5308r RFID
To view updated Printronix information, go to Loftware’s website, www.loftware.com. See the section
on Printers on the Technical Support page.
Refer to the RFID Devices and Tag Types section for information on tag types supported by the
Printronix RFID printers.
Printer Status
This function can be a very valuable tool when printers are connected using the Serial Interface. If there
is a problem communicating with the printer, an error message is displayed. By default, Printer Status is
disabled for Printronix printers. To enable Printer Status, you must first enable “One Char Enquiry” on
the printer via the menu controls, and then uncheck the “Disable Status Checking” check box in the
device Connection dialog box in Loftware.
Interface Cables (Parallel, Serial and USB)
Parallel Interface - Using a standard parallel cable, plug the hardware license key into an LPT parallel
port, and connect the cable between the key and the printer.
Serial Interface - For all Printronix printers, use an RS232-C null modem cable. The hardware license
key is not part of the serial interface since it must always be plugged into an LPT parallel port.
USB Interface (standard or optional interface) - Use a standard USB cable between the printer and PC
(or server), and plug in either a USB or Parallel hardware license key to one of the other ports on the
computer.
Loftware Label Manager User's Guide
Appendix B Printers and Labels B - 45
Printronix Options
Printronix Options may be label-specific or printer-specific. Label Specific Options (LSOs) can be
accessed when you click on the Label Options button from the Label Setup and Properties dialog (F5).
Printer Specific Options (PSOs) can be accessed by clicking on the Options button while configuring the
printer or by selecting the printer from the Device Configuration grid and clicking on the Options
button. (Printronix RFID options are also described in this section.)
Printronix Label Specific Options
Label Options Section
Print Speed (IPS)
The range of available print speeds in inches per second (IPS) varies with the
selected printer type. Note that the printer may use a slower print speed than
you specify in order to maintain print quality.
Slew Rate (IPS)
This setting affects the speed in inches per second (IPS) at which the paper is
fed when advancing over non-printing areas. This setting may affect printer
throughput.
Darkness
This allows you to control the darkness of the print. -3 is nominal; setting the
temperature higher than -3 causes the label to print darker. Temperature
settings lower than -3 cause the label to print lighter. The valid values range
from -15 to 15.
Format Number
Specifies the areas of RAM in which the label format is to be stored. The valid
values are 1-100.
Print Quality
This setting only applies to the P5000 Series line matrix printers and is
somewhat similar to the darkness control on the thermal transfer printers.
° Best - prints the darkest images, but at the slowest speed.
° High - prints at a faster speed than Best, but the characters are not as dark.
° Data Processing - This mode should be set if the highest speed is desired,
printing is not as dark as High.
Label Overrides Section
Symbol Set
° Use Printer Symbol Set – Label uses settings from Printer Specific Options.
° User Defined – Label uses an added CodePage.
° Other Symbol Sets (Arabic to Turkish)
Send Options
° Use Printer Setup - Label uses settings from Printer Specific Options (PSO).
° No – Overrides any Send Options set in PSO, nothing set.
° Yes – Overrides Do Not Send Option in PSO
Cutter
Enables cutter for this label only.
Cut Interval
Sets Cut Interval for this label only.
B - 46 Appendix B Printers and Labels
Loftware Label Manager User's Guide
Printronix Printer Specific Options
Since none of the printer options are sent from Loftware, the Printer must be properly configured
through its front panel for this to work. Be sure to enable HOST FORM LENGTH on the printer.
Media Options Section
Stock Type
(Gap Sense)
° This option specifies the method used to detect the media top.
° Advanced Gap Stock -Media being used has liner gaps between die cut labels
with black background.
° Advanced Notch Stock – Media being used has notches or holes that interrupt
a black vertical line on the underside of the media.
° Continuous Stock - Continuous media with no black stripe and no gap is being
used.
° Die Cut Stock - Media with a space or “gap” between die cut labels is being
used, where the media backing or liner is present between labels. Also for
media with pre-punched notches or holes.
° Mark Stock - Media with a horizontal black stripe on the backside of the liner
is being used.
Media Type
(Print Mode)
° Direct - Direct Thermal type of printing (no ribbon) requires special heat
sensitive media.
° Transfer - Thermal Transfer type of printing (ribbon installed).
Media Handling
This option specifies how the printer handles the media.
° Continuous operation - Printer prints on the media and sends it out the front.
° Cut Each Label - Media is cut after printing each page (requires optional
cutter).
° Peel-Off - Prints and peels die-cut labels from the liner without assistance.
The printer waits for you to take away the label before printing the next one.
The label backing is rewound on the internal rewinder. A “LABEL
PRESENT/Remove Label” message reminds you to remove the label before
the next one can be printed.
° Tear-Off - After each label is printed, the printer positions the label over the
tear-off bar and waits for you to tear-off the label before printing the next one.
A “LABEL PRESENT/Remove Label” message reminds you to remove the
label before the next one can be printed.
° Tear-Off Strip - Printer prints on the media and sends it out the front until the
print buffer is empty, then positions the last label over the tear-off bar for
removal.
Forms Control Section
Cut Interval
Sets the printer to cut after the specified number of pages (requires optional
cutter).
Tear Off Pause
Count
Sets the printer to pause after the specified number of pages. The paper must be
completely torn before the printer resumes normal operation.
Loftware Label Manager User's Guide
Appendix B Printers and Labels B - 47
Offline Pause
Count
Sets the printer to pause (offline) after the specified number of physical pages
printed.
Auto Eject Labels
Specifies whether the printer ejects the last page of a job if the page is not full.
When this setting is checked, the printer ejects the last page after the entire job
has been processed and printed.
By default, this setting is deselected; the printer does not eject the last page
unless you send a Page Eject command or until the printer receives another print
job.
Specifies whether the printer performs a Form Feed when a Form Feed
command is received and the printer is already at the Top of Form.
When this setting is checked, the printer advances media from the present Top
of Form position to the next Top of Form position upon receipt of a Form Feed
command, causing a blank form. The factory default is Enable.
When this setting is deselected, the printer does not advance media from the
present Top of Form position to the next Top of Form position upon receipt of a
Form Feed command.
Determines how the physical label size is affected upon an EXECUTE
command.
Form Feed at Top
of Form
Host Form Length
The physical label length changes to match the form length (defined in CREATE mode). The physical
label size remains at the new setting until another EXECUTE command is received, or the PRINTER
CONTROL menu settings are changed. The factory default is Enable.
Forms printed in EXECUTE mode do not change the physical label size. Therefore, the size of the form
(defined in CREATE mode) must fit within the current label dimensions, or errors may occur.
Note: Changing the form length via the EXECUTE command changes the ASCII Emulation logical
dimensions.
Field Options Section
Print UPC
Descenders
Force Uppercase
Slashed Zeros
This parameter allows you to print bar code descenders when human readable
data is not present in the UPC/EAN bar codes
° Always - UPC/EAN bar codes are printed with descenders, even if there is
no human readable data.
° With HR Enabled - UPC/EAN bar codes are printed with descenders only
when the Human Readable text field is enabled.
When checked, any lower case data supplied for text fields are converted to
uppercase. When unchecked, lower case data supplied for text fields print in
lowercase.
This option applies to all character sets except OCR A and OCR B. When
checked, zeros are printed with a slash. When unchecked, zeros are printed
without a slash.
Advanced Options Section
Symbol Set
Accesses one of the printer’s internal multinational or international character
sets.
Note: See the Templates and Wizards chapter for more information on this.
B - 48 Appendix B Printers and Labels
Loftware Label Manager User's Guide
Error Report
This option sets the error reporting capability of the printer.
° Debug - Puts the printer in debug mode whenever a label format is defined.
Each line of the format is printed along with any printer language errors.
° Fault – If a printer language error occurs, the error is printed on the media,
the message “IGP Error” is displayed on the front panel, and then the
printer goes offline.
The error must be cleared before the printer can resume normal operation.
° Off – The printer does no physical boundary checking whatsoever. Fields
are clipped if they are beyond the page boundaries.
° On - Full physical boundary checking is performed. Any field that falls off
the current page is reported as an error.
PPM/PMU
° PPM = Printronix Printer Manager – Printronix version, only works with
Printronix printers
° PMU = Print Manager Utility – IBM version, only works with IBM printers
The PPM/PMU is a program that provides status and control of multiple
printers of the associated type on a network.
To use this Loftware feature, enter the IP Address of the computer where the
PPM/PMU is running, and click the Browse button. This feature assumes you
have a browser on your system and that the PPM/PMU is running on the PC
whose IP Address is displayed. If you are successful, a login screen is
displayed where you can enter your credentials and configure the system.
Refer to your Printronix Manual for information on the actual workings of the
PPM/PMU. The IP Address is persistent across all IBM/Printronix printers;
each time you enter any IBM / Printronix PSO dialog, the display reflects
whatever was typed in that box the last time the IBM/Printronix PSO dialog
was closed.
Don’t Send
Options
When this is checked, Loftware does not send any PSOs or LSOs to the
printer. This is useful if you have an older printer or a printer with an older
emulation that does not support one or more of the current commands that
Loftware sends.
Custom Command Section
The Custom Command box allows you to add additional commands to the data stream that is sent to the
printer. Please consult your IGP/PGL manual for custom command syntax.
Note: The custom command is sent after the ~CONFIG command and before the ~CREATE command.
Printronix RFID Options Section
This section applies to Printronix RFID printers.
Use Label or
Printer Options
This allows you to use either the Label Specific Options settings or those set
in Printer Specific Options (PSO).
Single Protocol
Firmware
Changes in firmware affect the commands that the printer accepts. Check
this box if your firmware is single protocol.
Loftware Label Manager User's Guide
Appendix B Printers and Labels B - 49
Send Options to
Printer
This will use the currently selected options.
Tag Type
Auto Detect determines the tag type. Select “No Tags” if none is available.
Passcode Write
Retries
Number of passcode write retries.
Printronix Error Messages
Printer turned Off
Cable disconnected No stock
Print Head up
LPT
Error message: “Printer Error Message. Lets
Error Message. Lets
not Initialized” No
you retry to Print label. you retry so you can
retry allowed
print label.
COM
Error Message. Lets
you retry, label prints.
Error Message. Lets
you retry, label prints.
Error Message. Lets Error Message. Lets
you retry, label prints. you retry, label
prints.
Spooled
Locally
Windows error
message: “Device not
connected” Allows
retry, reprints when
error corrected.
Windows error
message: “Device not
connected” Allows
retry, reprints when
error corrected.
Windows error
Message. Allows
retry, reprints when
error corrected.
Spooled To No error message.
No error Message.
No Error Message.
Shared
Labels print when error Labels print when error Label Prints when
is corrected.
is corrected.
error is Corrected.
Spooled to No Error Message.
PrintServer The labels print when
error is corrected
Direct IP
Error Message lets
you retry so you can
print Label.
Windows error
Message. Allows
retry, reprints when
error corrected.
No error Message.
Label Prints when
error is corrected
No Error Message. The No Error Message.
No Error Message.
labels print when error The labels print when The labels print when
is corrected
error is corrected
error is corrected
No error message. The No error message. The No error message.
labels when the error is labels when the error is The labels when the
corrected.
corrected.
error is corrected.
No error message.
The labels when the
error is corrected.
Quick Label Information
Loftware's supported Quick Label printers include:
Pronto 442
Pronto 472
Pronto 474
Pronto 843
These printers use the same language as Datamax Printers; therefore, pertinent information regarding
printer options, label options, and error messages may be found in the Datamax section in this appendix.
Sato Information
This section of the printer guide provides information specific to the Sato family of printers. RFID
Printers are italicized in shaded cells. Updated printer information is available at Loftware’s website,
www.loftware.com. See Printers on the Technical Support page. Supported Sato printers include:
B - 50 Appendix B Printers and Labels
Loftware Label Manager User's Guide
CL408
CL408e
CL412
CL412e
CL608
CL608e
CL612
CL612e
CT400
CT410
CX200
CX208
CX212
CX400
GT408e
M10e
M5900
M5900E
M5900RV
M5900RVe
M84 Pro
M8400
M8400RV
M8400RVe
M8400S
M8450
M8459S
M8459Se
M8460S
M8460Se
M8480S
M8485S
M8485Se
M8490S
M8490Se
XL400
XL400e
XL410
XL410e
CL408e RFID
CL412e RFID
M8485Se RFID
203, 305, 609 dpi
Refer to the RFID Devices and Tag Types section for information on tag types supported by the Sato
RFID printers.
Printer Status
If the printer reports that everything is OK, the level of firmware in the printer is displayed. This
function can be a very valuable tool. If there is a problem communicating with the printer, a
corresponding error message is displayed.
Interface Cables (Parallel, Serial and USB)
These printers usually have a serial interface. A parallel interface is available as an option. Generally,
newer models support USB, but this may or may not be standard.
Parallel Interface (optional interface) - Using a standard parallel cable, plug the hardware license key
into an LPT parallel port, and connect the cable between the key and the printer.
Serial Interface (standard interface) - For all Sato printers, use an RS232-C null modem cable. The
hardware license key is not part of the serial interface since it must always be plugged into an LPT
parallel port.
USB Interface (standard or optional interface) - Use a standard USB cable between the printer and PC
(or server), and plug in either a USB or Parallel hardware license key to one of the other ports on the
computer.
Note: Make sure that the printer is powered off any time you plug in or remove a parallel cable from a
Sato printer. This prevents Parallel ports from malfunctioning.
Sato Options
Sato Options may be label-specific or printer-specific. Label Specific Options (LSOs) can be accessed
when you click on the Label Options button from the Label Setup and Properties dialog (F5). Printer
Specific Options (PSOs) can be accessed by clicking on the Options button while configuring the printer
or by selecting the printer from the Device Configuration grid and clicking on the Options button.
Loftware Label Manager User's Guide
Appendix B Printers and Labels B - 51
Sato Label Specific Options
Label Options Section
Print Speed
The range of available print speeds varies with the selected printer type.
Print Darkness
Allows you to control the darkness of the print. 1 is the nominal setting.
Label Cut Options Section
Cut Option
Use Printer Cut Options
Use label Cut Options
Cut Interval
This determines how frequently labels are cut.
Custom Command Section
Allows commands not available in LLM to be sent to the printer.
Send Command - This command instructs Loftware Label Manager when to send a command.
Sato Printer Specific Options
Settings are in dots. Use the dots per inch (dpi) for your printer to find the proper value. For example, if
your printer has 203 dpi and you want to set a skip distance of 1 inch, specify a value of 203 for the skip
distance.
Label Options Section
Stock Type
° Continuous - No gaps or separations between labels.
° Die Cut - Gap or separation between each label.
° Mark Stock - Black line or mark on the label stock backing.
° Tag Stock - Notch in corner of stock.
Character Set
Several printer languages are available to print international characters that
are not available in the U.S. character set. See the appendix section of
your printer guide to find the corresponding hex codes used to select the
desired character.
Print Length
° 7 Inches sets the printer to the standard print length.
° 14 Inches sets the printer to the expanded print length (not available for
some models).
Expanded Memory
Expanded memory requires the use of a PCMCIA card. Using a PCMCIA
card does not add on to existing memory, it replaces it. You must also
select the Memory Slot in which the card is located. The length of the
label that can be printed varies by printer and resolution. Consult a Sato
Technical Reference Manual (not available for some models).
Note: The M-84XX printers have two choices for maximum label length: 7" (187mm) or 14" (356mm).
When using the 8450 printer at 300 dpi, the printer has a maximum print length of 7" and it ignores this
setting.
B - 52 Appendix B Printers and Labels
Loftware Label Manager User's Guide
Memory Slot
Selects the Memory Card slot.
° None - No memory card is installed.
° Slot A - Memory card is installed in location A or 1 in the printer.
° Slot B - Memory card is installed in location B or 2 in the printer.
Note: Some printers refer to slot 1 instead of A; A = 1 and B = 2.
Cutter Options Section
Print/Cut Offset
This is useful for aligning labels to the cut position.
Cut Interval
This determines how frequently labels are cut – a cut interval of 2 cuts every
two labels, a cut interval of 1 cut every label, etc.
Base Reference Point Section
The base reference point is the Horizontal and Vertical setting on the label where fields (lines, text, bar
codes and graphics) may start printing.
Horizontal
Specifies a field’s location in the X direction from the current base reference
point measured in number of dots at 0 degree orientation.
Vertical
Specifies a field’s location in the Y direction from the current base reference
point measured in number of dots at 0 degree orientation.
Applicator Options Section
Opposite Hand
Printer
Sato manufactures two applicator engines, a Standard Hand Model and an
Opposite Hand Model, identified by looking on the identification tag of the
printer or by looking directly at the front of the printer. If the label stock
width is less than the print head width and the stock is right justified, this is
a Standard Hand Model. An Opposite Hand Model is oriented at lower left
as are many of the Sato tabletop printers.
Custom Command Section
Allows commands not available in LLM to be sent to the printer.
Note: Start, End, and Escape commands (STX, ETX, and ESC) are not required at the start and end of
the commands. Example: For a base reference point of 10 Horizontal and 10 Vertical, you would only
enter the following command:
A3H010V001
Note: Press the Send To Printer button to issue command to the printer.
Custom Firmware
Sato manufactures two applicator engines, a Standard Hand Model and an
Opposite Hand Model, identified by looking on the identification tag of the
printer or by looking directly at the front of the printer. If the label stock
width is less than the print head width and the stock is right justified, this is
a Standard Hand Model. An Opposite Hand Model is oriented at lower left
as are many of the Sato tabletop printers.
Loftware Label Manager User's Guide
Appendix B Printers and Labels B - 53
Serial Communications Section
Bi-Com Mode
To enable Printer Status capabilities, this box must be checked and the proper
dip switch must be set on the printer.
Get Printer Status
Establishes if printer is communicating with the software. Use File | Devices |
Connection to make sure settings are correct.
Send to Printer
When using Custom Commands, press this button to send them to the printer.
Sato RFID Options
Use Old RFID
Command
Tag Type
When selected, the old read and write commands for the printer are used.
Number of Retries
Per label
This setting determines the number of times to retry writing to the label in case
of initial failure.
Transponder
Position
This is the distance of the chip from the leading edge. This defaults to 26 mm.
Select from: EPC Class 0 +, EPC Class 1, EPC 1.19, EPC Class 1 Gen 2.
Sato - More Information
Sample of Supported Fonts
The following list represents only a small portion of the fonts available for Sato Printers. Consult Sato's
manual or their web site for further information.
*
*
*
*
*
*
*
*
5x9
8x15
13x20
OCR-A
OCR-B
18x30
28x52
Vector Font
Dot Font
Dot Font
Dot Font
Dot Font
Dot Font
Smooth Dot Font
Smooth Dot Font
Vector / Scalable Font
Dot Fonts can be magnified up to 9X horizontally and 9X vertically. The Vector font can be scaled to
any size between .05" to 4.88" high.
Printer Capabilities and Limits
Maximum Number
of Fields
These printers have no set limit on the number of fields a label may have.
However, the size of the entire print job, (excluding image or graphic data),
cannot exceed the size of the printer's receive buffer of approximately 8k.
If the printer reports a “receive buffer overflow,” you have to reduce the number of fields on the label.
The best way to assure that your label does not exceed the printer's buffer size is to do test printing while
you are designing the label. When you test print, variable data fields are printed at their maximum
length. If you are able to test print a label, it should to fit in the printer's receive buffer.
If your label becomes too large to print, you must reduce the number of fields on the label.
B - 54 Appendix B Printers and Labels
Loftware Label Manager User's Guide
Model
Min Print Length
Max Print Length
8400 200 dpi
0.25"
14.0"
8400 150 dpi
0.25"
14.0"
8450 300 dpi
0.25"
7.0"
8450 150 dpi
0.25"
14.0"
8450 100 dpi
0.25"
14.0"
Image Fields Size Limitations - Up to ten images or logos can be used on a label. The maximum image
sizes that the printer can handle are shown below. The actual size of the images that your printer can
handle may be smaller depending on the available memory in the printer.
Model
Maximum Image Size in Pixels
8400 200 dpi
832 x 832
8400 150 dpi
768 x 768
8450 300 dpi
1536 x 1536
8450 150 dpi
768 x 768
8450 100 dpi
512x512
Performance Considerations
Vector Fonts
(also called
“Scaleable” Fonts)
The LLM supports all of the Proportional Vector fonts available on the SATO
M-84XX printers. These fonts can be scaled to any size between .05” to 4.88”.
The quality of these fonts is excellent; however, vector fonts must be “imaged”
in the printer before the label is printed, and that process can slow down
printing times. It is not uncommon for a label with several sizes of vector fonts
to encounter a 3 to 15 second delay per label. Obviously, there is a trade off
between font quality and print speed. In addition, Proportional Fonts do not
center properly; see the Advanced Techniques chapter for information on
centering fonts.
Images
When an image is downloaded to the printer, any white space surrounding the
actual image is also downloaded to the printer. This wastes printer RAM and
increases the amount of time required to download the image. Always crop
your images as tightly as possible.
Loftware Label Manager User's Guide
Appendix B Printers and Labels B - 55
Sato Error Messages
Printer Turned Off
Cable Disconnected
No Stock
Print Head Up
LPT
Error message. Does not Error message. Lets you Error message. Does
let you retry, the label
retry, the label does not not let you retry, the
does not print.
print.
label does not print.
COM
Error message after the
printer is turned back
on. Lets you retry, the
label prints.
Error message after the
cable is re-connected.
Lets you retry, the label
prints.
No error message.
No error message. Once
Once stock is added, all the print head is put
labels print.
down all labels print.
Spooled
Locally
No Loftware error
message. A Windows
error message is
displayed. Lets you
retry, the label prints.
No Loftware error
message. A Windows
error message is
displayed. Lets you
retry, the label prints.
No Loftware error
message. A Windows
error message is
displayed. Lets you
retry, the label prints.
No Loftware error
message. A Windows
error message is
displayed. Lets you
retry, the label prints.
Spooled to
Shared
No Loftware error
message. A Windows
error message is
displayed. Lets you
retry, the label prints.
No Loftware error
message. A Windows
error message is
displayed. Lets you
retry, the label prints.
No Loftware error
message. A Windows
error message is
displayed. Lets you
retry, the label prints.
No Loftware error
message. A Windows
error message is
displayed. Lets you
retry, the label prints.
Spooled to
PrintServer
No Loftware error
message, a Windows
error message is
displayed. Lets you
retry, the label prints.
No Loftware error
message, but a Windows
error message is
displayed. Lets you
retry, the label prints.
No Loftware error
message, but a
Windows error
message is displayed.
Lets you retry, the label
prints.
No Loftware error
message, but a Windows
error message is
displayed. Lets you
retry, the label prints.
Direct IP
No error message. All
labels print after the
printer is turn back on.
No error message. All
labels print after the
printer is reconnected.
No error message. All
labels print after the
printer is re-stocked.
No error message. All
labels print after the
print head is put down.
Error message. Does not
let you retry, the label
does not print.
TEC Information
This section provides information specific to the TEC family of printers. RFID Printers are italicized in
shaded cells. Supported TEC printers include:
B372
B419
B431
B452
B472
B482
B492
B572
B672
B682
B852
B858
B872
B882
B-SX4
B-SX5
B-SX4 RFID
B-SX5 RFID
Updated printer information is available on Loftware’s website, www.loftware.com. See Printers on the
Technical Support page. See also the Toshiba section for supported Toshiba printers.
Refer to the RFID Devices and Tag Types section for information on tag types supported by the TEC
RFID printers.
B - 56 Appendix B Printers and Labels
Loftware Label Manager User's Guide
Connections
These printers usually have a serial interface. A parallel interface is available as an option. Generally,
newer models support USB, but this may or may not be standard.
Parallel Interface (optional interface) - Using a standard parallel cable, plug the hardware license key
into an LPT parallel port, and connect the cable between the key and the printer.
Serial Interface (standard interface) - Use the serial cable that came with your printer. If it did not come
with a cable, consult the printer documentation for cable requirements.
USB Interface (standard or optional interface) - Use a standard USB cable between the printer and PC
(or server), and plug in either a USB or Parallel hardware license key to one of the other ports on the
computer.
Network Port - Optional on some printers
TEC Options
TEC Options may be label-specific or printer-specific. Label Specific Options (LSOs) can be accessed
when you click on the Label Options button from the Label Setup and Properties dialog (F5). Printer
Specific Options (PSOs) can be accessed by clicking on the Options button while configuring the printer
or by selecting the printer from the Device Configuration grid and clicking on the Options button.
TEC Label Specific Options
Label Options Section
Print Speed
The range of available print speeds in inches per second (IPS) varies with the
selected printer type.
Note: The printer may use a slower print speed than you specify in order to maintain print quality.
Note: The actual maximum value supported by the printer varies among different models & different
print speeds. Consult your printer manual for further information.
Print Density
Adjusts the print density, on some printers, this is known as darkness, or head
temperature. The valid range is from 10 to 10. When the value exceeds the
range, the printer automatically corrects it to the maximum value.
Tag Rotation
° Bottom First – The bottom edge of the label is the leading edge as it is fed
out of the printer.
° Top First– The top edge of the label is the leading edge as it is fed out of
the printer.
° Bottom First Mirrored – The bottom edge of the label is the leading edge as
it is fed out of the printer, the entire label is printed as a mirror image.
° Top First Mirrored – The top edge of the label is the leading edge as it is
fed out of the printer, the entire label is printed as a mirror image.
Loftware Label Manager User's Guide
Appendix B Printers and Labels B - 57
Label Overrides Section
Media Options, Issue Settings, Backfeed Settings, and Fine Position Adjustments each have label
overrides. This means that the Label Options settings are used instead of the Printer Options.
Media Options Section
Gap Length
When die cut stock is used, this specifies the size (in .1mm) of the gap
between each label.
Override Printer
Setup
If this is checked, the Gap Length value is used; otherwise, the Printer
Options setting is used.
Issue Settings Section
Issue Mode
° Batch Mode - Normal printing mode; labels are continuously printed and
fed out of the printer.
° Strip Mode - While in strip mode, the printer presents each label and waits
for it to be removed before continuing. The printer does not print labels if
there is a label at the strip sensor.
° Use Printer Setup – Use the setting from the device Options dialog box.
° Applicator Mode – Similar to strip mode except that the printing of each
subsequent label is controlled by a pause signal from an expansion I/O
device (typically an applicator) rather than the strip sensor.
Batch Mode must be selected and the optional cutter is required.
Cutter
° After Every Job – Cutting occurs after all labels from each print request are
done printing.
° After Every Label – Cutting occurs after every label that prints.
° Disabled – No cutting occurs
° Use Cut Interval – Uses the value that is selected in the Cut Interval.
Note: When using the LPS, note that each occurrence of a *PrintLabel command constitutes a print
request.
Cut Interval
Designates the number of pieces to be printed before the label is cut. The
range is 000 to 100 (no cutting occurs when set at 000)
This setting may yield unexpected results if you use a value that is not an even multiple of the
Quantity and/or Duplicates value. For example: If Quantity = 2, Duplicates = 3, and CutInterval =
2, your labels may print/cut in the following sequence:
Label
Label
<CUT>
Label
<CUT>
Label
Label
<CUT>
Label
<CUT>
1 Duplicate 1
1 Duplicate 2
1 Duplicate 3
2 Duplicate 1
2 Duplicate 2
2 Duplicate 3
B - 58 Appendix B Printers and Labels
Loftware Label Manager User's Guide
Backfeed Settings Section
Backfeed
° Don’t Send Backfeed – No backfeed commands are sent to the printer.
° Send Backfeed - Before printing the first label in a print request the printer
backfeeds the specified distance (in .1mm) and after printing the last label
it forward feeds the same distance. Use this setting to present the label
for manual tear off after printing. This setting is not used when printing
multi-up layouts.
° Use Printer Setup - Use the setting from the device Options dialog box.
° Distance - All measurements are in tenths of a millimeter.
Note: When using the LPS, note that each occurrence of a *PrintLabel command constitutes a print
request.
Fine Position Adjustments Section
Don’t Send
Settings
No Fine Position Adjust commands are sent to the printer.
Send Settings
Use this setting for making fine adjustments( in .1mm increments) in the
Feed Distance, Cutting or Stripping Position, or Backfeed Distance.
Consult your printer manual for further information on setting these values
Use Printer Setup
Use the setting from the device Options dialog box.
Feed
Range is set between –500 to +500 mm.
Cut/Strip
Range is between from –500 to +500 mm.
Backfeed
Range is between from –99 to +99 mm.
Graphics Method Section
This is the default setting and applies the setting
selected in the Printer Setup dialog.
Use Printer Setup
Graphic data is drawn as shown in the images below:
Overwrite Drawing example
OR Drawing example
Custom Command Section
Command
You may enter a custom TPCL command string here. You must include the
command prefix and terminators (“{“ and “|}”).
This command is sent when printing a label and when clicking on the Send To Printer button. It is sent
immediately prior to the buffer clear command.
Loftware Label Manager User's Guide
Appendix B Printers and Labels B - 59
RFID Option Section
Override Printer
Setup
When checked, the Tag Position setting on this dialog will be used, overriding
the selection made from the Printer Specific Options dialog.
Tag Position
This sets the feed amount to adjust the RFID tag position before data is written
to it. Tag Position can be adjusted in units of 0.1 mm. Feed direction: + :
forward, - : backward
TEC Printer Specific Options
Media Options Section
Stock Type
° Continuous Stock - Continuous media with no black stripe and no gap.
° Die Cut Stock - The label-to-label gap is automatically sensed by the
transmissive sensor and the paper position is finely adjusted for every piece.
° Mark Stock – The black mark provided on the back side of the stock is
automatically sensed by the reflective sensor and the paper position is finely
adjusted for every piece. (See the Threshold Set command for more
information.)
° Mark Stock on Print Side - The black mark provided on the print side of the
stock is automatically sensed by the upper reflective sensor and the paper
position is finely adjusted for every piece.
° Preprinted Die Cut Stock - The label-to-label gap is automatically sensed by the
transmissive sensor and the paper position is finely adjusted for every piece
according to the value set by the threshold setting (Consult your printer manual
for further information on setting the threshold).
° Punched Hole Stock - The marginal punched holes (round holes) on the fanfold
paper are automatically sensed by the lower reflective sensor. Several round
holes are automatically sensed according to the specified length of label, and
the paper position is finely adjusted for every piece.
Media Type
° Direct Thermal - Direct Thermal type of printing (no ribbon), requires special
heat sensitive media.
° Thermal Transfer - Thermal Transfer type of printing (ribbon installed).
Gap Length
When die cut stock is used, this is the size (in .1mm) of the gap between each label.
Threshold Set
When Mark Stock is used, the black mark provided on the back of the stock is
automatically sensed by the reflective sensor and the paper position is finely
adjusted for every piece, according to the value set by the threshold setting.
(Consult your printer manual for further information on setting the threshold.)
Ribbon Saver
When checked, if there is a non-print area (in the feed direction) of 20 mm or more
in the batch mode, cut mode, or strip mode, ribbon saving is performed
automatically.
Note: On some printers, the required non-print area is different; consult your printer manual for more
information.
B - 60 Appendix B Printers and Labels
Loftware Label Manager User's Guide
Issue Settings Section
Issue Mode
° Batch Mode - Normal printing mode; labels are continuously printed and
fed out of the printer.
° Strip Mode - While in strip mode, the printer presents each label and waits
for it to be removed before continuing. The printer does not print labels if
there is a label at the strip sensor.
° Applicator Mode – Similar to Strip Mode except that the printing of each
subsequent label is controlled by a pause signal from an expansion I/O
device (typically an applicator) rather than the strip sensor.
Cutter
Batch Mode must be selected and the optional cutter is required.
° After Every Job – Cutting occurs after all labels from each print request are
done printing.
° After Every Label – Cutting occurs after every label that prints.
° Disabled – No cutting occurs.
° Use Cut Interval – Uses the value that is selected in the Cut Interval.
Note: When using the LPS, note that each occurrence of a *PrintLabel command constitutes a print
request.
Cut Interval
This designates the number of pieces to be printed before the label is cut.
The range is 000 to 100 (no cutting occurs when set at 000).
This setting may yield unexpected results if you use a value that is not an even
multiple of the Quantity and/or Duplicates value. For example: If Quantity =
2, Duplicates = 3, and CutInterval = 2, your labels may print/cut in the
following sequence:
Label 1 Duplicate 1
Label 1 Duplicate 2
<CUT>
Label 1 Duplicate 3
<CUT>
Label 2 Duplicate 1
Label 2 Duplicate 2
<CUT>
Label 2 Duplicate 3
<CUT>
Backfeed
When this check box is enabled, printer backfeeds the stock prior to the
printing of the next label a specified distance from 30 to 2000 dpi.
Note: When using the LPS, note that each occurrence of a *PrintLabel command constitutes a print
request.
All measurements are in tenths of a millimeter.
Loftware Label Manager User's Guide
Appendix B Printers and Labels B - 61
Fine Position Adjustments Section
Enable
When checked, the adjustments listed below become active, and can be set.
Feed
Range is set between –500 to +500 mm.
Cut/Strip
Range is between from –500 to +500 mm.
Backfeed
Range is between from –99 to +99 mm.
Graphics Method Section
OR Drawing
Overwrite Drawing
Overwrite Drawing is the default PSO setting. Graphic data is drawn,
overwriting data in the image buffer.
Custom Command Section
Command
You may enter a custom TPCL command string here. You must include the
command prefix and terminators (“{“ and “|}”).
This command is sent when printing a label and when clicking on the Send To Printer button. It is sent
immediately prior to the buffer clear command.
RFID Option Section
Tag Position
This sets the feed amount to adjust the RFID tag position before data is written
to it. Tag Position can be adjusted in units of 0.1 mm. Feed direction:
+ : forward
- : backward
Supported Features and Limitations
TEC Incrementing/Decrementing Fields - When the printer is capable of doing the
incrementing/decrementing internally, it is instructed to do so. This is called “Native Mode.” When
printing in Native Mode, control returns to the PC almost immediately.
Loftware Label Manager does incrementing/decrementing in software when the printer cannot do it
internally and sends down a different set of data for each label. This is called “Extended Mode.”
In Extended mode, the Printing dialog box shows the line “Printing Label x of y” and control does not
return to the PC until the entire series of labels is printed.
Number of variable fields - There are limits to the number of variable Outline Font, Bitmapped Font and
Bar code fields that be printed on a single label. They are as follows:
Variable Outline Font fields = 99
Variable Bitmapped Font fields = 199
Variable Bar code fields = 31
Image Support - Images are downloaded and stored in the printer’s image memory. Loftware Label
Manager remembers images that are sent to the printer and only resends an image if the image is
changed.
B - 62 Appendix B Printers and Labels
Loftware Label Manager User's Guide
Codabar and other Bar Code Symbologies
Loftware has created bar code remaps that are built in to our supported TEC Printers. These are
implemented through the use of reserved field names. Here is how it works. Add a bar code to a label
designed for a TEC Printer. Look at the table below, and in the Properties Box, choose a symbology
from the left column, then start the field name of the bar code with one of the reserved remap names in
the right-hand column.
Properties Box Symbol
Reserved Remap Name
Code93
CODABAR
Datamatrix
QRCODE
PostNet
ROYALMAIL
PostNet
KIX
Start/Stop Codes - The default Start/Stop Codes for Codabar are “A” and “D.” To change the default
Start/Stop Code, from Design Mode, choose Options | Preferences, click on the + symbol beside the
TEC folder, and follow the instructions to the right to customize the Start/Stop Codes.
Figure B-C: TEC Codabar Remap String
TEC Error Information
Paper Jam (on LCD screen) - There is a problem with the media. The problem must be corrected, then
turn the printer off & back on.
Time Out - If Loftware times out in the middle of sending a large amount of graphic information
(images, true type fonts, etc.), the printer may be left in a state where it cannot accept any further
commands. If this occurs, you must turn the printer off and back on. Try increasing the timeout value
for the printer in the Advanced Settings section of the device Connection dialog box.
Loftware Label Manager User's Guide
Appendix B Printers and Labels B - 63
Printer Commands displayed on LCD screen - If the printer receives commands that are not formatted
in a way that it understands, it displays a portion of the command string on the LCD screen. It may look
something like the following:
{PC001:0120,0680,
Contact Loftware technical support, and please have the following information ready:
Loftware version number
Printer Model and program version number
A specific example or a description of a way to reproduce the error
Toshiba Information
Supported Toshiba printers include:
B-SA4T
B- SP2D
B- SV4
B-SX6T
B-SX8T
Updated printer information is available on Loftware’s website, www.loftware.com. See Printers on the
Technical Support page.
For connection information, Device Specific Options, and supported TEC printers, please refer to the
TEC section.
UBI Information
This section provides information specific to the UBI family of printers.
301
501E
601E
Updated printer information is available at Loftware’s website, www.loftware.com. See Printers on the
Technical Support page.
Printer Status (Serial only)
If the status report is positive, the level of firmware in the printer is also displayed. This function can be
a very valuable tool. If there is a status problem, a corresponding error message is displayed.
Interface Cables (Parallel, Serial and USB)
These printers usually have a serial interface. A parallel interface is available as an option. Generally,
newer models support USB, but this may or may not be standard.
Parallel Interface (optional interface) - Using a standard parallel cable, plug the hardware license key
into an LPT parallel port, and connect the cable between the key and the printer.
Serial Interface (standard interface) - Use the serial cable that came with your printer. If it did not come
with a cable, consult the printer documentation for cable requirements.
USB Interface (standard or optional interface) - Use a standard USB cable between the printer and PC
(or server), and plug in either a USB or Parallel hardware license key to one of the other ports on the PC.
B - 64 Appendix B Printers and Labels
Loftware Label Manager User's Guide
Supported Features
Image Support - Images are downloaded and stored in the printer's image memory. Loftware Label
Manager “remembers” images that are sent to the printer and only resends an image if the image is
changed.
Supported Fonts - Most UBI printers come standard with scaleable fonts. Consult your printer manual
for available fonts. TrueType fonts are downloaded to the UBI printers as graphics.
UBI Options
UBI Options may be label-specific or printer-specific. Label Specific Options (LSOs) can be accessed
when you click on the Label Options button from the Label Setup and Properties dialog (F5). Printer
Specific Options (PSOs) can be accessed by clicking on the Options button while configuring the printer
or by selecting the printer from the Device Configuration grid and clicking on the Options button. This
section also describes options for the Intermec RFID FP printer.
Note: The Intermec PM4i RFID (FP) Printer is created with UBI printer language. Refer to the
Intermec RFID FP sections below for Intermec RFID FP settings.
UBI Label Specific Options
Format
This allows you to choose a unique format number for storage in the printer's
memory. Read the Owner's Manual as all files in the printer may be permanently
erased by using this instruction.
Performance
The performance range varies with the selected printer type. In this case, the
choices are Normal, High, or Ultra High.
Label Options Section
Cut Option
Choose Printer Cut Options (as set in PSOs, which is the default setting) or the
Label Cut Options which may be chosen along with the following setting.
Feed Length
Zero is the default, but the Cut Interval may be set to cut after any number of
labels.
Advanced Options Section
Character Set
Allows you to choose from a list of Character Sets or use the Character Set from
the PSOs.
Intermec RFID FP Options Section
Use Label or
Printer Options
This allows you to use either your Label Specific Options or the options as set
in Printer Specific Options (PSOs).
Write Protect
RFID Data
When checked, this protects the RFID data written to the tag from being
overwritten.
Intermec RFID FP RFID Setup Options Section
Send Setup
Options to Printer
When checked, selected settings will be used.
Loftware Label Manager User's Guide
Appendix B Printers and Labels B - 65
Void Text
This is the text that will be printed across the label after write retries fail.
Label Retries per
Label
This sets the number of attempts to write to the label after an unsuccessful try.
Number of Write
Retries per Label
This sets the number of attempts to write to the label after an unsuccessful try.
Settings range from 0 to 10.
Tag Adjust
The position of the label will, if necessary, be adjusted before trying to write
data to the tag.
UBI Printer Specific Options
Forms Control Section
Start Adjust
This can be a negative or a positive number of dots. A positive Start Adjust
value will feed out the specified length of media before the printing starts. A
negative value will pull back the specified length of media before the printing
starts.
Stop Adjust
This can be a negative or a positive number of dots. A positive Stop Adjust
value will increase the normal media feed by the specified value after printing
is finished. A negative value will decrease the normal media feed by the
specified value after printing is finished.
Refer to your printer guide for recommended feed adjustment settings.
X-Start
This specifies the start of the printable area.
Label Taken
Sensor
This detects if the printed label has been removed before the next one is
printed.
Disable Print Key
This disables the <Print> key requiring the key to be pressed to print a label.
Ribbon Saver
This turns the ribbon saver "auto economy" feature on in supported printers.
EasySet System
This uses the optional EasySet bar code wand or scanner.
Cutter Options Section
Feed Length
Zero is the default, but this may be set to cut after any number of labels.
Enable Cutter
Enables an optional label cutter. When enabled, the cutter is set to cut a label
after printing.
Media Settings Section
Contrast
This controls the darkness of the print.
B - 66 Appendix B Printers and Labels
Loftware Label Manager User's Guide
Media Options Section
Media Type
° Fixed Length Strip – This is used for continuous stock. The length of the
media that will be fed out depends on the length of the print window.
° Label With Gaps – This is used for adhesive labels mounted on liner.
° Ticket With Gaps – This is used for tickets and tags with detection slits.
° Ticket With Marks – This is used for labels, tickets, or continuous stock
provided with black marks at the back.
° Variable Length Strip- This is used for continuous stock. The length of each
copy depends on the size of the print images.
Paper Type
° Thermal Transfer - Uses ribbon and non-heat sensitive label stock to print.
The print head is activated as the label moves underneath heating the ribbon
material and melting it onto the label. To increase the quality of the print
decrease/increase the speed and increase/decrease the heat as necessary.
° Direct Thermal - Uses heat sensitive label stock without the ribbon. The
print head is activated as the label moves underneath heating the label stock
and activating the heat sensitive material in the stock causing darkening of
the material. To increase the quality of the print decrease/increase the speed
and increase / decrease the heat as necessary.
Media Sensitivity Guide Section
The sensitivity for a particular type of media and ribbon is critical to achieving high quality printing. If
the Media Type you are using is listed, select it, and then press "Apply" to achieve the recommended
sensitivity setting. The corresponding settings in the Media Settings section will be refreshed.
Advanced Options Section
Memory Module
If a memory card is attached to the printer, you can select it.
Character Set
Several printer languages are available that can print international characters
that are not available in the U.S. character set. If your printer supports it,
select a different Character Set.
Ext Font Location
Specify the source of additional fonts.
Custom Command Section
Custom Command
Specify printer commands otherwise not available in the Loftware Label
Manager dialog boxes. Click on the Send Options box to send the commands
during printing.
Loftware Label Manager User's Guide
Appendix B Printers and Labels B - 67
UBI Error Messages
LPT
COM Port
USB
Spooled
Locally
Spooled to
Shared
Spooled to
PrintServer
Direct IP
Printer Turned Off
Cable Disconnected No Stock
Print Head Up
Error message, no
retry; the label is not
printed.
No error message.
LLM-WIN behaves as
if the labels have
printed. Printer turned
back on= no labels
Received ‘port not
found’ error. USB
port not shown in Port
combo of Printer
|Connection
No Loftware error
message, displays
Windows error
message. Lets you
retry; labels print.
No Loftware error
message, but displays
Windows error
message. Does let you
retry, the labels print.
No Loftware error
message, but displays
Windows error
message. Does let you
retry, the labels print.
No error message. All
labels print after the
printer is turn back on.
Error message, no retry; Error message, no
the label is not printed. retry; the label is not
printed.
No error message.
No error message.
When reconnected, all
When you re-stock,
the labels print.
all labels print.
Error message, no retry;
no label is printed.
Error Message. Printing Error Message.
starts when cable
Printing resumes
reconnected.
when stock added.
Error Message.
Inconsistent results with
printing when head is
put back down.
No Loftware error
message, displays
Windows error message.
Lets you retry; labels
print.
No Loftware error
message, but displays
Windows error message.
Does let you retry, the
labels print.
No Loftware error
message, but displays
Windows error message.
Does let you retry, the
labels print.
No error message. All
labels print after the
printer is reconnected.
No Loftware error
message, displays
Windows error message.
Lets you retry; labels
print.
No Loftware error
message, but displays
Windows error message.
Does let you retry, the
labels print.
No Loftware error
message, but displays
Windows error message.
Does let you retry, the
labels print.
No error message. All
labels print after the
print head is put down.
No Loftware error
message, displays
Windows error
message. Lets you
retry; labels print.
No Loftware error
message, but displays
Windows error
message. Does let you
retry, the labels print.
No Loftware error
message, but displays
Windows error
message. Does let you
retry, the labels print.
No error message. All
labels print after the
printer is re-stocked.
No error message.
When you put the print
head down, all labels
print.
Windows Printers
Like other Loftware printers, Windows printers can now be configured from the Loftware Label
Manager Device Configuration grid or from a label's LSO page. Previously, you would be directed
from LLM to the Control Panel's Windows printer configuration page.
Note: If you are working in an environment with multiple LPS installations and versions, be aware that
sharing LLM / LPS version 9.5 Windows printer configuration files with a pre-9.5 version will wipe out
any Windows printer configuration settings made in Version 9.5. Windows printer settings made in 9.5
are unsupported in pre-9.5 versions. Refer to "Sharing Windows Printer Configuration Across LPS
Versions" in Appendix D for a Best Practices solution.
Windows printer settings available when you select File / Print / Properties from Microsoft Office
applications and other popular programs can be set from LLM. This includes settings for Orientation,
Page Size, and Paper Source. The default for each of the settings is the setting selected in the “Printers
B - 68 Appendix B Printers and Labels
Loftware Label Manager User's Guide
and Faxes” control panel. However, these can be overridden at the label level (LSO) or at the
application level (PSO).
A configuration setting that will be used to print a label depends on where the setting is enabled.
#1. Label Level: When set from a label's LSO page, a print setting for the specific label supersedes any
setting selected at the application level (PSO) or system level.
#2. Application Level: When set from the printer's PSO page, a Windows printer setting applies to all
Loftware label printing and supersedes the system level setting unless a specific label's LSO page
specifies a different selection.
#3. System Level: When set from the printer's Properties page accessed from the system's Printers and
Faxes, a Windows printer setting applies to all printing, not just to Loftware labels, unless a
different setting is specified from the printer's PSO or a label's LSO page.
To summarize, configuration settings for a Windows printer apply to printing in the following sequence:
1.
If the LSO setting is enabled and valid for the printer, #1 (the Label Level setting) is used to print
the label. Otherwise, #2 (the Application Level setting) is used.
2.
If the LSO setting is disabled and the PSO setting is enabled and valid for the printer, #2 (the
Application Level setting) is used. Otherwise, #3 (the System Level setting) is used.
3.
#3 (System Level setting) is used if both #1 and #2 (LSO and PSO settings) are disabled.
4.
If a job containing a *TRAY command is submitted through LPS, the *TRAY command Paper
Source setting overrides the label setting. (Refer to the *TRAY command section of the "Print
Request Data Structures" topic in Chapter 1 of the LPS guide.)
Validation - Internally, the selected Paper Size and Paper Source PSO configuration items, when saved,
are identified by both a string and an ID value. The following steps are taken to validate the
configuration setting with the capabilities of the printer.
1.
If the saved ID matches one of the IDs in the printer’s list, then the saved string is compared to the
printer’s string for that ID. If the strings match, then that ID is used. Otherwise, see #2 below.
2.
If the saved string matches one of the strings in the printer’s list, then the printer’s ID for that string
is used. Otherwise, see #3 below.
3.
If a matching ID is found in #1 but the saved string does not match the printer’s string for that ID,
then that ID is used. Otherwise, see #4 below.
4.
Validation failed; the setting is not applied (the printer’s control panel configuration is used).
Note: Different printer drivers are not necessarily in synch with these strings and IDs. The table
below and the validation scenarios that follow provide an example:
Win Printer 1
Win Printer 2
Win Printer 3
Win Printer 4
Printer Auto Select – 257
Printer auto select - 257
Auto Select - 7
Auto Select - 262
Manual Feed (Tray 1) – 4
Manual Feed (Tray 1) - 258
Loftware Label Manager User's Guide
Manual Feed - 4
Manual Paper Feed – 4
2000 Sheet Input Tray - 259
Tray 3 - 259
Appendix B Printers and Labels B - 69
Some Validation Scenarios:
1.
A label designed for Win Printer 1 with a “Manual Feed (Tray 1)” setting, when printed
to Win Printer 2 would result in the Paper Source ID value of 258 being set in the print
time configuration (Validation step # 2).
2.
A label designed for Win Printer 3 with a “2000 Sheet Input Tray” setting, when printed
to Win Printer 4, would result in the Paper Source ID value of 259 being set in the print
time configuration (Validation step # 3).
Windows Printers Options
Windows Label Specific Options
Label Specific Options can be set for a Windows printer, except when the target printer is the "Generic
Windows Printer."
Leave the settings unchecked if you wish to use Windows Printer settings to print the label.
Configuring a Windows Printer from the label's LSO page will apply the settings to the specific label
only. The settings are applied for all printing of this label until changed. To set an option, click on the
check box, and then select from the drop-down list.
Print settings specified for a label from the LSO page supersede settings selected from the system
(Printers or Faxes) or from the PSO page. Note that because the settings from the LSO page apply to the
label and not to the printer, the Printer Control Panel button that is accessible from the PSO page is not
available.
Refer to the Windows Printers topic for information on how configuration settings are applied to print a
label when these settings are specified from different properties pages.
Windows Printer Specific Options
Note: If you are working in an environment with multiple LPS installations and versions, be aware that
sharing LLM / LPS version 9.5 Windows printer configuration files with a pre-9.5 version will wipe out
any Windows printer configuration settings made in Version 9.5. Windows printer settings made in 9.5
are unsupported in pre-9.5 versions. Refer to "Sharing Windows Printer Configuration Across LPS
Versions" in Appendix D for a Best Practices solution.
Leave the settings unchecked if you wish to use the system's Windows Printer settings to print the label.
From the printer's PSO page, you can configure settings for this Windows printer that affect printing at
the application level. The settings are applied not just to the specific label but for all label printing,
unless a specific label has a different label level setting specified in its LSO page. To set an option,
click on the check box, and then select from the list.
Clicking the Printer Control Panel button takes you to the Windows printer properties box when you
respond to the warning message. Windows printer configuration changes are applied at the system
level. This will affect all printing on this printer, not just Loftware label printing.
System printer settings apply if PSO or LSO settings are not set for the label. PSO options when set
supersede the system settings and will be used to print the label and all labels, unless a label's LSO
B - 70 Appendix B Printers and Labels
Loftware Label Manager User's Guide
printer settings are specified. When LSO settings are specified, they will be used to print the specific
label.
Refer to the Windows Printers topic for information on how configuration settings are applied to print a
label when these settings are specified from different properties pages.
Zebra Information
This printer guide provides information specific to the ZEBRA family of printers. RFID Printers are
italicized. Loftware-supported Zebra printers include:
105
110PAX3
140
140xiIII Plus
170xi
17XPAX
220xiII
2443 Orion
2746
2844-Z TLP/LP
90A
90xiIII
96xiIII
HT-146
QL420
R110Xi
R402
S4M (EPL)
Stripe 400
TA402
Z6000
R110 PAX4 RFID
R170Xi RFID
105S
110PAX4
140xi
160S
170xiII
17XPAX2
220xiIII
2684
2746e
3742
90xi
90xiIII Plus
96xiIII Plus
Px400
R110PAX3
R140
R4M Plus
S4M (IPL)
Stripe 500
Z4000
Z6M
R110XiIIIPlus RFID
R402 RFID (HF)
105SE
110xiIII Plus
140xiII
170PAX3
170xiIII
220
220xiIII Plus
2722
2824
3842
90xiII
91
A300
QL220
R110PAX4
R170Xi
RW420
S4M (ZPL)
Stripe 600
Z4M
Z6M Plus
R110Xi RFID
R4M Plus RFID
105SL
130
140xiIII
170PAX4
170xiIII Plus
220xi
221
2742
2844
3844-Z TLP/LP
90xiII 600dpi
95
DA402
QL320
R110XiIIIPlus
R2844-Z
S4M (DPL)
Stripe 300
T300
Z4M Plus
R110 PAX3 RFID
R140 RFID (HF)
R2844-Z RFID (HF)
The list above includes former Eltron printers added to the Zebra lineup and supported by Loftware.
Information and options on these printers may be found in the Eltron Section of this appendix. They
include:
2443 Orion
2684 Strata
2722
2742
2746
2746e
TLP 2824
2844
3742
3842
Updated printer information is available at Loftware’s website, www.loftware.com. See Printers on the
Technical Support page.
Loftware Label Manager User's Guide
Appendix B Printers and Labels B - 71
Refer to the RFID Devices and Tag Types section for information on tag types supported by the Zebra
RFID printers.
Interface Cables (Parallel, Serial and USB)
These printers usually have a serial interface. A parallel interface is available as an option. Generally,
newer models support USB, but this may or may not be standard.
Parallel Interface (optional interface) - Using a standard parallel cable, plug the hardware license key
into an LPT parallel port, and connect the cable between the key and the printer.
Serial Interface (standard interface) - Use the serial cable that came with your printer. If it did not come
with a cable, consult the printer documentation for cable requirements.
USB Interface (standard or optional interface) - Use a standard USB cable between the printer and PC
(or server), and plug in either a USB or Parallel hardware license key to one of the other ports on the PC.
Supported Features
Image Support - Images are downloaded and stored in the printer’s image memory. Loftware Label
Manager “remembers" images that are sent to the printer and only resends an image if the image is
changed.
Supported Fonts - Most Zebra printers come standard with 8 bitmapped fonts, and 1 scaleable font.
Additional downloadable fonts are also available. Consult your printer manual for available fonts.
TrueType fonts are downloaded to the Zebra printers as graphics.
Zebra Options
Zebra Options may be label-specific or printer-specific. Label Specific Options (LSOs) can be accessed
when you click on the Label Options button from the Label Setup and Properties dialog (F5). Printer
Specific Options (PSOs) can be accessed by clicking on the Options button while configuring the printer
or by selecting the printer from the Device Configuration grid and clicking on the Options button.
(Zebra RFID options are described in the next section.)
Zebra Label Specific Options
These settings are accessed when you click on the Label Options button from the Label Setup and
Properties dialog. Printer options set when you click on the Options button from the Device
Configuration dialog are described below.
Label Options Section
Print Speed
Darkness
Label Top
Flip Label 180 Degrees
Print Mirror Image of
Label
This option allows the user to vary the speed at which the label prints. The
range of available print speeds varies with the selected printer type.
Darkness allows you to control the darkness of the print. 0 is the nominal
setting.
This command moves the entire label format up or down from its current
position. Inputting a negative value moves the format toward the top of the
label. Inputting a positive number moves the format away from the top of the
label.
This command prints a label that has been inverted 180 degrees.
This command instructs the printer to print the entire label as a mirror image.
The image is flipped from left to right.
B - 72 Appendix B Printers and Labels
Loftware Label Manager User's Guide
Print Label as White on
Black
This instruction reverses the printing of all fields on the label format. The
fields are printed as white on a black background.
Character Options Section
Character Set
Default is set to using the Character Set specified in Printer Options (PSOs) but
the list displays other Character Sets that may be chosen.
Double Byte Character
Set
Default is set to using the Character Set specified in Printer Options (PSOs) but
the list displays other Double Byte Character Sets that may be chosen.
Custom ZPL Section
ZPL Command
Send Command
The ZPL command option sends printer commands otherwise not available in the
Loftware Label Manager dialog boxes.
This command instructs Loftware Label Manager when to send a ZPL command.
Label Cut Options Section
Cut Option
Choose Printer Cut Options (as set in PSOs which is the default setting)
Cut Interval
Zero is the default but the Cut Interval may be set to cut after any number of labels
True Type Fonts Section
See the following section titled "Zebra TrueType Font Download and Use Instructions."
Zebra Printer Specific Options
These settings are accessed when you click on the Options button from the Device Configuration dialog.
Options set when you click on the Label Options button from the Label Setup and Properties dialog are
described above.
Printer Options Section
PrintMode
The Print Mode instruction determines the action the printer takes after a label or group
of labels has been printed. There are five different modes of operation:
° Cutter - The web separating the printed label and the next blank label to be printed
is extended into the cutter mechanism. The label is cut; the blank label is then
retracted into the printer so that it can be printed.
° Peel Off – After printing, the label is partially separated from the backing. Printing
stops until the label is completely removed. Peel off handling requires that the
stock in the printer be properly fed through the peel off attachment on the printer.
Select only if printer is equipped with an internal rewind spindle.
° Rewind - Label and backing are rewound on an optional internal rewind device.
The next label is positioned under the printhead.
° Tear Off - After printing, the label is advanced so that the web is over the tear bar.
Label, with backing attached, can then be torn off manually.
° Applicator – After printing, the label may be mechanically removed and applied to
an object.
Media
° Thermal Transfer (Ribbon) - Uses ribbon and non-heat sensitive label stock to print.
The print head is activated as the label moves underneath heating the ribbon
material and melting it onto the label. To increase the quality of the print
decrease/increase the speed and increase/decrease the heat as necessary.
Loftware Label Manager User's Guide
Appendix B Printers and Labels B - 73
° Direct Thermal (No Ribbon) - Uses heat sensitive label stock without the ribbon.
Backfeed
The print head is activated as the label moves underneath heating the label stock
and activating the heat sensitive material in the stock causing darkening of the
material. To increase the quality of the print, decrease/increase the speed and
increase/decrease the heat as necessary.
The default is the default for the selected Print Mode. Other options include:
° After Print - causes the printer to backfeed (retract) between each label that is
printed.
° Before Print - causes the printer to backfeed (retract) before each label that is
printed.
° Suppress - causes the printer to suppress the backfeeding or retracting action before
print and after print.
° Suppress Except Last Label - causes the printer to suppress the backfeeding or
retracting action before print and after print, except before or after the last label has
printed.
Stock Type
Cut Interval
Tear Off
Download
Graphics To
Always Download
Format
Override Pause
Count
Enable Zebra
Network
Ignore Printer
Status
Use ZPL II
Only re-send fields
that have changed
Send Options
[Label/Printer]
°
°
°
°
Continuous - No gaps or separations between labels.
Non-Continuous – Gap, perforation or separation between each label.
Mark Stock - Black line or mark on the label stock backing.
Web – Perforation, gap, or separation between each label.
Number of printed labels between cutting. If the cutter is enabled, and the cut interval
is set to 0 (zero), then the printer cuts the label after the batch.
Adjusts the rest point of the media after a label is printed, which changes the position at
which the label can be torn off or cut. By default, the Tear Off settings are sent to the
printer. If you do not want any Tear-Off settings sent to the printer, this may be
disabled in Preferences. In LLM Design Mode: Options | Preferences | Zebra.
DRAM – The default location for graphic storage is the printer’s internal memory.
This is volatile memory; if the printer is powered off, the graphics are lost.
° EEPROM - This is a battery-backup type memory. If the printer is powered off, the
graphics remain in memory.
° PCMCIA - This is a memory card which can be removed from the printer.
Instructs the Loftware Label Manager system to send the label format with every print
request.
This overrides the Paused Count setting, which is controlled by the Cut Interval
selection.
This setting enables the printer to connect with the Zebra Network.
When this option is enabled, data is sent directly to the printer without statusing. In
this mode, the Loftware Label Manager system does not get messages back from the
printer in the event an error occurs.
This function enables the use of ZPL II commands. See the ZPL II manual for
information on commands.
When checked, only the data that has been changed is re-sent for printing.
Checked by default, which sends all label and printer options. When unchecked, only
the Map Clear command is sent.
B - 74 Appendix B Printers and Labels
Loftware Label Manager User's Guide
Font Options Section
Several printer languages are available to print international characters that are
not available in the U.S. character set. See the appendix section of your printer
guide to find the corresponding hex codes used to select the desired character.
The list displays options for Double Byte Character Set.
Character Set
DB Char Set
Custom Command Section
The ZPL command option sends printer commands otherwise not available in
the Loftware Label Manager dialog boxes.
Send Command instructs the Loftware Label Manager system when to send the
ZPL Command.
ZPL Command
Send Command
Real Time Clock Section
These settings will apply only if the Real Time Clock option is supported by and installed in the printer.
This will place a time/date stamp on the label.
Currently, the following Zebra printers support the RTC option:
110PAX3
110PAX4
110xiIII Plus
140xiII
140xiIII
140xiIII Plus
170PAX3
170PAX4
170xiII
170xiIII
170xiIII Plus
17XPAX
17XPAX2
220xiII
220xiIII
220xiIII Plus
2844-Z TLP/LP
3844-Z TLP/LP
90xiII
90xiII 600dpi
90xiIII
90xiIII Plus
96xiIII
96xiIII Plus
DA402
QL220
QL320
QL420
R110PAX3
R110PAX4
R110XiIIIPlus
R110Xi
R140
R170Xi
R2844-Z
R402
R4M Plus
RW420
S4M (ZPL)
Stripe 400
Stripe 600
TA402
Z4M
Z4M Plus
Z6M
Z6M Plus
R110 PAX3 RFID
R110 PAX4 RFID
R110XiIIIPlus RFID
R110Xi RFID
R140 RFID
R170Xi RFID
R402 RFID
R4M Plus RFID
R2844-Z RFID
Currently, the following Imtec printers support the RTC option:
Apply Pro w/140xiII
Apply Pro w/170xiII
Apply Pro w/90xiII
Apply Pro w/90xiII (600 dpi)
Protector w/140xiII
Protector w/170xiII
Protector w/90xiII
Protector w/90xiII (600 dpi)
Value Pro w/140xiII
Value Pro w/90xiII
Field Clock
Indicators
Specify the character(s) that will precede and indicate a time/date value. For
example, the default indicator for the primary clock is %. There are no default
indicators for the secondary and tertiary clocks. Most printable characters are
acceptable except those that conflict with ZPL II commands. Refer to your
ZPL II manual (volume 2) for more information.
If indicators for secondary and tertiary clocks are entered, separate the
characters with a comma.
Loftware Label Manager User's Guide
Appendix B Printers and Labels B - 75
Set Date/Time
Set Clock Offset
This displays options for the current clock date/time. Select AM, PM, or
Military time format.
This displays options for the secondary and tertiary clocks. Time and date are
determined by adding the offsets to the primary clock reading. The Language
selection determines the language to use for the days and the months.
In Start Time mode, the time printed on the label is the Real Time Clock time
when label formatting begins. In Time Now mode, the time printed on the
label is the Real Time Clock time when label is placed in the print queue.
Real Time Clock can be set either in the printer's LCD or from the printer's PSO dialog. Fields that will
be using Real Time Clock should be defined as “fixed fields” in Loftware. The fields must use the
reserved field name of ZtimeFieldxxx, where x allows for unique identification. Only the first 10
characters of the reserved field name are evaluated, and so the field can be uniquely defined after the
reserved portion. The fixed fields must provide the date formatting as data.
As a minimum, the Field Clock Indicator should contain a % for use with the primary clock. If all three
clocks are used the suggested syntax for the Field Clock Indicators might look like: %,#,@ (Note that
^ and ~ are excluded from use. Any symbol not expected to be used in the printed output may be used.)
Sample data in the fixed field may be as follows based on the above field indicator settings:
Field Name (in Properties dialog) – ZtimeFieldCurDate
Primary clock data: %A, %B %d, %Y %I:%M
Printed result: Monday, January 01, 2001 01:06
Field Name (in Properties dialog) – ZtimeFieldSecDate
Secondary clock data: #A, #B #d, #Y #I:#M
Secondary clock offset values all set to 3
Printed result: Sunday, April 4, 2004 04:07
Field Name (in Properties dialog) – ZTimeFieldTerDate
Tertiary clock data: @A, @B @d, @Y @I:@M
Tertiary clock offset values all set to 5
Printed result: Tuesday, June 06, 2006 06:12
Zebra RFID Printer Options
The following information applies to Loftware-supported Zebra RFID printers.
Zebra Label Specific RFID Options
Use Label or Printer
Options
This allows you to use either your settings in the Label Specific Options or
those set in the Printer Specific Options.
Set Up Options Section
Send Setup Options
to Printer
When checked, the setup options selected on this dialog are used for
printing.
Tag Type
Auto-detect automatically determines the tag type by querying the tag.
Select “None” if no tags are available. If the printer supports it, select from:
EPC Class 0, EPC Class 0 Plus, EPC Class 1 64-bit, EPC Class 1 96-bit,
ISO 18000-06B, EPC Gen2, Philips HF I-Code, Philips HF I-Code ISO
B - 76 Appendix B Printers and Labels
Loftware Label Manager User's Guide
15693, TI HF Tag-it, or TI HF Tag-it ISO 15693. (Note that not all tag
types are supported by all printers. Refer to the RFID Devices and Tag
Types section.)
Transponder
Position From Top
of Label
The position in Dot Rows from the top of the label to the RFID Transponder
embedded in the label. The default position is 8 Dot Rows from the top of
the label. '0' dot rows means that the Transponder is not to be moved from
its default position.
Length of Void
Printout
This lets you determine how much of the label is printed with a "VOID"
warning when the encoding or reading of the RFID tag fails. The default of
"0" prints the VOID message the entire length of the label.
Number of Labels to
Retry in Case of
Read/Encode
Failure
This setting allows you to determine how many retries are allowed after a
failure while encoding the RFID tag or label. As the cost of RFID smart
labels and tags is still fairly high, setting this to a low number may be
advisable.
Write Options Section
Number of Times to
Retry
This setting determines the number of times to retry writing to the tag in case
of initial failure. The default setting is 0.
Feed Label After
Writing
When checked, the label is fed from the printer for removal and use after
writing.
Enable RFID Motion
By default, labels automatically print at the end of the format. When
deselected, the label is not moved when it reaches the program position. Note
that this setting must be specified for each label; it is not automatically
carried over from one label to the next.
Write Protect
When checked, the data written to the tag is protected and the tag may not be
written to again. This could be used for example, as a pre-emptive step to
prevent a label in transit from being altered, thus rendering the original
encoding to the tag invalid.
Read Options Section
Number of Times to
Retry
This setting determines the number of times to retry writing to the tag in case
of initial failure. The default setting is 0.
Enable RFID Motion
By default, labels automatically print at the end of the format. When
deselected, the label is not moved when it reaches the program position. Note
that this setting must be specified for each label; it is not automatically
carried over from one label to the next.
Feed Label After
Reading
When this is checked, the label is fed from the printer for removal and use
after reading.
Zebra Printer Specific RFID Options
Set Up Options Section
Send Setup Options
to Printer
When this is checked, settings are used for printing.
Loftware Label Manager User's Guide
Appendix B Printers and Labels B - 77
Tag Type
This is set to Auto-Detect, by default, which automatically determines the tag
type by querying the tag. Other choices are None (no tags available), Texas
Instruments Tag-it, and Philips I-Code.
Transponder
Position From Top
of Label
The position in Dot Rows from the top of the label to the RFID transponder
embedded in the label. The default position is 8 Dot Rows from the top of
the label. '0' dot rows means that the media should not to be moved from its
default position. This setting may be particularly important if you are not
using Zebra RFID label stock in your printer, as the transponder position may
be quite different.
Length of Void
Output
This lets you determine how much of the label is printed with a "VOID"
warning when the encoding or reading of the RFID tag fails. The default of
"0" prints the VOID message the entire length of the label. This may or may
not be helpful, as the VOID printing would use up more of the printer's
ribbon, but on the other hand, it would make the failure of the tag's encoding
or reading more visible and therefore more evident.
Number of Labels to
retry in case of
read/encode failure
This setting allows you to determine how many retries are allowed after a
failure while encoding or reading the RFID tag.
Write Options Section
Number of Times to
Retry
This setting determines the number of times to retry writing to the tag in case
of initial failure. The default setting is 0.
Enable RFID Motion
By default, labels automatically print at the end of the format. When
deselected, the label is not moved when it reaches the program position. Note
that this setting must be specified for each label; it is not automatically
carried over from one label to the next.
Write Protect
When checked, the data written to the tag is protected, and the tag may not be
written to again. This could be used, for example, as a pre emptive step to
prevent a label in transit from being altered thus rendering the original
encoding to the tag invalid. The default setting is not checked.
Read Options Section
Number of Times to
Retry
Enable RFID Motion
This setting determines the number of times to retry reading the tag data in
case of initial failure. The default setting is 0. This setting only applies if
you have set the Human Readable property of the RFID field to "Read Tag.”
See Chapter 5 for more information.
By default, labels automatically print at the end of the format. When
deselected, the label is not moved when it reaches the program position. Note
that this setting must be specified for each label; it is not automatically
carried over from one label to the next.
Zebra Printer Capabilities and Limits
Maximum Number of
Fields
The maximum number of fields per label format is 200.
Maximum Image
Size
The maximum size of any image is 600 dots x 600 dots. The physical size of
the image depends on the resolution of your printer. Note that the actual size
B - 78 Appendix B Printers and Labels
Loftware Label Manager User's Guide
of images the printer is able to handle is determined by the amount of RAM
installed in your printer. If images are displayed in Loftware Label Manager
label design but do not print, the printer may not have enough memory to store
the image.
Printed Bar code
Does Not Match the
Design
It is possible to define a combination of attributes, such as line width, ratio,
etc., that the printer cannot produce, or might print in one orientation but not
another. Under these conditions, the printer may print the "closest possible"
bar code. This usually occurs when you define a bar code with line width 1.
The printer sometimes "promotes" this to a line width 2 bar code, resulting in a
printed bar code that is twice as long as desired.
Disappearing Fields
The Advanced printers do not print any field with an invalid definition. For
example, if you define a UPC-A bar code, which requires exactly 11 digits,
and then provide alphabetic data at print time, the printer does not print the
field. If your label test prints correctly but fields do not print in production
printing, check your data carefully to make sure it is valid.
Using CODE 128
Refer to the section on building Code 128, UCC-128 symbologies.
Zebra Incrementing /
Decrementing Fields
When the printer is capable of doing the incrementing/decrementing internally,
it is instructed to do so. This is called Native Mode. When printing in Native
Mode, control returns to the PC almost immediately.
Set Label Size
Loftware Label Manager does incrementing/decrementing in software when
the printer cannot do it internally and sends down a different set of data for
each label. This is called “Extended Mode.” In Extended mode, the Printing
dialog box shows the line “Printing Label x of y” and control does not return to
the PC until the entire series of labels is printed.
The label size is used as a frame of reference. When you rotate your label, or
when you rotate the printing of a label, it is imperative that Loftware Label
Manager Design knows the exact size of the stock on which you are printing.
Zebra TrueType Font Download and Use Instructions
Some Zebra printers are capable of storing fonts. Zebra provides a utility called ZTools™ that allows
TrueType Fonts (TTF) to be downloaded to a memory location. The advantage to this is that you do not
have to remap a font and guess at what size it prints on the label.
Note: Contact Zebra for information regarding your printer’s capability of storing fonts and for the
latest version of ZTools™ (3.1). Important: Do an Options | Test Print from ZTools™ to verify that the
font is successfully downloaded to the printer.
Part 1 - Font Download Instructions
1.
Open the Zebra ZTools (Version 3.1) program.
2.
3.
Select File | Add from the menu.
From the “Select File” dialog, select the font from the left column to be downloaded (.ZST
extension).
Note: The font you select to download must have been converted by ZTools from the PC (TTF extension)
to ZTools prior to this selection.
4.
Click OK; the dialog box is no longer displayed.
Loftware Label Manager User's Guide
Appendix B Printers and Labels B - 79
5. Select View | Download.
6. The Zebra Tools Download dialog box is displayed.
7. Press the button with the "-" icon (displayed in blue). The icon changes to a checkmark.
8. Press the button with the "Stop Light" icon.
The Stop Light icon becomes gray, and the font starts downloading to the printer.
Part 2 – Loftware Design Instructions
1.
Open Loftware Label Manager in Design mode.
2.
Open the label in Design, press F6 and the Options button.
3.
Check the Recall TrueType Fonts box, and then press OK.
4.
Place a field on the label; change the Font Category property to TrueType Fonts.
5.
Select the downloaded font from the Font list in the properties box.
6.
Print the label.
Points to remember:
•
Either all TrueType Fonts are sent to the printer as bitmaps, or they are all recalled from the printer.
It is not possible to mix and match them.
•
If the printer is turned off, the font is lost unless it has been downloaded to something other than
volatile ram.
•
This functionality is only available in Versions 5.5.1.8 and greater of Loftware.
•
The printer must have the correct version firmware and must have been created with Zebra Printer
Language (ZPL).
Zebra Error Messages
Printer Turned Off
Cable Disconnected No Stock
LPT
Error message. All
labels print when the
printer is turned back
on.
Error message. When
the printer is reconnected, all labels
print.
Error message. When Error message. When
the stock is added, all the print head is down,
labels print.
all the labels print.
COM
Not tested.
Not tested.
Not tested.
Spooled
Locally
Error message. The
labels print once the
printer is turned back
on.
Error message. The
labels print once the
printer is reconnected.
Error message. The Error message. The
labels print after stock labels print fine after
is added.
print head is down.
Spooled to
Shared
No error msg. When the No error msg. When
printer is turned back
reconnected all labels
on, all labels print.
print.
No error msg. When
stock is added all
labels print.
No error msg. When
print head is put down all
the labels print.
Spooled to
PrintServer
No error msg. When the No error msg. When
printer is on, all labels reconnected, the labels
print
print.
No error msg. When
stock is added, all
labels print.
No error msg. When
head is down, the labels
print.
Direct IP
No error msg. When the No error msg. If
printer is turned back on reconnected, the labels
all labels print.
do not print.
No error msg. When
stock is added, all
labels print out.
No error msg. When
print head is put down,
all the labels print.
B - 80 Appendix B Printers and Labels
Print Head Up
Not tested.
Loftware Label Manager User's Guide
Tag Configuration
This section outlines relevant block configuration of the RFID tags supported by Loftware RFID devices.
HF RF tagging system uses the 13.56 MHz frequency range. Currently, HF tag types are supported by
some Loftware RFID printers. See the next section on RFID Devices and Tag Types.
HF Tag Type
Configurable Data Blocks
Philips HF I-Code
Blocks 5 to 15 can be encoded, each with a block size of 4 bytes.
(16 blocks total; blocks 0 to 4, which are not user-accessible, contain the
serial number, write-access conditions and configuration bits.)
Supports Lock Tag after Writing, Overflow, EAS, and AFI features.
The higher blocks – 0 to 27 – are used for user data, each with a block size
of 4 bytes. RF interface is defined by the ISO 15693 standard.
(32 blocks total; the lowest blocks (-4 to -1), which are not useraccessible, contain the unique identifier, write access conditions, and other
special data.)
Supports Lock Tag after Writing, Overflow, EAS, AFI, and DSFID
features.
User data is contained in blocks 0-7. Each block consists of 4 bytes.
Supports Lock Tag after Writing and Overflow features.
User data is organized into 64 blocks (0 to 63). Each block consists of 4
bytes. RF interface is defined by the ISO 15693 standard.
Supports Lock Tag After Writing, Overflow, AFI, and DSFID features.
Philips HF I-Code
ISO 15693
TI HF Tag-it
TI HF Tag-it ISO
15693
The following UHF tag types are supported by Loftware. See also the next section on RFID Devices
and Tag Types.
UHF Tag Type
User-accessible Data Blocks
UHF 64-bit Class 1
UHF UCODE EPC 1.19
PC block = 1 byte - used to lock the tag
EPC block = 8 bytes - used for EPC / DOD / URI
PC block = 1 byte - used to lock the tag
EPC block = 12 bytes used for EPC / DOD / URI
KC block = 3 bytes - used to lock the tag
EPC block = 12 bytes used for EPC / DOD / URI
USR block = 13 bytes - used for user specific data
Block #0 = 12 bytes
UHF ISO 18000-6B
Block #0 = 200 bytes
UHF Class 1 Gen 2
32-bit Access Password
32-bit Kill Password
96-bit EPC
32-byte USR block
UHF 96-bit Class 1
UHF 96-bit Class 0+
RFID Devices and Tag Types
In order to encode data on RFID labels and tags, an RFID device must support specific RFID
commands. Some RFID printers exclusively support encoding to UHF tag types. Others will write only
to HF tags. A few printers support both UHF and HF tags.
Loftware Label Manager User's Guide
Appendix B Printers and Labels B - 81
The tables below list current Loftware RFID printers and the tag types each supports.
RFID UHF Printers
This table shows Loftware RFID Gen 1 and Gen 2 UHF printers for smart labels and the UHF tag types
each supports.
UHF Gen 2
UHF Gen 1
64-bit
Class 1
96-bit
Class 1
X
X
X
X
X
X
X
X
X
X
X
X
X
X
X
X
X
X
X
X
X
X
X
X
X
X
X
X
X
X
X
X
X
X
X
X
X
X
X
X
X
X
X
X
X
X
X
X
X
X
X
X
X
X
X
X
X
X
X
X
X
X
X
X
X
X
X
X
X
X
X
X
X
X
X
X
Avery 6404 RFID
Avery 6405 RFID
Avery 6406 RFID
Avery 6408 RFID
Avery ALX 924 RFID
Avery ALX 925 RFID
Avery ALX 926 RFID
Avery DPM 4 RFID
Avery DPM 5 RFID
Avery DPM 6 RFID
Datamax A-4212 RFID
Datamax A-4310 RFID
Datamax A-4408 RFID
Datamax A-4606 RFID
Datamax A-6212 RFID
Datamax A-6310 RFID
Datamax H-4212X RFID
Datamax H-4310X RFID
Datamax I-4210 RFID*
Datamax I-4212 RFID*
Datamax I-4308 RFID*
Datamax I-4406 RFID*
Datamax I-4604 RFID*
FOXIV SPLA 7204e RFID
FOXIV SPLA 7304e RFID
IBM Infoprint 6700 5504R40 (203 dpi) RFID
IBM Infoprint 6700 5504R40 (300 dpi) RFID
IBM Infoprint 6700 5504R60 (203 dpi) RFID
IBM Infoprint 6700 5504R60 (300 dpi) RFID
IBM Infoprint 6700 5504R80 (203 dpi) RFID
IBM Infoprint 6700 5504R80 (300 dpi) RFID
Intermec EasyCoder PM4i
RFID (FP)
Intermec EasyCoder PM4i
RFID (IPL)
B - 82 Appendix B Printers and Labels
96-bit
Class 0+
UCODE
EPC 1.19
ISO
18000-6B
X
X
X
X
X
X
X
X
X
X
Impinj
Monza
X
X
X
TI
Dallas
X
X
X
X
X
X
X
X
X
X
X
X
X
X
X
X
X
X
X
X
X
X
X
X
X
X
X
X
X
X
X
X
X
X
X
X
X
X
X
X
X
X
X
X
X
X
X
X
X
X
X
X
X
X
X
X
X
X
X
X
X
X
X
X
X
X
Loftware Label Manager User's Guide
UHF Gen 2
UHF Gen 1
64-bit
Class 1
96-bit
Class 1
X
X
X
X
X
X
X
X
X
X
X
X
X
X
X
X
X
X
X
X
X
X
X
X
X
X
X
X
X
X
X
X
X
X
X
X
X
X
X
X
X
X
X
X
X
X
X
X
X
X
X
X
X
X
X
X
X
X
X
X
X
X
X
X
X
X
X
X
X
X
Monarch 9855 RFID
Monarch 9855 RFMP
Printronix LPA8204r RFID
Printronix LPA8304r RFID
Printronix SL5204 RFID
Printronix SL5204r RFID
Printronix SL5304 RFID
Printronix SL5304r RFID
Printronix SL5306r RFID
Printronix SL4M RFID
Printronix SLPA5204r RFID
Printronix SLPA5304r RFID
Printronix SLPA7204e RFID
Printronix SLPA7304e RFID
Printronix SLPA8204r RFID
Printronix SLPA8304r RFID
Printronix T4M RFID
Printronix T5204 RFID
Printronix T5204r RFID
Printronix T5206r RFID
Printronix T5208r RFID
Printronix T5304 RFID
Printronix T5304r RFID
Printronix T5306r RFID
Printronix T5308r RFID
Sato CL408e RFID*
Sato CL412e RFID
Sato M8485Se RFID
TEC B-SX4 RFID
TEC B-SX5 RFID
Zebra R110 PAX3 RFID
Zebra R110 PAX4 RFID
Zebra R110 XiIIIPlus RFID
Zebra R110 Xi RFID
Zebra R170Xi RFID
Zebra R4M Plus RFID
96-bit
Class 0+
UCODE
EPC 1.19
X
X
X
X
X
X
X
X
X
X
X
X
X
X
X
X
X
X
X
X
X
X
X
X
X
X
X
X
X
X
X
X
X
X
X
X
X
X
X
X
X
X
X
X
X
X
X
X
ISO
18000-6B
Impinj
Monza
TI
Dallas
X
X
X
X
X
X
X
X
X
X
X
X
X
X
X
X
X
X
X
X
X
X
X
X
X
X
X
X
X
X
X
X
X
X
X
X
X
X
X
X
X
X
X
X
X
X
X
X
X
X
X
X
X
X
X
X
X
X
X
X
X
X
X
X
X
X
X
X
X
X
X
X
X
X
X
X
X
Table B-1: Loftware-supported UHF RFID Printers and Tag Types
* The Datamax I-4210 RFID, I-4212 RFID, I-4308 RFID, I-4406 RFID, I-4604 RFID, and the Sato
CL408e RFID also support HF encoding. See Table B-3 below.
Loftware Label Manager User's Guide
Appendix B Printers and Labels B - 83
RFID HF Printers
The table below shows Loftware RFID HF printers for RFID smart labels and the HF tag types that each
supports. Note that the Datamax printers on this table also support UHF tags. The Sato printer also
supports UHF tags. (These are listed in the tables above and/or below.)
Philips HF
I-Code
Philips HF ICode ISO 15693
X
X
X
X
X
X
Datamax I-4210 RFID*
Datamax I-4212 RFID*
Datamax I-4308 RFID*
Datamax I-4406 RFID*
Datamax I-4604 RFID*
X
X
X
X
Sato CL408e*
Zebra R140 RFID
Zebra R2844-Z RFID
Zebra R402 RFID
TI HF
Tag-it
TI HF Tag-it
ISO 15693
X
X
X
X
X
X
X
X
X
X
X
X
X
X
Table B-2: Loftware-supported HF RFID Printers and Tag Types
* The Datamax I-4210 RFID, I-4212 RFID, I-4308 RFID, I-4406 RFID, I-4604 RFID, and the Sato
CL408e RFID also support UHF encoding. See Table B-3 below.
RFID HF / UHF Printers
This table shows Loftware RFID printers for smart labels that support both HF and UHF and the tag
types each supports.
UHF Gen 1
HF Gen 1
UHF Class 1
Gen 2
Impinj
Monza
TI
Dallas
X
X
X
X
X
X
X
X
X
X
X
X
X
X
X
X
X
X
X
X
X
X
X
X
X
X
Datamax I4604 RFID
X
X
X
X
X
X
X
X
Sato CL408e
X
X
X
X
64-bit
Class
1
96-bit
Class
1
96-bit
Class
0+
UCODE
EPC
1.19
Datamax I4210 RFID
X
X
X
Datamax I4212 RFID
X
X
Datamax I4308 RFID
X
Datamax I4406 RFID
ISO
180006B
X
Phillips
I-Code
X
Phillips ICode
ISO15693
X
TI
Tag-it
X
TI Tag-it
ISO
15693
X
Table B-3: Loftware RFID Printers that support HF and UHF Tag Types
B - 84 Appendix B Printers and Labels
Loftware Label Manager User's Guide