1
CDC775
Compact Disc Changer
1
Untitled-19
1
6/15/00, 1:34 PM
3139 116 17401
English
Important notes for users in the U.K.
Italia
Mains plug
This apparatus is fitted with an approved 13 Amp plug. To change a fuse in this
type of plug proceed as follows:
1 Remove fuse cover and fuse.
2 Fix new fuse which should be a BS1362 5 Amp, A.S.T.A. or BSI approved type.
3 Refit the fuse cover.
If the fitted plug is not suitable for your socket outlets, it should be cut off and an
appropriate plug fitted in its place.
If the mains plug contains a fuse, this should have a value of 5 Amp. If a plug
without a fuse is used, the fuse at the distribution board should not be greater
than 5 Amp.
DICHIARAZIONE DI CONFORMITA’
Si dichiara che l’apparecchio CDC775 Philips
risponde alle prescrizioni dell’art. 2 comma 1 del
D.M. 28 Agosto 1995
n. 548.
Fatto a Eindhoven , il 31/12/1998
Philips Consumer Electronics
Philips, Glaslaan 2
5616 JB Eindhoven, The Netherlands
Note: The severed plug must be disposed of to avoid a possible shock hazard
should it be inserted into a 13 Amp socket elsewhere.
How to connect a plug
The wires in the mains lead are coloured with the following code: blue = neutral
(N), brown = live (L).
As these colours may not correspond with the colour markings identifying the
terminals in your plug, proceed as follows:
• Connect the blue wire to the terminal marked N or coloured black.
• Connect the brown wire to the terminal marked L or coloured red.
• Do not connect either wire to the earth terminal in the plug, marked E (or e) or
coloured green (or green and yellow).
Before replacing the plug cover, make certain that the cord grip is clamped over
the sheath of the lead - not simply over the two wires.
Observer: Nettbryteren er sekundert innkoplet.
Den innebygde netdelen er derfor ikke frakoplet
nettet så lenge apparatet er tilsluttet
nettkontakten.
Copyright in the U.K.
Recording and playback of material may require consent. See Copyright Act 1956
and The Performer’s Protection Acts 1958 to 1972.
For å redusere faren for brann eller elektrisk
støt, skal apparatet ikke utsettes for regn eller
fuktighet.
Norge
Typeskilt finnes på apparatens underside.
2
Untitled-19
2
6/15/00, 1:34 PM
3139 116 18631
Nederlands ............................56
Italiano ...................................69
Svenska .................................82
Dansk .....................................95
Français
Español
Português ............................121
Português
CLASS 1
LASER PRODUCT
∂ÏÏËÓÈο ............................ 134
∂ÏÏËÓÈο
Suomi ...................................108
Italiano Nederlands Deutsch
Deutsch ..................................43
Svenska
Español ..................................30
Dansk
Français .................................17
Suomi
English .....................................4
English
INDEX
3
Untitled-19
3
6/15/00, 1:34 PM
3139 116 18631
CDC775/22-Eng
6/15/00
1:37 PM
Page 4
English
CONTENTS
INTRODUCTION
Introduction . . . . . . . . . . . . . . . . . . . . . . .4
Thank you for selecting the Philips CDC 775
Compact Disc Changer.
A Compact Disc Changer of the state-of-the-art Philips
700 series, the CDC 775 combines supreme playback
quality with a high degree of user-friendliness by
offering the following possibilities:
– able to play CD-RW disc;
– changing CDs during play;
– quick access to a particular CD by means of QUICK
PLAY;
– storing 40 tracks from different CDs in any desired
order in the changer memory;
– storing the required recording time and playing time
in the EDIT mode.
Installation . . . . . . . . . . . . . . . . . . . . .4 - 5
Functional Overview . . . . . . . . . . . . .6 - 8
Playback . . . . . . . . . . . . . . . . . . . . . .9 - 13
Programming . . . . . . . . . . . . . . . . . . . . .13
Edit . . . . . . . . . . . . . . . . . . . . . . . . . .14 - 15
Additional Information . . . . . . . . .15 - 16
Troubleshooting . . . . . . . . . . . . . . . . . . .16
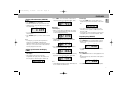
Power Supply Setting
• Check that the type plate on the rear of your changer
indicates the correct supply voltage.
• If your mains supply voltage is different, consult your
dealer or our Service Organisation.
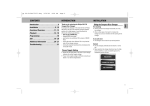
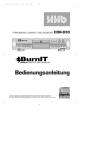
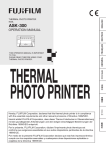
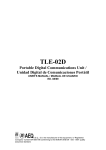
INSTALLATION
Siting the Compact Disc Changer
Free standing
• Always position the changer horizontally on a flat,
firm surface.
• Allow a free space of at least 3 cm above the
changer so as not to interfere with the cooling of the
changer.
In an audio rack
• The changer can be sited in any desired position.
Stacked
• Site the changer preferably at the bottom or at the
top.
• Never position the changer directly on top of a highpower amplifier, as such an amplifier gives off a
substantial amount of heat.
RECEIVER
CASSETTE DECK
CD CHANGER
4
CDC775/22-Eng
6/15/00
1:37 PM
Page 5
English
INSTALLATION
COAXIAL
R
L
DIGITAL
OUTPUT
ANALOG
OUT
1
2
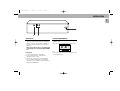
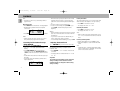
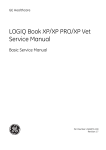
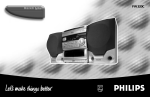
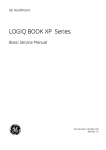
Connections
1 Digital Out
This output supplies digital signal and can therefore
only be connected to an input which is suitable for
this signal. Use here a lead with one cinch plug on
either end.
Never connect this socket to a non-digital input
of an amplifier, such as AUX, CD, TAPE, PHONO
etc!
2 Analog Out
For the connecting cable to the amplifier.
• Insert a red plug into the ‘R’ socket and the
other plug into the ‘L’ socket.
• Insert the two other plugs into the corresponding
sockets of the CD or AUX input of your amplifier.
You can also use the TUNER or TAPE IN connection,
but never the PHONO input!
Connecting Headphones
• Connect headphones with a 6.3 mm jack plug to the
PHONES socket.
• The sound level is adjusted with the LEVEL control.
PHONES
LEVEL
MIN
MAX
Note:
– The volume control on the remote control must not be
at the minimum level.
5
CDC775/22-Eng
6/15/00
1:37 PM
Page 6
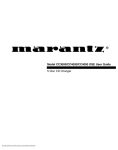
FUNCTIONAL OVERVIEW
English
1
23 4 5 6 7
8
9
0!
@ #
$ %
CDC 775 • COMPACT DISC CAROUSEL CHANGER
POWER ON/OFF
CD TEXT
PROG
SCAN
TRACK
4
REPEAT
SCROLL
3
TIME
TOT
REM
TRACK
NEXT
STOP
PLAY
PAUSE
1
CD DIRECT PLAY
DISC SELECT
PAUSE REPEAT 1 DISC
SHUFFLE
FADE/
P-SEARCH
DIGITAL OUTPUT
PREV
TIME
5
2
PROGRAM
EDIT
PEAK
%
–
–
–
1
IR SENSOR
2
3
4
5
SHUFFLE
CD REWRITABLE COMPATIBLE
MULTI DISC CHANGER
OPEN / CLOSE
^
&
*
PHONES
LEVEL
MIN
MAX
(
(
*
1 POWER-ON/ OFF
Switching on and off.
2 EDIT
Activating the EDIT function when making a
recording.
3 PROGRAM
Opening the memory when compiling a program.
4 TIME
Selecting the information you want to see on the
display.
5 SCAN
Automatically playing the beginning of each track.
6 REPEAT
Repeating play.
7 FADER
Fading in and out during play.
PEAK SEARCH
Searching the loudest passage (peak) on a CD or in
a program when making a tape recording.
6
&
^
)
8 DISPLAY
Informs you about the functioning of the player.
9 I(nfra) R(ed) SENSOR
Receives the signals from the remote control.
0 SHUFFLE
Playing in random order.
! PAUSE ;
Interrupting play.
@ S T
– Selecting another track during play.
– Selecting a track to start play with.
– Selecting tracks when compiling a program.
– Fast search to a particular passage during play.
– Selecting the recording mode during edit.
– Selecting the recording time during edit.
# STOP 9
– Stopping play.
– Cancel a Program, Peak Search or Edit.
$ PLAY 2
– Starting play.
– Returning to the beginning of a track.
¡
CD DIRECT PLAY
Selecting another CD during play.
Selecting a CD to start play with.
Selecting CDs when compiling a Program, Peak
Search or Edit.
OPEN/CLOSE
Opening and closing the CD compartment.
CD CAROUSEL TRAY
LEVEL
Adjusting the volume when listening with
headphones.
PHONES
Connecting headphones.
QUICK PLAY
Immediate playing of a particular CD.
LOAD
Rotating the turntable in the CD compartment when
inserting CDs.
TRACK
4
3
PEAK
TOT
REM
TRACK
TIME
5
2
PROGRAM
1
SHUFFLE
PAUSE REPEAT 1 DISC
IR SENSOR
PHONES
LEVEL
¡
)
CDC775/22-Eng
6/15/00
1:37 PM
Page 7
Remote Control
DISC
5
TRAY
OPEN
4
PROG.
SCAN
SHUFFLE
1
2
3
4
5
6
7
8
9
3
2
6
PAUSE
1
7
REPEAT
8
9
0
VOLUME
12
10
PLAY
PREV.
í
É
STOP
NEXT
ë
10
Ç
11
DIGITAL REMOTE CONTROL
2 X 1.5 V R03 /
UM4 / AAA
PAUSE ;
Interrupting play.
2 SCAN
Automatically playing the beginning of each track.
3 PROG.
Opening the memory when compiling a program.
4 DISC
– Selecting another CD during play.
– Selecting a CD to start play with.
– Selecting CDs when compiling a Program, Peak
Search or Edit.
5 TRAY OPEN
Opening and closing the CD compartment.
6 SHUFFLE
Playing in random order.
7 1 - 0 DIGIT KEYS
– Selecting another track.
– Selecting a track to start play with.
– Selecting tracks when compiling a program.
8 REPEAT
Repeating play.
9 – VOLUME +
Adjusting the sound level when the changer is
connected via the ANALOG or DIGITAL OUT output
to an amplifier or HiFi system without its own
remote control. Also for adjusting the sound level
on the headphones.
10 í PREV. / NEXT ë
– Selecting another track during play.
– Selecting a track to start play with.
– Selecting tracks when compiling a program.
– Fast search to a particular passage during play.
– Selecting the recording mode during edit.
– Selecting the recording time during edit.
1
11
–
–
12
–
–
STOP 9
Stopping play.
Cancel a Program, Peak Search or Edit.
PLAY 2
Starting play.
Returning to the beginning of a track.
English
FUNCTIONAL OVERVIEW
The life of the batteries of the remote control is around
one year. For replacement only use batteries of the type
RO3, UM4 or AAA.
7
CDC775/22-Eng
6/15/00
1:37 PM
Page 8
FUNCTIONAL OVERVIEW
English
Display
TRACK
4
3
PEAK
TOT
REM
TRACK
TIME
5
2
PROGRAM
1
SHUFFLE
PAUSE REPEAT 1 DISC
{
– Lights up when the changer receives a command from
the remote control.
4
3
5
1
1 - 5 CD number indicator
– Lights up when you switch the changer on.
– Indicates the number of CDs in the CD compartment.
– Indicates what CD is being played (CD number
flashes).
PROGRAM
– Flashes when a program is being compiled.
– Lights up when a program is being played.
TRACK – Indicates:
– what track is being played;
– the number of tracks on a CD or in a program.
PEAK
– Flashes when the loudest passage (peak) on a CD or
in a program is being searched.
– Lights up when the loudest passage (peak) has been
found.
TRACK TIME
– Indicates the elapsed playing time of the track being
played.
REM(aining) TRACK TIME
– Indicates the remaining playing time of the track
being played.
8
2
TOT(al) REM(aining) TIME
– Indicates the remaining playing time of a CD.
TOT(al) TIME
– Indicates the total playing time of a CD.
SHUFFLE
– Lights up when the tracks are played in random order.
PAUSE
– Lights up when play is interrupted.
REPEAT 1
– Lights up when you repeat a track.
REPEAT DISC
– Lights up when you repeat a CD.
REPEAT
– Lights up when you repeat all CDs or a program from
them.
Display messages:
REAd – Lights up when a CD's contents list is being
scanned.
NO dISC– Lights up when there are no CDs in the
CD compartment.
WRONG tRACK– Lights up when you select a nonexistent track number.
SELECt dISC– Lights up when you try to activate
a function for which you must first select a CD number.
INSERt dISC– Lights up when you give a play
command while the CD compartment is empty.
GO tO StOP – Lights up if you try to activate a
function for which you must first stop play.
– Lights up when the player is put into the
EDIT mode.
CDC775/22-Eng
6/15/00
1:37 PM
Page 9
Inserting the CDs
NOTE!
Use only audio CD; audio CD-R or audio CD-RW.
• Press POWER-ON/OFF to switch the changer on.
– The changer will now start CD detection to check how
many CDs there are in the CD compartment. The
turntable will rotate slowly until all positions (1 - 5)
in the CD compartment have been checked.
– The position which is being checked is always shown
on the display (dISC X).
– After CD detection the 1 - 5 CD number indicator will
show the number of CDs in the CD compartment.
• Open the CD compartment by pressing OPEN/CLOSE.
– OPEN lights up.
• Insert the CDs, printed side up; use the LOAD
button to rotate the turntable
in the CD compartment.
• Close the compartment by
PREFERRED
POSITION
pressing OPEN/CLOSE.
QUICK PLAY
– CLOSE lights up. The
LOAD
changer will start CD
detection again.
NOTE!
– CD detection may never be interrupted. If, during
detection, you press any button, then the changer
will stop detection and the display will give an
incorrect indication of the number of CDs in the CD
compartment.
– Always remove all CDs from the CD compartment if
you want to transport the changer.
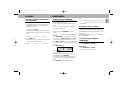
Normal Playback (PLAY 2)
– The display shows the number of the current CD.
3
2
1
• Press PLAY 2 to start playback.
– The CD number indicator (1-5) always shows what CD
is being played (B X flashes).
– The track being played and its elapsed playing time
are shown under TRACK and TRACK TIME.
See 'CALLING UP INFORMATION ON THE DISPLAY' if
you wish to see other information on the display.
TRACK
TRACK
TIME
1
Quick Play
• Use the PREFERRED POSITION
in the CD compartment if you
wish to insert only one CD and
then start play by pressing the
QUICK PLAY button. Play will
then start immediately with
the inserted CD.
English
PLAYBACK
PREFERRED
POSITION
QUICK PLAY
LOAD
NOTE!
– You can also press PLAY 2 immediately after inserting the CDs; the compartment then closes
automatically and play starts from the first available
CD.
– You can interrupt playback by pressing PAUSE ;;
PAUSE then lights up. Press PLAY 2 or PAUSE ;; to
restart.
– If you press PLAY 2 during play, the current track will
start again from the beginning.
– You can stop playback by pressing STOP 9 .
– If you press OPEN/CLOSE during play, the CD
compartment will open while play continues. The
three CDs outside the changer may now be changed
without playback being interrupted.
– Play will stop after all CDs have been played.
• Press POWER-ON/OFF to switch the changer off.
9
CDC775/22-Eng
6/15/00
1:37 PM
Page 10
PLAYBACK
English
Selecting Another Track During Play
(S T)
• Press T or S (less than 0.5 seconds) until the
desired track number appears under TRACK.
TRACK
TRACK
TIME
5
– The music stops and a moment later the selected
track begins to play.
WRONG tRACK lights up when you select a nonexistent track number.
Selecting Another CD During Play (CD
DIRECT PLAY)
• Key in the desired CD number.
– The music stops and a moment later the selected CD
begins to play.
NO dISC lights up when there is no CD in the
selected CD compartment.
You can also select the number by using the DISC
button on the remote control.
Searching For A Passage During Play
(S T)
• Hold S down to search backwards to the
beginning.
• Hold T down to search forwards to the end.
The searching speed is determined by how long a key is
pressed:
– the first 2 seconds fairly slowly, with sound;
– then at the maximum speed, with no sound.
10
If you reach the end of the last track and release T,
play will resume a few seconds before the end of the
CD.
Starting With A Particular CD
(CD DIRECT PLAY)
• Key in the required CD number.
– If the CD compartment was open, it will now close.
– Play starts from the selected CD.
NO dISC lights up when there is no CD in the
selected CD compartment.
You can also select the number by using the DISC
button on the remote control.
Starting With A Particular Track
(CD DIRECT PLAY, S T and PLAY
2)
• First select the number of the required CD using CD
DIRECT PLAY or DISC on the remote control.
– If the CD compartment was open, it will now close.
• Then select the (track) number by using T or
S (press less than 0.5 seconds).
• Press PLAY 2.
– Play starts from the selected track.
WRONG tRACK lights up when you select a nonexistent track number.
NO dISC lights up when there is no CD in the
selected CD compartment.
Scanning CDs (SCAN)
All CDs:
• Press SCAN before or during play.
– If the CD compartment was open, it will now close.
– SCAN lights up and the first 10 seconds of each
track are played in turn (starting from the current
track). 10 seconds are counted down each time under
REM(aining) TRACK TIME.
TRACK
REM
TRACK
TIME
5
• When the player reaches a track which you wish to
hear in full, press SCAN again or PLAY 2.
CDC775/22-Eng
6/15/00
1:37 PM
Page 11
Playing In Random Order (SHUFFLE)
All CDs:
• Press SHUFFLE before or during play.
– If the CD compartment was open, it will now close.
– SHUFFLE lights up and all the tracks are now played
in a random order.
TRACK
TRACK
TIME
3
SHUFFLE
– If you press T, you will select any one of the
following tracks.
• Press SHUFFLE again if you wish to return to normal
play.
NOTE!
– If, during play, you open the CD compartment to
change CDs (see 'NORMAL PLAYBACK') then
playback in random order will be cancelled. Playback
will stop as soon as the last track of the current CD
has been played (in normal order).
Calling Up Information On Display
(TIME)
In STOP mode:
Text display
– After loading the CDs and closing the CD
compartment, the display shows the number of the
CD to be played (= default display in STOP mode).
• Press TIME to shows the number of tracks and the
total playing time of the current CD (TOTAL TIME).
TRACK
TOT
TIME
1
2. Text display
• If you press TIME again, you will switch to text
display; the display shows the number of the current
CD.
3
During play:
1. Time display
– When you start play (from STOP mode), the display
shows the elapsed playing time of the current track
(= default display in PLAY mode).
TRACK
TRACK
TIME
2
1
• If you wish to know the total playing time of the
entire CD you must go back to STOP mode first and
then press TIME.
– The display now shows the number of tracks and the
total playing time of the current CD (TOTAL TIME).
1
Repeating Play (REPEAT)
• Press TIME whenever you want to know the
remaining playing time of the current track (REM
TRACK TIME).
TRACK
REM
TRACK
TIME
1
Repeating a track:
• Press REPEAT before or during playback of the CD.
– REPEAT 1 lights up; the track will now be repeated
continuously.
TRACK
2
TRACK
TIME
REPEAT
1
1
• Press TIME, if you wish to know the total playing
time from the beginning (TOTAL TIME).
TRACK
TOT
TIME
• Press REPEAT three times to stop the track being
repeated.
1
• Press TIME again if you wish to know the remaining
playing time of the entire CD (TOTAL REM TIME).
TRACK
TOT REM
TIME
1
Repeating a CD:
• Press REPEAT twice before or during playback of the
CD.
– REPEAT DISC lights up; the CD will now be repeated
continuously.
TRACK
3
English
PLAYBACK
TRACK
TIME
REPEAT
DISC
1
1
Note :
– TOTAL REM(aining) TIME and TOTAL TIME indications
are not available in SHUFFLE mode.
• Press REPEAT twice to stop the CD being repeated.
11
CDC775/22-Eng
6/15/00
1:37 PM
Page 12
PLAYBACK
English
Note:
– Repeating of a CD is not possible during shuffle or
program mode.
Repeating all CDs:
• Press REPEAT three times before or during playback.
– REPEAT lights up; all CDs will now be repeated
continuously.
TRACK
TRACK
TIME
NOTE!
– When a program has been stored (for one or more
CDs), then only the program will be repeated.
NOTES!
– When searching for the loudest passage in a program
(from one or more CDs) there is no need to enter the
CD number(s).
– If you wish to record tracks from different CDs you
have to repeat peak search for each CD.
– You can interrupt PEAK SEARCH by pressing STOP 9.
Searching For The Loudest Passage
(PEAK SEARCH)
Adjusting The Sound Level
(- VOLUME +) (on the remote control only)
1
REPEAT
• Press REPEAT again to stop the CDs being repeated.
• In STOP mode, press PEAK SEARCH.
– SELECt dISC lights up and PEAK starts
flashing.
• Press PEAK SEARCH again to select the last
selected disc or press any CD DIRECT PLAY button
or DISC (on the remote control) to select the desired
disc.
– The CD will now be scanned for the loudest passage
(the peak).
– The display shows the track being scanned and its
elapse playing time.
TRACK
1
12
– When the loudest passage has been found it will be
repeated continuously (from 2 seconds before the
peak until 2 seconds after the peak) and PEAK lights
up.
• You can now adjust your recording device.
• You can stop the scan by pressing STOP 9: if you
press PLAY 2, the CD will be played from the
beginning.
PEAK
TRACK
TIME
The volume output of the CD changer can be adjusted.
This will affects the analog out, digital out and
heaphones level.
• Press VOLUME - or + to reduce or increase the
sound level.
– The display will show a value between VOL 0 and
VOL 20.
Important!
The volume level will influenced the sound level
during recording. Set the volume level to the
maximum and do not change the volume setting
during recording.
Locking the volume
This unique feature allows you to lock the volume level
when listening to the heaphones or doing recording.
• Press EDIT for more than 2 seconds.
– The displays will show VOL LOCK.
Unlocking the volume
• Press EDIT for more than 2 seconds.
– The displays will show VOL 20.
Note:
– When you adjust the volume and the display shows
VOL LOCK, it means that the volume is in the lock
mode.
Listening to the heaphones
• Connect the headphones to the PHONES socket.
• Adjust the headphones sound level with the LEVEL
control.
Note:
– Should there be no sound after adjusting the LEVEL
control to maximum; press VOLUME + on the remote
control to increase the sound level.
6/15/00
1:37 PM
Page 13
PLAYBACK
Activating The Fade-In And Fade-Out
Function (FADER)
NOTE!
– The FADER function can be used if the changer is
connected to the amplifier or the system via the
ANALOG OUT output.
• During play press FADER.
– The sound level will now gradually decrease (FADE
OUT), after which the changer will go into the PAUSE
mode.
FAdE ≠
f ™ FAdE ≠ ™ FAdE _
• Press FADER again.
– Play continues and the sound level will increase again
to the originally set level (FADE IN).
FAdE _ ™ FAdE ≠ ™ FAdE ≠
f
PROGRAMMING
Storing A Program (PROGRAM)
– By programming the changer you can play up to 40
tracks in any required sequence.
– FULL lights up if you exceed the maximum of 40
tracks.
– NO dISC lights up when there is no CD in the
selected CD compartment.
• In STOP mode, press PROGRAM to open the
memory.
– SELECt dISC lights up and PROGRAM starts
flashing.
• Press PROGRAM again to select the last selected
disc or press any CD DIRECT PLAY button or DISC
(on the remote control) to select the desired disc.
• Press T or S (less than 0.5 seconds) until the
first track number you wish to program appears under
TRACK.
• Press PROGRAM again.
TRACK
TRACK
TIME
5
PROGRAM
Note:
– If the total playing time is more than “99:59”, then
“--:--” appears in the display instead of the total
playing time.
English
CDC775/22-Eng
Playing The Program ( PLAY 2)
• Press PLAY 2.
– Playback starts with the first number of the program.
The PROGRAM and EDIT buttons cannot be used during
programmed play.
Search for a particular passage is only possible within
the track being played.
Erasing A Program (STOP 9 or
OPEN/CLOSE)
In PLAY mode:
• Press OPEN/CLOSE or STOP 9 (twice).
In STOP mode:
• Press OPEN/CLOSE or STOP 9.
– The program has now been erased.
– The track number has now been stored in the
changers memory.
• Select the other track numbers required and store
each track by pressing PROGRAM.
– The number of tracks and the playing time of your
program will be shown under TRACK and TOT(al)
TIME.
• Press STOP 9 to quit the PROGRAM mode.
13
CDC775/22-Eng
6/15/00
1:37 PM
Page 14
EDIT
English
The EDIT function has two recording modes in which you
can store the recording time in the changer memory.
EDIT NORMAL – The changer will determine which
tracks fit on each side of the tape and will stop after the
last track. The tracks will be recorded in the order in
which they appear on the CD(s).
EDIT OPTIMAL – The changer now calculates the
combination of tracks that will optimize the use of
available recording time.
NOTE!
– The EDIT function cannot be used for CDs containing
more than 40 tracks.
– The – VOLUME + keys on the remote control may not
be used during recording as they affect the strength
of the signal from the changer.
Before Recording
Important!
The volume level will influence the sound level
during recording. Set the volume level to the
maximum and do not change the volume setting
during recording.
Preparation:
• A program to be recorded, must be stored in advance.
See 'PROGRAMMING'.
• If required you can search the loudest passage and
adjust your recording device. See 'SEARCHING THE
LOUDEST PASSAGE (PEAK SEARCH)'.
This can also be done after selecting the recording
mode and the recording time. See below.
14
• Press EDIT to activate the EDIT mode.
– SELECt dISC appears on the display.
• Press EDIT again to select the last selected disc or
press any CD DIRECT PLAY button or DISC (on the
remote control) to select the desired disc.
When recording a program there is no need to enter
the CD number(s).
Selecting the recording mode:
– The display shows NORMAL (= EDIT NORMAL
which is the default setting).
• With S T can now select OPT(imal), CANCEL
or EDIT (NORMAL) again.
– The display shows OPt(imal), CANCEL or
NORMAL again.
• Press EDIT to store the required recording mode
(NORMAL or OPTimal).
If you select CANCEL, the EDIT mode will be
cancelled and the changer will go back to STOP
mode.
– As soon as you have stored the recording mode the
display shows C90 (default setting).
Selecting the recording time:
– As soon as you have stored the recording mode the
display shows C90 (default setting).
• With S T you can now select the required
recording time:
C30, C45, C60, C90, C100, C120,
CdR21, CdR60 or CdR74.
In EDIT NORMAL mode the recording time must be at
least equal to the playing time of the first track on the
first CD or in the program.
In EDIT OPTimal mode the recording time must be at
least equal to the playing time of the shortest track
on the CD(s) or in the program.
– NOt POSSIbLE lights up if you select a 'wrong'
time.
• Press EDIT to store the required recording time.
– The CD changer will now go back to STOP mode
• You can now record the CD or the program.
Recording
• Press PLAY 2.
– Playback starts with the selected CD (or with the first
track of the program).
– The display shows the elapsed playing time of the
current track.
• Press TIME to switch to other time display
information.
– The number of tracks for side A and their playing time
are shown on the display.
TRACK
TOT
TIME
1
– After the last track that fits on side A of the tape, the
CD changer will go into PAUSE mode.
– PAUSE lights up.
– Under TRACK you will see the number of the first
track to be recorded on side B of the tape.
TRACK
TOT
TIME
1
PAUSE
• Turn the tape over or select the tape travel direction
for side B.
6/15/00
1:37 PM
Page 15
EDIT
• Press PLAY 2.
– The remaining tracks will now be played.
– After the last track play will stop; EdIt
CANCELLEd lights up.
NOTE!
– As soon as you press PLAY 2 the other changer
functions will temporarily be switched off to prevent
the recording being interfered with; EDIT ACTIVE
lights up if you press one of the other buttons during
recording.
– You can quit the EDIT mode by pressing STOP 9. or
OPEN/CLOSE ; EDIT CANCELLED then lights up.
– EDIT NOT POSSIBLE lights up if you try to record a CD
containing more than 40 tracks.
– Should the CD or the program be longer than the
total recording time of the tape, play will stop after
the last track that fits onto side B of the tape.
– Should the first track of the first CD or the program
be longer than one side of the tape (= the entered
recording time divided by two), then EDIT NOT
POSSIBLE will light up. You will now have to enter
another recording time.
ADDITIONAL INFORMATION
Maintenance
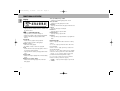
The CDs
• Never write on the printed side of a CD.
• Do not attach any stickers to the CD.
• Keep the shiny surface of the disc
clean. Use a soft lint-free cloth
and always wipe the disc in a
straight line from centre to edge.
• Never use cleaning agents for
conventional records.
• Detergents or abrasive cleaning
agents should not be used either.
Environmental Information
All unnecessary packaging material has been omitted.
We have done our utmost to make the packaging easily
separable into three mono-materials: cardboard (box),
polystyrene foam (buffer) and polythene (bags, protective
foam sheet).
English
CDC775/22-Eng
Your system consists of materials which can be recycled
and reused if disassembled by a specialized company.
Please observe the local regulations regarding the
disposal of packaging materials, exhausted batteries and
old equipment.
The changer
• A chamois leather slightly moistened with water is
sufficient for cleaning the changer.
• Do not use cleaning agents containing alcohol, spirits,
ammonia or abrasives.
15
CDC775/22-Eng
6/15/00
1:37 PM
Page 16
ADDITIONAL INFORMATION
English
Technical Data
Typical Audio Performance
Frequency range: . . . . . . . . . . . . . . . . . . .20 Hz - 20 kHz
Amplitude non-linearity: . . . . . . . ≤ 3 dB (1 kHz, -90 dB)
Dynamic range: . . . . . . . . . . . . . . . . . . . .>90 dB (1 kHz)
Signal-to-noise ratio: . . . . . . . . . . . . . . . .>95 dB (1 kHz)
Channel separation: . . . . . . . . . . . . . . . . .>95 dB (1 kHz)
Channel unbalance . . . . . . . . . . . . . . . . . .≤ 1 dB (1 kHz)
Total harmonic distortion: . . . . . . . . . . . .0.004% (1 kHz)
Audio output level: . . . . . . . . . . . . .2 Vrms, ± 2 dB, 1 kΩ
Impedance PHONES socket (6.5 mm): . . . . . .30 – 600Ω
. . . . . . . . . . . . . . . . . . . . . . . . . (4.5V e.m.f. from 120Ω)
Digital coaxial output . . . . . . . . . . . . .75Ω acc. IEC 958
Power supply
Mains voltage and frequency: . . . . . . . . . . . . . . . . . . . .
. . . . . . . . .see the type plate on the rear of the changer
Power consumption: . . . . . . . . . . . . . . . . . . . . . . .<12 W
Safety requirements: . . . . . . . . . . . . . . . . . . . .EN60065
Cabinet
Material/finish: . . . . . . . . . . . . . . . . . . . . . . . . . . . . . . .
. . . . . . . . . .metal and polystyrene with decorative trim
Dimensions (w x h x d): . . . . . . . . . .435 x 119 x 380 mm
Weight: . . . . . . . . . . . . . . . . . . . . . . . . . . . . . . . . .7.4 kg
Subject to modification
TROUBLESHOOTING
If a fault occurs, run through the points listed below
before taking your changer for repair.
If the fault remains, try to clear it by switching the
changer off and on again. If this also fails to help,
consult your dealer.
Under no circumstances should you repair the
changer yourself as this will invalidate the
guarantee!
Playback does not start or interruption of
playback.
• The current CD has been loaded upside down.
™ Reload the CD, label side up.
• No CDs inserted.
™ Insert the CDs, label side up.
• The current CD is badly scratched or dirty.
™ Clean the CD with a soft, lint-free cloth.
• Moisture condensation on the lens.
™ Leave the CD changer in a warm environment until
the moisture evaporates.
Sound skips (at the same part).
• The current CD is dirty.
™ Clean the CD with a soft, lint-free cloth.
The current CD skips tracks.
• The CD is damaged or dirty.
™ Replace or clean the CD.
Playback does not start from the first track (of the
current CD).
• PRG (program) or SHUFFLE activated.
™ Switch off SHUFFLE or clear program.
No sound or bad sound.
• Loose or wrong connections.
™ Check connections.
16
• Strong magnetic fields near the CD changer.
™ Find another place for the unit or change
connections.
No sound or bad sound on headphones.
• Volume control on remote control is at minimum.
™ Increase the volume control level.
• Level control set to – position.
™ Set level control.
• Headphones plug is dirty.
™ Clean plug.
Volume is too low.
• Sound level has been adjusted too low with the
–VOLUME + keys on the remote control.
™ Adjust sound level.
Remote control does not function.
• Batteries are empty.
™ Replace the batteries.
Remote control commands are not properly
received.
• The distance between remote control and CD
changer is larger than 10 metres.
™ Reduce the distance between remote control and CD
changer.
“dISC NOt FINALISEd“ is displayed.
• The CD-RW (or CD-R) is not properly recorded for the
use on a standard CD player.
™ Read the instruction booklet of your CD-Rewriteable
(or CD-Recordable) recorder on how to finalise a
recording.
• The CD is badly scratched or dirty.
™ Replace or clean the CD.