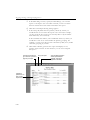
1
User’s Guide
WinFax PRO User’s Guide
Copyright Notice
© Symantec Corporation 2000
All rights reserved.
The use and copying of this product is subject to a license agreement. Any other use is prohibited. No part of
this publication may be reproduced, transmitted, transcribed, stored in a retrieval system or translated into any
language in any form by any means without the prior written consent of Symantec Corporation. Information in
this manual is subject to change without notice and does not represent a commitment on the part of the vendor.
Federal copyright law permits you to make a backup of this software for archival purposes only. Any other
duplication of this software, including copies offered through sale, loan, rental or gift is a violation of law, and
subject to both criminal and civil penalties.
Notice to WinFax PRO Users
It shall be unlawful for any person within the United States to use any computer or other electronic device to
send any message via a facsimile machine unless such message clearly contains, in a margin at the top or bottom
of each transmitted page or on the first page of the transmission, the date and time it is sent and an identification
of the business, other entity or individual sending the message and the telephone number of the sending machine
or such business, other entity, or individual.
Trademarks
Symantec, the Symantec logo, WinFax PRO, Cover Your Fax, TalkWorks, Cover Your Voice, WinFax PRO for
Networks, and pcANYWHERE are trademarks of Symantec Corporation and its subsidiaries.
AOL is a registered trademark of America Online, Inc.
cc:Mail is a trademark of cc:Mail, a division of Lotus Development Corporation.
CompuServe is a registered trademark of CompuServe, Inc.
Corel WordPerfect is a registered trademark of Corel Corporation.
Intel is a trademark of Intel Corporation.
Microsoft, MS, MS-DOS, Word, Excel, and PowerPoint are registered trademarks, and Windows is a
trademark of Microsoft Corporation.
SatisFAXtion is a trademark of WildCard Technologies Inc.
TextBridge® OCR ©1994-96 Xerox Corporation. All rights reserved.
All other product names are trademarks of their respective owners.
Printed in the U.S.A.
SYMANTEC LICENSE AND WARRANTY
NOTICE: SYMANTEC LICENSES THE ENCLOSED
SOFTWARE TO YOU ONLY UPON THE CONDITION
THAT YOU ACCEPT ALL OF THE TERMS CONTAINED IN
THIS LICENSE AGREEMENT. PLEASE READ THE
TERMS CAREFULLY BEFORE OPENING THIS
PACKAGE, AS OPENING THE PACKAGE WILL
INDICATE YOUR ASSENT TO THEM. IF YOU DO NOT
AGREE TO THESE TERMS, THEN SYMANTEC IS
UNWILLING TO LICENSE THE SOFTWARE TO YOU, IN
WHICH EVENT YOU SHOULD RETURN THE FULL
PRODUCT WITH PROOF OF PURCHASE TO THE
DEALER FROM WHOM IT WAS ACQUIRED WITHIN
SIXTY DAYS OF PURCHASE, AND YOUR MONEY WILL
BE REFUNDED.
LICENSE AND WARRANTY:
The software which accompanies this license (the "Software")
is the property of Symantec or its licensors and is protected by
copyright law. While Symantec continues to own the Software,
you will have certain rights to use the Software after your
acceptance of this license. Except as may be modified by a
license addendum which accompanies this license, your rights
and obligations with respect to the use of this Software are as
follows:
• You may:
(i) use one copy of the Software on a single computer;
(ii) make one copy of the Software for archival purposes, or
copy the software onto the hard disk of your computer and
retain the original for archival purposes;
(iii) use the Software on a network, provided that you have a
licensed copy of the Software for each computer that can access
the Software over that network;
(iv) after written notice to Symantec, transfer the Software on a
permanent basis to another person or entity, provided that you
retain no copies of the Software and the transferee agrees to the
terms of this agreement; and
(v) if a single person uses the computer on which the Software
is installed at least 80% of the time, then, after returning the
completed product registration form which accompanies the
Software (see the back of this guide), that person may also use
the Software on a single home computer.
• You may not:
(i) copy the documentation which accompanies the Software;
(ii) sublicense, rent or lease any portion of the Software;
(iii) reverse engineer, decompile, disassemble, modify,
translate, make any attempt to discover the source code of the
Software,
or create derivative works from the Software; or
(iv) use a previous version or copy of the Software after you
have received a disk replacement set or an upgraded version
as a replacement of the prior version, unless you donate a
previous version of an upgraded version to a charity of your
choice, and such charity agrees in writing that it will be the sole
end user of the product, and that it will abide by the terms of
this agreement. Unless you so donate a previous version of an
upgraded version, upon upgrading the Software, all copies of
the prior version must be destroyed.
• Sixty Day Money Back Guarantee:
If you are the original licensee of this copy of the Software and
are dissatisfied with it for any reason, you may return the
complete product, together with your receipt, to Symantec or
an authorized dealer, postage prepaid, for a full refund at any
time during the sixty day period following the delivery to you
of the Software.
• Limited Warranty:
Symantec warrants that the media on which the Software is
distributed will be free from defects for a period of sixty (60)
days from the date of delivery of the Software to you. Your sole
remedy in the event of a breach of this warranty will be that
Symantec will, at its option, replace any defective media
returned to Symantec within the warranty period or refund the
money you paid for the Software. Symantec does not warrant
that the Software will meet your requirements or that operation
of the Software will be uninterrupted or that the Software will
be error-free.
THE ABOVE WARRANTY IS EXCLUSIVE AND IN LIEU OF ALL
OTHER WARRANTIES, WHETHER EXPRESS OR IMPLIED,
INCLUDING THE IMPLIED WARRANTIES OF
MERCHANTABILITY, FITNESS FOR A PARTICULAR PURPOSE
AND NONINFRINGEMENT. THIS WARRANTY GIVES YOU
SPECIFIC LEGAL RIGHTS. YOU MAY HAVE OTHER RIGHTS,
WHICH VARY FROM STATE TO STATE.
• Disclaimer of Damages:
REGARDLESS OF WHETHER ANY REMEDY SET FORTH
HEREIN FAILS OF ITS ESSENTIAL PURPOSE, IN NO EVENT
WILL SYMANTEC BE LIABLE TO YOU FOR ANY SPECIAL,
CONSEQUENTIAL, INDIRECT OR SIMILAR DAMAGES,
INCLUDING ANY LOST PROFITS OR LOST DATA ARISING
OUT OF THE USE OR INABILITY TO USE THE SOFTWARE
EVEN IF SYMANTEC HAS BEEN ADVISED OF THE
POSSIBILITY OF SUCH DAMAGES.
SOME STATES DO NOT ALLOW THE LIMITATION OR
EXCLUSION OF LIABILITY FOR INCIDENTAL OR
CONSEQUENTIAL DAMAGES SO THE ABOVE LIMITATION
OR EXCLUSION MAY NOT APPLY TO YOU.
IN NO CASE SHALL SYMANTEC’S LIABILITY EXCEED THE
PURCHASE PRICE FOR THE SOFTWARE. The disclaimers and
limitations set forth above will apply regardless of whether you
accept the Software.
• U.S. Government Restricted Rights: All Symantec products
and documentation are commercial in nature. The software
and software documentation are “Commercial Items”, as that
term is defined in 48 C.F.R. §2.101, consisting of “Commercial
Computer Software” and “Commercial Computer Software
Documentation”, as such terms are defined in 48 C.F.R.
§252.227-7014(a)(5) and 48 C.F.R. §252.227-7014(a)(1), and
used in 48 C.F.R. §12.212 and 48 C.F.R. 227.7202, as applicable.
Consistent with 48 C.F.R. §12.212, 48 C.F.R. §252.227-7015, 48
C.F.R. §227.7202 through 227.7202-4, 48 C.F.R. §52.227-14, and
other relevant sections of the Code of Federal Regulations, as
applicable, Symantec’s computer software and computer
software documentation are licensed to United States
Government end users with only those rights as granted to all
other end users, according to the terms and conditions
contained in this license agreement. Manufacturer is Symantec
Corporation, 10201 Torre Avenue, Cupertino, CA 95014.
• General:
This Agreement will be governed by the laws of the State of
California. This Agreement may only be modified by a license
addendum which accompanies this license or by a written
document which has been signed by both you and Symantec.
Should you have any questions concerning this Agreement, or
if you desire to contact Symantec for any reason, please write:
Symantec Customer Sales and Service, 10201 Torre Avenue,
Cupertino, CA 95014.
Credits
The WinFax PRO 10.0 product team – This product was developed and brought to you by the following teams:
Product Management, Program Management, Software Development, Documentation, Software Quality
Assurance, International Product Engineering, Modem and Communications Lab, Marketing, Online Business,
Multimedia, User-Centered Design and Engineering, External Testing, Localization, Customer Support, Technical
Support, and Shipping.
C
O
N
T
E
N
T
S
About This Guide
Contents ..............................................................................................................v
Assumptions .......................................................................................................v
Using the Online Help ......................................................................................vi
Getting Help in a Dialog ..................................................................................vii
Documentation Feedback ...............................................................................viii
1
Introducing WinFax
About WinFax ..................................................................................................1-9
Different Ways to Use WinFax ..............................................................1-10
Easier, Faster, and Cheaper Faxing ..............................................................1-11
What’s New in This Version .........................................................................1-12
The WinFax PRO Program Group ................................................................1-13
2
Installing WinFax
Reviewing System Requirements ..................................................................2-16
Windows NT/2000 Considerations ...............................................................2-17
Granting Special Access Rights to Users and Groups ..........................2-18
Upgrading From an Earlier Version .............................................................2-18
Before You Install WinFax ............................................................................2-19
Starting the WinFax Installation ....................................................................2-20
Troubleshooting the Installation ...................................................................2-20
Updating WinFax Using LiveUpdate ............................................................2-21
Uninstalling WinFax ......................................................................................2-22
3
Getting Started
Starting and Exiting WinFax Programs .........................................................3-23
Saving Time With the Controller ..................................................................3-25
About the Controller Icon ..............................................................3-26
4
Personalizing Your Setup
Defining WinFax Settings ..............................................................................4-29
Personalizing Cover Pages ............................................................................4-30
Getting Your Signature into WinFax .....................................................4-30
Adding your signature to a fax .............................................................4-32
i
Creating Custom Cover Pages ............................................................... 4-32
Customizing the Quick Cover Page ............................................... 4-35
Specifying a Default Cover Page ........................................................... 4-35
Setting Up Phonebooks ................................................................................ 4-36
Creating WinFax Phonebooks ............................................................... 4-37
Creating Recipient Records in Phonebooks .................................. 4-38
Creating Group Records in Phonebooks ...................................... 4-39
Importing Phonebook Recipients ......................................................... 4-40
Using Phonebooks from Other Programs ............................................ 4-40
Basic Support .................................................................................. 4-41
Advanced Support .......................................................................... 4-41
Setting Up Calling Cards ............................................................................... 4-42
Advanced Features for Personalizing Your Setup ....................................... 4-44
5
Sending Faxes
Personalizing Your Faxes ............................................................................. 5-47
Understanding How WinFax Sends Faxes ................................................... 5-48
Methods of Sending Faxes ............................................................................ 5-48
Faxing One or More Documents .......................................................... 5-49
Faxing one or more documents as a self-viewing email attachment . 5-53
Faxing a Cover Page with a Note ......................................................... 5-55
Faxing to a Group ................................................................................. 5-56
Drag and Drop Faxing .................................................................................. 5-58
Charging Faxes to a Calling Card ................................................................. 5-58
Scheduling Faxes ........................................................................................... 5-59
Previewing Faxes .......................................................................................... 5-60
Confirming Successful Transmission ............................................................ 5-62
Confirming Successful Transmission ..................................................... 5-63
Re-sending Faxes .......................................................................................... 5-64
6
Receiving Faxes
Preparing to Receive Faxes .......................................................................... 6-68
Methods of Receiving Faxes ......................................................................... 6-68
Receiving Faxes Automatically .............................................................. 6-68
Receiving Faxes Manually ..................................................................... 6-70
Setting Notification Options ......................................................................... 6-70
Setting Up Pager and SMS Text Messaging Notification ...................... 6-71
Enabling Receive Rules ......................................................................... 6-72
Scheduling Receive Rules ...................................................................... 6-72
Forwarding Faxes .......................................................................................... 6-73
Forwarding Faxes Manually .................................................................. 6-73
Forwarding Faxes Manually by Email ................................................... 6-73
Forwarding Faxes Automatically ........................................................... 6-75
ii
Checking for New Faxes ............................................................................... 6-76
Junk Fax Management .................................................................................. 6-77
7
Viewing and Printing Faxes
Methods of Viewing Faxes ........................................................................... 7-81
Viewing Faxes on an Individual Basis .................................................. 7-82
Viewing Fax Details or Miniature Pages ............................................... 7-83
Rotating Fax Pages ........................................................................................ 7-83
Removing Transmission Specks ................................................................... 7-84
Methods of Printing Faxes ............................................................................ 7-85
Printing Faxes While Viewing ............................................................... 7-85
Printing Faxes From the Logs Window ................................................ 7-85
8
Logging, Storing, and Organizing Faxes
Logging Faxes ................................................................................................ 8-88
How Message Manager Organizes Log Records .................................. 8-89
Log Record Information ......................................................................... 8-89
Message Types ................................................................................ 8-89
Message Priority .............................................................................. 8-89
Transmission Status ........................................................................ 8-90
Organizing Faxes .......................................................................................... 8-90
Creating Message Stores and Message Folders .................................... 8-90
Deleting Faxes ............................................................................................... 8-93
Importing Log Records ................................................................................. 8-95
Generating Reports ....................................................................................... 8-95
Troubleshooting WinFax
Other Sources of Troubleshooting Information ......................................... A-98
Improving Performance ............................................................................... A-99
Checking the Basics ................................................................................... A-101
Checking Your Modem .............................................................................. A-101
Checking Dialing Setup ............................................................................. A-103
How WinFax Dials Numbers .............................................................. A-104
Sending Problems ...................................................................................... A-109
Receiving Problems .................................................................................... A-112
Viewing and Printing Problems ................................................................. A-113
Phonebook and Log Problems .................................................................. A-114
Using WinFax and ACT!
Getting the Most Out of WinFax and ACT! 4.0/2000 ............................... B-117
Integrating ACT! 4.0/2000 With WinFax ................................................... B-118
Faxing Documents to ACT! 4.0/2000 Contacts ......................................... B-119
iii
Logging Faxes in ACT! 4.0/2000 ................................................................ B-122
Viewing Faxes ............................................................................................ B-123
Symantec Service
and Support Solutions
Product Registration Form
WinFax CD Exchange Form
iv
P
R
E
F
A
C
E
About This Guide
This user’s guide describes how to use the most popular features in
WinFax™ PRO 10.0, a fax program from Symantec. This product runs
under Microsoft Windows 95/98, Windows NT 4.0, and Windows 2000.
This preface describes the conventions used in this guide and in the online
help. For an introduction to WinFax, see Chapter 1, “Introducing WinFax”.
Contents
This guide contains instructions for the most commonly used features in
WinFax. For a complete set of information and instructions, use the online
help (see page vi)
Section I: Getting Started – This section introduces WinFax and walks
you through the installation.
Section II: Using WinFax – This section describes how to use WinFax. It
covers personalizing your faxing setup, sending and receiving faxes, and
viewing and printing faxes, and managing your faxes and logs.
Section III: Appendixes – The appendixes cover information that may be
useful to you but is not part of the most commonly used feature set.
Assumptions
This guide assumes you are familiar with the version of Windows you are
using. If you are not familiar with Windows terms such as “dialog”, “icon”,
“option”, or “drop-down list”, see your Windows documentation.
v
About This Guide
Using the Online Help
The Help Topics dialog is the main entry into the online help. As such, it
contains links to both feature overviews, “how to” instructions for the most
commonly used features, and troubleshooting information.
To open the Help Topics dialog:
1
In Message Manager, click WinFax Help Topics on the Help menu.
The Help Topics dialog appears.
2
Click the Contents tab, if it is not already selected.
Click a book to display the
topics available
Use to quickly locate information
using a standard index
Use to search for words in
the online help
3
vi
Select the help options you want to use.
Getting Help in a Dialog
Getting Help in a Dialog
Help button
in upper right
corner of most
WinFax dialogs
and window
Many WinFax dialogs and windows contain a help button (called the
What’s This button) in the upper right corner that you can use to display
information about on-screen components, such as buttons and individual
fields in dialogs.
To view the pop-up help for an on-screen component:
In a dialog, click the What’s This? button in the upper right corner,
then click any screen element. A pop-up appears over the element.
What’s This? help button
Help pop-up contains
information about options
and controls in the dialog
vii
Documentation Feedback
Symantec is interested in your suggestions for improving both the print and
the online documentation for WinFax. We are interested in knowing what
works and what needs improvement. Did you find errors, omissions, or
confusing information? Tell us if you found information too difficult to find.
Tell us where you looked for information, and where you looked first.
Your feedback will help shape future versions of the documentation for
WinFax.
To forward your feedback, use one of the following methods:
Q
Fax – Fax your comments to (416) 441 0333 to the attention of the
Technical Publications Department.
Q
Postal letter – Send a letter to:
Symantec Corporation
Technical Publications Department
895 Don Mills Road, 500-2 Park Centre
Toronto, Ontario M3C 1W3 (Canada)
All feedback will be gathered and considered for future releases by our
Technical Publications Department. Your feedback is valuable and very
much appreciated.
C
H
A
P
T
E
R
Introducing WinFax
1
This chapter introduces WinFax PRO, a fax program for Windows 95/98,
Windows NT 4.0, and Windows 2000. Topics in this chapter include:
Q
how WinFax PRO can improve your efficiency and productivity
Q
an overview of WinFax PRO features and programs
About WinFax
WinFax turns your computer into a fax machine that sends and receives
faxes. Using WinFax, you can fax documents from your computer to
any fax number in the world, anytime. In addition to being able to send
faxes from your computer, WinFax PRO also provides a wide variety of
features for personalizing and automating your faxes.
Easier
Assemble your faxes just like you would traditional faxes, and preview and
modify them while you are creating them. Check for new messages in one
place. Conveniently access fax numbers directly from your WinFax or
contact manager phonebook.
Faster
Fax right from your computer to one or more people. Faxes transmit
faster with improved fax compression. WinFax detects and corrects
conditions that could otherwise cause faxes to fail. Send laser-quality text
and photo-quality graphics.
Cheaper
Using WinFaxyou can save on long distance charges by scheduling faxes
to be sent at off-peak times. WinFax also supports your calling card so
that sending faxes from a hotel room when you are on the road does not
get too expensive.
1-9
Introducing WinFax
Different Ways to Use WinFax
In most cases, you use WinFax with a modem that is attached to your
computer. However, WinFax also works with a variety of other modem-like
communications devices. WinFax works with these devices in a manner
similar to how it works with a local modem. If you want to use WinFax
with one of these communications devices, you must set up and activate
the device in WinFax.
You can set up and activate the following communications devices in
WinFax:
1-10
Q
modems – You can use different types of modems with your
computer, including external, internal, memory modems, PC card
(PCMCIA), and cellular. For more information, see “Checking Your
Modem” on page A-101.
Q
ISDN – With an ISDN card that uses CAPI 2.0 drivers attached to
your computer, WinFax can communicate with standard Group 3
fax devices on traditional analog phone lines as well as digital
ISDN lines at speeds of up to 14,400 bps. (Both the card and the
drivers must support G3 faxing.) For more information, look up
“ISDN” in the online help index.
Q
WinFax PRO Fax Sharing – Using WinFax PRO Fax Sharing, you
do not need to have a modem directly attached to your computer
to send and receive faxes—you can send and receive faxes by
installing WinFax Client and using modems attached to a WinFax
Host station on your network. For more information, look up “Fax
Sharing” in the online help index, or see the Fax Sharing User’s
Guide (FAXSHARE.PDF) located in the DOCS directory on your
WinFax installation CD.
Easier, Faster, and Cheaper Faxing
Easier, Faster, and Cheaper Faxing
You can choose from a wide variety of powerful features in WinFax PRO to
customize your faxing needs. The table below highlights some of the most
popular features in WinFax.
When you …
Did you know you can do this?
Send faxes
•
•
•
•
•
•
•
Receive and view
faxes
• Receive faxes automatically—without interrupting your work!
• Forward faxes automatically to your next destination, or use remote
retrieval when you get there.
• Have WinFax call your cellular phone or pager, to notify you that you have
received new faxes.
• Filter out unwanted ‘Junk Mail’ faxes, using Caller ID or CSID.
• View faxes and print them, or print them automatically upon receipt.
• Rotate fax pages received sideways or upside down.
• Remove transmission specks on received faxes.
• Edit faxes you receive by circling text and adding review comments, or
by converting them to text you can edit.
• Organize faxes by creating folders.
Use two phone
lines with WinFax
• Double your faxing capabilities by using two modems or communications
devices and two phone lines to send faxes, or set up one line for sending
faxes and the other for receiving.
Use phonebooks
•
•
•
•
Drag and Drop to fax any document instantly.
Add your signature to faxes and cover pages.
Send faxes as self-viewing email attachments.
Combine multiple documents from various programs into one fax.
Scan a paper document into your computer and fax it.
Send the same fax to more than one person.
Include cover pages with faxes. Choose from cover pages in the WinFax
Cover Your Fax collection, or create your own.
• Preview faxes before sending them.
• Schedule faxes so they are sent during off-peak hours.
Create phonebooks for storing addresses and numbers.
Organize your phonebooks using folders.
Specify special dialing instructions for specific individuals.
Use phonebooks from contact managers such as ACT! and GoldMine.
1-11
Introducing WinFax
When you …
Did you know you can do this?
Use your email
package with
WinFax
• If you use a supported email program, including Microsoft Exchange or
Microsoft Outlook, email faxes as self-viewing attachments directly from
within WinFax.
What’s New in This Version
If you are upgrading from a previous version of WinFax, read this section
to learn about the new features in this version.
1-12
Q
Send and forward faxes by email -- Now you can send or
forward a fax in self-viewing format to any email address. Your
message arrives looking exactly the way you want it to, and your
recipient does not need to own a fax machine.
Q
Send photo-quality faxes -- With WinFax Photo Quality faxing,
ensure that your customers see exactly what you want them to see.
Simply choose the Photo Quality option when printing your
documents to WinFax, and you can include high-quality graphics
and photos in your faxes to show your customers your best side.
Q
Add a personal touch by adding your signature to outgoing
faxes – Small details are often what make a business seem more
professional. With WinFax you can easily import or capture your
signature and then use the fast new Signature button to add it to
outgoing faxes.
Q
Automatically configure phonebooks and contact managers - Winfax now automatically checks for and configures all
compatible phonebooks and Personal Information Managers in
your system to ensure that they work perfectly right from the start.
Q
Use your Outlook Express Address Book in Winfax -- Now
use your Outlook Express contact list from the Winfax Send dialog
to address outgoing faxes and emails.
Q
Drag and Drop faxing -- Drag files from any folder to the new
Winfax Drag and Drop Depot desktop icon to instantly fax any
document.
Q
Enhanced dialing configuration -- Improved dialing rules allow
you to easily manage split, overlaid, and multiple local area codes.
Q
Store faxes outside of Winfax -- Now you can store Winfax fax
documents outside of Winfax in any Windows folder.
The WinFax PRO Program Group
Q
Filter out unwanted faxes – Unsolicited ‘junk mail’ faxes cost
you time and money. With the new Junk Fax management feature,
you can enter a fax source’s Caller ID or CSID to filter out
unwanted incoming faxes, such as advertisements and flyers.
Receive only the faxes you want – and need – to receive.
Q
Create detailed reports -- Track your business communications
quickly and easily. Generate detailed, printable reports about sent
and received faxes based on criteria you define.
The WinFax PRO Program Group
Program Icon Details
Controller – loads automatically when you start Windows and appears as an icon in
the Windows system tray. The Controller provides quick and easy access to many
WinFax features and allows you to send and receive faxes when Message Manager is
not running. The Controller also provides a quick and easy way to check for new
faxes and view new faxes. To use the Controller, right click the Controller icon on the
taskbar. For more information, see “Saving Time With the Controller” on page 3-25.
Install Directory – This is a shortcut to the WinFax installation directory.
Program Setup – Program Setup is the program you use to set up WinFax. You
can configure your modems or communications devices, define how you want to send
and receive faxes, set up WinFax to notify you when you receive new faxes, and
more.
Send New Fax – Use this to open the Send dialog to send a fax without opening
Message Manager.
WinFax PRO Message Manager – Message Manager is the main program you use for
all your faxing activities—preparing faxes, sending and receiving faxes, using
phonebooks, and so on. From Message Manager, you can access Fax Viewer, the tool
you use to view and print faxes you receive, and Cover Page Designer, the tool you
use to modify cover pages or to create your own cover pages from scratch. From
Message Manager, you can also install macros that add faxing commands to the
following programs: Microsoft Excel (versions 2000, 97, 7.0, and 5.0), Microsoft Word
(versions 2000, 97, 7.0, and 6.0) and Corel WordPerfect (versions 7, 8 and later). For
more information about macros, see the WFXMACRO.TXT file in the \WinFax\Macros
folder.
1-13
C
H
A
P
T
E
R
Installing WinFax
2
This chapter describes the WinFax PRO installation process. Topics in this
chapter include:
Q
reviewing system requirements
Q
upgrading from an earlier version
Q
installing WinFax
Q
updating WinFax using LiveUpdate
Q
troubleshooting installation problems
Q
uninstalling WinFax
Before you install WinFax, we recommend that you read the system
requirements section on page 2-16 to familiarize yourself with the
hardware and software requirements.
If you are upgrading from an earlier version of WinFax, we recommend
that you also read the upgrading section on page 2-18.
If you encounter problems during the installation, see the
troubleshooting section on page 2-20.
Fax network users: If you are installing a network version of WinFax,
WinFax PRO Fax Sharing, see FAXSHARE.PDF on the WinFax installation
CD. This document describes the planning issues and procedures for
installing WinFax as a client on your existing fax network. (To view this
file, you must first install the Adobe Acrobat Reader included on the
WinFax CD.)
2-15
Installing WinFax
Reviewing System Requirements
The following table outlines both the minimum and the recommended
system requirements for installing and running WinFax under Windows 95/
98, Windows NT 4.0, and Windows 2000.
Equipment
Minimum
Recommended
Operating
system*
Windows 95/98
Windows 95/98
Windows NT 4.0 Workstation
Windows NT 4.0 Workstation
Windows 2000 Workstation
Windows 2000 Workstation
Computer
Pentium 166 processor, a mouse, a CD- Pentium 200 processor, a mouse, a CDROM drive, and an SVGA graphics
ROM drive, and an SVGA graphics
display (800x600 resolution, 256 colors). display (800x600 resolution, 256 colors).
Computer
memory
Windows 95/98 – 32 MB (64 MB for
2 modem support)
Windows 95/98 – 32 MB or more
Windows NT 4.0/2000 – 64 MB or more
Windows NT 4.0/2000 – 32 MB
Hard disk space
(approximate)
Modems or
devices
Use one or two
ISDN
Use one
Phone line(s)
Use one or two
Minimum Install
Typical Install
80 MB for WinFax files
5 MB for temporary installation files
100 MB for WinFax files
5 MB for temporary installation files
Additional free space for faxes
Additional free space for faxes
Fax-capable modem -- Class 1, Class 2/ Fax-capable modem -- Class 1 to use
2.0, CAS-compatible. Caller ID capability features such as binary file transfer
recommended.
(BFT), polling, and error correction.
Caller ID capability required for some
Any ISDN card using CAPI 2.0 drivers.
Both the card and drivers must support features.
G3 faxing and DTMF detection.
Any ISDN card using CAPI 2.0 drivers.
Both the card and drivers must support
G3 faxing and DTMF detection.
One phone line connected to each each
One phone line connected to each
modem or device you use (maximum 2 modem or device you use (maximum 2
modems or devices and 2 phone lines) modems or devices and 2 phone lines)
* It is anticipated that WinFax will support future versions of popular
operating systems. See the online help for more information.
2-16
Windows NT/2000 Considerations
Windows NT/2000 Considerations
If you are running Windows NT or Windows 2000, note the following:
Q
Installation for multiple user accounts – After you install
WinFax once on a computer running Windows NT 4.0/2000, all
users with Windows NT/2000 accounts on that computer can use
WinFax. With this type of installation, users share the same set of
logs, archives, phonebooks, and so on. To install WinFax, you
must have an account with administrative privileges. For more
information, see “Starting the WinFax Installation” on page 2-20.
Q
Fax header personalized for each user – After WinFax is
installed, the program prompts each user to customize their
personal fax header the next time they log on to their
Windows NT/2000 account.
Q
Users share common program and modem settings – Most
program and modem settings are shared by all users and cannot
be modified by users that do not have administrative rights. If
desired, an administrator can set up WinFax so that specific users
and groups can change the shared WinFax settings. For more
information, see “Granting Special Access Rights to Users and
Groups” on page 2-18.
Q
NT/2000 Services compatibility – The Windows NT/2000
Service logs on as a system account (as opposed to a user account)
so you can receive faxes and voice messages when no one is
signed on to a user account. For more information, look up “NT/
2000 Service” in the online help index.
Note for Windows NT/2000 upgraders: If you upgraded to
Windows NT 4.0/2000 from Windows NT 3.51 and you have Microsoft RAS
installed, remove your modem from your Modems control panel before
you install WinFax. When you install WinFax, the WinFax Setup program
prompts you to reinstall your modem. If you do not remove your modem
before installing WinFax, you may need to reconfigure your modem after
installing WinFax. For more information, look up “RAS” in the online help
index.
2-17
Installing WinFax
Granting Special Access Rights to Users and Groups
If an option cannot be changed by a Windows NT/2000 user, it is disabled
(for example, a menu command or an option in a dialog box is “grayed
out”). To enable users to modify shared program and modem settings, an
administrative user must grant special access rights to individual user or
group accounts using the RegAccess utility installed with WinFax.
Granting special rights to users enables them to edit all the shared settings,
but it does not enable them to use LiveUpdate, Uninstall, or Reinstall. If
you want users to be able use all features, you must grant administrative
privileges to the appropriate group or user accounts (see your
Windows NT/2000 documentation).
To enable users to modify shared WinFax settings:
1
Click the Windows Start button, and then click Run. The Run
dialog appears.
2
In the Open field, type …
“C:\PROGRAM FILES\SYMANTEC\WINFAX\REGACCES.EXE”
Notes: Include quotation marks around the path. RegAccess is
located in the WinFax installation folder.
3
Click OK. The RegAccess utility starts and the WinFax Shared
Settings Permissions dialog appears.
4
Click Add. The Add Users And Groups dialog appears.
5
In the Names list, click the users or groups you want to add to the
Authorized list, and then click Add.
Note: If you want to grant special access rights to all users, click
the Everyone group.
6
Click OK. The WinFax Shared Settings Permissions dialog
reappears, displaying the users and groups in the list.
Upgrading From an Earlier Version
If you are upgrading from an earlier version of WinFax, you do not have to
uninstall your previous version because the Setup program automatically
detects and upgrades the program. In addition, when you upgrade by
installing over a previous version, WinFax retains your data and
customizations (your faxes, logs, phonebooks, modem settings, dialing
2-18
Before You Install WinFax
settings, user settings, calling card information, attachments, cover pages,
and so on).
Before You Install WinFax
To ensure a smooth installation, we recommend you follow the
procedure below before you install WinFax.
Before you install WinFax:
1
Review the Read Me file.
2
Exit all programs.
3
If you have an external modem, turn it on. (If you have an
internal modem, it should be already turned on, as it starts
when you start Windows.)
Two modems/phone lines: If you have more than one
modem and two phone lines, the Setup program detects and
sets up one of your modems during the installation. To use
WinFax with two modems, you must add the second modem
later, after the installation is complete (Start Program Setup and
then double click Modems And Other Communications Devices).
4
Check for sufficient disk space. Your requirements will vary,
depending on the type of installation you choose. See “Reviewing
System Requirements” on page 2-16.
5
If you are upgrading from an earlier version of WinFax, see
“Upgrading From an Earlier Version” on page 2-18.
6
If you are installing under Windows NT or Windows 2000, see
“Windows NT/2000 Considerations” on page 2-17.
7
If more than one person in your organization is installing
WinFax, your adminstrator can automate the process using a
scripted installation. For more information, see the scripted
installation guide (WFSCRIPT.PDF) on the WinFax installation CD.
2-19
Installing WinFax
Starting the WinFax Installation
The Setup program guides you through the installation process by
prompting you for information and automatically determining your system
configuration, modem setup, COM port location, and available disk space.
Note to Windows NT/2000 users: If you are installing WinFax under
Windows NT or Windows 2000, you must have administrative privileges.
To install WinFax:
1
Start Windows.
2
Insert the WinFax CD into the CD-ROM drive.
3
Do one of the following:
Q
The WinFax multimedia installation program starts – Follow
the instructions on the screen to install WinFax.
Q
The WinFax multimedia installation program does not start –
Click the Windows Start button and click Run. The Run dialog
appears. In the Open field, type …
D:\WINFAX\DISK1\SETUP.EXE
… where “D” is the letter of your CD-ROM drive. Click
OK. The Setup program starts. Follow the instructions on
the screen. Click Next to continue.
Troubleshooting the Installation
Installing WinFax is easy; simply follow the instructions on your screen.
However, if you encounter difficulties with the installation, see the
following table.
Solutions
Details
Check for
sufficient disk
space
The Setup program checks for sufficient disk space before proceeding with the
installation. If a message appears warning that you do not have enough disk space,
exit the Setup program and do any or all of the following to create additional
space:
• Delete program and data files that you no longer require.
• Empty the Recycle Bin on the Windows desktop.
• Delete temporary files (see “Checking the Basics” on page A-101).
2-20
Updating WinFax Using LiveUpdate
Solutions
Details
Copy the CD
image to your
hard drive
If you are having difficulty installing WinFax from a CD-ROM, copy the CD
image to a directory on your hard drive and install WinFax from that directory.
Optimize your
hard drive
Files are stored in one location on the hard drive, if possible. However, as files are
added and deleted, the availability of sufficient space in one location decreases, and
files must be broken up and stored in fragments throughout the drive. File
fragmentation slows down disk access, which can in turn slow down your
installation and program performance. If necessary, defragment the hard drive to
rearrange files before beginning the installation. For more information about
defragmenting your hard drive, see your Windows documentation.
Use 16-bit
drivers
Windows 95/98 and Windows NT 4.0/2000 are all 32-bit operating systems
designed to work best with 32-bit software. However, many devices, such as
modems, hard drives, and CD-ROM drives, may still use 16-bit software drivers.
This can cause conflicts in Windows, resulting in faulty operation when using or
installing WinFax. Whenever possible, use 32-bit device drivers. If you experience
problems with system devices that worked properly under Windows 3.1, contact
your hardware vendor or manufacturer for software updates or device drivers.
Updating WinFax Using LiveUpdate
You can use the LiveUpdate feature from Symantec to update your
installation of WinFax. LiveUpdate connects to the Symantec Web site and
automatically searches for and installs updated files, such as patches, and
modem definitions.
Note to Windows NT/2000 users: To use the LiveUpdate feature, your
Windows NT/2000 account must have administrative privileges.
To update WinFax using LiveUpdate:
1
Start Message Manager (see page 3-24).
2
On the Help menu, click LiveUpdate. The LiveUpdate wizard
starts.
3
Follow the instructions on the screen. Click Next to proceed.
2-21
Installing WinFax
Uninstalling WinFax
At some point, you may want to uninstall WinFax (for example, you might
want to reinstall WinFax). When uninstalling and reinstalling WinFax, you
can back up your data folder if you do not want to lose your phonebooks,
cover pages, and faxes. For more information, look up “backing up” in the
online help index.
Note to Windows NT/2000 users: To use the Uninstall feature, your
Windows NT/2000 account must have administrative privileges.
To uninstall WinFax:
2-22
1
Click the Windows Start button, point to Settings, and then click
Control Panel. The Control Panel folder opens.
2
Double click Add/Remove Programs. The Add/Remove Programs
Properties dialog appears.
3
In the program list, click Symantec WinFax PRO.
4
Click Add/Remove. The WinFax PRO Uninstall program starts.
5
Follow the instructions on the screen to uninstall WinFax.
C
H
A
P
T
E
R
Getting Started
3
Once you have installed WinFax, you are ready to start exploring the
program. To install WinFax, see Chapter 2, “Installing WinFax”.
Topics in this chapter include:
Q
starting and exiting WinFax programs
Q
saving time with the Controller
Starting and Exiting WinFax Programs
WinFax includes the following separate programs:
Q
Message Manager – The main interface for retrieving, storing, and
organizing messages. It also provides access to the Cover Page
Designer and Fax Viewer.
Q
Program Setup – The main interface for changing WinFax
program settings.
Q
Controller – The tool you can use to automatically receive
messages and faxes without having to run the full WinFax
program. For more information, see “Saving Time With the
Controller” on page 3-25.
You can start the WinFax programs the same way you start any other
Windows program. You can also start the WinFax programs using the
Controller.
3-23
Getting Started
To start Message Manager:
Do one of the following:
Q
From the Start menu – Click the Windows Start button, point to
Programs, point to Symantec WinFax PRO, and then click
WinFax PRO Message Manager.
Q
From the Controller – Ensure the Controller is running (see the
procedure later in this section). Right click the Controller icon
in the Windows system tray, and then click Start Message
Manager.
Message Manager starts.
To start Program Setup:
Do one of the following:
Q
From the Start menu – Click the Windows Start button, point to
Programs, point to Symantec WinFax PRO, and then click
Program Setup. Program Setup starts.
Q
From Message Manager – On the Tools menu, click Program
Setup.
Q
From the Controller – Ensure the Controller is running (see the
next procedure). Right click the Controller icon in the Windows
system tray and click Program Setup.
Program Setup starts.
To start the Controller:
Click the Windows Start button, point to Programs, point to Symantec
WinFax PRO, and then click Controller. The Controller icon appears
in the Windows system tray.
To exit WinFax programs:
On the File menu, click Exit or Exit All.
3-24
Saving Time With the Controller
Saving Time With the Controller
The Controller is a tool that appears as an icon in the Windows system
tray. It begins automatically with Windows if you specify that it do so
during the installation of WinFax. Because it is always running (unless you
close it), the Controller gives you quick, shortcut access to the most
commonly used WinFax features. These features include the following:
Q
Receive faxes at all times – You can receive faxes even when
Message Manager is not running. When the Controller detects
an incoming fax, it receives the message in the background,
letting you continue with your work. (You must enable
automatic reception.)
Q
Send faxes – Start preparing a new fax or email fax without
starting Message Manager. When you start a new fax, the
Controller starts only the Send dialog, not Message Manager.
Q
Turn automatic reception on or off – Using the Controller,
you can enable or disable automatic reception without starting
Message Manager.
Q
Check for new messages – Recently received faxes appear on
the Controller menu. To view a fax, simply click that item on the
menu.
Q
Quickly start WinFax programs – With one click, you can
start Message Manager or Program Setup.
Q
Monitor current WinFax activities – The Controller icon
changes appearance when messages are being sent or received,
and when you have received new messages.
Q
Quickly change dialing locations – You can quickly change
your current dialing location.
Because most of the components started from the Controller do not start
Message Manager, using the Controller may reduce the amount of
system memory your computer uses.
3-25
Getting Started
About the Controller Icon
The Controller icon changes to represent the status of your WinFax
program. For example, when Auto Receive is on, a blue circle appears
behind the Controller icon. The following icons represent the Controller in
varying states:
Ready to receive, automatic
receive on – WinFax is ready to
receive faxes at any time.
Busy outgoing and incoming –
You are sending and receiving a
fax at the same time (dual line/
modem setup).
Not ready to receive, automatic
receive off – To receive faxes
when WinFax detects an incoming
call, click Manual Receive Now on
the Controller menu.
Failed send – WinFax was unable
to send a fax successfully. This icon
appears until you close the
Controller or view the Send Log.
Busy outgoing – You are sending
a fax.
New fax – A flashing Controller
icon indicates that you have new
faxes.
Busy incoming – You are
receiving a fax.
To use the Controller menu options:
1
Ensure the Controller is running (see page 3-24).
2
Right click the Controller icon in the Windows system tray. The
Controller menu appears.
View a list of your most recently
received messages. Click any
fax or message to view it
Send a fax without
starting Message
Manager (may use
less memory)
Start Message Manager
Controller icon in Windows
system tray
Start Program Setup
3
3-26
Click the desired option.
Saving Time With the Controller
To close the Controller:
1
Right click the Controller icon. The Controller menu appears.
2
Click Exit.
3-27
Getting Started
3-28
C
H
A
P
T
E
R
Personalizing Your Setup
4
This chapter describes how to personalize your faxing setup.
Topics in this chapter include:
Q
defining WinFax settings
Q
adding your signature to outgoing faxes
Q
personalizing cover pages
Q
setting up phonebooks
Q
setting up calling cards
Q
setting advanced options
Note: Some advanced features for personalizing your faxing setup are
described only in the online help.
Defining WinFax Settings
WinFax provides a single, central interface, called Program Setup, for
defining most WinFax system settings. In Program Setup, you can do the
following:
Q
specify advanced receive options, such as call discrimination, junk
fax blocking, and distinctive ring settings
Q
configure dialing options to handle ten-digit dialing, and multiple,
split, or overlaid area codes
Q
configure calling cards and credit cards for use with WinFax
Q
create fax forwarding and notification rules
Q
backup or restore your WinFax data
4-29
Personalizing Your Setup
Q
add and configure new modems and communications devices
Q
set up your system to use WinFax fax sharing
Q
specify user settings
...and much more. For instructions on starting Program Setup, see
page 3-24.
Personalizing Cover Pages
You can include a cover page with any fax. A cover page is a page that
WinFax adds to the front of your fax. It typically includes information such
as your name and fax number, the recipient’s name and fax number, the
total number of fax pages, and so on.
There are two types of cover pages:
Q
Pre-designed cover pages – WinFax includes dozens of
ready-to-use cover pages in the Cover Your Fax collection.
Q
Cover pages you create or customize – WinFax includes the
Quick Cover Page, a basic cover page without graphics that
automatically includes details such as the recipient’s name and fax
number, the date and time, and the number of pages in the fax.
You can customize the Quick Cover Page by adding text and a
graphic to it (for example, your logo). If you want to create a cover
page from scratch, you can do so using the Cover Page Designer
tool included with WinFax or the Cover Page Design wizard.
Getting Your Signature into WinFax
You can create an electronic version of your signature so you can quickly
add it to faxes or cover pages. This feature is useful, for example, when
you receive a fax and you are required to “sign” it before faxing it back to
the sender or before forwarding it to someone else.
Once you have created an electronic version of your signature in WinFax,
you can add it quickly and easily to any WinFax fax or cover page using
the Add Signature button on the WinFax Send dialog.
Note: If you want to use your signature on the Quick Cover Page, export
the image and save it as an .FXS file. For more information, look up
“exporting faxes” in the online help index.
4-30
Personalizing Cover Pages
To create an electronic version of your signature in WinFax:
1
Prepare a sheet of paper that has your signature on it. Write it at
normal size, using dark ink.
Tips: You can use your letterhead or an envelope, or tape your
business card to a blank sheet of paper. If you have an electronic
writing tablet, such as Palm Pen, you can use it to capture your
signature and import it into WinFax. If you have a scanner, you
can scan your signature or any other image to create a signature
stamp (look up “scanning” in the online help index).
2
Have someone fax it to your computer at high (fine) resolution, at
normal size, using dark ink.
3
Open the fax in Viewer.
4
On the View menu, disable Annotation.
5
On the toolbar, click the Select Area button.
6
Position the cursor at the desired start point and hold the left
mouse button down.
7
Drag the mouse to outline your signature. This is the area you will
use as your signature stamp.
8
Release the mouse button. A dotted line outlines the selected area.
9
On the Edit menu, click Create Stamp. The Select Graphic dialog
appears.
10
In the File Name field, type a file name for the signature stamp.
11
In the Description field, type a name or description to help you
identify the stamp in the future. Click Save. The signature stamp is
added to the list of available stamps.
12
On the View menu, enable Annotation.
13
On the Insert menu, click Stamp. The Insert Stamp dialog appears.
14
In the list of available stamps, click on the signature stamp you just
created.
15
Click to check the Use This Stamp As My Signature checkbox.
Click OK.
16
Position the stamp at the desired insertion point and click to test
your signature.
17
On the File menu, click Save. Exit from the Viewer. The signature
stamp is now ready for use.
4-31
Personalizing Your Setup
Notes: The signature stamp remains permanently available for future use.
You can now add it to any outgoing fax by clicking the Add Signature
button on the Send dialog.
You can also scan your signature directly into WinFax format or TIFF
format.
You can also add your signature to WinFax using an electronic writing
tablet, such as the PalmPad.
Adding your signature to a fax
You can use the Add Signature button on the WinFax Send dialog to
quickly and easily add your signature to any outgoing fax. The first time
you click the Add Signature button, WinFax instructs you on how to add
your signature to the program. After you add your signature, when you
click the Add Signature button WinFax automatically displays your
signature stamp, which you can place anywhere on your fax.
To add your signature to a fax:
1
Prepare your signature and add it to WinFax.
2
Prepare a fax to send, as usual. Enter recipient information, add
fax documents, and select the cover page you want to use, as
desired.
3
On the WinFax Send dialog fax preview toolbar, click the Add
Signature button. Viewer opens and displays the pages of the fax.
The signature stamp cursor is active.
4
Use your mouse to move the signature stamp over the fax pages to
the position where you want your signature to appear.
5
Click at the desired insertion point. Your signature appears.
6
On the file menu, click Save. Exit the Viewer.
7
Complete the outgoing fax as desired, and send.
Creating Custom Cover Pages
When you create a new cover page, you can use two methods:
Q
4-32
Cover Page Design wizard – Use the Cover Page Design wizard
to create a cover page by following step-by-step instructions.
Personalizing Cover Pages
Q
Cover Page Designer tools – Use the tools in Cover Page
Designer to create a custom cover page from scratch or to
customize one of the WinFax cover pages.
To create a custom cover page using the Cover Page Design wizard:
1
Start Message Manager (see page 3-24).
2
On the Tools menu, click Cover Page Designer. Cover Page
Designer starts and the New Cover Page dialog appears.
Use the wizard for step-by-step
instructions
Use the Cover Page Designer
program
Modify an existing cover page
3
Click Using The Cover Page Design Wizard and then click OK. The
Cover Page Design wizard starts.
4
Follow the instructions on the screen. Click Next to continue.
5
On the last panel of the wizard, click Finish to create the cover
page.
To create a cover page in Cover Page Designer:
1
Start Message Manager (see page 3-24).
2
On the Tools menu, click Cover Page Designer. Cover Page
Designer starts and the New Cover Page dialog appears.
3
Click Using The Cover Page Designer Tools.
4
Using the Size and Height fields, specify the appropriate page size
and then click OK. A new cover page appears in Cover Page
Designer.
5
OPTIONAL – Add your company logo. Do the following:
a Convert your logo to a WinFax graphic..
b On the toolbar, click the Stamp button. The Insert Stamp dialog
appears.
4-33
Personalizing Your Setup
c In the Description list, click the logo you prepared and then
click OK. The cursor changes.
d Drag the cursor to the location where you want to insert your
logo and click the left mouse button. Your logo appears.
e Resize the logo, if required.
6
OPTIONAL – Insert the appropriate text. Do the following:
a On the toolbar, click the Text button. The cursor changes.
b Click at the desired start point and hold the left mouse button
down.
c Drag the pointer to outline where you want to add the text. A
dashed line outlines the size of the text object you are creating.
d Release the mouse button. A text box appears with the cursor
positioned inside if it.
e Type the appropriate text.
f
Spell check your text. On the Tools menu, click Spelling.
Follow the instructions on screen to correct any spelling errors.
g Format the text using the tools on the Cover Page Designer
toolbar. For more information, look up “formatting text” in the
online help index.
7
OPTIONAL – Add variables such as the sender’s name, recipient’s
name, number of pages, and so on. Do the following:
a On the Insert menu, point to Recipient, Sender, or Details and
click the appropriate variable. The variable appears.
b Drag the variable to the desired location.
c Resize the variable, if required.
8
OPTIONAL – Add other graphics or text using the tools on the
Cover Page Designer toolbar. For more information, look up
“toolbar buttons” in the online help index.
9
When you are finished, click Save on the File menu. The Save
Current Page As dialog appears.
10
In the File Name field, type a name for the cover page file.
11
In the Description field, type a description for the cover page. This
is the name that appears in the Cover Page library.
Note: Do not overlap elements (such as text, graphics, or variable fields)
on cover pages, as this may cause problems when you send faxes.
4-34
Personalizing Cover Pages
Customizing the Quick Cover Page
The Quick Cover Page transmits more quickly than other types of cover
pages because it is already converted to the fax image format (.FXS) and
does not need to be converted at send time. You can modify the Quick Cover
Page at any time.
To add text or a logo to the Quick Cover Page:
1
Prepare your logo by saving it as a WinFax stamp.
2
Start Message Manager (see page 3-24).
3
On the Go menu, click Cover Pages. The Cover Pages window
opens.
4
In the cover page list, click Quick Cover Page.
5
On the File menu, click Properties. The Quick Cover Page Properties
dialog appears.
6
In the Logo section, click Select, locate the .FXS version of your logo
file, and then click Open. The Quick Cover Page Properties dialog
reappears and displays your logo.
Notes: If you have a Class 2/2.0 modem, the image does not display
in the dialog and appears only on the sent fax. CAS modems cannot
use .FXS files in this context.
7
In the Text section, do one of the following:
Q
Reference an ASCII file – Click File Name, then type the path and
file name, or click Select and browse for the file.
Q
Add your own text – Click User-Defined, then type text in the box
provided.
Q
Import a file – Click User-Defined, select the file you want to
import, and then click Open.
Note: If text is automatically inserted in this field, you can replace
the text at any time by typing over it.
Specifying a Default Cover Page
Once you create a cover page or customize one to suit your needs, you can
set up WinFax to use that design as the default cover page, so you do not
need to select it each time you send a fax. Selecting a default cover page can
save you the time of searching for and selecting a cover page each time you
4-35
Personalizing Your Setup
send a fax. When you select a default cover page, the Send dialog links
that cover page to your faxes.
If you want to select another cover page at send time or send a fax without
a cover page, you can do so without having to change the default cover
page setting. For example, this feature allows you to use a business cover
page as the default and to select other cover pages (such as a humorous
design) at send time without changing the default setting.
To specify a default cover page:
1
Start Message Manager (see page 3-24).
2
On the Go menu, click Cover Pages. The Cover Pages window
opens.
3
In the cover page list, locate the cover page you want to use as
your default, and then click that cover page.
4
On the File menu, click Set As Default.
Setting Up Phonebooks
Using phonebooks, addressing a fax is quick and easy. Instead of typing
the information every time you send a fax, you can select recipients from a
phonebook.
You can use three types of phonebooks with WinFax:
4-36
Q
WinFax phonebooks – Create and manage personal phonebooks
directly in WinFax. You can also create shared phonebooks on a
network. For more information about shared phonebooks, look up
“shared phonebooks” in the online help index. When you create
WinFax phonebooks, you can import records from other
phonebooks. For more information, see “Importing Phonebook
Recipients” on page 4-40.
Q
ACT! phonebooks – You can use your ACT! phonebooks with
WinFax (see Appendix B, “Using WinFax and ACT!”).
Q
Other phonebooks – You can use phonebooks created in other
Personal Information Manager programs (PIMs), such as
Lotus Organizer, Goldmine, and ECCO. For more information,
look up “PIM” in the online help index.
Setting Up Phonebooks
Creating WinFax Phonebooks
WinFax phonebooks can contain two types of phonebook records, or
entries: recipient records and group records. Recipient records contain
addressing information and fax settings for one person. Group records
contain a list of recipient records. Use group records to automatically
address a fax to a group of people. To modify the fax settings for a group,
you must modify each recipient record individually.
To organize your phonebook records, you can create multiple
phonebooks, or create folders within each phonebook.
To create a WinFax phonebook:
1
Start Message Manager (see page 3-24).
2
On the Go menu, click Phonebooks. The Phonebooks window
opens.
Phonebook
Group record
(always bold)
Phonebook
folders
Recipient
list
Phonebook
record information
3
On the File menu, point to New, and then click Phonebook. The
New Phonebook wizard starts.
4
Follow the instructions on the screen. Click Next to continue.
5
On the last panel of the wizard, click Finish to create the
phonebook.
4-37
Personalizing Your Setup
Creating Recipient Records in Phonebooks
Recipient records contain information that you would normally expect to
find in any standard directory. When you address a fax using a
phonebook, WinFax uses the basic recipient information (that is, the name
and fax number). Additional information you specify in the recipient
record is used for advanced WinFax features, such as scheduling, special
dialing instructions, and so on.
To create a recipient record:
1
Start Message Manager (see page 3-24).
2
On the Go menu, click Phonebooks. The Phonebooks window
opens.
3
In the phonebook list, click the appropriate phonebook.
4
On the File menu, point to New and click Recipient. The New
Recipient dialog appears.
Click to specify a
mailing address
4-38
Click to specify keywords, billing
codes, and notes
5
Click the Name And Number tab.
6
In the First Name and Last Name fields, type the recipient’s first
and last names.
7
In the Primary Fax row, type the recipient’s fax number. For
examples of domestic and international dial sequences, see the
illustration on page A-103.
Setting Up Phonebooks
8
Click the other tabs and fill in the appropriate information.
Tips: If you want to add another recipient to the phonebook without
closing the New Recipient dialog, click Add instead of OK. To use the
current record as a template for the next new record, enable Last Values.
Creating Group Records in Phonebooks
If you frequently send faxes to the same group of people, you can create a
group record, which functions as a distribution list. This saves you the time
of repeatedly sending the same fax to different people. When you send a
fax to a group, WinFax automatically distributes it to each member of the
group, but you send the fax only once.
To create a group record:
1
Start Message Manager (see page 3-24).
2
On the Go menu, click Phonebooks. The Phonebooks window
opens.
3
In the phonebook list, click the appropriate phonebook.
4
On the File menu, point to New and click Group. The Create
Group dialog appears.
5
In the Group Name field, type a name for the new phonebook
group.
6
In the Potential Group Members list, click the first recipient you
want to include in the group.
4-39
Personalizing Your Setup
7
Click Add. The recipient appears in the Group Members list.
8
Repeat steps 6 and 7 until you have added all the members of the
group.
Importing Phonebook Recipients
You can import existing phonebook records into WinFax PRO 10.x
phonebooks. File formats you can import include the following: WinFax
PRO, TalkWorks, ACT!, Dbase, Microsoft Access (via ODBC), Oracle, SQL
Server, Outlook Express, and Lotus Organizer.
Before you import recipients, gather the following information:
Q
Format of source file – What is the database format for the
phonebook you are importing from, including version information (for
example, a dBASE phonebook format)?
Q
Delimiters in source database – What are the delimiters, or
separators, used between records and fields in the database file you
are importing (for example, are commas or tabs used)?
Q
Source phonebook fields – Which fields do you want to import?
What are the names for those fields?
Q
WinFax phonebook fields – Do the fields in the source file
correspond to those in the WinFax phoneboook? What are the names
of those fields in WinFax PRO 10.0?
To import recipient records into a WinFax phonebook:
1
Start Message Manager (see page 3-24).
2
On the File menu, point to Import and click Phonebook. The Import
Phonebook wizard starts.
3
Follow the instructions on the screen. Click Next to continue.
4
On the last screen, click Finish. WinFax imports the recipient records.
Notes: If you import an ASCII record into a WinFax phonebook that
already contains a recipient record with the same name and company,
WinFax adds a duplicate record. For best results, be as accurate as possible
when specifying the field names, the order of the fields and the import file
delimiters. Otherwise, you may lose some fields and records during the
import.
Using Phonebooks from Other Programs
4-40
In WinFax, you can access information from phonebooks created in other
programs, such as ACT!, Microsoft Exchange, Microsoft Access, Microsoft
Setting Up Phonebooks
Outlook, Outlook Express, Lotus Organizer, Goldmine, and ECCO. For
information on accessing information from your ACT! phonebooks, see
Appendix B, “Using WinFax and ACT!”.
Basic Support
If WinFax detects a phonebook from another program installed on your
computer, it automatically creates a read-only link to that phonebook and
displays the phonebook records in the Send dialog and in the Phonebooks
list.
You can address faxes to recipients using read-only phonebooks as you
would using regular WinFax phonebooks. However, you cannot modify the
“external” phonebook or its records in WinFax. You must make changes
using the source program.
WinFax provides two levels of basic support for phonebooks from other
programs.
Q
Level 1 – WinFax displays only the recipient’s name, fax number,
and miscellaneous details in the phonebook. Recipient records are
sorted by last name only, and you cannot change the sort order.
Q
Level 2 – WinFax displays all applicable recipient fields in the
phonebook. Access to recipient records is faster, and you can sort
records by last name or by company.
Advanced Support
WinFax supports advanced integration of phonebooks created in other
programs using the Symantec WinFax PRO Phonebook Development Kit
(PDK). If your phonebook has been designed to integrate with WinFax via
the PDK, you can take advantage of the following advanced features (in
addition to the basic features listed above):
Q
increased speed accessing your external phonebooks from within
WinFax
Q
improved sorting capabilities
Q
ability to modify external phonebook records from within WinFax
To use these advanced integration features, set up your phonebook as an
“external” phonebook in WinFax (for details, look up “external
phonebooks, integrating with WinFax” in the online help index). WinFax
can integrate with most third-party phonebook applications using the
WinFax PDK. All third-party applications that support this advanced WinFax
4-41
Personalizing Your Setup
phonebook integration appear in the Other phonebook type list. If your
external phonebook does not appear in the list, contact your phonebook
manufacturer for more information.
Note: For more information about the WinFax PDK, see the PDK User’s
Guide (PDK.PDF), available in Adobe Acrobat format, in the DOCS folder
of your WinFax installation CD.
Setting Up Calling Cards
You can charge long distance faxes to your calling card or credit card. To
do this, your card information must appear in the dial sequence. You can
specify this information by selecting one of the calling card definitions
included in WinFax, or by creating a definition for your specific card.
Most calling cards require you to add different components to the dial
sequence. For example, you may need to specify a special access number,
including pauses. The following example illustrates a calling card dial
sequence.
Sample Dial Sequence for MCI Friends and Family
Wait
Wait
1-800-674-7000 tone 123-456-7890-1234 tone 416-555-1212
Service access number
MCI card number
Local number
Area code
When you charge faxes to your calling card, you can either charge faxes on
an individual basis or set up WinFax to charge all faxes you send from a
specific location. At the office, you might want to send faxes by dialing
directly, so the call is charged to your company’s phone bill; at home or on
the road, you might want to charge business-related faxes to your
corporate credit card.
After you set up your calling cards, you can enable any card at any time.
For more information, see “Charging Faxes to a Calling Card” on page 5-58.
To set up your calling cards:
4-42
1
Start Program Setup (see page 3-24).
2
In the list, double click Calling Cards. The Dialing Properties
dialog appears.
Setting Up Calling Cards
3
Click the Calling Cards tab, and then click New. The New Calling
Card wizard starts.
4
Follow the instructions on the screen. Click Next to continue.
5
On the last screen, click Finish. WinFax creates the calling card
definition.
To modify a calling card dial sequence:
1
Start Program Setup (see page 3-24).
2
In the list, double click Calling Cards. The Dialing Properties
dialog appears.
3
Click the Calling Cards tab.
4
In the Selected Calling Cards list, click the appropriate card.
5
Click Dial Sequence. The Dial Sequence Properties dialog appears.
Specify the
wait time
6
In the drop-down lists and fields, specify the appropriate options.
Note: If your modem skips the Wait For Bong setting and continues the
dial sequence too soon, that modem does not support the Wait For Bong
or Wait For Dial Tone options. Change the dial sequence to use Wait, and
try using a wait time of 4 or 6 seconds.
4-43
Personalizing Your Setup
Advanced Features for Personalizing Your Setup
The following table describes some of the advanced features you can use
to personalize your faxing setup. For information about these features, see
the online help.
Did you know you can …
For more information …
Set up multiple dialing locations. You can store the Look up “locations” in the
location settings you need when dialing from
online help index.
different locations.
Set up off-peak dialing times and schedule faxes for Look up “off-peak dialing”
in the online help index.
future delivery. This feature enables you either to
accommodate for international time differences or
to save money.
Specify how often and how many times WinFax
resends faxes that fail due to either a busy signal or
a “no answer” status.
Look up “retrying calls” in
the online help index.
Specify default options that WinFax applies globally Look up “send options” in
to all faxes you send, or select options on a fax-by- the online help index.
fax basis at send time. You can choose from a wide
variety of send options, including fax resolution,
printed confirmation reports, and so on.
Set up documents you fax often, so you have quick Look up “attachments” in
and easy access to them at send time. Convert them the online help index.
to fax images ahead of time for faster faxing, or
convert them at send time (to fax the most current
version).
Send faxes on your letterhead. Set up WinFax to
use letterhead on the first page or on all pages.
Look up “letterhead” in the
online help index.
Create templates for faxes you send frequently. You Look up “template” in the
online help index.
can also use this feature to save work in progress
(for example, you are interrupted, and you want to
save the fax you are working on).
4-44
Set up recurring faxes. Set up WinFax to send the
same document (faster faxing) or the most current
version of a document (takes more time).
Look up “scheduling faxes”
in the online help index.
Set up WinFax to receive faxes according to your
special requirements. Select from a wide variety of
receive options.
See Chapter 5, “Receiving
Faxes”.
Advanced Features for Personalizing Your Setup
Did you know you can …
For more information …
Set up your pager or cellular telephone so that
WinFax notifies you when you receive a fax.
Look up “notification” in the
online help index.
Modify the information that appears in your Fax
Header and Calling Station Identifier (CSID).
Look up “fax headers” and
“CSID” in the online help
index.
4-45
Personalizing Your Setup
4-46
C
H
A
P
T
E
R
Sending Faxes
5
This chapter explains the basics of sending faxes using WinFax PRO.
Topics in this chapter include:
Q
how you can personalize your faxes
Q
understanding how WinFax sends faxes
Q
faxing one or more documents
Q
sending faxes as self-viewing email attachments
Q
faxing a cover page with a note on it
Q
Drag and Drop faxing
Q
sending a fax to a group of people
Q
charging fax calls to your calling card
Q
previewing faxes before sending them
Q
signing faxes electronically
Q
monitoring fax transmission
Q
re-sending faxes
Q
For advanced sending features, such as sending binary files
(BFTs), and using advanced cover page options, see the online
help.
Personalizing Your Faxes
To personalize your faxes, you can customize your dialing setup, and
create electronic versions of your signature, create custom cover pages,
and create WinFax phonebooks.
5-47
Sending Faxes
We recommend you personalize your faxing setup before you begin
faxing. For more information, see Chapter 4, “Personalizing Your Setup”.
Understanding How WinFax Sends Faxes
Faxes typically consist of one or more documents. For example, you might
fax a letter, a price list, and a cover page. When you use a fax machine,
you would print each document you want to fax, assemble the printed
pages in the appropriate order, and then feed them into a fax machine.
Using WinFax, you can select the documents you want to fax, and then fax
them from your computer with a single click—without printing a paper
copy.
To send a fax with WinFax, you need a minimum of two things:
Q
at least one page for faxing (for example, a document you created
in a word processor or a WinFax cover page)
Q
a destination fax phone number or email address
Methods of Sending Faxes
The two most commonly used methods for sending a fax are faxing one or
more documents from your computer and faxing a one-page note, using a
cover page as the entire fax. The following table outlines these two
methods of sending faxes, as well as some of the more advanced methods.
Level
If you want to ...
For more information ...
Basic
Fax one or more documents stored on your
computer (add a cover page if you want).
See page 5-49.
Basic
Fax one or more documents stored on your
computer as a self-viewing email attachment.
See page 5-53.
Basic
Fax a cover page with a note on it.
See page 5-55.
Basic
Send a fax to a group of people.
See page 5-56.
Basic
Send a fax to an ACT! contact.
See Appendix B, “Using
WinFax and ACT!”.
Basic
Send faxes using the Controller.
See page 3-25.
Basic
Send faxes using WinFax program macros.
Look up “macro” in the
online help index.
Advanced
Send a file in its native format so the recipient can
edit it (called binary file transfer, or BFT).
Look up “BFT” in the
online help index.
5-48
Methods of Sending Faxes
Level
If you want to ...
For more information ...
Advanced
Fax a document printed on your letterhead.
Look up “letterhead” in the
online help index.
Advanced
Scan a paper document and fax it.
Look up “scanning” in the
online help index.
Advanced
Save information about a fax (such as a cover page
and the address), or save work in progress.
Look up “template” in the
online help index.
Advanced
Send faxes using DDE macros.
Look up “DDE” in the
online help index.
Advanced
Schedule a fax or send a recurring fax.
See page 5-59, or look up
“scheduling” and in the
online help index.
Faxing One or More Documents
When you fax a document, there are several ways you can start a fax and
open the Send dialog. The procedure in this section describes the
following methods of starting a fax:
Q
Opening the document in its native program – Open your
document in the program you used to create it and then print it to
the WinFax printer. Use this method if you want to view or modify
the document you want to fax.
Q
Start WinFax – Use this method if the document you want to fax
is ready to fax and you do not need to view it.
Whenever you send a fax, you can always combine multiple documents
together in the same fax. For example, you could fax a letter you created in
Word and a price list you created in Excel. Whether you start a fax by
printing to WinFax from another program or by starting WinFax, the Send
dialog appears at the appropriate time. Use the Send dialog to address the
fax and select any other options you want to use. The following illustration
highlights features available in the Send dialog.
5-49
Sending Faxes
For more information, click
here, then click any field
If you created more than one
phonebook, the phonebook list
appears here
Addressing
information
Add a recipient
to the
Recipients list
Select a cover
page
Cover page fill
and fax preview
area
Click the
cover page to
fill it
Click a fax
page to
preview it
Note: If you start your fax by printing to WinFax from another program,
some formatting changes may occur in your document when you select a
WinFax printer. Setting your printer to a WinFax printer driver before
creating documents minimizes formatting changes, but it may also limit
your selection of available fonts.
To fax one or more documents stored on your computer:
1
Start the fax by doing one of the following:
Q
Open the document you want to fax, then print it to a
WinFax printer:
a Start the appropriate Windows program and open the
document you want to fax. (For example, start Word and
open your letter.)
5-50
Methods of Sending Faxes
b On the program’s File menu, click Print. Select the desired
WinFax printer (High Quality or Photo Quality), then print
the document. WinFax converts the file to fax format and
opens the Send dialog with the document you printed
displayed in the fax preview area.
Each thumbnail represents a page in the document.
Q
Start Message Manager, then select the document you
want to fax:
a Start Message Manager (see page 3-24).
b On the Send menu, click Send New Fax. The Send dialog
appears.
c On the Insert menu, click Files. The Insert Files dialog
appears. Locate and then click the appropriate file. Click
OK.
d If you have not specified a default WinFax Printer Driver,
the Print Preferences dialog appears. Choose the desired
print option, and click OK.
e WinFax converts the file to fax format and displays the fax
in the preview area of the Send dialog.
Each thumbnail represents a page in the document.
2
OPTIONAL – Add any additional documents to the fax:
a On the Insert menu, click Files. The Insert Files dialog appears.
b Select the next document you want to appear in the fax, then
click OK.
c If you have not specified a default WinFax Printer Driver, the
Print Preferences dialog appears. Choose the desired print
option, and click OK.
d WinFax converts the file to fax format and displays the fax in
the preview area of the Send dialog, after the previous
document you added.
e Continue adding documents until all documents appear in the
fax preview area.
5-51
Sending Faxes
3
Address the fax by doing one of the following:
Q
Type the appropriate information – Type the recipient’s name,
fax number, and company name in the appropriate fields.
(If you are unsure of how to fill in the Number field, see
“Checking Dialing Setup” on page A-103. To determine what
you need to include in a dial sequence, try dialing the number
as if the call were a voice call, refer to your local phonebook,
or contact a telephone operator.)
Q
Select a recipient from a phonebook – Locate and then click the
recipient or group you want to send the fax to.
Note: If you want to send the fax to more than one person, click
Add To List and continue adding recipients. For more information
on faxing to groups, see “Faxing to a Group” on page 5-56.
4
OPTIONAL – Add a subject line to the fax. In the Subject field,
type the appropriate text (for example, “Price List” or “Sales
Report”).
5
OPTIONAL – Add a cover page by doing the following:
a In the Cover Page drop-down list, click the cover page you
want to use. The cover page appears as the first thumbnail in
the preview area.
b Type a note in the text area of the cover page, in the preview
area beside the fax thumbnails. If there is more than one text
field, press Tab to move from field to field, or click WinFax
Filler on the View menu, and then fill in the appropriate fields
in Filler.
6
OPTIONAL – Select any other options on the Options menu of the
Send dialog.
7
Click Send. WinFax begins processing your fax. If you included a
cover page and did not fill in the text area, Filler starts. Fill in the
cover page text and click Send.
WinFax processes the fax. Until the fax is sent successfully, it appears
in the Outbox in the Logs window.
Note: If you click Preview And Send instead of Send, the Preview
window opens and displays the fax. Preview the fax, annotate the
fax (optional), and then click Send Fax. For more information
about annotating a fax while you preview it, see “Previewing
Faxes” on page 5-60.
5-52
Methods of Sending Faxes
Faxing one or more documents as a self-viewing email
attachment
There are times when you want to send a document in secure, high-quality
fax format, but your recipient does not have a fax machine or faxing
software. Now you can send or forward a fax in self-viewing format to any
email address. The recipient simply double clicks the attached file to
launch the fax document in its own viewer. Your message arrives looking
exactly the way you want it to, and your recipients do not need any special
software or equipment.
Note: In order to be able to use this feature, you must first Enable Sending
Faxes By Email (in Program Setup, click Email and Outlook Integration).
To fax one or more documents as a self-viewing email attachment:
1
Start Message Manager (see page 3-24).
Q
Open the document you want to fax, then print it to a
WinFax printer:
a Start the appropriate Windows program and open the
document you want to fax. (For example, start Word and
open your letter.)
b On the program’s File menu, click Print. Select the desired
WinFax printer (High Quality or Photo Quality), then print
the document. WinFax converts the file to fax format and
opens the Send dialog with the document you printed
displayed in the fax preview area.
Each thumbnail represents a page in the document.
Q
Start Message Manager, then select the document you
want to fax:
a Start Message Manager (see page 3-24).
b On the Send menu, click Send New Fax By Email. The Send
dialog (email version) appears.
c On the Insert menu, click Files. The Insert Files dialog
appears. Locate and then click the appropriate file. Click
OK.
d If you have not specified a default WinFax Printer Driver,
the Print Preferences dialog appears. Choose the desired
print option, and click OK.
e WinFax converts the file to fax format and displays the fax
in the preview area of the Send dialog.
5-53
Each thumbnail represents a page in the document.
2
Address the email. Click the down arrow beside the To button and
select one of the following options:
Q
Add From Your Email Phonebook—In the Show Names From
drop-down list, click the phonebook containing the desired
recipient. Next click the appropriate recipient or group, and
click Add. When you have added all the desired recipients for
this fax, click OK.
Q
Add Internet Address—In the field provided, type a recipient’s
Internet email address. To add multiple recipients, separate
addresses with semi-colons. When you have added all the
desired recipients for this fax, click OK.
3
In the Subject field, type a descriptive subject for this email.
4
In the Message field, type the main body text of the message you
want to appear in this email.
5
OPTIONAL—Attach additional documents to your fax. Do the
following:
a On the Insert menu, click Files. The Insert Files dialog appears.
b Select the next document you want to appear in the fax, then
click OK.
c If you have not specified a default WinFax Printer Driver, the
Print Preferences dialog appears. Choose the desired print
option, and click OK.
d WinFax converts the file to fax format and displays the fax in
the preview area of the Send dialog, after the previous
document you added.
e Continue adding documents until all documents appear in the
fax preview area.
6
Select any other desired options in the Send dialog.
7
Click Send. WinFax sends the email with the fax attached.
Methods of Sending Faxes
Note: WinFax sends email messages from its outbox to the outbox of your
email program, from which point they are sent to your recipients. If your
email program is active, WinFax sends the email to your email program’s
Outbox immediately. If your email program is not active, WinFax holds the
email in its Outbox until you log in to your email program, and then
forwards it. After the email has gone to your email program, WinFax marks
the email message as Sent Successfully. This means only that the email has
successfully been sent to your email program Outbox. To determine
whether or not the email has been successfully sent from your email
program to your recipients, you must check the outgoing mail folder of
your email program.
Faxing a Cover Page with a Note
If you want to send only a one-page fax with a quick note on it, you can
fax a cover page instead of creating a one-page document from scratch. As
a minimum requirement for a fax, WinFax needs only one page and a
destination fax number.
To fax a cover page with a note on it:
1
Start Message Manager (see page 3-24).
2
On the Send menu, click Send New Fax. The Send dialog appears.
3
Address the fax by doing one of the following:
Q
Type the appropriate information – Type the recipient’s name,
fax number, and company name in the appropriate fields.
(If you are unsure of how to fill in the Number field, see
“Checking Dialing Setup” on page A-103. To determine what
you need to include in a dial sequence, try dialing the number
as if the call were a voice call, refer to your local phonebook,
or contact a telephone operator.)
Q
Select a recipient from a phonebook – Locate and then click the
recipient or group you want to send the fax to.
Note: If you want to send the fax to more than one person, click
Add To List and continue adding recipients.For more information
on faxing to groups, see “Faxing to a Group” on page 5-56.
4
Select the cover page you want to use by doing the following:
a In the Cover Page drop-down list, click the cover page you
want to use. The cover page appears as the first thumbnail in
the preview area.
5-55
Sending Faxes
b Type a note in the text area of the cover page, in the preview
area beside the fax thumbnails. If there is more than one text
field, press Tab to move from field to field, or click WinFax
Filler on the View menu, and then fill in the appropriate fields
in Filler.
5
OPTIONAL – Add a subject line to the fax. In the Subject field,
type the appropriate text (for example, “Price List” or “Sales
Report”).
6
OPTIONAL – Select any other options in the Send dialog.
7
Click Send. WinFax begins processing your fax. If you did not fill
in the cover page text area, Filler starts. Fill in the cover page text
and click Send.
WinFax processes the fax. Until the fax is sent successfully, it appears
in the Outbox in the Logs window.
Note: If you click Preview And Send instead of Send, the Preview
window opens and displays the fax. Preview the fax, annotate the
fax (optional), and then click Send Fax. For more information
about annotating a fax while you preview it, see “Previewing
Faxes” on page 5-60.
Faxing to a Group
You can send faxes to a group so you do not need to prepare a separate
fax for each recipient. For example, you can prepare a price list and print it
to WinFax, add all the appropriate recipients to the Recipients list, and then
click the Send button once. WinFax does the rest, sending the fax to each
recipient’s fax number.
When you send a fax to a group, you can address your fax using two
methods. If you use a phonebook to address the fax, you can either select
the recipients you want to send the fax to, or create a group record for
those individuals (this is useful if you want to send faxes to the same group
in the future). When you use any of the following methods, you can use
them alone or in combination with one another. For example, you could
type a number and select a group from a phonebook.
When you address a fax to a group, you can use any of the following
methods:
Q
5-56
Type the numbers individually – If you are sending a fax to a
group and you do not want to add the contact information for
Methods of Sending Faxes
those people to your phonebook, type the phone numbers in the
Send dialog and create a list of recipients.
Q
Select recipients from a phonebook – If you are sending a fax
to a group of recipients that are recorded in your WinFax
phonebook, you can select those names from the phonebook to
build the Recipients list. For information about creating recipient
records, see page 4-38.
Q
Select a group from a phonebook – You can address a fax by
selecting a group from a WinFax phonebook. For information
about creating group records, see page 4-39.
To address a fax to a group:
1
Prepare your fax. For information about preparing faxes, see
page 5-49 or page 5-56.
2
Address the fax to the group in the Send dialog. Do one of the
following:
Q
Type the first name and number in the address section – In the
To, Number, and Company fields, type the first recipient’s
name, fax number, and company name.
Q
Select a recipient from a phonebook – Locate and then click the
appropriate recipient record.
Q
Select a group from a phonebook – Locate and then click the
appropriate group record.
If you created more than one
phonebook, the phonebook list
appears here
Type the contact
information in this area,
then click Add To List
Select a group
record
Select a recipient
record
5-57
Sending Faxes
3
Click Add To List. The recipient or group appears in the
Recipients list.
4
Repeat steps 2 and 3 until the Recipients list is complete.
Drag and Drop Faxing
If you have Windows Explorer or File Manager open, you can fax almost
any document instantly using the WinFax Drag and Drop Depot.
To send a fax using the Drag and Drop depot:
1
Open Windows Explorer or File Manager. Locate the document or
document you want to fax.
2
On the document, click and hold down the left mouse button, and
move the mouse to drag the document over the WinFax Drag And
Drop Depot desktop icon. Release the mouse button.
3
The WinFax Send dialog appears.
4
OPTIONAL—If you have not specified a default WinFax Printer
Driver, the Print Preferences dialog appears. Choose the desired
print option, and click OK.
5
Address the fax. (For more information, see “Faxing One or More
Documents” on page 5-49.)
6
OPTIONAL – Specify any other appropriate options on the
Options menu in the Send dialog.
7
Click Send.
Charging Faxes to a Calling Card
You can charge a fax to a calling card you set up. To set up your calling
card, see “Setting Up Calling Cards” on page 4-42.
Once you enable your calling card for a location, all faxes you send from
that location are automatically charged to your calling card until you
disable the calling card for that location.
To enable a calling card for a location:
1
5-58
Prepare and address your fax. For more information, see page 5-49
or page 5-56.
Scheduling Faxes
2
In the Send dialog, point to Location on the Options menu and
click Setup. The Dialing Properties dialog appears.
3
Click the Location tab.
4
In the Location drop-down list, click the location you are sending
from.
5
Enable Use Calling Card.
Note: If you have not yet set up a calling card, you are prompted
to do so. In that case, click the Calling Card tab and set up your
calling card. For more information, see page 4-42.
6
In the Use Calling Card drop-down list, click the calling card to be
used from this location.
To disable a calling card for a location:
1
Start Program Setup (see page 3-24).
2
In the list, double click Calling Cards.
3
Click the Location tab.
4
In the Location drop-down list, click the appropriate location.
5
Disable Use Calling Card.
Scheduling Faxes
You can schedule faxes to work around international time differences or to
take advantage of lower telephone rates outside of peak business hours.
You can also schedule recurring faxes to be sent at regular intervals—daily,
weekly, monthly, or yearly.
Scheduled faxes are stored in the Outbox and are sent automatically at the
specified time. If you need to, you can put them on hold. Held faxes
remain in the Outbox until you release them. Scheduled, or “pending”
faxes are indicated by an hourglass icon. Held faxes are indicated by an
upheld palm icon.
Note: Message Manager or the Controller must be running at the time
scheduled faxes are to be sent, or the fax will not be sent.
5-59
Sending Faxes
To schedule a fax:
1
Prepare and address your fax. For more information, see page 5-49
or page 5-56.
2
If you are sending the fax to multiple recipients or groups, select
the entries in the Recipients list you want to schedule for the same
time and date. For more information, see “Faxing to a Group” on
page 5-56.
3
On the Recipient menu, click Advanced. The Delivery Options
dialog appears.
4
In the Send By drop-down list, click the modem you want to use.
5
Do one of the following:
Q
Schedule a specific time for delivery – In the Deliver drop-down
list, click At A Date And Time I Specify. Change the time and
date settings, as required.
Q
Schedule an off-peak delivery – In the Deliver drop-down list,
click During Off-Peak Hours. The fax is scheduled using the
off-peak start and end times set in the Dialing Properties dialog
(to change these settings, look up “off-peak dialing” in the
online help index.).
Previewing Faxes
Before you send a fax, you can preview it in the preview area at the
bottom of the Send dialog. The preview area displays thumbnails of your
fax pages.
In the preview area, you can do the following:
5-60
Q
Click the Cover Page thumbnail and type text directly on the
enlarged view of the cover page, pressing the Tab key to move
from field to field. Format the text if the cover page you selected is
not the Quick Cover Page.
Q
Click a thumbnail to display an enlarged view of a fax page. When
you click the Cover Page, you can fill it in the enlarged view area.
Q
Drag and drop thumbnails to rearrange fax pages before sending.
Q
Delete pages you do not want to include in the fax.
Q
Use the tools at the bottom of the preview area to magnify and
rotate the pages before sending.
Previewing Faxes
Format text on
cover pages
Thumbnail area
Tools for magnifying
and rotating pages
Preview area
You can also preview your fax in Viewer to verify the contents and page
order, or you can mark up the pages using the Annotation tools. For
example, you can use the Annotation tools to circle something or type a
note. For more information, look up “annotating” in the online help index.
To preview a fax in Viewer:
1
Prepare and address your fax. For more information, see page 5-49
or page 5-56.
2
In the Send dialog, click Preview And Send on the File menu.
WinFax Preview starts and displays the first page of the fax.
3
After viewing the fax, do any of the following:
Q
Annotate the fax – Enable Annotation and use the Annotation
toolbars. Look up “annotating” in the online help index.
Q
Return to the Send dialog – Click Return.
Q
Send the fax – Click Send.
Note: If you added a cover page and did not fill in the text area,
Filler starts. Fill in the cover page text and click Send. The Preview
window appears and displays the fax.
5-61
Sending Faxes
Confirming Successful Transmission
Depending on the options you select in the Send dialog, in the Send
Properties dialog, or in the wizard, the following may occur immediately
when you send a fax:
If you did this …
This happens …
Sent a fax to one recipient.
WinFax processes the fax immediately.
Sent a fax to multiple
recipients or a phonebook
group.
WinFax prepares to send the fax to all recipients.
Sent a fax that includes a cover Filler starts. Type the appropriate text in the
fillable fields of the cover page, then click Send
page with fillable text fields
Fax.
but you did not fill them.
Sent a fax using the Preview
And Send command.
Preview starts. Preview or annotate the fax before
sending it and click Send Fax.
Sent a fax as a self-viewing
email attachment
WinFax sends email messages from its outbox to
the outbox of your email program, from which
point they are sent to your recipients. If your
email program is active, WinFax sends the email
to your email program’s Outbox immediately. If
your email program is not active, WinFax holds
the email in its Outbox until you log in to your
email program, and then forwards it. After the
email has gone to your email program, WinFax
marks the email message as Sent Successfully.
This means only that the email has successfully
been sent to your email program Outbox. To
determine whether or not the email has been
successfully sent from your email program to
your recipients, you must check the outgoing
mail folder of your email program.
You can monitor the status of faxes you send using either the Line Status
dialog or the status bar (located at the bottom of the Message Manager
window). The Line Status dialog displays detailed transmission information,
while the status bar displays only transmission progress information. You
can cancel a fax transmission at any time from either the Line Status dialog
or the status bar.
5-62
Confirming Successful Transmission
Current fax
transmission
activity
Rate of
transmission
Current page
Cancel the
transmission
Collapse details
display area
By default, WinFax displays the Line Status dialog while sending and
receiving faxes.
Note: If you have two modems set up and both are busy, only the details
of the currently selected modem appear in the details area of the Line
Status dialog. Click the other modem to view its details.
To display the Line Status dialog:
1
Start Program Setup (see page 3-24).
2
In the list, double click Call Status And Controller. The Call Status
And Controller Properties dialog appears.
3
Click the General tab.
4
Enable Display Status Dialog.
5
Enable Bring Dialog To Front.
If you do not enable Display Status Dialog, you can still monitor the status
of incoming faxes from the status bar at the bottom of Message Manager, or
from the Controller on the Windows taskbar.
Confirming Successful Transmission
You can verify the status of a sent fax by checking the Send Log or the
Controller. The details about sent faxes, including those canceled, appear
in the record list of the Send Log folder. A check mark () indicates a fax
5-63
was sent successfully; an “x” () indicates a canceled fax or a failed
transmission.
Sometimes faxes are not sent successfully due to communication problems
such as busy or no-answer signals. In those situations, WinFax stores the
faxes in the Outbox until either they are successfully delivered or the
number of retries is exceeded.
Notes: If the number of retries is exceeded, WinFax places the fax in the
Send Log and marks it as an “unsuccessful” event. For more information,
look up “retrying calls” in the online help index. If a fax cannot be
transmitted, the Controller displays a failed fax icon. For information about
other Controller status icons, see “Saving Time With the Controller” on
page 3-25.
To verify the status of a sent fax:
1
Start Message Manager (see page 3-23).
2
On the Go menu, click Send Log. The Logs window opens and
displays details for each fax in your Send Log folder. For details on
interpreting the log record status icons, see “How Message
Manager Organizes Log Records” on page 8-89.
Re-sending Faxes
WinFax creates log records for all faxes you send (whether successful,
canceled, or failed), and stores them in the Send Log. Using these records,
you can resend faxes.
All of the original information in the Send dialog is saved with the fax—
you do not need to reassemble it. You can resubmit the fax as is, or modify
it before resending. If you are resending an unsuccessful fax, you can
resend the entire fax or just the failed pages.
To re-send an entire fax:
1
Start Message Manager (see page 3-23).
2
On the Go menu, click Send Log. The Logs window opens and
displays the contents of the Send Log folder.
3
In the record list, click the fax you want to resubmit.
4
Do one of the following:
Re-sending Faxes
Q
Send the fax as is – On the Send menu, click Send Now.
WinFax resends the fax.
Q
Make changes to the fax or address – On the Send menu, click
Resubmit. The Send dialog appears. Change the appropriate
information and click Send. WinFax resends the fax with your
changes.
To re-send failed fax pages only:
1
Start Message Manager (see page 3-23).
2
On the Go menu, click Send Log. The Logs window opens and
displays the contents of the Send Log folder.
3
In the record list, click the fax you want to resubmit.
4
On the Send menu, click Resubmit. the Send dialog appears.
5
On the Options menu, click Send Options. The Send Options
dialog appears.
6
In the When Sending section, enable If Resubmitting A Fax, Send
Failed Pages Only.
7
Click OK. the Send dialog reappears.
8
Click Send. WinFax resends the failed fax pages.
5-65
Sending Faxes
5-66
C
H
A
P
T
E
R
Receiving Faxes
6
This chapter explains the basics of receiving faxes with WinFax PRO.
Topics in this chapter include:
Q
preparing to receive faxes
Q
methods of receiving faxes
Q
receiving faxes automatically and manually
Q
setting notification options, including pager and SMS Text
Messaging notification
Q
forwarding faxes and forwarding faxes by email
Q
Junk Fax management
Q
monitoring fax reception
For advanced receiving features, such as retrieving faxes from a remote
location, see the online help.
6-67
Receiving Faxes
Preparing to Receive Faxes
Before you can receive faxes, you must have:
Q
an active modem or communications device capable of sending
and receiving faxes; the modem must be connected both to the
computer and to an active phone line
Q
Windows running
Q
Message Manager or the Controller running
Methods of Receiving Faxes
There are two basic methods of receiving faxes: automatically and
manually. You can set up WinFax to receive faxes automatically, or you
can receive faxes manually on a fax-by-fax basis. The table below
describes these basic methods as well as more advanced methods, and
indicates where you can find the corresponding information.
Level
If you want to …
For more information …
Basic
Receive faxes automatically.
See page 6-68.
Basic
Receive faxes manually.
See page 6-70.
Advanced
Retrieve faxes remotely from a computer or fax
machine that supports polling.
Look up “remote fax retrieval”
in the online help index.
Receiving Faxes Automatically
With automatic reception enabled, WinFax receives faxes automatically as
long as either Message Manager or the Controller is running. You can
continue working in any other Windows program while WinFax receives
your faxes in the background.
You can also schedule automatic reception to start and end at specific
times. For example, you might want to receive faxes only during business
hours. For more information on scheduling automatic reception, look up
“scheduling” in the online help index.
6-68
Methods of Receiving Faxes
Notes: If you are using Windows 98 with OnNow functionality, WinFax
receives faxes even when your computer is asleep. If you are running
under Windows NT/2000, you can receive faxes when you are logged out
of Windows NT/2000 using the NT/2000 service. For more information,
look up “NT/2000 service” in the online help index.
To receive faxes automatically:
1
Start Program Setup (see page 3-24).
2
In the list, double click Modems and Communications Devices.
The Modems and Communications Devices Properties dialog
appears.
3
In the devices list, enable the Active check box beside the
appropriate modem.
Note: If you want to set up two modems or devices and two
phone lines for receiving faxes, look up “dual line/modem
support” in the online help index.
4
Click Apply, and then click OK. The Program Setup dialog
reappears.
5
In the list, double click Receive. The Receive Properties dialog
appears.
6
Click the General tab.
Specify a modem and
phone line for automatic
reception (this drop-down
list appears only if you set
up two modems and two
phone lines)
Schedule
information
6-69
Receiving Faxes
7
In the When Answering On drop-down list, click the appropriate
modem or device. When you specify automatic reception settings,
they will apply to this modem.
8
Enable Automatically Answer Incoming Calls. Click Apply and
then click OK.
Tip: You can also quickly enable or disable automatic reception
from the Controller menu or from the Receive menu in Message
Manager.
Receiving Faxes Manually
To receive faxes manually, either Message Manager or the Controller must
be running. Receiving faxes manually is useful if you have only one line
for both fax and voice calls, or if you want to monitor the faxes you
receive. You can answer calls first, then manually receive faxes as needed.
To receive faxes manually:
Manually receive a fax in one of the following ways:
Q
If a call comes in and you know it is a fax – Right click the
Controller icon in the Windows system tray and click Manual
Receive Now.
Q
If you answer a fax call on a shared voice/fax line – Do not
hang up the handset right away. Right click the Controller icon
in the Windows system tray and click Manual Receive Now.
When you hear your modem pick up the line and the message
“Answering …” appears on the Line Status dialog, hang up the
handset.
WinFax prepares your modem and begins receiving the fax.
Setting Notification Options
When you are away from your computer, WinFax can monitor your
Receive Log for new messages. When you receive a new message, WinFax
can notify you by forwarding the message or, if you are unsure of where
you will be at a give time, WinFax can also notify you via your pager, SMS
text messaging enabled cellular telephone, or by email (you can then use
remote retrieval to read your messages).
You can configure automatic forwarding and notification by setting up
receive rules. Receive rules describe the faxes you want to monitor and
6-70
Setting Notification Options
how WinFax will notify you of new faxes. In addition, you can schedule
forwarding and notification to avoid disruptions at specified times. Once
you create a receive rule, you enable it for the log folder you want to
monitor.
To set up receipt notification:
1
Start Program Setup (see page 3-24).
2
In the list, double click Receive. The Receive Properties dialog
appears.
3
Click the After Receive tab.
4
Specify the options you want to use.
5
OPTIONAL— Click the Notification and Forwarding button to set
up advanced notification rules.
Setting Up Pager and SMS Text Messaging Notification
WinFax can notify your pager whenever new messages arrive in your
Receive Log. WinFax works with Alphanumeric, Numeric, and Tone Only
pagers, and SMS Text Messaging devices (such as cellular telephones). To
use the pager and SMS text messaging notification feature, you must know:
Q
the capabilities of your pager or cell phone
Q
the telephone numbers WinFax must dial to connect to your
service provider
Q
your personal identification number (if your pager or SMS text
messaging device supports this feature)
Note: If you are using an ISDN device, WinFax supports only
Alphanumeric pagers and SMS Text Messaging devices.
To set up WinFax to work with your pager or SMS text messaging
device:
1
Start Program Setup (see page 3-24).
2
In the list, double click Pager and SMS Text Messaging. The Pager
or SMS Properties dialog appears.
3
Click the General tab.
4
Click Add. The Pager and SMS Text Messaging Setup wizard starts.
5
Follow the instructions on the screen. Click Next to proceed.
6-71
Receiving Faxes
6
On the last wizard panel, click Finish.
To create a pager or SMS text messaging notification receive rule:
1
Start Program Setup (see page 3-24).
2
In the list, double click Notification And Forwarding. The
Notification And Forwarding Properties dialog appears.
3
Click the Available Rules tab.
4
Click New. The New Notification And Forwarding Properties
dialog appears.
5
Click New. The Notification And Forwarding Rule wizard starts.
6
Follow the instructions on the screen. Click Next to proceed.
7
On the last wizard panel, click Finish.
Enabling Receive Rules
Once you create a receive notification rule, you must enable it for the
Receive Log.
To enable a notification rule:
1
Start Program Setup (see page 3-24).
2
In the list, double click Notification And Forwarding. The
Notification And Forwarding Properties dialog appears.
3
Click the Available Rules tab
4
In the folder list, click the Receive Log folder.
5
In the rules list, enable the check box beside the appropriate rule.
Scheduling Receive Rules
You can specify when and how often you want to be notified of new faxes
or have faxes automatically forwarded.
To schedule receive rules:
6-72
1
Start Program Setup (see page 3-24).
2
In the list, double click Notification And Forwarding. The
Notification And Forwarding Properties dialog appears.
3
Click the Available Rules tab.
4
Click Delivery. The Delivery Properties dialog appears.
Forwarding Faxes
5
Click the Frequency tab.
6
In the After Receiving field, type the minimum number of faxes
that WinFax must receive before forwarding them.
7
Specify the appropriate frequency option.
Forwarding Faxes
You can forward faxes you receive—either manually or automatically.
When you forward faxes automatically, you can use a variety of options to
control when and how faxes are forwarded. You can choose to forward
faxes by fax, or by email as self-viewing email attachments.
Forwarding Faxes Manually
From the Logs window, you can forward an entire fax or select the fax
pages you want to forward.
To forward a fax manually:
1
Start Message Manager (see page 3-24).
2
On the Go menu, click Receive Log. The Logs window opens and
displays the contents of the Receive Log folder.
3
In the record list, click the fax you want to forward.
4
On the Send menu, point to Forward By, and click Fax. The Send
dialog appears.
5
Address the fax. (For more information, see “Faxing One or More
Documents” on page 5-49.)
6
OPTIONAL – Specify any other appropriate options on the
Options menu in the Send dialog.
7
Click Send.
Forwarding Faxes Manually by Email
If you want to forward a fax to someone who does not have a fax machine
or faxing software, you can forward it as a self-viewing email attachment.
The recipient simply opens the email message and double-clicks the
attached file to view the document in its own viewer.
6-73
Receiving Faxes
To forward a fax manually by email:
1
Start Message Manager (see page 3-24).
2
On the Go menu, click Receive Log. The Logs window opens and
displays the contents of the Receive Log folder.
3
In the record list, click the fax you want to forward.
4
On the Send menu, point to Forward By, and click the Email
option. The Send dialog (email version) appears.
5
Address the email. Click the down arrow beside the To button and
select one of the following options:
Q
Add From Your Email Phonebook—In the Show Names
From drop-down list, click the phonebook containing the
desired recipient. Next click the appropriate recipient or group,
and click Add. When you have added all the desired recipients
for this fax, click OK.
Q
Add Internet Address—In the field provided, type a
recipient’s Internet email address. To add multiple recipients,
separate addresses with semi-colons. When you have added all
the desired recipients for this fax, click OK.
6
In the Subject field, type a descriptive subject for this email.
7
In the Message field, type the main body text of the message you
want to appear in this email.
8
OPTIONAL – Specify any other appropriate options on the
Options menu in the Send dialog.
9
Click Send. WinFax send the email, with the fax document
attached.
Note: WinFax sends email messages from its outbox to the outbox of your
email program, from which point they are sent to your recipients. If your
email program is active, WinFax sends the email to your email program’s
Outbox immediately. If your email program is not active, WinFax holds the
email in its Outbox until you log in to your email program, and then
forwards it. After the email has gone to your email program, WinFax marks
the email message as Sent Successfully. This means only that the email has
successfully been sent to your email program Outbox. To determine
whether or not the email has been successfully sent from your email
program to your recipients, you must check the outgoing mail folder of
your email program.
6-74
Forwarding Faxes
Forwarding Faxes Automatically
You can set up a receive rule (a set of instructions) to have WinFax monitor
incoming calls and automatically forward new faxes to you. Receive rules
are useful if you are going to be away from your computer and want to
make sure you do not miss an important fax. Using receive rules, you can
choose to be notified:
Q
immediately, after a given number of faxes have been received
Q
at regular intervals (reduces long distance charges and work
interruptions)
Q
when you receive faxes during a specific time period
Q
when a fax arrives from a specified fax device (you must know the
CSID for the fax device)
You can create as many receive rules as you need and save them for use at
different times. To enable a rule, you need to apply it to the Receive Log
folder. For details, see “Enabling Receive Rules” on page 6-72.
For details on scheduling the delivery of forwarded faxes, see “Scheduling
Receive Rules” on page 6-72.
Note: You can also set up receive rules to notify you via your pager or
cellular telephone (must be STS text messaging enabled) when a fax is
received. For more information, see “Setting Notification Options” on
page 6-70.
To create an automatic forwarding receive rule:
1
Start Program Setup (see page 3-24).
2
In the list, double click Notification And Forwarding. The
Notification And Forwarding Properties dialog appears.
3
Click the Available Rules tab.
4
Click New. The Notification And Forwarding Rule wizard starts.
5
Follow the instructions on the screen. Click Next to proceed.
6
On the last wizard panel, click Finish.
6-75
Receiving Faxes
Checking for New Faxes
To check for new faxes, do any of the following:
Q
From Message Manager – On the Go menu, click Receive Logs.
The Logs window opens to display the contents of the Receive Log
folder. All new faxes appear bolded.
Q
From the Controller – Look for a “flashing” new message icon.
You can monitor the status of faxes you receive using either the Line Status
dialog or the status bar (located at the bottom of Message Manager). The
Line Status dialog displays detailed transmission information, while the
status bar displays only transmission progress information. You can cancel
a fax transmission at any time from either the Line Status dialog or the
status bar.
Current fax
transmission
activity
Rate of
transmission
Current page
Collapse details
display area
Cancel the
transmission
By default, WinFax displays the Line Status dialog while sending and
receiving faxes. You can also set up WinFax to notify you when you
receive new faxes by displaying a notification message, playing a sound, or
flashing the Scroll Lock light on your keyboard. For information, see
“Setting Notification Options” on page 6-70.
Note: If you have two modems or communications devices set up and
both are busy, only the details of the currently selected modem or device
appear in the details area of the Line Status dialog. Click the other modem
or device to view its details.
6-76
Junk Fax Management
To display the Line Status dialog when sending and receiving faxes:
1
Start Program Setup (see page 3-24).
2
In the list, double click Call Status And Controller. The Call Status
And Controller Properties dialog appears.
3
Click the General tab.
4
Enable Display Status Dialog.
5
Enable Bring Status Dialog To Front.
6
Click Apply, and then click OK.
Junk Fax Management
Unsolicited ‘junk mail’ faxes cost you time and money. Use the new Junk
Fax Management feature to filter out unwanted incoming faxes, such as
advertisements and flyers. Receive only the faxes you want – and need – to
receive. Junk fax filtering works by screening out incoming fax calls from
sources you specify. You can specify an unwanted source either by Caller
ID (their fax/phone number), or by CSID (the calling station identification
code of their computer or fax device).
Note: To filter unwanted faxes by Caller ID, your modem or
communications device must support Caller ID, and you must subscribe to
the Caller ID feature offered by your local telephone company.
To filter out unwanted junk faxes:
1
Start Program Setup (see page 3-24).
2
In the list of settings, click Receive, and then click Properties. The
Receive properties dialog appears.
6-77
Receiving Faxes
3
Click the Junk Fax tab.
4
Click to check the Enable Junk Fax Management checkbox.
5
OPTIONAL—Enable the Handle All Faxes With No CSID As Junk
Faxes checkbox, if you want to screen out all faxes sent with
unspecified CSIDs.
6
To add a sender whose faxes you wish to screen out, click Add.
The Add/Modify Junk Sender dialog appears.
7
Enter sender identification information into one or both of the
following:
Q
6-78
In the CSID field, enter the CSID (calling station identifier) of
the sender from whom you do not wish to receive faxes. You
can find this information listed in the Details view of received
faxes, in the incoming fax status dialog, and on the header of
Junk Fax Management
received faxes. Note, however, that this information is not
appended to every fax.
Q
In the Caller ID fields, enter the Country Code (optional), area
code (optional), and local telephone/fax number (required) of
the sender from whom you do not wish to receive faxes. Note
that not all Caller ID systems use the country code or area code
as identifiers.
8
In the Rules drop-down list, select the filter or filters you want to
use to screen out unwanted faxes. Choose CSID, Caller ID, or
both.
9
Click Add/Save, and then click OK.
6-79
Receiving Faxes
6-80
C
H
A
P
T
E
R
Viewing and Printing Faxes
7
This chapter describes the basics of viewing, modifying, and printing faxes
using WinFax PRO.
Topics in this chapter include:
Q
viewing faxes
Q
rotating fax pages
Q
removing transmission specks
Q
printing faxes
For advanced features, such as exporting faxes to common graphic formats
and converting faxes to editable text, see the online help. For information
about annotating faxes you receive (adding notes to them, circling text,
adding graphics, and so on), look up “annotating” in the online help index.
Methods of Viewing Faxes
You can use a variety of methods to view faxes. The table below describes
these methods and indicates where you can find the corresponding
information.
Level
If you want to …
For more information …
Basic
View a fax, then print it.
See page 7-82.
Basic
View a fax using the Controller.
See page 3-25.
Advanced
View information about a fax, including number
of pages and message type.
See page 7-83.
Advanced
View fax pages as miniatures or thumbnails.
See page 7-83.
7-81
Viewing and Printing Faxes
Level
If you want to …
For more information …
Advanced
View incoming faxes automatically as soon as
they are received.
Look up “viewing faxes” in the
online help index.
Advanced
View a fax from your Windows desktop using
Quick Fax Viewer.
Look up “viewing faxes” in the
online help index.
Viewing Faxes on an Individual Basis
You can open and view faxes directly from the Logs window. This is the
most common method of viewing faxes.
To view a fax:
1
Start Message Manager (see page 3-24).
2
On the Go menu, click Receive Log. The Logs window opens and
displays the contents of the Receive Log folder.
3
In the record list, click the fax you want to view.
4
On the File menu, click Open. Viewer starts and displays the first
page of the fax.
Click a thumbnail
to go to another
page
Change the magnification
7-82
Go to another page
Enable or disable Annotation
( indicates enabled)
Rotating Fax Pages
5
On the View menu, point to Zoom, then click 100%, 50%, 25%,
Whole Page, Page Width, or Zoom In. Viewer displays the fax at
the appropriate magnification.
Viewing Fax Details or Miniature Pages
In some cases, it may be useful to view information about a fax or to view
miniature pages in the fax. You can do this directly within the Logs
window.
To view fax information or miniature pages in the Logs window:
1
Start Message Manager (see page 3-24).
2
On the Go menu, click Receive Log. The Logs window opens and
displays the contents of the Receive Log folder.
3
In the record list, click the appropriate fax.
4
On the View menu, click one of the following:
Q
Display Details – Displays details such as message type,
message subject, and number of pages.
Q
Display Fax View – Displays each page of the fax, one at a time.
Q
Display Thumbnails – Displays smaller thumbnail images of fax
pages (icons represent other message types).
Rotating Fax Pages
When you receive a fax and the pages are oriented differently than you
want—sideways or upside down—use the Rotate feature to correct the
page orientation.
To rotate fax pages:
1
Open the fax in Viewer (see page 7-82).
2
On the View menu, disable Annotation.
3
On the View menu, point to Rotate Pages or Rotate All Pages and
click the appropriate rotation option.
4
On the File menu, click Save or Save Page As.
7-83
Viewing and Printing Faxes
Removing Transmission Specks
When you receive a fax, some detail may be lost or random spots may
appear on the fax. You can improve the appearance of a fax before
printing or forwarding it.
To automatically remove specks:
1
Open the fax in Viewer (see page 7-82).
2
On the View menu, disable Annotation.
3
If specks are confined to one area of the fax, zoom in on that area.
4
On the Tools menu, click Cleanup. The Cleanup dialog appears.
5
In the Area section, click the appropriate option.
6
In the Degree section, click the appropriate option.
7
Click OK. Viewer removes the specks.
8
On the File menu, click Save.
Tips: If specks are still visible after cleaning the fax, repeat the
procedure. (You may want to try a heavier setting.) If the cleanup
removes portions of the fax that you want to keep, click Undo on
the Edit menu and clean the fax using a lighter setting.
To manually remove specks:
7-84
1
Open the fax in Viewer (see page 7-82).
1
On the View menu, disable Annotation.
2
Zoom in on the area you want to retouch.
3
On the Format menu, point to Eraser, and then click the size you
prefer.
4
Retouch the fax by erasing detail, as required.
5
On the File menu, click Save.
Methods of Printing Faxes
Methods of Printing Faxes
You can print faxes from Viewer or directly from the Logs window. The
following table describes the various methods for printing faxes.
Level
If you want to …
For more information …
Basic
Print a fax you are currently viewing.
See page 7-85.
Basic
Print a fax directly from the Logs window
without opening it first.
See page 7-85.
Advanced
Print a list of all records in the selected log.
See page 7-86.
Advanced
Print faxes automatically when they are
received.
Look up “printing faxes” in the
online help index.
Printing Faxes While Viewing
You can print a fax while viewing it.
To print a fax while viewing it:
1
Open the fax in Viewer (see page 7-82).
2
On the File menu, click Print.
3
Select the appropriate options.
Printing Faxes From the Logs Window
The Logs window lists all sent and received faxes. You can print a fax
directly from the Logs window without first viewing it. In addition, you can
also print a list of all faxes (and other types of messages) in any log folder.
To print a fax from the Logs window:
1
Start Message Manager (see page 3-24).
2
On the Go menu, click the appropriate log folder. The Logs
window opens and displays the contents of the folder.
3
In the record list, click the fax you want to print.
4
On the File menu, click Print Message. The Print dialog appears.
5
Select the appropriate options.
7-85
Viewing and Printing Faxes
To print a list of all faxes in a log folder:
7-86
1
Start Message Manager (see page 3-24).
2
On the Go menu, click the appropriate log folder. The Logs
window opens and displays the contents of the folder.
3
On the File menu, click Print List. The Print List Options dialog
appears.
4
Select the appropriate options.
C
H
A
P
T
E
R
Logging, Storing, and
Organizing Faxes
8
This chapter describes how to organize, manage, and archive your messages
using the Logs window in Message Manager.
Topics in this chapter include:
Q
an overview of how Message Manager stores log records
Q
organizing messages in Message Manager
Q
archiving log records
Q
deleting log records
Q
importing log records
Q
generating detailed reports
Using the Logs window, you can view, print, resubmit (resend), and
forward faxes. The table below indicates where you can find information
on these features:
To do this …
For more information …
View faxes
See “Methods of Viewing Faxes” on page 7-81.
Print faxes
See “Methods of Printing Faxes” on page 7-85.
Resubmit failed faxes
See “Re-sending Faxes” on page 5-64.
Forward faxes
See “Forwarding Faxes” on page 6-73.
For advanced features, including sorting and searching for log records,
filtering log records, rescheduling faxes, holding and releasing faxes,
exporting log records, and backing up and restoring faxes, see the online
help.
8-87
Logging, Storing, and Organizing Faxes
Logging Faxes
Message Manager keeps track of faxes and other messages you send and
receive by creating a log record for each message in the Logs window. A
log record contains both the message and information about the message,
including:
Q
identification of the recipient/sender
Q
delivery date and time
Q
message type (fax, pager or SMS text notification, BFT, or email)
Q
transmission status
You can view information about a log record in the display area at the
bottom of the Logs window (in Display Information view).
Message stores and folders
Display area
8-88
Log record list (unread
messages appear in bold)
Logging Faxes
How Message Manager Organizes Log Records
Message Manager stores log records in a collection of folders in the Logs
window.
Q
Send Log – Contains records of all sent messages.
Q
Receive Log – Contains records of all received messages.
Q
Outbox – Contains all “pending” messages that are waiting to be
delivered.
Q
Wastebasket – Contains all deleted messages.
In addition to these default folders, you can create your own folders to
organize messages. For more information, see “Organizing Faxes” on
page 8-90.
Log Record Information
Message Manager displays a wide range of information about your
messages in the Logs window. Using icons, you can quickly determine
what type of messages you have received, which messages are “new”
(unread messages appear bold), what priority messages have been given,
and whether messages transmitted successfully.
Message Types
Message Manager uses icons to indicate the type of message associated
with each log record. Some message types may not be available,
depending on your system setup.
Fax – A regular fax. The
message is stored in WinFax
image files, one file per page.
Email – A message sent with
an email program.
Binary File Transfer (BFT) –
A document transmitted in its
native file format.
Pager/SMS notification – A
message sent to your pager or
cell phone to notify you of
new messages.
Message Priority
When you send a message, you can assign a priority of high, normal, or
low (look up “prioritizing delivery” in the online help index). If more than
one message is scheduled for delivery at the same time, WinFax sends
8-89
Logging, Storing, and Organizing Faxes
them in order, according to their priority. If the log record has no icon, the
fax has a priority level of Normal.
High – Message is important
or urgent.
Low – Message is not urgent.
Transmission Status
WinFax tracks the status of all messages you send and receive. Depending
on the status, you can resend, modify, or reschedule a message.
Successful – Entire message
was sent or received and can
be viewed.
Recurring – Message is
scheduled to be sent at regular
intervals.
Unsuccessful – Message was
not sent or received, or was
only partially transmitted.
Held – Message is “on hold”
until you instruct WinFax to
send it.
In progress – Message is
currently being sent.
Collapsed group – Message is
being sent to a recipient
group.
Scheduled or pending –
Message is scheduled, or
WinFax is waiting to retry the
send.
Organizing Faxes
You can organize your messages by creating message stores or message
folders. After you create your message stores and folders, you can copy or
move messages to them at any time.
Creating Message Stores and Message Folders
You can create message stores and folders to customize how you store
your faxes. Message stores are like filing cabinets that you can use to hold
folders. You can create custom message stores and organize them to suit
your business needs, for example “Correspondence”, “Messages”, and
“Sales Reports”.
8-90
Organizing Faxes
The default message store, “Messages”, is the main message store created
when you install WinFax. Messages in this message store are
uncompressed for fast and easy access. As a result, the “Message” message
store is more suitable for short-term message storage or for storing a
smaller number of messages. To keep messages for long-term use, or to
store a larger number of messages, you can set up your own message filing
system by creating custom message stores with folders and subfolders that
organize messages. For example, you might organize correspondence by
customer or organize sales reports by quarter.
You can also share message stores with others in your workgroup. To
share a message store, simply create it on a network drive that is accessible
to those with whom you want to share it. Other WinFax users can access it
by creating a new message store in their Logs window that points to the
message store you placed on the network. If desired, you can make the
message store read-only so that it cannot be modified by other users. For
more information, look up “message stores” in the online help index.
Tip: You can create desktop shortcuts to message stores and folders you
use frequently. To create a shortcut, click the appropriate message store or
folder, then click Create Shortcut on the File menu.
To create a message store:
1
Start Message Manager (see page 3-24).
2
On the Go menu, click Receive Log, Send Log, or Outbox to open
the Logs window.
3
On the File menu, point to New, and then click Message Store.
The New Message Store dialog appears.
4
Click Advanced. The New Message Store dialog expands.
8-91
Logging, Storing, and Organizing Faxes
Save message store in
another location, for
example on a network
drive where others can
access it
Keep others from
modifying log records
in this message store
5
In the Name field, type a name for the new message store.
6
OPTIONAL – In the Description field, type a longer name to help
you identify the message store.
7
In the Type section, click New WinFax PRO 10.0.
8
Select any other appropriate options.
9
Click OK. WinFax creates the new message store.
To create a folder or subfolder in a message store:
1
Start Message Manager (see page 3-24).
2
On the Go menu, click Receive Log, Send Log or Outbox.
3
On the File menu, point to New, and then click Message Folder.
The New Folder dialog appears.
4
In the Name field, type the name for the folder.
5
OPTIONAL – In the Description field, type a description for the
folder.
6
In the Subfolder Of section, do one of the following:
7
Q
Create a folder in a message store – Click the message store in
which you want to store the folder.
Q
Create a subfolder in a folder – Click the folder in which you
want to store the subfolder.
Click OK. Message Manager creates the new message folder.
To link to a shared message store:
8-92
1
Start Message Manager (see page 3-24).
2
On the Go menu, click Receive Log, Send Log, or Outbox to open
the Logs window.
Deleting Faxes
3
On the File menu, point to New and click Message Store. The New
Message Store dialog appears.
4
Click Advanced. The New Message Store dialog expands.
5
In the Name field, type a name for the link to the message store.
6
OPTIONAL – In the Description field, type a longer name to help
you identify the message store.
7
In the Type section, click WinFax PRO 7.x/8.x/9.x/10.x Or WinFax
PRO 2.x, 3.x.
8
Click Select. The Select Log File dialog appears.
9
Locate the shared message store on your network, click that
message store file (.WFB), and then click Open. The New Message
Store dialog reappears.
10
Click OK. WinFax creates a message store that is linked to the log
records in the shared message store.
Deleting Faxes
You can delete log records manually or automatically. You can manually
delete log records at any time. If you select automatic deletion, you can
specify how often WinFax deletes messages and whether WinFax will
delete successful messages, failed messages, or both.
WinFax moves deleted messages to the Wastebasket. To delete the files
from your hard drive, you can either empty the Wastebasket manually or
have WinFax empty it automatically when you exit the program.
To set deletion options:
1
Start Program Setup (see page 3-24).
2
In the list, double click Message Management. The Message
Management Properties dialog appears.
3
Click the General tab.
4
In the Default Deletion section, enable Delete Messages
Automatically At.
5
In the Delete Messages Automatically At field, type the number of
days after which the specified messages are deleted.
6
Click the type of message you want to delete.
8-93
Logging, Storing, and Organizing Faxes
Tips: To delete both the log record and the associated fax pages,
click Both Log Record And Its Fax Pages. To delete the fax pages
but keep a record of the message, click Fax Pages Only. If you
want WinFax to prompt you for confirmation when you manually
delete log records, enable Confirm All Manual Deletions.
To empty the Wastebasket automatically:
1
Start Program Setup (see page 3-24).
2
In the list, double click Call Status And Controller. The Call Status
And Controller Properties dialog appears.
3
Click the General tab.
4
In the Controller section, enable Empty Wastebaskets On Exit.
To delete a log record or empty the Wastebasket manually:
1
Start Message Manager (see page 3-24).
2
On the Go menu, click Receive Log, Send Log, or Outbox to open
the Logs window.
3
In the Logs window, click the record you want to delete.
4
On the Edit menu, click Delete. A confirmation dialog appears.
5
To confirm the deletion, click Yes. If you are deleting a log record,
WinFax moves the record to the Wastebasket. If you removed the
log record from the Wastebasket, WinFax deletes the file from your
hard drive.
Note: If you disable Confirm All Manual Deletions in the Message
Management Properties dialog, the confirmation dialog does not appear.
WinFax immediately deletes the selected log record and all its associated
files.
8-94
Importing Log Records
Importing Log Records
If you upgrade from a previous version of WinFax, the Setup program
prompts you to update your existing log records to the current format. If
you did not update your log records during installation, you can import
them at any time. You can import records only into uncompressed message
stores.
To import log records:
1
Start Message Manager (see page 3-24).
2
On the Go menu, click Receive Log, Send Log, or Outbox to open
the Logs window.
3
In the Logs window, click the folder or message store into which
you want to import the log records.
4
On the File menu, point to Import, and then click Log. The Import
Log wizard starts.
5
Follow the instructions on the screen. Click Next to continue.
6
On the last screen, click Finish. WinFax imports the log records
into the folder or message store.
Generating Reports
The reporting feature allows you to generate and print detailed reports, so
that you can closely track the usage of your WinFax system. Choose from
two different types of report to track either incoming or outgoing fax
events. Each report is generated using criteria you specify, so that you
decide which logs, folders, and dates are included in the report, as well as
the order in which the event records are sorted.
To generate a report:
1
Start Message Manager (see page 3-24).
2
On the Tools menu, click Create Report and then click the type of
report you want to create. The Folder Selection dialog appears.
3
Check the logs or folders for which you want to generate the
report. Click Next. The Report Data dialog appears.
4
Look at the Report Title field. You can either use the default title as
it appears, or type in a different descriptive title for the report.
8-95
Logging, Storing, and Organizing Faxes
5
In the Date Range section, specify the Date Range you want the
report to encompass. You can either click All, or enter two dates
between which all records will be included in the report.
6
Click Next. The Report Sorting dialog appears.
7
In the Group By field select the primary criteria by which you
would like the fax records in the report to be sorted (for example,
you may want the fax events to be sorted by Date or by the Folder
with which they are associated).
In the Sort fields that follow, select additional criteria by which you
would like events to be sorted within the primary grouping. For
example, you may want the records sorted first by Date, then, within
each date grouping, by Folder.
8
Click Finish. WinFax generates the report and displays it in a
separate report window. In this window you can view and print
the report.
Use the arrow buttons to
go to the next or previous
page of your report
Fax data is
presented in an
easy to read
report format
8-96
Print your report
Click the lightening bolt to
refresh report data (for
example, if the report
appears to be blank)
A
P
P
E
N
D
I
X
Troubleshooting WinFax
A
This appendix describes how to diagnose and solve common problems
and situations you may encounter while using WinFax PRO.
If you encounter problems while installing WinFax, see “Troubleshooting
the Installation” on page 2-20. If you encounter problems while using
WinFax, there are a number of things you can do before calling technical
support. Taking the time to troubleshoot your situation may help you
identify the problem and fix it. In many cases, this can save you time and
money.
Make note of any changes you have made to your computer and to your
Windows setup. Determine when you started experiencing the problem. If
you can reproduce the problem, make note of the steps required to do so.
Also, record any messages that appear on the screen when the problem
occurs. When you have done this, check the following sources for
troubleshooting information:
Q
System performance – See page A-99.
Q
Basic system check – See page A-101.
Q
Modem setup – See page A-101.
Q
Dialing setup – See page A-103.
Q
Faxing problems – If you encounter problems with sending,
receiving, viewing, and printing faxes – See page A-109.
Q
Phonebook and log problems – See page A-114.
Q
WinFax settings problems – WinFax installs with default options
that meet the needs of most users. However, you can customize
these programs to suit your unique needs and preferences by
using Program Setup (see “Personalizing Your Setup” on
page 4-29).
Q
Other sources of troubleshooting information – See page A-98.
A-97
Troubleshooting WinFax
Q
Symantec Technical Support – If you are unable to resolve your
problem, Symantec Technical Support representatives are available
to assist you.
Other Sources of Troubleshooting Information
In addition to the information in this appendix, Symantec provides online
troubleshooting information that is updated on a regular basis. For the
most up-to-date information, check the following online sources:
Q
Online help – Contains detailed troubleshooting information for
WinFax. To view the troubleshooting section in the online help,
click WinFax Help Topics on the Help menu, and then double
click the “Troubleshooting” book in the Help Topics dialog.
Q
Read Me file – Contains hardware-specific information and
information not available when this user’s guide was printed. To
view the Read Me file, go to the WinFax installation folder in
Windows and double click README.TXT.
Q
Technical note library – An extensive database of WinFax
technical notes is available on the Symantec Technical Support
Web site and the Symantec automated fax retrieval system. *
Q
Frequently Asked Questions (FAQ) – A list of frequently asked
questions and their answers is available on the Symantec Technical
Support Web site, and the Symantec automated fax retrieval
system. *
Q
Online forums – Provide question-and-answer support on
CompuServe and America Online (AOL). Symantec Technical
Support representatives monitor these forums. *
Q
Discussion groups – Provide question and answer support in a
newsgroup format. Symantec Technical Support representatives
monitor these forums. *
* For information on using these services, see “Symantec Service and Support Solutions”.
In addition to the above sources of information, the documentation
provided with your hardware, your operating system, and any other
programs you use with WinFax may be a good source of information.
A-98
Improving Performance
Improving Performance
The Setup program installs WinFax with default settings that work best on
most computers. WinFax includes many optional settings and advanced
features that may improve your overall system performance. To optimize
the performance of your system, follow the suggestions provided below.
Situation
Solution
You want to
remove the
Controller from
the Windows
system tray
Solution – If you want to temporarily remove the Controller from the system tray,
you can close the Controller. Right click the Controller icon in the Windows
system tray and click Exit. To configure the Controller to close when not actively
in use, open Program Setup, double-click Call Status and Controller, and set the
Controller exit option to Close Automatically. For more information about using
the Controller, see “Saving Time With the Controller” on page 3-25.
You want to
improve speed
when using
WinFax
Solution – Run the Controller instead of Message Manager. To access the most
common WinFax features, right click the Controller icon on the Windows taskbar.
For more information about using the Controller, see “Saving Time With the
Controller” on page 3-25.
Solution – When sending faxes, personalize your WinFax setup ahead of time.
For example, you can set up phonebooks, create an electronic version of your
signature, set up your letterhead, and customize a cover page—all ahead of time.
See Chapter 4, “Personalizing Your Setup”.
You want to
improve
database
performance
To improve the speed and performance of WinFax, reduce network traffic, and
reduce SQL server load, we recommend that you take the following actions:
Solution – WinFax can use any one of a Database, Table, or View to link to an
SQL server. We recommend that you create a View to screen out any database
entries lacking a fax number, and set WinFax to use that View.
Solution – If using a Table to link WinFax to an SQL server, create an Index for
that table.
A-99
Troubleshooting WinFax
Situation
Solution
You are running Solution – Uninstall WinFax, and then re-install using the Minimum installation
out of disk space type. For more information, see Chapter 2 “Installing WinFax”.
Solution – Uninstall WinFax, and then re-install using the Custom installation
type (select only the components you need). For more information, see Chapter 2
“Installing WinFax”.
Solution – Delete some or all of the Cover Your Fax collection of cover pages.
You can delete cover pages from the Cover Pages window.
Solution – Empty the Wastebasket in each window in Message Manager. To
empty Wastebaskets automatically when you exit Controller, enable Empty
Wastebaskets On Exit in the Call Status And Controller Properties dialog. Start
Program Setup (see page 3-24), double click Call Status And Controller, and then
click the General tab.
Solution – Delete all temporary files (*.TMP) and run the ScanDisk program (see
“Checking the Basics” on page A-101).
Solution – Regularly delete unneeded faxes and attachments from the Message
Manager Logs window. Remember to empty the Wastebasket folder after you
delete them or set up WinFax to automatically empty Wastebaskets when you exit
Controller. To do this, start Program Setup (see page 3-24), double click Call
Status And Controller, click the General tab, then enable Empty Wastebaskets On
Exit.
Solution – Optimize your logs regularly to remove records marked for deletion
(see “Phonebook and Log Problems” on page A-114).
Solution – Keep only the log record and delete associated attachments and fax
image files. When your log record list becomes lengthy, print it out and file it.
Solution – Back up your files to another location. Look up “backup” in the online
help index.
You want to
move the \DATA
subfolder to
another location
A-100
Cause – All of your WinFax data is stored in the \DATA subfolder of your WinFax
installation folder. To free up disk space, move your \DATA subfolder to another
location.
Solution – Use the Maintenance Utility. On the Message Manager Tools menu,
click Maintenance Utility. Message Manager and the Controller close, and the
SymDiag Maintenance Utility dialog appears. Click Move Data Directory Location
and follow the instructions that appear onscreen.
Checking the Basics
Checking the Basics
If you experience intermittent communication failures, program failures, or
system lockups while using WinFax, try the problem-solving techniques
outlined in the table below.
Check this …
Situation/Solution
Temporary files
Situation – Windows, WinFax, and many other Windows programs create
temporary files (.TMP files). Sometimes these files can become damaged or are not
deleted when they should be. This can occur when you turn off or restart your
computer without properly exiting Windows first.
Solution – Delete temporary files as part of your regular system maintenance. To
do this, close all programs, exit Windows and restart your computer in MS-DOS
mode (do not use a DOS window). At the DOS prompt, type SET and press Enter.
The environment variables for your computer system appear. Change to the folder
in the TEMP= line. To delete all temporary files in the TEMP folder, type
DEL *.TMP and press Enter. To delete all WinFax temporary files, change to the
\DATA subfolder in your WinFax installation folder and type the same command.
Note that you can also delete temporary files from Windows.
Hard disk
Solution – Run the ScanDisk utility to locate and repair file system errors on your
hard disk. This procedure should be part of your regular system maintenance. (If
you use a disk-compression program, check the program’s documentation to
ensure running ScanDisk is recommended.) For more information about running
ScanDisk, see your Windows documentation.
Checking Your Modem
A modem is a peripheral device attached to your computer that connects
your computer to a phone line. Modem software (such as WinFax)
converts data stored on your computer (for example, fax image files) into
sound so that your modem can transfer the data via the phone line to
another computer.
You can use different types of modems with your computer, including
external, internal, memory modems, PC card (PCMCIA), and cellular.
Q
External modems are separate, box-like devices you plug into your
computer.
Q
Internal modems are electronic circuit cards installed inside your
computer.
A-101
Troubleshooting WinFax
Q
Memory modems accept incoming data and faxes even when your
computer is turned off. They store the incoming data and upload it
to your computer the next time you turn it on.
Q
PC card modems are thin, credit-card sized external modems used
with laptop computers and are inserted into the modem port.
Q
Cellular modems connect to your cellular phone and can send and
receive using a cellular phone line.
WinFax works with a wide variety of internal and external modems
(including cellular modems), as well as other types of communications
devices (such as ISDN cards). For a complete list of supported modems
and devices, see the Symantec Web site (http://www.symantec.com).
Many problems you experience may be related to your modem. This
section contains a list of generic problems that can apply to all modems, as
well as a list of known problems with specific types of modems. Use the
following table to help identify and troubleshoot your problem..
Situation
Cause/Solution
Modem is not
responding
Solution – If you have an external modem, turn it off and on again to reset it. To
reset an internal modem, exit Windows and turn off your computer. Wait ten
seconds, then turn the computer on again.
Solution – If you upgraded from Windows NT 3.51 to NT 4.0 or Windows 2000,
your modem may not be set up correctly. Look up “RAS” in the online help index.
Modem is not
connected
properly
Solution – Connection procedures vary, depending on the type of modem you
are using. For information about connecting your modem, look up “connecting
modem to phone lines” in the online help index.
Modem is not
installed
properly
Solution – Check that your modem is set up correctly in Windows. Click the
Windows Start button, point to Settings, and then click Control Panel. In the
Control Panel folder, double click Modems, click your modem in the list, and then
click Properties to check your modem settings.
Solution – Uninstall your modem driver, restart Windows, and then re-install your
modem driver. You can do this from the Control Panel (click the Windows Start
button, point to Settings, click Control Panel, and then double click Modems). If
you are using a PCMCIA modem, plug-and-play modem, or memory modem
contact your modem manufacturer for assistance.
Solution – Check for hardware conflicts. For more information, check your
modem documentation.
A-102
Checking Dialing Setup
Situation
Cause/Solution
Modem is not set Cause – You installed a new modem after you installed WinFax, and now WinFax
up for use with does not detect the new modem.
WinFax
Solution – Add the modem in WinFax. To do this, start Program Setup (see
page 3-24), double click Modems And Communications Devices, and then click
Add. Follow the instructions on the screen. When you are finished, the modem
appears in the devices list in the General tab. To use this modem, activate it by
enabling the Active check box beside it.
Modem settings
need to be
customized
Solution – Customize the modem settings in WinFax. To do this, start Program
Setup (see page 3-24), double click Modems And Communications Devices, click
the modem in the devices list, and then click Properties. In the Properties dialog
for your modem, make the appropriate changes. Contact your modem
manufacturer to determine the optimal settings for your modem.
For best results with cellular modems, switch the telephone line type from regular
to cellular on the Fax tab.
Modem is not
active
Solution – To communicate with your modem, the modem must be set as
“active” in WinFax. To check this, start Program Setup (see page 3-24) and double
click Modems And Communications Devices. In the devices list, enable the Active
check box beside each modem you want to activate.
Modem is in use Cause – If you are running another communications program, it may “hold onto”
by another
the modem, even after it has finished using it. As a result, WinFax cannot access
program
the modem.
Solution – Wait until the other program releases the modem, or close the other
program. If you are running a DOS-based communications program, close the
DOS session as well. If the problem persists, you may need to restart your
computer to access the modem.
Solution – Close all programs. Press Ctrl+Alt+Del to display the Windows task list
and then shut down all programs except for Explorer and Systray.
Some WinFax
features are
unavailable
Solution – Some WinFax features are dependent on your modem’s capabilities.
For more information, look up “modems, capabilities” in the online help index.
Checking Dialing Setup
Sometimes you may experience problems using WinFax because the
phone number is being dialed incorrectly. Before you start troubleshooting
dialing problems, make sure that you can dial the number correctly from a
regular phone. You may find it helpful to write down the exact sequence
of numbers you dial (called the dial sequence) so you can compare it with
your dialing setup. If you are sure that the number you are trying to dial is
correct, the next step is to verify the number that WinFax is dialing. You
A-103
Troubleshooting WinFax
can do this by watching the dialing process from the Status dialog. For
information on how WinFax dials number, see the next section.
The table on page A-106 describes common dialing situations and
solutions.
How WinFax Dials Numbers
When you send a fax with WinFax, you must enter a dial sequence, or fax
number. The components of a dial sequence vary, depending on the type
of call you are making — local, domestic long distance (within North
America), or international long distance (overseas). The following example
illustrates two dial sequences.
Domestic Long Distance
International Long Distance
1 + area code + local number
011 + country code + routing code + local number
1-416-555-1212
011-30-1-555-1212
Local number
Area code
Long distance access code/country code
Note: In North America, the long distance
access code is also the North American
country code.
Local number
Routing code (sometimes
referred to as “city code”)
Country code
International access code
When you install WinFax, the Setup program prompts you to enter a
variety of information, some of which is required to dial a fax number. This
information includes your name, and your telephone and fax numbers.
This information is used to define the default location that WinFax uses
each time it dials a fax number. WinFax uses your location information to
determine whether a fax transmission is a local, long distance, or overseas
call. You can also include your calling card information in your location if
you want to charge faxes to your card.
If you regularly dial from locations with varying dialing requirements, you
can set up more than one location. For example, you might send faxes
from your office, from your home, or from different hotels. For information
about setting up locations, look up “locations, setting up” in the online
help index.
A-104
Checking Dialing Setup
When you send a fax, WinFax uses some or all of your location
information, depending on how you specify the fax number:
Q
Did you type the fax number?
If you manually enter a fax number, you must type the complete
dial sequence, including the necessary long distance or
international access code. WinFax dials the number exactly as it
appears on your computer screen, and then applies any prefix,
suffix, area code rule, calling card, and pulse dialing settings that
are specified for your location.
Q
Did you select a name from a WinFax phonebook?
If you select a name from a phonebook, WinFax determines if the
call is local or long distance by comparing the fax number
information for that person to the corresponding information for
your current location. For example, if the country code for the
person differs from the country code for your current location,
WinFax dials the number as an overseas call.
If you send faxes to numbers that are within an area that uses split,
multiple, or overlaid area codes, see the following section, “Checking
Dialing Setup”.
Situation
Solution
Modem does not
detect a dial
tone or
incorrectly
detects a dial
tone
Solution – Check your modem connections.
Solution – Disable dial tone detection. Start Program Setup (see page 3-24),
double click Dialing And Location, click the General tab, and then disable Detect
Dial Tone.
Cause – If you subscribe to a messaging service through your phone company,
the dial tone on your line may sound different when you have new messages
waiting. As a result, WinFax cannot detect the dial tone and does not start dialing
phone numbers.
Solution – Disable dial tone detection. Start Program Setup (see page 3-24),
double click Dialing And Location, click the General tab, and then disable Detect
Dial Tone.
Cause – You may have a bad phone cable or modem.
Solution – Try using a different phone cable. If you still have problems, try using
a different modem. Test your modem and phone cable with another
communications program, such as Terminal or HyperTerminal, to see if the
problem is specific to WinFax.
For more information, look up “call disturb phone company service” in the online
help index.
A-105
Troubleshooting WinFax
Situation
Solution
Modem does not Cause – WinFax is unable to communicate with your modem.
dial the phone
Solution – See “Checking Your Modem” on page A-101.
number at all
Solution – Check that you have set up WinFax to dial properly for your phone
line type (that is, touch tone or pulse). By default, WinFax uses touch tone
dialing. You can enable pulse dialing in your location settings. Start Program
Setup (see page 3-24), double click Dialing And Location, and then click the
Location tab. You can also switch between touch tone and pulse dialing by
inserting a “T” or “P” (as appropriate) at the beginning of your dial sequence.
Filling in the
country code,
area code and
local number
fields
Cause – In WinFax, you may need to enter the phone number you want to dial in
three parts: the country code, the area code, and the local number.
Solution – Use the following examples to help you identify the components of a
typical dial sequence. Wherever you are required to fill in the area code as a
separate field, type the country code and routing code together in that field if you
are recording an international phone number.
Long Distance within North America
1 + area code + local number
Overseas Long Distance
011 + country code + routing code + local number
1-416-555-1212
011-30-1-555-6789
Local number
Area code
Long distance access code
Local number
Routing code (sometimes called “city code”)
Country code
International access code
You do not
know your
country code
Solution – Check your local phone company directory or check the World Wide
Web for an online country code directory.
Setting your
current location
Cause – WinFax dials phone numbers using the dialing instructions for the
current location. If you have recently changed locations, you may need to change
your current location in WinFax (for example, you are using a laptop and you
frequently travel to different cities or countries).
Solution – Start Program Setup (see page 3-24), double click Dialing And
Location, and then click the Location tab. In the Location drop-down list, click
your current location. WinFax displays the current dialing instructions for the
selected location. To set your current location at send time, point to Locations on
the Options menu in the Send dialog and click your location.
A-106
Checking Dialing Setup
Situation
Solution
Setting up
dialing for other
TAPI programs
Situation – You use several TAPI-compliant communication programs, and you
want to set up your dialing information in one place for all programs.
Dialing for
special calling
requirements
Cause – The recipient you are calling has special calling requirements that you
cannot define in your location settings. For example, you are calling a local
number in another area code, or a long distance number within your own area
code.
Solution – Switch to the Windows dialing method. Start Program Setup (see
page 3-24), double click Dialing And Location, click the General tab, and then
click Advanced. In the Dialing Method dialog, click Windows. To modify
Windows dialing instructions, click Properties.
Solution – If you call this recipient frequently, add the recipient to a WinFax
phonebook and specify the special calling requirements on the Send By tab of the
Recipient Properties dialog.
Dialing in calling
areas using split,
multiple, or
overlaid area
codes
Cause – WinFax assumes that all calls within your area code are local calls.
However, in some metropolitain areas, telephone companies have “split” area
codes to accommodate the requirements of large populations. If you live in a
location that has split, multiple, or overlaid area codes, the following conditions
apply:
• some calls within your area code are long distance
• some calls to another area code are local
As a result, the dialing instructions specified in your location settings may be
inappropriate for some recipients. In this case, you need to override your default
dialing instructions. You can do this in one of three ways:
Solution – Configure a set of Area Code Rules for any locations containing split,
overlaid, or multiple area codes. See “area code rules” in the online help index.
Solution – Add the recipient to a WinFax phonebook and specify the special
calling requirements on the Send By tab of the Recipient Properties dialog.
Solution – Set up WinFax to dial the number exactly as you type it (see next).
Dialing the
number exactly
as entered
Solution – Disable the location settings so WinFax dials the number exactly as
you enter it. To do this, set your current location to “Dial As Entered” (see
“Checking Dialing Setup” on page A-103).
A-107
Troubleshooting WinFax
Situation
Solution
Call waiting
interrupts dialing
and
communication
Situation – When a second call comes in, you hear a call-waiting beep. This beep
disrupts and terminates WinFax communications (sending faxes, receiving faxes).
Solution – Ask your phone company for the code to suspend call waiting. For
most North American locations, the code is *70 (star, followed by “70”).
To suspend call waiting for outgoing calls, add *70 and a comma pause to your
dial prefix in your location settings (for more information, look up “Call Waiting”
in the online help index).
To suspend call waiting for incoming calls, enable This Line Has Call Waiting on
the General tab of the Receive Properties dialog. Start Program Setup (see
page 3-24) and double click Receive.
Combining
touch tone and
pulse dialing
Cause – By default, WinFax dials fax numbers using touch tone dialing, unless
you enable Pulse Dial in your location settings.
Solution – If required, you can override the default dialing type to combine
touch tone and pulse dialing in a single fax number. For example, when sending
on a pulse dial line, you may need to switch to touch tone dialing to specify your
calling card number for charging long distance calls.
If you are set up to send using pulse dialing, insert the letter “T” in the phone
number to switch to touch tone dialing. For example, dialing “9,444T0333”
causes WinFax to dial the last four digits of the fax number (0333) using touch
tone dialing.
If you are set up to use touch tone dialing, insert the letter “P” to switch to pulse
dialing.
You want to
charge calls to a
calling card
Solution – Set up your calling card for use with WinFax. Create a location setting
for using the calling card and switch to that location whenever you want to charge
calls to your calling card. See “Setting Up Calling Cards” on page 4-42.
During calling
card dialing,
WinFax does not
wait for the
“bong” or dial
tone.
Cause – Not all modems support the Wait For Bong or Wait For Dial Tone
features.
Solution – Modify your dial sequence to use the Wait option, instead of the
Wait For Bong option. Start Program Setup (see page 3-24), double click Dialing
And Location, click the Calling Cards tab, and then click Dial Sequence.
You need to dial Solution – Add the appropriate number (for example, 8 or 9) for getting an
a prefix to get an outside line, and a comma pause to your dial prefix. To do this, start Program
outside line.
Setup, click Dialing and Location, and then click Properties. Click the Location
tab, edit the Prefix, and click Apply to save your changes.
A-108
Sending Problems
Sending Problems
If your problems are related to sending faxes, try the troubleshooting
techniques outlined in the table below.
Situation
Cause/Solution
Improve fax
image quality
Solution – Use the Photo Quality WinFax printer driver option when sending
faxes containing graphic images.
Solution – Select the desired WinFax printer driver before you create the
document. Document formatting can change when you switch printer drivers.
Solution – Consider fax image quality when creating graphics. For best results,
convert color graphics to black and white or to grayscale before faxing.
Solution – Send faxes at high resolution. To send all faxes at high resolution, start
Program Setup (see page 3-24), double click Send, and then click Fine in the Fax
Resolution drop-down list. To specify the resolution for individual faxes, set the
resolution in the Send Options dialog at send time (in the Send dialog, click Send
Options on the Options menu).
Transmission
errors
Solution – For a list of error messages and their meanings, look up “error
messages” in the online help index.
Performance
problems
Solution – See “Improving Performance” on page A-99.
Modem
problems
Solution – See “Checking Your Modem” on page A-101.
Dialing
problems
Solution – See “Checking Dialing Setup” on page A-103.
Phone line
problems
Solution – If you encounter a transmission error resulting from a phone line
problem, it is probably related to a bad line (that is, the line is noisy or busy). The
problem may be temporary. Wait for a few minutes, then try again. If the line
problem persists, contact your local phone company.
Solution – If you are sending over a compressed phone line, contact your phone
company to determine the fastest possible connection speed and then set WinFax
to that speed. If you still experience problems, try setting WinFax to connect at a
slightly lower speed. To do this, start Program Setup (see page 3-24), double click
Modems And Communications Devices, click your modem in the devices list, and
then click Properties. In the Properties dialog, click the General tab, and then
click the appropriate speed in the Initialize At drop-down list. Then click the Fax
tab and adjust the setting in the Transmission Speed section.
A-109
Troubleshooting WinFax
Situation
Cause/Solution
Problems faxing
to specific fax
machines
Solution – Contact the recipient or sender to determine whether their fax
machine is functioning.
Solution – Start Program Setup (see page 3-24), double click Modems And
Communications Devices, click your modem in the devices list, and then click
Properties. On the Fax tab, disable all check boxes in the Options section, set the
Maximum Transmit Speed to 9600, and check that the hardware or software flow
control setting is correct. Most Class 1 modems use hardware flow control. The
most common settings for flow control (and the matching portion of the
initialization string) are listed below:
• Rockwell settings: &K3 (hardware), &K4 (software)
• U.S. Robotics settings: &H1 (hardware), &H2 (software)
• AT&T/Cirrus Logic settings: \Q3 (hardware), \Q1 (software)
Solution – If the fax machine of the sender or recipient is an older model, it may
be incompatible with WinFax. If this is the case, you cannot transmit faxes
between WinFax and that particular fax machine.
Fax sits in the
Solution – Ensure your modem is active. See “Checking Your Modem” on
Outbox and will page A-101.
not send
Solution – Delete all temporary files on your computer. See “Checking the
Basics” on page A-101.
WinFax Status
dialog does not
appear
Solution – Start Program Setup (see page 3-24), double click Call Status And
Controller, click the General tab, and then enable Display Status Dialog. To
prevent the Status dialog from appearing under other open windows, enable
Bring Status Dialog To Front as well.
Solution – If Display Status Dialog is enabled and the Status dialog is still not
visible, right click the Controller icon in the Windows systems tray and click
Display Status on the menu.
Page margins
and fonts
change when
printing to the
WinFax printer
driver
Solution – Select a WinFax printer driver (either High Quality or Photo Quality,
as desired) as your printer before you create the document.
Color graphics
are not
displayed,
printed, or faxed
properly
Cause – WinFax must convert color graphics to black and white, which can
reduce the image quality.
A-110
Solution – Convert color graphics to black and white or grayscale format before
using them.
Solution – Use the Photo Quality WinFax printer driver option when sending
faxes containing graphic images.
Sending Problems
Situation
Cause/Solution
Information in
Solution – Update your user information in WinFax. Start Program Setup (see
the fax header is page 3-24) and double click User.
incorrect
Solution – Customize the fax header. Start Program Setup (see page 3-24), double
click Send, and then click the Header tab.
WinFax sends
the fax without
previewing it
first
Solution – To preview a fax at send time, click Preview And Send on the File
menu on the Send dialog.
You want to
include the same
cover page with
every fax
Solution – Start Program Setup (see page 3-24) and double click Send. In the
Send Properties dialog, click the General tab, enable Use Cover Page, and then
click OK. On the Go menu in Message Manager, click Cover Pages. In the Cover
Pages window, click the cover page you want to use, and then click Set As
Default on the File menu.
You want to add
your logo to a
cover page or
document
Solution – Customize the Quick Cover Page to include an electronic version of
your logo or create a custom cover page using Cover Page Designer/Cover Page
Design wizard (see “Personalizing Cover Pages” on page 4-30).
Your cover page
truncates text
that replaces
variables
Cause – The length of your recipient data is too long to display in the field. You
cannot know how long the recipient data is going to be for a particular fax until
you send the fax. Therefore, whenever you design a field, you risk the truncation
of the expanded text.
Solution – Create a letterhead attachment that you can merge with your faxes.
Look up “letterhead” in the online help index.
Solution – To avoid the problem, open the cover page in Cover Page Designer,
omit unnecessary text from fields with variables, resize the field lengths to be as
long as possible, and then reduce the font point size for the field (look up “cover
pages” in the online help index).
A-111
Troubleshooting WinFax
Receiving Problems
If your problems are related to receiving faxes, try the troubleshooting
techniques outlined in the table below.
Situation
Cause/Solution
Modem problem Solution – See “Checking Your Modem” on page A-101.
Using 16-bit
programs when
you are running
WinFax
Situation – You have problems using a 16-bit communication program such as
America Online (AOL) and CompuServe with WinFax.
WinFax Status
dialog does not
appear
Solution – Start Program Setup (see page 3-24), double click Call Status And
Controller, click the General tab, and then enable Display Status Dialog. To
prevent the Status dialog from appearing under other open windows, enable
Bring Status Dialog To Front.
Solution – Disable automatic reception before using these programs. To disable
automatic reception, right click the Controller icon on the taskbar and disable
Automatic Receive for all modems.
Solution – If Display Status Dialog is enabled and the Status dialog is still not
visible, right click the Controller icon in the Windows system tray and click
Display Status on the menu.
You cannot
receive faxes
automatically
Solution – Start Message Manager or the Controller, and then enable Automatic
Receive.
Solution – Test your modem for a ring signal in the HyperTerminal program.
Solution – Check for a fax tone from the modem. Call your modem phone
number from another phone and listen for a fax tone. If you do not hear a fax
tone, check your modem setup (see page A-101).
You cannot
receive faxes
automatically
under
Windows NT/
2000
Solution – To receive faxes under Windows NT/2000 when you are not logged
on to your NT/2000 account, start Program Setup (see page 3-24), double click
Call Status And Controller, click the General tab, and then enable Allow Sending
And Receiving When Logged Off.
You have
insufficient disk
space for
receiving faxes
Cause – WinFax requires a minimum of 1 MB of free disk space to receive faxes
(30 MB is recommended). If your computer does not meet this requirement,
WinFax displays the following error message:
For more information, see “Windows NT/2000 Considerations” on page 2-17.
Disk is full. Unable to receive faxes.
Solution – Follow the procedure on page 2-20, then close any other open
programs and ask the sender to resend the fax.
A-112
Viewing and Printing Problems
Viewing and Printing Problems
If your problems are related to viewing or printing faxes, try the
troubleshooting techniques outlined in the table below.
Situation
Cause/Solution
Missing toolbars
or commands in
Viewer
Solution – The toolbars and menu commands available in Viewer depend on
whether you have the annotation feature enabled or disabled. You can enable or
disable annotation using the Annotation command on the View menu.
Fax is spotted
with
transmission
specks
Solution – In Viewer, disable Annotation and use the Cleanup command on the
Tools menu to automatically remove specks. You can also clean up transmission
specks manually using the Eraser tool on the toolbar.
Fax pages are
sideways or
upside down
Solution – Use the Rotate Page or Rotate All Pages command on the View menu
in Viewer to adjust the page orientation.
Black and white
colors on fax
pages are
inverted
Solution – Use the Invert Display command on the View menu in Viewer.
Received faxes
print on half the
page when you
print them on a
dot matrix
printer
Cause – Received faxes sent using high or fine resolution are 200 x 200 dpi
graphic images. If they are printed on a printer not set for a square aspect ratio,
the image is squeezed onto half of the page. This problem occurs most frequently
on dot matrix printers because they can print at a higher resolution horizontally
than they can vertically.
Solution – Use the Rotate commands on the View menu in Viewer to rotate fax
pages by a specified number of degrees.
Solution – To avoid this problem, set your printer driver for a resolution as
square as possible (in the Control Panel, use the Printer option).
Solution – Ask the sender to resend you the fax at standard or low resolution
(200 x 100 dpi).
You want to
print
transmission
records (like a
fax machine
does)
Solution – Set up WinFax to print transmission records for all faxes you send.
Start Program Setup (see page 3-24) and double click Send. Click the After
Sending tab, enable Print A Send Confirmation Page, and then click Setup to
specify the details you want to print.
A-113
Troubleshooting WinFax
You want to
print faxes
automatically
(like a fax
machine does)
Solution – Set up WinFax to print all faxes upon receipt. Start Program Setup (see
page 3-24) and double click Receive. Click the After Receive tab, enable Print, and
then click Setup to select the printer you want to use.
Phonebook and Log Problems
If you experience problems working with WinFax phonebooks, with
imported or linked phonebooks, or with logs and log records, try the
troubleshooting techniques outlined in the table below.
Situation
Cause/Solution
Disk space
problems
Solution – See “Improving Performance” on page A-99.
You imported
phonebook
records from a
database file into
a WinFax
phonebook. The
results dialog
reports that
some records
were ignored.
Cause – To create valid records from an existing database, you must link at least
one field for the recipient name and one field for the fax number or email
address.
You cannot
open a
phonebook or
log folder in the
Logs window. A
message appears
to indicate the
database file is
corrupt or the
call failed.
Solution – Try using the database optimizer utility that comes with WinFax to
repair and rebuild the database.
A-114
Solution – Import the phonebook again, linking at least one of the database
fields to the “FirstName”, “LastName” or “Company” field and another to the
“FaxNumber” or “MailAddr” field. Link additional fields to import other
information in your database file, as appropriate.
To optimize your databases, on the Message Manager Tools menu, click
Maintenance Utility. Message Manager and the Controller close, and the SymDiag
Maintenance Utility dialog appears. Click Launch Application Or Applet, click
Optimize Phonebooks/Logs, and click OK. Follow the instructions that appear
onscreen.
To repair a corrupted database, on the Message Manager Tools menu, click
Maintenance Utility. Message Manager and the Controller close, and the SymDiag
Maintenance Utility dialog appears. Click Launch Application Or Applet, click
Rebuild Phonebooks/Logs, and click OK. Follow the instructions that appear
onscreen.
Phonebook and Log Problems
Situation
Cause/Solution
You have
problems using
your ACT!
phonebooks
Solution – Look up “ACT” in the online help index.
You have
problems using
your Lotus
Organizer
phonebooks
Solution – Look up “Lotus Organizer” in the online help index.
You have
problems using
your ECCO
phonebooks
Solution – Look up “ECCO” in the online help index.
You have
modified your
WinFax logs or
phonebooks,
and you want to
optimize the
database.
Cause – This is not mandatory, and it is typically only useful after adding and
deleting a large number of database records. Optimizing databases is also known
as “purging records” or “packing databases”.
Solution – Use the database optimizer utility that comes with WinFax. This utility
recovers disk space by removing the database records that are marked for
deletion and optionally optimizes the database.
The default log database and the default phonebook database are both located in
the \DATA subfolder of your WinFax installation folder. The default log database
file is STATUS.WFB. If you are upgrading from a previous version of WinFax, the
default phonebook database file is WFX7DEV.WFB. If you are installing WinFax
for the first time, the name of the default phonebook database is MY-PH-BK.WFB.
To optimize your databases, on the Message Manager Tools menu, click
Maintenance Utility. Message Manager and the Controller close, and the SymDiag
Maintenance Utility dialog appears. Click Launch Application Or Applet, click
Optimize Phonebooks/Logs, and click OK. Follow the instructions that appear
onscreen.
A-115
Troubleshooting WinFax
A-116
A
P
P
E
N
D
I
X
Using WinFax and ACT!
B
This appendix describes how to use WinFax and ACT! 4.0 or ACT! 2000 to
make your contact management faxing easier, faster, and smarter. It
includes the following topics:
Q
getting the most out of WinFax and ACT! 4.O/2000
Q
integrating ACT! 4.0/2000 with WinFax
Q
faxing documents to ACT! 4.0/2000 contacts
Q
logging faxes
Q
viewing faxes
For information on using WinFax and ACT! 2.x or 3.x, refer to the
online help.
Getting the Most Out of WinFax and ACT! 4.0/2000
The list below highlights some of the most popular integration features.
Q
Easy integration – WinFax and ACT! have been designed to
integrate seamlessly. Depending on your preferences, you can
take advantage of the integration while working in ACT! or while
working in WinFax.
Q
Sending faxes – WinFax and ACT! have been integrated together
so that you can continue to fax the way you are accustomed to. If
you prefer to work in ACT!, you can send WinFax faxes to ACT!
contacts directly from your default word processor. If you prefer to
work in WinFax, you can prepare your faxes as you normally
would in WinFax and then address them to ACT! contacts. Either
way, sending WinFax faxes to ACT! contacts is quick and easy.
Q
Logging faxes – Keep track of all the faxes you send—both in the
ACT! Notes/History section and the WinFax Logs window.
B-117
Using WinFax and ACT!
Q
Viewing faxes – Using the fax linking feature, you can view
WinFax faxes directly from an ACT! 4.0/2000 contact’s Notes/
History section.
Q
Setting up ACT! databases as WinFax phonebooks – Use your
ACT! databases to address faxes you prepare in WinFax.
Integrating ACT! 4.0/2000 With WinFax
You can integrate WinFax and ACT! in the following ways:
Q
Use WinFax as your ACT! faxing software – You can send
WinFax faxes directly from your default word processor.
Q
Set up your ACT! databases as phonebooks in WinFax – If
WinFax detects you are running ACT! and WinFax together, it will
automatically prompt you to select the ACT! 4.0/2000 databases
you want to set up as phonebooks in WinFax. Otherwise, you can
set up your ACT! 4.0/2000 database as an “external” phonebook in
WinFax.
To set up WinFax as your ACT! 4.0/2000 faxing software:
1
Start ACT!
2
On the Edit menu in ACT!, click Preferences. The Preferences
dialog appears.
3
Click the General tab.
4
In the Fax Software drop-down list, click WinFax.
To integrate ACT! with WinFax:
1
B-118
Do one of the following:
Q
Windows 95/98 users – Proceed to step 2.
Q
Windows NT/2000 users – Log onto Windows NT/2000 using an
account with administrative privileges.
2
Start Message Manager (see page 3-24).
3
On the Go menu, click Phonebooks. The Phonebooks window
opens.
4
On the File menu, point to New and click Phonebook. The New
Phonebook wizard starts.
5
Click Link To An Existing Phonebook From Another Program and
click Next
Faxing Documents to ACT! 4.0/2000 Contacts
6
In the Name field, type a name for the new phonebook and click
Next.
7
Click ACT! 4.0/2000 And Higher and click Next.
8
Click Set Information. The Symantec ACT! 4.0/2000 Phonebook
Properties dialog appears.
9
Click the File Access tab. Do the following:
a Type a description for the ACT! 4.0/2000 phonebook.
b In the File Access section, click Select. The Open dialog
appears.
c Select your ACT! database and click Open. The Symantec ACT!
4.0/2000 Phonebook Properties dialog reappears.
d In the Name field, type your name.
e If your ACT! database requires a password, type the password
in the Password field.
f
10
If you are running WinFax under Windows NT/2000 and other
non-administrative Windows NT/2000 users will be using
WinFax on this computer, click Set Defaults to set up a default
ACT! phonebook for those users.
Click the Options tab and specify how you want WinFax to track
fax information in the Notes/History section in ACT! Do any the
following:
Q
Log faxes in the contact’s Notes/History section in ACT! – In the
When WinFax Sends To An ACT! Contact section, specify the
type of events you want WinFax to log in the Notes/History
section in ACT!
Q
Remind me to resend failed events – If you want WinFax to
create an ACT! activity entry for failed events, enable If A Send
Fails.
Q
Allow me to view faxes directly from the contact’s Notes/History
section in ACT! – If you want to be able to view this contact’s
faxes by double clicking the entry in the contact’s Notes/History
section in ACT!, enable Include A Link.
Faxing Documents to ACT! 4.0/2000 Contacts
Once you have set up WinFax as your faxing software, you fax documents
to your ACT! 4.0/2000 contacts in a number of ways:
Q
from ACT! to a single contact
B-119
Using WinFax and ACT!
Q
from ACT! to multiple contacts using the Mail Merge feature
Q
from WinFax
To fax documents to a single contact from ACT! 4.0/2000:
1
Start ACT!
2
Set up WinFax as your faxing software (see page B-118).
3
Look up the contact to whom you want to send the fax.
4
Using your default ACT! word processor, create or open the first
document you want to fax.
5
Depending on the default word processor you are using with
ACT!, do one of the following:
Q
ACT! Word Processor – On the File menu, point to Send and
click Fax.
Q
Microsoft Word – On the File menu, click Send Fax Using ACT!
Q
Corel WordPerfect – On the File menu, click Send Fax Using
ACT!
The ACT! Send Fax dialog appears.
6
Select the appropriate options and click Continue. The WinFax
PRO Send dialog appears with a new fax addressed to the current
ACT! contact and the document displayed in the fax preview area.
7
OPTIONAL – Attach additional documents to your fax. Do the
following:
a On the Insert menu, click Files. The Insert Files dialog appears.
b Select the appropriate file and click OK. The Send dialog
reappears with the document displayed in the fax preview area
after the first document.
8
OPTIONAL – Add a cover page. Do the following:
a In the Cover Page drop-down list, select the cover page you
want to use.
b In the text area beside the fax thumbnails, type a note. (If the
the cover page has more than one fillable field, press Tab to
move from field to field.)
9
10
B-120
Select any other options in the Send dialog.
Click Send. WinFax processes and sends your fax.
Faxing Documents to ACT! 4.0/2000 Contacts
To fax documents using the ACT! 4.0/2000 mail merge feature:
1
Start ACT! (if it is not already running).
2
Set up WinFax as your faxing software (see page B-118).
3
Look up the contacts to whom you want to send the fax.
4
On the Write menu, click Mail Merge. The Mail Merge dialog
appears.
5
In the Merge With section, click the option corresponding to the
contacts to whom you want to send this fax.
6
In the Template section, select the document template you want to
use. If you want to create a new template, click the New button. If
you want to edit an existing template, select the template and click
the Edit button.
7
In the Send Output To section, click Fax.
8
OPTIONAL – Log the faxed document in each contact’s history. Do
one of the following:
9
Q
Log the faxed document – Enable Create History When Sent and
type the subject of the fax in the Regarding field.
Q
Do not log the faxed document – Disable Create History When
Sent.
Click OK. WinFax begins processing the faxes.
To fax documents to ACT! 4.0/2000 contacts from WinFax:
1
If this is the first time you are using ACT! 4.0/2000 with WinFax,
you must integrate ACT! with WinFax by setting up ACT! as an
external phonebook (see page B-118).
2
Start the fax by doing one of the following:
Q
Open the document you want to fax, then print it to a WinFax
printer.
a Start the appropriate program and open the first document
you want to fax. (For example, start Word and open your
letter.)
b On the program’s File menu, click Print. Select a WinFax
printer (either High Quality or Photo Quality, as desired),
then print the document. WinFax starts and the Send dialog
appears with the document displayed in the fax preview
area.
Each thumbnail represents a page in the document.
B-121
Using WinFax and ACT!
Q
Start Message Manager, then select the document you want to
fax.
a Start Message Manager (see page 3-24).
b On the Send menu, click Send New Fax. The Send dialog
appears.
c On the Insert menu, click Files. The Insert Files dialog
appears.
d Select the appropriate file and click OK. The Send dialog
reappears with the document displayed in the fax preview
area.
Each thumbnail represents a page in the document.
3
Address the fax to the appropriate ACT! recipients. Do the
following:
a In the phonebook list, click your ACT! phonebook.
b In the record list, double click the ACT! contact to whom you
want to send this fax. The contact appears in the Recipients list.
c Repeat step b until the Recipients list contains all the contacts
to whom you want to send the fax.
4
OPTIONAL – Add a cover page. Do the following:
a In the Cover Page drop-down list, select the cover page you
want to use.
b In the text area beside the fax thumbnails, type a note. (If the
the cover page has more than one fillable field, press Tab to
move from field to field.)
5
Select any other options in the Send dialog.
6
Click Send. WinFax begins processing the fax.
Note: Some formatting changes may occur in your document when you
select a WinFax printer. Selecting a WinFax printer before creating
documents minimizes formatting changes; however, it may also limit your
selection of available fonts.
Logging Faxes in ACT! 4.0/2000
By default, WinFax stores all sent and received faxes in the Default
message store (that is, the Send Log and the Receive Log in the Logs
window). When you use ACT! and WinFax together, you can also log sent
and received faxes in the contact’s History.
B-122
Viewing Faxes
Q
Sent faxes – If you want to automatically link sent faxes to the
contact’s History, enable Include A Link In The Note/History Entry
To Open The Event on the Options tab of the Symantec ACT! 4.0/
2000 Properties dialog (in the WinFax Phonebooks window, click
your ACT! phonebook, click Properties on the File menu, and then
click the Options tab). You can also set this option from the
WinFax Options tab on the ACT! Preferences dialog (on the Edit
menu in ACT!, click Preferences).
Q
Received faxes – You can manually link faxes you receive to an
ACT! contact. To do this, click the appropriate fax in the WinFax
Logs window, point to Link To Symantec ACT! 4.0/2000 Contact on
the WinFax File menu, click Phonebooks and select the
appropriate contact.
You can double click any linked fax in the Notes/History section to view
the fax.
Viewing Faxes
You can view received faxes from WinFax or from your ACT! 4.0/2000
contacts history.
To view a fax from WinFax:
Do either of the following:
Q
WinFax – On the Window menu, click Receive Log. In the Receive
Log, double click the fax you want to view.
Q
Controller – Right click the Controller icon on the Windows
taskbar, point to New Messages and click the fax you want to
view.
To view a fax from an ACT! 4.0/2000 contact’s history:
1
Start ACT!
2
Look up the appropriate contact.
3
In the Contact window, click the Notes/History tab.
4
Locate the fax log entry.
5
Double click the fax log entry. Fax Viewer starts and displays the
first page of the fax.
B-123
S
U
P
P
O
R
T
Symantec Service
and Support Solutions
S
Service and Support information is available from the Online Help System
of your Symantec product. Choose the Service and Support topic from the
Online Help Index tab.
Regional support
Telephone and internet support services vary from region to region. To
view the technical support contact telephone number and Web site
address for your region, do the following:
1
Start Message Manager.
2
On the Help menu, click About Message Manager. The About
WinFax dialog appears.
3
Click the System Info tab, and then click Technical Support.
Technical Support information for your region appears in the
display box.
StandardCare Support
Connect to Symantec Service and Support site at
www.service.symantec.com for a complete selection of technical support
options and customer services, including product knowledgebases,
interactive troubleshooter, Frequently Asked Questions (FAQ), and more!
From this Web site you can order CD and manual replacements, change
your address, find out the status of your order or return, or post a query to
a Customer Service discussion group.
S-1
Symantec Service and Support Solutions
PriorityCare, GoldCare, and PlatinumCare Support
Fee-based telephone support services are available to all registered
customers. For complete information, please call our automated fax
retrieval service, located in the United States, at (800) 554-4403 (general
information) or (541) 984-2490 (technical support), and press 1 for an
index of options.
Telephone support information is also available on the Service and Support
Web site. Connect to www.service.symantec.com, select your product and
version, and select Contact Technical Support.
Automated fax retrieval
Use your fax machine to receive general product information, fact sheets,
and product upgrade order forms. For general information, call (800) 5544403. For technical application notes, call (541) 984-2490 and press 1 for an
index of options.
Support for old and discontinued versions
Whena a new version of this software is released, registered users will
receive upgrade information by mail. Telephone support will be provided
for the old version for an additional six months following the release of the
new version. Technical information will also remain available through the
Symantec Service and Support Web site (www.service.symantec.com).
When Symantec announces that a product will no longer be marketed or
sold, telephone support will be discontinued sixty days later. Support will
be available for discontinued products via the Symantec Service and
Support Web site only (www.service.symantec.com).
International Service and Support
Technical Support and Customer Service solutions vary by country. For
information on Symantec and International Partner locations outside of the
United States, please call our Technical Support automated fax retrieval
service at +1 (541) 984-2490, and press 1 for an index of options.
S-2
Customer Service
Symantec Customer Service can provide assistance for non-technical
questions such as:
Q
Subscribing to the Symantec Support Solution of your choice
Q
Obtaining product literature or trialware
Q
Locating resellers and consultants in your area
Q
Replacing missing or defective CD-ROMS, disks, manuals, and so forth
Q
Updating your product registration with address or name changes
Q
Getting rebate status information
Q
Accessing Frequently Asked Questions (FAQ)
Q
Posting questions to the Customer Service newsgroup
To speak with a customer service representative, call (800) 441-7234 or visit
us online at http://service.symantec.com.
Upgrade Orders
For upgrade orders, and order or return status information, please call the
Customer Service Order Desk at (800) 568-9501, or visit the upgrade center
online at: http://www.symantec.com/upgrades/
Worldwide Service and Support
Symantec provides Technical Support and Customer Service worldwide.
Services vary by country and include International Partners who represent
Symantec in regions without a Symantec office. For general information,
please contact the Symantec Service and Support office for your region or
visit us at http://www.symantec.com.
Service and Support Offices:
NORTH AMERICA
Symantec Corporation
175 W. Broadway
Eugene, OR 97401
http://www.symantec.com/
(800) 441-7234 (USA & Canada)
(541) 334-6054 (all other locations)
Fax: (541) 984-8020
Automated Fax Retrieval
(800) 554-4403
(541) 984-2490
S-3
Symantec Service and Support Solutions
EUROPE, MIDDLE EAST, AFRICA
Symantec Customer Service Center
P.O. Box 5689
Dublin 15
Ireland
http://www.symantec.com/region/
reg_eu/
Automated Fax Retrieval
+31 (71) 408-3782
+353 (1) 811 8032
Fax: +353 (1) 811 8033
ASIA/PACIFIC RIM
Symantec Australia Pty. Ltd.
408 Victoria Road
Gladesville, NSW 2111
Australia
http://www.symantec.com/region/
reg_ap/
+61 (2) 9850 1000
Fax: +61 (2) 9817 4550
LATIN AMERICA
Symantec América Latina
Oficina principal
2500 Broadway, Suite 200
Santa Monica, CA 90404
http://www.symantec.com/region/mx/
(310) 449-7086
Fax: (310) 449-7576
BRAZIL
Symantec Brazil
Av. Juruce, 302 - cj 11
São Paulo - SP
04080 011
Brazil
http://www.symantec.com/region/br/
+55 (11) 5561 0284
Fax: +55 (11) 5530 8869
Registering Your Symantec Product
To register your Symantec product, use one of the following methods:
S-4
Q
Mail – Fill in the registration form at the back of this guide, and
then drop it in the mail.
Q
Fax – Fax the registration form at the back of this guide to
(541) 984 8020.
Q
Online – Use the online registration feature during the installation
process to register via modem (if your software offers this feature).
Registering Your Symantec Product
Every effort has been made to ensure the accuracy of this information.
However, the information contained herein is subject to change without
notice. Symantec Corporation reserves the right to make such changes
without prior notice.
February, 2000
S-5
Symantec Service and Support Solutions
S-6
I
N
D
E
X
Symbols
.CVP files. See online help
.FXR files. See online help
.FXS files. See online help
.TMP files, A-101
? button in dialogs, vii
Numerics
16-bit programs, using, A-112
A
ACT! phonebooks, 4-36, A-114, A-115, B-117
addressing faxes
to groups, 5-56
using Send dialog, 5-52
America Online (AOL), A-112
annotating faxes, 5-60
area codes
multiple, A-105, A-107
overlaid, A-105, A-107
split, A-105, A-107
ASCII format, importing phonebooks, 4-35, 4-40
attachments, 4-44, 5-51, 5-53
See also online help
automatic forwarding, 6-75
automatic reception
enabling, 3-25
status, 3-26
troubleshooting, A-112
B
backup and restore. See online help
BFT (binary file transfer), sending files, 5-48
See also online help
billing codes. See online help
broadcasting faxes. See sending faxes, to groups
C
call disturb, A-105
call waiting, A-108
Calling Card wizard, 4-42
calling cards, 5-47
charging faxes to, 5-58
setting up, 4-42
canceling faxes, 5-62
CAS modems, importing phonebooks, 4-40
cellular telephones, notification, 6-71
Controller, 1-13
common uses, 3-25
saving time, 3-25
starting, 3-24
converting faxes to text (OCR). See online help
country codes, A-106
Cover Page Design wizard, 4-33
Cover Page Designer, 4-30
cover pages
about, 4-30
adding to faxes, 4-35, 5-52
creating, 4-32
creating custom, 4-33
customizing Quick Cover Page, 4-35
default, 4-36
modifying existing, 4-32
pre-designed, 4-30
truncated text, A-111
using as entire fax, 5-55
using your signature, 4-30
See also online help
credit cards. See calling cards
.CVP files. See online help
D
DDE macros, 5-49
See also online help
deleting
faxes, 8-93
log records, 8-93
DELFIX.EXE, A-115
devices, system requirements, 2-16
dialing
about, A-104, A-105
call disturb, disabling, A-105
call waiting
disabling, A-108
interruptions on line caused by, A-108
calling cards, 4-42, 5-58
dial sequences, examples, A-104
dial tone, detecting, A-105
locations, A-104
troubleshooting, A-106
methods, A-105
selecting recipient from phonebook, A-105
typing number, A-105
off-peak time periods, 5-59–5-60
Index-1
Did you know …
… that the online help contains an even more extensive index? See page vi.
outside line, A-108
outside line, obtaining, A-104
prefix, A-104
call disturb, disabling, A-105
call waiting, disabling, A-108
outside line, A-104
pulse and touch tone, combining, A-108
TAPI setup, A-107
touch tone and pulse, combining, A-108
troubleshooting, A-103, A-109
displaying faxes. See viewing faxes
documentation
assumptions, v
contents of online help, vi
contents of user’s guide, v
sending feedback, viii
documents for faxes, 5-48, 5-49
Drag and Drop Depot, 5-58
drag and drop faxing, 5-58
E
ECCO phonebooks. See online help
email. See online help
exporting
faxes to graphic files. See online help
log records. See online help
phonebooks. See online help
F
Fax Broadcast. See Concord Fax Services
fax header, A-111
Fax Mailbox. See Concord Fax Services
fax modems, system requirements, 2-16
fax notification, pager, 6-71
fax notification, SMS text messaging, 6-71
fax setup, personalizing, 4-29
calling cards. See calling cards
cover pages. See cover pages
logoSee the online help
phonebooks. See phonebooks
signature, 4-30
faxes
attachments, 4-44
See also online help
BFT delivery method, 5-48
See also online help
calling cards, 5-47
canceling, 5-62
copying. See online help
credit cards, 5-47
deleting, 8-93
dialing, customizing setup, 5-47
filtering. See online help
Index-2
forwarding
See also forwarding faxes
holding and releasing. See online help
image quality, A-109
improving readability. See online help
letterhead, 4-44, 5-49
See also online help
logo, getting into WinFax, 5-47
minimum requirements, 5-48–??
monitoring receive progress, 6-76
monitoring send progress, 5-62
opening source documents, 5-50, 5-53
overview, 5-48–??
phonebooks, using. See phonebooks
previewing. See previewing faxes
printing. See printing faxes
receiving. See receiving faxes
recurring, 4-44
See also online help
rescheduling. See online help
resending. See resubmitting faxes
resolution, A-109
resubmitting, 5-64
failed pages only, 5-65
scheduling, 5-59–5-60
sending using drag and drop, 5-58
sending. See sending faxes
signature, getting into WinFax, 5-47
storing, 8-87
See also message stores
templates, 4-44, 5-49
See also online help
transmission specs, A-113
transmission status, 5-63, 8-90
viewing. See viewing faxes
See also log records
faxing
drag and drop, 5-58
file types. See online help
folders
creating, 8-90
in Attachments window. See online help
in Cover Pages window. See online help
in Phonebooks window, 4-37
shortcuts to, 8-91
forwarding faxes, 6-73
forwarding faxes as email attachments, 6-73
.FXR files. See online help
.FXS files. See online help
G
generating reports, 8-95
getting faxes. See receiving faxes
getting help. See documentation
glossary. See online help
Did you know …
… that the online help has a table of contents? See page vi.
graphics
color, not displayed, A-110
signature, using yours, 5-47
your logo
on cover pages, 4-35, 5-47
on fax pages, 5-47
your signature
on cover pages, 4-35, 5-47
on fax pages, 4-30, 5-47
grid. See online help
group faxes, 5-56
group records in phonebooks. See phonebooks
H
hard disk
low on space, A-100, A-112, A-114
problems, A-101
header on faxes. See fax header
help
online help. See online help, using
technical support. See technical support
user’s guide. See documentation
holding faxes. See online help
I
importing
ASCII phonebook options, 4-40
log records, 8-95
phonebook records, 4-40
PIM phonebooks, 4-40
incoming fax reports, 8-95
Install Directory, 1-13
installing WinFax, 2-20
LiveUpdate, 2-21
preparing to install, 2-19
scripted installation, 2-19
troubleshooting, 2-20
uninstalling, 2-22
updating WinFax, 2-21
upgrading from previous version, 2-18
ISDN, system requirements, 2-16
K
keywords. See online help
L
letterhead, using on faxes, 4-44, 5-49
See also online help
LiveUpdate, 2-21
locations for dialing
about, A-104
troubleshooting, A-106
log records
copying. See online help
deleting, 8-93
exporting. See online help
filtering. See online help
importing, 8-95
message priority, 8-89
message types, 8-89
moving. See online help
overview, 8-88, 8-89
See also faxes
transmission status, 8-90
troubleshooting, A-114
See also faxes
logging faxes in ACT!, B-122
logo, using yours on cover pages and faxesSee the online help
Logs window, 8-88
forwarding faxes, 8-87
illustrated, 8-88
message priority, 8-89
message types, 8-89
Outbox, 8-89
printing faxes, 8-87
Receive Log, 8-89
resubmitting faxes, 8-87
Send Log, 8-89
transmission status, 8-90
viewing faxes, 8-87
Wastebasket, 8-89
Lotus Organizer phonebooks, A-115
See also online help
M
macros
using DDE macros, 5-49
See also online help
maintenance utility, A-100, A-114, A-115
manual fax reception, 6-70
Message Manager, starting, 3-24
message stores
creating, 8-90
shared, 8-91
linking to, 8-92
shortcuts to, 8-91
messages
priority status, 8-89
storing, 8-87
transmission status, 8-90
types, 8-89
Microsoft Exchange, using with WinFax. See online help
Microsoft RAS, 2-17, A-102
See also online help
Index-3
Did you know …
… that the online help contains an even more extensive index? See page vi.
modems
activating, A-103
connecting to phone lines, A-102
installation problems, solving, A-102
settings, customizing, A-103
troubleshooting, A-101
dialing problems, A-103
moving data folder, A-100
multiple area codes, A-105, A-107
online help, vi
Answer Wizard, vi
in dialogs, vii
using, vi, A-98
opening faxes. See viewing faxes
Outbox, 8-89
faxes do not send, A-110
outgoing fax reports, 8-95
overlaid area codes, A-105, A-107
optimizing database, A-115
See also online help
PIM phonebooks, 4-36
See also online help
recipient records, 4-37, 4-38
searching. See online help
shared. See online help
sorting. See online help
troubleshooting, A-114
Phonebooks window, illustrated, 4-37
PIM phonebook support, 4-40
prefix, A-104
call disturb, disabling, A-105
call waiting, disabling, A-108
preparing faxes, formatting problems, A-110
previewing faxes, 5-60, A-111
at send time, 5-52, 5-56
printing faxes, 7-85–7-86
automatically, A-114
from Logs window, 7-85, 8-87
methods of printing, 7-85
troubleshooting, A-113
while viewing, 7-85
printing to WinFax, 5-49
printing transmission records. See online help
Program Setup, 1-13, 4-29
starting, 3-24
P
Q
pager notification, 4-45
See also online help
pagers, notification, 6-71
pagers, setting up, 6-71
pcANYWHERE, A-112
performance, improving, A-99
personalizing faxes and cover pages. See fax setup, personalizing
phone lines
connecting to modems, A-102
troubleshooting, A-109
phonebook records. See phonebooks
Phonebook wizard, 4-37
phonebooks, 4-36
ACT! phonebooks, 4-36, A-114, A-115, B-117
ASCII import options, 4-40
creating, 4-37, 5-47
ECCO phonebooks. See online help
exporting. See online help
folders for organizing, 4-37
group records, 4-37, 4-39
importing, 4-40
importing. See also online help
Lotus Organizer phonebooks, A-115
See also online help
question mark (?) help button, vii
Quick Cover Page, 4-30
See also online help, 4-30
N
notification, pager, 6-71
notification, SMS text messaging, 6-71
O
Index-4
R
Read Me file, A-98
Receive Log, 8-89
receive rules, using, 6-75
receiving BFT files. See online help
receiving email. See online help
receiving faxes, 6-67
automatically, 6-68
manually, 6-68, 6-70
methods of receiving, 6-68
monitoring progress, 6-76
status bar, 6-76
Status dialog, 6-76
pager notification, 4-45
See also online help
polling, 6-68
preparing to receive, 6-68
recognizing text (OCR). See online help
sideways, A-113
troubleshooting, A-112
Did you know …
… that the online help has a table of contents? See page vi.
upside down, A-113
recipient records in phonebooks
importing, 4-40
recipient records. See phonebooks
recurring faxes, 4-44
See also online help
registering Mobile Essentials, S-4
reports, 8-95
generating, 8-95
rescheduling faxes. See online help
resending faxes, 5-64
failed pages only, 5-65
resubmitting faxes, 5-64
failed pages only, 5-65
retrieving faxes. See receiving faxes
rotating fax pages, 7-83
S
saving
annotations. See online help
attachments. See online help
cover pages. See online help
send information for faxes, 4-44, 5-49
See also online help
scanning documents for faxing, 5-49
See also online help, using
scripted installation, 2-19
Send dialog
illustrated, 5-49
opening, 5-49
Send Log, 8-89
Send New Fax, 1-13
sending faxes
annotating before sending. See annotating faxes
attaching files to fax, 5-51, 5-53
attachments. See online help
billing codes. See online help
binary file transfer (BFT). See online help
canceling, 5-62
cover page
adding to fax, 5-52
See also cover pages
using as entire fax, 5-48, 5-55
DDE macros, using, 5-49
See also online help
drag and drop, 5-58
errors in transmission, A-109
faxing one or more documents, 5-48
faxing to ACT! contacts, B-119
files, sending in native format (BFT), 5-48
keywords. See online help
letterhead, using, 5-49
macros, using, 5-48
methods you can use, 5-48
modem problems, A-109
monitoring progress, 5-62–5-64
status bar, 5-62
Status dialog, 5-62
multiple documents, faxing, 5-49
notification. See online help
opening source documents, 5-50, 5-53
options at send time, 5-52
performance problems, A-109
previewing. See previewing faxes
resending, 5-64
failed pages only, 5-65
resolution, A-109
resubmitting, 5-64
failed pages only, 5-65
saving information to fax templates, 5-49
scanning documents for faxing, 5-49
scheduling, 5-59–5-60
successful transmission, confirming, 5-63
to groups, 5-56
transmission records, printing, A-113
troubleshooting, A-109
using Send dialog
starting a fax, 5-49
See also Send dialog
setup, defining, 4-29
shared message stores, 8-91
shortcuts, creating for folders and message stores, 8-91
signature
adding to faxes, 4-30
getting yours into WinFax, 5-47
signature button, 4-32
signature, adding to a fax, 4-32
signing faxes, 4-32
sixteen-bit programs, using, A-112
SMS text messaging, 6-71
SMS text messaging, notification, 6-71
split area codes, A-105, A-107
stamps
logo, 5-47
signature, 5-47
status bar
monitoring receive transmission, 6-76
monitoring send transmission, 5-62
Status dialog
does not appear, A-110
monitoring receive transmission, 6-76
monitoring send transmission, 5-62
system performance, improving, A-99
system requirements, 2-16
T
TAPI dialing, troubleshooting, A-107
technical support, vi
Index-5
Did you know …
… that the online help contains an even more extensive index? See page vi.
discussion groups, A-98
FAQ list, A-98
online forums, A-98
Read Me file, A-98
technical note library, A-98
templates, using for faxes, 4-44
See also online help
temporary files, troubleshooting, A-101
.TMP files, A-101
transmission records. See online help
transmission specks on faxes, removing, 7-84
transmitting faxes. See sending faxes
troubleshooting, A-97
checking basics, A-101
diagnosing problems, A-97
dialing, A-103
discussion groups, A-98
FAQ list, A-98
logs, A-114
modem, A-101
online forums, A-98
other sources of information, A-98
phonebooks, A-114
printing faxes, A-113
Read Me file, A-98
receiving faxes, A-112
sending faxes, A-109
technical note library, A-98
viewing faxes, A-113
troubleshooting information, A-98
U
uninstalling WinFax, 2-22
user’s guide. See documentation
V
viewing BFT files. See online help
viewing email. See online help
viewing faxes, 7-81, 7-82
colors inverted, A-113
from Logs window, 8-87
in ACT!, B-123
methods of viewing, 7-81
printing while viewing, 7-85
removing transmission specks, 7-84
rotating fax pages, 7-83
sideways, A-113
troubleshooting, A-113
upside down, A-113
viewing details and miniatures, 7-83
Index-6
W
Wastebasket
about, 8-89
emptying
automatically, 8-94
manually, 8-94
What’s This? button, vii
Windows dialing (TAPI)
troubleshooting, A-107
Windows NT/2000 considerations, 2-17
WinFax
benefits, 1-9
Controller, 1-13
DDE macros, using, 5-49
See online help
exiting, 3-24
faxing overview, 5-48–??
installing. See installing WinFax
macros, 5-48
Corel WordPerfect, 1-13
most popular features, 1-11
new features, 1-12
setting up, 4-29
starting, 3-23
system requirements, 2-16
troubleshooting, A-97
uninstalling, 2-22
using with 16-bit programs, A-112
Controller. See Controller
WinFax Drag and Drop depot, 5-58
wizards
Calling Card wizard, 4-42
Cover Page Design wizard, 4-33
Phonebook wizard, 4-37
Product Registration Form
Fill out this form, cut it
out, and mail it to:
Symantec Corporation
PO Box 599014
Miami, FL
33159-9963
U.S.A.
Name:
First
Initial(s)
Last
State/Province
Zip/Postal Code
Title:
Organization:
Address:
Street
City
Country
Daytime Phone: (
Fax Number: (
)
Ext.:
)
Internet Email Address:
May we email you about new releases and product features?
R Yes
R No
Date Purchased:
1. Which operating system(s) do you currently use?
a)R DOS
b) R Windows 95
c) R Windows 3.1d)R Windows NT 3.51
e) R Windows 98f) R Windows NT 4.0 g) R Windows 2000 h) R Windows Millenium
2. Where do you use your computer?
a) R Business
b) R Home
c) R Both
3. If purchased by your company, how many PCs are there at your office?
b) R 11-49
c) R 50-99
d) R 100 or more
a) R 1-10
4. How many PCs are there in your entire organization?
b) R 11-49
c) R 50-99
d) R 100 or more
a) R 1-10
5. Do you use a modem?
b) R No
a) R Yes
6. Do you access the Internet?
b) R No
a) R Yes
7. Do you use a CD-ROM?
a) R Yes
b) R No
8. What most influenced your decision to purchase WinFax?
Select three and rank them in order of importance.
a) R Magazine ad
b)R TV ad
c) R Radio ad
e) R Newspaper ad f) R Symantec Web site g) R Reviews
i) R Friend/colleague j) R Sales person
k) R Store promotion
m)R Trial version
n)R Direct mail offer
o)R Rebate offer
WinFax PRO 10.0
The Symantec list of registered users is occasionally made available to
selected mailers who offer quality goods and services that we feel are
of interest to you. If you do not wish to receive these mailings, check
here. R
d)R Catalog ad
h)R Trade shows
l) R WinFax box info
WinFax CD Exchange Form
DAMAGED CD EXCHANGE – If your CD becomes unusable at any time, you can exchange it for a new CD. DURING
THE 60-DAY LIMITED WARRANTY, THIS SERVICE IS FREE. After the 60-day limited warranty, the cost for this service
is $9.95 (shipping and handling).
TO ORDER – Fill in this form and return the following to the address below: 1) this form, 2) your original CD and
3) payment, if applicable*. You must be a registered customer to exchange your CD.
PLEASE SEND ME A NEW CD
Please briefly describe the problem with the original CD.
Name
Company Name
Mailing Address
City
State/Prov.
Zip/Postal Code
Country*
Daytime Phone
Software Purchase Date
Version
*This offer is limited to U.S. and Canada. Outside North America, please contact your local Symantec office or distributor.
Damaged CD
Exchange
Cost**
$ 9.95
Sales Tax (see table)
TOTAL DUE
SALES TAX TABLE: AZ (5%), CA (7.25%), CO (3%),
CT (6.25%), DC (5.75%), FL (6.25%), GA (4%), IA (5%),
IL (6.25%), IN (5%), KS (4.9%), LA (4%), MA (5%), MD (5%),
ME (5.5%), MI (6.25%), MN (6.5%), MO (4.225%),
NC (6.25%), NJ (6.25%), NY (4%), OH (5%), OK (4.5%),
PA (6.25%), SC (5%), TN (6.25%), TX (6.25%), VA (4.5%),
WA (6.5%), WI (5%),
Canada: All provinces (except NB, NF, NS, ON) add 7%
G.S.T. ON add 7% GST, plus 8% PST. NB, NF, NS add 15%
HST.
Please add local sales tax (as well as state sales tax) in:
AZ, CA, FL, GA, MO, NY, OH, OK, SC, TN, TX, WA, WI.
** If you are requesting an exchange for a damaged CD during the 60-Day Limited Warranty, this service is free. Leave the
cost area blank and ensure you thoroughly explain, in the space above, the problem with your CD.
FORM OF PAYMENT*** (Check One)
R Check or Money Order**** (Amount) $
R Visa R MasterCard R American Express
Credit Card Number
Expires
Name on Card (Please Print)
Signature
*** Payment must be made in U.S. dollars.
**** Checks must be drawn on a U.S. bank account. For Canadian orders, please send money order.
MAIL THIS ORDER FORM TO:
Symantec Corporation
Attention: Order Processing
175 West Broadway
Eugene, OR 97401-3003
Please allow 2-3 weeks for delivery
Symantec and WinFax are trademarks
of Symantec Corporation. Other brands and products are
trademarks of their respective holder/s. © 1999 Symantec
Corporation. All rights reserved. Printed in the U.S.A.