1
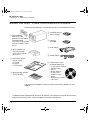
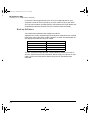
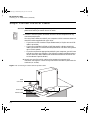
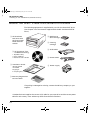
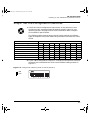
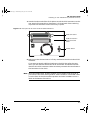
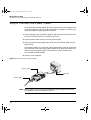
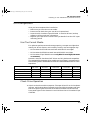
HP
SureStore DAT
External Tape Drive
Installation
Guide
Tape 5000e/eU, DAT8e/eU
DAT24e/eU, DAT40e
dat-ext.TOC Page i Wednesday, June 2, 1999 1:26 PM
HP SureStore DAT
Installation Overview (External Drives)
Refer to:
Before you start
page 1-2
Check the packing list inside this guide. Check system prerequisites.
Step 1: Check the Drive’s SCSI ID
page 1-5
Check the tape drive’s SCSI ID on the SCSI ID switch on the rear panel.
If necessary change it from the default of 3 by pressing the indented +
or - buttons above and below the SCSI ID number. Use a ball-point pen
or similar pointed object. To prevent particle contamination, do not use
a pencil. (If you are installing an HP SureStore DAT40 drive onto a
UNIX system, check the UNIX configuration switches on the bottom of
the drive.)
Step 2: Connect the SCSI Cable
page 1-8
Attach the SCSI cable to the SCSI connector on the rear of the tape
drive. If you have an HP SureStore DAT40 drive, connect the multimode terminator to the drive’s other SCSI connector. and tighten the
screws to secure it. For all other tape drives, make sure that the supplied
terminator is firmly attached to the drive’s other SCSI connector and the
latches are in place.
Step 3: Connect the Power Cable
page 1-10
Plug the power cable securely into the socket on the rear panel of the
drive. Plug the other end of the power cable into the power outlet.
On Completion
Power on the system and check the tape drive is operational. Insert the
HP SureStore Tape CD-ROM. It contains drivers, backup software and
many useful utilities. Register your tape drive.
page 1-11
Overview
External Drives—Installation Overview
Dat-ext.bk Page ii Wednesday, May 26, 1999 9:44 AM
Copyright © 1998-1999 by Hewlett-Packard
Limited.
The information contained in this document is
subject to change without notice.
November 1999
Part Number: C1555-90921
Printed in the UK
This document contains proprietary information
which is protected by copyright. All rights are
reserved. No part of this document may be
photocopied, reproduced or translated to another
language without the prior written consent of
Hewlett-Packard Limited.
Hewlett-Packard shall not be liable for errors
contained herein or for incidental or consequential
damages (including lost profits) in connection with
the furnishing, performance, or use of this material
whether based on warranty, contract, or other legal
theory.
Windows is a U.S. registered trademark of
Microsoft Corp.
UNIX is a registered trademark of X/Open
Company in the U.S. and other countries.
Product Details
Write your tape drive details here so you can find them easily if you need them.
Model (type of drive):
Model (number):
Serial (number):
Date purchased/installed:
SCSI ID:
Dat-ext.bk Page iii Wednesday, May 26, 1999 9:44 AM
Contents
External Drives—Installation Overview
External Drives—Installation Overview
inside front cover
inside back cover
1 Installing an “e” Model Drive (external)
Before You Start: Check the Contents of the Box 1-2
Before You Start: Check System Prerequisites 1-3
SCSI Host Adapter 1-3
SCSI Cable 1-3
Backup Software 1-4
Step 1: Check the Drive’s SCSI ID 1-5
Installing and Using HP TapeAssure 1-6
Unix Configuration Switches (DAT40e) 1-7
Step 2: Connect the SCSI Cable 1-8
Step 3: Connect the Power Cable 1-10
On Completion 1-11
Use The Correct Media 1-11
Check Drive Operation 1-11
Insert the HP SureStore Tape CD-ROM 1-13
Register Your Tape Drive 1-16
Limited Warranty Statement for USA, Canada, Australia and New
Zealand 1-17
2 Installing an “eU” Model Drive
(external for Unix)
Before You Start: Check the Contents of the Box 2-2
Before You Start: Check System Prerequisites 2-3
SCSI Host Adapter 2-3
SCSI Cable 2-3
Backup Software 2-3
Step 1: Check the Drive’s SCSI ID 2-4
Step 2: Set the Configuration Switches 2-5
Step 3: Connect the SCSI Cable 2-6
Step 4: Connect the Power Cable 2-8
iii
Dat-ext.bk Page iv Wednesday, May 26, 1999 9:44 AM
On Completion 2-9
Use The Correct Media 2-9
Check Drive Operation 2-9
Insert the HP SureStore Tape CD-ROM 2-10
Register Your Tape Drive 2-13
Limited Warranty Statement for USA, Canada, Australia and New
Zealand 2-14
3 Installation Troubleshooting
Save Yourself a Call 3-2
Problems with Your Computer 3-2
Problems with Your Tape Drive 3-3
Other Sources of Information 3-4
HP Tape Tools 3-4
HP SureStore Tape CD-ROM 3-4
HP Web Site 3-4
Index
Regulatory Information
iv
Dat-ext.bk Page 1 Wednesday, May 26, 1999 9:44 AM
1
Installing an “e” Model Drive
(external)
HP SureStore models covered:
• Tape 5000e
• DAT8e
• DAT24e
• DAT40e
“e” model drives are normally connected to computers running under
Windows® or NetWare. However, some models can also be connected to
computers running a UNIX® operating system. Refer to the “HP SureStore
Tape Software Compatibility” topic on our World Wide Web site (http://
www.hp.com/go/connect) for more information.
Dat-ext.bk Page 2 Wednesday, May 26, 1999 9:44 AM
HP SureStore DAT
Installing an “e” Model Drive (external)
Before You Start: Check the Contents of the Box
The following equipment is supplied with your HP SureStore DAT drive.
❑ HP SureStore
DAT drive with
SCSI terminator block
attachedto back
(Terminator is not attached
with HP SureStore DAT40
drives.)
❑ One DDS-format
data cartridge
❑ Cleaning
cartridge
❑ SCSI cable*
❑ Multi-mode SCSI
terminator block
(HP SureStore DAT40
drives only.)
❑ Power cable*
❑ Installation Guide
(Please discard
unneeded
languages
in recycling bin.)
❑ HP SureStore Tape
CD-ROM containing:
❑ Warranty Registration
card and label
•
•
•
•
•
•
HP TapeAssure software
TapeAlert utility
Drivers
Backup software
HP Tape Tools
Electronic User’s
Guides
• Media and accessories
information
If anything is damaged or missing, contact the delivery company or your
supplier.
* Hewlett-Packard supplies the correct SCSI cable for your tape drive and the correct power
cable for each country. Your cables may differ from these illustrations.
1-2
Dat-ext.bk Page 3 Wednesday, May 26, 1999 9:44 AM
HP SureStore DAT
Installing an “e” Model Drive (external)
Before You Start: Check System Prerequisites
To install and use your new tape drive, you will need the following:
• SCSI host adapter
• SCSI cable
• Backup software that supports the tape drive
SCSI Host Adapter
You need a properly installed and configured SCSI host adapter or a builtin SCSI controller on your computer’s motherboard (SCSI-2 or SCSI-3
compliant). Consult your supplier for details.
If you are installing on a Windows 95, Windows 98, Windows NT or Novell
NetWare system, you can use HP TapeAssure to check your computer’s
SCSI configuration, as directed on page 1-5.
HP SureStore DAT Drives and SCSI
All HP SureStore DAT drives, apart from the HP SureStore DAT40 are fast
narrow SCSI devices and should be connected to a single-ended (SE) host
bus adapter.
The HP SureStore DAT40 drive is an ultra wide SCSI device. For optimum
performance it should be connected to a low voltage differential (LVD) SCSI
host adapter. HP SureStore DAT40 drives may also be connected to SE
(single-ended) SCSI host adapters, but cable length will be restricted to the
SE rather than the LVD specification.
If you would like more information on SCSI specifications and configuring
your SCSI bus, read the “SCSI Background” topic in the “Before You Start”
section of the electronic User’s Guide on the HP SureStore Tape CD-ROM.
SCSI Cable
You need a SCSI cable that connects to your computer’s external connector.
For optimum performance, always use the supplied cable.
– The cable provided with DAT8e, DAT24e and DAT40e drives will
attach to a computer with a wide SCSI connector (68 pins). The cable
has been specified for use with LVD systems up to Ultra2 speeds.
– The cable provided with Tape 5000e drives will attach to a highdensity narrow SCSI connector (50 pins).
1-3
Dat-ext.bk Page 4 Wednesday, May 26, 1999 9:44 AM
HP SureStore DAT
Installing an “e” Model Drive (external)
If the SCSI cable supplied with your drive is not appropriate for your
computer’s external SCSI connector, you will need to order a new cable.
(For HP part numbers and descriptions, see the electronic DAT Media and
Orderable Accessories Guide on the HP SureStore Tape CD-ROM.)
Backup Software
You need backup software that supports the drive.
Applications usually recognize tape drives by their manufacturers’ internal
identifiers rather than their model numbers, so check the table below for
the appropriate reference for your model.
Drive Model
Internal Identifier
HP SureStore Tape 5000
HP 35480A
HP SureStore DAT8
HP C1533A
HP SureStore DAT24
HP C1537A
HP SureStore DAT40
HP C5683A
The HP SureStore Tape CD-ROM contains backup software, as well as
drivers, useful utilities and information about using your tape drive. See
page 1-13 for more information about using the HP SureStore Tape
CD-ROM.
1-4
Dat-ext.bk Page 5 Wednesday, May 26, 1999 9:44 AM
HP SureStore DAT
Installing an “e” Model Drive (external)
Step 1: Check the Drive’s SCSI ID
Note Your HP SureStore DAT drive is shipped with a default SCSI ID of 3, but
it can be assigned any unused ID between 1 and 6. Do not use SCSI ID 7,
which is reserved for the SCSI controller, or SCSI ID 0, which is typically
assigned to the boot disk.
HP SureStore DAT40 drives can be assigned any unused ID between 1
and 15.
1 Determine whether you need to change the SCSI ID from the default of 3.
If you are installing on a Windows 95/98, Windows NT or NetWare system,
install HP TapeAssure from the Software page on the HP SureStore Tape
CD-ROM and run it to check your computer’s current SCSI configuration.
See “Installing and Using HP TapeAssure” on page 1-6 for more
information about installing and running HP TapeAssure.
If you do not need to change the SCSI ID, check the drive’s SCSI ID setting
on the rear of the drive to be sure that it has not been inadvertently
changed, then go to step 2 on page 1-8.
Figure 1.1 Rear panel of an external HP SureStore DAT drive
Default
SCSI ID
setting = 3
SCSI ID
selector
1-5
Dat-ext.bk Page 6 Wednesday, May 26, 1999 9:44 AM
HP SureStore DAT
Installing an “e” Model Drive (external)
2 Change the tape drive’s SCSI ID. Use a small screwdriver or a ball-point
pen to press the indented SCSI ID selector buttons on the rear panel (see
figure 1.1) until the required value is displayed. Do not use a pencil because
small bits of lead could contaminate the drive.
Note Both the computer and the tape drive check SCSI IDs only at power-on. To
change the SCSI ID after installation, power down both the tape drive and
the computer, change the drive’s SCSI ID, power up the tape drive, and
then power up the computer.
Installing and Using HP TapeAssure
HP TapeAssure allows you to check your computer’s current SCSI
configuration on a Windows or NetWare system. You cannot install HP
TapeAssure on Unix systems.
Installing HP TapeAssure
1 Select home.htm on the HP SureStore Tape CD-ROM and the required
language.
2 Select the “HP TapeAssure” topic and follow the instructions on the screen
to install HP TapeAssure.
In Windows 95/98 or Windows NT, you can install TapeAssure directly on
the system to which the tape drive is connected. In NetWare, you will need
to install HP TapeAssure on the server from a client workstation running
Windows 95/98 or Windows NT, and then run HP TapeAssure from the
NetWare server console.
Using HP TapeAssure
Note If the program does not work correctly or hangs during processing, there
may be a compatibility problem with the SCSI card. The current version of
HP TapeAssure may not support Adaptec 1510 cards (6360 chip set) and
Symbios cards.
1 Once it is installed, run TapeAssure from the Programs menu in the
Windows Start menu. HP TapeAssure will check for the presence of a SCSI
controller and its driver software and identify the SCSI IDs of existing
SCSI devices.
2 View the current configuration and determine whether you need to change
1-6
Dat-ext.bk Page 7 Wednesday, May 26, 1999 9:44 AM
HP SureStore DAT
Installing an “e” Model Drive (external)
the SCSI ID from the default of 3.
3 Exit TapeAssure after you view the SCSI configuration information.
Unix Configuration Switches (DAT40e)
If you are installing a DAT40e on a UNIX system, you may also need to
change the configuration switches located on the underside of the drive.
(This step applies to any “e” model that is connected to a UNIX system, but
please note that not all UNIX operating systems support “e” model drives.)
1 Check the “UNIX Configuration Instructions” in the electronic User’s
Guide on the HP SureStore Tape CD-ROM for specific advice for your
operating system. See page 1-13 for more information about using the
HP SureStore Tape CD-ROM.
The following table summarizes the typical switch settings for different
types of computer, but further details are provided in the electronic User’s
Guide.
Switch Number
1
2
3
4
5
6
7
8
Default and most PC systems
System Type
On
On
Off
On
On
On
On
On
DEC systems
On
On
Off
On
On
On
On
Off
HP systems (Series 700)
On
On
Off
On
On
On
On
On
IBM RS/6000 systems
On
On
Off
On
On
Off
Off
On
SCO/PC UNIX systems
On
On
Off
On
On
On
On
On
Silicon Graphics systems
On
On
Off
On
On
Off
Off
On
Sun systems
On
On
On
On
On
Off
Off
On
2 If your UNIX configuration requires it, change the configuration switches
located on the underside of the drive from the default settings shown in
figure 1.2.
Figure 1.2 Configuration switches (shown in default positions)
= ON
= OFF
1-7
Dat-ext.bk Page 8 Wednesday, May 26, 1999 9:44 AM
HP SureStore DAT
Installing an “e” Model Drive (external)
Step 2: Connect the SCSI Cable
Caution To avoid damaging the computer or tape drive, ensure that both are
powered off while you attach the SCSI cable.
1 Perform a normal system shutdown and turn off the computer and any
connected peripherals.
You may need a different cable if your computer’s SCSI connector does not
match the cable supplied with your drive.
• If you have an HP SureStore Tape 5000e model, a 50-pin narrow SCSI
cable is provided.
• If you have a DAT8e, DAT24e or DAT40e model, a 68-pin wide SCSI
cable is provided. This cable has been specified for use with LVD systems
up to Ultra2 speeds.
• If you do not have the appropriate cable for your computer, you will have
to order one from your supplier. (For HP part numbers and descriptions,
see the electronic DAT Media and Orderable Accessories Guide on the
HP SureStore Tape CD-ROM.)
2 Attach one end of the SCSI cable to the computer’s external SCSI
connector. See figure 1.3. Push firmly and secure the cable in place with its
retainers (or screws).
Figure 1.3 Connecting the SCSI cable and power cable
SCSI
connector
SCSI terminator
SCSI cable
Power cable
1-8
Dat-ext.bk Page 9 Wednesday, May 26, 1999 9:44 AM
HP SureStore DAT
Installing an “e” Model Drive (external)
3 Attach the other end of the SCSI cable to one of the SCSI connectors on the
rear panel of the tape drive. (See figure 1.4.) Snap both of the retaining
clips over the connector to secure it firmly in place.
Note HP SureStore DAT40 drives use screw-in connectors. Tighten the screws
to secure the connector.
4 If you have an HP SureStore DAT40 drive, connect the multi-mode
terminator to the drive’s other SCSI connector and tighten the screws to
secure it. The multi-mode terminator detects whether the host bus adapter
is SE or LVD and automatically provides the appropriate termination.
For all other tape drives, make sure that the supplied terminator is firmly
attached to the drive’s other SCSI connector.
Figure 1.4 Rear panel of an external HP SureStore DAT drive
SCSI connector 1
Power switch
(shown in OFF position)
SCSI connector 2
with terminator fitted
Power socket
Note If you want to attach additional devices to the SCSI bus after the tape
drive, you will need to remove the SCSI terminator and attach the next
device to this SCSI connector. Make sure that you attach the terminator to
the last device in the chain.
1-9
Dat-ext.bk Page 10 Wednesday, May 26, 1999 9:44 AM
HP SureStore DAT
Installing an “e” Model Drive (external)
Step 3: Connect the Power Cable
An external HP SureStore DAT drive will operate using any voltage in the
range 100–240 volts (50-60 Hz). No adjustment is needed. To connect your
drive to the power supply, proceed as follows:
1 Make sure that the drive is switched OFF (O side down). The power switch
is on the rear panel (see figure 1.3).
2 Plug the power cable securely into the socket on the rear panel of the drive.
3 Plug the other end of the power cable into the power outlet.
Note Write the model name, product number, serial number, and SCSI ID of
your drive in the front of this guide for future reference. The model name
is on the front of the drive and the product and serial numbers are on a
label on the bottom of the drive.
1-10
Dat-ext.bk Page 11 Wednesday, May 26, 1999 9:44 AM
HP SureStore DAT
Installing an “e” Model Drive (external)
On Completion
Once you have completed the installation:
• Make sure you have the correct media.
• Power on and check that your new drive is operational.
• Insert the HP SureStore Tape CD-ROM. It contains everything you will
need to use your tape drive—drivers, backup software, utilities and user
information.
• Register your tape drive to ensure that you benefit from the full 3-year
warranty period.
Use The Correct Media
For optimum performance and storage capacity, use tape cartridges that
match your drive's format, and normally use only one cartridge per day.
• HP SureStore DAT40 drives work best with DDS-4 cartridges.
• HP SureStore DAT24 drives work best with DDS-3 cartridges.
• HP SureStore DAT8 drives work best with DDS-2 cartridges.
• HP SureStore Tape 5000 drives use only DDS-1 cartridges (60-meter
or 90-meter).
However, most HP SureStore DAT drives are fully backward compatible
(apart from the HP SureStore DAT40). The compatibility between drive
models and cartridges is summarized in the following table. Shaded boxes
show the recommended media for each tape drive.
HP SureStore Tape 5000
DDS-1
60 meter
DDS-1
90 meter
2.6 GB*
4 GB*
DDS-2
120 meter
DDS-3
125 meter
HP SureStore DAT8
read/write
read/write
8 GB*
HP SureStore DAT24
read/write
read/write
read/write
24 GB*
read only
read/write
read/write
HP SureStore DAT40
DDS-4
150 meter
40 GB*
* Capacity assumes 2:1 compression.
Check Drive Operation
1 Switch on the drive and the computer. The tape drive will run its hardware
self-test, which takes about 5 seconds. At the end of the hardware self-test,
both front panel lights should be off. Read more about the self-test and
front panel lights in the electronic User’s Guide on the HP SureStore Tape
CD-ROM.
1-11
Dat-ext.bk Page 12 Wednesday, May 26, 1999 9:44 AM
HP SureStore DAT
Installing an “e” Model Drive (external)
Note Always power up the drive before powering up the computer, otherwise
the computer may not recognize the drive.
2 Verify that the tape drive installation was successful.
For Windows and NetWare systems, select HP TapeAssure from the
Windows Start menu. (If you did not install HP TapeAssure at the start of
the installation process, or if it does not run correctly, refer to page 1-6.) No
other backup software should be running at the same time.
For UNIX systems, the configuration instructions in the electronic User’s
Guide on the HP SureStore Tape CD-ROM include a verification
procedure.
Note If you encounter a problem during this verification procedure, turn to
“Save Yourself a Call” on page 3-2 for help in diagnosing and fixing the
problem.
3 Install backup software, as required (see page 1-13). Use a blank cartridge
to carry out the backup and restore test, which you should perform to check
that the drive can write data to tape.
To load a cartridge:
Open the door flap, if fitted. Insert the cartridge
into the slot in front of the drive with the label
uppermost and apply gentle pressure until the
drive takes the cartridge and loads it. The Tape
light flashes green while the drive performs its
load sequence. When the cartridge is loaded, the
Tape light shows steady green.
To unload a cartridge:
Press the Unload button on the front panel.
The drive completes any task it is currently
performing, winds the tape to the beginning, and
ejects the cartridge. The sequence will take about
25 seconds for a write-enabled cartridge and 10
seconds for a write-protected cartridge.
Unload
button
1-12
Dat-ext.bk Page 13 Wednesday, May 26, 1999 9:44 AM
HP SureStore DAT
Installing an “e” Model Drive (external)
Insert the HP SureStore Tape CD-ROM
The HP SureStore Tape CD-ROM contains backup software, as well as
drivers, useful utilities and information about using your tape drive.
1 Load the CD-ROM and select home.htm.
Note If you do not have a web browser, see the Readme.txt file.
2 Select the required language to display the Welcome page. You may like to
add this page to your Bookmarks/Favorites for easy, subsequent access to
items on the HP SureStore Tape CD-ROM.
3 Select the appropriate link from the Welcome page. You will find backup
software and drivers under the “Software” topic, and electronic User’s
Guides, frequently asked questions and ordering information under the
“User Documentation” topic.
Note for UNIX Users
With some UNIX systems you may have problems reading the HTML files.
When you mount the CD-ROM, if the file names have a version number
and are all in capitals (for example, README.TXT;1), use the cdcopy.sh
utility that you can find in the UNIX directory on the CD-ROM. This utility
ensures that all file names and links work correctly in the HTML pages.
Run the command as follows: cdcopy.sh /mnt /toplevel
where /mnt is the CD mount point and /toplevel is a new directory in
which the files will be created.
Drivers
For detailed information about drivers, refer to the appropriate README
file in the DRIVERS directory on the HP SureStore Tape CD-ROM. There is
a separate sub-directory for each operating system. The tape drive must be
installed before installing the driver.
Backup Software
To use the tape drive, you will need a backup application or utility that
supports your tape drive model. The HP SureStore Tape CD-ROM contains
free backup software for use with Windows 95/98, Windows NT and Novell
1-13
Dat-ext.bk Page 14 Wednesday, May 26, 1999 9:44 AM
HP SureStore DAT
Installing an “e” Model Drive (external)
NetWare. This software also provides full support for HP One-Button
Disaster Recovery, which allows complete system recovery at the touch of
a button using only the latest backup cartridge.
Note Not all system configurations and backup software are capable of
supporting HP One-Button Disaster Recovery.
• If you are installing the drive on a standalone PC or a client PC that
runs Windows 95/98, you can use the HP Colorado Backup II software.
• If you are installing the drive on a PC that runs Windows NT Server or
Novell Netware, you can use Replica Single Server for HP SureStore
Tape. If using Replica with NetWare, please see the README file on the
HP SureStore Tape CD-ROM. Replica is not supported on NetWare 5.0.
• The tape drive must be installed before installing the software.
For the latest list of backup packages that support HP SureStore DAT
drives and advanced features such as HP One-Button Disaster Recovery
and TapeAlert, refer to our World Wide Web site (http://www.hp.com/
go/connect). The Selection section of this web site lists backup software
solutions suitable for your tape drive model and operating system
(including Microsoft Windows, Novell NetWare, IBM OS/2, various UNIX
systems, and Apple Macintosh).
Note Once you have installed your backup software, remember to carry out a
trial backup and restore.
User Documentation
For more information about using your DAT drive, refer to the “User
Documentation” topic on the HP SureStore Tape CD-ROM. This provides
links to frequently asked questions about drivers and operating systems,
and, from the “DAT Drive Documentation” link, to three electronic User’s
Guides:
• HP SureStore DAT User’s Guide
• HP One-Button Disaster Recovery Guide
• Media and Orderable Accessories Guide
Refer to your backup application’s documentation for instructions on how
to back up and restore data.
1-14
Dat-ext.bk Page 15 Wednesday, May 26, 1999 9:44 AM
HP SureStore DAT
Installing an “e” Model Drive (external)
Viewing the Electronic User’s Guides
You can view the electronic User’s Guides with most current web browsers
on any platform.
To view all the features of the electronic User’s Guide, including color and
animation, your system will need:
• A CD-ROM drive
• A super-VGA monitor configured to display at least 256 colors
HP SureStore DAT User’s Guide
This guide contains:
• Features and specifications of HP SureStore DAT drive models
• Operating instructions and how to interpret the front panel lights
• Which tape cartridges to use and how to store them safely
• Tape drive maintenance instructions
• Customer support information, such as warranty details, how to get
service, and how to contact technical support
• How to order parts and accessories
• UNIX configuration instructions
• Advice on backup strategies and SCSI bus configuration
HP One-Button Disaster Recovery User’s Guide
This guide contains:
• Instructions on using HP One-Button Disaster Recovery
• Compatibility and troubleshooting advice
Media and Orderable Accessories Guide
This guide contains:
• Recommended media for your tape drive
• Details about orderable accessories
1-15
Dat-ext.bk Page 16 Wednesday, May 26, 1999 9:44 AM
HP SureStore DAT
Installing an “e” Model Drive (external)
Register Your Tape Drive
You must register with HP to ensure that you benefit from the full 3-year
Express Exchange1 warranty period. The second and third years of
warranty are subject to registration within 30 days.
Please register via the web (http://www.hp.com/go/tapereg) or by
using the reply card in the box. The first year of warranty is provided
automatically.
In order to ensure your registration is complete, there are a number of
questions on the registration card and electronic form that are mandatory.
Other questions are optional. However, the more you feel able to complete,
the better HP can meet your needs. (If you wish, you may register your
drive and choose NOT to receive any further information from HP.)
If you have internet access, register electronically as described below.
1 Select the “Warranty Registration” topic on the HP SureStore Tape
CD-ROM.
2 Select the “Register on the Web” link. This links you to HP’s Warranty
Registration web site.
3 Complete the registration form. Mandatory questions are shown in red
text.
4 Click on the Submit button to forward your registration immediately to
HP.
If you do not have internet access:
1 Complete the Warranty Registration card supplied with the drive.
Mandatory questions are in black, bold text.
2 Post or fax the completed form to HP.
1. Express Exchange is available in most countries. In those countries that do not currently
support Express Exchange, support is provided through either the Low End Support
Program or the local parts center. Years 2 and 3 are subject to Product Registration.
1-16
Dat-ext.bk Page 17 Wednesday, May 26, 1999 9:44 AM
HP SureStore DAT
Installing an “e” Model Drive (external)
Limited Warranty Statement for USA, Canada, Australia and
New Zealand
1 HP warrants to you, the end-user customer, that HP hardware,
accessories and supplies will be free from defects in materials and
workmanship after the date of purchase, for the period specified above.
If HP receives notice of such defects during the warranty period, HP
will, at its option, either repair or replace products which prove to be
defective. Replacement products may be either new or like-new.
2 HP warrants to you that HP software will not fail to execute its
programming instructions after the date of purchase, for the period
specified above, due to defects in material and workmanship when
properly installed and used. If HP receives notice of such defects during
the warranty period, HP will replace software media which does not
execute its programming instructions due to such defects.
3 HP does not warrant that the operation of HP products will be
uninterrupted or error free. If HP is unable, within a reasonable time, to
repair or replace any product to a condition as warranted, you will be
entitled to a refund of the purchase price upon prompt return of the
product.
4 HP products may contain remanufactured parts equivalent to new in
performance or may have been subject to incidental use.
5 Warranty does not apply to defects resulting from (a) improper or
inadequate maintenance or calibration, (b) software, interfacing, parts
or supplies not supplied by HP, (c) unauthorized modification or misuse,
(d) operation outside of the published environmental specifications for
the product, or (e) improper site preparation or maintenance.
6 HP MAKES NO OTHER EXPRESS WARRANTY OR CONDITION
WHETHER WRITTEN OR ORAL. TO THE EXTENT ALLOWED BY
LOCAL LAW, ANY IMPLIED WARRANTY OR CONDITION OF
MERCHANTABILITY, SATISFACTORY QUALITY, OR FITNESS
FOR A PARTICULAR PURPOSE IS LIMITED TO THE DURATION
OF THE EXPRESS WARRANTY SET FORTH ABOVE. Some countries,
states or provinces do not allow limitations on the duration of an implied
warranty, so the above limitation or exclusion might not apply to you.
This warranty gives you specific legal rights and you might also have
other rights that vary from country to country, state to state, or province
to province.
7 TO THE EXTENT ALLOWED BY LOCAL LAW, THE REMEDIES IN
THIS WARRANTY STATEMENT ARE YOUR SOLE AND
EXCLUSIVE REMEDIES. EXCEPT AS INDICATED ABOVE, IN NO
EVENT WILL HP OR ITS SUPPLIERS BE LIABLE FOR LOSS OF
1-17
Dat-ext.bk Page 18 Wednesday, May 26, 1999 9:44 AM
HP SureStore DAT
Installing an “e” Model Drive (external)
DATA OR FOR DIRECT, SPECIAL, INCIDENTAL,
CONSEQUENTIAL (INCLUDING LOST PROFIT OR DATA), OR
OTHER DAMAGE, WHETHER BASED IN CONTRACT, TORT, OR
OTHERWISE. Some countries, states or provinces do not allow the
exclusion or limitation of incidental or consequential damages, so the
above limitation or exclusion may not apply to you.
FOR CONSUMER TRANSACTIONS IN AUSTRALIA AND NEW
ZEALAND: THE WARRANTY TERMS CONTAINED IN THIS
STATEMENT, EXCEPT TO THE EXTENT LAWFULLY PERMITTED, DO
NOT EXCLUDE, RESTRICT OR MODIFY AND ARE IN ADDITION TO
THE MANDATORY STATUTORY RIGHTS APPLICABLE TO THE SALE
OF THIS PRODUCT TO YOU.
Consumer Warranty Sept 16/97
1-18
Dat-ext.bk Page 1 Wednesday, May 26, 1999 9:44 AM
2
Installing an “eU” Model Drive
(external for Unix)
HP SureStore models covered:
• Tape 5000eU
• DAT8eU
• DAT24eU
The DAT40e does not have a separate Unix model; the same drive is used
for both non-Unix and Unix systems. Refer to Chapter 1 for installation
instructions.
Dat-ext.bk Page 2 Wednesday, May 26, 1999 9:44 AM
HP SureStore DAT
Installing an “eU” Model Drive (external for Unix)
Before You Start: Check the Contents of the Box
The following equipment is supplied with your HP SureStore DAT drive.
(See Chapter 1 for the contents supplied with the HP SureStore DAT40
drive.)
❑ DDS-format
data cartridge
❑ HP SureStore
DAT drive with
SCSI terminator
block attached
to back
❑ Cleaning
cartridge
❑ SCSI cable*
❑ HP SureStore Tape
CD-ROM containing:
• TapeAlert utility
• Driver software
• Electronic User’s Guide
❑ Installation Guide
(Please discard
unneeded
languages
in recycling bin.)
❑ Power cable*
❑ Power supply
❑ Warranty Registration
card and label
If anything is damaged or missing, contact the delivery company or your
supplier.
* Hewlett-Packard supplies the correct SCSI cable for your tape drive and the correct power
cable for each country. Your cables may differ from these illustrations.
2-2
Dat-ext.bk Page 3 Wednesday, May 26, 1999 9:44 AM
HP SureStore DAT
Installing an “eU” Model Drive (external for Unix)
Before You Start: Check System Prerequisites
To install and use your new tape drive, you will need the following:
• SCSI host adapter
• SCSI cable
• Backup software that supports the tape drive
SCSI Host Adapter
You need a properly installed and configured SCSI host adapter or a builtin SCSI controller on your computer’s motherboard (SCSI-2 or SCSI-3
compliant). Consult your supplier for details.
If you would like more information on configuring your SCSI bus, read the
“SCSI Background” topic in the “Before You Start” section of the electronic
User’s Guide on the CD-ROM.
SCSI Cable
If the SCSI cable supplied with your drive is not appropriate for your
computer’s external SCSI connector, you will need to order a new cable.
(For HP part numbers and descriptions, see the electronic DAT Media and
Orderable Accessories Guide on the HP SureStore Tape CD-ROM.)
– The cable provided with DAT8eU and DAT24eU drives will attach to
a computer with a wide SCSI connector (68 pins).
– The cable provided with Tape 5000eU drives will attach to a highdensity narrow SCSI connector (50 pins).
Backup Software
You need backup software that supports the drive.
Applications usually recognize tape drives by their manufacturers’ internal
identifiers rather than their model numbers, so check the table below for
the appropriate reference for your model.
Drive Model
Internal Identifier
HP SureStore Tape 5000
HP 35480A
HP SureStore DAT8
HP C1533A
HP SureStore DAT24
HP C1537A
2-3
Dat-ext.bk Page 4 Wednesday, May 26, 1999 9:44 AM
HP SureStore DAT
Installing an “eU” Model Drive (external for Unix)
Step 1: Check the Drive’s SCSI ID
Note Your HP SureStore DAT drive is shipped with a default SCSI ID of 3, but
it can be assigned any unused ID between 1 and 6.
1 Check your current SCSI configuration and determine if you need to
change the SCSI ID from the default of 3. On a UNIX system, examine your
device files to check the SCSI IDs of existing devices.
If you do not need to change the SCSI ID, check the drive’s SCSI ID setting
on the rear of the drive to be sure that it has not been inadvertently
changed from the default of 3, then go to step 2 on page 2-5.
2 Change the tape drive’s SCSI ID. Use a small screwdriver or a ball-point
pen to press the indented SCSI ID selector buttons on the rear panel (see
figure 2.1) until the required value is displayed. Do not use a pencil because
small bits of lead could contaminate the drive.
Figure 2.1 Rear panel of an external HP SureStore DAT drive
Default
SCSI ID
setting = 3
SCSI ID
selector
Note Both the computer and the tape drive check SCSI IDs only at power-on. To
change the SCSI ID after installation, power down both the tape drive and
the computer, change the drive’s SCSI ID, power up the tape drive, and
then power up the computer.
2-4
Dat-ext.bk Page 5 Wednesday, May 26, 1999 9:44 AM
HP SureStore DAT
Installing an “eU” Model Drive (external for Unix)
Step 2: Set the Configuration Switches
1 Check the “UNIX Configuration Instructions” in the electronic User’s
Guide on the HP SureStore Tape CD-ROM for specific advice for your
operating system. See page 2-10 for more information about using the
HP SureStore Tape CD-ROM.
The following table summarizes the typical switch settings for different
types of computer, but further details are provided in the electronic User’s
Guide.
Switch Number
1
2
3
4
5
6
7
8
Default and most PC systems
System Type
On
On
Off
On
On
On
On
On
DEC systems
On
On
Off
On
On
On
On
Off
HP systems (Series 700)
On
On
Off
On
On
On
On
On
IBM RS/6000 systems
On
On
Off
On
On
Off
Off
On
SCO/PC UNIX systems
On
On
Off
On
On
On
On
On
Silicon Graphics systems
On
On
Off
On
On
Off
Off
On
Sun systems
On
On
On
On
On
Off
Off
On
2 If your UNIX configuration requires it, change the configuration switches
located on the underside of the drive from the default settings shown in
figure 2.2.
Figure 2.2 Configuration switches (shown in default positions)
= ON
= OFF
2-5
Dat-ext.bk Page 6 Wednesday, May 26, 1999 9:44 AM
HP SureStore DAT
Installing an “eU” Model Drive (external for Unix)
Step 3: Connect the SCSI Cable
Caution To avoid damaging the computer or tape drive, ensure that both are
powered off while you attach the SCSI cable.
1 Perform a normal system shutdown and turn off the computer and any
connected peripherals. Disconnect power cables from the outlet.
You may need a different cable if your computer’s SCSI connector does not
match the cable supplied with your drive.
• If you have an HP SureStore Tape 5000eU model, a 50-pin narrow SCSI
cable is provided.
• If you have a DAT8eU or DAT24eU model, a 68-pin wide SCSI cable is
provided.
• If you do not have the appropriate cable for your computer, you will have
to order one from your supplier. (For HP part numbers and descriptions,
see the electronic DAT Media and Orderable Accessories Guide on the
HP SureStore Tape CD-ROM.)
2 Attach one end of the SCSI cable to the computer’s external SCSI
connector. Push firmly and secure the cable in place with its retainers.
2-6
Dat-ext.bk Page 7 Wednesday, May 26, 1999 9:44 AM
HP SureStore DAT
Installing an “eU” Model Drive (external for Unix)
3 Attach the other end of the SCSI cable to one of the SCSI connectors on the
rear panel of the tape drive. (See figure 2.3.) Snap both of the retaining
clips over the connector to secure it firmly in place.
Figure 2.3 Rear panel of an external HP SureStore DAT drive
SCSI connector 1
SCSI connector 2
with terminator
fitted
Power socket
4 Make sure that the terminator is firmly attached to the drive’s other SCSI
connector.
If you want to attach additional devices to the SCSI bus after the tape
drive, you will need to remove the SCSI terminator and attach the next
device to this SCSI connector. Make sure that you attach the terminator to
the last device in the chain.
Note Write the model name, product number, serial number, and SCSI ID of
your drive in the front of this guide for future reference. The model name
is on the front of the drive and the product and serial numbers are on a
label on the bottom of the drive.
2-7
Dat-ext.bk Page 8 Wednesday, May 26, 1999 9:44 AM
HP SureStore DAT
Installing an “eU” Model Drive (external for Unix)
Step 4: Connect the Power Cable
An external HP SureStore DAT drive will operate using any voltage in the
range 100–240 volts (50-60 Hz). No adjustment is needed. To connect your
drive to the power supply, proceed as follows:
1 Push the DIN plug on the power supply’s cable securely into the socket on
the rear panel of the drive, as shown in figure 2.4.
2 Plug the power cable securely into the power supply.
3 Power up the drive by plugging the other end of the power cable into the
power outlet.
The tape drive will run its self-test, which takes about 5 seconds. At the end
of the self-test, both front panel lights should be off. Read more about the
self-test and front panel lights in the electronic User’s Guide on the
HP SureStore Tape CD-ROM.
4 Switch on the computer.
Figure 2.4 Connecting the power supply
Power supply
DIN plug
Power cable
Note Always power up the drive before powering up the computer, otherwise
the computer may not recognize the drive.
2-8
Dat-ext.bk Page 9 Wednesday, May 26, 1999 9:44 AM
HP SureStore DAT
Installing an “eU” Model Drive (external for Unix)
On Completion
Once you have completed the installation:
• Make sure you have the correct media.
• Power on and check that your new drive is operational.
• Insert the HP SureStore Tape CD-ROM. It contains drivers, backup
software, utilities and user information.
• Register your tape drive to ensure that you benefit from the full 3-year
warranty period.
Use The Correct Media
For optimum performance and storage capacity, use tape cartridges that
match your drive's format, and normally use only one cartridge per day.
• HP SureStore DAT24 drives work best with DDS-3 cartridges.
• HP SureStore DAT8 drives work best with DDS-2 cartridges.
• HP SureStore Tape 5000 drives use only DDS-1 cartridges (60-meter
or 90-meter).
However, most HP SureStore DAT drives are fully backward compatible.
The compatibility between drive models and cartridges is summarized in
the following table. Shaded boxes show the recommended media for each
tape drive.
DDS-1
60 meter
DDS-1
90 meter
DDS-2
120 meter
DDS-3
125 meter
2.6 GB*
4 GB*
HP SureStore DAT8
read/write
read/write
8 GB*
HP SureStore DAT24
read/write
read/write
read/write
24 GB*
read only
read/write
read/write
HP SureStore Tape 5000
HP SureStore DAT40
DDS-4
150 meter
40 GB*
* Capacity assumes 2:1 compression.
Check Drive Operation
1 Switch on the drive and the computer. The tape drive will run its hardware
self-test, which takes about 5 seconds. At the end of the hardware self-test,
both front panel lights should be off. Read more about the self-test and
front panel lights in the electronic User’s Guide on the HP SureStore Tape
CD-ROM.
2-9
Dat-ext.bk Page 10 Wednesday, May 26, 1999 9:44 AM
HP SureStore DAT
Installing an “eU” Model Drive (external for Unix)
2 Verify that the tape drive installation was successful.
For UNIX systems, the configuration instructions in the electronic User’s
Guide on the HP SureStore Tape CD-ROM include a verification
procedure.
Note If you encounter a problem during this verification procedure, turn to
“Save Yourself a Call” on page 3-2 for help in diagnosing and fixing the
problem.
3 Use a blank cartridge to carry out the backup and restore test, which you
should perform to check that the drive can write data to tape.
To load a cartridge:
Insert the cartridge into the slot in front of the
drive with the label uppermost and apply gentle
pressure until the drive takes the cartridge and
loads it. The Tape light flashes green while the
drive performs its load sequence. When the
cartridge is loaded, the Tape light shows steady
green.
To unload a cartridge:
Press the Unload button on the front panel.
The drive completes any task it is currently
performing, winds the tape to the beginning, and
ejects the cartridge. The sequence will take about
25 seconds for a write-enabled cartridge and 10
seconds for a write-protected cartridge.
Unload
button
Insert the HP SureStore Tape CD-ROM
The HP SureStore Tape CD-ROM contains drivers, useful utilities and
information about using your tape drive.
1 Load the CD-ROM and select home.htm.
Note If you do not have a web browser, see the Readme.txt file.
2 Select the required language to display the Welcome page. You may like to
add this page to your Bookmarks/Favorites for easy, subsequent access to
items on the HP SureStore Tape CD-ROM.
2-10
Dat-ext.bk Page 11 Wednesday, May 26, 1999 9:44 AM
HP SureStore DAT
Installing an “eU” Model Drive (external for Unix)
3 Select the appropriate link from the Welcome page. You will find backup
software and drivers under the “Software” topic, and electronic User’s
Guides, frequently asked questions and ordering information under the
“User Documentation” topic.
Note for UNIX Users
With some UNIX systems you may have problems reading the HTML files.
When you mount the CD-ROM, if the file names have a version number
and are all in capitals (for example, README.TXT;1), use the cdcopy.sh
utility that you can find in the UNIX directory on the CD-ROM. This utility
ensures that all file names and links work correctly in the HTML pages.
Run the command as follows: cdcopy.sh /mnt /toplevel
where /mnt is the CD mount point and /toplevel is a new directory in
which the files will be created.
Drivers
For detailed information about drivers, refer to the appropriate README
file in the DRIVERS directory on the HP SureStore Tape CD-ROM. There is
a separate sub-directory for each operating system. The tape drive must be
installed before installing the driver.
Configuring UNIX Systems
The UNIX instructions in the electronic User’s Guide on the
HP SureStore Tape CD-ROM provide details on how to configure your
system to support the tape drive.
Backup Software
To use the tape drive, you will need a backup application or utility that
supports your tape drive model. For the latest list of backup packages that
support HP SureStore DAT drives and advanced features such as
TapeAlert, refer to our World Wide Web site (http://www.hp.com/go/
tape). The Selection section of this web site lists backup software solutions
suitable for your tape drive model and operating system (including
Microsoft Windows, Novell NetWare, IBM OS/2, various UNIX systems,
and Apple Macintosh).
Instructions for installing and using your backup application (and drivers,
if needed) should be supplied by the software manufacturer.
2-11
Dat-ext.bk Page 12 Wednesday, May 26, 1999 9:44 AM
HP SureStore DAT
Installing an “eU” Model Drive (external for Unix)
User Documentation
For more information about using your DAT drive, refer to the “User
Documentation” topic on the HP SureStore Tape CD-ROM. This provides
links to frequently asked questions about drivers and operating systems,
and, from the “DAT Drive Documentation” link, to three electronic User’s
Guides:
• HP SureStore DAT User’s Guide
• HP One-Button Disaster Recovery Guide
• Media and Orderable Accessories Guide
Refer to your backup application’s documentation for instructions on how
to back up and restore data.
Viewing the Electronic User’s Guides
You can view the electronic User’s Guides with most current web browsers
on any platform. If you do not have a web browser, see the Readme.txt file.
To view all the features of the electronic User’s Guide, including color and
animation, your system will need:
• A CD-ROM drive
• A super-VGA monitor configured to display at least 256 colors
HP SureStore DAT User’s Guide
This guide contains:
• Features and specifications of HP SureStore DAT drive models
• Operating instructions and how to interpret the front panel lights
• Which tape cartridges to use and how to store them safely
• Tape drive maintenance instructions
• Customer support information, such as warranty details, how to get
service, and how to contact technical support
• How to order parts and accessories
• UNIX configuration instructions
• Advice on backup strategies and SCSI bus configuration
HP One-Button Disaster Recovery User’s Guide
This guide contains:
• Instructions on using HP One-Button Disaster Recovery
• Compatibility and troubleshooting advice
2-12
Dat-ext.bk Page 13 Wednesday, May 26, 1999 9:44 AM
HP SureStore DAT
Installing an “eU” Model Drive (external for Unix)
Media and Orderable Accessories Guide
This guide contains:
• Recommended media for your tape drive
• Details about orderable accessories
Register Your Tape Drive
You must register with HP to ensure that you benefit from the full 3-year
Express Exchange1 warranty period. The second and third years of
warranty are subject to registration within 30 days.
Please register via the web (http://www.hp.com/go/tapereg) or by
using the reply card in the box. The first year of warranty is provided
automatically.
In order to ensure your registration is complete, there are a number of
questions on the registration card and electronic form that are mandatory.
Other questions are optional. However, the more you feel able to complete,
the better HP can meet your needs. (If you wish, you may register your
drive and choose NOT to receive any further information from HP.)
If you have internet access, register electronically as described below.
1 Select the “Warranty Registration” topic on the HP SureStore Tape
CD-ROM.
2 Select the “Register on the Web” link. This links you to HP’s Warranty
Registration web site.
3 Complete the registration form. Mandatory questions are shown in red
text.
4 Click on the Submit button to forward your registration immediately to
HP.
If you do not have internet access:
1 Complete the Warranty Registration card supplied with the drive.
Mandatory questions are in black, bold text.
2 Post or fax the completed form to HP.
1. Express Exchange is available in most countries. In those countries that do not currently
support Express Exchange, support is provided through either the Low End Support
Program or the local parts center. Years 2 and 3 are subject to Product Registration.
2-13
Dat-ext.bk Page 14 Wednesday, May 26, 1999 9:44 AM
HP SureStore DAT
Installing an “eU” Model Drive (external for Unix)
Limited Warranty Statement for USA, Canada, Australia and
New Zealand
1 HP warrants to you, the end-user customer, that HP hardware, accessories and
supplies will be free from defects in materials and workmanship after the date of
purchase, for the period specified above. If HP receives notice of such defects
during the warranty period, HP will, at its option, either repair or replace products
which prove to be defective. Replacement products may be either new or like-new.
2 HP warrants to you that HP software will not fail to execute its
programming instructions after the date of purchase, for the period
specified above, due to defects in material and workmanship when
properly installed and used. If HP receives notice of such defects during
the warranty period, HP will replace software media which does not
execute its programming instructions due to such defects.
3 HP does not warrant that the operation of HP products will be uninterrupted or
error free. If HP is unable, within a reasonable time, to repair or replace any
product to a condition as warranted, you will be entitled to a refund of the
purchase price upon prompt return of the product.
4 HP products may contain remanufactured parts equivalent to new in
performance or may have been subject to incidental use.
5 Warranty does not apply to defects resulting from (a) improper or inadequate
maintenance or calibration, (b) software, interfacing, parts or supplies not
supplied by HP, (c) unauthorized modification or misuse, (d) operation outside of
the published environmental specifications for the product, or (e) improper site
preparation or maintenance.
6 HP MAKES NO OTHER EXPRESS WARRANTY OR CONDITION WHETHER
WRITTEN OR ORAL. TO THE EXTENT ALLOWED BY LOCAL LAW, ANY
IMPLIED WARRANTY OR CONDITION OF MERCHANTABILITY,
SATISFACTORY QUALITY, OR FITNESS FOR A PARTICULAR PURPOSE IS
LIMITED TO THE DURATION OF THE EXPRESS WARRANTY SET FORTH
ABOVE. Some countries, states or provinces do not allow limitations on the
duration of an implied warranty, so the above limitation or exclusion might not
apply to you. This warranty gives you specific legal rights and you might also
have other rights that vary from country to country, state to state, or province
to province.
7 TO THE EXTENT ALLOWED BY LOCAL LAW, THE REMEDIES IN THIS
WARRANTY STATEMENT ARE YOUR SOLE AND EXCLUSIVE REMEDIES.
EXCEPT AS INDICATED ABOVE, IN NO EVENT WILL HP OR ITS
SUPPLIERS BE LIABLE FOR LOSS OF DATA OR FOR DIRECT, SPECIAL,
INCIDENTAL, CONSEQUENTIAL (INCLUDING LOST PROFIT OR DATA),
OR OTHER DAMAGE, WHETHER BASED IN CONTRACT, TORT, OR
OTHERWISE. Some countries, states or provinces do not allow the exclusion or
2-14
Dat-ext.bk Page 15 Wednesday, May 26, 1999 9:44 AM
HP SureStore DAT
Installing an “eU” Model Drive (external for Unix)
limitation of incidental or consequential damages, so the above limitation or
exclusion may not apply to you.
FOR CONSUMER TRANSACTIONS IN AUSTRALIA AND NEW ZEALAND: THE
WARRANTY TERMS CONTAINED IN THIS STATEMENT, EXCEPT TO THE
EXTENT LAWFULLY PERMITTED, DO NOT EXCLUDE, RESTRICT OR
MODIFY AND ARE IN ADDITION TO THE MANDATORY STATUTORY RIGHTS
APPLICABLE TO THE SALE OF THIS PRODUCT TO YOU.
Consumer Warranty Sept 16/97
2-15
Dat-ext.bk Page 16 Wednesday, May 26, 1999 9:44 AM
HP SureStore DAT
Installing an “eU” Model Drive (external for Unix)
2-16
Dat-ext.bk Page 1 Wednesday, May 26, 1999 9:44 AM
3
Installation Troubleshooting
Dat-ext.bk Page 2 Wednesday, May 26, 1999 9:44 AM
HP SureStore DAT
Installation Troubleshooting
Save Yourself a Call
The first step in problem-solving is establishing whether the problem lies
with the cartridge, the drive, the host computer and its connections, or with
the way the system is being operated. If none of the following advice helps
you to solve the problem, call for service. The HP technical support
numbers are listed in the “Customer Support” topic in the electronic User’s
Guide on the HP SureStore Tape CD-ROM.
Problems with Your Computer
Problem
Possible Cause
Potential Solution
The computer does not
boot up.
If you have just installed a SCSI
host adapter card in your
computer and the computer did
not boot up when you switched it
on, the new adapter is the likely
cause of the problem.
Refer to your host adapter
documentation to check that the
adapter is configured correctly.
The computer boots
but then hangs.
This might be caused by conflicts
in your hardware or software
configuration, such as two devices
with the same SCSI ID or improper
termination of the SCSI bus.
Make sure that each device
connected to the SCSI controller
has a unique SCSI ID. Check that
the SCSI bus is actively
terminated. (The electronic User’s
Guide on the HP SureStore Tape
CD-ROM provides information on
configuring your SCSI bus. Also
refer to the documentation for
your SCSI controller and any other
SCSI devices you may have.)
The computer does not The tape drive may have been
recognize the tape drive. switched on after the computer
was booted up. The computer
checks for SCSI devices only at
power-on.
The power cable or SCSI cable
may not be connected properly.
3-2
Switch on the tape drive, then
switch the computer off and then
on again.
Make sure that the power cable
and SCSI cable are firmly
connected.
Dat-ext.bk Page 3 Wednesday, May 26, 1999 9:44 AM
HP SureStore DAT
Installation Troubleshooting
Problems with Your Tape Drive
Problem
Possible Cause
The tape drive does not The power cable may not be
power up.
connected to the tape drive
properly.
TapeAssure does not
The power cable or SCSI cable
recognize the tape drive. may not be connected properly.
You cannot back up
or restore.
The SCSI connection may be
loose.
Potential Solution
Make sure that the power cable is
firmly connected. If it is, the device
has probably failed. Call for
service. For an external drive, also
check that the power switch is on.
Make sure that the power cable
and SCSI cables are firmly
connected.
Check that all expansion boards
are fully seated and the SCSI cable
is connected properly. Run
TapeAssure (MS-Windows only) to
determine whether the SCSI
controller is functioning properly.
The SCSI bus may not be properly Check that the SCSI terminator is
terminated.
installed and secure. The SCSI bus
must be terminated at both ends.
Most internal cables will have a
terminator plug on the end of the
cable farthest from the SCSI
controller. If there are no external
devices, the SCSI bus must be
terminated on the SCSI host
adapter or motherboard. If there
are external devices, the last
device in the external chain must
be terminated properly.
The Media Caution
(Clean) light shows
steady amber.
The tape drive’s SCSI ID may
conflict with another device.
Make sure that the tape drive SCSI
ID is not the same as that of any
other device attached to the same
SCSI controller. You can run
TapeAssure (MS-Windows only) to
check the SCSI IDs of attached
devices.
This is the error condition signal.
There may be a hard error on the
tape drive.
Try powering the tape drive off and
then on again. If the error condition
signal still shows, call for service.
3-3
Dat-ext.bk Page 4 Wednesday, May 26, 1999 9:44 AM
HP SureStore DAT
Installation Troubleshooting
Other Sources of Information
If you experience problems using your tape drive after installation, use HP
Tape Tools to help you diagnose the problem. You will also find
troubleshooting information on the HP SureStore Tape CD-ROM and the
HP web site.
HP Tape Tools
HP Tape Tools software provides the following functionality:
• Drive Information Utilities that provide you with information about
your tape drive and system configuration.
• Troubleshooting Diagnostics that allow you to run different tests on
your tape drive to identify problems with your tape drive or media.
• A Firmware Upgrade Utility that helps you find upgrade files for
your tape drive and allows you to perform the upgrade.
• HP Customer Support that gives you all the information you will
require should you need to contact us.
HP Tape Tools does not work on all operating systems. Refer to the
HP SureStore Tape CD-ROM for the latest compatibility information.
HP SureStore Tape CD-ROM
The HP SureStore Tape CD-ROM contains:
• Troubleshooting information in the electronic User’s Guide (this is
operational rather than installation troubleshooting)
• Frequently asked questions when using tape drives on Windows NT,
NetWare or UNIX operating systems
❑ Select the “User Documentation” topic on the Index page and follow the
appropriate links. See page 1-13 for more information about using the
HP SureStore Tape CD-ROM.
HP Web Site
The HP support web site contains two useful links:
• http:/www.hp.com/support/dat takes you to HP’s Customer Care
web site for a wide range of up-to-date information about your product
• http://www.hp.com/support/dds_troubleshooting takes you
directly to the Customer Care troubleshooting pages
3-4
Dat-ext.bk Page 1 Wednesday, May 26, 1999 9:44 AM
Index
A
accessories, ordering See
electronic User’s Guide
applications, backup 1-4, 1-13, 23, 2-11
B
backup applications
drives supported 1-4, 2-3
installing 1-13, 2-11
backup fails 3-3
backup strategies See electronic
User’s Guide
boot-up fails 3-2
browsers 1-15, 2-12
C
cables supplied with drive 1-3, 2-3
cables, SCSI 1-8, 2-6
capacity, tape See electronic
User’s Guide
cartridge
choosing See electronic
User’s Guide
forcing ejection See electronic
User’s Guide
loading 1-12, 2-10
ordering See electronic User’s
Guide
storing See electronic User’s
Guide
unloading 1-12, 2-10
write-protection See
electronic User’s
Guide
CD-ROM
contents 1-2, 2-2
electronic User’s Guide 1-14,
2-12
changing SCSI ID 1-6, 2-4
Clean light 3-3
See also electronic User’s
Guide
cleaning instructions See
electronic User’s Guide
Colorado Backup 1-14
computer
does not boot up 3-2
hangs 3-2
contacting HP See electronic
User’s Guide
contents of box
e models 1-2
eU models 2-2
customer support. See electronic
User’s Guide
head cleaning See electronic
User’s Guide
host adapter See SCSI controller
HP part numbers See electronic
User’s Guide
HP SureStore Tape CD-ROM
browser needed 2-11
contents 1-2, 2-2
TapeAssure 1-6, 1-12, 2-10
HP Tape Tools 3-4
D
I
data cartridge See cartridge
data compression See electronic
User’s Guide
DDS formats supported See
electronic User’s Guide
default SCSI ID 1-5, 2-4
drive
cannot back up or restore 3-3
does not power up 3-3
maintenance See electronic
User’s Guide
inserting a cartridge 1-12, 2-10
installation
prerequisites 1-3, 2-3
problems 3-2
E
ejecting a cartridge 1-12, 2-10
electrical requirements 1-10, 2-8
EMC certifications See back of
book
equipment supplied
e models 1-2
eU models 2-2
Express Exchange Warranty See
electronic User’s Guide
F
forcing ejection See electronic
User’s Guide
front panel lights
See also electronic User’s
Guide
Clean light 3-3
self-test 2-8
H
hang during boot-up 3-2
hard error 3-3
L
LEDs See lights
lights
See also electronic User’s
Guide
Clean light 3-3
self-test 1-11, 2-8, 2-9
Tape light 1-12, 2-10
loading a cartridge 1-12, 2-10
loose connections 3-3
M
maintenance instructions See
electronic User’s Guide
materials included
e models 1-2
eU models 2-2
multi-mode terminator
DAT40 1-9
N
Novell NetWare
backup applications 1-14, 211
O
on-off switch 1-10
operating instructions See
electronic User’s Guide
Index-1
Dat-ext.bk Page 2 Wednesday, May 26, 1999 9:44 AM
ordering parts and accessories
See electronic User’s
Guide
P
parts included
e models 1-2
eU models 2-2
power cable, attaching external
1-10, 2-8
power requirements 1-10, 2-8
power switch 1-10
power-up failure 3-3
problems
SCSI termination 3-3
with computer 3-2
with tape drive 3-3
putting in a cartridge 1-12, 2-10
R
radio interference statements
See back of book
read-write test 1-12, 2-10
regulatory information See back
of book
removing a cartridge 1-12, 2-10
repairs See electronic User’s
Guide
resolving problems 3-2
restore fails 3-3
S
safety certifications See back of
book
scheduling backups See
electronic User’s Guide
SCSI
checking configuration 1-6
configuration See electronic
User’s Guide
connection loose 3-3
LVD devices 1-3
prerequisites for installation
1-3, 2-3
SE devices 1-3
termination problems 3-2,
3-3
SCSI bus configuration See
electronic User’s Guide
Index-2
SCSI cables
connecting 1-8, 2-6
required for drive 1-3
SCSI controller 2-3
problems with 3-2
required for installation 1-3
SCSI ID
checked at power-on 1-6, 2-4
checking existing devices 1-6
conflicting 3-3
default 1-5, 2-4
devices sharing 3-2
setting 1-6, 2-4
SCSI-2 1-3, 2-3
SCSI-3 1-3, 2-3
self-test 1-11, 2-8, 2-9
service See electronic User’s
Guide
setting SCSI ID 1-6, 2-4
software
backup 1-4, 1-13, 2-3, 2-11
installing 1-13, 2-11
specifications, drive See
electronic User’s Guide
support numbers See electronic
User’s Guide
T
tape cartridge See cartridge
tape drive
cannot back up or restore 3-3
does not power up 3-3
maintenance See electronic
User’s Guide
tape formats See electronic User’s
Guide
tape heads, cleaning See
electronic User’s Guide
tape life See electronic User’s
Guide
Tape light 1-12, 2-10
See also electronic User’s
Guide
TapeAlert
See electronic User’s Guide
TapeAssure
checking configuration 1-6, 112
purpose 1-3, 1-12
verifying installation 1-12
technical support See electronic
User’s Guide
telephone numbers See electronic
User’s Guide
termination problems 3-3
terminators,fitting 1-9
testing installation 1-12
troubleshooting 3-2
See also electronic User’s
Guide
U
UNIX systems
backup applications 1-14, 211
configuring 2-11
reading HTML files 2-11
Unload button 1-12, 2-10
unloading a cartridge 1-12, 2-10
unpacking list
e models 1-2
eU models 2-2
usage instructions See electronic
User’s Guide
User’s Guide 1-14, 2-12
V
verifying installation 1-12
voltage requirements 1-10, 2-8
W
warranty See electronic User’s
Guide
web browsers 1-15, 2-12
Windows systems 1-14
World Wide Web site 1-14, 2-11
write-protection See electronic
User’s Guide
Dat-ext.bk Page 4 Wednesday, May 26, 1999 9:44 AM
Regulatory Information
Europe
Herstellerbescheinigung
Declaration of Conformity (according to
ISO/IEC Guide 22 and EN 45014)
Diese Information steht im Zusammenhang mit
den Anforderungen der Maschinenlärmverordnung
vom 18. Januar 1991.
Manufacturer:
Hewlett-Packard Company
Schalldruckpegel Lp <70 dB(A)
Address:
Hewlett-Packard Company
Computer Peripherals Bristol
Filton Road
Stoke Gifford
Bristol BS34 8QZ
United Kingdom
• am Arbeitsplatz
• normaler Betrieb
• nach ISO 7779: EN 27779 (Typprüfung)
declares that the following products
[This statement is provided to comply with the
requirements of the German Sound Emission
Directive, from 18 January 1991.
Product Name:
Sound pressure Lp <70 dB(A)
HP SureStore Tape 5000e/eU
HP SureStore DAT8e/eU
HP SureStore DAT24e/eU
HP SureStore DAT40e
conform to the following product specifications
Safety: IEC 950:1991+A1,A2
EN 60950 (1992)+A1,A2
EMC: CISPR 22:1993/EN 55022 (1994): Class B
EN50082-1:1992
IEC 801-2:1991/prEN 55024-2 (1992):
4kV CD, 8kV AD
IEC 801-3:1984/prEN 55024-3 (1991):
3V/m
IEC 801-4:1988/prEN 55024-4 (1992):
0.5 kV signal lines, 1.0kV power lines
LED Emission Level
• at operator position
• normal operation
• according to ISO 7779: EN 27779 (type test)]
General Approval
NS/G/1234/J/100003
This Hewlett-Packard tape drive meets the General
Approval NS/G/1234/J/100003 requirements.
Canada
Canadian Standards Association
Information Statement
(External tape drives only/lecteurs de
bande externes uniquement)
This digital apparatus does not exceed the Class B
limits for radio noise emissions from digital
apparatus as set out in the radio interference
regulations of the Canadian Department of
Communications.
This equipment has been tested and found to
comply with the limits for a Class 1 LED product,
set out in the international standard for safety of
laser products.
Le présent appareil numérique n'émet pas de bruits
radioélectriques dépassant les limites applicables
aux appareils numériques de Classe B prescrites
dans le règlement sur le brouillage radioélectrique
édicté par le Ministère des Communications du
Canada.
Dat-ext.bk Page 5 Wednesday, May 26, 1999 9:44 AM
Japan
Korea
U.S.A.
Radio Frequency Interference Statement
(Federal Communications Commission)
This equipment has been tested and found to
comply with the limits for a Class B digital device,
pursuant to Part 15 of the FCC Rules.
These limits are designed to provide reasonable
protection against harmful interference in a
residential installation. This equipment generates,
uses, and can radiate radio frequency energy and, if
not installed and used in accordance with the
instruction manual, may cause harmful
interference to radio communications. However,
there is no guarantee that interference will not
occur in a particular installation. If this equipment
does cause harmful interference to radio or
television reception, which can be determined by
turning the equipment off and on, you are
encouraged to try to correct the interference by one
or more of the following measures:
• Reorient or relocate the receiving antenna.
• Increase the separation between the equipment
and the receiver.
• Connect the equipment into an outlet on a
circuit different from that to which the receiver
is connected.
• Consult your dealer or an experienced radio/TV
technician for help.
Note that if you change or modify the equipment in
a way that is not expressly approved by HewlettPackard, any assurances of safety or performance
can no longer be held to apply, and could result in
violation of Part 15 of the FCC Rules.
Interference
This device complies with Part 15 of the FCC Rules.
Operation is subject to the following two conditions:
(1) this device may not cause harmful interference,
(2) this device must accept any interference
received including interference that may cause
undesired operations.
WARNING: Only the double-shielded data cable
supplied by the manufacturer should be used with
external tape drives. Other types of cables could
void the manufacturer's warranty and violate FCC
rules and regulations.
dat-overview-unix.fm Page 7 Wednesday, June 2, 1999 1:39 PM
HP SureStore DAT
Installation Guide (External UNIX Drives)
Installation Overview—External (UNIX) Drives
Overview
For further
details, see:
Before you start:
page 2-2
Check the packing list inside this guide. Check system prerequisites.
(DAT40 installation is identical on both Windows and UNIX systems.
See the front of this guide for summary details and Chapter 1 for
detailed instructions.)
Step 1: Check the Drive’s SCSI ID
page 2-4
Check the tape drive’s SCSI ID on the SCSI ID switch on the rear panel
of the drive. If necessary, change it from the default of 3 by pressing the
indented + or − buttons above and below the SCSI ID number. Use a
ball-point pen or similar pointed object. To prevent particle
contamination, do not use a pencil.
Step 2: Set the Configuration Switches
page 2-5
Check the UNIX configuration switches on the bottom of the drive.
Change the switch settings, if necessary.
Step 3: Connect the SCSI Cable
page 2-6
Attach the SCSI cable to the SCSI connector on the rear of the tape
drive. Make sure that the supplied terminator is firmly attached to the
drive’s other SCSI connector and the latches are in place.
Step 4: Connect the Power Cable
page 2-8
Push the DIN plug on the power supply’s cable securely into the socket
on the rear panel of the drive. Plug the power cable securely into the
power supply. Power up the drive by plugging the other end of the
power cable into the power outlet.
On Completion
Power on the system and check the tape drive is operational. Insert the
HP SureStore Tape CD-ROM. It contains drivers, backup software and
many useful utilities. Register your tape drive.
page 2-9