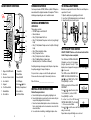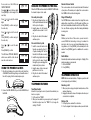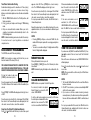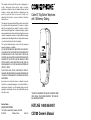
1
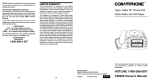
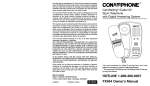
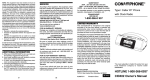
This warranty shall be invalid if the product is damaged as a
result of defacement, misuse, abuse, neglect, accident,
destruction or alteration of the serial number, improper electrical
voltages or currents, repair alteration or maintenance by any
person or party other than our own service facility or an
authorized Service Center, or any use violative of instructions
furnished by us.
Caller ID* Big Button Telephone
with 10 Memory Dialing
This warranty is also rendered invalid if this product is removed from
the country in which it was purchased, if it is used in a country in
which it is not registered for use, and/or if it is used in a country for
which it was not designed. Due to variations in telephone systems
and communications laws, this product may be illegal for use in some
countries. ConairphoneTM assumes no responsibility for damages
or penalties incurred resulting from the use of this product in a manner
or location other than that for which it is intended.
This one-year limited warranty is in lieu of all other expressed
warranties, obligations, or liabilities.
ANY IMPLIED WARRANTIES, OBLIGATIONS, OR LIABILITIES,
INCLUDING BUT NOT LIMITED TO THE IMPLIED WARRANTIES
OF MERCHANTABILITY AND FITNESS FOR A PARTICULAR
PURPOSE, SHALL BE LIMITED IN DURATION TO THE ONE-YEAR
DURATION OF THIS WRITTEN LIMITED WARRANTY. SOME
STATES DO NOT ALLOW LIMITATIONS ON HOW LONG AN
IMPLIED WARRANTY LASTS, SO THE ABOVE LIMITATIONS MAY
NOT APPLY TO YOU.
IN NO EVENT SHALL WE BE LIABLE FOR ANY SPECIAL,
INCIDENTAL OR CONSEQUENTIAL DAMAGES FOR BREACH OF
THIS OR ANY OTHER WARRANTY, EXPRESSED OR IMPLIED,
WHATSOEVER.
Some states do not allow the exclusion or limitation of special,
incidental or consequential damages, so the above limitation or
exclusion may not apply to you. This warranty gives you specific
legal rights, and you may also have other rights which may vary
from state to state.
Service Center
CONAIR CORPORATION
7475 N. Glen Harbor Blvd., Glendale, AZ 85307
IB-3519B
Printed in China
*YOU MUST SUBSCRIBE TO CALLER ID SERVICE FROM
YOUR LOCAL TELEPHONE COMPANY, TO RECEIVE
CALLER IDENTIFICATION.
HOTLINE 1-800-366-0937
NLM773Y2
CID100 Owner’s Manual
IMPORTANT SAFETY INSTRUCTIONS
BEFORE USING YOUR TELEPHONE EQUIPMENT, BASIC
SAFETY PRECAUTIONS SHOULD ALWAYS BE FOLLOWED
TO REDUCE THE RISK OF FIRE, ELECTRIC SHOCK AND
INJURY TO PERSONS, INCLUDING THE FOLLOWING:
1. Read and understand all instructions.
2. Follow all warnings and instructions marked on the product.
3. Unplug this product from the wall telephone jack and power
outlet before cleaning. Do not use liquid cleaners or aerosol
cleaners. Use a damp cloth for cleaning.
4. Do not use this product near water, for example, near a bath
tub, wash bowl, kitchen sink, or laundry tub, in a wet
basement, or near a swimming pool.
5. Do not place this product on an unstable cart, stand, or table.
The product may fall, causing serious damage to the product.
6. Slots or openings in the cabinet and the back and bottom
are provided for ventilation, to protect it from overheating.
These openings must not be blocked or covered. The
openings should never be blocked by placing the product
on a bed, or other similar surface. This product should never
be placed near or over a radiator or heat register.
7. This product should be operated only from the type of power
source indicated on the marking label. If you are not sure of
the type of power supply to your home, consult your dealer
or local power company.
8. Do not allow anything to rest on the power cord. Do not
locate this product where the cord will be abused by persons
walking on it. Do not attach the power cord to building
surfaces.
9. Do not overload wall outlets and extension cords as this
can result in the risk of fire or electric shock.
10. Never push objects of any kind into this product through
cabinet slots as they may touch dangerous voltage points
or short out parts that could result in the risk of fire or electric
shock. Never spill liquid of any kind on the product.
11. To reduce the risk of electric shock, do not disassemble this
product, but take it to a qualified serviceman when some
service or repair work is required. Opening or removing
1
covers may expose you to dangerous voltages or other risks.
Incorrect reassembly can cause electric shock when the
appliance is subsequently used.
12. Unplug this product from the wall outlet and refer servicing
to qualified service personnel under the following conditions:
a. When the power supply cord or plug is damaged or frayed.
b. If liquid has been spilled into the product.
c. If the product has been exposed to rain or water.
d. If the product does not operate normally by following the
operating instructions. Adjust only those controls that are
covered by the operating instructions because improper
adjustment of other controls may result in damage and
will often require extensive work by a qualified technician
to restore the product to normal operation.
e. If the product has been dropped or cabinet has been
damaged.
f. If the product exhibits a distinct change in performance.
13. Avoid using a telephone (other than a cordless type) during
an electrical storm. There may be a remote risk of electric
shock from lightning.
14. Do not use the telephone to report a gas leak in the vicinity
of the leak.
SAVE THESE INSTRUCTIONS
SAFETY INSTRUCTIONS FOR
BATTERIES
CAUTION
TO REDUCE THE RISK OF FIRE OR INJURY TO PERSONS,
READ AND FOLLOW THESE INSTRUCTIONS.
1. Use only 4 x 1.5V AAA size alkaline batteries.
2. Do not dispose of the batteries in a fire. The cells may
explode. Check with local codes for possible special disposal
instructions.
3. Do not open or mutilate the batteries. Released electrolyte
is corrosive and may cause damage to the eyes or skin. It
may be toxic if swallowed.
2
4. Exercise care in handling batteries in order not to short the
batteries with conduction materials such as rings, bracelets,
and keys. The batteries or conductors may overheat and
cause burns.
5. Do not attempt to recharge the batteries identified for use
with this product. The batteries may leak corrosive electrolyte
or explode.
6. Do not attempt to rejuvenate the batteries identified for use
with this product by heating them. Sudden release of the
battery electrolyte may occur causing burns or irritation to
eyes or skin.
7. When replacing batteries, all batteries should be replaced
at the same time. Mixing fresh and discharged batteries could
increase internal cell pressure and rupture the discharged
batteries.
8. When inserting batteries into this product, the proper polarity
or direction must be observed. Reverse insertion of the
batteries can cause charging, and that may result in leakage
or explosion.
9. Remove the batteries from this product if the product will
not be used for a long period of time (several months or
more) since during this time the batteries could leak in the
product.
10. Discard “dead” batteries as soon as possible since “dead”
batteries are more likely to leak in a product.
11. Do not store this product, or the batteries identified for use
with this product, in high-temperature areas. Batteries that
are stored in a freezer or refrigerator for the purpose of
extending shelf life should be protected from condensation
during storage and defrosting. Batteries should be stabilized
at room temperature prior to use after cold storage.
3
LOCATION OF CONTROLS
1
2
TO INSTALL BATTERIES
You have purchased a CID100, 10-Memory Caller ID Telephone
manufactured to the highest standards of ConairphoneTM. Before
installing and operating, be sure to read this manual.
Batteries are required for the Caller ID functions and Telephone
operations of the unit.
1. Open the battery door by pulling back the latch.
2. Insert four (4) AAA alkaline batteries (not included).
3. Snap the battery door back into place.
GENERAL INFORMATION
3
UNPACKING
4
11
12
5
13
14
15
16
6
7
8
9
10
1.
2.
3.
4.
5.
6.
7.
8.
CONGRATULATIONS!
9. Transmitter
10. Mem Button
11. New Call LED
12. LCD Display
Ringer Hi/Lo/Off Switch
Receiver
Receiver Volume Control
Hook Switch
Keypad
Tone/Pulse Switch
Redial Button
Store Button
13. Review / Button
14. Battery Compartment
15. Erase Button
16. Call Back Button
4
This package contains:
• CID100 Telephone with Caller ID
• Owner’s Manual
• One (1) Fully Modular Coil Cord
• One (1) Fully Modular Telephone Line Cord (Long Straight
Cord)
• One (1) Fully Modular Telephone Line Cord (Short Straight
Cord)
• One (1) Quick Installation Guide
• One (1) Important Notice
• One (1) Safety Instructions for Batteries
• One (1) Additional Memory Index Label
• Warranty Card (Part of the Owner’s Manual)
If anything is missing or damaged, contact the place of purchase.
Keep the packaging to transport telephone.
For your reference, keep a record of the date purchased.
Please save the sales receipt for the warranty reference.
Date of Purchase ___________________________
INSTALLATION INSTRUCTIONS
Follow these precautions:
a. Never install telephone wiring during a lightning storm.
b. Never install telephone jacks in wet locations unless the jack
is specifically designed for wet locations.
c. Never touch uninsulated telephone wires or terminals unless
the incoming telephone line has been disconnected at the
network interface.
d. Use caution when installing or modifying telephone lines.
5
SETTING UP YOUR CID100
DO NOT CONNECT the line cord to the wall outlet until the
Caller ID setup has been completed.
The LCD shows ‘ENTER LANGUAGE’
followed by a choice of 3 languages
(English, Spanish, French). If your
display does not appear this way, press and hold both [ ] and
[ ] for 4 seconds.
The LCD then shows ‘ENG ESP FRA’.
NOTE: The ‘ENG’ is BLINKING. Press
[ ] or [ ] to select ‘ENG’, ‘ESP’, or ‘FRA’.
Press [ERASE] to confirm.
If ENG is selected, the LCD shows ‘LCD
CONTRAST’.
Press [ ] or [ ] to adjust five levels (from
1 to 5, default is 3) contrast of LCD.
Press [ERASE] to confirm.
If contrast is set, the LCD shows
‘ENTER AREA CODE’. The first digit
‘–’ of the area code will blink.
Press [ ] or [ ] to enter the area code. Press [ERASE] to confirm
and go to next entry.
Repeat above steps until 3-digit area code is set.
6
If area code is set, the LCD shows
‘ENTER TIME DATE’.
Press [ ] or [ ] to select the hour digits.
Press [ERASE] to confirm and go to the
next entry.
Press [ ] or [ ] to select the minute
digits.
Press [ERASE] to confirm and go to
the next entry.
Press [ ] or [ ] to select the month
digits.
Press [ERASE] to confirm and go to
the next entry.
Press [ ] or [ ] to select the date
digits.
Press [ERASE] to confirm.
The LCD shows ‘TOTAL:00 NEW:00’,
which means both the total call and
new call counter are zero.
USING THE PHONE ON A DESK
1. Plug the long telephone line cord into the jack in the bottom
of the BASE, thread it through the groove toward the back of
the unit, then plug it into the modular phone jack.
HANGING THE PHONE ON THE WALL
When the CID100 is wall mounted, the HANDSET GUIDE holds
the handset in place in the cradle.
The receiver volume control is located on the side of the handset
of your phone. This enables you to adjust the receiver volume
from NORM to HI for a better listening level.
On a wall phone plate
Ringer Off/Low/High
1. Plug the short telephone line cord
into the jack in the base bottom and
into the jack on the plate.
2. Hang the base on to the two pins
and pull the base down to lock it
on.
3. Plug the coil cord into the handset
and base jacks.
Your CID100 features a harmonic dual tone ringer that can be
adjusted from a loud (HI) to a soft (LO) sound level. When you
don’t want to be disturbed, slide the switch to the OFF position.
You can still make outgoing calls without being disturbed by
incoming calls.
On a wall without a plate
1. Install 2 screws with anchors into
the wall, one above the other, 3-1/
4" apart, extending 3/16" out from
the wall to hold the base securely.
2. Install the long telephone line cord
into the jack in the base, thread it
through the groove and plug it into
modular wall jack as shown.
3. Hang the base on the screws and
pull it down to lock it on.
4. Plug the coil cord into the handset
and base jacks.
TELEPHONE FEATURES
2. Connect the COIL CORD to the jack in the HANDSET and
the BASE.
7
Receiver Volume Control
Tone/Pulse Switch
Set switch to your type of service. If you don’t know whether you
have tone or pulse:
1. Put the switch on “TONE”.
2. When you have a dial tone, press any key on the keypad. If
the dial tone stops, leave it on “TONE”. If not, change the
setting to “PULSE”.
8
Pause
Whether you have Tone or Pulse service, you can insert a 4second PAUSE into the dialing or storing of a number into
memory in order to access custom and telebanking services,
long distance, etc. Press [REDIAL] at the desired point in the
number. Press [REDIAL] again if an additional 4 seconds is
needed.
Redial Button
Automatically redials last number called (up to 32 digits). If the
number was busy or unanswered:
1. Lift the HANDSET.
2. Press [REDIAL].
TELEPHONE OPERATION
NOTE: Batteries must be installed, or Telephone operations will
not work properly (see Installation).
Receiving a Call
1. When your phone rings, pick up the handset and use it like
any basic telephone.
2. Hang up the handset to release the telephone line when your
conversation is completed.
Dialing a Call
1. Pick up the phone and wait for a dial tone.
2. Press the keypad for the telephone number you wish to dial.
9
Tone/Pulse Combination Dialing
Combination dialing is useful to subscribers of Pulse (rotary)
service who wish to gain access to various low-cost longdistance or automated computer services otherwise not available
to them.
1. With the TONE/PULSE switch in the PULSE position, dial
the phone number.
2. Press [ ], and your telephone will change to TONE dialing
mode.
3. Dial your code/authorization number. When your call is
completed, your telephone will automatically return to the
PULSE dialing mode.
NOTE: Combination dialing can also be stored into the memory
for one-touch access to your long distance or automated
computer service.
*
BASIC MEMORY PROGRAMMING
appears on the LCD. Press [STORE] twice to enter memory
store. The ‘MEM’ will be displayed on the right corner.
Press the memory location (0 to 9) on the keypad. The LCD will
then return to the ‘Answer-Ready’ mode, and display the total
call counter, new call counter, current time and date.
If no key is pressed within 20 seconds, the LCD will return to
‘Answer-Ready’ mode.
Repeat the above steps to store a different number in the same
speed dial location, or to store a new number in a different speed
dial location.
NOTES:
• Pressing [REDIAL] will place a 4-second PAUSE into the
number. Which may be required for accessing special phone
services.
• You can store a number with up to 16 digits maximum. Only
the last 14 digits will be displayed.
The CID100 comes with 10-memory dialing.
NOTE: Your local phone company restricts the time you can
have the handset off the base (off-hook).
YOU SHOULD PROGRAM THE CID100 MEMORY WITH THE
LINE CORD UNPLUGGED FROM THE WALL, IF YOU ARE
GOING TO PROGRAM MORE THAN ONE PHONE NUMBER.
Pick up the handset, and press
[STORE] to enter memory store.
Press the keypad to enter the number that you want to program.
The LCD on the back of the handset confirms the numbers you
entered.
Press [STORE]. The ‘MEM’ will be displayed on the right corner
of LCD.
Press the memory location (0 to 9) on the keypad. The LCD will
then return to the ‘Answer-Ready’ mode, and display the total
call counter, new call counter, current time and date.
MEMORY DIALING
Pick up the handset to make your call.
Press [MEM] [0] ... [MEM] [9] for one of the 10 memory locations
to be dialed.
NOTE: Remember to plug the telephone line cord back into the
wall.
CALLER ID OPERATION
NOTE: Batteries are required for Caller ID operation.
If an incorrect, invalid or incomplete
Caller ID signal is received, the LCD
shows ‘-LINE ERROR-’.
If only the caller’s phone number is received, the LCD shows
the caller’s phone number with the time
and date it was received. The ‘NEW’
icon turns on and New Call LED blinks.
Copy from the Caller ID to Telephone Memory
Press [ ] or [ ] until the Caller ID memory location to be copied
10
11
If the name and number are not available
due to the caller’s restriction, the LCD
shows ‘-PRIVATE CALL-’ with the time
and date received. The ‘NEW’ icon turns on and New Call LED
blinks.
If the name and number are not
available, the LCD will show ‘UNAVAILABLE-’ with the call’s time and
date. The ‘NEW’ icon turns on and New Call LED blinks.
If no key is pressed within 20 seconds,
the LCD will show the ‘Answer-Ready’
mode, and display the total call counter,
new call counter, current time and date.
VIEW THE CALLER ID MEMORY
If you have new calls (‘NEW’ icon and New Call LED is lit). Press
[ ] or [ ] to read all of the most recent calls. The CALL# will
decrease.
Once all the new calls have been read, ‘END OF NEW CALL’
will be displayed.
Press [ ] to view the oldest calls, or press [ ] to view the most
recent calls.
NOTE: After you view all the call in memory, the LCD will show
‘END OF LIST’.
NOTES:
1. The New Call LED will blink until all the new Caller ID data
has been reviewed.
2. If the ‘RPT’ icon is turned on, you have received multiple NEW
calls from the same number.
3. If you receive a call from a number stored in (previously
reviewed) memory, the data in memory will be replaced with
the new call’s time and date and the ‘NEW’ icon will be turned
on.
If no key is pressed within 20 seconds, the LCD will show the
‘Answer-Ready’ mode, and display the total call counter, new
call counter, current time and date.
12
ERASE THE CALLER ID MEMORY
Press [ ] or [ ] for the Caller ID memory location to be reviewed.
To clear a single Caller ID memory location, press [ERASE]
twice quickly.
The data for that call will be erased, and the CALL# and Caller
ID information will be updated.
After all new message being reviewed, press and hold [ERASE]
for 3 seconds. The message ‘ERASE ALL CALLS’ will appear
to confirm your action. Press [ERASE] to clear all the information,
then the message ‘NO CALLS’ appear.
Both the total call and new call counters will become zero, and
the current time and date will be displayed.
NOTE: All new calls must be reviewed before clearing the entire
memory.
CALL BACK (REDIAL) FROM THE
CALLER ID MEMORY
With the handset hung up on the base press [ ] or [ ] to find the
Caller ID memory location to be redialed.
Press [CALL BACK] twice to redial, the LCD shows ‘LIFT
HANDSET’ or ‘PICK UP CALL’.
Pick up the handset to make your phone call.
With the handset off hook, press [ ] or [ ] to find the Caller ID
memory location to be redialed. Press [CALL BACK] twice, the
number will then be dialed automatically.
WHEN THE CALLER’S PHONE
NUMBER HAS A DIFFERENT AREA
CODE FROM THE PRESET:
The long distance dialing digit ‘1’ will be inserted automatically
during Caller ID memory call back.
Press [CALL BACK], 11 digits number will blink. Press [CALL
BACK] again to confirm to dial the 11 digits number.
WHEN THE CALLER’S PHONE
NUMBER HAS THE SAME AREA CODE
AS THE PRESET:
The long distance dialing digit ‘1’ and the 3 digits area code will
be deleted automatically during Caller ID memory call back.
Press [CALL BACK], 7 digits number will blink. Press [CALL
BACK] again to confirm to dial the 7 digits number.
NOTE: Your telephone company may require a different format
for making out-of-area (toll) calls WITHIN your area code. See
the next section for the procedure to obtain the applicable tollcall format for your phone company.
WHEN YOUR TELEPHONE COMPANY REQUIRES YOU TO
DIAL OTHER THAN A 7-DIGIT NUMBER (SAME AREA
CODE) OR 11-DIGIT NUMBER (DIFFERENT AREA CODE)
TO MAKE TOLL CALLS WITHIN YOUR AREA CODE,
FOLLOW ONE OF THE 4 OPTIONS BELOW FOR CALLER
ID CALL BACK.
Option 1
1+Area Code+7-Digit Number (11 digits)
Option 2
1+7-Digit Number (8 digits)
Option 3
Area Code+7-Digit Number (10 digits)
Option 4
7-Digit Number Only.
13
14
Follow the procedure below to select one of the above
options for Caller ID call back.
With the handset hung up on the base.
1 Press [ ] or [ ] to find the Caller ID memory location to redial.
Press [CALL BACK], the 7-digit number (if same area code)
or 11-digit number (if different area code) will blink.
2. Press [ ] or [ ] to select one of the options.
3. Press [CALL BACK] again to confirm the dial.
LOW BATTERY INDICATION
The CID100 will signal you when the batteries become weak
and need replacement. Once battery power has been sufficiently
drained, the CID100 will appear the BATTERY LOW icon
(
)on the LCD display. Replace the AAA batteries with four
(4) fresh ones, and keep the line cord plugged in between the
phone and wall outlet in order to maintain the Caller ID and
Speed Dialing memories. If you do not install fresh batteries
within 2 minutes, your Caller ID and telephone memory
information may be lost.
FCC AND TELEPHONE COMPANY
INFORMATION
This equipment complies with Part 68 of the FCC rules. On the bottom
of the base of this equipment is a label that contains, among other
information, the FCC Registration Number and Ringer Equivalence
Number (REN) and the Universal Service Order Code (USOC) of
RJ11C for this equipment. You must, upon request, provide this
information to your telephone company.
A FCC compliant telephone cord and modular plug is provided with
this equipment. This equipment is designed to be connected to the
telephone network or premises wiring using a compatible modular
jack which is Part 68 compliant.
The REN is useful to determine the quantity of devices you may
connect to your telephone line and still have all of those devices ring
when your telephone number is called. In most, but not all areas,
the sum of the REN's of all devices connected to one line should not
exceed five (5.0). To be certain of the number of devices you may
connect to your line, as determined by the REN, you should contact
15
your local telephone company to determine the maximum REN
for your calling area.
If your telephone equipment causes harm to the telephone network,
the telephone company may discontinue your service temporarily. If
possible, they will notify you in advance. But if advance notice isn't
practical, you will be notified as soon as possible. You will be informed
of your right to file a complaint with the FCC.
Your telephone company may make changes in its facilities,
equipment, operations, or procedures that could affect the proper
functioning of your equipment. If they do, you will be notified in
advance to give you an opportunity to maintain uninterrupted
telephone service. If you experience trouble with this telephone
equipment disconnect from the network until the problem has been
corrected or until you are sure that the equipment is not
malfunctioning.
This equipment may not be used on coin service provided by the
telephone company. Connection to party lines is subject to state
tariffs. This equipment is hearing aid compatible.
Warning: Changes or modifications to this unit not expressly
approved by the party responsible for compliance could void the
user's authority to operate the equipment.
NOTE: This equipment has been tested and found to comply with
the limits for a Class B digital device, pursuant to Part 15 of the FCC
Rules. These limits are designed to provide reasonable protection
against harmful interference in a residential installation. Some
cordless telephones operate at frequencies that may cause
interference to nearby TV’s and VCR’s; to minimize or prevent such
interference, the base of the cordless telephone should not be placed
near or on top of a TV or VCR; and, if interference is experienced,
moving the cordless telephone farther away from the TV or VCR will
often reduce or eliminate the interference. However, there is no
guarantee that interference will not occur in a particular installation.
If this equipment does cause harmful interference to radio or
television reception, which can be determined by turning the
equipment off and on, the user is encouraged to try to correct the
interference by one or more of the following measures:
• Reorient or relocate the receiving antenna.
• Increase the separation between the equipment and receiver.
• Connect the equipment into and outlet on a circuit different from
that to which the receiver is connected.
• Consult the dealer or an experienced radio TV technician for help.
16
ADDITIONAL INFORMATION
TM
A. When your CONAIRPHONE is not in use make sure the handset
is engaged into the base unit.
B. Avoid rough handling, areas with excessive moisture heavy dust
or extreme temperature.
C. To clean, use mild detergent and slightly damp cloth, never use
strong solvents or abrasives.
D. Connecting this telephone to a coin operated telephone or a party
line is prohibited by law.
E. If it is determined that your telephone is malfunctioning, the FCC
requires that it be disconnected from the modular outlet until the
problem has been corrected.
SERVICE
According to FCC regulations, this equipment, which has been
certified and registered by the FCC, may only be repaired by
authorized persons. If repairs or adjustments are made by an
unauthorized person, the FCC certification may be voided. Should
you encounter any problems, please call the ConairphoneTM tollfree Customer Hotline for assistance:
1-800-366-0937, Monday - Friday
between the hours of 8:30 am - 9:00 pm and
Saturday 8:30 am - 12:30 pm (EST).
You can also visit our website at
www.conairphone.com
FOR IN-WARRANTY SERVICE:
Package your complete unit (including all adapters, line cords, and
other accessories) and ship the unit postage prepaid* and insured
(for your protection) to:
CONAIRPHONETM
DEPT.: In Warranty Repair
7475 North Glen Harbor Blvd., Glendale, AZ 85307
Be sure to include your return address, proof of purchase, a daytime
phone number, $5.00 for postage and handling * , and a brief
explanation of your difficulties.
*NOTE: California residents need only provide proof of purchase
and should call 1-800-366-0937 for shipping instructions.
17
FOR OUT-OF-WARRANTY SERVICE:
You may call our toll-free Help Line for the price of a replacement
before returning your unit. Please follow all instructions for InWarranty service (above) to return your unit, and mark the package:
DEPT.: Out-of-Warranty.
If you have called and know the cost of your replacement, please
include this information with your unit for prompt service.
QUESTIONS?
STOP ... don’t take unit back to the store.
LOOK ... for the toll-free “help” telephone number.
LISTEN ... as our experts talk you through the problem.
For immediate answers to your questions regarding operation,
missing parts or installation, call:
CONAIRPHONETM
HOTLINE AT:
1-800-366-0937
LIMITED WARRANTY
This ConairphoneTM is warranted to the original purchaser to be free
from defects in materials and workmanship under normal installation,
use, and service for a period of one (1) year from the date of purchase
as shown on the purchaser’s receipt.
The obligation of ConairphoneTM Retail Sales under this warranty
shall be limited to repair or replacement (at our option) during the
warranty period of any part which proves defective in material or
workmanship under normal installation, use, and service, provided
the product is returned to ConairphoneTM or to one of our authorized
Service Centres TRANSPORTATION CHARGES PREPAID.
Products returned to us or to an Authorized Service Center must be
accompanied by a copy of the purchase receipt. In the absence of
such purchase receipt, the warranty period shall be one (1) year
from the date of manufacture. To obtain service under this warranty,
return the defective product to the service center nearest you together
with your sales slip and $5.00 for postage and handling. (California
residents need only provide proof of purchase). You may also have
other warranty rights which vary from state to state.
18