1
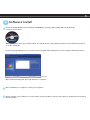
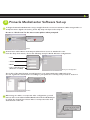
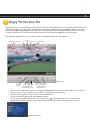
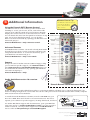
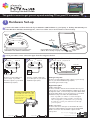
Getting Started Guide
This guide is meant to get you set up and watching TV on your PC in minutes.
1
Hardware Set-up
Connect the USB cord from the back of your PCTV Pro USB hardware to your laptop or desktop PC USB 2.0 port.
If the Windows hardware wizard appears, cancel out of this screen and continue to the next step.
I
USB 2.0
OUT
B
Connector
A
Connector
Ant.
Connect the USB 2.0 (B connector) Cable to the
USB 2.0 OUT of the PCTV Pro USB Hardware
II
A
Connect USB 2.0 (A connector) to the
USB 2.0 IN of a desktop or laptop computer
Select your video source connection type from the categories below.
Antenna
USB 2.0 OUT
B
Antenna IN
Analog Cable
USB 2.0 OUT
Ant.
Antenna IN
C
Digital Cable or Satellite Set-top Box
Audio IN
S-Video IN
Composite Video IN
Ant.
Set-top Box
or*
and
OR
Roof Top Portable
Cable Jack
Connect coaxial cable from
your rooftop or portable
antenna output to your PCTV
hardware input (Ant.).
Connect coaxial cable from
your cable jack to your PCTV
hardware input (Ant.).
Analog Set-top Box
Connect coaxial cable from the output of your set-top
box to your PCTV hardware input (Ant.)
(See Analog Connection Tip)
Digital Set-top Box
Analog Connection Tip:
To maintain your cable connection
to your television, use a splitter to
connect to both your
cable and your
PCTV hardware.
Video connection:
Connect S-Video cable from the S-Video OUT of your
set-top box to your PCTV hardware S-Video IN. If using
Composite video, connect Composite video RCA cable
from the video OUT of your set-top box to your PCTV
hardware Composite video IN. (labled Video)
* Note: If possible, use S-Video to ensure the highest
quality picture. When using an S-Video or Composite
video configuration, you will need to use your set-top
box remote to control your channel choices through
your set-top box.
Audio connection:
Connect the stereo mini jack to the Audio IN of the
PCTV Pro USB hardware. Plug the left and right RCA
Audio connectors into the Audio outputs of the
set-top box.
Coaxial Cable
Coaxial Cable
Stereo mini jack to RCA Audio Cable
S-Video Cable
Composite Video RCA Cable
7July2006
2
I
Software Install
Insert the PCTV Media Center Software CD-ROM into your PC’s CD or DVD drive and follow the
on-screen instructions.
When prompted, enter your serial number. You will find your serial number printed on the software CD sleeve
or on the actual CD.
In the Setup Type Window, we recommend choosing the Full Install option for the complete PCTV experience.
Setup Type
Note: Full install may take up to 10 minutes to complete.
II
Once installation is complete, restart your computer.
III
Please register your software to receive future product updates, 24 hour web support, downloads and exciting
Pinnacle offers.
3
I
Pinnacle MediaCenter Software Set-up
To begin the Pinnacle MediaCenter set-up, simply follow the on-screen instructions. When using S-Video or
Composite video digital connections, please skip Step II and proceed to Step III.
Be sure to “Check now” for the most recent updates when prompted.
Updates
II
Channel Scan. Click “Next” at the Prepare Channel Scan screen to initialize the scan.
From the drop down menus, choose the following set-up for North American configurations:
- USA
- default
- Quick
- Your connection type
(Antenna or Cable)
Analog Scan Configuration
The results of the initial channel scan will appear in your “PCTV Analog Pro USB analog” list.
You can organize the channels here according to your preference. You may now proceed to Section 4.
Favorites
III
When using an S-Video or Composite video configuration, you will
want to click on the Channel Name/Number field in the Media Player
to pull up the channel list. Select S-Video or Composite video feed
at the bottom of this list.
4
Enjoy TV On Your PC
PCTV is an all-in-one entertainment solution for the modern world. Now you can record your favorite shows and
watch them anytime you like. Pause and rewind live television with the unique TimeShifting features. Use the
Electronic Program Guide (EPG) to turn PCTV into your automated personal digital video recorder. You’ll even
be able to watch your recorded shows away from home on your laptop, DVD player, iPod and PSP.
The first time MediaCenter is accessed, you will see the Media Player as shown below.
Media Library/Home
TV
Radio
Playback
Program Guide
Media Player
Channel
up/down
Stop
Play/Pause
View Advanced
TimeShifting Features
Record
Volume
Channel Name/
Number Field
-
To access your channel list, click on the Channel Name/Number Field. This channel list also provides you
with the option of connecting to your S-Video or Composite video channels.
-
Use the top navigation icons to access other PCTV features.
-
Use the bottom navigation for TimeShifting controls.
-
To access your Media Library, click on the Pinnacle logo in the upper left corner. To access your
Media Library via the remote control, click on the Pinnacle logo at the top center of the remote.
Media Library/Home
5
Remote Control Tip:
Additional Information
The AV button at the bottom of
your remote will allow
you to switch between
video sources.
A
0
Using the Pinnacle PCTV Remote Control
The Pinnacle remote control allows you the freedom and
flexibility to access your movies, shows, and on-line radio
stations from a distance with ease. This reference diagram
displays the various functions of the PCTV remote control.
You can detach this area from this guide for reference at any
time. For more in-depth information, you can find the
Remote Control User Guide by opening your Windows start
menu and going to:
V
Pinnacle MediaCenter > Help > Remote Control.
Advanced Features
Your MediaCenter software comes with a handy User Guide
that will show you how to enrich your PCTV experience by
using advanced features. To access this document, open
your Windows start menu and go to:
Pinnacle MediaCenter > Help > User Guide.
Support
Are you in need of further assistance? We’re happy to help
you. For 24 hour product support, call 1-650-267-5196 or
visit www.pinnaclesys.com/PCTVProUSBSupport. You can
also find useful documentation, by opening your Windows
start menu and going to:
Pinnacle MediaCenter > Help.
Studio QuickStart version 10 overview
Pinnacle Remote Quick Reference Guide
Studio QuickStart provides added functionality to your PCTV hardware, allowing you to capture and preserve your
home recordings straight from a camcorder. You can also edit your home movies and transfer them to DVD, complete
with custom menus and soundtracks.
To install the Studio QuickStart software, insert the CD-ROM into your
PC’s CD or DVD drive and follow the on-screen instructions. Be sure to
register your software for product support, exciting downloads, and more.
For Studio QuickStart support and documentation, open your Windows
start menu and go to Studio 10 QuickStart > Help. If you are in need of
further assistance, call our product support line at 1-650-267-5196 or
visit us online at www.pinnaclesys.com/StudioQSsupport.
Audio IN
S-Video IN
Composite Video IN
*
CAMCORDER
* Choose one video connection Composite or S-Video.
Stereo mini jack to Stereo mini jack Cable
S-Video Cable
Composite Video RCA Cable