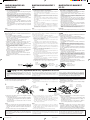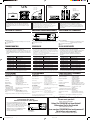
1
CH-X1500
CD CHANGER
CAMBIADOR CD
CHANGEUR CD
LVT0975-001A
[J]
Instructions
Manual de instrucciones
Manuel d’instructions
V
J
ESPAÑOL
ENGLISH
Thank you for purchasing this JVC product. Please read these
instructions carefully before starting operation to be sure to obtain
optimum performance and a longer service life from the unit.
This unit has been designed to play CD, CD-Rs, and CD-RWs.
• You can also play back your original CD-Rs (Recordable) and
CD-RWs (Rewritable) either in audio CD format or MP3 format.
• You can also play back CD Text.
For Customer Use:
Enter below the Model No. and Serial
No. which are located either on the rear,
bottom or side of the cabinet. Retain this
information for future reference.
Model No.
Serial No.
C
1002MNMMDWJEIN
EN, SP, FR
FRANÇAIS
Muchas gracias por haber comprado este producto de JVC.
Tenga a bien leer detenidamente este manual de instrucciones
antes de poner en funcionamiento la unidad a fin de obtener un
rendimiento óptimo y mayor duración.
Esta unidad ha sido diseñada para reproducir CD, CD-R y CDRW.
• Usted también podrá reproducir sus discos originales CD-R
(Regrabables) y CD-RW (Reescribibles) tanto en formato o
como en formato MP3.
• Usted también podrá reproducir sus discos originales CD Text.
INFORMATION (For U.S.A.)
This equipment has been tested and found to comply with the limits
for a Class B digital device, pursuant to Part 15 of the FCC Rules.
These limits are designed to provide reasonable protection against
harmful interference in a residential installation. This equipment
generates, uses, and can radiate radio frequency energy and, if not
installed and used in accordance with the instructions, may cause
harmful interference to radio communications. However, there is no
guarantee that interference will not occur in a particular installation.
Nous vous remercions d’avoir acheté cet appareil JVC. Veuillez
lire consciencieusement ce manual d’instructions avant de
commencer à faire fonctionner l’appareil de façon à être sûr
d’obtenir les performances optimales et la plus longue utilisation
de cet appareil.
Cet appareil a été conçu uniquement pour reproduire les CD, CDR et CD-RW.
• Vous pouvez aussi reproduire vos CD-R (enregistrable) et CDRW (réinscriptibles) originaux, soit au format audio ou au format
MP3.
• Vous pouvez aussi reproduire vos CD Text.
If this equipment does cause harmful interference to radio or television
reception, which can be determined by turning the equipment off
and on, the user is encouraged to try to correct the interference by
one or more of the following measures:
– Reorient or relocate the receiving antenna.
– Increase the separation between the equipment and receiver.
– Connect the equipment into an outlet on a circuit different from
that to which the receiver is connected.
– Consult the dealer or an experienced radio/TV technician for help.
IMPORTANT FOR LASER PRODUCTS
IMPORTANTE PARA PRODUCTOS LASER
IMPORTANT POUR PRODUITS LASER
PRECAUTIONS
1. CLASS 1 LASER PRODUCT
2. CAUTION: Invisible laser radiation when open and interlock
failed or defeated. Avoid direct exposure to beam.
3. CAUTION: Do not open the top cover. There are no user
serviceable parts inside the unit, leave all servicing to
qualified service personnel.
4. CAUTION: The compact disc player uses invisible laser
radiation and is equipped with safety switches which prevent
emission of radiation when unloading the CD magazine and
the safety interlocks have failed or are defeated. It is
dangerous to defeat the safety switches.
5. CAUTION: Use of controls or adjustments or performance
of procedures other than those specified herein may result
in hazardous radiation exposure.
PRECAUCIONES
1. PRODUCTO LASER CLASE 1
2. ATENCION: Radiación láser invisible cuando se abre, falla o
se anula el seguro. Evite la exposición directa al rayo.
3. ATENCION: No abra la tapa posterior. No hay piezas
reparables por el usuario dentro de la unidad; acuda a
técnicos calificados para la reparación.
4. ATENCION: El reproductor de discos compactos emplea
radiación láser invisible y cuenta con interruptores de
seguridad que evitan la emisión de radiación cuando se
abre la tapa del CD. Es peligroso anular estos interruptores.
5. ATENCION: El empleo de controles para ajustes y la
ejecución de procedimientos diferentes a los especificados
aquí puede causar una exposición peligrosa a la radiación.
PRECAUTIONS
1. PRODUIT LASER CLASSE 1
2. ATTENTION: Radiation laser invisible quand l’appareil est
ouvert ou que le verrouillage est en panne ou désactivé.
Éviter une exposition directe au rayon.
3. ATTENTION: Ne pas ouvrir le volet supérieur. Il n’y a pas de
pièce réparable par l’utilisateur à l’intérieur. Confier le service
après-vente à un personnel qualifié.
4. ATTENTION: Ce lecteur CD utilise une radiation laser
invisible, toutefois, il est équipé de commutateurs de sécurité
qui empêchent l’émission de radiation en retirant les disques.
Il est dangereux de désactiver les commutateurs de sécurité.
5. ATTENTION: L’utilisation des commandes des réglages et
effectuer des procédures autres que celles spécifiées dans
ce manuel peut provoquer une exposition aux radiations
dangereuses.
WARNING
ADVERTENCIA
AVERTISSEMENT
• This unit is designed to operate with 12 volt DC, NEGATIVE
ground electrical systems.
• When replacing the fuse, use one with the specified rating for
this unit. If the fuse blows frequently, consult your nearest JVC
car audio dealer.
• Esta unidad ha sido diseñada para funcionar con 12 voltios
de CC, con sistemas eléctricos de masa NEGATIVA.
• Cambie el fusible por uno con la capacidad especificada. Si
éste se quema a menudo, consulte a su concesionario JVC
de equipos de audio para automóviles más cercano.
• Cet appareil est conçu pour fonctionner sur courant continu de
12 volts, à systèmes électriques de masse NEGATIVE.
• En remplaçant le fusible, en utiliser un avec la valeur spécifiée
pour cet appareil. Si le fusible saute souvent, consulter votre
revendeur d’autoradios JVC le plus proche.
PRECAUTIONS
PRECAUCIONES
PRECAUTIONS A OBSERVER
• Car’s Internal Temperature
Before listening to CDs after your car has been parked for some
time in low or high temperatures, wait until the temperature
inside the car stabilizes.
• Condensation
In the following cases, moisture may condense on the lens, a
critical part of the CD player, making the CD signal unreadable:
– When the heater has just been turned on.
– When the humidity is high.
In these cases, unload the CD magazine and wait for 1 or 2
hours.
• Volume Setting
– CDs produce very little noise compared with analog sources.
If the volume level is adjusted for analog sources, the
speakers may be damaged by the sudden increase in the
output level. Therefore, lower the volume before operation
and adjust it as required during playback.
– Adjust the volume so that you can hear sounds occurring
outside the car.
• Temperatura interna del automóvil
Antes de escuchar un CD después de que su automóvil haya
estado estacionado durante algún tiempo en bajas o altas
temperaturas, espere hasta que la temperatura dentro del
mismo se estabilice.
• Condensación
En los siguientes casos, la humedad puede condensarse en
la lente, que es un componente clave del reproductor de CD,
imposibilitando la lectura de la señal del mismo:
– Cuando se haya encendido un calentador.
– Cuando la humedad es alta.
En tales casos, extraiga el magazín y espere durante 1 o 2
horas.
• Ajuste del volumen
– El CD produce muy poco ruido en comparación con las
fuentes analógicas de sonido. Si el nivel de volumen está
ajustado para estas fuentes, se puede dañar los altavoces
debido al súbito incremento del nivel de salida. Por lo tanto,
reduzca el volumen antes de ponerlo en funcionamiento y
ajústelo como desee durante la reproducción.
– Ajuste el volumen de tal manera que usted pueda escuchar
los sonidos fuera del automóvil.
• Température ambiante dans la voiture
Pour l’écoute de disques audionumériques après un
stationnement assez prolongé de la voiture à la chaleur ou au
froid, attendre que la température dans la voiture se stabilise.
• Condensation
Dans les cas suivants, de l’humidité peut se condenser sur la
lentille, une pièce vitale du lecteur CD, rendant impossible la
lecture du signal CD:
– Quand le chauffage vient juste d’être mis.
– Quand l’humidité est forte.
Dans ces cas, retirer le magasin CD et attendre environ 1 à 2
heures.
• Réglage du volume
– Les disques audionumériques produisent très peu de bruit
comparés avec des sources analogiques. Si le niveau du
volume est réglé comme pour ces sources, les haut-parleurs
peuvent être abîmés par une augmentation soudaine du
niveau de sortie. Par conséquent, baisser le volume avant
fonctionnement et le régler comme voulu pendant la lecture.
– Régler le volume pour pouvoir entendre les sons à l’extérieur
de la voiture.
INSTALLATION
INSTALACION
MISE EN PLACE
• Avoid installing the unit in the following places
– Where it would be exposed to direct sunlight or direct heat
from the heater or in an extremely hot place.
– Where it would be subject to rain, water splashes or excessive
humidity.
– Where it would be subject to dust.
– Where it would be positioned in an unstable place.
– Above connection cords or on the floor under which there is
piping.
– Where it could damage the car’s fittings (spare tire, etc.) in or
under the trunk.
• Before drilling holes in the trunk to install the unit, make sure
that there is a sufficient space under the trunk so that you do
not drill holes in the fuel tank, etc.
• Firmly install the unit using the provided screws.
• Evite instalar esta unidad en los siguientes lugares
– Donde esté directamente expuesta a la luz solar, al calor de
un calefactor o en un lugar con temperatura muy alta.
– Donde esté expuesta a la lluvia, salpicaduras de agua o
humedad excesiva.
– Donde haya polvo.
– Lugares donde quedaría en posición inestable.
– Sobre los cordones de conexión o en el piso debajo del
cual se encuentra la tubería.
– Donde podría dañar los accesorios del automóvil (neumático
de repuesto, etc.) en/o debajo del baúl.
• Antes de perforar orificios en el baúl para instalar la unidad,
asegúrese que haya suficiente espacio debajo del baúl ya
que podría llegar a perforar el depósito de combustible, etc.
• Instale firmemente la unidad utilizando los tornillos
suministrados.
• Eviter l’installation dans les endroits suivants
– Où il risque d’être exposer directement au soleil ou chauffé
directement par le chauffage ou dans un endroit très chaud.
– Où il risque d’être mouillé par la pluie, les flaques d’eau ou
dans une forte humidité.
– Dans les endroits poussiéreux.
– Où il peut être placé dans un endroit instable.
– Au-dessus des cordons de raccordements ou sur le plancher
sous lequel il y a une tuyauterie.
– Là où il pourrait endommager des accessoires de la voiture
(roue de secours, etc.) dans ou sous le coffre.
• Avant de percer des trous dans le coffre pour installer l’appareil,
s’assurer qu’il y a un espace suffisant sous le coffre pour ne
pas faire de trous dans le réservoir de carburant, etc.
• Installer fermement l’appareil en utilisant les vis fournies.
1
CH-X1500[J]EnSpFr_f.pm6
1
21/10/02, 10:56 AM
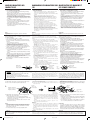
A
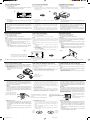
When installing the unit horizontally
Instalación horizontal de la unidad
Lors de l’installation de l’appareil horizontalement
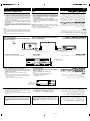
1. Attach the mounting brackets on the side panels of the unit using
screws. (Fig. a)
2. Install the unit on the floor of the trunk using self-tapping screws.
(Fig. b)
1. Fije las ménsulas de montaje a los paneles laterales de la
unidad utilizando los tornillos. (Fig. a)
2. Instale la unidad en el piso del baúl usando tornillos
roscachapa. (Fig. b)
1. Fixer les supports de montage sur les panneaux latéraux de
l’appareil en utilisant des vis. (Fig. a)
2. Installer l’appareil sur le plancher du coffre en utilisant des vis
auto-taraudeuses. (Fig. b)
1.
2.
Screw
(M4 x 8 mm)
Tornillo
(M4 X 8 mm)
Vis
Mounting bracket
(M4 x 8 mm) Ménsula de montaje
Support de montage
Tapping screw
(M5 x 20 mm)
Tornillo roscachapa
(M5 x 20 mm)
Vis auto-taraudeuse
(M5 x 20 mm)
Use these holes.
Utilice estos orificios.
Utiliser ces trous.
5
3
1
4
2
Drill holes
Orificios perforados
Trous de preçage
Trunk floor
Piso del baúl
Plancher du coffre
Fig. a
Fig. b
B
When installing the unit upright (Fig. c)
Lors de l’installation de l’appareil verticalement
Instalación vertical de la unidad (Fig. c)
(Fig. c)
H
H
V
V
Selector
Selector
Sélecteur
Fig. c
Use these holes.
Utilice estos orificios.
Utiliser ces trous.
5
3
4
Bottom panel of the unit
Panel inferior de la unidad
Panneau inférieur de l’appareil
Notes:
• When attaching the unit with the screws, refer to “ A When
installing the unit horizontally” above.
• When installing the unit upright, set the selectors located
on both sides to the “V (vertical)” position. (When it is
installed horizontally, be sure to set the selectors to the “H
(horizontal)” position.)
– When installing the unit upright, securely install to the trunk
floor.
• If you install the unit without setting the selectors correctly, the
symptoms below may occur.
– Sound is intermittent.
– CDs are damaged.
Trunk floor
Piso del baúl
Plancher du coffre
Notas:
• Para fijar la unidad con los tornillos, refiérase a “ A Instalación
horizontal de la unidad”, más arriba.
• Cuando instale la unidad verticalmente, coloque el
selector ubicado al costado en la posición “V (vertical)”.
(Cuando instale la unidad horizontalmente, asegúrese de
colocar los selectores en la posición “H (horizontal)”).
– Cuando instale la unidad verticalmente, fíjela firmemente
al piso del baúl.
• Si instala la unidad sin ajustar correctamente el selector,
podrían presentarse los siguientes síntomas.
– Sonidos intermitentes.
– Daños en los CDs.
Remarques:
• Pour la fixation de l’appareil avec les vis, se référer à “ A Lors
de l’installation de l’appareil horizontalement” ci-dessus.
• Si l’appareil est installé verticalement, régler les sélecteurs
situés sur les côtés sur la position “V (vertical)”. (S’il est
installé horizontalement, s’assurer de régler les sélecteurs
sur la position “H (horizontal)”).
– Lors de l’installation verticale, fixer fermement sur le plancher
du coffre.
• Si vous installez l’appareil sans régler le sélecteur correctement,
les problèmes suivants risquent de se produire.
– Le son est discontinu.
– Les CD sont endommagés.
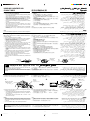
When installing the unit on an inclined plane
Instalación de la unidad en un sitioinclinado
(Fig. d)
(Fig. d)
Lors de l’installation de l’appareil sur un plan
incliné (Fig. d)
C
Fig. d
Selector
Selector
Sélecteur
H
V
H
V
1
2
3
USE
4
NO
45°
Notes:
• When attaching the unit with the screws, refer to “ A When
installing the unit horizontally” above.
• When installing, five angles can be selected. Be sure to
position the selectors on both sides of the unit pointing
upward, perpendicular (90°) to the earth surface.
• If you install the unit without setting the selector correctly, the
symptoms below may occur.
– Sound is intermittent.
– CDs are damaged.
5
Side panel of the unit
Panel lateral de la unidad
Panneau latéral de l’appareil
Trunk floor
Piso del baúl
Plancher du coffre
Notas:
• Para fijar la unidad con los tornillos, refiérase “ A Instalación
horizontal de la unidad”, más arriba.
• Para la instalación, se pueden seleccionar cinco ángulos.
Asegúrese de dirigir la flecha del dial provisto en ambos
lados de la unida hacia arriba, perpendicular (90°) a la
tierra.
• Si instala la unidad sin ajustar correctamente el selector,
podrían presentarse los siguientes síntomas.
– Sonidos intermitentes.
– Daños en los CDs.
Remarques:
• Pour la fixation de l’appareil avec les vis, se référer à “ A Lors
de l’installation de l’appareil horizontalement” ci-dessus.
• Pour l’installation, cinq angles peuvent être choisis.
S’assurer de positionner la flèche des sélecteurs, des deux
côtés de l’appareil, perpendiculairement (90°) au sol.
• Si vous installez l’appareil sans régler le sélecteur correctement,
les problèmes suivants risquent de se produire.
– Le son est discontinu.
– Les CD sont endommagés.
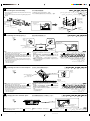
D
When hanging the unit in the trunk space
(Fig. e)
Instalación de la unidad suspendida dentro Lors de la suspension de l’appareil dans le
coffre (Fig. e)
del baúl (Fig. e)
Fig. e
2
4
5
2
CH-X1500[J]EnSpFr_f.pm6
2
21/10/02, 6:09 PM
3
Nota:
Para fijar la unidad con los tornillos, refiérase a “ A Instalación
horizontal de la unidad”, más arriba.
1
Note:
When attaching the unit with the screws, refer to “ A When installing
the unit horizontally” above.
Use these holes.
Utilice estos orificios.
Utiliser ces trous.
Remarque:
Pour la fixation de l’appareil avec les vis, se référer à “ A Lors de
l’installation de l’appareil horizontalement” ci-dessus.
OK
Correct
Correcto
Correct
Incorrect
Incorrecto
Incorrect
0° to +90°
0° a +90°
0° à +90°
Over +90°
Más de +90°
Supérieur à +90°
V
V
NO
USE
H
H
H
NO USE
V
NO USE
LOCATION OF CONTROLS
UBICACION DE LOS CONTROLES
EMPLACEMENT DES COMMANDES
~ 0EJECT button
Reset button: When pressing and holding for a few seconds
Ÿ CD magazine slot
! Door
Ÿ
!
~
EJECT
~ Botón 0EJECT
Botón de reposición: Cuando se pulse y mantenga pulsado durante algunos segundos
Ÿ Ranura del magazín de CD
! Puerta
~ Touche 0EJECT
Touche de réinitialisation: Quand elle est maintenue pressée pendant quelques secondes
Ÿ Compartiment du magasin CD
! Porte
TROUBLESHOOTING
LOCALIZACION DE AVERIAS
EN CAS DE DIFFICULTÉS
• “RESET1–RESET8” or “R1–R8” appears on the display of the
connected receiver (or other equipment).
* Are the units connected correctly? After checking, press and
hold the 0EJECT button for a few seconds to reset this unit.
If the problem still persists, consult the JVC authorized dealer.
• “RESET1–RESET8” o “R1–R8” aparece en la pantalla del
receptor (u otro equipo) conectado.
* ¿Están las unidades conectadas correctamente? Después,
pulse y mantenga pulsado el botón 0EJECT durante algunos
segundos para reposicionar la unidad.
Si el problema persiste, consulte con su concesionario JVC
autorizado.
• “RESET1–RESET8” ou “R1–R8” apparaît sur l’affichage de
l’autoradio connecté (ou d’un autre appareil).
* Les appareils sont-ils connectés correctement? Après l’avoir
vérifié, maintenez pressée la touche 0EJECT pendant quelques
secondes pour réinitialiser cet appareil.
Si le problème persiste, consultez un revendeur JVC autorisé.
Indication
Meaning
Indicación
Indication
Significado
Signification
Ejection error
RESET1 (o R1)
Error de expulsión
RESET1 (ou R1)
RESET2 (or R2)
Lifter error
RESET2 (o R2)
Error del alzador
RESET2 (ou R2)
Erreur de poussoir
RESET3 (or R3)
Tray error
RESET3 (o R3)
Error de bandeja
RESET3 (ou R3)
Erreur de plateau
RESET4 (or R4)
Pick up return error
RESET4 (o R4)
Error de retorno del fonocaptor
RESET4 (ou R4)
Erreur provenant du capteur
RESET5 (or R5)
—
RESET5 (o R5)
—
RESET5 (ou R5)
—
RESET6 (or R6)
Communication error
RESET6 (o R6)
Error de comunicación
RESET6 (ou R6)
Erreur de communication
RESET7 (or R7)
Other errors
RESET7 (o R7)
Otros errores
RESET7 (ou R7)
Autres erreurs
RESET8 (or R8)
Communication error
RESET8 (o R8)
Error de comunicación
RESET8 (ou R8)
Erreur de communication
RESET1 (or R1)
Erreur d’éjection
• Sounds are intermittent during play.
* Are the selectors on both sides adjusted correctly?
• Los sonidos se interrumpen durante la reproducción.
* ¿Están los selectores de ambos lados ajustados
correctamente?
• Le son est discontinu pendant la lecture.
* Les sélecteurs latéraux sont-ils ajustés correctement?
SPECIFICATIONS
ESPECIFICACIONES
CARACTERISTIQUES TECHNIQUES
CD CHANGER SECTION
Frequency response
: 5 Hz – 20 000 Hz
Dynamic range
: 99 dB
S/N ratio
: 103 dB
Distortion
: 0.005%
Wow & flutter
: Less than measurable limit
Output terminal
: Analog (8 pin x 1),
1.5 V (full scale)/less than 1 kΩ
GENERAL
Power requirement
Operating voltage
: DC 14.4 V (11 V – 16 V allowable)
Grounding system
: Negative ground
Allowable working temperature
: –10°C to +50°C (14°F to 122°F)
Dimensions (W x H x D) : 252 mm x 88 mm x 174 mm
(9-15/16" x 3-1/2" x 6-7/8")
Mass
: 2.3 kg (5.1lbs.) (excluding accessories)
SECCION DEL CAMBIADOR DE CD
Respuesta de frecuencia
: 5 Hz – 20 000 Hz
Gama dinámica
: 99 dB
Relación S/R
: 103 dB
Distorsión
: 0,005%
Lloro y trémolo
: Inferior al límite medible
Terminal de salida
: Analógica (8 conectadores x 1),
1,5 V (escala total)/Menos de 1 kΩ
GENERALIDADES
Alimentación
Tensión de funcionamiento : 14,4 V CC (11 V – 16 V permisible)
Sistema de puesta a masa : Masa negativa
Temperatura de trabajo permisible
: –10°C a +50°C
Dimensiones (An x Al x Pr) : 252 mm x 88 mm x 174 mm
Peso
: 2,3 kg (excluyendo accesorios)
SECTION CHANGEUR DE CDS
Réponse en fréquence
: 5 Hz – 20 000 Hz
Gamme dynamique
: 99 dB
Rapport signal/bruit
: 103 dB
Distortion
: 0,005%
Pleurage et scintillement
: Inférieur à la limite mesurable
Borne de sortie
: Analogique (8 broches x 1),
1,5 V (pleine échelle)/inférieure
à 1 kΩ
GENERALES
Alimentation
Tension de fonctionnement : CC 14,4 V (11 V – 16 V possible)
Système de mise à la masse : Masse négative
Température de fonctionnement admissible
: –10°C à +50°C
Dimensions (L x H x P)
: 252 mm x 88 mm x 174 mm
Masse
: 2,3 kg (sans les accessoires)
El diseño y las especificaciones están sujetos a cambio sin aviso
previo.
Présentation et caractéristiques modifiables sans préavis.
Si fuera necesario un juego de instalación para su automóvil,
consulte la guía telefónica para ubicar la tienda especialista en
audio para automóviles más cercana.
Si un kit est nécessaire pour votre voiture, consulter votre
annuaire téléphonique pour chercher le revendeur
d’accessoires audio pour automobile le plus proche.
Design and specifications are subject to change without notice.
If a kit is necessary for your car, consult your telephone directory
for the nearest car audio speciality shop.
Having TROUBLE with operation?
Please reset your unit
Refer to "How to reset your unit"
Still having trouble??
USA ONLY
http://www.jvcmobile.com
Call 1-800-252-5722
Visit us on-line for
Technical Support & Customer Satisfaction Survey.
http://www.jvc.com
US RESIDENTS ONLY
We can help you!
3
CH-X1500[J]EnSpFr_f.pm6
3
24/10/02, 11:44 AM
ENGLISH
ESPAÑOL
FRANÇAIS
ELECTRICAL CONNECTIONS
CONEXIONES ELECTRICAS
RACCORDEMENTS ELECTRIQUES
• This changer can be connected to JVC KD-MX, KD-SX, KDLX, KD-SH, KD-LH or KS-FX series receivers that include a
Changer Control function. However, operating procedures and
indications on the display will be different depending on the
connected receiver. For details, refer to manuals supplied with
your receiver. Note that some receivers cannot play back discs
recorded in MP3 format. For detailed information, consult your
nearest JVC car audio dealer.
• To prevent short circuits from occurring while making
connections, keep the battery’s negative terminal
disconnected.
We recommend that you make all electrical connections (see
Fig. f) before installing the unit. If you are not sure of your ability
to correctly install this unit, have it installed by a qualified service
technician.
• Este cargador puede ser conectado a los receptores de la
serie KD-MX, KD-SX, KD-LX, KD-SH, KD-LH o KS-FX de JVC
que incluyen una función de control del cambiador. Sin
embargo, los procedimientos de operación y las indicaciones
en pantalla serán diferentes según el receptor conectado. Para
mayor información, consulte los manuales suministrados con
su receptor. Tenga en cuenta que algunos receptores no
pueden reproducir discos grabados en formato MP3. Para
mayor información consulte a su concesionario JVC de equipos
de audio para automóviles más cercano.
• Para evitar cortocircuitos, mantenga desconectado el
terminal negativo de la batería durante las conexiones.
Le recomendamos hacer todas las conexiones eléctricas (ver
Fig. f) antes de instalar la unidad. Si no estuviera seguro de
su habilidad para colocarla correctamente, hágala instalar por
un técnico de servicio calificado.
• Ce changeur peut être raccordé aux récepteurs de série KDMX, KD-SX, KD-LX, KD-SH, KD-LH ou KS-FX JVC qui
disposent d’une fonction de commande de changeur.
Cependant les procédures de fonctionnement et les indications
sur l’affichage sont différentes en fonction du récepteur
connecté. Pour les détails, référez-vous aux modes d’emploi
fournis avec votre récepteur. Notez que certains récepteurs ne
peuvent pas reproduire les disques enregistrés au format MP3.
Pour plus d’informations, consulter votre revendeur d’autoradios
JVC le plus proche.
• Pour éviter tout court-circuit alors que vous effectuez les
raccordements, laisser la borne négative de la batterie non
branchée.
Nous vous conseillons de faire tous les raccordements
électriques (voir la Fig. f) avant de mettre l’appareil en place. Si
vous n’êtes pas sûr de vous, faites-le installer par un technicien
qualifié.
Note:
This unit is designed for 12 volt DC, negative ground. If your vehicle
does not have a 12 volt negative ground electrical system, you
need a voltage inverter which can be bought from a JVC car audio
dealer.
• Be sure to ground this unit to the car’s chassis.
Nota:
Esta unidad está diseñada para 12 V de CC, masa negativa. Si
su vehículo no estuviera provisto de un sistema eléctrico de masa
negativa de 12 voltios, necesitará un inversor de tensión que
puede adquirir en un concesionario JVC de equipos de audio
para automóviles.
• Asegúrese de conectar a masa esta unidad al chasis del
automóvil.
Remarque:
Cet appareil est conçu pour un courant continu de 12 volts, à masse
négative. Si votre véhicule ne fournit pas une masse négative de
12 volts, il vous faut un convertisseur de tension, que vous pouvez
vous procurer chez un revendeur d’autoradios JVC.
• Bien raccorder le câble de mise à la masse de cet appareil au
châssis de la voiture.
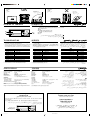
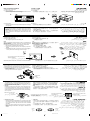
When connecting to
JVC KD-MX/KD-SX/KD-LX/KD-SH/KD-LH/KSFX series receivers
Conexión a los receptores JVC de la serie
KD-MX/KD-SX/KD-LX/KD-SH/KD-LH/KS-FX
Lors de la connexion à un récepteur de la série
KD-MX/KD-SX/KD-LX/KD-SH/KD-LH/KS-FX
de JVC
Fig. f
H
V
8-pin cord (supplied)
Cordón de 8 conectadores (suministrado)
Cordon à 8 broches (fourni)
• How to remove the cord
Pull the plug by holding it firmly as in the figure.
To JVC CD changer controller
Al controlador cambiador de CD de JVC
Vers contrôleur de changeur CD JVC
• Cómo sacar el cable
• Comment retirer le cordon
Tire del enchufe sujetándolo firmemente como en la figura.
Tirez sur la fiche en la tenant solidement de la façon montrée
sur la figure.
Do not hold this portion.
No sujete esta parte.
Ne la tenez pas par cette partie.
• After installation and connection...
• Después de la instalación y conexión...
• Après l’installation et les connexions...
When loading the magazine for the first time into the CD
changer, press and hold the 0EJECT button for a few
seconds to reset the unit.
Normally do not press and hold the 0EJECT button.
Cuand cargue el magazín por primera vez en el cambiador
de CD, pulse y mantenga pulsado el botón 0EJECT durante
algunos segundos para reposicionar la unidad.
Normalmente no pulse ni mantenga pulsado el botón 0EJECT.
Lors de l’insertion du magasin CD dans le changeur CD,
pour la première fois, maintenir pressée la touche 0EJECT
pendant quelques secondes pour réinitialiser l’appareil.
Normalement, ne pas maintenir pressée la touche 0EJECT.
Note:
You may also need to reset the unit in the following cases.
• When the power supply is interrupted such as for replacement
of the car's battery.
• When the unit does not function correctly.
Nota:
También podría ser necesario reposicionar la unidad en los
casos siguientes.
• Cuando se interrumpa el suministro de energía debido por
ejemplo, al reemplazo de la batería del automóvil.
• Cuando la unidad no funciona correctamente.
Remarque:
Il peut être nécessaire de réinitialiser l’appareil dans les cas
suivants.
• Quand l’alimentation est coupée, comme pendant le
remplacement de la batterie de la voiture.
• Quand l’appareil ne fonctionne pas correctement.
How to reset your unit / Cómo reposicionar su unidad / Comment réinitialiser votre appareil
Press and hold the 0EJECT button for several seconds. This will reset the built-in microcomputer.
Pulse y mantenga pulsado el botón 0EJECT durante varios segundos. Esto hará que se reinicialice
el microcomputador incorporado.
Maintenez pressée la touche 0EJECT pendant plusieurs secondes. Cela réinitialisera le microordinateur intégré.
0EJECT button
Botón 0EJECT
Touche 0EJECT
EJECT
• Listening to CDs
This unit does not have operation buttons to play CDs. CD
operations can be performed using the JVC CD changer
controller, etc. connected to this unit.
For CD operations, refer to the CD Changer Controller
Instructions.
• Reproducción de CDs
Esta unidad no tiene botones de operación para reproducción
de CD. Las operaciones de CD pueden ser ejecutadas
utilizando el controlador cambiador de CD de JVC, etc.,
conectado a esta unidad.
Para las operaciones de CD refiérase a las instrucciones del
controlador cambiador de CD.
• Ecoute des disques compacts
Cet appareil n’a pas de touches de fonctionnement pour lire
les disques. Les opérations CD peuvent être effectuées en
utilisant le contrôleur de changeur CD JVC, etc. raccordé à cet
appareil.
Pour les opérations CD, se reporter au manuel d’instructions
du contrôleur de changeur CD.
Mistracking
Mistracking may occur when driving on an extremely rough
road. The unit and compact disc will not be damaged by
mistracking; however, since it is offensive to the ear, stop
playback and restart when you reach a road that’s in good
condition.
Mal seguimiento
El mal seguimiento se produce cuando se conduce por
una carretera muy irregular. No obstante, aunque la unidad
y compact disc no se dañarán por esta razón, es
conveniente detener la reproducción y volver a escuchar
el disco cuando llegue a una carretera en buenas
condiciones, puesto que resulta molesto para los oídos.
Erreur d’alignement
Un problème d’alignement peut se produire en conduisant
sur une route très mauvaise. L’appareil et le disque
audionumérique ne seront pas abîmés par un problème
d’alignement, toutefois, comme ce n’est pas agréable pour
les oreilles, arrêter la lecture et la reprendre quand la route
sera meilleure.
4
CH-X1500[J]EnSpFr_f.pm6
4
21/10/02, 10:57 AM
HANDLING MAGAZINES AND
COMPACT DISCS
MANIPULACION DE MAGAZINES Y
CDS
MANIPULATION DES MAGASINS ET
DES CDS
How to handle the magazines
Cómo manipular los magazines
Manipulation des magasins
• Care in handling the magazines
– Do not carry the magazine with its inserting slot facing down
or the CDs may fall out.
– Always keep the twelve disc trays loaded in the magazine.
– When sliding the disc trays out or in to place CDs, hold the
magazine horizontally so as not to drop CDs.
– Do not insert CDs without pulling out the disc trays from the
magazine. Never place CDs directly into the magazine.
– Do not expose the magazine to high temperatures or direct
sunlight.
– Do not disassemble the magazine.
– Take care not to drop or hit the magazine. Do not apply
excessive pressure to the disc trays which have been removed
from the magazine.
– Never apply solvents such as benzine, thinner or insecticide
to the magazine or trays. These solvents may erode their
surfaces.
• Cuidado en la manipulación de magazines
– Para evitar que los CDs se caigan, no transporte el magazín
con su ranura de inserción hacia abajo.
– Mantenga siempre los doce portadiscos colocados en el
magazín.
– Cuando extraiga o introduzca las bandejas de los CDs,
mantenga el magazín horizontalmente para evitar que se
caigan los CDs.
– No inserte los CDs sin haber extraído las bandejas de discos
del magazín. Nunca introduzca CDs directamente dentro
del magazín.
– No lo exponga a la luz solar directa o a temperaturas
elevadas.
– No desarme los magazines.
– No los deje caer ni los golpee. No aplique demasiada presión
sobre las bandejas de discos extraídas de los magazines.
– No use jamás solventes tales como bencina, diluyente o
insecticida en el magazín o las bandejas. Los mismos
podrían perjudicar su superficie.
• Faire attention en manipulant les disques
– Ne portez pas le magasin avec la fente d’insertion dirigée
vers le bas pour ne pas faire tomber les CD.
– Toujours laisser douze tiroirs de disque chargés dans le
magasin.
– Lorsque l’on fait glisser les tiroirs de disque pour les ouvrir
ou les refermer, tenir le magasin horizontalement pour ne
pas faire tomber les CD.
– Ne pas insérer de CD sans ouvrir le tiroir de disque du
magasin. Ne pas insérer les CD directement dans le magasin.
– Ne pas exposer les magasins à de hautes températures ni
aux rayons directs du soleil.
– Ne pas démonter les magasins.
– Faire attention de ne pas faire tomber ou cogner les magasins.
Ne pas appliquer de pression excessive sur les tiroirs de
disque qui ont été retirés des magasins.
– Ne jamais appliquer de solvants comme de la benzine, du
diluant ou des insecticides sur le magasin ou les tiroirs de
disque. Ces solvants peuvent éroder leurs surfaces.
Note:
If you need additional magazines, purchase XC-M200 magazines.
Nota:
Si necesita un magazín adicional, adquiera un XC-M200.
Remarque:
Si l’on a besoin d’un magasin supplémentaire, acheter le XC-M200.
When playing a CD-R or CD-RW
Cuando se reproduce un CD-R o CD-RW
Before playing back CD-Rs or CD-RWs, read their instructions or
cautions carefully.
• Use only “finalized” CD-Rs or CD-RWs.
• Some CD-Rs or CD-RWs may not play back on this unit because
of their disc characteristics, and for the following reasons:
– Discs are dirty or scratched.
– Moisture condensation on the lens inside the unit.
– The pickup lens inside the unit is dirty.
• CD-RWs may require a longer readout time since the
reflectance of CD-RWs is lower than that of regular CDs.
• CD-Rs or CD-RWs are susceptible to high temperatures or high
humidity, so do not leave them inside your car.
• Do not use following CD-Rs or CD-RWs:
– Discs with stickers, labels, or protective seal stuck to the
surface.
– Discs on which labels can be directly printed by an ink jet
printer.
Using these discs under high temperatures or high humidity
may cause malfunctions or damage to discs. For example,
– Stickers or labels may shrink and warp a disc.
– Stickers or labels may peel off so discs cannot be ejected.
– Print on discs may get sticky.
Read instructions or cautions about labels and printable discs
carefully.
Antes de reproducir los CD-Rs o CD-RWs, lea atentamente sus
instrucciones o precauciones.
• Utilice únicamente CD-Rs o CD-RWs “finalizados”.
• Es posible que algunos CD-Rs o CD-RWs no se puedan
reproducir en esta unidad debido a las características propias
del disco y por los siguientes motivos:
– Discos sucios o rayados.
– Hay condensación de humedad en el lente interior de la
unidad.
– Suciedad en el lente captor del interior del reproductor.
• Los CD-RWs pueden requerir más tiempo de lectura debido a
que la reflectancia de los mismos es menor que la de los CDs
comunes.
• Los CD-Rs o CD-RWs son afectados por las altas temperaturas
o la alta humedad; por lo tanto, no los deje en el interior de su
automóvil.
• No utilice los siguientes CD-Rs o CD-RWs:
– Discos con pegatinas, etiquetas o sellos protectores
adheridos a la superficie.
– Discos que tengan etiquetas que se puedan imprimir con
una impresora de chorro de tinta.
El uso de estos discos bajo altas temperaturas o alta humedad
pueden producir fallos de funcionamiento o daños a los discos.
Por ejemplo,
– Las etiquetas o las pegatinas se podrían encoger y provocar
la curvatura del disco.
– Las etiquetas o las pegatinas se podrían despegar y
entorpecer la expulsión del disco.
– Las partes impresas del disco podrían volverse pegajosas.
Lea atentamente las instrucciones o precauciones acerca de
las etiquetas y de los discos que se pueden imprimir.
Lors de la reproduction d’un CD-R ou d’un
CD-RW
Warped disc
Disco curvado
Disque gondolé
Sticker
Etiqueta
Autocollant
Avant de reproduire un CD-R ou un CD-RW, lisez attentivement
leurs instructions et précautions.
• Utilisez uniquement des CD-R ou CD-RW “finalisés”.
• Certains CD-R ou CD-RW ne peuvent pas être reproduits sur
cet appareil à cause de leurs caractéristiques et pour les raisons
suivantes.
– Les disques sont sales ou rayés.
– De l’humidité s’est condensée sur la lentille, à l’intérieur de
l’appareil.
– La lentille du capteur, à l’intérieur de l’appareil, est sale.
• Les CD-RW peuvent nécessiter une durée de mise en service
plus longue car le facteur de réflexion des CD-RW est inférieur
à celui des CD ordinaires.
• Les CD-R ou CD-RW sont sensibles aux hautes températures
ou à une humidité importante. Ne les laissez pas à l’intérieur
de la voiture.
• N’utilisez les CD-R ou CD-RW suivants.
– Disques avec des autocollants, des étiquettes ou des cachets
de protection collés sur leur surface.
– Disques sur lesquels une étiquette peut être imprimée
directement avec, par exemple, une imprimante à jet d’encre.
L’utilisation de ce type de disque par haute température ou
humidité peut entraîner un mauvais fonctionnement de l’appareil
ou endommager le disque. Par exemple:
– L’autocollant ou l’étiquette peut rétrécir et gondoler le disque.
– L’autocollant ou l’étiquette peut se détacher et le disque ne
peut plus être éjecté.
– L’impression sur le disque peut devenir collante.
Lisez attentivement les instructions et les précautions sur les
étiquettes et les disques imprimables.
Stick-on label
Etiqueta autoadhesiva
Etiquette spécialisée
Sticky residue
Resto de etiqueta Disc
Reste collant
Disco
Disque
Playing a CD Text/ Reproducción del CD Text/ Reproduction d’un CD Text
En el CD Text se ha grabado cierta información relacionada con
el disco (el título del disco, su ejecutante y título de pista).
Si usted conecta esta unidad a un receptor con función de
visualización de CD Text, podrá exhibir esta información en la
pantalla del receptor.
Dans un CD Text, certaines informations à propos du disque
(son titre, l’interprète et les titres des plages) sont enregistrées.
Si cet appareil est connecté à un récepteur possédant une
fonction d’affichage de CD Text, il est possible de voir les
informations des disques sur l’affichage du récepteur.
How to load CDs
Colocación de CDs
Chargement des CDs
1. Slide the disc tray partly out of the magazine until it stops.
2. Place a CD on the disc tray with its label side up.
1. Extraiga parcialmente la bandeja de disco del magazín hasta
que se detenga.
2. Ponga un CD en la bandeja de disco con su etiqueta hacia
arriba.
1. Faire glisser le tiroir de disque partiellement à l’extérieur du
magasin jusqu’à ce qu’il s’arrête.
2. Placer un CD sur le tiroir de disque avec la face imprimée dirigée
vers le haut.
In a CD Text, some information about disc (its disc title,
performer and track title) is recorded.
If you connect this unit to a receiver with the CD Text displaying
function, you can show this disc information on the receiver’s
display.
1.
2.
Disc tray
Bandeja de disco
Tiroir de disque
Magazine (XC-M200)
Magazín (XC-M200)
Magasin (XC-M200)
Grooves
Ranuras
Rainures
*
Compact disc
Disco compacto
Disque compact
12
11
10
9
8
7
6
5
4
3
2
1
Disc tray
Bandeja de disco
Tiroir de disque
3. Align the disc tray with the grooves in the magazine, and push
the disc tray all the way in.
• Check that the disc tray is securely inserted into the magazine.
If a CD becomes disengaged from the disc tray, reposition it
on the disc tray.
* The inserted CDs are counted as “disc-1,” “disc-2”... from the
bottom to the top.
3. Alinee la bandeja de disco con las ranuras del magazín e
introduzca la bandeja de disco hasta el fondo.
• Verifique que la bandeja de disco esté firmemente
introducida dentro del magazín. Si algún CD se sale de la
bandeja de disco, vuélvalo a poner sobre la bandeja.
* Los CDs insertados se cuentan como “disc-1”, “disc-2”...
desde abajo hacia arriba.
3. Aligner le tiroir de disque avec les rainures dans le magasin et
le pousser complètement.
• Vérifier que le tiroir de disque est correctement inséré dans
le magasin. Si un CD est désengagé du tiroir de disque, le
repositionner sur le tiroir.
* Les CD insérés sont comptés comme “disque 1”, “disque 2”,
etc. en commençant du bas et en allant vers le haut.
Notes:
• There are openings in the disc trays through which signals are
read from the CDs. These openings leave part of the shiny side
of the CD exposed. Be careful not to touch the shiny surface of
the CD.
• It is not possible to play a CD if placed upside down.
Notas:
• Las bandejas tienen aberturas por las cuales son leídas las
señales de los discos. Estas aberturas dejan expuesta parte
del lado brillante del disco. Tenga cuidado de no tocar la
superficie brillante del disco.
• No es posible reproducir un CD colocado boca abajo.
Remarques:
• Il y a des ouvertures dans les tiroirs de disque à travers
lesquelles les signaux sont lus des disques. Ces ouvertures
laissent une partie de la face brillante du disque exposée. Faire
attention de ne pas toucher à la surface brillante du disque.
• Il n’est pas possible de reproduire un CD s’il est placé à l’envers.
Caution:
CDs shaped like a heart, flower, etc. (specially-shaped CDs)
cannot be used with this unit. If this type of CD is loaded, it will
cause problems.
Precaución:
Los CDs con forma de corazón, flor, etc. (CDs con forma especial),
no pueden ser uasados con esta unidad. Si coloca tipos de CD,
se producirá una falla.
Attention:
Des CD en forme de coeur, de fleur, etc. (CD de forme spéciale)
ne peuvent pas être utilisés avec cet appareil. Si ce type de
CD est chargé, il causera un problème de fonctionnement.
5
CH-X1500[J]EnSpFr_f.pm6
5
21/10/02, 10:57 AM
How to load the magazine
Colocación de un magazín
Chargement d’un magasin
1. Slide the door to the right.
2. Load the magazine.
• Load the magazine into the CD changer with the ) mark on
top and the CD insertion side to the right.
1. Deslice la puerta hacia la derecha.
2. Coloque un magazín.
• Coloque un magazín en el cambiador de CD con la marca
) apuntando hacia arriba y el lado de inserción del CD
hacia la derecha.
1. Faire glisser la porte vers la droite.
2. Charger un magasin.
• Charger un magasin dans le chargeur CD avec la marque )
en haut et le côté d’insertion CD sur la droite.
1.
2.
3. Close the door.
• Normally the door must be kept closed except when changing
the magazine.
3. Cierre la puerta.
• La puerta debe estar cerrada excepto al poner o sacar un
magazín.
3. Fermer la porte.
• La porte doit être fermé en dehors du chargement ou du
retrait d’un magasin.
Cautions:
• Do not insert your hands or any foreign object into the loading
slot, otherwise you may be injured or cause malfunctions or
damage.
• When a label on the magazine, if any, partly peels off, it may
cause a malfunction. If this happens, remove the label or stick
it on firmly.
Precaución:
• No introduzca la mano o algún objeto por la ranura de carga
pues podría lastimarse o producir fallas de funcionamiento
o daños.
• Si el magazín está provisto de una etiqueta y ésta se despega
en parte, podría producirse una falla de funcionamiento. En
tal caso, despegue la etiqueta o vuélvala a pegar firmemente.
Attention:
• Ne pas introduire vos mains ou d’objet étranger dans la
fenêtre de chargement, vous pourriez vous blesser ou causer
des mauvais fonctionnements ou dommages.
• Si l’étiquette sur le magasin se décolle, cela peut causer un
mauvais fonctionnement. Si cela se produit, retirer l’étiquette
ou la recoller solidement.
How to unload the magazine
Cómo retirar un magazín
Retrait d’un magasin
1. Slide the door to the right.
2. Press the 0 EJECT button.
• The magazine ejects from the loading slot.
Note:
When the magazine cannot be ejected, push in the magazine and
play the 12th disc once more; when play has ended, repeat the
above procedure.
If the above procedure does not work, follow the steps below:
1. Be sure that the selectors are set correctly.
2. Peel off the protective seal over the compulsory eject hole.
(Fig. g)
3. Put a straight stick like a screw driver into the hole. (Fig. h)
* Do not put the stick at an angle, insert it straight.
1. Deslice la puerta hacia la derecha.
2. Pulse el botón 0EJECT.
• El magazín es expulsado de la ranura de carga.
Nota:
Cuando el magazín no pueda ser eyectado, presione el magazín
hacia adentro y reproduzca el disco no.12 una vez más; cuando
la reproducción haya terminado, repita el procedimiento de
arriba.
Si el procedimiento de arriba no funciona, realice los pasos
siguientes:
1. Asegúrese de que los selectores estén correctamente
ajustados.
2. Despegue el sello protector del orificio de expulsión
forzosa. (Fig. g)
3. Introduzca en el orificio una varilla recta, tal como un
destornillador. (Fig. h)
* Inserte la varilla en sentido recto, sin ningún ángulo.
1. Faire glisser la porte vers la droite.
2. Appuyer sur la touche 0EJECT.
• Le magasin est éjecté du compartiment.
Remarque:
Si le magasin ne peut pas être éjecté, pousser sur le magasin et
lire une fois de plus le 12 ème disque; quand la lecture est terminée,
refaire la procédure précédente.
Si la procédure ci-dessus ne fonctionne pas, suivez les étapes
suivantes:
1. Assurez-vous que les sélecteurs sont réglés correctement.
2. Décollez l’autocollant protecteur du trou d’éjection forcée.
(Fig. g)
3. Insérez une tige droite telle qu’un tournevis dans le trou.
(Fig. h)
* N’insérez pas le levier de biai, insérez-le bien droit.
Fig. g
Fig. h
H
V
The compulsory eject hole and protective seal
Orificio de expulsión forzosa y sello protector
Le trou d’éjection forcé et l’autocollant protecteur
Should the problem still persists, consult the JVC authorized dealer.
Si el problema persiste, consulte con su concesionario JVC
autorizado.
Si le problème persiste, consultez un revendeur JVC autorisé.
How to remove the disc trays
Cómo quitar las bandejas de los discos
Comment retirer les tiroirs de disque
Use the release knob to remove the disc trays when cleaning them.
1. While pulling down the release knob, pull out the disc tray.
2. After cleaning, insert the disc tray into the magazine while pulling
down the release knob.
• Clean the trays one by one to avoid
inserting two trays into one slot of the
magazine.
Utilice la perilla de desenganche cuando desee retirar las
bandejas de disco para su limpieza.
1. Extraiga la bandeja de disco mientras baja la perilla de
desenganche.
2. Después de limpiarla, inserte la bandeja de disco en el
magazín mientras baja la perilla de desenganche.
• Limpie las bandejas una por una para impedir la inserción
de dos bandejas en la misma ranura de magazín.
Utilisez le bouton de retrait pour retirer le tiroir de disque afin de le
nettoyer.
1. Tout en tirant vers le bas le bouton de retrait, tirez le tiroir de
disque.
2. Après le nettoyage, insérez le tiroir de disque dans le magasin
tout en tirant sur le bouton de retrait.
• Nettoyez les tiroirs un par un pour éviter d'en insérer deux à la
fois dans un seul tiroir.
Release knob
Perilla de desenganche
Bouton de retrait
• Handling CD-Rs/CD-RWs
The reflective film of CD-Rs/CD-RWs is less tough than that of
ordinary music CDs. If these discs are damaged, their film may
peel. These media are also susceptible to fingerprints, so use
extreme care when handling them.
• Storage
Make sure to keep CDs in their cases. If discs are piled on top of
one another without their cases, they may be damaged. Do not
put CDs where they will be exposed to direct sunlight or in a
place subject to high temperatures and humidity. Avoid leaving
CDs in your car.
Hold down the center holder.
Presione el sujetador central.
Appuyer au milieu du support.
• Manejo de los CD-Rs/CD-RWs
La película reflectora de los CD-Rs/CD-RWs es menos
resistente que la de los CDs de música convencionales. En
este tipo de discos, los daños pueden provocar el
desprendimiento de su película. Estos medios también son
afectados por las huellas de los dedos; por lo tanto, trátelos
con sumo cuidado.
• Cómo guardar los discos
Guarde los discos en sus cajas. No apile discos sin sus cajas,
ya que podrían dañarse. No ponga los discos donde queden
expuestos a la luz solar directa o en lugares con alta
temperatura o humedad. No los deje en el automóvil.
Lift it out without touching the recorded surface.
Levántelo para sacarlo sin tocar la superficie
grabada.
Le lever sans toucher à la surface enregistrée.
• Maintenance of CDs
– When fingerprints and dirt adhere to a CD, wipe the disc clean
with a soft, dry cloth, wiping from the inside towards the edge.
If it is difficult to clean, wipe the CD with a cloth moistened
with water.
– Do not use record cleaners, benzine, alcohol or antistatic
agents.
– Do not damage the label side or stick paper or adhesive to the
surface.
Insert with the label facing up.
Inserte con la etiqueta hacia arriba.
Mettre en place avec l’étiquette audessus.
• Mantenimiento de los CDs
– Limpie las huellas y el polvo que se adhiere sobre el disco
con un paño limpio y suave desde el centro hacia los
bordes. Si no salen, límpielo con un paño humedecido con
agua.
– No utilice limpiadores para discos, bencina, alcohol o
agentes antiestáticos.
– No dañe el lado con etiqueta ní pegue papeles o adhesivos
en la superficie.
Incorrect
Incorrecto
Incorrect
Correct
Correcto
Correct
6
CH-X1500[J]EnSpFr_f.pm6
6
• Manipulation des CD-R/CD-RW
Le film réfléchissant des CD-R/CD-RW est moins résistant que
celui des CD audio ordinaires. Si ces disques sont
endommagés, leur film peut se décoller. Ces disques sont aussi
sensibles aux empreintes de doigts. Faites très attention quand
vous les manipulez.
• Stockage
Bien conserver les disques dans leurs boîtes. Si des disques
sont empilés les uns sur les autres sans leurs boîtes, ils peuvent
être abîmés. Ne pas mettre des disques où ils pourraient être
exposés à la lumière directe du soleil ou dans un endroit sujet
à de fortes températures ou à l’humidité. Eviter de laisser des
disques dans votre voiture.
21/10/02, 10:57 AM
Press gently on the disc to insert.
Presione suavemente el disco para
insertalo.
Appuyer légèrement sur le disque
pour le mettre en place.
• Entretien des CDs
– Si des empreintes digitales ou de la poussière adhèrent à un
disque, essuyer le disque avec un tissu doux, sec et propre,
en essuyant de l’intérieur vers l’extérieur. S’il est difficile à
nettoyer, essuyer le disque avec un tissu humidifié avec de
l’eau.
– Ne pas utiliser de nettoyants, benzine, alcool ou agent
antistatique.
– Ne pas endommager le côté de l’étiquette ou coller du papier
ou de la bande adhésive sur la surface.
CH-X1500/X550
CH-X1500
CH-X550
CD CHANGER
CD-WECHSLER
CHANGEUR CD
Instructions
Bedienungsanleitong
Manuel d’instructions
LVT0975-002A
[E/EX]
V
J
ENGLISH
DEUTSCH
C
1002MNMMDWJEIN
EN, GE, FR
FRANÇAIS
Vielen Dank für den Kauf dieses JVC Geräts. Bitte lesen Sie
diese Bedienungsanleitung sorgfältig durch, ehe Sie das Gerät
in Betrieb nehmen, um einen langen und störungsfreien Betrieb
zu erzielen.
Mit diesem Gerät können CDs, CD-Rs und CD-RWs
wiedergeben werden.
• Sie können außerdem Ihre CD-Rs (Recordable) und CD-RWs
(Rewritable) entweder im Audio-CD-Format oder im MP3Format (nur bei CH-X1500) wiedergeben.
• Sie können außerdem CD-Text (nur bei CH-X1500)
wiedergeben.
• CH-X550 ist nicht zu MP3 und CD-Text kompatibel.
Nous vous remercions d’avoir acheté cet appareil JVC. Veuillez lire
consciencieusement ce manuel d’instructions avant de commencer à
faire fonctionner l’appareil de façon à être sûr d’obtenir les
performances optimales et la plus longue utilisation de cet appareil.
Cet appareil a été conçu uniquement pour reproduire les CD, CD-R et
CD-RW.
• Vous pouvez aussi reproduire vos CD-R (enregistrables) et CDRW (réinscriptibles) originaux, au format CD audio ou au format
MP3 (seulement pour le CH-X1500).
• Vous pouvez aussi reproduire les CD Text (uniquement pour le
CH-X1500).
• Le CH-X550 n’est pas compatible avec les CD MP3 et les CD Text.
IMPORTANT FOR LASER PRODUCTS
WICHTIGE HINWEISE ZU LASERGERÄTEN
IMPORTANT POUR LES PRODUITS LASER
PRECAUTIONS
1. CLASS 1 LASER PRODUCT
2. CAUTION: Invisible laser radiation when open and
interlock failed or defeated. Avoid direct exposure to
beam.
3. CAUTION: Do not open the top cover. There are no user
serviceable parts inside the unit, leave all servicing to
qualified service personnel.
4. CAUTION: The compact disc player uses invisible laser
radiation and is equipped with safety switches which
prevent emission of radiation when unloading the CD
magazine and the safety interlocks have failed or are
defeated. It is dangerous to defeat the safety switches.
5. CAUTION: Use of controls or adjustments or performance
of procedures other than those specified herein may result
in hazardous radiation exposure.
VORSICHTSMASSNAHMEN
1. LASER-PRODUKT DER KLASSE 1
2. ACHTUNG: Unsichtbare Laserstrahlung bei Öffnung und
fehlerhafter oder beschädigter Sperre. Direkten Kontakt mit
dem Strahl vermeiden!
3. ACHTUNG: Das Gehäuseoberteil nicht abnehmen. Das
Gerät enthält keinerlei Teile, die vom Benutzer gewartet
werden können. Überlassen Sie Wartungsarbeiten
qualifizierten Kundendienst-Fachleuten.
4. ACHTUNG: Der Compact Disc-Player arbeitet mit unsichtbaren Laserstrahlen und ist mit Sicherheitsschaltern
ausgestattet, die die Aussendung von Strahlen verhindern,
wenn bei Entnahme des CD-Magazins die
Sicherheitssperren gestört oder beschädigt sind. Es ist
gefährlich, die Sicherheitsschaltung zu deaktivieren.
5. ACHTUNG: Falls die Verwendung der Regler, Einstellungen
oder Handhabung von den hierin gegebenen Anleitungen
abweichen, kann es zu einer gefährlichen Strahlenfreisetzung
kommen.
PRECAUTIONS
1. PRODUIT LASER CLASSE 1
2. ATTENTION: Radiation laser invisible quand l’appareil est
ouvert ou que le verrouillage est en panne ou désactivé.
Eviter une exposition directe au rayon.
3. ATTENTION: Ne pas ouvrir le couvercle du dessus. Il n’y a
aucune pièce à régler à l’intérieur. Laisser à un personnel
qualifié le soin de réparer l’appareil.
4. ATTENTION: Le lecteur de disque audionumérique utilise
une radiation laser et est équipé de commutateurs de
sécurité qui empêchent l’émission de radioation en retirant
le magasin CD et si les interverrouillages de sécurité n’ont
pas marché ou sont en panne. Il est dangereux de
désactiver les commutateurs de sécurité.
5. ATTENTION: L’utilisation des commandes, réglages ou
processus autres que ceux qui sont spécifiés dans ce
manuel risquent de provoquer une exposition dangereuse
aux radiations.
Position And Reproduction Of Labels
Abbildung und Position der am Gerät befindlichen
Aufkleber
Emplacement et reproduction des étiquettes
Thank you for purchasing this JVC product. Please read these
instructions carefully before starting operation to be sure to
obtain optimum performance and a longer service life from the
unit.
This unit has been designed to reproduce CDs, CD-Rs and CDRWs.
• You can also play back your original CD-Rs (Recordable) and
CD-RWs (Rewritable) either in audio CD format or MP3
format (only for CH-X1500).
• You can also play back CD Text (only for CH-X1500).
• CH-X550 is not compatible with MP3 and CD Text.
WARNING LABEL, PLACED INSIDE THE UNIT
WARNSCHILD, INS GERÄT GELEGT
ETIQUETTE D’AVERTISSEMENT, PLACEE A L’INTERIEUR DE L’APPAREIL
CAUTION: Invisible laser
radiation when open and
interlock failed or defeated.
AVOID DIRECTEXPOSURE
TO BEAM.
(e)
ADVARSEL:Usynlig laserstråling ved åbning, når
sikkerhedsafbrydere er ude
af funktion. Undgåudsættelse for stråling.
(d)
VARNING:Osynlig laserstrålning när denna del
är öppnadoch spärren är
urkopplad. Betrakta ej
strålen.
(s)
VARO: Avattaessa ja suojalukitus ohitettaessa olet
alttiina näkymättömälle
lasersäteilylle. Älä katso
säteeseen.
(f)
Rear panel of the unit
Geräte-Rückseite
Panneau arrière de l’appareil
CLASS
LASER
Name/Rating Plate
Typenschild
Nom/plaque d’identification
1
PRODUCT
Caution:
This production contains a laser component
of higher laser class than Class 1.
Achtung:
Die Klassifikation der Laserkomponente in diesem
Gerät liegt über Laser-Klasse 1.
Attention:
Ce produit contient un composant laser de
classe laser supérieure à la classe 1.
WARNING
WARNUNG
AVERTISSEMENT
• This unit is designed to operate with 12 volt DC, NEGATIVE
ground electrical systems.
• When replacing the fuse, use one with the specified rating for
this unit. If the fuse blows frequently, consult your nearest
JVC IN-CAR ENTERTAINMENT dealer.
• Dieses Gerät ist nur zur Verwendung mit NEGATIV geerdeten
elektrischen Systemen mit 12 V Gleichstrom bestimmt.
• Für dieses Gerät ausschließlich Sicherungen mit Nennwert
verwenden! Bei zu häufigem Durchbrennen der Sicherung
sollten Sie sich an Ihren nächsten JVC-Autoradiofachhändler
wenden.
• Cet appareil est conçu pour fonctionner sur courant continu
de 12 volts, à systèmes électriques de masse NEGATIVE.
• En remplaçant le fusible, en utiliser un avec la valeur
spécifiée pour cet appareil. Si le fusible saute souvent,
consulter votre revendeur d’autoradios JVC le plus proche.
PRECAUTIONS
VORSICHTSMASSNAHMEN
PRECAUTIONS A OBSERVER
• Car’s Internal Temperature
Before listening to CDs after your car has been parked for
some time in low or high temperatures, wait until the
temperature inside the car stabilizes.
• Condensation
In the following cases, moisture may condense on the lens, a
critical part of the CD player, making the CD signal
unreadable:
– When the heater has just been turned on.
– When the humidity is high.
In these cases, unload the CD magazine and wait for 1 or 2
hours.
• Volume Setting
– CDs produce very little noise compared with analog
sources. If the volume level is adjusted for analog sources,
the speakers may be damaged by the sudden increase in
the output level. Therefore, lower the volume before
operation and adjust it as required during playback.
– Adjust the volume so that you can hear sounds occurring
outside the car.
• Fahrzeug-Innentemperatur
Wenn das geparkte Fahrzeug für längere Zeit besonders
hohen bzw. niedrigen Temperaturen ausgesetzt war, erst auf
CD-Wiedergabe schalten, wenn sich die FahrzeugInnentemperatur stabilisiert hat.
• Kondensationsniederschlag
In den folgenden Fällen kann es zu
Kondensationsniederschlag an der Laserlinse, einem der
wichtigsten Teile des CD-Players, kommen. Bei
beschlagener Linse wird eine einwandfreie Signalabtastung
von der CD verhindert. Kondensation kann auftreten:
– Unmittelbar nach Einschaltung der Innenraumheizung.
– Bei hoher Luftfeuchtigkeit.
In diesen Fällen das CD-Magazin entnehmen und ca. 1 bis 2
Stunden warten.
• Lautstärkeeinstellung
– Im Vergleich zu Analog-Schallplatten weisen CDs
erheblich weniger Störgeräusche auf. Wenn die Lautstärke
vor Beginn eines Titels zu hoch eingestellt wird, können
die Lautsprecher bei einem plötzlich einsetzenden Signal
beschädigt werden. Daher die Lautstärke vor dem
Wiedergabestart verringern und dann wie erforderlich
einstellen.
– Die Lautstärke so einstellen, daß Außengeräusche
wahrgenommen werden können.
• Température ambiante dans la voiture
Pour l’écoute de disques audionumériques après un
stationnement assez prolongé de la voiture à la chaleur ou
au froid, attendre que la température dans la voiture se
stabilise.
• Condensation
Dans les cas suivants, de l’humidité peut se condenser sur la
lentille, une pièce vitale du lecteur CD, rendant impossible la
lecture du signal CD:
– Quand le chauffage vient juste d’être mis.
– Quand l’humidité est forte.
Dans ces cas, retirer le magasin CD et attendre environ 1 à 2
heures.
• Réglage du volume
– Les disques audionumériques produisent très peu de bruit
comparés avec des sources analogiques. Si le niveau du
volume est réglé comme pour ces sources, les hautparleurs peuvent être abîmés par une augmentation
soudaine du niveau de sortie. Par conséquent, baisser le
volume avant fonctionnement et le régler comme voulu
pendant la lecture.
– Régler le volume pour pouvoir entendre les sons à
l’extérieur de la voiture.
INSTALLATION
EINBAU
MISE EN PLACE
• Avoid installing the unit in the following places
– Where it would be exposed to direct sunlight or direct heat
from the heater or in an extremely hot place.
– Where it would be subject to rain, water splashes or
excessive humidity.
– Where it would be subject to dust.
– Where it would be positioned in unstable place.
– Above connection cords or on the floor under which there
is piping.
– Where it could damage the car’s fittings (spare tire, etc.) in
or under the trunk.
• Before drilling holes in the trunk to install the unit, make sure
that there is a sufficient space under the trunk so that you do
not drill holes in the fuel tank, etc.
• Firmly install the unit using the provided screws.
• Der CD-Wechsler darf nicht installiert werden
– an Orten, die direktem Sonnenlicht oder direkter Wärme von
einer Heizung ausgesetzt sind, oder an extrem heißen Orten.
– an Orten, in die Regen- oder Spritzwasser eindringen kann
oder an denen übermäßige Feuchtigkeit vorhanden ist.
– an staubigen Orten.
– Wenn es an einem instabilen Platz positioniert wird.
– über Verbindungskabeln oder auf dem Teil des
Karosseriebodens, unter dem Rohre verlaufen.
– an Orten, an denen Fahrzeugkomponenten im oder unter dem
Kofferraum (Ersatzreifen usw.) beschädigt werden könnte.
• Ehe Sie im Kofferraum Löcher bohren, um den CD-Wechsler
zu installieren, vergewissern Sie sich, daß ausreichend Raum
unterhalb des Kofferraums vorhanden ist, so daß Sie keine
Löcher in den Kraftstofftank usw. bohren.
• Installieren Sie den CD-Wechsler mit Hilfe der mitgelieferten
Schrauben.
• Eviter l’installation dans les endroits suivants
– Où il risque d’être exposer directement au soleil ou chauffé
drectement par le chauffage ou dans un endroit très chaud.
– Où il risque d’être mouillé par la pluie, les flaques d’eau ou
dans une forte humidité.
– Dans les endroits poussiéreux.
– Où il peut être placé dans un endroit instable.
– Au-dessus des cordons de raccordements ou sur le plancher
sous lequel il y a une tuyauterie.
– À où il pourrait endommager des accessoires de la voiture
(roue de secours, etc.) dans ou sous le coffre.
• Avant de percer des trous dans le coffre pour installer l’appareil,
s’assurer qu’il y a un espace suffisant sous le coffre pour ne
pas faire de trous dans le réservoir de carburant, etc.
• Installer fermement l’appareil en utilisant les vis fournies.
1
CH-X1500[E_EX]EnGeFr_f.pm6
1
22/10/02, 9:58 AM
A
When installing the unit horizontally
Horizontale Installation des CD-Wechslers
Lors de l’installation de l’appareil horizontalement
1. Attach the mounting brackets on the side panels of the unit
using screws. (Fig. a)
2. Install the unit on the floor of the trunk using self-tapping
screws. (Fig. b)
1. Bringen Sie die Montagehalterungen mit den Schrauben an
den Seitenwangen des CD-Wechslers an. (Abbildung a)
2. Installieren Sie den CD-Wechsler auf dem Boden des
Kofferraums mit Hilfe der selbstschneidenden
Gewindeschrauben. (Abbildung b)
1. Fixer les supports de montage sur les panneaux latéraux de
l’appareil en utilisant des vis. (Fig. a)
2. Installer l’appareil sur le plancher du coffre en utilisant des
vis auto-taraudeuses. (Fig. b)
1.
Screw
(M4 x 8 mm)
Schraube
(M4 X 8 mm)
Vis
(M4 x 8 mm)
2.
Use these holes.
Verwenden Sie diese
Bohrungen.
Utiliser ces trous.
Mounting bracket
Montagehalterung
Support de montage
Tapping screw
(M5 x 20 mm)
Selbstschneidende
Gewindeschraube
(M5 x 20 mm)
Vis auto-taraudeuse
(M5 x 20 mm)
5
3
1
4
2
Trunk floor
Kofferraumboden
Plancher du coffre
Fig. a
Abbildung a
Fig. a
Drill holes
Bohren Sie vier Löcher
Trous de preçage
Fig. b
Abbildung b
Fig. b
B
When installing the unit upright (Fig.c)
Lors de l’installation de l’appareil verticalement
(Abbildung c)
(Fig. c)
V
Selector
Wahlschalter
Sélecteur
H
H
V
Fig. c
Abbildung c
Fig. c
Senkrechte Installation des CD-Wechslers
Use these holes.
Verwenden Sie diese
Bohrungen.
Utiliser ces trous.
5
3
Bottom panel of the unit
Unterseite des CD-Wechslers
Panneau inférieur de l’appareil
1
4
2
Trunk floor
Kofferraumboden
Plancher du coffre
Notes:
• When attaching the unit with the screws, refer to “ When
installing the unit horizontally” above .
• When installing the unit upright, set the selectors located
on both sides to the “V (vertical)” position. (When it is
installed horizontally, be sure to set the selectors to the
“H (horizontal)” position.)
– When installing the unit upright, securely install to the trunk
floor.
• If you install the unit without setting the selectors correctly, the
symptoms below may occur.
– Sound is intermittent.
– CDs are damaged.
Hinweise:
• Informationen über die Installation finden Sie unter dem obigen
Punkt „ Horizontale Installation des CD-Wechslers“.
• Wenn Sie das Gerät senkrecht installieren wollen,
stellen Sie die Wahlschalter, die sich an den
Geräteseiten befinden, auf die Position „V (vertikal)“.
(Wenn das Gerät horizontal installiert wird, achten Sie
darauf, daß die Wahlschalter auf die Position „H
(horizontal)“ gestellt werden).
– Wenn Sie das Gerät senkrecht installieren, montieren Sie
es auf dem Kofferraumboden.
• Wenn Sie das Gerät installieren, ohne den Wahlschalter
korrekt einzustellen, können die nachfolgenden Symptome
auftreten.
– Der Ton wird unterbrochen.
– CDs werden beschädigt.
Remarques:
• Pour la fixation de l’appareil avec les vis, se référer à “
Lors
de l’installation de l’appareil horizontalement” ci-dessus.
• Si l’appareil est installé verticalement, régler les sélecteurs
situés sur les côtés sur la position “V (vertical)”. (S’il est
installé horizontalement, s’assurer de régler les sélecteurs
sur la position “H (horizontal)”).
– Lors de l’installation verticale, fixer fermement sur le plancher
du coffre.
• Si vous installez l’appareil sans régler le sélecteur
correctement, les problèmes suivants risquent de se
produire.
– Le son est discontinu.
– Les CD sont endommagés.
C
When installing the unit on an inclined plane
(Fig. d)
Bei Installation des CD-Wechslers in einer Lors de l’installation de l’appareil sur un
schrägen Lage (Abbildung d)
plan incliné (Fig. d)
Fig. d
Abbildung d
Fig. d
Selector
Wahlschalter
Sélecteur
H
V
H
V
1
2
3
4
NO
USE
5
Side panel of the unit
Seitenblende des Geräts
Panneau latéral de l’appareil
Trunk floor
Kofferraumboden
Plancher du coffre
45°
Notes:
• When attaching the unit with the screws, refer to “ When
installing the unit horizontally” above.
• When installing, five angles can be selected. Be sure to
position the selectors on both sides of the unit pointing
upward, perpendicular (90°) to the earth surface.
• If you install the unit without setting the selector correctly, the
symptoms below may occur.
– Sound is intermittent.
– CDs are damaged.
Hinweise:
• Informationen über die Installation finden Sie unter dem
obigen Punkt „ Horizontale Installation des CD-Wechslers“.
• Bei der Installation können fünf verschiedene Winkel
gewählt werden. Achten Sie darauf, daß der Pfeildrehregler
auf beiden Seiten des Geräts (im Winkel von 90° zur Erde)
nach oben weist.
• Wenn Sie das Gerät installieren, ohne den Wahlschalter korrekt
einzustellen, können die nachfolgenden Symptome auftreten.
– Der Ton wird unterbrochen.
– CDs werden beschädigt.
Remarques:
• Pour la fixation de l’appareil avec les vis, se référer à “ Lors
de l’installation de l’appareil horizontalement” ci-dessus.
• Pour l’installation, cinq angles peuvent être choisis.
S’assurer de positionner la flèche des sélecteurs, des deux
côtés de l’appareil, perpendiculairement (90°) au sol.
• Si vous installez l’appareil sans régler le sélecteur correctement,
les problèmes suivants risquent de se produire.
– Le son est discontinu.
– Les CD sont endommagés.
D
(Fig. e)
Hängende Installation des CD-Wechslers im Lors de la suspension de l’appareil dans le
Kofferraum (Abbildung e)
coffre (Fig. e)
Fig. e
Abbildung e
Fig. e
2
4
5
When
Hinweis:
Informationen über die Installation finden Sie unter dem
obigen Punkt „ Horizontale Installation des CD-Wechslers“.
2
CH-X1500[E_EX]EnGeFr_f.pm6
2
22/10/02, 10:11 AM
3
Note:
When attaching the unit with the screws, refer to “
installing the unit horizontally” above.
1
When hanging the unit in the trunk space
Use these holes.
Verwenden Sie diese
Bohrungen.
Utiliser ces trous.
Remarque:
Pour la fixation de l’appareil avec les vis, se référer à “
Lors
de l’installation de l’appareil horizontalement” ci-dessus.
OK
Correct
Richtig
Correct
Incorrect
Falsch
Incorrect
0° to +90°
0° bis +90°
0° à +90°
Over +90°
Über +90°
Supérieur à +90°
V
V
NO
H
USE
H
H
NO USE
V
NO USE
Mistracking
Mistracking may occur when driving on an extremely rough
road. The unit and compact disc will not be damaged by
mistracking, however, since it is offensive to the ear, stop
playback and restart when you reach a road that’s in good
condition.
Erreur d’alignement
Un problème d’alignement peut se produire en conduisant
sur une route très mauvaise. L’appareil et le disque
audionumérique ne seront pas abîmés par un problème
d’alignement, toutefois, comme ce n’est pas agréable pour
les oreilles, arrêter la lecture et la reprendre quand la route
sera meilleure.
Spurfolgefehler
Bei schlechter Wegstrecke kann es zu Spurfolgefehlern
(Fehlabtastungen des Lasers) kommen. Hierdurch werden
CDs und Gerät nicht beschädigt. Da jedoch die
Klangwiedergabe deutlich beeinträchtigt wird, empfehlen
wir, auf Wiedergabstop zu schalten, bis erneut eine
einwandfreie Wegstrecke erreicht wird.
ANORDNUNG DER BEDIENUNGSELEMENTE
LOCATION OF CONTROLS
EMPLACEMENT DES COMMANDES
Ÿ
!
~
EJECT
~ 0EJECT button
Reset button: When pressing and holding for a few seconds
Ÿ CD magazine slot
! Door
~ Taste 0EJECT
Rückstelltaste: Drücken und einige Sekunden lang festhalten
Ÿ CD-Magazineinschub
! Tür
~ Touche 0EJECT
Touche de réinitialisation: Quand elle est maintenue pressée
pendant quelques secondes
Ÿ Compartiment du magasin CD
! Porte
TROUBLESHOOTING
FEHLERSUCHE
EN CAS DE DIFFICULTÉS
• “RESET1–RESET8” or “R1–R8” appears on the display of
the connected receiver (or other equipment).
* Are the units connected correctly? After checking, press and
hold the 0EJECT button for a few seconds to reset this unit.
Should the problem still persists, consult the JVC authorized
dealer.
• „RESET1–RESET8“ oder „R1–R8“ erscheint auf dem Display
des angeschlossenen Empfängers (oder anderen Geräts).
* Sind die Geräte richtig angeschlossen? Drücken Sie dann die
Taste 0EJECT und halten Sie die Taste einige Sekunden lang
gedrückt, um das Gerät zurückzustellen.
Setzen Sie sich mit Ihrem JVC-Händler in Verbindung, wenn
das Problem weiterhin besteht.
• “RESET1–RESET8” ou “R1–R8” apparaît sur l’affichage de
l’autoradio connecté (ou d’un autre appareil).
* Les appareils sont-ils connectés correctement? Après l’avoir
vérifié, maintenez pressée la touche 0EJECT pendant
quelques secondes pour réinitialiser cet appareil.
Si le problème persiste, consultez un revendeur JVC
autorisé.
Indication
Meaning
Anzeige
Bedeutung
Indication
Signification
RESET1 (or R1)
Ejection error
RESET1 (oder R1)
Ausgabefehler
RESET1 (ou R1)
Erreur d’éjection
RESET2 (or R2)
Lifter error
RESET2 (oder R2)
Heberfehler
RESET2 (ou R2)
Erreur de poussoir
RESET3 (or R3)
Tray error
RESET3 (oder R3)
Drehtellerfehler
RESET3 (ou R3)
Erreur de plateau
RESET4 (or R4)
Pick up return error
RESET4 (oder R4)
Aufnehmer-Rückkehrfehler
RESET4 (ou R4)
Erreur provenant du capteur
RESET5 (or R5)
—
RESET5 (oder R5)
—
RESET5 (ou R5)
—
RESET6 (or R6)
Communication error
RESET6 (oder R6)
Kommunikationsfehler
RESET6 (ou R6)
Erreur de communication
RESET7 (or R7)
Other errors
RESET7 (oder R7)
andere Fehler
RESET7 (ou R7)
Autres erreurs
RESET8 (or R8)
Communication error
RESET8 (oder R8)
Kommunikationsfehler
RESET8 (ou R8)
Erreur de communication
• Sounds are intermittent during play.
* Are the selectors on both sides adjusted correctly?
• Bei der Wiedergabe wird der Ton unterbrochen.
* Sind die Wahlschalter auf beiden Seiten richtig eingestellt?
• Le son est discontinu pendant la lecture.
* Les sélecteurs latéraux sont-ils ajustés correctement?
SPECIFICATIONS
SPEZIFIKATIONEN
CARACTERISTIQUES TECHNIQUES
CD CHANGER SECTION
Frequency response
: 5 Hz – 20 000 Hz
Dynamic range
: 99 dB (CH-X1500)
93 dB (CH-X550)
S/N ratio
: 103 dB (CH-X1500)
96 dB (CH-X550)
Distortion
: 0.005% (CH-X1500)
0.006% (CH-X550)
Wow & flutter
: Less than measurable limit
Output terminal
: Analog (8 pin x 1),
1.5 V (full scale)/less than 1 kΩ
GENERAL
Power requirement
Operating voltage
: DC 14.4 V (11 V – 16 V allowable)
Grounding system
: Negative ground
Allowable working temperature
: –10°C to +50°C
Dimensions (W x H x D) : 252 mm x 88 mm x 174 mm
Mass
: 2.3 kg (excluding accessories)
CD-WECHSLER
Frequenzgang
Dynamikbereich
Design and specifications are subject to change without notice.
Design und Spezifikationen können ohne vorherige
Ankündigung geändert werden.
Rauschabstand
Verzerrung
Gleichlaufschwankungen
Ausgangsanschluß
: 5 Hz – 20 000 Hz
: 99 dB (CH-X1500)
93 dB (CH-X550)
: 103 dB (CH-X1500)
96 dB (CH-X550)
: 0,005% (CH-X1500)
0,006% (CH-X550)
: Weniger als meßbare Grenze
: Analog (8 polig x 1),
1,5 V (Vollaussteuerung)/weniger
als 1 kΩ
ALLGEMEIN
Anschlußspezifikation
Betriebsspannung
: 14,4 V DC (zulässig: 11 V – 16 V)
Erdungssystem
: Negative Erdung
Zugelassene Arbeitstemperatur
: –10°C bis +50°C
Abmessungen (B x H x T)
: 252 mm x 88 mm x 174 mm
Gewicht
: 2,3 kg (ohne Zubehör)
Refer to “How to reset your unit”
Press and hold the 0EJECT button for several
seconds.This will reset the built-in microcomputer.
Maintenez pressée la touche 0EJECT pendant
plusieurs secondes. Cela réinitialisera le
microprocesseur intégré.
Présentation et caractéristiques modifiables sans préavis.
Having TROUBLE with operation?
Please reset your unit
How to reset your unit
Zurücksetzen des Geräts
Comment réinitialiser votre appareil
Drücken Sie die Taste 0EJECT und halten Sie sie
mehrere Sekunden lang gedrückt. Dadurch wird der
eingebaute Mikro-Computer zurückgesetzt.
SECTION CHANGEUR DE CDS
Réponse en fréquence
: 5 Hz – 20 000 Hz
Gamme dynamique
: 99 dB (CH-X1500)
93 dB (CH-X550)
Rapport signal/bruit
: 103 dB (CH-X1500)
96 dB (CH-X550)
Distortion
: 0,005% (CH-X1500)
0,006% (CH-X550)
Pleurage et scintillement
: Inférieur à la limite mesurable
Borne de sortie
: Analogique (8 broches x1), 1,5 V
(pleine échelle)/inférieure à 1 kΩ
GENERALES
Alimentation
Tension de fonctionnement : CC 14,4 V (11 V – 16 V
possible)
Système de mise à la masse : Masse négative
Température de fonctionnement admissible
: –10°C à +50°C
Dimensions (L x H x P)
: 252 mm x 88 mm x 174 mm
Masse
: 2,3 kg (sans les accessoires)
Haben Sie PROBLEME mit dem Betrieb?
Bitte setzen Sie Ihr Gerät zurück
Siehe „Zurücksetzen des Geräts“
EJECT
Vous avez des PROBLÈMES de fonctionnement?
Réinitialisez votre appareil
0EJECT button
Taste 0EJECT
Touche 0EJECT
Référez-vous à “Comment réinitialiser votre appareil”
3
CH-X1500[E_EX]EnGeFr_f.pm6
3
22/10/02, 9:59 AM
ENGLISH
DEUTSCH
FRANÇAIS
ELECTRICAL CONNECTIONS
ELEKTRISCHE ANSCHLÜSSE
RACCORDEMENTS ELECTRIQUES
• This changer can be connected to JVC KD-MX, KD-LX,
KD-SH, KD-LH, KD-SX, KS-FX, KS-LX or KS-LH series
receivers that include a Changer Control function. However,
operating procedures and indications on the display will be
different depending on the connected receiver. For details,
refer to manuals supplied with your receiver. Note that some
receivers cannot play back discs recorded in MP3 format
(only for CH-X1500). For detailed information, consult your
nearest JVC IN-CAR ENTERTAINMENT dealer.
• To prevent short circuits from occurring while making
connections, keep the battery’s negative terminal
disconnected.
We recommend that you make all electrical connections (see
Fig. f) before installing the unit. If you are not sure of your
ability to correctly install this unit, have it installed by a
qualified service technician.
• Dieser CD-Wechsler kann an alle JVC-Receiver der Serie
KD-MX, KD-LX, KD-SH, KD-LH, KD-SX, KS-FX, KS-LX oder
KS-LH angeschlossen werden, die über eine CDSteuerfunktion verfügen. Die Gerätebedienung und
Displayanzeigen unterscheiden sich jedoch
receiverabhängig. Weitere Informationen entnehmen Sie
bitte den Bedienungsanleitungen Ihres Receivers. Beachten
Sie, dass manche Receiver keine CDs wiedergeben können,
die im MP3-format aufgenommen wurden (nur bei CHX1500). Nehmen Sie Kontakt mit Ihrem örtlichen JVCAutoradiofachhändler bzgl. näherer Informationen auf.
• Um Kurzschlüsse zu vermeiden, während Sie die
Anschlüsse herstellen, trennen Sie den negativen
Batteriepol ab.
Wir empfehlen Ihnen, alle elektrischen Anschlüsse
vorzunehmen, ehe Sie den CD-Wechsler montieren (siehe
Abbildung f). Wenn Sie nicht genau wissen, wie Sie den
CD-Wechsler installieren sollen, lassen Sie ihn durch einen
qualifizierten Techniker einbauen.
• Ce changeur peut être raccordé aux récepteurs de série
KD-MX, KD-LX, KD-SH, KD-LH, KD-SX, KS-FX, KS-LX ou KSLH JVC qui disposent d’une fonction de commande de changeur.
Cependant les procédures de fonctionnement et les indications
sur l’affichage sont différentes en fonction du récepteur
connecté. Pour les détails, référez-vous aux modes d’emploi
fournis avec votre récepteur. Notez que certains récepteurs ne
peuvent pas reproduire les disques enregistrés au format MP3
(seulement pour le CH-X1500). Pour des informations plus
précises, veuillez consulter votre revendeur d’autoradios JVC
le plus proche.
• Pour éviter tout court-circuit alors que vous effectuez les
raccordements, laisser la borne négative de la batterie non
branchée.
Nous vous conseillons de faire tous les raccordements
électriques (voir la Fig. f) avant de mettre l’appareil en place.
Si vous n’êtes pas sûr de vous, faites-le installer par un
technicien qualifié.
Note:
This unit is designed for 12 volt DC, negative ground. If your
vehicle does not have a 12 volt negative ground electrical
system, you need a voltage inverter which can be bought from a
JVC IN-CAR ENTERTAINMENT dealer.
• Be sure to ground this unit to the car’s chassis.
Hinweis:
Dieser CD-Wechsler ist auf 12-Volt-Gleichstrombetrieb ausgelegt.
Wenn Ihr Fahrzeug nicht über ein 12-V-System mit negativer
Erdung verfügt, benötigen Sie einen Spannungsinverter, den Sie
bei einem JVC-Autoradiofachhändler erwerben können.
• Denken Sie daran, diesen CD-Wechsler am
Fahrzeugchassis zu erden.
Remarque:
Cet appareil est conçu pour un courant continu de 12 volts, à
masse négative. Si votre véhicule ne fournit pas une masse
négative de 12 volts, il vous faut un convertisseur de tension,
que vous pouvez vous procurer chez un revendeur d’autoradios
JVC.
• Bien raccorder le câble de mise à la masse de cet appareil au
châssis de la voiture.
When connecting to JVC
KD-MX/KD-LX/KD-SH/KD-LH/KD-SX/KS-FX/
KS-LX/KS-LH series receivers
Anschluß an JVC-Receiver der Serie
KD-MX/KD-LX/KD-SH/KD-LH/KD-SX/KS-FX/
KS-LX/KS-LH
Lors de la connexion à un récepteur de la
série KD-MX/KD-LX/KD-SH/KD-LH/KD-SX/
KS-FX/KS-LX/KS-LH de JVC
Fig. f
Abbildung f
Fig. f
H
V
8-pin cord (supplied)
8 poliges Kabel (gehört zum Lieferumfang)
Cordon à 8 broches (fourni)
• How to remove the cord
To JVC CD changer controller
Zum JVC-Steuergerät des CD-Wechslers
Vers contrôleur de changeur CD JVC
• So entfernen Sie das Kabel
• Comment retirer le cordon
Ziehen Sie den Stecker ab, indem Sie ihn so festhalten, wie
es in der Abbildung dargestellt ist.
Pull the plug by holding it firmly as in the figure.
Tirez sur la fiche en la tenant solidement de la façon montrée
sur la figure.
Do not hold this portion.
Halten Sie nicht diesen Teil fest.
Ne la tenez pas par cette partie.
• After installation and connection...
• Nach der Installation und Anschluß...
When loading the magazine for the first time into the CD
changer, press and hold the 0EJECT button for a few
seconds to reset the unit.
Normally do not press and hold the 0EJECT button.
Wenn Sie das Magazin zum ersten Mal in den CD-Wechsler
schieben, halten Sie die Taste 0EJECT einige Sekunden
lang gedrückt, um den CD-Wechsler zurückzusetzen
Im Normalbetrieb brauchen Sie die Taste 0EJECT nicht
gedrückt zu halten.
Hinweis:
Möglicherweise müssen Sie den CD-Wechsler auch
zurücksetzen.
• Wenn die Stromversorgung beispielsweise beim
Wechseln der Autobatterie unterbrochen wurde.
• Wenn der CD-Wechsler nicht richtig funktioniert.
Note:
You may also need to reset the unit in the following cases.
• When the power supply is interrupted such as for
replacement of the car’s battery.
• When the unit does not function correctly.
0EJECT button
Taste 0EJECT
Touche 0EJECT
• Listening to CDs
This unit does not have operation buttons to play CDs. CD
operations can be performed using the JVC CD changer
controller, etc. connected to this unit.
For CD operations, refer to the CD Changer Controller
Instructions.
4
Lors de l’insertion du magasin CD dans le changeur CD,
pour la première fois, maintenir pressée la touche
0EJECT pendant quelques secondes pour réinitialiser
l’appareil.
Normalement, ne pas maintenir pressée la touche 0EJECT.
Remarque:
Il peut être nécessaire de réinitialiser l’appareil dans les cas
suivants.
• Quand l’alimentation est coupée, comme pendant le
remplacement de la batterie de la voiture.
• Quand l’appareil ne fonctionne pas correctement.
EJECT
• Wiedergeben von CDs
An diesem Gerät befinden sich keinerlei Bedienungselemente,
um CDs wiederzugeben. Der CD-Wiedergabebetrieb erfolgt
über das JVC-Steuergerät des CD-Wechslers usw., an das
der CD-Wechsler angeschlossen ist.
Informationen über den CD-Wiedergabebetrieb entnehmen Sie
bitte der Bedienungsanleitung des Steuergeräts des CDWechslers.
4
CH-X1500[E_EX]EnGeFr_f.pm6
• Après l’installation et les connexions...
22/10/02, 9:59 AM
• Ecoute des disques compacts
Cet appareil n’a pas de touches de fonctionnement pour lire les
disques. Les opérations CD peuvent être effectuées en utilisant
le contrôleur de changeur CD JVC, etc. raccordé à cet appareil.
Pour les opérations CD, se reporter au manuel d’instructions
du contrôleur de changeur CD.
HANDLING MAGAZINES AND
COMPACT DISCS
HANDHABUNG VON MAGAZINEN UND MANIPULATION DES MAGASINS ET
CDS
DES DISQUES COMPACTS
How to handle the magazines
Umgang mit Magazinen
Manipulation des magasins
• Care in handling the magazines
– Do not carry the magazine with its inserting slot facing
down, or the CDs may fall out.
– Always keep the twelve disc trays loaded in the magazine.
– When sliding the disc trays out or in to place CDs, hold the
magazine horizontally so as not to drop CDs.
– Do not insert CDs without pulling out the disc trays from
the magazine. Never place CDs directly into the magazine.
– Do not expose the magazine to high temperatures or direct
sunlight.
– Do not disassemble the magazine.
– Take care not to drop or hit the magazine. Do not apply
excessive pressure to the disc trays which have been
removed from the magazine.
– Never apply solvents such as benzine, thinner or
insecticide to the magazine or trays. These solvents may
erode their surfaces.
• Pflege der Magazine
– Tragen Sie das Magazin nicht so, daß der Einlegeschlitz
nach unten zeigt, damit die CDs nicht herausfallen.
– Sorgen Sie dafür, daß das Magazin stets 12 CD-Einschübe
enthält.
– Wenn Sie die CD-Einschübe herausnehmen oder
einführen, um CDs einzulegen, halten Sie das Magazin
waagerecht, damit keine CDs herausfallen.
– Legen Sie niemals CDs ein, ohne die CD-Einschübe aus
dem Magazin herauszuziehen. Legen Sie CDs niemals
direkt in das Magazin ein.
– Setzen Sie die Magazine niemals hohen Temperaturen
oder direkter Sonneneinstrahlung aus.
– Bauen Sie die Magazine niemals auseinander.
– Lassen Sie die Magazine nicht fallen, und achten Sie
darauf, mit den Magazinen nirgends anzustoßen. Üben
Sie keinen übermäßigen Druck auf die CD-Einschübe aus,
die aus den Magazinen entnommen wurden.
– Bringen Sie niemals Lösungsmittel, wie z. B. Benzin,
Verdünner und Insektizid, mit dem Magazin oder den
Einschüben in Berührung. Diese Lösungsmittel können die
Oberflächen des Magazins und der Einschübe
beschädigen.
• Faire attention en manipulant les disques
– Ne portez pas le magasin avec la fente d’insertion dirigée
vers le bas pour ne pas faire tomber les CD.
– Toujours laisser douze tiroirs de disque chargés dans le
magasin.
– Lorsque l’on fait glisser les tiroirs de disque pour les ouvrir
ou les refermer, tenir le magasin horizontalement pour ne
pas faire tomber les CD.
– Ne pas insérer de CD sans ouvrir le tiroir de disque du
magasin. Ne pas insérer les CD directement dans le
magasin.
– Ne pas exposer les magasins à de hautes températures ni
aux rayons directs du soleil.
– Ne pas démonter les magasins.
– Faire attention de ne pas faire tomber ou cogner les
magasins. Ne pas appliquer de pression excessive sur les
tiroirs de disque qui ont été retirés des magasins.
– Ne jamais appliquer de solvants comme de la benzine, du
diluant ou des insecticides sur le magasin ou les tiroirs de
disque. Ces solvants peuvent éroder leurs surfaces.
Note:
If you need additional magazines, purchase XC-M200
magazines.
Hinweis:
Wenn Sie zusätzliche Magazine benötigen, kaufen Sie die
Magazine XC-M200.
Remarque:
Si l’on a besoin d’un magasin supplémentaire, acheter le XCM200.
When playing a CD-R or CD-RW
Bei der Wiedergabe einer CD-R oder CD-RW
Lors de la reproduction d’un CD-R ou d’un CD-RW
Before playing back CD-Rs or CD-RWs, read their instructions
or cautions carefully.
• Use only “finalized” CD-Rs or CD-RWs.
• Some CD-Rs or CD-RWs may not play back on this unit
because of their disc characteristics, and for the following
reasons:
– Discs are dirty or scratched.
– Moisture condensation on the lens inside the unit.
– The pickup lens inside the unit is dirty.
• CD-RWs may require a longer readout time since the
reflectance of CD-RWs is lower than that of regular CDs.
• CD-Rs or CD-RWs are susceptible to high temperatures or
high humidity, so do not leave them inside your car.
• Do not use following CD-Rs or CD-RWs:
– Discs with stickers, labels, or protective seal stuck to the
surface.
– Discs on which labels can be directly printed by an ink jet
printer.
Using these discs under high temperatures or high humidity
may cause malfunctions or damage to discs. For example,
– Stickers or labels may shrink and warp a disc.
– Stickers or labels may peel off so discs cannot be ejected.
– Print on discs may get sticky.
Read instructions or cautions about labels and printable
discs carefully.
Lesen Sie vor der Wiedergabe einer CD-R oder CD-RW die
zugehörigen Anleitungen bzw. Vorsichtsmaßnahmen sorgfältig
durch.
• Verwenden Sie nur „finalisierte“ CD-Rs oder CD-RWs.
• Manche CD-Rs oder CD-RWs können aufgrund ihrer CDCharakteristiken aus folgenden Gründen nicht mit diesem Gerät
wiedergegeben werden:
– Die CDs sind schmutzig oder verkratzt.
– Kondenswasserbildung auf der Linse im Innern dieses
Geräts.
– Die Aufnahmelinse in diesem Gerät ist verschmutzt.
• Bei CD-RWs dauert das Lesen möglicherweise etwas länger,
da sie eine niedrigere Reflexion als reguläre CDs aufweisen.
• CD-Rs oder CD-RWs sind gegen hohe Temperaturen oder
hohen Feuchtigkeitsgehalt empfindlich. Lassen Sie die CDs
aus diesem Grund nicht in Ihrem Wagen liegen.
• Verwenden die folgenden CD-Rs oder CD-RWs nicht:
– CDs mit Aufklebern, Etiketten oder mit Schutzfolie auf der
Oberfläche.
– CDs, auf deren Etikett direkt mit einem Tintenstrahldrucker
gedruckt werden kann.
Die Verwendung dieser CDs bei hohen Temperaturen oder
hoher Luftfeuchtigkeit kann zu Fehlfunktionen oder Schäden
an den CDs führen. Zum Beispiel:
– Aufkleber oder Etikette können schrumpfen und eine CD
verziehen.
– Aufkleber oder Etikette können sich ablösen und die CD
können nicht ausgeworfen werden.
– Der Druck auf den CDs kann klebrig werden.
Lesen Sie die Anweisungen oder Warnhinweise über Etikette
und bedruckbare CDs aufmerksam durch.
Avant de reproduire un CD-R ou un CD-RW, lisez attentivement
leurs instructions et précautions.
• Utilisez uniquement des CD-R ou CD-RW “finalisés”.
• Certains CD-R ou CD-RW ne peuvent pas être reproduits sur
cet appareil à cause de leurs caractéristiques et pour les
raisons suivantes.
– Les disques sont sales ou rayés.
– De l’humidité s’est condensée sur la lentille, à l’intérieur de
l’appareil.
– La lentille du capteur, à l’intérieur de l’appareil, est sale.
• Les CD-RW peuvent nécessiter une durée de mise en service
plus longue car le facteur de réflexion des CD-RW est inférieur
à celui des CD ordinaires.
• Les CD-R ou CD-RW sont sensibles aux hautes températures
ou à une humidité importante. Ne les laissez pas à l’intérieur
de la voiture.
• N’utilisez les CD-R ou CD-RW suivants.
– Disques avec des autocollants, des étiquettes ou des
cachets de protection collés sur leur surface.
– Disques sur lesquels une étiquette peut être imprimée
directement avec, par exemple, une imprimante à jet d’encre.
L’utilisation de ce type de disque par haute température ou
humidité peut entraîner un mauvais fonctionnement de
l’appareil ou endommager le disque. Par exemple:
– L’autocollant ou l’étiquette peut rétrécir et gondoler le disque.
– L’autocollant ou l’étiquette peut se détacher et le disque ne
peut plus être éjecté.
– L’impression sur le disque peut devenir collante.
Lisez attentivement les instructions et les précautions sur les
étiquettes et les disques imprimables.
Warped disc
Verzogene CD
Disque gondolé
Sticker
Aufkleber
Autocollant
Sticky residue
Klebriger
Rückstand
Reste collant
Disc
CD
Disque
Stick-on label
Klebeetikett
Etiquette spécialisée
Playing a CD Text (only for CH-X1500)/Wiedergeben CD Text (nur bei CH-X1500)/ Reproduction d’un CD Text (seulement pour le CH-X1500)
Auf einer CD mit CD-Text werden einige Informationen über die
CD (CD-Titel, Künstler und Titelbezeichnung) aufgezeichnet.
Wenn Sie dieses Gerät an einen Receiver anschließen, der CDText anzeigen kann, können Sie diese CD-Informationen im
Display des Receivers anzeigen.
Dans un CD Text, certaines informations à propos du disque
(son titre, l’interprète et les titres des plages) sont enregistrées.
Si cet appareil est connecté à un récepteur possédant une
fonction d’affichage de CD Text, il est possible de voir les
informations des disques sur l’affichage du récepteur.
How to load CDs
Einlegen von CDs
Chargement des CDs
1. Slide the disc tray partly out of the magazine until it stops.
2. Place a CD on the disc tray with its label side up.
1. Ziehen Sie die CD-Einschübe aus dem Magazin heraus, bis
Sie einen Anschlag erreichen.
2. Legen Sie eine CD in den CD-Einschub, so daß die Labelseite
nach oben weist.
1. Faire glisser le tiroir de disque partiellement à l’extérieur du
magasin jusqu’à ce qu’il s’arrête.
2. Placer un CD sur le tiroir de disque avec la face imprimée dirigée
vers le haut.
In a CD Text, some information about disc (its disc title,
performer and track title) is recorded.
If you connect this unit to a receiver with the CD Text
displaying function, you can show this disc information on
the receiver’s display.
1.
Disc tray
CD-Einschub
Tiroir de disque
Magazine (XC-M200)
Magazin (XC-M200)
Magasin (XC-M200)
2.
*
12
11
10
9
8
7
6
5
4
3
2
1
Disc tray
CD-Einschub
Tiroir de disque
3. Align the disc tray with the grooves in the magazine, and
push the disc tray all the way in.
• Check that the disc tray is securely inserted into the
magazine. If a CD becomes disengaged from the disc tray,
reposition it on the disc tray.
* The inserted CDs are counted as “disc-1”, “disc-2”... from
the bottom to the top.
Notes:
• There are openings in the disc trays through which signals
are read from the CDs. These openings leave part of the
shiny side of the CD exposed. Be careful not to touch the
shiny surface of the CD.
• It is not possible to play a CD if placed upside down.
Caution:
CDs shaped like a heart, flower, etc. (specially-shaped CDs)
cannot be used with this unit. If this type of CD is loaded, it
will cause problems.
5
Compact disc
CD
Disque compact
3. Richten Sie den CD-Einschub auf die Nuten im Magazin aus,
und schieben Sie den CD-Einschub vollständig in das Magazin.
• Überprüfen Sie, ob sich der CD-Einschub ordnungsgemäß
im Magazin befindet. Wenn sich eine CD aus dem CDEinschub löst, schieben Sie sie wieder in den Einschub
zurück.
* Die eingelegten CDs werden als „disc-1“, „disc-2“... von
unten nach oben durchnumeriert.
Hinweise:
• In den CD-Einschüben befinden sich Öffnungen, durch die
die Signale von den CDs gelesen werden. Durch diese
Öffnungen sind Teile der glänzenden CD-Seite sichtbar. Achten
Sie darauf, daß Sie die glänzende Oberfläche der CD nicht
berühren.
• Es ist nicht möglich, eine CD wiederzugeben, die verkehrt
herum eingelegt wurde.
3. Aligner le tiroir de disque avec les rainures dans le magasin et
le pousser complètement.
• Vérifier que le tiroir de disque est correctement inséré dans
le magasin. Si un CD est désengagé du tiroir de disque, le
repositionner sur le tiroir.
* Les CD insérés sont comptés comme “disque 1”, “disque 2”,
etc. en commençant du bas et en allant vers le haut.
Achtung:
CDs in Herz-oder Blumenform usw. (CDs in Sonderformen) können
mit diesem Gerät nicht wiedergegeben werden. Wenn Sie eine
solche CD einlegen, können Störungen verursacht werden.
Attention:
Des CD en forme de coeur, de fleur, etc. (CD de forme
spéciale) ne peuvent pas être utilisés avec cet appareil. Si ce
type de CD est chargé, il causera un problème de fonctionnement.
5
CH-X1500[E_EX]EnGeFr_f.pm6
Grooves
Nuten
Rainures
22/10/02, 9:59 AM
Remarques:
• Il y a des ouvertures dans les tiroirs de disque à travers
lesquelles les signaux sont lus des disques. Ces ouvertures
laissent une partie de la face brillante du disque exposée. Faire
attention de ne pas toucher à la surface brillante du disque.
• Il n’est pas possible de reproduire un CD s’il est placé à l’envers.
How to load the magazine
Einlegen des Magazins
Chargement d’un magasin
1. Slide the door to the right.
2. Load the magazine.
• Load the magazine into the CD changer with the ) mark on
top and the CD insertion side to the right.
1. Schieben Sie die Tür nach rechts.
2. Legen Sie das Magazin ein.
• Legen Sie das Magazin so in den CD-Wechsler ein, daß
die Markierung ) nach oben und die CD-Einschubseite
nach rechts zeigt.
1. Faire glisser la porte vers la droite.
2. Charger un magasin.
• Charger un magasin dans le chargeur CD avec la marque
) en haut et le côté d’insertion CD sur la droite.
1.
2.
3. Schließen Sie die Tür.
• Normalerweise muß die Tür geschlossen bleiben. Sie wird
nur beim Wechseln des Magazins geöffnet.
3. Fermer la porte.
• La porte doit être fermé en dehors du chargement ou du
retrait d’un magasin.
Achtung:
• Führen Sie weder eine Hand noch ein Fremdobjekt in die
Ladeöffnung ein, weil Sie anderenfalls verletzt werden bzw.
Fehlfunktionen verursachen oder Schäden anrichten könnten.
• Wenn Sie ein eventuell vorhandenes Label auf dem Magazin
teilweise abschält, verursacht es möglicherweise eine
Fehlfunktion. Sollte dieser Fall eintreten, ziehen Sie das Label
entweder vollständig ab, oder kleben Sie es erneut fest auf.
Attention:
• Ne pas introduire vos mains ou d’objet étranger dans la
fenêtre de chargement, vous pourriez vous blesser ou
causer des mauvais fonctionnements ou dommages.
• Si l’étiquette sur le magasin se décolle, cela peut causer
un mauvais fonctionnement. Si cela se produit, retirer
l’étiquette ou la recoller solidement.
How to unload the magazine
Entnehmen des Magazins
Retrait d’un magasin
1. Slide the door to the right.
2. Press the 0EJECT button.
• The magazine ejects from the loading slot.
1. Schieben Sie die Tür nach rechts.
2. Drücken Sie die Taste 0EJECT.
• Das Magazin wird aus der Ladeöffnung ausgeworfen.
1. Faire glisser la porte vers la droite.
2. Appuyer sur la touche 0EJECT.
• Le magasin est éjecté du compartiment.
Note:
When the magazine cannot be ejected, push in the magazine
and play the 12th disc once more; when play has ended, repeat
the above procedure.
If the above procedure does not work, follow the steps below:
1. Be sure that the selectors are set correctly.
2. Peel off the protective seal over the compulsory eject hole.
(Fig. g)
3. Put a straight stick like a screw driver into the hole. (Fig. h)
* Do not put the stick at an angle, insert it straight.
Hinweis:
Remarque:
Wenn das Magazin nicht ausgeworfen werden kann, schieben Si le magasin ne peut pas être éjecté, pousser sur le magasin et
Sie das Magazin in den CD-Wechsler zurück, und geben Sie lire une fois de plus le 12 ème disque; quand la lecture est
die 12. CD noch einmal wieder. Wiederholen Sie das oben terminée, refaire la procédure précédente.
genannte Verfahren nach Beendigung der Wiedergabe.
Si la procédure ci-dessus ne fonctionne pas, suivez les étapes
Führen Sie folgenden Schritte aus, wenn die oben genannten suivantes:
Maßnahmen nicht helfen.
1. Assurez-vous que les sélecteurs sont réglés correctement.
1. Stellen Sie sicher, daß die Wahlschalter richtig eingestellt
2. Décollez l’autocollant protecteur du trou d’éjection forcée.
sind.
(Fig. g)
2. Ziehen Sie den Schutzaufkleber über dem
3. Insérez une tige droite telle qu’un tournevis dans le trou.
Zwangsauswurfloch ab. (Abbildung g)
(Fig. h)
3. Stecken Sie einen geraden Stift, z.B. einen
* N’insérez pas le levier de biai, insérez-le bien droit.
Schraubenzieher, in das Loch. (Abbildung h)
* Führen Sie den Stab nicht angewinkelt, sondern gerade
ein.
Fig. h
Abbildung h
H
Fig. h
3. Close the door.
• Normally the door must be kept closed except when
changing the magazine.
Cautions:
• Do not insert your hands or any foreign object into the
loading slot, otherwise you may be injured or cause
malfunctions or damage.
• When a label on the magazine, if any, partly peels off, it may
cause a malfunction. If this happens, remove the label or
stick it on firmly.
Fig. g
Abbildung g
Fig. g
The compulsory eject hole and protective seal
Das Zwangsauswurfloch und der Schutzaufkleber
Le trou d’éjection forcé et l’autocollant protecteur
V
Should the problem still persists, consult the JVC authorized
dealer.
Setzen Sie sich mit Ihrem JVC-Händler in Verbindung, wenn das
Problem weiterhin besteht.
Si le problème persiste, consultez un revendeur JVC autorisé.
How to remove the disc trays
CD-Laden entfernen
Comment retirer les tiroirs de disque
Use the release knob to remove the disc trays when cleaning
them.
1. While pulling down the release knob, pull out the disc tray.
2. After cleaning, insert the disc tray into the magazine while
pulling down the release knob.
• Clean the trays one by one to avoid
inserting two trays into one slot of the
magazine.
Verwenden Sie den Ausrückknopf, um die CD-Einschübe zur
Reinigung zu entnehmen.
1. Ziehen Sie den Ausrückknopf und gleichzeitig die CDEinschub heraus.
2. Schieben Sie die CD-Einschub nach der Reinigung wieder in
das Magazin, während Sie den Ausrückknopf herausziehen.
• Reinigen Sie die einzelnen CD-Einschübe nacheinander,
um zu vermeiden, daß zwei CD-Einschübe in einen Schacht
des Magazins eingeführt werden.
Utilisez le bouton de retrait pour retirer le tiroir de disque afin de
le nettoyer.
1. Tout en tirant vers le bas le bouton de retrait, tirez le tiroir de
disque.
2. Après le nettoyage, insérez le tiroir de disque dans le
magasin tout en tirant sur le bouton de retrait.
• Nettoyez les tiroirs un par un pour éviter d'en insérer deux à
la fois dans un seul tiroir.
Release knob
Ausrückknopf
Bouton de retrait
• Handling CD-Rs/CD-RWs
The reflective film of CD-Rs/CD-RWs is less tough than that
of ordinary music CDs. If these discs are damaged, their film
may peel. These media are also susceptible to fingerprints,
so use extreme care when handling them.
• Storage
Make sure to keep CDs in their cases. If discs are piled on
top of one another without their cases, they may be
damaged. Do not put CDs where they will be exposed to
direct sunlight or in a place subject to high temperatures and
humidity. Avoid leaving CDs in your car.
Hold down the center holder.
Drücken Sie vorsichtig auf den
Zentrierhalter.
Appuyer au milieu du support.
• Behandlung von CD-Rs/CD-RWs
Die Reflexionsschicht von CD-Rs/CD-RWs ist nicht so
widerstandsfähig wie die Reflexionsschicht normaler MusikCDs. Werden diese CDs beschädigt, kann sich die Schicht
abschälen. Diese Medien sind auch Fingerabdrücken
gegenüber empfindlich. Behandeln Sie die CDs daher
äußerst vorsichtig.
• Lagerung
Lagern Sie CDs immer in ihren Hüllen. Wenn Sie CDs ohne
Hülle übereinanderstapeln, können sie beschädigt werden.
Lagern Sie CDs niemals an Orten, an denen sie direkter
Sonneneinstrahlung oder extremen Temperaturen und
Feuchtigkeit ausgesetzt sind. Vermeiden Sie auch, CDs im
Auto zu lagern.
Insert with the label facing up.
Legen Sie die CD in die Hülle, so daß
die Labelseite nach oben zeigt.
Mettre en place avec l’étiquette audessus.
Lift it out without touching the
recorded surface.
Heben Sie die CD heraus, ohne
die Aufnamefläche zu berühren.
Le lever sans toucher à la
surface enregistrée.
• Maintenance of CDs
– When fingerprints and dirt adhere to a CD, wipe the disc
clean with a soft, dry cloth, wiping from the inside towards
the edge. If it is difficult to clean, wipe the CD with a cloth
moistened with water.
– Do not use record cleaners, benzine, alcohol or antistatic
agents.
– Do not damage the label side or stick paper or adhesive to
the surface.
Incorrect
Falsch
Incorrect
Correct
Richtig
Correct
6
Press gently on the disc to insert.
Drücken Sie vorsichtig auf die CD,
um sie zu arretieren.
Appuyer légèrement sur le disque
pour le mettre en place.
• Entretien des CDs
• Pflege von CDs
– Wenn sich Fingerabdrücke und Schmutz auf einer CD
– Si des empreintes digitales ou de la poussière adhèrent à un
befinden, wischen Sie die CD mit einem weichen, trockenen
disque, essuyer le disque avec un tissu doux, sec et propre,
Tuch ab, und wischen Sie dabei in radialen Bewegungen
en essuyant de l’intérieur vers l’extérieur. S’il est difficile à
von innen nach außen. Wenn sich die CD nur schwer reinigen
nettoyer, essuyer le disque avec un tissu humidifié avec de
läßt, wischen Sie die CD mit einem Tuch ab, das Sie zuvor
l’eau.
mit Wasser befeuchtet haben.
– Ne pas utiliser de nettoyants, benzine, alcool ou agent
– Verwenden Sie keinen Schallplattenreiniger, kein Benzin,
antistatique.
keinen Alkohol und keine antistatischen Mittel, um CDs zu
– Ne pas endommager le côté de l’étiquette ou coller du papier
reinigen.
ou de la bande adhésive sur la surface.
– Beschädigen Sie die Labelseite nicht, und kleben Sie auch
kein Papier oder Klebeband auf die Oberfläche.
6
CH-X1500[E_EX]EnGeFr_f.pm6
• Manipulation des CD-R/CD-RW
Le film réfléchissant des CD-R/CD-RW est moins résistant que
celui des CD audio ordinaires. Si ces disques sont
endommagés, leur film peut se décoller. Ces disques sont aussi
sensibles aux empreintes de doigts. Faites très attention quand
vous les manipulez.
• Stockage
Bien conserver les disques dans leurs boîtes. Si des disques
sont empilés les uns sur les autres sans leurs boîtes, ils peuvent
être abîmés. Ne pas mettre des disques où ils pourraient être
exposés à la lumière directe du soleil ou dans un endroit sujet
à de fortes températures ou à l’humidité. Eviter de laisser des
disques dans votre voiture.
22/10/02, 9:59 AM
CH-X1500
CD CHANGER
CD CD ﻣﺒﺪّل اﺳﻄﻮاﻧﺎت ﻣﺪﻣﺠﺔ
LVT0975-006A
[U]
Instructions
!"
ﺗﻌﻠﻴﻤﺎت اﻟﺘﺮﻛﻴﺐ
V
J
Thank you for purchasing this JVC product. Please read these
instructions carefully before starting operation to be sure to obtain
optimum performance and a longer service life from the unit.
This unit has been designed to play CDs, CD-Rs, and CD-RWs.
• You can also play back your original CD-Rs (Recordable) and
CD-RWs (Rewritable) either in audio CD format or MP3 format.
• You can also play back CD Text.
!" JVC !"#$%&'()*+"#,-.&
!"#$%&'()*+,-./0123456789:
!"#$% CDCD-R CD-RW
• !" #$ CD =MP3 !"#$ CD-R
!=CD-RW !"#$
• !"# CD Text
IMPORTANT FOR LASER PRODUCTS
PRECAUTIONS
1. CLASS 1 LASER PRODUCT
2. CAUTION: Invisible laser radiation when open and interlock
failed or defeated. Avoid direct exposure to beam.
3. CAUTION: Do not open the top cover. There are no user
serviceable parts inside the unit, leave all servicing to
qualified service personnel.
4. CAUTION: The compact disc player uses invisible laser
radiation and is equipped with safety switches which prevent
emission of radiation when unloading the CD magazine and
the safety interlocks have failed or are defeated. It is
dangerous to defeat the safety switches.
5. CAUTION: Use of controls or adjustments or performance
of procedures other than those specified herein may result
in hazardous radiation exposure.
1. 2. 3. 4. 5. !"#
!"#$%&'()*+,-./01234
!"#$%&'()*+,-.&'(/01
!"
!"#$%&'("#)*+,-./012
!"#$%&'()*+,-.%&/01%
!"#$%&'()*+,-./0123
!"#$%&'()*+,-./(01234
!"#$%&'()*+,-./012345)
! "#$%&#'"#()*+,-./
!"#$%&'()*+,-./0
ﲢﺬﻳﺮات
.CLASS 1 LASER PRODUCT ١ ﻣﻨﺘﺞ ﻟﻴـﺰري ﺻﻨـﻒ.١
اﺷﻌﺔ ﻟﻴﺰرﻳﺔ ﻏﻴﺮ ﻣﺮﺋﻴﺔ ﻋﻨﺪ اﻟﻔﺘﺢ ﻣﻊ ﺣﺪوث ﺿﻌﻒ او: ﲢﺬﻳﺮ.٢
ﺗﻌﺮض ﻧﻔﺴﻚ ﺑﺼﻮرة ﻣﺒﺎﺷﺮة
ّ
ﻻ.ﺗﻮﻗﻒ ﻟﻮﻇﻴﻔﺔ ﻣﻔﺎﺗﻴﺢ اﻻﻣﺎن
.ﻟﻼﺷﻌﺔ اﻟﻠﻴﺰرﻳﺔ
ﻻ ﻳﻮﺟﺪ اﺟﺰاء داﺧﻞ اﳉﻬﺎز ﳝﻜﻦ. ﻻ ﺗﻔﺘﺢ اﻟﻐﻄﺎء اﻟﻌﻠﻮي: ﲢﺬﻳﺮ.٣
اﺗﺮك اﻋﻤﺎل اﻟﺘﺼﻠﻴﺢ واﻟﺼﻴﺎﻧﺔ.ﺻﻴﺎﻧﺘﻬﺎ ﻣﻦ ﻗﺒﻞ اﳌﺴﺘﻌﻤﻞ
.ﻻﺷﺨﺎص ﻣﺨﺘﺼﲔ ﺑﺎﻋﻤﺎل اﻟﺘﺼﻠﻴﺢ واﻟﺼﻴﺎﻧﺔ
ﻳﺴﺘﺨﺪم ﻣﺸﻐّﻞ اﻻﺳﻄﻮاﻧﺔ اﳌﺪﻣﺠﺔ اﺷﻌﺔ ﻟﻴﺰرﻳﺔ ﻏﻴﺮ: ﲢﺬﻳﺮ.٤
ﻣﺰود ﲟﻔﺎﺗﻴﺢ ﻟﻼﻣﺎن ﲤﻨﻊ اﻧﺒﻌﺎث اﻻﺷﻌﺔ ﻋﻨﺪ ﻧﺰع
ّ
ﻣﺮﺋﻴﺔ واﳉﻬﺎز
وﻋﻨﺪ ﺿﻌﻒ او ﺗﻮﻗﻒ وﻇﻴﻔﺔCD ﻣﺨﺰن اﻻﺳﻄﻮاﻧﺔ اﳌﺪﻣﺠﺔ
ﻳﺼﺒﺢ ﻣﻦ اﳋﻄﺮ ﺟﺪا اﺳﺘﻌﻤﺎل اﳉﻬﺎز ﺑﺪون وﻇﻴﻔﺔ.ﻣﻔﺎﺗﻴﺢ اﻻﻣﺎن
.ﻣﻔﺎﺗﻴﺢ اﻻﻣﺎن
ﳝﻜﻦ ان ﻳﻨﺘﺞ ﻋﻦ اﺳﺘﻌﻤﺎل اﻟﻀﻮاﺑﻂ او اﻟﻀﺒﻮﻃﺎت او: ﲢﺬﻳﺮ.٥
اﻟﺘﻌﺮض
ّ
اﺟﺮاءات اﻟﺘﺄدﻳﺔ ﻏﻴﺮ اﳌﻮﺻﻮﻓﺔ ﻓﻲ ﻫﺬا اﻟﻜﺘﻴّﺐ ﺧﻄﺮ
.ﻟﻼﺷﻌﺎع اﻟﻠﻴﺰري
ﺗﻨﺒﻴﻪ
• This unit is designed to operate with 12 volt DC, NEGATIVE
ground electrical systems.
• When replacing the fuse, use one with the specified rating for
this unit. If the fuse blows frequently, consult your nearest JVC
car audio dealer.
• !"# 12 !"#$%&'()!*+,• !"#$%&'()*+,-./&0123!"#45
!"#$%&'()*+,-. JVC !"#$%
PRECAUTIONS
• Car’s Internal Temperature
Before listening to CDs after your car has been parked for some
time in low or high temperatures, wait until the temperature
inside the car stabilizes.
• Condensation
In the following cases, moisture may condense on the lens, a
critical part of the CD player, making the CD signal unreadable:
– When the heater has just been turned on.
– When the humidity is high.
In these cases, unload the CD magazine and wait for 1 or 2
hours.
• Volume Setting
– CDs produce very little noise compared with analog sources.
If the volume level is adjusted for analog sources, the
speakers may be damaged by the sudden increase in the
output level. Therefore, lower the volume before operation
and adjust it as required during playback.
– Adjust the volume so that you can hear sounds occurring
outside the car.
• !"#$
!"#$%&'()*(+,-./012345&67
!"#$%&'()*+,-./0123
• !"#$%&'()*+,-.+ /0123
!"#$%&'()*+,-.
– !"#$%
– !"
!"#$%&'()* !"
• !
– !"#$%&'()*+,-./0
!"#$%&'()*+,-./01()23456
!"#$%&'()*+,-./012&34'5+
!"#$%&'
– !"#$%"&'()*+ ,
INSTALLATION
• Avoid installing the unit in the following places
– Where it would be exposed to direct sunlight or direct heat
from the heater or in an extremely hot place.
– Where it would be subject to rain, water splashes or excessive
humidity.
– Where it would be subject to dust.
– Where it would be positioned in an unstable place.
– Above connection cords or on the floor under which there is
piping.
– Where it could damage the car’s fittings (spare tire, etc.) in
or under the trunk.
• Before drilling holes in the trunk to install the unit, make sure
that there is a sufficient space under the trunk so that you do
not drill holes in the fuel tank, etc.
• Firmly install the unit using the provided screws.
• !"#$%&'()*'+
– !"#$ %&'()*"#+,-./012
– !"#$%&'()$*+,-.'()/
– !"#$%&'()
– !"#$%&
– !"#$%&'()*+,-.#/
– !"#$%&'()*+,-./.01234
!"#$%
• !"#$%&'()*+,-./012"#$34
!"#$%&'()*+,-,./
• !"#$%&'()*+,-./012
١٢ DC • ﻟﻘﺪ ﺻﻤﻢ ﻫﺬا اﳉﻬﺎز ﻟﻴﻌﻤﻞ ﺑﻮاﺳﻄﺔ ﺗﻴﺎر ﻛﻬﺮﺑﺎﺋﻲ ﻣﺒﺎﺷﺮ
.NEGATIVE اﻧﻈﻤﺔ ﻛﻬﺮﺑﺎﺋﻴﺔ ﺗﺄرﻳﺾ ﺳﺎﻟﺐ،ﻓﻮﻟﺖ
اﺳﺘﻌﻤﻞ ﺻﻤﺎﻣﺔ،(• ﻋﻨﺪ اﺳﺘﺒﺪل اﻟﺼﻤﺎﻣﺔ اﻟﻜﻬﺮﺑﺎﺋﻴﺔ )اﻟﻔﻴﻮز
اذا ﺗﻜﺮر.ﻛﻬﺮﺑﺎﺋﻴﺔ )ﻓﻴﻮز( ﲢﻤﻞ ﻧﻔﺲ اﻟﻘﻴﺎﺳﺎت اﳌﻮﺻﻮﻓﺔ
اﺳﺘﺸﺮ اﻗﺮب وﻛﻴﻞ ﻟﺸﺮﻛﺔ،(اﺣﺘﺮاق اﻟﺼﻤﺎﻣﺔ اﻟﻜﻬﺮﺑﺎﺋﻴﺔ )اﻟﻔﻴﻮز
. ﻣﺘﺨﺼﺺ ﺑﺎﻻﺟﻬﺰة اﻟﺼﻮﺗﻴﺔ ﻟﻠﺴﻴﺎرةJVC
ﲢﺬﻳﺮات
• درﺟﺔ اﳊﺮارة اﻟﺪاﺧﻠﻴﺔ ﻟﻠﺴﻴﺎرة
ﺑﻌﺪ ان ﻳﺘﻢ اﻳﻘﺎف،CD ﻗﺒﻞ اﻻﺳﺘﻤﺎع اﻟﻰ اﻻﺳﻄﻮاﻧﺎت اﳌﺪﻣﺠﺔ
،اﻟﺴﻴﺎرة ﻟﺒﻌﺾ اﻟﻮﻗﺖ ﻓﻲ درﺟﺎت ﺣﺮارة ﻣﻨﺨﻔﻀﺔ او ﻋﺎﻟﻴﺔ
.اﻧﺘﻈﺮ ﺣﺘﻰ ﺗﺜﺒﺖ درﺟﺔ اﳊﺮارة داﺧﻞ اﻟﺴﻴﺎرة
• ﺗﻜﺎﺛﻒ اﻟﺮﻃﻮﺑﺔ
اﻟﺘﻲ، ﳝﻜﻦ ان ﺗﺘﻜﺎﺛﻒ اﻟﺮﻃﻮﺑﺔ ﻋﻠﻰ اﻟﻌﺪﺳﺔ،ﻓﻲ اﳊﺎﻻت اﻟﺘﺎﻟﻴﺔ
ﺣﻴﺚ،CD ﻫﻲ ﺟﺰء دﻗﻴﻖ وﺣﺴﺎس ﺟﺪا ﳌﺸﻐّﻞ اﻻﺳﻄﻮاﻧﺔ اﳌﺪﻣﺠﺔ
ﻳﺴﺒﺐ ﺗﻜﺎﺛﻒ اﻟﺮﻃﻮﺑﺔ ﻋﻠﻰ اﻟﻌﺪﺳﺔ ﻋﺪم ﻗﺮاءة اﺷﺎرات
:CD اﻻﺳﻄﻮاﻧﺔ اﳌﺪﻣﺠﺔ
.– ﻋﻨﺪﻣﺎ ﻳﺘﻢ اﺷﻌﺎل ﻣﺪﻓﺌﺔ
.– ﻋﻨﺪﻣﺎ ﺗﻜﻮن اﻟﺮﻃﻮﺑﺔ ﻋﺎﻟﻴﺔ
واﻧﺘﻈﺮ ﳌﺪةCD اﺧﺮج ﻣﺨﺰن اﻻﺳﻄﻮاﻧﺔ اﳌﺪﻣﺠﺔ،ﻓﻲ ﻫﺬه اﳊﺎﻻت
. ﺳﺎﻋﺔ٢ او١
• ﺿﺒﻂ ﻣﺴﺘﻮى ﻗﻮة اﻟﺼﻮت
ﺿﺠﻴﺞ ﻗﻠﻴﻞ ﺟﺪا ﻣﻘﺎرﻧﺔ ﻣﻊCD ﺗﻜﻮن اﻻﺳﻄﻮاﻧﺎت اﳌﺪﻣﺠﺔ
ّ
–
.اﳌﺼﺎدر اﳌﺘﻨﺎﻇﺮة
ﻓﺎﻧﻪ،اذا ﻛﺎن ﻣﺴﺘﻮى ﻗﻮة اﻟﺼﻮت ﻣﻀﺒﻮﻃﺎ ﻟﻠﻤﺼﺎدر اﳌﺘﻨﺎﻇﺮة
ﳝﻜﻦ ان ﻳﺤﺼﻞ ﺿﺮرا ﻟﻠﺴﻤﺎﻋﺎت ﻋﻨﺪ اﻟﺰﻳﺎدة اﳌﻔﺎﺟﺌﺔ ﳌﺴﺘﻮى
اﺧﻔﺾ ﻣﺴﺘﻮى ﻗﻮة اﻟﺼﻮت ﻗﺒﻞ، ﻟﻬﺬا اﻟﺴﺒﺐ.ﺧﺮج اﻟﺼﻮت
اﻟﺘﺸﻐﻴﻞ وﺑﻌﺪ ذﻟﻚ اﺿﺒﻂ ﻣﺴﺘﻮى ﻗﻮة اﻟﺼﻮت ﻋﻠﻰ اﳌﺴﺘﻮى
.اﳌﻄﻠﻮب اﺛﻨﺎء اﻻﺳﺘﻤﺎع
– اﺿﺒﻂ ﻣﺴﺘﻮى ﻗﻮة اﻟﺼﻮت ﺑﺤﻴﺚ ﳝﻜﻨﻚ ﺳﻤﺎع اﻻﺻﻮات ﻣﻦ
.ﺧﺎرج اﻟﺴﻴﺎرة
اﻟﺘﺮﻛﻴﺐ
1
1
ﻳﺮﺟﻰ ﻗﺮاءة ﻫﺬا.JVC ﺷﻜﺮا ﻟﻚ ﻋﻠﻰ ﺷﺮاء ﻫﺬا اﳌﻨﺘﺞ ﻣﻦ ﺻﻨﺎﻋﺔ
اﻟﺘﻌﻠﻴﻤﺎت ﺑﻌﻨﺎﻳﺔ واﻧﺘﺒﺎه ﻗﺒﻞ ﺑﺪء ﺗﺸﻐﻴﻞ اﳉﻬﺎز وذﻟﻚ ﻣﻦ اﺟﻞ
.اﳊﺼﻮل ﻋﻠﻰ اﻓﻀﻞ اداء وﻣﺪة ﺧﺪﻣﺔ اﻃﻮل ﻣﻦ ﻫﺬا اﳉﻬﺎز
،CD ﻟﻘﻢ ﰎ ﺗﺼﻤﻴﻢ ﻫﺬا اﳉﻬﺎز ﻟﺘﺸﻐﻴﻞ اﻻﺳﻄﻮاﻧﺎت اﳌﺪﻣﺠﺔ
.CD-RW واﻻﺳﻄﻮاﻧﺎتCD-R اﻻﺳﻄﻮاﻧﺎت
( )اﻟﻘﺎﺑﻠﺔ ﻟﻠﺘﺴﺠﻴﻞCD-R • ﲟﻜﻨﻚ اﻳﻀﺎ ﺗﺸﻐﻴﻞ اﻻﺳﻄﻮاﻧﺎت
)اﻟﻘﺎﺑﻠﺔ ﻟﻠﻜﺘﺎﺑﺔ( اﻻﺻﻠﻴﺔ اﳌﺴﺠﻠﺔCD-RW واﻻﺳﻄﻮاﻧﺎت
.MP3 او ﻓﻮرﻣﺎتCD ﺑﻔﻮرﻣﺎت اﺳﻄﻮاﻧﺔ ﺻﻮﺗﻴﺔ
.CD • ﳝﻜﻨﻚ اﻳﻀﺎ ﺗﺸﻐﻴﻞ اﺳﻄﻮاﻧﺔ ﻧﺺ
ﻫﺎم ﺑﺎﻟﻨﺴﺒﺔ ﻟﻠﻤﻨﺘﺠﺎت اﻟﻠﻴﺰرﻳﺔ
!"#$%&
WARNING
CH-X1500[U]6.0C
1002MNMMDWJEIN
EN, CH, AR
ﻋﺮﺑﻲ
ENGLISH
C
24/10/02, 10:04 AM
• ﲡﻨّﺐ ﺗﺮﻛﻴﺐ اﳉﻬﺎز ﻓﻲ اﻻﻣﺎﻛﻦ اﻟﺘﺎﻟﻴﺔ
ﻳﺘﻌﺮض ﺑﻬﺎ اﳉﻬﺎز اﻟﻰ اﺷﻌﺔ
ّ
– ﻓﻲ اﻻﻣﺎﻛﻦ اﻟﺘﻲ ﳝﻜﻦ ان
اﻟﺸﻤﺲ اﳌﺒﺎﺷﺮة او اﳊﺮارة اﳌﺒﺎﺷﺮة ﻣﻦ اﳌﺪﻓﺌﺔ او ﻓﻲ ﻣﻜﺎن
.ﺣﺎرة ﺟﺪا
ﻳﺘﻌﺮض ﺑﻬﺎ اﳉﻬﺎز ﻟﻠﻤﻄﺮ او رﺷﻖ
ّ
– ﻓﻲ اﻻﻣﺎﻛﻦ اﻟﺘﻲ ﳝﻜﻦ ان
.اﳌﺎء او اﻟﺮﻃﻮﺑﺔ اﻟﻌﺎﻟﻴﺔ
.اﳌﻌﺮﺿﺔ ﻟﻠﻐﺒﺎر
ّ
– ﻓﻲ اﻻﻣﺎﻛﻦ
.– ﻓﻲ اﻻﻣﺎﻛﻦ ﻏﻴﺮ اﳌﺴﺘﻮﻳﺔ
– ﻓﻮق اﺳﻼك اﻟﺘﻮﺻﻴﻞ او ﻋﻠﻰ اﻻرﺿﻴﺔ اﻟﺘﻲ ﻳﻮﺟﺪ ﲢﺘﻬﺎ
.اﻧﺎﺑﻴﺐ
– ﻓﻲ اﻻﻣﺎﻛﻦ اﻟﺘﻲ ﳝﻜﻦ ان ﺗﻀﺮر اﳉﻬﺎز ﻣﺜﻞ ﻣﻜﺎن ادوات
داﺧﻞ او ﲢﺖ،(. اﻟﺦ،اﻟﺴﻴﺎرة )ﻣﺜﻞ اﻟﻌﺠﻠﺔ اﻻﺣﺘﻴﺎﻃﻴﺔ
.ﺻﻨﺪوق اﻟﺴﻴﺎرة
ﺗﺄﻛﺪ ﻣﻦ،• ﻗﺒﻞ ﻋﻤﻞ ﺛﻘﻮب ﻟﺘﺮﻛﻴﺐ اﳉﻬﺎز داﺧﻞ ﺻﻨﺪوق اﻟﺴﻴﺎرة
وﺟﻮد ﻓﺮاغ ﻛﺎف ﲢﺖ ﺻﻨﺪوق اﻟﺴﻴﺎرة ﺑﺤﻴﺚ ﻻ ﻳﺘﻢ ﻋﻤﻞ اﻟﺜﻘﻮب
. اﻟﺦ،داﺧﻞ ﺧﺰان اﻟﻮﻗﻮد
ﻛﺐ اﳉﻬﺎز ﺑﺼﻮرة ﻣﺤﻜﻤﺔ ﺑﻮاﺳﻄﺔ اﺳﺘﻌﻤﺎل اﻟﺒﺮاﻏﻲ اﳌﺰودة ﻣﻊ
ّ• ر
.اﳉﻬﺎز
A
When installing the unit horizontally
!"#$%&
1. Attach the mounting brackets on the side panels of the unit using
screws. (Fig. a)
2. Install the unit on the floor of the trunk using self-tapping screws.
(Fig. b)
1. !"#$%&'()*+,-E=aF
2. !"#$%&'()*+,-./012E=bF
WOI,« …—uBÐ “UN'« VO'dð bMŽ
‰ULF²ÝUÐ “UN−K WO³½U'« UŠuK« vKŽ VO'd²« UOH²' qMË« Ʊ
©a qJý® Æwž«d³«
ÆXO³¦²« wž«dÐ ‰ULF²ÝUÐ ‚ËbMB« WO{—« vKŽ “UN'« V'
Ò — Æ≤
©b qJý®
1.
2.
Screw
(M4 x 8 mm)
(M4 x 8 mm)
wž«dÐ Mounting bracket
©3 ∏ x M4® VO'd²« WOH²'
Use these holes.
!"#
Æ»uI¦« Ác¼ qLF²Ý«
Tapping screw
(M5 x 20 mm)
(M5 x 20 mm)
XO³¦²« wž«dÐ
©3 ≤∞ x M5®
5
3
1
4
2
Drill holes
»uI¦« l{u
Trunk floor
!"
…—UO!« ‚ËbMM WO{—« Fig. b
Fig. a
=a
a qJý
=b
b qJý
B
When installing the unit upright (Fig. c)
V
Selector
V2²M
©c qJý®
W¹œuLŽ …—uBÐ VO'd²« bMŽ
H
H
V
Fig. c
=c
c qJý
!"#$%&=E=cF
Use these holes.
!"#
Æ»uI¦« Ác¼ qLF²Ý«
5
3
Bottom panel of the unit
!"#
“UN−K WOKH!« WŠuK«
1
4
2
Trunk floor
!"
…—UO!« ‚ËbMM WO{—«
Notes:
• When attaching the unit with the screws, refer to “ A When
installing the unit horizontally” above.
• When installing the unit upright, set the selectors located
on both sides to the “V (vertical)” position. (When it is
installed horizontally, be sure to set the selectors to the “H
(horizontal)” position.)
– When installing the unit upright, securely install to the trunk
floor.
• If you install the unit without setting the selectors correctly, the
symptoms below may occur.
– Sound is intermittent.
– CDs are damaged.
• !"#$%&'()*+,-./0=A= !"#
!"
• !"#$%&'()$*+,-.$/01V !"#$%&'()*+,-./01234H !"#$
– !"#$%&'()*!+,-)./01234
• !"#$%&'()*+,-.&/01234567
– !"#$%&'
– !"#$%
∫ UEŠö
bMŽ A ¢ r!" v« lł—« ¨wž«d³« WDÝ«uÐ “UN'« XO³¦ð bMŽ •
ÆvKŽô« w, —u'c*« ¢WOI,« …—uBÐ “UN'« VO'dð
…œułu*« U³2²M*« j³{« ¨W¹œuLŽ …—uBÐ “UN'« VO'dð bMŽ •
“UN'« VO'dð bMŽ® Æ¢©ÍœuLŽ® V¢ l{Ë vKŽ 5³½U'« ö' vKŽ
©Æ¢©wI,«® H¢ l{Ë vKŽ U³2²M*« j³{ s b'Qð ¨WOI,« …—uBÐ
XÐUŁ qJAÐ “UN'« V'— ¨W¹œuLŽ …—uBÐ “UN'« VO'dð bMŽ –
Æ…—UO!« ‚ËbMM WO{—« l rJ×Ë
¨W×O×M …—uBÐ U³2²M*« j³{ ÊËbÐ “UN'« VO'dð WUŠ w, •
ÆWOU²« ÷«dŽô« qB% Ê« sJ1 t½U,
Æ «uMô« w, lDIð
Ò
–
ÆCD W−b*« U½«uDÝö —d{ –
C
When installing the unit on an inclined plane
!"#$%&'(=E=dF
©d q?Jý®
qzU `DÝ vKŽ “UN'« VO'dð bMŽ
(Fig. d)
Fig. d
=d
d qJý
Selector
V2²M
H
V
H
V
1
2
Side panel of the unit
!"#
“UN−K WO³½U'« WŠuK«
3
4
USE
5
NO
45°
Notes:
• When attaching the unit with the screws, refer to “ A When
installing the unit horizontally” above.
• When installing, five angles can be selected. Be sure to
position the selectors on both sides of the unit pointing
upward, perpendicular (90°) to the earth surface.
• If you install the unit without setting the selector correctly, the
symptoms below may occur.
– Sound is intermittent.
– CDs are damaged.
Trunk floor
!"
…—UO!« ‚ËbMM WO{—«
• !"#$%&'()*+,-./0=A= !"#
!"
• !"#$%&'()*+,-./012345%&2
!"#$%&'()* 90 • !"#$%&'()*+,-.&/01234567
– !"#$%&'
– !"#$%
∫ UEŠö
bMŽ A ¢ r!" v« lł—« ¨wž«d³« WDÝ«uÐ “UN'« XO³¦ð bMŽ •
ÆvKŽô« w, —u'c*« ¢WOI,« …—uBÐ “UN'« VO'dð
U³2²M*« l{Ë s b'Qð ÆU¹«Ë“ µ —UO²š« sJ1 ¨VO'd²« bMŽ •
¨vKŽö WN−² ÊuJð YO×Ð “UN'« w³½Uł ö' vKŽ …œułu*«
ÆWO{—ô« `DÝ l ©Wł—œ π∞® ÍœuLŽ jš qJAð YO×Ð
¨W×O×M …—uBÐ U³2²M*« j³{ ÊËbÐ “UN'« VO'dð WUŠ w, •
ÆWOU²« ÷«dŽô« qB% Ê« sJ1 t½U,
Æ «uMô« w, lDIð
Ò
–
ÆCD W−b*« U½«uDÝö —d{ –
D
When hanging the unit in the trunk space
!"#$%&'()*+,=E eF
©e qJý®
…—UO!« ‚ËbMM qš«œ “UN'« oOKFð bMŽ
(Fig. e)
2
4
5
!"#$%&'()*+,-./0=A= !"#$%
2
CH-X1500[U]6.0C
2
24/10/02, 10:05 AM
3
Note:
When attaching the unit with the screws, refer to “ A When installing
the unit horizontally” above.
1
Fig. e
=e
e qJý
Use these holes.
!"#
Æ»uI¦« Ác¼ qLF²Ý«
∫WEŠö
VO'dð bMŽ A ¢ r!" v« lł—« ¨wž«d³« WDÝ«uÐ “UN'« XO³¦ð bMŽ
ÆvKŽô« w, —u'c*« ¢WOI,« …—uBÐ “UN'«
OK
Correct
ﺻﺤﻴﺢ
Incorrect
ﻏﻴﺮ ﺻﺤﻴﺢ
0° to +90°
0 90 درﺟﺔ٩٠ ﻣﻦ ﺻﻔﺮ اﻟﻰ
Over +90°
90 درﺟﺔ٩٠ + ﻓﻮق
V
V
NO
USE
H
H
H
NO USE
V
NO USE
LOCATION OF CONTROLS
!"#
اﻣﺎﻛﻦ اﻟﻀﻮاﺑﻂ
~ 0EJECT button
Reset button: When pressing and holding for a few seconds
Ÿ CD magazine slot
! Door
Ÿ ٢
~ Ÿ ! ! ٣
~ ١
EJECT
!"#$=E0 EJECTF=
!"#$ %&'(
0EJECT زر اﻻﺧﺮاج١
. ﻋﻨﺪ اﻟﻀﻐﻂ وﻣﺘﺎﺑﻌﺔ اﻟﻀﻐﻂ ﻟﻌﺪة ﺛﻮان:زر اﻋﺎدة اﻟﻀﺒﻂ
CD ﻓﺘﺤﺔ ﻣﺨﺰن اﻻﺳﻄﻮاﻧﺎت اﳌﺪﻣﺠﺔ٢
اﻟﺒﺎب٣
TROUBLESHOOTING
• “RESET1–RESET8” or “R1–R8” appears on the display of the
connected receiver (or other equipment).
* Are the units connected correctly? After checking, press and
hold the 0EJECT button for a few seconds to reset this unit.
If the problem still persists, consult the JVC authorized dealer.
• RESET1–RESET8 R1–R8 !"#$%&%'(
!"#$%&
* !"#$%&'()*+,-./0123456789
E0 EJECTF= !"#$%&'()*+,-./0123
JVC !"#$%&'(
Indication
اﻟﺒﺤﺚ ﻋﻦ اﻻﻋﻄﺎل واﻻﺻﻼح
Meaning
RESET1 (or R1)
!
اﳌﻌﻨﻰ
RESET1 ( R1)
Ejection error
" ﻋﻠﻰR8-R1" " او اﻟﺒﻴﺎﻧﺎتRESET8-RESET1 " • ﺗﻈﻬﺮ اﻟﺒﻴﺎﻧﺎت
.ﺷﺎﺷﺔ ﻋﺮض اﳌﺴﺘﻘﺒﻞ اﳌﻮﺻﻮل )او اﳉﻬﺎز اﻻﺧﺮ( ﻣﻊ ﻫﺬا اﳉﻬﺎز
اﺿﻐﻂ وﺗﺎﺑﻊ،* ﻫﻞ اﻻﺟﻬﺰة ﻣﻮﺻﻮﻟﺔ ﺑﺼﻮرة ﺻﺤﻴﺤﺔ؟ ﺑﻌﺪ اﻟﻔﺤﺺ
ﻟﻌﺪة ﺛﻮان ﻣﻦ اﺟﻞ اﻋﺎدة ﺿﺒﻂ0EJECT اﻟﻀﻐﻂ ﻋﻠﻰ زر اﻻﺧﺮاج
اﳌﻌﺘﻤﺪ ﻓﻲJVC اﺳﺘﺸﺮ وﻛﻴﻞ، ﻓﻲ ﺣﺎﻟﺔ ﺑﻘﺎء اﳌﺸﻜﻠﺔ.ﻫﺬااﳉﻬﺎز
.ﻣﻨﻄﻘﺘﻚ
اﻟﺒﻴﺎن
!
ﺧﻄﺄ اﺧﺮاج
(R1 )اوRESET1
ﺧﻄﺄ اﻟﺮاﻓﻊ
(R2 )اوRESET2
ﺧﻄﺄ اﻟﺼﻴﻨﻴﺔ
(R3 )اوRESET3
ﺧﻄﺄ ﻋﻮدة اﻟﻼﻗﻂ
(R4 )اوRESET4
RESET2 (or R2)
Lifter error
RESET2 ( R2)
!"
RESET3 (or R3)
Tray error
RESET3 ( R3)
!
RESET4 (or R4)
Pick up return error
RESET4 ( R4)
!"#
RESET5 (or R5)
—
RESET5 ( R5)
—
RESET6 (or R6)
Communication error
RESET6 ( R6)
!
RESET7 (or R7)
Other errors
RESET7 ( R7)
RESET8 (or R8)
Communication error
RESET8 ( R8)
—
(R5 )اوRESET5
(R6 )اوRESET6
!
ﺧﻄﺄ اﺗﺼﺎل
اﺧﻄﺎء اﺧﺮى
!
ﺧﻄﺄ اﺗﺼﺎل
(R8 )اوRESET8
• Sounds are intermittent during play.
* Are the selectors on both sides adjusted correctly?
• * !"#$%&'()*(+,
!"#$% &'()*+,
SPECIFICATIONS
CD CHANGER SECTION
Frequency response
: 5 Hz – 20 000 Hz
Dynamic range
: 99 dB
S/N ratio
: 103 dB
Distortion
: 0.005%
Wow & flutter
: Less than measurable limit
Output terminal
: Analog (8 pin x 1),
1.5 V (full scale)/less than 1 kΩ
GENERAL
Power requirement
Operating voltage
: DC 14.4 V (11 V – 16 V allowable)
Grounding system
: Negative ground
Allowable working temperature
: –10°C to +50°C
Dimensions (W x H x D) : 252 mm x 88 mm x 174 mm
Mass
: 2.3 kg (excluding accessories)
!"#
!
S/N !"
!
W
W
W
W
W
W
!
!
!
!
!"#
! x x W 14.4 V=E ! 11 V – 16 V F
W !
W –10˚C +50˚C
W 252 mm x 88 mm x 174 mm
W 2.3 !"#$%&
Design and specifications are subject to change without notice.
!"#$%&'()*+,-./0
(R7 )اوRESET7
.• اﻻﺻﻮات ﻣﺘﻘﻄﻌﺔ اﺛﻨﺎء اﻻﺳﺘﻤﺎع
* ﻫﻞ اﳌﻨﺘﺨﺒﺎت اﳌﻮﺟﻮدة ﻋﻠﻰ ﻛﻼ اﳉﺎﻧﺒﲔ ﻣﻀﺒﻮﻃﺔ ﺑﺼﻮرة
ﺻﺤﻴﺤﺔ؟
اﳌﻮاﺻﻔﺎت
!
5 Hz – 20 000 Hz
99 dB
103 dB
0.005 %
!"#$
8 x 1
1.5 V !L 1 kΩ
CD ﻗﺴﻢ ﻣﺒﺪّل اﻻﺳﻄﻮاﻧﺎت اﳌﺪﻣﺠﺔ
ﻫﺮﺗﺰ٢٠٠٠٠ ﻫﺮﺗﺰ ــ٥ :
اﺳﺘﺠﺎﺑﺔ اﻟﺘﺮدد
دﻳﺴﺒﻞ٩٩ :
اﳌﺪى اﻟﺪﻳﻨﺎﻣﻴﻜﻲ
دﻳﺴﺒﻞ١٠٣ : S/N اﻟﻀﺠﻴﺞ/ﻧﺴﺒﺔ اﻻﺷﺎرة
٪ ٠٫٠٠٥ :
اﻟﺘﺸﻮﻳﺶ
اﻗﻞ ﻣﻦ اﳊﺪ اﳌﻤﻜﻦ ﻗﻴﺎﺳﻪ:
اﻟﺘﻔﺎوت واﳋﻠﻞ
(١ × دﺑﻮس٨) ﻣﺘﻨﺎﻇﺮ:
ﻃﺮف اﳋﺮج
اﻗﻞ/( ﻓﻮﻟﺖ )ﻣﻘﺎس ﻛﺎﻣﻞ١٫٥
ﻛﻴﻠﻮ اوم١ ﻣﻦ
ﻋﺎم
ﻣﺘﻄﻠﺒﺎت اﻟﻄﺎﻗﺔ اﻟﻜﻬﺮﺑﺎﺋﻴﺔ
ﻓﻮﻟﺖ١٤٫٤ DC ﺗﻴﺎر ﻣﺒﺎﺷﺮ:
ﻓﻮﻟﻄﻴﺔ اﻟﺘﺸﻐﻴﻞ
( ﻓﻮﻟﺖ ﻣﺴﻤﻮح ﺑﻪ١٦ ــ١١)
ﺗﺄرﻳﺾ ﺳﺎﻟﺐ:
ﻧﻈﺎم اﻟﺘﺄرﻳﺾ
درﺟﺔ اﳊﺮارة اﳌﺴﻤﻮح ﺑﻬﺎ
درﺟﺔ ﻣﺌﻮﻳﺔ٥٠ + اﻟﻰ١٠ - ﻣﻦ:
ﺗﺸﻐﻴﻞ اﳉﻬﺎز
ﱈ١٧٤ × ﱈ٨٨ × ﱈ٢٥٢ : (اﻻﺑﻌﺎد )ﻋﺮض × ارﺗﻔﺎع × ﻋﻤﻖ
( ﻛﻐﻢ )ﺑﺎﺳﺘﺜﻨﺎء اﳌﻠﺤﻘﺎت٢٫٣ :
اﻟﻮزن
.اﻟﺘﺼﻤﻴﻢ واﳌﻮاﺻﻔﺎت ﻣﻌﺮﺿﺔ ﻟﻠﺘﻐﻴﻴﺮ ﺑﺪون اﺷﻌﺎر
How to reset your unit
!"#
ٌﻛﻴﻔﻴﺔ اﻋﺎدة ﺿﺒﻂ اﳉﻬﺎز
Having TROUBLE with operation?
Please reset your unit
Refer to "How to reset your unit"
Press and hold the 0EJECT button for several seconds. This will reset the built-in
microcomputer.
!"#$%&=E0EJECTF= !"#$%&'()*+,-./012
ﻫﺬا اﻻﺟﺮاء ﺳﻮف ﻳﻌﻴﺪ ﺿﺒﻂ. ﻟﻌﺪة ﺛﻮان0EJECT اﺿﻐﻂ وﺗﺎﺑﻊ اﻟﻀﻐﻂ ﻋﻠﻰ زر اﻻﺧﺮاج
.اﳌﻴﻜﺮوﻛﻤﺒﻴﻮﺗﺮ اﻟﺪاﺧﻠﻲ
!"#$%
!"#$%&'
ﻓﻲ ﺣﺎﻟﺔ ﺣﺪوث ﻋﻄﻞ ﻓﻲ اﻟﺘﺸﻐﻴﻞ؟
ﻳﺮﺟﻰ اﻋﺎدة ﺿﺒﻂ اﳉﻬﺎز
0EJECT button
=E0EJECTF=
0EJECT زر اﻻﺧﺮاج
"ارﺟﻊ اﻟﻰ اﳌﺘﻌﻠﻘﺔ "ﻛﻴﻔﻴﺔ اﻋﺎدة ﺿﺒﻂ اﳉﻬﺎز
EJECT
3
CH-X1500[U]6.0C
!"#$%&\
3
24/10/02, 3:34 PM
ENGLISH
wÐdŽ
ELECTRICAL CONNECTIONS
• This changer can be connected to JVC KD-MX, KD-SX, KDLX, KD-SH, KD-LH or KS-FX series receivers that include a
Changer Control function. However, operating procedures and
indications on the display will be different depending on the
connected receiver. For details, refer to manuals supplied with
your receiver. Note that some receivers cannot play back discs
recorded in MP3 format. For detailed information, consult your
nearest JVC car audio dealer.
• To prevent short circuits from occurring while making
connections, keep the battery’s negative terminal
disconnected.
We recommend that you make all electrical connections (see
Fig. f) before installing the unit. If you are not sure of your ability
to correctly install this unit, have it installed by a qualified service
technician.
• !"#$%&'()*+,- JVC KD-MXKD-SX
KD-LXKD-SHKD-LH KS-FX !"# $%&'
!"#$%&'()*+,-./012345678*
!"#$%& '()*+,!-. /012
=MP3 !"#$%&'()*+,-./0 JVC
!"#$%&'
• !"#$%&'()*+,-./01234
!"#$%&'()*+,-./01+234567
=f !"#$%&'()*+,-./01234
!"#$%&
WOzUÐdNJ« öOMu²«
!"#$%&'() 12 !"#$%&'()*+,
12 !"#$%&'()*+,-./01234/
!" JVC !"#$%&'
• !"#$%&'()*+,-.//01
Note:
This unit is designed for 12 volt DC, negative ground. If your vehicle
does not have a 12 volt negative ground electrical system, you
need a voltage inverter which can be bought from a JVC car audio
dealer.
• Be sure to ground this unit to the car’s chassis.
When connecting to
JVC KD-MX/KD-SX/KD-LX/KD-SH/KD-LH/KSFX series receivers
Fig. f
=f
f qJý
JVC KD-MX W?K!KÝ s ö³I²!*« l ‰Òb³*« «c¼ qOMuð sJ1 •
w²« KS-FX Ë« KD-LH Ë« KD-SH Ë« KD-LX Ë« KD-SX Ë«
nK²2ð ·uÝ ¨p– lË Æ‰Òb³LK j³{ WHOþË vKŽ Íu²%
p–Ë ÷dF« WýUý vKŽ …œułu*« UMO³*«Ë qOGA²« «¡«dł«
v« lł—« ¨qOMUH²« qł« s ƉuMu*« q³I²!*« vKŽ «œUL²Ž«
ö³I²!*« iFÐ Ê« kŠô Æq³I²!*« l o,d*« ULOKF²« VO²'
qł« s ÆMP3 U—uHÐ WK−!*« U½«uDÝô« qOGAð lOD²!ðô
hB2² JVC W'dA qO'Ë »d"« dA²Ý« ¨WKBH UuKF
Æ…—UO!K WOðuB« …eNłôUÐ
·dÞ „dð« ¨ öOMu²« qLŽ ¡UMŁ« dz«ËbUÐ dOBIð ÀËbŠ lM* •
ÆôuBH VU!« W¹—UD³«
q³" ©f qJý dE½«® WOzUÐdNJ« öOMu²« lOLł qLFÐ `BM½
VO'dð vKŽ pð—bI s b'Q²« ÂbŽ WUŠ w, Æ“UN'« VO'dð
5OM, ’U2ýô VO'd²« UOKLŽ „dð« ¨W×O×M …—uBÐ “UN'«
ƉU:« «c¼ w, 5B²2Ë
∫WEŠö
±≤ DC dýU³ wzUÐdN' —UOð WDÝ«uÐ qLFO “UN'« «c¼ rLM bI
wzUÐdN' ÂUE½ pK²9 ô pð—UOÝ Ê« WUŠ w, ÆVUÝ i¹—Qð ¨Xu,
‰u× v« ÃU²% ¨Xu, ±≤ DC dýU³ —UO²Ð VUÝ i¹—Qð
WOðuB« «—UO!« …eNł« qO'Ë s ‰u;« «c¼ ¡«dý sJ1Ë ¨WODu,
ÆJVC W'—U
Æ…—UO!« qJO¼ l “UN'« ©qOMuð® i¹—Qð s b'Qð •
=JVC KD-MX/KD-SX/KD-LX/KD-SH/KD-LH/
KS-FX !"#
JVC W!KÝ s ö³I²!*« l qOMu²« bMŽ
KD-MX/KD-SX/KD-LX/KD-SH/KD-LH/KS-FX
H
V
8-pin cord (supplied)
8 !"#$
©“UN'« l o,d® ”uÐœ ‡ ∏ pKÝ
• • How to remove the cord
Pull the plug by holding it firmly as in the figure.
To JVC CD changer controller
JVC !"#$"%&
JVC W'—U CD W−b*« W½«uDÝô« ‰b³0
Ò
rJײ*« v«
!"#
pK!« Ÿe½ WOHO' •
!"#$%&
ÆqJA« w, UL' WLJ× …—uBÐ tJ! WDÝ«uÐ fÐUI« V×Ý«
Do not hold this portion.
!"#$
Ær!I« «c¼ p!9 ô
• • After installation and connection...
When loading the magazine for the first time into the CD
changer, press and hold the 0EJECT button for a few
seconds to reset the unit.
Normally do not press and hold the 0EJECT button.
Note:
You may also need to reset the unit in the following cases.
• When the power supply is interrupted such as for replacement
of the car's battery.
• When the unit does not function correctly.
Mistracking
Mistracking may occur when driving on an extremely rough
road. The unit and compact disc will not be damaged by
mistracking; however, since it is offensive to the ear, stop
playback and restart when you reach a road that’s in good
condition.
ÆÆÆ qOMu²«Ë VO'd²« bFÐ •
!"#$%&'()*+,-./01
• !"#$%&'()*+
• !"#$%&'(
0EJECT button
=E0EJECTF=
0EJECT ëdšô« —“
• Listening to CDs
This unit does not have operation buttons to play CDs. CD
operations can be performed using the JVC CD changer
controller, etc. connected to this unit.
For CD operations, refer to the CD Changer Controller
Instructions.
!"#$%&
!"#$%&'()*+,- !"./01=E0EJECTF
!"#$%&'(
!"#$%&'()*=E0EJECTF=
4
∫WEŠö
ÆWOU²« ôU(« w, “UN'« j³{ …œUŽô ÃU²% Ê« UC¹« sJ1
dOOGð bMŽ q¦ WOzUÐdNJ« W"UDK qB, ‰uBŠ WUŠ w, •
Æ…—UO!« W¹—UDÐ
ÆW×O×M …—uBÐ qLF¹ ô “UN'« Ê« WUŠ w, •
EJECT
• !"# $%&'()*$% '(+,-./0
JVC !"#$%&'()*+,-./012
!"#$%&'() !*+,-./0123
!"#$%&'()*$+,-./0123456
!"#$%&'()*+,-./0"123*45
!"#$%&'() *%+,-+./012.
!"#$%
4
CH-X1500[U]6.0C
W−b*« W½«uDÝô« ‰Òb³ qš«œ vËô« …dLK Êe<« ‰Ušœ« bMŽ
Ê«uŁ …bF 0EJECT ëdšô« —“ vKŽ jGC« lÐUðË jG{« ¨CD
Æ“UN'« j³{ …œUŽ« qł« s
Æ0EJECT ëdšô« —“ vKŽ jGC« lÐU²ðË jGCð ô …œUŽ
24/10/02, 10:08 AM
CD W−b*« U½«uDÝô« v« ŸUL²Ýô«
U½«uDÝô« v« ŸUL²Ýö qOGAð —«—“« “UN'« «c¼ pK²1 ô
CD W−b*« W½«uDÝô« qOGAð UOKLŽ W¹œQð sJ1 ÆCD W−b*«
W−b*« W½«uDÝô« ‰b³ ‰Òb³0 rJײ*« ‰ULF²Ý« WDÝ«uÐ
Æ“U?N'« «c¼ l ‰uMu*« ¨a« ¨ JVC W'—UCD
ULOKFð v« lł—« ¨W−b*« W½«uDÝô« qOGAð UOKLF
.CD W−b*« W½«uDÝô« ‰Òb³0 rJײ*« qOGAð
«—U!*« WFÞUI
o¹dÞ vKŽ …œUOI« ¡UMŁ« «—U!LK WFÞUI Àb×¹ Ê« sJ1
W−b*« W½«uDÝô«Ë “UN'« —dC²¹ ô ·uÝ Æ«bł …dŽË
WFÞUI Ê« V³!Ð ¨p– lË ¨ «—U!*« WFÞUI V³!Ð
qOGAð bŽ« rŁ “UN'« qOGAð n"Ë« ¨Ê–ö W−Že «—U!*«
Æ…bOł WU×ÐË WKNÝ o¹dÞ v« qBð UbMŽ “UN'«
•
HANDLING MAGAZINES AND
COMPACT DISCS
How to handle the magazines
• Care in handling the magazines
– Do not carry the magazine with its inserting slot facing down,
or the CDs may fall out.
– Always keep the twelve disc trays loaded in the magazine.
– When sliding the disc trays out or in to place CDs, hold the
magazine horizontally so as not to drop CDs.
– Do not insert CDs without pulling out the disc trays from the
magazine. Never place CDs directly into the magazine.
– Do not expose the magazine to high temperatures or direct
sunlight.
– Do not disassemble the magazine.
– Take care not to drop or hit the magazine. Do not apply
excessive pressure to the disc trays which have been
removed from the magazine.
– Never apply solvents such as benzine, thinner or insecticide
to the magazine or trays. These solvents may erode their
surfaces.
!"#
U½«uDÝô«Ë Ê“U<« l qUF²«
W−b*«
!
!"#$
Ê“U<« l qUF²« WOHO'
• !
– !"#$%&'()*+,-!"./0
– 12 !"#$%& '()*+,– !"#$%&'(%&)*+,%&'-./0*12
!"
– !"#$%&!"'()*+,-!"./0*+ !
!"#$%
– !"#$%&'() *!+,– !"#$%
–
!"#$%
– !"#$%&#$'()*+,-./01234,2
!"#$%&!'()*+,-.#
Ê“U<« l qUF²« bMŽ ÂUL²¼ô« •
◊uIÝ lM* qHÝö ‰Ušœô« Wײ, WNł«u l Êe<« qL% ô –
ÆCD W−b*« U½«uDÝô«
ÆÊe<« qš«œ ±≤ U½«uDÝô« w½«uM kHŠ« ULz«œ –
l{u qš«b« Ë« ×U2K U½«uDÝô« w½«uM o“ bMŽ –
p–Ë WOI,« …—uBÐ Êe<« p!« ¨CD W−b*« U½«uDÝô«
ÆCD W−b*« U½«uDÝô« ◊uIÝ lM*
V×!ð Ê« ÊËbÐ Êe<« qš«œ CD W−b*« U½«uDÝô« qšbð ô –
U½«uDÝô« UIKD lCð ô ÆÊe<« ×U) U½«uDÝô« w½«uM
ÆÊ“U<« qš«œ …dýU³ CD W−b*«
fLA« WFýô Ë« WOUŽ …—«dŠ Wł—b Ê“U<« ÷ÒdFð ô –
Æ…dýU³*«
ÆÊ“U<« pJHð ô –
vKŽ jGCð ô ÆUNOKŽ dOŁQ²« ‰ËU% ôË Ê“U<« jI!ð ô –
ÆÊ“U<« s UNł«dš« - w²« U½«uDÝô« w½«uM
dMO¦« Ë« s¹eM³« q¦ W³¹c*« qOU;« s U¹« UIKD lCð ô –
Æw½«uB« Ë« Êe<« vKŽ p– tÐUý U Ë« W¹dA(« «bO³*« Ë«
ÆÕuD!« w, q'Qð W³¹c*« œ«u*« Ác¼ V³!ð Ê« sJ1
!"#$%&'()*+, XC-M200 !"
Note:
If you need additional magazines, purchase XC-M200 magazines.
∫WEŠö
ÆXC-M200 q¹œu Ê“U2 ¡«dý vłd¹ ¨WO,U{« Ê“U2 ¡«dý œ—« «–«
When playing a CD-R or CD-RW
CD-R CD-RW
Before playing back CD-Rs or CD-RWs, read their instructions or
cautions carefully.
• Use only “finalized” CD-Rs or CD-RWs.
• Some CD-Rs or CD-RWs may not play back on this unit because
of their disc characteristics, and for the following reasons:
– Discs are dirty or scratched.
– Moisture condensation on the lens inside the unit.
– The pickup lens inside the unit is dirty.
• CD-RWs may require a longer readout time since the
reflectance of CD-RWs is lower than that of regular CDs.
• CD-Rs or CD-RWs are susceptible to high temperatures or high
humidity, so do not leave them inside your car.
• Do not use following CD-Rs or CD-RWs:
– Discs with stickers, labels, or protective seal stuck to the
surface.
– Discs on which labels can be directly printed by an ink jet
printer.
Using these discs under high temperatures or high humidity
may cause malfunctions or damage to discs. For example,
– Stickers or labels may shrink and warp a disc.
– Stickers or labels may peel off so discs cannot be ejected.
– Print on discs may get sticky.
Read instructions or cautions about labels and printable discs
carefully.
CD-R CD-RW !"#$%&'()*+,• !"#$%& CD-R CD-RW
• CD-R CD-RW !"#$%&'()*+,-.
!
– !"#$%&'
– !"#$%&'()*
– !"#$%&'()
• CD-RW !"#$%&'() CD-RW !"#$
!"
• CD-R CD-RW !"#$!%&'()*+,-./0
!"
• !" CD-R CD-RW
– ! "#$%&'()*+,-./01
– !"#$%&'()*+,-./-.0
!"#$%&'()*+,-./012"34+,5
=
– !"#$%&'()*+,
– !"#$%&'()*+,-./
– !"#$%&'()*
!"#$%&'()*+,-./012345
Sticker
oBK
Warped disc
!
WOM× W½«uDÝ«
Sticky residue
!"
Włe U¹UIÐ
qO−!²K WKÐUI« W−b*« W½«uDÝô« qOGAð bMŽ
CD-RW WÐU²J« …œUŽô WKÐUI« Ë« CD-R
Ë« ULOKFð √d"« ¨CD-RW U½«uDÝ« Ë« CD-R U½«uDÝ« qOGAð q³"
ÆW¹UMFÐ U½«uDÝô« Ác¼ qOGAð «d¹c%
Æ¢…e−M¢ CD-RW Ë« CD-R U½«uDÝ« jI, qLF²Ý« •
V³!Ð CD-RW Ë« CD-R U½«uDÝ« iFÐ qG²Að ô Ê« sJ1 •
∫WOU²« »U³ÝöË ¨ U½«uDÝô« Ác¼ hzUBš
ÆWýËb2 Ë« W2ÝË U½«uDÝô« –
Æ“UN'« qš«œ …œułu*« j"ö« WÝbŽ vKŽ WÐuÞd« nŁUJð –
ÆW2ÝË “UN'« qš«œ …œułu*« j"ö« WÝbŽ –
Ê« p– V³Ý Æ…¡«dIK ‰uÞ« …b CD-RW U½«uDÝ« VÒKD²ð Ê« sJ1 •
ÆCD W¹œUF« U½«uDÝô« s q"« u¼ CD-RW U½«uDÝ« ”UJF½« qUF
WOUF« …—«d(« Uł—bÐ dŁQ²K WKÐU" CD-RW Ë« CD-R U½«uDÝ« •
Æ…—UO!« qš«œ U½«uDÝô« „d²ð ô «cN ¨WOUF« WÐuÞd« Uł—œË
∫WOU²« CD-RW U½«uDÝô« Ë« CD-R U½«uDÝô« qLF²!ð ô •
W¹U"Ë r²š Ë« ¨ ö³O Ë« ¨ UIBK vKŽ Íu²% w²« U½«uDÝô« –
Æ U½«uDÝô« Ác¼ `DÝ« vKŽ
WDÝ«uÐ …dýU³ UNOKŽ ö³OK« WŽU³Þ sJ1 w²« U½«uDÝô« –
ÆYH½ d³Š WFÐUÞ
Ë« WOUŽ …—«dŠ Uł—bÐ U½«uDÝô« Ác¼ ‰ULF²Ý« V³!¹ Ê« sJ1
¨‰U¦ Æ U½«uDÝö —d{ Ë« W¹œQ²« w, hI½ WOUŽ WÐuÞ— Uł—œ
¡UM×½« V³!ðË ö³OK« Ë« UIBK*« gLJMð Ê« sJ1 –
ÆW½«uDÝö
Œ«dš« sJ1 ôË ö³OK« Ë« UIBK*« dÒAI²ð Ê« sJ1 –
Æ U½«uDÝô«
ÆoOÐb²K WKÐU" Ë« Włe U½«uDÝô« vKŽ WŽU³D« `³Bð Ê« sJ1 –
WKÐUI« U½«uDÝô«Ë ö³OK« ‰uŠ «d¹cײ« Ë« ULOKF²« √d"«
ÆW¹UMFÐ WŽU³DK
Stick-on label
!"
‚UB« q³O
Disc
W½«uDÝ«
Playing a CD Text/ CD Text/ CD h½ W½«uDÝ« qOGAð
In a CD Text, some information about disc (its disc title,
performer and track title) is recorded.
If you connect this unit to a receiver with the CD Text displaying
function, you can show this disc information on the receiver’s
display.
CD Text !"#$%&'(#$)*+,-./01)
!"#$
!"#$%&' CD Text !"#$%&'()*+
!"#$%&#$'
How to load CDs
1. Slide the disc tray partly out of the magazine until it stops.
2. Place a CD on the disc tray with its label side up.
1.
1. 2. CD U½«uDÝô« qOL% WOHO'
!"
!"#$% &'()*+,!" #$%&'()*+,-./
v²Š Êe<« ×U) WOzeł …—uBÐ W½«uDÝô« WOMOM o“« Ʊ
Æn"u²ð
Ê« …UŽ«d l W½«uDÝô« WOMOM vKŽ CD W−b*« W½«uDÝô« l{ Æ≤
ÆvKŽö UN−² oBK*« V½Uł ÊuJ¹
2.
Disc tray
!
W½«uDÝô« WOMOM
Magazine (XC-M200)
EXC-M200F
©XC-M200® Êe2
W½«uDÝô« ‰uŠ UuKF*« iFÐ ¨CD hM« W½«uDÝ« w,
ÆWK−! ©—U!*« Ê«uMŽË wMG*« rÝ« ¨W½«uDÝô« Ê«uMŽ®
WHOþË vKŽ Íu²×¹ q³I²! l “UN'« «c¼ qOMuð WUŠ w,
vKŽ W½«uDÝô« UuKF —UNþ« pMJ1 ¨CD h½ W½«uDÝ« ÷dŽ
Æq³I²!*« ÷dŽ WýUý
Grooves
b¹œUš«
*
Compact disc
W−b W½«uDÝ«
12
11
10
9
8
7
6
5
4
3
2
1
Disc tray
!
W½«uDÝô« WOMOM
3. Align the disc tray with the grooves in the magazine, and push
the disc tray all the way in.
• Check that the disc tray is securely inserted into the magazine.
If a CD becomes disengaged from the disc tray, reposition it
on the disc tray.
* The inserted CDs are counted as “disc-1,” “disc-2”... from
the bottom to the top.
3. !"#!"$%&!"'()*+,-./012
• !"#$%&'()*+,-!"./012!"3!
!"#$%&'()*+
* !"#$%&'(disc-1 disc-2KKK= !
Notes:
• There are openings in the disc trays through which signals are
read from the CDs. These openings leave part of the shiny
side of the CD exposed. Be careful not to touch the shiny surface
of the CD.
• It is not possible to play a CD if placed upside down.
• !"#$%&'()*+,-"./01= !
!"#$%&'(&)*+,-./01$%$(&)
• !"#$%&'()" !*+,-.
Caution:
CDs shaped like a heart, flower, etc. (specially-shaped CDs)
cannot be used with this unit. If this type of CD is loaded, it will
cause problems.
!"#$%&'()*+,-%&'./012345
!"#$%&'()*+,-.
5
CH-X1500[U]6.0C
5
24/10/02, 10:09 AM
l,œ« p– bFÐË ¨Êe<« qš«œ b¹œUšô« l W½«uDÝô« WOMOM Ê“«Ë Æ≥
ÆW¹UNM« v²Š qš«bK W½«uDÝô« WOMOM
ÆÊe<« qš«œ WLJ× …—uBÐ W½«uDÝô« WOMOM ‰Ušœ« s b'Qð •
vKŽ W×O×M …—uBÐ WŽu{u dOž CD W−b*« W½«uDÝô« X׳M« «–«
ÆW½«uDÝô« WOMOM vKŽ W×O×M …—uBÐ UNF{Ë bŽ« ¨W½«uDÝô« WOMOM
q¦ UNUšœ« - w²« CD W−b*« U½«uDÝô« œ«bFð r²¹ *
ÆvKŽô« v« qHÝô« s ÆÆÆ ¢disc-2¢ ¨¢disc-1¢
∫ UEŠö
UNöš s r²¹ YOŠ U½«uDÝô« w½«uM qš«œ Uײ, błu¹ •
UײH« «c¼ ÆCD W−b*« U½«uDÝô« s «—Uýô« …¡«d"
fLKð ô ÆCD W−b*« U½«uDÝô« s lö« `D!« nAJð
ÆCD W−b*« W½«uDÝô« s lö« `D!«
ÆWÐuKI X½U' «–« CD W−b*« W½«uDÝô« qOGAð sJ1 ô •
∫d¹c%
Ë« VKI« qJý vKŽ WŽuMB*« CD W−b*« U½«uDÝô« ‰ULF²Ý« sJ1 ô
«c¼ l ©WMU)« ‡ ‰UJýô« «– CD W−b*« U½«uDÝô«® ¨a« ¨…œ—u«
¨“UN'« qš«œ CD W−b*« W½«uDÝô« s ŸuM« «c¼ l{Ë - «–« Æ“UN'«
Æ“UN'« w, ‰UDŽ«Ë q'UA ‰uBŠ v« ÍœRð ·uÝ t½U,
How to load the magazine
!"#$
Êe<« ‰Ušœ« WOHO,
1. Slide the door to the right.
1. !"#$%
2. Load the magazine.
2. !"#
• Load the magazine into the CD changer with the ) mark on
• !"# $%&'()*+=)= !"#$%
top and the CD insertion side to the right.
1.
Æ5LO« WN' »U³« o“« Ʊ
ÆÊe<« qš«œ U½«uDÝô« l{ Æ≤
Ê« …UŽ«d l CD W−b*« W½«uDÝô« ‰Òb³ qš«œ Êe<« qšœ« •
W½«uDÝô« ‰Ušœ« V½UłË WL vKŽ …œułu*« ) WöF« ÊuJð
Æ5LO« WN' CD W−b*«
2.
3. Close the door.
3. !"
• Normally the door must be kept closed except when changing
• !"#$%&'()*+,-./01
the magazine.
Cautions:
• Do not insert your hands or any foreign object into the loading
slot, otherwise you may be injured or cause malfunctions or
damage.
• When a label on the magazine, if any, partly peels off, it may
cause a malfunction. If this happens, remove the label or stick
it on firmly.
• !"#$%&'()*+*,-./0!12-$
!"#$%&
• !"#$%&'()*+,-./012345627
!"#$%&'()*+%,-./
How to unload the magazine
Æ»U³« oKž« Æ≥
ÆÊe<« dOOGð bMŽ ¡UM¦²ÝUÐ UIKG »U³« ÊuJ¹ Ê« V−¹ …œUŽ •
∫ «d¹c%
·ö^Ð ÆqOLײ« Wײ/ qš«œ W³¹dž ÂU7ł« W¹« Ë« p¹b¹ qšbð ô •
Æ—d{ Ë« qDŽ qB×¹ Ê« sJ1 Ë« ÕËdł qB×¹ Ê« sJ1 ¨p–
¨błË Ê« ¨W−b*« W½«uDÝô« vKŽ œułu*« oBK*« ÊuJ¹ UbMŽ •
«–« ÆqDŽ V³7¹ Ê« sJ1 p– ÊU/ ¨WOzeł …—uBÐ «—uAI
…—uBÐ t½UJ w/ tIB« Ë« oBK*« Ÿe½« ¨p– q¦ qBŠ
ÆWLJ×
!"#$
1. Slide the door to the right.
2. Press the 0 EJECT button.
• The magazine ejects from the loading slot.
1. !"#$%
2. !"#$%&=E0EJECTF=
• !"#$%&'
Note:
When the magazine cannot be ejected, push in the magazine and
play the 12th disc once more; when play has ended, repeat the
above procedure.
If the above procedure does not work, follow the steps below:
1. Be sure that the selectors are set correctly.
2. Peel off the protective seal over the compulsory eject hole.
(Fig. g)
3. Put a straight stick like a screw driver into the hole. (Fig. h)
* Do not put the stick at an angle, insert it straight.
1.
2.
3.
Êe<« ëdš« WOHO,
Æ5LO« WN' »U³« o“« Ʊ
Æ0EJECT ëdšô« —“ jG{« Æ≤
ÆqOLײ« Wײ/ s Êe<« Ãd^¹ •
∫WEŠö
v« lL²Ý«Ë qš«bK Êe<« l/œ« ¨Êe<« ëdš« …—bI ÂbŽ WUŠ w/
!"#$%&'( !)*+,'-./01234 12
¡«dłô« bŽ« ¨ŸUL²Ýô« s ¡UN²½ô« bFÐË ¨WO½UŁ …d ±≤ r— W½«uDÝô«
!"#$%&'()*+!
ÆvKŽô« w/ —u,c*«
!"#$%&'()*+,-.=W
«uD)« l³ð« ¨Êe<« Ãd^¹ ô vKŽô« w/ —u,c*« ¡«dłô« Ê« WUŠ w/
!"#$%&'
∫WOU²«
!"#$%&'E gF
ÆW×O×( …—uBÐ WÞu³C U³^²M*« Ê« s b,Qð Ʊ
!"#$%&'()*+,E hF
©g qJý® ÆÍ—U³łô« ëdšô« VIŁ ‚u/ œułu*« w«u« ¡UDG« Ÿe½« Æ≤
* !"#$%&'()*%&+,©h qJý® ÆVI¦« qš«œ wž«dÐ pH q¦ WLOI²7 ¡UBŽ qšœ« Æ≥
ÆWLOI²7 …—uBÐ qšœ« ÆWKzU W¹Ë«“ qJAÐ UBF« qšbð ô *
Fig. g
=g
g qJý
Fig. h
=h
h qJý
H
V
The compulsory eject hole and protective seal
!"#$%&'
Æw«u« r²)« l Í—U³łô« ëdšô« VIŁ
!"#$%&'( JVC !"#$%&'(
Should the problem still persists, consult the JVC authorized dealer.
How to remove the disc trays
Use the release knob to remove the disc trays when cleaning them.
1. While pulling down the release knob, pull out the disc tray.
2. After cleaning, insert the disc tray into the magazine while pulling
down the release knob.
• Clean the trays one by one to avoid inserting
two trays into one slot of the magazine.
Æhšd*« JVC qO,Ë dA²Ý« ¨WLzU WKJA*« XOIÐ «–«
!"#$%
W½«uDÝô« WOMO( Ÿe½ WOHO,
!"#$%&'()*+,-./
1. !"#$%&'()*+,
2. !"#$%&'()*+,-. CD • !!"#$%&'()*+,!$%&'-. CD !"#$
ÆUNHOEMð bMŽ ’dI« w½«u( l/d ‚öÞô«…—Ëb qLF²Ý«
Æ’dI« tOMO( V×Ý«¨‚öÞô«…—Ëb V×7ð ULMOРƱ
ULMOÐ W½e)« qš«œ w/ ’dI« WOMO( qšœ« ¨nOEM²« bFÐ Æ≤
Æ‚öÞô« …—Ëb qHÝö V×7ð
w/ 5²OMO( ‰Ušœ« VM−² Èdšô« b×Ð …bŠ«u« w½«uBÒ« k½ •
ÆW½e)« s bŠ«Ë oý qš«œ
Release knob
‚öÞô«…—Ëb
• Handling CD-Rs/CD-RWs
The reflective film of CD-Rs/CD-RWs is less tough than that of
ordinary music CDs. If these discs are damaged, their film may
peel. These media are also susceptible to fingerprints, so use
extreme care when handling them.
• Storage
Make sure to keep CDs in their cases. If discs are piled on top
of one another without their cases, they may be damaged. Do
not put CDs where they will be exposed to direct sunlight or in
a place subject to high temperatures and humidity. Avoid leaving
CDs in your car.
Hold down the center holder.
!"#$
Æe,d*« qUŠ vKŽ qHÝö jG{«
• • !"#$%CD-R/CD-RW
!"#$%&CD-R/CD-RW !"#$%&'()
!"#$%&'()* +,-./01234!
!"#$%&'(&)*+,-./01234,
!"#$
Lift it out without touching the recorded surface.
!"#$%&'()*
ÆtOKŽ qÒ−7*« `D7« f* ÊËbÐ W½«uDÝô« l/—«
Correct
`O×(
U½«uDÝô« Êeš •
WUŠ w/ ÆUN WBB<« UE/U(« w/ CD W−b*« U½«uDÝô« Êeš s b,Qð
lCð ô Æ—dC²ð Ê« sJ1 t½U/ ¨Èdšô« ‚u/ …bŠ«Ë U½«uDÝô« f¹bJð
fLA« WFý« v« UNÐ ÷dF²ð Ê« sJ1 s,U« w/ CD W−b*« U½«uDÝô«
U½«uDÝô« „d²ð ô ÆWOUF« WÐuÞd« Ë« WOUF« …—«d(« Ë« …dýU³*«
Æ…—UO7« qš«œ CD W−b*«
Insert with the label facing up.
!"#$%&
œułu*« V½U'« ÊuJ¹ Ê« …UŽ«d l qšœ«
ÆvKŽö UN−² oBK*« tOKŽ
25/10/02, 11:54 AM
Press gently on the disc to insert.
!"#$%
ÆUNUšœô W½«uDÝô« vKŽ nDKÐ jG{«
CD W−b*« U½«uDÝô« W½UO( •
W½«uDÝô« vKŽ ŒUÝË« Ë« lÐU(« ULBÐ œułË WUŠ w/ –
WLŽU½ ‘UL WFDIÐ W−b*« W½«uDÝô« nÒE½ ¨CD W−b*«
ÆW/U(« ÁU&UР×U)« v« qš«b« s UN×7 WDÝ«uÐ ¨W/UłË
W−b*« W½«uDÝô« `7« ¨nOEM²UÐ WÐuF( œułË WUŠ w/
Æ¡U*UÐ öOK WKK³ ‘UL WFDIÐ CD
Ë« ‰u×J« Ë« s¹eM³« Ë« U½«uDÝô« UHEM qLF²7ð ô –
ÆWOJOðU²Ýô« b{ œ«u
tOKŽ oBKð ôË W−b*« W½«uDÝô« vKŽ œułu*« oBK*« —dCð ô –
Æ‚«—Ë« Ë« UIBK
Incorrect
`O×( dOž
6
6
WKÐUI« /CD-R qO−7²K WKÐUI« ‡ W−b*« U½«uDÝö W7,UF« WI³D«
W−b*« U½«uDÝö W7,UF« WI³D« s …ËU7 q« CD-RW WÐU²J« …œUŽô
dAI²ð Ê« sJ1 ¨ U½«uDÝô« ÁcN —d{ qBŠ «–« ÆW¹œUF« WOIOÝu*« CD
ULB³Ð dŁQ²« WF¹dÝË WÝU7Š UC¹« U½«uDÝô« Ác¼ ÆW7,UF« UNðUI³Þ
Æ U½«uDÝô« Ác¼ l qUF²« bMŽ b¹bA« —c(« …UŽ«d V−¹ pc ªlÐU(ô«
!"#$%"#&'()*!"#+,-./$012
!"#$%&'( )*+,-./012345
!"#$%&'()*+,"
• Maintenance of CDs
• !"
– When fingerprints and dirt adhere to a CD, wipe the disc clean
– !"#$%"&'#()*+,-./0123452
with a soft, dry cloth, wiping from the inside towards the edge.
!"#$%&'()*+,-%.-/01234
If it is difficult to clean, wipe the CD with a cloth moistened
with water.
– !"#$%&'()&*+,-./%0
– Do not use record cleaners, benzine, alcohol or antistatic
– !"#$%&'()*"#$+,-./01(
agents.
– Do not damage the label side or stick paper or adhesive to the
surface.
CH-X1500[U]6.0C
W?KÐUI« /CD-R q?O−7²K WKÐUI« W−b*« U½«uDÝô« l qUF²« •
ÆCD-RW WÐU²J« …œUŽô
CAUTION / PRECAUCION / ATTENTION
ENGLISH
This unit can only be connected to the JVC car receivers/controllers equipped with MP3-CD
changer control functions. If connected to any other receiver/controller, this unit cannot work
(even CDs may not play back).
ESPAÑOL
Esta unidad puede conectarse únicamente a los receptores/controladores para automóvil JVC
provistos de las funciones de control del cambiador de MP3-CD. Esta unidad no podrá
funcionar en el caso de que esté conectada a cualquier otro receptor/controlador (tampoco se
podrán reproducir los CDs).
FRANÇAIS
Cet appareil peut uniquement être connecté aux autoradios/contrôleurs JVC munis d’une
fonction de commande de changeur de CD MP3. Il ne peut pas fonctionner s’il est connecté à
un autre type d’autoradio/contrôleur (même les CD ne peuvent pas être reproduits).
LV43470-001A
CautionCh-X1500.pm6
1
02.12.11, 15:14