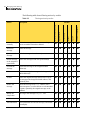
1
Symantec Mail Security
8200 Series
Implementation Guide
Symantec Mail Security 8200 Series
Implementation Guide
The software described in this book is furnished under a license agreement and
may be used only in accordance with the terms of the agreement.
Documentation version 1.0.2
June 8, 2005
Part Number: 10413018
Copyright notice
Copyright © 1998–2005 Symantec Corporation.
All rights reserved.
Any technical documentation that is made available by Symantec Corporation is
the copyrighted work of Symantec Corporation and is owned by Symantec
Corporation.
NO WARRANTY. The technical documentation is being delivered to you AS-IS
and Symantec Corporation makes no warranty as to its accuracy or use. Any use
of the technical documentation or the information contained therein is at the
risk of the user. Documentation may include technical or other inaccuracies or
typographical errors. Symantec reserves the right to make changes without
prior notice.
No part of this publication may be copied without the express written
permission of Symantec Corporation, 20330 Stevens Creek Blvd., Cupertino, CA
95014.
Trademarks
Symantec, the Symantec logo, Symantec TurnTide and Norton AntiVirus are
U.S. registered trademarks of Symantec Corporation. LiveUpdate, LiveUpdate
Administration Utility, Symantec AntiVirus, and Symantec Security Response
are trademarks of Symantec Corporation.
Other brands and product names mentioned in this manual may be trademarks
or registered trademarks of their respective companies and are hereby
acknowledged.
Printed in the United States of America.
10 9 8 7 6 5 4 3 2 1
Technical support
As part of Symantec Security Response, the Symantec global Technical Support
group maintains support centers throughout the world. The Technical Support
group’s primary role is to respond to specific questions on product feature/
function, installation, and configuration, as well as to author content for our
Web-accessible Knowledge Base. The Technical Support group works
collaboratively with the other functional areas within Symantec to answer your
questions in a timely fashion. For example, the Technical Support group works
with Product Engineering as well as Symantec Security Response to provide
Alerting Services and Virus Definition Updates for virus outbreaks and security
alerts.
Symantec technical support offerings include:
■
A range of support options that give you the flexibility to select the right
amount of service for any size organization
■
Telephone and Web support components that provide rapid response and
up-to-the-minute information
Upgrade insurance that delivers automatic software upgrade protection
Please visit our Web site for current information on Support Programs. The
specific features available may vary based on the level of support purchased and
the specific product that you are using.
■
Contacting Technical Support
Customers with a current maintenance agreement may contact the technical
support group, http://www.symantec.com/techsupp/enterprise/
When contacting the technical support group, please have the following:
■
Product release level
■
Hardware information
■
Available memory, disk space, NIC information
■
Operating system
■
Version and patch level
■
Network topology
■
Router, gateway, and IP address information
■
Problem description
■
Error messages/log files
■
Troubleshooting performed prior to contacting Symantec
■
Recent software configuration changes and/or network changes
Contents
Section 1
Getting started
Chapter 1
Introducing Symantec Mail Security 8200 Series
About Symantec Mail Security appliances ........................................................ 3
Protection against source and content threats ......................................... 4
Automatically managed, comprehensive, flexible protection ................ 5
What’s new in Symantec Mail Security 8200 Series ........................................ 5
Functions of Symantec Mail Security 8200 Series ........................................... 6
How Symantec Mail Security 8200 Series works .............................................. 7
Architectural Overview ................................................................................. 9
Features of Symantec Mail Security 8200 Series ........................................... 10
Email Firewall ............................................................................................... 10
TCP-layer Traffic Shaping .......................................................................... 11
Antispam technology .................................................................................. 11
Antivirus technology ................................................................................... 13
Content Compliance .................................................................................... 13
Group policies, filter policies ..................................................................... 14
End user features ......................................................................................... 15
Administration and manageability ........................................................... 15
Appliance models and specifications ............................................................... 18
Part list .......................................................................................................... 18
Documentation ............................................................................................. 18
Chapter 2
Setting up Symantec Mail Security 8200 Series
Before you set up your appliance ...................................................................... 21
Compatible browsers and SSH settings .................................................... 22
Supported USB CD-ROM drives ................................................................. 22
How to set up Symantec Mail Security 8200 Series ....................................... 22
Configuring your network to include the new appliance ...................... 23
Understanding key indicators and controls ............................................ 23
Initialize your new appliance ..................................................................... 24
Registering your system ............................................................................. 26
Setting up your appliances ......................................................................... 27
Setting up a Scanner ................................................................................... 31
Completing setup ......................................................................................... 34
vi Contents
Logging in and logging out ................................................................................. 35
Logging out ................................................................................................... 37
Having trouble logging in or out? ............................................................. 37
Section 2
Managing email
Chapter 3
Managing email filtering
About email filtering ........................................................................................... 41
Understanding filtering ...................................................................................... 41
Multiple actions ........................................................................................... 46
Multiple policies ........................................................................................... 48
Creating groups and adding members ............................................................. 48
Assigning filter policies to a group ................................................................... 51
Selecting virus policies for a group ........................................................... 51
Selecting spam policies for a group .......................................................... 52
Selecting compliance policies for a group ............................................... 52
Enabling and disabling end user settings ................................................ 53
Allowing or blocking email based on language ....................................... 55
Managing Group Policies .................................................................................... 55
Creating virus, spam, and compliance filter policies ..................................... 57
Creating virus policies ................................................................................ 57
Creating spam policies ................................................................................ 58
Creating compliance policies ..................................................................... 59
Managing Email Firewall policies ..................................................................... 65
Configuring attack recognition ................................................................. 66
Configuring sender groups ......................................................................... 67
Configuring Sender Authentication ......................................................... 77
Managing policy resources ................................................................................ 78
Configuring attachment lists ..................................................................... 78
Configuring dictionaries ............................................................................. 80
Annotating messages .................................................................................. 81
Adding and editing notifications ............................................................... 83
Archiving messages ..................................................................................... 84
Configuring virus and spam settings ............................................................... 86
Configuring virus settings .......................................................................... 86
Configuring spam settings ......................................................................... 87
Chapter 4
Working with Web Quarantine
About Quarantine ................................................................................................ 91
Delivering messages to Quarantine .................................................................. 91
Working with messages in Quarantine for administrators .......................... 92
Accessing Quarantine ................................................................................. 92
Contents
Checking for new Quarantine messages .................................................. 92
Administrator message list page ............................................................... 92
Administrator message details page ......................................................... 95
Searching messages ..................................................................................... 97
Configuring Quarantine ....................................................................................100
Delivering messages to Quarantine from the Scanner ........................100
Configuring Quarantine for administrator-only access ......................101
Configuring Quarantine on a Control Center-only appliance .............101
Configuring the user and distribution list notification digests ..........102
Configuring recipients for misidentified messages .............................106
Configuring the Delete Unresolved Email setting ................................107
Setting the Quarantine message retention period ...............................107
Setting the Expunger frequency and start time ...................................108
Configuring the login help .......................................................................108
Configuring the Quarantine port for incoming SMTP email ..............109
Specifying Quarantine message and size thresholds ...........................110
Administering Quarantine ...............................................................................111
Starting and stopping Quarantine ..........................................................111
Checking the Quarantine postmaster mailbox .....................................111
Checking the Quarantine error log .........................................................112
Increasing the amount of information in BrightmailLog.log .............113
Backing Up the Quarantine message database .....................................114
Troubleshooting .................................................................................................114
Message “The operation could not be performed.” is displayed ........114
Can’t log in due to conflicting LDAP and Control Center accounts ...114
Error in Quarantine log file due to very large spam messages ...........114
Users don’t see distribution list messages in their Quarantine .........115
Undeliverable Quarantined messages go to Quarantine postmaster 115
Error in Quarantine log file due to running out of disk space ............116
Users receive notification messages, but can’t access messages .......116
Duplicate messages appear in Quarantine ............................................117
Maximum number of messages in Quarantine .....................................117
Copies of misidentified messages aren’t delivered to administrator 118
Message “Unable to release the message.” is displayed ......................118
Chapter 5
Creating Reports
About reports .....................................................................................................119
Choosing a report ...............................................................................................120
About charts and tables ....................................................................................128
Selecting report data to track ..........................................................................128
Setting the retention period for report data .................................................129
Running reports .................................................................................................129
Saving and editing Favorite Reports ..............................................................130
vii
viii Contents
Troubleshooting report generation ................................................................ 131
Error: No data for the specified parameters .......................................... 131
Sender HELO domain or IP connection shows gateway information 131
Reports presented in local time of Control Center ............................... 131
By default, data are saved for one week ................................................. 132
Processed message count recorded per message, not per recipient .. 132
Recipient count equals message count ................................................... 132
Deferred or rejected messages are not counted as received ............... 133
Reports limited to 1,000 rows .................................................................. 133
Printing, saving, and emailing reports ........................................................... 133
Scheduling reports to be emailed .................................................................... 134
Section 3
Managing your system
Chapter 6
Managing your system
Configuring global system settings ................................................................ 139
Configuring alert settings ........................................................................ 139
Configuring certificate settings .............................................................. 141
Configuring LDAP settings ....................................................................... 143
Configuring replication settings ............................................................. 147
Invalid Recipient Handling .............................................................................. 151
Configuring log settings ........................................................................... 151
Configuring report settings ..................................................................... 152
Configuring local domains ....................................................................... 153
Configuring address masquerading ........................................................ 154
Importing masqueraded entries .............................................................. 155
Configuring aliases .................................................................................... 156
Managing Scanners ........................................................................................... 159
Testing Scanners ....................................................................................... 159
Editing Scanners ........................................................................................ 159
Enabling and disabling Scanners ............................................................ 160
Deleting Scanners ...................................................................................... 161
Configuring individual host settings .............................................................. 161
Starting and stopping services ................................................................ 161
DNS servers, routers, and time ................................................................ 162
HTTP Conduit proxies ............................................................................... 162
Ethernet settings ....................................................................................... 163
SMTP Scanner settings ............................................................................. 164
Chapter 7
Administering the system
Administration information about your system .......................................... 171
System logging facilities ........................................................................... 171
Contents
Getting status information ..............................................................................172
Overview of system information .............................................................172
Processed message details ........................................................................173
Host details .................................................................................................173
Scanner replication ...................................................................................174
LDAP synchronization ..............................................................................174
Queue details ..............................................................................................175
Log Details ..................................................................................................176
Administering appliances with the Control Center .....................................176
Managing system administrators ...........................................................177
Designating access to the Control Center ..............................................178
Managing software licenses .....................................................................178
Updating your system ...............................................................................178
Managing connections through system utilities ..................................179
Backing up your system ............................................................................179
Restoring your system from backup files ..............................................181
Shutting down an appliance ....................................................................181
Rebooting your appliance .........................................................................183
Returning to factory defaults ..................................................................183
Administering appliances with the command line ......................................183
clear ..............................................................................................................185
crawler .........................................................................................................186
date ...............................................................................................................186
db-backup ....................................................................................................186
db-restore ....................................................................................................187
deleter ..........................................................................................................189
diagnostics ..................................................................................................189
dns-control ..................................................................................................190
grep ..............................................................................................................190
help ...............................................................................................................191
http ...............................................................................................................191
ifconfig ........................................................................................................191
install ...........................................................................................................191
iostat ............................................................................................................191
more .............................................................................................................192
mta-control .................................................................................................192
mta-stats .....................................................................................................193
netstat ..........................................................................................................194
nslookup ......................................................................................................194
passwd .........................................................................................................194
ping ..............................................................................................................195
reboot ...........................................................................................................195
rebuildrpmdb ..............................................................................................195
ix
x Contents
rollback ........................................................................................................ 195
route ............................................................................................................. 196
service .......................................................................................................... 196
set-time ........................................................................................................ 197
shutdown ..................................................................................................... 197
sshdctl ......................................................................................................... 198
system-stats ................................................................................................ 200
tail ................................................................................................................ 200
traceroute .................................................................................................... 201
update .......................................................................................................... 201
version ......................................................................................................... 202
watch ........................................................................................................... 203
Chapter 8
Testing the system
Verifying normal delivery ................................................................................ 205
Testing antivirus filtering ................................................................................ 206
Verifying spam filtering to Quarantine ......................................................... 207
Appendix A
Plug-ins and Foldering
About Plug-ins and foldering ........................................................................... 209
Installing the Symantec Outlook Spam Plug-in ............................................ 209
Usage Scenarios ......................................................................................... 210
End User Experience ................................................................................. 210
Software Requirements ............................................................................ 211
Configuring Automatic Spam Foldering ........................................................ 216
Configuring the Symantec Spam Folder Agent for Exchange ............ 216
Configuring the Symantec Spam Folder Agent for Domino ............... 218
Enabling Automatic Spam Foldering .............................................................. 220
Enabling Language Identification ................................................................... 221
Glossary
Index
Section
Getting started
■
Introducing Symantec Mail Security 8200 Series
■
Setting up Symantec Mail Security 8200 Series
1
2
Chapter
1
Introducing Symantec Mail
Security 8200 Series
This chapter includes the following topics:
■
About Symantec Mail Security appliances
■
What’s new in Symantec Mail Security 8200 Series
■
Functions of Symantec Mail Security 8200 Series
■
How Symantec Mail Security 8200 Series works
■
Features of Symantec Mail Security 8200 Series
■
Appliance models and specifications
About Symantec Mail Security appliances
Welcome to Symantec Mail Security 8200 Series. The Symantec Mail Security
appliances provide enterprises with an easy-to-deploy, comprehensive gatewaybased email security solution. Deployed in front of Microsoft Exchange or other
email or groupware servers, these hardened, Linux-based appliances secure
your organization from malicious, email-based spam or virus attacks while
ensuring that email remains an effective tool for collaboration and
communication.
By providing integrated email threat defenses that consolidate Email Firewall,
Traffic Shaping, antispam, antivirus, and Content Compliance capabilities in a
single box, Symantec Mail Security 8200 Series appliances achieve the most
effective, accurate, and easy-to-deploy email security solution available today.
4 Introducing Symantec Mail Security 8200 Series
About Symantec Mail Security appliances
This document explains the implementation of Symantec Mail Security 8200
Series appliances, including:
■
Symantec Mail Security 8240 - For organizations with more than 100 and
less than 1,000 users
■
Symantec Mail Security 8260 - For organizations with 1,000 or more users
Protection against source and content threats
The universe of email threats is constantly expanding. Source-based threats can
compromise email security when access to the mail server is not effectively
controlled. In many systems, virtually any email sender can connect to a mail
server. In other systems, overly-restricted access to mail servers impedes vital
business functions. The Email Firewall and Traffic Shaping features in
Symantec Mail Security 8200 Series appliances automatically calibrate finegrained access control—ensuring easy access for legitimate senders yet making
it difficult or impossible for abusive senders to waste mail server resources.
In addition to source-based threats, protecting against malicious content is
imperative. Organizations need to keep up with the exponential growth of spam
and email-borne viruses. Given current legal mandates to maintain a hospitable
workplace environment, organizations are also under increasing pressure to
meet email compliance standards. Symantec Mail Security 8200 Series
appliances tightly integrate three dimensions of content security protection:
antispam, antivirus, and content. While these proven, industry-leading
technologies can stand on their own, they are even more effective as part of an
integrated email security solution. For example, because the Email Firewall and
Traffic Shaping layers reduce the amount of incoming email traffic, the
antispam and antivirus filtering can operate with much greater efficiency.
This level of automated email security protection is possible due to the industryleading effectiveness and accuracy of Symantec’s email filtering technology, as
well as extremely flexible configuration capabilities. This technology has made
possible the outstanding performance of Symantec email products—over 95%
effectiveness, with less than 1 in 1 million false positives. Competing
technologies that catch less than 90% of spam or viruses—or have high false
positive rates—do not generate the level of trust in end users and administrators
that makes centralized email policy management feasible. Symantec Mail
Security 8200 Series appliances allow you to create an unlimited number of
Group Policies to customize message processing in myriad ways for different
groups of users, to filter inbound and outbound email, and to combine filtering
criteria and actions to suit your requirements.
Introducing Symantec Mail Security 8200 Series
What’s new in Symantec Mail Security 8200 Series
Automatically managed, comprehensive, flexible protection
The automated filter updates and the integrated appliance format of the
Symantec Mail Security 8200 Series remove almost all the ongoing
administrative burden. The Symantec Mail Security 8200 Series appliances
feature the Control Center, a Web-based administration console for
administrators that provides extensive control, flexibility, and visibility. With
LDAP-aware email policies, extensive message handling options, Web-accessible
quarantines, and filtering customization tools, administrators can enforce
company or departmental policies on spam and unwanted mail for different
groups or users in the organization. For deep insight into trends and attack
statistics, a wide range of reports are available, featuring flexible scheduling and
delivery options.
What’s new in Symantec Mail Security 8200 Series
Symantec Mail Security 8200 Series Version 4.0.2 includes the following new or
improved features:
Table 1-1
New features in Version 4.0.2
Feature
Description
Domain- and userbased routing
When you specify the domains for which you accept mail, optionally choose only specific
email addresses within a domain. Optionally choose a specific mail server to accept mail for
each domain or email address.
Address
masquerading
Automatically transform the email addresses of inbound recipients and outbound senders
into addresses of your choosing, in both message envelopes and message headers.
Import groups of
names
Import a list of local domains or masquerade name definitions.
Aliasing
Transform the email addresses of inbound recipients in the message envelope into a predefined alternate address or list of addresses.
Invalid recipient
handling
Choose to have invalid recipients dropped from messages. This protects your internal mail
server name spaces from directory harvest attacks.
Received header
control
Choose to strip received headers added by Symantec Mail Security 8200 Series or by other
MTAs in your system.
Archiving flexibility
Specify the mail server to use when archiving messages to a specific email address. Also,
assign an X-header to archived mail, enabling further processing by your system based on
the X-header.
Apply policy to all
messages
Specify that particular Content Compliance policies apply to all messages. For example,
easily configure all messages to include a uniform legal disclaimer, for all groups of users.
5
6 Introducing Symantec Mail Security 8200 Series
Functions of Symantec Mail Security 8200 Series
Table 1-1
New features in Version 4.0.2 (Continued)
Feature
Description
Certificate
management
Specify that a certificate applies to a particular Scanner appliance.
Static routing
Configure static IP-based routing between firewalls and Symantec Mail Security 8200 Series
Scanners.
Access control
Specify a list of computers authorized to access your Control Center appliance, using IP
addresses, CIDR notation, subnets, or DNS names. Access your Symantec Mail Security
8200 Series appliances via HTTP(S).
CIDR notation
Use CIDR notation, optionally, whenever specifying an IP address mask.
Functions of Symantec Mail Security 8200 Series
Each Symantec Mail Security 8200 Series appliance can be deployed as follows:
■
Scanner – Deployed as a Scanner only, a Symantec Mail Security 8200
Series appliance filters email. Your installation can have one or many
Scanners. Symantec Mail Security 8200 Series appliances work with your
existing email or groupware server.
■
Control Center – Deployed only as a Control Center, a Symantec Mail
Security 8200 Series appliance is a Web-based configuration and
administration center. Use it to configure and manage email filtering, SMTP
routing, system settings, and all other functions. Each Symantec Mail
Security 8200 Series installation has one Control Center. You can configure
and monitor multiple Scanner appliances from a single Control Center.
The Control Center provides status for all Symantec Mail Security 8200
Series appliances in your system, system logs, and extensive customizable
reporting. You can configure both system-wide and host-specific details
using the Control Center.
The Control Center provides the Setup Wizard, for initial configuration of
all Symantec Mail Security 8200 Series appliances at your site, and also the
Add Scanner Wizard, for adding new Scanners.
The Control Center appliance also hosts Quarantine, an optional component
that stores spam messages and provides end users access to their spam
messages. You can also configure Quarantine for administrator-only access.
End users can access the Control Center to view their spam messages in
Quarantine and also to set their preferences for language filtering and
blocked and allowed senders.
■
Control Center and Scanner – Performs both functions. Suitable for smaller
installations.
Introducing Symantec Mail Security 8200 Series
How Symantec Mail Security 8200 Series works
Note: Symantec Mail Security 8200 Series appliances provide neither mailbox
access for end users nor message storage, and are not intended for use as the
only MTA in your email infrastructure.
Note: Symantec Mail Security 8200 Series appliances do not filter messages that
are local domain-deliverable. For example when two mailboxes reside on the
same MS Exchange Server, or on different MS Exchange Servers within an
Exchange organization, the messages will not traverse the appliance.
How Symantec Mail Security 8200 Series works
As spam messages traverse the Internet, they pass through Symantec’s
worldwide Probe Network, an extensive array of email addresses. The Probe
Network includes over 2 million probe accounts that attract the latest spam,
based upon up-to-date research into spamming methodologies. The Probe
Network sends possible spam messages in real time to Symantec Security
Response for evaluation. If the message is verified as spam, Symantec Security
Response issues antispam filters to Scanners on your system that isolate similar
messages.
Symantec Security Response includes several centers working cooperatively on
three continents, comprising a round-the-clock protection network that spans
the globe. Sophisticated automated tools, assisted and monitored by Symantec
Security Response technicians, evaluate mail for new variations of spam, then
issue filters to identify and capture similar messages. Symantec Security
Response continuously provides updated filters to the Scanners on your system.
This combination of automation and human intervention allows Symantec Mail
Security 8200 Series appliances to adapt in real time to ever-changing
spamming techniques, providing unparalleled flexibility and accuracy in
filtering spam.
Most of the filters that Symantec Security Response creates are designed to
thwart specific spam attacks. A spam attack can contain thousands of identical
or similar messages. By targeting filters against specific attacks, Symantec
Security Response keeps the false positive rate extremely low (less than 1 in 1
million).
Symantec also employs a carefully designed set of heuristic filters, which target
patterns common in spam and add a proactive element to our spam-fighting
arsenal. Commonly available heuristic filters can lead to large increases in false
positives because of the problems inherent in a pattern-matching approach.
7
8 Introducing Symantec Mail Security 8200 Series
How Symantec Mail Security 8200 Series works
Symantec Mail Security 8200 Series heuristic filters are carefully designed and
tested to prevent large increases in false positives.
Symantec resources also augment the source-based filtering that the Symantec
Mail Security 8200 Series appliances perform at your site. Traffic Shaping and
Email Firewall filtering is based upon data collected at your site as well as
aggregate data collected by Symantec throughout the Internet. This enables
Symantec to develop a reliable, constantly updated picture of the reputation of
various source domains. This information is combined with local information
collected at your site to determine how best to treat each email source.
Symantec Mail Security 8200 Series appliances automatically implement the
latest antivirus definitions and filtering engines as soon as they are available
from Symantec Security Response. At Symantec Security Response, the
industry’s largest team of experts works to identify and neutralize viruses
before they can enter the network and spread across the enterprise.
Introducing Symantec Mail Security 8200 Series
How Symantec Mail Security 8200 Series works
Architectural Overview
Your Symantec Mail Security 8200 Series appliance processes a mail message as
follows. For the sake of discussion, our sample message passes through the
Filtering Engine to the Transformation Engine without being rejected.
■
At the gateway, TCP-Layer Traffic Shaping checks the message’s IP address
to determine if it comes from a known source of spam or email-borne
viruses.
■
The incoming connection arrives at the inbound MTA via TCP/IP.
■
Before accepting the connection, the inbound MTA sends the message’s IP
address to the Email Firewall to check whether it is a known source of spam
or email-borne viruses. If it is not, the inbound MTA accepts the connection
and moves the message to its inbound queue.
■
The Filtering Hub accepts a copy of the message for filtering.
9
10 Introducing Symantec Mail Security 8200 Series
Features of Symantec Mail Security 8200 Series
■
The Filtering Hub consults the LDAP SyncService directory to expand the
message’s distribution list.
■
The filtering engine determines each recipient’s filtering policies.
■
The Email Firewall checks the message’s SMTP From: field and IP address
against Sender Group settings, which the administrator configured via the
Control Center. In addition, the message is checked against Blocked/Allowed
Senders Lists defined by end users.
■
The Email Firewall tries to authenticate the message using the Sender Policy
Framework (SPF).
■
Antivirus and heuristic filters determine whether the message is infected.
■
Content Compliance filters scan the message for restricted attachment types
or words, as defined in configurable dictionaries.
■
Antispam filters compare message elements with current filters published
by Symantec Security Response to determine whether the message is spam.
At this point, the message may also be checked against end-user defined
language settings.
■
The Transformation Engine performs actions based on filtering results and
configurable Group Policies.
Features of Symantec Mail Security 8200 Series
Symantec Mail Security 8200 Series appliances have the features described in
the following sections.
Email Firewall
Email Firewall—The first level of defenses, the Email Firewall, analyzes
incoming SMTP connections and enables preemptive responses and actions
before messages progress further in the filtering process.
The Email Firewall includes extended features, including:
■
Directory harvest attack (DHA) protection—Detects and stops dictionary
attacks and other attempts to harvest email addresses. To use DHA
protection, you must enable the LDAP SyncService.
■
Attack preemption—Detects possible spam, virus, and directory harvest
attacks by examining the frequency and quality of the messages received
from incoming IP addresses. The Email Firewall tracks how many messages
received from a given IP address were identified as spam or containing
viruses during a given window of time.
Introducing Symantec Mail Security 8200 Series
Features of Symantec Mail Security 8200 Series
■
Administrator-defined blocked and allowed senders—Recognizes blocked
and allowed senders (identified by IP address, domain, or email address) for
the organization. Messages from blocked senders are handled in a method
chosen by the administrator. Messages from allowed senders are always
delivered, unless they contain viruses or worms.
■
SMTP Connection Management—The Email Firewall can act based on the
correlation of IP address to the frequency of either bad messages or
unrecognized recipients. Connections from abusive senders can be throttled,
slowing the rate at which they can send email for a specified period of time.
■
Integrated Sender Reputation Service data—The Email Firewall can
automatically block or allow SMTP connections based on data from the
Sender Reputation Service. The Sender Reputation Service leverages the
reach of Symantec's Probe Network along with sender data culled from
filtering statistics. The Sender Reputation Service includes the Open Proxy
Senders, Suspected Spammers, and Safe Senders lists.
■
Sender authentication—The Email Firewall can be configured to
authenticate messages using the Sender Policy Framework (SPF). Messages
that fail authentication are handled in a method chosen by the
administrator.
TCP-layer Traffic Shaping
Traffic Shaping prioritizes sources with good traffic and throttles sources that
are sending spam, reducing the load downstream in the network. Spammers
have no way to force mail into the protected network, so their spam backs up on
their own servers. Symantec Mail Security 8200 Series has the ability to identify
attacks locally and adjust traffic shaping to respond to those attacks.
Most competing approaches filter email messages at network layer 7, the
application layer, where the SMTP protocol lives. However, by the time the
SMTP application is reached, abusive and inappropriate senders have already
consumed mail server and network resources. In contrast, the patented Traffic
Shaping feature embedded in Symantec Mail Security 8200 Series appliances
operates at network layers 3 and 4, the network-level protocol. Rather than
working on messages, it analyzes the packets that make up messages and the
network paths those packets have traveled.
Antispam technology
In addition to the features already covered, the range of antispam features and
technologies includes the following:
■
Text file import—Import lists of allowed and blocked senders.
11
12 Introducing Symantec Mail Security 8200 Series
Features of Symantec Mail Security 8200 Series
■
Choice of actions—Set policies to handle spam or suspected spam in a
variety of ways. Based upon the sender, recipient, and filtering results, you
can specify how a message is processed.
■
Updated URL Filters—Identifies and filters a spammer's intended URL,
which is often disguised and leads to spam Web pages. Symantec Mail
Security 8200 Series appliances incorporate fourth generation URL
technologies, optimized for speed.
■
Updated Heuristic Filters—Proactive filtering technology that evaluates the
content of incoming messages based on telltale characteristics of spam and
legitimate mail. Includes language-agnostic and language-aware heuristics.
■
BrightSig2—Signature technology that eliminates randomization and
HTML-based filter evasion techniques.
■
Attachment Signatures—Targets a specific MIME attachment, for example, a
pornographic image used in a specific spam attack.
■
Header Filters—Tight, targeted, regular expression-based filters based on
real-time attacks or commonalities or trends present in spam messages.
■
Body Hash Signatures—Signature technology based on the message body.
■
Adjustable suspected spam threshold—Site-specific definition of suspected
spam can be used to provide more aggressive filtering.
■
10-minute updates—Filters automatically downloaded from Symantec to
customer sites via secure HTTPS every 10 minutes. No need for
administrator intervention.
■
Language Identification—Text of a message can be identified as belonging to
one of 11 languages. Software then runs only the filters that apply to the
message's language. Administrators can set policies that accept or block
messages based on language identification. End users can choose the
languages in which they want to receive messages.
■
Language-specific heuristics—Specially tuned heuristics based on 11
languages target non-English spam.
■
Language expertise—Technicians deployed across the globe analyze spam
and create targeted filters in over 15 languages.
■
Global operations centers—Globally distributed spam analysis and
operations centers in the United States, Ireland, Australia, and Taiwan
provide 24x7 monitoring of spam attacks and filter performance at
customer sites worldwide.
■
Spam detection network—Our Probe Network is the largest honeypot
network (over 2 million decoy email addresses and domains). Also includes
submissions and statistics from over 300 million email inboxes.
Introducing Symantec Mail Security 8200 Series
Features of Symantec Mail Security 8200 Series
■
Missed spam submission—End users can log into the Control Center, a Webbased interface, to submit missed spam to Symantec.
■
24x7 false positive resolution—All possible false positives are analyzed by
Symantec technicians.
■
False positive submissions—Using convenient submission tools, Symantec's
user community—300 million strong—can quickly inform Symantec in the
event of a misidentified message.
■
Submission responses—Based on the submissions, Symantec adjusts filters
if warranted to improve filtering quality.
Antivirus technology
Symantec Mail Security 8200 Series appliances scan and detect viruses by
integrating award-winning Symantec antivirus technology. Antivirus protection
includes automatic virus definition updates, flexible policies to handle messages
with viruses, and specific defenses against mass mailing worms and the
associated spawned messages. The range of antivirus features and technologies
includes the following:
■
Automatic updates—Antivirus signatures and definitions are created by
Symantec and updated at customer sites as soon as they are available.
■
Choice of actions—Set policies to handle messages with viruses: clean and
deliver, deliver normally, or delete the message.
■
Mass-mailing worm auto-deletion—Automatically removes not only the
mass-mailing worm but also the associated spawned messages, which can
number in the hundreds per end user and serve no valuable purpose.
■
Variable scanning levels—Adjustable heuristics for more or less aggressive
identification of viruses.
■
Adjustable scanning thresholds—Specify maximum size and scanning depth
levels to reduce exposure to zip bombs that tax processing.
Content Compliance
When used with the message policy features, the Content Compliance features
equip administrators to enforce corporate email policies, reduce legal liability,
and ensure compliance with regulatory requirements. The range of Content
Compliance features includes the following:
■
Attachment management—Administrators can scan for attachments with
specific attributes (for example, a given file extension, file name, MIME type,
size, and so on) and perform specific actions. You can, for example,
quarantine all ZIP files, delete image files, or filter out oversized messages.
13
14 Introducing Symantec Mail Security 8200 Series
Features of Symantec Mail Security 8200 Series
■
Content compliance dictionary filters—Enables administrators to define or
import a pre-defined dictionary of prohibited words. This feature assists
with Human Resources (HR) and regulatory compliance-related issues.
■
Easy filter creation and editing—An easy-to-use graphical interface lets you
enforce company policies by creating global, server-level filters. Quickly
activate and deactivate individual filters, display activation status, and
choose the order in which filters run.
■
Multiple criteria—You can write complex rules using multiple combinations
of 16 different message parameters, scanning based on content, headers,
MIME types, and a host of other criteria. There is no limit to the number of
conditions you can create in a content filter.
■
Multiple actions—For messages matching content filters, administrators can
choose to delete, forward to an email address, modify the messages, or
perform other actions.
Group policies, filter policies
Symantec Mail Security 8200 Series appliances enable you to create targeted
policies for individuals and groups. The groups can be defined via LDAP
integration or from customized lists using a variety of identification methods,
including domains and email addresses. Two levels of policy definition allow for
maximum flexibility in customizing message processing:
■
Group Policies—Groups of users or domains. You define the membership for
the Group Policy, and select the Filter Policies it will use. You can leverage
the LDAP SyncService to provide email address resolution to LDAP groups
in your enterprise directory. You can customize email processing for each
group, and you can design group-specific Content Compliance filters.
■
Filter Policies—Sets of actions to take on types of email. Each Filter Policy
can include multiple actions (for example, add a header to the message and
archive a copy of the message) to perform on the same set of messages (for
example, spam messages or messages containing viruses). You assign a
name to each Filter Policy.
Additional features add even more flexibility to policies:
■
LDAP synchronization—Symantec Mail Security 8200 can perform one-way
LDAP synchronization from existing directory stores via its SyncService
feature. Supported source directories include Windows 2000 Active
Directory, Windows 2003 Active Directory, Sun Directory Server 5.2
(formerly known as the iPlanet Directory Server), and Exchange 5.5.
■
Adjustable suspected spam threshold—You can configure your own
definition of suspected spam to provide more aggressive filtering. You can
Introducing Symantec Mail Security 8200 Series
Features of Symantec Mail Security 8200 Series
then use policies to set up unique actions per group, or common actions, for
messages identified as suspected spam.
■
Alias and distribution list expansion—Symantec Mail Security 8200 enables
alias, distribution list, and LDAP group resolution to recipients’ primary
email addresses—matching a recipient’s primary email address to a Group
Policy even if the message was sent to an alias or distribution list.
End user features
Symantec Mail Security 8200 Series appliances allow end users to manage and
customize their filtering. Users log into a special section of the Control Center
and select appropriate settings. The customizable end user features include:
■
Blocked Senders Lists—Users can specify addresses that will always be
blocked. These entries supplement the organization-wide block lists defined
by administrators.
■
Allowed Senders Lists—Users can designate senders who are allowed to
bypass antispam filtering. These entries supplement the organization-wide
block lists defined by administrators.
■
Language settings—Users can either specify languages in which they want to
receive email or in which they don't want to receive email. Users can choose
from 11 supported languages.
■
Submissions—Users can submit missed spam or false positives to Symantec
for analysis.
■
Web-based Quarantine—Users on your network can log in to their personal
quarantine at any time and view their quarantined messages.
■
Quarantine message search—Users can search messages in Quarantine
using multiple criteria, including To: headers, From: headers, message body,
Subject: headers, Message ID: headers, and time range.
Administration and manageability
Symantec Mail Security 8200 Series appliances feature automated content
updates for comprehensive protection. They are feature-rich and customizable
enough to give administrators control and visibility into their organizations'
email security issues. The range of administration features includes:
■
Web-based administration—The Web-based Control Center lets
administrators use a Web browser to view a real-time dashboard of
consolidated filtering performance and centrally administer multiple
Symantec Mail Security 8200 Series appliances.
15
16 Introducing Symantec Mail Security 8200 Series
Features of Symantec Mail Security 8200 Series
■
Automated filter downloads and statistics transfer—Secure HTTPS polling
from customer sites initiates download of updated filters. The same process
transmits statistics from customer sites to Symantec, allowing Symantec to
gauge the performance and effectiveness of deployed filters. The process
requires no administrator intervention and filtering is never stopped during
the update process.
■
Easy software updates—Administrators can apply software updates to
appliances quickly and easily.
■
Assignable administrator privileges—Create additional administrator
accounts, granting each the desired level of management privileges for
different components. You can assign any or all of the following
management roles: Manage Quarantine, Manage status and logs, Manage
reports, Manage policies, Manage settings, Manage administration.
■
Automated email alerts—You can choose to have alerts sent to the system
administrator when any of the following conditions arise:
■
A component is not responding or working.
■
Antispam filters are older than a specified time.
■
Antivirus filters are older than a specified time.
■
A message queue is larger than a specified size.
■
Available disk space is less than a specified quantity.
■
SSL/TLS certificates are about to expire.
■
LDAP synchronization errors occur.
■
LDAP scanner replication errors occur.
■
Your antivirus license expired.
■
Your antispam license expired.
■
Your software update license expired.
■
A new software update is available.
■
Consolidated logs—Logging can be set to any of five levels, for the Filter Hub
and the Conduit. You can designate the maximum size and retention period
for entries in the log database and save logs to a text file for further review.
■
Consolidated status view—View the following from one central location:
Quarantine information, configured Scanner appliances in your network,
along with any associated components. The basic status (running or not) of
the Scanners and components.
■
Command line interface—Administrators can optionally manage certain
tasks using a command line interface.
Introducing Symantec Mail Security 8200 Series
Features of Symantec Mail Security 8200 Series
Submissions
Messages identified by administrators and users as missed spam or false
positives are automatically sent to Symantec for analysis. Administrators can
receive a copy of all misidentified messages sent by users to Symantec.
Security
Support for Transport Layer Security (TLS) encryption enables administrators
to configure whether each Scanner uses TLS for processing inbound messages,
processing outbound messages, or message delivery.
Quarantine
Symantec Mail Security 8200 Series provides a Web-based Quarantine. Using
the Control Center, administrators can log in and review spam messages that
the Symantec software has quarantined for all users in their organization. The
range of Quarantine features includes:
■
Email notification—Quarantine can send a periodic email summary to users,
listing quarantined messages, including links for users to immediately
release messages to their inbox or to log in to their personal quarantines.
■
One-click release of quarantined messages—Recipients of spam quarantine
digest can click links to immediately release or view caught spam
messages—without having to log in.
■
Alias expansion—Quarantine automatically resolves aliases and delivers
mail to the correct quarantine account for the underlying email address
(requires Control Center access to your LDAP server).
■
Spam expunging and size thresholds—Administrators can set the retention
period for spam messages, as well as thresholds to control the Quarantine
database size and the message number limit, on a global or per-user basis.
■
Quarantine message search—Users and administrators can search messages
using multiple criteria, including To: Headers, From: Headers, message
body, Subject: Headers, Message ID: Headers, and time range.
■
Customizable notification template—Administrators can customize delivery
frequency, message content, content type (HTML, text, or both). They can
also specify whether the digest includes embedded view message and
release message links to enable users to access messages without logging in,
and choose whether to deliver the digest to distribution lists.
17
18 Introducing Symantec Mail Security 8200 Series
Appliance models and specifications
Reporting
The reporting capabilities of Symantec Mail Security 8200 Series include:
■
Consolidated reporting—View consolidated filter performance statistics for
all Symantec Mail Security 8200 Series appliances operating as Scanners.
■
Multiple preset reports—Provides comprehensive real-time reporting of
filter performance and email attacks, with over 50 types of preset reports.
■
Report export—Export report data for use in any reporting or spreadsheet
software for further analysis.
■
Report scheduling—Schedule reports for automatic generation and email
delivery.
Appliance models and specifications
The Symantec Mail Security 8200 Series appliances consolidate Email Firewall,
Traffic Shaping, antispam, antivirus, and Content Compliance capabilities into
one single box. Each compact, rack-mounted, Intel-based server appliance is
based on proven hardware, with all necessary operating system, MTA and
product software pre-installed. The appliance and included software ship prehardened against common vulnerabilities and attacks. All software and security
updates are simply applied with minimal administrator intervention. Updated
spam and virus filters and definitions are applied automatically.
Symantec Mail Security 8240 is powered by a 2.8 GHz Intel Pentium 4 processor,
1.5 GB of RAM, two 40GB SATA hard drives (RAID1), one power supply and fan.
Symantec Mail Security 8260 is powered by a two 3.0 GHz Intel Xeon processors,
2GB of RAM, two 73GB SCSII hard drives (RAID1), dual power supplies and fans.
Part list
Your Symantec Mail Security 8200 Series appliance package includes the
following items:
■
Symantec Mail Security 8240 or 8260 appliance
■
Removable front bezel
Documentation
In addition to this Implementation Guide, your Symantec Mail Security 8200
Series appliance comes with the following documentation:
■
Symantec Mail Security 8200 Series Planning Guide
Introducing Symantec Mail Security 8200 Series
Appliance models and specifications
■
Symantec Mail Security 8200 Series Getting Started
■
Online help for end users
■
Online help for administrators
19
20 Introducing Symantec Mail Security 8200 Series
Appliance models and specifications
Chapter
2
Setting up Symantec Mail
Security 8200 Series
This chapter includes the following topics:
■
Before you set up your appliance
■
How to set up Symantec Mail Security 8200 Series
■
Logging in and logging out
Before you set up your appliance
Each Symantec Mail Security 8200 Series appliance can be used to perform a
variety of functions in your system. For smaller installations, the same
appliance can be used to perform all needed functions. For larger installations, a
number of appliances can be set up to perform specialized functions.
The available functions are:
■
Scanner: Performs email filtering. You can set up one or many Scanner
appliances.
■
Control Center: Manages your system. Each Symantec Mail Security 8200
Series installation has exactly one Control Center appliance. The Control
Center can manage multiple Scanner appliances.
■
Control Center and Scanner: Performs both functions. Suitable for smaller
installations.
The Control Center appliance also hosts Quarantine, a component that stores
spam messages and provides end users access to their spam messages. You can
also configure Quarantine for administrator-only access. Use of Quarantine is
optional.
22 Setting up Symantec Mail Security 8200 Series
How to set up Symantec Mail Security 8200 Series
During initial setup, you will be asked to choose the function that this appliance
will perform. Before setting up the appliance, decide which function or set of
functions you will choose from the list above.
For more information about planning your installation, see the Symantec Mail
Security 8200 Series Planning Guide.
Compatible browsers and SSH settings
Symantec Mail Security 8200 Series works with the following browsers:
■
Microsoft Internet Explorer 6.0
■
Netscape 7.2
■
Firefox 1.0
Some SSH clients need to be correctly configured to talk to the Symantec Mail
Security 8200 Series SSH server when using the v2 protocol. If your client will
not connect to your appliance, try configuring the client to use the standard
SSH server. If your client does not support that configuration option and does
not automatically detect it, you will need to use the v1 protocol.
For additional system requirements, see the Symantec Mail Security 8200 Series
Planning Guide.
Supported USB CD-ROM drives
The following USB CD-ROM drives are supported (but not included):
■
Dynex DX-ECDRW100
■
IOMEGA CD-RW CDRW55292EXT
■
TEAC CD-210PU
How to set up Symantec Mail Security 8200 Series
Setting up your appliance involves the following tasks:
■
Configuring your network to include the new appliance
■
Understanding key indicators and controls
■
Initialize your new appliance
■
Setting up your appliances
■
Setting up a Scanner
Setting up Symantec Mail Security 8200 Series
How to set up Symantec Mail Security 8200 Series
After performing the above tasks, you can continue to add additional Scanners if
desired. Then proceed to the next chapter to complete system setup.
Configuring your network to include the new appliance
For each appliance you set up, you will need a valid IP address and a fully
qualified hostname. Before setting up your appliances, obtain the IP addresses
you will need. Perform whatever other tasks are necessary in your environment
to be able to include the new appliance in your network.
Also, ensure that your network is configured to permit outbound connections to
Symantec on port 443. For registration and ongoing operations, Symantec Mail
Security 8200 Series appliances communicate with Symantec Security Response
over a secure connection.
Understanding key indicators and controls
Most of the controls on your appliance are not needed for normal, everyday use.
Of the connectors on the back panel, pay special attention to the labels for the
Ethernet jacks.
When you initialize your appliance, you will need to configure separately each
Ethernet jack you used, depending on your appliance model, as follows:
■
On Model 8240, the top Ethernet jack is labeled 1, the bottom Ethernet jack
is labeled 2.
■
On Model 8260, the Ethernet jack on the right is labeled 1, the Ethernet jack
on the left is labeled 2.
Front panel indicators
The two system identification buttons on the front and back panels can be used
to locate a particular system within a rack. When one of these buttons is pushed,
the blue system status indicators on the front and back of the system blink. To
stop the indicator from blinking, press one of the buttons a second time.
Table 2-1 describes the indicators on the system front panel.
Table 2-1
Front Panel Indicators
LED Indicator
Description
Blue/amber system status
indicator
The blue system status indicator lights up during normal system operation.
The amber system status indicator flashes when the system needs attention
due to a system problem.
23
24 Setting up Symantec Mail Security 8200 Series
How to set up Symantec Mail Security 8200 Series
Table 2-1
Front Panel Indicators (Continued)
LED Indicator
Description
Hard drive indicator (Model 8240
only)
The green hard drive activity indicator flashes when the hard drives are in
use.
NIC1 and NIC2 link indicators
The indicators for the two Ethernet jacks light if network connections are
active.
NIC1 corresponds to Ethernet jack 1.
NIC2 corresponds to Ethernet jack 2.
Power indicator
The green indicator in the center of the power button flashes if AC power is
available to the system, but the system is not powered on.
The green indicator is on when the system is powered on.
If the system is not connected to AC power, the green indicator is off.
Initialize your new appliance
Each installation must have exactly one Control Center appliance. Set up your
Control Center appliance first, then set up your Scanner appliances. If you are
using the same appliance for both of these functions, you will be asked questions
regarding both the Control Center setup and the Scanner setup.
To begin initialization
1
Unpack the appliance and either rackmount it or place it on a level surface.
2
Plug in AC power.
3
Connect the appliance using one of the following methods:
■
Connect a keyboard and VGA monitor to the appliance.
■
Connect another computer to the appliance via the serial port. Use a
null modem cable with a DB9 connector, and settings of
9600 bps, 8/N/1.
4
Connect an Ethernet cable to the Ethernet jack labeled 1 on the back panel.
You can optionally also connect to the Ethernet jack labeled 2. (See
“Understanding key indicators and controls” on page 23.)
5
Switch on the power.
When you first boot up the appliance, you are asked to log in, then change
your password.
6
Log in using the login name admin and the password symantec.
7
Type your new password twice when prompted.
You are next asked for the host name.
Setting up Symantec Mail Security 8200 Series
How to set up Symantec Mail Security 8200 Series
8
Type a fully qualified DNS name for this host. To avoid problems with
message routing, this DNS name should not be your mail domain. For
example:
mhost6.company.com
Next you will be asked to configure the IP address for the Ethernet interface
labelled 1 on the back of the appliance.
9
Continue with To specify interfaces and DNS settings below.
To specify interfaces and DNS settings
1
When prompted, type the IP address for Ethernet interface 1. For example:
192.168.0.1
2
When prompted, type the netmask for Ethernet interface 1. For example:
255.255.255.0
You are next asked if you want to use the second Ethernet interface,
interface 2.
3
Type YES if you want to use interface 2. Otherwise, skip to step 6.
4
When prompted, type the IP address for Ethernet interface 2. For example:
192.168.12.3
5
When prompted, type the netmask for Ethernet interface 2. For example:
255.255.255.0
6
When prompted, type the IP address of the default gateway (default router).
You are next asked if you want to use the Internet’s root domain name
system (DNS) servers.
7
Type YES to use the Internet’s root DNS servers, or type NO and skip to step 9.
If you answered YES, you are asked if you also want to use your own DNS
servers.
8
Type YES to also use your own DNS servers, or type NO and follow the steps
in To specify the role of the appliance below.
9
When prompted, type the IP addresses of up to two DNS servers, then
continue with To specify the role of the appliance below.
To specify the role of the appliance
1
When prompted, choose a role for this appliance: Control Center, Scanner or
Scanner and Control Center. For more information, see “Before you set up
your appliance” on page 21.
2
If you chose Scanner only as the role for this appliance, specify when
prompted the IP address of the Control Center.
25
26 Setting up Symantec Mail Security 8200 Series
How to set up Symantec Mail Security 8200 Series
3
If the summary information is correct, type YES; if not type NO and make
changes.
4
Continue with the next section.
The appliance will reboot. Once it has finished, continue with the next
procedure, registration.
Registering your system
After you complete the initialization process, you can access the appliance from
any computer that can connect with the appliance using a browser. Log in to the
Control Center as user admin, using the password you set during initialization
in order to register the appliance.
Note: Ensure that your network is configured to permit outbound connections to
Symantec on port 443. For registration and ongoing operations, Symantec Mail
Security 8200 Series appliances communicate with Symantec Security Response
over a secure connection.
To complete registration, you need the license file (.slf file) provided to you by
Symantec. Place this file on the computer from which you are accessing the
Control Center.
Each time you add a Scanner, you must confirm your licenses or register again.
However, you can use the same .slf files for each Scanner.
Note: Licenses from other Symantec products, such as Symantec Brightmail
AntiSpam, will not work with Symantec Mail Security 8200 Series appliances.
To register your first appliance
1
From a computer that can access the new appliance, locate the appliance in
a browser (see “Compatible browsers and SSH settings” on page 22).
The default login address is:
https://<hostname>:41443
where <hostname> is the hostname you designated for your appliance
during initialization. Or, you can use the IP address in place of <hostname>.
Port 443 provides SSL access to the Control Center. HTTP access is disabled
by default. To use HTTP, you need to enable HTTP via the command line
interface and specify 41080. See “Administering appliances with the
command line” on page 183 for information on the http command.
You will see a security alert message.
2
Accept the self-signed certificate to continue.
Setting up Symantec Mail Security 8200 Series
How to set up Symantec Mail Security 8200 Series
The Control Center log in page is displayed.
3
Log in as user admin, using the password you set during initialization.
The License Registration page is displayed, showing the license status of
each feature.
4
On the License Registration page, click Browse to find your .slf file.
5
Select your .slf file and click Open to return to the License Registration page.
6
If your Scanner will be using a proxy server for communications with
Symantec, complete the proxy configuration fields.
7
Click Register.
If registration was successful, the License Registration page returns. If there
was an error, you will see error text at the top of the page.
For registration and ongoing operations, Symantec Mail Security 8200
Series communicates with Symantec Security Response over a secure
connection. If registration has failed, ensure that your network is configured
to permit outbound connections to Symantec on port 443.
8
If you have another .slf file for a different feature, repeat steps 4, 5, and 7.
9
When all your .slf files are successfully registered, click Next.
If a software update is available, the Software Update page is displayed.
Click Update to update your software. You can click Skip to update later.
(See “Updating your system” on page 178 for instructions.) After the
update, the Setup Wizard is displayed.
If your software is up-to-date, the Setup Wizard is displayed.
Setting up your appliances
Setting up your appliances involves setting up the Control Center and then
using the Setup Wizard on the Control Center to configure all of your site-wide
settings.
Depending on how you plan to use this appliance, perform the remaining setup
tasks as follows:
■
If you plan to use this Symantec Mail Security 8200 Series appliance as your
Control Center only, or as both your Control Center and as a Scanner,
proceed to Set up your appliance below.
■
If you plan to use this Symantec Mail Security 8200 Series appliance only as
a Scanner, skip to “Setting up a Scanner” on page 31.
27
28 Setting up Symantec Mail Security 8200 Series
How to set up Symantec Mail Security 8200 Series
Set up your appliance
Many of the site-wide settings that you will specify as you use the Setup Wizard
are actually site defaults that you can later vary for each Scanner you add. If you
are setting up the Control Center and a Scanner on the same appliance, the
Setup Wizard will not show a summary, instead you will proceed directly to the
Add Scanner Wizard.
Note: None of the settings you specify using the wizard are final until you click
Finish at the end of the wizard. If you step through all the panels of the wizard
and do not click Finish, configuration settings will be unchanged.
To specify administrator, time, and local domain settings
1
On the Administrator Settings panel, specify an email address for the
administrator.
The system will send alerts to this address.
2
On the Time Settings panel, specify your system-wide time settings.
You can specify a time zone. Then, either specify up to three NTP servers,
set the time manually, or choose not to change the time.
3
On the Local Domains panel, add the domains for which you accept
incoming mail. You can also add specific email addresses. See “Configuring
local domains” on page 153 for more detailed instructions.
To delete a domain from the list, check it and click Delete.
4
For each domain or email address you add, optionally specify that messages
should be routed through a specific host and port. You can optionally check
Enable MX Lookup.
5
You can click Import to import a list of local domains. See “Importing local
domains” on page 154 for instructions.
If you are setting up a Control Center-only appliance, you will now see the
Setup Wizard Summary panel. If you are setting up a Control Center and a
Scanner on the same appliance, you will see the Mail Filtering panel.
6
Do one of the following:
■
If you are setting up a Control Center-only appliance, review the information
on the Setup Wizard Summary panel. Click Back to make changes, or Finish
to complete. You must set up a Scanner before you can filter mail. To set up a
Scanner on another appliance, see “Setting up a Scanner” on page 31.
■
If you are setting up a Control Center and a Scanner on this appliance,
continue with To specify mail filtering settings below.
Setting up Symantec Mail Security 8200 Series
How to set up Symantec Mail Security 8200 Series
Note: If you plan to use one appliance as both a Control Center and a Scanner,
add the Scanner on that appliance before adding other Scanners.
To specify mail filtering settings
1
On the Mail Filtering panel, specify how you will use this Scanner. You can
choose to filter inbound mail, outbound mail, or both inbound and outbound
mail. Depending on your choice, do the following:
■
If you select both inbound and outbound and you have only specified one
physical port, you will see the Create Optional Virtual IP Address panel next.
Proceed with step 2.
■
If the above does not apply:
■
If you chose to filter inbound mail, you will see the Inbound Mail
Filtering panel. Proceed with step 4.
■
If you chose to filter outbound mail only, you will see the Outbound
Mail Filtering panel. Proceed with “To specify outbound mail filtering
settings” on page 30.
2
On the Create Optional Virtual IP Address panel, read the instructions and
click Yes or No. If you click Yes you will see the Create Virtual IP Address
panel next. Proceed with step 3. If not, you will see the Inbound Mail
Filtering panel. Skip to step 4.
3
On the Create Virtual IP Address, specify the IP address and netmask to
associate with the specified port.
4
On the Inbound Mail Filtering panel, choose the IP address to use for
inbound mail.
5
If desired, change the port specification for inbound mail.
6
On the Inbound Mail Filtering - Connections panel specify the mail servers
from which this Scanner will accept inbound mail. You can choose All IP
addresses or specify IP addresses or hostnames. A typical choice would be
All IP addresses, thus allowing the appliance to accept mail from any MTA
on the Internet.
7
On the Inbound Mail Filtering - Local Relay panel, specify the internal host
to which this Scanner will relay inbound mail after filtering is complete. You
can select a host from the list or define a new host. A typical value is a
downstream mail server such as your corporate mail server.
You can also specify a port. If you check Enable MX lookup for this host,
you must specify a host name (not an IP address) for that server.
29
30 Setting up Symantec Mail Security 8200 Series
How to set up Symantec Mail Security 8200 Series
8
If you chose to filter only inbound mail, proceed to step 6 in “To specify
outbound mail filtering settings” below. If you chose to filter inbound and
outbound mail, proceed to step 1 in “To specify outbound mail filtering
settings” below.
To specify outbound mail filtering settings
1
On the Outbound Mail Filtering panel, choose the IP address to use for
outbound mail.
2
If desired, change the port specification for outbound mail. In most cases
this should be left as port 25.
3
On the Outbound Mail Filtering - Connections panel specify by IP address
the internal mail servers from which this Scanner will accept outbound
mail. Typically you would limit this to your corporate outbound mail server.
It is important to restrict to sources you trust the parties that can send
outbound mail through this host.
If you chose to filter only outbound mail, you will see the Outbound Mail
Filtering - Local Relay panel next. Proceed to step 4. If not, skip to step 5.
4
On the Outbound Mail Filtering - Local Relay panel, specify the internal host
to which this Scanner will relay outbound mail after filtering is complete.
You can select a host from the list or define a new host. A typical value is a
downstream mail server such as your corporate mail server.
You can also specify a port. If you check Enable MX lookup for this host,
you must specify a host name (not an IP address) for that server.
5
On the Outbound Mail Filtering - Nonlocal Relay panel, specify how you
want to relay outbound mail after filtering is complete. You can use default
MX lookup, select a host from the list, or define a new host.
You can also specify a port. If you check Enable MX lookup for this host,
you must specify a host name (not an IP address) for that server.
For outbound mail addressed to a non-local domain, there is typically no
relay host to specify. If you choose Use default MX lookup, the appliance
will use Internet MX records to deliver the mail.
6
On the Setup Wizard Summary panel, review the settings shown.
7
If you are satisfied with the settings, click Finish to save them. If not, you
can click Back to revise your settings, or Cancel to end without saving any
changes.
Setting up Symantec Mail Security 8200 Series
How to set up Symantec Mail Security 8200 Series
Setting up a Scanner
If you are adding a Scanner on the same appliance as your Control Center, see
“Setting up your appliances” on page 27. The instructions in this section only
apply to adding a Scanner on a different appliance than the appliance hosting
your Control Center.
Note: If you plan to use one appliance as both a Control Center and a Scanner,
add the Scanner on that appliance before adding other Scanners.
Add a Scanner
Use the Add Scanner Wizard to set up a Scanner appliance.
Note: None of the settings you specify using the wizard are final until you click
Finish at the end of the wizard. If you step through all the panels of the wizard
and do not click Finish, you will not make any changes to configuration settings.
To configure host IP settings
1
From the Control Center, click Settings > Hosts.
If you are adding your first Scanner, you will now see the Add Scanner
Wizard. Skip to step 3. If you are adding an additional Scanner, continue
with step 2.
2
On the Hosts page, click Add.
3
On the Scanner Host Settings panel, identify your new Scanner by typing a
description and a name or IP address.
4
Continue with To register the Scanner below.
To register the Scanner
1
On the License Registration page, click Browse to find your .slf file.
2
Select your .slf file and click Open to return to the License Registration
page.
3
Click Register.
If registration was successful, the License Registration page returns. If there
was an error, you will see error text at the top of the page.
4
If you have another .slf file for a different feature, repeat steps 1, 2, and 3.
5
When all your .slf files are successfully registered, click Next.
31
32 Setting up Symantec Mail Security 8200 Series
How to set up Symantec Mail Security 8200 Series
If your software needs to be updated, the Mandatory Software Update page
is displayed. Click Update to update your software. After the update, the
Add Scanner Wizard is displayed. If your software is up-to-date, the Add
Scanner Wizard is displayed.
6
On the Time Settings panel, specify the time settings for this Scanner.
You can specify a time zone. Then, either specify up to three NTP servers,
set the time manually, or choose not to change the time.
7
Continue with “To specify mail filtering settings” below.
To specify mail filtering settings
1
On the Mail Filtering panel, choose the role for this Scanner. You can choose
to filter inbound mail, outbound mail, or both inbound and outbound mail.
Depending on your choice, do the following:
■
If you select both inbound and outbound and you have only specified one
physical port, you will see the Create Optional Virtual IP Address panel next.
Proceed with step 2.
■
If the above does not apply:
■
If you chose to filter inbound mail, you will see the Inbound Mail
Filtering panel. Proceed with step 4.
■
If you chose to filter outbound mail only, you will see the Outbound
Mail Filtering panel. Proceed with “To specify outbound mail filtering
settings” on page 30.
2
On the Create Optional Virtual IP Address panel, read the instructions and
click Yes or No. If you click Yes you will see the Create Virtual IP Address
panel next. Proceed with step 3. If not, you will see the Inbound Mail
Filtering panel. Skip to step 4.
3
On the Create Virtual IP Address panel, specify the IP address and netmask
to associate with the specified port.
4
On the Inbound Mail Filtering panel, choose the IP address to use for
inbound mail.
5
If desired, change the port specification for inbound mail.
6
On the Inbound Mail Filtering - Connections panel specify the mail servers
from which this Scanner will accept inbound mail. You can choose All IP
addresses or specify IP addresses. A typical choice would be All IP
addresses, thus allowing the appliance to accept mail from any MTA on the
Internet.
7
On the Inbound Mail Filtering - Relay panel, specify the internal host to
which this Scanner will relay inbound mail after filtering is complete. You
Setting up Symantec Mail Security 8200 Series
How to set up Symantec Mail Security 8200 Series
can select a host from the list or define a new host. A typical value is a
downstream mail server such as your corporate mail server.
You can also specify a port. If you check Enable MX lookup for this host,
you must specify a host name (not an IP address) for that server.
8
If you chose to filter only inbound mail, proceed to step 6 in To specify
outbound mail filtering settings below. If you chose to filter inbound and
outbound mail, proceed to step 1 in To specify outbound mail filtering
settings below.
To specify outbound mail filtering settings
1
On the Outbound Mail Filtering panel, choose the IP address to use for
outbound mail.
2
If desired, change the port specification for outbound mail.
3
On the Outbound Mail Filtering - Connections panel specify by IP address
the internal mail servers from which this Scanner will accept outbound
mail. Typically you would limit this to your corporate outbound mail server.
It is important to restrict the parties that can send outbound mail through
this host to sources that you trust.
If you chose to filter only outbound mail, you will see the Outbound Mail
Filtering - Local Relay panel next. Proceed to step 4. If not, skip to step 5.
4
On the Outbound Mail Filtering - Local Relay panel, specify the internal host
to which this Scanner will relay outbound mail after filtering is complete.
You can select a host from the list or define a new host. A typical value is a
downstream mail server such as your corporate mail server.
You can also specify a port. If you check Enable MX lookup for this host,
you must specify a host name (not an IP address) for that server.
5
On the Outbound Mail Filtering - Nonlocal Relay panel, specify how you
want to relay outbound mail after filtering is complete. You can use default
MX lookup, select a host from the list, or define a new host.
You can also specify a port. If you check Enable MX lookup for this host,
you must specify a host name (not an IP address) for that server.
For outbound mail addressed to a non-local domain, there is typically no
relay host to specify. If you choose Use default MX lookup, the appliance
will use Internet MX records to deliver the mail.
6
On the Scanner Host Summary panel, review the settings shown.
7
If you are satisfied with the settings, click Finish to save them. If not, you
can click Back to revise your settings, or Cancel to end without saving any
changes.
33
34 Setting up Symantec Mail Security 8200 Series
How to set up Symantec Mail Security 8200 Series
Completing setup
Your appliance is now nearly ready to use, with a set of default policies designed
for most enterprise installations. Review the sections below to determine what
additional setup tasks you need to perform.
Adding more Scanners
To add more Scanners, repeat the tasks in “Setting up a Scanner” on page 31.
Setting mail filtering policies
When you set up Symantec Mail Security 8200 Series, a set of ready-made
default message filtering policies are in place. You can use these policies or
customize them.
The initial default policies are as follows:
■
The default group policy includes all users, and specifies use of default
filtering policies for spam, suspected spam, virus, content compliance, and
end user settings.
■
The default spam policy is to modify the subject line by prepending [Spam]
and deliver the message to the inbox.
■
The default suspected spam policy is to modify the subject line by
prepending [Suspected Spam] and deliver the message to the inbox.
■
The suspected spam threshold is set to 72 (see “Configuring spam settings”
on page 87 for more information).
■
The default virus policy is to delete the message.
■
The default worm policy is to delete the message.
■
No default content compliance policies are in place.
■
No end user configuration capabilities are in place.
For more information on these policies and instructions on adjusting them to
meet your needs, see “Managing email filtering” on page 41.
Testing Scanners
For instructions on testing Scanners, see “Testing the system” on page 205.
Setting up Symantec Mail Security 8200 Series
Logging in and logging out
Changing Host IP addresses
If you change the IP address for the Control Center or any Scanner after initial
setup, see “Changing the IP address” on page 164.
Logging in and logging out
Follow these instructions to begin using the Control Center.
Log in
Choose the appropriate method for logging in depending on your role and
system type.
To log in, if you are an administrative user
1
Access your Control Center from a browser.
The default login address is:
https://<hostname>:41443
where <hostname> is the hostname you designated for your appliance
during initialization. Or, you can use the IP address in place of <hostname>.
You may see a security alert message.
2
If you see a security alert message, accept the self-signed certificate to
continue.
The Control Center log in page is displayed.
3
In the User name box, type the user name given to you by your system
administrator. If you are the first administrator to use this appliance, type:
admin
4
In the Password box, type your administrative password. Contact your
system administrator if you do not know the password.
5
Click Login.
Note: Do not create an account for an administrator that is identical to a user
account name. Do not create an end user account that is identical to an
administrator account name. If a naming conflict occurs, the administrator will
take precedence and the end user will be denied access to their account. In the
unlikely event that both the username and the password for an administrator
and an end user are identical, the end user will be granted access to the
administrator account.
35
36 Setting up Symantec Mail Security 8200 Series
Logging in and logging out
To log in as an end user, if you have an account on an iPlanet or Sun ONE
Directory Server
Note: To do this, LDAP authentication must be enabled.
1
Access your Control Center from a browser.
The default login address is:
https://<hostname>:41443
where <hostname> is the hostname you designated for your appliance
during initialization. Or, you can use the IP address in place of <hostname>.
You may see a security alert message.
2
If you see a security alert message, accept the self-signed certificate to
continue.
The Control Center log in page is displayed.
3
In the User name box, type your full email address (for example,
[email protected]).
4
In the Password box, type the password you normally use to log in to your
system.
5
Click Login.
To log in as an end user, if you have an Active Directory account
1
Access your Control Center from a browser.
The default login address is:
https://<hostname>:41443
where <hostname> is the hostname you designated for your appliance
during initialization. Or, you can use the IP address in place of <hostname>.
You may see a security alert message.
2
If you see a security alert message, accept the self-signed certificate to
continue.
The Control Center log in page is displayed.
3
In the User name box, type your user name (for example, kris).
4
In the Password box, type the password you normally use to log in to your
system.
5
Select the LDAP server you use to verify your credentials (not shown).
6
Click Login.
To log in as an end user, if you have an Exchange 5.5 account
1
Access your Control Center from a browser.
Setting up Symantec Mail Security 8200 Series
Logging in and logging out
The default login address is:
https://<hostname>:41443
where <hostname> is the hostname you designated for your appliance
during initialization. Or, you can use the IP address in place of <hostname>.
You may see a security alert message.
2
If you see a security alert message, accept the self-signed certificate to
continue.
The Control Center log in page is displayed.
3
In the User name box, type your full primary email address (for example,
[email protected]).
4
In the Password box, type the password you normally use to log in to your
Windows system.
5
Click Login.
To determine your primary email address for Exchange 5.5, check the
following in Outlook 2000 or Outlook 2003
1
Click Tools, click Address Book.
2
Type your name in the Type Name or Select from List box.
3
Double-click your name in the list displayed, and then click E-mail
Addresses.
The mail address on the line starting with SMTP: in capitals is your primary
email address.
Logging out
Follow these steps to log out.
To log out
1
Click the Log Out icon in the upper right corner of the current page.
2
For security purposes, close your browser window to clear your browser’s
memory.
Having trouble logging in or out?
If you are having trouble logging in or logging out, consider the following:
■
When logging in, make sure you type your user name and password in the
correct case. Note the difference between kris, Kris, and KRIS.
■
You are automatically logged out if you don’t use the Control Center for a
certain period (usually 30 minutes). If that happens, log in again.
37
38 Setting up Symantec Mail Security 8200 Series
Logging in and logging out
Section
Managing email
■
Managing email filtering
■
Working with Web Quarantine
■
Creating Reports
2
40
Chapter
3
Managing email filtering
This chapter includes the following topics:
■
About email filtering
■
Understanding filtering
■
Creating groups and adding members
■
Assigning filter policies to a group
■
Managing Group Policies
■
Creating virus, spam, and compliance filter policies
■
Managing Email Firewall policies
■
Managing policy resources
■
Configuring virus and spam settings
About email filtering
Although Symantec Mail Security 8200 Series provides default settings for
dealing with spam and viruses, you will likely want to tailor the actions taken on
spam and viruses to suit your requirements. Content filtering and Email
Firewall policies offer further methods of managing mail flow into and out of
your organization.
Understanding filtering
Symantec Mail Security 8200 Series appliances provide a wide variety of actions
for filtering email, and allow you to either set identical options for all users, or
specify different actions for distinct user groups.
42 Managing email filtering
Understanding filtering
You can specify groups of users based on email addresses, domain names, or
LDAP groups. For each group, you can specify an action or group of actions to
perform given a particular verdict.
You can choose different filtering actions for the following categories of email.
The following table lists filtering verdicts by filtering category:
Table 3-1
Filtering verdicts by category
Filtering Category
Verdict
Description
Email Firewall
Directory harvest attack
Email is flagged because an attempt is underway –
via emailing to your domain with a specified
number of generated recipient addresses – to
capture valid email addresses.
Spam attack
Email is flagged because a specified quantity of
spam messages has been received from a
particular IP address.
Virus attack
Email is flagged because a specified quantity of
infected messages has been received from a
particular IP address.
Virus
Email is flagged because it contains a virus, based
on current Symantec antivirus filters.
Mass-mailing worm
Email is flagged because it contains a massmailing worm, based on current antivirus filters
from Symantec.
Unscannable for viruses
Email is flagged because it is insusceptible to
current Symantec virus filters.
Spam
Email is flagged as spam, based on current
antispam filters from Symantec.
Suspected spam
Email is flagged as spam based on configurable
Spam Scoring.
Message contains words or phrases
Email is flagged because it contains words or
phrases in your configurable dictionary.
Message contains specific
attachments
Email is flagged because it contains a specific
attachment type.
Subject:
Email is flagged because it contains a particular
Subject: line or part of a Subject: line.
From: Address
Email is flagged because it contains a particular
From: address.
Virus
Spam
Content Compliance
Managing email filtering
Understanding filtering
Table 3-1
Filtering Category
Filtering verdicts by category (Continued)
Verdict
Description
To: Address
Email is flagged because it contains a particular
To: address.
Cc: Address
Email is flagged because it contains a particular
Cc: address.
Bcc: Address
Email is flagged because it contains a particular
Bcc: address.
To:/Cc:/Bcc: Address
Email is flagged because it contains a particular
To:, Cc:, or Bcc: address.
From:/To:/Cc:/Bcc: Address
Email is flagged because it contains a particular
From:, To:, Cc:, or Bcc: address.
Envelope Sender
Email is flagged because its envelope contains a
particular sender address.
Envelope Recipient
Email is flagged because its envelope contains a
particular recipient address.
Envelope Helo
Email is flagged because its envelope contains a
particular SMTP Helo domain.
Message Header
Email is flagged because it contains a particular
header.
Message Size
Email is flagged because it is a particular size.
Message Body
Email is flagged because it contains particular text
in its body.
For all messages
All email not filtered by a higher precedence
policy is flagged.
43
44 Managing email filtering
Understanding filtering
The following table shows filtering actions by verdict.
Table 3-2
Filtering actions by verdict
●
●
●
●
●
Delete the
message
Delete the message.
●
●
●
●
●
●
Quarantine the
message
Send the message to the end-user Quarantine.
●
●
●
●
●
●
Deliver message
to the recipient’s
Spam folder
Deliver the message to end-user Spam folder(s).
●
●
●
●
●
●
Forward the
message
Forward the message to the designated SMTP
address(es).
●
●
●
●
●
●
BCC
Blind carbon copy the message to the designated
SMTP address(es).
●
●
●
●
●
●
Archive
Deliver the original message and forward a copy of
the message to the designated SMTP address, and,
optionally, host.
●
●
●
●
●
●
Bounce the
message
Return the message to its From: address with a
custom response, as well as deliver it to the intended
recipient. Optionally, the original message can be
included.
●
●
●
●
●
●
Modify the
Subject line
Add a tag to the message’s Subject: line.
●
●
●
●
●
●
Add a header
Add an X-header to the message.
●
●
●
●
●
●
Add annotation
Insert predefined text into the message (a disclaimer,
for example).
●
●
●
●
●
●
Content Compliancec
●
Spamb
Deliver the message. Viruses and mass-mailing
worms are neither cleaned nor deleted.
Virusa
Deliver message
normally
Virus attack
Verdict
Spam attack
Description
Directory harvest attack
Action
Managing email filtering
Understanding filtering
Send notification Deliver the original message and send a predefined
notification to designated SMTP address(es) with or
without attaching the original message.
●
●
●
Defer
Using a 4xx SMTP response code, tell the sending
MTA to try again later.
●
●
●
Reject
Using a 5xx SMTP response code, notify the sending
MTA that the message is not accepted.
●
●
●
Strip
attachments
Content Compliancec
Spamb
Virusa
Verdict
Spam attack
Description
Directory harvest attack
Action
Filtering actions by verdict (Continued)
Virus attack
Table 3-2
●
●
●
Remove message attachments.
●
●
●
Clean
Delete unrepairable virus infections and repair
repairable virus infections.
●
Treat as spam
Process the message using the action(s) specified in
the associated spam policy. The message is delivered
normally if the spam policy is disabled or the spam
policy doesn’t apply because of message direction.
●
Treat as
suspected spam
Process the message using the action(s) specified in
the associated suspected spam policy. The message is
delivered normally if the suspected spam policy is
disabled or the suspected spam policy doesn’t apply
because of message direction.
●
Treat as virus
Process the message using the action(s) specified in
the associated virus policy. The message is delivered
normally if the virus policy is disabled or the virus
policy doesn’t apply because of message direction.
●
Treat as worm
Process the message using the action(s) specified in
the associated worm policy. The message is delivered
normally if the worm policy is disabled or the worm
policy doesn’t apply because of message direction.
●
45
46 Managing email filtering
Understanding filtering
Table 3-2
Filtering actions by verdict (Continued)
Treat as allowed
senderd
Process the message using the action(s) specified in
the Domain-based Allowed Senders List. Applies
even if the Domain-based Allowed Senders List is
disabled, and applies to inbound messages only.
●
Throttle attack
Connections from attacking IP addresses are slowed
down, penalizing the sending computers.
●
●
Content Compliancec
●
Spamb
Process the message using the action(s) specified in
the Domain-based Blocked Senders List. Applies even
if the Domain-based Blocked Senders List is disabled,
and applies to inbound messages only.
Virusa
Treat as blocked
sender
Virus attack
Verdict
Spam attack
Description
Directory harvest attack
Action
●
a.
a.All Virus verdicts share the same available actions.
a.All Virus verdicts share the same available actions.
b.All Spam verdicts share the same available actions.
c.All Content Compliance verdicts share the same available actions.
d.Messages from senders in the Allowed Senders Lists are always delivered directly to end-user mailboxes, bypassing spam filtering.
Multiple actions
You can create compound actions, performing multiple actions for a particular
verdict. An example follows:
1
Defining an antivirus policy, the administrator selects the Virus verdict then
assigns the actions, Clean, Add annotation, and Send notification to the
policy.
2
Defining a Group Policy, the administrator assigns members then selects the
new antivirus policy.
3
An email message is received whose recipients include someone in the new
Group Policy.
4
The Symantec Mail Security 8200 Series appliance cleans the message,
annotates it, then sends a notification to its intended recipients.
Managing email filtering
Understanding filtering
The following table lists the limitations on combining actions.
Table 3-3
Compatibility of filtering actions by verdict
Action
Compatibility with other
actions
Can be added multiple
times?
Deliver message normally
Any except Delete the message
and Quarantine the message
No
Delete the message
Bounce Message
Send Notification
Archive
No
Quarantine the message
Any except Deliver the message No
normally and Delete the
message
Deliver the message to the Any except Delete the message
recipient’s Spam folder
No
Forward the message
Any except Delete the message
Yes
BCC
Any except Delete the message
Yes
Archive
Any
No
Bounce the message
Any
No
Modify the Subject line
Any except Delete the message
One for prepend and one
for append
Add a header
Any except Delete the message
No
Add annotation
Any except Delete the message
One for header or one for
footer, but not both
Send notification
Any except Delete the message
No
Defer
Can’t be used with other actions No
Reject
Can’t be used with other actions No
Strip attachments
Any except Delete the message
Yes
Clean
Any except Delete the message
No
Treat as spam
Can’t be used with other actions No
Treat as suspected spam
Can’t be used with other actions No
Treat as virus
Can’t be used with other actions No
Treat as worm
Can’t be used with other actions No
47
48 Managing email filtering
Creating groups and adding members
Table 3-3
Compatibility of filtering actions by verdict (Continued)
Action
Compatibility with other
actions
Can be added multiple
times?
Treat as blocked sender
Can’t be used with other actions No
Treat as allowed sender
Can’t be used with other actions No
Throttle attack
Can’t be used with other actions No
Multiple policies
If there are multiple policies that may apply to a message, the policy that is
applied depends on the direction the message is traveling. If the message is
outbound, the policy applied is based on the sender. If the message is inbound,
the policy applied is based on the recipient.
Creating groups and adding members
Group policies are configurable message management options for an unlimited
number of user groups which you define. Policies collect the antispam,
antivirus, and content filtering verdicts and actions for a group.
Add or remove members from a group
You can specify groups of users based on email addresses or domain names. For
each group, you can specify email filtering actions for different categories of
email.
Note: To edit a group member, such as to correct a typo, delete the member and
add the member again. There is no edit button for group members.
To create a new Group Policy
1
In the Control Center, click Policies > Group Policies.
For each Group Policy, this page maps email handling verdicts to associated
actions. The Default Group Policy, which contains all users and all domains,
appears last. Although you can add or modify actions for the Default Group
Policy, you can neither add members to nor delete this Group Policy or
disable it.
2
On the Group Policies page, click Add.
3
Enter a name in the Group Name box.
Managing email filtering
Creating groups and adding members
4
Click Save.
To add a new member to this Group Policy
1
Ensure that the Members tab is displayed, and click Add.
2
Specify members using one or both of the following methods:
■
Type email addresses, domain names, or both in the box. To specify
multiple entries, separate each with a comma, semicolon, or space. Use
* to match zero or more characters and ? to match a single character.
To add all recipients of a particular domain as members, type any of the
following:
domain.com
@domain.com
*@domain.com
If you use a wildcard in the domain when specifying a member, be sure
to precede the domain with the @ symbol and precede the @ symbol
with a wildcard, a specific user, or a combination of those. The
following examples show valid uses of wildcards:
user@domain.*
user*@dom*.com
ali*@sub*.domain.com
These examples are not valid, and won’t match any users:
domain.*
@domain.*
dom*.com
sub*.domain.com
■
Check the box next to one or more LDAP groups.
The LDAP groups listed on this page are loaded from your LDAP server.
See “Configuring LDAP settings” on page 143 for information about
configuring LDAP.
3
Click Add members to add the new member(s).
4
Click Save.
49
50 Managing email filtering
Creating groups and adding members
To delete a Group Policy member
1
On the Members tab of the Add Group page, check the box next to one or
more email addresses, domains, or LDAP groups, and then click Delete.
2
Click Save.
To import Group Policy members from a file
1
On the Members tab of the Add Group page, click Import.
2
Enter the appropriate path and filename (or click Browse to locate the file
on your hard disk), and then click Import.
Separate each domain or email address in the plain text file with a comma,
newline, semicolon, or space. Below is a sample comma-delimited file:
[email protected], [email protected], ben*@example.com, example.net,
*.org
Below is a sample newline-delimited file:
[email protected]
[email protected]
ben*@example.com
example.net
*.org
The email addresses in the samples behave as follows:
■
[email protected] and [email protected] match those exact email
addresses.
■
ben*@example.com matches [email protected] and
[email protected], etc.
■
example.net matches all email addresses in example.net.
■
*.org matches all email addresses in any domain ending with .org.
3
Click Save.
Note: The maximum number of entries in the Group Members list for a Group
Policy is 10,000. If you require more than 10,000 entries, contact your Symantec
representative for instructions on how to configure MySQL and Tomcat to
support more entries. This limitation refers to the number of entries in the
Group Members list, not the number of users at your company. Due to this limit
on importing large lists of users, when possible use LDAP groups, domain
names, subdomain names or wildcards in email addresses to add users to
groups.
Managing email filtering
Assigning filter policies to a group
To export Group Policy members to a file
1
In the Members tab of the Add Group page, click Export.
2
Complete your operating system’s save file dialog box as appropriate.
Assigning filter policies to a group
By default, groups you create are assigned the default filter policies for spam
and viruses (there is no default for compliance policies). Follow the steps in the
sections below to assign different filter policies to groups. You may first want to
create your own filter policies. See “Creating virus, spam, and compliance filter
policies” on page 57.
Selecting virus policies for a group
Virus policies determine what to do with inbound and outbound messages that
contain viruses, mass-mailing worms, or that cannot be scanned due to file size
or archive file scan depth. See “Creating virus policies” on page 57 for
information about creating virus policies.
By default, inbound and outbound messages containing a virus or mass-mailing
worm will be deleted.
To select virus policies for a group
1
In the Control Center, click Policies > Group Policies.
2
On the Group Policies page, click the group for which you want to select
virus policies.
3
Click the Virus tab.
4
If desired, check Enable inbound virus scanning for this group to enable
the following three virus policies for incoming email.
5
Select the desired policy from each of the following drop-down lists:
■
Inbound virus policy
■
Inbound mass-mailing worm policy
■
Unscannable inbound message policy
6
If desired, check Enable outbound virus scanning for this group to enable
the following three virus policies for outgoing email.
7
Select the desired policy from each of the following drop-down lists:
■
Outbound virus policy
■
Outbound mass-mailing worm policy
51
52 Managing email filtering
Assigning filter policies to a group
■
8
Unscannable outbound message policy
Click Save.
Selecting spam policies for a group
Spam policies determine what to do with inbound and outbound messages that
contain spam or suspected spam. See “Creating spam policies” on page 58 for
information about creating spam policies.
By default, inbound and outbound spam will be marked up with [spam] at the
beginning of subject lines, and inbound and outbound suspected spam will be
marked with [suspected spam]. Both types of spam will not be deleted by default.
To select spam policies for a group
1
In the Control Center, click Policies > Group Policies.
2
On the Group Policies page, click the group for which you want to select
spam policies.
3
Click the Spam tab.
4
If desired, check Enable inbound spam scanning for this group to enable
the following two spam policies for incoming email.
5
Select the desired policy from each of the following drop-down lists:
■
Inbound spam policy
■
Inbound suspected spam policy
6
If desired, check Enable outbound spam scanning for this group to enable
the following two spam policies for outgoing email.
7
Select the desired policy from each of the following drop-down lists:
8
■
Outbound spam policy
■
Outbound suspected spam policy
Click Save.
Selecting compliance policies for a group
By associating an appropriate compliance policy with a group, you can check
messages for attachments or certain words, or depending on the message
content, add annotations, send notifications, or copy messages to an email
address. See “Creating compliance policies” on page 59 for information about
creating compliance policies.
Managing email filtering
Assigning filter policies to a group
To select compliance policies for a group
1
In the Control Center, click Policies > Group Policies.
2
On the Group Policies page, click the group for which you want to select
compliance policies.
3
Click the Compliance tab.
4
Check Enable Inbound Content Compliance for this group.
5
Select the desired policy from the Content Compliance Policies drop-down
list.
If desired, click View to see a summary of the compliance policy, and then
click OK to return. As you add compliance policies from the drop-down list,
they are displayed in the bottom list and become unavailable in the dropdown list.
6
Click Add.
7
If desired, add additional policies from the Content Compliance Policies
drop-down list.
8
Configure the outbound compliance policies similarly.
9
Click Save.
Enabling and disabling end user settings
The end user settings determine whether end users in a group can log in to the
Control Center to configure personal Allowed and Blocked Senders Lists and
block or allow email in specified languages.
To log in, users access the same URL in their browser as Control Center
administrators: https://<hostname>:41443. The login and password for end
users is the same as their LDAP login and password. For information about
supported browsers, see “Compatible browsers and SSH settings” on page 22.
The Specify language settings check box enables or disables user access to the
language identification offered by the Symantec Mail Security 8200 Series, not
the Symantec Outlook Spam Plug-in. If the Symantec Outlook Spam Plug-in is
installed and enabled, end users can set their language preferences using the
Options dialog box accessible from the Symantec Outlook Spam Plug-in toolbar.
Precedence for end user Allowed and Blocked Senders Lists
Because they are checked at the firewall, the following sender lists are checked
before the end user Allowed and Blocked Senders Lists:
■
IP-based Allowed Senders List
53
54 Managing email filtering
Assigning filter policies to a group
■
Third Party Services Allowed Senders List
■
IP-based Blocked Senders List
■
Safe Senders
■
Open Proxy Senders
■
Third Party Services Blocked Senders List
■
Suspected Spammers
End user Allowed and Blocked Senders Lists take precedence over these systemlevel sender lists:
■
Domain-based Allowed Senders List
■
Domain-based Blocked Senders List
Requirements for enabling end user settings
The following requirements must be satisfied before end users can configure
their own personal Allowed and Blocked Senders Lists and block or allow email
in specified languages:
■
At least one LDAP SyncService server must be configured and enabled.
■
In Settings > LDAP settings, an LDAP source configured for Authentication
or Authentication and Synchronization must be defined and saved.
■
In Settings > Replication settings, a replication schedule must be defined
and enabled.
■
In Policies > Group Policies > Edit Group, the End user preferences must be
enabled for the given group on the End Users tab.
■
The members of the group in question can only be LDAP users, not a locally
defined user (that is, an email address you typed manually).
To select end user policies for a group
1
In the Control Center, click Policies > Group Policies.
2
On the Group Policies page, click the group for which you want to select
compliance policies.
3
Click the End Users tab.
4
Check Enable end user settings for this group.
5
If desired, check Modify Personal Allowed and Blocked Senders Lists.
6
If desired, check Specify language settings.
7
Click Save.
Managing email filtering
Managing Group Policies
Allowing or blocking email based on language
Using the language identification offered by the Symantec Mail Security 8200
Series, you can block or allow messages written in specified languages for a
group. For example, you can choose to only allow English and Spanish messages,
or block messages in English and Spanish and allow messages in all other
languages.
Note: If the Language tab in the Edit Group page is inaccessible, the Symantec
Outlook Spam Plug-in has been enabled. To disable support for the Outlook
Plug-in and enable support for built-in language identification, set Language
Identification to No in the Spam Settings page on the Settings tab. That will
make the Language tab accessible.
To allow or block email based on language for a group
1
In the Control Center, click Policies > Group Policies.
2
On the Group Policies page, click the group for which you want to select
compliance policies.
3
Click the Language tab.
4
Click the desired setting.
5
If you chose the second or third option, check the box for each desired
languages.
6
Click Save.
Managing Group Policies
The Group Policy management options let you do the following:
■
Set Group Policy precedence, the order in which Group Policy membership is
determined when policies are applied.
■
Edit Group Policy membership and actions.
■
Enable and disable Group Policies.
■
Delete Group Policies.
■
View Group Policy information for particular users.
■
Manage groups.
55
56 Managing email filtering
Managing Group Policies
Manage Group Policies
The following sections describe common administrative tasks for Group
Policies.
To set Group Policy precedence
◆
Check the box next to a Group Policy, and then click Move Up or Move Down
to change the order in which it is applied.
Note: You cannot change the precedence of the Default Group Policy.
To edit an existing Group Policy
◆
On the Group Policy page, click the policy name or check the box next to a
Group Policy, and then click Edit.
Add or delete members or change filtering actions for this Group Policy as
you did when you created it. See “Add or remove members from a group” on
page 48 for more information.
To enable a Group Policy
◆
Check the box next to a Group Policy, and then click Enable.
To disable a Group Policy
◆
Check the box next to a Group Policy, and then click Disable.
Note: You cannot disable the Default Group Policy.
To delete a Group Policy
◆
On the Group Policies page, check the box next to a Group Policy, and then
click Delete.
To view Group Policy information for a particular user or domain:
1
On the Members tab of the Edit Group page, click Find User.
2
Type an email address or domain name in the Email address box.
3
Click Find User.
The Control Center lists the first enabled group in which the specified user
exists, searching in the order that groups are listed on the Group Policies
page.
Managing email filtering
Creating virus, spam, and compliance filter policies
Creating virus, spam, and compliance filter policies
Use filter policy pages to combine a message characteristic, such as virus, with
an action, such as delete. The initial Policies > Filter Policies page contains a
table that indicates the status of defined virus, spam, compliance policies.
Table 3-4
Policy status page
Column
Description
Virus/Spam/Content Name of the policy
Compliance Policies
Enabled
Indicates if the policy is enabled for one or more groups
Applied to
Indicates the directions the policy is applied to: Inbound,
Outbound, or both
Number of Groups
Number of groups that this policy has been used in
Creating virus policies
Using the Virus Policies page, you can add, edit, copy, delete, and enable or
disable virus policies.
To add a virus policy
1
In the Control Center, click Policies > Virus.
2
Click Add.
3
In the Policy name box, type a name for the virus policy.
This is the name that appears in the main Virus Policies page, and in the
Virus tab when configuring a Group Policy. Compliance, spam, and virus
policy names must be completely unique. For example, if you have a
compliance policy called XYZ, you can’t have a spam or virus policy called
XYZ.
4
Under Apply to, choose where this virus policy should be available:
■
Inbound messages
■
Outbound messages
Inbound and Outbound messages
This determines where this virus policy is available on the Virus tab when
configuring a Group Policy. For example, if you choose Inbound messages
and the mass-mailing worm condition on this page, this virus policy is only
available in the Inbound mass-mailing worm policy drop-down list when
configuring a Group Policy.
■
57
58 Managing email filtering
Creating virus, spam, and compliance filter policies
5
Under Groups, check one or more groups to which this policy should apply.
You can also add a virus policy to a group on the Virus tab of the Edit Group
page.
6
Under Conditions, select one of the following three conditions:
If the message
contains a virus
The message contains a virus
If the message
contains a massmailing worm
The message contains a mass-mailing worm, a worm
that propagates itself to other systems via email, often
by using the address book of an email client program
If the message is not A message is unscannable for viruses if it exceeds either
scannable for viruses the maximum file size or maximum scan depth
configured on the Virus Settings page on the Settings
tab. Compound messages such as zip files that contain
many levels may exceed the maximum scan depth.
7
Select the desired action.
See Table 3-2, “Filtering actions by verdict,” on page 44.
8
Click Add Action.
9
If desired, add more actions.
See Table 3-3, “Compatibility of filtering actions by verdict,” on page 47.
10 Click Save.
Creating spam policies
Using the Spam Policies page, you can add, edit, copy, delete, and enable or
disable spam policies.
To add a spam policy
1
In the Control Center, click Policies > Spam.
2
Click Add.
3
In the Policy name box, type a name for the spam policy.
This is the name that appears in the main Spam Policies page, and in the
Spam tab when configuring a Group Policy. Compliance, spam, and virus
policy names must be completely unique. For example, if you have a
compliance policy called XYZ, you can’t have a spam or virus policy called
XYZ.
4
Under Apply to, choose where this virus policy should be available:
■
Inbound messages
Managing email filtering
Creating virus, spam, and compliance filter policies
■
Outbound messages
Inbound and Outbound messages
This determines where this spam policy is available on the Spam tab when
configuring a Group Policy. For example, if you choose Inbound messages
and the spam condition, this spam policy is only available in the Inbound
spam policy drop-down list when configuring a Group Policy.
■
5
Under Groups, check one or more groups to which this policy should apply.
You can also add a spam policy to a group on the Spam tab of the Edit Group
page.
6
Under Conditions, select one of the following three conditions:
If the message is
Spam
Perform the specified action if a message is
determined to be spam
If the message is
Suspected Spam
Perform the specified action if a message is likely to
be spam. The suspected spam level is adjustable on
the Spam Settings page of the Settings tab.
If the message is
Spam or Suspected
Spam
Perform the specified action if a message contains
either spam or suspected spam
7
Select the desired action.
See Table 3-2, “Filtering actions by verdict,” on page 44.
8
Click Add Action.
9
If desired, add more actions.
See Table 3-3, “Compatibility of filtering actions by verdict,” on page 47.
10 Click Save.
Creating compliance policies
Using the Content Compliance Policies page, you can add, edit, copy, delete, and
enable or disable compliance policies.
You can create compliance policies based on key words and phrases found in
specific areas of a message. Based on policies you set up, you can perform a wide
variety of actions on messages that match against your compliance policies.
Compliance policies can be used to:
■
Eliminate spamming viruses by blocking messages with specific body
content, or specific file attachment types or filenames.
■
Control message volume and preserve disk space by filtering out oversized
messages.
59
60 Managing email filtering
Creating virus, spam, and compliance filter policies
■
Block email from marketing lists that generate user complaints or use up
excessive bandwidth.
■
Block messages containing certain text in their headers or bodies.
Actions specified for custom filter matches will not override actions resulting
from matches in your Blocked Senders Lists or Allowed Senders Lists or from
matches against antispam filters created by Symantec. In other words, if a
message’s sender matches an entry in your Blocked Senders Lists or Allowed
Senders Lists or if a message is determined to be spam by Symantec Mail
Security 8200 Series, compliance policies will have no effect on the message.
Guidelines for creating compliance policy conditions
Keep these suggestions and requirements in mind as you create the conditions
that make up a filter.
■
To start out, you may want to set your policies so that messages that match
against compliance policies are quarantined, forwarded, or modified instead
of deleted. When you are sure the compliance policies are working correctly,
you can adjust the action.
■
Sieve scripts cannot be imported, including those created in previous
versions of Symantec or Brightmail software.
■
There is no limit to the number of conditions per compliance policy.
■
Conditions can’t be nested.
■
You can create compliance policies that block or allow email based upon the
sender information, but usually it is best to use the Allowed Senders Lists
and Blocked Senders Lists. However, it is appropriate to create compliance
policies if you need to block or keep email based on a combination of the
sender and other criteria, such as the subject or recipient.
■
All tests for words and phrases are case-insensitive, meaning that lowercase
letters in your conditions match lower- and uppercase letters in messages,
and uppercase letters in your conditions match lower- and uppercase letters
in messages. For example, if you tested that the subject contains “inkjet”,
then “inkjet”, “Inkjet”, and “INKJET” in a message subject would match. If
you instead tested for “INKJET” in the subject, then “inkjet”, “Inkjet”, and
“INKJET” would still match. This applies to all test types and all filter
components.
■
Multiple white spaces in an email header or body are treated as a single
space character. For example, if you tested that the subject contains “inkjet
cartridge”, then “inkjet cartridge” and “inkjet cartridge” in a message
subject would match. If you instead tested for “inkjet cartridge” in the
subject, then “inkjet cartridge” and “inkjet cartridge” would still match.
Managing email filtering
Creating virus, spam, and compliance filter policies
This applies to all test types and all filter components. A message subject
containing “i n k j e t c a r t r i d g e” would not match a test for “inkjet
cartridge” or “inkjet cartridge”.
■
The order of conditions in a filter does not matter as far as whether a filter
matches a message. However, if a filter has Message Body tests, you can
optimize the filter by positioning them as the final conditions in a filter.
■
Spammers usually “spoof” or forge some of the visible messages headers
and the usually invisible envelope information. Sometimes they forge
header information using the actual email addresses or domains of innocent
people or companies. So use care when creating filters against spam you’ve
received.
Add a compliance policy
Refer to the following tables when creating your compliance policy.
To create conditions in compliance policies
Table 3-5 describes the rule components available when creating a compliance
policy.
Table 3-5
Compliance conditions
Condition
Test against
Examples
Message contains
words or phrases
Dictionary. See “Configuring
dictionaries” on page 80.
Bad-words
Message contains
An attachment list, file name, or MIME script.vbs
specific attachments type. See “Configuring attachment
application/octet-stream
lists” on page 78.
Subject
Subject: message header.
$100 F R E E, Please Play
Now!
From Address
From: message header.
jane
example.com
[email protected]
To Address
To: message header.
jane
example.com
[email protected]
Cc Address
Cc: (carbon copy) message header.
jane
example.com
[email protected]
61
62 Managing email filtering
Creating virus, spam, and compliance filter policies
Table 3-5
Compliance conditions (Continued)
Condition
Test against
Examples
Bcc Address
Bcc: (blind carbon copy) message
header.
jane
example.com
[email protected]
To/Cc/Bcc Address
To:, Cc:, and Bcc: message headers.
jane
example.com
[email protected]
From/To/Cc/Bcc
Address
From:, To:, Cc:, and Bcc: message
headers.
jane
example.com
[email protected]
Envelope Sender
Sender in message envelope.
jane
example.com
[email protected]
Envelope Recipient
Recipient in message envelope.
jane
example.com
[email protected]
Envelope Helo
SMTP Helo domain in message
envelope.
example.com
Message Header
Message header specified in the
accompanying text field. A header is
case-insensitive. Don’t type the
trailing colon in a header.
Reply-To
reply-to
Message-ID
Message Size
Size of the message in bytes, kilobytes, 2
or megabytes, including the header
200
and body is less than or greater than
2000
the specified value.
Message Body
Contents of the message body. This
You already may have
component test is the most processing won
intensive, so you may want to add it as
the last condition in a filter to
optimize the filter.
For all messages
(Not applicable)
All email not filtered by a higher
precedence policy is flagged. For
example, if a message matches a spam,
virus, sender group, or higher
precedence compliance policy, it won’t
match the “For all messages”
condition.
Managing email filtering
Creating virus, spam, and compliance filter policies
Table 3-6 describes the filter tests available for certain conditions when creating
a compliance policy.
Table 3-6
Filter tests
Test type
Perl-compatible regular Description
expressions allowed?
Is
No
Exact match for the supplied text
Contains
No
Tests for the supplied text within the
component specified. This is
sometimes called a substring test.
Starts with
No
Equivalent to ^text.* wildcard test
using Matches.
Ends With
No
Equivalent to .*text$ wildcard test
using Matches.
Matches
Yes
Exact match for the supplied text
Exists
No
Tests for the presence of the message
header typed in the text box
Notes:
All text tests are case-insensitive.
There are also negative test types.
Some tests are not available for some components.
To use Perl-compatible regular expressions with the matches and does not
match tests
If you specify the Matches or Does not Match test for a component, you can use
Perl-compatible regular expressions to refine your search as described in Table
3-7. To match certain special characters, you have to escape each with \ as
shown in the table. For more information about Perl-compatible regular
expressions, see www.perldoc.com/perl5.8.4/pod/perlre.html
Table 3-7
Sample Perl-compatible regular expressions
Character Description
Example Sample matches
.
j.n
jen, jon, j2n, j$n
jo..
john, josh, jo4#
Match any one character
63
64 Managing email filtering
Creating virus, spam, and compliance filter policies
Table 3-7
Sample Perl-compatible regular expressions (Continued)
Character Description
Example Sample matches
.*
sara.*
sara, sarah, sarahjane,
saraabc%123
s.*m.*
sm, sam, simone,
s321m$xyz
sara.+
sarah, sarahjane,
saraabc%123
s.+m.+
simone, s321m$xyz
Match zero or more characters
.+
Match one or more characters
\.
Match a period
stop\.
stop.
\*
Match an asterisk
b\*\*
b**
\+
Match a plus character
18\+
18+
To add a compliance policy
1
In the Control Center, click Policies > Compliance.
2
Click Add.
3
In the Policy name box, type a name for the compliance policy.
This is the name that appears in the main Content Compliance Policies page,
and in the Compliance tab when configuring a Group Policy. Compliance,
spam, and virus policy names must be completely unique. For example, if
you have a compliance policy called XYZ, you can’t have a spam or virus
policy called XYZ.
4
Under Apply to, choose where this compliance policy should be available:
■
Inbound messages
■
Outbound messages
■
Inbound and Outbound messages
5
Under Groups, check one or more groups to which this policy should apply.
You can also add a compliance policy to a group on the Compliance tab of the
Edit Group page.
6
Under Conditions, click a condition. See Table 3-5, “Compliance conditions,”
on page 61.
7
Click Add Condition.
Add additional conditions if desired.
8
Under Perform the following action, click an action.
See Table 3-2, “Filtering actions by verdict,” on page 44.
Managing email filtering
Managing Email Firewall policies
9
Click Add Action.
Add additional actions if desired. See Table 3-3, “Compatibility of filtering
actions by verdict,” on page 47.
10 Click Save.
Determining compliance policy order
You can change the order in which compliance policies are checked against
messages.
To set compliance policy order
1
Check the box next to a compliance policy.
2
Click Move Up or Move Down.
Enabling and disabling compliance policies
After you create compliance policies, they are automatically enabled and put to
use. For testing or other administrative purposes, you may need to enable or
disable one or more filters without having to delete them. By disabling filters,
filters become inactive but are displayed in the main Content Compliance
Policies list.
To enable or disable a compliance policy
1
Check the box next to a compliance policy.
2
Click Enable or Disable.
Managing Email Firewall policies
The Symantec Mail Security 8200 Series can detect patterns in incoming
messages to thwart certain types of spam and virus attacks. You can block and
allow messages based on email addresses, domains, or IP address. Messages can
be checked against Open Proxy Senders, Suspected Spammers, and Safe Senders
lists maintained by Symantec. Sender Policy Framework (SPF) provides a way to
block forged email.
65
66 Managing email filtering
Managing Email Firewall policies
Configuring attack recognition
The Symantec Mail Security 8200 Series can detect the following types of
attacks originating from a single SMTP server.
Directory harvest
attacks
Spammers employ directory harvest attacks to find valid
email addresses at the target site. A directory harvest
attack works by sending a large quantity of possible email
addresses to a site. An unprotected mail server will simply
reject messages sent to invalid addresses, so spammers can
tell which email addresses are valid by checking the
rejected messages against the original list. By default,
messages received from violating senders are deferred.
Spam attack
A specified quantity of spam messages has been received
from a particular IP address. By default, messages received
from violating senders are deferred.
Virus attack
A specified quantity of infected messages has been received
from a particular IP address. By default, messages received
from violating senders are deferred.
Enable, disable, and configure attack recognition
Set up attack recognition as described in the following sections. All attack
recognition types are disabled by default, so must be enabled to be activated.
To enable or disable attack recognition
1
In the Control Center, click Policies > Attacks.
2
Check the box next to each attack type that you want to enable or disable, or
check the box next to Attacks to select all attack types.
3
Click Enable to enable the checked attack types, or click Disable to disable
the checked attack types.
To configure directory harvest, spam, and virus attack recognition
1
In the Control Center, click Policies > Attacks.
2
Click Directory Harvest Attack, Spam Attack, or Virus Attack.
3
Accept the defaults or modify the values under Attack Configuration:
Minimum percentage of ... Percentage of bad recipient, spam, or virus messages
from a single server that must be exceeded to trigger the
specified action. The minimum number must also be
exceeded.
Managing email filtering
Managing Email Firewall policies
Minimum number of ...
Number of bad recipient, spam, or virus messages from
a single server that must be exceeded to trigger the
specified action. The minimum percentage must also be
exceeded.
Qualification time window Time period in which the specified percentage and
number of bad recipient, spam, or virus messages
violations must be exceeded to trigger the specified
action.
Penalty box time
Period of time to perform the specified action against all
messages from the sending SMTP connection.
4
Under Actions, accept the default, recommended action of Defer SMTP
Connection, or change and/or add more actions.
5
Click Save.
To enable TCP-layer throttling
1
In the Control Center, click Policies > Attacks.
2
Check Throttle all attacks with TCP-Layer Traffic Shaping.
See “TCP-layer Traffic Shaping” on page 11.
Configuring sender groups
Filtering based on the source of the message, whether it’s the sender’s domain,
email address or mail server IP connection, can be a powerful way to fine-tune
filtering at your site.
Note: The information in this section describes global Blocked and Allowed
Senders Lists, which are applied at the server level for your organization. Two
other options are available to give users the ability to maintain individual
Blocked and Allowed Senders Lists. You can enable personal Allowed and
Blocked Senders Lists on the End Users tab of the Group Policies page.
Alternatively, you can deploy the Symantec Outlook Spam Plug-in. With the
Symantec Outlook Spam Plug-in, users can easily create personal lists of
blocked and allowed senders from within their Outlook mail client. The Plug-in
imports information from the Outlook address book to populate the personal
Allowed Senders List.
Symantec Mail Security 8200 Series lets you customize spam detection in the
following ways:
■
Define Allowed Senders
67
68 Managing email filtering
Managing Email Firewall policies
Symantec Mail Security 8200 Series treats mail coming from an address or
connection in an Allowed Senders List as legitimate mail. As a result, you
ensure that such mail is delivered immediately to the inbox, bypassing any
other filtering. The Allowed Senders Lists reduce the small risk that
messages sent from trusted senders will be treated as spam or filtered in
any way.
■
Define Blocked Senders
Symantec Mail Security 8200 Series supports a number of actions for mail
from a sender or connection in a Blocked Senders List. As with spam
verdicts, you can use policies to configure a variety of actions to perform on
such mail, including deletion, forwarding, and subject line modification.
■
Use the Reputation Filters
By default, Symantec Mail Security 8200 Series is configured to use the
Reputation Filters. Symantec monitors hundreds of thousands of email
sources to determine how much email sent from these addresses is
legitimate and how much is spam. The service currently includes the
following lists of IP addresses, which are continuously compiled, updated,
and incorporated into the Symantec Mail Security 8200 Series filtering
processes at your site:
■
Open Proxy Senders
IP addresses that are open proxies used by spammers.
■
Safe Senders
IP addresses from which virtually no outgoing email is spam.
Suspected Spammers
IP addresses from which virtually all of the outgoing email is spam.
No configuration is required for these lists. You can choose to disable any of
these lists.
■
■
Incorporate lists managed by other parties
Third parties compile and manage lists of desirable or undesirable IP
addresses. These lists are queried using DNS lookups. When you configure
Symantec Mail Security 8200 Series to use a third-party sender list,
Symantec Mail Security 8200 Series checks whether the sending mail server
is on the list. If so, Symantec Mail Security 8200 Series performs a
configured action, based on the policies in place.
About Allowed and Blocked Senders Lists
Note the following about the Allowed Senders Lists and Blocked Senders Lists:
■
Overall filtering precedence
Managing email filtering
Managing Email Firewall policies
In the process of determining an overall verdict for a message, Symantec
Mail Security 8200 Series keeps track of the different filters that fire
against a message. There are preset precedence rules that govern the
ultimate verdict. For example, Symantec Mail Security 8200 Series gives a
higher precedence to matches against the Allowed Senders and Blocked
Senders Lists. In other words, matches against the Allowed Senders Lists
and Blocked Senders Lists will “win” against conflicting filters created by
Symantec or compliance policies created by you.
■
■
Precedence within the lists
If a message source falls into both an Allowed Senders List and a Blocked
Senders List, the Allowed Senders List will have precedence and that
message will be delivered to the inbox.
Any list with an action of Defer or Reject takes precedence over lists
without an action of Defer or Reject.
Within the lists, IP addresses are generally more reliable for source filtering
than email addresses, which are easily spoofed.
In addition, lists that you create (domain-based and IP-based) will always
have precedence over lists created by Symantec. Note that list information
from third party DNS blacklists does not have priority over Symantec lists.
In the event of a conflict between the Safe Senders (part of the Symantec
Reputation Service) and an entry from a DNS blacklist, the Symantecpropagated list will win. The order of precedence is:
■
IP-based Allowed Senders List
■
Third Party Services Allowed Senders List
■
IP-based Blocked Senders List
■
Domain-based Allowed Senders List
■
Domain-based Blocked Senders List
■
Safe Senders
■
Open Proxy Senders
■
Third Party Services Blocked Senders List
■
Suspected Spammers
Duplicate entries
You cannot have the exact same entry in both a Blocked Senders List and an
Allowed Senders List of the same type. If an entry already exists in one list,
you will receive the message “Duplicate sender - not added” when you try to
add it to the other list. The entry may not appear in the list you’re working
with. To move from one list to the other, delete it from the first and add it to
69
70 Managing email filtering
Managing Email Firewall policies
the second. If you have two entries such as [email protected] and *@b.com in the two
different lists, the precedence listed in the previous bullet wins.
■
Performance impact of third party DNS lists
Incorporating third party lists adds additional steps to the filtering process.
For example, in a DNS list scenario, for each incoming message, the IP
address of the sending mail server is queried against the list, similar to a
DNS query. If the sending mail server is on the list, the mail is flagged as
spam. If your mail volume is sufficiently high, running incoming mail
through a third party database could hamper performance because of the
requisite DNS lookups. Symantec recommends that you use the Reputation
Filters instead of enabling third party lists.
Reasons to use Allowed and Blocked Senders
Table 3-8 provides some examples of why you would employ lists of allowed or
blocked senders. The table also lists an example of a pattern that you as the
system administrator might use to match the sender:
Table 3-8
Use cases for lists of allowed and blocked senders
Problem
Solution
Pattern example
Mail from an end-user’s
colleague is occasionally
flagged as spam.
Add a colleague’s email address to the
Domain-based Allowed Senders List.
[email protected]
Desired newsletter from a
mailing list is occasionally
flagged as spam.
Add the domain name used by the
newsletter to the Domain-based Allowed
Senders List.
newsletter.com
An individual is sending
unwanted mail to people in
your organization.
Add the specific email address to the
Domain-based Blocked Senders List.
Joe.unwanted*@getmail.com
Numerous people from a
specific range of IP addresses
are sending unsolicited mail to
people in your organization.
After analyzing the received headers to
218.187.133.191/255.255.0.0
determine the sender's network and IP
address, add the IP address and net mask to
the IP-based Blocked Senders List.
How Symantec Mail Security 8200 Series identifies senders
and connections
The following sections provide details about the Allowed Senders Lists and
Blocked Senders Lists.
Managing email filtering
Managing Email Firewall policies
Supported Methods for Identifying Senders
You can use the following methods to identify senders for your Allowed Senders
Lists and Blocked Senders Lists.
■
Domain-based: specify sender addresses or domain names
Symantec Mail Security 8200 Series checks the following characteristics of
incoming mail against those in your lists:
■
MAIL FROM: address in the SMTP envelope. Specify a pattern that
matches the value for localpart@domain in the address. You can use
the * or ? wildcards in the pattern to match any portion of the address.
■
From: address in the message headers. Specify a pattern that matches
the value for localpart@domain in the From: header. You can use
wildcards in the pattern to match any portion of this value.
If you choose to identify messages by address or domain name, see Table 39 for examples.
Table 3-9
Matches for email addresses or domain names
Example
Sample matches
example.com
[email protected], [email protected],
[email protected]
[email protected] [email protected]
■
■
sara*@example.org
[email protected], [email protected]
[email protected]
[email protected], [email protected]
IP-based: specify IP connections
Symantec Mail Security 8200 Series checks the IP address of the mail server
initiating the connection to verify if it is on your Allowed Senders Lists or
Blocked Senders Lists. Wildcards are not supported. Although you can use
network masks to indicate a range of addresses, you cannot use subnet
masks that define non-contiguous sets of IP addresses (e.g. 69.84.35.0/
255.0.255.0). Supported notations are:
■
Single host: 128.113.213.4
■
IP address with subnet mask: 128.113.1.0/255.255.255.0
■
Classless Inter-Domain Routing (CIDR) IP address: 192.30.250.00/18
Third party services: supply the lookup domain of a third party sender
service
Symantec Mail Security 8200 Series can check messages sources against
third party DNS-based lists to which you subscribe, for example,
list.example.org.
71
72 Managing email filtering
Managing Email Firewall policies
Automatic expansion of subdomains
When evaluating domain name matches, Symantec Mail Security 8200 Series
automatically expands the specified domain to include subdomains. For
example, Symantec Mail Security 8200 Series expands example.com to include
biz.example.com and, more generally, *@*.example.com, to ensure that any
possible subdomains are allowed or blocked as appropriate.
Logical connections and internal mail servers: non-gateway deployments
When deployed at the gateway, Symantec Mail Security 8200 Series can reliably
obtain the physical or peer IP connection for an incoming message and compare
it to connections specified in the Allowed Senders Lists and Blocked Senders
Lists. If deployed elsewhere in your network, for example, downstream from the
gateway MTA, Symantec Mail Security 8200 Series works with the logical IP
connection. Symantec Mail Security 8200 Series determines the logical
connection by obtaining the address that was provided as an IP connection
address when the message entered your network. Your network is based on the
internal address ranges that you supply to Symantec Mail Security 8200 Series
when setting up your Scanners. This is why it is important that you accurately
identify all the internal mail hosts in your network. For more information, see
“Advanced SMTP settings” on page 166.
Adding senders to Blocked Senders Lists
To prevent undesired messages from being delivered to inboxes, you can add
specific email addresses, domains, and connections to your Blocked Senders
Lists.
To add Domain-based, IP-based, and Third Party Services entries to your
Blocked Senders Lists
1
In the Control Center, click Policies > Sender Groups.
2
Click one of the Blocked Sender groups.
3
Click Add.
4
In the Add Sender Group Members page, supply the information appropriate
for the current Blocked Sender group.
See “How Symantec Mail Security 8200 Series identifies senders and
connections” on page 70.
5
Click Save.
6
Modify the default action for messages originating from blocked senders
(Delete the message) if desired.
7
Click Save.
Managing email filtering
Managing Email Firewall policies
Adding senders to Allowed Senders Lists
To ensure that messages from specific email addresses, domains, and
connections are not treated as spam, you can add them to your Allowed Senders
Lists.
To add Domain-based, IP-based, and Third Party Services entries to your
Allowed Senders Lists
1
In the Control Center, click Policies > Sender Groups.
2
Click one of the Allowed Sender groups.
3
Click Add.
4
In the Add Sender Group Members page, supply the information appropriate
for the current Allowed Sender group.
See “How Symantec Mail Security 8200 Series identifies senders and
connections” on page 70.
5
Click Save.
6
Modify the default action for messages originating from allowed senders
(Deliver message normally) if desired.
7
Click Save.
Deleting senders from lists
Follow the steps below to delete senders.
To delete senders from your Blocked Senders Lists or Allowed Senders Lists
1
In the Control Center, click Policies > Email Firewall Policies > Sender
Groups.
2
Click one of the Blocked or Allowed Sender groups, depending on the list
that you want to work with.
3
In the list of senders, check the box next to the sender that you want to
remove from your list, and then click Delete.
4
Click Save.
Editing senders
Follow the steps below to change sender information.
73
74 Managing email filtering
Managing Email Firewall policies
To edit information for senders in your Blocked Senders Lists or Allowed
Senders Lists
1
In the Control Center, click Policies > Email Firewall Policies > Sender
Groups.
2
Click one of the Blocked or Allowed Sender groups, depending on the list
that you want to work with.
3
In the list of senders, click the check box next to the sender whose
information you want to modify, and then click Edit.
You can also click an underlined sender name to automatically jump to the
corresponding edit page.
4
Make any changes, and then click Save.
5
Click Save.
Enabling or disabling senders
When you add a new sender to a Sender Group, Symantec Mail Security 8200
Series automatically enables the filter and puts it to use when evaluating
incoming messages. You may need to periodically disable and then re-enable
senders from your list for troubleshooting or testing purposes or if your list is
not up to date. Symantec Mail Security 8200 Series will treat mail from a sender
that you’ve disabled just as it would any other message.
To enable or disable senders in your lists
1
In the Control Center, click Policies > Sender Groups.
2
Click one of the Blocked or Allowed Sender groups, depending on the list
that you want to work with.
A red x in the Enabled column indicates that the entry is currently disabled.
A green check mark in the Enabled column indicates that the entry is
currently enabled.
3
In the list of senders, do one of the following:
4
■
To enable a sender entry that is currently disabled, check the box
adjacent the sender information, and then click Enable.
■
To disable a sender entry that is currently enabled, check the box
adjacent the sender information, and then click Disable.
Click Save.
Managing email filtering
Managing Email Firewall policies
Importing allowed and blocked sender information
If you have many senders and addresses to add to your Blocked Senders Lists or
Allowed Senders Lists, it is often easier to place the sender information in a text
file and then import the file. This section describes how to format that file.
Maximum number of entries in an allowed and blocked sender file
Be aware of the following limitations when importing senders:
■
The maximum number of sender lines per file when importing senders is
500,000. To add more (up to the limit noted below), divide senders into
multiple files and import multiple times.
■
The maximum number of total allowed and blocked senders that can be
stored is 625,000 for the Symantec Mail Security 8240 and 750,000 for the
Symantec Mail Security 8260.
■
No warning is displayed if you exceed these limits. Sender data is silently
dropped.
Format of allowed and blocked sender file
The file is line-oriented and uses a format similar to LDIF. It has the following
restrictions and characteristics:
■
The file must have the required LDIF header that is included upon
installation
■
Each line contains exactly one attribute, along with a corresponding pattern
■
Empty lines or white spaces are not allowed
■
Lines beginning with # are ignored
■
Entries terminating with the colon-dash pattern (:-) are disabled; entries
terminating with the colon-plus pattern (:+) are enabled;
To populate the list, specify an attribute, which is followed by a pattern. In the
following example, a list of attributes and patterns follows the LDIF header.
## Permit List
#
dn: [email protected], ou=bmi
objectclass: top
objectclass: uiaBlackWhiteList
AC: 65.86.37.45/255.255.255.0
AS: [email protected]
RC: 20.45.32.78/255.255.255.255
RS: [email protected]
BL: spl.spamhaus.org
# Example notations for disabled and enabled entries follow
RS: [email protected]:-
75
76 Managing email filtering
Managing Email Firewall policies
RS: [email protected]:+
Table 3-10 lists the attributes and the syntax for the values.
Table 3-10
Syntax for imported Allowed and Blocked Sender Lists
Attribute
Description
Examples
AC:
Allowed connection or network. Specify a numerical IP address
or numerical IP address and network mask.
AC:76.86.37.45
AC:76.86.37.45/255.255.255.0
RC:
Rejected connection or network. Specify a numerical IP address
or numerical IP address and network mask.
RC:76.86.37.45
RC:76.86.37.45/255.255.255.0
AS:
Allowed sender. Specify an email address or domain using
alphanumeric and special characters, except the plus sign (+).
AS: symantecs.org
AS: [email protected]
AS: [email protected]
RS:
Rejected or blocked sender. Specify an email address or domain
using alphanumeric and special characters, except the plus sign
(+).
RS: symantecs.org
RS: [email protected]
RS: [email protected]
BL:
Third party blocked sender server. Specify a numerical IP
address or canonical name.
BL: spl.spamhaus.org
WL:
Third party allowed sender service. Specify a numerical IP
address or canonical name.
WL: senderbase.org
To import sender information from a text file
1
In the Control Center, click Policies > Sender Groups.
2
Click Blocked Senders or Allowed Senders.
3
Click Import.
4
In the Import dialog box, specify the location of the your text file with the
sender information, and then click Import. Ensure that the sender
information is formatted as described in “Format of allowed and blocked
sender file” on page 75.
Symantec Mail Security 8200 Series merges data from the imported list with
the existing sender information.
5
Click Save.
Exporting sender information
You can export to a single file all the information in your Allowed Senders Lists
and Blocked Senders Lists.
Managing email filtering
Managing Email Firewall policies
To export sender information from your Blocked Senders Lists or Allowed
Senders Lists
1
In the Control Center, click Policies > Sender Groups.
2
Click any of the Blocked Senders or Allowed Senders Lists.
The entries for all Blocked Senders and Allowed Senders Lists are exported
no matter which list you open.
3
Click Export.
Your browser will prompt you to open the file from its current location or
save it to disk.
Enabling Open Proxy Senders, Safe Senders, and Suspected
Spammers lists
Symantec continuously compiles and updates the three Reputation Filters:
■
Open Proxy Senders
IP addresses that are open proxies used by spammers.
■
Safe Senders
IP addresses from which virtually no outgoing email is spam.
■
Suspected Spammers
IP addresses from which virtually all of the outgoing email is spam.
Symantec monitors hundreds of thousands of email sources to determine how
much email sent from these addresses is legitimate and how much is spam.
Email from given email sources can then be blocked or allowed based on the
source’s reputation value as determined by Symantec. By default, Symantec
Mail Security 8200 Series is configured to incorporate the source information
from all three lists comprising the Reputation Filters.
To enable or disable Proxy Senders, Safe Senders, and Suspect Spammers
lists
1
In the Control Center, click Policies > Sender Groups.
2
Check or uncheck the boxes for the desired lists.
3
Click Enable or Disable.
Configuring Sender Authentication
The Symantec Mail Security 8200 Series can check incoming email for validity
using Sender Policy Framework (SPF). This can reduce spam because spammers
often attempt to forge the mail server name to evade discovery. In SPF, your
Symantec Mail Security 8200 Series checks the name of the mail server against
77
78 Managing email filtering
Managing policy resources
the DNS SPF record for that mail server. If the names match, the email is valid.
For more information about SPF, see http://spf.pobox.com/
If you add Sender Authentication domains, it’s best to specify the highest level
domain possible, such as example.com, because subdomains of the specified
domain will also be tested for SPF compliance.
To enable sender authentication
1
In the Control Center, click Policies > Sender Authentication.
2
Check the Authenticate using Sender Policy Framework (SPF) box.
3
Choose one of the following:
■
Click All messages to check attempt SPF authentication on all
incoming messages.
■
Click Messages from these domains to only attempt authentication
against domains you specify.
Click Add, type a domain name, and click Save to add domains to the
list.
4
By default, each failed message has the phrase [sender auth failure]
prepended to its subject line. If desired, change this action, or add additional
actions.
5
Click Save.
Managing policy resources
The settings under Policy Resources are used in the conditions or actions for
policies.
Configuring attachment lists
Attachment lists provide a way to match against specific types of email
attachments. For example, you could create an attachment list that matches
messages containing .exe files. By adding that attachment list to a policy, you
could strip attachments from those messages, insert an annotation for the
recipients, and notify the senders.
The following attachment lists have been predefined, and can be edited:
■
Image Files
■
Archive Files
■
Executable Files
■
Document Files
Managing email filtering
Managing policy resources
■
Multimedia Files
Table 3-11 includes information about valid choices for attachment list
properties. All characters are interpreted literally; wildcards are not allowed.
Table 3-11
Attachment characteristics for attachment lists
Characteristic
Description
Examples
Extension
A period followed by usually three letters at the end .txt
of a file that, by convention, indicates the type of the .exe
.text
file.
.zip
File name
Part or all of a file. A partial match for a file will
match a file, such as “oxy” for “oxygen.txt”.
oxy
oxygen
oxygen.txt
MIME-type
The MIME type of the attachment in the email
message. MIME is a standard for email attachments.
text/plain
image/gif
application/msword
application/octet-stream
For a technical description of MIME, see the following RFC:
www.ietf.org/rfc/rfc1521.txt?number=1521
To add an attachment list
1
In the Control Center, click Policies > Attachment Lists.
2
Click Add.
3
In the Attachment list name box, type a name for the attachment list.
This is the name that appears on the Attachment Lists page and as the
Attachment List in the Conditions section when configuring a policy.
4
In the Configure Attachment Types box, click the attachment type and type
of match, and type the text to match or not match.
Type only one filename, extension, or MIME type in the box. Table 3-11
includes information about valid extension, file name, and MIME-type
attachment types. Type the MIME type completely, such as image or
image/gif, not ima.
5
Click Add to add the condition you created in step 6 to the list of conditions
at the bottom of the page.
6
Repeat steps 6 and 7 to add more conditions as desired.
7
Click Save.
79
80 Managing email filtering
Managing policy resources
Configuring dictionaries
A dictionary is a list of words, phrases, or both that messages are checked
against when you choose the “Message contains words or phrases” compliance
condition in a Group Policy.
Symantec Mail Security 8200 Series includes the following predefined
dictionaries, which can’t be edited. The dictionaries marked as ambiguous
contain terms that could be legitimate when used in certain contexts.
■
Profanity
■
Profanity (Ambiguous)
■
Racial
■
Racial (Ambiguous)
■
Sexual
■
Sexual Slang
■
Sexual (Ambiguous)
Note the following additional information about dictionaries:
■
Tests against dictionaries only match the exact word listed, not other
common endings, such as verb tenses.
■
Wildcards are not supported in dictionaries.
■
Only one language is allowed in each dictionary.
■
Up to 100 dictionaries are supported, and each dictionary can contain up to
10,000 words.
■
Individual words in a dictionary cannot be set to be more or less important
than other dictionary words.
■
A dictionary can be used in multiple compliance policies.
■
When adding words to a dictionary, keep in mind that some words can be
considered both profane and legitimate, depending on the context.
To add a new dictionary
1
In the Control Center, click Policies > Policy Resources > Dictionaries.
2
Click Add.
3
In the Dictionary name box, type a name for the dictionary.
This is the name that appears in the Policy Resources > Dictionary Lists
page and in the drop-down list for the Message contains words or phrases
Condition when configuring a compliance policy.
Managing email filtering
Managing policy resources
4
Type a word or phrase in the Enter a word or phrase box.
5
Click Add to add the word or phrase to the list at the bottom of the page.
6
Repeat steps 5 and 6 to add more words as desired.
7
Click Save.
Importing dictionary words
You can import dictionary words from a newline delimited text file. Words can
be imported into a new, empty dictionary, or an existing dictionary.
To import dictionary words
1
In the Control Center, click Policies > Dictionaries.
2
Click the dictionary that you want to import words into or create a new
dictionary by clicking Add.
3
Click Import.
The dictionary words or phrases in the text file should be newline
delimited—each word or phrase should be on a separate line.
4
Click Save.
Editing a dictionary
Edit an existing dictionary to add or delete words.
To edit a dictionary
1
In the Control Center, click Policies > Policy Resources > Dictionaries.
2
Click the dictionary that you want to edit.
3
Add or delete words as desired.
4
Click Save.
Annotating messages
Annotations are phrases or paragraphs that are placed at the beginning or end
of the body of an email message when you choose the action Add annotation. An
annotation may be a legal disclaimer or text necessary to comply with
government or corporate policy, such as “All email sent to or from this email
system may be retained and/or monitored.”
81
82 Managing email filtering
Managing policy resources
How plain text and HTML text is added to messages
When specifying an annotation, a plain text version is required, and an HTML
version is optional. In nearly all cases, you should type the same message for
both the plain text and HTML versions. If desired, you can use HTML formatting
tags in the HTML version, such as <b>bold text here</b>, but don’t use HTML
structure tags, such as <body> or <html>. Table 3-12 lists the annotation
behavior depending on the type of message and whether you specified an HTML
annotation or not.
Table 3-12
Annotation behavior
If these MIME parts
are found...
And these annotations have been
specified...
Then...
Text only
Plain text only
Plain text annotation is added to the message
Text only
Plain text and HTML
Plain text annotation is added to the message;
HTML annotation is not used
Text and HTML
Plain text only
Plain text annotation is added to the plain text
part, and added to the HTML part by enclosing
it in a <p> tag
Text and HTML
Plain text and HTML
Plain text annotation is added to the plain text
part, and HTML annotation is added to the
HTML part
With messages containing both text and HTML MIME parts, the configuration of
each recipient’s email client (e.g. Microsoft Outlook) may determine which part
is displayed.
Annotation guidelines
Note the following additional information about annotations:
■
Annotations may not contain non-English characters.
■
An annotation can contain up to 10,000 individual words.
■
Up to 100 distinct annotations are allowed.
■
Don’t use HTML structure tags such as <body> or <html> in the HTML box.
To add a new annotation
1
In the Control Center, click Policies > Annotations.
2
Click Add.
3
In the Annotation description box, type a name for the annotation.
Managing email filtering
Managing policy resources
This is the name that appears on the Annotations page and on the append
and prepend annotations lists in the Actions section when configuring a
policy.
4
In the Plain text box, type the annotation text.
5
If desired, type annotation text in the HTML box.
You can use HTML formatting tags, if desired. See “How plain text and
HTML text is added to messages” on page 82.
6
Click Save.
Editing an annotation
Edit an annotation to change the wording.
To edit an annotation
1
In the Control Center, click Policies > Annotations.
2
Click the annotation that you want to edit.
3
Change the annotation text as desired.
4
Click Save.
Adding and editing notifications
Notifications are preset email messages that can be sent to the sender,
recipients, or other email addresses when a specified condition in a policy is
met. For example, if you have a policy that strips .exe attachments from
incoming messages, you may want to also notify the sender that the attachment
has been stripped.
Notifications are different than alerts. Alerts are sent automatically when
certain system problems occur with your Symantec Mail Security 8200 Series,
such as low disk space. See “Configuring alert settings” on page 139.
Note the following additional information about notifications:
■
The original message is delivered to the original recipients unless you
specify an additional action that prevents this.
■
Notifications can not contain non-English characters.
To add a new notification
1
In the Control Center, click Policies > Notifications.
2
Click Add.
3
In the Notification description box, type a name for the notification.
83
84 Managing email filtering
Managing policy resources
This is the name that appears in the Notifications page and the Notification
list in the Actions section when configuring a policy.
4
In the Send from box, type an email address that the notification should
appear to be from. Specify the full email address including the domain
name, such as [email protected].
Since recipients can reply to the email address supplied, type an address
where you can monitor responses to the notifications. Alternatively, include
a statement in the notification that responses won’t be monitored.
5
In the Send to box, check one or more of the following boxes:
Sender
Check this box to send the notification to sender listed in the
message envelope (not the sender listed in the From: header).
Recipients
Check this box to send the notification to the recipients listed in the
message envelope (not the recipients listed in the To: header).
Others
Check this box to send the notification to one or more complete
email addresses you specify. Separate multiple email addresses with
a comma, semicolon, or space.
6
In the Subject box, type the text for the Subject: header of the notification
message.
7
In the Message body box, type the text for the body of the notification
message.
8
Click Save.
Archiving messages
The archive action creates a copy of a message and sends it to an email address,
and, optionally, an archive server host. If no additional action is specified, the
original message is delivered normally as well. The copy is delivered via SMTP
email to the specified email address, so can be accessed as email by the email
address owner. Ensure that the email address you specify is valid and that the
messages delivered to the address are managed appropriately. For example, you
may want to add the archived messages to your backup scheme.
Note the following additional information about the Archive action:
■
Only one email address is supported. You can’t supply different email
addresses for different policies.
■
The specified archive email address replaces the original message recipients
in the message envelope. The To: header is not changed.
Managing email filtering
Managing policy resources
■
Archiving occurs after spam and virus filtering but before message markup,
such as modifying the subject line.
■
If you specify an archive server host, all messages addressed to the archive
email address are routed to the archive server host, regardless of any
configured Archive actions.
To set the archive email address destination
1
In the Control Center, click Policies > Archive.
2
In the Archive email address box, type a complete email address, such as
[email protected].
3
Optionally, specify a computer to which to relay archived messages in the
Archive server host box.
4
Optionally, specify a port for the archive server host in the Archive server
port box.
Port 25, the usual port for SMTP messages, is the default.
5
Check or uncheck Enable MX Lookup to enable or disable MX lookup for the
archive server host.
If enabled, archive messages are routed using the MX information
corresponding to the archive server host. If disabled, archive messages are
always routed to the specified archive server host.
6
Click Save.
Configuring optional archive tags
When adding the archive action to a policy, you can optionally specify an
archive tag. Specifying an archive tag adds an X-archive: header to archived
messages followed by your text. The X-archive: header may be useful to sort
archived messages when viewing them with an email client. However, the
Symantec Mail Security 8200 Series itself does not use the X-archive: header. If
multiple policies result in archiving the same message, each unique X-archive:
header is added to the message. For example, the following archive tag:
Docket 53745
adds the following header to the message when it is archived:
X-archive: Docket 53745
To specify an archive tag
1
When configuring a virus, spam, or compliance policy, click the Archive the
message action.
See “Creating virus policies” on page 57, “Creating spam policies” on
page 58, or “Creating compliance policies” on page 59.
85
86 Managing email filtering
Configuring virus and spam settings
2
In the Optional archive tag box, type the text that should occur after the
X-archive header.
Type any character except carriage return, line feed, or semicolon.
3
Click Add Action.
4
Finish configuring the policy.
Configuring virus and spam settings
Virus and spam settings may be tuned to suit your requirements.
Configuring virus settings
The available configuration settings for antivirus filtering include the following:
■
Enabling and disabling
For testing or troubleshooting purposes, you may need to temporarily
disable and then re-enable antivirus filtering. It may also be permanently
disabled.
■
Setting the heuristic level
The heuristic level determines the way in which viruses are flagged. Higher
heuristic levels may catch more viruses, but consume more processing
power, potentially slowing incoming mail processing.
■
Dealing with potential zip bombs and large files
When Symantec Mail Security 8200 Series extracts and processes certain
zip files and other types of compressed files, these files can expand to the
point where they deplete system memory. Such files are often referred to as
“zip bombs.” Symantec Mail Security 8200 Series can handle such
situations by automatically sidelining large attachments and cleaning
them. There is a presumption that such a file can be a “zip bomb” and
should not be allowed to over-use the resources of the Symantec Mail
Security 8200 Series. The file is sidelined for cleaning only because of its
size, not because of any indication that it contains a virus.
Note: In some cases, where the size of the file or the number of nested levels
exceeds the resources available for processing, the file cannot be cleaned. If it
cannot be cleaned, it will be deleted. If it cannot be deleted, an advisory message
is included, notifying the recipient that antivirus cleaning was not possible.
You can specify this size threshold, as well as the maximum extraction level
that Symantec Mail Security 8200 Series will process in memory. If the
configured limits are reached, Symantec Mail Security 8200 Series will
Managing email filtering
Configuring virus and spam settings
automatically perform the action designated for the “unscannable”
category in the Group Policies settings.
To configure virus settings
1
In the Control Center, click Settings > Virus Settings.
2
Uncheck Scan messages for viruses to disable virus checking or check it to
enable virus scanning.
3
Under Heuristic Level, choose Off, Low, Medium, or High.
No or lower heuristic levels may miss viruses, but consume less processing
power, potentially speeding incoming mail processing. Higher heuristic
levels may catch more viruses, but consume more processing power,
potentially slowing incoming mail processing.
4
Specify a number in the Maximum archive scan depth box.
A message is unscannable for viruses if the directory depth in an archive file
(such as a .zip file) exceeds the number specified. Do not set this value too
high or you could be vulnerable to a zip bomb, in which huge amounts of
data are zipped into very small files. Do not set this value too low, or nested
sets of replies and forwards on legitimate messages could trigger the
threshold.
5
Specify a number in the Maximum file size to scan box.
A message is unscannable for viruses if an attachment exceeds the size
specified.
Configuring spam settings
When evaluating whether messages are spam, Symantec Mail Security 8200
Series calculates a spam score from 1 to 100 for each message, based on
techniques such as pattern matching and heuristic analysis. If an email scores in
the range of 90 to 100 after being filtered by Symantec Mail Security 8200
Series, it is defined as spam.
For more aggressive filtering, you can optionally define a discrete range of
scores below 90 and above 25. The messages that score within this range will be
considered “suspected spam.” Unlike spam, which is determined by Symantec
and not subject to adjustment by administrators, you can adjust the trigger for
suspected spam. Using policies, you can specify different actions for messages
identified as suspected spam and messages identified as spam by Symantec.
For example, assume that you have configured your suspected spam scoring
range to encompass scores from 80 and 89. If an incoming message receives a
spam score of 83, Symantec Mail Security 8200 Series will consider this message
to be suspected spam, and will apply the action you have in place for suspected
87
88 Managing email filtering
Configuring virus and spam settings
spam messages, such as Modify the Message (tagging the subject line). Messages
that score 90 or above will not be affected by the suspected spam scoring setting,
and will be subject to the action you have in place for spam messages, such as
Quarantine the Message.
Note: Symantec recommends that you not adjust the spam threshold until you
have some visibility into filtering patterns at your site. Then, gradually move
the threshold setting down 1 to 5 points a week until the number of false
positives is at the highest level acceptable to you. A great way to test the effects
of spam scoring is to set up a designated mailbox or user to receive false positive
notifications to monitor the effects of changing the spam score threshold.
Choosing language identification type
Language identification is the ability to block or allow messages written in a
specified language. For example, you can choose to only allow English and
Spanish messages, or block messages in English and Spanish and allow
messages in all other languages.
You can use one of two types of language identification:
■
Language identification offered by the Symantec Mail Security 8200 Series
Processing takes place on the Symantec Mail Security 8200 Series, and no
further software needs to be installed. Using the Policies > Group Policies >
Edit > Language tab, administrators can set language preferences or allow
users to set language preferences.
■
Language identification offered by the Symantec Outlook Spam Plug-in
Processing takes place on each user’s computer, and each user must install
the Symantec Outlook Spam Plug-in. Users set their own language
preferences.
To configure spam settings, including language identification
1
In the Control Center, click Settings > Spam Settings.
2
Under Do you want any messages to be flagged as suspected spam, click
Yes.
3
Click and drag the slider to increase or decrease the lower bound of
suspected spam range. You can also type a value in the box.
Managing email filtering
Configuring virus and spam settings
4
5
Under Do you want to enable Language Identification, click Yes or No.
Yes
Click Yes if users will use the Symantec Outlook Spam Plug-in for
language identification. Built-in language identification is disabled,
and can’t be accessed in the Edit Group page.
No
Click No to use the built-in language identification. Symantec
Outlook Spam Plug-in language identification won’t work if you
choose No.
Click Save.
89
90 Managing email filtering
Configuring virus and spam settings
Chapter
4
Working with Web
Quarantine
This chapter includes the following topics:
■
About Quarantine
■
Delivering messages to Quarantine
■
Working with messages in Quarantine for administrators
■
Configuring Quarantine
■
Administering Quarantine
■
Troubleshooting
About Quarantine
Quarantine provides storage of spam messages and Web-based end-user access
to spam. You can also configure Quarantine for administrator-only access. Use
of Quarantine is optional. Quarantined messages and associated databases are
stored on the Symantec Mail Security 8200 Series Control Center.
Delivering messages to Quarantine
To use Quarantine, check that your system is configured as follows:
■
One or more groups must have an associated filter policy that quarantines
messages. For example, you could create a suspected spam policy called
Quarantine that quarantines suspected spam messages and set it as the
inbound and outbound suspected spam policy for the Default group.
92 Working with Web Quarantine
Working with messages in Quarantine for administrators
■
Control Center access to your LDAP server using Authentication must be
working for end users to be able to log in to Quarantine to check their
quarantined messages and for LDAP email alias expansion. If you don’t have
an LDAP server or don’t want to enable end user access to quarantined
messages, you can configure Quarantine for administrator-only access.
Working with messages in Quarantine for
administrators
This section describes how Quarantine works for administrators. Online help
similar to this information is available for end users when they log into
Quarantine.
Accessing Quarantine
Administrators access Quarantine by logging into the Control Center. All
administrators can work with messages in Quarantine, but administrators
without full privileges or Manage Quarantine rights won’t see the Quarantine
link in the Settings tab, and the Settings button will be grayed out.
Users access Quarantine by logging into the Control Center using the user name
and password required by the type of LDAP server employed at your company.
For users, the Quarantine message list page is displayed after logging in.
Checking for new Quarantine messages
New messages that have arrived since logging in and checking quarantined
messages are not shown in the message list until you do one of the following:
■
Click the Quarantine tab or the Quarantine link in the left pane
■
Cancel a search by clicking Clear
Other than these two cases, newly arrived messages are not displayed in
Quarantine.
Administrator message list page
The administrator message list page provides a summary of the messages in
Quarantine. The user message list page is very similar. See “Differences between
the administrator and user message list pages” on page 95.
Working with Web Quarantine
Working with messages in Quarantine for administrators
Work with messages on the message list page
The following steps describe how to perform some common tasks on the
message list page.
To sort messages
◆
Click on the To, From, Subject, or Date column heading to select the column
by which to sort.
A triangle appears in the selected column that indicates ascending or
descending sort order. Click on the selected column heading to toggle
between ascending and descending sort order. By default, messages are
listed in date descending order, meaning that the newest messages are listed
at the top of the page.
To view messages
◆
Click on a message subject to view an individual message.
To redeliver misidentified messages
◆
Click on the check box to the left of a misidentified message and then click
Release to redeliver the message to the intended recipient.
This also removes the message from Quarantine. Depending on how you
configured Quarantine, a copy of the message may also be sent to an
administrator email address (such as yourself), Symantec, or both. This
allows the email administrator and/or Symantec to monitor the
effectiveness of the Symantec Mail Security 8200 Series.
To delete individual messages
1
Click on the check box to the left of each message to select a message for
deletion.
2
When you’ve selected all the messages on the current page that you want to
delete, click Delete.
Deleting a message in the administrator’s Quarantine also deletes the
message from the applicable user’s Quarantine. For example, if you delete
Kathy’s spam messages in the administrator’s Quarantine, Kathy won’t be
able to see those messages when accessing Quarantine.
To delete all messages
◆
Click Delete All to delete all the messages in Quarantine, including those on
other pages.
This deletes all users’ quarantined messages.
93
94 Working with Web Quarantine
Working with messages in Quarantine for administrators
To search messages
◆
Click Search to search messages for a specific recipient, sender, subject,
message ID, or date range.
See “Searching messages” on page 97.
To navigate through messages
◆
Click one of the following buttons to navigate through message list pages:
Go to beginning of messages
Go to the end of messages. This button is displayed
if there are less than 50 pages of messages after the
current page.
Go to previous page of messages
Go to next page of messages
Choose up to 500 pages before or after the current
page of messages
To set the entries per page
◆
On the Entries per page drop-down list, click a number.
Details on the administrator message list page
Note the following Quarantine behavior:
■
When you navigate to a different page of messages, the status of the check
boxes in the original page is not preserved. For example, if you select three
messages in the first page of messages and then move to the next page,
when you return to the first page, all the message check boxes are cleared
again.
■
The “To” column in the message list page indicates the intended recipient of
each message as listed in the message envelope. When you display the
contents of a single message in the message details page, the To: header
(not envelope) information is displayed, which is often forged by spammers.
Working with Web Quarantine
Working with messages in Quarantine for administrators
Differences between the administrator and user message list
pages
The pages displayed for administrators and other users on your network have
the following differences.
■
Users can only view and delete their own quarantined messages. Quarantine
administrators can view and delete all users’ quarantined messages, either
one by one, deleting all messages, or deleting the results of a search.
■
When users click Release, the message is delivered to their own main inbox.
When a Quarantine administrator clicks Release, the message is delivered to
the inbox of the intended recipient.
■
The administrator message list page includes a “To” column containing the
intended recipient of each message. Users can only see their own messages,
so the “To” column is unnecessary.
■
The Settings button is only available to Quarantine administrators, not
users.
■
Users only have access to Quarantine, not the rest of the Control Center.
Administrator message details page
When you click on the subject line of a message in the message list page, this
page displays the contents of individual quarantined messages. The user
message details page is very similar. See “Differences Between the
administrator and user message pages” on page 97.
Note the following message details page behavior:
Graphics appear as gray
rectangles
When viewed in Quarantine, the original
graphics in messages are replaced with graphics
of gray rectangles. This suppresses offensive
images and prevents spammers from verifying
your email address. If you release the message
by clicking Release, the original graphics will be
viewable by the intended recipient. It is not
possible to view the original graphics within
Quarantine.
Attachments can’t be viewed
The names of attachments are listed at the
bottom of the message, but the actual
attachments can’t be viewed from within
Quarantine. However, if you redeliver a message
by clicking Release, the message and
attachments will be accessible from the inbox of
the intended recipient.
95
96 Working with Web Quarantine
Working with messages in Quarantine for administrators
Work with messages in the message details page
The following steps describe how to perform some common tasks on the
message details page.
To redeliver misidentified messages
◆
Click Release to redeliver the message to the intended recipient.
This also removes the message from Quarantine. Depending on how you
configured Quarantine, a copy of the message may also be sent to an
administrator email address (such as yourself), Symantec, or both. This
allows the email administrator and/or Symantec to monitor the
effectiveness of the Symantec Mail Security 8200 Series.
To delete the message
◆
To delete the message currently being viewed, click Delete.
When you delete a message, the page refreshes and displays the next
message. If there are no more messages, the message list page is displayed.
Deleting a message in the administrator’s Quarantine also deletes the
message from the applicable user’s Quarantine. For example, if you delete
Kathy’s spam messages in the administrator’s Quarantine, Kathy won’t be
able to see those messages when accessing Quarantine.
To navigate through messages
◆
Click one of the following buttons to navigate through message details
pages:
Go to next message
Go to previous message
To return to the message list
◆
To return to the message list, click Back To Messages.
To display full headers
◆
To display all headers available to Quarantine, click Display Full Headers.
The full headers may provide clues about the origin of a message, but keep
in mind that spammers usually forge some of the message headers.
Working with Web Quarantine
Working with messages in Quarantine for administrators
To display brief headers
◆
To display only the From:, To:, Subject:, and Date: headers, click Display
Brief Headers.
Differences Between the administrator and user message
pages
The pages displayed for administrators and other users on your network have
the following differences.
■
Users can only view and delete their own quarantined messages. Quarantine
administrators can view and delete messages for all users.
■
Users only have access to Quarantine, not the rest of the Control Center.
Searching messages
Click Search on the message list page to display the search page. Type in one or
more boxes or choose a time range to display matching messages in the
administrator Quarantine. The search results are displayed in a page similar to
the message list page.
The user search page is very similar. See “Differences between the
administrator and user search pages” on page 100 for more information.
If you search for multiple characteristics, only messages that match the
combination of characteristics are listed in the search results. For example, if
you typed “LPQTech” in the From box and “Inkjet” in the Subject box, only
messages containing “LPQTech” in the From: header and “Inkjet” in the
Subject: header would be listed in the search results.
Search messages
The search results sometimes may not return the results you expect.
See “Search details” on page 99.
To display the search area
◆
On the message list page, click Search.
To search message envelope “To” recipient
◆
Type in the To box to search the message envelope RCPT TO: recipient in all
messages for the text you typed.
You can search for a display name, the user name portion of an email
address, or any part of a display name or email user name. If you type a full
email address in the To box, only the user name portion of
[email protected] is searched for. You can attempt to search for the
97
98 Working with Web Quarantine
Working with messages in Quarantine for administrators
domain portion of an email address by typing just the domain, but if more
than 50% of the messages contain part of the search phrase, nothing will be
displayed. See “Search details” on page 99. The search is limited to the
envelope To:, which may contain different information than the header To:
displayed on the message details page.
To search “from” headers
◆
Type in the From box to search the From: header in all messages for the text
you typed.
You can search for a display name, email address, or any part of a display
name or email address. The search is limited to the visible message From:
header, which in spam messages is usually forged. The visible message
From: header may contain different information than the message envelope.
To search subject headers
◆
Type in the Subject box to search the Subject: header in all messages for
the text you typed.
To search the Message ID header
◆
Type in the Message ID box to search the message ID in all messages for the
text you typed.
The message ID is not visible in Quarantine, but it can obtained by
examining the mail log on the MTA. In addition, most email clients have the
capability of displaying the full message header which includes the message
ID. For example, in Outlook 2000, double click on a message to show it in a
window by itself, click View and then click Options.
The message ID is typically assigned by the first email server to receive the
message and is supposed to be a unique identifier for a message. However,
spammers may tailor the message ID to suit their purposes, such as to hide
their identity. For legitimate email, the message ID may indicate the domain
where the message was sent from and/or the email server used to send the
message.
To search using time range
◆
Choose a time range from the Time Range list to show all messages from
that time range.
You can also choose Customize to search using a specific time range.
Working with Web Quarantine
Working with messages in Quarantine for administrators
Search details
The search function is optimized for searching a large number of messages.
However, this can lead to unexpected search results. Keep in mind the following
when analyzing search results:
Note: If any term in the search phrase matches 50% or more of the messages in
the database, then the search will show no results.
■
About 570 common words such as “after” and “which” are ignored in any of
the search boxes, as well as the word “spam”. These are called MySQL
stopwords. Also, words of three characters or less are ignored. This applies
to To, From, Subject, and Message ID searches.
■
If any word in a multiple word search is found in a message, that message is
considered a match. For example, searching for “red carpet” will match “red
carpet,” and also “red wine” and “flying carpet.” You don’t have to put quote
marks around search text that contains spaces.
■
Searches match exact whole words only in To, From, Subject, and Message
ID searches. A word is considered a group of letters, numbers, or
underscores. For example, if you searched for “finance”, the search would
not find “refinance”. Also, if you searched for “[email protected]”,
the search is interpreted as “user_name” OR “example”. Since “com” is three
characters, it is ignored. The @ and the period are treated as spaces.
■
Search results are sorted by date descending order by default but can be
resorted by clicking on a column heading.
■
Wildcards such as * are not supported in search. All searches are literal.
■
If you search for multiple characteristics, only messages that match the
combination of characteristics are listed in the search results. For example,
if you typed “LPQTech” in the From box and “Inkjet” in the Subject box, only
messages containing “LPQTech” in the From header and “Inkjet” in the
Subject: header would be listed in the search results.
■
All text searches are case-insensitive. This means that if you typed emerson
in the From box, then messages with a From: header containing emerson,
Emerson, and eMERSOn would all be displayed in the search results.
■
The amount of time required for the search is dependent on how many
search boxes you filled in and the number of messages in the current
mailbox. Searching in the administrator mailbox will take longer than
searching in a user’s mailbox.
■
Spammers usually “spoof” or forge some of the visible messages headers
such as From: and To and the invisible envelope information. Sometimes
99
100 Working with Web Quarantine
Configuring Quarantine
they forge header information using the actual email addresses or domains
of innocent people or companies.
Differences between the administrator and user search
pages
■
Quarantine administrators can search for recipients.
■
In the Search Results page, users can only delete their own quarantined
messages. Quarantine administrators can delete all users’ quarantined
messages.
Configuring Quarantine
Most Quarantine settings are accessed by clicking Quarantine Settings on the
Settings tab.
Delivering messages to Quarantine from the Scanner
Use the Group Policies filtering actions to deliver spam messages to Quarantine.
Note: Quarantine does not use a separate SMTP mail server to send notifications
and resend misidentified messages, although an SMTP mail server must be
available to receive notifications and misidentified messages sent by
Quarantine. Set this SMTP server on the Control Center Settings page. The
SMTP server you choose should be downstream from the Scanner, as
notifications and misidentified messages do not require filtering.
To deliver messages to Quarantine
1
In the Control Center, click Policies > Spam.
2
Click Add.
3
Under Policy name, type Quarantine or a descriptive name of your choice.
4
Under Apply to, click Inbound messages.
5
Under Groups, check the box next to the groups that should have their email
quarantined.
6
Under Conditions, choose If a message is spam or suspected spam.
Alternatively, you could configure spam to be deleted, and only quarantine
suspected spam.
7
Under Perform the following action, click Quarantine the message.
Working with Web Quarantine
Configuring Quarantine
8
Click Add Action.
9
Click Save.
For more information about Group Policies, see “Creating groups and adding
members” on page 48.
Configuring Quarantine for administrator-only access
If you don’t have an LDAP directory server configured or don’t want users in
your LDAP directory to access Quarantine, you can configure Quarantine so that
only administrators can access the messages in Quarantine.
When administrator-only access is enabled, you can still perform all the
administrator tasks described in “Working with messages in Quarantine for
administrators” on page 92, including redelivering misidentified messages to
local users, whether or not you’re using an LDAP directory at your organization.
However, notification of new spam messages is disabled when administratoronly access is enabled.
To configure Quarantine for administrator-only access
1
In the Control Center, click Settings > Quarantine Settings.
2
Check the box next to Administrator-only Quarantine.
3
Click Save.
Configuring Quarantine on a Control Center-only appliance
If you configure a Symantec Mail Security 8200 Series appliance to act as a
Control Center without a Scanner, you won’t be able to release messages from
the Quarantine until you set the Control Center Settings to a computer that has
a working MTA on it, such as a Symantec Mail Security 8200 Series appliance
with a working Scanner, or another computer accessible from the Control
Center-only appliance.
To configure Quarantine to use an MTA on an alternate computer
1
In the Control Center, click Settings > Control Center Settings.
2
In the Host box, type the IP address or fully-qualified domain name of the
computer that has a working MTA on it, such as a Symantec Mail Security
8200 Series appliance with a working Scanner.
3
In the Port box, type the port on the computer you specified in step 3 that
should receive SMTP messages.
4
Click Save.
101
102 Working with Web Quarantine
Configuring Quarantine
Configuring the user and distribution list notification digests
By default, a notification process runs at 4 a.m. every day and determines if
users have new spam messages in Quarantine since the last time the notification
process checked. If so, it sends a message to users who have new spam to remind
them to check their spam messages in Quarantine. You can also choose to send
notification digests to users on distribution lists. The sections below describe
how to change the notification digest frequency and format.
Notification for distribution lists/aliases
If Quarantine is enabled, a spam message sent to an alias with a one-to-one
correspondence to a user’s email address is delivered to the user’s normal
quarantine mailbox. For example, if tom is an alias for tomevans, quarantined
messages sent to tom or to tomevans all arrive in the Quarantine account for
tomevans.
Note: An “alias” on UNIX or “distribution list” on Windows is an email address
that translates to one or more other email addresses. In this text, distribution
list is used to mean an email address that translates to two or more email
addresses.
When Symantec Mail Security 8200 Series forwards a spam message sent to a
distribution list to Quarantine, the message is not delivered in the intended
recipients’ Quarantine. Instead, the message is delivered to a special Quarantine
mailbox for that distribution list. However, you can configure Quarantine to
send notification digests about the messages in a distribution list mailbox to the
recipients of that distribution list by selecting the Notify distribution lists check
box on the Quarantine Settings page. If the Include View link box is selected on
the Quarantine Settings page, recipients of the notification digest can view all
the quarantined distribution list messages. If a recipient clicks on the Release
button for a message in the quarantined distribution list mailbox, the message is
delivered to the normal inboxes of the distribution list recipients.
Working with Web Quarantine
Configuring Quarantine
Note: For example, if a distribution list called mktng contains ruth, fareed, and
darren, spam sent to mktng and configured to be quarantined won’t be delivered
to the Quarantine inboxes for ruth, fareed, and darren. If the Notify distribution
lists check box on the Quarantine Settings page is selected, then ruth, fareed,
and darren will receive email notifications about the quarantined mktng
messages. If the Include View link box is selected on the Quarantine Settings
page, then ruth, fareed, and darren can view the quarantined mktng messages
by clicking on the View link in the notification digests. If ruth clicks on the
Release button for a quarantined mktng message, the message is delivered to
the normal inboxes of ruth, fareed, and darren.
Separate notification templates for standard and
distribution list messages
By default, the notification templates for standard quarantined messages and
quarantined distribution list messages are different. This allows you to
customize the notification templates for each type of quarantined message.
Changing the notification digest frequency
To change the frequency at which notification messages are sent to users, follow
the steps below. The default frequency is every day. To not send notification
messages, change the Notification frequency to NEVER.
To change the notification digest frequency
1
In the Control Center, click Settings > Quarantine Settings.
2
Choose the desired setting from the Notification frequency drop-down list.
3
Choose the desired setting from the Spam Notification start time dropdown list.
4
Click Save.
Changing the notification digest templates
The notification digest templates determine the appearance of notification
messages sent to users as well as the message subject and send from address.
The default notification templates are similar to the text listed below. The
distribution list notification template lacks the information about logging in. In
your browser, the text doesn’t wrap, so you’ll have to scroll horizontally to view
some of the lines. This prevents unusual line breaks or extra lines if you choose
to send notifications in HTML format.
103
104 Working with Web Quarantine
Configuring Quarantine
Quarantine Summary for %USER_NAME%
There are %NEW_MESSAGE_COUNT% new messages in your Spam Quarantine
since you received your last Spam Quarantine Summary. These messages
will automatically be deleted after %QUARANTINE_DAYS% days.
To review the complete text of these messages, go to
%QUARANTINE_URL%
and log in.
===================== NEW QUARANTINE MESSAGES =====================
%NEW_QUARANTINE_MESSAGES%
===================================================================
In the notification digest sent to users, the variables in Table 4-1 are replaced
with the information described in the Description column. You can reposition
each variable in the template or remove it.
Table 4-1
Notification Message Variables
Variable
Description
%NEW_MESSAGE_COUNT%
Number of new messages in the user’s
Quarantine since the last notification message
was sent.
%NEW_QUARANTINE_MESSAGES% List of messages in the user’s Quarantine since
the last notification was sent. For each message,
the contents of the From:, Subject:, and Date:
headers are printed. View and Release links are
displayed for each message if they are enabled
and you’ve chosen Multipart or HTML
notification format.
%QUARANTINE_DAYS%
Number of days messages in Quarantine will be
kept. After that period, messages will be purged.
%QUARANTINE_URL%
URL that the user clicks on to display the
Quarantine login page.
%USER_NAME%
User name of user receiving the notification
message.
To edit the notification templates, digest subject, and send from address
1
In the Control Center, click Settings > Quarantine Settings.
2
Under Quarantine Notification, click Edit next to Notification templates.
3
In the Send from box, type the email address that the notification digests
should appear to be from. Since users can reply to the email address
supplied, type an address where you can monitor users’ questions about the
Working with Web Quarantine
Configuring Quarantine
notification digests. Specify the full email address including the domain
name, such as [email protected].
4
In the Subject box, type the text that should appear in the Subject: header
of notification digests, such as “Your Suspected Spam Summary.” Don’t put
message variables in the subject box; they won’t be expanded.
Note: The Send from and Subject settings will be the same for both the user
notification template and distribution list notification template.
5
Edit the user notification template, distribution list notification template, or
both. See Table 4-1, “Notification Message Variables,” on page 104. Don’t
manually insert breaks if you plan to send notifications in HTML.
6
Click Save to save your changes to the template and close the template
editing window. Or, click one of the following:
7
■
Default: Erase the current information and replace it with defaults.
■
Cancel: Discard your changes to the notification template and close the
template editing window.
Click Save in the Quarantine Settings page.
Enabling notification for distribution lists
You can configure Quarantine to send notification digests about the messages in
a distribution list mailbox to the recipients in a distribution list. See
“Notification for distribution lists/aliases” on page 102 for more information.
To enable notification for distribution lists
1
In the Control Center, click Settings > Quarantine Settings.
2
Under Quarantine Notification, click Notify distribution lists.
3
Click Save in the Quarantine Settings page.
Selecting the notification digest format
The notification digest template determines the MIME encoding of the
notification message sent to users as well as whether View and Release links
appear in the message.
To choose a notification format
1
In the Control Center, click Settings > Quarantine Settings.
2
Under Quarantine Notification, click one of the following items in the
Notification formats list:
105
106 Working with Web Quarantine
Configuring Quarantine
■
Multipart (HTML and text): Send a notification message in MIME
multipart format. Users will see either the HTML version or the text
version depending on the type of email client they are using and the
email client settings. The View and Release links do not appear next to
each message in the text version of the summary message.
■
HTML only: Send the notification message in MIME type text/html
only.
■
Text only: Send the notification message in MIME type text/plain only.
If you choose Text only, the View and Release links do not appear next
to each message in the summary message.
3
Check the Include View link box to include a View link next to each message
in the notification digest message summary.
When a user clicks on the View link in a notification digest message, the
adjacent message is displayed in Quarantine in the default browser. This
check box is only available if you choose Multipart (HTML and text) or
HTML only notification format. If you remove the
%NEW_QUARANTINE_MESSAGES% variable from the notification digest
template, the new message summary, including the View links, won’t be
available.
4
Check the Include Release link box to include a Release link next to each
message in the notification digest message summary.
The Release link is for misidentified messages. When a user clicks on the
Release link in a notification digest message, the adjacent message is
released from Quarantine and sent to the user’s normal inbox. This check
box is only available if you choose Multipart (HTML and text) or HTML only
notification format. If you remove the %NEW_QUARANTINE_MESSAGES%
variable from the notification digest template, the new message summary,
including the Release links, won’t be available.
5
Click Save.
Configuring recipients for misidentified messages
If users or administrators find false positive messages in Quarantine, they can
click Release. Clicking Release redelivers the selected messages to the user’s
normal inbox. You can also send a copy to a local administrator, Symantec, or
both.
To configure recipients for misidentified message submissions
1
In the Control Center, click Settings > Quarantine Settings.
2
To report misidentified messages to Symantec, click Brightmail Logistics
and Operations Center (BLOC). This is selected by default.
Working with Web Quarantine
Configuring Quarantine
Symantec Security Response analyzes message submissions to determine if
the filters need to be changed. However, Symantec Security Response will
not send confirmation of the misidentified message submission to the
administrator or the user submitting the message.
3
To send copies of misidentified messages to a local administrator, click
Administrator under Misidentified Messages and type the appropriate
email address. These messages should be sent to someone who will monitor
misidentified messages at your organization to determine the effectiveness
of Symantec Mail Security 8200 Series.
Type the full email address including the domain name, such as
[email protected]. The administrator email address must not be an alias,
or a copy of the misidentified message won’t be delivered to the
administrator email address, and errors will be recorded in the log accessible
from the Logs tab (not the BrightmailLog.log Quarantine log file).
4
Click Save.
Configuring the Delete Unresolved Email setting
By default, quarantined messages sent to non-existent email addresses, based
on LDAP lookup, will be deleted. If you clear the check box for Delete messages
sent to unresolved email addresses, these messages will be stored in the
Quarantine postmaster mailbox. “Checking the Quarantine postmaster
mailbox” on page 111 describes how to view these messages.
Note: If there is an LDAP server connection failure or LDAP settings have not
been configured correctly, then quarantined messages addressed to nonexistent users are stored in the Quarantine postmaster mailbox whether the
Delete unresolved email check box is selected or cleared.
Setting the Quarantine message retention period
To change the amount of time spam messages are kept before being deleted,
follow the steps below. You may want to shorten the retention period if
quarantined messages are using too much of your system’s disk space. However,
a shorter retention period increases the chance that users may have messages
deleted before they have been checked. The default retention period is 7 days.
By default, the Expunger runs at 1 a.m. every day to delete messages older than
the retention period. Each time the process runs, at most 10,000 messages can
be deleted. Increase the expunger frequency if your organization receives a very
large volume of spam messages.
107
108 Working with Web Quarantine
Configuring Quarantine
To set the Quarantine message retention period
1
In the Control Center, click Settings > Quarantine Settings.
2
Type the desired number of days in the Days to store in Quarantine before
deleting setting.
3
Click Save on the Quarantine Settings page.
Setting the Expunger frequency and start time
The Expunger periodically deletes after the amount of time listed in the Days to
store in Quarantine before deleting setting.
To set the Expunger frequency and start time
1
In the Control Center, click Settings > Quarantine Settings.
2
Click the desired value for the Quarantine Expunger frequency.
3
Click the desired value for the Quarantine Expunger start time.
4
Click Save.
Configuring the login help
By default, when users click on the Need help logging in? link on the Control
Center login page, online help from Symantec is displayed in a new window. You
can customize the login help by specifying a custom login help page. This
change only affects the login help page, not the rest of the online help. This
method requires knowledge of HTML.
By default, when users click on the Need help logging in? link on the Control
Center login page, online help from Symantec is displayed in a new window. You
can customize the login help in two ways:
■
Modify the contents of the existing login help page
■
Specify a custom login help page
Configure the login help
These changes only affect the login help page, not the rest of the online help.
Both of these methods require knowledge of HTML.
To modify the contents of the existing login help page
1
Open the following files in a text editor such as WordPad or vi:
/data/bcc/webapps/brightmail/help/login/about.htm
/data/bcc/webapps/brightmail/help/login/how_to.htm
Working with Web Quarantine
Configuring Quarantine
These two help files are linked to behave like the other Symantec help pages.
If you just want one help page, the about.htm file is the one called when you
click on Need help logging in?
2
Edit the files, using the existing contents as a guide.
3
Save and exit from the files.
To specify a custom login help page
1
Create a Web page that tells your users how to log in and make it available
on your network. The Web page should be accessible from any computer
where users will log in to Quarantine.
2
In the Control Center, click Settings > Quarantine Settings.
3
In the Login help URL box, type the URL to the Web page you created.
4
Click Save on the Quarantine Settings page.
To disable your custom login help page, delete the contents of the Login help
URL box.
Configuring the Quarantine port for incoming SMTP email
By default, Quarantine accepts quarantined messages from the Scanner on port
41025. To specify a different port, type it in the Quarantine Port box. You don’t
need to change any Scanner settings to match the change in the Quarantine Port
box.
To disable the Quarantine port, type 0 in the Quarantine Port box. Disabling the
Quarantine port is appropriate if your Symantec Mail Security 8200 Series
appliance is not behind a firewall and you’re concerned about security risks.
Note: If you disable the Quarantine port, disable any filtering policies that
quarantine messages. Otherwise, quarantined messages will back up in the
delivery MTA queue until the expiration time elapses and will then be bounced
back to the original sender.
109
110 Working with Web Quarantine
Configuring Quarantine
Specifying Quarantine message and size thresholds
To limit the number of messages in Quarantine or size of Quarantine, configure
Quarantine threshold settings.
Table 4-2
Quarantine Thresholds
Threshold
Description
Maximum size of quarantine Maximum amount of disk space used for quarantined
database
messages for all users.
When a new message arrives after the threshold has been
reached, the 10 oldest messages are deleted, and the new
message is kept.
Maximum size per user
Maximum amount of disk space used for quarantine
messages per user.
When a new message arrives after the threshold has been
reached, the 10 oldest messages of the user are deleted,
and the new message is kept.
Maximum number of
messages
Maximum number of messages for all users (the same
message sent to multiple recipients counts as one
message).
When a new message arrives after the threshold has been
reached, the oldest message is deleted, and the new
message is kept.
Maximum number of
messages per user
Maximum number of quarantine messages per user.
When a new message arrives after the threshold has been
reached, the user’s oldest message is deleted, and the new
message is kept.
To specify Quarantine message and size thresholds
1
In the Control Center, click Settings > Quarantine Settings.
2
Under Quarantine Thresholds, for each type of threshold you want to
configure, select the check box and enter the size or message threshold. You
can configure multiple thresholds.
3
Click Save.
Note: No alert or notification occurs if Quarantine thresholds are exceeded.
However, you can be alerted when disk space is low, which may be caused by a
large number of messages in the Quarantine database. For more information
about alerts, see “Configuring alert settings” on page 139.
Working with Web Quarantine
Administering Quarantine
Administering Quarantine
The following sections describe common tasks for Quarantine administrators.
Starting and stopping Quarantine
Quarantine is configured to start when the Symantec Mail Security 8200 Series
is turned on and to stop when it is shut down. However, there may be times
when you need to manually stop and later start Quarantine processes, such as to
investigate a problem.
Start or stop Quarantine
Use the command line interface to start and stop the processes. For more
information about the command line interface, see “Administering appliances
with the command line” on page 183.
To start Quarantine processes
◆
To start Tomcat and related processes like the Expunger and Notifier, log in
as root or use sudo to run the following command:
service bcc start
starting bcc: [OK]
◆
To start MySQL, log in as root or use sudo to run the following command:
service mysql start
starting mysql: [OK]
To stop Quarantine processes
◆
To stop MySQL, log in as root or use sudo to run the following command:
service mysql stop
stopping mysql: [OK]
◆
To stop Tomcat and related processes like the Expunger and Notifier, log in
as root or use sudo to run the following command:
service bcc stop
stopping bcc: [OK]
Checking the Quarantine postmaster mailbox
If Quarantine can’t determine the proper recipient for a message received from
Symantec Mail Security 8200 Series, it delivers the message to a postmaster
mailbox accessible from Quarantine. Your network may also have a postmaster
mailbox you access using a mail client that is separate from the Quarantine
postmaster mailbox. Spam messages may also be delivered to the Quarantine
postmaster mailbox if there is a problem with the LDAP configuration.
111
112 Working with Web Quarantine
Administering Quarantine
Note: No notification messages are sent to the postmaster mailbox.
To display messages sent to the postmaster mailbox
1
Log into the Control Center as an administrator with full privileges or
Manage Quarantine rights.
2
Click Quarantine.
3
Click Search.
4
In the To box, type postmaster.
5
Click Search.
Checking the Quarantine error log
Periodically, you should check the Quarantine error log. All errors related to the
Quarantine are written to the BrightmailLog.log file. The file is located in the
following directory:
/data/logs/bcc/BrightmailLog.log
This file is a plain text file, viewable with a text editor such as Notepad or vi.
Each problem results in a number of lines in the error log. For example, the
following lines result when Quarantine receives a message too large to handle:
com.mysql.jdbc.PacketTooBigException: Packet for query is too large
(3595207 > 1048576)
at com.mysql.jdbc.MysqlIO.send(MysqlIO.java:1554)
at com.mysql.jdbc.MysqlIO.send(MysqlIO.java:1540)
at com.mysql.jdbc.MysqlIO.sendCommand(MysqlIO.java:1005)
at com.mysql.jdbc.MysqlIO.sqlQueryDirect(MysqlIO.java:1109)
at com.mysql.jdbc.Connection.execSQL(Connection.java:2030)
at
com.mysql.jdbc.PreparedStatement.executeUpdate(PreparedStatement.ja
va:1750)
at
com.mysql.jdbc.PreparedStatement.executeUpdate(PreparedStatement.ja
va:1596)
at
org.apache.commons.dbcp.DelegatingPreparedStatement.executeUpdate
(DelegatingPreparedStatement.java:207)
at
com.brightmail.dl.jdbc.impl.DatabaseSQLManager.handleUpdate(Unknown
Source)
at
com.brightmail.dl.jdbc.impl.DatabaseSQLManager.handleUpdate(Unknown
Source)
Working with Web Quarantine
Administering Quarantine
at
com.brightmail.dl.jdbc.impl.DatabaseSQLTransaction.create(Unknown
Source)
at com.brightmail.bl.bo.impl.SpamManager.create(Unknown Source)
at com.brightmail.service.smtp.impl.SmtpConsumer.run(Unknown
Source)
Increasing the amount of information in BrightmailLog.log
If you have problems with Quarantine, you can increase the detail of the log
messages saved into BrightmailLog.log by changing settings in the
log4j.properties file. The BrightmailLog.log contains logging information
for Quarantine and the Control Center. When you increase the logging level of
log4j.properties, it creates a lot of log information, so it’s recommended to
increase the maximum size of the BrightmailLog.log as described below.
To increase the detail of logging messages saved into BrightmailLog.log
1
Open the following file in a text editor such as WordPad or vi:
/data/bcc/webapps/brightmail/WEB-INF/classes/log4j.properties
2
Find the following line:
#log4j.rootLogger=ERROR, file
3
Change the word ERROR to DEBUG.
4
Find the following line:
log4j.appender.file.MaxFileSize=5MB
5
Change the 5MB to the desired number, such as 10MB.
6
Find the following line:
log4j.appender.file.MaxBackupIndex=10
7
Change the number after MaxBackupIndex to the desired number, such as
40.
This setting determines the number of saved BrightmailLog.log files. For
example, if you specify 2, BrightmailLog.log contains the newest
information, BrightmailLog.log.1 contains the next newest, and
BrightmailLog.log.2 contains the oldest information. When
BrightmailLog.log reaches the size indicated by
log4j.appender.file.MaxFileSize, then it’s renamed to
BrightmailLog.log.1, and a new BrightmailLog.log file is created. The
original BrightmailLog.log.1 is renamed to BrightmailLog.log.2, etc.
This number times the value of log4j.appender.file.MaxFileSize
determines the amount of disk space required for these logs.
8
Save and exit from the log4j.properties file.
113
114 Working with Web Quarantine
Troubleshooting
9
Log in as root or use sudo to run the following command:
# /etc/init.d/bcc restart
Note: Change the settings of the log4j.properties file back to the original
settings when you’re finished debugging Quarantine.
Backing Up the Quarantine message database
The messages in Quarantine are stored in a MySQL database. To back up and
restore this information you can use the db-backup and db-restore commands.
See “Administering appliances with the command line” on page 183.
Troubleshooting
The following sections describe some problems that may occur with Quarantine.
Message “The operation could not be performed.” is displayed
Rarely, you or users at your organization may see the following message
displayed at the top of the Quarantine page while viewing email messages in
Quarantine:
The operation could not be performed.
If this happens, check the Quarantine error log as described in “Checking the
Quarantine postmaster mailbox” on page 111.
Can’t log in due to conflicting LDAP and Control Center accounts
If there is an account in your LDAP directory with the user name of “admin,” you
won’t be able to log in to Quarantine as admin, but you will still be able to log
into the Control Center as admin. This is because your LDAP administrator
account name conflicts with the default Control Center administrator account
name.
To address this problem, you can change the user name in LDAP. You cannot
change the “admin” user name in the Control Center.
Error in Quarantine log file due to very large spam messages
If you check the Quarantine log file as described in “Checking the Quarantine
error log” on page 112 and see lines similar to those listed below, the messages
forwarded from the Scanner to Quarantine are larger than the standard packet
Working with Web Quarantine
Troubleshooting
size used by MySQL. If you see this error and expect to receive more large
messages, you can configure the MySQL client and server to receive larger
packets. See this Web page for more information www.mysql.com/doc/en/
Packet_too_large.html:
com.mysql.jdbc.PacketTooBigException: Packet for query is too large
(3595207 > 1048576)
at com.mysql.jdbc.MysqlIO.send(MysqlIO.java:1554)
at com.mysql.jdbc.MysqlIO.send(MysqlIO.java:1540)
at com.mysql.jdbc.MysqlIO.sendCommand(MysqlIO.java:1005)
at com.mysql.jdbc.MysqlIO.sqlQueryDirect(MysqlIO.java:1109)
at com.mysql.jdbc.Connection.execSQL(Connection.java:2030)
at
com.mysql.jdbc.PreparedStatement.executeUpdate(PreparedStatement.ja
va:1750)
at
com.mysql.jdbc.PreparedStatement.executeUpdate(PreparedStatement.ja
va:1596)
at
org.apache.commons.dbcp.DelegatingPreparedStatement.executeUpdate
(DelegatingPreparedStatement.java:207)
at
com.brightmail.dl.jdbc.impl.DatabaseSQLManager.handleUpdate(Unknown
Source)
at
com.brightmail.dl.jdbc.impl.DatabaseSQLManager.handleUpdate(Unknown
Source)
at
com.brightmail.dl.jdbc.impl.DatabaseSQLTransaction.create(Unknown
Source)
at com.brightmail.bl.bo.impl.SpamManager.create(Unknown Source)
at com.brightmail.service.smtp.impl.SmtpConsumer.run(Unknown
Source)
Users don’t see distribution list messages in their Quarantine
When a Scanner forwards a spam message sent to a distribution list to
Quarantine, the message is not delivered in the intended recipients’ quarantine.
Instead, the message is delivered to a special Quarantine mailbox for that
distribution list. For more information, see “Notification for distribution lists/
aliases” on page 102.
Undeliverable Quarantined messages go to Quarantine postmaster
If Quarantine can’t determine the proper recipient for a message received from
a Scanner, it delivers the message to a postmaster mailbox accessible from
Quarantine. Your network may also have a postmaster mailbox you access
using a mail client that is separate from the Quarantine postmaster mailbox. To
115
116 Working with Web Quarantine
Troubleshooting
display messages sent to the Quarantine postmaster mailbox, see “Checking the
Quarantine postmaster mailbox” on page 111.
Error in Quarantine log file due to running out of disk space
If you check Quarantine log file as described in “Checking the Quarantine error
log” on page 112 and see lines similar to those listed below, make sure that you
haven’t run out of disk space on the computer where Quarantine is installed. If
that isn’t the problem, follow the steps below.
9 Jan 2004 00:00:22 (ERROR:5396:6396):[2032] Error connecting to
192.168.1.4:41025: Unknown Error; Out of range.
9 Jan 2004 00:00:22 (ERROR:5396:6396):[4042] smtp_direct: failed to
connect to SMTP server.
To correct this problem
1
Delete the following directory:
.../Tomcat/jakarta-tomcat-version/work
2
Reboot the computer where Quarantine is installed.
Users receive notification messages, but can’t access messages
If some users at your company can successfully log into Quarantine and read
their spam messages, but others get a message saying that there are no
messages to display after logging in to Quarantine, there may be a problem with
the Active Directory (LDAP) configuration. If the users who can’t access their
messages are in a different Active Directory domain than the users who can
access their messages, configure LDAP in the Control Center to use a Global
Catalog, port 3268, and verify that the nCName attribute is replicated to the
Global Catalog as described below.
Configure access to a global catalog
To configure your appliance to access a Global Catalog, specify the port for the
Global Catalog, usually 3268, in the your LDAP server settings page in the
Control Center. In addition, verify that the nCName attribute is replicated to the
Global Catalog.
To replicate the nCName attribute to the Global Catalog using the Active
Directory Schema snap-in
1
Click Start > Run, type regsvr32 schmmgmt.dll and click OK.
2
Click Start > Run, type mmc and click OK.
3
Click File > Add/Remove Snap-in.
Working with Web Quarantine
Troubleshooting
4
Click Add and select Active Directory Schema from the list.
5
In the left pane, expand Active Directory Schema, and click Attributes.
6
In the right pane, locate and double-click the nCName attribute.
7
Check the Replicate this attribute to the Global Catalog check box.
If an error occurs after performing the steps above, make sure that the current
domain controller has permission to modify the schema.
To grant permission to the current domain controller (if necessary)
1
Open the Active Directory Schema snap-in as described above.
2
In the left pane, click Active Directory Schema to select it.
3
Click Action > Operations Master.
4
Check the check box for The Schema may be modified on this Domain
Controller.
If replication to the Global Catalog cannot be modified as described above,
contact your Symantec representative for a work-around.
Duplicate messages appear in Quarantine
You may notice multiple copies of the same message when logged into
Quarantine as an administrator. When you read one of the messages, all of them
are marked as read. This behavior is intentional. If a message is addressed to
multiple users at your company, Quarantine stores one copy of the message in
its database, although the status (read, deleted, etc.) of each user’s message is
stored per-user. Because the administrator views all users’ messages, the
administrator sees every user’s copy of the message. If the administrator clicks
on Release, just the selected message or messages are redelivered to the users’
mailboxes, not all the duplicate messages.
Maximum number of messages in Quarantine
Note: If you don’t set any Quarantine thresholds and your system has adequate
capacity, there is a 1 TB (terabyte) MySQL limit on the number of messages that
can be stored in Quarantine (the same message sent to multiple recipients
counts as one message). For more information about Quarantine thresholds, see
“Specifying Quarantine message and size thresholds” on page 110.
117
118 Working with Web Quarantine
Troubleshooting
Copies of misidentified messages aren’t delivered to administrator
If you typed an email address in the Administrator box under Misidentified
Messages on the Quarantine Settings page but messages aren’t being delivered
to the email address, make sure the email address is not an email alias. The
administrator email address for misidentified messages must be a primary email
address including the domain name, such as [email protected].
Message “Unable to release the message.” is displayed
This message may occur if you are running Quarantine on a Symantec Mail
Security 8200 Series appliance that only has the Control Center in use on it (i.e.
no Scanner). See “Configuring Quarantine on a Control Center-only appliance”
on page 101.
Chapter
5
Creating Reports
This chapter includes the following topics:
■
About reports
■
Choosing a report
■
Selecting report data to track
■
Setting the retention period for report data
■
Running reports
■
Saving and editing Favorite Reports
■
Troubleshooting report generation
■
Printing, saving, and emailing reports
■
Scheduling reports to be emailed
About reports
Symantec Mail Security 8200 Series reporting capabilities provide you with
information about filtering activity at your site, including the following
features:
■
Analyze consolidated filtering performance for all Scanners and investigate
spam and virus attacks targeting your organization.
■
Create several pre-defined reports that track useful information, such as
which domains are the source of most spam and which recipients are the top
targets of spammers.
■
Export report data for use in any reporting or spreadsheet software for
further analysis.
■
Schedule reports to be emailed at specified intervals.
120 Creating Reports
Choosing a report
Choosing a report
Tables 5-1 through 5-8 show the names of pre-set reports that you can generate
and their contents. The third column lists the reporting data that you must
instruct Symantec Mail Security 8200 Series to track before you can generate
the specified report. You can choose from a selection of reports, all of which can
be customized to include specific date ranges, time period grouping per row, and
email delivery. For some reports, you can filter based on specific recipients and
senders of interest.
Note: If any Scanners are accepting relayed messages from a gateway computer,
the SMTP HELO name or IP connection address will be the name or connection
of the gateway computer, rather than the external Internet address you might
expect.
Affected reports are: all “Top Sender HELO Domains” reports, all “Top Sender IP
Connections” reports, “Top Succeeded Connections” SMTP report, “Top Failed
Connections” SMTP report, and “Top Rejected Connections” SMTP report.
Table 5-1
Available Message reports
Report Type:
Displays...
Required Report
Data Storage
Options (Reports
Settings Page)
Overview
A summary of total messages and messages that matched for spam,
suspected spam, attacks, blocked, allowed, viruses, worms, unscannable,
and content (compliance policy)
None
Average
Message Size
The average size of messages in KB and the percentage of each message
relative to the overall average
None
Total Message
Size
Total size in KB of all messages in the report, and total size of each
grouping
None
Number of
Messages
Number of all messages in the report, and number for each grouping
None
Number of
Recipients
Number of recipients in the report, and number of recipients for each row.
Every recipient in a message counts as one: To:, Cc:, and Bcc:.
None
Top Sender
Domains
Domains from which the most messages have been processed. For each
domain, the total processed and number of virus and spam messages are
listed. Specify the maximum number of domains to list for the specified
time range.
Sender domains
Creating Reports
Choosing a report
Table 5-1
Available Message reports (Continued)
Report Type:
Displays...
Required Report
Data Storage
Options (Reports
Settings Page)
Top Senders
Email addresses from which the most messages have been processed. For
each email address, the total processed and number of virus and spam
messages are listed. Specify the maximum number of email addresses to
list for the specified time range.
Senders, Sender
domains
Specific Senders Number of messages processed for a sender email address that you specify. Senders, Sender
For each grouping, the total processed and number of virus and spam
domains
messages are listed.
Top Sender
HELO Domains
SMTP HELO domain names from which the most messages have been
Sender HELO
processed. For each HELO domain, the total processed and number of virus domains
and spam messages are listed. Specify the maximum number of HELO
domains to list for the specified time range.
Top Sender IP
Connections
IP addresses from which the most messages have been processed. For each Sender IP
IP address, the total processed and number of virus and spam messages are connections
listed. Specify the maximum number of IP addresses to list for the
specified time range.
Top Recipient
Domains
Recipient domains for which the most messages have been processed. For Recipient domains
each recipient domain, the total processed and number of virus and spam
messages are listed. Specify the maximum number of recipient domains to
list for the specified time range.
Top Recipients
Email addresses for which the most messages have been processed. For
each email address, the total processed and number of virus and spam
messages are listed. Specify the maximum number of email addresses to
list for the specified time range.
Recipients,
Recipient domains
Specific
Recipients
Number of messages processed for a recipient email address that you
specify. For each grouping, the total processed and number of virus and
spam messages are listed.
Recipients,
Recipient domains
121
122 Creating Reports
Choosing a report
Table 5-2
Available Virus reports
Report Type:
Displays...
Required Report
Data Storage
Options (Reports
Settings Page)
Overview
A summary of total messages that matched for each virus type. For each
grouping, the virus to total processed percentage, total processed, and
number of virus, worm, and unscannable messages are listed.
None
Top Sender
Domains
Domains from which the most virus messages have been detected. For each Sender domains
domain, the virus to total processed percentage, total processed, and
number of virus, worm, and unscannable messages are listed. Specify the
maximum number of senders to list for the specified time range.
Top Senders
Email addresses from which the most virus messages have been detected.
For each email address, the virus to total processed percentage, total
processed, and number of virus, worm, and unscannable messages are
listed. Specify the maximum number of email addresses to list for the
specified time range.
Senders, Sender
domains
Specific Senders Number of virus messages detected from a sender email address that you
specify. For each grouping, the virus to total processed percentage, total
processed, and number of virus, worm, and unscannable messages are
listed.
Senders, Sender
domains
Top Sender
HELO Domains
SMTP HELO domain names from which the most virus messages have been Sender HELO
domains
detected. For each HELO domain, the virus to total processed percentage,
total processed, and number of virus, worm, and unscannable messages are
listed. Specify the maximum number of HELO domains to list for the
specified time range.
Top Sender IP
Connections
IP addresses from which the most virus messages have been detected. For
each IP address, the virus to total processed percentage, total processed,
and number of virus, worm, and unscannable messages are listed. Specify
the maximum number of IP addresses to list for the specified time range.
Sender IP
connections
Top Recipients
Domains
Recipient domains for which the most virus messages have been detected.
For each recipient domain, the virus to total processed percentage, total
processed, and number of virus, worm, and unscannable messages are
listed. Specify the maximum number of recipient domains to list for the
specified time range.
Recipient Domains
Creating Reports
Choosing a report
Table 5-2
Available Virus reports (Continued)
Report Type:
Displays...
Top Recipients
Email addresses for which the most virus messages have been detected. For Recipients,
each email address, the virus to total processed percentage, total
Recipient domains
processed, and number of virus, worm, and unscannable messages are
listed. Specify the maximum number of email addresses to list for the
specified time range.
Specific
Recipients
Number of virus messages detected for a recipient email address that you
specify. For each grouping, the virus to total processed percentage, total
processed, and number of virus, worm, and unscannable messages are
listed.
Recipients,
Recipient domains
Top Viruses and
Worms
Names of the most common viruses detected. For each grouping, the virus
to total processed percentage, virus to total virus and worm percentage,
and last occurrence of the virus are listed.
None
Table 5-3
Required Report
Data Storage
Options (Reports
Settings Page)
Available Spam reports
Report Type:
Displays...
Required Report
Data Storage
Options (Reports
Settings Page)
Overview
A summary of total detected spam messages (spam, blocked, allowed and
suspected spam messages). Also reports false positives.
None
Top Sender
Domains
Domains from which the most spam messages have been detected. For
each domain, the spam to total processed percentage, total processed, and
number of spam, suspected spam, blocked, and allowed messages are
listed. Specify the maximum number of senders to list for the specified
time range.
Sender domains
Top Senders
Email addresses from which the most spam messages have been detected.
For each email address, the spam to total processed percentage, total
processed, and number of spam, suspected spam, blocked, and allowed
messages are listed. Specify the maximum number of email addresses to
list for the specified time range.
Senders, Sender
domains
Specific Senders Number of spam messages detected from a sender email address that you
specify. For each grouping, the spam to total processed percentage, total
processed, and number of spam, suspected spam, blocked, and allowed
messages are listed.
Senders, Sender
domains
123
124 Creating Reports
Choosing a report
Table 5-3
Available Spam reports (Continued)
Report Type:
Displays...
Top Sender
HELO Domains
SMTP HELO domain names from which the most spam messages have
Sender HELO
been detected. For each HELO domain, the spam to total processed
domains
percentage, total processed, and number of spam, suspected spam,
blocked, and allowed messages are listed. Specify the maximum number of
HELO domains to list for the specified time range.
Top Sender IP
Connections
IP addresses from which the most spam messages have been detected. For
each IP address, the spam to total processed percentage, total processed,
and number of spam, suspected spam, blocked, and allowed messages are
listed. Specify the maximum number of IP addresses to list for the
specified time range.
Top Recipients
Domains
Recipient domains for which the most spam messages have been detected. Recipient Domains
For each recipient domain, the spam to total processed percentage, total
processed, and number of spam, suspected spam, blocked, and allowed
messages are listed. Specify the maximum number of recipient domains to
list for the specified time range.
Top Recipients
Email addresses for which the most spam messages have been detected.
For each email address, the spam to total processed percentage, total
processed, and number of spam, suspected spam, blocked, and allowed
messages are listed. Specify the maximum number of email addresses to
list for the specified time range.
Recipients,
Recipient domains
Specific
Recipients
Number of spam messages detected for a recipient email address that you
specify. For each grouping, the spam to total processed percentage, total
processed, and number of spam, suspected spam, blocked, and allowed
messages are listed.
Recipients,
Recipient domains
Table 5-4
Required Report
Data Storage
Options (Reports
Settings Page)
Sender IP
connections
Available Content Compliance reports
Report Type:
Displays...
Required Report
Data Storage
Options (Reports
Settings Page)
Overview
Total messages processed and number and percentage of content
compliance policies triggered
None
Creating Reports
Choosing a report
Table 5-4
Available Content Compliance reports (Continued)
Report Type:
Displays...
Top Sender
Domains
Domains from which the most compliance matches have been detected. For Sender domains
each domain, the total messages processed and number and percentage of
content compliance policies triggered are listed.
Top Senders
Email addresses from which the most compliance matches have been
Senders, Sender
detected. For each email address, the total messages processed and number domains
and percentage of content compliance policies triggered are listed.
Specific Senders Number of compliance policies triggered from a sender email address that
you specify. For each grouping, the total messages processed and number
and percentage of content compliance policies triggered are listed.
Required Report
Data Storage
Options (Reports
Settings Page)
Senders, Sender
domains
Top Sender
HELO Domains
SMTP HELO domain names from which the most compliance matches have Sender HELO
domains
been detected. For each HELO domain, the total messages processed and
number and percentage of content compliance policies triggered are listed.
Specify the maximum number of HELO domains to list for the specified
time range.
Top Sender IP
Connections
IP addresses from which the most compliance matches have been detected. Sender IP
For each IP address, the total messages processed and number and
connections
percentage of content compliance policies triggered are listed. Specify the
maximum number of IP addresses to list for the specified time range.
Top Recipient
Domains
Recipient domains
Recipient domains for which the most compliance matches have been
detected. For each recipient domain, the total messages processed and
number and percentage of content compliance policies triggered are listed.
Specify the maximum number of recipient domains to list for the specified
time range.
Top Recipients
Email addresses for which the most compliance matches have been
Recipients,
detected. For each email address, the total messages processed and number Recipient domains
and percentage of content compliance policies triggered are listed. Specify
the maximum number of email addresses to list for the specified time
range.
Specific
Recipients
Number of compliance policies triggered for a recipient email address that Recipients,
Recipient domains
you specify. For each grouping, the total messages processed and number
and percentage of content compliance policies triggered are listed.
Top Policies
Names of the most common compliance matches, number of policies
triggered, and percentage of policies triggered versus total processed
messages.
None
125
126 Creating Reports
Choosing a report
Table 5-5
Available Attack reports
Report Type:
Displays...
Overview
Total messages processed and number and percentage of directory harvest, None
spam, and virus attacks versus messages processed.
Top Directory
Harvest Attacks
IP addresses from which the most directory harvest attacks have been
Sender IP
detected. For each IP address, the total messages processed and number
connections
and percentage of directory harvest attacks versus messages processed are
listed.
Top Virus
Attacks
IP addresses from which the most virus attacks have been detected. For
each IP address, the total messages processed and number and percentage
of virus attacks versus messages processed are listed.
Sender IP
connections
Top Spam
Attacks
IP addresses from which the most spam attacks have been detected. For
each IP address, the total messages processed and number and percentage
of spam attacks versus messages processed are listed.
Sender IP
connections
Table 5-6
Required Report
Data Storage
Options (Reports
Settings Page)
Available Sender Authentication reports
Report Type:
Displays...
Required Report
Data Storage
Options (Reports
Settings Page)
Overview
Total messages processed and number and percentage of sender
authentication sessions that were attempted, not attempted, successful,
and failed versus messages processed
None
Top Attempted
Senders
Email addresses from which the most sender authentication attempts have Senders
been detected. For each email address, the total messages processed and
number and percentage of sender authentication attempts versus
messages processed are listed.
Top Not
Attempted
Senders
Email addresses from which the fewest sender authentication attempts
have been detected. For each email address, the total messages processed
and number and percentage of not attempted sender authentication
sessions versus messages processed are listed.
Senders
Creating Reports
Choosing a report
Table 5-6
Available Sender Authentication reports (Continued)
Report Type:
Displays...
Top Succeeded
Senders
Email addresses from which the most successful sender authentication
Senders
attempts have been detected. For each email address, the total messages
processed and number and percentage of successful sender authentication
attempts versus authentication attempts are listed.
Top Failed
Senders
Email addresses from which the most failed sender authentication
attempts have been detected. For each email address, the total messages
processed and number and percentage of failed sender authentication
attempts versus authentication attempts are listed.
Table 5-7
Required Report
Data Storage
Options (Reports
Settings Page)
Senders
Available SMTP Connection reports
Report Type:
Displays...
Required Report
Data Storage
Options (Reports
Settings Page)
Overview
Number and percentage of SMTP connections attempted, successful,
failed, rejected, and deferred
None
Top Succeeded
Connections
IP addresses from which the most successful SMTP connections were
detected.
Sender IP
connections
Top Failed
Connections
IP addresses from which the most failed SMTP connections were detected.
Sender IP
connections
Top Rejected
Connections
IP addresses from which the most rejected SMTP connections were
detected.
Sender IP
connections
Table 5-8
Available Quarantine reports
Report Type:
Displays...
Required Report
Data Storage
Options (Reports
Settings Page)
Overview
Total number of quarantined messages and quarantine releases.
None
127
128 Creating Reports
About charts and tables
About charts and tables
When running a report, creating a favorite report, or scheduling a report, you
can choose to display the report data in a chart, table, or both.
Table 5-9
Report charts and tables
Format
Description
Chart—overview
Line graph of each category of
report data. This chart does not
contain the summary
information (sums and averages
for the entire time period) listed
in the overview table.
Chart—all others
(non-overview)
Bar graph(s) for each item in the
report type chosen. A maximum
of 20 items can be displayed in a
bar graph.
Table
Numeric representation of the
report data. A table report can
list more than 20 items.
Selecting report data to track
By default, Symantec Mail Security 8200 Series tracks data for several basic
reports. Before you can generate other reports, you must configure Symantec
Mail Security 8200 Series to track and store data appropriate for the report. For
example, to generate recipient-based reports, such as Spam/Virus: Specific
Recipients, you must configure Symantec Mail Security 8200 Series to store
recipient information. See tables 5-1 through 5-8 for a list of reports and the
data you must store for each type of report.
Note: Because the data storage requirements for some reports can be high, refer
to “Setting the retention period for report data” on page 129 to learn how to
keep the report data manageable. In particular, the sender statistics usually
consume a large amount of disk space.
To enable data tracking for reports
1
In the Control Center, click Settings > Report Settings.
2
Under Reports Data Storage, select the report data you want to track.
Creating Reports
Setting the retention period for report data
3
Click Save.
Symantec Mail Security 8200 Series will begin to store the specified report
data.
Setting the retention period for report data
You can specify the number of days, weeks, or months that Symantec Mail
Security 8200 Series should keep track of report data. Depending on your
organization’s size and message volume, the disk storage requirements for
reports data could be quite large. You should monitor the storage required for
reporting over time and adjust the retention period accordingly.
To specify the retention period for report data
1
In the Control Center, click Settings > Report Settings.
2
Under Reports Data Storage, change the number of days, weeks, or months
that Symantec Mail Security 8200 Series keeps track of your reporting data.
3
Click Save.
Running reports
Provided that report data exists to generate a given report type, you can run an
ad hoc report to get a summary of filtering activity. The results will display in
the browser window.
To run a report
1
Ensure that you have configured Symantec Mail Security 8200 Series to
track the appropriate data for the report. See “Selecting report data to
track” on page 128.
2
In the Control Center, click Reports > View Reports.
3
Click a report in the Report drop-down list.
See tables 5-1 through 5-8 for a description of each report.
4
For reports that filter on specific recipients, such as Spam: Specific
Recipients or Virus: Specific Recipients, type an email address in the
Recipient name or Sender name box, such as [email protected].
5
In the Direction drop-down list, select the message direction to include in
the report.
6
In the Time range drop-down list, do one of the following:
129
130 Creating Reports
Saving and editing Favorite Reports
■
To specify a preset range, click Past Hour, Past Day, Past Week, or Past
Month.
■
To specify a different time period, click Customize, and then click in
the Start Date and End Date fields and use the popup calendar to
graphically select a time range. You must have JavaScript enabled in
your browser to use the calendar.
7
In the Group By drop-down list, select Hour, Day, Week, or Month.
8
Check Chart, Table, or both.
See “About charts and tables” on page 128.
9
For reports that rank results, such as Spam: Top Senders, specify the
maximum number of entries you want to display per specified time range.
10 Click Run Report.
If there is data available, the report you selected appears in the browser
window. Depending on how much data is available for the report you
selected, this may take up to several minutes.
Saving and editing Favorite Reports
You can save a report for quick access later, and also edit saved reports.
Save or edit Favorite Reports
Follow these steps to save or edit Favorite Reports.
To save a Favorite Report
1
Follow steps 1 through 9 in “Running reports” on page 129.
2
Click Add to Favorites.
3
In the Name box, type a name for the saved report.
4
Click Save.
Favorite Reports can also be saved by clicking the Add button on the Reports >
Favorite Reports page.
To edit a Favorite Report
1
In the Control Center, click Reports > Favorite Reports.
2
Click the desired report in the Favorite Reports drop-down list.
3
Click Edit.
4
Change the values in the report as desired.
Creating Reports
Troubleshooting report generation
5
Click Save.
Troubleshooting report generation
Check the following information if you’re having trouble with reports.
Error: No data for the specified parameters
Instead of displaying the expected reports, Symantec Mail Security 8200 Series
might display the following message:
No data for the specified parameters
If you received this message, verify the following:
■
Data exists for the filter you specified
For example, perhaps you specified a recipient address that didn’t receive
any mail over the specified period when generating a Specific Recipients
report.
■
Symantec Mail Security 8200 Series is configured to keep data for that
report type
See “Selecting report data to track” on page 128 for more information. Keep
in mind that occasionally you will be able to produce reports even if you are
not currently tracking data. This will happen if you were collecting data in
the past and then turned off data tracking. The data collected will be
available for report generation until they are old enough to be automatically
purged. After that period, report generation will fail. The Keep for x days
setting on the Report Settings page controls this retention period.
Sender HELO domain or IP connection shows gateway information
If any Scanners are accepting relayed messages from a gateway computer, the
SMTP HELO name or IP connection address will be the name or connection of
the gateway computer, rather than the external Internet address you might
expect
Reports presented in local time of Control Center
Symantec Mail Security 8200 Series stores statistics in the stats directory on
the individual hosts that run Scanners. The date and hour for each set of these
statistics are recorded in Greenwich Mean Time (GMT). A single Control Center
that is connected to all the Scanners generates reports that represent all the
connected hosts. The combined numbers from all Scanners in the reports are
presented in the local time zone of the Control Center.
131
132 Creating Reports
Troubleshooting report generation
Although the reports themselves do not list times—they only list a date—you
should be aware of the implications of the GMT/local time conversion. The
boundaries for splitting the reporting data into groups of days, weeks, or
months are set from the perspective of the Control Center.
For example, during the summertime, California is 7 hours behind GMT. Assume
that a Scanner receives and marks a message as spam at 5:30pm local time on
April 23, Friday (12:30am, April 24, Saturday GMT). When generating the
report, Symantec Mail Security 8200 Series determines what day the email
belongs to based on where the report is being generated. If the Control Center is
in Greenwich, the resulting report will count it in GMT (the local time zone) so it
will increase the spam count for April 24. If the Control Center is in San
Francisco, California, the report will count it in Pacific Daylight Time (the local
time zone), and will accordingly increase the spam count for April 23.
See the following URL to translate GMT into your local time:
http://www.timeanddate.com/worldclock/converter.html
By default, data are saved for one week
By default, statistics are retained for seven days. If Symantec Mail Security 8200
Series already has seven days of data, the oldest hour of statistics will be deleted
as each new hour of statistics is stored. To keep the data longer, see “Setting the
retention period for report data” on page 129.
Processed message count recorded per message, not per recipient
For reports that list the number of processed messages, the number of processed
messages is counted per message, not per recipient. For example, if a single
message lists 12 recipients, that message will be delivered to all 12. The
processed count increases by 1, not 12. If a policy for any of the recipients
determines that this message is spam, it will also increase the spam count by 1
for that day. The spam count will be 1 no matter how many of the recipients
have policies that determine the message is spam. If you run a Spam: Specific
Recipients report in this situation and list one of the 12 recipients, the processed
count will include this message, and, if the message matches for spam, the spam
count will include the message, too.
Recipient count equals message count
For reports that list the number of recipients, each received message counts as
one message, even if the same recipient receives more than one message. For
example, if 10 messages are sent to the same recipient, the number of recipients
Creating Reports
Printing, saving, and emailing reports
will be 10, not 1. If 10 messages are sent to the same recipient and another
recipient is listed on the Cc line, the number of recipients will be 20, not 2.
Deferred or rejected messages are not counted as received
For reports that list the number of recipients, if a spam or virus message is
deferred or rejected, it is not counted as received. If 100 messages are deferred
or rejected, the recipient count for those messages is 0.
Reports limited to 1,000 rows
The maximum size for any report, including a scheduled report, is 1,000 rows.
Printing, saving, and emailing reports
After running a report, you can choose to print, save, or email a report.
Printing
Print a report from your local computer using the native
operating system print dialog box
Saving
Save a report to your local computer using the native
operating system save dialog box. Choose one of the
following file types:
Save as HTML—The type of file saved depends on the
format of the report chosen:
■
Table—saved file is HTML
■
Chart—saved file is .png graphics format
■
Table and chart—saved file is a .zip containing an
HTML and a .png file
Save as CSV—The report is saved as a comma separated
values file no matter which of the Table and Chart boxes
are checked.
Emailing
Type an email address to which to send the report.
Scheduled reports are also emailed, see “Scheduling
reports to be emailed” on page 134.
Print, save, or email reports
Follow these steps to print, save, or email reports.
To print a report
1
After creating and running a report as described in “Running reports” on
page 129, click Print.
133
134 Creating Reports
Scheduling reports to be emailed
2
Click Print again to print the report.
3
Choose the appropriate options on the print dialog box to print the browser
window.
4
Click Close to close the current browser window.
To save a report
1
After creating and running a report as described in “Running reports” on
page 129, click the desired save button.
2
Choose the appropriate options on the save dialog box.
To email reports
1
After creating and running a report as described in “Running reports” on
page 129, type an email address, such as [email protected], in the box
next to Email.
2
Click Email.
Scheduling reports to be emailed
You can schedule some reports to run automatically at specified intervals. You
can specify that scheduled reports be emailed to one or more recipients.
Note: You can’t select a saved favorite report to be scheduled. However, you can
duplicate the settings from a saved favorite report.
Schedule, Edit, or Delete Reports
Follow these steps to schedule, edit, or delete reports.
To schedule a report
1
Ensure that you have configured Symantec Mail Security 8200 Series to
track the appropriate data for the report. See “Selecting report data to
track” on page 128.
2
In the Control Center, click Reports > Scheduled Reports.
3
Click Add.
4
In the Report Name box, type a name for the report.
5
Using the procedure under “Running reports” on page 129 as a guide, select
the desired report and report settings.
Creating Reports
Scheduling reports to be emailed
6
Under Report Schedule, specify the time intervals at which you want to
generate the report.
If you specify 29, 30, or 31 in the Day of every month box, and a month
doesn’t have one of those days, the report won’t be sent. Choose the Last day
of every month option to avoid this problem.
7
Under Report Format, click one of the following to specify the format:
■
HTML formats the report in HTML format. Check Chart, Table, or both.
See “About charts and tables” on page 128.
■
CSV formats the report in comma-separated-values format
8
Under Report Addresses, type an email address, such as
[email protected], in the Send from the following email addresses box.
9
Under Report Addresses, type at least one email address in the Send to the
following email addresses box. You can use spaces, commas, or semi-colons
as separators between email addresses.
10 Click Save.
A report can also be scheduled by clicking the Schedule button on the View
Reports page.
To edit a scheduled report
1
In the Control Center, click Reports > Scheduled Reports.
2
Check the box next to the scheduled report that you want to edit, and then
click Edit. You can also click the underlined report name to jump directly to
the edit page for the report.
3
Make any changes to the settings.
4
Click Save.
To delete a scheduled report
1
In the Control Center, click Reports > Scheduled Reports.
2
Check the box next to the scheduled report that you want to delete, and then
click Delete.
3
Click Save.
135
136 Creating Reports
Scheduling reports to be emailed
Section
Managing your system
■
Managing your system
■
Administering the system
■
Testing the system
3
138
Chapter
6
Managing your system
This chapter includes the following topics:
■
Configuring global system settings
■
Configuring individual host settings
■
Managing Scanners
Configuring global system settings
Global settings apply to the Control Center and all Scanners attached to it. This
section explains these global settings.
Information is included on the following settings and their configuration:
■
Configuring alert settings
■
Configuring LDAP settings
■
Configuring replication settings
■
Configuring log settings
■
Configuring report settings
■
Configuring address masquerading
■
Configuring aliases
Configuring alert settings
Alerts are email notifications sent automatically by Symantec Mail Security
8200 Series to inform system administrators of conditions potentially requiring
attention. You can choose the kinds of alerts sent, the email address shown for
alerts, and the administrators receiving them.
140 Managing your system
Configuring global system settings
The following alert conditions are available:
Table 6-1
Alert Conditions
Alert Condition
Explanation
A component is not
responding or working
An alert is sent because of a nonresponsive component. Components include the
Conduit, Filtering Hub, and MTA.
Antispam filters are older
than
An alert is sent because of the age of your antispam filters. Antispam filters
update periodically, at different intervals for different types of filters. To avoid
unnecessary alerts, a minimum setting of 2 hours is recommended.
Antivirus filters are older
than
An alert is sent because of the age of your antivirus filters. Antivirus filter
updates typically occur several times a week. To avoid unnecessary alerts, a
setting of 7 days is recommended.
A message queue is larger
than
An alert is sent when the size of a message queue exceeds the size specified next
to the alert description. Available message queues are Inbound, Outbound and
Delivery. Queues can grow if the MTA has stopped, or if an undeliverable
message is blocking a queue.
Available disk space is less
than
An alert is sent when your disk capacity falls below the amount specified next to
this error message.
SSL/TLS certificate
expiration warning
A certificate expiration alert is sent when a certificate expires. You can check the
status of your certificates by going to Settings > Certificate Settings and
clicking View. The first expiration warning is sent seven days prior to the
expiration date. A second warning is sent one hour later. No more than two
warnings per certificate are sent.
LDAP synchronization
errors
An alert is sent because of LDAP synchronization errors. These errors are
caused by problems in directory synchronization. Only messages that log at the
error level cause alerts.
LDAP Scanner replication
errors
An alert is sent because of replication errors. These errors are caused by
problems in the replication of LDAP data from the Control Center to attached
and enabled Scanners. Only messages that log at the error level cause alerts.
Antivirus license expired
An alert has been sent because your license has expired. Your antivirus license
has expired. Contact your Symantec Sales Representative for assistance.
Antispam license expired
An alert has been sent because your license has expired. Your antispam license
has expired. Contact your Symantec Sales Representative for assistance.
Software update license
expired
An alert has been sent because your license has expired. Your software update
license has expired. Contact your Symantec sales administrator for assistance.
Software update available
An alert is sent when a software update becomes available if the box next to this
item is checked.
Managing your system
Configuring global system settings
Configure alerts
Follow these steps to choose which administrators receive alerts, and to
determine the alerts sent.
To choose administrators that receive alerts
1
In the Control Center, click Administration > Administrators.
2
In the Administrators list, click the name of an administrator.
3
Click Edit.
4
Under Administrator, check or uncheck Receive alert notifications.
5
Click Save.
6
Repeat steps 2-4 as needed for other administrators.
To choose the kinds of alerts sent and the email address from which alerts
are sent
1
In the Control Center, click Settings > Alert settings.
2
Under Notification sender in the Send from box, type the email address
shown on alerts sent.
3
Under Alert Conditions, check the alert conditions for which alerts are to be
sent.
Specify duration or size parameters for those alert conditions requiring
them, using the boxes and drop-down lists on the right.
4
Click Save.
Configuring certificate settings
Manage your certificates using the Certificate Settings page.
There are two kinds of certificates:
■
MTA TLS certificate—This is the TLS certificate used by the MTAs in each
Scanner. Every Scanner has separate MTAs for inbound messages, outbound
messages, and message delivery. Assign this certificate from the SMTP tab
on the Settings > Hosts page.
■
User interface HTTPS certificate—This is the HTTPS certificate used by the
Control Center for secure Web management. Assign this certificate from the
Settings > Control Center Settings page.
You can add certificates to the Certificate list in two ways:
■
Add a self-signed certificate by adding the certificate and filling out the
requested information.
141
142 Managing your system
Configuring global system settings
■
Add a Certification Authority Signed certificate by submitting a certificate
request to a Certification Authority. When you receive the certificate back
from the Certification Authority, you then import the certificate.
Manage certificates
Follow these steps to add either self-signed or Certification Authority Signed
certificates and to assign certificates.
To add a self-signed certificate to the list
1
In the Control Center, click Settings > Certificate Settings.
2
Click Add.
3
In the Certificate type drop-down list, choose Self-Signed Certificate.
4
Complete the information on the Add Certificate page.
5
Click Create.
To add a Certification Authority Signed certificate to the list
1
In the Control Center, click Settings > Certificate Settings.
2
Click Add.
3
In the Certificate type drop-down list, choose Certificate Authority Signed.
4
Fill in the information on the Add Certificate page.
5
Click Create.
A new page is displayed, showing the certificate information in a block of
text, designed for use by the Certification Authority.
6
Copy the block of text that appears and submit it to the Certification
Authority.
Each Certification Authority has its own set of procedures for granting
certificates. Consult your Certificate Authority for details.
7
When you receive the certificate file from the Certification Authority, place
the file in an easily accessed location on the computer from which you are
connecting to the Control Center.
8
On the Certificate Settings page, click Import.
9
On the Import Certificate page, type the full path and filename or click
Browse and choose the file.
10 Click Import.
To view or delete a certificate
1
In the Control Center, click Settings > Certificate Settings.
Managing your system
Configuring global system settings
2
Check the box next to the certificate to be viewed or deleted.
3
Click View to read the certificate.
4
Click Delete to remove the certificate.
To assign an MTA TLS certificate
1
In the Control Center, click Settings > Hosts.
2
Select a host and click Edit.
3
Click the SMTP tab.
4
Check Accept TLS encryption as appropriate.
5
Choose the TLS certificate from the Certificate drop-down list for the
inbound or outbound MTA.
6
Click Save.
To assign a user interface HTTPS certificate
1
In the Control Center, click Settings > Control Center Settings.
2
Select a certificate from the User interface HTTPS certificate drop-down
list.
3
Click Save.
Configuring LDAP settings
The Control Center can optionally use directory information from LDAP servers
at your site for the following two purposes:
■
Authentication—LDAP user and password data is used for Quarantine
access authentication and resolving email aliases for quarantined
messages.
■
Synchronization—LDAP user and group data is used for group policies,
directory harvest attack recognition, and dropping messages for invalid
recipients. User and group data is read from the LDAP server and cached in
the Control Center and Scanners, but not written back to the LDAP server.
Symantec Mail Security 8200 Series supports the following LDAP directory
types:
■
Windows 2000 Active Directory
■
Windows 2003 Active Directory
■
Sun Directory Server 5.2 (formerly known as the iPlanet Directory Server)
■
Exchange 5.5
143
144 Managing your system
Configuring global system settings
■
OpenLDAP (for authentication only)
Note: OpenLDAP users must add allow bind_v2 to the slapd.conf LDAP
configuration file.
The following table describes the available settings for LDAP authentication and
synchronization services:
Table 6-2
LDAP Settings
Item
Description
Description
Text describing the LDAP server being defined. Permissible characters are any alphanumeric
character (1-9, a-z, and A-Z), a space ( ), hyphen (-), and underline (_). Any other symbol will
cause the definition to fail.
Host
Host name or IP address.
Port
The TCP/IP port for the server listed in the type box. Usually the port will be 389, the default
port for LDAP servers.
Directory Type
Specifies the type of directory used by the LDAP server. Available choices are: Active Directory,
iPlanet/Sun ONE/Java Directory Server, Exchange 5.5, and Other. The choice Other is only
available when Usage is set to Authentication.
Usage
Describes how this LDAP server will be used. Available usage modes are: Authentication,
Synchronization, and Authentication and Synchronization. You can have only one
authentication server defined in the Control Center, and OpenLDAP users can only use
Authentication directory services by selecting Authentication from this drop-down list and
Other from the Directory Type drop-down list.
Administrator
Credentials
Specifies a user name and password. Or, if your directory server is set up to accept it, you can
select Anonymous Bind by checking the designated radio button rather than providing specific
logon information. Before using anonymous bind, you should consider the security
implications. If you choose to allow anonymous bind, be sure to configure your
synchronization LDAP installation to grant anonymous access to the change log and base DN.
Use Test Login to verify your login credentials.
Authentication
Query Details
Allows you to specify:
■
Query start (Auth base DN)—Designates the point in the directory from which to start
searching for entries to authenticate.
■
Login attribute—Specifies the attribute used to identify a person by Username or User ID.
■
Primary email attribute—Finds users based on the attribute which represents a mailbox.
■
Email alias attribute—Finds users based on the attribute which represents one or more
alternative addresses for a mailbox.
■
Login query—Finds users based on their Login attributes.
Use Auto Fill to begin populating the fields, then tailor them specifically to your system needs.
Use Test to verify your query.
Managing your system
Configuring global system settings
Table 6-2
LDAP Settings
Item
Description
Windows Domain
Names
Allows you to specify your Windows domain names if you are using Active Directory.
Synchronization
Configuration
Allows for the definition of the recurrence interval (expressed in digits), frequency (minutes/
hours/days), and audit level (verbosity for LDAP audit logs) governing LDAP synchronization.
The synchronization schedule should begin at a different time than the replication schedule to
avoid schedule conflicts. For instance, if you have replication set to every 12 hours, setting the
LDAP synchronization schedule to 53 minutes will help prevent one from starting while the
other is in progress. This section is grayed out if Usage type is Authentication.
Synchronization
Query Details
Specifies queries to use for synchronization. Available queries are:
■
Query start (Sync base DN)—Designates the point in the directory from which to start
searching for entries with email addresses/aliases or groups. To use this field, begin by
clicking Auto Fill for the naming contexts of the directory. Reduce the received list of DN’s
brought into the field to a single DN, or write your own base DN using the list for
guidance.
■
Custom query start—Allows for the addition of a customized query.
■
User Query—Finds users in the LDAP server.
■
Group Query—Finds LDAP groups in the LDAP server.
■
Distribution List Query—Finds Distribution Lists in the LDAP Server.
Use Auto Fill to begin populating the fields and then tailor them specifically to your system
needs. Use the Test buttons to verify User, Group or Distribution List queries.
Follow these steps to set up global LDAP definitions, and add, edit, or delete
LDAP servers.
To set up global LDAP definitions
1
In the Control Center, click Settings > LDAP Settings.
2
Add, edit, delete, enable or disable LDAP definitions as appropriate.
3
Click Save.
To add an LDAP server
1
In the Control Center, click Settings > LDAP Settings.
2
Click Add.
3
Complete the necessary fields presented for defining a new LDAP Server.
The values you complete will depend on your choice in the Usage drop-down
list.
4
Click Save.
145
146 Managing your system
Configuring global system settings
Note: When adding an LDAP server that performs synchronization, you can
replicate data from the Control Center to attached and enabled Scanners with
the Replicate now button. Begin this replication only after initial
synchronization has completed successfully. If synchronization has not
completed successfully, error messages will be shown on the Status > LDAP
Synchronization page. Alternatively, you can wait until the next scheduled
replication occurs at which time all Scanners will be fully updated by the LDAP
synchronization server.
To edit an LDAP server
1
In the Control Center, click Settings > LDAP Settings.
2
Choose an LDAP server definition by checking the box next to it.
3
Click Edit.
4
Make changes as appropriate.
5
Click Save.
Editing this definition can cause a full synchronization to be initiated. This
can have serious performance impact on your system until the
synchronization completes.
To delete an LDAP server
1
In the Control Center, click Status > LDAP Synchronization.
Check to be sure that no synchronization is processing. You cannot delete a
synchronization server while synchronization is running.
2
Click Settings > LDAP Settings.
3
Choose an LDAP server definition by checking the box next to it.
4
Click Delete.
Synchronization status information
When LDAP data is synchronized between an LDAP server and the Control
Center, status information is generated and displayed via the Status tab of the
appliance.
To view LDAP Synchronization status information
◆
In the Control Center, click Status > LDAP Synchronization.
Managing your system
Configuring global system settings
The following information is displayed:
Item
Description
Status
Information about synchronization activity.
Status can be any of the following:
■
Idle—Nothing is happening.
■
Started—A synchronization request was issued either by the Control Center or through
a replication request from a Scanner.
■
In Progress—A synchronization request has been acknowledged by the synchronization
server and the process is under way.
■
Success—The synchronization has completed successfully.
■
Failed—The synchronization has failed. Consult your logs to identify possible causes.
Started
Time at which the most recent synchronization began.
Ended
Time at which the most recent synchronization finished.
Read
Number of directory entries read from the synchronization server. For a full
synchronization, this number is equal to the total number of records from the LDAP source.
Added
Number of directory entries added from the synchronization server to the Control Center.
Modified
Number of records modified in the Control Center based on synchronization server
information.
Deleted
Number of entries deleted from the Control Center based on synchronization server
information.
Rejected
Number of directory entries from the LDAP server rejected by the synchronization server.
A number of LDAP transactions can be rejected when an attempt to add a group entry fails
because one or more of the group members is not yet known to the LDAP synchronization
service. Generally, this can be resolved by issuing a Synchronize Changes request from the
Control Center. Each time this is done, the number of rejected entries should decrease. Once
all group members are propagated, the group entries are added successfully. If, after a
number of LDAP synchronization attempts, you continue to see the same number of rejected
entries for an LDAP Source, examine the logs at Status > Logs with Control Center: LDAP
selected in the Log Type: drop-down list. Use the information on this page to determine why
the entries are repeatedly rejected. Pay particular attention to the file error.log.X, where
X is a number.
Configuring replication settings
In the Control Center, replication refers to the process by which LDAP data are
propagated from the Control Center to attached and enabled Scanners.
Replication is controlled by global settings in the Control Center and by locally
configurable settings on each Scanner.
147
148 Managing your system
Configuring global system settings
Global replication settings
The replication attributes on the Settings > Replication Settings page determine
how replication operates in your installation. You can determine if replication is
to take place, and how often it occurs. These are in addition to settings available
on local Scanners.
To configure global replication settings
1
In the Control Center, click Settings > Replication Settings.
2
To activate Scanner replication, check Enable Scanner Replication.
3
If Scanner replication is enabled, set the frequency and interval of
replication for Replicate every as follows:
■
Frequency—Use this edit box to enter a digit indicating the number of
intervals at which replication occurs.
Interval—Use the combo box to select the interval of time between
replications. Available choices are hours and days.
The replication schedule should begin at a different time than the
synchronization schedule to avoid schedule conflicts. For instance, if you
have replication set to every 12 hours, setting the LDAP synchronization
schedule to 53 minutes will help prevent one from starting while the other is
in progress.
■
4
Click Replicate Now to have LDAP data replicated to all Scanners
immediately.
5
Click Save to store the current settings.
6
To verify the most recent replication, click Status > Scanner Replication in
the Control Center.
Note: The replication process will not complete until an LDAP
synchronization source is available.
Local replication settings
Local replication settings for each Scanner can also be configured in the Control
Center. See “Enabling and disabling Scanner replication” on page 169 for
information on changing replication settings for individual Scanners.
Replication status information
When LDAP data is replicated from the Control Center to one or more Scanners,
status information is generated and displayed via the Status tab of the
appliance.
Managing your system
Configuring global system settings
To view replication status information
◆
In the Control Center, click Status > Scanner Replication.
The following information is displayed:
Item
Description
Status
Information replication synchronization activity.
Status can be any of the following:
■
Idle—Nothing is happening.
■
Started—A replication request has been issued.
■
In Progress—A replication request has been acknowledged by the Control Center and the
process is under way.
■
Success—The replication has completed successfully.
■
Failed—The replication has failed. Consult your logs to identify possible causes.
Started
Time at which the most recent replication began.
Ended
Time at which the most recent replication finished.
Size
Number of bytes of replicated data.
Troubleshooting replication
Replication will not complete until at least one LDAP synchronization source is
available, and synchronization has completed successfully. Until this happens,
there is no data that replication can use to update Scanners.
Available troubleshooting techniques
The following techniques can help you troubleshoot replication problems.
Basic troubleshooting procedure
1
Verify that synchronization has occurred.
2
If a successful synchronization has occurred, check your replication status
and take one or more of the actions described below.
To verify that synchronization has completed successfully
1
In the Control Center, click Status > LDAP Synchronization.
2
Check the Status column for a Success message.
For additional information about synchronization status, see
“Synchronization status information” on page 146.
To check replication status
1
In the Control Center, click Status > Scanner Replication.
149
150 Managing your system
Configuring global system settings
2
Check the Status column for each attached and enabled Scanner on the list.
For additional information about replication status, see “Replication status
information” on page 148.
To troubleshoot a status message
1
If the Scanner has a Status of Success, all attached and enabled Scanners are
fully updated with LDAP information and no action is required.
2
If a message is displayed indicating that replication has been cancelled, an
LDAP synchronization source was found, but either synchronization has not
yet completed, or synchronization has failed.
Check your synchronization status. (See “To check replication status” on
page 149.) Check the Control Center log for errors about creating or moving
synchronization data within the Control Center, or errors regarding
communication between the Control Center and a Scanner. Check LDAP
synchronization logs for any errors that occur in transforming data from the
Control Center database to a Scanner database.
3
If you see the message No scanners configured for replication, make
sure you have successfully added an LDAP sychronization server, that the
initial synchronization service has completed successfully, that you have
enabled global replication via Settings > Replication Settings, and that
replication is enabled on at least one attached and enabled Scanner via the
Replication tab at Settings > Hosts > Edit.
4
If the replication process shows the message IN-PROGRESS for an unusually
long period of time, the replication process has stalled. It is difficult to
predict the length of time a replication can take. As a benchmark, a user
population of 25k users and 5k distribution lists (with nesting levels ranging
from 1-10), can take as much as 7.5 hours on a Symantec Mail Security 8240.
To resolve a replication process with a message of In-Progress
1
Perform a manual replication from the Control Center.
To do this, click Status > Scanner Replication and click Replicate Now.
2
If replication continues to hang, initiate a new synchronization cycle using
the service command from the Control Center, and then repeat step 1.
Login to the Control Center as admin.
When logged in, issue the following commands:
service bcc stop
service ldapsync restart
service bcc start
For additional information on the service command, see “service” on
page 196.
Managing your system
Invalid Recipient Handling
3
If replication still stalls, reboot the machine running the Control Center and
begin the entire cycle again with a full synchronization.
For information on rebooting the Control Center, see “reboot” on page 195.
For synchronization information, see “Configuring LDAP settings” on
page 143.
Invalid Recipient Handling
Spammers employ directory harvest attacks to find valid email addresses at the
target site. A directory harvest attack works by sending a large quantity of
possible email addresses to a site. An unprotected mail server will simply reject
messages sent to invalid addresses, so spammers can tell which email addresses
are valid by checking the rejected messages against the original list.
To drop messages addressed to invalid recipients instead of bouncing them
1
In the Control Center, click Settings > Invalid Recipients.
2
Either:
■
Uncheck Drop messages for invalid recipients to return bounce messages
to the sender for invalid addresses.
■
Check Drop messages for invalid recipients to drop invalid messages from
the mail stream and return no bounce messages to the sender.
This setting is independent of the Directory Harvest Attack Email Firewall
policy, and can be used in conjunction with it.
3
Click Save.
Configuring log settings
You can configure log settings for Symantec Mail Security 8200 Series
components on each Scanner in your system. The severity of errors you want
written to the log files can be chosen for the following components:
■
Conduit
■
Filter Engine
■
Mail Transfer Agent
Five logging levels are provided. Each successive level includes all errors from
previous levels.
Your choices, from the least to the greatest amount of error reporting, and from
the highest to the lowest severity, are as follows:
■
Errors (least logged data)
151
152 Managing your system
Invalid Recipient Handling
■
Warnings
■
Notices
■
Information
■
Debug (most logged data)
To configure log settings
1
In the Control Center, click Settings > Log Settings.
2
On the Log Settings page, under Log Level, choose a Scanner from the Host
drop-down list.
3
Use the component drop-down lists to select the logging level for each
component.
4
For changes to apply to all Scanners, check Apply to all hosts.
5
To reduce the size of the log table under Log Storage Limits, check
Maximum log size. As the table exceeds the size specified, the oldest entries
are removed.
6
If you checked Maximum log size, indicate an upper limit for log size in KB,
MB, or GB. The default is 50 MB.
7
Type a numeric value in Maximum number of days to retain. The default is
7.
8
Under Log Expunger, choose a frequency and a start time when the Control
Center runs the Log Expunger to delete log data. The default is once per day.
9
Click Save to store your information.
Configuring report settings
You can choose how much report data to store for how long, and when to
automatically delete report data. Your choices may affect the performance of
the appliance. Storing large amounts of report data can degrade performance.
To configure report settings
1
In the Control Center, click Settings > Report Settings.
2
Under Report Data Storage, check all the types of report data to be stored.
By default, only basic summary data on spam and virus filtering is stored.
3
Under Report Expunger, choose how often the Report Expunger deletes
reports.
4
If desired, click Clear All to delete all report data.
5
Click Save.
Managing your system
Invalid Recipient Handling
Configuring local domains
On the Local Domains page, you can view, add, edit, delete, and import lists of
local domains. Local domains are domains from which inbound messages are
accepted.
Working with local domains
Use these procedures to manage local domains.
To add local domains
1
In the Control Center, click Settings > Local Domains.
2
On the Local Domains page, click Add.
3
In Domain or email address from which to accept inbound mail, enter a
local domain, sub-domain, or email address.
The resulting behavior for each setting is as follows:
Setting
Syntax
Behavior
Domain name
company.com
The appliance accepts email for all
recipients in the specified domain.
Sub-domain
.company.com
The appliance accepts email for all
recipients in all sub-domains of the parent
domain, but not in the parent domain.
Email address
[email protected]
The appliance accepts email only for the
specified recipient.
You can also specify a destination host to which the domain or email address is
routed via the Optional Destination Host field.
Note: If you do not specify a destination host here, the domain or email address
is routed to the Inbound Relay you configure on the SMTP Settings page. See
“SMTP Scanner settings” on page 164.
4
Click Add to add the domain, sub-domain, or email address.
5
Click Save.
To delete a local domain
1
In the Control Center, click Settings > Local Domains.
2
Select a local domain from the list of domains.
3
Click Delete.
153
154 Managing your system
Invalid Recipient Handling
4
Click Save.
Importing local domains
Lists of local domain definitions can be imported from a file, similar to the
Sendmail mailertable. In the import file, place each domain definition on a line
by itself. The domain definition consists of the following:
■
Domain Name—Can be either a complete domain name, a sub-domain name,
or an email address.
■
Destination—Consists of destination type and destination host name. Only
definitions with a destination type (Mailer) of SMTP or ESMTP are
supported, and %backreferences are not supported. After import, ESMTP
destination types convert to SMTP. When the host name is enclosed in
brackets—smtp:[destination.domain.com]—MX lookup is not performed for
the destination host.
Here is a sample import file:
[email protected]
smtp:local1.com
[email protected]
smtp:local2.com:20
[email protected]
smtp:[local3.com]:30
[email protected]
smtp:[local4.com]
.local5.com
smtp:[192.168.248.105]
local6.com
smtp:[192.168.248.106]:60
To import a list of local domains
1
In the Control Center, click Settings > Local Domains.
2
Click Import.
3
On the Import Local Domains page, enter or browse to the file containing
the list of domain definitions.
4
Click Import.
If entries in the import file do not match the required file format, you can
download a file containing the unprocessed entries.
Configuring address masquerading
Address masquerading is a method of concealing email addresses or domain
names behind the mail gateway by assigning replacement values to them.
Symantec Mail Security 8200 Series appliances let you implement address
masquerading on inbound mail, outbound mail, or both.
Managing your system
Invalid Recipient Handling
Manage masqueraded entries
To add a masqueraded entry
1
In the Control Center, click Settings > Address Masquerading.
2
Click Add.
3
Specify an address or domain to masquerade.
4
Specify a new name for the address or domain name.
5
Specify a mail flow direction to which this masqueraded name will apply:
inbound, outbound, or both.
6
Click Save.
To edit a masqueraded entry
1
In the Control Center, click Settings > Address Masquerading.
2
Click Edit.
3
Specify a masqueraded address or domain.
4
Specify a new name for the address or domain name.
5
Specify a mail flow direction to which this masquerade will apply: inbound,
outbound, or both.
6
Click Save.
Importing masqueraded entries
In addition to creating new masqueraded entries, you can import them from a
file similar to the Sendmail virtusertable. In the import file, place each
masquerade address definition on a line by itself. The definition consists of the
following:
■
Original entry—Specifies the original email address or domain name to be
masqueraded
■
Replacement entry—Specifies the replacement email address or domain
name.
■
Apply to—Indicates the direction to which masquerading is applied.
Available choices are:
■
Inbound messages
■
Outbound messages
■
Inbound and outbound messages
155
156 Managing your system
Invalid Recipient Handling
Following is a sample import file:
[email protected]
[email protected]
inbound
[email protected]
[email protected]
outbound
[email protected]
[email protected]
inbound/outbound
[email protected]
new4.com
inbound
[email protected]
new5.com
outbound
[email protected]
new6.com
inbound/outbound
orig7.com
[email protected]
inbound
orig8.com
[email protected]
outbound
orig9.com
[email protected]
inbound/outbound
To import a list of masquerade entries
1
In the Control Center, click Settings > Address Masquerading.
2
Click Import.
3
On the Import Masqueraded Entry page, enter or browse to the filename
containing the list of masqueraded entries.
4
Click Import.
Note: If entries in the import file do not match the required file format, you
can download a file containing the unprocessed entries.
Configuring aliases
An alias is an email address that translates to one or more other email
addresses. Windows users may understand this concept as a “distribution list.”
You can add an alias as a convenient shortcut for typing a long list of recipients.
An alias can also translate addresses from one top-level domain to another, such
as from symantecs.org to symantec-internetsecurity.com. Email addressed to
[email protected], for example, would be delivered to [email protected].
Note: The alias functionality available on the Settings > Aliases page is separate
from LDAP aliases.
Note the following additional information about aliases:
■
Aliases are recursive. This means that an alias specified in the destination
email address list is expanded as defined in the list of aliases. For example,
with the aliases specified in Table 6-3, a message addressed to
[email protected] would be delivered to the destination addresses for both
Managing your system
Invalid Recipient Handling
[email protected] and [email protected], because [email protected]
includes [email protected].
Table 6-3
Example of recursive aliases
Alias
Destination addresses
[email protected]
[email protected], [email protected], [email protected]
[email protected] [email protected], [email protected], [email protected]
■
Alias transformation does not occur for messages passing through the
appliance’s MTA to the Internet. Alias transformation only applies to
inbound or internal messages that pass through the appliance’s MTA.
■
The appliance’s inbound MTA checks email addresses in the SMTP envelope
To: to determine if any need to be transformed. Transformed addresses are
written back to the SMTP envelope To:. The contents of the message To:
and Cc: headers are ignored and not changed.
■
Inbound address masquerading has precedence over aliases. If the same
original email address or domain exists in both the address masquerading
list and the aliases list, but the new address or domain is different, the
message is routed to the new address or domain in the address masquerade
list, not the aliases list.
Manage aliases
Follow these steps to add or edit aliases.
To add an alias
1
In the Control Center, click Settings > Aliases.
2
Click Add.
3
In the Add Aliases page, type the alias in the Alias domain or email address
box.
Alias form
Examples
Email address—specify one user name and domain
[email protected]
Domain—specify one domain from which email addresses
should be translated
symantecs.org
157
158 Managing your system
Invalid Recipient Handling
4
5
Type a domain or one or more destination email addresses in the Domain or
email addresses for this alias box.
Alias form
Examples
Email address—specify user name and
domain for each email address. Separate
multiple email addresses with a comma,
semicolon, or space.
[email protected], [email protected]
Domain—specify one domain to which
email addresses should be translated
symantec-internetsecurity.com
Click Save.
To edit an alias
1
In the Control Center, click Settings > Aliases.
2
Click the alias or check the box next to an alias, and then click Edit.
3
In the Edit aliases page, modify the text in the Alias domain or email address
box as desired.
4
Modify the text in the Domain or email addresses for this alias box as
desired.
5
Click Save.
Importing aliases
Aliases can be imported from a text file. Each address in the text file must be
separated with one or more spaces or tabs, or a combination of spaces and tabs.
Commas or semi-colons are not valid delimiters. In the import file, each line
must contain an alias address followed by one or more destination addresses.
Following is a sample import file:
[email protected] [email protected]
[email protected] [email protected] [email protected]
noadsorspam.com blocksads.com
To import aliases
1
In the Control Center, click Settings > Aliases.
2
Click Import.
3
On the Import Aliases page, enter or browse to the filename containing the
list of aliases.
4
Click Import.
Managing your system
Managing Scanners
Note: If entries in the import file are not specified correctly, do not match
the required file format, or are duplicates, a message is displayed. You can
click a link to download a file containing the unprocessed entries. Click
Cancel to return to the main Aliases page to review the valid imported
entries.
Managing Scanners
This section assumes that you have successfully completed the necessary steps
outlined in “Setting up Symantec Mail Security 8200 Series” on page 21. At least
one Scanner must be attached and enabled.
The following sections provide information on tasks for managing previously
defined Scanners:
■
Testing Scanners
■
Editing Scanners
■
Enabling and disabling Scanners
■
Deleting Scanners
Testing Scanners
After adding a Scanner, you can quickly test that the Scanner is operating and
that the Agent, a component that facilitates communicating configuration
information between the Control Center and each Scanner, is able to make a
connection.
To test a Scanner
1
In the Control Center, click Status > Host Details.
2
If only one Scanner is attached to your system, you can see a snapshot of
how it is currently functioning.
3
If more than one Scanner is attached, select the Scanner you want to test
from the drop-down list.
You will see a snapshot of its current status.
Editing Scanners
Once you set up a Scanner, you can go back and edit the configuration. For
example, you can change the time zone or enable different components and
services.
159
160 Managing your system
Managing Scanners
To edit a Scanner
1
In the Control Center, click Settings > Hosts.
2
Check the host to edit.
3
Click Edit.
4
Make any changes to the host or its included components and services.
From this page, you can:
■
Start and stop services
■
Modify DNS servers
■
Modify NTP servers and set time values
■
Alter Conduit and related proxy and user settings
■
Change Ethernet settings
■
Define SMTP settings
Enable and disable Scanner replication
If the host you are editing is a stand-alone Control Center appliance, only
DNS and Ethernet settings are available for modification.
For more details on these categories, see “Configuring individual host
settings” on page 161.
■
To edit a Scanner (alternative method)
1
In the Control Center, click Status > Host Details.
2
Select a host from the drop-down list.
3
Click Configure Host.
4
Make any changes to the host or its included components and services.
See To edit a Scanner above for a list of the types of changes you can make.
Enabling and disabling Scanners
For troubleshooting or testing purposes, you can disable and then re-enable
Scanners. Also, It is strongly recommended that you disable a Scanner before
deleting it. Otherwise, you run the risk of losing email messages within the
Scanner email queues. Bear in mind that a Scanner will not process mail while it
is disabled.
To enable or disable a Scanner
1
In the Control Center, click Settings > Hosts.
A red x ( ) in the Enabled column indicates that the Scanner is disabled. A
green check mark ( ) in the Enabled column indicates that the Scanner is
enabled.
Managing your system
Configuring individual host settings
2
Do one of the following:
■
To enable a Scanner that is currently disabled, check the box next to
the Scanner and click Enable. Check as many Scanners as needed
before clicking Enable.
To disable a Scanner that is currently enabled, check the box next to
the Scanner and click Disable. Check as many Scanners as needed
before clicking Disable.
The Scanner list updates to reflect your choice.
Clicking Enable for an enabled Scanner or Disable for a disabled Scanner
has no effect on the Scanner.
■
Deleting Scanners
When you delete a Scanner using the Control Center, you permanently remove
that Scanner’s services from the Control Center. To prevent a Scanner from
continuing to run after deleting it, disable the Scanner before deleting it.
To delete a Scanner
1
In the Control Center, click Settings > Hosts.
2
Check the box next to the host you want to delete, and click Delete.
You can select multiple Scanners before deleting.
The host is removed from the list of available Scanners.
Configuring individual host settings
The following sections describe changes that can be made to individual hosts. It
is assumed that you are familiar with and have followed the steps outlined in
“Editing Scanners” on page 159.
Information is available on the following topics:
■
Starting and stopping services
■
DNS servers, routers, and time
■
HTTP Conduit proxies
■
Ethernet settings
■
SMTP Scanner settings
Starting and stopping services
Follow these steps to start and stop services.
161
162 Managing your system
Configuring individual host settings
To start and stop services
1
In the Control Center, click Settings > Hosts.
2
Check the Scanner to edit.
3
Click Edit.
4
Select the services to be started or stopped.
5
Click Stop to stop a running service or Start to start a stopped service.
DNS servers, routers, and time
DNS servers translate descriptive addresses into IP addresses. Additionally, you
can choose primary, secondary, and tertiary time servers, or manually specify
the time.
Configure DNS servers, routers, and time definitions
Follow these steps to add or modify DNS servers, routers, and time definitions.
To add or modify DNS servers, routers, and time definitions
1
In the Control Center, click Settings > Hosts.
2
Click the host definition to modify.
3
Click Edit.
4
Click the DNS tab.
5
Change or add values for DNS Servers or routers as appropriate.
6
When necessary, you can also flush buffers for DNS Servers or Routers.
7
Change your time or time zone as appropriate.
You can choose to specify a time zone and up to three NTP servers, or you
can set the time manually. For a change of time to take effect, reboot the
appliance.
8
Click Apply above settings to all hosts to apply your changes to all hosts
immediately.
9
Click Save to store the definition.
HTTP Conduit proxies
The Conduit runs on each Scanner appliance, and receives filter updates from
Symantec. If you need to add proxy and/or other security settings to your
Conduit definition, use the steps below.
Managing your system
Configuring individual host settings
To change or add Conduit proxy information
1
In the Control Center, click Settings >Hosts.
2
Check the Scanner definition to edit.
3
Click Edit.
4
Click the Conduit Proxy tab.
5
Check Use proxy server.
If you do not check Use proxy server, any information in the related fields is
ignored.
6
Specify the proxy host name and port on this panel. In addition to this
information, you can include a user name and password as needed.
7
Click Save to store your information.
Ethernet settings
Use the following procedures to configure the Ethernet settings, and to
maintain the necessary connection between the Control Center and Scanners
when the IP address of any host must be modified.
To configure the Ethernet settings
1
In the Control Center, click Settings >Hosts.
2
Check the host definition to edit.
3
Click Edit.
4
Click the Ethernet tab.
You can delete, add, or modify your network IP address as well as two
Ethernet connection definitions.
5
To delete a definition, click the Delete button associated with that
definition.
6
To modify gateway information or to add or change an Ethernet definition,
change the Gateway address for the Router and fill in the Description, IP
address, Netmask, Broadcast, and Network edit fields as needed. You can
also select if auto-negotiation is used. Otherwise, select a speed for the
connection, and specify half or full duplex operation of the connection.
Note: When modifying the IP address, use the next procedure.
7
Under Routing, specify a Default gateway.
The Default gateway is required, and must be an IP address (e.g.
128.113.213.4).
163
164 Managing your system
Configuring individual host settings
8
To optionally define a static route, specify the following:
■
Destination address—IP address, IP address with subnet mask (e.g.
128.113.1.0/255.255.255.0), or CIDR notation (e.g. 192.30.250.00/18)
■
Gateway address—IP address
Interface—Default, Ethernet 1, or Ethernet 2
Click Add to add a static route.
Static routes direct data from one subnet to a different subnet faster than
dynamic routes. But static routes must be updated if addresses change.
■
9
Click the Add button associated with the definition to add a new Ethernet
definition.
10 Click Save.
Changing the IP address
If it becomes necessary to use a different IP address for the Control Center or
any Scanner, you must take steps to safeguard the communication between the
Control Center and attached Scanners. After changing the active Ethernet IP
address, take the following steps.
To accommodate changing the active Ethernet IP address
1
Wait approximately 30 seconds while the IP address change is processed
into the configuration database.
2
Close the browser session in which the IP address was changed.
3
Logon to an attached Scanner as admin.
4
Issue the following command:
clear osconfig.xml
5
Reboot the Scanner.
While logged on as admin, type reboot.
6
After the reboot completes, logon again to the Scanner as admin.
You are prompted to initialize the Scanner. This allows for the entry of the
new IP address.
7
Repeat steps 3 through 6 for all the attached Scanners in your installation.
SMTP Scanner settings
A full complement of SMTP settings has been provided to help you define
internal and external SMTP configurations for Scanners. Inbound SMTP
settings determine how the inbound MTA processes inbound messages.
Outbound SMTP settings determine how the outbound MTA processes outbound
Managing your system
Configuring individual host settings
messages. If you set up the inbound or outbound MTA to perform this filtering
rather than using Content Compliance filters, you can save resources because
messages that do not meet the criteria will be rejected before filtering processes.
To modify SMTP settings for a Scanner
1
In the Control Center, click Settings > Hosts.
2
Check the box next to the Scanner to edit.
3
Click Edit.
4
Click the SMTP tab.
5
As appropriate, complete the SMTP definition for the scanner.
The following parameters are included:
Setting
Description
Scanner Role
Determines if the Scanner is used for Inbound mail filtering only,
Outbound mail filtering only, or Inbound and outbound mail
filtering.
Inbound Mail
Settings*
Provides settings for inbound messages. In this area, you can provide
the following information:
■
Inbound mail IP address— Location at which inbound
messages will be received.
■
Inbound mail SMTP port—Port on which inbound mail is
received, typically port 25.
■
Accept TLS encryption—Indicates if TLS encryption is
accepted. Check the box to accept encryption. You must have a
certificate defined for MTA TLS certificate in Settings >
Certificate Settings to accept TLS encryption.
■
Certificate—Specifies an available certificate for TLS
encryption.
■
Accept inbound mail connections from all IP addresses—
Indicates that all connections for inbound messages are
accepted when checked. This is the default.
■
Accept inbound mail connections from only the following IP
addresses and domains—Indicates that only the addresses or
domain names entered in the checked IP Address/Domains
box are accepted.
Relay inbound mail Gives the location where inbound mail is sent after being received on
to:
the inbound port.
165
166 Managing your system
Configuring individual host settings
Setting
Description
Outbound Mail
settings*
Provides settings for outbound mail characteristics.
Relay Outbound
mail to:
In this area, you can provide the following information:
■
Outbound mail IP address—Specifies the IP address on which
outbound messages are sent.
■
Outbound mail SMTP port—Specifies the port on which
outbound mail is received, typically port 26.
■
Accept TLS encryption—Indicates if TLS encryption is
accepted. Check the box to accept encrypted information. You
must have a certificate defined for MTA TLS certificate in
Settings > Certificate Settings to accept TLS encryption.
■
Certificate—Specifies an available certificate for TLS
encryption.
■
Accept outbound mail connections from only the following IP
addresses and domains—Indicates that only the addresses
entered in the checked IP Address/Domains box are accepted.
Specifies how outbound SMPT message relaying is routed. By
default, MX Lookup is used.
Apply above
Indicates that when saved, all settings on this page are applied
settings to all hosts immediately to all hosts.
Advanced Settings
Provides for inbound, outbound and delivery advanced settings. See
“Advanced SMTP settings” on page 166 for details.
(*) Classless Inter-Domain Routing (CIDR) is supported for inbound and outbound
mail connection IP addresses.
6
Click Save to store your changes.
Advanced SMTP settings
Use the following advanced inbound SMTP settings to define further your SMTP
configuration.
Table 6-4
Inbound SMTP Advanced Configuration Settings
Setting
Description
Maximum number of
connections
You can set the number of simultaneous inbound connections allowed. Additional
connections will be rejected. The default is 2,000 connections.
Maximum number of
connections from a single IP
address
You can set the number of simultaneous inbound connections allowed from a
single IP address. Additional connections from the same IP address will be rejected.
The default is 20.
Managing your system
Configuring individual host settings
Table 6-4
Inbound SMTP Advanced Configuration Settings
Setting
Description
Maximum message size in
bytes
The appliance will reject messages larger than the specified number of bytes. The
default is 10,485,760.
Maximum number of
recipients per message
The appliance will reject messages with more than the specified number of
recipients. The default is 1,024.
Default domain
The appliance will append this domain to any sender address that does not include
a domain.
Use the following advanced outbound SMTP settings to define further your
SMTP configuration.
Table 6-5
Outbound SMTP Advanced Configuration Settings
Setting
Description
Maximum number of
connections
You can set the number of simultaneous outbound connections allowed. Additional
connections will be rejected. The default number of allowed connections is 2,000.
Maximum number of
connections from a single IP
address
You can set the number of simultaneous outbound connections allowed from a
single IP address. Additional connections for the same IP address will be rejected.
The default is 20.
Maximum message size in
bytes
You can set the maximum message size in bytes that can be sent. Larger messages
will be rejected. The default is 10,485,760.
Maximum number of
recipients per message
The appliance will reject unsent messages with more than the specified number of
recipients. The default is 1,024.
Default domain for sender
addresses with no domain
Sets a default domain when none can be found in the message. The default is
company.com.
Insert RECEIVED header
Places a RECEIVED header in the message as the message is sent to the SMTP
delivery queue.
Strip RECEIVED headers
Removes all RECEIVED headers for the message as the message reaches the
outbound SMTP server.
167
168 Managing your system
Configuring individual host settings
Settings also exist governing SMTP delivery configuration for your site.
Delivery configuration message settings are as follows:
Table 6-6
Delivery SMTP Advanced Configuration Settings
Setting
Description
Maximum number of External
connections
You can set the number of simultaneous external connections allowed.
Additional external connections will be rejected. The default number of allowed
external connections is 100.
Maximum number of external
connections to a single IP
address
You can set the number of simultaneous external connections allowed to a
single IP address. Additional external connections for the same IP address will
be rejected. The default is 50.
Maximum number of
connections to all internal mail
servers
You can set the number of connections allowed to all internal mail servers. Any
additional connection attempts will be rejected. The default is 100.
Maximum number of
connections per single internal
mail server
You can set the number of connections to a single internal mail server. Any
additional attempt to create connections will be rejected. The default is 50.
Minimum retry interval
You can set the minimum interval that the SMTP server uses to retry delivery of
a message that has not yet been sent successfully. Two combo boxes are
available in which you can choose a number and interval type. The default is 15
minutes. Interval choices are 15, 30, 45, and 60. Available interval types are
seconds, minutes, hours, and days.
Sent message time-out
You can set the time after which a message to be sent times out and is rejected
from the queue. Interval choices are from 1-5. Interval types are seconds,
minutes, hours, and days. The default is 5 days.
Bounce message time-out
You can set a time-out period for deletion of messages in your bounce queue.
This can be particularly useful in environments where you cannot configure
LDAP settings, such as in Domino installations. The default is 1 day.
Message delay time in queue
before notification
You can set the time a message waits in the mail queue before notification of
nondelivery is sent. Interval choices are from 1-5. Interval types are seconds,
minutes, hours, and days. The default is 4 hours.
Enable TLS encryption
Check this box to accept external TLS-encrypted messages. This is important if
your MTA uses TLS encryption.
To set up the SMTP Advanced Configuration
1
From the control Center, click Settings > Hosts.
2
Select a Scanner from the displayed list.
3
Click Edit.
Managing your system
Configuring individual host settings
4
Click the SMTP tab.
On this page, you will see some general-purpose settings described in
“SMTP Scanner settings” on page 164.
5
Click Advanced Settings.
On this page you will see some advanced Scanner configuration SMTP
settings. These settings are fully described in “Advanced SMTP settings” on
page 166.
6
As appropriate, modify the settings explained above.
7
Click Save to store your information.
Enabling and disabling Scanner replication
Follow these steps to enable or disable Scanner replication.
To enable or disable Scanner replication
1
In the Control Center, click Settings > Hosts.
2
Check the box next to the Scanner to be edited.
3
Click Edit.
4
Click Replication.
5
Check or uncheck Enable Replication for this host.
When checked, the Scanner will replicate LDAP data according to the
defined schedule or upon specific request. If unchecked, changes to LDAP
data will not be replicated to this Scanner.
6
Click Save to store your information.
169
170 Managing your system
Configuring individual host settings
Chapter
7
Administering the system
This chapter includes the following topics:
■
Administration information about your system
■
Getting status information
■
Administering appliances with the Control Center
■
Administering appliances with the command line
Administration information about your system
Symantec Mail Security 8200 Series appliances use the Linux kernel 2.6.7.
Kernel modifications have been made to support specifics of the hardware
supplied to you.
System logging facilities
The operating system provides a local logging facility, via syslog, which is
configured to store logs that are accessed through the Control Center. A
software facility, Logrotate, runs hourly and manages logs based on
configurable criteria.
To view or change log settings
1
In the Control Center, click Status > Logs.
2
Click Settings.
3
Modify log settings as appropriate.
4
Click Save to store your changes.
By default, a log is rotated if:
■
Maximum log size is exceeded
172 Administering the system
Getting status information
■
Maximum number of days to retain is exceeded
Up to five previous logs are retained on the file system.
Note: Critical errors are logged as described above and are also displayed on the
console or via serial connection on the appliance.
Getting status information
Symantec Mail Security 8200 Series appliances provide a comprehensive means
of checking and displaying system status. Status information is combined with
options for changing what is displayed as well as with actions you can take based
on the information shown. LDAP synchronization and Scanner replication
management facilities can also be found within the status area.
Status and management control facilities are available to inform you about the
following system activities:
■
Overview of system information
■
Processed message details
■
Host details
■
Scanner replication
■
LDAP synchronization
■
Queue details
■
Log Details
Overview of system information
An overview of system status is provided to give you a snapshot of system
activity including spam processed, antivirus filter updates, Quarantine
utilization, and similar general information.
To examine overview status for the appliance
◆
In the Control Center, click Status > Overview.
Use the Reset button to refresh status information for the Totals-Since table
to reflect the current day.
Administering the system
Getting status information
Note: Upon initial startup, even if messages go through the Filtering Engine, the
Last 24 Hours and Last 30 Days graphs display no data, even though the Last 60
Minutes and Totals Since tables show data. The Last 24 Hours graph displays
data for the past 24 hours, not including the current hour. The Last 30 Days
graph displays data for the past 30 days, not including today. At the next hour,
data from :00 to :59 minutes will be displayed in the Last 24 Hours graph. At
midnight, data from the last day will be displayed in the Last 30 Days graph.
Processed message details
Totals data is provided via time period for the following categories of messages:
■
Inbound
■
Outbound
■
Rejected SMTP Connections
■
Virus
■
Mass-Mailing Worm
■
Spam
■
Suspected Spam
■
Content Violations
Columns list the numbers of messages for each of the following time periods:
■
Past Hour
■
Past Day
■
Past Week
■
Past Month
■
Uptime: the period since this appliance was last started
■
Lifetime: the period since this appliance was installed.
To view totals information
◆
In the Control Center, click Status > Message Details.
Host details
You can view details about the status of components on selected hosts.
The following information categories are available for the selected host:
■
Control Center
173
174 Administering the system
Getting status information
■
Scanner
■
Performance
Working with the Host Details page
The following steps describe some common tasks on the Host Details page.
To view details about available hosts
◆
In the Control Center, click Status > Host Details.
To view additional component information
◆
Click the plus sign, when available, next to any component to view
additional information.
To make changes to host configuration
◆
Select a host and click Configure Host.
Scanner replication
Status information is available to show you your most recent replication
activity. The Replication process moves updated information between the
Control Center and each Scanner host.
Working with the Scanner replication status page
The following steps describe how to perform some common tasks on the
Scanner Replication page.
To view the status of replication for a host
◆
In the Control Center, click Status > Scanner Replication.
To perform an immediate (unscheduled) replication
◆
From the Scanner Replication page, click Replicate Now.
LDAP synchronization
You can synchronize user, alias, group and distribution list data and view
synchronization details from LDAP directories with the Control Center. When
an LDAP server initially is attached to the Control Center, a full synchronization
is performed automatically. Synchronization is then performed according to the
automatic schedule defined. The default schedule is once per day.
Administering the system
Getting status information
Working with the LDAP Synchronization page
The following steps describe how to perform some common tasks on the LDAP
Synchronization page.
To view information about LDAP synchronization
◆
In the Control Center, click Status > LDAP Synchronization.
To synchronize fewer than 1,000 directory entries before the next update
◆
On the LDAP Synchronization page, check the box next to the source to
synchronize and click Synchronize Changes.
To synchronize more than 1,000 directory entries before the next update
On the LDAP Synchronization page, check the box next to the source to
synchronize and click Full Synchronization.
When a full synchronization is performed, all LDAP source records are erased
from the Control Center and synchronized to new LDAP source records.
Synchronization takes some time to be initiated and performed, depending on
the number of records being synchronized. As a benchmark, a user population of
25,000 users and 5,000 distribution lists (with nesting levels ranging from 1-10),
can take as much as 7.5 hours on a Symantec Mail Security 8240.
Queue details
You can view and save messages from the message queues on a specified host.
The following message queues are available for selection:
■
Inbound
■
Outbound
■
Delivery
Working with a message Queue
The following steps describe how to perform some common tasks on the
message Queues page.
To view message queue information
◆
In the Control Center, click Status > Queues.
To tailor information on a queue
◆
On the Queues page, select a queue and then search it by typing search
values in To or From.
175
176 Administering the system
Administering appliances with the Control Center
Additional functions are also available, such as setting display options and
modifying queue contents. Each queue can take up to 1MB of storage space,
even when empty, due to the size of its initialized structure on disk.
Log Details
You can examine performance logs for Scanners and the Control Center. Log
data is based on time range, log type, and error severity.
Working with the Logs page
The following steps describe some common tasks on the Logs page.
To view log data
◆
In the Control Center, click Status > Logs.
To work with the Log list
◆
On the Logs page, click a column label in the Log File list to sort the logs in
either ascending or descending order.
To open or save a log
◆
On the Logs page, click a file name in the list to trigger a pop-up window
through which you can open or save the selected file.
Administering appliances with the Control Center
In addition to many useful client commands available for the Symantec Mail
Security 8200 Series appliance, numerous administrative and management
functions can be accomplished through the Control Center user interface. This
section covers the following functions:
■
Managing system administrators
■
Managing software licenses
■
Updating your system
■
Managing connections through system utilities
■
Backing up your system
■
Restoring your system from backup files
■
Shutting down an appliance
■
Rebooting your appliance
■
Returning to factory defaults
Administering the system
Administering appliances with the Control Center
Managing system administrators
You can add, delete, and edit information for administrators of the Control
Center from the Administrators page.
Manage administrators
Follow these steps to add, edit, or delete administrators.
To add an administrator
1
In the Control Center, click Administration > Administrators.
2
Click Add.
3
Type the user name and password, and confirm the password.
4
Enter the email address of the administrator.
5
If this Administrator is to receive system alerts, check Receive alert
notifications.
6
Choose the administrative rights you want to assign.
You can do this in either of the following ways:
■
Click Full Administration Rights to allow the administrator to view
and modify all available rights, and then Skip to step 9.
■
Click Limited Administration Rights to choose specific rights for this
administrator.
7
Check the specific tasks you want this Administrator to manage.
8
For each task selected, click View or Modify.
9
Click Save.
To edit an administrator
1
In the Control Center, click Administration > Administrators.
2
Select an Administrator from the list and click Edit.
3
Change the Administrator definition as needed.
4
Click Save.
To delete an administrator
1
In the Control Center, click Administration > Administrators.
2
Select administrators by checking the boxes next to administrator names.
3
Click Delete.
You will be asked to confirm deletion of the selected administrator(s).
177
178 Administering the system
Administering appliances with the Control Center
Designating access to the Control Center
You can restrict Web access to the Control Center to one or more computers.
Users attempting to log into the Control Center from unauthorized computers
will see a 403 Forbidden page in their Web browser.
Note: If you accidentally restrict access to the Control Center so that you can’t
log in using your Web browser, log into the appliance using SSH or via hardware
and run the clear bcchostacl command. See “clear” on page 185.
To allow access only to certain hosts
1
In the Control Center, click Settings > Control Center Settings.
2
Type one DNS name, IP address, IP address with subnet mask, or CIDR net
block and click Add.
Specify additional computers or networks as needed.
3
Click Only the following hosts.
4
Click Save.
To re-enable Web access from any computer, click All hosts, and then click
Save.
Managing software licenses
Licenses determine which features are enabled on your appliances.
To view and add licenses through the Control Center
1
In the Control Center, click Administration > Licenses.
2
Review the license information for the appliance.
Next to each licensed entry, a status of Licensed is shown. For an unlicensed
product, ask your Symantec representative about getting a license file
through which to register the product. License files must be placed on the
same machine on which the browser is open.
3
To license a Symantec product, either enter or browse for a filename in the
Add a new license file edit box.
4
Click Add.
Updating your system
You can view your current system software version and, if available, request
software updates.
Administering the system
Administering appliances with the Control Center
Updating software
To view the current software version or request an update
1
In the Control Center, click Administration > Software Updates.
2
If applicable, select a host.
The version and status of your software are displayed.
Newer versions of software are displayed as radio buttons with a status of
Available.
To update current software
1
In the Control Center, click Administration > Software Updates.
2
If applicable, select a host.
3
If available, select an updated software version and click Update.
Managing connections through system utilities
Several utility programs are available through the Control Center that help you
test and trace IP addresses. For a discussion of utilities and parameters that are
required, see “Administering appliances with the command line” on page 183.
To execute a utility program
1
In the Control Center, click Administration > Utilities.
2
In the Host drop-down list, select the server to execute a utility.
3
From the Utility combo box, select the utility to execute.
Available utilities are:
■
nslookup
■
ping
■
traceroute
4
Enter any attribute information required to execute the chosen utility.
5
Click Run.
Backing up your system
A backup program and scheduler are available through the Control Center. Only
one backup schedule can be defined.
Configuring a Schedule and backing up an appliance
Follow these steps to back up your appliance and manage a backup schedule.
179
180 Administering the system
Administering appliances with the Control Center
To create the backup schedule
1
In the Control Center, click Administration > Backup.
2
Click Add.
3
In Backup description, enter text that describes the schedule.
4
Under Backup Schedule, define the time and frequency of backups.
5
Under Backup To, choose to store backups on the local server or on a remote
host using FTP.
6
If you are backing up on the local server, indicate how many backup versions
are to be kept. The default is 3.
It is only necessary to specify the number of backup versions retained when
storing files locally. When storing backup data at a remote location, you
must supply the necessary information for FTP transfer and, when required
by the remote location, user authentication information as well.
7
Click Save.
To backup your system immediately
1
In the Control Center, click Administration > Backup.
2
Click Backup Now.
3
Indicate if backup data is to be stored on the local server or at a remote
location via file transfer protocol.
When storing backup data at a remote location, you must supply the
necessary information for FTP transfer and, when required by the remote
location, user authentication information as well.
4
Click Backup Now.
To edit a backup schedule
1
In the Control Center, click Administration > Backup.
2
Click Edit.
3
Make changes to the definition as needed.
4
Click Save.
To delete a backup schedule
1
In the Control Center, click Administration > Backup.
2
Click Delete.
Administering the system
Administering appliances with the Control Center
Restoring your system from backup files
If you have previously backed up your system databases, it is possible to restore
them from any of the available backup stores.
Restore from system backups
Follow these steps to restore from local or remote backups. A procedure is also
included here to restore system policies.
To restore your system from a local backup
1
In the Control Center, click Administration > Restore.
2
Select a restore definition from the displayed list.
This assumes that you have previously backed up your system on the
appliance, and that you have not modified the default backup name for the
backup file. If you have changed the name of the backup file, use db-restore
from the client command line to restore from this backup file.
3
Click Restore.
To restore your system from a remote backup
1
In the Control Center, click Administration > Restore.
2
Check either Restore backup from a remote location or Upload a file from
your local computer.
When restoring from a remote location, protocol and authentication
information can be required. Also, a fully qualified filename for the backup
is required.
3
Click Restore.
To restore policy information
1
In the Control Center, click Settings > Hosts.
2
Check the box next to a restored host and click Edit.
3
Click Save.
Shutting down an appliance
When you shut down an appliance, the shutdown process begins immediately
upon selection. If you have mail in your inbound or outbound queues, it is
retained in the queues. Before shutting down an appliance, it is strongly
recommended that you stop its flow of mail. This can be done using the
following steps.
181
182 Administering the system
Administering appliances with the Control Center
Managing the shutdown process
To stop the flow of mail using the Control Center
1
In the Control Center, click Status > Queues.
2
Select the Inbound queue from the Queues drop-down list and click
Display.
3
If the queue is started, click Stop.
4
Select the Outbound queue from the Queues drop-down list and click
Display.
5
If the queue is started, click Stop.
To stop the flow of mail using the command line
◆
Issue these commands from the client command line:
mta-control inbound suspend-accept
mta-control outbound suspend-accept
Let the mail drain from the system until it is free of messages.
As a precaution, you might also wish to flush your inbound, outbound and
delivery email queues. You can do this in one of two ways.
To flush email queues from the Control Center
1
In the Control Center, click Status > Queues
2
For the mail queues you have stopped as described above, click Flush.
To flush email queues using the client command line
◆
Issue the following command after stopping inbound and outbound mail
queues:
mta-control all flush
It is now safe to shutdown the appliance.
To shut down an appliance
1
In the Control Center, click Administration > Shutdown.
2
Select the appliance from the Host combo box.
3
Click Shutdown.
4
Before powering down the system, be sure the message Power Down is
displayed on a locally connected video console or through a serial
connection.
Administering the system
Administering appliances with the command line
Rebooting your appliance
Follow these steps to reboot your appliance.
To reboot an appliance
1
In the Control Center, click Administration > Reboot.
2
Select the appliance to be rebooted.
3
Click Reboot.
Connections will be closed and the system rebooted.
Returning to factory defaults
You can return to the factory defaults with which an appliance was originally
delivered. Choosing this option causes the following to happen:
■
Stops all Scanner hosts
■
Clears all Hosts from the host table
■
Clears all logs from the database
■
Clears all reports from the database
■
Clears all status information from the database
■
Resets all settings and policies to their default values
To reset an appliance to its factory defaults
1
In the Control Center, click Administration > Factory Reset.
2
Select the host to reset.
3
Click Reset.
4
Click OK to confirm system reset or Cancel to stop the process.
Note: After performing a factory reset, you must log in directly on each reset
appliance and perform initialization. Factory reset puts the appliance in a state
where it has no IP address defined. Logging in via the network or accessing the
appliance via a separate Control Central appliance at that point will not work.
Administering appliances with the command line
Each appliance has a set of commands you can use to configure, optimize and
administer your system. Access these commands by logging into the system
either through SSH or via the VGA or serial connections on the appliance.
183
184 Administering the system
Administering appliances with the command line
The following commands are available:
■
clear
■
crawler
■
date
■
db-backup
■
db-restore
■
deleter
■
diagnostics
■
dns-control
■
grep
■
help
■
http
■
ifconfig
■
install
■
iostat
■
more
■
mta-control
■
mta-stats
■
netstat
■
nslookup
■
passwd
■
ping
■
reboot
■
rebuildrpmdb
■
rollback
■
route
■
service
■
set-time
■
shutdown
■
system-stats
■
tail
Administering the system
Administering appliances with the command line
■
traceroute
■
update
■
version
■
watch
clear
The clear command removes logs, configuration information, and other data as
specified in a set of associated classes.
The clear command has the following syntax:
clear <class class ...>
where class can be any combination of the following:
Table 7-1
Classes for the clear command
Class
Description
scannerlogs
Clears the scanner logs
synclogs
Clears the synchronization logs
oslogs
Clears the operating system logs
alllogs
Clears Scanner and operating system logs
scannerconfig
Clears Scanner configuration files
osconfig
Clears the operating system configuration
allconfig
Clears Scanner and operating system configuration
scannerdata
Clears all Scanner data
bccdata
Clears all Control Center data
bcchostacl
Clears the host access controls made on the Settings > Control Center
Settings page to allow access from all hosts
sudata
Clears all software update cache data
alldata
Clears Scanner, operating system, and software update cache data
password
Resets and admin password
all
Clears all logs, configuration, password, synchronization and Scanner
data, restoring your appliance to the original factory configuration.
help
Types a help file of the command syntax.
185
186 Administering the system
Administering appliances with the command line
crawler
The crawler command searches the appliance file system for core dumps.
Under normal circumstances, core dumps are accounted for in the standard
clean-up process on each appliance. However, it is possible for occasional core
dumps to be deposited in irregular locations. The crawler command examines
the appliance file system to find such instances. If it finds core dumps, they are
compressed and moved into an area where they can be managed appropriately.
An email about the existence of these files and their location is sent to the
system administrator. A sample email might look like this:
Subject: found core
The following core files have been found:
/data/scanner/jobs/other/17Jan2004-15h49m02s
/data/scanner/jobs/other/15Jan2004-02h22m59s
The crawler command has the following syntax:
crawler
For additional related information see “deleter” on page 189.
date
The date command displays the date and time. This command is part of the
standard Linux command set, but has been modified in this implementation.
When logged into the appliance, you can receive specific help for this command
by typing date --help.
db-backup
The db-backup command backs up Symantec databases on the Symantec Mail
Security 8200 Series appliance, storing five backup versions by default in your
local backup store. Only one instance of db-backup can be run at a time, as a lock
file is created during command execution.
Backup files are compressed before they are written to disk to maximize disk
space. The db-backup script checks the available disk space on the /data
partition and exits if less than 50% of the partition space is available.
If any part of the operation fails, db-backup fails with a non-zero status and
explanatory message on the command line.
The db-backup command has the following syntax:
db-backup <options> [database]
Administering the system
Administering appliances with the command line
where:
■
Options—are specifications you can provide that modify default backup
conditions as follows:
Table 7-2
Option
Description
-f <filename>
Writes output to the specified file. By default, output is written locally to /<local backup store>/
db-backup.<database-name|all>.<Mon-Day-Year-Hour-Min>.tar.bz2. If you enter a different file
name, you can only restore this backup from the client command line. You can add a prefix to the
path to change the output location as follows:
■
scp—Temporarily stores database dumps on the local appliance, checking files for data
integrity, before copying them remotely using SCP (secure copy protocol). A username is
required when using SCP as a transport, and the administrator is prompted for a password.
Return codes are checked to ensure that the entire dump was copied to the remote host.
■
ftp—Temporarily stores database dumps on the local appliance, checking files for data
integrity, before copying them remotely using FTP (file transfer protocol). Login will be
attempted using the username and password credentials provided on the command line. If
special characters are included in the password, you must enclose the password in single
quotes (‘). If the special characters in a password include a single quote, you can use the
double quote instead (“). Passwords containing single and double quotes are not valid. If no
credentials are specified, an anonymous login will be used. Error checking ensures that the
dumps and copies are complete.
If the file path specification ends with '/' then the directory is assumed, and the default file name
is appended to it. Otherwise, a full path to the file is assumed to be provided.
To view the file syntax online, type db-backup -h.
-n
Does not compress the backup file before writing it to disk. By default, backup files are compressed
with bzip2.
-l
Lists existing backups in the local backup store
-g
Uses gzip instead of bzip2
-b <number>
Specifies the number of backups to keep in the local backup store. The default is 5.
-h
Displays help for command usage
■
database—is an optional parameter by which you can selectively
backup databases when you do not need a full backup. When no
database is specified, a full backup is performed.
db-restore
The db-restore command restores Symantec databases to an appliance, from
previously created backups located by default in your local backup store, or from
187
188 Administering the system
Administering appliances with the command line
remote locations via FTP, SCP and HTTP. Only one instance of db-restore can be
run at a time, as a lock file is created during command execution. db-restore
expects compressed backup files created by db-backup. If you want to restore
system policies in addition to system databases, see “To restore policy
information” on page 181.
If any part of the operation fails, db-restore fails with a non-zero status and an
explanatory message on the command line.
The db-restore command has the following syntax:
db-restore <options> [filename]
where:
■
filename—is the name of the file to restore your database information.
Use the -l option to see a list of available files. The filename can be
prefixed with SCP, FTP, or HTTP. Otherwise, it is assumed that the file
resides in the local backup store.
The syntax for a local filename is filename.
In addition, you can prefix the path of the file as follows:
Table 7-3
Pattern
Description
scp://
user@host/
path
Copies the backup file from its remote location using SCP (secure copy protocol). A complete path
and filename, along with username, are required when using SCP as a transport, and the
administrator is prompted for a password. Return codes are checked to ensure that the entire
dump was copied from the remote host, and the script exits with non-zero status on failure.
ftp://
Copies files from their remote location using FTP (file transfer protocol). Login will be attempted
user:password using the username and password credentials provided on the command line. If special characters
@[:port]/path are included in the password, you must enclose the password in single quotes (‘). If the special
characters in a password include a single quote, you can use the double quote instead (“).
Passwords containing single and double quotes are not valid. If no credentials are specified,
anonymous login will be used. Error checking ensures that the copies are complete.
http://
host[:port]/
path
Allows for web-based transfer of a restore file from the Control Center. Using this mode, backups
stored on your local appliance can be retrieved at either of the following addresses:
http://host.domain.com:41080/brightmail/backups/file.bz2
https://host.domain.com:41443/brightmail/backups/file.bz2
If special characters are included in the password, you must enclose the password in single quotes
(‘). If the special characters in a password include a single quote, you can use the double quote
instead (“). Passwords containing single and double quotes are not valid.
Note: If you are using Internet Explorer, be certain that Do not save encrypted pages to disk is
unchecked. This option can be found in the Internet Explorer Tools menu, Internet Options menu,
expanded Security view.
Administering the system
Administering appliances with the command line
■
Options are any of the following:
Table 7-4
Option
Description
-l
Lists existing backups in the local backup store
-h
Displays help for command usage
deleter
The deleter command removes core files that you have been informed about
via email. If not deleted, these files can be picked up by the diagnostics
command and used in compiling system data as described in “diagnostics” on
page 189.
The deleter command has the following syntax:
deleter <pathname/filename>
where <pathname/filename> is the path and filename provided in email via
crawler to the system administrator.
An example of using deleter based on the first file shown in the sample email
message from the crawler command would look like this:
deleter /data/scanner/jobs/other/17Jan2004-15h49m02s
For related information, see “crawler” on page 186.
diagnostics
The diagnostics command takes a snapshot of key elements on the appliance
and sends it to the designated location via SCP or FTP.
The diagnostics command has the following syntax:
diagnostics <options> <url>
where:
■
options are:
■
-h—Displays a help message showing command usage information
■
-v—Turns on verbose reporting for command execution
189
190 Administering the system
Administering appliances with the command line
■
url Location to which the package of information is transmitted via SCP or
FTP. Prefix the url as follows:
Table 7-5
Prefix
Description
scp://user@host/path
Copies the diagnostics package remotely using SCP (secure copy protocol). A username
is required when using SCP as a transport, and the administrator is prompted for a
password.
ftp://user:password@host
[:port]/path
Copies the diagnostics package remotely using FTP (file transfer protocol). Login will
be attempted using the username and password credentials provided on the command
line. If special characters are included in the password, you must enclose the password
in single quotes (‘). If the special characters in a password include a single quote, you
can use the double quote instead (“). Passwords containing single and double quotes
are not valid. If no credentials are specified, anonymous login will be used.
dns-control
The dns-control command manages local caching for the name server. The
command has the following syntax:
dns-control <option>
where any of the following options can be specified:
■
start—Starts the local caching name server
■
stop—Stops the local caching name server
■
restart—Restarts the local caching name server
■
status—Displays the status of the local caching name server
■
flush—Flushes the cache
■
list—Lists the locally configured name servers for the resolver
■
trace—Increments the tracing (debug) level by +1
■
notrace—Disables tracing (debug)
■
help—Displays a help message showing command usage information
grep
The grep command searches within redirected output from any other command
available in the appliance. This command is part of the standard Linux
command set, but has been modified in this implementation. When logged into
the appliance, you can receive specific help for this command by typing
grep --help.
Administering the system
Administering appliances with the command line
help
The help command displays a list of available commands on the appliance.
The help command has the following syntax:
help
http
The http command enables or disables HTTP access for your appliance. By
default, each appliance has the HTTPS Web server enabled and the HTTP Web
server disabled. Using the http command has no effect on HTTPS access. After
executing the command, the Control Center must be restarted with the service
command for the change to take effect.
The http command has the following syntax:
http <on|off>
where <on> enables HTTP access and <off> disables HTTP access.
ifconfig
The ifconfig command displays the status and configuration of network
interfaces and can make temporary changes to interface configurations. This
command is part of the standard Linux command set, but has been modified in
this implementation. When logged into the appliance, you can receive specific
help for this command by typing ifconfig --help.
install
The install command loads the designated version of software as an upgrade to
the appliance.
The install command has the following syntax:
install <version>
where <version> is an available version of sms-appliance software.
iostat
The iostat command monitors system input/output device loading by
observing the time devices are active in relation to their average transfer rates.
The iostat command has the following syntax:
iostat <flags>
191
192 Administering the system
Administering appliances with the command line
more
The more command displays output, one screen at a time, for redirected output
from any other appliance command. This command is part of the standard
Linux command set, but has been modified in this implementation. When logged
into the appliance, you can receive specific help for this command by typing
more --help.
mta-control
The mta-control command allows you to run additional instances of the MTA,
query MTA instances, and control specific elements within MTA message
processing.
The mta-control command has the following syntax:
mta-control [instance] [command]
where:
■
■
instance is one of the following MTA queues:
■
inbound
■
outbound
■
delivery
■
all
command—is one of the following:
■
start—Starts the instance
■
stop—Stops the instance
■
reload—Causes the instance to reload its configuration files
■
status—Displays the current status. The status can be: running, not
running, enabled or disabled.
■
restart—Restarts the instance
■
suspend-accept—Stops the listener(s) (but continues to process the
queue unless delivery is suspended)
■
resume-accept—Resumes the listener(s)
■
suspend-deliver—Stops message delivery but continues to accept
messages unless accept is suspended
■
resume-deliver—Resumes message delivery
■
disable—Stops the instance and causes it to remain stopped across
reboots
■
enable—Causes the instance to be enabled across reboots, and start it if
necessary
Administering the system
Administering appliances with the command line
■
show-queue—Displays a summary of messages in the queue
■
flush—Reattempts delivery for all queued messages
■
delete-msgs-by-sender <regexp>—Deletes from the queue all messages
with Envelope Sender that matches the given Perl regexp (case
insensitive).
■
delete-msgs-by-rcpt <regexp>—Deletes from the queue all messages
with an Envelope Recipient that matches the given Perl regexp (case
insensitive). Note that this deletes the entire *msg* not just the
recipient.
■
delete-msg-by-id <queue-ID>—Deletes the message with the given
queue-ID from the queue. For this command, Instance cannot be all.
■
delete-all-msgs—Deletes all messages from the queue
■
query-queue—Querys the message queue. The following optional
parameters are accepted: sender_match=<perl regexp>,
rcpt_match=<perl regexp>, start=N, limit=N, format=<neat|xml>.
sender_match and rcpt_match are logically ANDed together if present.
The intermediate result set after applying these matches is sorted by
date, and then the start and limit are applied: $start-1 messages are
skipped and then $limit messages are returned.
The default is to show all messages in 'neat' format, which is meant to
be human readable.
Instance cannot be all. Note that the ID is only unique per instance.
mta-stats
the mta-stats command Reports MTA statistics for the specified key, or if key is
unspecified, for all available keys.
The mta-stats command syntax is as follows:
mta-stats <key> <key> <...>
where key can be any of the following MTA elements:
■
inbound_listener_connections
■
outbound_listener_connections
■
delivery_connections
■
inbound_queued_msgs
■
outbound_queued_msgs
■
delivery_queued_msgs
■
inbound_deferred_msgs
193
194 Administering the system
Administering appliances with the command line
■
outbound_deferred_msgs
■
delivery_deferred_msgs
■
inbound_queue_size
■
outbound_queue_size
■
delivery_queue_size
■
inbound_listener_data_rate
■
inbound_listener_msg_rate
■
outbound_listener_data_rate
■
outbound_listener_msg_rate
■
delivery_data_rate
■
delivery_msg_rate
netstat
The netstat command Prints network connections, routing tables, interface
statistics, masquerade connections, and multicast memberships. This command
is part of the standard Linux command set, but can have been modified in this
implementation. When logged into the appliance, you can receive specific help
for this command by typing netstat --help.
The netstat command has the following syntax:
netstat <flags>
nslookup
The nslookup command performs a DNS lookup of the given hostname or IP
address. This command is part of the standard Linux command set, but can have
been modified in this implementation.
The nslookup command has the following syntax:
nslookup <hostname|ip address>
passwd
The passwd command changes the password for the admin login and is part of
the operating system.
The passwd command has the following syntax:
passwd
Administering the system
Administering appliances with the command line
ping
The ping command tests, via data packet, the transfer of that data between the
issuing machine and the given hostname or IP address. All arguments are
permitted. This command is part of the standard Linux command set, but can
have been modified in this implementation. When logged into the appliance, you
can receive specific help for this command by typing ping --help.
The ping command has the following syntax:
ping <hostname|ip address>
reboot
The reboot command reboots the appliance and is part of the operating system.
The reboot command has the following syntax:
reboot
rebuildrpmdb
The rebuildrpmdb command recreates the RPM database for the appliance.
The rebuildrpmdb command has the following syntax:
rebuildrpmdb
rollback
The rollback command reverts from the current version of appliance software
to the specified earlier version. Use the update command with the list option
the see a list of available releases.
The rollback command has the following syntax:
rollback <version>
where version is a version number of sms-appliance software.
Rolling back software updates
Note: If you do not have a database backup from which you can restore, you
cannot roll back to the previous version when database tables have been
modified for the newer version of appliance software. If you do not have a
backup database for the version to which you want to roll back available, do not
attempt to roll back your software.
195
196 Administering the system
Administering appliances with the command line
When the rollback command is issued, it returns the Control Center to the
previously installed version of software. It does not, however, necessarily roll
back all aspects of appliance’operation to the previous state. For example, if you
use the newer software and database changes are a part of the update, the
database remains untouched after the issuing of the rollback command. If the
system configuration is altered during update, this change is unaffected by the
rollback command as well. In order to roll back changes made to message data
and/or configuration settings, it is necessary to restore the database from your
previous configuration using the db-restore command. In addition, it is
necessary to use rollback on each Scanner as well as replicate the older settings
from the rolled back Control Center appliance to each attached Scanner.
To roll back your software version
1
Issue the rollback command to revert to the previous version of software
installed on the appliance.
2
If you used db-backup to make a copy of your original database, use
db-restore to put the original database back in place.
3
From the Control Center, click Settings > Hosts.
4
Select a Scanner by checking the box next to it and click Edit.
5
Click Replication Settings.
6
Click Replicate Now in order for the Control Center to create a configuration
file for the selected Scanner from the appliance database.
7
If necessary, repeat steps 4, 5, and 6 for any other Scanners connected to the
Control Center.
8
If you have chosen to roll back without using db-restore, in some cases it
will be necessary for you to initialize attached Scanners and perhaps even
make changes in the Control Center.
If you need more information on this, refer to “Initialize your new
appliance” on page 24.
route
The route command allows you to view routing tables or to add entries to a
routing table temporarily. Its primary use is for viewing the routing tables.
service
The service command allows for the changing of status for components within
the Symantec 8200 appliance.
The service command has the following syntax:
Administering the system
Administering appliances with the command line
service <component_name> <command>
where:
■
■
component_name can be any one of the following:
■
mta
■
bcc
■
ldapsync
■
mailwall
■
mysql
■
osconfig
■
stunnel
command can be any one of the following:
■
start
■
stop
■
restart
set-time
The set-time command sets the system time and time zone for an appliance.
This command has the following syntax:
set-time <MMddHHmmYYYY> <timezone>
where MM is the month, dd is the day, HH is the hour entered in 24-hour time
format, mm is the minutes, and YYYY is the four-digit year. The timezone
parameter references a file. For example, to set the date to Wednesday, October
13, 2004 at 11:49:00 PDT, enter the command:
set-time 101311492004 US/Pacific
If you want to set the time zone only, use 0 for the time. For example, to change
only the time zone to US/Pacific, enter the command:
set-time 0 US/Pacific
To see a list of available time zones, type set-time help.
shutdown
The shutdown command shuts down the appliance. Shutdown occurs
immediately and email remains in the queues.
197
198 Administering the system
Administering appliances with the command line
Shut down an appliance
Before shutting down, it is strongly recommended that you stop the flow of mail
to and from the Control Center.
To stop the flow of mail
1
Suspend the acceptance of new mail.
You can do this either by modifying your network setup such that the
inbound and outbound appliance ports are blocked, or by issuing the
following commands:
mta-control inbound suspend-accept
mta-control outbound suspend-accept
2
Let the mail drain from the system until it is free of messages.
3
As a precaution, you might also wish to flush your inbound, outbound and
delivery email queues.
You can flush the queues by going to Status > Queues in the Control Center
and clicking Flush, or by issuing the following command:
mta-control all flush
The shutdown command has the following syntax:
shutdown
sshdctl
The sshdctl command designates machines from which a system administrator
can connect to an appliance with the ssh command. Machines are granted and
denied ssh connection based on rules in allow and deny lists. An entry on the
allow list always takes precedence over deny. If a machine is matched with both
lists, access is allowed. If a machine is unmatched on either list, access is
allowed.
Administering the system
Administering appliances with the command line
The sshdctl command has the following syntax:
sshdctl [option] <parameter> ...
where:
Table 7-6
sshdctl command syntax
Option
Description
-a [allow|deny] [rule]
Adds a rule to the allow or deny list.
A rule restricts access to an appliance via ssh connection and can be any of the following:
■
Host name or IP address—Designates a specifically allowed or denied location. A host
name can be prefixed with a . to include subdomains. An IP address can be terminated
with a . to include subdomains.
Net masks can also be used to designate groups of IP addresses. An expression of the
form n.n.n.n/m.m.m.m is interpreted as a net/mask pair. An IPv4 host address is
matched if net is equal to the bitwise AND of the net address and the mask. For
example, the net/mask pattern 131.155.72.0/255.255.254.0 matches every address in
the range 131.155.72.0 through 131.155.73.255.
You can also use wildcards of ? and * to include multiple IP address or host name
entries for a rule. Wild cards cannot be used with any of the abbreviated forms
described above.
■
ALL—Matches all hosts.
■
LOCAL—Matches any host name not containing a dot.
■
UNKNOWN—Matches any host with an unknown host name or IP address. Use this
pattern with care as host names can be unavailable due to temporary name server
problems. A network address is unavailable when the software cannot determine the
type of network being accessed.
■
KNOWN—Matches any host with a known host name or IP address. Use this pattern
with care as host names can be unavailable due to temporary name server problems. A
network address is unavailable when the software cannot determine the type of
network being accessed.
■
EXCEPT—Modifies entries from another list using the form list_n EXCEPT list_n.
-d [allow|deny] <#>
Deletes a rule from the allow or deny list. Delete rules from highest to lowest numbered
rule.
-l
Lists the active rules. the utility displays the full list of restrictions, including both the
allow and deny list. If either list has no entries, the word empty is displayed for that list.
-h
Displays help for this command.
Examples
To add a rule allowing ssh access to an appliance for your_domain.com:
◆
sshdctl -a allow .your_domain.com
199
200 Administering the system
Administering appliances with the command line
To delete rules from a list;
◆
sshdctl -d deny 3 -d deny 1
To allow your_domain.com but none of its possible subdomains, and
my_domain.com and all subdomain addresses access to an appliance via ssh as
well as eliminate access to any other domain:
◆
sshdctl -a allow your_domain.com -a allow .my_domain.com -a deny
ALL
system-stats
The system-stats command displays system statistics.
The system-stats command has the following syntax:
system-stats <key>
where key can be blank, in which case all available values are returned, or one or
more of the following:
■
cpu_idle—Displays CPU idle time as a percentage of CPU activity
■
cpu_iowait—Displays input/output wait time as a percentage of CPU activity
■
cpu_usage—Displays the CPU usage as a percentage
■
disk_used—Displays the disk used in KB
■
disk_free—Displays the disk free in KB
■
mem_used—Displays the memory used in KB
■
mem_free—Displays the memory free in KB
■
swap_used—Displays the amount of swap in use
■
swap_free—Displays the amount of free swap
■
eth_in—Displays the current incoming data rate in KB if the interface is
defined and enabled
■
eth_out—Displays the current outgoing data rate in KB if the interface is
defined and enabled
■
disk_in—Displays the current rate of disk writes in KB
■
disk_out—Displays the current rate of disk reads in KB
tail
The tail command shows the last 50 lines of the named log file. This command
is part of the standard Linux command set, but has been modified in this
Administering the system
Administering appliances with the command line
implementation. When logged into the appliance, you can receive specific help
for this command by typing tail help.
The tail command has the following syntax:
tail <log_name>
where log_name can be any of the following:
■
messages
■
mailllog
■
boot.log
■
cron
■
dmesg
■
secure
■
named.run
■
stats.maillog
■
agent_log
■
conduit_log
■
filter-hub_log
■
BrightMailLog.log
traceroute
The traceroute command traces the network route to the given hostname or IP
address and is part of the operating system. All arguments are permitted. This
command is part of the standard Linux command set, but has been modified in
this implementation. When logged into the appliance, you can receive specific
help for this command by typing traceroute --help.
The traceroute command has the following syntax:
traceroute <hostname|ip address>
update
The update command:
■
Checks for new packages
■
Downloads new packages
■
Installs new packages
■
Lists available update package versions for download or installation
201
202 Administering the system
Administering appliances with the command line
Before using update to install a new version of appliance software, be sure to
familiarize yourself with the procedure described below for performing a
software update.
The update command has the following syntax:
update <option>
where option can be any of the following:
■
check—Compares installed and available packages to check if your
installation is current.
■
download—Fetches new packages for future installation.
■
install—Installs the most recent software version to your appliance.
■
list—Displays a list of installations available for your appliance.
Installing software updates
Use update install to download and install the most recent version of
software to the appliance. If you are running separate appliances for the Control
Center and Scanners, be sure to update every appliance before running updated
software.
Before updating the software, be certain your appliance is not performing tasks
that, if disrupted, could cause problems after resetting the system. Such tasks
include but are not necessarily limited to the following:
■
A running synchronization cycle
■
A Scanner replication cycle
To install software with the update command
1
Make a backup of your database information using the db-backup command.
For information on doing this, see “db-backup” on page 186. If you choose to
skip this step, the rollback command cannot restore your previous version
in some cases.
2
Use the update install command to install the new software.
Be sure to update all appliances if more than one is being used.
version
The version command displays the version of software being run by the
appliance.
The version command has the following syntax:
version
Administering the system
Administering appliances with the command line
watch
The watch command displays the last ten lines of the specified log file when
issued, and then displays any messages written to the log. Output is sent to the
screen for monitoring. When logged into the appliance, you can receive specific
help for this command by typing
watch --help.
The watch command has the following syntax:
watch <log_name>
where log_name can be any of the following:
■
messages
■
mailllog
■
boot.log
■
cron
■
dmesg
■
secure
■
named.run
■
stats.maillog
■
agent_log
■
conduit_log
■
filter-hub_log
■
BrightMailLog.log
203
204 Administering the system
Administering appliances with the command line
Chapter
8
Testing the system
This chapter includes the following topics:
■
Verifying normal delivery
■
Testing antivirus filtering
■
Verifying spam filtering to Quarantine
The following are sample tests by which you can verify that the Symantec Mail
Security 8200 Series appliance is filtering your email as intended. Use these
tests as models for additional tests that you can perform periodically.
Verifying normal delivery
You can verify whether the Windows SMTP Service, Sendmail, or your installed
MDA is working properly with the Scanner to deliver legitimate mail by sending
an email to a user.
To test delivery of legitimate mail
1
Send an email with the subject line Normal Delivery Test to a user.
2
Verify that the test message arrives correctly in the normal delivery location
on your local host.
Verifying spam filtering
This test assumes you are using default installation settings for spam message
handling.
To test spam filtering with subject line modification
1
Create a POP3 account on your MDA.
For the SMTP Server setting on this account, specify the IP address of a
Symantec Mail Security appliance with an enabled Scanner.
206 Testing the system
Testing antivirus filtering
2
Compose an email message addressed to an account on the machine running
the Scanner.
3
Give the message a subject that is easy to find such as Test Spam Message.
4
To classify the message as spam, include the following URL on a line by
itself in the message body:
http://www.example.com/url-1.blocked/
5
Send the message.
6
Check the email account to which you sent the message.
You should find a message with the same subject prefixed by the word
[Spam].
7
Send a message that is not spam to the same account used in step 5.
8
In the Control Center, click Status > Overview after several minutes have
passed.
The Spam counter on the Overview page increases by one if filtering is
working.
Testing antivirus filtering
You can verify that antivirus filtering is working correctly by sending a test
message containing a pseudo-virus. This is not a real virus.
To test the Antivirus Cleaner
1
Using your preferred email program, create an email message addressed to a
test account to which a policy is assigned to allow for the cleaning of virusinfected messages. For information on virus policies, see “Creating virus
policies” on page 57.
2
Attach a virus test file such as eicar.COM to the email.
Virus test files are located at
http://www.eicar.org/.
3
Send the message.
4
Send a message that does not contain a virus to the same account referenced
in step 1.
5
In the Control Center, click Status > Overview after several minutes pass.
Typically, this will be sufficient time for statistics to update on the Control
Center.
The Viruses counter on the Overview page increases by one if filtering is
working.
Testing the system
Verifying spam filtering to Quarantine
6
Check the mailbox for the test account to verify receipt of the cleaned
message with the text indicating cleaning has occurred.
Verifying spam filtering to Quarantine
If you’ve configured the Symantec Mail Security appliance to forward spam
messages to Quarantine as described below and your appliance is running with
an enabled Scanner, you should be able to see spam messages when you enter
the Control Center user interface from the Quarantine tab. There can be a slight
delay until the first spam message arrives, depending on the amount of spam
received at your organization.
If new spam messages arrive for a user while that user is viewing quarantined
messages, the new spam messages will be displayed after a page change. For
example, if you’re viewing an individual message and then return to the
message list, any new messages that have just arrived will be added at the end of
the message list and displayed when the last message list page is displayed.
The appliance must be configured to forward spam messages to Quarantine. If
the default configuration is not changed, the Symantec Mail Security appliance
inserts [Spam] in the subject line of spam messages and delivers them to users’
normal inbox rather than to Quarantine.
Any antispam message category can be configured via policy to forward
messages to Quarantine for groups assigned to that policy. You can choose to
have all, some or none of the available message types forwarded to Quarantine,
depending on the policies set for each.
Note: Quarantine only supports the ISO-Latin-1 character set. If messages are
processed into the Quarantine database in other character sets, any noncompliant characters may not be readable.
To set up delivery of messages to Quarantine, see “To deliver messages to
Quarantine” on page 100.
To verify sending a spam message to Quarantine
1
Using an email client such as Microsoft Outlook Express, open an email
addressed to an account that belongs to a group configured to filter spam to
Quarantine. See “To deliver messages to Quarantine” on page 100 for stepby-step instructions on creating such a configuration policy for a group.
2
Give the message a subject that is easy to find such as Test Spam Message.
3
To classify the message as spam, include one or more of the following URLs
on a line by itself:
207
208 Testing the system
Verifying spam filtering to Quarantine
http://www.example.com/url-1.blocked/
4
Send the message.
5
Send a message to the same account that is not spam and that does not
contain any viruses.
6
In the Control Center, click the Quarantine tab and click Search.
7
Search under Subject for a message with the subject Test Spam Message.
Appendix
A
Plug-ins and Foldering
This appendix includes the following topics:
■
About Plug-ins and foldering
■
Installing the Symantec Outlook Spam Plug-in
■
Configuring Automatic Spam Foldering
■
Enabling Automatic Spam Foldering
About Plug-ins and foldering
This chapter tells you how to install and configure the Symantec Outlook Spam
Plug-in and spam foldering agents for Microsoft Exchange and Lotus Domino
users. This is an alternative to the personal allowed and blocked senders lists
and language preferences offered on the Symantec Mail Security 8200 Series
appliance. For a comparison of the native language processing offered by the
Symantec Mail Security 8200 Series, and the Symantec Outlook Spam Plug-in,
see “Choosing language identification type” on page 88.
Note: The Symantec Outlook Spam Plug-in and foldering software described in
this chapter is available on the Symantec support site.
Installing the Symantec Outlook Spam Plug-in
The Symantec Outlook Spam Plug-in makes it easy for Outlook users to submit
missed spam and false positives to Symantec. Depending on how you configure
the plug-in, user submissions can also be automatically sent to a local system
administrator. The Symantec Outlook Spam Plug-in also gives users the option
to administer their own Blocked Senders and Allowed Senders Lists as well as
specify languages in which they do or do not wish to receive email.
210 Plug-ins and Foldering
Installing the Symantec Outlook Spam Plug-in
Usage Scenarios
You can use Symantec Outlook Spam Plug-in with the following other
components:
■
Symantec Spam Folder Agent for Exchange
■
Quarantine
■
Both Symantec Spam Folder Agent for Exchange and Quarantine
■
Neither Symantec Spam Folder Agent for Exchange nor Quarantine
End User Experience
Note: Documentation for end users is provided in the Symantec Outlook Spam
Plug-in help system.
After performing a simple installation process, users will have a new toolbar in
their Outlook window:
This is Spam
Users click this button to submit the message to Symantec
Security Response and move it from their Inbox to their
Spam folder
Plug-ins and Foldering
Installing the Symantec Outlook Spam Plug-in
This is Not Spam
Users click this button to submit the message to Symantec
and move it from their Spam folder to their Inbox.
Empty Spam Folder
Users click this button to empty their Spam folder (if
configured)
Spam Quarantine
Users click this button to launch Quarantine in their default
Web browser (if configured).
Symantec
By choosing an item from this pull-down menu, users can get
information on using the plug-in, view a report (if
configured), and administer their personal Blocked Senders
and Allowed Senders Lists
The Symantec menu includes the following options:
Symantec Help
Launch a help page for the Symantec Outlook
Spam Plug-in using your default Web browser.
Spam Report
View spam statistics (if configured).
Options
Set plug-in properties and administer your private
Blocked Senders and Allowed Senders Lists,
specify languages in which you do or do not wish
to receive email.
About Symantec
Get information on the current version of the
software.
Software Requirements
The Symantec Outlook Spam Plug-in can be used with Outlook 2000, Outlook
2002, Outlook XP, and Outlook 2003, on Windows 98, Windows ME, Windows
NT, Windows 2000, Windows XP, and Windows 2003.
Note: If you are using Symantec Spam Folder Agent for Exchange, the plug-in
retrieves the name of the spam folder from the Symantec Spam Folder Agent for
Exchange Inbox Rule. Absent the Symantec Spam Folder Agent for Exchange,
the plug-in retrieves the SPAM_FOLDER value from the Windows registry. If
there is no SPAM_FOLDER value in the Windows registry, it creates a Spam
folder during installation.
Administrator Setup Instructions
Follow these procedures to enable your users to install the Symantec Outlook
Spam Plug-in.
211
212 Plug-ins and Foldering
Installing the Symantec Outlook Spam Plug-in
To set up the Symantec Outlook Spam Plug-in
1
Navigate to the folder containing the Symantec Outlook Spam Plug-in
software.
2
Copy all the files in the Plugin\Outlook folder to a network directory that is
accessible to your users.
3
If desired, modify the setup.ini file to configure system-wide settings. See
the optional settings in See Table A-1, “Symantec Outlook Spam Plug-in
setup variables,” on page 213.
4
Either email your users a link to the setup.exe file in this directory, or use
remote distribution software to install it on your users’ computers.
You can install silently by running setup.exe with the following switches: /s /
v"/qn"
Note: If you run setup.exe with the command /s /v"/qn", the silent install
option ignores changes made to setup.ini. To preserve your changes, add /qn to
the end of the CmdLine attribute in setup.ini, and then run the silent install
using: /s.
Note: Instruct users to close Outlook before running the installer by clicking
File, and then clicking Exit. If they close Outlook in any other way, Outlook may
continue to run in memory and return an error.
To configure system-wide settings for the Symantec Outlook Spam Plug-in
(optional)
1
Open the setup.ini file for editing.
This file contains the initial settings for launching the Symantec Outlook
Spam Plug-in installation package. All the settings you need to use can be
set on the CmdLine attribute in the [Startup] section at the beginning of the
setup.ini file. The settings will be added as values for the following Windows
Registry key: HKLM\Software\Brightmail\OutlookPlugin
2
Change the settings in Table A-1 as desired.
Example:
CmdLine=SPAM_FOLDER="Junk"
ADMIN_FALSE_ADDRESS="[email protected]"
3
Save your changes to the setup.ini file.
Plug-ins and Foldering
Installing the Symantec Outlook Spam Plug-in
These settings will be used during each installation of the Symantec
Outlook Spam Plug-in to modify the Windows Registry on each user’s
computer.
Table A-1
Symantec Outlook Spam Plug-in setup variables
Variable Name
Description
ADMIN_FALSE_ADDRESS
The email address of the administrator to copy with
false positive submissions. The default for this is an
empty string. If this value is empty, then the
message will not be sent to the administrator.
ADMIN_JUNK_ADDRESS
The email address of the administrator to copy with
missed spam submissions. The default for this is an
empty string. If this value is empty, then the
message will not be sent to the administrator.
ALLOWED_CONTACTS
If set to 1 (the default) or any non-zero value, treat
all entries of the Outlook Contacts folder as
members of the Allowed Senders List. If set to 0, do
not treat any members of the Outlook Contacts
folder as members of the Allowed Senders List.
AUTO_ADD_BLOCKED
When submitting a spam message to Symantec
Security Response, add the sender of the message to
the Blocked Senders List. The default is 1.
AUTO_ADD_ALLOWED
If set to 1 (the default) or any non-zero value,
automatically generate the Allowed Senders list. If
set to 0, do not automatically generate the Allowed
Senders list
AUTO_ALLOWED
If set to 1 (the default) or any non-zero value,
automatically generate the Allowed Senders List. If
set to 0, do not automatically generate the Allowed
Senders List.
CHECK_ALLOWED
If set to 1 (the default) or any non-zero value, move
messages directly to the Spam folder. If a message
sender is in the user’s Allowed Senders List or
(optionally) Outlook Contacts list, or if ANY of the
message’s recipients are in the user’s Allowed
Recipients List, the message is moved to the Inbox.
Otherwise it stays in the Spam folder. If set to 0,
messages are delivered normally (to the Inbox).
213
214 Plug-ins and Foldering
Installing the Symantec Outlook Spam Plug-in
Table A-1
Symantec Outlook Spam Plug-in setup variables (Continued)
Variable Name
Description
CHECK_BLOCKED
If set to 1 (the default) or any non-zero value, move
messages directly to the Spam folder. If a message
sender is in the user’s Allowed Senders List or
(optionally) Outlook Contacts list, or if ANY of the
message’s recipients are in the user’s Allowed
Recipients List, the message is moved to the Inbox.
Otherwise it stays in the Spam folder. If set to 0,
messages are delivered normally (to the Inbox).
DELETE_SPAM
If set to 1 or any non-zero value, spam messages will
be deleted. If set to 0 (the default value), spam
messages will be moved to the Spam folder.
DELETE_X_DAYS
Deletes messages in the Spam folder which are more
than x days old. The default is 7. Set this value to 0
to disable this feature.
DISPLAY_ARE_YOU_SURE_MSGS Specifies whether the confirmation dialog is
displayed after a message is submitted.
If this variable is set to 1 (the default value) the
confirmation message will be displayed. If this
variable set to any other value or left empty, the
message will not be displayed.
DISPLAY_CONFIRMATION_MSG
Specifies whether the confirmation dialog is
displayed after a message is submitted. If this
variable is set to 1 (the default value) the
confirmation message will be displayed. If this
variable set to any other value or left empty, the
message will not be displayed.
EMPTY_SPAM_FOLDER
If set to 0 (the default), do not display the Empty
Spam button. If set to 1 or any non-zero value,
display the Empty Spam button. This button allows
users to delete the contents of their Spam folders.
HIDE_NOT_SPAM
Specifies whether the This is Not Spam button is
hidden. The default is 0 (displayed). Any non-zero
value, including an empty value, will cause the
button to be hidden.
HIDE_SPAM
Specifies whether the This is Spam button is hidden.
The default is 0 (displayed). Any non-zero value,
including an empty value, will cause the button to be
hidden.
Plug-ins and Foldering
Installing the Symantec Outlook Spam Plug-in
Table A-1
Symantec Outlook Spam Plug-in setup variables (Continued)
Variable Name
Description
MANUAL_ALLOWED
If set to 1 (the default) or any non-zero value, allow
users to add entries to the Allowed Senders and
Allowed Recipients Lists. If set to 0, do not allow
users to add entries.
MANUAL_BLOCKED
If set to 1 (the default) or any non-zero value, allow
users to add entries to the Allowed Senders and
Allowed Recipients Lists. If set to 0, do not allow
users to add entries.
MARK_AS_READ
If set to 1 (the default) or any non-zero value,
messages are marked as Read when moved to the
Spam folder. If set to 0, messages are not marked as
Read when moved to the Spam folder.
MODIFY_OPTIONS
If set to 1 (the default) or any non-zero value, allow
users to view/edit the Submissions and Preferences
tabs. If set to 0, do not allow users to view/edit the
Submissions and Preferences tabs.
MULTI_CONFIRM_MSG
The confirmation message for multiple successful
submissions. The default value for this string is:
“Thank you for submitting messages to Symantec
for review. We appreciate your help in improving our
antispam service. This will be your only
acknowledgement.”
SENDER_NOT_IN_ALLOWED
Specify the action to take if the message sender is
not in the Allowed Senders List.
Normal – Move the message to the Inbox.
Delete – Delete the message.
SpamFolder – Move the message to the Spam folder.
The default is Normal.
SINGLE_CONFIRM_MSG
The confirmation message for a single successful
submission. The default value for this string is:
“Thank you for submitting a message to Symantec
for review. We appreciate your help in improving our
antispam service. This will be your only
acknowledgement.”
SPAM_FOLDER
The name of the Spam folder. The default is “Spam.”
215
216 Plug-ins and Foldering
Configuring Automatic Spam Foldering
Table A-1
Symantec Outlook Spam Plug-in setup variables (Continued)
Variable Name
Description
SPAM_QUARANTINE_URL
If specified, this setting causes the Spam Quarantine
button to appear in the toolbar. Clicking the button
displays the Spam Quarantine login page in a Web
browser. If unspecified (the default), the Spam
Quarantine button does not appear in the toolbar.
REPORT_URL
If specified, this setting causes the Spam Report
button to appear in the toolbar. Clicking the button
displays the Spam Report application. If unspecified
(the default), the Spam Report button does not
appear in the toolbar.
Configuring Automatic Spam Foldering
You can route users’ spam into a special email folder so they can review it using
the Symantec Spam Folder Agent for Exchange or the Symantec Spam Folder
Agent for Domino. To enable spam foldering after configuring it, see “Enabling
Automatic Spam Foldering” on page 220.
Configuring the Symantec Spam Folder Agent for Exchange
Follow these steps to configure the Symantec Spam Folder Agent for Exchange.
Note: Symantec Mail Security 8200 Series does not support native spam
foldering for Exchange 2003. As an alternative, you can deploy the Symantec
Spam Folder Agent for Exchange on Exchange 2003 systems.
To install the Symantec Spam Folder Agent for Exchange
1
Navigate to the folder containing the setup.exe file and double-click it.
2
Click Next to skip the introductory dialog box.
3
After reading the license agreement, click I accept the terms of this license
agreement, and then click Next.
4
Choose a setup type, and then click Next.
Setup options include Complete and Custom. The Complete option installs
all software in a predefined set of folders and files. The Custom option
allows you to tailor installation options.
Plug-ins and Foldering
Configuring Automatic Spam Foldering
5
Under Service Account, specify an account to be used by the Symantec Spam
Folder Agent for Exchange.
Type the Active Directory or NT Domain, as well as the user name and
password.
6
In the Mailbox field, specify the mailbox alias of a valid mailbox for the
Symantec Spam Folder Agent for Exchange to use.
To find this alias, click Active Directory Users and Computers, right-click
User properties, and then click the General tab. The account specified in the
last step must have Full Access to this mailbox.
7
In the Spam folder name field, specify the name of the folder in each end
user’s mailbox where spam will be foldered,
8
In the Spam expiration field, specify the period in days for which you want
to retain spam messages. The default period is 30 days.
You may need to adjust this setting based on the volume of spam you receive
at your organization.
9
Click Next.
Maintenance occurs once daily; the flag is activated by the main thread
when the current hour (local time) is between the maintenance window
begin hour and end hour. When all worker threads have completed, the
maintenance flag will be marked as completed. When the time has passed
the maintenance end hour, the maintenance flag is reset. If the Symantec
Spam Folder Agent for Exchange is restarted during the maintenance
window, it will rerun maintenance immediately.
10 Click OK.
Note: If the installation process is unable to verify the existence of the spam
folder because you have insufficient user rights, a Warning dialog is
displayed. You can either continue without verification, or return to the
Configuration dialog box and halt installation.
11 Click Install to begin the installation process.
12 Click Finish.
The Installer configures the Symantec Spam Folder Agent for Exchange as a
Windows service that will run automatically. For information on how to
change this default configuration, see “Enabling Automatic Spam
Foldering” on page 220.
217
218 Plug-ins and Foldering
Configuring Automatic Spam Foldering
Configuring the Symantec Spam Folder Agent for Domino
To enable automatic foldering of spam for your Lotus Domino users, install the
Symantec Spam Folder Agent for Domino on each Lotus Domino mail server.
Before you install, ensure that your computer meets the following software and
configuration requirements:
■
Windows NT 4.0 (SP 3), Windows 2000 (SP 2), or Windows 2003.
■
Lotus Notes Release 5.0.10 or later.
To install the Symantec Spam Folder Agent for Domino
1
Navigate to the folder containing the setup.exe file and double-click it.
2
Click Domino Agent.
3
Follow the displayed instructions to start Lotus Notes and open the
Symantec Spam Folder Agent for Domino database.
The Domino Agent Installation Wizard panel is displayed.
4
Select the Install Domino Agent radio button, and then click Next.
The License Agreement panel is displayed.
5
After reading the license agreement, click I accept the terms of the license
agreement, and then click Next.
The Preparing to Install panel is displayed.
6
Complete all prerequisite steps if you haven’t already done so.
Warning: On each server in your environment running Lotus Notes Release
5, you must add the following variable to the Notes.INI file:
Amgr_DisableMailLookup=1
Notes.INI is usually found in the server’s root Notes folder.
You should then restart each server running Release 5. (This setting is not
required for servers running Release 6.) For more information, search for
document #1099178 on the Lotus support page:
http://www-3.ibm.com/software/lotus/support/
7
Click Next.
The Selecting Options panel is displayed.
8
Select the option(s) you wish to configure and click Next.
The Configuring Spam Folder Information panel is displayed.
Note: This screen appears only if you chose to configure spam foldering.
Plug-ins and Foldering
Configuring Automatic Spam Foldering
9
Under Spam Folder, specify the name of the folder in each end user’s
mailbox where spam will be sidelined, and then click Next.
The default is Spam.
10 Specify a spam expiration between 1 and 365 days.
Messages will be automatically deleted from the Spam folder after the
specified number of days. The default is 30 days.
11 Click Next.
The Configuring Submissions panel is displayed.
Note: This panel appears only if you chose to configure missed spam and false
positive submissions.
12 Under Submission Types, select Missed Spam, False Positives, or both.
13 Under Local Administrator Email for Submissions, either select an email
address from the drop down list adjacent the submission type(s) you wish to
configure or type the address.
14 Click Next.
The Configuring Server Information panel is displayed.
15 Specify a mail server.
If your mail template files are replicas (as they are when shipped), you need
only install the Symantec Spam Folder Agent for Domino on one server.
16 Specify a mail template filename.
You must repeat this process for each mail template used at your site.
17 Click Install.
The Installation Completed panel is displayed.
18 Click Finish.
The mail server on which you install the Symantec Spam Folder Agent for
Domino distributes changes to all other mail servers in your environment as
part of the Design task, which runs overnight.
The Symantec Spam Folder Agent for Domino will not be visible on each user’s
mail file until the following conditions occur:
■
Replication distributes the change to the template on the user’s home mail
server.
■
The nightly Design process runs on the user’s home mail server.
■
The user reopens his or her mail file after installation.
219
220 Plug-ins and Foldering
Enabling Automatic Spam Foldering
This only applies if the user’s mail file was open when its design was
refreshed. The Symantec Spam Folder Agent for Domino will take effect
when the design is refreshed, though the folder will not be visible.
See the Lotus Notes online help for information on forcing changes
immediately.
Note: To reconfigure the Symantec Spam Folder Agent for Domino, you must
first uninstall it, then reinstall it.
Distributing End-User Help
The Symantec Spam Folder Agent for Domino installer includes an MS Word file
(BMIEndUser.doc) detailing the submission process.
You can distribute this information to your users in the following two ways:
■
Import BMIEndUser.doc or email it as an attachment to all end users.
■
Add the information in BMIEndUser.doc to the Help Using document of the
mail template so that users have it available at all times.
To uninstall the Symantec Spam Folder Agent for Domino
1
Click Domino Agent in the Installer screen.
The Installation Wizard is displayed.
2
Click Uninstall Domino Agent, and then click Next.
The Uninstall panel is displayed.
3
Click Uninstall.
If your mail template files are replicas (as they are when shipped), you need
only uninstall once.
The Successfully Uninstalled panel is displayed.
4
Click Finish.
Enabling Automatic Spam Foldering
Follow these steps to enable automatic spam foldering for Exchange 5.5,
Exchange 2000, Exchange 2003, or Lotus Domino.
To deliver spam messages to users’ spam folders
1
In the Control Center, click the Policies tab.
2
In the left pane, click Filter Policies > Spam.
Plug-ins and Foldering
Enabling Language Identification
3
Click Add.
4
Under Policy Name, type Folder or a descriptive name of your choice.
5
Under Apply to, click Inbound messages.
6
Under Groups, check the box next to the groups that should have their spam
foldered.
7
Under Conditions, choose If a message is spam or suspected spam.
8
Under Perform the following action, click Deliver the message to the
recipient’s spam folder.
9
Click Add Action.
10 Click Save.
For more information about Group Policies, “Creating groups and adding
members” on page 48.
Enabling Language Identification
Symantec Mail Security 8200 Series must be configured to work with the clientside language processing offered by the Symantec Outlook Spam Plug-in.
See “Choosing language identification type” on page 88.
221
222 Plug-ins and Foldering
Enabling Language Identification
Glossary
administrator
1. A person who oversees the operation of a network. 2. A person who is responsible for
installing programs on a network and configuring them for distribution to workstations.
The administrator may also update security settings on workstations.
Agent
A component of Symantec Mail Security 8200 Series appliances that facilitates
communicating configuration information between the Control Center and each Scanner.
Allowed Senders List
In Symantec Mail Security 8200 Series appliances, a list of senders whose messages are
omitted from most types of filtering (but not from antivirus filtering).
annotation
A phrase or paragraph placed at the beginning or end of the body of an email message.
Symantec Mail Security 8200 Series appliances allow you to specify up to 1000 distinct
annotations to use in specific categories of messages for specific groups of recipients. You
can use this feature to automate email disclaimers.
antivirus
A subcategory of a security policy that pertains to computer viruses.
API (application
The specific methodology by which a programmer writing an application program can
programming interface) make requests of the operating system or another application.
archive
An action that can be performed on email messages by Symantec Mail Security 8200
Series appliances, which consists of forwarding the messages to specific SMTP address.
authentication
The process of determining the identity of a user attempting to access a network.
Authentication occurs through challenge/response, time-based code sequences, or other
techniques. Authentication typically involves the use of a password, certificate, PIN, or
other information that can be used to validate identity over a computer network.
bandwidth
The amount of data transmitted or received per unit time. In digital systems, bandwidth is
proportional to the data speed in bits per second (bps). Thus, a modem that works at
57,600 bps has twice the bandwidth of a modem that works at 28,800 bps.
Blocked sender
On Symantec Mail Security 8200 Series appliances, a sender identified as blocked, either
by email address or originating IP address, on a Blocked Senders List, or on a third party
blocked senders list. You can configure how messages from blocked senders are handled.
Blocked Senders List
A list used by Symantec Mail Security 8200 Series appliances in filtering email. Email
from senders on a Blocked Senders List is processed according to your configuration
choices.
224 Glossary
bounce
An action that can be performed on an email message by an email server, which consists
of returning the message to its From: address with a custom response. Symantec Mail
Security 8200 Series appliances also deliver the message, when possible, to its intended
recipient.
broadcast address
A common address that is used to direct (broadcast) a message to all systems on a network.
The broadcast address is based upon the network address and the subnet mask.
CA (Certificate
Authority)
A trusted third-party organization or company that issues digital certificates that are used
to create digital signatures and public-private key pairs. The role of the CA in this process
is to guarantee that the entity granting the unique certificate is, in fact, who it claims to
be. This means that the CA usually has an arrangement with the requesting entity to
confirm a claimed identity. CAs are a critical component in data security and electronic
commerce because they guarantee that the two parties exchanging information are really
who they claim to be.
certificate
A file that is used by cryptographic systems as proof of identity. It contains a user's name
and public key.
Certificate Authoritysigned SSL
A type of Secure Sockets Layer (SSL) that provides authentication and data encryption
through a certificate that is digitally signed by a Certificate Authority.
CIDR
Classless Inter-Domain Routing is a way of specifying a range of addresses using an
arbitrary number of bits. For instance, a CIDR specification of 206.13.1.48/25 would
include any address in which the first 25 bits of the address matched the first 25 bits of
206.13.1.48.
clean
An action that consists of deleting unrepairable virus infections and repairing repairable
virus infections.
Conduit
A component of a Symantec Mail Security 8200 Series appliance that retrieves new and
updated filters from Symantec Security Response through secure HTTPS file transfer.
Once retrieved, the Conduit authenticates filters, and then alerts the Filter Hub that new
filters are to be received and implemented. Finally, the Conduit manages statistics for use
by Symantec Security Response and for generating reports. The Conduit resides on each
Scanner appliance.
Content Compliance
A set of features in Symantec Mail Security 8200 Series appliances that enable
administrators to enforce corporate email policies, reduce legal liability, and ensure
compliance with regulatory requirements. These features include annotations,
streamlined filter creation using multiple criteria and multiple actions, flexible sender
specification, dictionary filters, and attachment management.
Control Center
A Web-based configuration and administration center for Symantec Mail Security 8200
Series appliances. Each site has one Control Center. The Control Center also houses
Quarantine and supporting software. You can configure and monitor all of your Scanners
from the Control Center.
defer
An action that an MTA receiving an email message can take, which consists of using a 4xx
SMTP response code to tell the sending MTA to try again later.
Glossary
dialog box
A secondary window containing command buttons and options available to users for
carrying out a particular command or task.
dictionary
A list of words and phrases against which email messages can be checked for noncompliant content. Symantec Mail Security 8200 Series appliances allow you to create
Content Compliance filters that screen email against a specific dictionary. You can use the
provided dictionaries, add terms to the provided dictionaries, or add additional
dictionaries.
directory harvest attack A high volume email campaign addressed to dictionary-generated recipient addresses on a
specific domain. Directory harvest attacks (DHAs) not only consume resources on the
targeted email server, they also provide the spammers with a valuable list of valid email
addresses (targets for future spam campaigns). Symantec Mail Security 8200 Series
appliances allow you to identify and defuse directory harvest attacks.
DMZ (de-militarized
zone)
A network added between a protected network and an external network to provide an
additional layer of security. Sometimes called a perimeter network.
DNS (Domain Name
Server) proxy
An intermediary between a workstation user and the Internet that allows the enterprise to
ensure security and administrative control.
DNS (Domain Name
System)
A hierarchical system of host naming that groups TCP/IP hosts into categories. For
example, in the Internet naming scheme, names with .com extensions identify hosts in
commercial businesses.
DNS server
A repository of addressing information for specific Internet hosts. Name servers use the
Domain Name System (DNS) to map IP addresses to Internet hosts.
domain
1. A group of computers or devices that share a common directory database and are
administered as a unit. On the Internet, domains organize network addresses into
hierarchical subsets. For example, the .com domain identifies host systems that are used
for commercial business. 2. A group of computers sharing the network portion of their
host names, for example, raptor.com or miscrosoft.com. Domains are registered within the
Internet community. Registered domain entities end with an extension such as .com, .edu,
or .gov or a country code such as .jp (Japan).
downstream
At a later point in the flow of email. A downstream email server is an email server that
receives messages at a later point in time than other servers. In a multiple-server system,
inbound mail travels a path from upstream mail servers to downstream mail servers.
Downstream can also refer to other types of networking paths or technologies.
Email Firewall
A set of features of Symantec Mail Security 8200 Series appliances that provide perimeter
defense, similar to a regular firewall, focused on email traffic. The Email Firewall analyzes
incoming SMTP connections and enables preemptive responses and actions before
messages progress further in the filtering process. The Email Firewall provides attack
preemption for spam, virus, and directory harvest attacks, sender blocks based on IP
address, domain, third party lists, or Symantec lists, and authentication using the Sender
Policy Framework (SPF).
email server
An application that controls the distribution and storage of email messages.
225
226 Glossary
Ethernet
A local area network (LAN) protocol developed by Xerox Corporation in cooperation with
DEC and Intel in 1976. Ethernet uses a bus or star topology and supports data transfer
rates of 100 Mbps.
Expunger
A component of Quarantine, which resides on the Control Center on Symantec Mail
Security 8200 Series appliances. Expunger can be configured to periodically remove older
or unwanted messages from the Quarantine database.
extension
A suffix consisting of a period followed by several letters at the end of a file that, by
convention, indicates the type of the file.
false positive
A piece of legitimate email that is mistaken for spam and classified as spam by Symantec
Mail Security 8200 Series.
filter
A method for analyzing email messages, used to determine what action to take on each
message. Symantec Mail Security 8200 Series uses a variety of types of filters to process
messages. A filter can be provided by Symantec, created by a local administrator, created
by an end user, or provided by a third party.
Filtering Engine
A component of a Symantec Mail Security 8200 Series Scanner appliance that performs
message filtering.
Filtering Hub
A component of a Symantec Mail Security 8200 Series Scanner appliance that manages
message filtering processes.
filter policy
On Symantec Mail Security 8200 Series appliances, a set of actions that apply to a
category of messages. The actions specified in a filter policy are only applied to users who
are members of a group policy that includes the filter policy. There are three types of filter
policies: spam, virus, and content compliance policies. See also group policy.
firewall
A program that protects the resources of one network from users from other networks.
Typically, an enterprise with an intranet that allows its workers access to the wider
Internet will want a firewall to prevent outsiders from accessing its own private data
resources. See also Email Firewall.
FTP (File Transfer
Protocol)
The simplest way to exchange files between computers on the Internet. Like the Hypertext
Transfer Protocol (HTTP), which transfers displayable Web pages and related files, and the
Simple Mail Transfer Protocol (SMTP), which transfers email, FTP is an application
protocol that uses the Internet's TCP/IP protocols.
gateway
A network point that acts as an entrance to another network. A gateway can also be any
computer or service that passes packets from one network to another network during
their trip across the Internet.
group policy
On Symantec Mail Security 8200 Series appliances, a set of filter policies that apply to a
specified group of users. Users can be specified by email address or domain. See also filter
policy.
heuristic
Filters that pro-actively target patterns common in spam and viruses.
Glossary
host
1. In a network environment, a computer that provides data and services to other
computers. Services might include peripheral devices, such as printers, data storage,
email, or World Wide Web access. 2. In a remote control environment, a computer to which
remote users connect to access or exchange data.
HTML (Hypertext
Markup Language)
A standard set of commands used to structure documents and format text so that it can be
used on the Web.
HTTP (Hypertext
Transfer Protocol)
The set of rules for exchanging files (text, graphic images, sound, video, and other
multimedia files) on the World Wide Web. Similar to the TCP/IP suite of protocols (the
basis for information exchange on the Internet), HTTP is an application protocol.
HTTPS (Hypertext
Transfer Protocol
Secure)
A variation of HTTP that is enhanced by a security mechanism, which is usually Secure
Sockets Layer (SSL).
IP (Internet Protocol)
The method or protocol by which data is sent from one computer to another on the
Internet. Each computer (known as a host) on the Internet has at least one address that
uniquely identifies it to all other computers on the Internet.
IP address
A unique number that identifies a workstation on a TCP/IP network and specifies routing
information. Each workstation on a network must be assigned a unique IP address, which
consists of the network ID, plus a unique host ID assigned by the network administrator.
This address is usually represented in dot-decimal notation, with the decimal values
separated by a period (for example 123.45.6.24).
language identification On Symantec Mail Security 8200 Series appliances, a feature that allows you to block or
allow messages written in a specified language. For example, you can choose to only allow
English and Spanish messages, or block messages in English and Spanish and allow
messages in all other languages. Administrators can set language identification for groups
of users, or allow users to specify their own settings. See also Symantec Outlook Spam
Plug-in.
LDAP (Lightweight
Directory Access
Protocol)
A software protocol that enables anyone to locate organizations, individuals, and other
resources such as files and devices in a network, whether on the Internet or on a corporate
intranet. LDAP is a lightweight (smaller amount of code) version of Directory Access
Protocol (DAP), which is part of X.500, a standard for directory services in a network.
LDIF (LDAP Data
Interchange Format)
An Internet Engineering Task Force (IETF) standard format for representing directory
information in a flat file, specified in RFC 2849.
list box
A dialog box containing a list of items from which a user can choose.
mailing list
An automatic email system that allows members to carry on a discussion on a particular
topic. Subscribers to the mailing list automatically receive email messages that are posted
to the list. Mailing lists are commonly used for subscribers to post questions, answers, and
opinions based on the topic to which the list is devoted.
messaging gateway
The outermost point in a network where mail servers are located. All other mail servers
are downstream from the mail servers located at the messaging gateway.
227
228 Glossary
MIME (Multipurpose
Internet Mail
Extensions)
A protocol used for transmitting documents with different formats via the Internet.
MTA (Mail Transfer
Agent)
A generic term for programs such as Sendmail, postfix, or qmail that send and receive
mail between servers. Each Symantec Mail Security 8200 Series appliance deployed as a
Scanner uses the following three separate MTAs:
■
Delivery MTA: The component that sends inbound and outbound messages that have
already been filtered to their required destinations. To do this, the delivery MTA uses
the filtering results and the configuration settings for relaying inbound and
outbound mail.
■
Inbound MTA: The component that receives inbound mail and forwards it to the
Filtering Hub for processing.
■
Outbound MTA: The component that receives outbound mail and forwards it to the
Filtering Hub for processing.
name server
A computer running a program that converts domain names into appropriate IP addresses
and vice versa. See also DNS server.
network
A group of computers and associated devices that are connected by communications
facilities (both hardware and software) for the purpose of sharing information and
peripheral devices such as printers and modems. See also LAN (local area network).
notification
1. On Symantec Mail Security 8200 Series appliances, a separate email that can be
automatically sent to the sender, recipients, or other email addresses when a specified
condition is met. For example, if you have a policy that strips .exe attachments from
incoming messages, you may want to also notify the sender that the attachment has been
stripped. 2. On Symantec Mail Security 8200 Series appliances, a periodic email summary
sent by Quarantine to users, listing the newly quarantined spam messages, and including
links for users to immediately release messages to their inbox or to log in to their personal
quarantines. See also Notifier.
Notifier
A component of Quarantine, which resides on the Control Center on Symantec Mail
Security 8200 Series appliances. Notifier sends periodic email messages to users,
providing a digest of their spam. The Notifier message (notification) is customizable; it can
contain a list of the subject lines and senders of all spam messages.
Open Proxy Senders
A dynamic list of IP addresses of identity-masking relays, including proxy servers with
open or insecure ports, provided by Symantec based on data from the Probe Network.
Because open proxy servers allow spammers to conceal their identities and off-load the
cost of emailing to other parties, spammers will continually misuse a vulnerable server
until it is brought offline or secured. Part of the Sender Reputation Service, Open Proxy
Senders is a sender group within Symantec Mail Security 8200 Series appliances. You can
specify actions to take on messages from each sender group.
Glossary
packet
A unit of data that is formed when a protocol breaks down messages that are sent along
the Internet or other networks. Messages are broken down into standard-sized packets to
avoid overloading lines of transmission with large chunks of data. Each of these packets is
separately numbered and includes the Internet address of the destination. Upon arrival at
the recipient computer, the protocol recombines the packets into the original message.
parameter
A value that is assigned to a variable. In communications, a parameter is a means of
customizing program (software) and hardware operation.
password
A unique string of characters that a user types as an identification code to restrict access
to computers and sensitive files. The system compares the code against a stored list of
authorized passwords and users. If the code is legitimate, the system allows access at the
security level approved for the owner of the password.
ping (Packet Internet
Groper)
A program that system administrators and hackers or crackers use to determine whether a
specific computer is currently online and accessible. Pinging works by sending a packet to
the specified IP address and waiting for a reply; if a reply is received, the computer is
deemed to be online and accessible.
policy
A set of message filtering instructions that Symantec Mail Security 8200 Series
appliances implement on a message or set of messages. See also filter policy, group policy.
POP3 (Post Office
Protocol 3)
An email protocol used to retrieve email from a remote server over an Internet connection.
port
1. A hardware location used for passing data into and out of a computing device. Personal
computers have various types of ports, including internal ports for connecting disk drives,
monitors, and keyboards, and external ports, for connecting modems, printers, mouse
devices, and other peripheral devices. 2. In TCP/IP and UDP networks, the name given to
an endpoint of a logical connection. Port numbers identify types of ports. For example,
both TCP and UDP use port 80 for transporting HTTP data.
probe accounts
Email addresses assigned to Symantec by our Probe Network Partners, and used by
Symantec Security Response to detect spam.
Probe Network
A network of email accounts provided by Symantec’s Probe Network Partners. Used by
Symantec Security Response for the detection of spam, the Probe Network has a statistical
reach of over 300 million email addresses, and includes over 2 million probe accounts.
Probe Network Partners ISPs or corporations that participate in the Probe Network.
protocol
A set of rules for encoding and decoding data so that messages can be exchanged between
computers and so that each computer can fully understand the meaning of the messages.
On the Internet, the exchange of information between different computers is made
possible by the suite of protocols known as TCP/IP. Protocols can be stacked, meaning that
one transmission can use two or more protocols. For example, an FTP session uses the FTP
protocol to transfer files, the TCP protocol to manage connections, and the IP protocol to
deliver data.
229
230 Glossary
proxy
An application (or agent) that runs on the security gateway and acts as both a server and
client, accepting connections from a client and making requests on behalf of the client to
the destination server. There are many types of proxies, each used for specific purposes.
See also gateway, proxy server.
proxy server
A server that acts on behalf of one or more other servers, usually for screening, firewall, or
caching purposes, or a combination of these purposes. Also called a gateway. Typically, a
proxy server is used within a company or enterprise to gather all Internet requests,
forward them out to Internet servers, and then receive the responses and in turn forward
them to the original requester within the company.
Quarantine
A database that stores email messages separately from the normal message flow, and
allows access to those messages. On Symantec Mail Security 8200 Series appliances,
Quarantine is located on the Control Center appliance, and provides users with Web access
to their spam messages. Users can browse, search, and delete their spam messages and
can also redeliver misidentified messages to their inbox. An administrator account
provides access to all quarantined messages. Quarantine can also be configured for
administrator-only access.
radio button
A click button used to select one of several options.
reject
An action that an MTA receiving an email message can take, which consists of using a 5xx
SMTP response code to tell the sending MTA that the message is not accepted.
release
On Symantec Mail Security 8200 Series appliances, an action that end users or
administrators can take on messages in the Quarantine database. Releasing removes the
message from the Quarantine database and returns the message to the end user’s inbox.
See also Quarantine.
replication
On Symantec Mail Security 8200 Series appliances, the process of duplicating
configuration data from the Control Center to Scanners.
report
A formatted query that is generated from a database. Administrators can modify reports
to create custom reports of specific event data.
reporting
The output generated by products and services that illustrates the information
(sometimes the data) that is collected. This output can be in static or customized formats,
text-based or text with graphical charts. See also report.
router
A device that helps local area networks (LANs) and wide area networks (WANs) achieve
interoperability and connectivity.
Safe Senders
A list of IP addresses from which no outgoing email is spam, provided by Symantec based
on data from the Probe Network. Part of the Sender Reputation Service, Safe Senders is a
sender group within Symantec Mail Security 8200 Series appliances. You can specify
actions to take on messages from each sender group.
Scanner
The component in a Symantec Mail Security 8200 Series appliance or set of appliances
that filters mail. Each site can have one or many Scanners. The configuration of each
Scanner is managed via the Control Center.
Glossary
security
The policies, practices, and procedures that are applied to information systems to ensure
that the data and information that is held within or communicated along those systems is
not vulnerable to inappropriate or unauthorized use, access, or modification and that the
networks that are used to store, process, or transmit information are kept operational and
secure against unauthorized access. As the Internet becomes a more fundamental part of
doing business, computer and information security are assuming more importance in
corporate planning and policy.
sender group
A category of email senders that Symantec Mail Security 8200 Series appliances manage
using the Email Firewall feature. Sender groups can be based upon IP addresses, domains,
third party lists, or Symantec lists. You can configure the Email Firewall to take a variety
of actions on messages from each group.
Sender Reputation
Service
A service that provides comprehensive reputation tracking, as part of Symantec Mail
Security 8200 Series. Symantec manages the following three lists as part of the Sender
Reputation Service: Open Proxy Senders, Safe Senders, and Suspected Spammers. Each
operates automatically and filters your messages using the same technology as
Symantec’s other filters.
server
A computer or software that provides services to other computers (known as clients) that
request specific services. Common examples are Web servers and mail servers.
session
In communications, the time during which two computers maintain a connection and,
usually, are engaged in transferring information.
signature
1. A state or pattern of activity that indicates a violation of policy, a vulnerable state, or an
activity that may relate to an intrusion. 2. Logic in a product that detects a violation of
policy, a vulnerable state, or an activity that may relate to an intrusion. This can also be
referred to as a signature definition, an expression, a rule, a trigger, or signature logic. 3.
Information about a signature including attributes and descriptive text. This is more
precisely referred to as signature data.
site
A collection of one or more Symantec Mail Security 8200 Series appliances, in which
exactly one appliance is a Control Center, and one or more appliances are Scanners. If the
site consists of one appliance, that appliance will include the Control Center and a
Scanner.
SMTP (Simple Mail
Transfer Protocol)
The protocol that allows email messages to be exchanged between mail servers. Then,
clients retrieve email, typically via the POP or IMAP protocol.
spam
1. Unsolicited commercial bulk email. 2. An email message identified as spam by a
Symantec Mail Security 8200 Series appliance, using its filters.
spam attack
A series of spam emails from a specific domain. Symantec Mail Security 8200 Series
appliances allow you to choose an action to perform on these messages; by default,
messages received from violating senders are deferred.
spam scoring
The process of grading messages when filtering email for spam. Symantec Mail Security
8200 Series appliances assign a spam score to each message that expresses the likelihood
that the message is actually spam. See also suspected spam.
231
232 Glossary
SSH (Secure Shell)
A program that allows a user to log on to another computer securely over a network by
using encryption. SSH prevents third parties from intercepting or otherwise gaining
access to information sent over the network.
SSL (Secure Sockets
Layer)
A protocol that allows mutual authentication between a client and server and the
establishment of an authenticated and encrypted connection, thus ensuring the secure
transmission of information over the Internet. See also TLS.
SPF (Sender Policy
Framework)
A set of standard practices for authenticating email. If the sender’s domain owner
participates in SPF, the recipient MTA can check for forged return addresses. Symantec
Mail Security 8200 Series appliances allow you to specify an action for messages that fail
SPF authentication.
strip attachment
The process of removing and discarding an attachment from an email message. Symantec
Mail Security 8200 Series appliances allow you to strip attachments from selected
messages.
subnet mask
A local bit mask (set of flags) that specifies which bits of the IP address specify a particular
IP network or a host within a subnetwork. Used to "mask" a portion of an IP address so
that TCP/IP can determine whether any given IP address is on a local or remote network.
Each computer configured with TCP/IP must have a subnet mask defined.
suspected spam
A category of messages separate from Spam. Customers using Symantec Mail Security
8200 Series appliances can use the Control Center to define the suspected spam category
based upon spam scoring, and can then specify different actions to be taken on suspected
spam and spam.
Suspected Spammers
A list of IP addresses from which virtually all of the outgoing email is spam, provided by
Symantec based on data from the Probe Network. Part of the Sender Reputation Service,
Suspected Spammers is a sender group within Symantec Mail Security 8200 Series
appliances. You can specify actions to take on messages from each sender group.
Symantec Outlook Spam An application that makes it easy for Outlook users to submit missed spam and false
Plug-in
positives to Symantec. Depending on how you configure the plug-in, user submissions can
also be sent automatically to a local system administrator. The Symantec Outlook Spam
Plug-in also gives users the option to administer their own Allowed Senders List and
Blocked Senders List, and to specify their own language identification settings. See also
language identification.
Glossary
Symantec Security
Response
Symantec Security Response is a team of dedicated intrusion experts, security engineers,
virus hunters, threat analysts, and global technical support teams that work in tandem to
provide extensive coverage for enterprise businesses and consumers. Symantec Security
Response also leverages sophisticated threat and early warning systems to provide
customers with comprehensive, global, 24x7 Internet security expertise to proactively
guard against today’s blended Internet threats and complex security risks.
Security Response covers the full range of security issues to provide complete protection
for customers including the following areas:
■
Viruses, worms, Trojan horses, bots and other malicious code
■
Hackers
■
Vulnerabilities
■
Spyware, adware, and dialer programs
■
Spam
■
Phishing and other forms of Internet fraud
Security Response keeps Symantec and its customers ahead of attackers by forecasting the
next generation of threats using its worldwide intelligence network and unmatched
insight. The team delivers the bi-annual Internet Security Threat Report that identifies
critical trends & statistics for the entire security community, placing Symantec at the
forefront of the rapidly shifting landscape.
With the steadily increasing sophistication of today’s threats, a holistic approach to
defending your digital assets is the key to repelling attackers. With a unified team
covering the full range of security issues, Symantec Security Response helps provide its
customers with fully integrated protection as it combines the collective expertise of
hundreds of security specialists to bring updates and security intelligence to the full range
of Symantec’s products and services. Symantec has research and response centers located
around the world.
Symantec Spam Folder
Agent for Domino
An application designed to work with Lotus Domino. Installed separately, the Symantec
Spam Folder Agent for Domino creates a subfolder and a server-side filter in each user’s
mailbox. This filter gets applied to messages that a Scanner identifies as spam, routing
spam into each user’s spam folder, relieving end users and administrators of the burden of
using their mail clients to create filters. The Symantec Spam Folder Agent for Domino also
allows users to submit missed spam and false positives to Symantec.
Symantec Spam Folder
Agent for Exchange
An application designed to work on Microsoft Exchange Servers. Installed separately, the
Symantec Spam Folder Agent for Exchange creates a subfolder and a server-side filter in
each user’s mailbox. The filter gets applied to messages that a Scanner identifies as spam,
routing spam into each user’s spam folder, relieving end users and administrators of the
burden of using their mail clients to create filters.
synchronize
To copy files between two folders on host and remote computers to make the folders
identical to one another. Copying occurs in both directions. If there are two files with the
same name, the file with the most current date and time is copied. Files are never deleted
during the synchronization process.
233
234 Glossary
SyncService
A feature of Symantec Mail Security 8200 Series appliances that provides automated
synchronization between LDAP directory sources and Symantec Mail Security 8200
Series. When properly configured this feature enables alias expansion, facilitates
application of filtering policies to users and groups, and provides enhanced performance.
TCP (Transmission
Control Protocol)
The protocol in the suite of protocols known as TCP/IP that is responsible for breaking
down messages into packets for transmission over a TCP/IP network such as the Internet.
Upon arrival at the recipient computer, TCP is responsible for recombining the packets in
the same order in which they were originally sent and for ensuring that no data from the
message has been misplaced in the process of transmission.
TCP/IP (Transmission
Control Protocol/
Internet Protocol)
The suite of protocols that allows different computer platforms using different operating
systems (such as Windows, MacOS, or UNIX) or different software applications to
communicate. Although TCP and IP are two distinct protocols, each of which serves a
specific communications purpose, the term TCP/IP is used to refer to a set of protocols,
including Hypertext Transfer Protocol (HTTP), File Transfer Protocol (FTP), Simple Mail
Transfer Protocol (SMTP), Post Office Protocol (POP), and many others. This set of
protocols allows computers on the Internet to exchange different types of information
using different applications.
threat
A circumstance, event, or person with the potential to cause harm to a system in the form
of destruction, disclosure, modification of data, or denial of service.
throttle
The process of slowing down connections from IP addresses that are sending spam. This
process is used by the Traffic Shaping feature of Symantec Mail Security 8200 Series
appliances.
TLS (Transport Layer
Security)
A protocol that provides communications privacy over the Internet by using symmetric
cryptography with connection-specific keys and message integrity checks. TLS provides
some improvements over SSL in security, reliability, interoperability, and extensibility. See
also SSL.
toolbar
The various rows below the menu bar containing buttons for a commonly used subset of
the commands that are available in the menus.
Traffic Shaping
A feature of Symantec Mail Security 8200 Series appliances that prioritizes sources with
good traffic and throttles sources that are sending spam, reducing the load downstream in
the network.
Transformation Engine
A component of Symantec Mail Security 8200 Series Scanner appliances that performs
actions on messages.
unscannable
On Symantec Mail Security 8200 Series appliances, a message is unscannable for viruses
if it exceeds either the maximum file size or maximum archive scan depth configured on
the Virus Settings page on the Settings tab of the Control Center. Compound messages
such as zip files that contain many levels may exceed the maximum archive scan depth.
You can configure how unscannable messages are processed.
Glossary
virus
A piece of programming code inserted into other programming to cause some unexpected
and, for the victim, usually undesirable event. Viruses can be transmitted by downloading
programming from other sites or present on a diskette. The source of the file you are
downloading or of a diskette you have received is often unaware of the virus. The virus lies
dormant until circumstances cause the computer to execute its code. Some viruses are
playful in intent and effect, but some can be harmful, erasing data or causing your hard
disk to require reformatting.
virus attack
A series of virus-infected emails from a specific domain. Symantec Mail Security 8200
Series appliances allow you to choose an action to perform on these messages; by default
messages received from violating senders are deferred.
Web browser
A client program that uses the Hypertext Transfer Protocol (HTTP) to make requests of
Web servers throughout the Internet on behalf of the browser user.
worm
A special type of virus. A worm does not attach itself to other programs like a traditional
virus, but creates copies of itself, which create even more copies.
WWW (World Wide Web) An application on the Internet that allows for the exchange of documents formatted in
Hypertext Markup Language (HTML), which facilitates text, graphics, and layout. As the
World Wide Web has grown in popularity, its capabilities have expanded to include the
exchange of video, audio, animation, and other specialized documents. The World Wide
Web is also a system of Internet servers that support specially formatted documents.
Another important aspect of the World Wide Web is the inclusion of hypertext links that
allow users to click links and quickly navigate to other related sites.
XML (eXtensible Markup The common language of the Web that is used to exchange information.
Language)
235
236 Glossary
Index
Numerics
443, access on port 443 23
8240 and 8260 models 23
A
address masquerading 154
administration
from the command line client 183
from the Control Center 176
administrator
add, delete, edit 177
administrator-only Quarantine access 101
email address for alerts 28
message details page, Quarantine 96
message list page, Quarantine 93
rights of 177
search messages, Quarantine 94, 97, 99
advanced SMTP settings 166, 168
agents
enable Symantec Spam Folder Agent for
Exchange 220
Symantec Spam Folder Agent for Domino 218
Symantec Spam Folder Agent for
Exchange 216, 218
alerts
address to send to 28
conditions 140
configure settings 139
aliases and distribution lists
configure 156
import 158
notification 102
notification, enable 105
Quarantine 102
separate notification templates 103
Allowed Senders Lists
about 68
add, delete senders 73
disable, edit, enable senders 74
export data from 77
import data for 76
reasons to use 70
annotate messages 81
antivirus filtering, test 206
antivirus policies, create 57
archive messages 84
attachment lists 78
attachments, Quarantine 95
authentication, sender 77
automatic spam foldering, configure 216
B
backup
backup immediately 180
restore from local 181
restore from remote 181
schedule, delete 180
schedule, edit 180
scheduling 179
unscheduled 180
Blocked Senders Lists
about 68
add senders 72
delete senders 73
disable, edit, enable senders 74
export data from 77
import data for 76
reasons to use 70
Brightmaillog.log 113
browsers, compatible 22
buttons, front panel 23
C
CD-ROM drives, compatible 22
certificate
add, delete, view 142
assign for Control Center 141
assign TLS or HTTPS 143
assign to a Scanner 141, 143, 165, 166
configure settings 141
Certification Authority Signed certificate
238 Index
add 142
clear command 185
command line interface 183
commands
clear 185
crawler 186
date 186
db-backup 186
db-restore 187
deleter 189
diagnostics 189
grep 190
help 191
http 191
ifconfig 191
install 191
iostat 191
more 192
mta-control 192
mta-stats 193
netstat 194
nslookup 194
passwd 194
ping 195
reboot 195
rebuildrpmdb 195
rollback 195
route 196
service 196
set-time 197
shutdown 197
sshdctl 198
system-stats 200
tail 200
traceroute 201
update 201
version 202
watch 203
compatibility, see software compatibility or
hardware compatibility
conditions, in Content Compliance filters 61
Conduit proxy
add information 163
edit settings 163
console logging 172
Content Compliance filters
create compliance policies 59
create conditions 61
create dictionaries 80
disable, enable 65
for all messages 62
language-based 55, 88
Match and Does Not Match tests 63
order 65
Control Center
assign certificate for 141
changing IP address of 164
description 6
initialize 24
logging in and out 35
registration 178
registration, initial 26
set up 27
settings 139
crawler command 186
custom filter, See Content Compliance filters
D
data
choose data to track in reports 128
data retention for reports 132
report data tracking 128
date command 186
db-backup command 186
db-restore command 187
defaults, return to factory defaults 183
deleter command 189
delivery
deliver messages to Quarantine 100
misidentified message redelivery,
Quarantine 93, 96
SMTP advanced settings for 168
test delivery of legitimate mail 205
to user Spam folders 220
undeliverable Quarantined messages 115
verify normal delivery 205
deployment, email firewall policies 72
diagnostics command 189
dictionaries, create 80
distribution lists, See aliases and distribution lists.
DNS server, add, configure 162
DNS settings 25
dns-control command 190
does Not Match and Match tests 63
domains
add to Allowed Senders Lists 73
add to Blocked Senders Lists 72
import local domains 154
Index
specify routing for local domains 153
duplicate messages in Quarantine 117
E
email addresses
add to Allowed Senders Lists 73
add to Blocked Senders Lists 72
email aliases, See aliases and distribution lists.
email firewall policies 65
end user experience, Symantec Outlook Spam Plugin 210
end user settings 53
errors
”the operation could not be performed” 114
log file error, no Quarantine disk space 116
Quarantine, disk or work directory full 116
Quarantine, graphics appear as gray
rectangles 95
Quarantine, very large spam messages 114
Ethernet
interfaces 25
jacks 23
settings 163
F
factory defaults, return to 183
features 10
new 5
filter policies
assign to groups 51
create 57
description 14
filters
attachment, lists 78
configure order 65
disable, enable, edit 65
for all messages 62
sender authentication 77
settings 29
settings, default 34
settings, outbound 30
settings, outbound Scanner 33
settings, Scanner 32
spam settings 87
test anti-virus filtering 206
test spam filtering 205
test spam filtering to Quarantine 207
test Subject line modification 205
tests for matching, Content Compliance 63
virus settings 86
firewall
port 443 access 23
See also email firewall policies
foldering
configure 216
enable automatic spam foldering 220
enable Symantec Spam Folder Agent for
Exchange 220
Symantec Spam Folder Agent for Domino 218
Symantec Spam Folder Agent for
Exchange 216, 218
From headers, search in Quarantine 98
G
global replication settings, configure 148
global system settings, configure 139
grep command 190
group policies
add 48
delete 56
delete member 50
description 14
disable, enable, edit 56
export members to file 51
import members from file 50
manage 55
H
hardware compatibility, CD-ROM drives 22
headers
display full or brief, Quarantine 96
received headers, insert or strip 167
search From headers in Quarantine 98
search Message ID header in Quarantine 98
search Subject headers in Quarantine 98
search To headers in Quarantine 97
help
configuring login help 108
specify custom Login help page 109
help command 191
host details, status 173
host settings, configure 161
HTTP command 191
HTTP Conduit proxies 162
HTTPS certificate assignment 143
239
240 Index
I
logs
configure settings 151, 152
increase amount of information logged 113
logging facilities 171
logging on the console 172
open, save 176
Quarantine error log, check 112
status, details 176
system 171
ifconfig command 191
inbound SMTP advanced settings 166
install command 191
interfaces, Ethernet 25
invalid recipients, drop 151
iostat command 191
IP address, changing 164
K
kernel 171
L
language identification
filter based on 55, 88
Symantec Outlook Spam Plug-in 88
LDAP
add LDAP server 145
configure settings 143
delete LDAP server 146
edit LDAP server 146
global definitions 145
settings 144
synchronization 174
license, add, manage, view 178
lights, front panel 23
Linux, kernel information 171
lists
Allowed Senders Lists 68
attachment lists 78
Blocked Senders Lists 68
configure aliases and distribution lists 156
delete senders from lists 73
import aliases and distribution lists 158
select Sender Reputation Service lists 77
separate notification templates for,
Quarantine 103
local domains
add, configure, delete 153
import 154
initial settings 28
specify routing for 153
local replication, configure 148
log in 35
help, configuration 108
problems 114
specify custom Login help page 109
log out 37
M
mail filters, See filters.
mail flow
stop with command line 182
stop with Control Center 198
masquerading, address 154
Match and Does Not Match tests 63
message delivery, See delivery.
message filters. See filters.
message queue information 175
messages
annotate 81
archive 84
configure misidentified message
submissions 106
configure Quarantine message and size
thresholds 110
configure Quarantine message retention
period 107, 108
delete Quarantine messages 93
delete unresolved email setting 107
drop invalid recipients 151
duplicate Quarantine messages 117
insert or strip received headers 167
maximum allowed, Quarantine 117
message navigation in Quarantine 94, 96
redeliver misidentified, Quarantine 93, 96
search Message ID header in Quarantine 98
search messages in Quarantine 94, 97
sent to postmaster mailbox, display 112
sorting in Quarantine 93
view 93
models, 8240 and 8260 23
more command 192
mta-control command 192
mta-stats command 193
Index
N
netstat command 194
network, email firewall policy considerations 72
new features 5
notification, Quarantine
change frequency of 103
choose format 105
configuring digests 102
edit template, subject, address 104
for distribution lists, aliases 102
notifications 83
nslookup
Control Center utility 179
nslookup command 194
O
outbound
filters, settings 30
SMTP advanced configuration settings 167
Outlook Plug-in, see Symantec Outlook Spam Plugin.
overview of system information 172
P
passwd command 194
password 35
ping
Control Center utility 179
ping command 195
policies
add group policy 48
create compliance policies 59
create spam policies 58
create virus policies 57
delete group policy 56
delete group policy member 50
disable group policies 56
edit group policy 56
email firewall 65
enable group policy 56
export group members to file 51
filter policies, assign to groups 51
filter policies, create 57
filter policies, description 14
group policies, description 14
import group policy members from file 50
language-based 55, 88
notifications 83
restoring 181
sender authentication 77
port 443, access requirement for 23
ports, SMTP email configuration, Quarantine 109
postmaster mailbox, display messages 112
processed message details, status 173
proxy settings, add or edit 163
Q
Quarantine
access 92
administer 111
administrator-only access 101
aliases and distribution lists 102
attachments 95
delete messages 93
deliver messages to Quarantine 100
differences between administrator and user
message list pages 95
differences between administrator and user
message pages 97
differences between administrator and user
search pages 100
duplicate messages 117
error log, check 112
login help page, customize 109
maximum number of messages 117
message details page 96
message list page 93
message navigation 94, 96
message redelivery 93, 96
message retention period 107
message sorting 93
notification 102
port for SMTP email configuration 109
postmaster mailbox, check 111
redeliver misidentified messages 93, 96
search messages 94, 97, 99
size and message thresholds, configure 110
start and stop 111
templates 103
troubleshooting 114
undeliverable messages 115
queue
details, status 175
flush email queue from command line 182
flush email queue from Control Center 182
tailor information on 175
241
242 Index
R
reboot command 195
rebuildrpmdb command 195
received headers, insert or strip 167
recipients, drop invalid ones 151
redeliver misidentified messages, Quarantine 93,
96
registration 178
initial 26
initial, Scanners 31
Scanners, Control Center 178
replication
check status of 149
configure settings 147
disable, enable 169
immediate 174
resolve errors 150
status information 148
reports
choose data to track 128
configure report data retention period 129
configure settings 152
data retention 132
delete 135
edit scheduled reports 135
print 133
run 129
save 134
schedule 134
size limit 133
time shown 131
troubleshoot report generation 131
types available 120
restore
from local backup 181
from remote backup 181
See also backup.
retention
configure Quarantine message retention
period 107, 108
configure report data retention period 129
data retention for report information,
default 132
role of appliance, choices 21
rollback command 195
route command 196
router, add, configure, edit 162
routing
specify for local domains 153
specify for Scanners 163
static for Scanners 163
S
Scanners
Add Scanner Wizard 31
assign certificates for 141, 143, 165, 166
changing IP addresses 164
configure 159
delete 161
description 6
disable, enable 160
edit, alternative method 160
enable and disable Scanner replication 169
Ethernet settings 163
manage 159
modify SMTP settings for 165
registration 178
registration, initial 31
replication 174
set up 31
specify routing for 163
static routing 163
test 159
scenarios, configuration 210
schedule
backup, create 180
backup, delete 180
backup, edit 180
scheduled reports 134
delete 135
edit 135
search
details, Quarantine 99
From headers in Quarantine 98
Message ID header in Quarantine 98
messages in Quarantine 94, 97
Quarantine, using multiple characteristics 97
Quarantine, using time range 98
Subject headers in Quarantine 98
To headers in Quarantine 97
self-signed certificate, add 142
sender authentication 77
Sender Reputation Service 77
configure 77
customize 77
select lists 77
senders
delete from lists 73
Index
disable, enable 74
edit senders in lists 74
export data from senders lists 77
how identified, details 70
identifying senders, methods for 71
import sender information 75
reasons to use blocked senders 70
service command 196
set up
registration 26
registration, Scanners, initial 31
set-time command 197
settings
alert address for administrator 28
Control Center 139
default filters 34
end user 53
Ethernet 163
filters 29
filters, outbound 30
filters, outbound Scanner 33
filters, Scanner 32
local domain 28
spam 87
time 28
virus 86
shut down 37
management 182
shutdown command 197
site set up 27
SMTP
advanced parameter configuration 168
port for SMTP email, Quarantine 109
Scanner settings for 164
settings, delivery 168
settings, inbound 166
software compatibility
browsers 22
SSH settings 22
software licenses, manage 178
software requirements, Symantec Outlook Spam
Plug-in 211
software updates, install 202
spam filtering
configuring spam settings 87
creating spam policies 58
language-based 55, 88
sender authentication 77
spam filtering to Quarantine, verify 207
spam filtering, verify 205
spam foldering, enable 220
SSH settings, compatible 22
sshdctl command 198
static routing, specify for Scanners 163
status
host information 173
LDAP synchronization 174
log information 176
overview information 172
processed message information 173
queue information 175
Scanner replication 174
subdomain expansion 72
subject headers, search in Quarantine 98
subject line modification, test 205
submissions
configure recipients for misidentified
messages 106
redeliver misidentified messages 93, 96
Symantec Outlook Spam Plug-in
administrator setup 211
configuration 212
end user experience 210
installation 209
language identification 88
software requirements 211
Symantec menu items 211
Symantec Spam Folder Agent for Domino
configure 218
enable 220
install 218
uninstalling 220
Symantec Spam Folder Agent for Exchange
configure 216
enable 220
install 216
synchronization
LDAP 174
status information 146
synchronize less than 1,000 directory entries
before next scheduled update 175
troubleshooting procedure 149
verify completion of 149
system
backing up 179
factory defaults, return to 183
information 171
log details 176
243
244 Index
logging facilities 171
logging, console 172
reboot 183
shutdown 181, 182, 197
statistics 200
updating 178
system administrator, See administrator.
system utility. See utility.
system-stats command 200
T
tail command 200
tests
anti-virus filtering 206
delivery of legitimate mail 205
for matching in Content Compliance filters 63
Scanners 159
spam filtering 205
spam filtering to Quarantine 207
Subject line modification 205
third-party lists
add to Allowed Senders List 73
add to Blocked Senders List 72
thresholds, set Quarantine message and size 110
time
add, edit definition 162
search Quarantine using Time Range 98
settings 28
shown on reports 131
TLS certificate assignment 143
To headers, search in Quarantine 97
totals information 173
traceroute command 201
traceroute, Control Center utility 179
troubleshoot
Quarantine 114
replication 149
status message 150
synchronization 149
U
undeliverable Quarantine messages 115
unresolved email setting, Quarantine 107
update command 201
updates, install software updates 178, 202
USB CD-ROM drives, compatible 22
user name 35
utility
list of available 179
manage connections through 179
run 179
V
version command 202
version of software, view 179
virus filtering
configuring virus settings 86
create virus policies 57
W
watch command 203