1
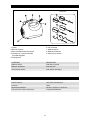
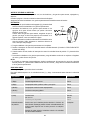
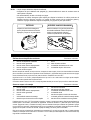
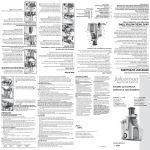
HAND MIXER
OPERATION MANUAL
BATIDORA DE MANO MANUAL DE INSTRUCCTIONES
MODEL MODELO
E M - H 5 DW
CONTENTS
•
•
•
•
•
•
•
•
1
For Customer Assistance .........................
2
Consumer Limited Warranty .....................
3
Important Safeguards ..............................
4
Part Names ..............................................
4
Specifications ...........................................
5
How to Use ...............................................
6
Cleaning and Care ...................................
Recipes .................................................... 6-7
INDICE
•
•
•
•
•
•
8
Normas de seguridad importantes ...........
9
Nombres de las partes .............................
9
Especificaciones .......................................
Utilización ................................................. 10
Limpieza y cuidados ................................. 11
Recetas ....................................................11-12
READ ALL INSTRUCTIONS CAREFULLY BEFORE USING THE MIXER.
LEA TODAS LAS INSTRUCCIONES COMPLETAMENTE ANTES DE UTILIZAR EL BATIDORA.
We suggest recording all the information listed below and saving the original sales receipt for future reference.
Please provide the following information when you write or call: model number, date of purchase, your
complete mailing address (including zip code), your daytime telephone number (including area code) and
description of the problem.
MODEL NUMBER
DATE OF PURCHASE
DEALER
TELEPHONE
TO PHONE:
DIAL 1-800-BE-SHARP (237-4277) for:
SERVICE INFORMATION
ADDITIONAL CUSTOMER INFORMATION
TO WRITE:
Sharp Electronics Corporation
Customer Assistance Center
1300 Naperville Drive
Romeoville, IL 60446-1091
TO ACCESS INTERNET: www.sharp-usa.com
1
SHARP ELECTRONICS CORPORATION warrants to the first consumer purchaser that this Sharp brand
product (the “Product”), when shipped in its original container, will be free from defective workmanship and
materials, and agrees that it will, at its option, either repair the defect or replace the defective Product or
part thereof with a new or remanufactured equivalent at no charge to the purchaser for parts or labor for
the period(s) set forth below.
This warranty does not apply to any appearance items of the Product nor to the additional excluded item(s)
set forth below nor to any Product the exterior of which has been damaged or defaced, which has been
subjected to improper voltage or other misuse, abnormal service or handling, or which has been altered or
modified in design or construction.
In order to enforce the rights under this limited warranty, the purchaser should follow the steps set forth
below and provide proof of purchase to the servicer.
The limited warranty described herein is in addition to whatever implied warranties may be granted to
purchasers by law. ALL IMPLIED WARRANTIES INCLUDING THE WARRANTIES OF
MERCHANTABILITY AND FITNESS FOR USE ARE LIMITED TO THE PERIOD(S) FROM THE DATE OF
PURCHASE SET FORTH BELOW. Some states do not allow limitations on how long an implied warranty
lasts, so the above limitation may not apply to you.
Neither the sales personnel of the seller nor any other person is authorized to make any warranties other
than those described herein, or to extend the duration of any warranties beyond the time period described
herein on behalf of Sharp.
The warranties described herein shall be the sole and exclusive warranties granted by Sharp and shall be
sole and exclusive remedy available to the purchaser. Correction of defects, in the manner and for the
period of time described herein, shall constitute complete fulfillment of all liabilities and responsibilities of
Sharp to the purchaser with respect to the Product, and shall constitute full satisfaction of all claims,
whether based on contract, negligence, strict liability or otherwise. In no event shall Sharp be liable, or in
any way responsible, for any damages or defects in the Product which were caused by repairs or
attempted repairs performed by anyone other than an authorized servicer. Nor shall Sharp be liable or in
any way responsible for any incidental or consequential economic or property damage. Some states do not
allow the exclusion of incidental or consequential damages, so the above exclusion may not apply to you.
THIS WARRANTY GIVES YOU SPECIFIC LEGAL RIGHT. YOU MAY ALSO HAVE OTHER RIGHTS
WHICH VERY FROM STATE TO STATE.
Your Product Model Number
& Description:
EM-H5DW Hand Mixer
(Be sure to have this information available when you request service
for your Product.)
Warranty Period for this Product: One (1) year parts from the date of purchase.
Additional Item(s) Excluded from
Warranty Coverage :
Flat Beaters, Wire Beaters, and Dough Hooks
What to do to Obtain Service:
Exchange service is available in the United States from Sharp. Call
Sharp at 1-800-BE-SHARP to obtain a Return Authorization and
shipping instructions. Be sure to have Proof of Purchase available.
To Obtain Supplies, Accessories or Product Information, call
1-800-BE-SHARP or Visit www.Sharp-usa.com.
2
When using electrical appliances, basic safety precautions should always be followed, including the following:
8. The use of accessory attachments not
recommended or sold by SHARP may cause fire,
electric shock or injury.
1. Read all instructions.
2. To protect against risk of electrical shock, do not
put body, cord or plug in water or other liquid.
9. Do not use outdoors.
3. Close supervision is necessary when the mixer is
used by or near children.
10. Do not let cord hang over edge of table or
counter or touch hot surfaces.
4. Unplug from outlet when not in use, before putting
on or taking off parts and before cleaning.
11. Remove beaters/dough hooks from the mixer
before washing.
5. Avoid contacting moving parts.
12. Check that control is off before plugging cord into
outlet.
6. Keep hands, hair, clothing, as well as spatulas and
other utensils away from beaters/dough hooks
during operation to reduce the risk of injury to
persons and/or damage to the mixer.
13. Unplug before inserting or removing beaters or
dough hooks.
14. Do not use the mixer for other than intended use.
7. Do not operate the mixer with a damaged cord or
plug or after the mixer malfunctions or is dropped
or damaged in any manner.
15. Never add to container while appliance is
operating.
Call 1-800-BE-SHARP(237-4277) for service
information.
16. Container must be properly in place before
operating appliance.
SAVE THESE INSTRUCTIONS
and the Operation Manual
This product is intended for household use only.
This mixer has a polarized plug (one blade is wider than the other). To reduce the risk of electric shock, this plug
is intended to fit into a polarized outlet only one way. If the plug does not fit fully into the outlet, reverse the plug.
If it still does not fit, contact a qualified electrician. Do not attempt to modify the plug in any way.
3
Attachments
1
2
3
4
5
6
7
8
9
Body
Eject Button
Power Boost Button
Speed Control (ON/OFF) Switch
Rotating Swivel Cord
Cushioned Handle
Flat Beaters
Wire Beaters
Dough Hooks
ATTACHMENT:
DESCRIPTION
Flat Beaters:
For general mixing purposes
Wire Beaters:
For whipping cream
Dough Hooks:
For kneading light dough
Rated Voltage:
120V, 60Hz, AC only
Power Consumption:
180W
Outside Dimensions:
8”(W) x 3 11/16” (D) x 6”(H)
Weight (not including weight of attachments):
Approx. 2.2 lb
4
BEFORE USING
Before using the mixer for the first time, wash beaters and dough hooks, rinse and dry.
See page 6 for cleaning instructions.
Be sure to remove beaters or dough hooks from the body before washing.
HOW TO USE
1. Be sure the mixer is OFF (0) and unplugged before inserting the beaters or dough hooks.
2. Insert the beaters or dough hooks into the holes on the bottom
Collar
until they click into place.
When using the dough hooks, make sure that the dough hook
with a smaller collar is inserted into the hole shown in
the figure.
The dough hooks are not interchangeable.
3. Plug into outlet securely. Use the mixer on a 120V, 60Hz only
protected electrical supply.
4. Place the beaters or dough hooks into the bowl.
5. Slide the Speed Control Switch to the desired speed. (See the “MIXING GUIDE” below.)
6. When finished mixing, slide the Speed Control Switch to the “0” position and unplug the mixer.
7. To detach beaters or dough hooks, position the mixer over a bowl or sink and push the Eject Button down.
NOTE:
• If mixing action stops or slows significantly, slide the Speed Control Switch to "0" immediately. Unplug the
mixer and remove the food from the beaters or dough hooks.
• Thick doughs may need to have the final mixing done by hand.
MIXING GUIDE
Use the following chart for speed selections.
To begin mixing, speed should be set on the lowest speed (1) and then moved to desired speed.
SPEED
0
FUNCTION
1 (LOW)
Mixing dry ingredients.
Flat
2 (LOW)
Preparing sauces, puddings, muffins or quick breads.
Flat
3 (MEDIUM)
Preparing packaged cake mix.
Flat
4 (MEDIUM)
Making cookie dough.
Flat
Kneading light dough.
Dough Hooks
Whipping cream.
Wire
Beating eggs.
Flat
Mashing potatoes.
Flat
When you feel the mixer slowing down or straining, press
and hold down the Power Boost Button for additional power
at any speed.
Any
5 (HIGH)
Power Boost
BEATERS
OFF
After releasing the Button, the mixer will return to the speed
you were using.
5
NOTE: •
•
•
•
Always clean the mixer after using.
Be sure the mixer is OFF(0) and unplugged from the outlet before removing parts or cleaning.
Do not immerse the body, cord or plug in water.
Be sure to use dish detergent, not cleanser, benzene, thinner, alcohol or a nylon scrubbing brush,
because they may cause cracks and rust. Rinse and polish dry.
OUTSIDE
BEATERS / DOUGH HOOKS
Prepare a mild detergent solution and
carefully wipe the outside.
Rinse and dry with a soft cloth.
Remove the beaters or dough hooks from
the mixer body using the Eject Button.
Wash in mild, sudsy water.
They are also dishwasher-proof.
Peanut Butter Cookies
1/2
1/2
1/2
1/4
1/4
Makes 3 dozen
cup peanut butter
cup granulated sugar
cup packed brown sugar
cup margarine or butter
cup vegetable shortening
1
1 1/4
3/4
1/2
egg
cups all-purpose flour
teaspoon baking soda
teaspoon baking powder
Combine peanut butter, sugars, margarine, shortening and egg; beat using Flat Beaters at speed 1 to blend
ingredients. Increase to speed 3 and beat until smooth. Blend in flour, baking soda and baking powder at
speed 1. Preheat oven to 375˚F.
Shape dough into 3/4-inch balls. Place 2 inches apart on lightly greased baking pan. With fork, flatten in
crisscross pattern.
Bake 12 minutes at 375˚F.or until set but not hard. Cool on wire racks.
Orange Oatmeal Chippers
1/2
1/3
3/4
1/4
2
1
2
Makes 4 dozen
cup margarine or butter, softened
cup oil
cup packed brown sugar
cup granulated sugar
eggs
teaspoon orange extract
cups quick-cooking rolled oats
1
1/2
1
1/2
1
1
1/2
cup all-purpose flour
cup whole wheat flour
teaspoon baking soda
teaspoon salt
cup raisins or chocolate chips
tablespoon grated orange peel
cup coarsely chopped nuts
Preheat oven to 350˚F. Cream together margarine, oil and sugars. Beat using Flat Beaters at speed 1 to
blend ingredients. Increase to speed 3 and beat until creamy. Beat in eggs and orange extract at speed 3 until
blended. Add rolled oats, flours, baking soda and salt; mix at speed 1 until blended. Stir in raisins or chocolate
chips, orange peel and nuts at speed 1.
Drop dough by teaspoonfuls 2 inches apart on greased round baking pans. Bake 8 to 12 minutes at 350˚F. or
until light golden brown. Cool on wire racks.
6
RECIPES
Cheesecake
Makes 12 servings
Filling:
4
packages (8 ounce each) cream cheese
1 1/4 cups sugar
2
tablespoons all-purpose flour
4
eggs
1
egg yolk
2
tablespoons heavy cream
Grated lemon peel from 1/2 lemon
Crust:
1 1/4 cups all-purpose flour
3/4
cup margarine or butter
1/4
cup sugar
1
egg yolk
Grated lemon peel from 1/2 lemon
Combine crust ingredients in small bowl; beat until well mixed. Refrigerate, covered 1 hour.
Preheat oven to 400˚F. Press one-third flour mixture into bottom of 9-inch spring from pan. Bake at 400˚F. 8
minutes; cool.
In large bowl, beat cream cheese using Flat Beaters at speed 3 until smooth. Slowly beat in sugar at speed 1.
Add flour and remaining ingredients. Beat 5 minutes at speed 1. Press remaining dough around side of pan to
within 1 inch of top; do not bake. Pour cream cheese mixture into pan.
Bake 40-45 minutes at 350˚F until set. Let cheesecake remain in oven 30 minutes. Remove; cool in pan.
Nut Cake With Mocha Frosting
8
1 1/2
2
1/4
1 1/2
Makes 10 servings
eggs
cups sugar
cups hazelnuts or walnuts, finely chopped
cup all-purpose flour
tablespoons baking powder
Frosting:
1
pint heavy cream
1/2
cup plus 2 tablespoons sugar
1/4
cup plus 1 tablespoon chocolate-flavor drink
mix
2 1/2 teaspoons vanilla
1
teaspoon instant coffee
Preheat oven to 350˚F.
Grease and flour two 9-inch round cake pans; line with wax paper. Combine eggs and sugar in large bowl.
Start using Flat Beaters at speed 1 and gradually increase to speed 4. Beat until light and fluffy. Add nuts; mix
at speed 1. Add flour and baking powder; blend at speed 1 until just mixed. Pour into prepared pans. Bake 25
to 35 minutes. If wooden pick inserted in center does not come out clean, let stand in oven a few minutes to
complete cooking. Cool
For frosting, combine remaining ingredients in medium bowl. Beat using Wire Beaters until stiff on speed 5.
Frost cake and chill. Cake must be refrigerated.
Sour Cream Pound Cake
4
2
1
1/2
2
1
Makes 12 servings
cups all-purpose flour
teaspoons baking powder
teaspoon baking soda
teaspoon salt
cups sugar
cup margarine or butter, softened
4
1
2
1/2
1/4
2
eggs
teaspoon vanilla
cups dairy sour cream
cup sugar
cup finely chopped walnuts
tablespoons ground cinnamon
Preheat oven to 350˚F.
Mix flour, baking powder, baking soda and salt in medium bowl. Set aside. Beat 2 cups sugar and the
margarine using Flat beaters at speed 3 until light and fluffy. Add eggs, one at a time, beating well after each.
Mix in vanilla. Blend in flour mixture alternately with sour cream, beating after each addition at speed 1 until
smooth. Set aside.
Combine 1/2 cup sugar, the nuts and cinnamon. Pour half the batter into well-greased 10-inch tube pan;
sprinkle with half of filling. Repeat with remaining batter and filling.
Bake 50-60 minutes or until wooden pick inserted in center comes out clean. Allow to cool on counter 10
minutes. Turn out onto plate and allow to finish cooling.
7
Cuando se utilicen aparatos eléctricos, deberán seguirse siempre ciertas normas de seguridad básicas, entre las
que se incluyen las siguientes:
7. La utilización de accesorios que no hayan sido
recomendados ni vendidos por SHARP puede
causar un incendio, una descarga eléctrica o
lesiones.
1. Lea todas las instrucciones.
2. Para protegerse contra el riesgo de sufrir una
descarga eléctrica, no ponga la batidora, el cable
o la clavija en el agua o en otro líquido.
8. No utilice la batidora en exteriores.
3. Cuando la batidora sea utilizada por niños o
cerca de ellos deberá realizarse una atenta
supervisión.
9. No deje que el cable cuelgue sobre el borde de
mesas o mostradores, ni que toque superficies
que estén calientes.
4. Desenchufe la batidora de la toma de corriente
cuando no la utilice, antes de colocar o retirar
piezas y antes de limpiarla.
10. Retire los batidores/ganchos para amasar de la
batidora antes de lavarla.
11. Verifique que el interruptor de control de
velocidad esté en la posición de apagado antes
de enchufar el cable en una toma de corriente.
5. Evite tocar las piezas móviles.
Durante el funcionamiento de la batidora,
mantenga las manos, el cabello y las ropas, así
como también las espátulas y demás utensilios
de cocina, alejados de los batidores/ganchos
para amasar, para reducir así el riesgo de que se
lesionen las personas y/o se estropee la batidora.
12. Desenchufe la batidora antes de colocar o retirar
los batidores o los ganchos para amasar.
13. No utilice la batidora para otras cosas que no
sean aquellas para las que ha sido diseñada.
6. No utilice la batidora si ésta tiene un cable o
clavija estropeado, ni tampoco si funciona mal, se
ha caído o se ha estropeado de cualquier forma.
Llame al 1-800-BE-SHARP(237-4277) para
obtener información relacionada con las
reparaciones.
GUARDE ESTAS INSTRUCCIONES
y el manual de instrucciones
Este producto ha sido diseñado para ser utilizado en casa solamente.
Esta batidora tiene una clavija polarizada (una patilla es más ancha que la otra). Para reducir el riesgo de que se
produzcan descargas eléctricas, esta clavija ha sido diseñada para poder enchufarse de una sola forma en una
toma de corriente polarizada. Si la clavija no se puede enchufar completamente en la toma de corriente, dé
vuelta a la clavija. Si sigue sin poder enchufarla, póngase en contacto con un electricista cualificado. No intente
modificar la clavija de ninguna forma.
8
Accesorios
6
7
8
9
1
2
3
4
Cuerpo
Botón de eyección
Botón sobrealimentador de potencia
Interruptor de control de velocidad
(encendido/apagado)
5 Cable giratorio
Asa acolchada
Batidores planos
Batidores de alambre
Ganchos para amasar
ACCESORIO:
DESCRIPCIÓN
Batidores planos:
Para batir en general
Batidores de alambre:
Para batir nata
Ganchos para amasar:
Para amasar masa ligera
Tensión nominal:
120V, 60Hz, CA solamente
Consumo:
180W
Dimensiones exteriores:
203 (An) x 94 (Prof) x 152 (Al) mm
Peso (sin incluir el de los accesorios):
1.0kg aproximadamente
9
ANTES DE UTILIZAR LA BATIDORA
Antes de utilizar la batidora por primera vez, lave los batidores y los ganchos para amasar, enjuáguelos y
séquelos.
Consulte la página 11 donde se indican las instrucciones de limpieza.
Asegúrese de retirar los batidores o los ganchos para amasar de la batidora antes de lavarlos.
UTILIZACIÓN
1. Asegúrese de que la batidora esté apagada (0) y desenchufada
antes de introducir los batidores o los ganchos para amasar.
Collar
2. Introduzca los batidores o los ganchos para amasar en los
agujeros de la parte inferior hasta que queden colocados
haciendo un ruido seco.
Cuando utilice los ganchos para amasar, asegúrese de que el
gancho que tenga el collar más pequeño sea insertado en el
agujero izquierdo, como se muestra en la figura.
3. Enchufe firmemente el cable de alimentación de la batidora en la
toma de corriente. Utilice solamente un suministro eléctrico de
120V, 60Hz que esté protegido.
4. Ponga los batidores o los ganchos para amasar en el recipiente.
5. Deslice el interruptor de control de velocidad hasta la velocidad deseada. (Consulte la "GUÍA PARA BATIR"
indicada más abajo.)
6. Cuando termine de batir, deslice el interruptor de control de velocidad hasta la posición "0" y desenchufe la
batidora.
7. Para retirar los batidores o los ganchos para amasar, ponga la batidora encima de un recipiente o fregadero
de cocina y pulse el botón de eyección.
NOTA:
• Si el batido se interrumpe inesperadamente, deslice inmediatamente el interruptor de control de velocidad
hasta la posición "0" y desenchufe la batidora de la toma de corriente, y luego retire la comida de los batidores
o de los ganchos para amasar.
GUÍA PARA BATIR
Utilice la guía siguiente para seleccionar la velocidad.
Para batir deberá empezar con la velocidad mínima (1) y luego ir aumentando hasta alcanzar la velocidad
deseada.
FUNCIÓN
BATIDORES
VELOCIDAD
0
Apagado
1 (Baja)
Para batir ingredientes secos.
Planos
2 (Baja)
Para preparar salsas, pudines, bollos o pan rápido.
Planos
3 (Media)
Para preparar mezcla de tortas empaquetada.
Planos
4 (Medio)
Para hacer masa para galletas.
Planos
Para amasar una masa ligera.
Ganchos para amasar
Para batir nata.
Alambre
Batir huevos.
Planos
Para hacer puré de patatas.
Planos
Cuando note que la batidora pierda velocidad o funcione de
forma forzada, mantenga pulsado el botón sobrealimentador de
potencia para disponer así de más potencia a cualquier
velocidad.
Cualquiera
5 (Alta)
Sobrealimentador
de potencia
Después de soltar el botón, la batidora volverá a la velocidad
que usted estaba utilizando.
10
NOTA: • Limpie siempre la batidora después de utilizarla.
• Asegúrese de que la batidora esté apagada (0) y desenchufada de la toma de corriente antes de
retirar piezas o limpiarla.
• No meta la batidora, el cable o la clavija en el agua.
• Asegúrese de utilizar detergente para vajillas para limpiar la batidora. No utilice productos de
limpieza, bencina, diluyente, alcohol o un cepillo de nailon porque tal vez produzcan grietas y
oxidación. Enjuague la batidora después de limpiarla y luego pase un paño para secarla.
EXTERIOR
Prepare una solución de detergente
suave y limpie suavemente el exterior.
Enjuague y seque con un paño blando.
BATIDORES / GANCHOS PARA AMASAR
Retire los batidores o los ganchos para amasar
de la batidora utilizando el botón de eyección.
Lávelos en agua templada y jabonosa.
También los puede lavar en un lavavajillas.
Galletas de mantequilla de cacahuete
1/2
1/2
1/2
1/4
1/4
taza de mantequilla de cacahuete
taza de azúcar granulada
taza de azúcar morena empaquetada
taza de margarina o mantequilla
taza de manteca vegetal
Para hacer 3 docenas
1
1 1/4
3/4
1/2
huevo
tazas de harina multiuso
cucharadita de bicarbonato de soda
cucharadita de polvo de hornear
Mezcle la mantequilla de cacahuete, los dos tipos de azúcar, la margarina, la manteca vegetal y el huevo; bata la mezcla utilizando los batidores
planos a la velocidad 1 para mezclar bien los ingredientes. Aumente la velocidad a 3 y siga batiendo hasta que quede una mezcla suave. Agregue
la harina, el bicarbonato de soda y el polvo de hornear y bata a la velocidad 1. Precaliente el horno a unos 190°C.
Haga bolas de unos 2 cm con la masa y colóquelas separadas entre sí por unos 5 cm en un molde untado con una ligera capa de mantequilla.
Empleando un tenedor, aplaste las bolas de forma entrecruzada.
Cueza al horno durante 12 minutos a unos 190°C, o hasta que las galletas estén listas pero no duras. Deje que se enfríen en estantes de alambre.
Avena en copos a la naranja
1/2
1/3
3/4
1/4
2
1
2
taza de margarina o mantequilla, ablandada
taza de aceite
taza de azúcar moreno empaquetada
taza de azúcar granulada
huevos
cucharadita de extracto de naranja
tazas de copos de avena de cocción rápida
Para hacer 4 docenas
1
1/2
1
1/2
1
1
1/2
taza de harina multiuso
taza de harina de trigo integral
cucharadita de bicarbonato de soda
cucharadita de sal
taza de uvas pasas o trocitos de chocolate
cucharada grande de corteza de naranja rallada
taza de nueces cortadas en trozos grandes
Precaliente el horno a unos 175°C. Ponga juntos la margarina, el aceite y los dos tipos de azúcar. Bata la mezcla utilizando los
batidores planos a la velocidad 1 para mezclar los ingredientes. Aumente la velocidad a 3 y bata hasta que la mezcla quede
cremosa. Agregue los huevos y el extracto de naranja y bata a la velocidad 3 hasta que se mezclen los ingredientes. Agregue
los copos de avena, las harinas, el bicarbonato de soda y la sal y siga batiendo a la velocidad 1 hasta que todo quede mezclado.
Agregue las uvas pasas o los trozos de chocolate, el pellejo de naranja y las nueces y bata a la velocidad 1.
Deje caer la masa de cucharitas llenas, manteniendo una separación de 5 cm entre los trozos de masa, en moldes redondos
untados con mantequilla. Cueza al horno de 8 a 12 minutos a 175°C o hasta que la masa adquiera un color marrón dorado. Deje
luego enfriar en estantes de alambre.
11
RECETAS
Tarta de queso
Para hacer 12 porciones
Corteza de la tarta:
1 1/4 tazas de harina multiuso
3/4
taza de margarina o mantequilla
1/4
taza de azúcar
1
yema de huevo
Corteza de 1/2 limón rayada
Relleno:
paquetes de queso crema (225 gramos cada uno)
4
1 1/4 tazas de azúcar
2
cucharadas grandes de harina multiuso
4
huevos
1
yema de huevo
2
cucharadas grandes de nata doble
Corteza de 1/2 limón rayada
Ponga los ingredientes de la corteza de la tarta en un recipiente pequeño; bátalos hasta que queden bien mezclados.
Tape la mezcla y refrigérela durante 1 hora.
Precaliente el horno a unos 200°C. Ponga un tercio de la mezcla de harina presionándola contra el fondo de un molde de
borde separable de unos 23 cm de diámetro. Cueza al horno a 200°C durante 8 minutos y luego deje que se enfríe.
En un recipiente grande, bata el queso crema utilizando batidores planos a la velocidad 3 hasta que quede suave. Bata
luego lentamente el azúcar a la velocidad 1. Agregue la harina y los ingredientes restantes. Bata durante 5 minutos a la
velocidad 1. Presione el resto de la masa de la corteza de la tarta contra el lado del molde sin poner nada en el espacio
que queda a 2.5 cm a partir del borde superior; no cueza al horno todavía. Vierta la mezcla del queso crema en al horno.
Cueza al horno durante 40-45 minutos a 175°C hasta que se estabilice. Deje la tarta de queso en el horno durante 30
minutos. Sáquela luego del horno y deje que se enfríe en el molde.
Tarta de nuez o avellana con baño de moca
8
1 1/2
2
1/4
1 1/2
Para hacer 10 porciones
huevos
tazas de azúcar
tazas de avellanas o nueces picadas finamente
taza de harina multiuso
cucharaditas de polvo de hornear
Baño de moca:
500 ml de crema doble
1/2
taza más 2 cucharadas grandes de azúcar
1/4
taza más 1 cucharada grande de mezcla de
bebida con sabor a chocolate
2 1/2 cucharaditas de vainilla
1
cucharadita de café instantáneo
Precaliente el horno a unos 175°C.
Unte con mantequilla y harina dos moldes redondos de 23cm para tartas; y luego cubra con papel de cera. Ponga los huevos y
el azúcar en un recipiente grande. Empiece utilizando los batidores planos a la velocidad 1 y vaya aumentando poco a poco la
velocidad hasta llegar a la 4. Bata hasta que la mezcla quede suave y esponjosa. Agregue las nueces o avellanas y mezcle a la
velocidad 1. Agregue la harina y el polvo de hornear y bata a la velocidad 1 hasta que todo quede mezclado. Vierta la mezcla en
los moldes preparados. Cueza al horno durante 25 a 35 minutos. Si el palito de madera introducido en el centro no sale limpio,
deje el molde en el horno unos pocos minutos más hasta completar la cocción. Luego, deje enfriar.
Para el baño de moca, combine los ingredientes restantes en un recipiente de tamaño medio. Bata a la velocidad 5 utilizando los
batidores de alambre hasta que la mezcla quede firme. Cubra la tarta y póngala a enfriar. La tarta deberá estar refrigerada.
Tarta de nata agria
4
2
1
1/2
2
1
Para hacer 12 porciones
tazas de harina multiuso
cucharaditas de polvo de hornear
cucharadita de bicarbonato de soda
cucharadita de sal
tazas de azúcar
taza de margarina o mantequilla, ablandada
4
1
2
1/2
1/4
2
huevos
cucharadita de vainilla
tazas de nata agria
taza de azúcar
taza de nueces picadas finamente
cucharadas grandes de canela molida
Precaliente el horno a unos 175°C.
Mezcle la harina, el polvo de hornear, el bicarbonato de soda y la sal en un recipiente de tamaño medio. Ponga esta mezcla
aparte. Bata 2 tazas de azúcar y la margarina utilizando los batidores planos a la velocidad 3 hasta que la mezcla quede
suave y esponjosa. Agregue los huevos uno a uno batiéndolos bien. Mezcle la vainilla. Bata la mezcla de harina con la nata
agria según va agregando la nata. Bata a la velocidad 1 hasta que la mezcla quede suave. Ponga esta mezcla aparte.
Mezcle 1/2 de azúcar, las nueces y la canela. Vierta la mitad de la masa en un molde tubular de 25cm bien untado en
mantequilla; esparza por encima la mitad del relleno. Repita lo mismo con la otra mitad de la masa y del relleno.
Cueza al horno durante 50-60 minutos hasta que el palillo de madera introducido en el centro salga limpio. Deje que el
pastel se enfríe durante 10 minutos. Póngalo luego en una fuente y deje que termine de enfriarse.
12
SHARP ELECTRONICS CORPORATION
Sharp Plaza,Mahwah,NJ 07430-2135
SHARP CORPORATION
Osaka, Japan
TINSEA003RREZ
Printed in China