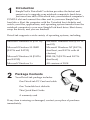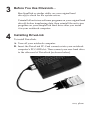
1
DriveLink™ Quick Start Guide This document contains all the information you need to use , SimpleTech’s easy-to-use hard drive mirroring kit. DriveLink All trademarks or registered trademarks listed in this document belong to their respective owners. 2001 SimpleTech www.simpletech.com Part number: STI-PCDL/xx Document number: 61600-00041-002 1 Introduction SimpleTech’s DriveLink solution provides the fastest and easiest way to upgrade your notebook computer’s hard drive. Just insert one end of DriveLink into your notebook computer’s PCMCIA slot and connect the other end to your new SimpleTech hard drive. Start the computer with the Twindisk boot diskette and watch your files, applications, and operating system transfer from the notebook computer to your new SimpleTech hard drive. Shut down, swap the drives, and you are finished! DriveLink supports a wide variety of operating systems, including: Microsoft Windows 95 (FAT 16) Microsoft Windows 2000 (FAT 16 and 32) Microsoft Windows 95 OSR2 (FAT16 and FAT32) Microsoft Windows NT (FAT16, dual boot, and FAT16 with 64 clusters) Microsoft Windows 98 (FAT16 and FAT32) IBM OS/2 (FAT16 and FAT16 dual boot) Microsoft Windows 3.x All versions of DOS 2 Package Contents Your DriveLink package includes: One DriveLink PC Card and cable One Twindisk boot diskette This Quick Start Guide A warranty card If any item is missing or damaged, contact your place of purchase immediately. 3 Before You Use DriveLink… Run ScanDisk or similar utility on your original hard drive(s) to check for file system errors. Uninstall all anti-virus software programs on your original hard drive(s) before transferring data, then reinstall the anti-virus programs on your SimpleTech hard drive after you install it in your notebook computer. 4 Installing DriveLink To install DriveLink: A. Turn off your notebook computer. B. Insert the DriveLink PC-Card connector into your notebook computer’s PC-CARD slot. Then connect your new hard drive to the other end of DriveLink (as shown below). over, please C. In your notebook computer’s floppy drive, insert the supplied bootable diskette labeled TwindiskD. D. Turn on your notebook computer. Twindisk takes a moment to recognize both drives. E. After agreeing to the Twindisk license agreement, click the Express button to start the data-transfer process. The data-transfer process should take about 10 minutes for each Gigabyte of data being transferred. • Advanced users: Use the Custom button to create and edit your partitions to the target drive. For more information, visit our support site at www.simpletech.com F. When the data-transfer process completes, remove your SimpleTech drive from DriveLink and swap it with the drive in your notebook computer (refer to installation instructions that came with your SimpleTech hard drive). G. Boot your notebook computer and start using your new SimpleTech hard drive. Tips: As with any data transfer utility, it is highly recommended that you back up all data on your original hard drive before using DriveLink. Some notebooks may require the latest BIOS for DriveLink to work properly. Check your notebook manufacturer's website for any BIOS updates.