1
GB
18-11-2003
13:57
Pagina 1
CF 210
• Use and maintenance manual . . . . pag.
4
• Mode d’emploi et d’entretien . . . . . pag.
15
• Instrucciones de uso . . . . . . . . . . pag.
21
• Manual de instruções . . . . . . . . . . pag.
41
• Istruzioni per l’uso . . . . . . . . . . . . pag.
54
GB
18-11-2003
13:57
Pagina 2
I m p o r t a n t s a f e g u a rd s
• Use this appliance only as described in this instruction manual.
As with any electrical appliance, the instructions aim to cover as many eventualities as possible. Caution and common sense should be used when operating and installing this air conditioner.
• This appliance has been manufactured to cool and dehumidify domestic environments and
should not be used for other purposes.
• It is dangerous to alter or modify the unit's characteristics in any way.
• The appliance must be installed in line with the relevant national legislation.
• Should repairs be necessary, contact the nearest authorized De’Longhi Repair Service Center.
Unauthorized De’longhi servicing can be dangerous.
• This appliance is to be used by adults only; keep away from children.
• In the case that the power cord becomes damaged, this must be replaced only by specialized personnel authorized by the manufacturer.
• Always ensure the appliance is grounded. If you have any doubts check with a qualified electrician.
• Avoid using extension cords with the unit.
• Before cleaning or maintenance operations, always unplug the unit from the outlet.
• Do not pull on or place strain on the power cord when moving the appliance.
• The appliance should not be installed where the atmosphere may contain combustible gases,
oil or sulphur, or near heat sources.
• Do not rest hot or heavy objects on the appliance.
• Clean the filters at least once a week.
• Avoid using heaters near the unit.
• The unit should be transported in a vertical position. If this is not possible secure the unit at
an angle, do not lie it horizontally.
• Before transporting the unit, drain the condensation collecting-tray and tank. After transportation, wait at least 1 hour before switching on the unit.
• The packaging materials can be recycled. You are therefore recommended to place them in
the special containers for differentiated waste collection.
SAVE THESE INSTRUCTIONS
2
GB
18-11-2003
13:57
Pagina 3
Introduction
The portable air conditioner is a compact unit for regulating air temperature and humidity. Its extremely
flexible characteristics make it easy to use at any time and in any room. It can be operated in multiple
modes including cooling, dehumidifying and ventilating. The appliance has been designed for domestic use and may be used in the home, office, etc.
It must be connected to an outlet with an impedance of less than 0.197 Ohms.
If necessary, consult your electricity supply company for information on impedance values.
TIPS FOR ENERGY SAVING
•
•
Keep blinds and/or curtains and windows closed during the sunniest hours of the day (cooling function).
Keep the filter clean. In normal conditions, the filter should be cleaned about every 2 weeks. The filter eliminates part of the pollutant particles or dust transported in the air. Air quality thus depends on
the frequency with which the filter is cleaned.
3
GB
18-11-2003
13:57
Pagina 4
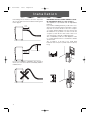
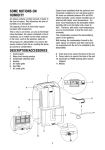
Description
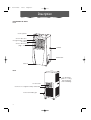
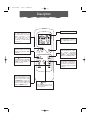
DESCRIPTION OF PARTS
Front
Control panel
Air flow direction
fins (right hand – left hand)
Air outlet
Air flow direction fins
(high – low)
Handle
Water tank
Castors
Back
Top air intake
grille for cooling,
dehumidifying
and ventilating.
Hot air outlet
Connector for supplementary water tank
Bottom air intake grill
4
GB
18-11-2003
13:57
Pagina 5
Control panel
All functions of the unit can be controlled from the control panel or the remote control unit (certain models only).
SET TEMP buttons
TIMER ON/OFF
button
Press this button to
activate the timer
function (turns the
appliance off if
already on and vice
versa).
These buttons can
be used to set the
required room temperature in a range
between
17°C
(62°F) and 31°C
(87°F). The temperature set is increased
or reduced by 1°C
(33°F).
SWING button
FAN SPEED button
Press this button to
distribute the air flow
evenly throughout
the room (swing) or
in a specific direction (fixed position).
Press this button to
set the speed of the
air flow emitted:
Max (HIGH), Med
(MED), Min (LOW).
MODE KEY
Press this button to
select the various
operating modes:
air
conditioning
(COOL), dehumidifying (DRY) or ventilating (FAN).
ON/OFF button
Press this button to
turn the air conditioning unit on or off.
Infrared receiver
Only some models
TIMER HOUR button
Press this button to
set the length of
time before the
appliance goes off
(with the
unit on) or comes
on (with the
unit off).
Standby button
Tank full
When the indicator light is on, the
appliance is plugged into the outlet.
When on, indicates that the tank
needs emptying
displays the operating mode
displays the position
of the air distribution
fins
COOL/ DRY/ FAN
Air conditioning
Dehumidifying
Ventilating
F
Indicates that the
keypad is locked
5
GB
18-11-2003
13:57
Pagina 6
Description
Display
SET TEMP buttons
Use these buttons to set
the required room temperature between 17°C
(62°F) and 31°C (87° F).
The temperature set is
increased or reduced by
1°C (33° F).
FAN SPEED button
Press this button to set the
speed of the air flow: Max,
Med, Min.
°F
ON/OFF button
Press this button to turn the
air conditioning unit on or
off.
:
+
-
MODE key
Press this button to select
the various operating
modes: air conditioning
(COOL),
dehumidifying
(DRY) or ventilating (FAN).
Button
Press this button to activate
the timer function (turns the
appliance off if already on
and vice versa).
HOUR and MIN buttons
Press these buttons to set
the hour and minutes on the
remote control unit or, using
the HOUR button only, to set
the time the air conditioning
unit will come on and go off
using the TIMER function.
6
SWING button
Press this button to distribute
the air flow evenly throughout the room (swing) or
in a specific direction (fixed
position).
Button
Press this button to lock or
unlock the keypad on the
control panel.
GB
18-11-2003
13:57
Pagina 7
O p e ra t i o n
SETTING THE REMOTE CONTROL CLOCK
Remove the cover of the battery compartment on the back of the remote control unit.
After inserting two 1.5 V alkaline batteries in the compartment, the clock is automatically set at 12:00. If you want to
set the time to 10:30, proceed as follows:
CLK
1
Press the CLK button (in the battery compartment) with a pointed object such as a pencil.
The time indicator on the display flashes and the
correct time can be set.
2
Press the HOUR button on the remote control unit
to set the hours (set to 10 am).
3
Press the MIN button on the remote control unit
to set the minutes (set to 30).
4
Press the CLK button again to confirm the operation, then replace the battery compartment
cover.
ACL
Note: the RST button (reset) in the battery compartment cancels all the settings on the remote control unit (once pressed, the current time must be re-set).
Important: make sure you do not reverse the poles of the batteries.
OPERATING RANGE
The operating range of the air conditioning
unit goes from a minimum of +17°C (62°F) to a
maximum of +35°C (95°F), with a choice of
temperatures in cooling mode of from +17°C
(62°F) to + 31°C (87°F).
In dehumidifying mode, the operating range
goes from +20°C (68°F) to + 31°C (87°F). The
temperature cannot be selected in advance.
POWER SUPPLY
• Plug the air conditioning unit into a suitable outlet. Do not connect to multiple
sockets.
• Once plugged into the outlet, wait about
two seconds until you hear a beep, then
press the "
" button to turn the appliance on.
OPERATING IN AIR CONDITIONING MODE
1. Make sure the condensation tank is correctly in place.
2. Press the "MODE" button repeatedly until
the air conditioning mode is selected.
"COOL" appears on the display.
While the unit is operating in air conditioning mode, always place the exhaust
hose through an open window to eject
the hot air from the room.
3. Press the “SET TEMP” button to set a suitable room temperature between +17°C
(62°F) and +31°C (87°F).
4. Press the FAN SPEED button to select a suitable fan speed: Max, Med, Min.
OPERATING IN DEHUMIDIFYING MODE
1. Keep the windows and door closed to
make dehumidification of the room more
efficient.
2. Make sure the condensation tank is correctly in place.
3. Repeatedly press the "MODE" button to
select the dehumidifying mode. "DRY"
appears on the display.
4. Neither the fan speed nor temperature
can be regulated.
5. Do not use the exhaust hose to expel the
air outside. The hot air given out at the
back of the appliance should not be
expelled from the room.
7
GB
18-11-2003
13:57
Pagina 8
O p e ra t i o n
TIMER FUNCTION
When the air conditioning unit is off (but plugged into the outlet), to turn it on at the required
time press the "TIMER ON/OFF" button ("
"
will appear on the display), then press the "
TIMER HOUR" button until the number of hours to
elapse before the appliance comes on
appears on the display. Vice versa, when the
air conditioning unit is on, to turn it off at the
required time press the "TIMER ON/OFF" button
("
" will appear on the display), then press
the "TIMER HOUR" button until the number of
hours to elapse before the appliance goes off
appears on the display. The timer can be set
from one to 12 hours.
AUTOMATIC SWING FUNCTION
Press the SWING button once. The fins will
swing, distributing the air flow in the room.
Press the button again, the flow will be steady
in one direction.
CHILD SAFETY
Pressing the "+" and "-" buttons on the control
panel together for more than two seconds
locks the keypad.
The " “ symbol appears on the LCD display.
The same keypad lock function can be activated on the remote control unit by pressing
the “ “ button.
To unlock, repeat the operation.
BEFORE USING THE APPLIANCE
1. If the appliance has been in a horizontal
position during storage or transport, you
are recommended to wait at least three
hours before turning it on.
2. Always position the air conditioning unit on
a stable surface.
3. Attach the air exhaust hose to the air conditioning unit.
4. Plug the air conditioning unit into a suitably
rated outlet.
5. Set the various functions of the air conditioning unit according to your requirements.
6. The cooling system will shut down when
room temperature drops below the set
temperature. The fan will, however, continue to operate at the set speed.
If the room temperature rises above the
temperature set, the cooling system
comes on again automatically.
8
18-11-2003
13:57
Pagina 9
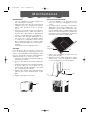
Installation
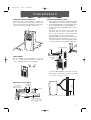
CHOOSING THE INSTALLATION SITE
Position the air conditioning unit on a flat surface where the air outlet grilles cannot be
obstructed. Position the appliance at least 50
cm (19.7) away from walls or obstacles.
INSTALLING THE AIR EXHAUST HOSE
1. Open out the end of the hose and screw the
two adapters on counterclockwise (see figure).
2. Fit the square adapter on the air exhaust hose
to the air exhaust outlet on the appliance.
3. Connect the other end (flange) to the nearest window.
Important: the air exhaust hose must be
between 500 mm (19.7”) and 2000 mm
(78.7”) long. You are recommended to keep
the air exhaust hose as short as possible.
During installation, keep the hose as horizontal
as possible without distorting it. Do not connect the terminal to other exhaust ducts (flue
or chimney) as this could lead to malfunction.
square adapter
Flange
CABLE WINDER
Before installing the air exhaust hose, mount
the two cable winder brackets using the
screws supplied as shown in the figure.
air exhaust
outlet
Correct wall installation: the hole must be
at a height of between 40 cm (15.7”) and
130 cm (51.2”) from the floor.
AIR EXHAUST ACCESSORIES
adapter
for flange
130 cm
(51.2 in)
hose length
500 mm (19.7”)
2000 mm (78.7”)
flange
40 cm
(15.7 in)
GB
adapter
crosspiece 675 mm
(26.5”) - 1230 mm
(48.4”) (some models
only)
9
18-11-2003
13:57
Pagina 10
Installation
If the flange hose must be curved to expel the
air, you should follow the measurements given
in the figure:
50 cm
(19.7 in)
60 cm
(23.6 in)
GB
50 cm
(19.7 in)
Incorrect installation diagram (the bend in
the hose is excessive and could easily lead to
malfunction)
10
MOUNTING THE ADJUSTABLE WINDOW CLOSURE CROSSPIECE ( Only for some models )
The appliance is provided with an adjustable
bracket.
If you have a sliding window, position the crosspiece in the window frame, extend it completely then close the window onto the crosspiece. Fit the window flange onto the end of the
air exhaust hose, position it on the hole in the
crosspiece, then fit the other end of the hose
onto the back of the air conditioning unit.
This considerably reduces heat dispersion due
to contact between the room and the outside
environment.
The crosspiece is 40 mm (1.5”) wide and
between 675 mm (26.7”) and 1230 mm (48.4”)
long.
GB
18-11-2003
13:57
Pagina 11
Installation
CONDENSATION DRAINAGE
When the air conditioning unit is operating in
air conditioning or dehumidifying mode, the
condensation is collected in a special tank.
When the tank is full, the "tank full" indicator
light on the control panel flashes.
Remove the condensation tank, empty and
replace on the unit as shown in the following
figures.
3. Do not remove the cap of the tube in the
water tank compartment (present in certain
models only) while the unit is operating with
condensation collecting in the tank as this
could lead to leaks of water.
CONTINUOUS CONDENSATION DRAINAGE
To drain condensation continuously without
the air conditioning unit shutting down, proceed as follows (models designed for continuous condensation drainage only):
1. Pass the tube in the tank compartment
through the hole in the tank (see figure).
2. Remove the cap from the tube and connect it to an external pipe (not provided)
able to drain the condensation continuously.
Condensation
drainage tube
coupling
Attention
1. While the air conditioning unit is operating in
air conditioning or dehumidifying mode, do
not extract the condensation tank before it
is full, otherwise a buzzer will sound indicating that the compressor has stopped. The
unit will switch to FAN mode.
2. To remove the tank before it is completely
full, the unit must be stopped by turning it off
or operating it in FAN mode only, waiting
about three minutes to avoid the condensation dripping outside the tank, then removing the tank.
11
GB
18-11-2003
13:57
Pagina 12
Maintenance
MAINTENANCE
• Turn the appliance off and unplug from
the outlet before cleaning.
• Make sure the unit is disconnected from all
voltage before proceeding with maintenance. This avoids the risk of electric
shock.
• Never use chemical solvents (such as benzene and alcohol) to clean the surface of
the unit. This could scratch or damage the
surface or even distort the external part.
• Use water with delicate detergents or a
soft cloth only to clean or dry plastic parts.
• To clean the condensation tank, remove
and completely empty it of water. Clean
with neutral detergents, rinse and dry thoroughly.
Then replace in the original position.
AIR FILTER
If the air filter is blocked by dirt or dust, the
flow of air diminishes, reducing the performance of the appliance and leading to malfunction. The air filter must be cleaned and/or
washed at least once every two weeks.
1. Open the air filter holder grill by pulling it
towards the outside.
2. Remove the filter from the filter holder grille.
3. Wash the air filter by immersing it delicately
in warm water (no more than 40° C)
(104°F) with neutral detergent, rinse and
dry completely in the shade.
4. Replace the dry filter in the grill, fastening it
with the pins on the inside surface of the
grille.
5. Replace the grille on the unit.
grille
12
END OF SEASON PROCEDURE
1. Turn the appliance off and disconnect
from the outlet by unplugging from the
outlet.
2. In models with a continuous condensation
drain tube only, before emptying the condensation from the tank, remove the cap
from the plastic tube to enable water in the
tube to flow into the tank, then operate the
unit in fan mode for half a day to ensure that
the inside of the unit is completely dry.
Filter
holder grille
Pins
3. Empty the condensation water from the
tank, clean and dry
4. Wind the power cable around the cable
winder, then cover the appliance with a
cover or bag and store in a dry place.
plastic tube
cap
GB
18-11-2003
13:57
Pagina 13
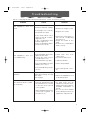
Tr o u b l e s h o o t i n g
Before contacting an authorized technical service center, check the following:
Problem
The appliance does not
work.
The appliance does not
cool satisfactorily
There is excessive noise and
vibration
The unit shuts down or starts
up frequently
Check
Solution
• If there is a power outage
• Check it no longer occurs
• If the plug is not correctly
inserted in the outlet
• Plug into the outlet
• If the outlet switch or the
switch on the air conditioning unit is off.
• If the condensation tank
indicator light is on.
• If the condensation tank is
positioned correctly
• Check the outlet switch or
turn the air conditioning
unit switch on
• Empty the water in the
tank
• Position the condensation
tank correctly
• If the air intake and outlet
grilles are blocked
• If there are other sources
of heat in the room
• If the air filter is very dirty
• clean and free from
obstructions
• move the heat source
• If the temperature set (SET
TEMP) is not correct
• set the temperature
• If the internal fan speed is
on slow
• set the fan speed correctly
• It is caused by the refrigerant fluid running through
the tubes
• Is it sloping?
• This is normal
• Is the air expelled through
the exhaust hose correctly
or does the hose follow a
correct path?
• Other exhausts have been
connected together on
the same hose
• clean the air filter
• Place the appliance in a
horizontal position
• Try and keep the air
exhaust hose in as horizontal a position as possible to
facilitate evacuation of
the air.
• Do not use other exhaust
hoses, always use the hose
supplied to expel the air.
13
GB
18-11-2003
13:57
Pagina 14
L i m i t e d W a r ra n t y
De’Longhi is the distributor of Kenwood home appliances.
This warranty applies to all home appliances with De’Longhi or Kenwood brand names.
FOR CONTIGUOUS UNITED STATES ONLY
Limited Warranty
We warrant each De’Longhi AIR CONDITIONER to be free from defects in material and workmanship. From the purchase date, our obligation under this warranty is to provide one (1) year free
parts and labor on the entire AIR CONDITIONER, with an additional four (4) years free on any part
of the sealed system consisting of the compressor, evaporator, condenser and factory connected
refrigerant tubing. Labor and all other parts during the additional four (4) year warranty are to be
paid by the owner. All AIR CONDITIONERS in need of repair are to be shipped to an authorized
De’Longhi service center at the owner’s expense, and De’Longhi will then incur the return shipping costs. After the first five (5) years of ownership, all expenses (all parts, labor and shipping) are
to be paid by the owner of the unit. This warranty shall apply only if the AIR CONDITIONER is used
in accordance with the factory directions that accompany it, and on an Alternating Current (AC)
circuit. This warranty is in lieu of all other warranties and representations, expressed or implied, and
all other obligations or liabilities on our part. We do not authorize any other person or company
to assume for us any liability in connection with the sale or use of our AIR CONDITIONER. This warranty shall not apply to any AIR CONDITIONER that has been repaired or altered outside our factory nor shall it apply to any AIR CONDITIONER that has been subjected to misuse, negligence or
accidents.
If repairs become necessary, see contact information below:
U.S. Residents:
Please contact our toll free hotline at 1-800-322-3848 or log onto our website at
www.delonghi.com.
For all accessories, spare parts or replacement parts, please contact our parts division at 1-800865-6330.
CANADA Residents:
Please contact our toll free hotline at 1-888-335-6644 or log onto our website at
www.delonghi.com.
Other countries:
Please visit: www.delonghi.com.
14