1
Gigaset 4000 Micro, IM1 eng, A31008-G4000-B022-2-
4000co-
17.12.01
s
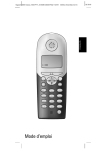
Be inspired
Operating instructions
!
ENGLISH
and safety precautions
Gigaset 4000 Micro, IM1 eng, A31008-G4000-B022-2-6Z19
4000COU.FM
18.03.02
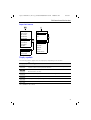
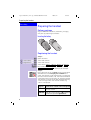
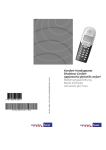
Brief overview of the handset
Brief overview of the handset
The display is protected by a plastic film.
Remove the plastic film.
Status LED (light-emitting diode)
lights up during a call;
flashes at:
– Incoming call
– New messages
– Alarm call, appointments, anniversaries
Display (display field)
Charging status
= empty
U full
flashes: Battery low
Current functions
and display keys
Reception strength
Control key
Talk key
– Accept call
– Dial number
– Switch from handsfree talking to
handset
Open the directory
Ñ
e
Annabella
19.07.01
{
13:13
¨
End call and On/
Off key
– End call
– Cancelling function
– One menu level back
(press briefly)
– Return to idle state
(hold down)
– Handset on/off
(hold key down)
Key 1
Hold down to select Answ.
machine/Mailbox
Asterisk key
Hold down to activate and deactivate
the ringer
Keypad protection
On/off
hold key down!
Handsfree key
With the display keys, you
have access to the current
functions.
Caller list
Access to message lists
Microphone
Socket
– for Headset,
MP3-Player
Sel Services key
– Open network access
list: press briefly!
– R key function:
hold key down!
Interaction between control key and display keys
With the display keys you
can carry out functions that
can also be partly controlled
with the control key.
The side of the control key
which you must press is indicated in the operating instructions by arrows:
Display keys
Control key
2
INT
F/ G (left/right)
E/ D (top/bottom)
Gigaset 4000 Micro, IM1 eng, A31008-G4000-B022-2-6Z19
4000COU.FM
18.03.02
Brief overview of the handset
Important menus
©
D
Text Message*
New Entry
Select Services
Anne
Add. Features
Barbara
Calendar/Clock
Chris
:
Sound Settings
Call Charges
©
OKƒ
H/Set Settings
Display Number
Base Settings
Delete Entry
Voice Mail
Copy Entry
Delete List
Handset Volume
Send List
Ringer Settings
Available Memory
Advisory Tones
Display symbols
The following symbols appear above the display keys depending on the situation:
Display keys
Meaning
¨
Menu key: Activates the main menu when the phone is idle. During a call, it
activates a menu for the particular situation.
Z
Selects and confirms the menu function.
Ends and saves an entry.
W
Delete key (Backspace): Deletes characters from right to left.
{
Automatic redial key: Opens a list of the last five numbers dialled.
I
Displayed if SMS*, answering machine, mail service box or caller list is active
Í
One menu level back, cancel
* Not available in all countries
3
Gigaset 4000 Micro, IM1 eng, A31008-G4000-B022-2-6Z19
4000COU.FM
18.03.02
Safety precautions
Safety precautions
$
!
Only use the power supply unit supplied as indicated on the underside of the
device.
Only insert approved rechargeable batteries of the same type. Never use ordinary (non-rechargeable) batteries as they may pose a health hazard or cause injury.
‹
Make sure the rechargeable battery is inserted the right way round
Œ
Use the battery specified in these operating instructions
The phone may affect medical equipment so always switch your phone off before
entering hospitals or doctors’ practices.
The handset may cause an unpleasant humming noise in hearing aids.
Do not operate the phone in places where there is a risk of explosion (such as paint
workshops).
The handset is not splash-proof (see page 25).
Drivers must not use the phone while driving (including the Walk and Talk
function).
The phone must be switched off at all times in an aircraft (including the Walk and
Talk function). Make sure it cannot be switched on accidentally.
ƒ
If you give your Gigaset to someone else you should also give them the operating
instructions.
Dispose of batteries and the phone carefully. Do not pollute the environment.
Not all the functions described in these operating instructions are available in all countries.
4
Gigaset 4000 Micro, IM1 eng, A31008-G4000-B022-2-6Z19
4000coivz.fm
15.03.02
Contents
Contents
Brief overview of the handset . . . . . . . . . . . . . . . . . . . . . . . . . . . . . . . . . . . . . . . . . . . . 2
Interaction between control key and display keys. . . . . . . . . . . . . . . . . . . . . . . . . .2
Important menus . . . . . . . . . . . . . . . . . . . . . . . . . . . . . . . . . . . . . . . . . . . . . . . . . .3
Display symbols . . . . . . . . . . . . . . . . . . . . . . . . . . . . . . . . . . . . . . . . . . . . . . . . . . .3
Safety precautions . . . . . . . . . . . . . . . . . . . . . . . . . . . . . . . . . . . . . . . . . . . . . . . . . . . . . 4
Preparing the handset. . . . . . . . . . . . . . . . . . . . . . . . . . . . . . . . . . . . . . . . . . . . . . . . . . . 6
Delivery package . . . . . . . . . . . . . . . . . . . . . . . . . . . . . . . . . . . . . . . . . . . . . . . . . . .6
Inserting the battery . . . . . . . . . . . . . . . . . . . . . . . . . . . . . . . . . . . . . . . . . . . . . . . .6
Registering the handset . . . . . . . . . . . . . . . . . . . . . . . . . . . . . . . . . . . . . . . . . . . . .6
Charging the battery . . . . . . . . . . . . . . . . . . . . . . . . . . . . . . . . . . . . . . . . . . . . . . . .7
Attaching the belt clip . . . . . . . . . . . . . . . . . . . . . . . . . . . . . . . . . . . . . . . . . . . . . . .7
Setting the date and time . . . . . . . . . . . . . . . . . . . . . . . . . . . . . . . . . . . . . . . . . . . .8
Changing the display language . . . . . . . . . . . . . . . . . . . . . . . . . . . . . . . . . . . . . . . .8
Making calls . . . . . . . . . . . . . . . . . . . . . . . . . . . . . . . . . . . . . . . . . . . . . . . . . . . . . . . . . . . 9
Making an external call . . . . . . . . . . . . . . . . . . . . . . . . . . . . . . . . . . . . . . . . . . . . . .9
Making internal calls . . . . . . . . . . . . . . . . . . . . . . . . . . . . . . . . . . . . . . . . . . . . . . . .9
Answering a call . . . . . . . . . . . . . . . . . . . . . . . . . . . . . . . . . . . . . . . . . . . . . . . . . . .9
Open caller list/message list . . . . . . . . . . . . . . . . . . . . . . . . . . . . . . . . . . . . . . . . .10
Handsfree talking. . . . . . . . . . . . . . . . . . . . . . . . . . . . . . . . . . . . . . . . . . . . . . . . . .10
Forwarding an external call, enquiry call . . . . . . . . . . . . . . . . . . . . . . . . . . . . . . . .10
Automatic redial . . . . . . . . . . . . . . . . . . . . . . . . . . . . . . . . . . . . . . . . . . . . . . . . . . . . . . . 11
Directory and network access list . . . . . . . . . . . . . . . . . . . . . . . . . . . . . . . . . . . . . . . 12
Speed dialling from the network access list . . . . . . . . . . . . . . . . . . . . . . . . . . . . .13
Dialling with speed dialling . . . . . . . . . . . . . . . . . . . . . . . . . . . . . . . . . . . . . . . . . .13
Settings . . . . . . . . . . . . . . . . . . . . . . . . . . . . . . . . . . . . . . . . . . . . . . . . . . . . . . . . . . . . . . 17
Setting the alarm clock . . . . . . . . . . . . . . . . . . . . . . . . . . . . . . . . . . . . . . . . . . . . .17
Deactivating the alarm clock . . . . . . . . . . . . . . . . . . . . . . . . . . . . . . . . . . . . . . . . .17
Turning off the alarm call . . . . . . . . . . . . . . . . . . . . . . . . . . . . . . . . . . . . . . . . . . . .17
Setting an appointment . . . . . . . . . . . . . . . . . . . . . . . . . . . . . . . . . . . . . . . . . . . .18
Handset and loudspeaker volume . . . . . . . . . . . . . . . . . . . . . . . . . . . . . . . . . . . . .19
Activating/deactivating warning and signal tones . . . . . . . . . . . . . . . . . . . . . . . . .20
Activating/deactivating the vibration alarm . . . . . . . . . . . . . . . . . . . . . . . . . . . . . .21
Auto talk feature on/off . . . . . . . . . . . . . . . . . . . . . . . . . . . . . . . . . . . . . . . . . . . . .21
Resetting to the factory defaults . . . . . . . . . . . . . . . . . . . . . . . . . . . . . . . . . . . . .22
Room monitoring (babyphone). . . . . . . . . . . . . . . . . . . . . . . . . . . . . . . . . . . . . . . . . . . 22
Setting the room monitor . . . . . . . . . . . . . . . . . . . . . . . . . . . . . . . . . . . . . . . . . . .23
Walk and Talk mode . . . . . . . . . . . . . . . . . . . . . . . . . . . . . . . . . . . . . . . . . . . . . . . . . . . 24
Appendix . . . . . . . . . . . . . . . . . . . . . . . . . . . . . . . . . . . . . . . . . . . . . . . . . . . . . . . . . . . . . 25
Operating on base stations in the Gigaset family . . . . . . . . . . . . . . . . . . . . . . . . .25
Contact with liquid. . . . . . . . . . . . . . . . . . . . . . . . . . . . . . . . . . . . . . . . . . . . . . . . .25
Range . . . . . . . . . . . . . . . . . . . . . . . . . . . . . . . . . . . . . . . . . . . . . . . . . . . . . . . . . .26
Guarantee . . . . . . . . . . . . . . . . . . . . . . . . . . . . . . . . . . . . . . . . . . . . . . . . . . . . . . .26
Customer Care Service . . . . . . . . . . . . . . . . . . . . . . . . . . . . . . . . . . . . . . . . . . . . .27
5
4000co.fm
Gigaset 4000 Micro, IM1 eng, A31008-G4000-B022-2-6Z19
18.03.02
Preparing the handset
Press Keys:
Preparing the handset
Delivery package
Gigaset 4000 Micro handset, one battery, charging
unit, belt clip, operating instructions.
Inserting the battery
et
as
Gig
et
as
00
40 icro
Gig
m
00
40 icro
m
Registering the handset
Step 1:
© Open the menu.
D åååååååååååååååååååååååååååååååå
[ Select and confirm.
H/Set Settings
D åååååååååååååååååååååååååååååååå
[ Select and confirm.
Register H/Set
D [ Select base ( Base 1 ,
o[
Base 2 , Base 3 or Base 4 ).
Key in PIN and confirm (as supplied: 0000):
Regstr.Procedure Base 1 is displayed, for example.
Step 2:
Press down the key on the back of the Gigaset 4010/
4015 Micro base and keep it pressed down for a
while. The handset will be automatically assigned the
next free internal number (1–6). The internal number 6
will be overwritten if all positions are already occupied.
The handset will return to the idle condition following
successful registration. The internal number (e.g.
“INT1”) is displayed.
Gigaset
On the base station or base telephone
4010/4015 Hold down the key on the underside of
the base station.
3010/3015 Hold down the paging-keyy on the base
station until you hear signal tones.
6
Gigaset 4000 Micro, IM1 eng, A31008-G4000-B022-2-6Z19
4000co.fm
18.03.02
Preparing the handset
Press Keys:
3020/25
3030/35
4030/35
Select settings, system settings and register handset in the menu at the base station telephone and confirm with OK.
3070/75
4070/75
Press the LED – it will flash during registration.
Non-Sie- To register at “GAP base stations”
, follow
mens base the relevant operating instructions
stations (steps 2 and 3).
Charging the battery
5,5
Leave the handset for approx. 5,5 hours in
the charging unit to charge the battery, as
they are not charged when they leave the
factory. The charging status icon flashes on
the handset to indicate that the battery are
being charged:
See the appendix for a list of recommended battery.
●
●
The battery heat up during charging. This is normal
and not dangerous.
Opening the battery compartment unnecessarily
may cause the wrong charging status to be displayed.
Attaching the belt clip
Push the belt clip onto the back of the handset until the
lugs at the side click into place.
7
Gigaset 4000 Micro, IM1 eng, A31008-G4000-B022-2-6Z19
4000co.fm
18.03.02
Preparing the handset
Press Keys:
Setting the date and time
You need to set the date and time so that the time that
messages and calls are received is shown correctly.
© Open the menu.
D åååååååååååååååååååååååååååååååå
[ Select and confirm.
Calendar/Clock
D åååååååååååååååååååååååååååååååå
[ Select and confirm.
Date/Time
The current setting is shown.
Enter the date
Enter the day/month/year.
In this case 20.05.2001. e. g.ŸÞÞ¢Þ]
D Go down one line.
Enter the time
Enter hours and minutes.
In this case 19:05
e. g. ] ¬ Þ ¢
D Go down one line.
Select the display mode
use the left side of the control key to select the 12hour mode (am or pm) or the 24-hour mode (default).
[ Save the settings.
Save
åååååååååååååååååååååååååååååååå
Changing the display language
© Open the menu.
D åååååååååååååååååååååååååååååååå
[ Confirm the function.
H/Set Settings
D åååååååååååååååååååååååååååååååå
[ The current language is marked with a ✓.
Language
D[ Select the language you want and confirm.
You will find a.table on the last page of this booklet.
Dialling an emergency number
You can dial the emergency numbers saved in the base
station even if the telephone lock is activated. Please
refer to the operating instructions for your base station.
8
Gigaset 4000 Micro, IM1 eng, A31008-G4000-B022-2-6Z19
4000co.fm
18.03.02
Making calls
Press Keys:
Making calls
Making an external call
o Enter the telephone number. If you make a mistake
use the X key to correct individual digits.
c
a
Press the talk key.
Press the end call key to end the call.
●
●
●
You can also press the talk key c first and then
enter the telephone number - each digit will be dialled immediately.
You can cancel the dialling operation by pressing
the end call key a.
You can insert a pause: After entering the prefix,
open the menu using the display key © and select “insert pause”
.
Making internal calls
F Open the list of internal users. Your own handset is
identified by “<".
D E c Select the handset you want and press the talk key.
or e. g. Ÿ Enter the internal number of the handset.
or Call All
or « All handsets are called.
c
a
Press the end call key to end the call.
Answering a call
c
Your telephone will ring (ringing tone) and the status
LED will flash.
/ u Press the talk key or handsfree key.
or
k
Ö
Simply remove the handset from the charging unit
(factory setting: “Auto talk”).
9
Gigaset 4000 Micro, IM1 eng, A31008-G4000-B022-2-6Z19
4000co.fm
18.03.02
Making calls
Press Keys:
Open caller list/message list*
A message appears in the display and the status LED
flashes to indicate that there are new calls/messages.
? Press
Handsfree talking
Handsfree talking when dialling
o Dial the telephone number.
u Press the handsfree key.
When handsfree talking is activated, the handsfree
key u and the status LED are lit.
Handsfree talking during a call
u Activate handsfree talking.
To set the volume:
Press the handsfree key u once more.
F G Raise or lower the volume.
Save
c
a
Save the volume level.
Change from handsfree talking to the handset
End the call.
Forwarding an external call, enquiry call
You can forward an external call to another handset or
make an internal enquiry call.
F Open the list of internal users.
E D c Select the internal user and call.
If the internal user answers:
.
● To forward the call: Press the end call key
● To end the enquiry call: Use End to return to the
waiting party.
a
* Not available in all countries
10
Gigaset 4000 Micro, IM1 eng, A31008-G4000-B022-2-6Z19
4000co.fm
18.03.02
Automatic redial
Press Keys:
Automatic redial
Manual redial
You have access to the last five telephone numbers dialled.
z D Display and select the telephone number.
c
Press the talk key.
Automatic redial
This function is not available in all countries.
The handsfree key flashes and open listening is activated. The function is deactivated after ten unsuccessful call attempts or if a call was made in the
meantime.
Press Off or any key if the person you called is not available.
z D Display and select the telephone number.
© Open the menu.
Automatic Redial [ Activate.
åååååååååååååååååååååååååååååååå
c
If the other person answers press the talk key.
Deleting a number from the redialling list
z D Display and select the telephone number.
© Open the menu.
D åååååååååååååååååååååååååååååååå
[ The telephone number is deleted.
Delete Entry
Copying a telephone number to the directory
z D Display and select the telephone number.
© Open the menu.
D åååååååååååååååååååååååååååååååå
Copy to Directory [ The telephone number is entered.
o If you like you can change the number and enter a
name (you can also enter an anniversary s. page 16).
For notes on how to enter letters and characters
s. page 14.
© Open the menu.
[ Save the entry.
Save Entry
åååååååååååååååååååååååååååååååå
11
Gigaset 4000 Micro, IM1 eng, A31008-G4000-B022-2-6Z19
4000co.fm
18.03.02
Directory and network access list
Press Keys:
Directory and network access
list
With the D directory you can store up to 200 telephone numbers and then dial them at the push of a
button.
You can save the prefixes (Call-by-Call)* of telephone
companies in the network access list C. The directory and network access list are used in exactly the
same way.
Storing an entry
D / C Open the directory/network access list.
[ Select the menu item and confirm.
New Entry
åååååååååååååååååååååååååååååååå
o Enter the telephone number (no more than 32 digits).
D o Scroll to the name field and enter the name. You can
also enter an anniversary in the directory, see also
page 16.
© Open the menu.
[ Store the entry
Save Entry
åååååååååååååååååååååååååååååååå
Dialling with the directory
D Open the directory.
e. g. ^^
c
Enter the first letter of the name. For example for “E”
press the ^ key twice or scroll with the D key.
Press the talk key.
After selecting the name you can also open the menu,
select Display Number , extend/change the number
and dial with the talk key c.
* Not available in all countries
12
Gigaset 4000 Micro, IM1 eng, A31008-G4000-B022-2-6Z19
4000co.fm
18.03.02
Directory and network access list
Press Keys:
Dialling with the network access list
(Call-by-Call)
C Open the network access list.
D© Select call-by-call number and open the menu.
[ Select the menu item and confirm.
Display Number
åååååååååååååååååååååååååååååååå
o Enter the telephone number of the person you want
to call.
or
DD [ Select the telephone number in directory and confirm.
c
Press the talk key. The telephone number is dialled.
Speed dialling from the network
access list
You can store 8 speed dialling numbers in the network
access list. Enter a speed dialling number (2–9) before
the name.
Example: Press speed dial key 2 and then enter the
network provider's name.
Dialling with speed dialling
e. g. Ÿ
Hold down the key:
The stored network provider's name is displayed.
e. g. o Enter the telephone number
or
DD [ Select an entry from the directory and confirm.
c
Press.
13
4000co.fm
Gigaset 4000 Micro, IM1 eng, A31008-G4000-B022-2-6Z19
18.03.02
Directory and network access list
Press Keys:
Character map
Press the relevant key repeatedly or hold down:
1x
]
Ÿa
^ d
¡ g
¢j
£ m
¤ p
¥t
¬ w
→A
« a→
Þ.
ª #
blank
2x 3x
4x
5x
6x
7x
8x 9x
10 x
ã
ç
ô
õ
å
1
â
£
$
¥
¤
b
c
2
ä
á
à
â
e
f
3
ë
é
è
ê
h
i
4
ï
í
ì
î
k
l
5
n
o
6
ö
ñ
ó
ò
q
r
s
7
ß
u
v
8
ü
ú
ù
û
x
y
z
9
ÿ
ý
æ
ø
*
/
(
)
<
=
>
%
,
?
!
0
+
-
:
¿
@
\
&
§
*
Other characters on this key:
¡*
“,‘,;,_
The first letter of the name is automatically written
in uppercase and the rest in lowercase.
To change one letter from uppercase to lowercase or
vice versa press « .
Control the cursor with F G E D. Delete
characters with X
Letters are always inserted to the left of the cursor.
Inserting a blank before a name takes that name to
the top of the directory (for example “ Karla”).
Sort sequence:
14
1. Blank
3. Letters (alphabetical)
2. Digits (0-9)
4. Other characters
4000co.fm
Gigaset 4000 Micro, IM1 eng, A31008-G4000-B022-2-6Z19
18.03.02
Directory and network access list
Press Keys:
Displaying, changing or deleting an entry
D/C Open the directory/network access list.
D Select the entry you want.
View
Change
View all the information for the entry.
Open the input field and make the necessary changes.
o Change the number if necessary.
D o Go to the name field and change the name.
For notes on entering letters and characters
s. page 14.
For the directory enter an anniversary if necessary
s. page 16.
© Open the menu.
[ Confirm the changes.
Save Entry
åååååååååååååååååååååååååååååååå
or
D/C Open the directory/network access list.
D Select the relevant entry.
© Open the menu.
D åååååååååååååååååååååååååååååååå
[ You will hear a confirmation tone. The entry has been
Delete Entry
deleted.
Copying an entry to another handset
You can copy an entry to another Micro/Comfort handset.
D/C Open the directory/network access list.
D Select the required entry.
© Open the menu.
[ Select the menu item and confirm.
Delete Entry
D åååååååååååååååååååååååååååååååå
D[ Select the internal user (receiving handset) and confirm.
Copying a further entry:
YES
Press.
D Select the required number.
Copy
Initiate the copy process.
15
Gigaset 4000 Micro, IM1 eng, A31008-G4000-B022-2-6Z19
4000co.fm
18.03.02
Directory and network access list
Press Keys:
Copying the directory/network access list
You can copy the entire directory/network access list
to another Micro/Comfort handset.
See “Copying an entry to another handset”
.
Transmission is interrupted:
●
●
if the memory of the receiving handset is full.
if you receive a call.
Copying of an entry is terminated.
Deleting the directory/network access list
D/C Open the directory/network access list.
D Select the required entry.
© Open the menu.
D åååååååååååååååååååååååååååååååå
[ Select the menu item and confirm.
Delete List
YES
Confirm delete all entries.
Entering anniversaries (birthdays and so on)
You can store the date and time of anniversaries so you
can be reminded of them.
D Open the directory.
DView Select and display the entry.
Change
Open the input field.
D Move the cursor into the birthday/anniversary field.
Change
Confirm.
o Enter or change the date (day/month).
D o Scroll forward one line and enter the time.
D Scroll forward one line.
F G Choose the indicator for the alarm.
[ Store entries.
Use the display key Delete to delete the anniversary
alarm.
16
Gigaset 4000 Micro, IM1 eng, A31008-G4000-B022-2-6Z19
4000co.fm
18.03.02
Settings
Press Keys:
Settings
Setting the alarm clock
If activated, the alarm clock (¼ icon) on your handset
will ring every day at the time entered.
With the handset idle:
© Open the menu.
D åååååååååååååååååååååååååååååååå
[ Select the menu item and confirm.
Calendar/Clock
D åååååååååååååååååååååååååååååååå
[ Select the menu item and confirm.
Alarm Clock
The current setting is displayed.
FG
Select On .
D Scroll forward one line.
Þ £Þ Þ
Enter the hours/minutes. The example here is 06.00.
D Scroll forward one line.
F G Choose the ringer melody for the alarm call.
Save
Save the settings.
An alarm call will not be made if room monitoring (babyphone) is activated or during automatic redialling.
Deactivating the alarm clock
The alarm clock is set but you do not want it to ring.
© Open the menu.
D åååååååååååååååååååååååååååååååå
[ Select the menu item and confirm.
Calendar/Clock
D åååååååååååååååååååååååååååååååå
[ Select the menu item and confirm.
Alarm Clock
F G Select
Save
Off .
Save the settings.
Turning off the alarm call
An alarm call is signalled like an incoming call. Press
any key to turn it off.
17
Gigaset 4000 Micro, IM1 eng, A31008-G4000-B022-2-6Z19
4000co.fm
18.03.02
Settings
Press Keys:
Setting an appointment
Your handset is able to remind you of one appointment. If you have set an appointment, this is indicated
by the ¼ icon in the display.
With the handset idle.
© Open the menu.
D åååååååååååååååååååååååååååååååå
[ Select the menu item and confirm.
Calendar/Clock
[ Select the menu item and confirm.
Set Appoints.
åååååååååååååååååååååååååååååååå
F G Select
On to activate the appointment alarm.
D Scroll forward one line.
Ÿ Þ Þ ¢ Enter the day/month.
The example here is 20th May.
D Scroll forward one line.
Þ ¬ ^ Þ Enter the hours/minutes.
The example here is: 9.30.
D Scroll forward one line.
F G Choosing the ringer melody for the appointment
alarm.
Save
Save the settings.
An appointment alarm will only ring when the handset
is idle. An appointment alarm is not made when room
monitoring is activated or during automatic redial.
Turning off the appointment alarm
An appointment alarm is signalled in the same way as
an incoming call; press any key to turn it off.
18
Gigaset 4000 Micro, IM1 eng, A31008-G4000-B022-2-6Z19
4000co.fm
18.03.02
Settings
Press Keys:
Missed appointments and anniversaries
An appointment and anniversaries that have been signalled on the handset but not been accepted are saved
in a list.
A new missed appointment/anniversary is indicated
by Appt.. Press the right display key to display the list
Events list. Then select Missed Appoint. ¼ [.
If you want to view your appointment again, proceed
as follows:
© Open the menu.
D åååååååååååååååååååååååååååååååå
[ Select the menu item and confirm.
Calendar/Clock
D åååååååååååååååååååååååååååååååå
[ Select the menu item and confirm.
Missed Dates
D [ Select a missed appointment ¼ or anniversary ‚
Information on this entry is displayed.
Use the display key Delete to delete the appointment/
anniversary.
Handset and loudspeaker volume
© Open the menu.
D åååååååååååååååååååååååååååååååå
[ Select the submenu.
Sound Settings
Handset Volume [ You will hear the current handset volume.
åååååååååååååååååååååååååååååååå
F G Set the required handsfree talking volume.
D Scroll forward one line.
F G Save Select the required level for the handset volume and
confirm.
Setting the ringer volume/melody
You can choose from five ringer volumes, “crescendo” ring (increasing volume), ringer off and any of ten
ringer melodies:
© Open the menu.
D åååååååååååååååååååååååååååååååå
[ Select the menu item and confirm.
Sound Settings
D åååååååååååååååååååååååååååååååå
[ You will hear the current ringer volume and its level
Ringer Settings
will be displayed.
F G Select the ringer volume.
D Scroll forward one line.
F G Save Select the required ringer melody (1–10) and confirm.
19
Gigaset 4000 Micro, IM1 eng, A31008-G4000-B022-2-6Z19
4000co.fm
18.03.02
Settings
Press Keys:
Time control for ringer volume
You can set a different ringer volume for a particular
time of day.
© Open the menu.
D åååååååååååååååååååååååååååååååå
[ Select the menu item and confirm.
Sound Settings
D åååååååååååååååååååååååååååååååå
[ You will hear the current ringer volume and its level
Ringer Settings
will be displayed.
Time C.
Press.
F G Activate/deactivate time control.
Do Enter the period for the different ringer
e. g. ]]ÞÞ
]¢ÞÞ
from 11:00 to 15:00.
DF G Scroll forward one line and select the ringer volume
Save Entry
Save or
a
Save the settings.
Press.
Activating/deactivating warning and
signal tones
●
Key beeps: Every keystroke is confirmed.
Confirmation beeps: Confirmation beep (a rising
tone sequence) when you make entries/settings and
when you replace the handset in the charging station.
● Battery low beep: The battery must be recharged.
© Open the menu.
●
D åååååååååååååååååååååååååååååååå
[ Select the menu item and confirm.
Sound Settings
D åååååååååååååååååååååååååååååååå
[ Select the menu item and confirm.
Advisory Tones
D Select the required function.
FG
Save
20
On , Off
or select In Call (battery low beep in the
call).
Save the settings.
Gigaset 4000 Micro, IM1 eng, A31008-G4000-B022-2-6Z19
4000co.fm
18.03.02
Settings
Press Keys:
Activating/deactivating the vibration
alarm
If you do not wish to be disturbed by the ringing tone
you can activate the handset’s vibration alarm instead.
This can also be activated in addition to the ringing tone
(in noisy surroundings, for instance).
© Open the menu.
D åååååååååååååååååååååååååååååååå
[ Select and confirm.
Sound Settings
D åååååååååååååååååååååååååååååååå
[ Select and confirm.
Silent alert
½
The current setting is marked with a ✓
You can deactivate the ringing tone by keeping the «
key pressed down for a while. Only the vibration alarm
will then be active.
Auto talk feature on/off
When this function is activated you can remove the
handset from the charging unit without pressing the
c key to accept a call (factory setting).
© Open the menu.
D åååååååååååååååååååååååååååååååå
[ Select the menu item and confirm.
H/Set Settings
D åååååååååååååååååååååååååååååååå
[ Activate/deactivate with [
Auto Answer
(✓= function on).
21
Gigaset 4000 Micro, IM1 eng, A31008-G4000-B022-2-6Z19
4000co.fm
18.03.02
Room monitoring (babyphone)
Press Keys:
Resetting to the factory defaults
The directory, the network access list and the caller list
are not deleted when you reset the handset. Registration at the base station is not affected.
© Open the menu.
D åååååååååååååååååååååååååååååååå
[ Select the menu item and confirm.
H/Set Settings
D åååååååååååååååååååååååååååååååå
[ Select the menu item and confirm.
Reset Handset
YES
Confirm.
Function
Handset volume
Ringer volume (“ring tone”
,)
Ringer melody
Auto talk
Battery low beep
Handsfree volume
Room monitor level
Time control
Display language
Vibration alarm
Factory setting
1
5
1
On
On
3
high
off
english
off
Room monitoring (babyphone)
You can use your handset as a baby monitor.
The handset should be placed at least 1 to 2 meters
away from your baby. If a certain noise level is reached (for
example if your baby is crying) the handset will automatically dial the number you stored (internal or external).
When the room monitor is active, incoming calls are
merely displayed.
22
4000co.fm
Gigaset 4000 Micro, IM1 eng, A31008-G4000-B022-2-6Z19
18.03.02
Room monitoring (babyphone)
Press Keys:
Setting the room monitor
© Open the menu.
D åååååååååååååååååååååååååååååååå
[
Add. Features
D åååååååååååååååååååååååååååååååå
[
Room Monitor.
FG
D
Change
Select the menu item and confirm.
Select the menu item and confirm.
Select On or Off .
Scroll forward one line.
Open the entry field for the telephone number.
Delete an existing external number with X.
Delete an existing internal number with YES (you will
be asked to confirm).
F o Open the list of internal users and select the internal
number.
[ Save the number.
or
D Open the directory.
D [ Select an external user.
© Open the menu.
[ Confirm the setting.
Save Entry
åååååååååååååååååååååååååååååååå
D Go down one line.
F G Set sensitivity to “high” or “low”.
Save
Save the setting.
Room monitoring can be deactivated with the display
key Off .
You can deactivate the room monitor from an external number (from your mobile phone for example).
Answer a call made from the room monitor.
Deactivate with ».
The room monitor is now deactivated. The room monitor will no longer call.
23
Gigaset 4000 Micro, IM1 eng, A31008-G4000-B022-2-6Z19
4000co.fm
18.03.02
Walk and Talk mode
Press Keys:
Walk and Talk mode
Requirements:
The handsets must have the same base settings (e.g.
best base station) or they must not be registered at
any base station. (Walk and Talk mode reduces the
handset's talk time considerably).
In Walk and Talk mode, handsets are not available for
incoming calls.
Activating Walk and Talk mode on the handset
© Open the menu.
D åååååååååååååååååååååååååååååååå
[ Select the function.
Add. Features
D åååååååååååååååååååååååååååååååå
[ Activate Walk and Talk mode.
Walk and Talk
Walk and Talk mode can be deactivated with the
display key Off .
Using Walk and Talk mode
Two handsets are in Walk and Talk mode:
Calling handset:
Call
Press.
Called handset:
The call is indicated by a message on the display.
Silent
c
a
24
Press.
Press.
The two handsets are connected to one another.
Press. The call is ended.
Gigaset 4000 Micro, IM1 eng, A31008-G4000-B022-
4000co.fm
18.03.0
Appendix
Appendix
Operating on base stations in the Gigaset family
Gigaset 1000/2000/3000
The following functions on your 4000 Micro/Comfort handset are not
supported by base stations in this Gigaset family:
●
●
●
●
Setting the time (the time is not transferred after the handset has
been switched off)
Changing the display language
Room monitoring (cannot be switched off externally)
SMS transfer (SMS-compatible base stations only)*
Gigaset 4010/4015 Classic
The following functions on your 4000 Micro/Comfort handset are not
supported by the above-mentioned base stations:
●
●
●
Changing the display language
SMS transfer*
Setting authorisation stages
* Not available in all countries
Looking after your phone
Wipe the base station and handset with a damp cloth or an antistatic
wipe. Never use a dry cloth as this can cause static discharge.
Contact with liquid
!
If the handset should come into contact with liquid,
on no account switch the device on.
Remove all batteries immediately.
Allow the liquid to drip out of the device, and then dab all parts of the
device dry.
Keep the handset with the batteries removed in a warm, dray place for
at least 72 hours. In many cases, you will then be able to use it again.
25
Gigaset 4000 Micro, IM1 eng, A31008-G4000-B022-2-6Z19
4000co.fm
18.03.02
Appendix
Recommended batteries:
Nickel-Metal-Hydride (NiMH), 500 mAh.
Order No. V30145-K1310-X125 or
Order No. V30145-K1310-X229
The handset’s operating times/charging time:
Capacity
(mAh)
Standby time
(hours)
Talk time
(hours)
Charging time
(hours)
500
up to 300
approx. 16
approx. 5.5
Battery charging capacity falls after a number of years.
Range
The handset will operate away from the base station up to about 300
m outdoors and up to 50 m indoors.
Desktop charging station
The desktop charging station for Siemens mobile telephones can also
be used to charge your handset.
(Accessory for Siemens C45, ME45, S45 mobile telephones)
Order No. L36880-N4501-A101
½
When a Gigaset handset is being charged in the desktop charging station, a spare battery will not be charged up while the
handset is in the charging station.
The charge display LED is always lit.
Guarantee
Scope
●
●
●
●
26
This equipment guarantee applies to end users (“customers”). This guarantee does not
in any way affect the customer's statutory rights.
The guarantee applies to the supplied devices and all their components but not to their
installation or configuration or to the services provided by the dealer. Manuals and any
software supplied on a separate data medium are excluded from the guarantee. This
guarantee does not apply to decorative covers or any other personalised parts or
software not included in the scope of supply. The guarantee also does not apply to
decorative top or bottom shells for special editions.
The guarantee provides for devices or components that, despite proper care and use,
have demonstrably developed defects due to faulty workmanship and/or faulty
materials to be replaced or repaired at our discretion free of charge. The guarantee
does not cover normal wear and tear. Alternatively, we reserve the right to replace the
defective device with a successor model or reimburse the original purchase price on
return of the defective device. Our decision is final. Any legal claims are excluded.
Claims under the guarantee cannot be made if
– the defect or damage was caused by improper care or use.
Improper care or use includes the following:
Gigaset 4000 Micro, IM1 eng, A31008-G4000-B022-
4000co.fm
18.03.0
Appendix
–
–
–
–
●
●
●
●
●
●
●
●
●
Opening the device (this is classed as third-party intervention)
Manipulating components on the printed circuit board
Manipulating the software
Defects or damage caused by dropping, breaking, lightning or ingress of moisture.
This also applies if defects or damage was caused by mechanical, chemical, radio interference or thermal factors (e.g. microwave, sauna, etc.).
– Repairs or other work done by persons not authorised by us.
– Devices fitted with accessories not authorised by Siemens.
Any further claims due to damage are excluded, such as damage arising outside the
device, provided this was not due to gross negligence and/or intent on our part.
Claims under the guarantee must be made as soon as the defect is noticed.
A till receipt showing the date of purchase must be presented as proof. Each claim
under the guarantee is accepted with the express reservation that subsequent
investigations confirm the validity of the claim.
Any devices or components that are replaced become our property.
The costs of materials and labour will be borne by us, but not the costs of transport,
postage or freight.
We are entitled, at our discretion, to make technical changes (such as firmware
updates) beyond repair or replacement in order to upgrade the device to the latest state
of the art. There is no additional charge to the customer for this work. Our decision is
final. Any legal claims are excluded.
The guarantee is valid in the country of purchase. It applies only if the device is operated
in the relevant geographical area in accordance with the information on the packaging
and in the operating instructions.
Any further claims are excluded. Siemens is not liable in any circumstances for
downtime, loss of profits, loss of data or loss of any other information. The customer
alone is responsible for safeguarding such data and information.
Changes to this guarantee require prior approval by Siemens in writing.
Guarantee period
●
●
●
●
●
The guarantee applies in countries in the EU from 1 January 2002 for a period of 24
months.
In all other countries the guarantee period shall be the relevant minimum statutory
guarantee period, but no longer than 24 months.
The guarantee period starts on the day of purchase by the customer.
A successful claim under the guarantee does not extend the guarantee period.
Work under the guarantee is handled by our Customer Care Centers.
The guarantor is Siemens Aktiengesellschaft Deutschland, Schlavenhorst 88, D-46395
Bocholt.
½
To redeem the guarantee please contact your local Customer
Care Center (see back cover).
Customer Care Service
You can get assistance easily when you have technical questions or
questions about how to use your device by using our online support
service on the Internet at:
www.my-siemens.com/customercare
If the device needs to be repaired, please contact one of our service
centers:
Service telephone number see back cover.
The CE symbol indicates that the telephone complies with the essential requirements of the R&TTE directive.
The 4000 Micro handset is approved for use in Switzerland and
throughout the EU.
27
Gigaset 4000 Micro, IM1 ndl, A31008-G4000-B022-2-
A31008- G4000- B022- 2- 6Z19
Issued by
Information and Communication mobile
Haidenauplatz 1
D-81667 München
© Siemens AG 2002
All rights reserved. Subject to availability.
Right of modification reserved.
Printed in Germany (03/2002)
Siemens AG
http://www.my-siemens.com
Best.-Nr.: A31008-G4000-B022-2-6Z19
4000co-Rücksei-
18.03.02