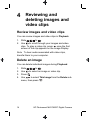
1
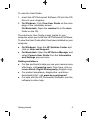
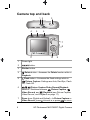
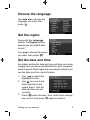
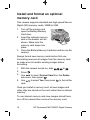
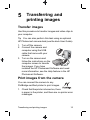
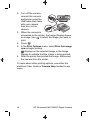
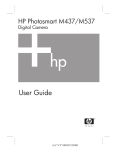
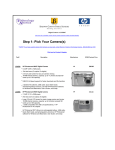
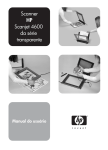
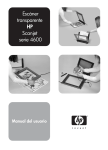
HP Photosmart M437/M537
Digital Camera
Quick Start Guide
www.hp.com/support
Argentina (Buenos Aires)
Argentina
54-11-4708-1600
Brasil (São Paulo)
Brasil
55-11-4004-7751
0-800-709-7751
Canada
1-800-474-6836
0-800-555-5000
Chile
800-360-999
Colombia (Bogota)
Colombia
571-606-9191
01-8000-51-4746-8368
Costa Rica
0-800-011-1046
Ecuador (Andinatel)
1-999-119
800-711-2884
1-800-225-528
800-711-2884
Ecuador (Pacifitel)
El Salvador
800-6160
Guatemala
1-800-711-2884
Jamaica
1-800-711-2884
Mexico (Mexico City)
Mexico
55-5258-9922
01-800-472-68368
Panama
1-800-711-2884
Paraguay
009 800 54 1 0006
Perú
0-800-10111
Puerto Rico
1-877-232-0589
República Dominicana
1-800-711-2884
Trinidad & Tobago
1-800-711-2884
United States
1-800-474-6836
Uruguay
0004-054-177
Venezuela
0-800-474-68368
4x6TitlePage_in_5x7Page.fm Page 1 Friday, August 25, 2006 2:16 PM
HP Photosmart M437/M537
Digital Camera
Legal and notice information
© Copyright 2007 Hewlett-Packard Development Company,
L.P.
The information contained herein is subject to change without
notice. The only warranties for HP products and services are
set forth in the express warranty statements accompanying
such products and services. Nothing herein should be
construed as constituting an additional warranty. HP shall not
be liable for technical or editorial errors or omissions contained
herein.
Windows® is a U.S. registered trademark of Microsoft
Corporation.
SD Logo is a trademark of its proprietor.
Disposal of waste equipment by users in private
households in the European Union
This symbol on the product or on its packaging indicates
that this product must not be disposed of with your other
household waste. Instead, it is your responsibility to dispose of
your waste equipment by handing it over to a designated
collection point for the recycling of waste electrical and
electronic equipment. The separate collection and recycling of
your waste equipment at the time of disposal will help to
conserve natural resources and ensure that it is recycled in a
manner that protects human health and the environment. For
more information about where you can drop off your waste
equipment for recycling, please contact your local city office,
your household waste disposal service or the shop where you
purchased the product.
For future reference, enter the following information:
●
●
●
Model number (camera front): _________
Serial number (camera bottom): _________
Purchase date: _________
Contents
1
2
3
4
5
6
Getting started.....................................................4
Viewing the electronic User Guide.........................4
Camera top and back ............................................6
Camera front, side, and bottom.............................7
Setting up your camera.......................................8
Install the batteries.................................................8
Turn on the camera................................................8
Choose the language.............................................9
Set the region.........................................................9
Set the date and time.............................................9
Install and format an optional memory card
.............................................................................10
Install the software...............................................11
Taking pictures and recording video clips
.............................................................................12
Take a picture......................................................12
Record a video clip..............................................12
Reviewing and deleting images and video
clips.....................................................................14
Review images and video clips............................14
Delete an image...................................................14
Transferring and printing images.....................15
Transfer images...................................................15
Print images from the camera..............................15
Camera quick reference....................................17
3
1
Getting started
This printed Quick Start Guide provides the information
you need to get started using the essential features of
your camera. For detailed information about camera
features, see the electronic User Guide (see Viewing the
electronic User Guide on page 4).
Quick Start Guide
Electronic User Guide
This printed guide will help
you to:
The electronic User Guide
includes:
●
●
●
Start using your camera ●
quickly
Install the HP Photosmart ●
Software
Become familiar with
your camera's basic
features
●
●
●
Descriptions of all the
camera features
Battery information,
including:
–
Extending battery
life
– Supported battery
types
– A description of the
power indicator
icons
Getting assistance from
HP
Troubleshooting
Camera specifications
Viewing the electronic User Guide
The electronic User Guide is on the HP
Photosmart Software CD.
4
HP Photosmart M437/M537 Digital Camera
To view the User Guide:
1. Insert the HP Photosmart Software CD into the CD
drive of your computer.
2. On Windows: Click View User Guide on the main
page of the installation screen.
On Macintosh: Open the readme file in the docs
folder on the CD.
The electronic User Guide is also copied to your
computer when you install the HP Photosmart Software.
To view the User Guide after it has been installed on your
computer:
●
●
On Windows: Open the HP Solution Center and
click on Help and Support.
On Macintosh: Open the HP Device Manager and
select Camera User Guide from the Information
and Settings pop-up menu.
Getting assistance
● For tips and tools to help you use your camera more
effectively, visit www.hp.com. From here, click on
Learn About: Digital Photography (English only).
● For product assistance, diagnostics, and driver
downloads 24x7, visit www.hp.com/support.
● For help with the HP Photosmart Software, see the
software's online help.
Getting started
5
Camera top and back
1 2
4
5
3
6
7
8
11
1
10
9
Power light.
2
button.
3
Shutter button.
4
Delete button—Accesses the Delete function while in
Playback.
5
Flash button—Accesses the flash settings while in
Picture Capture. Settings are Auto, Red-Eye, Flash
On, Flash Off.
6
Picture Capture/Video Record/Playback
selector—Switches between
Picture Capture,
Playback (see Picture Capture,
Video Record, and
Video Record, and Playback on page 17).
7
Zoom lever (Digital and Optical)—In Picture Capture or
Video Record, press
6
to zoom in or press
to zoom
HP Photosmart M437/M537 Digital Camera
out. In Playback, press
or press
to magnify the selected image
to view thumbnails of your images.
8
and
images.
9
button—Displays camera menus, selects options,
and confirms actions.
10
Back button—Returns you to a previous menu or
view. Press and hold to back out of all menus.
11
Image Display.
buttons—Scroll through menus and
Camera front, side, and bottom
1
2
3
6
5
4
1
Flash.
2
Self-Timer light.
3
Microphone.
4
Tripod mount.
5
Dock/USB connector.
6
Battery/Memory Card door.
Getting started
7
2
Setting up your
camera
Install the batteries
1. Open the Battery/Memory Card
door by sliding the door latch as
indicated on the Battery/Memory
Card door.
2. Insert the two AA batteries.
3. Close the Battery/Memory Card
door.
Note If using rechargeable NiMH batteries, fully
charge the batteries before using them the first time.
Turn the camera off before removing the batteries.
Camera usage and battery type will affect
battery life. Photo Lithium and NiMH batteries
provide longer battery life than Alkaline
batteries. For complete information, see Appendix A in
the electronic User Guide.
Actual battery life may vary based on usage.
Turn on the camera
To turn on the camera, press the
8
button.
HP Photosmart M437/M537 Digital Camera
Choose the language
Use
to choose the
language you want, then
.
press
Set the region
Along with the Language
setting, the Region setting
determines the default date
format.
Use
to choose the region
.
you want, then press
Set the date and time
Accurately setting the date and time will help you locate
images once you have uploaded them to your computer,
and will ensure that images are accurately marked if you
use the date and time imprint feature.
1. Use
to adjust the
highlighted value.
to move to the
2. Use
other selections and
repeat Step 1 until the
date and time are set
correctly.
3. Press
when the date, time, and format settings
again to confirm.
are correct, then press
Setting up your camera
9
Install and format an optional
memory card
This camera supports standard and high speed Secure
Digital (SD) memory cards, 32MB to 2GB.
1. Turn off the camera and
open the Battery/Memory
Card door.
2. Insert the optional memory
card in the smaller slot as
shown. Make sure the
memory card snaps into
place.
3. Close the Battery/Memory Card door and turn on the
camera.
Always format new memory cards before first use.
Formatting removes all images from the memory card,
so make sure to transfer existing images before
formatting.
1. With the camera turned on, slide
to
.
2. Press .
3. Use
to select Format Card from the Delete
.
sub-menu, then press
4. Use
to select Yes, then press
to format the
card.
Once you install a memory card, all new images and
video clips are stored on the card, rather than in internal
memory.
To use internal memory and view images stored there,
turn off the camera then remove the memory card.
10
HP Photosmart M437/M537 Digital Camera
Install the software
The HP Photosmart Software provides features for
transferring images and video clips to your computer, as
well as features for modifying stored images (remove red
eyes, rotate, crop, resize, adjust image quality, add
colors and special effects, and more).
To install the HP Photosmart Software, your computer
must meet the system requirements as stated on the
camera packaging.
If you have trouble installing or using the HP Photosmart
Software, see the Hewlett-Packard Technical Support
website for more information: www.hp.com/support.
Windows
1. Close all programs and temporarily disable any virus
protection software.
2. Insert the HP Photosmart Software CD into the CD
drive and follow the on-screen instructions. If the
installation window does not appear, click Start,
click Run, type D:\Setup.exe, where D is the letter
of your CD drive, then click OK.
3. When the software has finished installing, re-enable
virus protection software.
Macintosh
1. Insert the HP Photosmart Software CD into the CD
drive.
2. Double-click the CD icon on the computer desktop.
3. Double-click the installer icon, then follow the onscreen instructions.
Setting up your camera
11
3
Taking pictures and
recording video clips
Slide
to either
record video clips.
to take pictures or to
to
Take a picture
You can take a picture when you
are in
Picture Capture.
to
.
1. Slide
2. Frame the subject in the Image
Display.
3. Press the Shutter button halfway down to measure
and lock the focus and exposure. The focus brackets
in the Image Display turn solid green when focus is
locked.
4. Press the Shutter button all the way down to take
the picture.
After you have taken a picture, the camera displays it
briefly in the Image Display.
Record a video clip
You can record a video when you
are in
Video Record.
1. Slide
to
.
2. Frame the subject in the Image
Display.
12
HP Photosmart M437/M537 Digital Camera
3. Press the Shutter button halfway down to measure
and lock the focus. The focus brackets in the Image
Display turn solid green when focus is locked.
4. Press the Shutter button all the way down to start
recording.
5. To stop recording video, press and release the
Shutter button again.
After you have recorded a video clip, the camera
displays it briefly in the Image Display.
Taking pictures and recording video clips
13
4
Reviewing and
deleting images and
video clips
Review images and video clips
You can review images and video clips in Playback.
to
.
1. Slide
2. Use
to scroll through your images and video
once the first
clips. To play a video clip, press
screen of the clip appears on the Image Display.
Note To hear audio associated with video clips,
transfer them to your computer.
Delete an image
You can delete individual images during Playback:
1.
2.
3.
4.
Slide
to
.
to select an image or video clip.
Use
Press .
Use
to select This Image from the Delete sub.
menu, then press
14
HP Photosmart M437/M537 Digital Camera
5
Transferring and
printing images
Transfer images
Use this procedure to transfer images and video clips to
your computer.
Tip You can also perform this task using an optional
HP Photosmart camera dock (see the dock User Guide).
1. Turn off the camera.
2. Connect the camera and
computer using the USB
cable that came with your
camera.
3. Turn on the camera and
follow the instructions on the
computer screen to transfer
the images. If you have
installed the HP Photosmart Software and need
more information, see the Help feature in the HP
Photosmart Software.
Print images from the camera
You can connect the camera to any
PictBridge-certified printer to print images.
1. Check that the printer is turned on, there
is paper in the printer, and there are no printer error
messages.
Transferring and printing images
15
2. Turn off the camera,
connect the camera
and printer using the
USB cable that came
with your camera,
then turn on the
camera.
3. When the camera is
connected to the printer, the Image Display shows
an image. Use
to select the image you want to
print.
4. Press
.
5. In the Print Options menu, select Print this image
now to begin printing.
displays on the selected image in the Image
Display to indicate that the image is being printed.
6. After the printer has printed the image, disconnect
the camera from the printer.
To learn about other printing options, see either the
electronic User Guide or Camera Help located in any
menu.
16
HP Photosmart M437/M537 Digital Camera
6
Camera quick
reference
Use this chapter as a quick reference to camera
features. To learn more about these camera features,
refer to the electronic User Guide or on-camera Help.
Picture Capture, Video Record, and Playback
● Picture Capture allows you to frame pictures in the
Image Display. To activate Picture Capture, slide
to
.
● Video Record allows you to frame videos in the
Image Display. To activate Video Record, slide
to
.
● Playback allows you review and delete images and
video clips. To activate Playback, slide
to
.
Camera Menus
Menus allow you to adjust camera settings, work with
images, and access camera Help.
●
●
Within a menu, use
to move to specific
selections.
To exit the menu, press
at any time.
Picture Capture Menu—Allows you to adjust
camera settings that affect the characteristics of future
images you capture with your camera. To access this
Camera quick reference
17
menu, slide
to
, then press
select from the following options:
●
●
●
●
●
●
●
. You can
Shooting Mode (Auto, Close-up, Steady Photo,
Theatre, Landscape, Portrait, Action, Night Portrait,
Sunset)
Self-Timer
Image Quality
Burst
Date & Time Imprint
Camera Setup
Camera Help
Video Capture Menu—Allows you to adjust camera
settings that affect the characteristics of future video
clips you capture with your camera. To access this
menu, slide
to
, then press
. You can
select from the following options:
●
●
●
Self-Timer
Camera Setup
Camera Help
Playback Menu—Allows you to work with images.
To access this menu, slide
to
, then press
. You can select from the following options:
●
●
●
●
●
●
18
Remove Red Eyes
Design Gallery (Modify Color, Add Borders, Crop,
Rotate)
Photosmart Express (Print, Share, Buy Prints
Online)
Favorites
View Slideshow
Move Images to Card
HP Photosmart M437/M537 Digital Camera
●
●
Camera Setup
Camera Help
Camera Setup Menu—Allows you to change the
from
camera's behavior. To access this menu, press
,
, or
, then select Camera Setup. You can
select from the following options:
●
●
●
●
●
Display Brightness
Camera Sounds
Date & Time
USB Configuration
Language
Camera Help Menu—Provides descriptions of
camera features and picture-taking tips. To access this
from
, , or , then select Camera
menu, press
Help. You can select from the following options:
●
●
●
●
●
●
●
●
●
●
●
●
●
●
●
Top Ten Tips
Camera Accessories
Camera Buttons
Using Shooting Modes
Using Design Gallery
Using Photosmart Express
Printing Images
Recording Video Clips
Reviewing Pictures and Videos
Tagging Favorites
Deleting Images
Transferring Images
Managing Batteries
Getting Assistance
Tour Camera Features
Camera quick reference
19
●
●
Camera Shortcuts
About
Extending battery life
To conserve battery power, the Image Display turns off
after a period of inactivity. Pressing any button wakes up
the camera. After five minutes of inactivity, the camera
turns off.
To further extend battery life:
●
●
●
●
●
20
Set Display Brightness to Low (see the electronic
User Guide for details).
Set your camera to Auto Flash (see the electronic
User Guide for details).
Use optical zoom, video recording, and Image
Display sparingly.
If you are turning on the camera only to view images,
slide
to , then turn on the camera to start
in Playback without extending the lens.
When transferring or printing images, place your
camera in an optional HP Photosmart dock
connected to AC power.
HP Photosmart M437/M537 Digital Camera
© 2007 Hewlett-Packard Development Company, L.P.
Printed in China
www.hp.com
*L2442−90009*
L2442-90001