1
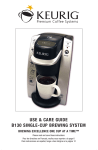
USE & CARE GUIDE
B100 SINGLE-CUP BREWING SYSTEM
B R E W I N G E X C E L L E N C E O N E C U P AT A T I M E
C
UL
US
Part # 71-000039-003
For Household and Commercial Use.
Revision E, May. 2004
®
ANSI/NSF 4
WARRANTY
Limited One Year Warranty
Keurig warrants that your Keurig B100 Brewer will be free of defects in materials or
workmanship under normal home use for one year from the date of purchase. Keurig will,
at its option, repair or replace the Brewer without charge upon its receipt of proof of the date
of purchase. If a replacement Brewer is necessary to service this warranty, the replacement
Brewer may be new or reconditioned. If a replacement Brewer is sent, it will carry the remaining
warranty of the original product. Keurig will cover all shipping costs for authorized returns.
This warranty only applies to Brewers operated in the United States and Canada. This warranty
gives you specific legal rights, and you may also have other rights that vary from state to state
and, in the case of Canada, from Province to Province.
What is not covered by the Limited Warranty?
THIS WARRANTY DOES NOT COVER CONSEQUENTIAL OR INCIDENTAL DAMAGES SUCH
AS PROPERTY DAMAGE AND DOES NOT COVER INCIDENTAL COSTS AND EXPENSES
RESULTING FROM ANY BREACH OF THIS WARRANTY, EVEN IF FORESEEABLE. Some states
or Provinces do not allow the exclusion or limitations of incidental or consequential damages,
so the above limitation or exclusion may not apply to you depending on the state or Province
of purchase.
Nor does this warranty cover damages caused by services performed by anyone other than
Keurig or its authorized service providers, use of parts other then genuine Keurig parts, or
external causes such as abuse, misuse, inappropriate power supply or acts of God.
Other Limitations
THIS WARRANTY IS EXCLUSIVE AND IS IN LIEU OF ANY OTHER EXPRESS
WARRANTY, WHETHER WRITTEN OR ORAL. THE DURATION OF ANY IMPLIED WARRANTIES,
INCLUDING BUT NOT LIMITED TO ANY IMPLIED WARRANTIES OF MERCHANTABILITY OR
FITNESS FOR A PARTICULAR PURPOSE, IS EXPRESSLY LIMITED TO THE PERIOD OF
DURATION OF THIS LIMITED WARRANTY. Some states or Provinces do not allow limitations
on how long an implied warranty lasts, so the above limitation may not apply to you depending
on the state or the Province of purchase.
How do you obtain warranty service?
Keurig Brewers are high quality appliances and, with proper care, are intended to provide years
of satisfying performance. However, should the need arise for warranty servicing, simply call
Keurig Customer Service at our toll free phone number 1-866-901-BREW (2739). Please do not
return your Brewer for servicing without first speaking to Keurig Customer Service to obtain an
Authorization to Return number (ATR). Keurig Brewers returned without an ATR number will be
returned to the sender without servicing.
Keurig, Inc.
101 Edgewater Drive
Wakefield, MA 01880
KEURIG B100
Single-Cup Brewing System
Use & Care Guide
TABLE OF CONTENTS
SECTION 1
SAFE OPERATION & USE
Important Safeguards . . . . . . . . . . . . . . . . . . . . . . . . . . . .
SECTION 2
SET-UP & OPERATION
Helpful Hints . . . . . . . . . . . . . . . . . . . . . . . . . . . . . . . . . . . . .
Unpacking . . . . . . . . . . . . . . . . . . . . . . . . . . . . . . . . . . . . . . .
Features of the B100 Brewer . . . . . . . . . . . . . . . . . . . . .
Assembly . . . . . . . . . . . . . . . . . . . . . . . . . . . . . . . . . . . . . . . .
Set-Up & First Brew . . . . . . . . . . . . . . . . . . . . . . . . . . . . . .
SECTION 3
3
4
5
5
7
8
CARE & MAINTENANCE
Cleaning Exterior Parts . . . . . . . . . . . . . . . . . . . . . . . . . .
Cleaning the K-Cup Holder Assembly . . . . . . . . . . . .
Draining & Storing Your Keurig Brewer . . . . . . . . . .
De-Scaling Your Keurig Brewer . . . . . . . . . . . . . . . . . .
Eliminating Potential Plastic Odor . . . . . . . . . . . . . . .
SECTION 5
2
CONTROLS & INDICATORS
Brewer Control Panel . . . . . . . . . . . . . . . . . . . . . . . . . . . .
Water Level Indicator . . . . . . . . . . . . . . . . . . . . . . . . . . . .
SECTION 4
1
TROUBLESHOOTING
...........................
9
9
10
10
12
13
SECTION 1
SAFE OPERATION & USE
Important Safeguards
When using electrical appliances, basic safety precautions should always be followed,
including the following:
1. Read all Instructions.
2. Do not touch hot surfaces.
3. To protect against fire, electric shock and injury to persons do not immerse cord,
plugs, or the appliance in water or other liquid.
4. Close supervision is necessary when any appliance is used by or near children.
5. Unplug from outlet when not in use and before cleaning. Allow to cool before putting
on or taking off parts, and before cleaning the appliance.
6. Do not operate any appliance with a damaged cord or plug or after the appliance
malfunctions, or has been damaged in any manner. Return appliance to the nearest
authorized service facility for examination, repair or adjustment.
7. The use of accessory attachments not recommended by the appliance manufacturer
may result in fire, electric shock or injury to persons.
8. Do not use outdoors.
9. Do not let cord hang over edge of table or counter, or touch hot surfaces.
10. Do not place on or near a hot gas or electric burner, or in a heated oven.
11. Plug cord into the wall outlet and turn switch to “on”. To disconnect, turn any control
to “off”, then remove plug from wall outlet.
12. Do not use appliance for other than intended use.
13. Do not overfill with water.
14. For best operation, plug the appliance into its own electrical outlet on a dedicated
circuit to prevent flickering of lights, blowing of fuses or tripping a circuit breaker.
15. This appliance is equipped with a power cord having a grounding wire with a grounding
plug. The appliance must be grounded by using a 3-hole properly grounded outlet.
In the event of an electrical short circuit, grounding reduces the risk of electrical shock.
16. If the outlet is a standard 2-prong wall outlet, it is your personal responsibility and
obligation to have it replaced with a properly grounded 3-prong wall outlet.
17. Do not, under any circumstances, cut or remove the third (ground) prong from the
power cord or use an adapter.
18. Consult a qualified electrician if the grounding instructions are not completely
understood, or if doubt exists as to whether the appliance is properly grounded.
19. This appliance must be properly installed and located in accordance with these
instructions before it is used.
SAVE THESE INSTRUCTIONS.
1
SECTION 2
SET-UP & OPERATION
Helpful Hints
1. Keep your Keurig Brewer turned “ON” all the time.
For a fresh cup of coffee or tea anytime you want, we suggest you keep your Keurig
Brewer turned “ON” all the time. The Brewer draws minimal power (approximately the
equivalent of a 60 Watt light bulb).
2. Turn Brewer “OFF” if you do not plan to use it for a week or longer.
Turn Brewer to “OFF” and unplug it if you do not plan to use it for a week or more. Drain
the water if you wish. Please follow the draining instructions in the Care & Maintenance
section on page 10 of this guide.
TURNING YOUR BREWER BACK ON.
When you turn it back on, a full tank of water will take approximately 8 – 10 minutes to
heat fully from room temperature. To brew your first cup sooner, do not completely fill the
tank. Less water in the tank will allow the water to heat up faster.
3. Plug the Brewer into its own outlet.
Plug the Brewer into its own outlet. If the electric circuit is overloaded with other
appliances, your Brewer may not function properly. The Brewer should be operated on its
own circuit, separate from other appliances.
4. Water varies from place to place.
Mineral and chlorine content in water varies from place to place. If you notice an
undesirable taste in your cup of coffee such as chlorine or other mineral taste, you should
consider using bottled water or water from a filtration system such as Brita®.
To remove chlorine taste or odor, you may also purchase a Charcoal Filter designed for
your Brewer on our website at www.keurig.com.
5. The Brew Button will only work when the Green “Ready” Light is flashing. After
closing the Brew Drawer, it will flash for 60 seconds, during which time you can press
the Brew Button. If you do not push the Brew Button in 60 seconds, the Brew Button will
be disabled to prevent accidental activation. Re-activate the Brew Button by opening and
closing the Brew Drawer.
6. Filling the Brewer
The Water Fill Lid is designed to close automatically to prevent hot water or steam from
escaping through a lid that may have been left accidentally open. If filling the Brewer is a
bit diifficult because it is positioned under a cabinet, simply grasp the Brewer by the lower
part of the front, side panels and pull toward you. The base is specially constructed to
make sliding the Brewer easy.
2
Unpacking
Carefully remove the Brewer from its package and check the contents of this box.
It should contain the following:
Parts Checklist:
1. K-Cup Holder Assembly (preassembled)
1 K-Cup Holder
1 Funnel
2. Keurig B100 Brewer
3. Drip Tray Assembly consisting of
1 Drip Tray
1 Drip Tray Plate
1 Cleaning Tool (under Drip Tray)
1. K-Cup Holder Assembly (preassembled)
1 K-Cup Holder
1 Funnel
2. Keurig B100 Brewer
K-Cup Holder
Funnel
3. Drip Tray Assembly
1 Drip Tray
1 Drip Tray Plate
1 Cleaning Tool
3
Features of the B100 Brewer
Water Fill Area & Lid
“Brew”
Button
Red
“Not Ready”
Light
Green
“Ready”
Light
Drain Cap
(in rear)
Brew
Drawer
On/Off
Switch
(in rear)
Cleaning Tool (under Drip Tray)
Drip Tray
Plate
Water Fill Indicator
Drip Tray
4
Assembly
1. Drip Tray Assembly
Drip Tray Plate
a. Ensure that Drip Tray Plate rests on
Drip Tray.
b. Place Drip Tray Assembly at the front
base of the Brewer.
2. K-Cup Holder Assembly
Drip Tray
K-Cup Holder Assembly
a. Open the Brew Drawer.
b. Insert K-Cup Holder Assembly into the
Brew Drawer and press down until
the K-Cup Holder Assembly snaps firmly
in place.
Brew Drawer
NOTE: The K-Cup Holder and Funnel can become separated during shipping. To
reassemble, line up the notch in the Funnel (lower section) with the tabs in the
K-Cup Holder (top section). Position one post from the Funnel into the square hole on
the underside of the K-Cup Holder. Snap the other post into place.
Set-Up & First Brew
1. Power
a. Plug Brewer in.
b. Turn power switch found on rear of Brewer to “ON” setting.
c. The Red “Not Ready” Light on the Brewer Control Panel will come on and the
blue light behind the Water Level Indicator will flash on and off.This indicates the
Brewer needs water.
5
2. Fill with Water
Water Fill Lid
Vent Port
a. Lift the Water Fill Lid and hold
it open.
Water Fill Area
b. Fill the Brewer with up to 80 oz of water
on the initial fill (regular re-fill quantity
is 64 oz) by pouring water into the
Water Fill Area.
c. The Water Fill Indicator will be flashing
with a blue light while you are filling or
re-filling, and will stop flashing when
water passes the minimum fill level.
d. The Brewer will indicate that it has
reached the full water level with four
flashes of the Green "Ready" Light
and 4 audible beeps.
3. Perform Eight Cleansing Brews First
Red “Not Ready” Light
Green “Ready” Light
Water Fill Indicator
The Red “Not Ready” Light indicates
the Brewer is not ready (the water is
heating). Wait for 8 – 10 minutes.
The Green “Ready” Light will illuminate
when the water has reached the proper
temperature for brewing.
a. Place a mug on the Drip Tray Plate.
b. Open and close the Brew Drawer, green light
will flash.
c. Press the Brew Button and hot water will
dispense into the mug.
d. Pour hot water into the sink.
CAUTION: When refilling the Brewer,
it is possible for hot steam to escape.
Take care not to position your hand
directly over the Vent Port located on
the right side of the Water Fill Area.
e. Repeat until brewer is empty.
4. Brew and Enjoy a Fresh Brewed Mug
Brew Button
a. Refill the brewer with water and allow
to heat.
K-Cup
b. Place a mug on the Drip Tray.
K-Cup Holder
c. Open the Brew Drawer and insert
a K-Cup into the K-Cup Holder as
shown.
d. Close the Brew Drawer (flashing Green
“Ready” Light signals ready to brew).
e. Press the Brew Button to start
the brewing process.
f. After an air purge completes the
45 second brew process, open the
Brew Drawer and remove and dispose
of the used K-Cup.
g. Enjoy your fresh brewed coffee or tea!
h. Your Brewer is ready to brew your next mug.
6
Brew Drawer
NOTE: Do not remove the foil lid
or puncture the K-Cup.
NOTE: Remember, the Brew Button will
not work if the Green "Ready" Light is not
flashing. Open and close the Brew Drawer
to reactivate the Brew Button.
SECTION 3
CONTROLS & INDICATORS
Brewer Control Panel
Controls operation and indicates the brewing system status.
Red
“Not Ready” Light
Green
“Ready” Light
“Brew”
Button
Control Panel Indicators
Display
Meaning
Red “Not Ready”
Solid
Not Ready - needs water or is
heating water.
Flashing
May need to be de-scaled or serviced.
Refer to Troubleshooting on page 13.
Solid
Water has reached correct temperature OR
coffee is brewing.
Flashing
Brew Drawer has been opened and closed
activating the Brew Button for 60 seconds.
Green “Ready”
NOTE: Remember, the Brew Button will
not work if the Green "Ready" Light is not
flashing. Open and close the Brew Drawer
to reactivate the Brew Button.
4 Flashes &
4 Beeps
Stop filling with water.
Water level has reached full.
7
Water Level Indicator
Indicates the amount of water and water system status.
Water Level Indicator
Water Level Indicators
Display
Meaning
Water Fill Indicator
Solid Blue
Has sufficient water.
Flashing Blue
Needs water.
Flashing Yellow
De-scale Brewer (See instructions
on page 10).
If you have de-scaled the Brewer and
the light is still flashing yellow, the
Brewer may need service – contact customer
service at 1-866-901-BREW (2739).
Flashing Red
8
Needs service – contact customer service
at 1-866-901-BREW (2739).
SECTION 4
CARE & MAINTENANCE
Cleaning Exterior Parts
Regular cleaning of the Brewer’s external components is recommended.
a. Housing: the Housing and other exterior components may be cleaned with a soapy, damp
non-abrasive cloth.
b. Drip Tray & Drip Tray Plate: the Drip Tray can accumulate up to 16 oz of overflow. The
Drip Tray and Drip Tray Plate should be periodically inspected and rinsed clean. To remove
the Drip Tray Assembly, simply slide it toward you, keeping it level at all times, to avoid
spilling. The Drip Tray and Drip Tray Plate are dishwasher safe.
Cleaning the K-Cup Holder Assembly
a. Cleaning the Parts
The K-Cup Holder Assembly consists of the
K-Cup Holder and Funnel, and can be removed
for cleaning. Both parts are dishwasher safe.
To remove from the Brewer, grasp the Brew
Drawer with your thumbs and the bottom of
the Funnel with your fingers. Push the Funnel
straight up while holding the Brew Drawer
firmly. (Refer to the Assembly instructions on
page 5 to put the K-Cup Holder Assembly back
together after cleaning).
K-Cup Holder
Funnel
b. Cleaning the Exit Needle
The Exit Needle is located on the inside bottom
of the K-Cup Holder Assembly. Should a clog arise due to coffee grinds, it can be cleaned
using the Exit Needle Cleaning Tool which can be found on the underside of the Drip Tray.
Insert the Cleaning Tool into the Needle to loosen the clog and push it out. Wash with
warm, soapy water and rinse thoroughly. CAUTION: The Exit Needle is sharp.
Cleaning Tool
Cleaning Tool
Exit Needle
Drip Tray
c. Water Fill Area and Lid
Use a clean cloth soaked in hot water to wipe the Water Fill Area and Lid clean.
CAUTION: Please ensure that no cleaners or cleaning solutions are used in or
near the fill area as they may contaminate the water supply in the Brewer.
9
Draining & Storing Your Keurig Brewer
You can drain the water from your Keurig Brewer if you
are going to move it, store it or not use it for more than
a week.
To drain your Keurig Brewer, please follow these
instructions:
a. Turn power “OFF” and unplug the Brewer.
CAUTION: Water is hot, please allow it to cool
before draining.
b. Carry Brewer to the sink making sure that it stays
upright.
c. Remove the Drain Cap on rear of Brewer
and, if present, remove Charcoal Filter from
the Water Fill Area.
d. Rest the rear of the Brewer flat on the
counter with the drain positioned over the
sink and allow Brewer to drain. For best
results, do not tilt beyond a 90° angle.
e. Once water is drained, replace the Drain Cap and,
if used, the Charcoal Filter. Your Brewer is now ready
to be moved, stored or refilled.
De-scaling Your Keurig Brewer
Mineral content in water varies from place to place. Depending on the mineral content of the
water in your area, scale may build up on your Brewer. Scale is non-toxic, but left unattended,
it can hinder optimal Brewer performance. De-scaling your Brewer regularly helps maintain the
heating element, water tank and other parts of the Brewer that come in contact with water.
Better water quality and water heating means a better cup of coffee. We recommend
de-scaling your Brewer at least every 6 months (every three months if your water has high
mineral content).
You will need to de-scale your Brewer if you get a flashing yellow light behind the water fill
tube. The Brewer will not work properly if the yellow light is flashing.
It will take approximately 41⁄2-5 hours to de-scale your Brewer. Properly follow the de-scaling procedure on the following page.
10
a. PREPARE
Step 1: Make sure you have at least 64 oz. of undiluted white vinegar on hand.
You will also need an empty sink and a ceramic mug (do not use a paper cup).
Step 2: Turn power “OFF”, remove Charcoal Filter (if any) and drain the Brewer
as instructed in the Care & Maintenance section on page 10 of this guide.
CAUTION: Water may be hot. Remember to replace the Drain Cap.
b. FILL AND CLEAN
Step 1: Plug Brewer in and turn power “ON”.
Step 2: Pour approximately 64 oz of the vinegar into the Brewer until 4 beeps signal the
tank is full.
Step 3: Wait about 6 – 8 minutes for the vinegar to heat up and the Green “Ready” Light
to go on.
Step 4: Place a ceramic mug on the Drip Tray and run a brew cycle. Do not use a K-Cup,
just press the brew button.
Step 5: Repeat the brew process 4 times, pouring the contents of the mug back into the
brewer after each cycle.
Step 6: Now let the Brewer stand for 4 hours while still on.
Step 7: Place the ceramic mug on the Drip Tray and run 4 brew cycles, pouring the
contents of the mug into the sink after each cycle.
Step 8: Drain the Brewer as instructed in the Care & Maintenance section on page 10
of this guide. CAUTION: Vinegar may be hot. Remember to replace the Drain Cap.
c. RINSE
Step 1: Power up Brewer when empty.
Step 2: Fill the Brewer with hot tap water.
Step 3: Wait about 6 – 8 minutes for the water to heat up and the Green “Ready”
Light to go on.
Step 4: Place a ceramic mug on the Drip Tray and run a brew cycle.
Step 5: Repeat brew process 4 times for a total of 5 cycles.
Step 6: Drain the Brewer as instructed in the Care & Maintenance section
on page 10 of this guide.
CAUTION: Water may be hot. Remember to replace the Drain Cap.
Step 7: You may need to rinse again to eliminate any residual taste.
11
Eliminating Potential Plastic Odor
Like many new products, you may notice a slight plastic or metallic odor. If this persists,
we recommend this cleaning procedure to eliminate any odor.
a. PREPARE
Step 1: Turn power “OFF”, unplug and drain the Brewer as instructed in the Care and
Maintenance section on page 10 of this guide.
CAUTION: Water may be hot. Remember to replace the Drain Cap.
Step 2: Add 1 tablespoon of baking soda OR 2 tablespoons of white vinegar to 2 cups (16 oz)
of warm water; stir the water to fully dissolve the baking soda or white vinegar. Pour this
solution into the Brewer.
Step 3: Plug Brewer in, turn power “ON” and add 6 more cups of fresh water, or until the
Brewer is full. (Indicated by four flashes of the green light and 4 beeps.) Wait for water to reach
brewing temperature (Green “Ready” Light will go on.) This should take 6 - 8 minutes.
b. FILL AND CLEAN
Step 1: When ready, place a mug or cup on the Drip Tray, open and close the Brew Drawer, and
press the Brew Button to run a brew cycle. DO NOT INSERT A K-CUP. Pour contents of the
mug back into the Brewer. Repeat this step for a total of 4 cycles
Step 2: When step 1 is complete, let the Brewer sit for 30 minutes.
Step 3: Turn power “OFF” and drain the Brewer as instructed in the Care and Maintenance
section on page 10 of this guide.
CAUTION: Water may be hot. Remember to replace the Drain Cap.
c. RINSE
Step 1: Fill the Brewer with fresh water. Turn Brewer “ON” and wait 6 – 8 minutes for the water
to heat up and the Green “Ready” Light to go on.
Step 2: When ready, place a mug or cup on the Drip Tray; open and close the Brew Drawer, and
press the Brew Button to run a brew cycle. DO NOT INSERT A K-CUP. Repeat this step until
flashing blue light indicates that the Brewer needs water (about 8 cycles).
Step 3: Turn power “OFF” and drain the Brewer as instructed in the Care and Maintenance
section on page 10 of this guide.
CAUTION: Water may be hot. Remember to replace the Drain Cap.
d. READY TO BREW COFFEE OR TEA
Now you are ready to brew coffee or tea again. Plug Brewer in, turn power “ON”, fill with fresh
water, wait for the water to reach brewing temperature (Green “Ready” Light will go on), insert
K-Cup, and brew.
12
SECTION 5
TROUBLESHOOTING
SITUATION
SOLUTION
Brewer Does Not Have Power
Check to be sure it is plugged in securely.
Plug into a different outlet.
Reset circuit breaker if necessary.
Brewing a Partial Cup
(Less than 6 oz.)
Ensure Exit Needle is not clogged.
Clean K-Cup Holder Assembly if necessary
and rinse under faucet (See page 9).
If problem persists, call Customer Service
at 1-866-901-BREW (2739).
Water Fill Indicator is Flashing Blue
Brewer is empty, add water.
Green “Ready” Light is on,
but you can’t Brew
Open and close Brew Drawer. Green light
will flash. Push the Brew Button.
The Brew Button is disabled if the
user does not brew within 60 seconds of
closing the Brew Drawer. This prevents
accidental activation.
Red “Not Ready” Light Flashing and
Yellow Light on Water Indicator is Flashing
De-scale Brewer following procedure
on page 10.
If lights persist, water level sensor is
blocked call Customer Service at
1-866-901-BREW (2739) and turn off.
Red “Not Ready” Light Flashing and
Red Light on Water Indicator Solid
or Flashing
Turn off Brewer and call Customer
Service at 1-866-901-BREW (2739).
Slight Plastic or Metallic Smell in
Coffee, Tea or Hot Water
Follow procedure to eliminate this smell
on page 12 of this guide
13
TO CONTACT CUSTOMER SERVICE:
www.keurig.com
or
1-866-901-BREW (2739)
Made in USA
Keurig, Keurig-Brewed, Brewing Excellence One Cup at a Time,
and K-Cup are registered trademarks of Keurig, Inc.
©2003 Keurig, Inc.
All rights reserved.
Covered by U.S. Patents 5,325,765; 5,840,189; 6,079,315;
D462865 and other patents pending.