1
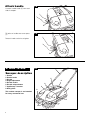
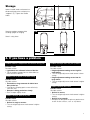
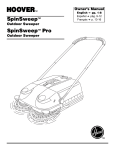
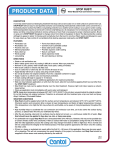
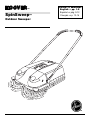
TM
SpinSweep™
Owner’s Manual
English ➜ pp. 1-8
Español ➜ pàg. 9-12
Français ➜ p. 13-16
Outdoor Sweeper
TM
Review this manual before
operating sweeper
Thank you for choosing a HOOVER product.
Please enter the COMPLETE model and serial numbers in the spaces provided.
The numbers are located on the bottom of your outdoor sweeper.
Model________________
Serial number__________________
Hint: Attach your sales receipt to this owner’s manual.
Verification of date of purchase may be required for warranty service
of your HOOVER product.
Be sure to fill out and return the product registration card included with your
outdoor sweeper (see back cover).
Important Safeguards!
Contents
Important Safeguards ....................2
Carton Contents .............................3
Assembly .....................................3-4
How to Use......................................4
Maintenance....................................6
If You Have a Problem ...................7
Service.............................................8
Warranty..........................................8
When using any equipment, always follow basic precautions,
including the following:
READ ALL INSTRUCTIONS BEFORE USING THIS PRODUCT
Warning:
To reduce the risk of fire, electric shock or injury:
• Close supervision is necessary when any equipment is used by or near
children. Do not allow outdoor sweeper to be used as a toy.
• Keep hair, loose clothing, fingers, feet and all parts of body away from openings and moving parts. Do not operate outdoor sweeper in bare feet or when
wearing open toe shoes or sandals.
• Do not use to pick up anything that is burning or smoking, such as cigarettes,
matches, or hot ashes.
• Do not use to pick up flammable, combustible, explosive, toxic, carcinogenic or
other materials and liquids dangerous to health.
• To avoid injury, use heavy gloves when removing glass, metal or similar
material from dirt bin.
• Do not use the outdoor sweeper near heat sources such as fire, fan heaters, or
other heat dissipating devices.
• Do not sweep over electrical cords.
• Use outdoor sweeper only for its intended use as described in the instructions.
Use only attachments recommended by The Hoover Company; others may
cause hazards.
Save these instructions!
© 2003 The Hoover Company
www.hoover.com
2
If you need any assistance:
Visit our website at www.hoover.com. Click on the “Service” button to find the
service outlet nearest you.
Please do not return this product to the store.
1. Assembly
Carton contents
1-1
A. Lower handle sections (2)
B. Top handle section
C. Outdoor sweeper
B
A
C
Assemble handle
1-2
Insert round end of straight lower
handle sections (A) into each side of
upper handle section (B).
B
A
Press button (C) on lower handle
section. Slide lower section into upper
handle until button snaps into one of
the holes (D).
1-3
Select upper holes for a shorter handle
or lower holes for a longer handle.
D
C
Continued
3
Attach handle
1-4
Unscrew handle knobs (E) from each
side of sweeper.
E
Fit holes on handle onto screw posts
(F).
1-5
Reattach knobs and twist to tighten.
F
2. How to use
2-1
1
Sweeper description
1.
2.
3.
4.
5.
6.
7.
8.
Handle
Handle knobs
Dirt bin
Height adjustment
Dirt bin handle
Dirt bin release button
SpinSweep™ brushes
Wall guides
5
4
6
2
3
8
This outdoor sweeper is not intended
for heavy commercial use.
2
8
7
4
The outdoor sweeper is designed for
use on hard, flat surfaces. It is not
intended to be used for wet pick up or
on lawns. Do not use outdoor sweeper
on steps.
2-2
The brushes rotate and sweep up
debris when the sweeper is pushed
forward.
For best results, push the outdoor
sweeper at a normal walking pace.
Brush height
adjustment
2-3
Turn the height adjustment control (A)
toward “HIGH” to raise the brushes.
(The rear of the sweeper will move to a
lower position.) Turn it towards “LOW”
to lower the brushes. (The rear of the
sweeper will move to a higher position.)
The settings
A
LOW - for smooth surfaces and picking up debris that is small in size.
HIGHER settings - for rougher surfaces, such as brick and asphalt, or for
picking up larger debris.
If the sweeper is difficult to push on a
surface, turn the height adjustment
toward “HIGH”.
Wall guides
2-4
Wall guides are provided on each side
of the sweeper to aid in sweeping
close to walls or edges.
Guide either side of sweeper along
walls.
Continued
5
3. Maintenance
Familiarize yourself with these home
maintenance tasks, as proper use and
care of your outdoor sweeper will
ensure continued cleaning ability.
Dirt bin
When to empty
It is recommended that the dirt bin be
emptied after every use.
How to empty
3-1
Slide dirt bin release (A) toward rear of
sweeper.
A
Lift on handle (B) and remove bin.
Empty bin in an approved trash receptacle. If needed, clean the bin and
exterior of sweeper with water and mild
detergent. Do not use any solventbased cleansers.
B
To replace dirt bin, align indent (C) on
bin over height adjustment (D).
3-2
C
Lower bin onto sweeper and snap in
place.
D
The brushes
Clean brushes with water and mild detergent. Do not use high pressure water
spray to clean the brushes.
New brushes can be installed by your local Hoover Service Center.
6
Storage
3-3
Loosen handle knobs and rotate handle toward the brushes and past the
“stoppers” (E). Tighten the handle
knobs.
E
E
E
Store the outdoor sweeper either
standing upright or hanging.
3-4
Store in a dry place.
4. If you have a problem
Problem: Debris is swept back onto surface during use.
Problem: Sweeper does not pick up debris.
Possible cause
Possible solution
• Light debris has collected in front of dirt bin.
• Tip the outdoor sweeper back to allow debris to
move to back of dirt bin.
Possible cause
Possible solution
• Height adjustment setting set too high for
small debris.
• Turn the height adjustment knob toward a lower
setting.
• Height adjustment setting set too low for
large debris.
• Turn the height adjustment knob toward a higher
setting.
Problem: Line of debris is left while using.
Possible cause
Possible solution
• Fine debris or large amounts of debris have
been picked up.
• Overlap the sweeping path to more effectively
clean the area.
• Sweeper is being pushed too slowly.
• Push sweeper slightly faster.
Problem: Sweeper difficult to push.
Possible cause
Possible solution
• Surface is rough or uneven.
• Turn the height adjustment knob toward a higher
setting.
Problem: Brushes won’t turn.
Possible cause
Possible solution
• Surface is uneven.
• Turn the height adjustment knob toward a higher
setting.
• Surface is too smooth.
• Sweeper not designed for optimum performance
on low friction surfaces, such as vinyl decks.
7
Service
To obtain approved HOOVER service and genuine HOOVER parts, locate the nearest Hoover Factory Service Center or
Authorized Hoover Warranty Service Dealer (Depot) by:
•
checking the Yellow pages under “Vacuum Cleaners - Household” OR -
•
checking the list of Factory Service Centers provided with this sweeper OR -
•
checking the Service section of The Hoover Company on-line at www.hoover.com OR -
•
calling 1-800-944-9200 for an automated referral of authorized service outlet locations (U.S. only).
Do not send your sweeper to The Hoover Company in North Canton for service, as this will only result in delay.
If further assistance is needed, contact The Hoover Company Consumer Response Center, North Canton, Ohio 44720,
Phone: 330-499-9499.
In Canada, contact Hoover Canada, Burlington, Ontario L7R 4A8, Phone: 1-800-263-6376.
Always identify your sweeper by the complete model number when requesting information or ordering parts. (The model number appears on the bottom of the sweeper.)
Full One Year Warranty
Your HOOVER® sweeper is warranted in normal household and light commercial use, in accordance with the Owner’s Manual
against original defects in material and workmanship for a period of one full year from date of purchase. This warranty provides, at
no cost to you, all labor and parts to place this sweeper in correct operating condition during the warranted period. This warranty
applies when the sweeper is purchased in the United States, including its territories and possessions, or in Canada or from a U.S.
Military Exchange. Sweepers purchased elsewhere are covered by a limited one year warranty which covers the cost of parts only.
This warranty does not apply if the sweeper is used in a heavy commercial or rental application.
Warranty service can only be obtained by presenting the sweeper to one of the following authorized warranty service outlets. Proof
of purchase will be required before service is rendered.
1. Hoover Factory Service Centers
2. Hoover Authorized Warranty Service Dealers (Depots)
For an automated referral of authorized service outlets in the U.S.A., phone 1-800-944-9200 OR
visit The Hoover Company on-line at www.hoover.com.
This warranty does not cover pick up, delivery, or house calls; however, if you mail your sweeper to a Hoover Factory Service
Center for warranty service, transportation will be paid one way.
While this warranty gives you specific legal rights, you may also have other rights which vary from state to state.
If further assistance is needed, or if there are questions concerning this warranty or the availability of warranty service outlets, write
or phone the Consumer Response Center, The Hoover Company, 101 East Maple St., North Canton, Ohio 44720.
Phone: 1-330-499-9499
In Canada, contact Hoover Canada, Burlington, Ontario L7R 4A8, 1-800-263-6376.
8