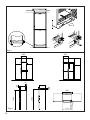
1
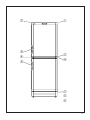
REFRIGERATOR/FREEZER UPRIGHT
REFRIGERATEURS CONGELATEURS COMBINAISONS
FRIGORIFICO/CONGELADOR
FRIGORIFERO/CONGELATORE
KOELKAST/DIEPVRIEZER
FC40RX4
FC41RB4
FC40AL4
FC37RB4
FC36AL4
FC36RX4
FC46RB4
FC45AL4
FC45RX4
Please read these instructions carefully before putting the
appliance into service. They are brief and contain only information which will help you to obtain the best performance from the
appliance.
Take care of all accessories supplied with the appliance.
Il est important de lire attentivement le mode d’emploi avant
d’utiliser votre appareil. Il contient des informations très utiles
pour obtenir les meilleures performances possibles et assurer
un fonctionnement parfait de votre appareil.
Prenez soin de tous les accessoires fournis avec votre appareil.
Antes de usar su nuevo refrigerador, debe leer cuidadosamente
todas las instrucciones contenidas en este folleto. Contiene
solamente las informaciones necesarias para que Vd. puede
tener el máximo rendimiento de su nuevo electrodoméstico.
Tenga cuidado de guardar todos los accesorios del frigorífico en
un lugar adecuado.
Prima di utilizzare l’apparecchio vogliate leggere attentamente e
per intero il libretto con le istruzioni d’utilizzo al fine di sfruttare al
meglio le caratteristiche del prodotto.
Conservate questo documento insieme agli accessori in
dotazione all’apparecchio.
Het is belangrijk deze gebruiksaanwijzing aandachtig te lezen
alvorens uw toestel in werking te stellen. Ze bevat belangrijke
informatie die u zal helpen uw toestel optimaal en probleemloos
te gebruiken.
2
1. BEFORE STARTING THE
REFRIGERATOR/FREEZER
Check that the cabinet is undamaged.
Please report any transport damage
immediately to your dealer.
Wash the cabinet and inner lining with a
mild unscented detergent and wipe it dry.
Do not use abrasive scouring powder, steel
wool or similar.
Connection to the electricity supply: See
head (7) and (8).
2. HOW TO USE THE APPLIANCE
Operating panel: See fig. (1) page 25.
1. Lamp for the refrigerator section.
2. Thermostat knob for the refrigerator
section.
3. Thermostat knob for the freezing section.
4. Indicator for the connection to the
electricity supply (green).
5. Indicator for deep-freezing (yellow).
6. Button for deep-freezing.
7. Thermometer for the freezing section.
8. Warninglamp.
The thermostat knob is adjustable from 0
(stop) to 7 (coldest). Find the position of the
thermostat which gives you the desired
temperature. Start at position 4.
The freezing section
Operating panel. See fig. (1) page 25.
Deep-freezing: Push the button (6). The
yellow indicator will then glow. It stops
glowing when the button is pushed anew.
When the quantity of foodstuffs to be frozen
is larger than 3 kg the button for deepfreezing should be pushed about 24 hours
before the desired freezing.
The button is pushed anew when the
foodstuffs are frozen.
It is important that the deep-freezing takes
place as quickly as possible. Therefore, the
temperature of the foodstuffs should be no
higher than room temperature.
Otherwise follow the advice given in handbooks on deep-freezing and the choice of
packing material.
Place the foodstuffs so that they obtain
maximum contact with the freezing shelf.
Open the door only when necessary. The
lamp of the alarm knob, fig. (1). page 25,
indicates whether the acoustic alarm is on. If
the lamp is lit the acoustic alarm will sound if
the temperature is too high.
Please note that the water ices, if consumed
immediately after removal from the freezer
compartment may result in a freezer-burn,
and they should be allowed to warm slightly
before consumption.
The refrigerator section
Never store hot foodstuffs in the cabinet and
remember always to wrap up the foodstuffs.
The evaporator of the refrigerator section is
automatically defrosted. The defrost water
is led to a tray on top of the compressor
where it evaporates.
Temperature regulation:
The slide damper above the crisper bin
makes it possible to regulate both the
temperature and the humidity in the crisper
bins.
l Open slide damper reduces the temperature and the humidity.
l Closed slide damper increases the
temperature and the humidity.
4
Defrosting
The foodstuffs cause frost to be formed. A
thin layer of frost does not affect the
performa nce of the freezer.
Loose frost may be removed carefully with a
plastic or wooden scraper. Never use a knife
or other sharp tools. When the layer of frost
on the shelves is 5-10 mm the freezer should
be defrosted.
Note: The layer of frost on the front edge of
the top freezing shelf may grow slightly
thicker.
Do like this:
Switch off the freezer.
Take out the foodstuffs and wrap them in
newspaper, a blanket or similar and store
them as cold as possible.
Place a bowl with hot but not boiling water in
the freezer.
Fold out the draining spout, mount the
enclosed extension and place a bowl under
it, fig. (3) page 25.
Wipe the cabinet when the frost has disappeared.
Important!
In case of damage to the power cord it must
be replaced by a power cord of corresponding
type, available from the manufacturer or his
service representative.
3. GENERAL ADVICE ON THE
USE OF THE APPLIANCE
4. MAINTENANCE
The shelves in the refrigerator section can be
moved, fig. (5) page 25.
The door rack and the butter- and cheeseboxes are also movable, fig. (2) page 25.
The freezing shelf cover should be closed.
The covers are opened by pulling, fig. (6)
page 25.
To remove the baskets lift them over the stop
pins, fig. (4) page 25.
If the cabinet is not to be used for more than
48 hours the doors should be left open to
avoid ill smells.
The appliance is equipped with a high-quality
skin condenser.
Therefore, a slight heating of the sidewalls is
quite normal.
In order to ensure the correct
functioning of the larder-fridge the glass
shelves must only be placed in shelf
grooves with integrated shelf stops.
Lighting
This appliance is equipped with a device
which causes the light to switch off if the
door is
open / left ajar for abnormally long time.
When the door has been closed for a
couple of minutes, the device is cut off and
the light
switches on in normal way again.
Only use an unscented detergent when
cleaning the cabinet inside.
Switch off the appliance and pull out the plug
when cleaning the cabinet.
The skirting board can be removed to faciliate
a vacuum cleaning of the floor. See fig. (1)
page 24.
Remember to clean the drain in the refrigerator
section also.
5. HAS THE APPLIANCE STOPPED
WORKING?
Before calling a repairman, check that
the plug is properly plugged into the wall
socket.
The fuse is intact.
The power has not been cut off.
All controls are correctly set.
The quantity of foodstuffs in deepfreezing is
not too large.
Switch off the cabinet for 15 minutes (for
instance at the thermostat). Switch it on again
and after 5 minutes check whether frost has
formed on the evaporator.
Do not open the cabinet when unnecessary. If
the break appears to stretch over a longer
period (over 12 hours) store the foodstuffs, if
possible, in another freezer. Most foodstuffs, if
thawed on the outside but otherwise hard,
can be re-frozen.
6. SAFETY
Fitting of an angle brace for fixing
In order to prevent a detached larder-fridge
from tilting forward when a filled fridge door
is opened, an angle brace can be fitted.
Fit the angle brace on the wall behind the
cabinet 80-100 mm from the left or right
side of the cabinet depending on which
side the door is hinged.
The angle brace must always be fitted in
the opposite side of the door hinges.
Do not store explosive substances in the
refrigerator section, such as gas, cigarette
lighters, petrol, ether or similar.
Scrapped cabinets may become dangerous to
children at play. Therefore, remove the doors
or place the scrapped cabinet in such a way
that children cannot enter it.
Never store liquids with carbon dioxide in the
freezing section.
5
7. TECHNICAL DATA
This appliance meets the provisions of the
following directives:
89/336/EEC (electromagnetic compatibility),
73/23/EEC (electrical equipment designed
for use within certain voltage limits) as
amended.
Household appliances sold in the EU also
meet 96/57/EEC (energy efficiency requirements) as amended.
The rating plate, which is placed either at the
back or inside the appliance, see fig. (7)
page 25, provides various technical information as well as type and serial number.
During a storm the electricity supply might be
cut off.
You should be aware of this when installing
the appliance in weekend cottages or
elsewhere where you would not immediately
observe that the power has been cut off.
Construction and details in the accessories
are subject to alteration without previous
notice.
If the cabinet is to be adjusted:
See drawings (1) page 24.
Take hold of the front panel with both hands.
Then lift up the front panel and turn out the
bottom part.
8. INSTALLATION
See drawings (1) and (2) page 24.
Install the cabinet in a dry place and so that it
is not exposed to direct sunlight or any other
source of heat.
Place the cabinet in a level position. This is
easily achieved by adjusting the adjustable
feet at the front edge of the base. The
cabinet should not rest against a wall on its
hinged side. When placing the cabinet on a
carpet or on a wooden floor, the placing
should be checked after a while to see
whether the unit has „subsided“ into the soft
flooring.
The cabinets can be built in or put side by
side, see fig. (2) page 24.
KF models put side by side with other
models require a distance of 30 mm between
the appliances.
For sufficient airflow around the cabinet it is
necessary to have a 50 mm high air duct
right above the appliance, see fig. (2), an air
duct that leeds the air up over the top
cupboard.
Make sufficient space for door opening as to
draw the baskets out, see fig. (2e).
The dimensions for building in are noted on
the drawings.
It is safest to place the earthed wall socket
above the appliance and at least 2.0 m
above the floor.
Any local installation rules for appliances of
this kind must be observed.
6
Adjust the tilt of the unit
See drawings (1) page 24.
by turning the adjustable feet with a 13 mm
spanner.
Adjusting the door
See drawings (1) page 24.
If the door bumps against the bottom panel,
this can be remedied by adjusting the feet as
shown on the drawing.
Side by side
See drawings (2) page 24.
Concerns all fridge/freezer models:
If 2 appliances are to be placed side by side,
the minimum distance between these must be
30 mm. The distance to other sources of heat
must also be at least 30 mm.
9. CHANGE OF HINGE SIDE
See drawings page 26.
1) Dismantle the top hinge. This one is to
be used later as top hinge at the opposite side. Lift off the top door.
2) On appliances with a door closer on the
upper door, this door closer should be
removed and remounted on the opposite
side.
3) Dismantle the middle hinge. Lift off the
bottom door. Mount the hinge screws
again
4) Remove the kick panel.
The bottom hinge is dismounted at the 3
screws. The hinge is turned 180° and
mounted on the opposite side..
5) Dismantle the screws in the middle of
the new hinge side. Mount the bottom
door and screw on the middle hinge.
6) Adjusting the bottom door: Loosen the 3
screws in the bottom hinge and push the
bottom hinge to the required side.
Tighten the screws and mount the kick
panel.
7) The kick panel is mounted and the hole
plugs are mounted on the opposite side.
8) Ajustment of the top door: loosen the
screws in the hinge above the door,
loosen the hinge above the door and
turn the hinge to the wanted side.
Tighten the screws.
9) Move the handle.
DISPOSAL OF THE
APPLIANCE
The appliance contains recyclable
materials. When disposing of the
appliance, please contact the technical
administration or other appropriate
authority in your municipality. They
can inform you of the collection and
recycling measures used in the
municipality.
7
Fig 1.
600
600
50
50
50
Fig 2.
24
1560
1560
600
610
4
8
6
!
S
7
1
3
0
0
0
1
7
1
7
2
..-10.....-20.....-30..
S
2
2
6
6
3
5
3
5
4
4
5
4
8
7
!
1
3
0
S
Fig 2.
Fig 4.
Fig 6.
5
1
7
2
2
..-10.....-20.....-30..
6
6
5
Fig 1.
0
1
7
O
S
2
3
4
5
3
4
9
Fig 3.
Fig 5.
Fig 7.
25
CHANGE OF HINGE SIDE
CHANGEMENT DU SENS D’OUVERTURE DES PORTES
CAMBIO DEL SENTIDO DE APERTURA DE LAS PUERTAS
REVERSIBILITÀ INCERNIERAMENTO PORTA.
HET WIJZEGEN VAN DEUROPHANG
26
¿
ƒ
¡
≈
¬
∆
√
«
∆
¿
«
√
«
¡
√
¬
ƒ
≈
27