1
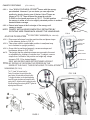
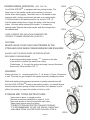
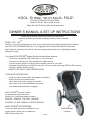
®
®
KOOL- STRIDE "WITH KOOL- FOLD"
tm
JOGGING STROLLER FOR CHILDREN
Model No. KS-KF Senior (Steel wheels)
Model No. KS-KFA Senior (Alloy wheel paramount)
OWNER`S MANUAL & SET UP INSTRUCTIONS
Please read & save all instructions contained in this booklet
.
Examine all carton contents and wrappings carefully before assembly.
®
READY, SET...GO!
Family fun is yours in a snap with your new, snug, sturdy and smooth-riding jogging stroller for children
by KOOL-STOP INTERNATIONAL INC. Your Jogging Stroller is loaded with superior comfort and
safety features, assembles for action in a few easy steps and folds down into a lightweight, portable
package for toting.
®
Your New KOOL-STRIDE Jogging Stroller includes these features:
•
•
•
•
Folds down, assembles quickly and easily in 1 minute or less.
Innovative 5-point harness, fully adjustable for toddler and up.
Unique zip seat (upright or reclining) offers versatile comfort for your child.
Sunshade that protects your child from heat, rain, UV rays, and an extra large PEEK-A-BOO window
built into a multiple position canopy.
* UNMATCHED QUALITY AND UNIQUE DESIGN
THINK SAFE AND BE SAFE!
•
•
•
•
Avoid city streets, heavy traffic and dangerous situations.
Always use the wrist retention strap.
Never roller-skate while pushing your stroller.
Never leave your child unattended in the stroller.
even when parking brakes are engaged.
®
KOOL-STRIDE all terrain strollers
are patented and protected by the
following U.S. And foreign patent numbers:
D419,133 D382,234 D371,094 D418,780
5,536,033 5,695,212 5,934,754 4,953,880
FURTHER U.S. AND FOREIGN PATENTS PENDING
®
KOOL-STRIDE ACCESSORIES
To see the latest accessories available for your
jogging stroller, please visit our website at:
Http://www.koolstop.com
Serial Number
Location
PAGE 1
SETUP INSTRUCTIONS (Fabric and wheels not shown for clarity)
STEP 1. Remove from carton and set wheels aside.
Lay stroller on a flat surface, as shown in FIG. 1.
STEP 2. From rear of stroller, take hold of the stroller by the handle bar ratchets and pull toward you
until frame is extended giving a final quick tug so that locking buttons snap in place, as
shown in Fig. 2 & 2-A * BE SURE TO CHECK THAT BUTTONS ARE LOCKED BY CHECKING
THE SLIDING HINGE AND STOPPING COLLAR ARE BUTTED TOGETHER AS SHOWN IN
FIG. 2-B
STEP 3. Release the handle bar clamps to unfold the handle bar and adjust handle bar to desired
position, as shown in FIG. 3, then reclose the clamps.
®
STEP 4. Now deploy the wrist retention strap from axle tube and connect to Velcro tab on the handle.
This is to keep strap out of the way when running and will break away and stop stroller if needed.
Never use stroller without the wrist strap properly secured to your wrist. (see FIG. 3)
FOLDING INSTRUCTIONS (Fabric and wheels not shown for clarity)
*IMPORTANT! -WHEN FOLDING THE STROLLER BE SURE THAT THE SEAT IS ZIPPED IN THE
UPRIGHT POSITION BEFORE FOLDING.
STEP 1. To fold, open the cam levers on both sides of the adjustable handle and fold the extended
handle all the way underneath and hold firmly against the stationary handle, then reclose
the cams. (Shown in fig.2-A)
STEP 2. Depress and hold locking buttons shown in figure 2.-B on both sides and then push foward until
stroller is completely flat as shown in FIG.1.
*NOTE; STROLLER MAY BE FOLDED WITH OR WITHOUT WHEELS ATTACHED.
FIG.1
FIG.2-B
STOPPING COLLAR
handle ratchet
FIG.2
SLIDING HINGE
LOCKING BUTTON
FIG.3
FIG.2-A
PAGE 2
FIG.5
FIG.4
FIG.4 & 5
SECURE THE QUICK RELEASE (Q/R) REAR WHEELS
STEP 1. Insert the wheel axle X into the side opening O of the main frame M.
STEP 2. Clamp down the Q/R lever down by moving the lever D 180 degrees to secure the wheel
in place. The Q/R lever should face to the rear and parallel to the ground. This will
prevent the Q/R lever from snagging a stationary object.
* See page 4 for special instruction on adjusting the rear wheel Q/R tension.
FIG.6
SECURING THE FRONT WHEEL
(FIG.6)
STEP 1. Open cam lever D and unscrew knob T until almost
off the end of the skewer.
STEP 2. Slide the wheel & axle XX into both fork ends Q .
Clamp down the wheel axle to the fork ends by
STEP 3. tightening knob T until snug and then closing
cam lever D .( You should feel resistance if correct.)
Give a good tug to check that wheel is secure.
ADJUSTING FRONT WHEEL Q/R AXLE
You may need to adjust the clamping tension on the wheel AA to
secure it in place. Hold adjusting knob T and turn cam lever D
clockwise a turn or so and clamp lever D down to check tension.
Repeat if necessary or back tension off by reversing tensioning
procedure.
PAGE 3
ADJUSTING THE REAR Q/R AXLE
Now and then it is necessary to adjust the axle so that it
clamps down correctly. Simply hold the small Nyloc nut
L with an 8mm wrench (provided) P or a pair of needle
nose pliers and turn the cam lever Q on the opposite
end of the skewer until the swedge cap and the shank
begin to spread the split ring J . Be sure to have the
cam lever Q in the closed position while turning it.
(This will be the position it is shown in FIG. 7 ).
TEST FIT THE WHEEL
1) Insert the wheel axle and wheel assembly into the hole
on the axle end with the cam lever open.
FIG.7
2) Close the cam lever (you should feel some resistance)
then pull on the wheel with a fair amount of pressure
(pull it hard) . If the wheel does not pull out then you
have correct adjustment.
3) If the wheel pulls out, even a little, you need to further
adjust the tension of the skewer. To do this, remove
the wheel and proceed as follows:
1. Hold the Nyloc nut with the pliers or socket wrench P
2. Turn the cam lever clockwise 1/2 to 1 turn.
3. Retry the "fit of the wheel process" .
.
FORK TIP ADJUSTMENT (FIG.8 & 9)
The fork tip adjustment is preset from the factory. However, if you notice the front wheel is not
tracking correctly, you may need to adjust the front wheel for correct alignment. To
adjust the front wheel alignment in linear position, loosen the screw (S) on the fork tip (K), and
manually move the wheel to the desired position. You may need to roll the stroller back and
forth to test the new setting. Tighten the adjustment screws when wheel is aligned.
NOTE:
To achieve proper wheel alignment,
you may need to test roll the stroller
several times.
FIG.8
PAGE 4
FIG.9
(Top view)
CANOPY POSITIONIG
(FIG. 10 & 11)
®
Your "KOOL-FOLD KOOL-STRIDE" comes with the canopy
pre-attached. However if you so desire you can adjust the
position by simply chosing one of the two Velcro®straps as
shown in FIG 10. Then re-thread the strap through the
®
D-RING on the handle as shown in FIG 11. This will position
VELCRO
the canopy in either a full out or slightly retracted position to achieve
desired shade coverage.
STEP 2. Extend wire frame at the front edge of the canopy until
canopy is taught.
NOTE: CANOPY MAY ALSO BE COMPLETELY RETRACTED BY
ROTATING WIRE FRAME BACK AGAINST THE HANDLE BAR.
STEP 1.
FIG.10
FIG.11
D-RING
FIG.12
®
ALWAYS USE THE KOOL-STRIDE 5 POINT SEAT
HARNESS (FIG. 12&12-B)
STEP 1.
Disconnect all straps from the main buckle and place straps
to the sides as shown in FIG.12.
STEP 2. Then place child in comfortable position in seat(seat may
be in reclined or upright position).
STEP 3. Once child is positioned properly, re-secure straps and
buckles as shown in FIG. 12-B.
NOTE: The height that the shoulder straps are secured to the seat
is adjustable for children of various size. To adjust, remove
straps from 1st/2nd/or 3rd position on height adj. straps
shown in FIG.12 for desired height.
SEAT MAY BE RECLINED OR POSITIONED UPRIGHT
SPECIAL
FEATURE BY ZIPPING UP OR DOWN THE ZIPPERS ON THE
®
SIDES OF THE CHILD, THIS IS EXCLUSIVE TO "KOOL-STRIDE"
PARKING BRAKE (FIG 13 & 14)
The " P- brake "AA comes from the
Factory Pre-adjusted. In period of time after
many brakes, the brake cable will stretch a little.
To re-adjust the brake, turn the knurled adjusting
barrel BR counter clockwise and loosen the cable
anchor bolt BT. Adjust the cable by pulling the cable
Wire W and fasten the anchoring bolt BT. Tighten the
adjusting barrel BR as well.
PAGE 5
HEIGHT ADJ.
STRAPS
LAP BELTS
GROIN STRAP
MAIN BUCKLE
FIG. 12-B
FIG.13
FIG.14
SHOULDER
STRAPS
PARKING BRAKE OPERATION (FIG. 15 & 16)
® is equipped with two parking brakes. The
Your KOOL-STRIDE
brake lever on the handle can be used manually to slow the
stroller down while jogging. The brake lever on the handle is also
equipped with a locking mechanism that acts as a parking brake.
To lock the brake in the parking position, as shown in FIG. 16,
hold the brake handle down to apply the brake. Hold the locking
button HH down while releasing the handle. To release the
parking brake. Depress the brake handle, and the locking button
will release itself.
FIG.15
HH
FIG.16
HH
NOTE: PROPER TIRE INFLATION IS NEEDED FOR
PROPER "P" BRAKE OPERATION (30-60 PSI.)
CAUTION:
NEVER LEAVE YOUR CHILD UNATTENDED IN THE
STROLLER EVEN WHEN PARKING BRAKES ARE ENGAGED .
ALWAYS USE THE REAR WHEEL RETENTION STRAP .
SECONDARY PARKING BRAKE
A secondary parking brake is strap JJ located on the side
of the stroller to prevent the wheel from rolling.
Thread strap JJ through the spokes and wrap it around the wheel.
Secure clip KK as shown in FIG. 17
FIG.17
WARNING!
Always clip strap JJ around upright tube C , as shown in Figure 18 when not
in use. The strap can get tangled in the spokes and may damage the wheel.
While both parking brake systems are made of quality materials and will
hold the KOOL-STRIDE ® steady in the parked position, you should always
exercise caution when putting a child in the stroller. Don't attempt to put a
child in the stroller (or expect the stroller to hold) on a hill.
STORAGE AND TOTING INSTRUCTUONS
*Leave seat in place, in upright position
*Reverse procedures described on pages 2, 3 & 4.
*Nest rear wheels so that the axles face each other.
*Keep sharp objects away from fabric.
*FOR BEST STROLLER PROTECTION AND STORAGE,
IT IS RECOMMENDED TO USE THE TRAVEL-CARRY BAG
AVAILABLE FROM YOUR RETAILER OR KOOL-STOP.®
PAGE 6
FIG.18
FIG.18
PARTS LIST
NO.
1
2
3
4
5
6
7
9
10
11
12
13
14
15
16
17
18
19
20
21
22
23
24
PART NO.
PARTS LIST
QTY.
NO.
J1-1063
J1-1016
KF-1000
FRONT WHEEL ASSEMBLY
REAR WHEEL ASSEMBLY
AXLE TUBE
HANDLE BAR TUBE(LOWER)
TOP TUBES
BOTTOM EXTRUSION
UPRIGHT TUBES
AXLE ENDS
AXLE TO UPRIGHT CONNECTOR
AXLE TO BOTTOM TUBE CONNECTOR
STRAIGHT EYE ENDS
FRONT WHEEL SKEWER
HANDLE RACHET ASSEMBLY
1
2
1
2
2
2
2
2
2
2
2
1
2
J1-1066L
J1-1066R
KF-1067
KF-1068
J1-1070*
J1-1071*
KF-1080
KF-1082
J1-1085*
J1-1081
FORK TIP, LEFT
FORK TIP, RIGHT
HINGES
FOOT PLATE
CANOPY RATCHET
RATCHET SPRING
SEAT
MULTI POSITION CANOPY
FOAM GRIP SHORT
LEASH / WRIST STRAP
1
1
2
1
2
2
1
1
1
1
25
26
27
28
29
30
31
32
33
34
35
36
37
38
39
40
42
43
41
44
45
J1-1010
J1-1020
J1-1050
KF-1051
KF-1052
J1-1053
KF-1054
J1-1060
KF-1061
J1-1062
DESCRIPTION
PART NO.
J1-1086
J1-1088*
J1-1090
J1-1100
J1-1101
J1-1102
J1-1209*
J1-1210*
J1-1211*
J1-1212*
J1-1215*
J1-1216 *
J1-1217*
J1-1219*
5LT32
J1-1055QR
KS-MWB
KF-1240
KF-1052
KF-1051B
J1-1087*
DESCRIPTION
FOAM GRIP, LONG
HANDLE BAR END PLUG*
CANOPY FRAME, WIRE
BRAKE LEVER ASSEMBLY
BRAKE CABLE
BRAKE CALIPER ASSEMBLY
BOLT, M6X60MM, PAN HEAD,
BOLT, M6X38MM, PAN HEAD,
BOLT, 1/4-20X27MM, W/10MM
BOLT, 1/4-20X27MM, W/10MM
NUT, M6 NYLOCK,
NUT, 1/4-20 NYLOCK, 7/16” HEX
NUT, M5 NYLOCK, BLACK
FLAT WASHER, 6MMX16MM, UCP
FIVE POINT BUCKLE
QUICK RELEASE AXLE
BASKET
SHOULDER STRAP CLIP
FRONT TOP TUBE
HANDLE BAR ADJ. TOP TUBE
PARKING BRAKE STRAP
QTY.
1
2
1
1
1
1
2
2
4
2
4
4
2
2
1
2
2
1
2
1
1
*ITEMS NOT ILLUSTRATED.
28
4
44
40
22
17
14
5
21
39
24
11
2
16
12
10
9
43
6
15
41
13
42
DETAILED EXPLODED VIEW
K OOL STRIDE ®
PARAMOUNT AND SENIOR
1
25
PAGE 7
WARNING!
DO NOT USE THIS STROLLER UNDER DARK CONDITIONS. THERE ARE NO REFLECTORS OR
LIGHTS INSTALLED TO ENABLE YOU TO SEE HAZARDS, OR OTHERS TO SEE THE STROLLER.
(MAXIMUM WEIGHT LIMIT IS 85 LBS.) Never hang items from the handle, it can cause the
stroller to tip backwards and injure the passenger!
IMPORTANT... Although a helmet for the passenger is not required, it is a good idea to put a
helmet on the passenger when jogging with a stroller.
KOOL-STRIDE ®ACCESSORIES
KF-PAD
SEAT PAD FOR EXTRA COMFORT AVAILABLE IN SEVERAL COLORS
KS-RC
WIND/RAIN SHIELD WITH CLEAR PVC WINDOW AND FABRIC---------KS-MWB
MESH WEDGE BAG (BLACK)-------------------------------------------------------KS-DWB
DELUXE WEDGE BAG WITH SHOULDER STRAPS (BLACK)-------------KS-TCB
DELUXE TRAVEL AND CARRY BAG (BLACK)---------------------------------KS-BUG
SHADE AND BUG SCREEN COVER (BLACK)-----------------------------------
$23.00 MSRP*
$25.00 MSRP*
$19.00 MSRP*
$40.00 MSRP*
$87.00 MSRP*
$87.00 MSRP*
* MANUFACTURER`S SUGGESTED RETAIL PRICES SUBJECT TO CHANGE WITHOUT NOTICE.
KOOL-STRIDE ® 10 YEAR LIMITED WARRANTY
KOOL STOP INTERNATIONAL, INC. warrants this product to be free of defects in workmanship and
material for 10 years (with the exception of all fabric components, which shall be warranted for a period of
five years). Under normal use and service following date of purchase and delivery to the original customer.
the warranty does not cover wheels and tires.
This warranty will not apply to damages arising from neglect, accidental or intentional damage, institutional
or commercial use, or misuse of the product.
Repairs or replacement under this warranty shall be made by KOOL STOP INTERNATIONAL, INC. or
through an authorized KOOL STOP INTERNATIONAL, INC. dealer without charge to the customer.
If the dealer or factory representative finds return necessary, packing and shipping cost to the factory will be
prepaid by the customer. KOOL STOP INTERNATIONAL, INC. will, at its sole option, repair or replace the
product and ship it (or one of equivalent type and quality if exact replacement is unavailable) to the dealer
authorizing the return.
Expressly excluded by this warranty is liability for consequential property or commercial damages. THIS IS
A LIMITED WARRANTY.
Information in this manual is subject to change without notice. CHECK FOR UPDATES AT: "WWW. KOOLSTOP.COM"
©2002 KOOL-STOP INTERNATIONAL, INC. All rights reserved. No part of this OWNER'S MANUAL AND
ASSEMBLY INSTRUCTIONS publication may be reproduced, transmitted, transcribed, stored in a retrieval
system, or translated into any languages in any form, by any means, without written permission by KOOL STOP
INTERNATIONAL, INC.
Designed and Imported By:
KOOL-STOP INTERNATIONAL, INC.
17150 S. W. Boones Ferry Rd.
Lake Oswego, OR. 97035
Sales Office:
KOOL-STOP INTERNATIONAL, INC.
1061 South Cypress St.
La Habra, CA. 90631
(800) 586-3332
Fax: (714) 992-6191
THINK SAFE AND BE SAFE!
Visit the JPMA Website at www.jpma.org
for the latest and most up-to-date information
PAGE 8
WWW.KOOLSTOP.COM
E-MAIL: [email protected]
MAINTENANCE AND CLEANING
SPECIFICATIONS
F O R K O O L - S T O P® S T R O L L E R S
CLEANING(ENTIRE STROLLER)
For general cleaning you may simply wash your stroller as you would an automobile. For instance,
scrubbing down the entire stroller with a scrub brush and non bleach dish soap & water would be
sufficient to clean normal sediments, dust and dirt, etc. Then rinse with fresh water (tap water from
garden hose).
Wipe down frame parts and excess water from fabric with a clean towel then allow to dry out of direct
sunlight. This cleaning procedure should only be performed out side at temperatures at or above 60
degrees Fahrenheit in order for proper drying to occur.
AFTER CLEANING ALWAYS PERFORM LUBRICATION PROCEDURES LISTED
UNDER: " L U B R I C A T I O N & P R E V E N T A T I V E
MAINTENANCE"SECTION
CLEANING (FABRIC REMOVED)
Remove canopy by extracting both canopy ratchet screws located on the sides of the stroller on the
sliding hinge portion of the stroller(see fig.2-b page 4) or locate on the exploded view on parts list page.
Be sure to note the order in which the hardware is assembled and always place removed hardware in a
container or plastic bag as not to lose any parts.There is a nut recessed in the back side of the hinge
that the ratchet screw threads into, be sure to remove these as well when you remove the ratchet
screws.
®
Now undo the Velcro at the back of the canopy and remove the canopy. Remove metal wires from
canopy and set canopy aside.
Remove all screws on seat fabric that hold any part of the fabric to the frame as well as all Velcro ®
straps.(once again, don`t forget to note the locations and order in which they belong and keep together
in a container). Once this has been performed the seat and canopy should be free of the frame.
Fabric may now be machine washed in cold water with non- bleach detergent on any cycle and then
hang dried.
Resort back to procedures for cleaning entire stroller to clean remaining frame work and wheels
NEVER CLEAN STROLLER WITHOUT PERFORMING
LUBRICATION PROCEDURES TO BE LISTED ON
FOLLOWING PAGE.(10)
PAGE 9.
MAINTENANCE AND CLEANING CONTINUED
LUBRICATION & PREVENTATIVE MAINTENANCE
Every 60 days or immediately after cleaning, the stroller should be lubricated as follows:
With a light film greaseless lubricant, spray all metal surfaces of the wheels and allow to sit for
a few minutes.(We recommend using LPS 1 You can find this lubricant at your local hardware
& automotive stores.)
After letting the wheels sit, wipe clean with a cloth. This will leave a thin film as a protective
layer on the metal parts of the wheels. This will also give a nice glow to the rims.
All other parts on the stroller are made of either aluminum or stainless steel and do not require
lubrication.
NOTE: EVEN STROLLERS WITH THE ALLOY WHEELS SHOULD BE MAINTAINED IN THIS
MANNER.(ALLOY WON`T RUST BUT IT WILL OXIDIZE.)
TIRE PRESSURES
Tire pressures should be checked periodically because they may change in time and with
changes in the weather. Performance and ride are also effected by tire pressure.(see chart)
RECOMMENDED PRESSURES
FRONT
20 - 40 PSI
REAR
40 - 65 PSI
ADJUST FOR PREFERRED RIDE
ALWAYS CHECK FOR ACTUAL MAXIMUM TIRE PRESSURE
MARKED ON TIRE SIDEWALL
AXLE ADJUSTMENT
While doing maintenance you should check the axle
tension. Refer to page 4. for tensioning procedures.
IF YOU HAVE PUSH BUTTON
AXLES THEN NO ADJUSTMENT IS
NEEDED
(REFER TO FEATURES LISTED ON FRONT COVER IF YOU
DON`T KNOW WHICH ONE YOU HAVE)
PRESSURE GUAGE
PAGE 10