1
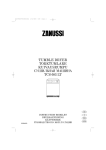
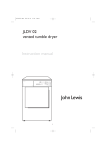
125994470.qxd
08/02/01
12.01
Pagina
1
(Nero/Process Black pellicola)
TUMBLE DRYER
SECADORA
SECADOR
TD 4212
DUAL TEMPERATURE
kg 5
kg 2,5
800 / 900
1000 / 1200
800 / 900
1000 / 1200
70' - 90'
35' - 50'
65' - 85'
30' - 45'
80' - 100'
55' - 70'
75' - 95'
50' - 65'
TD 4212
650
kg 2,5
kg 1
50' - 60'
30' - 35'
A U T O R E V E R S E
GB
125994470
Unpacking: see page 7
E
Desembalaje: ver página 20
P
Desembalagem: ver página 33
INSTRUCTION BOOKLET
INSTRUCCIONES PARA EL USO
INSTRUÇÕES DE UTILISAÇÃO
GB
E
P
125994470.qxd
08/02/01
12.01
Pagina
2
(Nero/Process Black pellicola)
Dear customer,
Please read these operating instructions carefully and pay particular attention to the safety notes indicated in
the first pages.
We recommend that you keep this instruction booklet for future reference and pass it on to any future owners.
Transport damages
After unpacking the machine please check it is not damaged. If in doubt, do not start it but contact your local
Service Centre.
The symbols you will see on some paragraphs of this booklet have the following meaning:
The warning triangle emphasize information that is particularly important for your safety or correct
functioning of the appliance.
The information marked with this symbol provides additional instructions and practical tips on the use of
the appliance.
Tips and information about economical and ecological use of the machine are marked with this symbol.
Our contribution to the protection of the
environment: we use recycled paper.
2
125994470.qxd
08/02/01
12.01
Pagina
3
(Nero/Process Black pellicola)
Important safety information ............4
Maintenance and Cleaning................13
External cleaning ................................................13
Disposal ............................................................5
Tips for environmental protection
Cleaning the door................................................13
Cleaning the filters ..............................................13
5
Something not working? ....................14
Description of the appliance ..............6
Installation ......................................................7
Unpacking ............................................................7
Positioning ............................................................7
Fitting the vent hose ..........................................7-8
Electrical connection ............................................8
Stacking kit............................................................8
Use ........................................................................9
The control panel ..................................................9
Drying times ........................................................10
Operating sequence............................................11
Useful hints ........................................................12
Technical specifications
DIMENSIONS:
Height
Width
Depth
85 cm
60 cm
58 cm
ELECTRICAL CONNECTION:
MAX. POWER ABSORBED:
MIN. FUSE RATING:
220/230 V/50 Hz
2200 W
10 A
MAX. DRYING CAPACITY:
Cotton, linen
Synthetics
6 kg
2.5 kg
CONSUMPTION:
Cotton, linen
Cotton, linen
3.3 kWh (5 kg store dry)
2.7 kWh (5 kg iron dry)
This appliance complies with the following E.E.C. Directives:
- 73/23 EEC of 19.2.73 (Low Voltage Directive) and subsequent modifications;
- 89/336 EEC of 3.5.89 (Electromagnetic Compatibility Directive) and subsequent modifications.
3
ENGLISH
Contents
125994470.qxd
08/02/01
12.01
Pagina
4
(Nero/Process Black pellicola)
Important safety information
These warnings have been provided in the interest of safety. You MUST read them carefully before installing or
using the appliance.
Installation
General safety
• Any electrical work required to install this appliance
should be carried out by a qualified electrician or
competent person.
• It is dangerous to alter the specifications or attempt
to modify this product in any way.
• Under no circumstances should you attempt to
repair the machine yourself. Repairs carried out by
inexperienced persons may cause injury or serious
malfunctioning. Contact your local Zanussi Service
Centre. Always insist on genuine Zanussi spare
parts.
• Care must be taken to ensure that the appliance
does not stand on the electrical supply cable.
• If the machine is situated on a carpeted floor,
please adjust the feet in order to allow air to
circulate freely.
• This tumble dryer is designed to be vented through
to the open air. It should have its own ventilation
system which should not be joined with any other
ventilation system connected to any other
appliance.
Child safety
• Children are often not aware of how dangerous
electrical appliances can be. When the machine is
working, children should be carefully supervised
and not be allowed to play with the appliance.
Use
• The packaging components (e.g. plastic film,
polystyrene) can be dangerous to children - danger
of suffocation! Keep them out of children’s reach.
• This appliance is designed for domestic use only. If
the machine is used for any other purposes or is
not used correctly, the manufacturer accepts no
responsibility for any damage that might occur.
• Make sure that children or pets do not climb into
the drum.
• When the appliance is to be scrapped, cut off the
electrical supply cable and destroy the plug with
the remaining cable. Disable the door catch in
order to prevent children from becoming trapped
inside while playing.
• Always unplug the appliance after use.
• Clothes which are dripping wet should not be
placed in the dryer.
• Danger of explosion: Never tumble dry items that
have been in contact with inflammable solvents
(petrol, methylated spirits, dry cleaning fluid and
the like). As these substances are volatile, they
could cause an explosion. Tumble dry only items
washed with water.
• Please make sure that no gas lighters have
accidentally been left in pockets of garments to be
loaded into appliance.
• Do not dry canvas shoes or sports shoes, as they
could get stuck between the door and the drum,
thus blocking this latter.
• Leave the door slightly ajar when the appliance is
not being used. This will allow the seal to be
preserved.
• Clean fluff filters after using the tumble dryer. To
prevent fire risks, do not use the appliance if the
fluff filters are damaged or without filters.
• Do not allow fluff to accumulate around the dryer.
4
125994470.qxd
08/02/01
12.01
Pagina
5
(Nero/Process Black pellicola)
• Packaging materials
The materials marked with the symbol
recyclable.
• Machine
are
Use authorised disposal sites for your old appliance.
Help to keep your country tidy!
This means that they can be recycled by disposing of
them properly in appropriate collection containers.
Tips for environmental protection
To save energy and to help protect the environment,
we recommend that you follow these hints:
• To utilize the maximum load, laundry which is to be
dried ready to put away (store dry) can be dried
together with items to be ironed. To do this, select
the programme for iron-dry, remove the iron-dry
items at the end of the programme and then finishdry the rest of the load.
• Try to load the maximum capacity of the machine
as small loads are uneconomical.
• Always load well spun laundry. The higher the spin
speed, the lower the electricity consumption and
the shorter the drying times.
• Clean the filters regularly to avoid excessive drying
times and high electricity consumption.
• Do not over-dry laundry, this avoids creasing and
saves energy.
Select the drying programme according to the type
of laundry and the required degree of dryness.
• Ventilate the room well. The room temperature
should not exceed +35°C during drying.
5
ENGLISH
Disposal
125994470.qxd
08/02/01
12.01
Pagina
6
(Nero/Process Black pellicola)
Description of the appliance
1 Control panel
2 Fluff filters
TD 4212
3 Rating Plate
DUAL
4 Adjustable feet
650
800 /
kg 5
kg 2,5
900
70' - 90'
35' - 50'
1000 /
1200
65' - 85'
30' - 45'
1
TURE
TEMPERA
800 /
900
80' - 100'
70'
55' -
1000 /
1200
75' - 95'
50' - 65'
kg 2,5
kg 1
50' - 60'
30' - 35'
E
R S
V E
R E
T O
A U
2
3
2
4
5 Side vent outlets
6 Ring nut
7 Rear vent outlet
7
6
5
6
125994470.qxd
08/02/01
12.01
Pagina
7
(Nero/Process Black pellicola)
Warning!
The feet must never be removed.
Do not restrict the floor clearance through deeppile carpets, strips of wood or similar. This might
cause heat build-up which would interfere with
the operation of the appliance.
Unpacking
Slide out the polythene bag with the
polystyrene stuffing before using the appliance.
Important
When operating the tumble dryer, the room
temperature must not exceed 35°C, as it may affect
the performance of the appliance.
Fitting the vent hose
To simplify the installation, there is a choice of vent
outlets: one at the back, the others in the left and
right-hand side.
Connect the hose to whichever is the more
convenient by pulling the ring nut (A) from the vent
outlet at the back, screwing it on to the hose and
pushing it firmly back into place.
The unused vents should now be sealed with the
special snap covers provided.
P1106
Positioning
It is recommended that, for your convenience, the
machine is positioned close to your washing machine.
Whilst drying, the tumble dryer will expel a certain
amount of warm, very moist air, and this should be
removed from the room as quickly as possible to
prevent condensation. In an extremely well ventilated
room or close to an open window, this may occur
naturally.
However, in general, it is better to carry the dryer's
exhaust outside via the 100 mm diameter flexible
hose supplied with the appliance; ending either
temporarily at an open window, or permanently at a
fixed ventilation grille, fitted to an exterior wall or
window.
The tumble dryer must be installed in a clean place,
where dirt does not build up.
Make sure there are no obstructing items or material
near the air-intake louvres provided at
the back (e.g. paper, rags etc.).
A
P1028
A
P1027
Advice: If the hose is long and the room
temperature low, the moisture might condense to
water inside the hose. This is an unavoidable
natural phenomenon. To prevent this water from
Iying in the hose or flowing back into the tumble
dryer, it is advisable to drill a small hole (dia.
3 mm) in the lowest point of the hose and to place a
small container below it.(See picture, point B).
To keep vibration and noise to a minimum when the
dryer is in use, it should be placed on a firm, level
surface.
Once in its permanent operating position, check that
the dryer is absolutely level with the aid of a spirit
level. If it is not, raise or lower the feet until it is.
P1056
P0046
7
B
ENGLISH
Installation
125994470.qxd
08/02/01
12.01
Pagina
8
(Nero/Process Black pellicola)
Electrical connection
Once connected to the dryer, run the vent hose to
the desired outlet point, ensuring that the run’s
overall length is less than 2 m, and that it contains no
more than two bends. As to the outlet itself, if you
have decided on a fixed wall/window grille, a good
local builder’s merchant should be able to supply you
with the necessary fittings and installation advice.
This machine is designed to operate on a 220-230 V,
single-phase, 50 Hz supply.
Check that your domestic electrical installation can
take the maximum load required (2.2 kW), also
taking into account any other appliances in use.
Connect the machine to an earthed socket, in
accordance with current wiring regulations.
It is important not to connect the vent
hose to, for example, a cooker hood, or
a chimney or flue pipe designed to carry
the exhaust from a fuel burning
appliance.
The manufacturer declines any
responsibility for damage or injury
through failure to comply with the
above safety precaution.
Stacking kit
A special stacking kit is available through your
dealer, to enable the mounting of the dryer on top of
your washing machine.
P0055
Note that to avoid condensation problems, it is
essential that the dryer be fitted with the flexible hose
to carry its “exhaust” at least beyond the kitchen
units; preferable outside the kitchen.
P1107
In order to prevent the appliance from overheating, it
is important that the steam exhaust is unobstructed.
Therefore, in case of a permanent hose fitted to an
exterior wall or ceiling, it must be ensured an
exhaust capacity of at least 150 m3/h.
If the dryer is fitted next to kitchen units, make
sure that the vent hose is not squashed. If the
hose is partially squashed, drying efficiency will
be reduced, resulting in longer drying times and
higher energy consumption.
If the hose is completely squashed, the safety
cut-outs with which the machine is fitted may
operate.
8
125994470.qxd
08/02/01
12.01
Pagina
9
(Nero/Process Black pellicola)
The control panel
DUAL TEMPERATURE
kg 5
kg 2,5
800 / 900
1000 / 1200
800 / 900
1000 / 1200
70' - 90'
35' - 50'
65' - 85'
30' - 45'
80' - 100'
55' - 70'
75' - 95'
50' - 65'
TD 4212
650
kg 2,5
kg 1
50' - 60'
30' - 35'
A U T O R E V E R S E
1
2 3
4
5
1 Programme Chart
5 Drying Time Selector Dial
This will help you to select the correct time for drying.
The selector dial incorporates two drying cycles, one
of up to 150 minutes at a high temperature for
cotton and linen, and one of up to 100 minutes at a
low temperature for synthetic fabrics.
2 Low Temperature Button
Press this button to reduce the temperature when
drying particularly delicate cotton or linen items.
In this case you should select a longer drying time.
On the programmes for synthetics the temperature is
automatically reduced.
Therefore it is not necessary to depress this button.
To set the machine to the selected time, turn the dial
clockwise until the time you want coincides exactly
with the pointer.
NEVER attempt to turn the dial in an anticlockwise
direction.
When selecting the drying time, you should
remember that it includes a 10 minute cooling phase
(position
on the dial).
This phase should not be shortened, stopped or
avoided, as this could cause skin burns or damages
to the laundry.
3 Start Button
After selecting the drying time press this button to
start the programme.
If the door is opened during drying, this button has to
be depressed again after closing the door to allow
the programme to continue.
Additional drying
If at the end of the programme the laundry is still too
damp, set the dial for a further period of drying
(remembering to take into account the cooling
period).
4 Mains-On Light
This lights up when the machine starts operating and
goes out by turning the selector dial to “O” and when
you open the door.
9
ENGLISH
Use
125994470.qxd
08/02/01
12.01
Pagina
10
(Nero/Process Black pellicola)
Drying Times
Cotton and Linen
Selector dial: up to 150 minutes
Degree of drying required
Degree of spin given
rpm
800/900
1000/1200
Store dry
800/900
1000/1200
Iron dry
Quantity
kg
Drying times
mins
6
5
2.5
100-120
80-100
55-70
6
5
2.5
95-115
75-95
50-65
6
5
2.5
90-110
70-90
35-50
6
5
2.5
85-105
65-85
30-45
Synthetics
Selector dial: up to 100 minutes
Degree of drying required
Degree of spin given
rpm
Store dry
650
Iron dry
650
Quantity
kg
Drying times
mins
2.5
50-60
1
30-35
0.5
25-30
2.5
40-50
Never overfill the drum (do not load large quilts, for example).
The laundry must be suitably spin dried in your washing machine before being placed in the tumble dryer
(500rpm minimum).
Drying times vary according to:
- The type of laundry
- The size of the load
- The degree of spinning prior to drying
Drying times are given as a guide only. Experience will soon enable you to estimate the drying time needed for
your usual laundry loads.
Do not start by selecting a long drying time. It is better to determine the required degree of dryness by gradually
increasing the drying time.
For a mixed load (cotton and resistant synthetics, for example) select the time for the most delicate fibres and
increase it by 10 mins.
10
08/02/01
12.01
Pagina
11
(Nero/Process Black pellicola)
4. Start the machine
Operating sequence
Depress Start-button
, the mains-on light comes
on and the machine starts operating.
Before starting up for the first time it is advisable lo
load a few moist cloths into the dryer and to let it run
for about 20 minutes. This ensures that no dust and
dirt is left in the drum.
1. Load the laundry
Open the door.
Load the items one at a time, shaking them out
loosely and close the door.
Please check the laundry does not get caught
between the door and filter.
5. When drying is completed
The machine stops automatically. Turn the selector
dial to “O”, the mains-on light goes out.
If the laundry is still too damp, select a further brief
drying time, bearing in mind that during the last 10
minutes the dryer carries out the cooling and anticrease treatment phase.
Clean the filters after every drying programme
(see page 13).
This will ensure correct functioning of the
appliance.
P1108
P1104
2. Depress button
,if required
3. Select the drying time
Turn the selector dial clockwise to the desired time,
in the high or low temperature section, depending on
the laundry.
100
M0045S
11
ENGLISH
125994470.qxd
125994470.qxd
08/02/01
12.01
Pagina
12
(Nero/Process Black pellicola)
• Avoid drying dark clothes with light coloured fluffy
items such as towels as they could attract the fluff.
Useful hints
• The laundry must be thoroughly spun before
tumble drying.
• Try to load to the maximum capacity of the
machine as small loads are uneconomical.
For information, here is a list of the average
weights of some common laundry items.
Sheet
700 - 1000 g
Tablecloth
• Knitted textiles (knitted underwear) may shrink a
little during drying. Please do not overdry items of
this type. It is advisable to allow for shrinkage
when choosing the size of new purchases.
400 - 500 g
Kitchen towel
70 - 120 g
Table napkin
50 - 100 g
Towelling hand towel
Bathrobe
• Easy-care items, too, e.g. shirts, should be briefly
pre-spun before drying (depending on crease
resistance approx. 30 seconds or using the special
brief spin programme of your washing machine).
• You can also put starched items into your dryer.
However, to achieve the desired starched effect,
choose the programme “iron dry”. To remove any
starch residues, wipe out the internal drum after
drying with a moist cloth and then rub it dry.
150 - 250 g
1000 - 1500 g
• To avoid a static charge when drying is completed,
use either a fabric softener when you are washing
the laundry or a fabric conditioner specifically for
tumble dryers.
Man’s shirt
200 - 300 g
Pillowcase
100 - 200 g
• Remove the laundry when the dryer has finished
drying.
Man’s pyjamas
400 - 500 g
Ladies’ nightdress
200 - 250 g
• If individual items are still damp after drying, set a
brief post-drying time, but at least 20 minutes.
This will be necessary particularly for multilayered
items (e.g. collars, pockets, etc.).
• Never tumble dry the following:
Particularly delicate items such as net curtains,
woollen, silk, fabrics with metal trim, nylon tights,
bulky materials such as anoraks, blankets,
eiderdowns, sleeping bags, feather quilts and any
items containing rubber foam or materials similar
to rubber foam.
• Always follow the instructions on garment labels:
may be tumble dried
normal drying (high temperature)
delicate drying (low temperature)
do not tumble dry
• Close pillowcases and covers with fasteners to
prevent small laundry items getting tangled inside
them. Close press studs, zips and hooks and tie
belts and apron strings.
• Sort laundry according to type and degree of
drying required.
• Do not over-dry laundry, this avoids creasing and
saves energy.
12
125994470.qxd
08/02/01
12.01
Pagina
13
(Nero/Process Black pellicola)
You must disconnect the appliance from the
electricity supply, before you can carry out any
cleaning or maintenance work.
If necessary the filters can be cleaned under running
water using a brush. In this case remove the filter in
the door opening as per picture (it can be positioned
with the tooth facing to the left or to the right).
External cleaning
650
800 /
kg 5
kg 2,5
900
70' - 90'
35' - 50'
1000 /
1200
65' - 85'
30' - 45'
Use only soap and water and then dry thoroughly.
Important: do not use methylated spirit, diluents or
similar products.
Cleaning the door
P1112
Clean periodically the interior part of the door to
remove any fluff from the seals around the filter.
Accurate cleaning ensures correct drying.
650
800 /
kg 5
kg 2,5
900
70' - 90'
35' - 50'
1000 /
1200
65' - 85'
30' - 45'
800 /
900
80' - 100'
70'
55' -
1000 /
1200
75' - 95'
50' - 65'
kg 2,5
kg 1
50' - 60'
30' - 35'
E
R S
V E
R E
T O
A U
P1109
Cleaning the filters
Your dryer will only function well if the filters are
clean.
The filters collect all the fluff which accumulates
during drying and they must therefore be cleaned at
the end of each programme, before removing the
laundry, with a damp cloth.
650
800 /
kg 5
kg 2,5
P1110
900
70' - 90'
35' - 50'
1000 /
1200
65' - 85'
30' - 45'
800 /
900
80' - 100'
70'
55' -
1000 /
1200
75' - 95'
50' - 65'
kg 2,5
kg 1
50' - 60'
30' - 35'
E
R S
V E
R E
T O
A U
P1111
The filter in the inner door must be removed for
cleaning.
Do not be alarmed by the amount of fluff. It is not
due to excessive wear caused by the dryer. All fabric
loses fluff when drying but it goes un-noticed in the
air. In a tumble dryer it simply collects in the filter.
13
800 /
900
80' - 100'
70'
55' -
1000 /
1200
75' - 95'
50' - 65'
kg 2,5
kg 1
50' - 60'
30' - 35'
E
R S
V E
R E
T O
A U
ENGLISH
Maintenance and Cleaning
125994470.qxd
08/02/01
12.01
Pagina
14
(Nero/Process Black pellicola)
Something not working?
Before contacting your local Zanussi Service Centre, please make the following checks:
Problem
Possible cause
• The dryer does not work:
• The door is open.
• The plug is not fitted into the wall socket.
• There is no electricity supply from the wall socket.
• The selector dial is not set correctly.
• The start button
• The dryer does not dry properly:
has not been depressed.
• The filters are clogged.
• Insufficient drying time.
• The selected cycle is not suitable for the laundry.
• The laundry has not been spun properly.
• The low temperature function
selected.
has been
• Excessive laundry load.
• The dryer is not correctly installed.
If, after the above checks, there is still a fault, call
your local Zanussi Service Centre.
Please make sure you give the model and serial
number of the appliance.
This information can be found on the rating plate
(see picture on page 6).
14