1
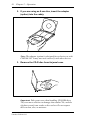
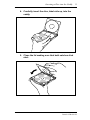
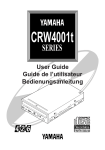
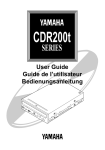
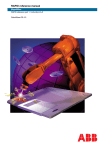
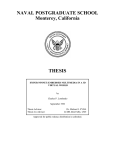
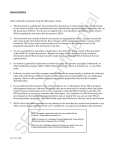
CDR
100/102
User Guide
EX
2
Introduction
Introduction
Welcome
Thank you for purchasing, and welcome to — the Yamaha
CDR100/102. Before using CDR100/102, please read through
this Operation Guide.
What is CDR100/102?
The Yamaha CDR100/102 allows you to record data onto
Compact Disc Recordable (CD-R) discs. It can also be used to
play discs just like a typical CD-ROM drive*. CD-ROM is an
acronym for Compact Disc Read Only Memory, which is a
read-only medium, so you can read data, but you cannot
record new data.
CDR100/102 uses a special kind of disc for recording. Its
appearance is similar to that of a typical CD-ROM, however,
the base material, manufacturing techniques, and recording
principles are different. CDR100/102 uses a laser to write data
to disc. Once the laser light hits the disc, the color and
reflective qualities of the disc change. Since this reflective
quality cannot be changed after initial exposure, the data
cannot be erased or changed.
Now that multimedia, which encompasses text, graphics,
audio, and video, has become a reality, CD-ROM, with its
550MB to 650MB storage capacity, has an important
supporting role to play.
* CDR100/102 will not play commercially made discs whose
center-hole location does not conform to the Orange book
specification.
Yamaha CDR100/102
CDR100/102 Features
3
CDR100/102 Features
4xS Recording & Reading (CDR100)
2xS Recording & 4xS Reading (CDR102)
CDR100 is the first CD-ROM recorder capable of recording at
quad speed (4xS). This means a significant time saving for
CD-ROM production. Both the CDR100 and CDR102 can
record at double speed (2xS) and normal speed (1xS), and read
discs at quad speed (4xS). CDR100 records at a maximum
speed of 4xS. CDR102 records at a maximum speed of 2xS.
Dual Use: Record and Play
As well as recording CD-ROM and CD-DA format discs,
CDR100/102 can play them, too. For these two formats,
CDR100/102 functions just like a typical CD-ROM drive.
Compact body
A compact size - approximately the size of an internal 5.25
inch floppy disk drive (half-height type) - allows you to build
the unit into your system architecture easily.
SCSI2forHigh-Volume,High-SpeedData
Transfer
CDR100/102 features SCSI2–the Second generation SCSI
interface for connecting computers and peripheral devices.
SCSI2 provides high-speed transmission for large volume
data, especially important when working with image data.
Yamaha CDR100/102
4
Introduction
OrangeBookPart2Compatible3-Mode
Recording
CDR100/102 conforms to the three recording modes outlined
in the Orange Book Part 2: Track At Once, Multisession and
Disc At Once.
Track at Once
In this mode, data can be recorded to disc a track at a time.
However, the disc cannot be played until the final recording is
made.
Multisession
In this mode, data can be recorded to disc one track at a time,
and the disc can be played in-between recording sessions.
Disc At Once
In this mode, data can be recorded to an entire disc in one go.
To use this mode, your software must support Disc At Once
recording.
Yamaha CDR100/102
CD-R Discs
5
CD-R Discs
Yamaha have developed two discs, use the discs below, or
conventional CD-R discs that conform to the Orange Book
Standard.
•
CDM12Y63 (12-cm)
•
CDM12Y74 (12-cm)
Using discs developed and manufactured by Yamaha will
minimize the occurrence of errors during writing operation,
and will ensure compatibility when you read data from the
disc using another manufacturer’s CD-ROM drive.
When using the “TRACK AT ONCE” recording mode, do not
try to play the disc until it has been finalized (i.e., until the
lead in/out information has been written), otherwise errors or
malfunctions may occur. Likewise, trying to play a blank disc
(i.e., a disc that has not yet been recorded) in a CD-ROM
drive, CD player, or CD-I player may cause malfunctions and
disc scratches.
Controlling Software
CDR100/102 is a platform independent software controlled
device. It can be used in MS-DOS, Windows, Macintosh, and
UNIX environments. Before purchasing software, make sure
that it supports CDR100/102 and your computer platform.
Yamaha CDR100/102
6
Introduction
CD Caddy and 8-cm disc adaptor
(Option)
Use a Yamaha CD Caddy designed for the CDR100/102, or an
equivalent caddy marked with the logo
. Using another
type of CD caddy may prevent the drive from operating at
optimal performance and may cause malfunction.
Also, use a dedicated Yamaha disc adaptor (item number: ADP
08) for the CDR100/102. Using another type of disc adaptor
may prevent the drive from operating at optimal performance.
Use the disc adaptor only for 8-cm Compact Discs and CD
Write-Once Discs.
• 8-cm disc adaptor (option)
Note: The disc adaptor is dedicated to the CDR100/102. Use
of the adaptor on other devices may cause malfunction.
Yamaha CDR100/102
Touring Around CDR100/102
7
Chapter 1 – Touring Around
CDR100/102
Front Panel
CDR100
9
PHONES
VOLUME
MIN
1
DISC READ WRITE
×2
×4
EJECT
MAX
2
345
6
7 8
CDR102
9
PHONES
42READ
WRITE
1
1
VOLUME
MIN
DISC READ WRITE
×2
×4
EJECT
MAX
2
345
6
7 8
PHONES jack
This stereo mini jack allows you to connect headphones.
2
VOLUME control
This control adjusts the volume level of the PHONES output.
Yamaha CDR100/102
8
Chapter 1 – Touring Around CDR100/102
3
DISC indicator
This indicator flashes when loading and ejecting. It remains on
when CDR100/102 contains a disc. If a disc is not inserted
into the caddy correctly, or the caddy does not contain a disc,
the DISC indicator stops flashing and the caddy is ejected.
4
READ indicator
This indicator flashes when data is being accessed. It remains
on when disc data is being read, and when CDR100/102 is
ready to record.
Note: DISC and READ indicators flashing together indicates
an error.
5
WRITE indicator
This indicator lights up when recording to disc. In Test mode,
it flashes.
6
X2/X4 indicators
These indicators show the speed: 2xS or 4xS. When both are
off, the speed is 1xS. When CDR100/102 is reset, these
indicators first go out, then both come on for an instant, then
the X2 indicator goes out, leaving just the X4 indicator on.
7
EJECT button
This button is used to eject the caddy.
8
Manual eject hole
This is used to manually eject a caddy that cannot be ejected in
the normal way. It is for emergency use only.
9
CD Caddy insertion slot
The CD Caddy is inserted here. A protective flap covers the
slot.
Yamaha CDR100/102
Operation
9
Chapter 2 – Operation
Inserting a Disc into the Caddy
Discs must be inserted into the CD Caddy before they can be
used by CDR100/102.
1. To open the caddy, squeeze the OPEN levers
together with one hand, and lift up the plastic lid
with the other hand.
Yamaha CDR100/102
10
Chapter 2 – Operation
2. If you are using an 8-cm disc, insert the adaptor
(option) into the caddy.
Note: The adaptor (option) is designed for exclusive use with
CDR100/102. It may not work correctly with other devices.
3. Remove the CD-R disc from its jewel case.
Important: Take great care when handling CD-ROM discs.
They are more sensitive to damage than audio CDs, and the
slightest scratch can render a disc useless. Do not expose
discs to dust, dirt, or moisture.
Yamaha CDR100/102
Inserting a Disc into the Caddy
11
4. Carefully insert the disc, label-side up, into the
caddy.
5. Close the lid making sure that both catches click
shut.
Yamaha CDR100/102
12
Chapter 2 – Operation
InsertingtheCaddyintoCDR100/102
1. Hold open the CDR100/102’s protective flap.
2. Insert the caddy with its arrow mark facing up and
forward into the CD Caddy insertion slot.
EJ
×4
×2
C
DIS
Yamaha CDR100/102
AD
RE
ITE
WR
EC
T
Inserting the Caddy into CDR100/102
13
3. Push the caddy carefully in until CDR100/102
accepts it.
The DISC indicator flashes while the caddy is loading, and
while the disc is being checked. It remains lit once the disc has
been loaded successfully.
If the disc is not loaded in the caddy correctly, or the caddy
does not contain a disc, the DISC indicator stops flashing and
the caddy is ejected.
When the caddy has loaded successfully, it takes about 20
seconds before the CDR100/102 is ready for use. When
adding new data to a multisession disc, it may take several
minutes before CDR100/102 responds to commands from the
host computer.
Note: Do not attempt to insert the caddy while the X2 and X4
indicators remain on after performing a reset. If you insert
the caddy too soon, it may get caught by the mechanism. If it
does, it will eject automatically after a while. Once this
happens, make sure that you power off CDR100/102, then
power on before proceeding. You may need to power down
your system before powering down CDR100/102. Consult
your system dealer.
Yamaha CDR100/102
14
Chapter 2 – Operation
Ejecting the Caddy
1. To eject the caddy, press the EJECT button.
PHONES
VOLUME
MIN
D WRITE
DISC REA
×2
×4
EJECT
MAX
Note: Some software prohibits the use of the EJECT button,
so a caddy cannot be ejected in this way. Please refer to the
instructions supplied with your software.
2. Once it has ejected, remove the caddy by hand.
3. Remove the disc from the caddy and return it to its
jewel case.
The caddy cannot be ejected while CDR100/102 is reading or
writing a disc.
Yamaha CDR100/102
VU98550
YAMAHA CORPORATION
Electronic Devices Division