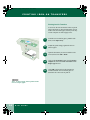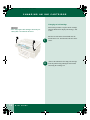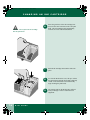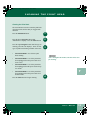
1
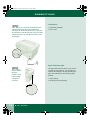
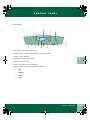
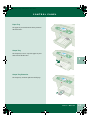
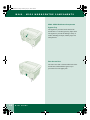
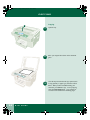
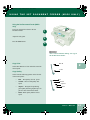
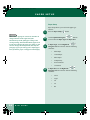
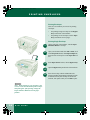
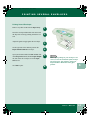
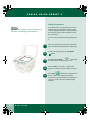
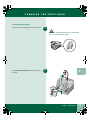
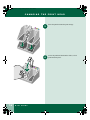
00-ugm940.book Page 1 Monday, July 31, 2000 3:20 PM
User
Guide
701P35371
WorkCentre M940
WorkCentre M950
00-ugm940.book Page 2 Monday, July 31, 2000 3:20 PM
Prepared by:
Xerox Industrial Design Human Interface
Graphic Design
Jefferson Road
Henrietta
New York
©2000 by Xerox Limited. All rights reserved.
Copyright protection claimed includes all forms and matters of copyrightable
material and information now allowed by statutory or judicial law or hereinafter
granted, including without limitation, material generated from the software
programs which are displayed on the screen, such as icons, screen displays,
looks, etc.
Xerox ® and all Xerox products mentioned in this publication are registered
trademarks of the Xerox Corporation.
Windows TM is a trademark of Microsoft Corporation. Product names and
trademarks of other companies are also acknowledged.
Changes are periodically made to this document. Changes, technical inaccuracies
and typographical errors will be corrected in subsequent editions.
This document was created on a PC using Adobe Framemaker software.
Publication number: 701P35371
00-ugm940.book Page iii Monday, July 31, 2000 3:20 PM
Table of Contents
U SER GU ID E
1. BASIC INFORMATION
M940 - M950 WorkCentre Components
Connections
Control Panel
M940 - M950 WorkCentre Components
Software Components
Xerox ControlCentre 2.0 - WorkCentre Status Bar
1-1
1-2
1-3
1-6
1-7
1-9
2. COPYING
Copying
Copying
Using the Set Document Feeder (M950 only)
Copy Color
Copy Quality
Paper Setup
Lighten/Darken
Reduce/Enlarge
Select Button
Menu/Exit
Copy Quantity Buttons
2-1
2-2
2-3
2-3
2-3
2-4
2-5
2-6
2-8
2-8
2-8
User Guide
iii
00-ugm940.book Page iv Monday, July 31, 2000 3:20 PM
Clear/Stop
Start
2-8
2-8
3. PRINTING
Printing
Printing Documents
Printing Cards
Printing Envelopes
Printing Single Envelope
Printing Several Envelopes
Printing Iron-On Transfers
Printing Labels
Printing Photographs
Printing Transparencies
Printing Banners
3-1
3-2
3-3
3-4
3-4
3-5
3-6
3-7
3-8
3-9
3-10
4. CUSTOMIZING YOUR WORKCENTRE
Customizing your WorkCentre
Customizing Copier Features
Selecting WorkCentre Display Window Language
Selecting Paper Default
Selecting Program Timeout
Selecting Sleep Mode Setting
Learning How to Customize Print Features on Your PC
Customizing Scan Features
Setting a Preset for Email
4-1
4-2
4-2
4-3
4-3
4-4
4-4
4-5
4-6
5. SCANNING
Scanning
Scan Using Preset 1
Sending a Scan through Email
Scanning Using ControlCentre - Pagis Inbox
Scanning Using MGI PhotoSuite
Scanning Using MS Word
Scanning Using Adobe PhotoShop
5-1
5-2
5-3
5-4
5-5
5-6
5-7
6. FAXING
Faxing from your PC
6-1
User Guide
iv
00-ugm940.book Page v Monday, July 31, 2000 3:20 PM
Faxing Using Preset 2
Faxing From ControlCentre - Pagis Inbox
6-2
6-3
7. MAINTENANCE
Maintaining Your WorkCentre
Changing an Ink Cartridge
Cleaning the Print Head
Aligning the Print Head
Changing the Print Head
7-1
7-2
7-5
7-6
7-7
8. TROUBLESHOOTING
Troubleshooting
Printing a Test Page
Paper Feeding Problems
Quality Problems
Quality Problems
Quality Problems
Copier/Printer Problems
Scanner Problems
Scanner Problems
Error Codes
Error Codes
8-1
8-2
8-3
8-4
8-5
8-7
8-8
8-11
8-12
8-13
8-14
9. General Information
General Information
Service and Support
Ordering Supplies
Ink Cartridge/Print Head Re-Order Numbers
Safety
9-1
9-2
9-3
9-3
9-7
User Guide
v
00-ugm940.book Page vi Monday, July 31, 2000 3:20 PM
User Guide
vi
00-ugm940.book Page 1 Monday, July 31, 2000 3:20 PM
M940 - M950 WORKCENTRE COMPONENTS
Chapter One
1z
M940 - M950 WorkCentre Components
BASIC
INFORMATION
1
2
1. CD, Getting Started guide, User Guide, and
Warranty Card (in most countries)
Y104
-
Magenta
Yellow
Cyan
+
Ink
Cartridges
DOCU PRINT M
WORK CENTRE
Series
M Series
1
Catouche
d’Encre
Tintenpatrone
Cartuccia
inhiostro
Inkt Cartridge
Cartucho
de tinta
Russian ink
Cartridge
Chinese ink
Cartridge
4
2. WorkCentre Control Panel
3. Ink cartridges (4)
3
Black
5
6
4. Print heads (2)
5. Power cord
7
8
6. USB cable
7. Output tray
8. Paper tray
9. WorkCentre M950 (Set Document Feeder)
9
10. WorkCentre M940
User
Guide
1.1
00-ugm940.book Page 2 Monday, July 31, 2000 3:20 PM
CONNECTIONS
Connections
Note: When power is connected the WorkCenter
will automatically go through an adjustment
procedure. Do not disconnect the power cord from
the wall outlet, as the WorkCentre requires a small
amount of power to prevent the ink in the nozzles
from drying.
1. USB cable (included)
2. Power cord
1
2
Paper Thickness Knob
The paper thickness knob allows you to choose
envelope or paper printing. An envelope icon
indicates the setting for envelope printing and a
paper icon indicates the dial setting for paper
printing.
Note: Always
keep the knob in
the paper
position, except
when printing
envelopes or
card stock.
1. Paper printing
2. Envelope/card stock printing
1
2
1.2
User
Guide
00-ugm940.book Page 3 Monday, July 31, 2000 3:20 PM
CONTROL PANEL
Control Panel
3
1
4
5
2
+
-
7
6
11
9
8
10
13
14
15
12
1.Paper Setup: Select paper type and size
2. Lighten/Darken: Adjust lightness/darkness and color intensity
3. Display: Shows messages
1
4. Menu/Exit: Enter or exit the menu
5. Clear/Stop: Clear or stop
6. Color: Select between Color and B & W
7. Quality: Select from the following quality options:
•
Best
•
Normal
•
eXpress
•
Draft
User
Guide
1.3
00-ugm940.book Page 4 Monday, July 31, 2000 3:20 PM
CONTROL PANEL
8. Reduce/Enlarge: Adjust the size copy desired
9. Scan Mode: Enter Scan Mode
10. Navigator Control: Move between selections
11. Error light: Lights when error occurs
12. Select button: Select options
13. Copy Quantity: Select copy quantity
14. Start: Starts scanning or copying
15. Power: Turns WorkCentre on and off, however, a residual amount of power is always on, as the
WorkCentre requires a small amount of power to prevent the ink in the nozzles from drying.
1.4
User
Guide
00-ugm940.book Page 5 Monday, July 31, 2000 3:20 PM
CONTROL PANEL
Paper Tray
The paper tray is inserted into the lower portion of
the WorkCentre.
Output Tray
The output tray rests on top of the paper tray and
slides into the WorkCentre.
1
Output Tray Extension
The output tray extension pulls out and flips up.
User
Guide
1.5
00-ugm940.book Page 6 Monday, July 31, 2000 3:20 PM
M940 - M950 WORKCENTRE COMPONENTS
M940 - M950 WorkCentre Components
Bypass Tray
The bypass tray is located on the back of the
WorkCentre. To use the bypass tray, flip it down.
The bypass tray is used for loading a variety of
media, including envelopes, banner paper, and
transparencies.
Rear Access Door
The rear access door is located on the back of the
WorkCentre, underneath the bypass tray to
provide access to the paper path.
1.6
User
Guide
00-ugm940.book Page 7 Monday, July 31, 2000 3:20 PM
SOFTWARE COMPONENTS
Software Components
ControlCentre 2.0:
•
•
Pagis PRO 3.0 : The latest version of Pagis
customized for the M940/950 which
integrates all of the functions into one easy
to use interface. The primary functions
include:
•
TextBridge PRO 9.0: Beneficial for
any document where you combine set
format, text, and graphics.
•
Pagis Document Management:
Allows you to easily manage any
scanned image, documet or file, and to
incorporate it into your application.
In addition you can set up default
destinations to automatically launch
your desired application and scan
directly to that application.
•
Pagis Copier: Scan document and
copy in color.
Note: To set up the five default presets, see
the section, "Customizing scan features" in
Chapter Four.
1
Smith Micro Quicklink III PC Fax: Fax
from your desk with your PC’s assistance.
Smith Micro is integrated into Xerox
ControlCentre, so Faxing is as simple as
scanning your document and dragging it to
the PC Fax icon, or using the PC Fax preset.
User
Guide
1.7
00-ugm940.book Page 8 Monday, July 31, 2000 3:20 PM
SOFTWARE COMPONENTS
Note: To use your WorkCentre as a scanner,
the WorkCentre TWAIN Scanner driver must
be installed on your PC during print driver
installation and you must have a TWAINcompliant software application (for example,
ScanSoft Pagis Pro, MS Word, or MGI
PhotoSuite).
1.8
User
Guide
•
MGI PhotoSuite: Photo editor modifies
your scanned images to fit your specific
application.
•
Adobe Acrobat: Allows you to view and
print PDF files, including on-line manuals.
•
Print driver: Allows printing from your PC.
•
TWAIN driver: Allows you to scan directly
into your TWAIN-compliant application.
•
Status Bar: Allows you to view the status
of the WorkCentre as well as the ink status
without launching Pagis PRO 3.0.
00-ugm940.book Page 9 Monday, July 31, 2000 3:20 PM
XEROX CONTROLCENTRE 2.0 - WORKCENTRE
Xerox ControlCentre 2.0 - WorkCentre Status Bar
Open the WorkCentre Status Bar by selecting Start>Programs>Xerox ControlCentre2.0>Status Bar or
by clicking the Xerox ControlCentre 2.0 - Pagis Inbox.
1. Select the ink level to display the Status/Maintenance window.
2. The display window shows error messages and allows you to change copier settings.
3. Select Settings to change any of the following:
•
Scan Presets: Set scan presets. For more information about how to set presets, see the section,
"Customizing scan features" in Chapter 4.
•
Copy Defaults: Set copy defaults (color, black and white, quality, and original type) from your PC.
•
System Defaults: Set system defaults (paper size/paper default, paper type, program timeout, sleep
mode).
4. Select Help for online help.
1.9
User
Guide
00-ugm940.book Page 10 Monday, July 31, 2000 3:20 PM
XEROX CONTROLCENTRE 2.0 - WORKCENTRE
1.10
User
Guide
00-ugm940.book Page 1 Monday, July 31, 2000 3:20 PM
COPYING
Chapter Two
233
COPYING
Copying
This chapter contains the following information:
•
Copying
•
Using the Set Document Feeder (M950
only)
•
Optimizing copy appearance
2
User
Guide
2.1
00-ugm940.book Page 2 Monday, July 31, 2000 3:20 PM
COPYING
Copying
2.2
User
Guide
1
Open the top.
2
Place your original face-down on the document
glass.
3
Close the top. Press the desired copy options (such
as copy quantity or paper type) from the Control
Panel. When you have finished making your
selections, press Start to copy. To stop copying,
select the Clear/Stop button. Copy options are
covered in more detail in the following pages.
00-ugm940.book Page 3 Monday, July 31, 2000 3:20 PM
USING THE SET DOCUMENT FEEDER (M950 ONLY)
Using the Set Document Feeder (M950
only)
Load your original face-down in the Set
Document feeder.
Adjust the side guide.
Press the Start button.
1
2
3
Note: You are limited to making one copy in
the Set Document Feeder.
Copy Color
2
B&W
Select either B & W or Color on the left side of the
control panel.
Color
Copy Quality
Select from the following options on the left side
of the control panel:
•
Best - Best quality, slowest speed
•
Normal - Best overall quality and
speed
•
eXpress - Designed for producing
good quality business graphics up to 50
percent faster than normal mode
•
Draft - Draft quality and the fastest
speed
Best
Normal
eXpress
Draft
User
Guide
2.3
00-ugm940.book Page 4 Monday, July 31, 2000 3:20 PM
PAPER SETUP
Paper Setup
Paper Setup allows you to select the paper type
and size.
1
Press the Paper Setup
button.
+
-
Note: When copying on card stock, remember to
change the knob on the right side of the
WorkCentre from the plain paper setting to the
envelope setting, which handles thicker paper stock.
If you do not change the paper type setting to card
stock or change the knob position, then only the
first page of your job will copy and "Adjust paper
know for thicker paper" will appear on the display.
2
User
Guide
+
-
3
4
2.4
Use the Up/Down Navigator
buttons
to move between Paper Type and Paper Size.
In Paper Type, use the Right/Left
Navigator buttons to choose from the following
selections:
•
Plain Paper
•
Coated Paper
•
Photo Paper
•
Transparency
•
Iron-on transfer
•
Card Stock
-
+
In Paper Size, use the Right/Left
Navigator buttons to choose from the following
selections:
•
Letter
•
Legal
•
A4
•
A5
•
B5
00-ugm940.book Page 5 Monday, July 31, 2000 3:20 PM
LIGHTEN/DARKEN
Lighten/Darken
The Lighten/Darken button allows you to adjust
lightness/darkness for black and white and color
copies as well as adjust the color intensity when
you make color copies.
To adjust the lightness or darkness, press the
Lighten/Darken
button.
-
1
+
Use the Up/Down Navigator
buttons to move between Lighten/Darken and
Color Intensity.
2
In Lighten/Darken, use the Right/Left
3
+
-
Navigator buttons to choose from
the following selections:
•
Lightest
•
Lighter
•
Normal (default)
•
Darker
•
Darkest
In Color Intensity, use the Right/Left Navigator
+
-
2
4
buttons to choose from the
following selections:
•
Least Color
•
Less Color
•
Normal (default)
•
More Color
•
Most Color
User
Guide
2.5
00-ugm940.book Page 6 Monday, July 31, 2000 3:20 PM
REDUCE/ENLARGE
Reduce/Enlarge
Note: The Left/Right Navigator buttons will
reduce or enlarge by 1% when using the Reduce/
Enlarge feature (Variable, Poster, Repeat Image,
Mirror, or Custom).
The Reduce/Enlarge button allows you to change
the copy image size.
1
To change the size, press the Reduce/Enlarge
button.
2
Use the Up/Down Navigator
buttons to scroll through the options. When the
option you want displays, press Select.
3
Use the Right/Left Navigator
-
Note: AutoFit, Poster, and Repeat Image are not
available when using the Set Document Feeder
(WorkCentre M950).
-
+
+
buttons to choose from the selections
listed on page 2.8.
2.6
User
Guide
00-ugm940.book Page 7 Monday, July 31, 2000 3:20 PM
REDUCE/ENLARGE
Reduce/Enlarge
If Default Paper
Type is Letter
If Default Paper
Type is A4
Description of Preset Function
Variable (100%,
default)
Variable (100%,
default)
Changes the size in 1% increments when you
press the Left/Right Navigator buttons.
Full Image (91%)
Full Image (91%)
If your image extends to the edge of the page, this
adds a margin and reduces it to fit on the page.
AutoFit (Letter)
AutoFit (A4)
Prescans and automatically sizes the image to the
page.
Poster (400%)
Poster (400%)
Prescans the image, then divides and prints image
in sections to create a poster.
Repeat Image (100%)
Repeat Image (100%)
Fits many smaller identical images on the same
page.
Mirror (100%)
Mirror (100%)
Reverses image.
Custom (50%)
Custom (122%)
Changes page size to most commonly used
setting.
Legal to Letter (78%)
A4 to A5 (70%)
Reduces page size. Legal size paper can only be
copied using the Set Document Feeder on the
WorkCentre M950.
Legal to A4 (82%)
B5 to A5 (81%)
Reduces page size. Legal size paper can only be
copied using the Set Document Feeder on the
WorkCentre M950.
A4 to Letter (95%)
A4 to B5 (86%)
Reduces page size.
5.5 x 8.5 to 8.5 x 11
(129%)
B5 to A4 (115%)
Enlarges page size.
Double Size (200%)
Double Size (200%)
Enlarges to twice the original size.
User
Guide
2
2.7
00-ugm940.book Page 8 Monday, July 31, 2000 3:20 PM
SELECT BUTTON
Select Button
The Select
button allows you to choose
options when they appear in the display window.
Menu/Exit
The Menu/Exit
button allows you to browse
through menu items. You must use the Select
button to add menu items.
Copy Quantity Buttons
The Copy Quantity
button allows you
to select the number of copies. You can make up
to 50 copies.
Clear/Stop
The Clear/Stop
button returns copy and scan
settings to their default or stops a job in progress.
Start
Depending on whether you are in Scan Mode or
Copy Mode, the Start
scanning or copying.
2.8
User
Guide
button starts
00-ugm940.book Page 1 Monday, July 31, 2000 3:20 PM
PRINTING
Chapter Three
333
PRINTING
Printing
This chapter contains the following information:
•
Printing documents from your PC
•
Printing cards
•
Printing envelopes
•
Printing iron-on transfer
•
Printing labels
•
Printing photographs
•
Printing transparencies
•
Printing banners
3
User
Guide
3.1
00-ugm940.book Page 2 Monday, July 31, 2000 3:20 PM
PRINTING DOCUMENTS
Printing Documents
1
Open the document you want to print and select
File > Print
2
Select Properties, then select from the options
listed on the Paper/Output tab:
•
Copies: Type how many copies you want.
•
Orientation: Choose Portrait or Landscape.
•
Print Order: Check Collate or Reverse print
order.
•
Print Document As:
- Brilliant Color - Photos, graphics, and text
- Greyscale - Black and white
•
Paper size: Choose the size of the paper
you want to print on.
•
Paper source: Choose either Tray 1 or the
Bypass tray (a flip tray located on the back
of the machine)
•
Paper type: Choose the type of paper you
want to print on.
•
Print quality:
- Best - Best overall quality
- Normal - Best overall print quality
- eXpress - This special feature is designed
for printing good quality business graphics,
50% faster than Normal mode.
- Draft - Draft quality, fastest speed
•
3
3.2
User
Guide
Saved settings: Choose from pre-set
options.
Click OK to print.
00-ugm940.book Page 3 Monday, July 31, 2000 3:20 PM
PRINTING CARDS
Printing Cards
You can use the WorkCentre to print index cards,
postcards, and birthday cards. Choose any card
size in the Paper Size Selection menu or use the
Custom selection to print on other card sizes not
found in the selection menu.
Note: The minimum card size you can print is
3 inches x 5 inches or 76.2mm x 127mm.
Remove any other media in the Paper Tray and
place up to 30 cards in the right side of the tray.
The maxiumum paper thickness is 0.3mm.
1
Adjust the guides snugly against the cards.
2
On the right side of the machine, turn the Paper
Thickness Knob to envelope. (The envelope
setting allows you to print thicker paper stock).
3
After you open your document and select File:
Print, click on the Properties button, then the
Paper/Output tab, then select the desired size in
the Paper Size list box.
4
Click OK to print.
5
Turn Paper Thickness Knob back to the paper
setting.
6
3
User
Guide
3.3
00-ugm940.book Page 4 Monday, July 31, 2000 3:20 PM
PRINTING ENVELOPES
Printing Envelopes
There are two methods you can use for printing
envelopes:
•
For printing a single envelope use the Bypass
Tray on the back of the machine.
•
For printing several envelopes use the Paper
Tray (instructions on next page).
Printing Single Envelope
Note: If the printing on your envelope is not
correct, reverse the orientation of the envelope
and print again. After printing, change the
Paper Thickness Knob back to the paper
position.
3.4
User
Guide
1
On the right side of the machine, turn the Paper
Thickness Knob to envelope.
2
Open your document and select File > Print, click
on the Properties button, then Paper/Output tab,
then select the envelope size in the Paper Size list
box.
3
In the Paper Source list box, choose Bypass Tray.
4
Open the Bypass Tray on the back of the machine.
5
Insert the envelope with the addressable side
facing up and the flap pointing toward the left side.
If inserted correctly the envelope feeds into the
machine, then pauses until you click OK to print.
00-ugm940.book Page 5 Monday, July 31, 2000 3:20 PM
PRINTING SEVERAL ENVELOPES
Printing Several Envelopes
Remove any other media from the Paper Tray.
1
Insert the envelopes addressable side down with
the flap of the envelope pointing toward the left
side.
2
Adjust the guides snugly against the envelopes.
3
On the right side of the machine position the
Paper Thickness Knob to envelope.
4
Open your document and select File > Print, click
on the Properties button, then the Paper/Output
tab, then select the envelope size in the Paper
Size list box.
5
Click OK to print.
6
Note: If the printing on your envelope is not
correct, reverse the orientation of the envelope
and print again. After printing, change the
Paper Thickness Knob back to the paper
position.
User
Guide
3
3.5
00-ugm940.book Page 6 Monday, July 31, 2000 3:20 PM
PRINTING IRON-ON TRANSFERS
Printing Iron-On Transfers
You can use the iron-on transfer feature to put an
image onto shirts or other cloth material. All you
need is iron-on transfer paper, which you can buy
at most computer or office supply stores.
Note: A mirror image will be printed on the
iron-on transfer paper.
3.6
User
Guide
1
Load the iron-on transfer paper, printable side
down, in the Paper Tray.
2
Adjust the guides snugly against the iron-on
transfer paper.
3
Open the document you want to transfer to the
iron-on, then select File > Print.
4
Click on the Properties button, then the Paper/
Output tab, then select Iron-on transfer in the
Paper Type list box.
5
Click OK to print. Refer to the instructions
included with the iron-on transfer paper to
determine the correct side to print on.
00-ugm940.book Page 7 Monday, July 31, 2000 3:20 PM
PRINTING LABELS
Printing Labels
You can use your WorkCentre to print sheets of
labels. Use only US letter or A4-sized labels. For
best results use labels that are specifically
designed for ink jet machines.
Fan the edges of the label sheets to separate them.
Remove any other paper in the Paper Tray and
load up to 30 sheets of labels face down.
1
2
Adjust the paper guides snugly against the stack.
3
After you open your document and select File>
Print, click on the Properties button, then the
Paper/Output tab, then select Plain paper in the
Paper Type list box.
4
Click OK to print.
Tip: First print the image on plain paper
and place on top of a label sheet. Hold up to
the light then check that the print is properly
aligned on the labels. If not, make the
required adjustments in your application.
3
5
User
Guide
3.7
00-ugm940.book Page 8 Monday, July 31, 2000 3:20 PM
PRINTING PHOTOGRAPHS
Printing Photographs
Note: If printing multiple pages, carefully remove
each sheet promptly and allow it to dry before
handling.
3.8
User
Guide
For best results use Photo Gloss paper.
1
Remove any other media and place the paper in
the Paper Tray with the glossy side down.
2
After you open your document and select File:
Print, click on the Properties button, then the
Paper/Output tab, and select Photo Quality
Glossy Paper in the Paper Type list box.
Brilliant Color automatically changes the print
quality to Best to optimize your image.
3
Click OK to print.
00-ugm940.book Page 9 Monday, July 31, 2000 3:20 PM
PRINTING TRANSPARENCIES
Printing Transparencies
For best results use a Xerox ink jet transparency or
a transparency specifically designed for ink jet
machines.
Note: Use transparencies designed for ink jet
machines. Using transparencies designed for laser
machines will cause the ink to smear.
Remove any other media and place up to 30
transparencies in the Paper Tray with the rough
side down. If your transparency has an adhesive
strip you can peel it off after printing. You can
print with the adhesive strip facing either way.
1
Adjust the guides snugly against the
transparencies.
2
After you open your document and select File:
Print, click on the Properties button, then click
on the Paper/Output tab, and select Ink jet
transparency in the Paper type list box.
3
In the Print Quality list box select eXpress or
Best. The eXpress mode will give you good
quality and print faster. Best will print slower, but
will give you the highest quality.
4
Click OK to print.
5
Note: Ensure you place transparencies rough-side
down in the tray. Also, remember that
transparencies take longer to dry than plain paper.
Allow for longer drying time before handling. If
printing multiple pages, remove each sheet
promptly and allow it to dry before handling.
3
User
Guide
3.9
00-ugm940.book Page 10 Monday, July 31, 2000 3:20 PM
PRINTING BANNERS
Printing Banners
For printing banners, we recommend you use 20
lb. or 75 gsm paper. You can feed up to five sheets
of banner paper through the bypass tray.
3.10
User
Guide
1
After you open your document and select File:
Print, click on the Properties button, then the
Paper/Output tab, then select Banner in the
Paper size list box. In the paper source list box
select Bypass Tray.
2
Tear off the number of sheets you will need to
print your banner (5 maximum).
3
Tear off the perforated edges and fan the stack to
separate the edges.
4
Open the bypass tray, which is located on the back
of the machine, to the flat position.
5
Place the unattached edge into the bypass tray slot
on the back of the machine. Push the paper down
until resistance is met. If inserted correctly, the
banner feeds into the machine, then pauses until
you click OK.
6
Sheets will continue to feed until printing is
complete.
00-ugm940.book Page 1 Monday, July 31, 2000 3:20 PM
CUSTOMIZING YOUR WORKCENTRE
Chapter Four
433
Customizing your WorkCentre
CUSTOMIZING YOUR
WORKCENTRE
This chapter contains the following information:
•
Customizing copier features
•
Selecting WorkCentre display window
language
•
Selecting paper default
•
Selecting program timeout
•
Selecting sleep mode
•
Customizing print features on your PC
•
Customizing scan features
•
4
Setting a preset for email
User
Guide
4.1
00-ugm940.book Page 2 Monday, July 31, 2000 3:20 PM
CUSTOMIZING COPIER FEATURES
-
+
Customizing Copier Features
You can customize and save the following copier
features:
Tip: You can also customize some copier features
from the ControlCentre on your PC, by selecting
Start>Programs>Xerox ControlCentre>Status Bar
and clicking the Settings>System Defaults button.
Selecting WorkCentre Display Window
Language
1
Press the Menu/Exit
button.
+
-
2
Press the down Navigator
until option "9. Language" displays.
-
4.2
User
Guide
button
+
3
Press the right Navigator
the required language displays.
button until
4
Press the Select
button. The display window
reads, "Updating display language."
00-ugm940.book Page 3 Monday, July 31, 2000 3:20 PM
SELECTING PAPER DEFAULT
Selecting Paper Default
Press the Menu/Exit
button.
1
+
-
Press the down Navigator
button
until option "7. Paper Default" displays.
2
+
-
Press the right Navigator
button
until the required paper size displays.
3
Press the Select
4
button.
Selecting Program Timeout
You can select the amount of time the
WorkCentre delays before returing to defaults.
Press the Menu/Exit
button.
Press the down Navigator
button
until option "5. Program Timeout" displays.
-
2
+
Press the right Navigator
button
until the program timeout you want to set
displays.
3
Press the Select
4
button.
4
1
+
-
User
Guide
4.3
00-ugm940.book Page 4 Monday, July 31, 2000 3:20 PM
SELECTING SLEEP MODE SETTING
Selecting Sleep Mode Setting
You can select the amount of time the
WorkCentre delays before going into sleep mode.
1
Press the Menu/Exit
button.
+
-
2
Press the down Navigator
button
until option "6. Sleep Mode" displays.
-
3
Press the right Navigator
the desired time displays.
4
Press the Select
+
button until
button.
Learning How to Customize Print
Features on Your PC
4.4
User
Guide
1
Select Start>Settings>Printers.
2
Right-click on the Xerox WorkCentre M940 M950 icon. Left-click on Properties.
3
Select the Paper/Output tab. Select the Help
button to find a table of contents listing topics.
00-ugm940.book Page 5 Monday, July 31, 2000 3:20 PM
CUSTOMIZING SCAN FEATURES
Customizing Scan Features
Your WorkCentre is set up with five presets. A
preset is a previously saved setting that allows you
to save frequently used settings. (For example, if
you make frequent scans of color pictures, you
might set up one of the presets to scan to your
favorite photo application).
Note: How to scan using a preset is covered in
chapter 5 of this guide, "Scanning." How to fax
using a preset is covered in chapter 6 of this guide,
"Faxing."
Two of the presets, scan and fax, are factory
default settings. When you select preset 1, your
image scans and the ControlCentre - Pagis Inbox
application opens automatically on your PC.
When you select preset 2, your image scans and
the QuickLink III PC Fax application opens with
your scan file attached and ready to fax.
4
User
Guide
4.5
00-ugm940.book Page 6 Monday, July 31, 2000 3:20 PM
SETTING A PRESET FOR EMAIL
Setting a Preset for Email
Note: You can set presets for other applications
using the same steps as email by changing the
application you will scan to.
1
On your PC, select Start>Programs>Xerox
ControlCentre>Status Bar. The Xerox
ControlCentre - WorkCentre Status Bar window
displays.
2
Select the Settings button. Select Scan Presets.
Under "Step 1," select Preset 3 from the list box.
Under " Step 2," Page Type, select the page type
you will be scanning.
Note: If you select"Automatically start scanning,"
and a preset, the scanner automatically scans and
opens the desired application.
3
4.6
User
Guide
Under "Step 2," Scan to, select the email
application you use from the list box. Select OK.
00-ugm940.book Page 1 Monday, July 31, 2000 3:20 PM
SCANNING
Chapter Five
533
SCANNING
Scanning
This chapter contains the following information:
•
Scanning using presets
•
Sending a scan through email
•
Scanning using ControlCentre - Pagis Inbox
•
Scanning using MGI PhotoSuite
•
Scanning using MS Word
•
Scanning using PhotoShop
.
5
Note: To use your WorkCentre as a scanner, the
WorkCentre TWAIN Scanner driver must be
installed on your PC during print driver installation
and you must have a TWAIN-compliant application
(for example, ScanSoft Pagis Pro, ScanSoft
TextBridge, Adobe Photoshop or MGI PhotoSuite).
User
Guide
5.1
00-ugm940.book Page 2 Monday, July 31, 2000 3:20 PM
SCAN USING PRESET 1
Scan Using Preset 1
Your WorkCentre is set up with five presets. A
preset is a programmed setup that allows you to
scan using preferred settings. (For example, if
you make frequent scans of color pictures, you
might set up one of the presets to scan to your
favorite photo application).
Note: How to set presets is covered in chapter 4 of
this guide, "Customizing your WorkCentre."
Two of the presets, scan and fax, are factory
default settings. When you select preset 1, your
image scans and the ControlCentre - Pagis Inbox
application opens automatically on your PC.
When you select preset 2, your image scans and
the QuickLink III PC Fax application opens.
Scanning using preset 1:
Note: For more information about using the
ControlCentre - Pagis Inbox, in the WorkCentre Pagis Inbox, select Help>Pagis User’s Guide.
5.2
User
Guide
1
Place your original face-down on the document
glass.
2
On the control panel, press the Scan Mode
button. The display reads, "Scan using: Preset 1."
3
Press the Select
button. A check mark
appears next to preset 1 to show that it is selected.
4
Press Start
. The Scan Status window
displays and the original scans. Pagis Scan Tool Scanner opns on your PC. You can select
Properties to change color and resolution,
brightness, and page size. The scan appears in the
Pagis Scan Tool - Scanner window.
5
If you want to scan more pages, click More
Pages. When finished, click Save.
00-ugm940.book Page 3 Monday, July 31, 2000 3:20 PM
SENDING A SCAN THROUGH EMAIL
Sending a Scan through Email
In the ControlCentre - Pagis Inbox, click and hold
the left mouse button down on the image you want
to send.
1
Drag the image to the email application and
release the left mouse button. The Choose Profile
window displays. Click OK. The email Pagis XIF
File window displays.
2
Select the format to send the file in. The three
options are:
3
•
No Conversion: Sends image in a
proprietary Pagis format. If your recipient
does not have Pagis, the file will not open.
•
JPEG: Sends most commonly readable
image type.
•
Send with Viewer (as self-extracting EXE
file): Sends an application viewer with the
file that allows the file to be opened.
Note: This information can be automated by setting
a preset. See chapter 4 of this guide, "Customizing
your WorkCentre."
5
Select OK. The image converts to the type
selected. The email application opens and
automatically attaches your image to a mailnote.
4
Enter email address information, write your
message and send your email.
5
You can also open the image you have scanned
and select File>Print, then select QuickLink III
PC Fax as the print destination to send your fax.
6
Note: If you have any questions regarding the
email application, see the documentation provided
by your Internet Service Provider.
Note: You can scan to any application by dragging
and dropping your scanned image.
User
Guide
5.3
00-ugm940.book Page 4 Monday, July 31, 2000 3:20 PM
SCANNING USING CONTROLCENTRE - PAGIS INBOX
Scanning Using ControlCentre - Pagis
Inbox
Note: Remember that Prescan only scans a preview
of a document. To actually scan a document, select
the Scan button.
5.4
User
Guide
1
Place your original face-down on the document
glass.
2
Select Xerox ControlCentre - Pagis Inbox icon
from your PC window.
3
In the Xerox ControlCentre - Pagis Inbox, select
the Scan icon. The Pagis Scan Tool - Scanner
window displays.
4
Select the Page Type. You can select Properties
to change color and resolution, brightness, and
page size. Select the application to Scan To.
5
Select Prescan to preview a document
(optional).
6
Select Scan to scan the document. If the scanner
does not scan, see the Troubleshooting chapter of
this guide.
7
If you want to scan more pages, click More
Pages. When finished, click Save.
00-ugm940.book Page 5 Monday, July 31, 2000 3:20 PM
SCANNING USING MGI PHOTOSUITE
Scanning Using MGI PhotoSuite
This feature allows you to incorporate a scanned
image directly into a document. These
instructions apply to MGI PhotoSuite. If you are
using a different application,consult the
documentation provided with the application.
Note: The scanning application must be
TWAIN-compliant.
Select Start>Programs>MGI PhotoSuite.
1
When the application opens, select Work on
Your Own.
2
Select File>Get Photos From>Camera/
Scanner.
3
In the Xerox WorkCentre M940-M950 Scanner
window, in the Basic tab, in the "Scan as" list
box, select True Color (24-bit), Greyscale (8bit), or Black and White (1-bit).
4
In the "Resolution" list box, select a resolution.
The lowest resolution is 100 dpi and the highest is
1200 dpi. The default resolution is 300 dpi.
5
In the "Scan size" list box, select the size of your
original.
6
Select the Image Quality tab to adjust Lighten/
Darken or Contrast.
7
Select Prescan to preview the image (optional).
Select Scan. The image scans and displays in your
application.
8
Note: The higher the resolution, the larger
the file size.
5
Note: The Saved settings list box is optional and
allows you to save settings you use frequently.
User
Guide
5.5
00-ugm940.book Page 6 Monday, July 31, 2000 3:20 PM
SCANNING USING MS WORD
Scanning Using MS Word
This feature allows you to incorporate a scanned
image directly into a Word document.
Note: The scanning application must be
TWAIN-compliant.
Note: The higher the resolution, the larger
the file size.
Note: The Saved settings list box is optional and
allows you to save settings you use frequently.
5.6
User
Guide
1
Select Start>Programs>Microsoft Word.
2
Open the document or select File>New to create a
new document.
3
Select Insert>Picture>From Scanner.
4
Select the Xerox WorkCentre M940-M950
scanner.
5
In the Xerox WorkCentre M940-M950 Scanner
window, in the Basic tab, in the "Scan as" list
box, select True Color (24-bit), Greyscale (8bit), or Black and White (1-bit).
6
In the "Resolution" list box, select a resolution.
The lowest resolution is 100 dpi and the highest is
1200 dpi. The default resolution is 300 dpi.
7
In the "Scan size" list box, select the size of your
original.
8
Select the Image Quality tab to adjust Lighten/
Darken or Contrast.
9
Select Prescan to preview the image (optional).
Select Scan. The image scans and displays in your
application.
00-ugm940.book Page 7 Monday, July 31, 2000 3:20 PM
SCANNING USING ADOBE PHOTOSHOP
Scanning Using Adobe PhotoShop
This feature allows you to incorporate a scanned
image directly into a PhotoShop document.
Note: The scanning application must be
TWAIN-compliant.
Select Start>Programs>Adobe PhotoShop.
1
Open a document or select File>New to create a
new document.
2
Select File>Import>TWAIN_32.
3
Select the Xerox WorkCentre M940-M950
scanner.
4
In the Xerox WorkCentre M940-M950 Scanner
window, in the Basic tab, in the "Scan as" list
box, select True Color (24-bit), Greyscale (8bit), or Black and White (1-bit).
5
In the "Resolution" list box, select a resolution.
The lowest resolution is 100 dpi and the highest is
1200 dpi. The default resolution is 300 dpi.
6
In the "Scan size" list box, select the size of your
original.
7
Select the Image Quality tab to adjust Lighten/
Darken or Contrast.
8
Select Prescan to preview the image (optional).
Select Scan. The image scans and displays in your
application.
9
Note: The higher the resolution, the larger
the file size.
5
Note: The Saved settings list box is optional and
allows you to save settings you use frequently.
User
Guide
5.7
00-ugm940.book Page 8 Monday, July 31, 2000 3:20 PM
SCANNING USING ADOBE PHOTOSHOP
5.8
User
Guide
00-ugm940.book Page 1 Monday, July 31, 2000 3:20 PM
FAXING FROM YOUR PC
Chapter Six
633
FAXING
Faxing from your PC
This chapter contains the following information:
•
Faxing using preset 2
•
Faxing using ControlCentre - Pagis Inbox
6
.
User
Guide
6.1
00-ugm940.book Page 2 Monday, July 31, 2000 3:20 PM
FAXING USING PRESET 2
Faxing Using Preset 2
Your WorkCentre is set up with fax as a factory
default setting for sending Faxes from your PC
modem using the WorkCentre - QuickLink III PC
Fax. This fax software uses the modem on your
PC to send faxes.
Note: How to set presets is covered in chapter 4 of
this guide, "Customizing your WorkCentre."
You can scan a document for faxing using preset
2.
1
Place your original face-down on the document
glass or in the Set Document Feeder (M950 only).
2
On the control panel, press the Scan Mode
button.
-
6.2
User
Guide
+
3
Press the right Navigator
button until
the display reads, "Scan using: Preset 2."
4
Press the Select
button. A check mark
appears next to preset 2 to show that it is selected.
5
Press Start
and follow the instructions on
the PC screen. The original scans and the
WorkCentre - QuickLink III PC Fax application
opens on your PC with your scanned original
attached.
00-ugm940.book Page 3 Monday, July 31, 2000 3:20 PM
FAXING FROM CONTROLCENTRE - PAGIS INBOX
Select View Fax to view your fax (optional).
6
Select Send Fax to fill out information regarding
your fax.
7
Select Send Fax or select the Help>Contents
button to find more information about using
WorkCentre - QuickFax III.
8
Note: For more information about using
WorkCentre - QuickLink III PC Fax select
Help>Contents in the application.
Faxing From ControlCentre - Pagis Inbox
Place your original face-down on the document
glass.
1
Select the Xerox ControlCentre - Pagis Inbox
icon from your PC window.
2
3
In the WorkCentre - Pagis window, select the Fax
button on the left side. The Pagis Scan Tool - Fax
displays.
3
Select the Quality and choose desired setting.
You can select Properties to change color and
resolution, brightness, and page size.
4
Select Prescan to preview a document before
you fax it. The original scans and the WorkCentre
- QuickLink III PC Fax PC Fax application opens
on your PC.
5
Select View Fax to view your fax.
6
6
Note: For more information about using
WorkCentre - QuickLink III PC Fax select
Help>Contents in the application.
User
Guide
6.3
00-ugm940.book Page 4 Monday, July 31, 2000 3:20 PM
FAXING FROM CONTROLCENTRE - PAGIS INBOX
6.4
User
Guide
7
Select Send Fax to fill out information regarding
your fax.
8
Select Fax to send your fax or use the
Help>Contents button to find more information
about using WorkCentre - QuickFax III.
00-ugm940.book Page 1 Monday, July 31, 2000 3:20 PM
MAINTAINING YOUR WORKCENTRE
Chapter Seven
7
MAINTENANCE
Maintaining Your WorkCentre
This chapter contains the following information:
•
Changing an ink cartridge
•
Cleaning the print head
•
Aligning the print head
•
Changing the print head
7
User
Guide
7.1
00-ugm940.book Page 2 Monday, July 31, 2000 3:20 PM
CHANGING AN INK CARTRIDGE
Changing an Ink Cartridge
Follow this procedure to replace an ink cartridge
when the WorkCentre displays the message, "Out
of ink."
Note: Only replace ink cartridges when they are
"Out of ink," not when the ink is low.
1
2
7.2
User
Guide
Pull the two side latches forward and raise the
WorkCentre cover. The ink tanks will move to the
center.
Remove the indicated color empty ink cartridge
from the print head by pushing the tab forward
and easing the cartridge out.
00-ugm940.book Page 3 Monday, July 31, 2000 3:20 PM
CHANGING AN INK CARTRIDGE
Remove the new ink cartridge from its package.
Slowly peel off the foil seal from the cartridge in
the direction of the arrow.
3
Caution: Do not touch the uncovered opening in
the ink cartridge, as ink will get on your hands.
7
User
Guide
7.3
00-ugm940.book Page 4 Monday, July 31, 2000 3:20 PM
CHANGING AN INK CARTRIDGE
6
Insert the green base of the ink cartridge, heel
first, into the correct location on the color print
head. The ink cartridges and corresponding
locations are color-coded and numbered.
7
Push the ink cartridge down until it clicks into
place.
8
To close the WorkCentre cover, lift up to release
the support arms and push down until completely
closed. Your WorkCentre will automatically
begin cleaning the print heads.
9
The control panel on the WorkCentre will now
lead you through a series of instructions for
alignment.
Caution: Do not force the ink cartridge
into the print head.
3 4
7.4
User
Guide
00-ugm940.book Page 5 Monday, July 31, 2000 3:20 PM
CLEANING THE PRINT HEAD
Cleaning the Print Head
The clean function is used to restore the print head
when the nozzles become dirty or clogged with
dried ink.
Press the Menu/Exit button.
Press the down Navigator button until
"Maintenance" displays. Press the Select button.
Press the right Navigator button until the type of
cleaning you want to do displays. There are four
types of print head cleaning available. Select one:
•
Clean Print Head 1: Use for basic print
head cleaning.
•
Clean Print Head 2: Use if the printer has
been unplugged from the power outlet for a
week or less.
•
Clean Print Head 3: Use if the printer has
been unplugged from the power outlet for up
to a month.
•
Clean Print Head 4: Use if the printer has
been unplugged from the power outlet for a
month or more.
Press the Select button to begin cleaning.
1
2
3
Note: The higher the number, the more ink is used
for cleaning.
7
4
User
Guide
7.5
00-ugm940.book Page 6 Monday, July 31, 2000 3:20 PM
ALIGNING THE PRINT HEAD
Aligning the Print Head
1
2
Press the down Navigator button until
Maintenance displays. Press the Select button.
3
Press the right Navigator button until "Align
PrintHead" displays.
4
7.6
User
Guide
Press the Menu/Exit button.
Press the Select button to print an alignment page.
5
Look over this page and find the areas that are
best aligned.
6
Using the Navigator buttons, select the
corresponding numbers on your control panel.
7
Press the Select button to store your choice. The
display window will read, "Ready to Copy" when
it finishes aligning.
00-ugm940.book Page 7 Monday, July 31, 2000 3:20 PM
CHANGING THE PRINT HEAD
Changing the Print Head
Remove the new print head from the plastic case.
1
Caution: Setting the print head on a hard surface
may cause damage to the inkjets.
1
Lift the Print head latch up to unlock the print
carriage.
7
2
2
User
3
4
Guide
7.7
00-ugm940.book Page 8 Monday, July 31, 2000 3:20 PM
CHANGING THE PRINT HEAD
1
2
3
Insert the print head into the print carriage.
4
Lower the print head latch until it clicks, to lock
print heads into place.
3
4
2
7.8
User
Guide
3
4
00-ugm940.book Page 1 Monday, July 31, 2000 3:20 PM
TROUBLESHOOTING
Chapter Eight
8
TROUBLESHOOTING
Troubleshooting
This chapter contains the following information:
•
Printing a test page
•
Paper feeding problems
•
Quality problems
•
Copier/Printer problems
•
Scanner problems
•
Error Problems
8
User
Guide
8.1
00-ugm940.book Page 2 Monday, July 31, 2000 3:20 PM
PRINTING A TEST PAGE
Printing a Test Page
1
2
8.2
User
Guide
Press the Menu/Exit button in the window
display.
Press the down Navigator button until
Maintenance displays. Press the Select button.
3
Press the right Navigator button until "Print Test
Page" displays.
4
Press the Select button to print a test page.
00-ugm940.book Page 3 Monday, July 31, 2000 3:20 PM
PAPER FEEDING PROBLEMS
Paper Feeding Problems
Symptom
DiagnosDiaDiagnosis and/or Solutiongnosis and ors and/
Paper sticks together
•
Ensure there is not too much paper in the tray. Depending on
the thickness of your paper, the paper tray can hold up to 150
sheets.
•
Ensure you are using the correct type of paper. Remove paper
from the feeder and flex or fan the paper.
•
Humid conditions may cause some paper to stick together.
More than one sheet of
paper being fed
•
There may be different types of paper in the tray. Load paper of
only one type, size, and weight at a time.
Paper skews or buckles
•
Ensure that the paper in the tray is not overloaded. Depending
on the thickness of your paper, the feeder can hold up to 150
sheets of paper.
•
Try another type of paper. Ensure the paper is not bowed in the
tray.
•
Ensure the paper guides are adjusted snugly against the paper.
•
If you are printing envelopes, ensure the paper thickness knob
is set to the envelope setting.
•
Use only transparencies specially designed for an ink jet printer.
•
Remove each transparency as it leaves the printer.
•
Ensure transparency is loaded rough-side down.
•
Ensure that the paper guide is against the left side of the
envelopes.
•
Ensure envelopes are correctly oriented.
Transparencies stick
together in the paper exit
Envelopes skew or fail to
feed correctly
8.3
User
Guide
00-ugm940.book Page 4 Monday, July 31, 2000 3:20 PM
QUALITY PROBLEMS
Quality Problems
Symptom
DiagnosDiaDiagnosis and/or Solutiongnosis and ors and/
Printed document is blank
•
Verify that you have an original on the document glass.
•
Print a test print from the Control Panel:
Note: Do not disconnect
the power cord from the
wall outlet, as the
WorkCentre requires a
small amount of power to
prevent the ink in the
nozzles from drying.
•
•
•
Press Menu/Exit in the display window.
•
Press the down Navigator button until Maintenance
displays. Press the right Navigator button until Print Test
Page displays.
•
Press the Select button. If the test print is good, check the
printer cable or the PC.
If the test print is blank, try cleaning the print head:
•
Press Menu/Exit on the Control Panel.
•
Press the down Navigator button until Maintenance
displays.
•
Press the right Navigator button until Clean Print Head
1 displays. Press the Select button.
Remove the print heads and clean with a damp cloth. Use a
clean cloth, dampened only with water, to gently clean the
nozzles (the copper-colored area on the bottom of the print
head). When cleaning the color print heads, wipe the nozzles in
only one direction so that the colors do not mix.
•
Press Menu/Exit on the Control Panel.
•
Press the down Navigator button until Maintenance
displays.
•
Press the right Navigator button until Align Print Head
displays.
•
Press the Select button.
User
Guide
8
8.4
00-ugm940.book Page 5 Monday, July 31, 2000 3:20 PM
QUALITY PROBLEMS
Quality Problems
Symptom
DiagnosDiaDiagnosis and/or Solutiongnosis and ors and/
Light or blurred characters
•
You may be using Draft quality. Try selecting a better print
mode using the Quality button (Normal, eXpress, Best).
•
Make sure you are using good quality ink jet paper. Try another
type of paper. Glossy paper provides better quality.
•
If you are printing on photo, transparency, or iron-on paper, you
may be printing on the wrong side of the paper.
•
The print head may need cleaning. If the test print is blank, try
cleaning the print head:
•
8.5
User
Guide
•
Press Menu/Exit on the Control Panel.
•
Press the down Navigator button until Maintenance
displays.
•
Press the right Navigator button until Clean Print Head
1 displays. Press the Select button.
If not printing on envelopes or card stock, ensure the paper
thickness knob on the side of the machine is in the paper
position.
00-ugm940.book Page 6 Monday, July 31, 2000 3:20 PM
QUALITY PROBLEMS
Quality Problems
Symptom
DiagnosDiaDiagnosis and/or Solutiongnosis and ors and/
Printed image is too small
or off the edge of the media
•
Select Full Image from Reduce/Enlarge button.
•
Change the document margins in the application that you are
using.
•
Ensure you have selected the correct Paper Size from the
Paper Setup button.
•
Try another type of paper. Ensure the paper is flat and
unwrinkled.
•
Ensure the paper thickness knob on the right side of the
WorkCentre is in the envelope position.
•
Let ink dry before handling the paper.
•
The print heads may be mis-aligned.
Smudged or dark characters
Vertical straight lines are
broken or jagged in tables,
borders, and graphs
8.6
•
Press Menu/Exit on the Control Panel.
•
Press the down Navigator button until Maintenance
displays.
•
Press the right Navigator button until Align Print Head
displays.
•
Press the Select button.
Printed color is
significantly different from
screen colors
•
The print head may need cleaning. Clean the print head using
the Clean function found on the Control Panel under Main
Menu>Maintenance>Clean Print Head 1. For more
information see the section "Cleaning the Print Head," found in
the Maintenance chapter of this guide.
Black and white is printing
instead of color printing
•
The copy settings may be incorrect. Check that it is not set to
Color is not set on the control panel.
User
Guide
00-ugm940.book Page 7 Monday, July 31, 2000 3:20 PM
QUALITY PROBLEMS
Quality Problems
Symptom
DiagnosDiaDiagnosis and/or Solutiongnosis and ors and/
Color print quality is poor
•
Try using a different kind of paper. Glossy paper provides better
quality.
•
Make sure that the Paper Type setting is correct for the type of
paper loaded.
•
Change the Print Quality setting.
•
The print heads may be mis-aligned.
Color images are fuzzy,
white streaks
•
•
•
•
Press Menu/Exit on the Control Panel.
•
Press the down Navigator button until Maintenance
displays.
•
Press the right Navigator button until Align Print Head
displays. Press the Select button.
The print head may need cleaning.
•
Press Menu/Exit on the Control Panel.
•
Press the down Navigator button until Maintenance
displays.
•
Press the right Navigator button until Clean Print Head
1 displays. Press the Select button.
The ink cartridge may be running out of ink. Replace the ink
cartridge, following the instructions in the "Maintenance"
chapter of this guide.
If printing on transparencies, try changing the fill pattern in
your application software.
User
Guide
8
8.7
00-ugm940.book Page 8 Monday, July 31, 2000 3:20 PM
COPIER/PRINTER PROBLEMS
Copier/Printer Problems
Symptom
DiagnosDiaDiagnosis and/or Solutiongnosis and ors and/
WorkCentre does not print
•
A paper jam has occurred. If this is the case, a message appears
in the display window.
•
Print a test print by selecting Exit/ Menu>Maintenance>Print
Test Page. If the test print is good, check the printer cable or
the PC. If the test print does not print, see the Copier
troubleshooting section.
•
The USB or parallel cable is not connected properly or is the
incorrect cable, as the USB cable only works for Windows 98
and 2000.
•
The USB or parallel cable is defective. Swap the cable with one
known to work. If necessary, replace the cable.
•
If using a parallel cable, ensure that it is IEEE 1284 - 1994
compliant.
•
The printer port is configured incorrectly. Check the printer
settings in Windows to make certain that the print job is being
sent to the correct port (for example, LPT1).
•
The printer may be configured incorrectly within the PC
application. Check the application to verify that all print
settings are correct.
•
The print driver may be incorrectly installed. Uninstall the
existing print driver, and re-install the printer driver.
•
There may be a conflict with another print driver. Uninstall the
other print driver.
Note: Switch boxes can
interrupt the
communication between
the WorkCentre and your
PC.
8.8
User
Guide
00-ugm940.book Page 9 Monday, July 31, 2000 3:20 PM
COPIER/PRINTER PROBLEMS
Copier/Printer Problems
Symptom
DiagnosDiaDiagnosis and/or Solutiongnosis and ors and/
Paper feed problems
•
Out of paper. Add paper.
•
Paper has not been loaded properly. Remove and re-insert the
paper correctly.
•
There is too much paper in the paper tray. Remove some paper.
•
Check paper path for obstructions.
Printed document does not
match selected settings
•
Some PC software applications override the settings selected on
the printer driver. In this case, choose the desired settings from
the software application.
Printed page is partly blank
•
The page orientation setting may be incorrect in the print driver.
Change the page orientation (e.g. portrait or landscape).
•
The actual paper size and the paper size settings in the printer
driver do not match. Load the correct paper in the printer or
change the paper size selection in the printer driver.
•
The printer cable may be incorrect. If not USB, the printer cable
type should be IEEE 1284 - 1994 compliant.
•
Print head may need cleaning:
•
Press Menu/Exit on the Control Panel.
•
Press the down Navigator button until Maintenance
displays.
•
Press the right Navigator button until Clean Print Head
1 displays. Press the Select button.
User
Guide
8
8.9
00-ugm940.book Page 10 Monday, July 31, 2000 3:20 PM
COPIER/PRINTER PROBLEMS
Copier/Printer Problems
8.10
Symptom
DiagnosDiaDiagnosis and/or Solutiongnosis and ors and/
Printer prints very slowly
•
If you do not need Best mode, change the Print Quality setting
to Normal or eXpress.
•
Close all applications not needed to print the job.
•
On your PC, select: Start > Settings > Printers. Click the
M940 - M950 icon with the right mouse button, select
Properties, click the Details tab, and then click the Spool
Settings button. Select the desired spool setting from the
available choices.
User
Guide
00-ugm940.book Page 11 Monday, July 31, 2000 3:20 PM
SCANNER PROBLEMS
Scanner Problems
Symptom
DiagnosDiaDiagnosis and/or Solutiongnosis and ors and/
Scanning is too slow
•
Lower the scanning resolution. Typically 150dpi will give you
an adequate image.
•
Typically color images and graphics take longer to scan than
black and white because of larger amounts of data.
•
If using a parallel cable, try using a USB cable (for Windows 98
or 2000).
•
Communication speed becomes slow in scan mode because of
the large amount of memory required to analyze and reproduce
the scanned image. To increase scan speed, set your computer
to ECP printer mode through BIOS setting. For details on how
to set BIOS, refer to your PC documentation.
No image appears after
scanning
•
Verify image is placed face-down on document glass.
•
USB cable is not properly connected or is defective. Replace
USB cable.
*1 appears in display
window
Scanner lock left engaged. "Shipping Lock is on, unlock to operate"
appears in display.
Scanner does not appear
listed in ControlCentre
Pagis-Inbox software
•
Turn power off. Pull the two release buttons on the sides of the
machine toward you and lift the Access Cover.
•
To prevent damage the WorkCentre scanner chassis is shipped
in the locked position. Pull the lock towards you to unlock the
chassis.
8
First make sure your application has been installed to include scan
functionality.
•
Open Xerox ControlCentre 2.0 - Pagis Inbox application.
•
Select Scan>Scanner>Next
•
Select Show TWAIN interface>OK>Finish
User
Guide
8.11
00-ugm940.book Page 12 Monday, July 31, 2000 3:20 PM
SCANNER PROBLEMS
Scanner Problems
8.12
Symptom
DiagnosDiaDiagnosis and/or Solutiongnosis and ors and/
The scanner does not scan
•
Ensure you placed the original to be scanned face-down on the
document glass.
•
There may not be enough available memory to hold the
document you want to scan. Lower the resolution rate.
•
The USB or parallel cable is not connected properly.
•
The USB or parallel cable is defective. Swap the cable with one
that is known to work. If necessary, replace the cable.
•
If using a parallel cable, ensure that it is IEEE 1284 - 1994
compliant.
•
Check the TWAIN Interface.
User
Guide
•
Select Scanner>Next>Advanced
•
In the TWAIN Interface window, check Hide TWAIN
interface (best, but may not be possible for some
scanners). Select OK.
•
Select Next for each window that displays until the
window with the Finish button displays. Select Finish.
•
If you still have unresolved issues, select Help.
00-ugm940.book Page 13 Monday, July 31, 2000 3:20 PM
ERROR CODES
Error Codes
These error codes may appear in the display:
Symptom
Where Error Occurs
Diagnosis and/or Solution
*1
Scanner unit
Initial motor hardware error. "Shipping Lock is on,
unlock to operate" appears in display.
•
Turn power off. Pull the two release buttons on
the sides of the machine toward you and lift the
Access Cover.
•
To prevent damage the WorkCentre scanner
chassis is shipped in the locked position. Pull the
lock towards you to unlock the chassis.
L100
Scanner unit
Motor hardware error. Follow instructions for *1.
0001
Operation panel unit
Unidentified operation panel. Follow instructions for
*1.
0016
Scanner unit
Motor hardware error 2 (Set Document Feeder, M960
only). Follow instructions for *1.
0032
Printer unit
Carriage position error. Unplug and plug in. If this
fails, call service.
E701
Copy unit
Image processing hardware error. Unplug and plug in.
If this fails, call service.
E713
Scanner unit
CCD hardware unit. Unplug and plug in. If this fails,
call service.
E731
Copy unit
Flash memory error. Unplug and plug in. If this fails,
call service.
F502
Scanner unit
Lamp hardware error. Unplug and plug in. If this fails,
call service.
F900
RDY-Bus communication
RDY-Bus communication error. Unplug and plug in. If
this fails, call service.
User
Guide
8
8.13
00-ugm940.book Page 14 Monday, July 31, 2000 3:20 PM
ERROR CODES
Error Codes
8.14
Symptom
Where Error Occurs
Diagnosis and/or Solution
F951
Printer unit
Printer hardware failure. Unplug and plug in. If this
fails, call service.
F960
RDY-bus communication
NVM error. Unplug and plug in. If this fails, call
service.
User
Guide
00-ugm940.book Page 1 Monday, July 31, 2000 3:20 PM
GENERAL INFORMATION
Chapter Nine
9
General Information
General
Information
This chapter contains the following information:
•
Service and Support
•
Ordering Supplies
•
Specifications
•
Safety
9
User
Guide
9.1
00-ugm940.book Page 2 Monday, July 31, 2000 3:20 PM
SERVICE AND SUPPORT
Service and Support
If you are unable to solve a problem using this
guide, do one of the following:
•
Access:
http:/WWW.XEROX.COM
•
In the U.S. and Canada Call the Xerox
Customer Support Center at:
1-800-TEAM XRX (1-800-832-6979)
If possible, call from a telephone near your PC
and the WorkCentre. Before calling, have the
following information ready:
9.2
User
Guide
•
Make sure that both your PC and your
printer are turned on.
•
Serial number for the M940 - M950, which
is located on the back of the WorkCentre.
•
Your operating system version (Windows 95/
98, NT 4.0, 2000)
•
Amount of memory in your PC
•
Information about the problem, including
description of the problem, any error
messages and any steps you have taken to
solve the problem.
•
Purchase information (when and where
purchased)
00-ugm940.book Page 3 Monday, July 31, 2000 3:20 PM
ORDERING SUPPLIES
Ordering Supplies
Order Xerox WorkCentre M940-M950 supplies
from your local Xerox dealer or retailer.
Ink Cartridge/Print Head Re-Order
Numbers
Black Ink Cartridge (400 page yield)
Y100
Cyan Ink Cartridge
Y101
Magenta Ink Cartridge
Y102
Yellow Ink Cartridge
Y103
High capacity black ink cartridge (700
page yield)
H100
Ink Cartridge Multi Pack (4)
Y104
Black Printhead
P100
Color Printhead
P105
Specifications
PRINTER
Technology
Color Thermal Inkjet
Print Speed
Up to 12 pages per minute
black
Up to 7 pages per minute color
Resolution
Up to 1200 x 1200 dpi
Networkable
External
Print Server
Optional Xerox CentreDirect
9
COPIER
Copy Speed
Up to 12 copies per minute
black
Up to 7 copies per minute color
User
Guide
9.3
00-ugm940.book Page 4 Monday, July 31, 2000 3:20 PM
INK CARTRIDGE/PRINT HEAD RE-ORDER NUMBERS
Resolution
Up to 1200 X 1200 dpi
Copy Quality
Modes
Best, Normal, Express, Draft
Reduction and
Enlargement
25 - 400% in 1% increments
Advanced
Copy Features
100%, Autofit, Poster, Clone,
Mirror,
Full Image, 7 presets
B&W / Color
Selection
Yes
Full Color
Legal-Size
Copies
M950 only
SCANNER
Scanner
Resolution
600 x 600 dpi, 1200 dpi
enhanced
Bit Depth
(Internal)
Color: 30-bit (millions of
colors)
Black: 10-bit (1,024 levels of
gray)
Pre-Scan Mode
Yes
Scan Control
Protocol
TWAIN
MEDIA HANDLING
9.4
User
Guide
Media Types
Paper: plain, coated,
photogloss;
envelopes, transparencies,
labels,
iron on transfers, banners, card
stock
Paper Sizes
Letter, legal, executive, A4,
A5, B5
Minimum Size
3” x 5” / 76 x 127 mm
00-ugm940.book Page 5 Monday, July 31, 2000 3:20 PM
INK CARTRIDGE/PRINT HEAD RE-ORDER NUMBERS
Maximum Size
8.5” x 14” / 216 x 356 mm
Banner Paper
Feed
US letter x 5 or A4 x 5
Paper Weight
16 - 110 lbs. / 60 - 200 g/m2
Input Tray
Capacity
150 sheets (20 lbs. / 75 g/m2)
Output Tray
Capacity
50 sheets (20 lbs. / 75 g/m2)
Bypass
1 sheet
SOFTWARE INCLUDED
Document
Management
Software
Xerox ControlCentre 2.0
Optical
Character
Recognition
TextBridge PRO 9.0
Photo Editor
MGI PhotoSuite
PC Fax
Smith Micro Quick Link III
(includes Pagis PRO 3.0)
GENERAL
eXpress Mode
Yes
Inklogic
System
Yes
Power Supply
110 V, 50/60 Hz
Power
Consumption
Standby: 25 W; Running: 70 W
ENERGY
STAR
compliant
Yes
Dimensions (W
x D x H)
18.9” x 15.9” x 14.0”
480 x 404 x 353 mm
9
User
Guide
9.5
00-ugm940.book Page 6 Monday, July 31, 2000 3:20 PM
INK CARTRIDGE/PRINT HEAD RE-ORDER NUMBERS
Weight
26.4 lbx. / 12 kgs (M940)
30.8 lbs. / 14 kgs (M950)
Environment:
Temperature
59° - 86° F / 15° - 30° C
Environment:
Humidity
20% - 80%
Warranty
1 year
SYSTEM REQUIREMENTS FOR
PC CONNECTION
9.6
User
Guide
Minimum
Requirements
Pentium 133 MHz processor,
32 MB RAM, 40 MB HD
space
Recommended
Requirements
Pentium 200 MHz,
64 MB RAM, 200 MB HD
space
Operating
System
Win 95/98/00, Win NT 4.0
Interface
USB and IEEE 1284 (USB
cable included)
00-ugm940.book Page 7 Monday, July 31, 2000 3:20 PM
SAFETY
Safety
Regulatory Notices
(European Union) Declaration of
Conformance
The CE marking applied to this product symbolizes Xerox Ltd
Declaration of Conformity with the following applicable
Directives of the European Union. Council Directive 73/23/
EC amended by Council Directive 93/68/EC, on the
harmonization of the laws of the Member States related to
equipment designated for use within certain voltage limits.
Council Directive 89/336/ED, approximation of the laws of
the Member States related to electromagnetic compatibility.
When applicable: Council Directive 99/5/EC, on the
harmonization of the laws of the Member States related to
radio and telecommunications terminal equipment. A full
declaration, defining the relevant Directives and referenced
standards can be obtained from your Xerox Ltd representative.
Changes or modifications to this equipment not specifically
approved by Xerox Europe may void the user's authority to
operate this equipment. Shielded cables must be used with this
equipment to maintain compliance with the EMC Directive
(89/336/EEC).
As an ENERGY STAR® Partner, Xerox Corporation has
determined that this product meets the ENERGY STAR®
guidelines for energy efficiency.
© 8/2000 by Xerox Corporation. All rights reserved.
Copyright protection claimed includes all forms and matters of
copyrighted material and information now allowed by
statutory or judicial law or hereinafter granted, including
without limitation material generated from the software
programs that are displayed on the screen such as icons, screen
display looks, etc.
XEROX®, The Document Company®, the stylized X and
WorkCentre are registered trademarks of Xerox Corporation
and Xerox Canada Ltd. is a licensee of all the trademarks.
Product names used in this guide may be trademarks or
registered trademarks of their respective companies and
hereby acknowledged. ENERGY STAR is a U.S. registered
mark.
9
User
Guide
9.7
00-ugm940.book Page 8 Monday, July 31, 2000 3:20 PM
SAFETY
Regulatory Notices
(USA) FCC Statement
Note: This equipment has been tested and found to comply
with the limits for a Class B digital device pursuant to Part 15
of the FCC Rules. These limits are designed to provide
reasonable protection against harmful interference in a
residential installation. This equipment generates, uses, and
can radiate radio frequency energy and, if not installed and
used in accordance with the instructions, may cause harmful
interference to radio communications. However, there is no
guarantee that interference will not occur in a particular
installation. If this equipment does cause harmful interference
to radio or television reception, which can be determined by
turning the equipment off and on, the user is encouraged to try
to correct the interference by one or more of the following
measures:
· Reorient or relocate the receiving antenna.
· Increase the separation between the equipment and receiver.
· Connect the equipment into an outlet on a circuit different
from that to which the receiver is connected.
· Consult the dealer or an experienced radio/TV technician for
help.
Changes or modifications to this equipment not specifically
approved by the Xerox Corporation may void the user's
authority to operate this equipment. Shielded cables must be
used with this equipment to maintain compliance with FCC
regulations.
Warning: In order to allow this equipment to operate in
proximity to Industrial, Scientific and Medical (ISM)
equipment, the external radiation from ISM equipment may
have to be limited or special mitigation measures taken.
9.8
User
Guide
00-ugm940.book Page 9 Monday, July 31, 2000 3:20 PM
SAFETY
Declaration of Conformity
These devices comply with Part 15 of the FCC Rules.
Operation is subject to the following two conditions: (1) These
devices may not cause harmful interference, and (2)these
devices must accept any interference that may cause undesired
operation.
Model Numbers: YPA-3 and YPA-4
Contact Person: Xerox Corporation
Phone:
1-800-828-6571
Address:
800 Phillips Road
Webster, NY 14580
9
User
Guide
9.9
00-ugm940.book Page 10 Monday, July 31, 2000 3:20 PM
SAFETY
9.10
User
Guide
00-ugm940.book Page 11 Monday, July 31, 2000 3:20 PM
INDEX
Index
USER GUIDE
A
Alignment, Print Head
..................... 7-6
B
Banners, Printing .......................... 3-10
Bypass Tray ................................... 1-6
C
Cards, Printing ............................... 3-3
Changing
Ink Cartridge ............................ 7-2
Print Head ............................... 7-7
Cleaning, Print head ........................ 7-5
D
Door, Rear Access
.......................... 1-6
User
Guide
I-
00-ugm940.book Page 12 Monday, July 31, 2000 3:20 PM
INDEX
E
Ink Cartridge
Changing ................................. 7-2
Re-Order Numbers .................... 9-3
Iron-On, Printing ............................ 3-6
Printing
Cards ......................................3-3
Iron-On ...................................3-6
Labels .....................................3-7
Photographs .............................3-8
Several Envelopes .....................3-5
Single Envelope ........................3-4
Problem Diagnosis & Solution ...........8-1
Paper Feeding ...........................8-3
Print Quality .............................8-4
Printer .....................................8-8
L
R
Envelopes
Printing Several ........................ 3-5
Printing Single ......................... 3-4
I
Labels, Printing
.............................. 3-7
............................1-6
O
S
Output Tray ................................... 1-5
Output Tray Extension ..................... 1-5
Service and Support
Customer Support Center ............9-2
Ink Cartridge Re-Order Numbers ..9-3
Ordering Supplies ......................9-3
Print Head Cartridge Re-Order Numbers
P
Paper Feeding Problems, Diagnosis &/or
Solution ................................... 8-3
Paper Tray ..................................... 1-5
Print Head
Alignment ............................... 7-6
Changing ................................. 7-7
Re-Order Numbers .................... 9-3
Print Quality Problems, Diagnosis &/or
Solution ................................... 8-4
Printer Components and Parts ............ 1-1
Bypass Tray ............................. 1-6
Output Tray ............................. 1-5
Output Tray Extension ............... 1-5
Paper Thickness Dial ................. 1-2
Paper Tray ............................... 1-5
Rear Access Door ..................... 1-6
Printer Problems, Diagnosis &/or Solution 8-
8
I-
Rear Access Door
User
Guide
9-3
Web Address ............................9-2
Supplies, Ordering ...........................9-3
T
Transparencies, Printing
....................3-9