1
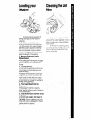
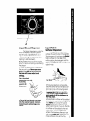
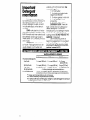
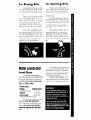
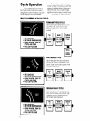
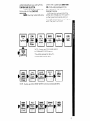
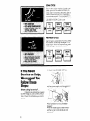
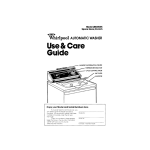
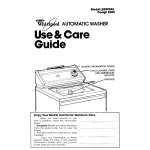
Model3LA5800XK~'
SUPER CAPACITY
whirlpool
AUTOMATIC WASHER
Use&Care
Guide
-*.*
LAUNDRY INFORMATION
CENTER
LOAD SIZE SELECTOR
TEMPERATURE SELECTOR
CONTROL KNO6
LIQUID BLEACH
LIQUID FABRIC
Copy
Your Model
and Serial
Numbers
When you need service,
or call
with a question,
have this information
ready:
1. Complete
Model and Serial Numbers
(from the plate under the lid near the
hinge).
2. Purchase date from sales slip [or date
installed).
Copy
this
information
in
these
Spaces. Keep this book in the Laundry
Information
Center
with your Laundry
Guide, sales slip and warranty
Here
Before using
your Washer
This washer is different from the
ones you may have used before. It IS
important that you read this and the
Laundry Guide carefully to get the best
results.
You are personally
responsible for making sure that your
washer...
l Is Installed
by a qualifted installer
l Is properly
Installed and leveled on a
floor that can support the weight.
l Is connected
to the right kind of outlet,
electric supply. water supply and drain
l Is properly
electrtcally grounded.
l Is used only for jobs normally
expected of home automatic washers
l Is properly
maintained.
l Is protected
from the weather.
l Is not run by chtldren
or anyone
unable to operate it properly
Remove the Consumer Buy
Guide label. It will be easier to remove
before the washer IS used.
You may want to wipe out the
basket with a damp cloth before using
to remove dust from storing or shipping.
SPECIAL INSTRUCTIONS: See the
laundry
Guide for tips on detergents, other laundry aids and
instructions
for washing special
items.
See the Installation Instructions for
complete Information.
CAUTION: Store laundry detergent and additives
in a cool, dry
1 plzz;
;T;e
children
can’t
Contents
(
Before Using Your Washer
Loading Your Washer
Cleaning
the Lint Filter,
Using Your Washer
Using the Dispensers.
Important
Detergent
Information
For Rinsing Only
For Spinning Only
Water Levels and Load Sizes
Cycle Operation
PERMANENT PRESS
KNITS GENTLE
REGULAR HEAVY
SOAK
PRE-WASH
If You Need Service or Help
Before Calling for Service
If You Have a Problem
::
2
3
3
4
4
6
7
7
: 7
8
8
8
8
IO
10
10
10
12
loading your
Washer
For best washing results and
energy savings, sort the laundry
carefully.
1. Sort the laundry
into loads.
l
Group the laundry into loads that
can be washed and dried together.
See the Laundry Guide for information and samples of typical loads.
l
Try to mix large and small items for
best movement
in the washer.
2. Measure Detergent;
Add to
Washer Basket.
l
See detergent
information
on page
6 and in Section IV of the Laundry
Guide.
3. load the Washer.
l
Load without packing
so items can
move freely for best cleaning
and
least wrinkling.
l
Spread the load evenly. (Don’t put
all the towels on one side and a few
wash cloths on the other.] An unbalanced load can cause the washerto
shake during spinning.
4. Pour liquid Bleach into the
Dispenser.
l
See page 5 and the “Laundry
Aids” section of the Laundry Guide for
more information.
5. Add Diluted Fabric Softener to the
Dispenser.
. DO NOT ADD FABRIC SOFTENER TO
THE WASH. Fabric softeners can combrne with soap or detergent
to make
greasy stains on fabrics.
Cleaning the Lint
Filter
-
Water runs through the lint filter
whenever the washer agitates Check
often to make sure it’s clean and filtering at Its best.
To remove It for cleaning, press
the release and pull straight out. lnstru
tlons for cleaning are printed on the
bottom of the filter
Start your washer after you put In
detergent, the load, and any other
laundry aids according to information
on page 3 and page 6
4.
Set the LOAD SIZE SELECTOR.
Select the water level that matches
the size of the load. See page 7 for
more information.
l To change
the setting on the LOAD
SIZE SELECTOR, first move it to RESET.
Then move it back to the setting you
want.
l
IMPORTANT, For the best cleaning
results with the least wrlnkllng. make
sure the load has enough water for
items to move freely.
2.
Set the TEMPERATURE SELECTOR.
Match the wash and rinse water temperatures to the type of fabrics and SOIIS
being washed. [See the instructlons
under the washer lid and on page 14 in
your Laundry Guide.
l Be sure to use a cold
rinse for PERMANENT PRESSand KNITS GENTLE Cycles.
l
4
3. Select a Cycle and Start the
Washer.
l
Push the Cycle Control Knob in and
turn It tothe right (clockwise).
l Stop when the pointer
is on thenumber of minutes
of washing you Want
in the cycle you want
l Instructions
for which cycles to ‘Jse for
each fabric type are under ihe lid.
l To start the washer, pull the Cycle
Control Knob out When the cycle IS
over, the washer will stop.
l To stop
the washer at any time
during a cycle, push the Control
Knob in. Pull It out to restart the washer.
l To change
a setting, push the Control Knob in to stop the washer Then turn
the Control Knob to the right (clockwise)
to the setting you want Pull the knob
out to start the washer.
l
Pages 8-11 show what happens In
each cycle.
Using the
Dispensers
You may want to use liquid
bleach and fabric softener in some
loads. Your washer has dispensers
designed to automatically
add these
liquid laundry aids at the correct time.
Follow the product package
recommendations
carefully. Use the dispensers for best results.
/
3
liquid
Bleach
Dispenser
The bleach dispenser IS under the
Ird of the washer in the front corner. It
has the words. LIQUID BLEACH, on It
l
Before starting the washer, but after
loading it, add the bleach.
l
Use a measurtng cup with a pouring
spout to help avoid spelling or spattering
the bleach
l
Follow the directions on the bottle for
the amount to use Never use more
than 1 cup (250 mL) for a full load.
Use less with lower water level
settings.
Use a standard
measuring
cup with
a pouring
\
spout to fill
dispensers.
Do not let any bleach run down
into the washer basket. Concentrated bleach will damage
any
fabric.
l
liquid Fabric
Softener Dispenser
The dispenser for liquid fabric
softener fits over the top of the agitator.
The dispenser will hold enough diluted
fabric softener for one deep rinse.
l After adding
the detergent and the
load, ftt the dispenser over the top of the
agitator cap.
Following directions on the bottle,
add the correct amount of fabric softener. Use a cup with a pourrng spout
to avoid dripping any on the load.
l
IMPORTANT: Add enough hot or
warm water to fill the dispenser
to
the FULL mark.
l Diluted
fabric softener will be added
just before the washer starts filling for the
rinse. NOTE: Do not stop the washer
during the first spin [when the wash
water is spinning out). If you do, the fabrrc softener will be added to the wet,
soapy load. This can cause stains.
l Clean
the dispenser after each use
with warm water only. Detergent can
make softeners sticky and lumpy.
5
l
Important
Detergent
Information
Detergents and soaps clean
by loosening soil, and by holding it in
the water so it drains away. If not
enough detergent is used, soil and
lint can settle back on the items in
the load.
SOAP works best in soft water
(O-4 grains hardness). In harder water,
both the wash and rinse water should
be softened. Use enough soap to
make about 1% to 2 inches (3.8 to 5.5
cm] of suds.
DETERGENT works in hard or
soft water. Package directions are
usually based on soft water and
washers with normal-size tubs. Use
more detergent...
1. for hard water.
2. for loads and water levels
larger than MEDIUM.
3. for heavy greasy or oily soils.
4. if the detergent is low
phosphate.
5. for cold-water washes.
DETERGENT SUDS. There are
high, normal and low sudsing powdered detergents. If the recommended amount of detergent makes
too much suds, switch to a lower
sudsing brand. DO NOT REDUCE THE
AMOUNT of detergent
Use the followlng chart as
beginning suggestions for powdered
and liquid detergent amounts. See
your Laundry Guide for more informotion (pages 14-22).
WATER HARDNESS IN GRAINS
O-4 Grains
Powdered
Detergents
Low Suds
4-10 Grains
IO-20 Grains
13/4-2 cups
(425-475 mL)
Normal Suds
1% cups (425 ml)
2% cups (600 mL) 3 cups (700 ml)
High Suds
2 cups (475 mL)
3% cups (825 mL)
3 cups (700 mL]
No phosphate
-Follow
package
recommendationsLiquid Detergents
% to 1% cups (80 to 325 ml], depending
on the brand
and amount of soil. Follow package
recommendations.
* These recommendations
do not apply...
l
l
11/4cups (300 mL)
I’/2 cups (350 ml]
In areas where phosphates
are banned.
In areas with laws limiting (by weight or percentage]
of detergent
used in a wash load.
the amount
For Rinsing Only
For Spinning Only
Your washer can be set to rinse
only Use the setting for an extra rinse,
or for laundry that only needs a rinse
and sprn
There IS a dot just after the numbers In PERMANENT PRESS, REGULAR
HEAVY and KNITS GENTLE. If you push
In on the Cycle Control Knob, turn
the pointer to one of those dots and
pull the Control Knob out, the washer
WIII fill, agitate, drain and sprn
If you want hrgh agitatron and
sprn, use the dot In REGULAR HEAVY. If
you want low agitation and spin, use
the dot in KNITS GENTLE Use the dot In
PERMANENT PRESS if you want high
agitation and a low-speed
spin
There may be times when you
want to dram out all the wash water
and start over. To stop the washer at
any time, just push In on the Cycle
Control Knob
To set the washer so it drains
and spans water out of the load, push
in on the Control Knob, turn the dial to
the right (clockwise) so the pointer IS
touching the bar just before OFF in
any cycle
The washer WIII drain, spin out
water and stop. If You want a lowspeed spin, use the bar on PERMANENT PRESS or KNITS GENTLE All the
other cycle settings have a hrgh-soeed
Water levels and
load Sizes
For the best cleaning results, the
load should move freely in the water.
Watch for rollover. An item (like a sock]
should sink in the middle and come
up later on the outside.
Be sure to read pages 11 13 in
your laundry Guide. You will find more
information on loading and load sizes.
The LOAD SIZE SELECTOR lets
you control the amount of water that fills
the washer. The selector can be set at
any water level between HANDWASHABLE and EXTRA LARGE.
WATER LEVELS
Setting
Gallons/Liters”
HANDWASHABLE
7.8/29.5
MEDIUM
13.9/52.6
EXTRA LARGE
20.5i77.6
*Approximate
fill with load.
To change the water level setting,
move the LOAD SIZE SELECTOR to
RESET.Then move it to the setting you
want. To save water and energy,
match the water level to the load
size.
Cycle Operation
Your washer has five cycles on
the Cycle Control Dial. Each cycle is
desianed to match the fabrrc tvoe with
pre-set agrtation and spin speeds.
The numbers in each cycle are
for the number of minutes you want the
washer to agrtate before it drains and
fills for the rinse. You will want longer
agitation times for heavily soiled loads.
You choose the wash and rinse
WHAT HAPPENS IN EACH CYCLE:
PERMANENT PRESS CYCLE
Use for permanent press fabrics Cooling of the wash water and low spin
speeds help prevent the setting of
wrinkles
l
H IN KNOB, TURN TC
YCLE AND TIME
dWlL OUT TO START
KNITS GENTLE CYCLE
Use for delrcate Items and washable
synthetic knits such as polyester, nylon,
acrylic. Wash nylon hose or panty hose
In a net laundry bag
. SET LOAD SlZE
a SETWATER TEMPERATURES
l PUSH IN KNCB. TURN TO
CYCLE AND TlME
m PULL OUT TO START
REGULAR HEAVY CYCLE
Use for sturdy whrte and colorfast cottons, and for heavy work clothes. High
agrtation and spin speeds are preset for best cleaning results
e SETLOAD SIZE
. SETWAT&R TEMPERAlURES
l PUSX lb4 KNOB, T-LIRNTO
CYCLE AMD TIME
* FULL OUT TO START
8
water temperatures
you want with the
TEMPERATURE SELECTOR.
You set the amount of water that
fills the tub with the LOAD SIZE
SELECTOR.
NOTE: you may notice that some
of the “SPIN” cycles have SPRAY RINSES. Cold water is sprayed on the
sprnnfng load to help rinse and remove
detergent residue.
If you turn to a cycle ond start the
washer; but change
your mind, push In
on the Cycie Controi Knob and turn
to the ught jciockwise]
to the setting you
wont. Then pull it out to start
NOTE Always use COLD RINSE WATER
for PERMANENT PRESS fabrics
The washer pauses for about I1 z
minutes after partral drain
NOTE Always use COLD RINSE WATER for Knots and Delicate
Items.
SOAK CYCLE
This cycle IS not for washing. It soaks, agltates, spins out the water and stops (no
rrnse). Use it for stained, yellowed. grey or
heavrly soiled laundry with a detergent
or pre-soak product. Chlorine bleach,* If
wanted, should be added to the cycle you
use after the SOAK Cycle IS over
PRE-WASH CYCLE
Use for heavily solled items that may need
two washes. Use enough detergent for a
single wash. When the washer stops. add
more detergent and select a cycle.*
If You Need
Service or Help,
We suggest You
Follow These
Steps:
IF YOUR WASHER DOES NOT FILL:
l
l
Is the power supply cord plugged
Are both water faucets open?
Before
calling
for service*...
Problems are sometimes caused
by little things you can correct without
tools Check this list before you call for
service:
l Is a fuse blown or circuit-breaker
tripped?
l Are the water supply hoses kinked?
l Is the Cycle Control Knob set and
pulled out?
10
in?
Before addrng detergent
use lrqurd detergent]
for washrng, dissolve in quart of warm water (or
Use a warm or cold PRE-WASH
to help prevent stains from setting
l Is a fuse blown
or circuit-breaker
trrpped7
l Are the water supply
hoses kinked?
l Is the Cycle
Control Knob set and
pulled out?
IF WASHER FILLS AND DRAINS WITHOUT
RUNNING:
l Make
sure that the Cycle Control
Knob is pointing to CI number In the
cycle
IF YOUR WASHER DOES NOT SPIN:
Is the Ild closed3
l Is the power
supply cord plugged
l Is a fuse blown
or circuit-breaker
tripped?
IF YOUR WASHER STOPS DURING THE
PERMANENT PRESS CYCLE.
l
Remember, the washer will stop for
about 1% mrnutes after the partial drain
durrng the cool-down period in this
cycle
MAKE SURE THE DRAIN HOSE IS HIGHER
THAN THE WATER LEVEL IN THE WASHER.
IF IT ISN’T...
l The washer
may seem to be draining
during wash and rinse cycles.
l Water can siphon out. [See Installation
Instructions.)
l
In?
If you move...To make sure that your
appliance
is correctly
installed and
to insure its continued
satisfactory
operation,
call your dealer. (Installation cost will, of course, be paid by
YOU.1
Helpful hinfs...You can help your
service representative
give you foster
service if you include the model and
serial number of your appliance
when requesting
service. Also, retain
your soles slip and warranty to verify
your warranty status.
Remember...Your
service representative is trained in the repairing
and
servicing
of your WHIRLPOOL appliances. He con help you maintain the
quality originally
built into your
WHIRLPOOL appliance.
So why not
take the time, now, to look up his tele-
phone number and jot it down in the
space provided
on the cover.
If you have a probJem* :
Call your dealer or write:
Service Manager,
International
Division
Whirlpool Corporation
Administrative
Center
2000 U.S. 33 North
Benton Harbor, Michigan
49022
*If you must write, please provide: your
name, address, telephone number,
type of appliance,
brand, model, serial
number, dote of purchase. the dealer’s
name, and a complete description of
the problem. This Information is needed
in order to better respond to your
request for assistance.
FSP is a registered
trademark
of WhIrlpool
Corporation
for
quality ports. Look for this
FSP
symbol of quality whenever
R you need a replacement
part
for your Whirlpool
appliance.
FSP replacement
parts
will fit right and work right. because
they are
mode to the same exacting
specifications
used to build every new Whirlpool
appliance
0
Benton Harbor. Mlchlgan
Aulomallc Washers. Clolhes Dryers.
Freezers. Relrigerator-Freezers.
Ice Makers. Dishwashers.
BullI-III Ovens and Surlace Unlls, Ranges. Microwave Ovens.
Compaclors.
Aoom Au Condllmners.
Dehumldiliers.
Cenlral
Healmg and An Conddmnmg Systems
T&rlpool
Home
APpll.3”CtS
Quality
Our way of life.
i
Part No. 383160
Prlnted In U S.A