1
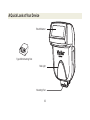
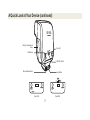
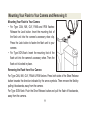
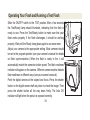
AF TTL Flash
INSTRUCTION MANUAL
VIV-DF-183
Limited One Year Warranty
Vivitar warrants this quality product to be free of defects in material and workmanship for a
period of one year from the date of purchase. During the period, Vivitar will repair or replace the
product at no charge for parts or labor.
TIME PERIOD OF THIS WARRANTY
The time period of this warranty starts from the date of the original purchase and expires on the
first anniversary date of purchase.
WHAT IS NOT COVERED BY THIS WARRANTY
No express or implied warranty is made for any defects in this product which result from
accident, abuse, misuse, failure to operate the product in accordance with relevant instructions,
neglect, immersion in or exposure to chemicals or liquids, extremes of climate, fungus, excessive
wear and tear/cosmetic damage and defects resulting from other extraneous causes such as
unauthorised disassembly, repair or modification.
This warranty shall not extend to any incidental or consequential damages arising from the
purchase, use or inability to use this product even if Vivitar has been advised of such damages.
The laws of some countries and some States thereof do not allow the limitation of incidental or
consequential damages, so the above limitation or exclusion may apply to you.
-1-
WHAT TO DO WHEN SERVICE IS NEEDED
STEP 1. Package the product and relevant accessories carefully, using ample padding materials and a sturdy
mailing container to prevent damage in transit.
STEP 2. Include in package:
a) Evidence of date and place of original purchase (for example, a copy of your sales receipt).
b) Detailed description of your problem.
c) When possible, a sample evidencing the problem.
STEP 3. Return item (insured) to: Vivitar
Attn: Technical Support
195 Carter Drive
Edison NJ 08817
When service is complete, the product will be returned to you shipping prepaid. In the event the product is
deemed to be not faulty or the defect is a result in wear and tear, Vivitar may levy a handling charge for the
return ofthe product. This warranty gives you specific legal rights. You may also have other rights which vary
from country and State to State thereof. For more information visit our website www.vivitar.com
Technical Support
For technical support issues please visit our website at www.vivitar.com. You can find manuals, software and
FAQ’s at the website. Can’t find what you are looking for? E-mail us at [email protected] and one of our
technical support team members will answer your questions or call 800-592-9541 to access our technical
support information on the phone.
-2-
Introduction
Congratulations on your purchase of the Vivitar VIV-DF-183 flash unit. This electronic flash
is innovatively designed for both digital cameras and film cameras, with advanced
technology used to control the correct amount of light output. Please kindly take a few
minutes to read this instruction manual before using.
Compatibility
The VIV-DF-183 flash comes in six different varieties, each compatible with different
cameras. Check to make sure the flash that you have is compatible with your camera.
VIV-DF-183-CAN
VIV-DF-183-NIK
VIV-DF-183-OLY
VIV-DF-183-PANA
VIV-DF-183-PEN
VIV-DF-183-SON
- Compatible with Canon Digital E-TTL, E-TTL II cameras & E-TTL film cameras
- Compatible with Nikon Digital TTL, i-TTL cameras & TTL, i-TTL film cameras
- Compatible with Olympus Digital TTL cameras
- Compatible with Panasonic Digital TTL cameras
- Compatible with Pentax Digital P-TTL & film cameras
- Compatible with Sony Alpha & Konica Minolta Digital ADI, D Lenses cameras & TTL film cameras
-3-
Features
The VIV-DF-183 has the following features:
•
•
•
•
•
•
•
A red focus assist beam for low light focusing
An automatic shutter speed setting
A flash readiness indication
A five position tilted reflector
Red-eye reduction (for VIV-DF-NIK, OLY, PANA and PEN units)
Front and rear curtain synchronization
A Power saving function
-4-
Specifications
Guide Number (ISO 100)
Five Position Tilted Reflector
Power Source
Flash Duration
Recycling Time
Number of Flashes
Dimensions
Weight w/o batt.
20(m)/66(ft)
0°/45°/60°/75°/90°
2 x 1.5V AA size batt. (R6, LR6)
1/2,000 - 1/40,000 sec.
0.3 - 10 sec. with fresh batteries
100 times with fresh batteries
Approx. 65 - 54 - 98mm
Approx. 127 g
Specifications are subject to change without notice.
-5-
A Quick Look at Your Device
Tilted Reflector
Type SON Mounting Foot
Red Light
Mounting Foot
-6-
A Quick Look at Your Device (continued)
DF-183
Battery Compartment
Cover
Auto OK
Test/Ready
ON/OFF Switch
Shoe Release Button
Lock Button
Type CAN
Type PEN
-7-
Inserting Batteries into Your Flash
• Turn the ON/OFF switch to the OFF position.
• Slide the battery compartment cover open.
• Insert 2 AA batteries as indicated by the symbols in
the battery compartment.
• Close the battery compartment cover.
Caution: Make sure your batteries are inserted with
the correct polarity (+,-). Replace each battery one at
a time and make sure that the batteries you are using
are of the same brand and type with the same
capacity.
-8-
Mounting Your Flash to Your Camera and Removing It
Mounting Your Flash to Your Camera
• For Type CAN, NIK, OLY, PANA and PEN flashes:
Release the Lock button. Insert the mounting foot of
the flash unit into the camera's accessory shoe clip.
Press the Lock button to fasten the flash unit to your
camera.
• For Type SON flash: Insert the mounting foot of the
flash unit into the camera's accessory shoe. Then the
flash unit is locked in place.
Removing the Flash from Your Camera
For Type CAN, NIK, OLY, PANA & PEN flashes: Press both sides of the Shoe Release
button towards the direction indicated by the arrow symbols. Then remove the flashby
pulling it backwards, away from the camera.
For Type SON flash: Push the Shoe Release button and pull the flash off backwards,
away from the camera.
-9-
Operating Your Flash and Running a Test Flash
Slide the ON/OFF switch to the "ON" position. After a few seconds
the Test/Ready lamp should illuminate, indicating that the flash is
ready to use. Press the Test/Ready button to make sure that your
flash works properly. If the flash discharges, it should be working
properly. Wait until the Ready lamp glows again to use once more.
Adjust your camera to the appropriate setting. Most cameras should
be set to the program position (see your camera's manual for details
on flash synchronization.) When the flash is ready to fire, it will
automatically match the camera's shutter speed. The flash readiness
indicator will appear on the camera. Different camera models indicate
flash readiness in different ways (see your camera's manual).
Point the digital camera at the subject and focus. Press the shutter
button on the digital camera half way down to check the image. Then
press the shutter button all the way down firmly. The Auto OK
indicator will light when the picture is exposed correctly.
-10-
AF/TTL Operation
AF - AUTO FOCUS
If the camera is compatible with an external AF mode, when the shutter button is pressed
half way down, the focus assist light is automatically activated to help the camera focus
properly when the subject is in darkness.
TTL
The flash performs pre-flashes for cameras to calculate the intensity of flash light output.
Therefore the flash light output is controlled automatically.
-For Nikon D40 & D40x owners: The flash can support an ISO speed up to 800 in full auto
mode. It may not perform as expected if the ISO speed exceeds the supported range.
Red-Eye Reduction (Type NIK, OLY, PANA and PEN)
The red-eye reduction function reduces any red-eye problems by emitting pre-flashes
before the main flash. To setup this function, please refer to your camera’s instruction
manual.
-11-
Front and Rear Curtain Synchronization
Some cameras offer the option of rear curtain synchronization (Rear mode) triggering the
flash unit at the end of the exposure time. Rear curtain synchronization is particularly
advantageous when using slow shutter speeds (slower than 1/30 sec.) or when shooting
moving objects that have their own source of light. Rear curtain synchronization gives a
more realistic impression of movement because the light streaks behind the light source
instead of building up in front of it, as is the case when the flash is synchronized with the
front shutter curtain. Depending on its operation mode, the camera uses shutter speeds
slower than its sync speed.
For Type PEN flash: You could select the synchronization mode as either front curtain (
or rear curtain (
) at the back of the flash. The flash will fire according to the mode
selected to match with the camera shutter.
For Type CAN, NIK, OLY, PANA, SON flashes: The camera controls front or rear curtain
synchronization, therefore no setting is required to be changed on the flash.
Note: The rear curtain synchronization is only possible on cameras with this feature. See
your camera’s instruction manual for details.
-12-
)
Bounce Photography
Using direct a flash to illuminate a subject will result in harsh,
unnatural and unattractive shadows. This can be avoided by
using bounce flash. The head of your flash can be tilted to an
angle of 45°, 60°, 75°, or 90°. You can tilt the flash head to
bounce the light off the ceiling or walls. While shooting indoors,
this technique can help to create more natural looking pictures
of people with softer shadows.
In order to have your pictures correctly exposed using bounce
flash, it is recommended to follow the steps below:
(1) Select white or reflective surfaces to bounce the light off. Otherwise your pictures will
come with an unnatural color cast similar to that of the reflecting surface.
(2) Set the camera’s exposure mode to Aperture Priority Auto (“A”) or Manual (“M”).
(3) Use a wider aperture than normal, as 2 or 3 stops of light can be lost when using
bounce flash.
-13-
Power Saving Functions
If there is no communication between the flash and your camera for about three minutes,
the flash will automatically be switched to power saving mode in order save battery power.
-The Ready light will be off while in power saving mode.
-To reactivate the flashgun, simply press your camera’s shutter button or switch the main
switch off and on again.
-The flashgun is not completely switched off in power saving mode. However, power
consumption is drastically reduced. If you are not going to use your flashgun for a while,
we recommend you to turn the flash off.
-14-
Maintenance and Tips for Taking Better Photos
• When not in use, switch the unit off. Take the
batteries out when the flash is being stored or when it
will be carried for a long time. Keep your flash away
from dust and moisture to prolong its life.
• The flash should not be exposed to moisture or
liquids.
• Batteries should not be exposed to excessive heat
from sunshine, fire or the like.
• Never try to open or repair your flash since the
electronic circuit inside carries a high voltage. If your
flash needs repair or does not work properly, please
contact a qualified repair service.
-15-