1
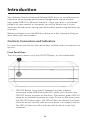
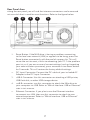
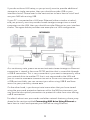
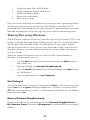
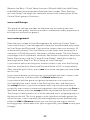
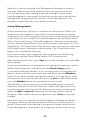
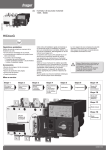
External Hard Drive NAS
User Guide
English
1
Contents
Introduction
6
Controls, Connectors and Indicators
6
Front Panel Area
6
Rear Panel Area
7
About the Hard Disk
8
Locating NAS Drive on Your Desk
8
Which Interface: USB or Ethernet?
Connecting NAS drive Using USB
8
10
Storing and Transferring Data via USB
10
Disconnecting NAS drive from a PC or Mac Host
11
Connecting NAS Drive Using Ethernet
12
About NAS Drive User Accounts
12
Connecting the NAS Drive to Your LAN
13
Web-Based Administration Tool
15
Administration Login
16
Basic Settings for Initial Setup
17
Set Language, Password, Hostname, IP Address, and Time
17
Add New User Account
18
Add New Group
20
Add New Shared Folder
21
2
NAS Drive Operation Using Ethernet
Sharing files using Windows
22
23
Run Dialogue
23
Browse Network Neighborhood
23
Search Dialogue
24
Browse My Computer
24
Sharing files using Mac OS X
24
Attaching USB Devices
24
Attaching a Printer
25
Attaching a USB Storage Device
26
NAS Administration Reference
Users and Groups
27
29
User Management
29
Group Management
30
File and Print
31
File Server
31
Windows Setting
31
FTP Server Setting
31
NFS Server Setting
32
Guest Access Setting
32
Share Management
32
Printer Server
33
System
33
Network Settings
33
Time Settings
34
3
Turn Off Server
34
Information
34
Disk Usage
34
Error Notification
35
Monitoring Services
35
Check Interval
35
E-mail Notification
35
Pop-Up Notification
35
Network Service
35
DHCP Server
36
Bonjour
36
Maintenance
36
Disk Utility
37
Format
37
Scan
37
Unmount
37
Detail
38
Firmware Upgrade
38
Save Configuration
38
Restore Configuration
38
Factory Reset
39
Log File
39
Samba Log
39
FTP Log
39
DHCP Server Log
39
4
System Log
39
Administration Log
40
Account Information
40
Logout
40
Technical Support
41
Limited Warranty Terms
41
Rights
42
FCC Compliance
42
WEEE Notice
43
CE Declaration
43
ROHS Compliance
44
5
Introduction
Your Verbatim Network Attached Storage (NAS) drive is a versatile external
hard drive featuring high-performance storage and a choice of either
high-speed USB 2.0 or Ethernet interface. Once your drive is connected
properly to your network or computer, you will be able to use it as you
would any hard drive for storing your data and for performing data back-up
functions.
Before you begin to use the NAS drive there are a few important things to
learn about your new product.
Controls, Connectors and Indicators
First familiarize yourself with the control keys and the various connectors on
the unit.
Front Panel Area
The front panel contains only the ON/OFF Button, as illustrated below.
1
1.
ON/OFF Button. Once the AC Adapter has been properly
connected to the NAS drive and an AC outlet, you can press the
ON/OFF button to power on the drive. The button’s green LED will
come on to indicate the power-on state. To turn off the drive, press
the ON/OFF button again. The LED will flash for about 15 seconds
while the drive’s internal software shuts down in an orderly fashion.
The LED will then turn off to indicate that the drive is now fully
turned off.
6
Rear Panel Area
Along the rear panel you will find the interface connectors and a recessed
micro-switch that is used for reset functions. Refer to the figure below.
1
2
3
4
5
1.
Reset Button. If the NAS drive is having a problem connecting
to the local area network (LAN) or appears to be hung, press the
Reset button momentarily with the end of a paper clip. This will
cause the unit to reset, similar to rebooting your PC. If the problem
persists, or if you are unsure of current settings (such as forgetting
your administration password), press and hold in the Reset button
for 5 seconds. This will restore the factory default settings.
2.
DC Input Connector. Connect the DC cable of your included AC
Adapter to the DC Input Connector.
3.
USB-A Connector. Use this connector for attaching a USB printer,
USB flash disk, or other USB storage device.
4.
USB-B Connector. Use this connector to attach the NAS drive to
your computer via USB. Refer to “Which Interface: USB or Ethernet”
later in this manual.
5.
Ethernet Connector. If you plan to use the Ethernet interface
to connect to a LAN, then use this connector to attach to your
network equipment. Refer to “Which Interface: USB or Ethernet”
later in this manual.
7
About the Hard Disk
The NAS drive internal hard disk comes pre-formatted in three partitions.
The largest partition is pre-formatted in the FAT32 format and is available
for your data storage through either a USB or Ethernet connection. The
other two partitions are in Linux EXT2 format and are used by the NAS
drive’s internal software for supporting the various networking features of
the product.
Note: Capacity dependent on model. Your operating system may
report capacity as fewer gigabytes. 1 GB = 1,000,000,000 bytes.
Your product’s hard drive is a complex electronic storage system and
should be handled with care, as you might treat a sensitive portable
computer or other state-of-the-art consumer electronics product. Do not
subject it to shock, high temperatures, or strong magnetic fields.
To extend the useful life of your NAS drive,
turn the unit OFF when not in use.
Locating NAS Drive on Your Desk
Place the NAS drive on a sturdy desk or table that is free from clutter
that could block airflow around the unit. The drive is designed to lie flat
on its rubber feet, or may stand upright using the included stand. In
either orientation take care not to block any air vents. If using the upright
orientation, install so that the ON/OFF button is at the top.
Which Interface:
USB or Ethernet?
In order to install and use your NAS drive, you need to decide which
interface is better for you. With the flexibility of the NAS drive, you can
always change the interface you want to use later, depending on your
application or computer environment. However, never attempt to connect
to both USB-B and Ethernet at the same time.
Caution: Do not connect to both USB-B and
Ethernet connections at the same time.
8
If you do not have LAN setup, or you primarily want to provide additional
storage to a single computer, then you should consider USB as your
interface choice. Please refer to the next section to learn how to install and
use your NAS drive using USB.
If your PC is connected to a LAN over Ethernet (either wired or wireless),
and you primarily want to provide shared storage amongst two or more
computers on the LAN, then you should consider Ethernet as your interface
choice. The figure below provides one example of a LAN configuration.
As a cautionary note, please be aware that data stored through an Ethernet
connection is stored in the same FAT32 partition that is accessible through
a USB-B connection. This is very convenient if you want to temporarily move
your network drive to another PC that is not connected to the LAN and
you still want to read data stored on the drive. Since most computers have
a USB port available, you can connect your drive using USB-B and have
access to your previously stored data.
On the other hand, if you have private information that you have stored
using the password protection features within the NAS environment, you
may want to take special precautions to protect this data from view during
USB-B connection.
For details about user passwords and other network features, please jump
ahead to the section entitled Connecting NAS drive Using Ethernet to
learn how to install and operate your NAS drive using Ethernet.
9
Connecting NAS drive
Using USB
Connecting your NAS drive to a USB host, such as a PC or Mac, is extremely
simple. Follow the steps below.
Note: If your computer is running Windows 98 Second Edition, you
will need some additional software that you can download from the
Verbatim web site. Refer to the Getting Help section.
1.
Connect the included AC Adapter to the NAS drive, and then to a
wall outlet using the included power cord.
2.
Next press the ON/OFF button on the front of the NAS drive.
3.
Finally, connect the included USB cable from the USB-B port on
the NAS drive to an available USB port on your computer.
4.
The NAS drive will mount automatically, and a new icon will
appear in My Computer (Windows) or a new icon will appear on
the desktop (Mac).
Note: If you are using a USB 1.1 port on your Windows computer, the
following cautionary note may appear on your display: Hi-Speed USB
Device plugged into non-Hi-Speed USB hub. This does not indicate a
problem because the NAS drive is compatible with both USB 1.1 and
USB 2.0 ports. Simply close the message and proceed. However, in this
case the NAS drive will operate only at USB 1.1 speeds.
Storing and Transferring Data via USB
Once your drive is connected to a computer via USB-B, it can be accessed
and used like any other removable disk. You can drag files to your unit’s
icon to copy them, navigate to your unit in Open or Save dialog boxes, or
delete files stored on your unit. For information on copying, opening, or
deleting files, consult your computer’s documentation.
10
Disconnecting NAS drive from a PC or Mac Host
While connected using the USB-B interface, your NAS drive is hotswappable. It can be connected and disconnected without restarting your
computer. To disconnect your drive at any time, perform the following
steps. You can also disconnect your hard drive at any time while your
computer is powered off.
Note: Please be careful to follow the correct procedure when
disconnecting your unit. Simply unplugging the unit without first
following the instructions below may result in damage to your unit and/
or loss of data.
For Windows Users:
1.
If you have files located on your NAS drive open in any
applications, close them.
2.
Click the Unplug or Eject Hardware button in the System Tray.
3.
4.
Select your NAS drive from the menu that appears.
After a moment, Windows will display a message that your
hardware can be safely removed.
For Mac OS Users:
1.
If you have files located on your NAS drive open in any
applications, close them.
2.
Locate the icon for your NAS drive on the desktop, and drag it to
the trash.
11
Connecting NAS Drive Using
Ethernet
Installing the NAS drive using Ethernet requires that you have an available
Ethernet port on a router or switch.
Before attempting to establish a connection to the network it would be
useful first to review some background information about how the NAS
drive handles data over the network. Basic to this understanding are the
fundamental concepts of user accounts and shared folders.
About NAS Drive User Accounts
The NAS drive keeps track of data stored by its network users by managing
the data’s destination folder (also referred to herein as a “shared folder” or
simply a “share”). Furthermore, the NAS drive must keep track of who may
read from, and write to, each folder. It does this by setting up user accounts
and groups. A group is a collection of specific user accounts. When you
assign access privileges to a new share you have the option of either
making assignments for individual user accounts, or for an entire group of
users at once by referring to the group’s name.
The default factory settings provide for two pre-defined user accounts, each
with their own unique properties. These user accounts are:
•
admin
•
guest-share
Each of these two user accounts has an associated pre-defined folder.
The name of the folder is the same as its associated user account. The
name “guest-share” also happens to be pre-defined as a group name.
Additionally, there is a pre-defined folder called “public” that initially is not
associated with any user account. These properties are summarized in the
table below.
Pre-defined Name
public
admin
guest-share
Group
User Account
@guest-share
admin
guest-share
12
Folder (Share)
public
admin
guest-share
Here are other initial properties of these pre-defined groups, accounts, and
shares:
•
The group @guest-share contains two members, which are user
“admin” and user “guest-share”.
•
Only user “admin” can access the share “public”.
•
The folder “guest-share” is a private folder for user “guest-share”.
This means only user “guest-share” can access this folder.
•
The folder “admin” is a private folder for user “admin”. This means
only user “admin” can access this folder.
By using the web-based administration tool, you can modify these initial
properties.
Before can you can begin storing data (other than as user “admin” or as user
“guest-share”), you must use the web-based administration tool to setup a
new user account that defines your User Name and Password. Furthermore,
you have the option to define other properties for your user account. For
example, each user can optionally be given their own private folder, which
is automatically assigned the same name as that user’s User Name. A user
can also be given read-only-privileges, or read/write-privileges, to other
folders on the drive.
Connecting the NAS Drive to Your LAN
Now that you have some understanding of user accounts, you are ready
to connect your NAS drive to the LAN. Refer to the illustration below and
follow these steps.
1.
Ensure that your LAN equipment is powered on and that the LAN
is operating properly.
2.
We recommended that you follow the directions of your LAN
equipment to enable a Dynamic Host Configuration Protocol
(DHCP) server. This may be referenced in your equipment’s
documentation as “Assign IP addresses automatically”.
3.
Since you will administer the NAS drive settings using a web
browser on your PC or Mac, ensure that this PC or Mac is powered
on and connected to the LAN.
13
4.
Connect the included Ethernet cable from the Ethernet port
on the NAS drive to an Ethernet switch (100 Base-T), a wired or
wireless router, or a wireless access point.
5.
Connect the included AC Adapter to the NAS drive, and then to a
wall outlet.
6.
Press the ON/OFF button on the front of the NAS drive. The
green LED will come on to indicate that the unit is now powered
on.
7.
Wait for the NAS drive to boot up and to auto-configure its
connection on the network. Depending on your particular LAN
configuration and settings, this may take several minutes. The
following protocols will be followed during auto-configuration:
a.
DHCP client is enabled by default. So your router or
other LAN equipment that is providing the DHCP
service will automatically assign an IP address to the
NAS drive and complete the network connection.
b.
If no DHCP server is available on your isolated network,
then the auto-negotiation process will proceed in one
of two ways, depending on whether Bonjour protocol
is enabled or disabled. Bonjour protocol is built-in to
recent Mac OS X systems, and can also be optionally
installed on Windows systems.
i. Apple Bonjour protocol is enabled by
default. So if you are connecting to an
isolated Bonjour-enabled network and
no DHCP server is present, your NAS
14
drive will negotiate an address within the
Bonjour range of 169.254.x.x. If you want
to determine the specific address within
this range, you can use the network “ping”
function to “ping sohonas” or “ping sohonas.
local”.
ii. If the NAS drive has been previously accessed
in order to disable Bonjour and you are now
connecting to a network with no DHCP server
present, then a different auto-negotiation
takes place. In this case the NAS drive will
automatically launch its internal DHCP server.
This will result in the NAS drive taking the
default IP address of 192.168.1.1 and
will also assign addresses (in the range of
192.168.1.2-50) to other DHCP clients on the
network .
8.
After successfully connecting to your network you will be
able to see the NAS drive on your network. Its default name is
“Sohonas” and it will be located in the network workgroup named
“Workgroup”. In Windows go to My Network Places / Entire
Network / Microsoft Windows Network / Workgroup, or in Mac
OS X go to Finder / Network / Workgroup. You can open the
device to see the following default folders:
c.
admin
d.
guest-share
e.
public
Though you are now ready to begin storing data on your drive, at this point
you have only the two default user accounts set up. To set up other user
accounts, and to configure other basic system settings, you are urged to
continue setup using the web-based administration tool described in the
next section.
Web-Based Administration Tool
The web-based administration tool is used to modify all internal settings of
your NAS drive. It is accessed using your computer’s web browser (such as
Internet Explorer or Netscape). To access the administration tool, your PC or
Mac should be on the same subnet as the NAS drive.
15
Administration Login
In most cases you need only to enter the default hostname (i.e., “//sohonas”
for Windows, or “//sohonas.local” for Bonjour) in your browser’s address
window to access the administration tool. If for some reason the default
hostname was not assigned to the NAS drive’s IP address during autoconfiguration, then you can alternatively enter the NAS drive’s IP address
into the browser’s address window.
As described previously, your router or other network equipment will
have assigned the IP address automatically, or the drive will have taken
one of its default addresses (either a Bonjour address 169.254.x.x
x or
the non-Bonjour address 192.168.1.1). If your router assigns addresses
automatically your router’s manual will describe how to determine your
drive’s IP address.
After your browser retrieves the initial web page from the NAS drive, the
browser window will present the following login screen:
From this screen you must enter the following default Username and
Password:
Username: admin
Password:
admin
16
Basic Settings for Initial Setup
Now, from within the administration tool perform the following steps
to define the basic settings. For more advanced features note that a full
description of all settings is provided later under “NAS Administration
Reference”.
1.
Click on Quick Setup to expand the selection group.
Set Language, Password, Hostname, IP Address, and Time
A special setup wizard will lead you through the configurations
for user interface language, administrator password, hostname, IP
address, and time.
2.
Select Wizard.
3.
Select your language preference from the pull-down menu. The
selection “set from browser options” will automatically set the
administrator language to the current browser language setting.
If the browser language is not supported in the administrator,
the default language of English will be enabled. Press Next to
continue.
4.
The next screen allows you to define a new password for the user
“admin”. If you want to keep the current password, simply press
Next to advance to the next screen.
17
5.
The next screen allows you to define a new Hostname for the NAS
drive. If you want to keep the current Hostname, simply press
Next to advance to the next screen.
6.
The next screen allows you to select between automatic and static
addresses for the NAS drive’s IP Address and Domain Name
System (DNS) address. It is recommended that your network
equipment be enabled to provide DHCP service, and that both
settings on this screen remain at the factory settings.
Alternatively, if your network requires that you define static
addresses, then you may enter them in the form provided.
Press Next to continue.
7.
The next screen allows you to manually set the date and time, or
to use an available Network Time Protocol (NTP) server. It is useful
to set the correct date and time because time stamps are used
in the various status logs that are described later in this manual.
After filling in your selections, press Next.
8.
The settings made in the previous steps are summarized on
this screen for your review. You may either go back to edit your
settings, or press Complete to save the settings as shown.
Add New User Account
9.
Next setup a user account by selecting the Quick Setup / Add
User button.
18
Fill in the initial screen with a User Name and Password. It is
recommended that these fields match the User Name and
Password that this user normally enters when logging into
Windows or to Mac OS X. The User Name must be lower-case
and may be a maximum of 20 alphanumeric characters, without
spaces. The User Name must begin with an alphabetic character.
Note: If your Windows username currently contains a space character,
or begins with a number, you may want to modify your Windows
username slightly so that it can follow the same format required by the
NAS drive. For Mac OS X user accounts, your username is automatically
saved without spaces as a field called “Short Name”. In this way the
“Short Name” already follows the format required by the NAS drive.
Also fill in the password. The password may be a maximum of
16 alphanumeric characters, without spaces. If you leave the
password field blank, the NAS drive will accept this as a null
password. This means that you will not need to fill in any password
in the future when accessing the NAS drive using this username.
A description of this user may optionally be entered in the field
provided.
If you want to create a private folder that only this network user
can access, then check the box marked “Create Private Folder”.
This folder cannot be accessed via the “admin” user account
or any other user account. The folder name will automatically
be given the same name as User Name. The path of your newly
created private folder will automatically be set to /mnt/IDE1.
Though in some environments the NAS drive supports a quota
feature that limits individual user accounts to a maximum amount
of storage space on the drive, this feature is grayed-out and is
not selectable in the factory default condition. This is because
the default disk format type FAT32 does not support the quota
function. If user account disk quotas are important to you, then
you should consider reformatting the drive to EXT2 or EXT3
format, as described later in section “NAS Administration
Reference”.
When done with this form, press Next to continue.
19
10.
The next screen allows you to assign this user to an existing
group. As described above, the initial factory setting provides for
the default group named “@guest-share”. When done with this
form, press Next to continue.
11.
The final screen for adding a user allows you to assign access
privileges to currently defined shares. Of course, if you checked
“Create Private Folder” in step (9), then read/write access has
automatically been provided to this user’s private folder.
Though the initial factory setting provides for three default shares
(admin, guest-share, and public), only “public” is available for
selection for access to new user accounts.
When done with this form, press Complete.
Add New Group
12.
Next you may optionally setup a new group. If you do not want to
set up a group at this time, you may jump ahead to Step 15.
Begin group setup by selecting the Quick Setup / Add Group
button.
Fill in the initial screen with your group’s name. The group name
must be lower-case and may be a maximum of 20 alphanumeric
characters, without spaces. The group name must begin with an
alphabetic character. Press Next to continue.
20
13.
The next screen allows you to assign any of the current users
to your new group. When done with this form, press Next to
continue.
14.
The next screen allows you to assign share access privileges for
the new group. Each of the existing shares may be setup for no
access, read-only access, or full read/write access. When done
with this form, press Complete.
Add New Shared Folder
15.
The final procedure for Quick Setup allows you to optionally
setup a new share. If you do not want to set up a share at this
time, you may exit the administrator as described in Step 18.
Begin share setup by selecting the Quick Setup / Add Share
button.
Fill in the initial screen with a name for your new share. The
share name must be lower-case and may be a maximum of 20
alphanumeric characters, without spaces. The share name must
begin with an alphabetic character. After entering the name,
the path for the new share will automatically be displayed. A
description of this share may optionally be entered in the field
provided. When done with this form, press Next to continue.
16. The next two screens allow you to assign access privileges for the
21
new share. Access is defined separately for Server Message Block
(SMB) / Common Internet File System (CIFS) access than it is for
Network File System (NFS) access. Use the first of the two screens,
titled “Windows, FTP Access” to assign access under SMB/CIFS.
You can assign read-write access for all users and groups by
checking the box marked “Allow for all”. Alternatively, you can
assign no access, read-only access, or read-write access privileges
individually for each user and group. Note that group names in
the list provided are denoted with the “@” character as the first
character in the name.
When done with this form, press Next to continue with
assignment of NFS access privileges.
17. The next screen is for NFS access. It will be of interest primarily if
you plan to operate Linux machines on your LAN and want to use
NFS protocol for file sharing. To enable NFS access to this share
from all users, you can check the box marked “Allow for all”. If this
box is not checked then you may individually assign NFS access
from specific IP addresses, or from specific subnets. When done
with this form, press Complete.
18.
You have now completed the Basic setup. You may either return
to Step 9 to add additional user accounts, groups or shares,
continue to set more advanced features as described under
“NAS Administration Reference”, or press Logout to leave the
administration tool and begin using the NAS drive to store and
share your data.
NAS Drive Operation Using
Ethernet
Once the NAS drive is connected to your network and has been configured
for your network environment, it can be accessed from any computer within
the same subnet on your LAN. Furthermore, more advanced users may
choose to configure name servers (such as WIN servers or DNS servers) in
order to access the drive from a different subnet. You will be able to:
22
•
•
•
•
•
Drag and drop files to NAS drive
Copy and paste data to NAS drive
Make and delete folders
Share files and folders
Back-up your data
How you access the drive will depend on your computer’s operating system.
A brief overview for accessing files for both Windows and Mac OS X is
provided next. You should consult your computer’s documentation for more
detailed explanations of file sharing using your specific operating system.
Sharing files using Windows
The NAS drive supports Microsoft Common Internet File System (CIFS), also
known as Server Message Block (SMB) protocol. Any PC running Windows
98, Windows Me, Windows 2000, and Windows XP can access shared
files on the NAS drive. Once you can view the folder in My Computer or in
Windows Explorer, you can drag and drop files to this folder like you can
with any folder.
There are several alternative ways to view the NAS shared folders in
Windows. For example, you can
•
Use the Run dialogue box accessed through the Start button in
the system tray.
•
Browse through the Network Neighborhood.
•
Use the Search dialogue box accessed through the Start button
or File Browser.
•
Look through devices in My Computer.
Run Dialogue
To find the NAS drive using this method select Start in the system tray and
select Run. In the Open: field provided enter “\\sohonas” and then press
OK. You may alternatively enter “\\” followed by the NAS drive’s IP address
and then press OK.
Browse Network Neighborhood
Open the File Browser and double-click on Network Neighborhood or
My Network Places. Browse to Workgroup to find the NAS drive shared
folders.
23
Search Dialogue
Select Start in the system tray and select Search. Use the Search dialogue
to search for Computers. For the computer name to search for enter
“sohonas” and then press Search Now to find the connected NAS drive.
Double-click the NAS drive entry to connect and view its shared folders.
Browse My Computer
Open My Computer and double-click on My Network Places. Browse to
Workgroup to find the NAS drive share folders.
Once you have located the attached NAS drive’s shared folders, you can
map a drive letter to a folder. To do this, right-click on the folder and select
“map network drive”. Fill out the dialogue box that Windows presents and
then select Finish.
Sharing files using Mac OS X
A Mac running Mac OS X can access a connected NAS drive. Click on
Network, open the folder “Workgroup” and locate the “sohonas” device.
Double-click “sohonas” to open the connection dialogue box.
When prompted to “Select SMB/CIFS shared volume you want to connect
to” use the pull-down menu to select one of the current shares. You will next
be prompted to authenticate by entering your username and password.
For “username” use the Mac OS “Short Name” that you used to create your
account on the NAS drive.
After completing authentication your shared folder will appear on your
desktop. You can now drag and drop files to this folder as you can for any
folder.
Attaching USB Devices
Your NAS drive contains a USB-A port that is active only while the drive
is connected using the Ethernet connection. This USB-A connection
is disabled when the drive is connected to a computer via the USB-B
connection.
The USB-A port can be used to attach either a USB printer or a USB storage
24
device, such as a flash disk. This section describes how to install and use
these USB devices while the NAS drive is connected to your LAN.
This USB-A port operates at USB Full-Speed.
Attaching a Printer
Once your USB printer is attached and installed to the connected NAS
drive, you can send print jobs to this printer from any user account. Follow
these steps to attach and install your USB printer:
1.
Attach the USB cable from your USB printer to the USB-A
connector on the rear panel of the NAS drive.
2.
Power on the printer.
3.
The Print Server setting within the web-based administration tool
is enabled as the factory default setting. If it has been previously
disabled for any reason, enter the administration tool now and
check the box labeled Enable under Control Panel / File and
Print / Printer Server. You may also use this opportunity to enter a
description for your printer.
From this point, you must follow the instructions of your computer’s
operating system to ensure that the printer is recognized and that the
proper printer driver is installed. For reference, the following additional
steps apply for Windows 2000 and Windows XP.
4.
From your file browser or network places, open the Sohonas
folder and locate the shared printer, which by default will have the
name “lp”.
5.
Double-click on the “lp” folder and Windows will ask you if you
want to install the printer drivers, click “Yes”.
6.
The “Select Printer” window will open and prompt you to select
your printer brand name, model name and number. After your
printer model has been selected, the printer drivers will be
installed on your computer. If you cannot find your printer in the
list, you can alternatively insert the driver CD-ROM from your
printer manufacturer and follow the dialogue for installing a driver
from CD.
7.
You can verify that the Sohonas printer has been installed by
going to Control Panel / Printers and Faxes. Under Printers and
Faxes you will see the Sohonas printer icon.
25
Now your printer is ready to accept print jobs like any other printer on your system.
Attaching a USB Storage Device
If you elect not to use the USB-A port for printing, then it is available to you
to attach another USB storage device, like a flash disk. Once your storage
device is attached and installed to the connected NAS drive, you can drag
and drop files to it like any other storage device.
These types of USB storage devices can be attached:
•
Flash Disk
•
Hard Drive
•
Memory Card Reader
Follow these steps to attach and use your USB storage device:
1.
Attach the USB cable from your device (or the USB connector
attached to your device) to the USB-A connector on the rear panel
of the NAS drive.
2.
If your device is self-powered, turn on the power to your device.
3.
Your device should now be visible through your file browser. If it
is not immediately visible it may mean that it is not formatted in a
format compatible with the NAS drive. In this case you must take
the additional step outlined in Step 4.
4.
You must reformat the device using the administration tool before
NAS drive will recognize it.
BEFORE PROCEEDING, MAKE CERTAIN THAT YOU HAVE
SAFELY SAVED ALL OF YOUR DEVICE’S DATA TO ANOTHER
STORAGE DEVICE.
Enter the administration tool and go to the screen at Control
Panel / Maintenance / Disk Utility. Highlight your device in the
list of devices. Its Mount Point will be /mnt/USBx where x is a
sequence number. Select the FAT32 Format Type in the dropdown menu. Now press the Format button. You will be prompted
to confirm. Press YES to continue. After successfully reformatting
your device, you can logout of the administration tool and again
look for the device in your file browser.
Now you can drag and drop files to your USB storage device like any other
storage device on your system. Access to the attached USB storage device
is not password protected.
26
NAS Administration Reference
The web-browser-based administration tool provides full access to all
configuration settings for the product when used as a NAS device. This
section of the manual provides a description for the settings within each of
the following main areas:
•
Setting up read/write access by User and by Group
•
Setting up File Servers, Print Servers, and Shares
•
System settings, such as IP Address and Date and Time
•
Enabling services such as DHCP and Apple Bonjour
•
Maintenance features, such as hard disk formatting and firmware
updating
•
Enabling data logging features
The menu system of the administration tool is summarized in the following
outline:
27
Basic
Quick Setup
p
Wizard
Add User
Add Group
Add Share
Control Panel
Users and Groups
p
User Management
Group Management
File and Print
File Server
Share Management
Print Server
System
y
Network Settings
Time Settings
Turn Off Server
Information
Disk Usage
Error Notification
Network Service
DHCP Server
Bonjour
Maintenance
Disk Utility
Firmware Upgrade
Save Configuration
Restore Configuration
Factory Reset
Log
g File
Samba Log
FTP Log
DHCP Server Log
System Log
Administration Log
Personal Information
Personal Information
Account
Logout
g
28
Because the Basic / Quick Setup functions (Wizard, Add User, Add Group,
and Add Share) have been described previously under “Basic Settings
for Initial Setup”, we begin this reference section with a description of the
Control Panel group of functions.
Users and Groups
This group of settings provides an alternate way to create a new user
account or new group, and also provides a method to modify properties of
existing user accounts or groups.
User Management
Enter the main screen of User Management by selecting Control Panel /
Users and Groups / User Management. Here you are presented entry fields
for User Name and Password. If you want to create a new user account, fill
in these fields directly. The User Name must be lower-case and may be a
maximum of 20 alphanumeric characters, without spaces. The User Name
must begin with an alphabetic character. See further information about User
Name, Description, and the “Create Private Folder” check box under by
referring back to Step 9 of “Basic Setup for Initial Settings”.
If you want to edit an existing user account, select a user from the Existing
User box, and the User Name and Password fields will fill in automatically.
After completing this form, press Save to save the changes you have made
for this user.
If you want to delete an existing user, first highlight that user’s name in the
Existing User box, and then press the Delete User button.
If you want to edit the group assignment properties of a current user,
first highlight that user’s name in the Existing User box, and then press
the Groups button. If you have created a new user account and want to
assign this user to one or more existing groups, then after pressing Save as
described above, press the Groups button to proceed to the next screen.
The Groups screen presents a list of the selected user’s assigned groups in
the box on the left. The list of groups in the right box includes groups for
which the user is not a member. By selecting group names and pressing
either the Add or Remove button you can reassign the user to various
existing groups. When done with your assignments, press Save to save your
changes.
29
Note that if you are using the User Management dialogue to create a
new user, there may be other properties that you want to set for this
user. For example, after creating a new user through Control Panel /
User Management, share access for that user can be set by leaving User
Management and going to File and Print / Share Management. This
dialogue is explained later in this reference section.
Group Management
As explained earlier, a group is a collection of user accounts. When you
assign access privileges to a new share you have the option of making
assignments for an entire group of users at once by referring to the group’s
name. Enter the main screen of Group Management by selecting Control
Panel / Users and Groups / Group Management. Here you are presented
an entry field for Group Name. If you want to create a new group, fill in this
field directly. The Group Name must be lower-case and may be a maximum
of 20 alphanumeric characters, without spaces. The Group Name must
begin with an alphabetic character.
If you want to edit an existing group, select a group from the Existing
Groups box, and the Group Name field will fill in automatically.
After completing this form, press Save to save the changes you have made
for this group.
If you want to delete an existing group, first highlight that group’s name in
the Existing Groups box, and then press the Delete Group button.
If you want to edit the member list of a current group, first highlight that
group’s name in the Existing Groups box, and then press the Members
button. If you have created a new group and want to assign one or more
existing users to this group, then after pressing Save as described above,
press the Members button to proceed to the next screen.
The Members screen presents a list of the selected group’s assigned
members in the box on the left. The users listed in the right box are not
currently members of the group. By selecting user names and pressing
either the Add or Remove button you can reassign various users to
the group. When done with your assignments, press Save to save your
changes.
Note that if you are using the Group Management dialogue to create a
new group, there may be other properties that you want to set for this
group. For example, after creating a new group through Control Panel /
Group Management, share access for that group can be set by leaving
30
Group Management and going to File and Print / Share Management. This
dialogue is explained later in this reference section.
File and Print
This group of settings allows for naming the Windows Workgroup, enabling
certain server protocols (such as FTP, NFS, and print server), as well as
providing full control over the creation and management of folders (shares)
on the drive.
File Server
Enter the main screen of File Server Setting by selecting Control Panel / File
and Print / File Server. This screen presents options for Windows Workgroup
and Windows Internet Naming Service (WINS), for enabling File Transfer
Protocol (FTP), and Network File System (NFS) server.
Each subgroup of settings is described below. After completing the form
you must press Save to save your changes.
Windows Setting
With these settings you can enable or disable the NETBEUI transport
protocol, which is required for SMB/CIFS file sharing in Windows. For
example, for shared folders to be visible in “My Network Places”, this
protocol needs to be running. It is enabled by default.
When Windows Setting is enabled, you can modify the Windows
Workgroup name and description. If a WINS server is available, you may
optionally fill in its IP address.
FTP Server Setting
You can enable or disable the FTP server support. If enabled, you can enter
the port number you will use for FTP.
Once FTP is enabled, you can remotely login to the NAS drive via FTP
using your username and password. You will then have FTP access to those
folders for which you have access privileges.
If you login to FTP anonymously and Guest Access is enabled (see below)
you will access the guest-share folder.
In order to reach the FTP server through the WAN, a public IP address
should be assigned to the NAS, or alternatively you can configure a
31
Network Address Translation (NAT) router to map a public IP address to the
NAS drive’s private IP address on the LAN.
NFS Server Setting
You can enable or disable NFS server support.
If you have only Windows PCs on your home network and have no pressing
reason to use NFS support to share files, then you can normally leave this
box unchecked in order to free up system resources for other servers.
NFS and Samba perform similar functions for file sharing. The main
difference is the Windows PCs have Samba-compatible clients and servers
as part of their default network support. Conversely, UNIX systems usually
come with NFS by default, with Samba being used to provide file sharing
with Windows PCs.
Note that the NAS drive has Samba enabled at all times.
Guest Access Setting
When Guess Access is enabled, you can access the “guest-share” folder by
logging in with the username “guest-share” and leaving the password field
blank. As explained earlier, the default disk format type FAT32 does not
support the quota function.
Also, when Guest Access is enabled, you can access the guest-share folder
via FTP by logging into FTP anonymously. When Guess Access is disabled,
anonymous FTP is not permitted.
Guest access is enabled by default.
Share Management
Enter the main screen of Share Management by selecting Control Panel /
File and Print / Share Management. Here you are presented entry fields for
Share Name and Share Path. If you want to create a new share, fill in these
fields directly. The Share Name must be lower-case and may be a maximum
of 20 alphanumeric characters, without spaces. The Share Name must begin
with an alphabetic character.
A description of this share may optionally be entered in the field provided.
If you want to edit an existing share, select a share from the Existing Shares
box, and the Share Name, Path, and Description fields will fill in automatically.
After completing this form, press Save to save the changes you have made
for this share.
32
If you want to delete an existing share, first highlight that share name in the
Existing Shares box, and then press the Delete Share button.
Once you have highlighted an existing share, or have created and saved a
new share, you will want to assign access privileges for that share. Access is
defined separately for SMB/CIFS access than it is for NFS access.
To assign SMB/CIFS access privileges for current share, press the Windows,
FTP Access button. To assign NFS access privileges, press the NFS Access
button.
Using the screen for SMB/CIFS access (Windows, FTP Access) you can
assign read-write access for all users and groups by checking the box
marked “Allow for all”. Alternatively, you can assign no access, read-only
access, or read-write access privileges individually for each user and group.
When done with this form, press Save to save your changes.
Using the screen for NFS access you can assign read-write access for all
users and groups by checking the box marked “Allow for all”. Alternatively,
you can assign access to individual IP addresses or a subnet range. When
done with this form, press Save to save your changes.
Printer Server
Enter this screen by selecting Control Panel / File and Print / Printer Server.
Here you may enable or disable the print server function. It is enabled as
the factory default. If a printer is attached to the USB-A port as described
previously under “Attaching a Printer”, its name will be shown on this screen.
You may optionally fill in a description for your printer. When done with this
form, press Save to save your changes.
System
The System group of settings provides control for IP addressing, date and
time settings, control of error notification services, and also displays basic
information about the product and its disk usage.
Network Settings
Enter this screen by selecting Control Panel / System / Network Settings.
The top entry field shows the current hostname (factory default is
“sohonas”). To change the hostname, type in a new name.
33
Next are IP Address settings. You will normally leave these in the factory
default condition, which selects “Obtain IP Address automatically” and
“Obtain DNS Server Address automatically”. With this selections enabled,
the NAS drive will act as a DHCP client and attempt to retrieve its IP Address
from the DHCP server active on your LAN.
Under some LAN environments you will need to enter fixed addresses in
the form provided.
The bottom of this screen displays the Media Access Control (MAC) address
of the product.
When done with this form, press Save to save your settings.
Time Settings
Enter this screen by selecting Control Panel / System / Time Settings. You
may manually enter the date, time, and time zone, or alternatively select a
Network Time Protocol (NTP) server available on your LAN. When done with
this form, press Save to save your changes.
Turn Off Server
If you have a need to restart or turn off your file server, you may do so using
the buttons available through Control Panel / System / Turn Off Server. This
is a convenient feature if your administration computer is located far away
from the NAS drive. Otherwise, you can simply power off the NAS drive to
turn off the server.
Information
Basic information about your system, such as the firmware version number
and IP address, can be displayed by selecting Control Panel / System /
Information. There are no user settings on this screen.
Disk Usage
Basic information about your hard disk, such as total and free space, can be
displayed by selecting Control Panel / System / Disk Usage. If you have a
USB storage device connected to your USB-A port as described previously
under “Attaching a USB Storage Device”, then you will also see information
about this device on the screen.
34
Error Notification
The NAS drive features a range of features to monitor product status and
to report errors. To enable and setup these features, select the screen at
Control Panel / System / Error Notification. These settings are grouped into
four sections, as described below. After completing this form, press Save to
save your changes.
Monitoring Services
Here you may select which of the following four functions you would like to
monitor:
•
Disk Usage
•
Windows File Sharing Server
•
FTP Server
•
DHCP Server
Check Interval
Enter how frequently you would like functions to be checked.
E-mail Notification
NAS drive has the capability to send you an e-mail message containing
status information for the functions being monitored. To enable this feature,
check the box marked “Enable” and fill in the form provided with the IP
address of the mail server that will process your automatic e-mail notices.
Also fill in up to five (5) destination mail addresses for these e-mail notices.
Pop-Up Notification
In addition to e-mail notification, the product has the capability to use the
Messenger service to display a pop-up message on your computer screen.
To enable this feature, check the box marked “Enable” and fill in the form
provided with the hostnames of up to five (5) computers that will receive
these pop-up notices. This feature requires that your computer’s Messenger
service is enabled and running, and that your network administrator has not
blocked the service.
Network Service
The Network Service group of settings provides control over the built-in
35
DHCP server, and the Bonjour protocol.
DHCP Server
Enter the main screen for DHCP Server by entering Control Panel / Network
Service / DHCP Server. Most LAN environments will already have a Dynamic
Host Configuration Protocol (DHCP) service running to automatically
issue IP addresses for attached devices. For example, your home router
equipment will likely provide this service. In the rare case that your
equipment does not provide this service, the NAS drive can run its built-in
DHCP Server.
To enable the DHCP Server, check the box marked “Enable Server”. It is
disabled by factory default setting.
A form is provided to optionally control the way addresses will be issued to
clients from the NAS drive’s DHCP Server. You may also set the maximum
lease duration from the pull-down menu. When done with this form, press
Save to save your changes.
If your LAN contains some equipment with fixed IP addresses that you
would like the server to avoid when issuing new addresses, you can define
these static IP addresses and MAC addresses on the screen accessed by
pressing the Static IP button at the bottom of the page. Be sure and save
any changes you would like to make when entering static IP addresses.
After the DHCP Server has been running on your LAN, you can periodically
check back to this screen and review the addresses that have been issued.
To view the address list, press the DHCP Lease List button at the bottom of
the page.
Bonjour
Bonjour protocol may be enabled or disabled by selecting the screen at
Control Panel / Network Service / Bonjour. The factory default setting is
enabled. Press Save to save any change to this screen.
Maintenance
The Maintenance group of settings provides control over disk formatting
and status, firmware upgrades, and ways to make global changes to all
settings.
36
Disk Utility
Enter this screen by selecting Control Panel / Maintenance / Disk Utility. You
will be presented with a table that lists the status of all detected storage
devices. The first device listed (“/dev/hda/”) will be the main data partition
of the NAS hard drive.
If you have another storage device attached to the USB-A port, its status will
be displayed on the next row of the table.
From this table, you have the option to perform the following actions on a
specific storage device using the buttons provided:
Format
The hard drive is preformatted at the factory as FAT32. If you want to
change the format to EXT2 or EXT3, make your selection from the pulldown menu, and press Format.
Caution: Formatting the drive will delete all data
from your drive and will reset all settings to factory
default. Use extreme care to protect any previously
stored data before reformatting your drive.
The FAT32 format is the most flexible format, since it allows you to use the
drive with either the USB-B or Ethernet interface. Alternatively, if you plan to
use your drive only with Ethernet, you can realize the following benefits by
reformatting to EXT2 or EXT3:
•
Faster data throughput
•
Ability to allocate user storage quotas
•
Prevent password-protected folders from being accessed via a
USB-B connection
Regarding auxiliary storage devices attached to your USB-A port, you may
find that you need to reformat your device to FAT32 using Disk Utility before
your device will mount properly using the NAS drive.
Scan
Press the Scan button if you would like to scan your disk for errors.
Unmount
Press the Unmount button if you would like to unmount the auxiliary
storage device. This button is disabled for the primary hard disk.
37
Detail
Press the Detail button in order to view a detailed status report for your
device.
Also, in case you have made a recent change to a storage device, you can
press the Refresh button at the bottom of the table to refresh the table with
the most current status.
Finally, the field at the bottom of the Disk Utility screen allows you to set an
automatic spin-down time for the hard drive. By spinning down the drive
when not in use, you can conserve power and extend the life of the drive.
The default setting is 30 minutes. Press Save to save your change.
Firmware Upgrade
If a more recent version of the NAS drive’s internal firmware is available, you
will want to download and install it. The most recent firmware version may
have improved performance or added features that could give you benefits
not present in your current version.
Enter this screen by selecting Control Panel / Maintenance / Firmware
Upgrade. Make a note of your current version number, which is displayed at
the top of this screen. Then visit Verbatim’s Technical Support web site (refer
to the Getting Help section later in this manual) to check if a more recent
version is available. If so, follow the download instructions provided on the
site.
Once the upgrade file is available on your computer, browse to it from the
Firmware Upgrade screen, and then press the Start Upgrade button.
Save Configuration
After you have completely configured all of the NAS drive’s settings, you
may want to save the full configuration for future reference. To do this enter
the Save Configuration screen by selecting Control Panel / Maintenance /
Save Configuration, and then press the Save button. This action will save a
configuration file (named “config.tar”) to your specified location.
Restore Configuration
After saving a configuration file as described above, you can later retrieve
38
that file to restore all device settings in a single step. Enter this screen by
selecting Control Panel / Maintenance / Restore Configuration, and then
browse to the saved configuration file and press the Restore button.
Factory Reset
You can return all of the NAS drive’s settings to their factory default state
by selecting Control Panel / Maintenance / Factory Reset, and pressing the
Factory Reset button on this screen.
As described earlier, an alternate way to reset the device to factory settings
is to press and hold in the Reset button for more than 5 seconds.
Log File
The NAS drive has the ability to record event logs for various activities that
occur during operation. Here you can control and display the available
event logs. Each log can be individually restarted by cleaning past events
and starting with a fresh log.
Samba Log
To view the log of events that have occurred during Samba file sharing,
select Control Panel / Log File / Samba Log.
FTP Log
To view the log of events that have occurred during FTP file transfers, select
Control Panel / Log File / FTP Log.
DHCP Server Log
To view the log of events that have been recorded by the NAS drive’s DHCP
Server, select Control Panel / Log File / DHCP Server Log.
System Log
To view the log of events that have recorded by the system monitor, select
Control Panel / Log File / System Log.
39
Administration Log
To view the log of events that have been recorded by the administration
monitor, select Control Panel / Log File / Administration Log.
Account Information
The Personal Info tab provides access to certain information about the
user currently logged into the web-based administration tool. Usually this
will be the admin user. To view this screen select Personal Info / Personal
Information / Account.
The top section provides input fields for changing the password, the
administration tool’s language setting, and the optional description text.
The bottom section displays current information about disk usage and the
current user’s shared folders.
When done with this form, press Save to save changes.
Logout
After completing all of the intended changes for your current session
with the administration tool, you can press the Logout button to end your
session.
40
Technical Support
If you are experiencing difficulty installing or using your Verbatim product,
please visit the main Verbatim Technical Support website at www.verbatim.
com or www.verbatim-europe.com. From this page you can access our
library of user documentation, read answers to frequently asked questions,
and download available software updates. Although most of our customers
find this content sufficient to put them back on the right track, this page also
lists ways in which you can contact the Verbatim Technical Support Team
directly.
US/Canada 800-538-8589
Mexico (55)55284642
Argentina (54-11) 4943-3336
Europe: For technical support in Europe e-mail [email protected] or call 00 800 3883 2222 in the following countries: Austria,
Belgium, Denmark, Finland, France, Germany, Hungary, Italy, Luxemburg,
Monaco, Netherlands, Norway, Poland, Portugal, Republic of Ireland, Spain,
Sweden and Switzerland. All other countries call +353 61 226586.
Limited Warranty Terms
Verbatim Corporation warrants this product to be free from defects in material
and workmanship for a period of 1 year from date of purchase (a period of
2 years applies in countries of the European Union). This warranty excludes
batteries. If this product is found to be defective within the warranty period,
it will be replaced at no cost to you. You may return it with your original cash
register receipt to the place of purchase or contact Verbatim.
In the U.S. and Canada, call 800-538-8589 or email [email protected].
In the following European countries, Austria, Belgium, Denmark, Finland, France,
Germany, Greece, Hungary, Italy, Luxembourg, Monaco, Netherlands, Norway,
Poland, Portugal, Republic of Ireland, Spain, Sweden, Switzerland, call 00 800
3883 2222. All other European countries call +353 61 226586. You can email
[email protected].
Product replacement is your sole remedy under this warranty, and this warranty
41
does not apply to normal wear or to damage resulting from abnormal use, misuse, abuse, neglect or accident, or to any incompatibility or poor performance
due to the specific computer software or hardware used. VERBATIM WILL NOT
BE LIABLE FOR DATA LOSS OR ANY INCIDENTAL, CONSEQUENTIAL OR
SPECIAL DAMAGES, HOWEVER CAUSED, FOR BREACH OF WARRANTIES
OR OTHERWISE. This warranty gives you specific legal rights and you may also
have other rights which vary from state to state or country to country.
NOTE: Verbatim Corporation may at any time revise the content of this
user guide without further notice.
Rights
Copyright ©2007 Verbatim Corporation. No part of this document may be
reproduced in any form or by any means, for any purpose, without the express
written permission of Verbatim Corporation. All rights reserved. All other brands
and product names referenced herein are property of their respective owners.
FCC Compliance
This equipment has been tested and found to comply with the limits
for a Class B digital device, pursuant to Part 15 of the FCC Rules. These
limits are designed to provide reasonable protection against harmful
interference in a residential installation. This equipment generates, uses
and can radiate radio frequency energy and, if not installed and used in
accordance with the instructions, may cause harmful interference to radio
communications. However, there is no guarantee that interference will
not occur in a particular installation. If this equipment does cause harmful
interference to radio or television reception, which can be determined by
turning the equipment off and on, the user is encouraged to try to correct
the interference by one or more of the following measures:
•
•
•
Reorient or relocate the receiving antenna.
Increase the separation between the equipment and receiver.
Connect the equipment into an outlet on a circuit different from
42
that to which the receiver is connected.
•
Consult the dealer or an experienced radio/TV technician for
help.
WEEE Notice
The Directive on Waste Electrical and Electronic Equipment (WEEE), which
entered into force as European law on 13th February 2003, resulted in a major
change in the treatment of electrical equipment at end-of-life.
The WEEE logo (shown at the left) on the product or on its
box indicates that this product must not be disposed of or
dumped with your other household waste. For more
information about electronic and electrical waste equipment
disposal, recovery, and collection points, please contact your
local municipal household waste disposal service or shop
from where you purchased the equipment.
.
CE Declaration
EC DECLARATION OF CONFORMITY
It is hereby declared that this product complied with the essential protection
requirements of Council Directive 89/336/EEC and its amendments on the
approximation of the laws of the Member States relating to electromagnetic
compatibility.
This declaration applies to all specimens manufactured identical to the model
submitted for testing/evaluation.
EN 55022: 1998 + A1: 2000 +A2: 2003
EN 61000-3-3:1995 + A1: 2001
EN 55024: 1998 + A1: 2001 + A2: 2003
IEC 61000-4-2: 1995 + A1: 1998 + A2: 2000
IEC 61000-4-3: 2002 + A1: 2002
IEC 61000-4-4: 1995 + A1: 2000 + A2: 2001
43
IEC 61000-4-5: 1995 + A1: 2000
IEC 61000-4-6: 1996 + A1: 2000
IEC 61000-4-8: 1993 + A1: 2000
IEC 61000-4-11: 1994 + A1: 2000
RoHS Compliance
This product is in compliance with Directive 2002/95/EC of the European
Parliament and of the Council of 27 January 2003, on the restriction of the use
of certain hazardous substances in electrical and electronic equipment (RoHS)
and its amendments
44