1
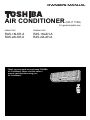
OWNER’S MANUAL
AIR CONDITIONER
(SPLIT TYPE)
For general public use
Indoor Unit
Outdoor Unit
RAS-18LKH-A
RAS-22LKH-A
RAS-18LAH-A
RAS-22LAH-A
Thank you very much for purchasing TOSHIBA
Air Conditioner. Please read this owner’s
manual carefully before using your
Air Conditioner.
A
A
SLEEP
ON/OFF
TEMP.
,
OWNER S MANUAL
CONTENTS
PRECAUTIONS
2
BEFORE OPERATION
6
UNIT DESCRIPTION
6
REMOTE CONTROL DESCRIPTION
8
REMOTE CONTROL PREPARATION
11
UNIT OPERATION
13
AUTOMATIC OPERATION
13
MANUAL OPERATION
14
TIMER OPERATION
15
DISCHARGE AIR LOUVER CONTROL
20
EMERGENCY AND TEST OPERATION
21
AIR CLEANING OPERATION
22
CARE AND MAINTENANCE
23
POINTS TO NOTE
23
CLEANING THE FILTERS AND FRONT PANEL
25
CLEANING THE MAIN UNIT
26
AFTER-SEASON CARE
26
TROUBLESHOOTING
27
,
OWNER S MANUAL - 2
PRECAUTIONS
Installing and servicing air conditioning equipment can be hazardous due to system pressure and electrical
components.
Only trained and qualified service personnel should install or service this equipment.
Untrained personnel can perform basic maintenance functions such as cleaning the coil and filters, and replacing
filters.
All other operations should be performed by trained service personnel.
When working on air conditioning equipment, observe precautions in the literature, tags and labels attached to the
unit.
WARNING
Before performing service or maintenance operations on the system, turn off the main power of the unit. Electric
shock can cause personal injury.
WARNING
Use the correct voltage.
Using voltage other than specified will damage
the unit.
WARNING
Check the power plug.
If the power plug is not inserted tightly, or if there is
any damage to the power cord, it could result in
leakage or electric shock.
WARNING
Do not use the power cord as a means of turning
off the unit.
,
OWNER S MANUAL - 3
PRECAUTIONS
WARNING
Do not use flammable sprays near the unit.
The unit can be damaged by gasoline, benzene, thinners,
insecticides and other chemical agents.
WARNING
When unplugging the power plug, do not pull by the
power cord.
The power cord will get damaged and it can cause
electric shock.
WARNING
To avoid the risk of serious electric shock, never
splash the indoor and the outdoor unit with water.
WARNING
Do not put hands or objects into the discharge grille
of outdoor unit.
This unit has a fan running at high speed. It is very dangerous
to touch the fan.
WARNING
Use only fuses of the proper amperage.
,
OWNER S MANUAL - 4
PRECAUTIONS
WARNING
Be careful to keep the room temperature a comfortable level.
Avoid continuous direct air flow to the occupant,
especially in case of sleeping persons or hospital patients.
WARNING
Do not obstruct the front of the discharge grille of both units.
This will block air flow, reduce the cooling effect
and may result in unit malfunction.
WARNING
Ventilate the room when it becomes stuffy or
filled with undesirable odors.
WARNING
yyy
;;;
;;;
yyy
;;;
yyy
;;;
yyy
;;;
yyy
;;;
yyy
Keep heat sources away from the unit; high
temperature can cause damage.
WARNING
Set a comfortable temperature.
Very low or very high temperature setting considerably increase power consumption.
27°C
,
OWNER S MANUAL - 5
PRECAUTIONS
WARNING
To circulate the room air only, operate at the FAN mode.
WARNING
In summer, if possible, prevent direct sunlight from
entering the room; draw curtains or blinds.
WARNING
yyy
;;;
;;;
yyy
;;
yy
;;yy
yy
;;
;;
yy
;;;
yyy
;;
yy
yy
y
;
;
;;
yy
;;
yy
;;
yy
y
;
;; yy
yy
;;
Use the timer correctly to maintain comfort conditions.
WARNING
Please read this owner , s manual carefully before
operating the unit.
It contains further important instructions for proper operation.
;;
;
;;
,
OWNER S MANUAL - 6
BEFORE OPERATION
UNIT DESCRIPTION
Indoor Unit
ROOM AIR INLET
AIR FILTER
ACTIVE CARBON FILTER &
OPTION 1 : ELECTROSTATIC FILTER
OPTION 2 : PHOTO-CATALYST FILTER
REMOTE CONTROL SIGNAL RECEIVER
AIR SWING FLAP
VERTICAL LOUVER
ROOM AIR OUTLET
POWER PLUG
LCD REMOTE CONTROL
OUTDOOR AIR OUTLET
OUTDOOR AIR INLET
INDOOR AND OUTDOOR
CONNECTION
DRAIN HOSE
Outdoor Unit
,
OWNER S MANUAL - 7
BEFORE OPERATION
Indoor Unit Display
• UNIT ON(Green): When the unit is switched on by the remote control,
a green light will be displayed.
• TIMER(Orange) : When the unit is in reservation mode,
an orange light will be displayed.
Switch Panel
EMERGENCY
TEST
• EMERGENCY button :
Can be used when the remote control is lost or inoperative.
• TEST button :
Is only used by service men to test the unit operation.
• For the usage of EMERGENCY and TEST buttons, refer to
EMERGENCY AND TEST OPERATION, p.21.
,
OWNER S MANUAL - 8
BEFORE OPERATION
REMOTE CONTROL DESCRIPTION
Names and Functions of the Buttons
1 ON/OFF BUTTON
If you press this button, the unit will begin operation. Press the
button again, and operation stops. ( You can hear a receiving
beep. ) If you press this button immediately after turning off
the unit, the compressor will not operate for 3 minutes to
prevent overloading.
A
2 TEMPERATURE SETTING BUTTONS
SWING
A
햳
SLEEP
ON/OFF
햲
TEMP.
햴
햶
MODE
FAN
FLAP
햵
햻
If you set the desired room temperature, then the unit will
maintain the room temperature as set . In COOL mode, if the
room temperature is higher than the setting, the compressor
will automatically turn on to provide a cooling effect. On the
other hand, if the room temperature is lower than the setting,
the compressor will automatically turn off to stop cooling
operation. In HEAT mode, if the room temperature is lower
than the setting, the compressor will automatically turn on to
provide a heating effect. If the room temperature is higher
than the setting, the compressor will automatically turn off to
stop heating operation. However,the indoor fan will continue
to circulate air even if the compressor is turned off.
CLOCK EVERYDAY HOUR MINUTE
햷
햹
3 SLEEP TIMER BUTTON
Press this button to set the SLEEP timer. (Refer to p.19)
햸
햾
햽
TIMER
ON
RST
OFF
TA
RESERV. CANCEL
햺
4 OPERATION MODE SELECTING BUTTON
Press this button to select the desired mode.
In AUTO mode, the unit will run automatically by selecting
COOL or HEAT mode according to the indoor room temperature.
In DRY mode, the microcomputer of the unit controls the indoor
fan motor and makes the outdoor unit automatically turn on
and off according to the room temperature, which causes
moisture to be removed more effectively.
In COOL mode, the unit will run at the normal cooling mode.
In FAN mode, only the indoor fan will operate at the selected
fan speed and circulate room air. In HEAT mode, the unit will
run at the normal heating mode.
,
OWNER S MANUAL - 9
BEFORE OPERATION
6 FLAP CONTROL BUTTON
Controls the discharge air flow direction up and down.
( Refer to p.20 ) On start up, the flaps open automatically
according to the operating mode.
If you press this button, the flap will move stepwise and
the position will be displayed. If you press this button
again, the unit operates at “SWING” mode. At operating
mode “SWING”, the flap will swing up and down
continuously.
TIMER AND CURRENT TIME
7 ON/OFF
BUTTONS
If you set the ON and OFF times, the unit will automatically
turn on and off at the set times.
( Refer to pp.15 -16 )
If you press the CLOCK button during Timer operation,
you will see the current time for 5 seconds.
8 HOUR/MINUTE SETTING BUTTONS
햿
RST
TA
Adjust the current time (Refer Page 11) and the on/off
times of timer operation with these buttons.
LR03(AM4)1.5V
LR03(AM4)1.5V
9 RESERVATION AND CANCEL BUTTONS
Press the RESERV. button to reserve the ON/OFF Timer and
press the CANCEL button to cancel the reserved on/off
time. ( Refer to pp.15 -18 )
10 EVERYDAY TIMER BUTTON
Press the EVERYDAY button and the on/off time you have
reserved will be repeated until cancelled. ( Refer to pp.15 -18 )
11 CURRENT TIME ADJUSTING BUTTON
Press this button to adjust the current time. ( Refer to p.11 )
12 RESET BUTTON
SPEED SELECTING
5 FAN
BUTTON
Press the button to select the desired fan
speed of AUTO, LOW, MED or HIGH, and the
indoor fan will operate at the selected fan
speed.
If you select “AUTO”, the fan speed will be
controlled by the microcomputer of the unit.
Press this button when the remote control is not operating
properly or after replacing batteries.
( Refer to p. 11 )
13 ADDRESS SWITCH
If you have two indoor units in the same room, you can
link one remote control with one indoor unit, and link the
other remote control with the other indoor unit.
( Refer to p.11 )
,
OWNER S MANUAL - 10
BEFORE OPERATION
Remote Control Display
A
햲
햳
햴
햶
햵
햷
5
Indicates the selected temperature.
6
Indicates flap modes
SWING
AUTO
햸
햹
User selected position
햺
SWING
A
1 Indicates the selected operating mode.
A
Automatic position
Swing up and down
7
Indicates the reserved status of SLEEP timer or
EVERYDAY timer.
8
Indicates the reservation time of ON timer and
OFF timer or the current time.
9
Indicates the selected fan speed.
AUTOMATIC CHANGEOVER
COOL DRY
FAN HEAT
up when the signal from the remote
2 Lights
control is transmitted.
A receiving beep is heard from the unit.
up when the batteries must be
3 Lights
replaced with new ones. When this mark
appears, replace the batteries within a
week.
4 Lights up when the unit is operating.
A
AUTO LOW
MED HIGH
,
OWNER S MANUAL -11
BEFORE OPERATION
REMOTE CONTROL PREPARATION
Replacing Batteries
1 Remove the cover of the
battery compartment at the
back of the remote control by
sliding it out in the direction of
the arrow.
2 Remove the used batteries and 3 Press the RST button with a sharp
insert new batteries. The remote
control uses two alkaline batteries.
(1.5V, LR03x2)
object to reset the remote control .
SLEEP
ON/OFF
TEMP.
RST TA
MODE
FAN
FLAP
RST TA
LR03(AM4)1.5V
CLOCK EVERYDAY HOUR MINUTE
LR03(AM4)1.5V
TIMER
ON
OFF
RESERV. CANCEL
LR03(AM4)1.5V
RST
LR03(AM4)1.5V
TA
NOTE
• Do not fit use the used batteries or batteries of a different type. Such use may cause the unit to malfunction.
• Changing batteries should be done after turning off the unit.
• The average battery life during normal use is approximately one year.
• When the air conditioner does not operate normally after replacing the batteries, remove the batteries, refit
them and repress the RST button after 5 seconds.
• TA/RST button may locate back side near battery compartment for some models.
Setting Current Time
the TA button with a sharp 5 Set the current time with the hour 6 Press the TA button again.
4 Press
object and the current time
and the minute buttons while the
The flashing will stop and the
indication symbol flashes. In the
beginning, 6:00A.M. will flash.
SLEEP
ON/OFF
current time indication flashes.
SLEEP
ON/OFF
MODE
FAN
SLEEP
ON/OFF
TEMP.
TEMP.
MODE
current time will be set.
TEMP.
FAN
FLAP
FLAP
MODE
FAN
FLAP
CLOCK EVERYDAY HOUR MINUTE
CLOCK EVERYDAY HOUR MINUTE
CLOCK EVERYDAY HOUR MINUTE
TIMER
TIMER
ON
RST
OFF
TA
RESERV. CANCEL
ON
OFF
RESERV. CANCEL
TIMER
ON
RST
TA
RST
OFF
RESERV. CANCEL
TA
Matching Address between Indoor Unit and Remote Control
1 When two units are used in the same room, you can match the address of the remote control to that of the unit.
the lid of the battery case. Assign the address switch of one remote control as B.
2 Remove
Press the RST button with a sharp object.
off the unit and pull out the power plug. Remove the front panel, Terminal block cover, and Frame grille.
3 Turn
Pull out the PCB. Assign the address switch of one indoor unit as B.
NOTE
• This function must only be performed by qualified service personnel.
,
OWNER S MANUAL - 12
BEFORE OPERATION
Signal Receiving
The remote control will only function when operated within 5 meters of the unit.
• You can hear a beeping sound from the unit in the following
cases, which indicates that the signal is received.
5m maximum
CAUTION
• The air conditioner will not operate if curtains,
doors or other materials block the signals from the
remote control to the unit.
• If the infrared signal receiver on the unit is exposed
to direct sunlight, the air conditioner may not work
properly.
Draw the curtains to avoid direct sunlight.
• Avoid spilling liquid onto the remote control
or dropping it. This can cause deformation,
discoloration and malfunction.
• A mounting bracket for the remote control is
supplied with the unit.
Install the mounting bracket on the wall 30cm
below the receiver of the unit.
,
OWNER S MANUAL - 13
UNIT OPERATION
AUTOMATIC OPERATION
Automatic operation means that the air conditioner operates automatically by selecting the COOL or HEAT mode and
automatically changes the fan speed according to the indoor condition to keep the room temperature
comfortable.
PROCEDURE
1 ON/OFF button
Press this button and the unit starts AUTO operation.
A
2 MODE button
If the unit is operating in another mode, press the MODE
button to select AUTO.
A
햲
SLEEP
ON/OFF
TEMP.
햷
햳
햴
햶
MODE
FAN
FLAP
CLOCK EVERYDAY HOUR MINUTE
TIMER
ON
RST
OFF
RESERV. CANCEL
햵
3 TEMP. (
) buttons
Set the desired temperature using the remote control
buttons.
At the start of the AUTO operation, the temperature
is set at 25°c and it is functional within the total
temperature range.
4 FLAP button
Press this button to control the desired air flow direction.
TA
5 FAN SPEED button
Set the desired fan speed at start up, on AUTO.
6 ON/OFF button
Press this button again to stop operation.
NOTE
• When the room temperature is between 21°c ~ 29°c.
- If the room temperature is lower 1°c or more than the set temperature : HEAT mode will operate
- If the room temperature is higher1°c or more than the set temperature : COOL mode will operate
• When the room temperature is lower than 21°c or higher than 29°c, the operation mode is restricted regardless of
the set temperature.
- If the room temperature is lower than 21°c then only the heating mode is allowed.
- If the room temperature is higher than 29°c then only the cooling mode is allowed.
• The Auto operation is not suitable for the application to the computer room or some food/wine stock storage.
,
OWNER S MANUAL - 14
UNIT OPERATION
MANUAL OPERATION
PROCEDURE
1 ON/OFF button
Press this button and the AUTO operation is indicated.
• A receiving beep is heard.
• The green UNIT on lamp of the indoor unit display illuminates.
2 MODE button
A
Press this button to select the desired operation mode.
AUTO
DRY
COOL
FAN
HEAT
3 FAN SPEED button
Press this button to select the desired fan speed.
AUTO
LOW
MED
HIGH
A
햲
SLEEP
ON/OFF
4 TEMP.(
TEMP.
햷
햳
햵
햴
MODE
FAN
FLAP
CLOCK EVERYDAY HOUR MINUTE
TIMER
ON
RST
OFF
TA
햶
) button
Press these buttons to set the desired temperature.
5 FLAP button
Press this button to control the desired air flow
direction.
RESERV. CANCEL
6 ON/OFF button
Press this button and AUTO operation is indicated.
• A receiving beep is heard.
• The UNIT ON lamp is extinguished.
DRY OPERATION
This operation eliminates moisture economically by operating the compressor, indoor and
outdoor fan motor intermittently, so that the room temperature is maintained at the set temperature.
,
OWNER S MANUAL - 15
UNIT OPERATION
TIMER OPERATION
ON Timer
PROCEDURE
1 ON TIMER button
Press this button.
On start up, time is set at 6:00 A.M..
2 HOUR, MINUTE buttons
A
Press these buttons to set the start-up time
desired while the ON Timer symbol is flashing.
3 RESERV. button
A
Press this button when pointing the remote control towards
the receiver of the indoor unit.
• A receiving beep is heard.
• TIMER lamp of the indoor unit illuminates.
SLEEP
ON/OFF
TEMP.
MODE
햵
FAN
Set the desired operation mode with these buttons.
CLOCK EVERYDAY HOUR MINUTE
TIMER
햲
4 MODE, FAN, FLAP, and TEMP. buttons
FLAP
ON
RST
OFF
TA
RESERV. CANCEL
햳
햴
About ON Timer
• When the ON Timer is set, the unit monitors the room
temperature for 1hour before the set time to make sure
the room condition is reached by the reserve time.
• The actual on time of the unit is earlier that the reserved
time by 0 to 40 minutes according to the difference
between room temp. and set temp.
NOTE
• The current time is not indicated during the reservation of ON/OFF Time.
• When you want to know the current time, press the CLOCK button and you will see the current time for 5 seconds.
• If you reserve the ON Timer during operation, the unit will operate continuously
,
OWNER S MANUAL - 16
UNIT OPERATION
OFF Timer
PROCEDURE
1 OFF TIMER button
Press this button.
In the beginning, the time is set at 2:00 A.M. .
A
2 HOUR, MINUTE buttons
Press these buttons to set the stop time desired while
the OFF Timer symbol is flashing.
A
3 RESERV. button
SLEEP
ON/OFF
TEMP.
MODE
FAN
Press this button by pointing the remote control
towards the receiver of the indoor unit.
• A receiving beep is heard.
• TIMER lamp of the indoor unit illuminates.
FLAP
CLOCK EVERYDAY HOUR MINUTE
TIMER
ON
햲
RST
OFF
TA
RESERV. CANCEL
햳
햴
,
OWNER S MANUAL - 17
UNIT OPERATION
Combination of ON, OFF and EVERYDAY Timer
PROCEDURE
햳
햲
햲
햳
For example when you want the operation to start at 5:30
P.M. and stop at 10:30 P.M..
1 Reserve the ON Timer at 5:30 P.M..
2 Reserve the OFF Timer at 10:30 P.M..
3 Set the operation mode as desired.
Or when you want to stop the operation at 10:30 P.M. and start
again at 7:30A.M. with the same condition.
1 Reserve the OFF Timer at 10:30 P.M. during operation.
2 Reserve the ON Timer at 7:30 A.M..
햴
햳
햲
When you want to start operation at 5:30 P.M. and stop at 10:30 P.
M. everyday with the same operating condition.
1 Reserve the ON Timer at 5:30 P.M..
2 Reserve the OFF Timer at 10:30 P.M..
3 Press the EVERYDAY button and RESERV. button.
NOTE
• Refer to pp.15 -16 for the setting method and refer to p.18 for the canceling method of the ON, OFF and
EVERYDAY Timers.
• In the ON and OFF Timer operation, the earlier setting compared to the current time will be applied first.
• The EVERYDAY Timer can be selected in case of a combination of the ON and OFF Timer reservation or
ON and SLEEP Timer reservation.
• You can change the ON/OFF reservation time where the EVERYDAY Timer reservation.
,
OWNER S MANUAL - 18
UNIT OPERATION
Cancellation of ON, OFF and EVERYDAY Timer
PROCEDURE
the ON TIMER button to cancel the ON Timer
1 Press
or press OFF TIMER button to cancel the OFF Timer.
To cancel the EVERYDAY Timer reservation, press the
EVERYDAY, ON TIMER or OFF TIMER button.
A
the CANCEL button by pointing the remote
2 Press
control towards the receiver of the indoor unit.
• A receiving beep is heard.
• TIMER lamp of the indoor unit lights off.
A
SLEEP
ON/OFF
TEMP.
MODE
FAN
FLAP
CLOCK EVERYDAY HOUR MINUTE
TIMER
ON
햲
RST
OFF
RESERV. CANCEL
햳
TA
NOTE
• If you cancel the ON Timer or OFF Timer reservation while EVERYDAY Timer is reserved, EVERYDAY Timer will be
automatically canceled.
• When the electricity fails while EVERYDAY Timer is reserved, EVERYDAY Timer reservation will be canceled.
Reserve the EVERYDAY Timer again after the electricity comes on.
• The current time will not be indicated and the TIMER lamp of the indoor unit will be on if either the ON Timer or
the OFF Timer is reserved.
,
OWNER S MANUAL - 19
UNIT OPERATION
Sleep Timer
This function enables the user to automatically switch off the unit.
PROCEDURE
If you want to stop the operation after 3 hours from now.
the SLEEP button 3 times
1 Press
• 3:hr will be displayed and the
SLEEP signal will be
flashing.
• After 5 seconds, the stopping time will be displayed.
• The unit operates in sleep mode for 3 hours and will
switch off at the end of the 3 hours.
• To change the reserved time or to cancel,
press the SLEEP Button again.
1:hr 2:hr
3:hr 7:hr
9:hr
Cancel
A
A
SLEEP
ON/OFF
TEMP.
햲
the SLEEP Timer is set, the unit will control the
2 When
set temperature to avoid overcooling or overheating
in operation.
Set temperature is changed as shown below.
MODE
FAN
FLAP
+0.5°C
°C
+0.5°C
+0.5°C
SLEEP
+0.5°C
SET
TEMP.
30
70
110
150
TIME (MIN.)
SET TIME
FOR COOLING OR DRY MODE
°C
SLEEP
SET
TEMP.
–1°C
–1°C
–1°C
30
SET TIME
90
150
TIME (MIN.)
FOR HEATING MODE
NOTE
• When the SLEEP timer is set, the luminosity of the unit lamps will be dimmed so as not to interrupt the sleep.
• The SLEEP timer can be combined with the ON timer.( Refer to p.17 for combination )
,
OWNER S MANUAL - 20
UNIT OPERATION
DISCHARGE AIR LOUVER CONTROL
Up and Down Control
The air discharge direction can be controlled to swing up and down and can be fixed at a preferred position or at
automatic position by the remote control.
햲
햷
AUTO
햶
햵 SWING
햳햴
CLOSE
햷
햶
햵
햴
햳
햲
Fixed
햷
햶
COOL
햵
햴
햳
햲
HEAT
햷
COOL
Swing Range
햳
Auto Position
HEAT
• If you select the Flap position using the FLAP button in the remote control, the flap in the unit will move to that
position automatically. Once you select the position, the unit remembers that position and whenever you turn
on the unit, the flap will be positioned to that position.
• If you select SWING, the flap will swing up and down. In the COOL, DRY and FAN mode, the flap will swing in the
cool range. In the HEAT mode, the flap will swing in the heat range.
• If you select AUTO, the flap will position itself to the preset position according to the operation mode.
NOTE
• Always use the remote control to adjust the flap position, otherwise it may cause abnormal operation.
Please turn off the unit and turn it on again when you manually adjust the flap out of range.
Left and Right Control
If you want to adjust the direction of the discharge air left or right, adjust the vertical louver with the handle after
opening the flap.
HANDLE
NOTE
• Please do not fix the flap at position 햲 for a long time, as this position minimizes air circulation resulting in
uneven room temperature.
• Avoid the discharge air being directed towards the occupants for a long period of time.
• Do not adjust the flap by the hand during SWING operation because it may damage the air swing mechanism.
,
OWNER S MANUAL - 21
UNIT OPERATION
EMERGENCY AND TEST OPERATION
EMERGENCY
TEST
Emergency Operation
When the remote control is lost, damaged or the battery is discharged, the EMERGENCY button can be used
to run the unit.
• Press the EMERGENCY button at the off mode condition.
- The unit operates automatically according to the room temperature by selecting either the cooling or
the heating operation.
• If you want to stop the emergency operation, push the EMERGENCY button again or operate the remote control.
• The setting conditions of emergency operation are as follows:
- Operation mode : AUTO
- Preset temperature : 25°c
- Fan speed : AUTO
- Timer mode : Disable
- Discharge air direction : Set automatically according to operation mode. ( Refer to p. 20 )
Test Operation
This operation is used for checking after unit installation.
• Press the TEST button.
• Press the TEST button once more after checking to activate remote control. If there is any input
signal ( remote control signal or EMERGENCY button pressed ) during test operation, the TEST mode will
change to the input signal mode.
• The setting conditions of the test operation are as follows:
- Operation mode : COOL
- Fan speed : HIGH
- Timer mode : Disable
- Discharge air direction : SWING
,
OWNER S MANUAL - 22
UNIT OPERATION
AIR CLEANING OPERATION
Information for filters
• Filters
Air filters
Option 1 : Active carbon filter/Photo-catalyst filter
Option 2 : Active carbon filter/Electrostatic filter
• Air filters eliminate dust and lint
• Optional Active carbon filter/Photo-catalyst filter effectively eliminates odor and cigarette smoke in the room air.
• Optional Active carbon filter/Electrostatic filter is particularly effective in eliminating odor and micro scopic dust.
ACTIVE CARBON FILTER
(Black color, OPTIONAL)
PHOTO-CATALYST FILTER
(Blue color, OPTIONAL)
or
ELECTROSTATIC FILTER
(White color, OPTIONAL)
STANDARD
AIR FILTER
Life time of filters
• The life of above filters varies according to the amount of cigarette smoke, room size and the operating time.
• Air filters can be cleaned with a vacuum cleaner or rinsed under running water after using a month.
(Refer to CLEANING THE FILTERS AND FRONT PANEL,p.25.)
• The life time of optional Active carbon filter is about 2 years and that of optional Electrostatic filter is about 3 months.
These filters cannot be recycled.
• The life time of optional Photo-catalyst filter is about 2 years. This filter can be washed under running water and
can be refreshed by exposing under direct sun light. Exposed time is 6 hours after using 3 months.
(Refer to CLEANING THE FILTERS AND FRONT PANEL,p.25)
,
OWNER S MANUAL - 23
CARE AND MAINTENANCE
POINTS TO NOTE
Operating Condition
• Temperature ranges suitable for unit operation are as follows.
MODE
COOL
HEAT
DRY
INDOOR
21 ~ 32°c
Below 27°c
17 ~ 32°c
OUTDOOR
21 ~ 43°c
Below 21°c
12 ~ 43°c
• When the unit operates above or below these conditions for a long time, system diagnostics may detect a
malfunction and the unit will not operate properly.
• If the unit operates for a long time under abnormal situation of extremely high humidity, condensed water may
drip from the unit.
Time Delay
• There will be time delay between compressor turning off and turning on. (Cool and Dry mode : 3minutes,
Heat mode : 3minutes for RAS-18LKH-A/RAS-18LAH-A, 5minutes for RAS-22LKH-A/RAS-22LAH-A)
• When heating operation starts, hot air delivery might be delayed due to a warm up period.
Minimum Operation Time
• In normal operation, once the compressor turned on, there is a minimum operation time of 3 minutes regardless of
ther mostat satisfaction.
Heating Features
• When the unit starts in the heating mode, there will be a preheating period before the unit is ready to deliver
warm air.
• When the outdoor temperature is low, the heating capacity will be reduced. If the room air is not warm enough
during severe winter conditions, use additional heating devices.
Defrost Operation
• In the heating mode, when the outdoor coil is frosted, the indoor fan and outdoor fan will turn off while the
compressor will turn on to remove the frost on the outdoor coil.
• The defrost mode stops after 10 minutes or when the outdoor coil temperature is greater than 25°c.
• When the power is off, the defrost operation is automatically conducted depending on frost
accumulation on the outdoor coil.
Auto Recovery
• When the electricity fails while the unit is operating, the unit memorizes the operating condition, and it will
start operation automatically when the electricity is restored.
• When you leave home during an electricity failure, please unplug the power cord, or the unit will automatically
restart in your absence.
,
OWNER S MANUAL - 24
CARE AND MAINTENANCE
Frost Prevention of Indoor Unit
When the unit operates (on cooling) at a low ambient temperature, frost may appear on the indoor coil. When the
indoor coil temperature is below 0°c, the microcomputer makes the compressor stop to protect the unit from frost.
Normal Operation
Any of the following can occur during normal operation:
• A sound like a “GURGLE” can sometimes be heard during operation or when the unit stops.
- It is the sound of the refrigerant flowing through the unit.
• Bad smells can come from the unit.
- Smells such as smoke or cosmetics can accumulate while room air circulates through the unit.
- Cleaning the filters will reduce this problem.
• The outdoor fan does not rotate during heating operation.
- The unit is in defrost mode.
• UNIT ON lamp on the indoor unit display flashes and no air comes from the unit.
- It indicates malfunction of the unit and the compressor will stop operating.
• A “creaking” noise can sometimes be heard during operation or when the unit turns on.
- This is the sound of plastic expanding due to an abrupt temperature change.
,
OWNER S MANUAL - 25
CARE AND MAINTENANCE
CLEANING THE FILTERS AND FRONT PANEL
Cleaning the Air Filter
NOTE
• Turn off the unit and pull out the power plug.
• Clean the air filters once a month.
the front panel and pull the
the filters with a vacuum
the filters under running
1 Liftair filters
2 Clean
3 Rinse
downward.
cleaner.
water, and dry them completely,
and then refit them correctly into
their guides.
Refreshing the optional Photo-catalyst filter
the front panel and pull the
off the dust from the filter
under direct sun light for 6
1 Liftoptional
2 Blow
3 Expose
Photo-catalyst filter
with fresh air or wash the filter
hours and refit it correctly into its
downward.
under running water.
guide.
Washing the Front Panel
NOTE
• Turn off the unit and pull out the power plug.
• Clean the front panel if it becomes dirty and spotted.
• Front panel is removable.
the front panel up to the top 2 Rinse the panel under running
it correctly. Installation
1 Liftof the
3 Refit
unit. Then separate the
water, and dry it completely in
procedure is reverse to the
front panel from the unit.
a shaded area.
removal procedure.
,
OWNER S MANUAL - 26
CARE AND MAINTENANCE
CLEANING THE MAIN UNIT
• Use only a damp soapy towel.
• Do not pour water onto the unit, and do not use
petrol, solvents or abrasive powder which may
result in damage of the unit.
;
;;;
NOTE
• When cleaning the unit, first turn it off and pull out the power plug.
AFTER-SEASON CARE
1 Clean the filters and refit them into the unit.
the unit is to be switched off for an extended
2 Ifperiod,
run the unit on FAN only for two hours to
dry inside of the unit.
3 Clean the indoor and outdoor unit.
,
OWNER S MANUAL - 27
TROUBLESHOOTING
Trouble
Unit does not
operate
Cooling is
abnormally low.
Heating is
abnormally low.
Unit stops during
operation.
Check Points
Action
Check that the power cord is plugged
into the wall outlet.
Insert the power cord into the wall outlet.
Has the circuit breaker tripped or has the
fuse blown?
Reset the circuit breaker or replace the
fuse with the specified replacement fuse.
Has there been a power failure?
Restart operation when power is resumed.
Does the “UNIT ON” lamp flash on and off?
Call your service representative.
Is the voltage too low?
Confirm the available voltage.
Is the filter blocked with dust?
Clean the air filter.
Has the temperature been set properly?
Check and reset it if necessary.
Are the windows or doors open?
Close the windows and doors.
Is anything obstructing the outdoor unit?
Remove the obstruction.
Is the fan speed too low?
Change the fan speed selection.
Is the operation mode FAN or AUTO?
Change to cooling operation or reset the
temperature.
Is the filter blocked with dust?
Clean the air filter.
Has the temperature been set too low?
Check and reset it if necessary.
Are the windows or doors open?
Close the windows and doors.
Is anything obstructing the outdoor unit?
Remove the obstruction.
Is the OFF timer operating?
Restart the unit operation.
Has passed the set time of sleep timer?
Restart the unit operation.
If the above actions do not correct the operation, consult the dealer from whom you bought the unit.
P/N:42QG8Q5404C