1
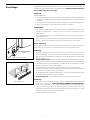
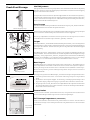
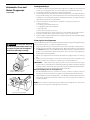
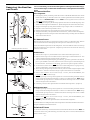
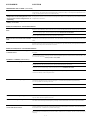
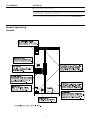
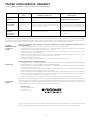
P/N 218947500 (9904) Product Registration The information contained in this Owner's Guide will instruct you on how to properlyoperateandcareforyourproduct. Pleasereadthroughtheinformation contained in your literature pack to learn more about your new appliance. Versión en español Si desea obtener una copia en español de este Manual del Usuario, sírvase escribir la direcciónqueseincluyeacontinuación.Solicite la P/N 218947600. Spanish Owner's Guides Frigidaire Home Products P.O. Box 212378 Augusta, GA 30917 Record Your Model and Serial Numbers Record the Model No. and Serial No. of this refrigerator in the spaces provided below. These numbers are found on the serial plate located on the ceiling of the refrigeratorcompartment. Model No. __________________________________________________ Serial No. ___________________________________________________ Register Your Product The self-addressed PRODUCT REGISTRATION CARD (shown left) should be filled in completely, signed and returned to the Frigidaire Company. Contents ThisOwner'sGuideprovidesspecific operatinginstructionsforyourmodel. Usetherefrigeratoronlyasinstructedin this Owner's Guide. Proper Disposal of Your Refrigerator/Freezer Risk of child entrapment. Child entrapment and suffocation are not problems of the past. Junked or abandoned refrigeratorsarestilldangerous-evenif theywillsitfor"justafewdays." Ifyou aregettingridofyouroldrefrigerator, pleasefollowinstructionsbelowtohelp preventaccidents. BEFORE YOU THROW AWAY YOUR OLD REFRIGERATOR OR FREEZER: • Takeoffdoors. • Leaveshelvesin place,sochildren may not easily climbinside. © 1999 White Consolidated Industries, Inc. Allrightsreserved. 2 3 3 3 3 3 4 4 4 4 4 4 5 5 5 5 5 6 7-8 9-10 10 10 10 9-10 11 12-15 15 16 17 18 Product Registration Important Safety Instructions For Your Safety ChildSafety ElectricalInformation OtherPrecautions FirstSteps Location Installation Door Opening Leveling Cleaning Energy Saving Ideas Setting the Controls Cool Down Period RefrigeratorControl FreezerControl Fresh Food Storage Automatic Ice and Water Dispenser Care and Cleaning Inside Outside ReplacingtheLightBulb Vacation and Moving Tips Removing the Handles and Doors Avoid Service Checklist Normal Operating Sounds Warranty Service Information Canada Warranty (Canada) 2 Important Safety Instructions Read all instructions before using this refrigerator. Avoid fire hazard or electricshock.Donotuseanextension cord or an adapter plug. Do not remove any prong from power cord. For Your Safety Do not store or use gasoline or other flammable vapors and liquids in the vicinity ofthis,oranyotherappliance. Readproductlabelsforflammabilityandotherwarnings. Child Safety • Destroy carton, plastic bags, and any exterior wrapping material immediately after the refrigerator is unpacked. Children should never use these items for play.Cartonscoveredwithrugs,bedspreads,plasticsheets,orstretchwrapmay become airtight chambers that can quickly cause suffocation. • Remove all staples from the carton. Staples can cause severe cuts, and ruin finishesiftheycomeincontactwithotherappliancesorfurniture. • An empty, discarded ice box, refrigerator, or freezer is a very dangerous attraction to children. Remove door of any appliance that is not in use, even if it is being discarded. Electrical Information These guidelines must be followed to ensure that safety mechanisms in the design of this refrigerator will operate properly. • Refrigerator must be plugged into its own 115 Volt, 60 Hz, AC only electrical outlet. The power cord of the appliance is equipped with a threeprong grounding plug, for your protection against shock hazards. It must be plugged directly into a properly grounded three-prong receptacle. The receptacle must be installed in accordance with local codes and ordinances. Consult a qualified electrician. DO NOT USE AN EXTENSION CORD OR AN ADAPTER PLUG. • If voltage varies by 10 percent or more, performance of your refrigerator may beaffected. Operating therefrigerator withinsufficient powercandamagethe compressor. Such damage is not covered under your warranty. If you suspect your voltage is high or low, consult your power company for testing. • To prevent the refrigerator from being turned off accidentally, do not plug the unitintoanoutletcontrolled byawallswitchorpullcord. • Do not pinch, knot, or bend the power cord in any manner. • Neverunplugtherefrigeratorbypullingonthepowercord.Alwaysgriptheplug firmly,andpullstraightoutfromthereceptacle. • To avoid electrical shock, unplug the refrigerator before cleaning and before replacingalightbulb. Note: TurningthecontroltoOFFturnsoffthecompressor, butdoesnotdisconnectpowertothelightbulborotherelectricalcomponents. • Do not operate the refrigerator in the presence of explosive fumes. • Avoid contact with any moving parts of the automatic ice maker. Other Precautions • Neverunplugtherefrigeratorbypullingonthepowercord.Alwaysgriptheplug firmly,andpullstraightoutfromthereceptacle. • To avoid electrical shock, unplug the refrigeratorbefore cleaning and before replacingalightbulb. Note: TurningthecontroltoOFFturnsoffthecompressor, butdoesnotdisconnectpowertothelightbulborotherelectricalcomponents. • Do not operate the refrigerator in the presence of explosive fumes. • Avoid contact with any moving parts of the automatic ice maker. 3 FirstSteps This Owner’s Guide provides specific operating instructions for your model. Use refrigeratoronlyasinstructedinthisOwner’sGuide. Beforestartingrefrigerator, follow these important first steps: Location Installrefrigerator: • nearagroundedelectricaloutlet.DONOTuseanextensioncordoranadapterplug. • outofdirectsunlightandawayfromrange,dishwasher,orotherheatsources, ifpossible. • onafloorthatislevelandstrongenoughtosupportafullyloadedrefrigerator. • where a water supply is available for automatic ice maker. Installation • Do not install refrigerator where temperature will drop below 60°F (15°C), or rise above 110°F (43°C). Compressor will not be able to maintain proper temperatures. • In a recessed installation, allow an extra 1/2 inch (10-15 mm) on each side for easeofinstallation. • Ifthehingesideoftheunitwillbeplacedagainstawall,allowa1-3/4inch(44 mm) space between wall and refrigerator to permit proper door swing. Door Opening For best use of drawers and freezer basket, refrigerator should be in a position where both the refrigerator and freezer doors can be opened about 135°. ROLLER ADJUSTING BOLT AdjustingFrontRollers Leveling • Refrigerator must be leveled with all bottom corners resting firmly on a solid floor.Adjustfrontrollerstolevelcabinetbothfront-to-rearandside-to-side. Keepcabinetaslowaspossibleforstability. Neveradjustcabinetrollerssofront islowerthanrear. • Toadjust front rollers: Openrefrigeratorandfreezerdoors.Removetoegrill bypullingitstraightout.Adjustrollersbyturningeachrolleradjustingboltwith anadjustablewrench,asocketwrench,oranutdriveruntil refrigeratorislevel andstable.Rearrollersarenotadjustable. • Check both doors to be sure seals touch cabinet evenly on all four sides. • Iffreezerdoorishigherthanrefrigeratordoor,raiserightcornerand/orlowerleft corneruntildoorsalignacrosstopofcabinet. • Ifrefrigeratordoorishigherthanfreezerdoor,raiseleftcornerand/orlowerright corneruntildoorsalignacrosstopofcabinet. • To replace toe grill: Line up tabs with holes, and push grill straight on. Cleaning ReplacingToeGrill • Wash the inside, all removable parts, and the outside with mild detergent and warm water. Wipe dry. DO NOT USE HARSH CLEANERS ON THESE SURFACES. • Do not use razor blades or other sharp instruments that can scratch appliance surface, when removing adhesive labels. Any glue left from the tape or energy label can be removed with a mixture of warm water and mild detergent, or touch glue with sticky side of tape already removed. • DO NOT REMOVE SERIAL PLATE. 4 Energy Saving Ideas • Installtherefrigeratorinthemostcoolpartoftheroom,outofdirectsunlightand awayfromheatingductsorregisters.Donotplacetherefrigeratornexttoheatproducingappliancessuchasarange,ovenordishwasher.Ifthisisnotpossible, asectionofcabinetryoranaddedlayerofinsulationbetweenthetwoappliances willhelptherefrigeratoroperatemoreefficiently. • Leveltherefrigeratorsothedoorsclosetightly. • RefertothisOwner'sGuideforthesuggestedrefrigeratorsettings. • Periodiccleaningofthecondenserwillhelptherefrigeratorrunmoreefficiently. See Outside in the "Care and Cleaning" section. • Do not overcrowd the refrigerator or block cold air vents. Doing so causes the refrigerator to run longer and use more energy. Shelves should not be lined with aluminum foil, wax paper or paper toweling. Liners interfere with cold air circulation, making the refrigerator less efficient, which could cause food spoilage. • Coverfoodsandwipecontainersdrybeforeplacingthemintherefrigerator.This cuts down on moisture build-up inside the unit. • Organize the refrigerator to reduce door openings. Remove as many items as needed at one time and close the door as soon as possible. Setting the Controls Cool Down Period Toensuresafefoodstorage,allowtherefrigeratortooperatewiththedoorsclosed for at least 8 to 12 hours before loading with food. Refrigerator Control • Therefrigeratorcontrolshouldbesetatthemidpointofthedialforatrialperiod of 24 hours. • After 24 hours, adjust the control as needed. For colder temperatures, turn the dial a notch toward COLDEST. For warmer temperatures, turn the dial a notch toward COLD. Adjust temperatures by one increment at a time. Freezer Control RefrigeratorControl • Thefreezercontrolshouldbesetatthemidpointofthedialforatrialperiodof 24 hours. • After 24 hours, adjust the control as needed. For colder temperatures, turn the dial a notch toward COLDEST. For warmer temperatures, turn the dial a notch toward COLD. Adjust temperatures by one increment at a time. Note: When first setting the controls or when changing a setting, wait 24 hours for the temperature to stabilize before making additional changes. FreezerControl FreezerControl Turning the freezer control may change temperatures in both compartments. For example,ifthefreezercontrolisturnedtoacoldersetting,therefrigeratorcontrol may have to be adjusted to a warmer one. Turning the refrigerator control will change only the refrigeratortemperature. IMPORTANT: If the freezer control is turned to OFF, cooling stops in both compartments. You may hear the "Frost Free" system working. A fan circulates air in the refrigerator and freezer compartments. For good circulation and maintenance of proper cooling temperatures, do not block cold air vents with food items. Water draining into the defrost water pan and hissing sounds are normal during the automatic"FrostFree"cycle. 5 Fresh Food Storage Shelf Adjustment Refrigeratorshelvesareeasilyadjustedtosuitindividualneeds.Beforeadjusting shelves,removeallfood.Theshippingclipswhichstabilizetheshelvesforshipping may be removed and discarded. Toadjustthecantilevershelves(shelvessupportedattherearoftherefrigerator), liftthebackoftheshelfupandout.Replaceshelfbyinsertinghooksatrearinto slots. Lower and lock into position. Some models have Spillfree glass shelves, whichcatchandholdaccidentalspills. Door Storage Remove Shipping Clips Doorbinsandshelvesareprovidedforconvenientstorageofjars,bottlesandcans. Itemsusedoftenareavailableforquickselection. Thedoorbinscanbemovedtosuitindividualneeds.Removebinsbyliftingstraight up. Place bins in the desired position and lower over the supports. The Dairy compartment is warmer than the general food storage section and is intended for short term storage of cheese, spreads, or butter. Crisper TheCrisperdrawer,locatedunderthebottomrefrigeratorshelf,isforstoringfruits and vegetables. Most produce should be washed in clear water and drained before placing in this drawer. Items with strong odors or high moisture should be wrapped beforestoring. The Humidity Control (some models) allows you to adjust the humidity within the Crisperdrawer.Thiscanextendthelifeoffreshvegetableswhichkeepbestinhigh humidity. Leafy vegetables, however, keep best when stored with the Humidity Control set on HIGHER, or in a drawer without a Humidity Control. This keeps incoming air to a minimum and maintains maximum moisture content. LOWER HIGHER Meat Keeper FRUITS HUMIDITY VEGETABL CONTROL The Meat Keeper is located at the bottom of the refrigerator. The temperature in this compartment can be made colder than the rest of the refrigerator compartment by sliding the Chilled Air Control knob within the COLDEST or COLD range. Meat will be partially frozen and may be kept fresh longer than if stored on a refrigeratorshelf. ES FRESH FRUITS & VEGE TABLES Humidity Control BeforeplacingitemsintheMeatKeeper,followthesestepstokeepthemeatfresh: 1. Carefully handle meat with clean hands and always keep the compartment clean. 2. Storemeatinitsoriginalwrapper.Ifnecessary,overwrapinplasticwraporfoil to prevent drying. Wrap fish tightly to prevent odor transfer to other foods. 3. Ifspoilageeveroccurs,disinfectthecompartmentwithliquidchlorinebleach followinglabeldirections.Thenrinsewithasolutionofbakingsodaandwater. Rinse with clear water and dry. ChilledAirControl Freezer Basket A slide-out wire basket (some models have two) hangs below the bottom freezer shelf.Thisbasketprovideseasyaccesstofrozenfoodpackages. Tall Storage Compartment (some models) TallStorage Compartment A shelf is attached to the freezer wall just below the ice server. This allows for convenient storage of tall items placed vertically between the ice server and the freezerwall. 6 Automatic Ice and Water Dispenser Theiceandwaterdispenseronthefreezerdoorconvenientlydispenseschilledwater and ice cubes. To operate the dispenser, slide the knob to the selection of your choice and press a glass against the dispensing arm, as shown. Be sure to hold the glass as far up as possibletocatchallice.Tostopdispensing,pullglassawayfromdispensingarm. Whendispensingice,releasethedispensingarmbeforetheglassisfull,butdonot remove the glass until the ice has completely dispensed. A small heated area beneath the dispenser floor catches and evaporates small spills. This drip tray is removable and dishwasher safe. Do not pour water or excess cubes into this area because there is no drain. Light DispenserSelector The dispenser has a light which can be turned on and off by sliding the knob to the desired position. The light also turns on automatically when ice and/or water is dispensed. Replace light bulb with an appliance bulb of the same wattage. How the Water Dispenser Works The water tank is located behind the drawers in the refrigerator compartment. As thewaterisdispensed,thetankisautomaticallyrefilled.Forproperoperationofthe dispenser, the supply water pressure must fall between 30 psi and 120 psi. Aftertherefrigeratorisinstalledandtheplumbingconnectionsarecomplete,the water tank should be filled by drawing one glass of water. It may take about 1-1/2 minutes after depressing the dispenser arm before water works its way through the plumbingconnectionsand begins to fill this first glass. Draw and discard 7more glasses tobesure that the tank and plumbing connections are rinsed of any impurities. The water delivery system has a built in shut off device that will stop the water flow after 3 minutes of continuous use. Simply release the actuator button to reset the dispensing mechanism. To ensure fresh-tasting water, plan to use the dispenser every day. If the water dispenser has not been used for a week or more, draw and discard 7-8 glasses to freshenthetanksupply. How the Ice Dispenser Works Pressglassagainstdispensingarm. The ice maker and ice storage bin are located in the top left corner of the freezer compartment.Aftertherefrigeratorisinstalledproperlyandhascooledforseveral hours, the ice maker can begin making ice. To begin ice production, lower the wire signal arm to the "down" or ON position. As cubes are made, they are stored in the storagebin.Withnousageitwilltakeapproximately2daystofillthebin.However, the dispenser may be used after the first batch of ice is made. The ice maker turns offautomaticallywhentheicestoragebinisfull. Because of new plumbing connections, the first production of ice cubes may be discolored or have an odd flavor. These should be discarded until the cubes made arefreeofdiscolorationandtaste. Remember that water quality determinesyouricequality. Itisbesttoconnecttheicemakertowaterthatisnot softened. Chemicals from a malfunctioning softener can damage the ice maker. If ice maker is connected to soft water, ensure the softener is maintained and workingproperly. Tostoptheicemaker,liftthewiresignalarmuntilitclicksandlocksinthe"up" orOFFposition. 7 Automatic Ice and Water Dispenser (continued) Ice Dispenser Tips 1. Ice cubes stored too long may develop an odd flavor. Empty the container and return it to the proper position. The ice maker will then produce more ice. 2. Occasionally shake the container to keep ice separated. 3. If the dispensing arm is pushed in for more than 4 minutes, the dispenser motor mayoverloadandstop.Theoverloadprotectorwillresetautomaticallyafter3 or4minutes.Ifalargequantityoficeisneededatonetime,itisbesttoremove cubesdirectlyfromtheicestoragebin. 4. Certain sounds are normal when the ice maker is operating. They are: • Motor operation • Ice being loosened from the tray • Ice dropping into the storage bin • Running water • Water valve opening or closing For more information on these operations, see "Normal Operating Sounds." 5. Stop the ice maker when cleaning the freezer or for long vacations. 6. Iftheicemakeristobeturnedoffforalongperiodoftime,turnthewatersupply valvetotheclosedposition. Cleaning the Ice Dispenser Do not use the ice chute as a handle when removing or replacing the ice storage bin. Surfaces there may be sharp. WARNING DO NOT PUT FINGERS UP ICE CHUTE. SURFACES THERE MAY BE SHARP. Cleanthedispenserandicestoragebinatregularintervals,particularlybeforeyou takeavacationormove,oriftheicedispensersticks. 1. Stop ice production by lifting the wire signal arm to the "up" or OFF position. 2. Remove ice storage bin by lifting up and out. Empty and carefully clean the bin with mild detergent. Do not submerge the bin while cleaning. Rinse with clear water. Do not use harsh or abrasive cleaners. Allow ice bin to dry completely beforereplacinginthefreezer. 3. Remove ice chips and clean the shelf and chute that supports the ice storage bin. 4. Replace the ice storage bin. Lower the wire signal arm on the ice maker to the "down" or ON position and the ice maker will resume production. IMPORTANT: When removing or replacing the ice bin, do not rotate the auger intheicebin.Iftheaugerisaccidentallyturned,youmustrealigntheaugerby turningitin90°turnsuntiltheicebinfitsintoplacewiththedrivemechanism. Forfurtherinstruction,seethelabelontheicebucket. Remove and empty the ice storage bin if: 1. An extended power failure (one hour or longer) causes ice cubes in the ice storage bin to melt and freeze together and jam the dispenser mechanism. 2. Theicedispenserisnotusedfrequently.Icecubeswillfreezetogetherinthebin and jam the dispenser mechanism. Remove the ice storage bin and shake to loosen the cubes. NEVER use an ice pick or similar sharp instrument to break up the ice. This could damage the ice storage bin and dispenser mechanism. DRIVER MECHANISM AUGER Repositioning the Auger 8 Care and Cleaning Keepyourrefrigeratorandfreezercleantopreventodorbuild-up.Wipeupanyspills immediately and clean both sections at least twice a year. Never use metallic scouringpads,brushes,abrasivecleanersorstrongalkalinesolutionsonanysurface. Do not wash any removable parts in a dishwasher. Always unplug the power cord from the wall outlet before cleaning. NOTE: Turning the control to OFF does not disconnect power to the controls, light bulb,orotherelectricalcomponents. Inside Damp objects stick to cold metalsurfaces.Donottouchrefrigerated surfaces with wet or damp hands. Washinsidesurfacesoftherefrigeratorandfreezerwithasolutionof2tablespoons baking soda in 1 quart warm water. Rinse and dry thoroughly. Be sure to wring excesswateroutofspongeorclothbeforecleaningaroundthecontrols,lightbulb, oranyelectricalparts. Wash removable parts such as shelves and drawers with baking soda solution or mild detergent and warm water. DO NOT USE HARSH CLEANERS ON THESE SURFACES. Rinse and dry thoroughly. Clean the door gaskets with mild suds, rinse with clear water and wipe dry. Do not use razor blades or other sharp instruments which can scratchtheappliancesurfacewhenremovingadhesivelabels.Anyglueleftfromthe tape or energy label can be removed with a mixture of warm water and mild detergent, or, touch the glue with the sticky side of tape already removed. DO NOT REMOVE THE SERIAL PLATE. Outside To avoid damage and help the refrigerator run as efficiently as possible, clean the condenser and air ventsperiodically. Air Vents on Lower Access Panel Wash the cabinet and handles with warm water and mild liquid detergent. Rinse well and wipe dry with a clean soft cloth. Do not use commercial household cleaners, ammonia, or alcohol to clean handles. Remove any dust or dirt from the front of the toe grill using a vacuum cleaner with itsdustingtoolattachment.Removethetoegrillbypullingitstraightout.Whilethe grill is removed, vacuum the backside of the grill and wipe with a sudsy cloth or sponge. Periodically clean the condenser (black tubes and wires beneath the refrigerator,behindthetoegrill).Donotallowlintordusttoaccumulateonthecoils. Insert a long handled brush or vacuum attachment between the two coils to bring thelintforward.Toreplacethetoegrill,lineuptabswithholesandpushgrillstraight on. Use caution when cleaning in the area of the coils. Surfaces there may be sharp. The air vents on the lower access panel at the rear of the refrigerator should be cleanedperiodically.Cleantheventsbyusingavacuumcleanerwithitsdustingtool attachment. When moving the refrigerator, pull straight out. Do not shift the refrigeratorfromsidetosideasthismaytearorgougethefloorcovering.Becareful not to move the refrigerator beyond plumbing connections. Replacing the Light Bulb To replace the light bulb in either compartment: 1. Unplugtherefrigerator. 2. Wearglovesasprotection againstpossiblebrokenglass. 3. Replace old bulb with an appliance bulb of the same wattage. 4. Remember to plug the refrigerator back in. Vacation and Moving Tips Short vacations: • Leave refrigerator operating during vacations of 3 weeks or less. • Useupallperishableitemsinrefrigeratorsection. • Wrap and store other items in the freezer. • Turn off automatic ice maker, even if you will be gone just a few days. 9 Care and Cleaning (continued) Long vacations: • Remove all food and ice if you will be gone 1 month or more. • Turn controls to OFF and disconnect power. • Turn off automatic ice maker and turn water supply valve to the closed position. • Clean interior thoroughly. Leave both doors open to prevent odor and mold build-up.Blockopenifnecessary. Moving: Whenmovingrefrigerator,followtheseguidelinestopreventdamage: • Remove all food and other items from both the refrigerator and freezer •compartments. • Emptyicestoragebin. • Ifahandtruckisusedinmoving,loadrefrigeratorfromtheside. • Turnrollersasfarupaspossible.Thiswillprotectthemduringslidingormoving. • Cabinet should be well padded and handled with care. DO NOT DROP. IMPORTANT OnceyourrefrigeratorIceandWaterdispensingsystemhasbeenfilledwithwater, itisimportantthattherefrigeratorremaininanenvironmentthatstaysabovethe freezingmark. Iftherefrigeratorisgoingtobestoredinanenvironmentthatwillfallbelowfreezing, or will see freezing temperatures during a move, the water in the Ice and Water system must be drained completely. Failure to do so could result in damage to the IceandWatersystem.Thisdamagecouldresultinwaterleakswhentherefrigerator isputbackinservice. Itwouldbeadvisabletocontactaservicerepresentativetoperformthisoperation. 10 Removing the Handles and Doors If it is necessary to move the refrigerator through narrow doorways, follow these steps to remove the handles and/or refrigerator and freezer doors. To Remove Handles Full-length Trim: 1. Usingaputtyknife,carefullyslidethecornerofthebladeunderthetrim.Slide blade down until you find the trim lock. Carefully maneuver the blade against the trim lock from the side as shown. Note: Pressing down on the trim lock fromabovewillnotreleaseit. 2. Carefullypushtheputtyknifefirmlyagainstthetrimlockandtwistgently.The trimlockwillsnapfreefromthedoor.(Eachtrimpiecewillhavetwotrimlocks.) 3. Grasp trim and pull up away from handle using a slight side-to-side motion. 4. Remove screws attaching handle to door. 5. Repeat these steps for each handle end. Keep screws and trim pieces. 6. Toreplacehandles,lineuphandlewithscrewholes,insertscrewsandtighten. Slide upper and lower trim pieces back on handle ends, and snap trim locks back intoholesondoorfront. To Remove Doors C05I0122 Removing handles and trim Before removing the doors, be sure the freezer control is turned to OFF. Remove all food from the doors and unplug the refrigerator. Remove the toe grill. Tracearoundthehingeswithasoftleadpencil.Thiswillmakeiteasiertorealign the doors when they are replaced. Completely remove one door before starting removal of the other. Freezer Door: WATER LINE NUT C05I0124 Figure1 1. Remove the toe grill. (See Outside in the "Care and Cleaning" section.) 2. Remove the wiring cover located over the lower hinge of the freezer door. The coverisheldinplacebyasinglescrew.(Figure1) 3.Todisconnectwiringharnessplug(connector),positionyourselftobeableto place your thumbs on the flat sides of each connector piece. Bend both parts back and forth. Then with a firm grasp, pull the two pieces apart as shown. 4. To disconnect water line, hold water line elbow and push in on gray collar, forcing elbow down, off from tube that runs into door. 5. Place a strip of tape along the door bottom, over the lower hinge and up the side of the door. This will hold the hinge in place when the door is removed. 6. Remove the top bolt of the lower hinge. Loosen, but DO NOT REMOVE, the bottom bolt of the lower hinge. 7. Remove top hinge cover by lifting back of cover and sliding forward. Remove hinge screws from hinge bracket with a counter-clockwise motion. Note: Hinge has minimal spring tension. Hold bracket when removing last screw. DO NOT remove hinge bracket from door. 8. Carefully lift the door up and off the loosened lower hinge bolt. (Figure 2) Refrigerator Door: Figure2 1. Remove top hinge cover by lifting back of cover and sliding forward. Remove hinge screws from hinge bracket with a counter-clockwise motion. Note: Hinge has minimal spring tension. Hold bracket when removing last screw. DO NOT remove hinge bracket from door. 2. Remove the top bolt of the lower hinge. Loosen, but DO NOT REMOVE, the bottom bolt of the lower hinge. 3. Carefully lift the door up and off the loosened lower hinge bolt. Storethedoorsinasafeplaceuntiltherefrigeratorismovedtothedesiredlocation. Keepallhardwareforreinstallation. To Reinstall Doors Toreinstallthedoors,reversetheinstructionsusedtoremovethedoors.Note: To reinstallwaterline,pushelbowup,ontodoortube,untilcollartouchestubeink mark as shown left. 11 Avoid Service Checklist OCCURRENCE Beforecallingforservice,reviewthislist.Itmaysaveyoutimeandexpense.Thislist includes common occurrences that are not the result of defective workmanship or materialsinthisappliance. SOLUTION RUNNING OF REFRIGERATOR Refrigerator compressor does not run. Freezer control is off. Set freezer control. See Setting the Controls. Refrigeratorisindefrostcycle.Thisisnormalforafullyautomaticdefrostingrefrigerator.Thedefrost cycleoccursperiodically,lastingabout20minutes. Plug at wall outlet is disconnected. Make sure plug is tightly pushed into outlet. House fuse has blown or circuit breaker has tripped. Check and/or replace fuse with a 15 amp timedelayfuse.Resetcircuitbreaker. Power outage. Check house lights. Call local electric company. Refrigerator runs too much or too long. Roomoroutsideweatherishot.Itisnormalfortherefrigerator toworklongerundertheseconditions. Refrigerator has recently been disconnected for a period of time. It takes about 8-12 hours for the refrigerator to cool down completely. Automatic ice maker is operating. Ice maker operation causes refrigerator to run slightly more. Doors are opened too frequently or too long. Warm air entering the refrigerator causes it to run more. Open doors less often. Refrigerator or freezer door may be slightly open. Make sure refrigerator is level. Keep food and containers from blocking door. See Occurrence section OPENING/CLOSING OF DOORS/DRAWERS. Refrigeratorcontrol(foundinrefrigeratorsection)issettoocold.Setrefrigeratorcontroltoawarmer settinguntilrefrigeratortemperatureissatisfactory.Allow24hoursforthetemperaturetostabilize. Refrigeratororfreezergasketisdirty,worn,cracked,orpoorlyfitted.Cleanorchangegasket.Leaks in door seal will cause refrigerator to run longer in order to maintain desired temperatures. Refrigerator compressor goes on and off frequently. Thermostatiskeepingrefrigeratorataconstanttemperature.Thisisnormal. Refrigeratorgoesonand off to keep temperature constant. TEMPERATURES ARE TOO COLD Temperature in freezer is too cold and refrigerator temperature is satisfactory. Freezer control is set too cold. Set freezer control to a warmer setting until freezer temperature is satisfactory.Allow24hoursforthetemperaturetostabilize.Then,ifrefrigeratortemperatureisnot right,setrefrigeratorcontroltoacoldersetting. Temperature in refrigerator is too cold and freezer temperature is satisfactory. Refrigerator control is set too cold. Set refrigerator control to a warmer setting. Allow 24 hours for temperaturestostabilize. Food stored in drawers freezes. Refrigeratorcontrolissettoocold.Seesolutionabove. Food stored in Meat Keeper (some models) freezes. Meat should be stored at a temperature just below the freezing point of water (32°F, 0°C) for maximum fresh storage time. It is normal for ice crystals to form due to the moisture content of meat. Chilled Air Control set too cold. Adjust Chilled Air Control to a lower setting. TEMPERATURES ARE TOO WARM Temperature in freezer or refrigerator is too warm. Doors are opened too frequently or too long. Warm air enters refrigerator whenever door is opened. Open door less often. Door is open slightly. See Occurrence section OPENING/CLOSING OF DOORS/DRAWERS. Condenser is dirty. Clean condenser. See "Outside" in Care and Cleaning. 12 OCCURRENCE SOLUTION TEMPERATURES ARE TOO WARM (continued) Temperature in freezer is too warm. Freezer control is set too warm. Set freezer control to a colder setting until freezer temperature is satisfactory. Allow24hoursforthetemperaturetostabilize.Then,if refrigeratortemperatureisnot right,setrefrigeratorcontroltoawarmersetting. Temperature in the refrigerator is too Refrigeratorcontrolissettoowarm.Setrefrigeratorcontroltoacoldersetting.Allow24hoursforthe warm and the freezer temperature is temperaturetostabilize. satisfactory. Temperature in Meat Keeper (some ChilledAirControlissettoowarm.AdjustChilledAirControltoacoldersetting. models) is too warm. WATER/MOISTURE/FROST INSIDE REFRIGERATOR Moisture collects on inside of refrigerator Weatherishotandhumid,whichincreasesrateoffrostbuildupandinternalsweating.Thisisnormal. walls. Door is slightly open. See Occurrence section OPENING/CLOSING OF DOORS/DRAWERS. Door is opened too often or too long. Open door less often. Water collects on bottom side of drawer Vegetables contain and give off moisture. It is not unusual to have moisture on the bottom side of the cover. cover. Water collects in bottom of drawer. Washed vegetables and fruits drain while in the drawer. Dry items before putting them into drawer. Water collecting in bottom of drawer is normal. WATER/MOISTURE/FROST OUTSIDE REFRIGERATOR Moisture forms on outside of refrigerator Weather is humid. This is normal in humid weather. When humidity is lower, the moisture should or between doors. disappear. Door is slightly open, causing cold air from inside refrigerator to meet warm air from outside. See Occurrence section OPENING/CLOSING OF DOORS/DRAWERS. AUTOMATIC ICE MAKER (some models) Ice maker is not making any ice. Ice maker wire signal arm is in "up" or OFF position. Move wire signal arm to "down" or ON position. Household water line valve is not open. Turn on household water line valve. Freezer is not cold enough. See Occurrence section TEMPERATURES ARE TOO WARM. Saddlevalveoncoldwaterpipeiscloggedorrestrictedbyforeignmaterial.Turnoffhouseholdwater linevalve.Remove,cleanorreplacevalve. Ice maker is not making enough ice. Ice maker is producing less ice than you expect. Ice maker should produce approximately 2-1/2 to 4 pounds of ice every 24 hours. Freezer is not cold enough. See Occurrence section TEMPERATURES ARE TOO WARM. Household water line valve is not completely open. Turn on household water line valve. Ice maker will not stop making ice. Ice maker wire arm is being held down by some item in freezer. Move item, and release arm. Remove any ice cubes frozen together over arm. Ice maker is not separating the cubes. Ice cubes are not being used frequently enough. Remove and shake ice bucket to separate cubes. Ice has bad odor and taste. Icehaspickedupodororflavorfromstrongfoodstoredinrefrigeratororfreezer.Coverfoodstightly. Discardstaleice.Icemakerwillproducefreshsupply. Water running to ice maker has poor taste or odor. Add filter to ice maker. Consult a water purifying company. 13 OCCURRENCE SOLUTION ICE DISPENSER Dispenser will not dispense ice. Icestoragebinisempty.Whenthefirstsupplyoficeisdroppedintobin,dispensershouldoperate. Freezertemperatureissettoowarm.Turnfreezercontroltoahighersettingsothaticecubeswill be made. When first supply of ice is made, dispenser should operate. Householdwaterlinevalveisnotopen. Openhouseholdwaterlinevalve,andallowsufficienttime for ice to be made. When ice is made, dispenser should operate. Freezerdoorisnotclosed. Besurefreezerdoorisclosed. Ice dispensing arm has been held in for more than 4-5 minutes. Motor is overloaded. Motor overload protectorwillresetinapproximately3minutes. Icecanthenbedispensed. Ice dispenser is jammed. Ice has melted and frozen around auger due to infrequent use, temperature fluctuations, and/or power outages. Remove ice storage bin, thaw, and empty the contents. Clean bin, wipe dry and replace in proper position. When new ice is made, dispenser should operate. Ice cubes are jammed between ice maker arm and back of bin. Remove ice cubes that are jamming dispenser. Ice cubes are frozen together. Use the dispenser often so that cubes do not freeze together. WATER DISPENSER Dispenser will not dispense water. Householdwaterlinevalveisnotopen. Openhouseholdwaterlinevalve. SeeOccurrence"Icemaker is not making any ice." Freezerdoorisnotclosed.Besurefreezerdoorisclosed. Water has an odd taste and/or odor. Water has been in the tank for a period of time. Draw and discard 7-8 glasses of water to freshen the supply. Draw and discard an additional 3-6 glasses to completely rinse out tank. Unitnotproperlyconnectedtocoldwaterline.Connectunittocoldwaterlinethatsupplieswater tokitchenfaucet. Tubingusedinthehouseholdwatersupplyandinstallationofunitmayaffectwatertasteandodor. Forbestresults,usecoppertubingforwaterconnection. Water has a high mineral content. Contact water treatment plant for help. Water pressure is extremely low. Have someone turn up the cut-off and cut-on pressure on the water pump system. ODORS IN REFRIGERATOR Interior needs to be cleaned. Clean interior with sponge, warm water, and baking soda. OPENING/CLOSING OF DOORS/DRAWERS Door(s) will not close. Foodwithstrongodorisinrefrigerator.Coverfoodtightly. Doorisnotdesignedtoswingshutautomatically.Closedoorsecurely. Door was closed too hard, causing other door to open slightly. Close both doors gently. Refrigeratorisnotlevel.Itrocksonthefloorwhenitismovedslightly.Besurefloorislevelandsolid, andcanadequatelysupportrefrigerator.Adjustrollersasneeded. Floorisunevenorweak.Refrigeratorrocksonthefloorwhenitismovedslightly.Besurefloorislevel andcanadequatelysupportrefrigerator.Contactcarpentertocorrectsaggingorslopingfloor. Refrigerator is touching the wall or cabinets. Be sure floor is level, and can adequately support refrigerator.Contactcarpentertocorrectsaggingorslopingfloor. Drawers are difficult to move. Food is touching shelf on top of drawer. Keep less food in drawer. Trackthatdrawersslidesonisdirty.Cleandrawer,rollers,andtrack. 14 OCCURRENCE LIGHT BULB IS NOT ON SOLUTION Light bulb is burned out. Replace bulb. Lightswitchisstuck. Lightswitchislocatedon interiordoorframenexttothetemperaturecontrol in each compartment. Push in plunger to release. No electric current is reaching refrigerator. See Occurrence section RUNNING OF REFRIGERATOR. Normal Operating Sounds 15 TAPPAN REFRIGERATOR WARRANTY Your Tappan product is protected by this warranty WARRANTY PERIOD FRIGIDAIRE, THROUGH ITS AUTHORIZED SERVICERS, WILL: THE CONSUMER WILL BE RESPONSIBLE FOR: FULL ONE-YEAR WARRANTY One year from original purchase date. Pay all costs for repairing or replacing any parts of this appliance which prove to be defective in materials or workmanship. Costs of service calls that are listed under NORMAL RESPONSIBILITIES OF THE CONSUMER.* LIMITED 2ND - 5TH YEAR WARRANTY (Sealed System) Second through fifth years from original purchase date. Repair or replace any parts in the Sealed Refrigeration System (compressor, condenser, evaporator, drier and tubing) which prove to be defective in materials or workmanship, and provide the labor to install such part. Diagnostic costs and any removal, transportation and reinstallation costs which are required because of service. Costs for labor, parts and transportation other than with respect to the Sealed Refrigeration System. LIMITED WARRANTY (Applicable to the State of Alaska) Time periods listed above. All of the provisions of the full and limited warranties above and the exclusions listed below apply. Costs of the technician's travel to the home and any costsforpickupanddeliveryoftheappliancerequired because of service. Your appliance is warranted by White Consolidated Industries, Inc. We authorize no person to change or add to any of our obligations under this warranty. WCI has authorized Frigidaire Home Products and its authorized servicers to perform services covered by this warranty. Our obligations for service and parts under this warranty must be performed by Frigidaire or an authorized Frigidaire servicer. *NORMAL RESPONSIBILITIES OF THE CONSUMER EXCLUSIONS IF YOU NEED SERVICE This warranty applies only to products in ordinary household use, and the consumer is responsible for the items listed below: 1. Proper use of the appliance in accordance with instructions provided with the product. 2. Proper installation by an authorized servicer in accordance with instructions provided with the appliance and in accordance with all local plumbing, electrical and/or gas codes. 3. Proper connection to a grounded power supply of sufficient voltage, replacement of blown fuses, repair of loose connections or defects in house wiring. 4. Expenses for making the appliance accessible for servicing, such as removal of trim, cupboards, shelves, etc., which are not a part of the appliance when it was shipped from the factory. 5. Damages to finish after installation. 6. Replacement of light bulbs and/or fluorescent tubes (on models with these features). This warranty does not cover the following: 1. CONSEQUENTIAL OR INCIDENTAL DAMAGES SUCH AS PROPERTY DAMAGE AND INCIDENTAL EXPENSES RESULTING FROM ANY BREACH OF THIS WRITTEN OR ANY IMPLIED WARRANTY. Note: Some states do not allow the exclusion or limitation of incidental or consequential damages, so this limitation or exclusion may not apply to you. 2. Service calls which do not involve malfunction or defects in workmanship or material, or for appliances not in ordinary household use. The consumer shall pay for such service calls. 3. Damages caused by services performed by servicers other than Frigidaire or its authorized servicers; use of parts other than genuine Frigidaire Home Products parts; obtained from persons other than such servicers; or external causes such as abuse, misuse, inadequate power supply or acts of God. 4. Products with original serial numbers that have been removed or altered and cannot be readily determined. Keep your bill of sale, delivery slip, or some other appropriate payment record. The date on the bill establishes the warranty period should service be required. If service is performed, it is in your best interest to obtain and keep all receipts. This written warranty gives you specific legal rights. You may also have other rights that vary from state to state. Service under this warranty must be obtained by contacting Frigidaire Home Products: 800•944•9044 Frigidaire Home Products P.O.Box 212378 Augusta, GA 30917 Product features or specifications as described or illustrated are subject to change without notice. All warranties are made by White Consolidated Industries, Inc. This warranty applies only in the 50 states of the U.S.A. and Puerto Rico. 16 Service Information (Canada) To avoid unnecessary cost and inconvenience, make a few simple checks before calling for service. Common occurrences and their solutions can be found in the Avoid Service Checklist. Be sure you have followed the instructions in this manual. If you are unable to locate the cause of a problem, call for service. Insist on factory service by an authorized FRIGIDAIRE PARTS AND SERVICE depot. FRIGIDAIRE PARTS AND SERVICE All Frigidaire appliances are backed by FRIGIDAIRE PARTS AND SERVICE, one of Canada's largest parts and service networks. The Frigidaire reputation means you can enjoy complete professional service from one of our hundreds of trained technicians across the country. FRIGIDAIRE PARTS AND SERVICE 7075 Ordan Drive Mississauga,Ontario L5T 1K6 Place the name, address and telephone number of your service depot in the spaces below. Product and feature specifications as described or illustrated are subject to change without notice. 17 WARRANTY IN CANADA REFRIGERATORS (FROST FREE) WARRANTOR: FrigidaireHomeProducts 7075 Ordan Drive Mississauga,Ontario L5T 1K6 Forserviceunderthiswarranty,contactyourlocaldealer/ retailer, authorized FRIGIDAIRE PARTS AND SERVICE depot,or: WARRANTY PERIOD: WARRANTOR WILL THROUGH ITS AUTHORIZED SERVICE DEPOT: Forthefirst year after purchase bytheoriginal consumer/ owner: Paycosttorepairorreplaceanydefectiveparts(including service and labour charge). Excludes original and replacement PureSource™ Ice & Water Filter cartridges (if equipped). Originalandreplacementcartridgesarewarranted for30days(partsonly). Forthesecond,third,fourth,fifth,sixth,seventh,eighth, ninthandtenthyearafterpurchasebytheoriginalconsumer/ owner: Paycost(includingserviceandlabourcharge)torepairor replacedefectivepartsofthesealedrefrigerationsystem consisting of the compressor, evaporator, condenser, interconnectingtubingdrierandrefrigerationcharge. FRIGIDAIRE HOME PRODUCTS PARTS AND SERVICE 7075 Ordan Drive Mississauga,Ontario L5T 1K6 Tel: (905) 565-9200 Fax: (905) 565-0937 WARRANTY APPLIES TO: a) Products purchased and installed in Canada for personal single family household use. b) Defectsresultingorarisingoutofthemanufacturingprocess. c) Products bearing legible manufacturer’s model and serial numbers. d) Replacement parts only for the remainder of the original warranty. WARRANTY DOES NOT APPLY TO: a) Transportation damage. b) Supplyandreplacementofporcelain,fuses,glassandlightbulbs. c) Parts and service supplied or obtained from other than FRIGIDAIRE PARTS AND SERVICE or FRIGIDAIRE PARTS SERVICE authorizeddepots. d) Properinstallation,controlsettingandcareoffinish. CONSUMER/OWNER RESPONSIBILITY: a) To provide proof of the original date of purchase by means of a bill of sale or payment. b) Supplyandreplacementofporcelain,fuses,glassandlightbulbs. c) To ensure proper power supply and connection of the appliance to same. d) Properinstallation,controlsettingandcareoffinish. Thiswarrantyisinadditiontoanystatutorywarrantiescontainedinanyapplicablelegislation. Thetermsandconditionsof thiswarrantyarenotintendedtoexcludeorlimityourrightsunderthosestatutes. Thewarrantorhoweverreservestheright tochargetransportationandtravellingcostsfordistancesinexcessof48kilometres(30miles)fromthenearestFRIGIDAIRE PARTS AND SERVICE authorized service depot. Thiswarrantyplusthestatutorywarrantiesmentionedaretheonlywarrantiesgiventotheconsumer/ownerforthisproduct. 18 Notes