1
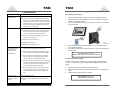
Tao
Digital Photo Frame
User’s Manual
Visit our webpage at
www.taoelectronics.com
for other products!
TAO Electronics, Inc.
1215 Chrysler Drive
Menlo Park, CA 94025
Phone: 650-326-5000
Fax: 650-326-5828
E-mail: [email protected]
Copyright ©2007 TAO Electronics, Inc. All Rights Reserved.
TAO Electronics, Inc. 1215 Chrysler Drive, Menlo Park, CA
Tao
Tao
O
Operation, 9
Overview, 5
!
·
·
·
·
·
·
·
·
WARNING-- To reduce the risk of fire, electrical shock, or serious personal injury:
Keep the product and all its parts and accessories out of the reach of small children.
Do not expose product to water or other liquids.
Do not leave the unit unattended while it is in use. Always unplug the AC Power Adapter from the
electrical outlet when the unit is not in use.
Do not place this product in a built-in installation such as a bookcase or rack unless proper ventilation is
provided or unless advised in the manufacturer’s instructions.
Only operate this product from the type of power source indicated on the marking label. If you are not
sure of the type of power supply to your home, consult your product dealer or local power company.
Do not open the case; there are no user-serviceable parts inside. Opening the case will void your
warranty.
Do not use attachments not recommended or sold by the product manufacturer.
Never operate this product if it is not working properly, has been dropped, damaged, or exposed to
water or other liquids. Do not attempt to examine or repair this product yourself; take the product to
an electronics repair shop of your choice for inspection and repair.
!
P
PC communication, 5
Photo format, 5
Play / Pause, 11
Power, 5
Power Button, 7
Previous, 9
Q
Quckstart, 3
R
Remote Control 8
Rotate, 11
S
Setup Menu, 13
Slide Show Speed, 13
Slideshow, 8
Specifications, 5
Supporting cards, 5
CAUTION-- To reduce the risk of personal injury or product/property damage:
· Do not expose the product to extreme temperature changes, moisture/high humidity, or dust/dirt.
· Slots and openings in the cabinet are provided for ventilation and to ensure reliable operation of the
product and to protect it from overheating; do not block or cover these openings by placing the product on a bed, sofa, rug, or other similar surface.
· Do not clean product with thinner, alcohol, or benzene.
· Do not leave the unit exposed to direct sunlight.
· Do not drop the product or subject it to strong shocks.
· Do not use this product outdoors; it is intended for indoor use only.
T
Table of Contents, 6
Technical Support, 14
Thumbnail / Setup / Menu., 8
Troubleshooting, 14
V
Video format, 5
Video Repeat, 13
Viewing angle, 7
Viewing Photos,
Volume -, 11
Volume +, 11
W
WARNING, 2
Web, 17
Weight, 5
Signal word Definitions
DANGER – Indicates an imminently hazardous situation, which, if not avoided, will result in death or
serious injury. Usage of this signal word is limited to the most extreme situations.
WARNING - Indicates a potentially hazardous situation, which, if not avoided, could result in death
or serious injury.
CAUTION – Indicates a potentially hazardous situation, which, if not avoided, may result in minor/
Moderate injury or product/property damage. IT also alerts against unsafe practices.
www.taoelectronics.com
Page 2
Copyright ©2007 TAO Electronics, Inc. All Rights Reserved
Page 19
Tao
Tao
Index
A
AC Power Adapter, 5
Adjust the viewing angle, 7
Condensation
· If cold water is poured into a glass, water droplets form on the outside of the glass. This is called
condensation. Condensation may occur on internal operating parts of the product. Condensation
occurs:
· When the product is brought from the outdoors into a warm room, or if it is in a cold room which is
heated quickly.
· If the unit is moved suddenly from an air-conditioned room or car to a hot or humid location.
· Should condensation occur, the product may not operate properly if condensation occurs. Wait 1-2
hours (to allow the internal parts to adjust to the surrounding temperature) before using the product.
· Do not apply pressure to the LCD screen as product damage may result.
· A residual image can appear on the screen after a still image is displayed on the screen for a long
period. The image will disappear after a short time.
· The screen becomes warm during normal operation; this is not a malfunction.
· To clean, use a soft, non-abrasive cloth such as the camera lens cloth to clean the LCD screen.
· If you use an LCD Cleaning Kit, do not apply the cleaning liquid directly to the LCD screen. Apply
cleaning liquid to the cleaning cloth first, and then clean the screen.
B
Button Functions, 10
C
CAUTION, 2
Cleaning, 2
compatible memory card, 5
Condensation, 2
Connecting to Power, 7
Contact Us, 17
Customer Service, 17
D
Dimensions, 5
Display, 5
IMPORTANT INFORMATION REQUIRED BY THE FCC
This device complies with Part 15 of the FCC Rules. Operation is subject to the following two conditions:
(1) this device may not cause harmful interference; and (2) this device must accept any interference
received, including interference that may cause undesirable operation.
NOTE: This equipment has been tested and found to comply with the limits for a Class B digital
device, pursuant to Part 15 of the FCC Rules. These limits are designed to provide reasonable
protection against harmful interference in a residential installation. This equipment generates, uses,
and can radiate radio frequency energy and, if not installed and used in accordance with the instructions, may cause harmful interference to radio elevation reception, which can be determined by
turning the equipment off and on. The user is encouraged to try to correct the interference by one or
more of the following measures:
· Reorient or relocate the receiving antenna.
· Increase the separation between the equipment and receiver.
· Connect the equipment into an outlet on a circuit different from that to which the receiver is connected.
· Consult the dealer or an experienced radio/TV technician for help.
E
Email, 17
ENTER, 11
Environmental Operating Ranges, 5
F
Features, 5
Frame height, 5
Frame stand, 7
Frequently Asked Questions, 15
G
Getting Started, 7
I
IMPORTANT, 3
Included Accessories, 5
Inserting Memory Cards, 8
Installing/Replacing Remote Control Battery, 8
Internal memory, 8
Contact:
TAO Electronics, Inc.
www.taoelectronics.com
1215 Chrysler Drive, Menlo Park, CA 94205
(tel) 650-326-5000 (ext 101);
(fax) 650-326-5828;
[email protected]
J
JPEG format, 7
L
Listening to MP3 Music, 12
Load photos from the computer. 4
M
Memory, 5
Memory card formats, 5
Menu, 8
Music files, 9
Music Repeat, 13
N
Next, 11
www.taoelectronics.com
Page 18
Copyright ©2007 TAO Electronics, Inc. All Rights Reserved
Page 3
Tao
Quick Start
Tao
8
Power up
1. Adjust frame stand. Press the button on the back of the frame stand to adjust
the length of the stand. The viewing angle is approximately 25 degrees in either
direction.
2. Connect the AC adapter and plug it into the wall. The frame should turn on,
displaying photos stored in the internal memory or inserted memory cards.
3. Press the power button to turn the unit on or off.
9
What is the best photo
resolution displayed on the
screen?
Can I rotate a photo on the
screen?
•
The highest display resolution is 320 x 248.
7 Contact Us
•
Yes. Use the ROTATE button on the remote
control to rotate a photo.
NOTE: The rotated photo will return to its
original orientation after you power down the
Digital Photo Frame.
Technical Support
US & Canada
Email: [email protected]
Toll-Free:
(888)the920-0829
10
Can I adjust
colors of
• No. All color settings are preset at the factory.
the display screen?
Web: www.taoelectronics.com
You can only adjust the brightness of the
screen. All color editing must be done with
photo editing software.
Load photos
1.
Connect the frame to your computer via USB cable.
2.
From your desktop click “START”, followed by “MY COMPUTER”. The Digital
Picture Frame’s memory will appear as a removable drive.
3.
Drag and drop, or copy and paste your photos into the frame’s internal memory.
4.
You can also search for photos by clicking the “START” button on the bottom
left hand corner of your screen, followed by the “Search” option to the right.
Specify that you want to search for photos, and choose the drive you would
like to search.
Customer Service
US & Canada
Email: [email protected]
Toll-Free: (888) 920-0829
Web: www.taoelectronics.com
International Support and Customer Service
Email: [email protected]
Web: www.taoelectronics.com
Technical Support
Manufactured
and distributed by:
US & Canada
TAO Electronics,
Inc.
• Email: [email protected]
1215 Chrysler
Drive
• Toll-Free: (888) 920-0829
Menlo •Park,
CAwww.taoelectronics.com
94025
Web:
Phone: (650) 326-5000
Fax: (650)
326-5828
Customer
Service
Your Digital Photo Frame is now ready for use!
IMPORTANT!
The TAO digital picture frame supports color JPEG/JPG (RGB) files. Grayscale
JPEG files or progressive JPEG files, altered photos saved under photo editing
format cannot be displayed on this frame.
You can save images of other formats in the RGB JPEG format using your Microsoft Paint Program, or other Photo/Paint programs by using the “Save As…” feature, and choosing either JPG or JPEG as your file type.
US & Canada
Email: [email protected]
Toll-Free: (888) 920-0829
Web: www.taoelectronics.com
•
•
•
International Support and Customer Service
Email: [email protected]
Web: www.taoelectronics.com
•
•
Manufactured and Distributed by:
TAO Electronics, Inc.
1215 Chrysler Drive
Menlo Park, CA 94025
Phone: (650) 326-5000
Fax: (650) 326-5828
www.taoelectronics.com
Page 4
Copyright ©2007 TAO Electronics, Inc. All Rights Reserved
Page 17
Tao
Tao
6 Frequently Asked Questions
Question
1 Overview
Answer
Question
Answer
What photo, music, and video
· Photo: RBG JPG / JPEG (grayscale JPG/progressive
1
What
photo, music,
formats
are supported
by the and JPG•not supported)
Photo: RBG JPG / JPEG (grayscale JPG /
Digitalvideo
Photo formats
Frame? are sup- · Music: MP3
transition JPG not supported)
ported by the Digital
· Video: Motion JPG.
• Digital
Music: Card™
MP3 (SD)
Photo Frame?
· Secure
What memory
cards are
·
MultiMedia
Card™
(MMC)
•
Video:
MPG1.
compatible with the Digital
· Memory Stick® (MS)
Photo Frame?
®
2
What memory cards are
· CompactFlash
(CF) Card™ (SD)
• Secure Digital
compatible with the Digital · Extreme Digital ™ (XD) (adaptor required)
• MultiMedia Card™ (MMC)
Photo
Frame?
How do
I play
music files?
· Use a personal computer and audio editing software to
®
• convert
Memory
yourStick
music(MS)
to MP3 format.
·
• CompactFlash® (CF)
Transfer the MP3 file to a memory card or internal mem• oryr.Extreme Digital ™ (XD)
How
do
I transfer
photos
3
How
do I play
musicfrom
files? · Connect and power on your digital picture frame to your
• PCUse
a personal computer and audio editing
my memory card into the
with the desired memory card inserted.
software to convert your music to MP3 format.
internal memory?
· The
cardthe
and
the file
internal
appear
• memory
Transfer
MP3
to thememory
memorywill
card
usingas
a
Memoryhard
Carddrives,
Reader.
removable
and you will be able to copy
and paste files from them.
4
How do I transfer photos
• See “Quick Start” on Page 3.
My memory
is notmemory?
com· You should be able to buy a memory card adapter that is
into thecard
internal
patible with the Digital Photo
compatible with one of the supported memory cards.
5
How
docan
I transfer
Frame.
What
I do? photos
example,and
if you
ownon
anyour
XD memory
card, frame
you
• ForConnect
power
digital picture
from my memory card into
cantobuy
anPC
XDwith
to CF
adapter
your
thememory
desiredcard
memory
cardand
in- use
the internal memory?
theserted.
adapter to connect the Digital Photo Frame to
• theThe
card and the internal memory will
XD memory card.
appear as removable hard drives, and you will be
able
copy
from card
them.and one
Can I insert multiple memory
· Yes. You
aretoable
to and
havepaste
a CFfiles
memory
cards?
additional supported memory card inserted at the
4
My memory card is not
• same
Youtime.
should
bethe
able
to buy
a memory
cardto select
Use
Card
Selection
Screen
compatible with the Digital
is compatible
with one of the suptheadapter
desired that
memory
card.
Photo Frame. What can I
ported memory cards. For example, if you own
· The Digital Photo Frame is able to display photos up to
What is
the maximum photo
do?
an XD memory card, you can buy an XD to CF
12 mega pixels.
size the digital frame can
memory card adapter and use the adapter to
display?
connect the Digital Photo Frame to the XD memDoes it play all types of video
· No. The device only plays Motion JPG files.
ory card.
files?
5
Can
insertphoto
multiple
mem- · See the specifications section for the resolution of your
What
is
theI best
reso• Yes. You are able to have a CF memory card
cards?on the
andphoto
one additional
supported memory card indigital
frame model.
lution ory
displayed
serted at the same time. Use the Card Selection
screen?
Screen to select the desired memory card.
No. All color settings are preset at the factory. You can
Can I adjust the colors of the
only adjust the brightness of the screen. All color
display
screen?
6
What is the maximum
bePhoto
done Frame
with photo
editing
software.
• editing
The must
Digital
is able
to display
photos
photo size the digital frame
up to 12 mega pixels.
can display?
7
Does it play all types of
video files?
www.taoelectronics.com
•
No. The device only plays MPG1 files.
Page 16
Thank you for purchasing the TAO Digital Photo Frame. With this product, you will be able to share and
enjoy your favorite digital photos in your home, office, or storefront. Feel free to visit our webpage at
www.taoelectronics.com for the latest information and downloads.
1.1 Features
Our models feature an at-a-glance naming convention to make their basic features easily recognizable:
•
•
•
•
•
Frame Size)_(LCD Screen Size)_(Internal Memory Size)_ (Frame Style)
Load and display rich color photos in RGB JPEG/JPG format up to 12 megapixel resolution.
Play your favorite songs as background music to your photo slideshows.
Adjust transition time and choose from a variety of transition effects to enhance your presentation.
Rotate and adjust the frame stand to show landscape and portrait style photos.
1.2 Included Accessories
· TAO Digital Photo Frame x 1
· Remote control and battery ( Digital Photo Clock: Not applicable ) x 1
· AC Power Adapter x 1
· User’s Manual x 1
1.3 Specifications:
Digital Photo Clock
Screen: 3.5" TFT LCD - 320 x 240
Internal memory: 64 MB
Photos: ~50 (64 1MB photos, 32 2MB photos)
Functions: clock (analog, digital), alarm, digital picture viewer
PC interface: USB port 1.1 (for photo download)
Software: not required
Weight: 1 lb
Dimension: 5" x 4" x 2"
5x7_5.6”_128MB_style Digital Photo Frames:
Display screen: 5.6" TFT LCD - 320 x 234
Internal memory: 128 MB
Photos: 56 ~ 100 (128 1MB photos, 64 2MB photos)
Memory cards: CFI, CFII, SD, MMC, MS, xD - push/push
Audio: yes ( speaker )
Formats: JPEG, Motion JPEG, MP3.
Frame: Replaceable for any standard 5x7 frame
design: glass cover, double matting
PC interface: USB Host/Slave (2.0, 1.1)
Remote control: yes (RF, radio frequency)
Software: not required
Weight: 2 lb
Dimension:10" x 8" x 2.5" ( varies on the design)
Packaging: color box - dimension: 13" x 11.5" x 5.5"
8x10_8”_256MB_style Digital Photo Frames:
Display screen: 8" TFT LCD - 800 x600
Internal memory: 256 MB
Photos: 56 ~ 100 (256 1MB photos, 128 2MB photos)
Memory cards: CFI, CFII, SD, MMC, MS, xD - push/push
Audio: yes ( speaker )
Formats: JPEG, Motion JPEG, MP3.
Frame: Replaceable for any standard 5x7 frame
design: glass cover, double matting.
PC interface: USB Host/Slave (2.0, 1.1)
Remote control: yes (RF, radio frequency)
Weight: 3 lb
Dimension:12" x 14" x 2.5"(varies on design)
Packaging: color box;dimension: 17" x 15" x 6"
Copyright ©2007 TAO Electronics, Inc. All Rights Reserved
Page 5
Tao
Table of Contents
Quick Start
..……………………………………..…...
4
1 Overview
..……………………………………..…...
..……………………………………..…...
..……………………………………..…...
..……………………………………..…...
5
5
5
5
..……………………………………..…...
..……………………………………..…...
..……………………………………..…...
..……………………………………..…...
..……………………………………..…...
..……………………………………..…...
..……………………………………..…...
..……………………………………..…...
..……………………………………..…...
..……………………………………..…...
7
7
7
8
8
8
9
9
9
9
..……………………………………..…...
……………………………………………
..……………………………………..……
..……………………….……………….…
..……………………………………..……
……………..…………………..…………
9
10
11
12
12
12
4.1 Setup Menu
4.2 Slide Interval
4.3 Show Time
4.4 Show Calendar
4.5 Music Repeat
4.6 Aspect
4.7 Volume
..…………………………………………..
……………………………………………
..……………………………………..……
..……………………….……………….…
..……………………………………..……
……………..…………………..…………
..……………………………………..……
……………..…………………..…………
13
13
13
13
13
13
13
13
5 Troubleshooting
..………………………………………….. 15
6 Frequently Asked Questions
………………………………..………….. 17
7 Contact Us
..………………………………………….. 18
1.1 Features
1.2 Included Accesories
1.3 Specifications
2 Getting Started
2.1 Powering and Connecting
2.2 Adjusting the Viewing Angle
2.3 Remote Control Battery Usage
2.4 Inserting Memory Cards
2.5 Main Menu
2.6 Photo Selection
2.7 Time Settings
2.8 Music Selection
2.9 Video Selection
3 Operation
3.1 Frame Button Functions
3.2 Remote Control Functions
3.3 Listening to MP3 Music/Audio
3.4 Viewing Videos
3.5 Time and Calendar Settings
4 Advanced Settings
www.taoelectronics.com
Page 6
Tao
4
Video file is choppy.
• Memory card speed is slow..
Small video size on the screen
· Low video resolution. This is normal since different
• Make
sure
you use
a high-speed
Video does not play properly.
digital cameras
take
photos
in varying
resolutions
memory card to play video files.
Black borders appear around the
(or pixels).
photo.
5
· Most digital cameras capture video in 320 x 240 or
Small video size on the screen
•
LowThe
video
resolution.
This resoluis norlower resolution.
highest
supported
mal since different digital cameras
Black borders appear around the tion of a photo or video is 640 x 480.
take photos in varying resolutions (or
photo.
pixels).
· Use photo editing software on your computer to resize
• to 640
Mostxdigital
the photo
480. cameras capture video
in 320 x 240 or lower resolution. The
supported
resolution
of ain
· Alternatively, youhighest
can turn
the Full Screen
option
photo or video is 640 x 480.
the Setup Menu to “On” to enlarge photos to fit
• dimensions.
Use photo editing
software
on your
full screen
Differing
photo size
computer to resize the photo to 640
ratios may cause distortion of the photo.
x 480.
Screen freezes.
Unable to turn unit off.
Music always plays during slideshow mode.
6
Screen freezes.
Unable to turn unit off.
7
Zoom
the
remote
· Unplug the •
powerUse
cordthe
from
the button
back ofon
the
unit
mocontrol to enlarge it.
mentarily and reinsert the cord.
• Alternatively, you can turn the Full
Screen option in the Setup Menu to
“On” to enlarge photos to fit full
screen dimensions. Differing photo
sizeoff
ratios
may
cause
distortion
of
· You can turn music
under
the
“MP3”
menu selection, or lowerthe
thephoto.
volume under the “Setup” menu
selection to turn the volume off.
• Unplug the power cord from the back
of the unit momentarily and reinsert
the cord.
Music always plays during slideshow
mode.
•
•
A memory card containing both MP3
music and JPEG photo files will play
both during slideshow mode.
You can stop the music by turning
the volume level down using the
Volume – button on the remote
control.
Contact:
TAO Electronics, Inc.
www.taoelectronics.com
1215 Chrysler Drive, Menlo Park, CA 94205
(tel) 650-326-5000 (ext 101);
(fax) 650-326-5828;
[email protected]
Copyright ©2007 TAO Electronics, Inc. All Rights Reserved
Page 15
Tao
Tao
2 Getting Started
5 Troubleshooting
#
Problem
Problem
2.1 Powering and Connecting
Solution
Solution
1
Digital
Digital
PicturePicture
FrameFrame ·doesThe power
the unit
is not
securely
• cord
Thetopower
cord
to the
unit isinserted.
not securely inn’tpower
poweron.
on.
doesn’t
serted.
· Make sure you connect the AC adapter to the frame properly.
When you connect the AC adapter to the frame and power
• Make sure you connect the AC adapter to the
up the unit, even without a memory card, you should see a
frame
properly.
the ACcheck if
blank white
screen.
If youWhen
don’t you
see connect
the lit screen,
to the frame
power
up the
unit,and
the poweradapter
is connected
to the and
Digital
Picture
Frame
even
a memory
make sure
it iswithout
securely
attached.card, you should see a
screen.
If you don’t see the lit
Files do not display.
· Memory card blank
is not white
inserted
correctly.
screen, check if the power is connected to the
· Verify that theDigital
way you
inserted
theand
cardmake
is correct.
Picture
Frame
sure itMake
is se-sure
the front label
the memory card is facing AWAY from
curelyofattached.
2
Cannot access Main Menu. you. Do not force the memory card into the slot.
• Memory card is not inserted correctly.
•
•
•
Remove the protective film covering the LCD screen by lifting the pull tab.
Plug the included AC Power Adapter into the frame, and then into a standard
110-220 volt AC electrical outlet.
Power on the Digital Photo Frame by pressing the power button on the remote
control or the frame.
• there
Verify
theone
waysupported
you inserted
the music,
card is or
· Make sure
is atthat
least
photo,
Make sure
the front label of the memory
video filecorrect.
on the memory
card.
card is facing AWAY from you. Do not force the
memory
cardJPEG,
into the
slot.
· Compatible Photo
format:
JPG
• Make sure there is at least one supported photo,
· Compatible Music
format:
MP3
music,
or video
file on the memory card.
Photo or thumbnails do
not appear after selecting the Thumbnail
Selection Screen.
• Video
Compatible
format:
· Compatible
formats:Photo
Motion
JPG. JPEG, JPG
•
Compatible Music format: MP3
· The digital frame is compatible with the JPEG file format only.
Compatible
Video formats:
MPG1.
The•device
does not support
TIFF, BMP,
GIF, etc.
· There are variations of the JPEG file (progressive, and gray
scale). This frame will not play these two JPEG variations.
Incompatible
3
Photo orfile.
thumbnails do not
• The digital frame is compatible with the JPEG
appear after selecting the
· If you alter / file
editformat
the photo
such
Photoonly.with
Theapplication
device does
notas
support
Thumbnail Selection
BMP,
GIF,format
etc. of the editing software.
shop, theTIFF,
file type
to the
Screen.
This
causeare
thevariations
“incompatible”
message.
• mayThere
of thefile
JPEG
file
Incompatible file.
(progressive, and gray scale). This frame will not
· Use the “Save
As”these
feature
select
either JPG or JPEG from
play
twoand
JPEG
variations.
the•drop If
down
file name
box. This such
option
you menu
alter / below
edit thethe
photo
with application
may varyas
byPhotoshop,
program, and
is recommended
thatofyou
theitfile
type to the format
the
editing
software.
may manual.
cause the
consult your
photo
editing This
software
“incompatible” file message.
· When you
your
photo,
to avoid
using
punctuation,
• rename
Use the
“Save
As”tryfeature
and
select
either JPG
spaces, and
special
characters.
This will
prevent
or JPEG
from
the drop down
menu
belowthe
the file
name
box. This
option
may
program,
frame from
believing
that the
photo
is vary
of a by
different
file
and it is recommended that you consult your
type.
photo editing software manual.
Video file is choppy.
Video does not play
properly.
www.taoelectronics.com
Figure 1
Powering Unit
•
•
If there are photos stored in the internal memory or on an inserted memory
card, a slideshow will begin.
If the internal memory does not have stored photos, you will be prompted with
the main menu.
5x7, 8x10 frames: See above.
Photo Clock: Memory card functions not applicable.
2.2 Adjusting the Viewing Angle
The digital LCD panel has a viewing angle of approximately 25 degrees in either
direction. You can achieve a better viewing angle by adjusting the frame stand
height.
•
•
•
Extend the frame stand to a position for greatest stability.
Extend or retract the strand by pushing the tab on the stand, and adjusting the
length.
Release the tab to lock the frame into position.
•
When you rename your photo, try to avoid using
· Memory card punctuation,
speed is slow.
spaces, and special characters.
This will prevent the frame from believing that
· Make sure you
use
a high-speed
memory
the
photo
is of a different
file card
type.to play video
files.
Page 14
5x7, 8x10 frames: See above.
Photo Clock: Not applicable.
Copyright ©2007 TAO Electronics, Inc. All Rights Reserved
Page 7
Tao
Tao
4 Advanced Settings
2.3 Remote Control Battery Usage
•
•
•
•
4.1 Setup Menu
Place the remote control buttons facing down.
Press the tabs against each other, and pull out the battery tray.
Place one CR2025 lithium battery on the tray with the “+” side facing up.
•
To enter the setup menu select the “Setup” option from the main menu using the arrow
buttons and play/enter.
Reinsert the tray.
4.2 Slide Interval
•
•
Figure 2
Battery Replacement
•
•
2.4 Inserting Memory Cards
•
•
Insert any compatible memory card with the front label facing the rear of the
frame. Do not force the memory card into the memory card slot.
If you cannot easily insert the memory card, you may have inserted it incorrectly. The frame should detect the memory card automatically and display
images from the card, rather than the internal memory.
The Digital Photo Frame is compatible with the following memory card formats:
Secure Digital Card ™(SD)
Memory Stick ® (MS)
Multi Media Card ™(MMC)
Compact Flash ® (CF)
Extreme Digital ™(XD) (adapter required) USB Flash Drive
5x7, 8x10 frames: See above.
Photo Clock: Not applicable.
•
•
When selecting items on your Digital Photo frame, you have two options:
•
•
Use the arrow buttons on your remote control, and press enter.
Use the arrow buttons your frame, and press play/pause.
Press either the “Exit” button on your remote, or the menu button on your
frame to cycle to the main menu.
Here you will be able to select photos, set the time, play music, or change
advanced settings.
www.taoelectronics.com
The factory setting transition speed is 5 seconds.
This option allows you to turn the digital clock on or off.
The factory setting is “OFF”.
4.4 Show Calendar
•
•
This option allows you to turn the calendar on or off.
The factory setting is “OFF”.
4.5 Music Repeat
•
•
•
•
•
This options allows you to change the music playback mode.
“All” will play all of the songs, and then loop to the first song.
“One” will loop the selected song repeatedly.
“None” will play the song once only.
The factory setting is, “All”
4.6 Aspect
2.5 Main Menu.
•
You are able to choose a transition speed of either 5, 10, 30, or 60 seconds between
photos.
4.3 Show Time
5x7, 8x10 frames: See above.
Photo Clock: Not applicable.
•
•
This option allows you to choose the time in between photos during your slide show.
Page 8
•
•
•
This option allows you to change the aspect ratio.
You can choose either 4:3, or 16:9.
The factory setting is 4:3.
4.7 Volume
•
•
•
This option allows you to change the speaker volume.
You can choose a numerical value where higher numbers are louder and lower numbers
are softer.
The factory setting is 6.
Copyright ©2007 TAO Electronics, Inc. All Rights Reserved
Page 13
Tao
Tao
3.3 Listening to MP3 Music/Audio
•
•
•
MP3 files are a popular audio format commonly used with digital music. Your sound file
must be saved in MP3 format to play on your digital photo frame.
Factory settings allow for MP3 audio files to be played in the background of your slide
show.
If you would like to play a specific song:
•
•
•
From the main menu, select the “Mp3” option, and press play/enter.
Select your desired audio/music file from the list, and press play/enter.
If the file does not play, check the volume setting of your frame.
5x7, 8x10 frames: See above.
Photo Clock: Not applicable.
Figure 4
Main Menu
3.4 Viewing Videos
2.6 Photo Selection
•
•
•
•
Motion JPEG files are a popular video format commonly used with digital video. Your
video file must be saved in Motion JPEG format to play on your digital photo frame.
Factory settings allow for Motion JPEG video files to play sequentially in a loop format.
If you would like to play a specific video:
•
•
•
•
From the main menu, select the “Reading Photo” option, and press play/
enter.
Select your desired video file from the list, and press play/enter. The video
will be shown as a preview image of your video.
If the file does not play, check the video file format.
2.7 Time Settings
•
•
3.6 Time and Calendar Settings
•
•
•
•
If the sound does not play, check the volume setting of your frame.
5x7, 8x10 frames: See above.
Photo Clock: Not applicable.
•
•
Select “Reading Photo” from the Main Menu and a list of thumbnails will appear.
You can browse through the thumbnails and press enter/play to select a single photo, and press enter/play to start a slideshow.
You must have at least one jpg photo on the storage device to be able to
access the thumbnail menu.
Select “Time” from the Main Menu and a list of time settings will appear.
You can select a time or date to change using the previous/next buttons or the
arrow buttons, and use the play/pause button, or the enter button to confirm.
Once you have made your selection, the arrow keys will cycle through numerical values, and the enter button will confirm your selection.
Here you will also be able to set a time for your Alarm clock.
2.8 Music Settings
There are a variety of display overlay possibilities with the time and date and your
digital photo collection.
If you would like to set the date or time:
•
•
•
From the main menu, select the “Time” option, and press play/enter.
Use the arrow keys to select what you would like to adjust, and press the
enter button to confirm.
•
•
•
Select “MP3” from the Main Menu and a list of songs will appear.
You can use the arrow buttons or the previous/next buttons to change your
song selection, and the enter button or the play/pause button to play.
You can change the volume, and the playback settings in the Setup menu
Use the arrow buttons to change the time, and press the enter button again to
confirm.
www.taoelectronics.com
Page 12
Copyright ©2007 TAO Electronics, Inc. All Rights Reserved
Page 9
Tao
Tao
3.2 Remote Control Functions
3 Operation
3.1 Frame Buttons Functions
Figure 7
Remote Control
Figure 5
5x7_5.6”_128_style frames
Figure 6
8x10_8”_256_style frames
1)
2)
Exit Button:
Enter Button:
3)
4)
5)
6)
7)
8)
9)
10)
11)
12)
13)
14)
Up Button:
On/Off Button:
Left Button:
Right Button:
Down Button:
Thumb Button:
Delete Button:
Slide Show Button:
Copy Button:
Vol – Button:
Vol + Button:
Mp3 Button:
Returns to the previous screen.
Press to confirm selection, or start/stop music or
slideshows. This button also allows you to cycle
through slideshow play modes.
Moves the selection up.
Turns the frame on or off.
Moves the selection to the left.
Moves the selection to the right.
Moves the selection down.
Toggles the thumbnail screen.
Deletes the current selection.
Toggles the slideshow on or off.
Saves current photo to internal memory.
Lowers volume.
Raises volume.
Toggles the MP3 screen.
Figure 7
Photo Clock
1)
2)
3)
4)
5)
Power Button. Press to turn your frame on or off.
Previous Button. Press to change selection, or view previous photo.
Play/Pause Button. Press to confirm selection, or start/stop slideshow.
Next Button. Press to change selection, or view next photo.
Menu Button. Press to view the thumbnail screen, or the main menu.
www.taoelectronics.com
Page 10
5x7, 8x10 frames: See above.
Photo Clock: Not applicable.
Copyright ©2007 TAO Electronics, Inc. All Rights Reserved
Page 11