1
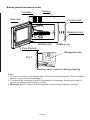
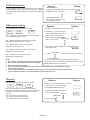
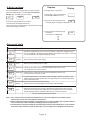
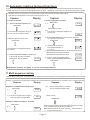
INSTRUCTION MANUAL
IN S T R U C T IO N
M A N U A L
MICROWAVE OVEN
88:88
M
G
L
L.M
D.1
D.2
D.3
M
M.H
H
Micro power Express
Auto
Kg
Preset.clock
Auto defrost Stop.clear Instant.start
Auto cooking
Time.weight
MODEL SMW736
Read this booklet thoroughly before using and
save it for future reference.
Operation theory of Microwave oven
1. Microwave is a kind of high frequency electromagnetic wave, which is commonly distributed in the nature.
But the existing form of microwave is dispersed so that it cannot be collected together for heating purpose.
The key component of magnetron of microwave oven will transform the energy of electricity to microwave
and huge energy of microwave field is established under the closed cavity. So the molecule of food is caused
to vibrate at very high speed and the friction heat produced will cook the food in a fast way.
2. There is 3 properly of microwave , that is
a) Absorbability, the microwave can cause the excess vibration of molecule of various food so as to obtain the
heating purpose. But the infiltration ability is largely depend on the size, thickness and properties of the food.
b) Penetrability, microwave can penetrate through ceramics, glass, temperature-resistant plastics. It is
required to use the containers whose material have good microwave penetrability to achieve best heating
result. See the below utensils guide.
c) Reflectivity, microwave would be reflected by the metal wall of interior cavity so as to establish an even
magnetic field, thus can prevent the overheating of partial area.
Installation of Microwave Oven
1) To ensure sufficient ventilation, the distance of back of oven to the wall or cabinet should be at least 10cm,
side of oven to the wall or cabinet should be at least 5cm, the top of oven to the ceiling or cabinet should be
at least 20cm.
2) Do not place any object on the top of oven.
3) The position of the oven shall be such that it is far from the TV, Radio or antenna as picture disturbance
or noise may occur.
3) The oven shall be so installed that the plug is accessible.
Utensils guide
It is strongly recommended to use the containers which are suitable and safe for microwave cooking. Generally
speaking, the containers which are made of heat-resistant ceramic, glass or plastic is suitable for microwave
cooking. But the following safeguards must be followed:
1. Never use the metal containers for microwave as spark is likely to occur.
2. The heat-resistant plastic is not suitable for long time cooking.
3. Never use the heat-resistant ceramic which are decorated with metal or glazed. .
4. Plastic film is not suitable for cooking chops and meat, as over temperature may do damage to the film.
For the first use
As there is manufacturing residue or oil remained on the oven cavity or heat element ,it usually would
smell the odor,even a slight smoke ,It is normal case and would not occur after several times use ,Keep
the door or window open to ensure good ventilation
So it is strongly recommended to operate as follows place a cup of water in the turntable ,setting at high
power and operate for several times
Page: 1
IMPORTANT SAFEGUARDS
The following basic precautions should always be followed when using electrical appliance:
WARNING - To reduce the risk of burn, electric shock, fire, injury to persons, or exposure to excessive
microwave energy:
1. Read all instructions before using.
2. Read and follow the specific PRECAUTIONS TO AVOID POSSIBLE EXPOSURE TO EXCESSIVE
MICROWAVE ENERGY found on next page.
3. This appliance must be grounded. Connect only to properly grounded outlet. See GROUNDING
INSTRUCTIONS found on next page.
4. Install or locate this appliance only is accordance with the provided installation instructions.
5. Some products such as whole eggs and sealed containers - for example, closed glass jars - may
explode and should not be heated in this oven.
6. Use this appliance only for its intended use as described in the manual. Do not use corrosive
chemicals or vapors in this appliance. This type of oven is specifically designed to heat, cook, or dry
food. It is not designed for industrial or laboratory use.
7. As with any appliance, close supervision is necessary when used by children.
8. Do not operate this appliance if it has a damaged cord or plug, if it is not working properly, or it if has
damaged or dropped.
9. This appliance should be serviced only by qualified service personnel. Contact nearest authorized
service facility for examination, repair, or a adjustment.
10. Do not cover or block any openings on the appliance.
11. Do not store this appliance outdoors. Do not use this product near water - for example, near a
kitchen sink, in a wet basement, or near a swimming pool, or similar locations.
12. Do not immerse cord or plug in water.
13. Keep cord away from heated surface..
14. Do not operate the oven without any liquid or food inside the oven. This would do damage the oven.
15. Make sure the utensils do not touch the interior walls during cooking.
16. Do not let cord hang over edge of table or counter.
17. Attention must be taken when cleaning door surface. See details on Cleaning and Maintenance.
18. To reduce the risk of fire in the oven cavity:
i) Do not overcook food. Carefully attend appliance if paper, plastic, or other combustible materials
are placed inside the oven to facilitate cooking.
ii) Remove wire twist-ties from paper or plastic bags before placing bag in oven.
iii) If materials inside the oven should ignite, keep oven door closed, turn oven off, and disconnect
the power cord, or shut off at the fuse or circuit breaker panel.
iv) Do not use the cavity for storage purposes. Do not leave paper products, cooking utensils, or
food in the cavity when not in use.
19.Liquid, such as water, coffee, or tea are able to be overheated beyond the boiling point without
appearing to be boiling. Visible bubbling or boiling when the container is VERY HOT LIQUIDS
SUDDENLY BOILING OVER WHEN THE CONTAINER IS DISTURBED OR A UTENSIL IS INSERTED
INTO THE LIQUID.
SAVE THESE INSTRUCTIONS
HOUSEHOLD USE ONLY
Page: 2
CAUTION: MICROWAVE RADIATION
PRECAUTIONS TO AVOID POSSIBLE EXPOSURE TO
EXCESSIVE MICROWAVE ENERGY
a) Do not atempt to operate this oven with the door open since open-door operation can result
in harmful exposure to microwave energy.
It is important not to defeat or tamper with the safety interlocks.
b) Do not place any object between the oven front face and the door or allow soil or cleaner residue
to accumulate on sealing surfaces.
c) Do not operate the oven if it is damaged. It is particularly important that the oven door close
properly and that there is no damage to the: (1) door(bent), (2) hinges and latches (broken or
loosened), (3) door seals and sealing surfaces.
d) The oven should not be adjusted or repaired by anyone except qualified service personnel.
GROUNDING INSTRUCTIONS
This appliance must be grounded. In the event of an electrical short circuit, grounding reduces the
risk of electric shock by providing an escape wire for the electrical current. This appliance is
equipped with a cord having a grounding wire with a grounding plug. The plug must be plugged into
an outlet that is properly installed and grounded.
WARNING - IMPROPER USE OF THE GROUNDING CAN RESULT IN A RISK OF ELECTRIC SHOCK.
Consult a qualified electrician or serviceman if the grounding instructions are not completely
understood, or it doubt exists as to whether the appliance is properly grounded, and either;
1) If it is necessary to use an extension cord, use only a 3 wire extension cord that has a 3-blade
grounding plug, and a 3-socket receptacle that will accept the plug on the appliance. The marked
rating of the extension cord shall be equal to or greater than the electrical rating of the appliance, or
2) Do not use an extension cord. If the power supply cord is too short, have a qualified electrician or
serviceman install an outlet near the appliance.
Page.3
Know your microwave oven
Turntable
Housing
Oven door
Control panel
Release button
Rotating axis
Rotating ring
Door interlock
Waveguide cover
Fig.1
Warning: never remove it during cleaning
Notes:.
1. The oven cannot be activated without the door properly closed. This is a safety
feature, never intend to damage it.
2. The operation of control panel is illustrated in next page( the control panel is
subject to change without prior notice)
3. Warning: Never remove the Waveguide cover during cleaning, see fig.1.
Page: 4
Operation of Control Panel
88:88
M
L
G
D.1 D.2
L.M M
M.H
Micro power Express
Auto defrost
D.3
Auto
L
Kg
LED Display
H
Preset.clock
It will show the clock time,
cooking mode and left
operation time, which is
depend on the current
set mode.
Stop.clear Instant.start
Auto cooking
Time.weight
MODEL: SMW736
1. After power-up
MW
L
The LED Display will flash
3 times when plugged in power supply. Then it will flash
Prompt you input the cooking menu and time.
:
,
2.Auto cooking/time.weight knob
Increase or decrease cooking time, weight and Auto menu during operation by turning the Auto cooking
/time.weight button
3. Stop.clear
Press stop.clear button once to
1.Stop the oven temporarily during cooking food.
2.Clear the enter if you make a mistake during setting .
3. Clear the previous setting if the food has been taken out prior to the preset time otherwise you cannot input new settings
without disconnect power supply.
4.Auto reminder
When your preset cooking procedure have finished, the LED Display will show E n
and six beep sound will be heard to
prompt you to take out food. If you do not press stop.clear button once or open the door the beep will be sounded at an interval
of 3 minutes.
P
Page: 5
5.Child lock function
Depress
Display
To set child lock
depress and hold below button about 3 seconds until the
LED appears OFF.
o ff
Use this feature to lock the control panel when you are cleaning
or so that children can not use the oven unsupervised. A beep
sound will be heard. All the buttons are rendered inoperable in
this mode.
Stop.clear
To cancel child lock:
the operation is same as above
and LED will show colon.
6.Microwave cooking
H
80P
M
::
100P
M
Example :To cook at 80P for 10 and half minutes.
20P
. 1. After power- up, the colon flashes
or Press stop.clear button once
L
M.H
Display
Depress
Press power button, LED will cycle to show
M
:
100P--- High power, 100% microwave power. Applicable
for quick and thorough cooking.
2 . Select the desired microwave
power by depressing Mcropower
Micro power
button consecutively.
80P--- Medium High power, 80% microwave power .
Applicable for medium express cooking
60P--- Medium power, 60% microwave power .
Applicable for steaming food
:
M
M.H
3. Set cooking time by turning the Auto cooking
/time.weight knob.
M
40P--- Medium Low Power, 40% microwave power .
Applicable for defrosting food.
80P
10:30
M.H
.
4.
20P--- Low power, 20% microwave power .
Applicable for keeping warm.
Press
Instant. Start
to start, and LED will count down to
.
show running time.
NOTE :
You may change the cooking time during cooking. And it is
1. The max time can be set is 99 minutes and 99 seconds . recommend to turn the food halfway, after you turn the food, Press
2. Never use the Grill rack during microwave cooking.
instant.start button once to continue...
3 . Never operate the oven empty.
4. If you turn the food during operation, press the Instant/start button once and the preset cooking
procedure will continue.
5. If you intend to remove the food before the preset time, you must press Pause/cancel button once to
clear the preset procedure to avoid unintended operation of next time use.
7.Express
Depress
Press this button LED Display will cycle to show
30
.
1:00
.
Display
Example :To cook with express for 1 minute
1:30
This function will allow you to heat a cup of water or
beverage conveniently, omitting the steps of setting time.
Choose the proper time depending on the beverage
capacity.
0:30---default 30 sec operation time
1:00---default 1minute operation time
1:30---default time is 1and half minutes.
. 1 . After power- up, the colon flashes
or Press stop.clear button once
2. Depress the button consecutively
to select desired menu
Express
:
1:00
Instant.start
3. Start cooking .
Page: 6
180
Depress
8. Auto defrost
Press the button and the LED display will circle to show
.2
.
D.3
.3
Example :To defrost 0.2kg poultry.
. 1. After power- up, the colon flashes
or Press stop.clear button once
P
.1 --- for defrosting meat. the weight range from
0.1Kg to 2.0 Kg.
P
2. Select the food kind
.2 --- for defrosting poultry. the weight
range from 0.2 to 3.0Kg.
P
.3 --- for defrosting seafood. the weight
P
range from 0.1to 0.9Kg.
Note:
1. It is necessary to turn over the food during operation
to obtain uniform effect.
2. Usually defrosting will need longer time than that of
cooking the food.
3. If the food can be cut by knife, the defrosting process
can be considered completed.
4. Observe the below Defrost guide to achieve best
performance.
Auto.defrost
.
3. Set defrosting weight by turning the Auto
cooking/time.weight
4. Start cooking .
Instant.start
D.2
.2
D.2
0.2
kg
LEDwill count down to show
the default running time
5 . Half way during defrosting 3 beep sound will be heard two
times
. to prompt you turn over the food. Open the door and turn
over the food and shield the warm portion. Pressing instant.start
button again to continue the defrosting.If you do not when an
audible signal sounds, the defrosting cyclewill continue until
the time count down to 0.
Defrost guide
Steaks chops
- shield thin end of chops or steaks with foil.
- position the food with thinner parts in the centre in a single layer on a shallow dish. If pieces are stuck
together,try to separate as soon as possible.
- when the oven Beeps, it is to prompt you to turn over the food. Turn over, rearrange and shield the
defrosted portions.
- Press instant.start to continue defrosting.
- After defrost time, stand covered with aluminium foil for 5-15 minutes.
Minced Beef
- Place frozen minced beef on a shallow dish. Shield edges.
- when the oven Beeps, it is to prompt you to turn over the food. Remove defrosted portions,turn over and
shield edges with foil strips.
- Press instant.start to continue defrosting.
- After defrost time, stand covered with aluminium foil for 5-15 minutes.
Roast Meat (Beef/pork/lamb)
- Shield the edges with foil strips.
- Place joint with lean side face upwards (if possible) on a shallow dish.
- when the oven Beeps, it is to prompt you to turn over the food. Turn over, and shield the defrosted portions.
- Press instant.start to continue defrosting.
- After defrost time, stand covered with aluminium foil for 10-30 minutes.
Poultry
- Remove from original wrapper. Shield wing and leg tips with foil.
- Place breast side down on a shallow dish.
- when the oven Beeps, it is to prompt you to turn over the food. Turn over and shield the defrosted portions.
- Press intant. start to continue defrosting.
- After defrost time, stand covered with aluminium foil for 15-30 minutes.
Note: After standing run under cold water to remove giblets if necessary.
Chicken pieces ( chicken wings and drumstick)
- shield the exposed bone with foil.
- Place chicken pieces on a shallow dish.
- when the oven Beeps, it is to prompt you to turn over the food. Turn over, rearrange and shield the
defrosted portions.
- Press instant.start to continue defrosting.
- After defrost time, stand covered with aluminium foil for 5-30 minutes.
Page: 7
:
P
.
P
.1
D.2
P
D.1
Display
9.Auto cooking
Depress
Example: Steam 0.45kg fish
The oven has default cooking menu forsimple operation.
When the LED flash colon, turn the Auto cooking/time.
Weight knob and LED will cycle to show
.
A.2
Auto
::
A.1
Auto
A.8
Displa y
. 1. After power- up, the colon flashes
or Press stop.clear button once
Auto
Choose the appropriate menu according
to the food type and weight and strictly
observe the directions of below table, otherwise the cooking
effect will be largely influenced.
.
:
2 Choose the appropriate menu by
turning the Auto cooking/time.weight .
A.8
3. Start cooking.And LED will show
the default
running time. Instant.start
6:30
Auto
Auto
Autocook table
Display
Category
A.1
Auto
Popcorn
A.2
Auto
Popcorn
Same as above except 3.5Oz weight
Auto
Pizza
Warm a piece of chilled pizza of 0.15Kg..
Direction
Suitable for popping a bag of corn, which is available in the market, weighted 3.0Oz.
Prior to completing, if the popping speed has been decreased to 1 time per 1-2 seconds
you should press Pause to stop the popping process.
.
A.3
A.4
Auto
Beverage
Heating a cup of 250 ml liquid. The liquid temperature is about 5-100C.
use a big mouth cup and do not seal.
A.5
Auto
Beverage
Heating a cup of 500 ml liquid. The liquid temperature is about 5-100C.
use a big mouth cup and do not seal.
Potato
Cooking the potato strips, cut into 5mm width and height, length is not limited. Total
weight is about 0.45Kg. Place the strips on a large dish and cover the dish with a thin
film to prevent water loss.
A.6
A.7
A.8
Auto
Auto
Potato
Same as above except the weight of potato strips is about 0.65Kg.
Fish
Suitable for steaming a fish of 0.45Kg. After the fish washed and scales removed,
make a slits on the skin of fish .Put the fish on a shallow dish of 22-27 cm diameter
sprinkle lightly with some ingredient .After cooking ,stand for 2 minutes .
Auto
Note:1. The cook time above based on the food which is of the room temperature of 20-250C except s
Results wiill vary for the food in different temperature.
2. When cooking the potatoes and fish it is suggested to cover the food with a layer of plastic thin film
to prevent the loss of water. And allow standing time prior taking food out.
3. The temperature, weight and shape of food will largely influence the cooking effect. If any deviation
has been found to the factor noted on above menu, you can adjust the cooking time for best result.
Page: 8
10.Automatic starting (delayed function)
If you do not want the menu be started immediately, you can preset the cooking menu and time and the preset menu will be automatically started at your set time. The setting will consist of 2 steps: 1. Setting the current clock; 2.setting the cooking menu and time
Example :Now it is 12:30 clock ,if you hope that the microwave oven will automatically start cooking
with100P microwave power for 9 minutes and 30 seconds at 14:20 .
Depress
1.set the current time
Display
1.1 depress Preset.clock button
0: 00
Preset.clock
L
Depress
Display
2.set the cooking menu and time
2.1
Micro.power
10 0P
M
H
Select cooking power
1. 2Turn the Auto cooking/time.weight to
set hours,and hours will be flashed.
12: 00
L
2.2 Turn the Auto cooking/time.weight to set
cooking time .
M
9:30
H
12: 00
1.3 Depress again to confirm hours.
L
2.3 Press preset.clock button and hold it for 3 seconds
for to return to current clock.
Preset.clock
12:30
.
M
Preset.clock
H
3. Set the time you expect to
14 :20
start. Repeat the steps of
1.2,1.3,1.4.
4. Depress preset.clock button to confirm the delayed menu.
Now the program has been activated.
And the menu will be started at 14:20 .
12 :30
M
12:30
1. 4Turnthe Auto cooking/time.weight to
set minutes
L
H
M
1.5 Depress preset.clock or waiting for
5 seconds, and the numbers
Preset.clock will go steady
L
H
12:30
L
5..You may check the preseted starting
time by depressing preset.clock button.
14:20
M
H
Preset.clock
NOTE:Delayed function is not applied to ex press, autocooking and defrost
11. Multi-sequence cooking
To obtain best cooking result ,some recipes call for different cook mode and time. You may program your personalized menu as follow:.
Example :you want cook food with 100p microwave for 3 minutes then cook food with 20P for 9 minutes . This is 2 sequence setting.
Depress
Display
Sequence 1:100Pmicrowave for 3min
1.1
Micro.power
Depress
2.2.
10 0P
M
Display
Set the cooking time by turning the
Auto cooking/time.weight button.
M
L
9 :00
H
1.2 Set the cooking time by turning the
Auto cooking/time.weight button.
M
3 :00
3. Start cooking.
M
3 :00
H
H
Instant.start
Sequence 2:20P microwave for 9min
Micro.power
2.1
M
L
20P
When microwave power cooking with 100P is finished ,microwave
oven will begin cooking with 20P automatically .
Notes: Max 4 sequence can be set per time repeat the steps
1.1, 1.2 if you like to set more.
Page: 9
Microwave cooking tips
1) Arrange food carefully, place thickest areas toward outside of dish.
2) Watch cooking time, cook for the shortest amount of time indicated and add more time as needed.
3) Cover foods before cooking
check recipe for suggestions: paper towels, microwave plastic wrap or a lid.Covers prevent spattering and help foods to cook
evenly. (Helps keep oven clean).
4) Shield foods
Use small pieces of aluinium foil to cover thin areas of meats or poultry to avoid overcooking.
5) Stir foods:From outside to center of dish once or twice during cooking, if possible.
6) Turn foods:Foods such as chicken, hamburgers or steaks should be turned over once during cooking.
7) Rearrange foods: Like meatballs halfway through cooking both from top to bottom and from the center of the dish to the outside.
8) Allow standing time
After cooking ensure adequate standing time.Remove food from oven and stir if possible.
Cover for standing time which allows the food to finish cooking without overcooking.
8) Check for doneness
Look for signs indicating that cooking temperature has been reached. Doneness signs include:
-Food steams throughout, not just at edge.
-Poultry thigh joints move easily.
-Pork and poultry show no pinkness..
-Fish is opaque and flakes easily with a fork.
9) Condensation
A normal part of microwave cooking. The humidity and moisture in food will influence the amount of moisture in the oven. Generally
, covered foods will not cause as much condensation as uncovered foods. Ensure that the ventilation openings are not blocked.
10) Browning dish
when using a browning dish, always place a heat-resistant insulator such as a porcelain plate under it to prevent damage to the
turntable, rotating ring due to heat stress. The preheating time specified in the dishes instructions must not be exceeded.
11) Microwave safe plastic wrap
for cooking food with high fat content, do not bring the wrap in contact with the food as it may melt.
12) Microwave safe plastic cookware
Some microwave safe plastic cookware are not suitable for cooking foods with high fat and sugar content.
Cleaning and maintenance
Disconnect the power supply cord before cleaning. And if possible leave the door open to inactivate the oven during cleaning.
Exterior:
The outside may be cleaned with mild soap and warm water, wipe clean with a damp cloth. Avoid theuse of harsh abrasive cleaners.
Door:
Wipe the door and window on both sides, the door seals and adjacent parts frequently with a damp cloth to remove any spills or
spatters. Do not use abrasive cleaners.
Control panel:
Care should be taken in cleaning the control panel. Wipe the panel with a cloth dampened slightly with water only.Do not scrub or use
any sort of chemical cleaners. Avoid the use of excess water.
Interior walls:
To clean the interior surfaces, wipe with a soft cloth and warm water for hygienic reasons. After usewipe the waveguide cover
in the oven with a soft damp cloth to remove any food splashed. Buildup splashes may overheat and begin to smoke or catch fire.
Do not remove the waveguide cover. Do not use a commercial oven cleaner, abrasive or harsh cleaners and scouring pads on any
part of your microwave oven. Never spray oven cleaners directly onto any part of your oven.Avoid using excess water. After cleaning
the oven, ensure any water is removed with a soft cloth.
Turntable/ Rotating ring/Rotating axis
Wash with mild soapy water and dry thoroughly.
TIP: When the microwave oven has been used for a long time, there may be some strange odors exist in
oven, Following 3 methods can get rid of them :
1. Place several lemon slices in a cup, then heat with high power for 2-3 min.
2. place a cup of red tea in oven, then heat with high power.
3. Put some orange peel into oven, then heat them with high power for 1 minute.
Servicing
Warning: it is hazardous for anyone, other than a qualified service technician, to carry out any service for repairing
operation which involves removal of any cover which gives protection against exposure to microwave energy.
Caution: MICROWAVE RADIATION
Do not become exposed to radiation from the microwave generator or other parts conducting microwave energy.
During servicing below listed parts are liable to be removed and give access to potentials above 250V to earth.
1. Magnetron
2. High voltage transformer
3. High voltage capacitor 4. High voltage diode
5. High voltage fuse
Below listed condition may cause undue microwave exposure during servicing.
1. Unproper fitting of magnetron.
2. Unproper matching of Door interlock, door hinge and door.
3. Unproper fitting of switch support.
4. Door, Door seal or enclosure has been damage.
Page: 10