1
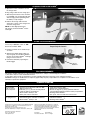
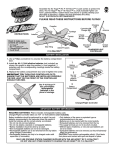
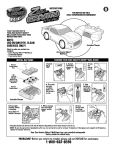
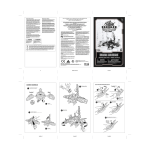
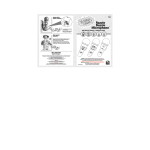
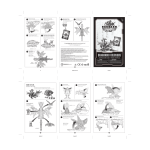
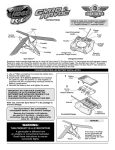
®
The Air Hogs® Room RaiderTM is perfect for
first-time flyers. There is no assembly required.
All you need is an open space and six AA 1.5V
alkaline batteries (not included) to take flight.
ADULT SUPERVISION RECOMMENDED.
PLEASE READ THESE INSTRUCTIONS
BEFORE FLYING!
Power/Charge
Switch
Controller/
Charger
Throttle
Trigger
INSTRUCTIONS
Check to make sure contents
are complete:
1 Air Hogs® Room RaiderTM with
Motor/Propeller
1 Controller/Charger
1 Instruction Manual
Jet
CONTROLLER/CHARGER BATTERY INSTALLATION
1. Use a Phillips screwdriver (not included) to unscrew
and remove the battery holder from the controller.
2. Install six AA 1.5V alkaline batteries (not included)
in the controller. Be careful to align the positive (+) and
negative (-) polarities with the corresponding markings
inside the battery holder.
3. Reinstall the battery holder and tighten the screw.
Controller
Battery
Compartment
IMPORTANT BATTERY INFORMATION
• Batteries should always be replaced by an adult.
• Do not mix old and new batteries.
• Do not mix alkaline, standard (carbon-zinc), or
rechargeable (nickel-cadmium) batteries.
• Non-rechargeable batteries are not to be recharged.
• Rechargeable batteries are to be removed from the toy
before being charged (if removable).
• Rechargeable batteries are only to be charged under
adult supervision (if removable).
• Different types of batteries or new and used batteries
are not to be mixed.
Battery
Holder
• Only batteries of the same or equivalent type as
recommended are to be used.
• Batteries are to be inserted with the correct polarity.
• Exhausted batteries are to be removed from the toy.
Six AA 1.5V
Alkaline
Batteries
(not included)
• The supply terminals are not to be short-circuited.
• Please retain this information for future reference.
CAUTION: Do not dispose of batteries in fire. Batteries
may explode or leak.
Familiarize yourself with the position of the “ON/OFF” switch,
and Charge Port.
FLYING INDOORS
Location – Fly in a wide open room, away from breakable
items. Avoid flying near vents and/or fans, as these
may overpower the Room RaiderTM and make it difficult to
control. NOTE: Always get permission to fly your Room
RaiderTM indoors.
WARNING: Never fly near your face. Keep propeller away
from your fingers, hair, eyes and other body parts. Always
lift off from a flat surface. Never hold the Room RaiderTM
by the bottom fin. Do not launch jet near people or
animals. Stay away from obstacles and electric hazards.
“ON/OFF” Switch
Charge Port
CHARGING YOUR ROOM RAIDERTM
1. Open door on the controller to access
the charge cable.
2. Plug charge cable into the charge port.
3. Slide the power switch on the controller
to “CHARGE”. The charge light will flash
while charging and stop flashing when
the battery is fully charged.
4. Remove the charge cable from the
charge port, store it in the charger and
close the storage door.
NOTE: For best flight performance,
fully charge your Room RaiderTM before
each flight.
Charge
Cable
FLYING YOUR ROOM RAIDERTM
1. Turn the jet “ON/OFF” switch to “ON”.
Proper Grip for Launch
2. Turn the controller “ON”.
3. Hold the controller in one hand and jet
as shown.
4. Squeeze the throttle trigger about 1/2
way and gently toss the Room RaiderTM
into the air. The Room RaiderTM will begin
flying in circles to the left.
5. Control the altitude by squeezing the
throttle trigger.
Do not
hold here
FCC REQUIREMENTS
This device complies with part 15 of the FCC Rules. Operation is subject to the following two conditions:
1) This device may not cause harmful interference.
2) This device must accept any interference received, including interference that may cause undesired operation.
WARNING: Changes or modifications not expressly approved by the party responsible for its compliance could void the user’s
authority to operate the equipment.
TROUBLESHOOTING
PROBLEM
CAUSE
SOLUTION
Room Raider
will not start or
has lost power.
1. You have not set the motor switch to “ON”.
2. Battery power is low.
3. Batteries (+) or (-) are not correctly placed
inside the battery compartment.
4. Room RaiderTM battery is low.
5. Safety auto-cutoff is activated.
1. Push motor switch to “ON”.
2. Replace the controller batteries.
3. Be sure to align the (+) and (-) polarities with the
corresponding markings inside the battery compartment.
4. Recharge Room RaiderTM.
5. Turn jet off, wait 3 seconds then turn back on.
Room RaiderTM
is flying too low.
1. Needs more power.
2. The batteries in the controller are drained.
3. Room RaiderTM battery is low.
1. Squeeze the throttle trigger more.
2. Install new batteries.
3. Recharge Room RaiderTM.
TM
Spin Master Ltd., 450 Front Street West, Toronto, ON M5V 1B6 Canada
Spin Master, Inc., PMB #10053, 300 International Drive, Suite 100,
Williamsville, NY 14221, USA
Spin Master Toys Far East Limited, Rm #1113, 11/F,
Chinachem Golden Plaza, 77 Mody Rd., Tsimshatsui E., Kowloon, HK
TM and © 2006 Spin Master Ltd. Air Hogs ® is a registered
trademark of Spin Master Ltd. All rights reserved. Conforms to
product safety standards ASTM F963-03, EN71 regulatory
requirements. Products and colors may vary. Please retain this
information for future reference. Patent Pending.
MADE IN CHINA.
North American Consumer Information
Phone: 1-800-622-8339
www.spinmaster.com
Item #44210
#20004655, #20004658
44210-ENG-IS-2
REV 2 US English
Contains LiPo battery pack.
Battery pack must be
recycled or disposed of
properly.
TM