1
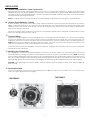
OWNER’S MANUAL Cinema In-Wall Sub In-Wall Subwoofer Cinema Sub 12 | Cinema Sub 10 | Cinema Sub 8 SAFETY INSTRUCTIONS APPLICABLE FOR USA, CANADA OR WHERE APPROVED FOR USAGE CAUTION: To reduce the risk of electric CAUTION: TO PREVENT ELECTRIC SHOCK, MATCH WIDE BLADE PLUG TO WIDE SLOT, INSERT FULLY. shock, do not remove cover (or back). No user-serviceable parts inside. Refer servicing to qualified service personnel. ATTENTION: POUR EVITER LES CHOCS ELECTRIQUES, INTRODUIRE LA LAME LA PLUS LARGE DE LA FICHE DANS LA BORNE CORRESPONDANTE DE LA PRISE ET POUSSER JUSQU AU FOND. • Explanation of Graphical Symbols The lightning flash with arrowhead symbol, within an equilateral triangle, is intended to alert you to the presence of uninsulated “dangerous voltage” within the product’s enclosure that may be of sufficient magnitude to constitute a risk of electric shock to persons. The exclamation point within an equilateral triangle is intended to alert you to the presence of important operating and maintenance (servicing) instructions in the literature accompanying the appliance. 10. Power Source - The appliance should be connected to a power supply only of the type described in the operating instructions or as marked on the appliance. 11. Power-Cord Protection - Power-supply cords should be routed so that they are not likely to be walked on or pinched by items placed upon or against them, paying particular attention to cords at plugs, convenience receptacles, and the point where they exit from the appliance. 1. Read Instructions - All the safety and operating instructions should be read before the appliance is operated. 2. Retain Instructions - The safety and operating instructions should be retained for future reference. 3. Heed Warnings - All warnings on the appliance and in the operating instructions should be adhered to. 12. Cleaning - The appliance should be cleaned only as recommended by the manufacturer. 4. Follow Instructions - All operating and other instructions should be followed. 13. Non use Periods - The appliance coupler shall remain readily operatable. The appliance coupler should be disconnected from the apparatus when left unused for a long period of time. 5. Water and Moisture - To reduce the risk of electric shock, do not expose this apparatus to rain or moisture – for example, near a bathtub, washbowl, kitchen sink, laundry tub, in a wet basement, or near a swimming pool, etc. 14. Object and Liquid Entry - Care should be taken so that objects do not fall into and liquids not spilled into the inside of the appliance. 6. Carts and Stands - The appliance should be used only with a cart or stand that is recommended by the manufacturer. 15. Damage Requiring Service - The appliance should be serviced by qualified service personnel when: PORTABLE CART WARNING 7. Wall or Ceiling Mounting - The appliance should be mounted to a wall or ceiling only as recommended by the manufacturer. 8. Ventilation - The appliance should be situated so that its location or position does not interfere with its proper ventilation. For example, the appliance should not be situated on a bed, sofa, rug, or similar surface that may block the ventilation openings; or placed in a built-in installation, such as a bookcase or cabinet that may impede the flow of air through the ventilation openings. a. The power-supply cord or the plug has been dam aged; or b. Objects have fallen onto, or liquid has been spilled into the appliance; or c. The appliance has been exposed to rain; or d. The appliance does not appear to operate normally or exhibits a marked change in performance; or e. The appliance has been dropped, or the cabinet damaged. 16. Servicing - The user should not attempt to service the appliance beyond those means described in the operating instructions. All other servicing should be referred to qualified service personnel. 17. Grounding or Polarization - The precautions that should be taken so that the grounding or polarization means of an appliance is not defeated. 9. Heat - The appliance should be situated away from heat sources such as radiators, stoves, or other appliances that produce heat. 1 INTRODUCTION Congratulations on your purchase of the Cinema Sub In-Wall Subwoofer! The Cinema Sub will provide the excellent performance and reliability that SpeakerCraft products have been recognized for. The Cinema Sub delivers the room-filling, thundering bass demanded by today’s home theater systems, while remaining completely recessed in the wall behind a flush mounted grille. The performance of high power, floor standing subwoofers has finally come to architectural speakers. SpeakerCraft is the name you can trust for accurate sound reproduction. SYSTEM COMPONENTS Included in this Carton: • • • • Cinema Sub Subwoofer Grille Paint Mask Cut Out Template INSTALLATION OPTIONS • For new construction applications, we highly recommend using the AccuTune box. For installation, follow the direc- tions included with the unit. • For retrofit installation, simply cut out the drywall using the template included. Then mount the woofer assembly into the cutout hole. AcoustaCell is also available and is recommended for retrofit installations. SYSTEM DESIGN CONSIDERATIONS • In new construction, we highly recommend using the Accutune box that matches your subwoofer. It has been designed to acoustically compliment the subwoofer and eliminate the acoustic problems caused by drywall, by providing a solid enclosure to which the subwoofer will be attached. Please contact your authorized SpeakerCraft dealer for further information. • The Subwoofer should be mounted low on the wall, free from obstructions. The lower you mount it, the louder the bass will be. • For retrofit applications every practical effort should be made to eliminate possible noise on or inside the wall surrounding this subwoofer. Steps must be taken to ensure that the wall and anything attached to the wall, in which the Cinema Sub is mounted, is secure. We recommend not hanging anything directly over the Cinema Sub. If there is no way around it, steps will need to be taken to ensure that pictures, mirrors, shelves, etc. do not vibrate on the wall. The use of rubber grommets, adhesive tape, extra mounting screws, or foam padding will help in these types of applications. • In addition to our AcoustaCell system (part # ASMX3101) we recommend using acoustical spray foam instead of insulation in the bays that surround the Cinema Sub. The foam will be able to get into all those small gaps and will absorb most of the vibration from the subwoofer. If foam is not available, stuff the wall with as much insulation as possible. Using adhesive foam strips between the stud and drywall is also an option that could be used to help keep the drywall from vibrating on the studs. In addition, extra drywall screws can be used to secure the drywall to the studs. 2 DIAGRAM 1 Installation Overview STEP 1 Cut opening STEP 2 Connect wires STEP 3 Mount Speaker STEP 4 Insert Grille Please use Diagram 1 for a quick installation overview, which will be explored in greater detail throughout this manual. CAUTION • The Cinema Sub is designed to work only with the Bass Power amplifier. To insure maximum sound quality and performance, use this amplifier only. • Be sure there is enough clearance for the mounting feet. • Please follow the instructions below carefully. For technical inquires, please call 1-800-448-0976 or e-mail us at [email protected]. 3 INSTALLATION 1a. Cinema Sub Installation – New Construction Mounting the Cinema Sub subwoofer requires that you first run speaker wire (minimum 14 gauge) to the Bass Power amplifier’s location. For greatest flexibility of connection, use four conductor, 14 gauge wiring. After pulling the speaker wire from the Bass Power amplifier location, you can now hang the drywall. Carefully mark and cut out the hole for the subwoofer before mounting the drywall. NOTE: It is critical to insure that the drywall (or any wall material) is well dampened and tight to avoid vibrations. 1b. Cinema Sub Installation – Retrofit Find the location of the studs in the wall by using a good stud finder. Locate the exact center between the studs by drilling a small hole as close to the center as can be determined, then, using a stiff wire (a metal coat hanger works well) bent to 90º, feel for both studs through the hole. By turning the wire around you should be able to determine the exact center between the studs. Once the center has been determined, use the cut-out template supplied with the subwoofer to mark and cut out the hole in the drywall, being sure that it is level. 2. Connect Wiring: Make sure that the amplifier's power is unplugged when connecting any wires or cables to it. In a mono bass amplifier, connect the speaker wire to the woofer, using the pair of terminals that has the white dot on the support piece (see Diagram 2). Be sure to connect the positive wire to the red terminal (+) and the negative wire to the black terminal (-). NOTE: Make sure the connections are tight or they may rattle. The other end of the wire should be connected to the “SUB OUT” terminals on the Bass Power amplifier in the same manner. In the case that a stereo bass amplifier is used, four conductor 14 gauge wire should be used to connect to both pairs of terminals on the subwoofer. 3. Mounting the Cinema Sub The Cinema Sub has been specifically designed to mount to the drywall. Make sure the mounting feet are turned inward to clear the opening, and insert the subwoofer into the cut-out. Position the speaker in the hole. NOTE: The flange of the speaker is designed to flex and conform to any small imperfections in the wall surface. Tighten the 8 screws on the front of the baffle enough to make the flange become snug against the drywall. As you tighten the screws, the feet will automatically flip into an outward position (see Diagram 3), clamping the drywall between the feet and the flange. CAUTION: Over tightening may warp the baffle, crack the drywall, cause the flange to distort, and make the grille difficult to install. 4. Inserting the Grille Once the Cinema Sub is in place, you can carefully push the grille into the slot on the baffle. Due to the nature of the system, the grill is designed to fit very tightly. DIAGRAM 3 DIAGRAM 2 Terminals Support Piece 4 SPECIFICATIONS Cinema Sub 12 Cinema Sub 10 Driver: 12" Long Throw Woofer, Treated Paper Cone with Butyl Rubber Surround 10" Long Throw Woofer, Treated PaperCone with Butyl Rubber Surround Impedance: 4 ohms / per coil 4 ohms / per coil SPL: 91 dB 89 dB Frequency Response: 25Hz - 500Hz 30Hz - 800Hz Power Handling: 250 watts 200 watts Baffle & Grille Color: White White Dimensions H x W: 1415⁄16" x 1415⁄16" 139⁄16" x 139⁄16" (380mm x 380mm) (345mm x 345mm) 133⁄8" x 133⁄8" 121⁄8" x 121⁄8" (340mm x 340mm) (308mm x 308mm) 10 lbs. 8 lbs. Cut-Out Dimensions H x W: Weight: (use the Bass Power 250 amp) Cinema Sub 8 Driver: 8" Long Throw Woofer, Treated Paper Cone with Butyl Rubber Surround Impedance: 4 ohms / per coil SPL: 88 dB Frequency Response: 35Hz - 1000Hz Power Handling: 150 watts Baffle & Grille Color: White Dimensions H x W: 111⁄2" x 111⁄2" (use the Bass Power 150 amp) (292mm x 292mm) Cut-Out Dimensions H x W: 10" x 10" (254mm x 254mm) Weight: 6 lbs. In our attempt to constantly improve our products, features and specifications are subject to change without notice. 5 (use the Bass Power 200 amp) LIMITED LIFETIME WARRANTY SpeakerCraft Inc. warrants to the original retail purchaser only that the Cinema Sub Subwoofer will be free from defects in materials and workmanship, provided the speaker was purchased from a SpeakerCraft Authorized Dealer. Defective products must be shipped, together with proof of purchase, prepaid insured to the SpeakerCraft Authorized Dealer from whom they were purchased, or to the SpeakerCraft factory at the address listed on this installation instruction manual. Freight collect shipments will be refused. It is preferable to ship this product in the original shipping container to lessen the chance of transit damage. In any case, the risk or loss or damage in transit is to be borne by the purchaser. If, upon examination at the Factory or SpeakerCraft Authorized Dealer, it is determined that the unit was defective in materials or workmanship at any time during this warranty period, SpeakerCraft or the SpeakerCraft Authorized Dealer will, at its option, repair or replace this product at no additional charge, except as set forth below. If this model is no longer available and can not be repaired effectively, SpeakerCraft, at its sole option, may replace the unit with a current model of equal or greater value. In some cases where a new model is substituted, a modification to the mounting surface may be required. If mounting surface modification is required, SpeakerCraft assumes no responsibility or liability for such modification. All replaced parts and product become the property of SpeakerCraft Inc. Products replaced or repaired under this warranty will be returned to the original retail purchaser, within a reasonable time, freight prepaid. This warranty does not include service or parts to repair damage caused by accident, disaster, misuse, abuse, negligence, inadequate packing or shipping procedures, commercial use, voltage inputs in excess of the rated maximum of the unit, or service, repair or modification of the product which has not been authorized or approved by SpeakerCraft. This warranty also excludes normal cosmetic deterioration caused by environmental conditions. This warranty will be void if the serial number on the product has been removed, tampered with or defaced. This warranty is in lieu of all other expressed warranties. If the product is defective in materials or workmanship as warranted above, the purchaser’s sole remedy shall be repair or replacement as provided above. In no event will SpeakerCraft be liable for any incidental or consequential damages arising out of the use or inability to use the product, even if SpeakerCraft Inc. or a SpeakerCraft Inc. Authorized Dealer has been advised of the possibility of such damages, or for any claim by any other party. Some states do not allow the exclusion or limitation of consequential damages, so the above limitation and exclusion may not apply. All implied warranties on the product are limited to the duration of this expressed warranty. Some states do not allow limitation on the length of an implied Warranty. If the original retail purchaser resides in such a state, this limitation does not apply. SpeakerCraft offers a variety of accessories to make your installation of this and other SpeakerCraft products easy, economical, and professional. Contact your authorized SpeakerCraft Dealer for more information. For technical inquires, please call 1-800-448-0976 or e-mail us at techsupport@ speakercraft.com. We are available to assist you every weekday, except holidays, between the hours of 7:00 a.m. and 5:00 p.m. PST. 6 940 Columbia Avenue, Riverside CA, 92507 | USA (800) 448 0976 Fax (951) 787 8747 International +1 951 787 0543 | www.speakercraft.com LIT67000