1
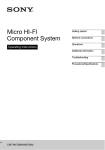
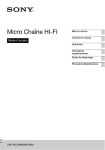
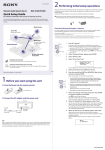
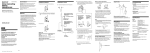
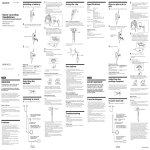
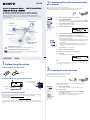
2 Connecting the system to your home network The access point scan method is introduced in this guide. For details on network connection methods other than the access point scan method “Connecting the system to your home network” in Operating Instructions This Quick Setup Guide explains how to connect CMT-MX700Ni/MX750Ni Micro HI-FI Component System to your wireless home network, and how to use the functions that can be used over a wireless network. 1 2 1 Press (power) to turn on the system. 2 Press HOME NETWORK. If the network setting display does not appear, press OPTIONS. Press / to select “Network,” then press ENTER. Select “Settings,” then press ENTER. Music Services 6 Server (PC) 3 Select “Wireless LAN Settings.” If “Change Setting?” appears, select “OK.” Stream audio content 2-9 4 Select “Access Point Scan.” DLNA player Play audio content stored on a server (PC) Home Network 5 Select the desired network name (SSID) from the list. 6 Enter the security key (WEP key, WPA/WPA2 key). By default, the security key appears as “*****.” Press DISPLAY repeatedly to encrypt and disclose the security key. Press CHARACTER repeatedly to select the character type (select “abc” Wireless LAN router/ access point Press the corresponding numeric/text button to enter the desired Listening to music services for entering lowercase letters, “ABC” for uppercase letters, and “123” for numbers). character, then press to move the cursor to the next input position. Press ENTER to save the text string. You can listen to various music services offered on the Internet. 7 On the IP setting, select “Auto.” 8 On the proxy setting, select “Do Not Use.” 9 Select “OK.” Listening to music stored on your server (PC) You can listen to audio content stored on a server (PC) that supports DLNA standards via your home network. If “Complete!” appears, press ENTER. 1 Before using the system Note If your network has not been secured by encryption (using the security key), the security setting display does not appear in step 6. 3 Insert batteries into the remote. Listening to music services R6 (size AA) 2 You can listen to various music services offered on the Internet. For details and further information on music services http://www.sony.net/audio/musicservices Connect the power cord and speaker cords. Insert only the stripped portion of the speaker cords. The following steps explain how to select “vTuner” as an example of music services offered on the Internet. Red () To a wall outlet To speakers Power cord 1 Speaker cords Check the following information You will be required to select or enter the following information when you make the network settings. Check the following information in advance, and record it in the space provided below. Network name (SSID)*: Security key (WEP key, WPA/WPA2 key)*: *This information should be available from a label on your wireless LAN router/access point, from the operating manual, from the person who set up your wireless network, or from the information provided by your Internet service provider. 1 Press MUSIC SERVICES. A list of service providers that the system can connect to appears. 2 Select “vTuner.” 3 Select the desired folder or station, then press . Press / to select the item. Press ENTER to go to the next directory, or to listen to the station. Press BACK to go back to the previous directory. 2-3 4 Listening to music stored on your server (PC) You can listen to audio content stored on a server (PC) that supports DLNA standards via your home network. You must set up the server (PC) in advance. If you encounter any trouble while the system is connected to a network, confirm the network status and settings. For details on the server settings for servers other than Windows 7, Windows Vista, or Windows XP Operation manuals or help of the respective servers, etc. Tips DLNA is an abbreviation for Digital Living Network Alliance. It is the name of an organization that establishes guidelines (DLNA guidelines), and it is also the name of the method that allows devices in a house to share digital content (such as music data, image data, etc.) over a home network. When checking the network status and settings, press OPTIONS, then select “Network” – “Information” – the desired setting item on the menu. Set up the server (PC) When using Windows Vista/XP This section explains how to set up Windows Media Player 11 installed on Windows Vista/XP*. *Windows Media Player 11 is not manufacturer-installed on Windows XP. Access the Microsoft website, download the installer, and install Windows Media Player 11 on your PC. For details on the use of Windows Media Player 11 Windows Media Player 11 Help Go to [Start] – [All Programs]. Select [Windows Media Player]. Select [Media Sharing...] from the [Library] menu. If you are using Windows XP, go to step . When is displayed, select [Networking...]. The [Network and Sharing Center] window appears. Select [Customize]. The [Set Network Location] window appears. When using Windows 7 This section explains how to set up manufacturer-installed Windows Media Player 12 for Windows 7. For details on the use of Windows Media Player 12 Windows Media Player 12 Help Go to [Start] – [Control Panel]. Check [Private] and select [Next]. Select [View network status and tasks] under [Network and Internet]. The [Network and Sharing Center] window appears. Note If the desired item does not appear on the display, try to change the Control Panel display type. Select [Public network] under [View your active networks]. The [Set Network Location] window appears. If the display shows other than [Public network], go to step . Confirm that the [Location type] is changed to [Private], and select [Close]. Confirm that [(Private network)] is displayed in the [Network and Sharing Center] window, and close the window. If [Share my media] in the [Media Sharing] window that is Select [Home network] or [Work network] according to the environment in which the system is displayed in step is not checked, check [Share my media], then select [OK]. A list of connectable devices is displayed. used. Follow the instructions that appear on the display according to the environment in which the system is used. When the settings are completed, confirm that the item under [View your active networks] is changed to [Home network] or [Work network] in the [Network and Sharing Center] window. Select [Change advanced sharing settings]. Select [Settings...] that appears beside [Share my media to:]. Check [Allow new devices and computers automatically] and select [OK]. Note Uncheck this item after you confirm that the system can be connected to the server, and play audio content stored on the server. Play music stored on your server (PC) 1 Select [Choose media streaming options...] from [Media 1 Press HOME NETWORK. 2 Select the server to be connected. When the server list does not appear, press OPTIONS and select “Refresh.” 3 Select the item (playlist, album, folder, etc.) you want to streaming]. 2 2-4 play. If another item appears, repeat step 3 until the desired item appears. 4 Select the track you want to play, then press ENTER. If [Media streaming is not turned on] appears in the [Media streaming options] window, select [Turn on media streaming]. Select [Allow All]. The [Allow All Media Devices] window opens. If all the devices in the local network are set to [Allowed], select [OK] and close the window. Troubleshooting For solutions to common problems and details of error messages “Troubleshooting” in Operating Instructions Select [Allow all computers and media devices]. Select [OK] to close the window. Customer support websites For customers in the USA: http://www.esupport.sony.com/ For customers in Canada:[English] http://www.sony.ca/ElectronicsSupport/ [French] http://fr.sony.ca/ElectronicsSupport/ For customers in Europe: http://support.sony-europe.com/ For customers in Latin America: http://esupport.sony.com/LA For customers in Brazil: http://esupport.sony.com/BR For customers in Asia and Oceania: http://www.sony-asia.com/support