1
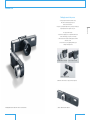
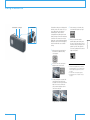
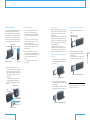
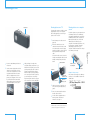
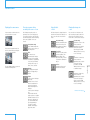
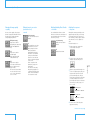
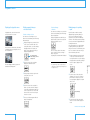
��������� ����������� ������� �� �����
������ �� � ���������� ��������� �� ���� ������������
�������� �� � ��������� �� ���� ������������
���������������
Owner’s Record
The model and serial numbers are located at
the bottom of the camera. Record these
numbers in the spaces provided below. Refer
to them whenever you call upon your Sony
dealer regarding this product.
Model No.
Serial No.
WARNING
To prevent fire or shock hazard, do not
expose the unit to rain or moisture.
CAUTION
You are cautioned that any changes or
modifications not expressly approved in this
manual could void your authority to operate
this equipment.
Note:
This equipment has been tested and found
to comply with the limits for a Class B digital
device, pursuant to Part 15 of the FCC
Rules.
These limits are designed to provide
reasonable protection against harmful
interference in a residential installation.
This equipment generates, uses, and can
radiate radio frequency energy and, if not
installed and used in accordance with the
instructions, may cause harmful interference
to radio communications.
However, there is no guarantee that
interference will not occur in a particular
installation. If this equipment does cause
harmful interference to radio or television
reception, which can be determined by
turning the equipment off and on, the user is
encouraged to try to correct the interference
by one or more of the following measures:
- Reorient or relocate the receiving antenna.
- Increase the separation between the
equipment and receiver.
This symbol is intended to alert the user to
the presence of uninsulated “dangerous
voltage” within the product’s enclosure that
may be of sufficient magnitude to constitute
a risk of electric shock to persons.
- Connect the equipment into an outlet on a
circuit different from that to which the
receiver is connected.
- Consult the dealer or an experienced
radio/TV technician for help.
Never expose the battery pack to
temperatures above 60°C (140°F), such as in
a car parked in the sun or under direct
sunlight.
This symbol is intended to alert the user to
the presence of important operating and
maintenance (servicing) instructions in the
literature accompanying the appliance.
For the Customers in the U.S.A.
THIS DEVICE COMPLIES WITH PART 15 OF
THE FCC RULES. OPERATION IS SUBJECT
TO THE FOLLOWING TWO CONDITIONS:
(1) THIS DEVICE MAY NOT CAUSE
HARMFUL INTERFERENCE, AND
(2) THIS DEVICE MUST ACCEPT ANY
INTERFERENCE RECEIVED, INCLUDING
INTERFERENCE THAT MAY CAUSE
UNDESIRED OPERATION.
For the Customers in Canada
THIS CLASS B DIGITAL APPARATUS
COMPLIES WITH CANADIAN ICES-003.
CET APPAREIL NUMÉRIQUE DE LA CLASSE
B EST CONFORME À LA NORME NMB-003
DU CANADA.
Contents
Introduction .............................................................................................................................. 10
Taking pictures ....................................................................................................................... 20
Identifying parts and controls ....................................................................................... 12
Zooming in ............................................................................................................. 22
Getting Started
1:Charging the batteries ................................................................................................... 14
To take out the “Memory Stick Duo”..................................................... 17
3:Setting the date and time ............................................................................................ 18
Using the self-timer .......................................................................................... 24
Reviewing pictures............................................................................................................... 26
Viewing pictures on a TV............................................................................... 27
Viewing pictures on a computer screen .............................................. 27
Checking camera settings .............................................................................................. 28
Checking the screen display in playback mode ............................ 30
About the number of pictures that can be taken .......................... 30
Menu Options
Checking the screen display in camera mode ................................ 29
Taking & Reviewing
Pictures
2:Inserting the “Memory Stick Duo” ......................................................................... 16
Using the flash ..................................................................................................... 23
Getting Started
Instant shooting from power off — Direct Shutter ............................... 23
Introduction
Taking & Reviewing Pictures
Introduction
Additional
Information
6
7
Additional Information
Caring for your camera ..................................................................................................... 46
How to use the touch pad ........................................................................... 33
About moisture condensation ................................................................... 47
Camera menu.......................................................................................................................... 34
About the internal rechargeable button battery ............................. 47
Displaying the camera menu ...................................................................... 34
Using the camera abroad ............................................................................. 48
Choosing a camera setting according to the scene
Cleaning your camera ..................................................................................... 48
— scene ............................................................................................................. 34
Changing the image size — size
............................................................... 35
Changing the image quality — quality
.................................................... 36
Taking pictures in succession (consecutive shot) — mode
...... 36
Adjusting the exposure — exposure
......................................................... 37
Adjusting the white balance — WB
......................................................... 38
Playback menu ....................................................................................................................... 40
Displaying the playback menu .................................................................. 40
Deleting unwanted images — delete/all delete
Marking images for printing — print
........................................................ 41
Changing the date and time — clock
Changing the date format — Y/M/D
..................................... 40
Viewing pictures ................................................................................................. 51
Deleting images .................................................................................................. 51
“Memory Stick Duo” ........................................................................................ 51
Others........................................................................................................................ 52
List of error icons ............................................................................................... 53
About the “Memory Stick Duo” ................................................................................... 54
Warranty card and after-sale services ..................................................................... 56
Specifications.......................................................................................................................... 57
Glossary ...................................................................................................................................... 59
Index ............................................................................................................................................. 60
..................................................... 42
........................................................ 42
Turning off the “beep sound” — beep .................................................... 43
Formatting the “Memory Stick Duo” — format
8
Taking pictures..................................................................................................... 50
The pictures used as examples in this “Owner’s Guide” are still images,
and are not actual images using this camera.
................................. 43
9
Additional
Information
Correcting blur caused by hand movement — hand .................... 38
Battery/power ...................................................................................................... 49
Menu Options
Enabling/disabling Direct Shutter — d.shutter..................................... 37
Troubleshooting ..................................................................................................................... 49
Taking & Reviewing
Pictures
Using the flash — flash...................................................................................... 35
Getting Started
Menu overview and operation ...................................................................................... 32
Introduction
Menu Options
Introduction
Finding pleasure in the process
Introduction
It’s not just about the moment of shutter release,
this camera is about enjoying the process
that leads to that moment –
the process of picking the right units for your subject and purpose,
and putting those units together one by one.
The range of units includes:
- a flash unit for capturing scenes at night and backlit scenes
- a viewer that enlarges your pictures for reviewing
- a timer remote unit for added versatility using the self-timer
and remote control
- conversion lenses for photographing distant objects
or taking in wide-angle views
The viewer slides onto the camera
Camera + flash unit + viewer
Camera + timer remote unit
Combine the units and lenses to enjoy the whole experience.
In the background: camera + flash unit + viewer + tele conversion lens
10
Camera + timer remote unit + flash unit
11
Identifying parts and controls
Top view
Images are stored on the
“Memory Stick Duo”
You can perform all settings without using
any buttons, just wih the touch pad (page
33).
The “Memory Stick Duo” IC recording
medium is one-third the size of a standard
“Memory Stick” and can store approximately
1000* images (page 30).
Shutter button
* When the 64 MB “Memory Stick Duo” (supplied) is
used and the image quality is STD (standard) and
the image size is S.
Touch pad
Front view
Touch the center
Touch the left end
Slide from left to right
Touch both ends
Lens
Power button
Back view
Select the lens according to the
subject
Battery
Strap holder
Screen
Wide conversion lens (left)
Use this lens to capture wide expanses such
as landscapes (page 22).
Tele conversion lens (right)
Use this lens to photograph people and
landscapes from a distance (page 22).
One battery type for all units
The camera, flash unit and video-out unit all
use the same type of lithium-ion battery.
Three batteries are provided which allow you
to have a backup battery on hand when the
battery in the camera or one of the units runs
out (page 14).
Side view
Cover of the Memory Stick
Duo slot
BATT LOCK (battery lock) switch
12
13
Introduction
Power lamp (green)
Easy operation using the touch
pad
1:Charging the batteries
1
Battery
This camera is supplied with three identical
batteries for the camera, the flash unit and
the video-out unit. Fully charge the batteries
before using them for the first time.
2
Prongs
CHG (charge)
lamp (red)
RELEASE button
Attach the battery to the battery charger
(supplied). Two batteries can be attached
at one time.
2
Flip out the prongs of the battery charger
and plug the charger into a wall outlet.
The red CHG (charge) lamp lights up
when charging begins and turns off
when charging is complete.
When you attach two batteries to the
charger, charging begins from the left
battery (the rearmost position on the
illustration), then the right battery
charges after charging is complete for
the left battery. If you attach a second
battery while you are already charging a
battery, charging continues on the first
battery, then begins on the second.
It takes about 2 hours to charge each
battery.
Battery charger
4
BATT LOCK switch
Unplug the battery charger when
charging is complete. Press the
RELEASE button to remove the battery.
4
Attach the battery to the camera (or the
flash unit or video-out unit) and slide the
BATT LOCK (battery lock) switch in the
direction of the arrow to lock in the
battery.
To remove the battery from the camera
or other unit, slide the BATT LOCK
switch in the opposite direction of the
arrow.
BATT LOCK switch
Camera
Flash unit
Battery
3
Battery
The chart below shows the approximate
number of pictures that can be taken/viewed
and the approximate battery life when the
camera uses a fully charged battery to take
or display STD-quality, S-size (640×480)
pictures at a temperature of 77°F. Actual
performance may vary depending on the
conditions.
Number of
Battery life:
pictures (approx.) min (approx.)
Standard
shooting*1
110
55
Consecutive
shooting*2
840
50
Playback
1200
60
*1 Shooting under the following conditions:
− The pictures are STD-quality, S-size.
− One picture is taken every 30 seconds.
− The camera is turned off after every 10 pictures
and turned on again after about 5 seconds.
*2 Shooting under the following conditions:
− The pictures are STD-quality, S-size.
− Pictures are taken every 4 seconds or so.
To check the remaining battery charge
You can check the approximate remaining
charge of the battery on the screen. For
details, see page 29.
����
����
Notes
• The battery life and the number of pictures that can
be taken/viewed may fall short of the levels listed
above if the camera is turned on/off repeatedly or
the camera is used at low temperatures.
• The battery supplies power only to the unit to which
it is attached.
14
15
Getting Started
3
1
Battery life and the number of pictures that
can be taken/viewed
2:Inserting the “Memory Stick Duo”
Open the cover of the Memory Stick Duo
slot.
2
Insert the “Memory Stick Duo” (supplied)
as illustrated on the left so that it clicks
into place, and close the cover.
To take out the “Memory Stick Duo”
First check that the access lamp (orange) is
off, then press in the “Memory Stick Duo”
and let it pop out.
The access lamp flashes when images are
being saved or loaded. Do not remove the
“Memory Stick Duo” or battery when the
access lamp is flashing; doing so may
damage image data.
Memory Stick
Duo slot
“Memory Stick Duo”
Cover of the Memory
Stick Duo slot
16
17
Getting Started
Access lamp
(orange)
1
3:Setting the date and time
Shutter button
Touch pad
Power button
1
2
3
When you press the power button for
the first time, the date/time setting
screen appears.
Touch the center of the touch pad to
display the year selection screen.
4
In the same way, set the month, date,
hour and minute using the touch pad.
��
�
�
����
������
������
�����
�
5
After you set the minute and the
date/time display starts flashing, touch
the center of the touch pad. You can set
the time precisely by touching the touch
pad when you hear a time signal. The
clock starts operating and the camera is
ready to take pictures.
��
� �
�
��
���
�
��
�
�
Notes
• If the internal rechargeable battery is exhausted or
the date/time display is reset to the default setting,
the date setting screen appears when you turn on
the camera.
• The date and time can be adjusted (page 42).
• For detailed instructions on using the touch pad,
see page 33.
Set the year using the touch pad. Slide
your finger from left to right over the
touch pad to increase the year and from
right to left to decrease it. When the
year you want is displayed, touch the
center of the touch pad.
The year increases. The year decreases.
18
19
Getting Started
The date/time setting screen is displayed the
first time you turn on the camera. Once you
set the date and time, the settings are
maintained by the camera’s internal
rechargeable battery. Although the internal
battery recharges each time the main battery
is attached to the camera, when the main
battery runs out, the internal battery will fully
discharge in about a month. If this happens,
the date and time will be reset to default
settings.
Taking pictures
Shutter button
Touch pad
Power button
4
Hold the camera steady and make sure
your fingers are not blocking the lens.
5
Press the shutter button halfway down
to allow the camera to adjust the focus.
The camera gives two short “beeps”
when it has set the focus and is ready to
take the picture. (The AF (Auto Focus)
frame also stops flashing (AF lock)).
AF frame flashes
Stops flashing
6
When you have the composition you
want, press the shutter button the rest
of the way to take the picture. A short
“beep” confirms that your picture has
been recorded. It may take a while for
the “beep” to sound if the camera shake
correction feature is on. (The access
indicator appears while the picture is
being recorded.) When the recorded
image appears on the screen for a few
seconds and the access indicator
disappears, the camera is ready to take
the next picture.
1
2
20
Check that the “Memory Stick Duo” is
inserted and remove the lens cap. If you
are facing the sun and the lens is
exposed to direct sunlight, use the lens
hood to reduce glare. To attach the lens
hood, align the dot on the lens hood
with the dot on the lens and push on the
lens hood until it clicks into place.
Press the power button and turn on the
camera. The QUALIA logo appears on
the screen followed by the battery and
Memory Stick Duo indicators. The
display will disappear when you touch
the touch pad.
3
Set the camera to camera mode. The
camera will always turn on in camera
mode. In camera mode, the image
captured by the lens appears on the
screen.
To switch to camera mode from
playback mode, touch the center of the
touch pad twice.
You can select a camera setting (page
32), such as Macro (page 34), for a
particular subject or scene and also set
the image size (page 35) and quality
(page 36).
As long as you do not press the shutter
button all the way down, Auto Focus is
released as soon as you release your
finger. Use the AF frame as a guide
when composing your shot. The camera
automatically adjusts the focus and
exposure to the object in the center. In
some cases, Auto Focus may not be
able to focus on the subject and the
flashing AF frame will disappear. If this
happens, try changing the composition
and refocusing on the subject.
To take a picture with the subject
off-center, first lock the focus with the
subject in the center and then move the
camera to get the composition you
want.
In macro mode, the minimum focal
distance is approximately 10 cm (4 in.)
(page 34).
The
icon appears on the screen in
macro mode. In camera shake correction
mode (page 38), the
icon appears
when you press the shutter button
halfway down.
You can turn off the “beep” sound (page
43).
When you have finished taking pictures,
press the power button. Note that the
camera turns off automatically if you do
not use it for more than 3 minutes (auto
power off).
Continued on the next page
21
Taking & Reviewing
Pictures
Access indicator
Taking pictures (continued)
Zooming in
To zoom in, slide your finger from left to right
over the touch pad. Keep your finger on the
right end to zoom all the way in up to x4
magnification. You can also repeat sliding
your finger to zoom in (up to x4, 16 steps).
To zoom out, slide your finger in the opposite
direction (from right to left). Since this feature
is a digital zoom which manipulates images
electronically, the picture becomes grainier
as the magnification increases.
�
Normal
Zoom out
�
�
�
Use the tele conversion lens (supplied) to
capture a distant subject. The tele
conversion lens also throws the background
of a subject out of focus because it has a
shallower depth of field (the range between
the nearest and farthest objects that appear
in focus). When using the tele conversion
lens, the distance between the front of the
lens and the subject should be more than 17
cm (6 3/4 in.).
For wide-angle pictures, use the wide
conversion lens (supplied). Because this lens
has an increased depth of field and takes in
a greater angle of view, it is effective for
photographing a landscape with the entire
image in focus. Nearby objects look larger
and distant objects look smaller so that the
feeling of distance is emphasized.
To attach a conversion lens, follow the
illustration below. Remove the caps of the
conversion lens and the lens on the camera
before attaching the conversion lens.
Align the blue dot on the
conversion lens with the
dot on the camera lens
and attach them.
x4 magnification
Twist the
conversion lens
clockwise until it
clicks into place.
Using the flash
The Direct Shutter feature allows you to take
a picture even if the camera is turned off.
Just press the shutter button and the camera
will turn on automatically and take the
picture. Although Auto Focus and flash are
disabled, you won’t miss unexpected photo
opportunities.
If you take a picture with Direct Shutter and
there is no “Memory Stick Duo” in the
camera or the “Memory Stick Duo” in the
camera is full, the image is temporarily
stored in the camera’s memory and the
camera goes to standby with the image
displayed on the screen. To save the image,
insert a “Memory Stick Duo” with enough
capacity available while the image is
displayed on the screen.
Any operation except for use of the power
button is disabled while the camera is in
standby with the image displayed on the
screen. If you press the power button while
there is no “Memory Stick Duo” inserted, the
camera turns off and the image that is
temporarily stored in the camera’s memory is
deleted. Also, if you do not use the camera
for more than 3 minutes, the camera turns
off automatically and the image stored
temporarily is deleted.
You can disable Direct Shutter to prevent
unintentional operation, such as when the
camera is in your bag (page 37).
You can take pictures using a flash by
attaching the flash unit (supplied). First, you
need to attach a battery to the flash unit (page
14).
The flash automatically senses how much
light is available and fires depending on
shooting conditions and menu settings. You
can also change the flash setting to Forced
Flash or No Flash (page 35).
The recommended flash range is 0.5 to 2 m (2
to 7 ft). The flash fires approximately 300
times with a fully charged battery (if fired
once every 30 seconds).
The flash is ready to fire when the ready
lamp on the flash unit lights up in orange.
Make sure your fingers do not block the flash
sensor or emitter when you hold the camera.
To attach the flash unit, follow the illustration
below. You need to remove the terminal
cover from the camera before attaching the
flash unit. To detach the flash unit, loosen
the locking screw and pull the flash unit
straight out while pressing the release
button.
Release button
Ready
lamp
Remove the
terminal cover.
Loosens
Flash unit
Tightens
Locking screw
Note
• To remove the lens hood, pull the bottom of the lens
hood to unlock it and then pull it off, grasping the
top and bottom. Grasping the lens hood from both
the left and right sides may damage the lens hood.
22
Continued on the next page
23
Taking & Reviewing
Pictures
Zoom in
To use conversion lenses
Instant shooting from power off
— Direct Shutter
Taking pictures (continued)
Using the self-timer
Use the timer remote unit (supplied) to take
pictures using the self-timer or remote
control. The timer remote unit is equipped
with a terminal for attaching the flash unit or
video-out unit. You can use flash with the
self-timer or take pictures using the remote
control while viewing them on a TV screen.
2
3
Timer button
Power button
Remote
sensor
Button
4
Timer remote unit
1
Remote
Remove the terminal cover of the
camera and attach the timer remote unit
to the camera. To steady the camera,
attach a tripod (available commercially)
to the tripod screw hole of the timer
remote unit.
To detach the timer unit, loosen the
locking screw and pull the timer unit
straight out while pressing the release
button.
Release button
Timer
remote unit
Press the power button on the timer
remote unit so that the power lamp
lights up (green). Before using the unit
for the first time, pull out the insulation
sheet.
If you do not use the timer remote unit
for approximately 10 minutes, the unit
will turn off automatically.
If the power lamp does not light up when
you press the power button, replace the
button battery.
Press the timer button on the timer
remote unit. The red timer lamp flashes
for about 10 seconds then lights steadily
for 2 seconds before the picture is
taken.
To cancel the shot, press the timer
button again.
To use the remote
To replace the button battery in the remote
Aim the remote at the remote sensor on the
front of the timer remote unit. The red timer
lamp lights up for 2 seconds before the
picture is taken.
The range of the remote is approximately 5
m (16 ft) when aimed straight ahead at the
remote sensor and 15 degrees to each side.
Before using the unit for the first time, pull
out the insulation sheet.
If the range of the remote becomes
noticeably shorter or the timer remote unit
no longer responds to remote operation,
replace the button battery in the remote.
1
Depress here to pull
out the battery holder.
2
To replace the button battery in the timer
remote unit
1
Pull out the battery holder from the
remote.
Press the release button and then pull
out the battery holder from the timer
remote unit.
Install a new battery (CR2025 lithium
battery) as illustrated below. Reinsert the
battery holder.
Use of batteries other than the CR2025
may present a risk of fire or explosion.
With the “+” side facing forward
Release button
2
Install a new battery (CR1616 lithium
battery) as illustrated below. Reinsert the
battery holder.
Use of batteries other than the CR1616
may present a risk of fire or explosion.
Note
• Batteries may explode if mistreated. Do no recharge,
disassemble or dispose of in fire.
Remove the
terminal cover.
Tighten the
locking screw.
With the “+” side facing forward
Tripod screw hole
24
25
Taking & Reviewing
Pictures
Timer lamp
Turn on the camera.
Reviewing pictures
Touch pad
Viewing pictures on a TV
If you attach the camera to the video-out unit
(supplied) and connect to a TV using the
video cable (supplied), you can view your
pictures on the TV screen.
Insert a recorded “Memory Stick Duo” in
the camera.
2
Set the camera to playback mode. If the
camera is in camera mode, touch the
center of the touch pad twice to switch
to playback mode. When the camera
switches to playback mode, the last
picture you took appears on the screen.
If you switch back from camera mode
without taking a picture, the last picture
you viewed reappears on the screen.
3
Slide your finger left or right on the
touch pad to display each picture. To go
back from the last picture you took, slide
your finger from right to left. To view the
pictures sequentially, slide your finger
from left to right. If you keep your finger
on the touch pad at the left or right end,
you can view pictures consecutively.
A picture may take some time to appear
on the screen due to its size and quality.
Attach a battery to the video-out unit
(page 14).
2
Remove the terminal cover of the
camera, then attach the video-out unit
to the camera and connect the output
terminal on the video-out unit to the TV’s
video input terminal using the video
cable.
To detach the video-out unit, loosen the
locking screw and pull the video-out unit
straight out while pressing the release
button.
Release button
To view the pictures on your computer, insert
the “Memory Stick Duo” into the Memory
Stick adapter (supplied) before inserting it in
the Memory Stick slot of the computer or a
Memory Stick reader. (You can insert the
“Memory Stick Duo” directly in your
computer if it has a Memory Stick Duo slot.)
For instructions on playing, saving and
editing images, please refer to your
computer’s instruction manual or the help of
the software you are using.
Taking & Reviewing
Pictures
1
1
Viewing pictures on a computer
screen
Memory Stick
Duo adapter
“Memory Stick Duo”
To the TV
Example of image storage
Remove the
terminal cover.
Video-out unit
Tighten the
locking screw.
3
Switch on the power of the video-out
unit so that the power lamp lights up
(green).
4
Turn on the camera and TV and select
the video input on the TV.
5
Set the camera to playback mode to
view the pictures. For detailed
instructions, see page 26.
This camera stores images on the “Memory
Stick Duo” to the “100MSDCF” folder in the
“DCIM” folder.
Note
• When the video-out unit is attached to the camera,
pictures do not appear on the camera screen.
26
27
Checking camera settings
Touch pad
Checking the screen display in
camera mode
Touch the center of the touch pad repeatedly
to display the following four screens:
Date and time
Indicates the current date and time.
��
� � �
�
��
�
���
��
�
Year/month/day
Time
Continued on the next page
Remaining battery charge, remaining capacity
of the “Memory Stick Duo”
Indicates approximate levels.
Taking & Reviewing
Pictures
Remaining battery charge
����
���
�
You can use the screen to check the
remaining battery charge, the remaining
capacity of the “Memory Stick Duo,” camera
settings and the date and time. Different
status screens appear for the camera mode
and playback mode.
To display the status screen, touch the left
end of touch pad for about 2 seconds in the
camera or playback mode.
Touch the touch pad in the same way to exit
the status screen. The status screen
disappears if it is not used for about 15
seconds and the camera returns to camera
or playback mode. The status screen also
disappears when you press the shutter button
halfway down.
Remaining capacity of the
“Memory Stick Duo”
Camera shake correction, exposure, scene,
white balance
Indicates the current settings.
Scene
���
� � � �� �
����
���
�
���
� �� �
Camera shake correction* 1
White balance
Exposure
Flash, consecutive shot, size, image quality
Indicates the current settings.
Flash* 2
Consecutive shot* 1
�� �
Picture quality
Size
*1 This icon does not appear when the image quality is
set to TIFF or the flash is set to Forced Flash or
Auto.
*2 This icon appears only when the flash unit is
attached.
28
29
Checking camera settings (continued)
Checking the screen display in
playback mode
About the number of pictures that
can be taken
Touch the center of the touch pad repeatedly
to switch between the following two screens:
The number of images that can be saved on
a “Memory Stick Duo” depends on the image
size (indicated in parentheses below) and
quality. You can change the image size and
quality each time you take a picture. (See
page 35 for the image size and page 36 for
the image quality.)
Number of images
Indicates the current image in relation to the
total number of pictures taken.
Remaining battery charge
Indicates the approximate battery level.
• The image size refers to the size on the computer
screen. On the camera screen, all pictures appear in
the same size regardless of the size setting.
• The number of pictures that can be taken may vary
depending on the shooting conditions.
• Image size values (such as 1600×1200) represent
the number of pixels.
S-size (equivalent to 640×480)
Image quality
Capacity
TIFF
FINE
STD
16 MB
16
99
246
32 MB
32
201
498
64 MB
65
404
1001
128 MB
132
810
2006
Taking & Reviewing
Pictures
����
���� �
����
����
Notes
M-size (equivalent 1024×768)
Image quality
Capacity
TIFF
FINE
STD
16 MB
6
44
70
32 MB
13
89
142
64 MB
26
179
286
128 MB
53
359
574
L-size (equivalent 1600×1200)
Image quality
Capacity
TIFF
FINE
STD
2
18
31
32 MB
5
38
64
64 MB
11
76
129
128 MB
22
154
259
16 MB
30
31
Menu overview and operation
All settings can be made using two menus—
camera menu and playback menu. You only
need to use the touch pad for menu
operation.
When taking pictures, customize the camera
menu settings according to the scene for
optimum results. Or, use the playback menu
for image management, such as deleting
images and formatting the “Memory Stick
Duo,” and also to change date/time and
“beep” settings. For detailed descriptions of
each menu option, see pages 34 and
onwards.
How to use the touch pad
The icons displayed on the screen indicate
current settings. Settings remain until they
are changed (with the exceptions of
delete/all delete and format).
To
Operation
Turn the menu on/off
In camera mode, touch both ends of the touch pad together
for about 2 seconds to display the camera menu; in playback
mode, the playback menu is displayed. Touch the touch pad so
that you are pressing down on both ends of the indented area.
Touch both ends again to exit the menu and return to the
camera mode or playback mode. The menu also disappears
when you press the shutter button halfway down.
Scroll through menu
options
To scroll to the right, slide your finger from left to right on the
touch pad. Place your finger on the left end and slide you finger
along the indented area all the way to the right end. If you keep
your finger on the touch pad at the right end, menu options will
appear in succession.
Menu options can be scrolled to the left by sliding you finger in
the opposite direction.
(horizontal direction in
the diagram below)
Touch the center of the touch pad repeatedly to display the
setting you want. Touch the touch pad so that you are pressing
down on the center of the indented area.
The setting is finalized when you display another menu option
as described above or return to the camera or playback mode.
Select a setting
(vertical direction in the
diagram below)
Playback menu
Slide from left to right to scroll through menu options.
Slide from left to right to scroll through menu options.
Scene
����
��
Flash
����
Image size
�
Image
quality
Consecutive
shot mode
Direct
Shutter
Exposure
���������������
���������
��������
�����
�����
����
����
����
�������
�������
�������
����
�
����
�����������������
����������
���������
�����
�����
�����
�����
����
����
���
�������
�������
�������
����
�
����
�����������������
����������
���������
�����
�����
�����
�����
����
����
�
����
�������
�������
White balance
��������
�����
�����
������
Touch the center
to select a setting
Menu Options
Camera menu
������
���
���
������
���������������
���������
��������
Camera shake
correction
������
�������
�����
����
��������
�������
�����
����
Delete
one image
Delete
all images
Select
for print
������
�
������
����������
�
���
������
�
�
���
������
����������
��� �
�
�����
�
�����
��������
�
����
��
�
����
����
�
����
��
�
����
����
�
Set
date/time
����������
�����
�������
�����������
�������
��
�
��
�
����� �
�������
��
��
�������
��������� ��
�������
��
�
��
�
����� �
�������
��
��
������
�
������
����������
�
������
�
������
����������
�
���
������
�
�
���
������
����������
��� �
�
���
������
�
�
���
������
����������
��� �
�
�����
�
�����
��������
�
���
������
������
�
�
���
������
����
�� � �
�
�����
�
�����
��������
�
����������
�����
�
�����
��������
�
�������
�����
����
������
�
������
����������
�
Date format
��
����
�
����
������
�
��
����
�
����
������
�
��
�
��
��
�
������
�
������
����������
�
��
�
��
��
�
����������
����
��
�
����
����
�
Beep sound
����
�
����
������
�
����
�
����
������
�
Format
���� �
����
�������
�
�������
�������
��������� ��
�������
��
�
��
�
����� �
�������
��
��
�����
����
�������
�
�������
���� �
����
�������
�
�������
����� �
���
��������
�������
�����
�����
��
�
��
�� �� ��
�
��
�
��
�
��
�����
�
��
��
32
33
Camera menu
Displaying the camera menu
Choosing a camera setting
according to the scene — scene
Using the flash
— flash
Changing the image size
— size
In camera mode, touch both ends of the
touch pad for about 2 seconds.
The following menu options can be set
separately for each scene: flash (page 35),
consecutive shot (page 36), exposure (page
37) and hand (page 38). Other menu settings
are the same, regardless of the scene
selected.
The flash setting can be changed only when
the flash unit is attached. The flash does not
fire in consecutive shot or Direct Shutter
modes.
You can set the size of the picture to be
taken according to its purpose and how it
will be used. As the image size increases
from S to M to L, the file size also increases.
Auto (default setting)
Flash fires automatically when
needed. The intensity of the
flash is adjusted according to
the lighting conditions.
L (default setting)
Equivalent to 1600×1200 size;
pictures are taken at
approximately 2 mega pixels.
Use this size to print on
letter-size paper. A 64 MB
“Memory Stick Duo” stores up
to 129 L-size images.
���
If the camera is in playback mode, first
switch to camera mode by touching the
center of the touch pad twice.
�� �� � �
��� �
������
��� �
������
��� �
������
��� �
������
34
Macro
The camera focuses
automatically when taking a
close-up shot. The minimum
focus distance is approximately
10 cm (4 in.). Use the Macro
setting to take close-ups of
flowers, insects, and food.
Backlight
This setting prevents backlit
subjects from appearing in
shadow.
Twilight
To take a picture of landscape
with people:
Set flash to Auto or Forced
Flash. This emphasizes the
people in the foreground
without detracting from the
landscape.
To take a picture of landscape
only:
Detach the flash unit. This
produces pictures of city lights
and fireworks that are close to
what you see with your own
eyes. The maximum shutter
speed is approximately 2
seconds. Use a tripod
(available commercially) to
support the camera.
����
������
����
������
����
������
Forced Flash
Flash fires every time you take
a picture, regardless of the
lighting conditions. If the
subject is backlit, you can use
Forced Flash to illuminate the
subject.
�
���
�����
���
�����
No Flash
The flash never fires even if
the flash unit is attached.
�
���
�����
M
Equivalent to 1024×768 size;
pictures are taken at
approximately 800,000 pixels.
Use this size to print to
postcard-size. A 64 MB
“Memory Stick Duo” stores up
to 286 M-size images.
S
Equivalent to 640×480 size;
pictures are taken at
approximately 300,000 pixels.
Use this size for images to
attach to e-mail. A 64 MB
“Memory Stick Duo” stores up
to 1001 S-size images.
Continued on the next page
35
Menu Options
The menu disappears when you press the
shutter button halfway down.
Normal (default setting)
Use the Normal setting when
you do not need to use any of
the settings below.
�� � �
Camera menu (continued)
Changing the image quality
— quality
You can select the quality of the picture to
be taken. Settings STD, FINE and TIFF offer
increasing levels of image quality with
correspondingly large file sizes.
����
�������
������
�
���
�������
������
�
STD
Images are recorded in
standard-quality
(high-compression) JPEG
format (Small file size).
TIFF
Images are recorded in
non-compressed TIFF format
with no compression noise
(Large file size).
TIFF cannot be selected when
the consecutive shot mode is
set to on or the hand mode is
set to On or Auto.
����
���
�
����
���
�
Off (default setting)
The consecutive shot mode is
disabled.
On
This setting allows you to take
four pictures in succession
when you keep the shutter
button pressed down.
Approximately four pictures
are taken in 2 seconds while
you keep the shutter button
pressed. In consecutive shot
mode, no images are displayed
on the screen.
Fix the composition in the
finder before you press the
shutter button.
You cannot use this setting
when the image quality is set
to TIFF. Both flash and camera
shake correction are disabled
in consecutive shot mode.
Enabling/disabling Direct Shutter
— d.shutter
Adjusting the exposure
— exposure
You can disable Direct Shutter so that it
will not be set off when the shutter button is
pressed unintentionally, such as when the
camera is in your bag.
Although this camera automatically sets the
appropriate exposure (AE), you can change
the automatic setting to the exposure you
want. However, you may not get the desired
effect when the scene is too bright or too
dark.
The default setting is +0.0.
���������
��������
�
�� �
On (default setting)
Enables the Direct Shutter
function.
1
Display the exposure compensation
screen using the touch pad.
Off
Disables Direct Shutter.
���������
��������
�
��������
����� ��
�
2
Touch the center of the touch pad to
display the exposure setting screen.
����
��������
3
Adjust the exposure while referring to the
screen. For a lighter exposure, slide your
finger from left to right over the touch
pad; for a darker exposure, slide you
finger in the opposite direction. Each time
you slide your finger across the touch
pad, the exposure increases or decreases
in increments of 0.3 EV (15 steps, +2.1
EV to -2.1 EV).
Under-exposure
Adjust in the “+” direction.
Over-exposure
Adjust in the “-” direction.
4
Touch the center of the touch pad to
apply the new setting.
Continued on the next page
36
37
Menu Options
����
�������
������
�
FINE (default setting)
Images are recorded in
high-quality (low-compression)
JPEG format (Medium file
size).
Taking pictures in succession
(consecutive shot)
— mode
Camera menu (continued)
Adjusting the white balance
— WB
�� � �
Auto (default setting)
The camera automatically
adjusts the white balance
according to the brightness
and the amount of light in the
scene so that white objects
appear white in the captured
image. Use this setting for
general photography.
Daylight
Adjusts the white balance for
shooting in daylight so that
white objects appear white in
the picture. This setting also
captures sunsets in colors that
are close to what you see with
your own eyes.
Incandescent
Corrects for incandescent
lighting so that the colors in
the picture are close to what
you see with your own eyes.
When there is not enough light and the
shutter speed slows down, camera shake
may often occur, but the camera can still
produce a bright, sharp image, taking four
pictures in rapid succession at a shutter
speed faster than normal and combining the
images into a single shot. When you use this
correction feature, keep aiming at the subject
for about 2 seconds until you hear the sound
of the shutter. After you press the shutter
button, the screen remains blank for almost
4 seconds while the camera processes the
images.
This function is useful when you want to
avoid flash photography, such as in dimly lit
restaurants and museums, when the subject
is out of range for the flash, or when you
take a close-up picture.
Set the flash to No Flash before selecting the
camera shake correction feature. If the flash
is set to Auto or Forced Flash, the flash will
override the camera shake correction
feature. Also, the camera shake correction
feature does not function if the image quality
is set to TIFF or if the consecutive shot mode
is selected.
� ��
����
���
�
�� � �
����
���
�
����
���
�
38
Notes
• The camera shake correction feature is not effective
if you shoot a moving object, for example, children,
animals, etc.
• When you shoot an extremely bright object such as
a spotlight, smear* often occurs. To avoid smear,
use the flash unit or set the scene to Twilight. Also,
you should pay attention to smear when there is
enough light, such as under a blue sky, and the
camera shake correction feature is set to On. Off is
the recommended setting because camera shake
rarely occurs under such shooting conditions.
• Use the flash unit or set the scene to Twilight if the
camera shake correction feature is not effective and
it is not light enough.
* The smear effect is a characteristic of CCD image
pickup devices. When you shoot in strong light,
the vertical leakage of light appears in the image.
This effect is not a malfunction.
Menu Options
Fluorescent
Corrects for fluorescent
lighting so that the colors in
the picture are close to what
you see with your own eyes.
Correcting blur caused by hand
movement
— hand
Off (default setting)
The camera shake correction
feature does not function.
Auto
The camera shake correction
feature functions if there is not
enough light to produce a
bright, sharp image.
On
The camera shake correction
feature functions every time
you take a picture to produce
bright, sharp images.
39
Playback menu
Displaying the playback menu
In playback mode, touch both ends of the
touch pad for about 2 seconds.
Deleting unwanted images
— delete/all delete
To delete one image — delete
You cannot recover an image once you
delete it. You should always check the image
before deleting it.
1
If the camera is in camera mode, first switch
to playback mode by touching the center of
the touch pad twice.
Display the image that you want to delete
on the screen. Touch both ends of the
touch pad for about 2 seconds to display
the playback menu. The “delete (one
image)” screen appears whenever you
display the playback menu.
������
�����
�
2
Touch the center of the touch pad to
display the confirmation screen.
����� �
�������
��
�
You cannot recover images once you delete
them. You should always check the images
before deleting them.
Display the playback menu and slide your
finger from left to right on the touch pad to
display the “all delete” screen.
����� �
������
��� ��
�
The rest of the procedure is the same as
steps 2-5 under “To delete one image —
delete” on page 40.
Only image files are deleted with “all delete.”
Marking images for printing
— print
Use this feature to mark the currently
displayed image for printing. When you
select On or On (with Date), the print
specification is recorded on the “Memory
Stick Duo.” This will save time when printing
at a store or with a DPOF (Digital Print Order
Format) printer at home.
The normal setting is off; to mark an image
for printing, follow the procedure below.
This option cannot be set if a “Memory Stick
Duo” is not inserted or there are no image
files in the “Memory Stick Duo.”
1
Note
• If you delete images using a computer after you
mark images for printing, the print settings may not
be applied correctly.
� ��
������
�����
�
3
Slide your finger from left to right on the
touch pad to select “OK.”
�����
����
�
2
����� �
�������
��
�
������
�����
�
4
5
Touch the center of the touch pad to
display the “On” screen. If you want to
print the date on the photo, touch the
touch pad again to display the “On (with
date)” screen.
On
Touch the center of the touch pad for
about 2 seconds to delete the image. To
cancel, slide your finger from right to left
on the touch pad to select “cancel” and
then touch the center of the touch pad
for about 2 seconds.
The access indicator appears while the
image is being deleted.
������
�����
�
40
Display the image that you want to print
on the screen. Touch both ends of the
touch pad for about 2 seconds to display
the playback menu, then slide your finger
from left to right to display the “Off”
screen.
�����
����
�
On (with date)
�����
����
�
3
Touch both ends of the touch pad for
about 2 seconds to return to playback
mode.
Continued on the next page
41
Menu Options
The menu disappears when you press the
shutter button halfway down.
The image that you
want to display is in the
background.
To delete all images
— all delete
Playback menu (continued)
Changing the date and time
— clock
Changing the date format
— Y/M/D
Reset the clock if you need to adjust the
date and time. Display the “clock” screen
under the playback menu and follow steps
2-5 of “3: Setting the date and time” (page
18).
You can change the order of Y/M/D
(year/month/day) for the date display in
camera mode (page 29) and for DPOF
printing (page 41). Changing the date format
does not change the date format of images
that have already been marked for Print With
Date. To change the date format of marked
images, you need to mark the images again
using the new date format (page 41).
�����
Y/M/D, 12-hour format
(default setting)
����
���
�
M/D/Y, 12-hour format
Turning off the “beep sound”
— beep
����
���
�
����
���
�
On (default setting)
The “beep” sounds when you
use the buttons or the touch
pad and also when you press
the shutter button.
Shutter Only
The “beep” sounds only when
you press the shutter button
down completely to take a
picture.
This “beep” sound cannot be
turned off.
Formatting the “Memory Stick
Duo” — format
Format the “Memory Stick Duo” if the camera
does not recognize it or if pictures cannot be
taken even after all images have been
deleted. Formatting erases all images on the
”Memory Stick Duo.”
You cannot recover images that have been
erased. You should always check the images
before formatting and make backup copies
of important images to your computer or
other storage equipment.
1
Insert the “Memory Stick Duo” that you
want to format in the camera.
2
In playback mode, touch both ends of the
touch pad for about 2 seconds to display
the playback menu and then display the
format screen.
�����
����
���
�
�����
�������
��� ��
����
���
�
Menu Options
D/M/Y, 24-hour format
3
Touch the center of the touch pad to
display the confirmation screen.
��
������ ��
������
������
������
Continued on the next page
42
43
Playback menu (continued)
4
Slide your finger from left to right on the
touch pad to select “OK.”
����� �
�������
��
�
�����
�������
5
Touch the center of the touch pad for
about 2 seconds to begin formatting.
To cancel, slide your finger from right to
left on the touch pad to select “cancel”
and then touch the center of the touch
pad for about 2 seconds.
6
The access indicator appears while the
“Memory Stick Duo” is being formatted
and disappears when formatting is
completed.
�����
�������
Menu Options
Note
• The supplied “Memory Stick Duo” and those that
are available commercially are pre-formatted and
can be used right away.
44
45
Caring for your camera
Make trial recordings
Notes on the LCD screen and lenses
About moisture condensation
Always make a trial recording to make sure
that the camera is working correctly.
• The LCD screen is manufactured using
extremely high-precision technology so
over 99.99 % of the pixels are operational
for effective use. However, there may be
some tiny black points and/or bright points
(white, red, blue or green in color) that
constantly appear on the LCD screen.
These points are normal in the
manufacturing process of the LCD screen
and do not affect the recording in any way.
If the camera is brought directly from a cold
to a warm location, or is placed in a very
damp room, moisture may condense inside
or outside the camera. This moisture
condensation may cause the camera to
malfunction.
Moisture condensation occurs easily when:
Note on the “Memory Stick Duo”
Do not remove the “Memory Stick Duo” or
the battery while the access lamp beside the
Memory Stick Duo slot is flashing.
Do not shake or strike the camera
In addition to malfunctions and inability to
record images, this may render the “Memory
Stick Duo” unusable or damage image data.
Do not get the camera wet
When taking pictures outdoors in the rain or
under similar conditions, be careful not to
get the camera wet.
If moisture condensation occurs, remove the
moisture before using the camera (page 47).
Note on operating temperature
The camera and flash unit is designed for
use between temperatures of 32°F and 104°F.
Shooting in extremely cold or hot places that
exceed this range is not recommended.
To avoid the potential risk of data loss,
always make backup copies of important
data.
• Replace the lens cap when you are not
using the camera, tele conversion lens or
wide conversion lens.
No compensation for recorded contents
Recorded contents cannot be compensated
for if recording or playback is not possible
due to a malfunction of your camera or
recording media, etc.
Notes on image data compatibility
• This camera conforms with the Design rule
for Camera File system universal standard
established by JEITA (Japan Electronics
and Information Technology Industries
Association).
• The camera is taken from an airconditioned
room or car interior to the hot outdoors,
etc.
This camera has an internal rechargeable
button battery for maintaining the date and
time and other settings regardless of whether
the power is on or off. This internal button
battery recharges every time you attach the
main battery. If the main battery becomes
exhausted, the internal button battery fully
discharges in about one month. In this case,
the date/time display is reset to the default
setting and the date/time setting screen will
appear the next time you turn on the camera.
Charging method
How to prevent moisture condensation
When bringing the camera from a cold place
to a warm place, seal the camera in a plastic
bag and allow it to adapt to conditions at the
new location over a period of time (about an
hour).
Attach a charged battery to the camera and
do not use the camera for 24 hours or more
with the power off.
Continued on the next page
If moisture condensation occurs
Turn off the camera, remove the battery and
wait about an hour for the moisture to
evaporate. Note that if you attempt to shoot
with moisture remaining inside the lens, you
will be unable to record clear images.
Additional
Information
Back up important data
• Be careful when placing the camera near a
window or outdoors. Exposing the LCD
screen and lens to direct sunlight for long
periods may cause malfunctions.
• The camera is brought from a cold location
such as a ski slope into a warmly heated
room.
About the internal rechargeable
button battery
• Playback of images recorded with your
camera on other equipment and playback
of images recorded or edited with other
equipment on your camera are not
guaranteed.
Precaution on copyrights
Television programs, films, video tapes, and
other materials may be copyrighted.
Unauthorized recording of such materials
may be contrary to the provision of the
copyright laws.
46
47
Troubleshooting
Caring for your camera (continued)
Using the camera abroad
You can use your camera in any country or
region with the supplied AC Adaptor
AC-L10A within 100 V to 240 V AC, 50/60
Hz. Use a commercially available AC plug
adaptor, if necessary, depending on the
design of the wall outlet.
AC-L10A
(supplied)
Cleaning your camera
If you experience trouble with your camera, try the following solutions.
Cleaning the screen and lens
1
Run through the symptoms and solutions on pages 49-52 to
check your camera. If an error icon is displayed on the screen,
the camera’s self-diagnosis function is working (page 53).
2
Should your camera still not work properly, remove the battery,
then reattach it and turn on the camera.
Wipe the screen and lens with the supplied
cleaning cloth to remove any fingerprints or
dirt. The cleaning cloth can be washed and
reused.
Cleaning the camera surface
AC plug Wall outlet
adaptor
Note
• Do not use an electronic transformer (travel
converter), as this may cause a malfunction.
First remove the battery from the camera.
Wipe the camera surface with a soft cloth
that has been moistened with water or
lukewarm water and thoroughly wrung out,
and then wipe the surface with a dry cloth.
Do not use thinner, benzine or alcohol as
these may damage the finish.
After using the camera at the beach or a
dusty location
Clean the camera carefully. Salt air causes
metal parts to corrode and sand and dust in
the camera may result in a malfunction.
Battery/power
Cause/Solution
The battery indicator does
not show the remaining
charge correctly
Or, the battery indicator
shows sufficient charge but
the power switches off
during operation
• The battery indicator may not show the correct level if you use the
camera in extremely hot or cold surroundings.
• The battery is exhausted. Replace with a charged battery (page 14).
• If dirty, wipe the terminals of the battery and camera with a dry cloth.
The battery runs out quickly
• The battery discharges more rapidly if used at extremely low
temperatures.
• If the battery is low, recharge the battery (page 14).
You cannot turn on the
camera
• Check that the battery is attached correctly (page 14).
• If the battery is not charged, recharge the battery (page 14).
The power switches off
during operation
• The camera turns off automatically if left idle for more than 3 minutes
to conserve battery power.
• If the battery is low, replace with a charged battery (page 14).
• If you continue using the camera in power-conservation mode, the
camera turns off automatically. Wait for a while before turning on the
camera.
Additional
Information
Symptom
Continued on the next page
48
49
Troubleshooting (continued)
Taking pictures
Viewing pictures
Symptom
Cause/Solution
Symptom
Cause/Solution
The screen does not show
the subject
• If the camera is in playback mode, switch it to camera mode (page
20).
• Remove the lens cap, if attached.
• Detach the video-out unit, if attached.
The camera does not play
back images
• If the camera is in camera mode, switch it to playback mode (page
26).
• The camera may not be able to play back images that were changed
to different file names or edited on a computer.
The camera does not
focus on the subject
• The camera cannot focus on a subject if it is too close. Position your
camera so that the distance to the subject is greater than the minimum
focal distance (10 cm (4 in.)).
• If the tele conversion lens is attached, position your camera at least
17 cm (6 3/4 in.) from the subject.
• Check the scene setting (page 34).
The camera does not take
pictures
The flash does not fire
• Check that the flash unit is attached correctly (page 23).
• If the flash is set to No Flash, change the setting to Auto or Forced
Flash (page 35).
• The flash does not fire while it is recharging. Wait until the ready lamp
on the flash unit lights up to take the next picture (page 23).
• You cannot use the flash in Direct Shutter mode (page 23) or
consecutive shot mode (page 36).
• If the battery is low, recharge it (page 14).
• Check that the timer remote unit is attached correctly (page 24).
• Check that button batteries are installed in the timer remote unit and
the remote (page 25).
• The remote does not function if it is too far from the remote sensor.
The range of the remote is approximately 5 m (16 ft) when aimed
straight ahead at the remote sensor and 15 degrees to each side.
• The remote may not function if the surroundings are too bright.
Symptom
Cause/Solution
The camera does not
delete images
• You cannot delete images that were protected against erasure on a
computer or other equipment.
• The camera cannot delete pictures if the “Memory Stick Duo” has an
erasure prevention switch and the erasure prevention switch is set to
LOCK (page 55).
The “Memory Stick Duo”
does not become empty
after deleting all images
• Any files that were renamed or stored in a different folder on a
computer will remain in the “Memory Stick Duo.” Any files that were
protected against erasure on another digital camera will also remain.
To erase these files and all other files, reformat the “Memory Stick Duo”
(page 43).
You erased an image by
mistake
• Erased files cannot be recovered. You can protect against accidents
by setting the erasure prevention switch on the “Memory Stick Duo” to
LOCK if the “Memory Stick Duo” has an erasure prevention switch (page
55).
“Memory Stick Duo”
Symptom
Cause/Solution
You cannot insert the
“Memory Stick Duo”
• Insert the “Memory Stick Duo” in the correct direction.
You cannot record on the
“Memory Stick Duo”
• If the “Memory Stick Duo” is full, delete unwanted images (page 40) or
insert a “Memory Stick Duo” with enough capacity available (page 16).
• The camera cannot take pictures if the erasure prevention switch on
the “Memory Stick Duo” is set to LOCK (page 55).
You cannot format the
“Memory Stick Duo”
• You cannot format the “Memory Stick Duo” if the “Memory Stick Duo”
has an erasure prevention switch and the erasure prevention switch is
set to LOCK (page 55).
You formatted the
“Memory Stick Duo” by
mistake
• When you format a “Memory Stick Duo,” all files are erased and
cannot be recovered. You can protect against accidents by setting the
erasure prevention switch on the “Memory Stick Duo” to LOCK (page
55).
Additional
Information
You cannot use the timer
or remote control
• Insert a “Memory Stick Duo” in the camera (page 16).
• If the “Memory Stick Duo” is full, delete unwanted images (page 40) or
insert a “Memory Stick Duo” with enough capacity availabe (page 16).
• The camera cannot take pictures if the “Memory Stick Duo” has an
erasure prevention switch and the erasure prevention switch is set to
LOCK (page 55).
Deleting images
Continued on the next page
50
51
Troubleshooting (continued)
List of error icons
Others
Symptom
Cause/Solution
The camera does not
respond to operations
• The battery is exhausted. Replace with a charged battery (page 14).
• The camera system maybe malfunctioning. Remove the battery and
wait for about one minute. Reattach the battery, turn on the camera
and check that it functions properly.
• Remove the battery and press the RESET button on the camera for
about 2 seconds using a pointed object. You can see the RESET
button when you remove the battery. The date/time display is reset to
the default setting when you reset the camera.
The camera turned on to
display the date/time
setting screen
Or, the date/time display is
not correct
• The internal rechargeable battery has run out and date/time display
has been reset to the default setting. You need to reset the date/time
(page 18). The internal battery recharges if you attach a charged
battery to the camera and leave the camera turned off for more than
24 hours.
The lens is cloudy
• Moisture may have condensed in the lens. Leave the camera for
about an hour for the moisture to evaporate (page 47).
An error icon appears on the screen to indicate a problem
with the camera or the “Memory Stick Duo.”
Icon
Cause/Solution
The battery charge is low. Replace with a charged battery (page 14).
The camera system is not functioning normally. Turn the camera off and
then turn it on again.
The camera is in power-conservation mode. Turn the camera off and
wait for a while before turning it on again.
No “Memory Stick Duo.” Insert a “Memory Stick Duo” in the camera (page
16).
�
The camera cannot access the “Memory Stick Duo.”
The “Memory Stick Duo” has an erasure prevention switch and the
erasure prevention switch is set to LOCK. You cannot take pictures, set
the print option, or format the “Memory Stick Duo.” Slide the switch
away from the LOCK positiion (page 55).
Failed to record an image.
When taking a picture: Change the image size (page 35) or delete
unwanted images (page 40).
When setting the print option: Delete unwanted images (page 40).
The “Memory Stick Duo” has two or more files with the same number.
Additional
Information
����
The “Memory Stick Duo” is full and no more pictures can be taken.
Delete unwanted images (page 40).
There are no images on the “Memory Stick Duo.”
Failed to read the file. The file’s image data may be damaged.
�
����
The camera cannot play back the image because the format is
incompatible or the file size is too large. Or, the camera is playing back a
file that is not in DCF format.
The number of images marked for printing has exceeded the limit (999).
You cannot select any more images for printing.
The selected image has been protected against erasure on a computer
or other equipment and cannot be deleted.
52
53
About the “Memory Stick Duo”
The “Memory Stick Duo” is a compact,
portable and versatile Integrated Circuit
recording medium with a data capacity that
exceeds that of a floppy disk. The “Memory
Stick Duo” is specially designed for
exchanging and sharing digital data among
“Memory Stick Duo” compatible products.
Because it is removable, the “Memory Stick
Duo” can also be used for external data
storage.
If you insert a “Memory Stick Duo” into a
Memory Stick Duo adapter, it becomes the
same size as a standard “Memory Stick” and
can be used on equipment that supports the
standard-size “Memory Stick Duo.”
• “Memory Stick,”“
,” and
“MagicGate Memory Stick” are trademarks
of Sony Corporation.
• “Memory Stick Duo” and
“
” are trademarks of Sony
Corporation.
• “Memory Stick PRO Duo” and
“
” are trademarks of
Sony Corporation.
• “MagicGate” and “
trademarks of Sony Corporation.
” are
Types of “Memory Stick”
“Memory Stick” media
Recording/
Playback
“Memory Stick Duo”
a
“Memory Stick Duo”
(MagicGate/high-speed data
transmission supported)
a*1*2
“MagicGate Memory Stick
Duo”
a*1
“Memory Stick PRO Duo”
a*1*2
*1 Data that uses “MagicGate” technology cannot be
recorded or played on this camera.
*2 High-speed data transmission with a parallel
interface is not supported.
Notes on the “Memory Stick Duo”
• Before using a “Memory Stick Duo” with
equipment that supports the standard-size
“Memory Stick,” insert the “Memory Stick
Duo” into a Memory Stick Duo adapter.
• This camera does not accommodate the
standard-size “Memory Stick.”
Note on the “Memory Stick PRO Duo”
The maximum memory capacity of a “Memory
Stick PRO Duo” that can be used with this
camera is 512 MB. A “Memory Stick PRO
Duo” with a memory capacity over 512 MB is
not supported by this camera.
Use a pointed object
to slide the erasure
prevention switch.
Damage to data
Data may be damaged in the following
cases:
• when the “Memory Stick Duo” is removed
or the camera is turned off during a read or
write operation
Using a “Memory Stick Duo” on other
equipment
Before using a “Memory Stick Duo” on
equipment that supports the standard-size
“Memory Stick,” insert the “Memory Stick
Duo” into the Memory Stick Duo adapter. If
you insert a “Memory Stick Duo” without a
Memory Stick Duo adapter into equipment
that supports the standard-size “Memory
Stick,” the “Memory Stick Duo” may get
stuck, damaging the “Memory Stick Duo” or
the equipment.
Precautions on storing a “Memory Stick Duo”
Do not leave a “Memory Stick Duo” in a
location that is subject to:
• extremely high temperature such as in a
sun-heated car
• direct sunlight
• high humidity or corrosive substances
• when the “Memory Stick Duo” is used in
locations subject to static electricity or
electrical noise
Precautions on handling a “Memory Stick
Duo”
Observe the following precautions:
Additional
Information
• Make sure that the “Memory Stick Duo” is
inserted facing the correct direction.
Incorrect usage may cause damage to the
equipment.
Protecting data
Slide the erasure prevention switch to the
LOCK position if the “Memory Stick Duo” has
an erasure prevention switch. In this position,
you cannot delete images (page 40), set the
print option (page 41), or format the “Memory
Stick Duo” (page 43).
Be careful not to erase data by mistake if the
“Memory Stick Duo” does not have an
erasure prevention switch.
• Keep the “Memory Stick Duo” in its case
when you carry or store it.
• Do not touch the “Memory Stick Duo”
connector with your finger or metallic
objects.
• Do not bend, drop, or subject the “Memory
Stick Duo” to strong shock.
• Do not disassemble or modify the “Memory
Stick Duo.”
• Do not allow the “Memory Stick Duo” to
get wet.
54
55
Warranty card and
after-sale services
Specifications
• Please note that the warranty card for this
product will be mailed to you in the next
two to three weeks.
Camera
• Please verify entries and details in the
warranty card, and keep it in a safe place.
• If you have any problems using the
projector or if any accessory is missing,
contact QUALIA Customer Service.
QUALIA Customer Service
Toll free number:
1-877-782-5423
System
Imaging device
6.72 mm (1/2.7 type) color CCD
Primary color filter
Total pixels
Approx. 2 100 000 pixels
Effective pixels
Approx. 2 000 000 pixels
Lens
Fixed focal lens f = 6.2 mm
(35 mm when converted to a 41
mm still camera), F2.8
Exposure control
±2.1 EV
File format Still images: DCF compliant (Exif
Ver. 2.2 TIFF/JPEG compliant),
DPOF compatible
Recording media
“Memory Stick Duo”
LCD screen
LCD panel 1.4 cm (0.55 type) TFT drive
Total number of dots
180 000 (800×225) dots
General
Power source
Lithium-ion battery 3.7 V
Power consumption (during shooting)
1.3 W
Operating temperature
0°C to +40°C (32°F to 104°F)
Storage temperature
–20°C to +60°C (–4°F to +140°F)
Dimensions
69.1×24.0×16.8 mm
(X X/X×X X/X×X X/X inches)
(W/H/D, excluding maximum
protrusions)
Mass
Approx. 57 g (XX.X oz)
(including battery pack,
“Memory Stick Duo,” and hand
strap)
Flash unit
Continued on the next page
56
57
Additional
Information
Recommended flash distance:
0.5 m to 2.0 m (XX X/X inches
to XX X/X inches)
Operating temperature
0°C to +40°C (32°F to 104°F)
Storage temperature
–20°C to +60°C (–4°F to +140°F)
Dimensions 50.0×24.0×14.4 mm
(X X/X×X X/X×X X/X inches)
(W/H/D, excluding maximum
protrusions)
Mass
Approx. 10 g (XX.X oz)
Glossary
Specifications (continued)
Timer remote unit
Accessories
Operating temperature
0°C to +40°C (32°F to 104°F)
Storage temperature
–20°C to +60°C (–4°F to +140°F)
Dimensions 42.0×24.0×14.0 mm
(X X/X×X X/X×X X/X inches)
(W/H/D, excluding maximum
protrusions)
Mass
Approx. 15 g (XX.X oz)
• Flash unit
• Timer remote unit (including CR2025
lithium battery)
• Remote (including CR1616 lithium battery)
• Video-out unit
• Video cable
• batteries (3)
• Battery charger
• Viewer
Video-out unit
Operating temperature
0°C to +40°C (32°F to 104°F)
Storage temperature
–20°C to +60°C (–4°F to +140°F)
Dimensions 55.55×24.0×16.8 mm
(X X/X×X X/X×X X/X inches)
(W/H/D, excluding maximum
protrusions)
Mass
Approx. 10 g (XX.X oz)
58
AE stands for Auto
Exposure. The exposure is
adjusted automatically
according to the lighting
conditions.
DPOF stands for Digital
Print Order Format.
You can mark images and
record the information
necessary for printing, and
save it on the recording
media with the image.
AF (page 21)
AF stands for Auto Focus.
The focus is adjusted
automatically.
AF lock (page 21)
• Wide conversion lens
The focus is set and locked
if you press the shutter
button halfway down. This
function is useful when you
want to shoot a subject at a
different angle after
focusing.
• Lens cap
• Lens hood
• Hand strap
• “MagicGate Memory Stick Duo” 64 MB
• Memory Stick Duo adaptor
• “Owner’s Guide”(this manual)
• “Menu Index”
Auto Power Off (page 21)
• Carrying case
The camera turns off
automatically to save
battery power if you do not
use it for more than three
minutes.
• Terminal covers (2 spares)
Design and specifications are subject to
change without notice.
CCD (page 57)
CCD stands for Charge
Coupled Device. A CCD is
a semiconductor that
converts received light
signals into electric signals.
DCF (page 57)
Printed on 100% recycled paper
using VOC (Volatile Organic
Compound)-free vegetable oil based
ink.
DCF stands for Design rule
for Camera File system, a
standard laid down by the
Japan Electronics and
Information Technology
Industries Association
(JEITA).
Exif (page 57)
Exif stands for
Exchangeable image file
format for digital still
cameras. This still image file
format is a standard laid
down by the Japan
Electronics and Information
Technology Industries
Association (JEITA). A
digital still camera
supporting Exif stores the
data relevant to the
shooting conditions as each
shot is taken.
Format (page 43)
You can write to recording
media after you format it.
Formatting erases all the
previously saved data on
the recording media.
JPEG (page 36)
JPEG stands for Joint
Photographic Experts
Group. JPEG is a format
used to compress color still
images and is most widely
used for compressing still
images that are exchanged
over the Internet. The
camera records images in
JPEG format when you set
the picture quality to FINE
or STD.
“Memory Stick Duo”
(page 13, 16, 54)
The “Memory Stick Duo” is
a compact, portable and
versatile Integrated Circuit
recording medium with a
data capacity that exceeds
that of a floppy disk.
If you insert a “Memory
Stick Duo” into a Memory
Stick Duo adapter, it
becomes the same size as
a standard “Memory Stick”
and can be inserted into a
slot that supports the
standard-size “Memory
Stick” on a TV, computer,
etc.
Pressing the shutter
button halfway down
(page 21)
Do not press the shutter
button all the way down.
Press the shutter button
halfway down so that the
camera can adjust the
focus and the exposure
automatically according to
the scene.
TIFF (page 36)
TIFF stands for Tagged
Image File Format. The TIFF
format does not compress
images for recording so the
images are not deteriorated.
The camera records images
in TIFF format when you set
the picture quality to TIFF.
59
Additional
Information
Power requirements
100 to 240 V AC, 50/60 Hz
3 to 6 VA
Rated output voltage
4.2 V DC, 230 mA
Dimensions
Approx. 57.0×22.0×95.5 mm
(X X/XX×X X/XX×X X/X inches)
(W/H/D)
Mass
Approx. 80 g (X oz)
Operating temperature
0°C to 35°C (32°F to XX°F)
Storage temperature
–20°C to +40°C (–4°F to +104°F)
DPOF (page 41)
• Tele conversion lens
• Cleaning cloth
Battery charger
AE (page 37)
Index
A
D
J, K
JPEG ............................................... 36
Accessories .................................. 58
d.shutter ........................................ 37
Access lamp ................................. 16
Date ......................................... 41, 42
AF lock ........................................... 21
Date and time ....................... 18, 29
all delete ........................................ 41
Changing the date and
time ..................................... 42
Auto power off ............................. 21
Date/time setting ................ 19
Lens ......................................... 12, 46
Tele conversion
lens ............................... 13, 22
Direct Shutter ........................ 23, 37
Backlight ....................................... 34
Battery charger ............ 14, 58
Battery life ............................ 15
Wide conversion
lens ............................... 13, 22
DPOF .............................................. 41
Lens hood ..................................... 20
Battery ............................ 12, 14, 49
Error icon ....................................... 53
M, N, O
Internal rechargeable
battery .......................... 19, 47
Exporsure (exposure) ......... 29, 37
“Memory Stick” ........................... 54
BATT LOCK (battery lock)
switch ................................... 12, 14
beep ................................................ 43
“Memory Stick
Duo” ..................... 16, 46, 51
F, G
FINE ................................................ 36
Flash (flash) ................... 23, 29, 35
Flash unit ............................... 23
Forced Flash ........................ 35
C
Camera menu ........................ 32, 34
No Flash ................................ 35
format ............................................. 43
Formatting ............................ 43
Memory Stick adapter ....... 27
RESET button .............................. 52
White balance ....................... 29, 38
S
Z
Scene ...................................... 29, 34
Zooming ......................................... 22
Screen ............................. 12, 46, 57
Screen display in playback
mode ........................................... 30
Size (size) ............................... 29, 35
STD ................................................. 36
T, U
Taking pictures ..................... 20, 50
Number of pictures ..... 15, 30
Menu ............................................... 32
Screen display in camera
mode ................................... 29
Minimum focal distance ........... 21
TIFF ................................................. 36
mode ............................................... 36
Timer
Moisture condensation ............. 47
Self-timer .............................. 24
Timer remote unit ........ 24, 58
H
Charging the batteries .............. 14
hand ................................................ 38
CHG (charge) lamp ..................... 14
Playback mode ............................ 26
Pressing the shutter button
halfway down ............................ 21
I
Image
Print (print) .................................... 41
Deleting images ........... 40, 51
Image data
compatibility ..................... 46
Image quality ........................ 29, 36
Twilight ........................................... 34
Playback menu ..................... 33, 40
Power ....................... 12, 20, 49, 57
Cleaning cloth .............................. 48
Touch pad .............................. 12, 33
Additional
Information
P
Camera shake
correction ............................ 29, 38
60
Warranty card .............................. 56
WB ................................................... 38
Macro ............................................. 34
Camera mode .............................. 20
Consecutive shot ................. 29, 36
RELEASE button ......................... 14
Remote ........................................... 24
Shutter ........................................... 12
E
Button battery ............... 25, 47
Remaining battery
charge .......................... 15, 29
W, X, Y
L
delete .............................................. 40
B
R
V
Video-out unit ....................... 27, 58
Video cable ................................... 27
Viewing pictures ................... 26, 51
Number of pictures ............ 15
Q
quality ............................................. 36
61