1
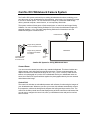
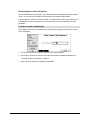
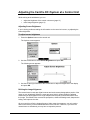
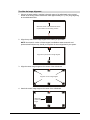
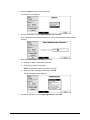
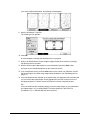
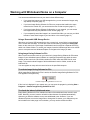
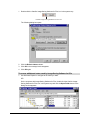
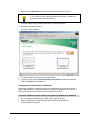
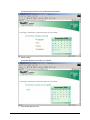
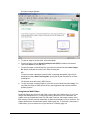
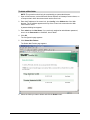
User’s Guide TM Camfire DCi Whiteboard Camera Registration Benefits In the past, we’ve made new features available as free software upgrades. Register your Camfire DCi system to be notified of free upgrades. Keep the following information available in case you need to contact Technical Support: Serial Number Date of Purchase Register online at: www.smarttech.com/registration FCC Warning This equipment has been tested and found to comply with the limits for a "Class A" digital device, pursuant to Part 15 of the FCC rules. These limits are designed to provide reasonable protection against harmful interference when the equipment is operated in a commercial environment. This equipment generates, uses and can radiate radio frequency energy and, if not installed and used in accordance with the manufacturer’s instructions, may cause harmful interference to radio communications. Operation of this equipment in a residential area is likely to cause harmful interference in which case the user will be required to correct the interference at his own expense. Trademark Notice Camfire, all SMART product logo types, the Camfire logo and the SMART logo are trademarks of SMART Technologies Inc. Microsoft and Windows are either registered trademarks or trademarks of Microsoft Corporation in the U.S. and/or other countries. Netscape and Netscape Communicator are registered trademarks of Netscape Communications Corporation in the U.S. and other countries. All other third-party product and company names may be trademarks of their respective owners. U.S. Patent No. 5,528,290. Other U.S., Canadian and foreign patents pending. Copyright Notice © 2000–2003 SMART Technologies Inc. All rights reserved. No part of this publication may be reproduced, transmitted, transcribed, stored in a retrieval system or translated into any language in any form by any means without the prior written consent of SMART. Information in this manual is subject to change without notice and does not represent a commitment on the part of SMART. Printed in Canada 09/2003 Important Information Read this manual carefully before setting up and using the Camfire DCi system. With proper care, your system should provide years of trouble-free service. About This Guide This guide explains how to use the Camfire DCi system with a camera boom and a control unit. Refer to the Camfire DCi Installation Guide for installation instructions. This guide doesn’t cover the Camfire PC system, which is a different product that consists of a camera boom connected directly to a computer. That product is explained in the Camfire PC Installation and User's Guide. CAUTION The camera boom for the Camfire DCi system contains precisely calibrated camera units. Handle it with care. Do not open the camera boom casing. Other Warnings and Safety Precautions For operating safety and to avoid damage to your Camfire DCi system, carefully read and observe the following instructions. 1. Avoid installing the Camfire DCi system near radio transmitting devices. The electromagnetic radiation created by these devices may reduce the quality of any images you save using the Camfire DCi system. 2. Avoid setting up and using the Camfire DCi system in an area with excessive levels of dust, humidity or cigarette smoke. 3. As you install the Camfire DCi system, make sure you tighten all of the security hex screws. There are two security hex screws at the bottom corners of the control unit and one in the camera boom base. These screws ensure the equipment can’t be accidentally knocked free from the wall brackets. The screws also help prevent unauthorized individuals from removing or taking the equipment. 4. Avoid exposing the Camfire DCi system to extreme heat or cold. The operating temperature range for the Camfire DCi system is from 32°F to 104°F (0°C to 40°C) with up to 90% humidity non-condensing. The shipping and storage range for the Camfire DCi system is from -13°F to 140°F (-25°C to 60°C) with up to 95% humidity non-condensing. 5. Don’t block the vents at the top and bottom of the control unit. For the control unit to maintain its operating temperature, these vents must remain exposed. 6. This product includes a three-wire grounded plug, which only fits into a grounding-type power outlet. If you’re unable to insert the plug into the outlet, have an electrician replace your outlet with a newer model. Do not defeat the safety purpose of the grounding-type plug. 7. Carefully handle the power cable and avoid excessive bending. Route the cable so it’s unlikely to be walked on or pinched by items placed upon or against it. Do not modify the power cable. Camfire DCi User's Guide i Cleaning the Control Unit Apply a mild detergent cleanser to a soft cloth and wipe the surface clean. Never use solvents or abrasive cleansers, as these may damage the surface of the control unit. Cleaning the Camera Boom Only clean the lens with a cloth designed specifically for that purpose. Lens-cleaning cloths are available from most photography stores. ii Camfire DCi User's Guide Contents Important Information .............................................................................................................. i About This Guide ................................................................................................................ i Other Warnings and Safety Precautions ............................................................................ i Cleaning the Control Unit....................................................................................................ii Cleaning the Camera Boom ...............................................................................................ii Camfire DCi Whiteboard Camera System ............................................................................. 1 Camera Boom.................................................................................................................... 1 Control Unit ........................................................................................................................ 1 Stand-Alone Control Unit (Not Networked)........................................................................ 2 Networked Control Unit...................................................................................................... 3 Image-Saving Software for PCs ........................................................................................ 3 Image-Saving Software for Networks ................................................................................ 3 Internal Web Folders ......................................................................................................... 4 Using the Camfire DCi System at a Control Unit.................................................................. 5 Creating a New Folder....................................................................................................... 6 Changing the Save Mode .................................................................................................. 6 Saving Whiteboard Notes .................................................................................................. 7 Activating/Deactivating the Statusboard Option at the Control Unit .................................. 8 Printing Whiteboard Notes............................................................................................... 10 Deleting Whiteboard Notes.............................................................................................. 10 Initiating Sleep Mode ....................................................................................................... 11 Reactivating the Camfire DCi System ............................................................................. 12 Adjusting the Camfire DCi System at a Control Unit......................................................... 13 Adjusting Screen Brightness ........................................................................................... 13 Refining Image Alignment................................................................................................ 13 Working with Whiteboard Notes on a Computer................................................................ 17 Using a Removable USB Storage Device ....................................................................... 17 Using Image-Saving Software for PCs ............................................................................ 17 Using Image-Saving Software for Networks.................................................................... 19 Using Internal Web Folders ............................................................................................. 21 Customer Support ................................................................................................................. 24 Contacting SMART Technical Support............................................................................ 24 General Inquiries ............................................................................................................. 24 Warranty .......................................................................................................................... 24 Index ....................................................................................................................................... 25 Contents Contents Camfire DCi Whiteboard Camera System The Camfire DCi system works with your existing whiteboard and markers, enabling you to save the notes on your whiteboard as a high-resolution, color image. You can print this image to a local or network printer. You can also save this image on a removable USB storage device, personal computer, network server, or in a temporary Web folder. The system consists of three parts: a fixed camera boom, a control unit and Image-Saving Software. You can use Image-Saving Software for PCs to save the whiteboard images to a personal computer, or you can order Image-Saving Software for Networks to save the whiteboard images to a network server. Camera Boom Image-Saving Software for PCs included for free. Whiteboard Image-Saving Software for Networks available on request. Computer within Same Network as Control Unit Control Unit Camfire DCi System for Saving Whiteboard Notes Camera Boom You can mount the camera boom above any standard whiteboard. This boom includes two digital cameras, each with fixed focus and auto exposure. The two cameras together can capture the notes on a whiteboard as large as 4 ft. x 8 ft. (1.22 m x 2.44 m). Each camera takes a color photograph of a portion of the whiteboard. Before your whiteboard notes are saved, the Camfire DCi system stitches together the photographs taken by the two cameras and enhances the image. Control Unit The control unit includes an embedded processor with software for enhancing the images of your whiteboard notes. Whenever you save your notes, this software automatically corrects the perspective, whitens the background, sharpens the writing and improves the color. The control unit includes a small screen that displays easy-to-follow instructions and buttons that you can use to configure the control unit, save your whiteboard notes and perform various other functions. Camfire DCi User's Guide 1 You can connect the control unit to a network or use it as a stand-alone device. Depending on the configuration you choose, you have the option of saving your whiteboard notes to a removable USB storage device, a personal computer running Image-Saving Software for PCs, a network server running Image-Saving Software for Networks, or a temporary Web folder. You can also print your whiteboard notes on a local or network printer. If you like, you can use the Camfire DCi system with multiple whiteboards. One control unit can work with as many as four camera booms. To do this, order additional camera booms as the Camfire XC product (SMART order No. SCF-XC). Bottom View of Control Unit Parallel Printer Port Serial Port (Currently Not Used) USB Port Camera Boom IEEE 1394 Port Power Socket Network Port Control Unit Ports Stand-Alone Control Unit (Not Networked) You don’t need a network connection to use the Camfire DCi system, although we recommend it. All you need is a camera boom and control unit, plus a removable USB storage device or a printer. To save whiteboard notes to a USB storage device, simply insert the device into the USB port on the control unit and begin saving images. If you have the Windows® 98, 2000, ME or XP operating system, you can use the USB storage device (SMART order No. SCF-USB16) that’s available from SMART Technologies. You can also use a USB storage device from a different supplier. However, before you use a third-party device, make sure it’s compatible with the Windows operating system on your computer. When you set up the control unit to save images on a removable USB storage device, a USB icon appears in the status area of the screen. 2 Camfire DCi User's Guide If you only need a paper copy of your whiteboard notes, attach a printer to the stand-alone control unit and press the Print button. Networked Control Unit A control unit that’s connected to a network can do everything a stand-alone unit can do and more, including the ability to: • save your notes to a removable USB storage device • save your notes to a personal computer running Image-Saving Software for PCs • save your notes to a network server running Image-Saving Software for Networks • temporarily store your notes in an internal Web folder on the control unit, so that you can later save these notes using a Web browser on a computer • print your notes to an attached printer Image-Saving Software for PCs The Camfire DCi system comes with Image-Saving Software for PCs, which you can use to save your whiteboard notes on a personal computer that’s within the same network as your control units. You can register as many as three control units to this computer, so this is the easiest way to distribute whiteboard notes in an organization with fewer than three control units. NOTE: To use this software, your control unit must be connected to a network. Image-Saving Software for PCs stores your whiteboard notes in folders named by the date and time at which they were created and it generates an HTML index of the notes in each folder. You can post this index to your intranet or simply open it using a Web browser, and then you can view, copy and print whiteboard notes at your desk. When the control unit is set up to save images on a personal computer (using Image-Saving Software for PCs), a computer icon appears in the status area of the screen. Image-Saving Software for Networks Alternatively, you can order Image-Saving Software for Networks (SMART order No. SCF1SSNT) to save your whiteboard notes on a network server. Image-Saving Software for Networks is ideal if your organization has more than three control units. In order to use this software, your control unit must be connected to a network. Image-Saving Software for Networks stores your whiteboard notes in folders and generates an HTML index of the notes in each folder. You can post this index on your intranet so others can view, copy and print the notes. Camfire DCi User's Guide 3 When the control unit is set up to save images on a network server (using Image-Saving Software for Networks), the control unit displays a network icon. This guide explains how to use whiteboard notes saved by Image-Saving Software for Networks. For information about installing and configuring this software, refer to the Camfire Image-Saving Software for Networks System Administrator’s Guide. Internal Web Folders The control unit has built-in flash memory. If you have a networked control unit, you can use this flash memory to temporarily store your whiteboard notes in an internal Web folder. Once they have been stored in a Web folder, remote users with access to the same network can view your notes in a Web browser by opening the Web address displayed on the control unit screen. However, Web folders are temporary. To retain the notes in a Web folder, you must save them on your hard drive or network using a Web browser. When the control unit is set up to save images in an internal Web folder, the following icon appears in the status area of the screen. 4 Camfire DCi User's Guide Using the Camfire DCi System at a Control Unit Using the Camfire DCi system at a whiteboard is simple. Just follow the instructions on the control unit screen. You can scroll, save, create a new folder, initiate sleep mode and activate a range of other commands with the press of a button. Depending on your current task, the functions of the command buttons vary. Refer to the control unit screen for the current function of each command button. Process Control Flow Chart Current Mode Legal Department FORM A-1 Control Unit Screen Marketing Functions of Command Buttons Options Button Command Buttons New Folder Scroll Button Power Indicator Light Sleep Save Sleep Button New Folder Button Save Button For best results when writing on the whiteboard: • Use regular dry-erase markers and not fine-point markers • Although the Camfire DCi system successfully captures a full range of colors, you may prefer using darker colors because they are easier to read • Do not use excessively small print. Make each letter at least 1/2 in. (1.27 cm) in. height. Remember, the Camfire DCi system creates the image of your whiteboard notes from photographs. If your writing is messy on the whiteboard, it’ll be messy in the image. Uneven lighting conditions at the whiteboard can create unwanted color variance in the saved image. For best results, use even lighting. Camfire DCi User's Guide 5 Creating a New Folder When whiteboard notes are saved, the images are stored in a folder named by the date and time at which it was created. To create a new folder for a USB storage device or Web folder Press the New Folder button. The Camfire DCi system stores your images in a new folder named by the time and date at which it was created. The previous folder closes when the new folder opens. To create a new folder for a personal computer or network 1. Press the New Folder button on the control unit. The New Folder Location screen appears. 2. Use the scroll button to select a directory for the new folder and press OK. NOTE: You can’t create directories using the control unit. You must create them on the computer running Image-Saving Software for PCs or the network server running ImageSaving Software for Networks. If Image-Saving Software for Networks is the current mode, you can access multiple levels of directories on the control unit screen. However, you can only access one level of directories if Image-Saving Software for PCs is the current mode. Changing the Save Mode Depending on how you configure your networked control unit, you can save your whiteboard notes to: 6 • a USB storage device • a personal computer running Image-Saving Software for PCs • a network running Image-Saving Software for networks • an internal Web folder Camfire DCi User's Guide To toggle through the available save modes for your configuration Press the Change Mode button. When you switch to a different mode, the folder created in the previous mode closes. NOTE: If only one mode is available, this button is disabled. Also, whenever you insert a USB storage device into the control unit, the mode automatically changes to USB Storage Device. Saving Whiteboard Notes 1. Press the Save button on the control unit. Stand away from the whiteboard and clear of the cameras while your whiteboard notes are being saved to avoid being included in the image. Options Delete New Folder Print Sleep Save Save Press the Save button Then stand clear of the cameras Camfire DCi User's Guide 7 If you have multiple whiteboards, the following screen appears. 2. Select a whiteboard, if required. 3. Press Save. Your notes are saved using the mode identified in the status area of the control unit screen. A screen indicates when the image is being saved and another screen indicates when it’s safe to erase the whiteboard. Wait until the Ready to Save screen appears before you capture any new notes. NOTE: The storage capacity for internal Web folders is limited (approximately 80–120 images), and the oldest folder is deleted automatically once you exceed this capacity. To retain the notes stored in a Web folder, you must save them on your hard drive or network as explained on page 22. Activating/Deactivating the Statusboard Option at the Control Unit By default, the system only saves your whiteboard notes when you press the Save button. However, if you prefer, you can use the Statusboard option to automatically save your whiteboard notes whenever you step away from the whiteboard or at regular time interval. You can choose to archive each image or overwrite the previous image with a new one each time your whiteboard notes are saved. For example, suppose your company uses a whiteboard to keep track of customer orders and your office is in a different room than the whiteboard. With the Statusboard option, you can keep pace with the changes noted on the whiteboard without ever leaving your office. NOTE: To use the Statusboard option, either Image-Saving Software for PCs or ImageSaving Software for Networks must be active. To activate the Statusboard option 1. Press the Options button on the control unit. The Options screen appears. 2. Use the scroll button to select Statusboard and press OK. 8 Camfire DCi User's Guide The Activating Statusboard screen appears. 3. To save the whiteboard notes whenever you step away from the whiteboard, select Auto Detect Mode and press Next. OR To automatically save the whiteboard notes at a regular time interval, select Timer Mode and press Next. Then use the scroll button to select the save interval and press Next again. The following screen appears. 4. To archive each saved image, select Yes and press OK. OR To update a single image of your whiteboard (without retaining the previous versions), select No and press OK. To deactivate the Statusboard option To begin saving to a new folder after you deactivate the Statusboard option, press the New Folders button on the control unit. OR To continue saving to the same folder after you deactivate the Statusboard option, press the Options button on the control unit and select Statusboard. When a message appears asking if you want to deactivate the Statusboard option, press OK. Camfire DCi User's Guide 9 Printing Whiteboard Notes 1. Press the Print button on the control unit. The following screen appears. 2. To print the current image, use the scroll button to navigate to the image you want and press the Current Image button. OR To print all of the images within the current folder, press the All Images button. Deleting Whiteboard Notes While working at the computer, you can delete one or all of the images in the current folder. To delete whiteboard notes 1. Press the Delete button on the control unit. 10 Camfire DCi User's Guide The following screen appears. 2. To delete the current image, use the scroll button to navigate to the image you want and press the Current Image button. OR To delete all of the images in the current folder, press the All Images button. A confirmation message appears. 3. Press OK. If you’re using Image-Saving Software for PCs or Networks, the image on the computer or network server is also deleted. Initiating Sleep Mode After an extended period of inactivity, the Camfire DCi system automatically goes into sleep mode. You can also initiate sleep mode at any time. To initiate sleep mode 1. Press the Sleep button. New Folder Sleep Sleep Button Save A confirmation message appears. 2. Press OK. Camfire DCi User's Guide 11 Reactivating the Camfire DCi System After an extended period of inactivity, the Camfire DCi system automatically goes into sleep mode. You can also put the system into this mode by pressing the Sleep button. In sleep mode, the control unit screen is blank. To reactivate the system, press any button. If you assigned a control unit password, you’ll also need to enter it as explained in the next procedure. To enter a control unit password If you assigned a control unit password, the following screen appears whenever the control unit is reactivated. 1. Use the scroll button to move up or down to select each character. 2. Scroll right to advance one space. The maximum number of characters allowed is 16. To delete the previous character, scroll left. 3. When you finish entering the password, press OK. 12 Camfire DCi User's Guide Adjusting the Camfire DCi System at a Control Unit While working at the whiteboard, you can: • adjust the brightness of the control unit screen (page 13) • refine image alignment (page 13) Adjusting Screen Brightness If you’re having problems reading the information on the control unit screen, try adjusting the screen brightness. To adjust screen brightness 1. Press the Options button on the control unit. The Options screen appears. 2. Use the scroll button to select Screen Brightness and press OK. The following screen appears. 3. Use the left and right functions of the scroll button to adjust the brightness of the display and press OK. Refining the Image Alignment The camera boom houses two digital cameras and each camera photographs a portion of the notes on your whiteboard. Before the notes are saved, built-in image-enhancing software stitches the two photographs into a single snapshot and crops any excess wall surface from the image. This software also corrects the perspective, whitens the background, sharpens the writing, and improves the color. All you must do is refine the image alignment. Under most circumstances, you only need to do this once before you save whiteboard notes for the first time. However, if you move the camera boom or whiteboard, you may have to repeat the process. Camfire DCi User's Guide 13 To refine the image alignment 1. Using a dry-erase marker, mark the horizontal center of the whiteboard at the top and bottom of the writing surface. Make each mark approximately 2 in. (5 cm) long, beginning at the whiteboard frame. Mark the center of the whiteboard at the top and bottom of the writing surface 2. Align the top and bottom image targets to the marks you just made. NOTE: An electronic version of these targets is available at www.smarttech.com/ products/camfire/specs.asp, should you misplace the ones shipped with your system. Align the top and bottom image targets 3. Align the corner image targets to the corners of the whiteboard. Align the corner image targets 4. Attach the center image target to the center of the whiteboard. Attach the center image target 14 Camfire DCi User's Guide 5. Press the Options button on the control unit. The Options screen appears. 6. Use the scroll button to select Administration and press OK. If you assigned an administrator password, the Enter Administrator Password screen appears. 7. Enter the Administrator Password, if required: a. Scroll up or down to select each character. b. Scroll right to advance one space. NOTE: To delete the previous character, scroll left. c. When you finish entering the password, press OK. The Administration screen appears. 8. Use the scroll button to select Image Alignment and press OK. Camfire DCi User's Guide 15 If you have multiple whiteboards, the following screen appears. 9. Select a whiteboard, if required. The following screen appears. 10. Press OK. A screen appears, indicating that the alignment is in progress. 11. Wait for the Administration screen to appear (approximately three minutes), indicating that the alignment is complete. 12. Without removing the image targets from your whiteboard, press the Save button. An image of your whiteboard appears on the control unit screen. 13. If you configured a printer, press the Print button on the control unit. Otherwise, access the saved image at your desk using Image-Saving Software or the USB storage device (page 17). 14. If the horizontal lines are unbroken in the saved image, the alignment was successful and you can remove the image targets. Some jaggedness in the lines is normal even for a well aligned system. Do not be concerned unless the lines are completely broken. OR If the horizontal lines are completely broken, leave the image targets on your whiteboard and repeat steps 5–14, or contact SMART Technical Support at 1.866.518.6791 (Canada/U.S.) or +1.403.228.5940 (all other countries). 16 Camfire DCi User's Guide Working with Whiteboard Notes on a Computer You can access whiteboard notes at your desk in three different ways: • If you saved the images to a USB storage device, you can access the images using any desktop computer (page 17) • If you have Image-Saving Software for PCs on a computer that’s within the same network as the control unit, you can access the files on that computer (page 17) • If you have Image-Saving Software for Networks on your network, you can access the images after they are published on the intranet (page 19) • If you temporarily stored the images in an internal Web folder, you can use your Web browser to save those images to your hard drive or the network (page 21) Using a Removable USB Storage Device Whenever you insert a USB storage device into a control unit, a new folder is created based on the current time and date. You can also create a new folder by pressing the New Folder button on the control unit. Each image of whiteboard notes is stored as a separate JPEG file within one of these folders. To access your images, insert the USB storage device into a USB port on a computer and use Windows Explorer to navigate to the image you want. Using Image-Saving Software for PCs When it’s the current save mode on your control unit, Image-Saving Software for PCs saves images of your whiteboard notes in folders on a specified computer that’s within the same network as the control unit. Each folder contains an HTML index and JPEG files for each image. To access thumbnail images of all the whiteboard notes in a folder, search for the index.html file. You can register as many as three control units on the specified computer. To activate Image-Saving Software for PCs While Image-Saving Software for PCs is active, the Camfire Image-Saving Software for PCs icon appears in the system tray. Camfire Image-Saving Software for PCs Icon If this icon isn’t displayed in your system tray, you can open the program by selecting Start > Programs > Camfire Image-Saving Software for PCs. To refresh the index of whiteboard notes Image-Saving Software for PCs maintains an index of the whiteboard notes saved in each folder. Normally, you won’t need to refresh this index because it’s updated automatically whenever you start the software or save new whiteboard notes. However, if you use Windows Explorer to move the image files or change the file names, your changes may not be included on the index page. In this situation, you may need to refresh the index. Camfire DCi User's Guide 17 1. Double-click the Camfire Image-Saving Software for PCs icon in the system tray. Camfire Image-Saving Software for PCs Icon The following dialog box opens. 2. Click the Refresh Indexes button. 3. Click OK in the message box that appears. 4. Click OK again. To access whiteboard notes saved by Image-Saving Software for PCs 1. Use Windows Explorer to navigate to the folder you want. OR On the computer with Image-Saving Software for PCs, double-click the Camfire ImageSaving Software for PCs icon in the system tray and click the Open Folder button in the dialog box that appears. 18 Camfire DCi User's Guide 2. Double-click the index.html file in the folder containing the images you want. TIP If you’re not sure which folder the images were stored in, double-click the index.html file in the root directory. A Camfire Image-Saving Software page opens in your Web browser. 3. Navigate to the folder you want. An index of images appears. 4. To view an image in greater detail, click its thumbnail. 5. To print an image, click the Printer Friendly Version (PDF) link below its thumbnail. Then select Print from the File menu. Using Image-Saving Software for Networks Image-Saving Software for Networks stores your whiteboard notes on a network server. A system administrator must install and activate this software as explained in the Camfire Image-Saving Software for Networks System Administrator’s Guide. To access whiteboard notes saved by Image-Saving Software for Networks 1. Ask your system administrator for the URL where notes are posted. 2. Open a Web browser, such as Microsoft Internet Explorer or Netscape® Communicator®, to this URL. Camfire DCi User's Guide 19 An intranet page with links to the whiteboard notes appears. 3. Select a folder. A calendar appears for the folder you selected. 4. Click the day that you want. 20 Camfire DCi User's Guide An index of images appears. 5. To view an image in greater detail, click its thumbnail. 6. To print an image, click the Printer Friendly Version (PDF) link below its thumbnail. Then select Print from the File menu. 7. To save the image in Internet Explorer, right-click its thumbnail and select Save Target As. Specify a file path and name in the Save As dialog box. OR To save the image in Netscape Communicator or Netscape Navigator®, right-click its thumbnail and select Save Link Target As. Specify the file path and name in the Save As dialog box. The browser saves the notes in JPEG format. 8. To copy the image in Internet Explorer, right-click on its thumbnail and select Copy. You can paste the image in JPEG format into any open application that uses the Windows operating system. Using Internal Web Folders By default, images are saved in a Web folder in the control unit’s flash memory. If you’re not using a USB storage device, or running Image-Saving Software for PCs or Networks, the system stores your whiteboard notes in a Web folder. However, the storage capacity of the flash memory is limited, and the oldest folder is deleted automatically once you exceed it. The system administrator can also delete specific folders (page 23). To retain the notes stored in a Web folder, you must save them on your hard drive or network (page 22). Camfire DCi User's Guide 21 To save the notes in a Web folder on your hard drive or network 1. Open a Web browser, such as Microsoft Internet Explorer or Netscape Communicator, on a computer that’s within the same network as the control unit. 2. Enter the control unit IP address (displayed at the top of the control unit screen) in the Address bar. NOTE: With some network setups, you can also type the control unit host name in the Address bar to access internal Web folders. Consult your system administrator to find out if this is possible on your network. If a Web folders password has been assigned, a password dialog box appears. 3. Enter guest as the User Name and the Web folders password in the Password box. 4. Click OK. The Web Folders page appears. 5. Navigate to the folder you want. An index of images appears. If you don’t see the images you want, click the Refresh button. 6. To view an image in greater detail, click its thumbnail. 7. To save an image in Internet Explorer, right-click its thumbnail and select Save Target As. Specify a file path and name in the Save As dialog box. OR To save an image in Netscape Communicator or Netscape Navigator, right-click its thumbnail and select Save Link Target As. Specify the file path and name in the Save As dialog box. The browser saves the notes in JPEG format. 22 Camfire DCi User's Guide To delete a Web folder NOTE: This procedure should only be completed by a system administrator. 1. Open a Web browser, such as Microsoft Internet Explorer or Netscape Communicator, on a computer that’s within the same network as the control unit. 2. Enter the IP address of the control unit, plus /config, in the Address bar of the Web browser. The IP address appears at the top of the control unit screen when the Web folder mode is active. A password dialog box appears. 3. Enter admin as the User Name. If you previously assigned an administrator password, enter it in the Password box. Otherwise, leave it blank. 4. Click OK. The Configuration page appears. 5. Click Delete Web Folders. The Delete Web Folders page appears. 6. Select the folder you want to delete and click the Delete button. Camfire DCi User's Guide 23 Customer Support Our Technical Support team welcomes your call. However, you may want to contact your local reseller first if you experience problems with any SMART product. SMART’s resellers can readily provide you with quick advice so you can enjoy the benefits of the Camfire DCi system without delay. Contacting SMART Technical Support There are a number of ways to contact SMART Technical Support: Telephone: 1.866.518.6791 (toll-free in Canada/U.S.) or +1.403.228.5940 (all other countries) (Available 7 a.m. − 6 p.m. Mountain time from Monday to Friday) Fax (24 hours): +1.403.245.0366 E-mail: [email protected] Web site: www.smarttech.com Please tell us when you purchased the product, the reseller’s name and the serial numbers of your control unit and camera boom(s). The control unit has two serial number labels: one underneath the control unit near the connection ports and another on the back of the control unit. Each camera boom also has two serial number labels: one inside the front door and another on the back of the camera boom base. General Inquiries Sales and Marketing: 1.888.42.SMART (toll-free in Canada/U.S.) or +1.403.245.0333 (all other countries) Fax (24 hours): +1.403.228.2500 E-mail: [email protected] Address: SMART Technologies Inc. Suite 600, 1177 − 11th Avenue SW Calgary, AB CANADA T2R 1K9 Warranty A one-year limited equipment warranty covers your Camfire DCi system. To return defective merchandise, call Technical Support to receive the appropriate Return of Merchandise Authorization, as well as shipping instructions so you can send your unit to an authorized service center. Warranty Shipping Charges Shipping charges incurred from warranty service are paid as follows. You are responsible for shipping the system to the service center. SMART pays return shipping via ground service on any product returned for service within the warranty period. If you request a rush order, you are billed for any charges associated with that rush order. After the warranty period, you are responsible for shipping the product to and from the service center. Read the warranty that was shipped with your Camfire DCi system for details. Registration You received a User Registration Card with your Camfire DCi system, which you can fill in and mail to SMART. You can also register online at www.smarttech.com/products/registration. If you indicate that you would like to receive details on product upgrades, we’ll e-mail you information on the newest software and tools for your Camfire DCi system. 24 Camfire DCi User's Guide Index A I Accessing Whiteboard Notes In an Internal Web Folder, 21–23 On a Network Server, 19–21 On a Personal Computer, 18–19 On a USB Storage Device, 17 Adjusting Screen Brightness on Control Unit, 13 Aligning Saved Images, 13–16 C Calibrating the Camera Boom Image Alignment, 13–16 Camera Boom Cleaning, ii Refining Image Alignment, 13–16 Changing the Save Mode, 6–7 Cleaning Camera Boom, ii Control Unit, ii Command Buttons, 5 Control Unit Activating Sleep Mode, 11–12 Activating the Statusboard Option, 8–9 Adjusting Screen Brightness, 13 Changing the Save Mode, 6–7 Cleaning, ii Deleting Whiteboard Notes, 10–11 Networked, 3–4 Password, Entering, 12 Ports in Use, 2 Printing Whiteboard Notes, 10 Reactivating, 12 Saving Whiteboard Notes, 6–8 Stand-Alone, 2 Creating a New Folder, 6 Customer Support, 24 D Image Saving Software for PCs, 17–19 Images of Whiteboard Notes Accessing in an Internal Web Folder, 21–23 Accessing on a Network Server, 19–21 Accessing on a Personal Computer, 18–19 Accessing on a USB Storage Device, 17 Activating the Statusboard Option, 8–9 Automatic Processing, 13 Changing the Save Mode, 6–7 Creating a New Folder, 6 Deleting, 10–11 Deleting an Internal Web Folder, 23 Printing at Control Unit, 10 Saving, 6–8 Image-Saving Software for Networks, 3–4, 19– 21 Image-Saving Software for PCs, 3 Internal Web Folders, 4 Accessing Whiteboard Notes, 21–23 Deleting an Internal Web Folder, 23 Saving Whiteboard Notes, 6–8 N Network Server Accessing Whiteboard Notes, 19–21 Saving Whiteboard Notes, 3–4, 6–8 Networked Control Unit, 3–4 P Password Reactivating Control Unit, 12 Personal Computer Accessing Whiteboard Notes, 18–19 Saving Whiteboard Notes, 3, 6–8 Printing Whiteboard Notes At a Control Unit, 10 Using a Web Browser, 17–23 Deleting Whiteboard Notes, 10–11 Camfire DCi User's Guide 25 R Reactivating the Control Unit, 12 Refining Image Alignment, 13–16 Registration of Product, 24 Removable USB Storage Device, 2, 17 Saving Whiteboard Notes, 6–8 S Saving Whiteboard Notes, 6–8 Activating the Statusboard Option, 8–9 Changing the Save Mode, 6–7 Network, 3–4 Personal Computer, 3 Refining Image Alignment, 13–16 USB Storage Device, 2 Web Folder, 4 Screen Brightness on Control Unit, 13 Sleep Mode, 11–12 SMART Web Site, 24 Stand-Alone Control Unit, 2 Statusboard Option, 8–9 T Technical Support, 24 U USB Storage Device, 17 Saving Whiteboard Notes, 2, 6–8 W Warranty, 24 Web Folders Accessing Whiteboard Notes, 21–23 Deleting, 23 Saving, 4 Saving, 6–8 Whiteboard Size, 1 Whiteboard Notes Accessing in Internal Web Folders, 21–23 Accessing on a Personal Computer, 18–19 Accessing on a USB Storage Device, 17 Accessing on a Web Server, 19–21 Activating the Statusboard Option, 8–9 Changing the Save Mode, 6–7 Creating a New Folder, 6 Deleting, 10–11 Deleting an Internal Web Folder, 23 Printing at a Control Unit, 10 Saving, 6–8 Writing Tips, 5 26 Camfire DCi User's Guide Suite 600, 1177 – 11th Avenue SW Calgary, AB CANADA T2R 1K9 Main Switchboard: 1.888.42.SMART (Canada/U.S.) or +1.403.245.0333 (all other countries) Support Tel: 1.866.518.6791 (Canada/U.S.) or +1.403.228.5940 (all other countries) Support Fax: +1.403.245.0366 [email protected] www.smarttech.com 99-00370-01 REV A0