1
I:RRFTgMRNo
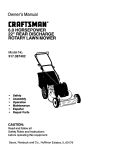
MODEL NUMBER 917.386121
OWNER'S
MANUAL
• Assembly
° Operation
• Customer
Responsibilities
• Service
° Adjustments
o Repair Parts
Caution;
Read and Follow
all Safety Rules
and Instructions
Before Operating
This
Equipment
153943
01,22,96
JJ
Printed in U.S,A
IIIIIIIIIIIIIIIIIIIIIIIIIIIIIIIIIIIIIIIIIIIIIIIIIIIIIIIIIIIIIIII
IIIIIIIIII
IIIIIIIIIIIHIIIIIIIIIIIIIIIIIIIII I IIIIIIIII
IIIIIIIIII
III1!111'1
I
I I IIIIIII II IIIIIIIIIIIII II
SAFETY
4_lb
RULES
Safe Operation Practices for Walk-Behind Mowers
IMPORTANT: THIS CUTTING MACHINE iS CAPABLE OF AMPUTATING HANDS AND FEET AND THROWING OBJECTS,
FAILURE TO OBSERVE THE FOLLOWING SAFETY INSTRUCTIONS COULD RESULT tN SERIOUS INJURY OR DEATH,
SAFETY STANDARDS REQUIRE OPERATOR PRESENCE CONTROLS TO MINIMIZE THE RISK OF INJURY. YOUR UNIT IS
EQUIPPED WITH SUCH CONTROLS, DO NOT ATTEMPT TO DEFEAT THE FUNCTION OF THE OPERATOR PRESENCE
CONTROLS UNDER ANY CIRCUMSTANCES
TRAINING:
•
Read ihis operator's manual carafully Become familiarwtth
theoonlrolsand know how to operate your mswer properly.
Learn how to quickly stop mower
•
,
Do not atlow chltdrento use your mower Never allowadMitS
to use mower without proper fnslruclisns
•
,, Keep the area o! opera!ion clear of el! persons, especially
small children and pets
Do not conllnueto run your mowerif you hita foreignobject
Follow the procedure outfinadabove, then repair any damage befora rostad_ng and operatingyou mower_
Do nol change the governor setUngs or overspend the
engine Enginedamage or personal fn}ury may result
•
Do not operate your mowerif it vibrates abnormally Exsessive vibration is an indicationof damage; stop Ihe engine,
safefy checkfor the cause ofvibrationand repair as required
Do not tun the engtne indoors
•
Use mower only as the manulacturer intended and as de.
scribed in this manuel
•
,,
Do not operate mower if it has been droppedor damaged in
any manner Always have damage repaired before using
•
Never cut grass by pulIingthe mower towards you Mow
acrossthe face of slopes, never up and down or you might
ioseyourfaettng. Donolmowexcessivalysteepslopss Uae
cautionwhenoperatingthe mower onuneven terrainorwhen
changingdirections- maintain good footing
•
Never operate your mower without proper guards, plates,
grass catcher or other safety devices In place
your
mower
•
Donotuseaccessoryettachmenlsthalarenotracommended
by the manuiacturar
Use of such attachments may be
hazardous
•
The blade lures when the angina ts running
PREPARATION:
MAINTENANCE
.
•
Always thor sughly checkthe areato be mowed and oleaMtof
all stsnes, sticks, wires, bones, and other foreign objects,
These ob}ecls wi!l be thrown by Ihe blade and can cause
severe injury
Always wear safety glasses or eye shields when starting and
whileusing your mower.
Dress properly, Do not operate mower when barelool or
wearing open sandals Wear only solid shoes wlth good
tracllon when mowing
ChecI<fuel lank before starting engtne. Do not fill gas tank
Indoors, when the engine is runningorwhen the engineIs hot.
Altow the engine to cool forseveral minutes before ltlling the
gas tank. Clean oil any spilled gasoline before stadlng the
engine.
,,
•
A_waysmake wheel height adjuelments before etad_ngyour
mower Never attempt to do th}s whiletheengine Is running
•
•
Keep elf safety devices In place and working
•
To reduce fire hazard, keep the engine free sf grass, leaves
or excessive grease end oil
•
Check grass catcher often for deterioration end wear and
replace worn bags Usa onty replacement bags that are
recommended by and comply wiih speolncaltons of the
manufacturer of your mower
•
AIways keep a sharp Made on your mower
•
Allow engine to coot before etodngIn any enclosure,
,,
Never stere mower with fuel In the tank Inside a building
where tumes may reach an open flame or an ignitionsource
such as e hot water heater, space h earNr, clothesdryer, elc
Mow only tn daylight or good adfficfaElight
Keep you reyes and mindon yourmower end Ihe area being
cut. Do not let other Interests distract you
portant safety precautions.
It means
Look for thisBECOMEALERTltl
CAUT!ONII1
symbol to point out
YOUR
imSAFETY IS INVOLVED.
Do not mow wet or sUpper'/grass, Never runwhtteoperating
yourmower. Always be sura of your footing- keep a firm hold
on the handles end watk
Do not put hands or feet near or under rotating pads Keep
ciearof the discharge opening at alf times,
•
Aiways stop the engine wheneveryou leave or are not using
yourmowe r, or before crossingdriveways,weika, made, and
any graveI..coveradareas
•
Never direcl discharge of materiel toward byslandets nor
allow anyone near the mower whileyou are operatingtL
•
Before cleaning, Inspecting, orrepairingyour mower, stop the
engine and make absolutely sure the blade and all moving
padshave stopped. Then disconnectthe sparkplug wire and
keep It away from the spark plug to prevent accidental
starling
AND STORAGE:
Check the blade and the engine mounling bolts oltan to be
sure theyare tightenedproperly.
Check all bofts, nuis and screws at frequent intervals Ior
propertightnessto be sure mower Is in safe workingcondt_
lion
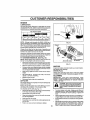
OPERATION:
•
Exhaust fumes are dangeP
ous
_
plug wire and place wire where it cannot contact spark plug tn order to pre_
vent accidental starting when setting
CAUTION:
Always
disconnect
spark
up, transporting,
adjusting
or making
repairs.
WARNING
t'l'heengine exhaust from this product conns chemicals
Known to the State of Cslhornia to cause cancer, birth defects,
or other
reproductive
harm.
CONGRATULATIONS
on your purchase of a Sears Lawn
Mower, it has been designed, engineered and manufactureci.tQ.gtve you the best possible dependability and
performance,
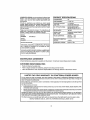
PRODUCT
SPECIFICATIONS
I-!ORSEPOWER:
4.0
DISPLACEMENT;
1"1,5CU_ IN
Should'y0uexperlence
any problem you cannot easily
remedy, please contact your nearest Sears Authorized
Servic e CentedDepartment
We have competent, welltrained technicians and the p roper tools to service or repair
this lawn mower
GASOLINE CAPACITY
AND TYPE:.
1.5 QUARTS
UNLEADED REGULAR
O!L TYPE (API-SoF_'_G):
SAE 30 {ABOVE 32=F}
please read.arid retain this manual The instructions wttl
enable you to assemble and maintain your lawn mower
properly, Always observe the "SAFETY RULES",
OiL CAPAciTY:
20 OZS
SPARK PLUG:
(GAP: _030=)
CHAMPION J19LM, RJ19LM
STD36t458
VALVE CLF__RANCE:
INTAKE;
.OOB
EXHAUST._ o00B
MODEL
NUMBER
91_7,386t21
s.a_5w.3o(BELOW
32°F)
SERIAL
NUMBER
SOLID STATE IGNITION
AIR GAP."
,0125 lN.
DATEOFPURCHASE
BLADE BOLT TORQUE:
35,40 FT,LBS
THE MODEL AND SERIALNUMBERSWILLBE
FOUND
ON A DECAL ATTACHED "TO THE REAR OF THE
LAWN MOWI_R HOUSING
YOU SHOULD RECORD BOTH SERIAL N UMBER AND
DATE OF PURCHASE AND KEEP tN A SAFE PLACE
FOR FUTURE REFERENCE.
MAINTENANCE
AGREEMENT
A Sears Maintenance Agreement
CUSTOMER
is available on this pmducL contact your nearest sears store for details,
RESPONSIBILITIES
•
Read and observe the safety rifles.
,,
•
Follow a regular schedule in maintaining, caring for and using your lawn mower.
Foliow the instructions under "Cuslomer Responsibilities" and "Storage" Sectlor_s of this owner's manual
LIMITED
TWO YEAR WARRANTY
ON CRAFTSMAN
POWER
MOWER
For two years from date of purchase, when this Craftsman Lawn Mower Is maintained, lubricated, and iuned up
according to the operating and maietenance instructions in the owner's manual, Sears wilt repair free Of charge any
defect tn material pr workmanshfp
If this Craftsman Lawn Mower is used for cammercial or rental purposes, this warranty appfte_ for on!y 90 days from
the date of purchase
This Warranty does not cover,
•
Exl'_endabte items which becomewom
air cleaners and spark plug..
during normal use such &s rotary mower blades, blade adapters, bells,
•
Repatrs necessary because of operaterabuse or negligence, including bent crankshafts and the failure to maintain
the equipment according to the lnstructlqns c_ntained tn' the owner's manual
,
WARRANTY SERVICE IS AVAILABLE BY RETURNING THE CRAFTSMAN POWER MOWER TO THE NEAREST
SEARS SERVICE CENTER/DEPARTMENT
tN THE UNITED STATES,, THIS WARRANTY APPLIES ONLY WHILE
THiS PRODUCT IS iN USE IN THE UNITED STATES
This Warran_
gives you specific legal rights0 and you may also have other rights whtch very from state to state.
SEARS, ROEBUCK AND CO., D/817 WA, HOFFMAN
ESTATES,
ILLINOIS
60179
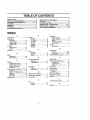
TABLE
.....
OF CONTENTS::
SAFETY RULES.. :. .................................
;............. ;....;...2
PRODUCT SPECIFICATIONS ............. .-"-:..:;o._;:;;"_. 3
CUSTOMER RESPONSIBILITIES
o_...._.,..:..._. 3, 11-13
WARRANTY ..._,_o.....:_._,: ..................... L:;......;.............. :3
ASSEMBLY ..; ...... :......... ;......... _............ ._.............. :........ 6
OPERATION .....................................................
;......;...... 8
MAINTENANCE
SCHEDULE
SERVICE AND ADJUSTMENTS
....;..; ........................
14
STORAGE .......................... _._;.'.,_L,,._.,,_ .............. _...... 15
TRO UBLESHOOTIN G .,.,,;._.':..;.;:L..o.o._ ....................... 21
REPAIR PARTS - LAWN MOWER ...... :.,...:: ......... 16-17
REPAIR PARTS-
ENG!NE o.,i..,'._=; ............ ;o_
........ tB-20
PARTS ORDERING/SERVICE
.....; ....... ;;;...;o;_;........... tl
._;.._7.;_".::
.............. ""r""* 24
INDEX
E
A
Accessories
...........
r.............................
5
Adjustments:
Carburetor ................. ;.............. 14
Engine Speed ........................... 14
Handle Height .......;.,,o: ............. 14
Helght of Cut .............................. 9
Air Filter:
Replacement ........................... 13
Ser.,ice ..................................... t 3
Assembly ............................................. 6
Operallon:
Engine:
Englne Control............
:..............
9
Air Filter ..,,_
....................................13
Grass Catcher _......_........ _.......... 9
.
Oi) Change .................. ;........... 13
Mower .........._...........,............_......... g
OIt Level ..........................
.,....;....... 13
Operator Presence
Oil Type ........................................13
Centre Bar ........
>. .....
• • 9
•
Starting
10
Options:;
Stopplng ...............................................
10
Accessodes
.;, ,°. ............
5
Storage, .....................................:, 15
a
F
Repair Pads:
:
Fuel:
Engine
Capacity .............................................
;.. 3
Lawn Mower ;.,;..,...;............. 16-17
Storage ,,.._ ................_........._...... 15
Respei'isibllities,
Customer., 3, 1 !-13
Type ......:
9
............................................
................
B
Blade:
Sharpening
t2
Replacement......;,_.: ........,,........t2
:,,1...;
............
18"20
..........................................
.....................................
C
H
Handle Adjustment:
Assembly. .........................._........6
Cutting Height ........................ 14
S
Safety Rules., .....................
_.o:
................ 2
Serviqe:and Adjustments _:._;,,
,,.:..... ! 4
Controls:
Ca_uretor o,o,(.;'o
....................... t4
Engine Zone Coqtrol ................. 9
,Eng!ne Speei:l o,°. .........................14
Engine Speed Control .............. 8
Hart'die ;,:........ :,o,,:,J................... t4
L
Operate[ Presence
,_ Lubdeatfoh:
Spark Plug.:;.....- ............._..,.;............... t3
Control Bar ........................ .o,o_...B
Engine .................... _.................. 13
Spaclflcat!0na _;;........:..........................
:.,,. 3
Customer Responsibilities ,.. 3, 1t -t3
Law n Mower .--._
......................
11
SpeedCaStrOh
:,
Air Ftffer .........................:.LoJ..... t_3
Engii_e ..,._;.:;;,o;,,.o.;.......................
:f4
M
Blade CaxotReplaceh_ent.:..,.o !2
Siaillhg tile Er_glne ...... -...........
;:,..,:. 10
Engtr_e............... _.......... ,.......... :. I3 _, Maintenance Agreement ..,,,:.................
3
Lubrication. ...................
;o t3
Sio.ppln_ ihe Engtne r.°:,,,..,,:
...........r" io
Spark Plug ...... :,.........::..,..:.:.:, t3 : Maintenance Schedule.,,,,; ....................
1_
Cutting Levels .................................
9
Mowing Tips ......... ..............................10
T
O
011:
TroubleShoollflg
Chart o-..,
...........
21
Engine ..............
,.,,,o._
..................................
13
W
Sloraga ..............................................
15
.......
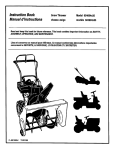
LAWN MOWER ACCESSORIES
These accessories were ava abe when ths awn mower was produeed_ Theyare _i_6_v_liable at,most Sears tetal!outlets
and service centers, Most Sears stores can a so order repa rpads foryou whe n YOUpray de the model number of yourlawn
mower, SOme oi these accessories may not apply to y0ur lawn mower, '
LAWN
MOWER
PERFORMANCE
CLIPPING DEFLECTOR
FOR REAR DISCHARGE LAWN MOWERS
GRASS CATCHERS
FOR
REAR DISCHARGE
LAWN MOWERS
MULCHER
KITS
STABILIZER
i
FOR
SiDE DISCHARGE
GRASS'
LAWN CATCHERS
MOWER S
_t
GAS CANS
LAWN
MOWER.
MAINTENANCE
AIR FILTERS
MUFFLERS
BELTS
111111
,1111,111
BLADES
BLADE ADAPTERS
i
WHEELS
1,,1
SPARK pLUGS
•ENGNEolk ........
H
•
ii
i
HHHIHHIIIII I N I I
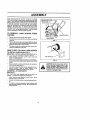
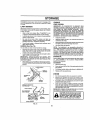
ASSEMBLY
:
Read these Inst_ct_ons ant! thts manual tn its entirety
before you attempt to assemble or operate your new lawn
mower. Your new lawn mower has been assen_bled at the
factory with the exception of those pads left unassembfed
for shipping purposes. All parts such as nuts. washers,
boils, etc, necessary to complete the assembly have been
placed {n the parts bag
To ensure sate end proper
operation of your tawd mower, all parts and hardware you
assemble must be {ightened securely
;Use tbe correct
tools as necessary to ensure proper t gh!ness
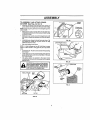
TO
REMOVE
LAWN
MOWER
OPERATORPRESENCE
COHTROLBAR
UPPER
HANDLE
LI_ UP
FROM
CARTON
•
Re_0ve
•
Cui down two end corners of cartOn and lay end pane
down flat_
loose parts included with mower
•
Removeaflpackingmelerialsexceptpaddin_jbetweeh
upper and lower handle and padding holding operator
presence control bar to upper handle
.
Ro_ fawn mower out of Cartoh and ch_ck Carton thor.
oughly for additional loose patter
LOWERHANDLE,
FIG_I
HOWTO SET UPYOUR LAWN MOWER
TO UNFOLD HANDLE (see Fig, f1)'
IMPORTANT:
UNFOLD HANDLES CAREFULLY SO _.S
NOT TO PINCH OR DAMAGE CONTROL CABLES
"
Raise handles until lower handle section locks into
pfa_e in moWing pesition
•
Raise upper handle secUon into place on lower handle,
remove protective padd ng and t ghtbn both hand e
knobs
•
Remove handle paddtng hoiding 01_erator presence
con{Pot bar to Upper handle
•
Your lawn mower handle can be adlusted for your
m0wtng comfort
Refei tc_ =Adjust Randie _ in the
Service and Ad.tustmenl ,section of this manual
TO INSTALL ATTACHMENTS,
(See Fig. 2)
'(our lawn mower was shipped ready 'to be i]sed as a
mulcher To convert to bagging or discilarg[ng:
•
Open rear door and remove
mulcher plug In a safe place
mulcher
pEug,
Store
• _You can now Lnstafl catcher or optional ciiPp_:ngdeflectore
•
To return to mulching operation, install mulcher plug
into discharge ol_ening of mower Be sure aft tabs are
seated propedy
MULCHERPLUG
FtG_2
CAUTION:
Do not run your lawn mower
proved ,clipping
deflector,or
grass.
catcher
place. plug
Ne_/erinattempt
to opwfthout In
mulcher
plaoe or
aperate the learn mowerwffh
the Pear door
removed or propped Open.
ASSEMBLY
i rill
iiiii
,,ll,ll
lllll
i
TO ASSEMBLE AND ATTACH GRASS
CATCHER (See Figs, 3A thru 4)
LowER
•
insert leg of tubular frame through trent Opening of
glass catcher and thread frame Into sewn hem of bag..
NOTE:. Keep bag hem gathered on he straight leg of the
tubular frame.
•
When frame comes out the other end of sewn hem,
immediately work the end of frame down Instde the bag
as Shown in InseL
•
Stile sewn hem evenly around the tubular frame until
both ends of frame are exposed out of the front opentng,,
Assemble Iower frame to tubular frame as shown. Be
sure handle is outside of bag and frames are fully
seated as shown in Inset.
•
•
(Frams_ must
TUBULAR !
'
FiG, 3B
LOWERFRAMEHANDLE
Slip viny_ bindings over frame.
NOTE: tf vinyl bindings are too st}if, hold them in warm
water for a few minutes,
if bag gets wet, let It dry before
using,,
•
Closet_efllpiid
lawn mower
•
Lift the rear door on the mower housing and place the
grass catcher lrame onto the formed tabs oh the rear
door hinge bracket,
•
The grass catcher is secured to the lawn mower
housing when the rear door {s lowered onto the grass
catcher Irame.
"-_.
FlipIidmustbeclosedwhfteoperating
.
cAuTION: Do not runyourlawn mower
without clipping deflector or approved
grass catcher in placer Never attempt
to operate the lawn mower with the rear
door removed or proppe d open.
:
FIG. 3C
BRACKET
GRASS
CATCHER
FRAME
FORMED
TABS
FIG. 4
SEWN
HE_
FLIP
LID
FIG. 3A
7
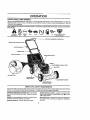
OPERATION
KNOW
YOUR
LAWN
MOWER
READ THiS OWNER'S MANUAL AND SAFETY RULES BEFORE OPERATING YOUR f_NN MOWER; Compare the
illustrations with yoLJt lawnmower
to familiarize yourseif with the Ioeatton of various controls and_adjOstments, Save this
manual !or future reference,,
,
. ......
These symbols
their meaning.
may appear on your lawn mower or in literature supped wlth the pr0dudL Lba_rnand understand
....
"
'
'
'
'
CAUTION ENGINE
ORWARNING., ON
ENGINE '
OFF
!
FAST
SLOW
CHOKE
FUEL
O_tr ,DANGER;KEEN HANDS
_. AND FEET AWAY
•.
GASOLINE
FJLLER dAB
MULCHERPLUG
ENG|NE OIL CAP
"WRU D_PST!CK
LAWN:MOWERHOUSING
MEETS CPSC SAFETY REQUIREMENTS.
Sears rotary walk-behind power fawn mowers conform to the safety standards of lhe American'National
and the U,S. Consumer Product Safety Cdmmfssian° The blade turns when the engine ts.i_nn}ng_
.........
i ,
,
OPERATOR
"
'
PREsENcE
'
CONTROL BAR - must be held
down t0 the hahdfe to start the englne,
englne•
Reiease to stopthe
PRIMER - pumps addillonal fuel from the carburetor to the
cylinder tor use when starting a cold engine
STARTER
HANDLE
- used for stad}ng the engine.
,J ,,,
i
,,,,,,,,, ,,,,,, ,,,,,
,,, i,
,11
'
Standards
Institute
'
ENGINE SPEED CONTROL
- locatedon the stde of the
engine which allows you to select e!lher re.st (_)
(.,_h) engine speed,
or Blow
MULCHER PLUG - located at tlie discharge,opeding
must
be removed when converting to bagging ordtscharglng
operation,
OPERATION
=
i
Th awnmowe
ope atonofa
wh,c
c ny
result in severe aye damager Always wear safety glasses or eye sh aids whe operat ng your
lawn mower or performing any adjustments or repairs. We recommend a wide vision §afety
mask over the spectacles or standard safety glasses, ' :;
...........
"
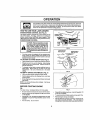
HOW TO USE YOUR LAWN MOWER
ENGINE SPEED CONTROL (See Fig. 5)
The engine speed Is controlled by a lever toceled on the
Side of the engine, Fast (,t_) posllion ts for starting the
engine, normal cutting, and better grass bagging
S!ow
(.0=,) POSition is forllghi cuffing, trimming and fuel economy,
OO!'_ROLLEVE_
_'
ENGINE ZONE CONTROL
CAUTION: Federal regulations
iequlre
an engine control to be installed on this
lawn mower in order to minimize the
risk of blade contact injury, Do not
under any circumstances
attempt to
defeat the function of the operator con*
troI.The blade turns when the engine is
running.
•
J'_
PRIMER
. . '_ :"
FIG, 5
LOWERWHEELS
FOR HIGHcLrr
Your lawn mower Is equipped with an operator presonce control bar which requires the operator to be
positioned behind the lawn mower handle to start and
_
_"
_
operate the ,own mower,r
•
•
.,._'
_.._.__._._,,.,i
TO ADJUST CUTFING HEIGHT (See Fig. 6)
,,
RAISEWHEELS
FOR LOWCUT
_r ,_r,
Wheels are set In low cut for shtppfng, AdjuSt cultlng
height to suit your requirements
Medium pos_tlon is
best
for most lawns
Raisewheelsforlowculandlowerwheeisforhlghcut,
'
_
_-
___
To change Cutting height, squeeze adjuster lever toWard wheel
Move wheef up or down to suit your
requirements
Be sure all wheels are tn the same
setting
FIG. 6
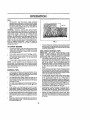
TO EMPTY GRASS CATCHER (See Fig, 7)
•
•
Lift up on grass calcher using Ihe fiame handle,
Empty clippings from bag uslng both lrame handre and
bag handle.
NOTE:
Do not drag the bag when emptying
unnecessary
BEFORE'
wearo
_
STARTING
:
•
t
"_"
it will cause
_i-_.:-"
ENGINE
OIL
Your lawn mower
"
•
•
•
Is sh_pped without oil in the engine,
, _
F!G; 7
Besuramoweristevelandareaaroundotiti]_isclean,
Remove engine oil cap w/dipstick and fill to the fuji line
•
Checkbil_ievelbefor_eachuse_
to full tire on dips!tck.
on the dipstick
•
To read proper leve]i _ighten engine oil cap each tithe
Use2Oozs_of oil. Fortypeandgradeofoiltouse,see
"ENGINE" In Customer Responstbitiltes section of this
manual,
.
Retnstaltenglneoflcapandtighten
'
• After the ttrst two (2) hours of m0wtng, change the oit,
and every 25 hours thereafter,
You may need to
changetheotlmorebftenunderdusty,
dirtycohdltions
Pour otl slowly,
•
Do not over tll!
9
Addolltfneeded.
Fill
r I
_ :
OPERATION
GAS
,,
Fill fuel tank. Use fresh, clean, regular unteaded
gesdiine With a minimum of 87 octan& (Use of leaded
gasoline Wit ncreaee carbon and lead oxide deposits
and reduce valve life),, Do not mix oil with gasoline.
Purchase fuel Fnquantities that can be used w thin 30
days tO assure flJel freshness.
",
WARNING:
Experience indicates that alcohol blended
fuels (called gasohel or using ethanol or methanol) can
attract moisture which Jeads to separation and format!on ot
acids during storage.
Acidic gas can damage the fuel
system of an erigtne while in storage. T_oavoid engine
problems, the ,fUel system should be emptied before storage of 30 days o1: longer. Drain 'th e fue! tank, start the
engine and et itrun 'unit fuel nes and carburetor are
empty. Use fresh fuel next season. Sea Storagei!nstruclions for additional information,
Never use engine or
carburetor cleaner products tn fue_ tank or permanent
damage may occur.
I
•
TO START ENGINE
•
To start a cold engine push pdmer_t_e (5) times berets
trying to'start. Use a firm push, This _tep is not usua!ly
necessary when starting an engine which has already
run for ate w mtnu es_
Push eng'lne speed control lever to fast [._)
MULCHING
Hold operator presence contro! bar down to the handle
and putl starter handle quickly. Do not aflow starter
rope to snap back°
.
To stop engine, release operat0r pre.sence control bar.
MOWING 'TIPS
IMPORTANT:
FOR BEST"PERFORM_NCE,
KEEP
MOWER HOUSING FREE OF BUIL,T-UFt GRASS AND
TRASH
CLEAN UNDERSIDE OF,MOWER HOUSING
AFTER EACH USE. SEE ."CLEANING" IN'CUSTOMER
RESPONSIBILITIES
SECT ON OFTHIS MANUAL
' '
•
The spec!al mutchlng blade wtti recut'_h§ grass Cllppings many times and redqce them in size So that as
they fal! onto the lawn Ihe_,iwjfl disperse into'the grass
and not be noticed,
Also, the mu!ched grass will
blodegrads quickly to provide nutrients for the lawn.
Afways muloh with your highestengine' (blade) speed
as this wilt provide lhe :best recuttlng action of the
Medea
.
position.
•
Pores In cloth grass catche(_ban
become filled with dirt
and dust with use and c'atchers wttl col!ect less gi'ess,
Toprevent lhfs, regu ally hose catchers off wilh water
andfet dry before using.
,"
_=
NOTE: In cooler weather It may be necessary to repeat
priming steps, In warmerweather
over priming maycause
flooding and engine will not start, If you do flood engine,
wait a few minutes before attempting to start and do not
repeat pdmlng step&
!,
MOWING TIPS
°
AvoidcuttJngyourlawnwhen
Hswet, Wetgraastends
to form clumps and interferes with the mulching action,
The best time to mow your lawn iSthe eady Afternoon,
At this time the grass has dded and the newly cut area
will notes exposed to the direct s0ri.
•
For best re,_utts, adjust the IeWli mower cu_Jng height
so that the lawn mowe_ cuts elf only the top one;third
of the grass blades (See EJg. 8), :If the lawn is
overgrown it will be necessary to'rais_the height of cut
to reduce pushing effort and to keep from byerloading
the engine and leaytngelumps of _ulPhedgrass,
For
extremely heavy mulching, red,Jce yoi4t width of cut,
mow slowly andTals_ the rea_"of the lawn mower one
wheel adjuster setting hlghe, r thari th=efront.
Certain types of gras_ ahd grass conditions may re;
quire that an area be mulched a rsecond time to
comp etely hide lhe clippings When :doing a second
cut, mew across or perpend!cular to the first cut path.
Change yourcutttng pattern from week to week, Mow
north to soulh one _eek then change tOeast to west the
next week. This will help prevent matt ng And grain ng
of the lawn.
•
Under certain conditions, such as very tallgrass, it may
be necessary to raise the height of c;ut to reduce
push ng effort and to keep from overloading the engine
and leav ng clumps of grass clippings.
•
For extremely heavy cutting, reduce the wtdih of cut
and raise the rear of the lawn mower housing one (1)
wh'eet adjL=stersetting higher than the front for better
discharge of grass.
•
For belier grass bagging and mbst Cutting _onditlons,
the engine speed should be set in the fast (.€_) position.
•
When using a rear discharge lawn mower in moist,
heavy grass, clumps of out grass may not enter the
grass catcher: Reduce ground speed (pushing speed)
a nd/or tun the lawn mows rover the area a second lime.,
"
•
If a trailer grass cllpplngsls left on ti:te right side of a rear
discharge lawn mower, mow in a cl0ckwfse dlrecUon
with a small oved&p to collect the clippings on the next
pass; "
L, ;
"
_
;
•
K_ep 'top of engine around Starter, dear and clean of
grass clippings and chaff. This wii! help engine air flow
and extend engine life
10
,J
...........................................
ii
i
,
i,
u ul lunn
,,
[
,
[,,, ,,,,[...........
CUSTOMER RESPONSIBILITIES
i
Check for Loose Fasteners
_
(If
Eqyipped)
Clean/Inspect
tl/
Grass Catcher
._
V'
WE Clean
Ctean UnderOd;.te
Lawn Mower Cover
(Self-Propelled Mowers)
R ChecldSha(pe_ep!ece
Blade
Lubrication Chart
Clean Battery/Recharge
(Electric Start Mowers I
"_ •
t,!
:
I_.
J
""
'
If;
.__
...........
i
.
_:
'
-_
V'
V' 3
• ,
N
Check Engine OIl Level
Change Engine Oil
•
G
I
Clean Air F!!!er
Inspect Muffler
U
Clean or Replace Spark Plug
E
Replace Air Filter Paper Cartridge
• _
'
I
'
!/
V'2
l - Changemoreoftenwhenoperatingundera heavyk_adorInhighambientlemperaluros
2 - ServicemoreoftenwhenoperagngIndirtyet dustyconditions
3" RopEase
bladesmoreoftenwhenmowingIn eahdyeoit
4 -.Charge48hoursat ando_season
LUBRICATION CHART
GENERAL
RECOMMENDATIONS
WHEEL
ADJUSTER
The warranty on this lawn mower does [_otcover items that
have been subjecte d to operator abuse or n'egugence. To
receive full value from the warranty, Operator must maintain
mower as instructed In this manual,
Some adjustments wili need to be made periodically to
properly maintain your unit.
AI! adjustments In the Service &nd Adjustments section of
this manual should be checked at least once each season.
•
•
Once a year, replace the spark piug, replace air filter
element and check blade for wear., A new spark plug
and s!eaninew air filter element assures proper air-fuel
mixlure and helps your engine ran better and Iast
longer.
Fotlow the maintenance schedule In this manual
BEFORE
•
•
EACH
(_BRAKE
SPRING
BRACKET
(_)ENGINE
OIL
USE
Check engine oil levet
Check for loose fasteners.
I.UBRICATtON
IMPORTANT; DO,NOT OIL OR GREASE PLASTIC WHEEL
BEARINGS
VISCOUS LUBRICANTS WILL ATTRACT
DUST AND DIRT THAT WILL SHORTEN .THE LIFE OF
THE SELF LUBRICATING BEARINGS. IF YOU FEEL THEY
MUST BE LUBRICATED USE ONLY A DRY, POWDERED
GRAPHITE TYPE LUBRICANT SPAR NGLY
Keep unit well lubricated (See "LUBRICATIO N CHART =)
11
CUSTOMER RESPONSIBILITIES
LAWN MOWER
Always observe safety ru_es when performing any maintenance.,
ii!'
TIRES
,'
Keep tires tree of gasoline, oil, or insect control chemicals which can harm rubber.
•
AvOid stumps, stones, deep ruts, sharp objects and
other hazards that _may cause tire damage.
BLADE CARE
For best resu!ts, m0werblade
bent or damaged blades.
BLADE
__
__
"_
must be kept sharp, Replace
TO REMOVE BLADE (see Fig° 9)
•
•
Disconnect spark plug wire from spark plug and place
wire where it cannot come In contact with spark plug,
Turn lawn mower on its side Make sure air filter and
carburetor ere up,,
•
Use a wood block between blade and mower housing
to prevent blade from turning when remov ng b ads
bolt,
.
Protect your hands with gievaa and/or wrap blade wtth
heavy cloth.
•
Remo_/e blade belt by turning counter-clockv_ise,
a 9/16" box OFopen-end wrench
•
Remove b_ade and attaching
washer and hardened washer)
hardware
I
wAs. .
T.A U. :\
LOCK WASHER
EDGE
BLADE ADAPIER
FIG. 9
NOTE: We do not recommend sharpening blade- but If you
do, be sure the blade is balanced
TO SHARPEN BLADE
Care Shou!d be taken to keep the blade balanced,
An
unbalanced blade will cause eventual damage to !awn
mower or engine.
Use
(bolt, Iocl_
NOTE:
Remove the btade adapter and check the key
inside hub of blade adapter.
The key must be n good
condition to Work property_ Replace adaptei' if damaged.
•
The blade can be sharpened with s fits or on a gdndlng
wheel, Do not attempt to sharpen while on the mower.
•
To check btade balance, ddve a nailtnIo a beam or wall
Lea_ve aboul one inch of the straight nail exposed.
Place canter ho e of blade over ths head of the na
If biade is baEanced, tt should remain in a horizonta!
position, t! either end of the blade moves downward,
sharpen the h6avy" endunt I the b ads S balahced.
TO REPLACE BLADE (See Fig. 9)
',
Position the blade adapter on the engine crank.shaft,
Be sure key in adapter and keyway tn crankshaft ai'e
aligned
•
Posliton blade on the blade adapter a#gningthe two (2)
holes in the blade with the raised fugs on the adapter.
•
The grass=catcher may be hosed wilh water, but must
be dry when use'd,
'
.
•
Be sure the trailing edge is up toward the engine.,
•
•
lnstaltthe blade bol! with the lock washei" and hardened
washer into blade adapter and crankshaft.
Use block of wood between blade and lawn mower
housing and lighten the blade bolt, turning clockwise
Check your grass c_tohsr 61ten for damage of: deter)oration. Through normat use it will wear, ][ catcher
needs replacing, replace only with a manufacturer
approved replacement catcher Give the lawn mower
model number when ordering
;
'
o
GRASS CATCHER
•
The recommended tightening torque ls 35-4(_ ft_ 15s
IMPORTANT; BLADE BOLT IS GRADE 8 HEATTREATED
12
...............CUSTOMER
RESPONSIBILITIES
'
ENGINE
LUBRICATION
Use only htgh quality d_,tergent 0if rated with APt service
classification SF or SG,; Select the oil s SAE viscosity grade
according to your expected operating temperature,
CONTAINER._
-2(_'
.tO"
"_P
TEt'_]FERATURE RANGE AHllCIPATED
IO _
"
_
313_
""
40'
BEFORE NEXT OIL CHANGE
NOTE: Allhough multi-viscosity otis (5W30, 10W30 etc.)
improve start ng n cold weather,.these mu Ii-viscos ty o s
will result in increased oil consumption when used above
32_'F, Check your engine oil level more frequently to avoid
possible engine damage from running low on oil
FIG, 10
COLLAR
Change the ofl after the first two hours of operation and
every 25 hours thereafter or at least once a year if the lawn
mower is not used for 25 hours In one year,
COUNTER'
Check the crankcase oll level before starting the engine
and after each five (5) hours of conllnuous use. Tighten oil
plug securely each time you check the oiI level
CLOCKWISE
TO REMOVE
SLOT
TO CHANGE ENGINE OIL (See Fig, 10)
NOTE: Before tipping lawn mower to drain o_l, drain fuel
tank by running engine until fuel tank is empty.
,,
Disconnect spark plug wire from spark plug and place
wire where it cannot,come in contact wilh spark plug.
•
Remove engfne ol! Cap; }ay astde on a clean surface.
MUFFLER
,,
Tip lawn mower on its side and drain oil into a suitable
container, Rock Fawn mower back and forth io remove
any otl trapped inside of engine.
Inspect and replace corroded muffler as it could create a
fire hazard and/or damage.
,,
W_pe off any spilled oil on lawn mower and on side of
engine•
"
Fttt engine Wilh oil. F_Honly to the "FULL" line on the
dipstick. DO NOT OVER FILL
•
Reptace engine oil cap.
•
Reconnect spark plug wire to spark ptug.
FIG. 11
SPARK PLUG.
Change your spark plug each year to make _iour engine
sla rt easier and run,bettel:, Set spark plug gap at ,.030 inch.
CLEANING.
IMPORTANT,:
.FOR BEST PERFORMANCE,
KEEP
MOWER HOUSING FREE OF BUILT, UP GRASS AND
TRASH,
CLEAN UNDERSIDE
OF MOWER HOUSING
AFTER EACH USE,
AIR FILTER
Your engine wilt not run properly and may be damaged by
using a dirty air filter,
AI_
Replace the a!r filter every year, more often If you mow in
ve_ dusty, dirty conditions. Do not wash air filter•
TO CHANGE
,,
Remove the air filtercover byturnlng counterclockwise
to the Stop and pull away from collar.
Remove filter from inside of cover..
•
Clean the Inside of the cover and the collar to remove
any dirt accumulat)on
Insert new filter into cover.
•
Put air filter cover and fliter into cotiar aligning the tab
wiih the slot
,,
Push in on cover and turn clockwise
' CAUTION_
P_t'l_':': ' _
D'_onne_t
sparll(pfug
wire
I
.....
Turn lawn mower on its side. Make sure air filler and
. carburetor are up: Clean the underside ot your lawn
mower by scraping to remove build-up of grass and
trash,
'
,
Clean enginb of!en to keep trash from accumulaling. A
€loggeo engine runs hotter and shortens engine itfs,
Keep Iini_hed surfaces and wheels free of all gasoline,
oil_ ate,
•
13
_
'
•
to lighten.
' from spark plug and place wire where it
cbr_n0t come In contact with the =park
,,_11_.
•,
AIR FILTER (See Fig 11)
•
•
I
we DO NOT i'ecommend using a garden hose to clean
lawn mower un!ess the electr|cal system, mufiier, air
filter and carburetor are covered to keep water out
Water in engfne can result In shortened engine life.
SERVICE AND ADJUSTMENTS
"
,i ,ml
|
_
| _l
!
•
_
H.ll
H,., ............................
r
•
,i i
'
Release control bar.
"
"
I
Make sure the blade and all moving parts have completely stopped, !:
I
Disconnect spark plug wire from spark plug and place:where tt cann0t_comeln
contact with plug. I
,.....
"
,,,,,,,,,i
................
"
"
i
, :,,,,;,,
,_........
; .
LAWN MOWER
TO ADJUST CUTTING HEIGHT
See "TO ADJUST CUTTtNG
secflbn of this manual,,
HEIGHT"
in the OperatiOn
REAR DEFLECTOR
The rear deflector,
your lawn mower,
that objects wiii be
into the 0perator's
tf the rear deflector
ptacedo
attached beiween the rear wheels of
is provided to minimize the possibility
thrown out the rear of the lawn mower
mowing p0sition:
becomes damaged,
it should be re-
TO ADJUST HANDLE (See Figs. 12 Thru 14)'
Your town mower handle can be raised or towered for your
mow!ng'comfort.
Four (4) positions are available', high,
medium high, mediuro'!ow and low. H_,ndles are shipped
mounted In the medium low position° _
.,
To change from medium tow to mediom high postliei!,
the upper and lower handle sections will ha;_e to be
turned over (Sea Fig, 12B),
.
Remove the cable clips,
,,
Remove the controls and ope[ato_' presence control
bar from the upper handle
,,
Remove th_ starter rope guide lrol_1the lower handle.
',
.
Remove hairpin coffers.
Disconnect the lower hand e from the handle brackets
(See Fig, 14)
' " '
"
•
Turn the handle over and reassemble
cotters that have been removed. ,.
•
•
Reassemble the starter rope guide i
Reassemble thecon|rois and the operator presence
control bar to the upper handteo
_
°
•
the hairpin
CAUTION i The operai0ri}_esen_ec0n-
' ]
brake engagement when control bar, Is
trol
bar mbst
freelyto
permtt
released,
Do plvot
not over
tighten
theblede
fas;_
tenors hold{ng the contro!s to the upperhani:fle.
"
' "
',,
|
'J
I
I
I
To change fl:om medium
u?per handle section will
Fig. 13A),
To change from medium
lower handle section will
Fig. 13B}.
HANDLE
low to h!gh posittcn only the
have to be turned o,ver (See
'
low lo,l_w position, 0nty the
have to,be turned over (See
:,
"
,
S'
HAIRPIN CL!P
BRACKET
FIG, t4
ENGINE SPEED
ENGINE
•
Your carburetor has a non-adjustable fixed main Jet for
mixture central
t1your engine does not operate prop6rty
due to suspected carburetor problems, take your lawn
mower to an authorized service center for repair Or adjustment
r
-
Your engine speed has been factory set,, Do not attempt
to increase engine speed or it may resu l in personal Injury,,
li you believe that the englhe !s running too fasi o _too stow,
take your fawn mower to an authorized service center for
repair and adjustment.
CARBURETOR
14
-
IIJLI
,Llllll,lu
LUll
I lll
HI,HI'
IIIII,IIIIIIIIHll
Ill
l
I
STORAGE
ImmediateLy prepare your lawn mower for storage at the
end _f the season or if the unit wt!l not be used for 30 days
or more.
ENGINE
FUEL SYSTEM
iMPORTANT:
IT IS IMPORTANT ,TO PREVENT GUM
DEPOSITS
FROM FORMING
IN ESSENTIAL
FUEL
SYSTEM PARTS SUCH AS CARBURETOR, FUEL F|LTER,
FUEL HOSE, OR TANK DURING STORAGE
ALSO,
EXPERIENCE INDECATES THAT ALCOHOL BLENDED
FUELS (CALL_ED GASOHOL OR USING ETHANOL. OR
METHANOL) CAN ATTRACT MOISTURE WHICH LEADS
TO SEPARATION AND FORMATION OF ACIDS DURING
STORAGE..ACIDIC
GAS CAN DAMAGE THE FU_L
,SYSTEM OF AN ENGINE WH_LE IN STORAGE
•
Drain:the fuel tank.
LAWN MOWER
When awn mower s to be stored fore pedod of t_me, clean
it thoroughly, remove all dirt, grease, eaves, etc Store n
a clean, dry area.
•
Ciean entire fawn mower (See "CLEANING" tn the
Customer Responsibilities Secfion of this manual).
"
•
Lubricate as shown in the Customer Responsibilities
secilon of this manual
•
Be sure that all nuts boIts screws and pins are
securelyfastened
inspect movlngpartsfordamage,
breakage and wear.. Replace If necessary.
•
Touch up all rusted or chipped
I_ghtty before painting.
Loosen upper handle mounting
upper handle Io be folded back,
IMPORTANT:
WHEN FOLDING
STORAGE OR TRANSPORTATION,
THE HANDLE AS SHOWN OR you
CONTROL CABLES:
•
•
Use fresh fuel next season
NOTE:
Fue_ stabilizer is an'acceptable
alternative In
minimizing the format}on ef fuel gum deposits dudng storage, Add stabilizer to gasoline in fuel tank or storage
contalner. Always follow the mix ratio found on stabilizer
container. Run eng!ne at least 10 minutes after adding
stabilizer to allow the stablllzer to reach the carburetor. Do
hot d rainthe gas tank and carburetorlf using fuet stabilizer
handle for storage
of the lower handle toward
handle clears the handle
forward_
=
Start {he _ngfne and tet It run until the fuel lines and
carbureto! are empty.
Never_use engtne or carburetor cleaner prod ucts in the
fuel tank Or permanent damage may occur
paint surlacas; Band
HANDLE (See Fig. 15)
You can fold your lawn mower
"
Squeeze the bottom ends
each other unttl the lower
bracket, then move handle
,
bolts enough to allow
ENGINE oIL
THE HANDLE FOR
BE SURE TO FOLD
MAY DAMAGE THE
Drain oil (with _nglne warm) and replace with clean engine
oil. (See "ENGINE = in the Customer Responsibilities
sect!0n of th!s manua!)
When setting up your handle from the storage position
the lower handle will automatically lbck Into the mew pg
position
•
' .
CYLINDER
LOWERHANDLE
"
•
Remov e spark 9lug.
•
Pout one ounce (29 mi) of oil through spark plug hole
into cylFnder_ '
•
Pull starter handle slowly a few limes to distribute eli.
•
Repiace With new spark ¢lug.
OTHER
SQUEEZETO
FOLD
._
._e;..
•
•
HAIRPIN
,,
COTTER
•
"
OPERATORPRESENCE
CONTROLBAR
Do not stere gasoIIne from one season to another_
Replace your gasoline can !1 your can starts t() rust
Rust and/or dirt in your gasoline will cause problems
if possible, store your _Jnt[indc_ors and cover it to give
protection f[om dust and dirt.
.,...,.__,..._
Cover your unit w!th a suitable protective cover that
dQes not retain moisture. DO not use plastic. PlasIic
cannot braathewhlch allows, condensation to form and
will caus_ your unit to rust.
IMPORTANT_ NEVER COVER MOWER WHILE ENGINE
AND E_HAUST AREAS ARE STILL WARM.
UPPER HANDLE "_J
_
, FOL;BAC WAnO
MOW|NG
•,
POSiTiON
-
AUTION: Never st0rethelawn
mower '
with gasoline tn thelanl( Inside n buiLding where fumes may reach an open
flame or spark, Allow the engine to
c0ol before storing In any enclosure, :
LOWERHANDLE
FIG, 15
15
:
' .....
H,,
i'H,, '
T""
CD
CO
r_
T-I
a_
d
..I
W
c_
0
!
|
lU
o/
0
I:l:
/
0:
0:
ma
IJJ
16
d
W
0
I
!
ILl
b,
_d
n__.
_d
0
t,o_z
_e
17
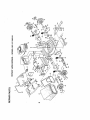
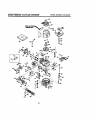
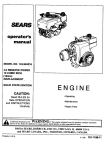
CRAFTSMAN 4-CYCLE_ENGINE '
MODEL NUMBER 143o964006
I
416
204
I
I
|
I
18
CRAFTSMAN 4-CYCLE ENGINE
REF PART
NO, NOr
1
36b.70A
2 26727
6 33734
7 35557
!2A 36558
129 34595
14 28277
15 30589
16 32651
17 31335
18 650548
19 36281
20 32600
30 35798
40 34514
4O 34515
40 34516
41 325389
41 325489
41
325499
42 28986
42 28987
42 28989
43 20381
45 309639
46 32610A
48 27241
50 36726
52
29914
69 35261
70 34311D
72
36083
75 27897
80 30574A
8t
30590A
82
30591
53 30588A
86 650488
89 611004
90 611112
92 650815
93 _650816
100 34443A
101 610118
103 651007
110 34961
119 36437
120 36474
125 35471
!25 36472
125
12G
130
135
150
15'1
29314B
293t5C
6021A
35395
35991
31673
MODEL NUMBER 143.964006REF PART
NO, NOr
DESCRIPTION
Cylinder
(Inc{, 2,7,20,125,169,172,174)
Dowel Pin
Breather Element
Brea!herAss'y.
(Incl 6 & 12A)
BreatherOevef&
Tube (IneL 129)
Breather Tube Elbow
Washer
Governor Rod (tncl. t4)
Governor Lever
Governer Lever Clam p
Screw, 8-32 x 5/16 _
Extension Spr!ng
OIt seal
Crankshaft
Piston, Pin & Rtng Set (Std.)
Piston, Pin & Ring Set (,010" OS)
Piston, Pin & Ring Set(.020" OS)
Piston & Pin Ass'y. (Side) (lncL 43)
Piston & P_n Ass'y.
(_OlO" OS) (tncf, 43)
Piston & Pin Ass'y.
(_020" OS) (lnot. 43)
Ring Set (Sld.)
Ring Set (.010" OS)
Ring Set (°020" OS)
Piston Pin Retaining Ring
CQnqecting Rod Ass'y (ind. 46)
Connecting Rod Boll
Valve Lifter
Camshaft (RCR)
. Oil Pump Ass'y
Moulittng Flange Gasket
Mounting Flange (Inci72 thru 83)
OI1 Drain Plug
Oil Seal
Governor Shaft
Washer
Governor GearAss'y
(incl. 81)
Governor Spoot
Screw, t/4-20 x 1-1/4"
Flywheel Key
Flywheel
Beflevi!te Washer
Flywheel Nut
Sotld State Ignition
Spark Plug Cover
Screw, Tor'x T-15, t0-24 x 15/18"
Ground Wire
"Cylinder Head Gasket
Cylinder Head
Exhaus! Valve (Std.) (fncl 151)
Exhaust VaNe
(1t32" OS) (IncL 151)
tntake Valve (Std.) (Incl, 151)
Intake Valve (I/32" OS) (fncl., !51)
Screw, 5/16-18 x 1-!/2"
Resistor Spark Plug (RJ19LM)
Valve Sprtng
Valve Spring cap
169
172
174
178
182
184
185
186
189
191
195
200
202
283
204
205
207
209
215
223
224
238
239
241
245
250
260
251
262
275
277
285
287
290
292
298
300
301
305
306
307
309
310
313
370A
3709
370K
380
390
400
27234A
32755
30200
29752
6201
26756
36544
34356
650839
36559
610973
35727
36482
31342
650549
650777
34336
30200
32410
650451
34690A
650932
34338
35797
35065
35085
36420A
30200
650831
36473
650988
35000A
650926
30705
26460
28763
343698
36246
35647
34265
35499
650562
35648
34080
36261
35167
36695
632744
590694
36475
416
36085
417
650760
DESCRIPTION
* Valve Cover Gasket
Valve Cover
Screw. 10-24 x 9/16 _
Nut & Lock Washer. 114-28
Screw, 1/4-28 x 7t8"
* Carburetor To Intake Pipe Gasket
Intake Pipe
Governor Link
Screw, t14-20 x 3/8"
S,Eo 'Brake Bracket (Incl. 195)
Terminal
Control Bracket (Inc[ 202 thru 205)
Compression Spring
Compression Spdng
Screw, 5-40 x 7/16
Screw, 6-32 x 21/32 =
Throttle Unk
Screw, 10-24 x 9/16"
Control Knob
Screw, 1/4-20 x 1"
"Intake Pipe Gasket
Screw, 10-32 x 49/64"
"Air Cleaner Gasket
Air Cleaner Collar
Air Cleaner Filter
Air Cleaner Cover
Blower Housing
,
screw, t0-24 x 9/16'
Screw, 1/4-20 x 1/2"
Muffler (lncl, 277)
.
Screw, t/4-20 x 2-5/t6
Starter Cup
Screw, 8-32 x 21/64"
FueJ Line
Fue! Line Clamp
• Screw, 10-32 x 35164"
Fuel Tank (Inc!. 292 & 301)
Fuel Cap
Oil Fill Tube
i * "O"-.Ring
"O"-RIng
Screw, 10-32 x 1t2"
Dipstick
Spacer
Lubrication Decal
Control Decal
Starter Decal
Carburetor (lncl. t84)
Rewind Starter
'
Gasket Set
(lncL Items Marked "tn Notes)
Spark Arrestor Kit
(lncl. 417)(Optional)
Screw, 8-32 x 3/8' (Optional)
RPM High 2900 to 3200
RPM Low 2450 to 2750
(NOTE: This engine could have been built with 590737
starter, Refer to the design of {he rope pulley strength
ribs for part Identiffcatlen. Individual starter parts do not
intem+hange )
NOTE:
19
All component dimensions
1 Inch = 25 4 mm
given tn US
inches
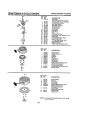
Mo E INoM ER 43,9--o06
CRAFTSMAN 4-CYCLE ENGINE
I]11 I
I'1" MI
REF PART
NO, NO.
632744
J_
=
_
_
! 631615
_Z_
,
"
2
631767
5
4
6
631183
63_184
632504
16
25
63t_75
6318_
26
29
632019
631028
"
_(._
Jt_,
"
"
3o 6
631022
Io2
,,_.
"
_.
_
._, _
.,
'
,_
3I
35
36045
37
36
40
44
48
632547
632745
632746
27110
63f027
REF NO."
PART
NO.
_"
_
I
590694
590599A
3
4
2
5
590696
590601
590600
590697
6
7
8
590696
590699
590700
'
--'
_
__,
|
I2 59o536
_,
IIilll''
13
I
I
"lt't'"l'l'
'lll'llll'l_ IIn
59_01
I
_
REF
NO:
Spi't_gC!li_. -'
.
p dp_erilBe'lS/Retainer Ring
Ma}ipNo_leT0be.
"
.
"O'* Ring, ,Ma!h No_Ie Tube
High Sp_ed Bqwl Nut
Peel NU!'W&_e_
":_;_.
. .
Welc5 PlUg; Atmbsphertc
Vent
=SC" iFrtoN
Recod S!arter ._
Sprth!;j P!n (IncL 4)
Washier
'
Retainer ;
:.
Washer, '
Blake!Spring
:
Staiter Dog
DO#Spahg
;.
'
P£lley & ReWtnd Spr|ng Ass'y.
Startei" Hdusing Ass'y,
Startei'ROpe (98
Starter Handle
"•'"
X'9/64
.......
•..............
',
client:-
, ,
it
PART
N0. :,
59_1737
590740
590616
590617
590618A
590687A
12
590535
13 _90701
590741
NOTE:
2O
Carburetb_
.,'., . •
ct_! 84 o! Engfne Par_s List)
hm|tl_ Shaft & Lever Assembfy
Throttle.' ReIL_ Sprtng
DlJst Seal Washer
Dust seat _Srottie)
Thrbtt!e'Sfi_tte.t
_
Shutter. Screw
Fuel Fittlng"_;, ,:
F!o_I Bowl
, ....
Floal Shaf_: " :"l
Float .::,_': ;'.
Fioat BO_I ."0" Ring
Irlie_ N'eedte, Seat, & Cl_p (|net 31)
r
-3
6
7
8
11
t4
DEsqRiP'rIot,
I J
l
I •
aew_':d Si_der
Retalne_..::'
'
Starter D6g _:,-:
DeclS'Prlng
Pi_,_ey'&
_e_in'd
Sp_ngAss'y
starte_']-{obdi0g Ass y
(40 degree grommet)
Slatte[:Ro_ie.. .....
(Lengih 9,8".X9/64" _ta.)
Stealer Handle '_: :,
Loc_tr_g Tab •
"
All component d}menstons given, in UoS Inches
1 inch = 26.4 rnm
'
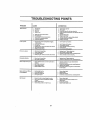
TRO'UBLESHOOTING
POINTS
II
CAUSE
PROBLEM
u
IIII
iii
iii
iiii
i
I
ii
iiiiiiii
CORRECTION
i
Doee not start
1
2
3
4
Dirty a!l finer
Out of fuai
S1eiefuel,
Water In fuel
1,
2
3
4
5
6
7
B
9.
Spark plug wire is d]sconnesled
Bad spark plug
Loose blade or broken bladeadapter
Conlmf bar _nreleased postUon
Control bar detective
5
6
7
8,
9.
Clean!replace air titter
RUfuet _nk,
Drain la_k and refill with fresh steer} fuel
Drain fuet f_nk and carburetor and refill tank wtl,hfresh
gazelles,
Connect wire to plug
Replace spark plug
Tighten blade boltor replace blade adapter
Depress conlrol bar to handle.
Replasa controi bar,
1
1.
Set in"Higher Cu_ pesgion
2
3
4
5
6.
Rear of lawn mower housing/blade dragging
in heavy grass,
Cutting too much grass
Dire! air filter,
Butidup of grass, leaves and trash under mawe_
Too much oil In engine
WatNng speed too tasL
2
3,
4,
5,
Sat In*Higher Cur" pesliion
C_eanfraplace
air filler
C_ean underside of mower housing
CheeR oft level
l
2
3,
4
Worn, bentor loose blade
Whes_ helghls uneven
Low enginespeed
Buildup of gta_,a, leaves, end trash under mower
1,
2.
3.
4
Rap!ace blade Tfghten blade bolt
Set allwheels at same height
Contact an abthodzod set'vice canter/department
Clean underside of mower housing
Excessive vibration
1
2
Worn. bent or loose blade
Bent engine crankshaft
t
2
Replace blade. Tighten blade boil
Contact en authorized sarv{ca eentsddspadment
Starter rope hard to pull
I
Enginettywheei brake leon when control batIs
released
Bent engine crankshaft
Blade adapter broken
Blade dragging In grass
1,
Depress control bar to upper handlebefore
puIling strutter rope
Contacl an oulhodzed service centerldepar'-,ment,
Replace blade adapter
Move town mower tocut grass or1o hard sadace
to start engine
Lose
of power
Pooreut-uneven
i1,1
2.
3,
4,
Grass catcher not filling
(If so equlppod )
1
2
3.
4.
Hard to push
I,
2,
3
4
Cuding
height
tOO_]OWr
Lift on blade worn off
Catcher eel venting _r
Low engIne speed
Grass _stoo hlgh or wheel helghl Is loo tow
Rear of lawn mower housing/blade dragging
in grass
Grass catcher too full.
Handle height pasff_ounet right for you
21
2
3.
4
!
2
3
4
Raise cutting helghl
Replace binds
Clead grass catcher.
Contact an authQdzed servlce
centar/dopndmant
'l
2
Raise culling height
Roles rear of lawn mower housing erie (t)
setting higher
Empty grass catcher.
Adjust handle hatghl to null
3,
4
SERVICE NOTES
22
SERVICE NOTES
23
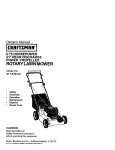
£RAFTXHRNo
OWNER'S
MANUAL
4.0 HORSEPOWER
20" REAR DISCHARGE
ROTARY LAWN MOWER
Each lawn mower has its own model number
gine has its own model number,
MODEL NO.
917.386121
Each en-
The model number for your Tawn mower will be found on a
decal attached to the rear of the lawn mower housing.
The model number for your engine will be found on the
blower housing of the engine_
All parts listed herein may be ordered from any Sears,
Roebuck and Co Service Center!Depadment
and most
Retail Stores,
IFYOU
NEED
REPAIR SERVICE
OR PARTS:
FOR REPAIR SERVICE, CALL
THIS TOLL FREE NUMBER:
'1-800-4-REPAIR
(1-B00..473-7247)
WHEN ORDERING REPAIR PARTS, ALWAYS GIVE THE
FOLLOWING INFORMATION_
• PRODUCT - LAWN MOWER
• MODEL NUMBER - 917o3B6121
• ENGINE
_ CRAFTSMAN.
MODEL NO. 143.964006
• PART NUMBER
, PART DESCRIPTION
FOR REPLACEMENT PARTS °
INFORMATION AND
ORDERING, CALL THIS
TOLL FREE NUMBER:
1-800-FON-pART
(%B00-366-727B)
Your Sears merchandise
has added value when yoU
consider Sears has service units nationwide slaffed with
Seers trained technicians,,
professional
technicians
spectllceIly trained to insure that we meet our pledge to
you, we service what we e_I_
24