1
»£¡÷«‚USER-æ’
∫Œ ∫– 98.7.16 12:51 PM
∆‰¿Ã¡ˆ9
DCS
DIGITAL COMMUNICATIONS SYSTEM
KEYSET USER GUIDE
– Australian version –
LCD 24B STD 24B
LCD 24Bi
LCD 12B STD 12B
6B ENHANCED
»£¡÷«‚USER-æ’
∫Œ ∫– 98.7.16 12:51 PM
∆‰¿Ã¡ˆ10
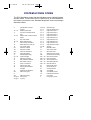
SYSTEM ACCESS CODES
The DCS telephone system has the following pre-set (default) feature
access codes. These codes can be used if a key is not available for
the feature you want to use. Standard telephone users must always
dial these codes.
9
10 + xxx
11
12 +xxx
13
16 + xxx
17
18
19
2xx
3xx
400
401
41
42 + xxx
43
44
45
46
47
48
49
500
to
529
53+grp+0
53+grp+1
Call attendant or system
operator
Retrieve parked calls
Put calls on and take calls off
hold
Retrieve calls on hold at another
station
Door lock release
Make speed dial calls
Save number and redial it
Recall dial tone for new call
Last number redial
Extension numbers
Extension numbers
Cancel Do not Disturb
Set Do Not Disturb
Set Message No Ring
Cancel message
Set/return messages
Busy station/line callback
Busy station camp-on
Set up a conference
Enter account code
Set programmed station
message
Send flash to outside line
Station hunt group
Station hunt group
Out of group
In group
54+zone
55 + 0
55 + 1
55 + 2
55 + 3
55 + 4
55 + 5
55 + 6
55 + 7
55 + 8
55 + 9
55 + ✱
56
57
58
59
600
601 + xxx
602 + xxx
603 + xxx
604 + xxx
605 + xxx
65
66
67
681
682
7xx
8x
0
Meet Me Page
Page all internal zones
Page internal zone 1
Page internal zone 2
Page internal zone 3
Page internal zone 4
Page external zone 1
Page external zone 2
Page external zone 3
Page external zone 4
Page all external zones
All Page
Meet Me Answer
Alarm sensor clear
DISA alarm clear
Walking class of service
Cancel all call forwarding
Set Forward All Calls
Set Forward Busy
Set Forward No Ans
Set Fwd Busy/No Ans
Set Fwd Follow m
Directed call pickup
Group call pickup
Universal Answer
Voice Dialler
Voice Dialler Record
Individual line numbers
Line groups
Line group 0 (Local)
»£¡÷«‚USER-æ’
∫Œ ∫– 98.7.16 12:51 PM
∆‰¿Ã¡ˆ2
LCD 24B STD 24B
LCD 24Bi
LCD 12B STD 12B
6B ENHANCED
KEYSET USER GUIDE
SAMSUNG
DIGITAL COMMUNICATION SYSTEM
JUNE 1998
»£¡÷«‚USER-æ’
∫Œ ∫– 98.7.16 12:51 PM
∆‰¿Ã¡ˆ4
SAMSUNG ELECTRONICS CO. LTD
Publication Information
Samsung Electronics reserves the right without prior notice to revise information in this publication for any reason.
Samsung Electronics reserves the right without prior notice to make changes
in design or components of equipment as engineering and manufacturing
may warrant.
Copyright 1998
Samsung Electronics Co. Ltd
All rights reserved. No part of this manual may be reproduced in any form or
by any means - graphic, electronic or mechanical, including recording,
taping, photocopying or information retrieval system - without express
written permission of the publisher of this material.
June/98
»£¡÷«‚USER-æ’
∫Œ ∫– 98.7.16 12:51 PM
∆‰¿Ã¡ˆ5
TABLE OF CONTENTS
THINGS YOU SHOULD KNOW
USER ORIENTATION ............................................................. 1
CALL INDICATION.................................................................. 1
SPEAKERPHONE................................................................... 2
HOT KEYPAD...........................................................................2
VOLUME CONTROLS ............................................................ 2
SYSTEM TONES..................................................................... 2
LCD 24B or STD 12B KEYSET LAYOUT
LABELLING PROGRAMMABLE KEYS ..................................4
LCD 12B or STD 12B KEYSET LAYOUT
LABELLING PROGRAMMABLE KEYS ..................................5
LCD 24Bi KEYSET LAYOUT
LABELLING PROGRAMMABLE KEYS ..................................6
6B ENHANCED KEYSET LAYOUT
LABELLING PROGRAMMABLE KEYS ..................................7
ADD-ON MODULE (AOM) LAYOUT
LABELLING PROGRAMMABLE KEYS ..................................8
OUTSIDE CALLS
MAKING AN OUTSIDE CALL................................................. 9
ANSWERING AN OUTSIDE CALL......................................... 9
UNIVERSAL ANSWER DEVICE .......................................... 10
RECALL DIAL TON............................................................... 10
SENDING A FLASH .............................................................. 10
BUSY LINE QUEUING WITH CALL-BACK.......................... 10
i
»£¡÷«‚USER-æ’
∫Œ ∫– 98.7.16 12:51 PM
∆‰¿Ã¡ˆ6
INTERCOM CALLS
MAKING A CALL ................................................................... 11
ANSWERING INTERCOM CALLS ....................................... 11
VOICE ANNOUNCE MODE ................................................. 11
AUTO ANSWER MODE ....................................................... 11
BUSY STATION CALLBACK................................................. 11
BUSY STATION CAMP-ON .................................................. 12
CALLING YOUR SYSTEM OPERATOR.............................. 12
CALL PROCESSING
SYSTEM HOLD..................................................................... 13
EXCLUSIVE HOLD ............................................................... 13
HOLD RECALL...................................................................... 13
CONSULTATION HOLD........................................................ 13
RETRIEVING CALLS HELD AT
ANOTHER STATION............................................................. 14
TRANSFERRING CALLS ..................................................... 14
TRANSFER WITH CAMP-ON .............................................. 14
CALL WAITING ..................................................................... 15
CONFERENCE CALLS......................................................... 15
FORWARDING CALLS ......................................................... 16
FORWARD ALL CALLS ........................................................ 16
FORWARD BUSY ................................................................. 16
FORWARD NO ANSWER .................................................... 16
FORWARD BUSY/NO ANSWER ......................................... 16
FORWARD FOLLOW ME ..................................................... 17
FORWARD TO AN EXTERNAL NUMBER.......................... 17
STATION CALL PICKUP....................................................... 17
GROUP CALL PICKUP......................................................... 17
DIALLING FEATURES
SPEED DIALLING................................................................. 18
PROGRAMMING PERSONAL SPEED
DIAL NUMBERS.................................................................... 18
ONE TOUCH SPEED DIALLING.......................................... 19
LAST NUMBER REDIAL....................................................... 19
SAVE NUMBER WITH REDIAL............................................ 19
ii
»£¡÷«‚USER-æ’
∫Œ ∫– 98.7.16 12:51 PM
∆‰¿Ã¡ˆ7
CHAIN DIALLING.................................................................. 19
AUTOMATIC REDIAL/RETRY.............................................. 20
PULSE TO TONE CHANGEOVER ...................................... 20
VOICE DIALLER ................................................................... 20
RECORDING A VOICE DIAL NAME.................................... 21
PLACING A VOICE DIAL CALL............................................ 21
POSSIBLE CAUSES FOR VOICE DIALLER FAILURE...... 21
PAGING AND MESSAGING
MAKING AN INTERNAL PAGE............................................ 22
MAKING AN EXTERNAL PAGE........................................... 22
ALL PAGE.............................................................................. 22
MEET ME PAGE.................................................................... 23
CALL PARK AND PAGE ....................................................... 23
SETTING A MESSAGE INDICATION .................................. 23
CANCELING MESSAGES.................................................... 24
RETURNING MESSAGES ................................................... 24
PROGRAMMED MESSAGES.............................................. 25
CONVENIENCE FEATURES
DO NOT DISTURB................................................................ 26
ONE TIME DND..................................................................... 26
MUTE..................................................................................... 26
BACKGROUND MUSIC........................................................ 26
APPOINTMENT REMINDER/ALARM CLOCK .................... 27
ANSWERING THE DOOR PHONE...................................... 27
CALLING THE DOOR PHONE/ROOM MONITOR ............. 28
EXECUTIVE/SECRETARY HOT LINE................................. 28
GROUP LISTENING ............................................................. 28
ACCOUNT CODES............................................................... 28
LOCKING YOUR KEYSET ................................................... 29
OFF-HOOK VOICE ANNOUNCING (OHVA)....................... 29
OHVA BLOCK........................................................................ 30
OHVA REJECT...................................................................... 30
IN GROUP/OUT OF GROUP ............................................... 30
iii
»£¡÷«‚USER-æ’
∫Œ ∫– 98.7.16 12:51 PM
∆‰¿Ã¡ˆ8
CUSTOMISING YOUR KEYSET
SELECT RING TONE ........................................................... 31
CHANGE YOUR PASSCODE.............................................. 31
SET ANSWER MODE........................................................... 31
AUTOMATIC HOLD............................................................... 31
HEADSET OPERATION....................................................... 32
HOT KEYPAD........................................................................ 32
KEY CONFIRMATION TONE ............................................... 32
REJOINING A PAGE............................................................. 32
RING PREFERENCE............................................................ 33
DISPLAY FEATURES
INTERACTIVE DISPLAY KEYS............................................ 34
DIRECTORY INFORMATION............................................... 34
DIAL BY DIRECTORY........................................................... 35
DISPLAY NUMBER DIALLED .............................................. 35
CALL DURATION TIMER ..................................................... 35
AUTO TIMER......................................................................... 35
MANUAL TIMER ................................................................... 36
CALL COST........................................................................... 36
VIEWING MESSAGE INDICATIONS................................... 36
ALARM REMINDER MESSAGES........................................ 36
PERSONAL SPEED DIAL NAMES...................................... 37
STATION NAMES.................................................................. 38
MANAGING KEY ASSIGNMENTS....................................... 38
SELECTING YOUR CLIP DISPLAY..................................... 39
VIEWING THE NEXT CLIP CALL ........................................ 39
SAVING THE CLIP NUMBER............................................... 39
REDIALLING A SAVED CLIP NUMBER .............................. 39
STORING A CLIP NUMBER................................................. 39
INQUIRE CLIP PARK/HOLD INFO....................................... 40
REVIEWING PAST CLIP CALLS.......................................... 41
LCR WITH CLEAR ................................................................ 41
ADD-ON MODULE
WITH KEYSET ...................................................................... 42
SYSTEM ACCESS CODES.................................................. 47
iv
»£¡÷«‚USER-
∫ª πÆ 98.7.16 12:52 PM
∆‰¿Ã¡ˆ1
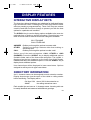
THINGS YOU SHOULD KNOW
USER ORIENTATION
DCS telephones are called "keysets." They contain buttons or "keys"
that are used to access or activate the many features of your DCS
system. The keys with paper designation strips are programmable
keys which can be programmed for a specific functions on your
keyset that you require. See your System Administrator to get your
most frequently used features assigned to your programmable keys.
Lines from the telephone company are "C.O. lines." Calls on these
lines are referred to as "outside calls." Your system can have
individual C.O. line keys or lines may be assigned to groups. When
they are in a group, you access a line by dialling an access code or
pressing a programmed button. For example: dial 0 or press the
LOCAL key to get a local outside line. Each line in the system is
numbered, beginning with 701, then 702, 703, etc.
Direct Station Selection (DSS) keys are programmed to ring specific
stations. You can press a DSS key instead of dialing the extension
number. A DSS key will light red when that station is busy (Busy
Lamp Indication). Each extension in the system is numbered,
beginning with 201, then 202, 203, etc
DCS provides distinctive ring patterns to your keyset:
• Outside calls have a double ring tone repeated.
• Internal calls have a single ring tone repeated.
• Door phone calls and alarm/appointment reminders have a short
ring tone repeated very quickly.
CALL INDICATIONS
The keys on your phone have light emitting diodes (LEDs). Some of
these are tri-coloured LEDs that light green, red or amber. Some of
the keys can only light red. See telephone layout for details.
Intercom calls, also called internal calls, always appear on your CALL
buttons. They will always light green. You can have up to eight CALL
buttons, but two are recommended.
Outside calls appear on individual line keys if they are assigned.
When an individual line is not assigned to its own key, it will appear on
a CALL button. Your outside calls will light green on your keyset and
1
»£¡÷«‚USER-
∫ª πÆ 98.7.16 12:52 PM
∆‰¿Ã¡ˆ2
red on other keysets.
You never lose sight of your calls while they are on hold. They stay
right where you put them and are identified with a green flashing light.
Some simple rules to remember:
• Any steady LED indicates the line or feature is in use.
• A fast flashing green LED indicates a new call incoming call.
• A slow flashing green or red LED indicates a call is on hold.
• A slow flashing amber LED indicates a recall to your keyset.
SPEAKERPHONE
Pressing the ANS/RLS key will answer or release a call on the
speaker phone.
Switching from the handset to the speaker phone is easy. Press the
SPEAKER key and hang up the handset.
HOT KEYPAD
On the DCS, your keysets keypad can be made "live" or "hot" so that
it is not necessary to lift the handset or press SPEAKER before you
begin dialing. Calls can be made and features activated by simply
dialing the outside line number, line access code, intercom number or
feature access code.
If the Hot Keypad feature has been turned off, you must first lift the
handset or press SPEAKER before dialing.
VOLUME CONTROLS
DCS keysets use the UP & DOWN keys to adjust the ringer volume
while the keyset is ringing, the speaker volume while the
speakerphone is in use and the handset volume while you are
listening. These three levels will be stored in memory until changed. If
background music is turned on at your keyset, the volume keys will
also control the level of music. The volume of pages heard through
the speaker of keyset can be adjusted during a page announcement
by using the volume keys. There are 16 levels for each volume
setting. The volume of off-hook ring is controlled by a userprogrammable setting.
SYSTEM TONES
The system provides several tones to assist you. Some of these tones
are already familiar to you.
2
»£¡÷«‚USER-
∫ª πÆ 98.7.16 12:52 PM
∆‰¿Ã¡ˆ3
WARNING
The handset receiver on the Keyset may retain metallic
objects. Care should be taken when using the handset in
the vicinity of small metal objects.
3
»£¡÷«‚USER-
∫ª πÆ 98.7.16 12:52 PM
∆‰¿Ã¡ˆ4
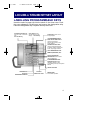
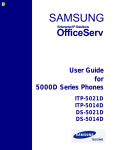
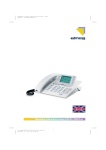
LCD 24B or STD24B KEYSET LAYOUT
LABELLING PROGRAMMABLE KEYS
Insert the end of a paper clip into the notch of the clear cover. Push
the cover sideways. Lift the cover and remove the designation strip.
Label the designation strip. Replace the strip and cover.
32 CHARACTER DISPLAY
Two lines with 16 character
each.
On LCD 24B only
SOFT KEYS Used to
activate feature via the
display. - LCD 24B only
SCROLLKEY Used to scroll
through displays.
16 PROGRAMMABLE KEYS
WITH TRI-COLORED LIGHTS
Used for CALL buttons,
intercom calls and many other
system features.
VOLUME CONTROL KEYS
Used to set independent levels
for handset, speaker, background
music, ring and page volumes.
LAST NUMBER REDIAL KEY
MEMORY(SPEED DIAL) KEY
DO NOT DISTURB KEY
SPEAKER KEY Used to switch
call to speakerphone.
8 PROGRAMMABLE KEYS
WITH RED LIGHTS Used to
call stations directly, for OneTouch dialling and many other system
features.
TRUNK FLASH KEY
TRANSFER KEY
HOLD KEY
ANSWER/RELEASE KEY
PULLOUT
DIRECTORY TRAY
MICROPHONE
For handsfree operation.
4
»£¡÷«‚USER-
∫ª πÆ 98.7.16 12:52 PM
∆‰¿Ã¡ˆ5
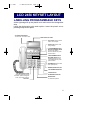
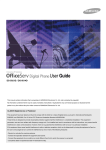
LCD 12B or STD12B KEYSET LAYOUT
LABELLING PROGRAMMABLE KEYS
Insert the end of a paper clip into the notch of the clear cover. Push
the cover sideways. Lift the cover and remove the designation strip.
Label the designation strip. Replace the strip and cover.
32 CHARACTER DISPLAY
Two lines with 16 character
each.
On LCD 12B only
SOFTKEYS Used to
activate feature via the
display.- LCD 12B only
SCROLLKEY Used to
scroll through displays.
8 PROGRAMMABLE KEYS
WITH TRI-COLORED LIGHTS
Used for CALL buttons,
intercom calls and many other
system features.
VOLUME CONTROL KEYS
Used to set independent levels
for handset, speaker, background
music, ring and page volumes.
LAST NUMBER REDIAL KEY
MEMORY(SPEED DIAL) KEY
DO NOT DISTURB KEY
SPEAKER KEY Used to switch
call to speakerphone.
4 PROGRAMMABLE KEYS
WITH RED LIGHTS Used to
call stations directly, for OneTouch dialling and many other
system features.
TRUNK FLASH KEY
TRANSFER KEY
HOLD KEY
ANSWER/RELEASE KEY
5
PULLOUT
DIRECTORY TRAY
MICROPHONE
For handsfree operation.
»£¡÷«‚USER-
∫ª πÆ 98.7.16 12:52 PM
∆‰¿Ã¡ˆ6
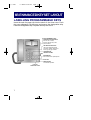
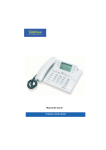
LCD 24Bi KEYSET LAYOUT
LABELLING PROGRAMMABLE KEYS
At the right edge lift up the plastic cover and remove the designation
strip.
Label the designation strip and replace. Insert the plastic cover
pressing firmly to click place.
32 CHARACTER DISPLAY
Two lines with 16 character each.
RING INDICATOR LAMP
SOFTKEYS Used to activate
feature via the display.
SCROLLKEY Used to scroll
through displays.
16 PROGRAMMABLE KEYS
WITH TRI-COLORED LIGHTS
Used for CALL buttons,
intercom calls and many other
system features.
8 PROGRAMMABLE KEYS
WITH RED LIGHTS Used to
call stations directly, for OneTouch dialling and many other
system features.
SPEAKER KEY Used to switch
call to speakerphone.
MEMORY(SPEED DIAL) KEY
LAST NUMBER REDIAL KEY
VOLUME CONTROL KEYS
Used to set independent levels
for handset, speaker, background
music, ring and page volumes.
HOLD KEY
TRANSFER KEY
ANSWER/RELEASE KEY
MICROPHONE
For handsfree operation.
6
»£¡÷«‚USER-
∫ª πÆ 98.7.16 12:52 PM
∆‰¿Ã¡ˆ7
6B ENHANCED KEYSET LAYOUT
LABELLING PROGRAMMABLE KEYS
Insert the end of a paper clip into the notch of the clear cover. Push
the cover sideways. Lift the cover and remove the designation strip.
Label the designation strip. Replace the strip and cover.
6 PROGRAMMABLE KEYS
WITH RED-COLORED LIGHTS
Used for CALL buttons,
intercom calls and many other
system features.
VOLUME CONTROL KEYS
Used to set independent levels
for handset, speaker, background
music, ring and page volumes.
TRANSFER KEY
TRUNK FLASH KEY
SPEAKER KEY
Used to switch call to speakerphone
HOLD KEY
MICROPHONE
For handsfree operation.
PULLOUT
DIRECTORY TRAY
7
»£¡÷«‚USER-
∫ª πÆ 98.7.16 12:52 PM
∆‰¿Ã¡ˆ8
ADD-ON MODULE(AOM) LAYOUT
FLEXIBLE FEATURE
CONTROL KEY
RED LED INDICATOR
8
»£¡÷«‚USER-
∫ª πÆ 98.7.16 12:52 PM
∆‰¿Ã¡ˆ9
OUTSIDE CALLS
MAKING AN OUTSIDE CALL
• Lift the handset and press an idle outside line button or dial the
outside line access code
• Dial the telephone number
• Finish the call by replacing the handset or pressing the
ANS/RLS key.
• If your system is programmed to require an authorization code
before making a call, dial ✱ plus a valid code before selecting an
outside line.
• If your system is programmed to require an account code before
making a call, press ACCT button or dial 47 plus a valid account
code. Press the ACCT button again and then select an outside
line.
For more information on authorization and account codes, see your
System Administrator.
ANSWERING AN OUTSIDE CALL
• Lift handset to answer the ringing call
OR
• Press the ANS/RLS key to answer on the speakerphone.
NOTE: If a call is flashing at your keyset but not ringing, you must
press the flashing button to answer.
9
»£¡÷«‚USER-
∫ª πÆ 98.7.16 12:52 PM
∆‰¿Ã¡ˆ10
UNIVERSAL ANSWER DEVICE
To answer calls ringing on a loud ringer dial 67 or press the UA key.
RECALL DIAL TONE
Press the FLASH or NEW button to disconnect your existing call, wait
for dial tone and then make a new call on the same line.
SENDING A FLASH
While on an outside call
• Press the RECALL key to send a flash.
BUSY LINE QUEUING WITH
CALL-BACK
If you receive a busy signal on selecting an outside line.
• Press the CALLBACK key or dial 44. You will hear confirmation
tone.
• When the line becomes free the system will call you back.
• Lift the handset or press the ANS/RLS key to answer.
NOTE: A callback will be canceled if not answered within 30
seconds. If you have set a call back, your CBK key will
light.
10
»£¡÷«‚USER-
∫ª πÆ 98.7.16 12:52 PM
∆‰¿Ã¡ˆ11
INTERCOM CALLS
MAKING A CALL
• Dial the extension number or group number or press a Direct
Station Select DSS key.
• Wait for the party to answer. If you hear a brief tone burst instead
of ringback tone, the station you called is set for Voice announce
or Auto answer. Begin speaking immediately after the tone.
• Finish the call by replacing handset or press ANS/RLS key.
ANSWERING INTERCOM CALLS
• Lift the handset -OR- press the ANS/RLS key.
• To finish the call replace the handset or press the ANS/RLS
button.
VOICE ANNOUNCE MODE
When another station calls you, your keyset will sound a brief
attention tone and you will hear the caller's announcement.
• Press ANS/RLS to turn on microphone and speak handsfree OR- lift the handset to reply.
• To finish the call, replace the handset or press the ANS/RLS key.
AUTO ANSWER MODE
When another station calls you, your keyset will sound a brief
attention tone and then automatically answer the call.
• Your microphone and speaker are turned on and you can speak
handsfree. For privacy, use the handset.
• To finish the call, replace the handset or press the ANS/RLS key.
BUSY STATION CALLBACK
When you call another station and receive a busy signal:
• Press the CBK key or dial 44.
• When the busy station becomes free, your keyset will ring.
• Lift the handset or press ANS/RLS to call the now idle station.
11
»£¡÷«‚USER-
∫ª πÆ 98.7.16 12:52 PM
∆‰¿Ã¡ˆ12
NOTES: A callback will be canceled if not answered within 30
seconds. If you have set a callback, your CBK key will light.
BUSY STATION CAMP-ON
When you call another station and receive a busy signal but you do
not want to wait for a callback:
• Press the CAMP key or dial 45
• The called station will receive off-hook ring tone.
• Wait for the called party to answer.
CALLING YOUR SYSTEM OPERATOR
• Dial 9 to call your system operator.
12
»£¡÷«‚USER-
∫ª πÆ 98.7.16 12:52 PM
∆‰¿Ã¡ˆ13
CALL PROCESSING
SYSTEM HOLD
• When you are connected to any call, press HOLD. The button
associated with the call will flash green.
• To return to the caller, press the HOLD key and the green
flashing light will go steady green again.
EXCLUSIVE HOLD
To place an outside call on hold at your phone so that other users
cannot access it:
• Press the HOLD button twice. The button associated with the
call will flash green.
• To retrieve the call, press the CALL key with the flashing green
light.
NOTE: Intercom calls will always be placed on exclusive hold.
HOLD RECALL
If you leave a call on hold longer than the hold timer, it will recall your
station. The button that the call appears on will have a slow flashing
amber or red light.
To answer
• Lift the handset or press the ANS/RLS key.
• If you do not answer this recall within a pre-programmed period
of time, it may go to the System Operator.
CONSULTATION HOLD
When you are talking on an outside line and it is necessary to consult
with another extension:
• Press the TRSF key; receive transfer dial tone. Your call is
placed on transfer hold.
• Dial the extension number.
• Consult with the internal party.
• Press TRSF to return to the outside party or hang up to transfer
the call.
13
»£¡÷«‚USER-
∫ª πÆ 98.7.16 12:52 PM
∆‰¿Ã¡ˆ14
NOTE: Repeatedly pressing the TRSF key will toggle between the
outside and inside party and internal extension.
RETRIEVING CALLS HELD AT
ANOTHER STATION
To retrieve a line is on hold that does not appear on your keyset,
• Dial 12 plus the line number or the extension number of the
station that placed the call on hold.
TRANSFERRING CALLS
You may transfer a call to another extension in one of two ways:. A
screened transfer allows you to inform the other party who is calling
or you can do a blind transfer without notification.
• While on a call, press the TRSF key and dial an extension
number or group number.
OR
• Press a DSS key or station group key. Your call is automatically
put on transfer hold.
• Hang up when you hear ringing (this is an unscreened or blind
transfer).
OR
• Wait for the called party to answer and then hang up.
• To return to outside party
• Press TRSF or the CALL button or line key.
NOTES: 1. After the inside party answers, you may alternate back
and forth between the parties by pressing the TRSF key.
2. You cannot transfer an intercom call by pressing a DSS
k e y. You must press the T R S F key and dial the
destination extension number.
3. When you are transferring a call to a keyset set for Voice
Announce or Auto Answer, the transferred call will always
ring.
TRANSFER WITH CAMP-ON
When you are transferring a call to another station and you receive a
busy signal, you may camp the call on to this station. Simply hang up
when you hear the busy signal. The called party will be alerted that a
call is waiting for them.
14
»£¡÷«‚USER-
∫ª πÆ 98.7.16 12:52 PM
∆‰¿Ã¡ˆ15
CALL WAITING
If an outside call has been camped on to your phone or another
station has camped on to you:
• You will hear off hook ring and the CALL button will flash green.
• Press the flashing button to answer; your other call will go on
hold automatically if your station has the Automatic Hold feature
set. If not, you must press HOLD and then the flashing button.
OR
Finish the first call and hang up; the waiting call will ring.
• Lift handset or press ANS/RLS key to answer.
NOTE: Intercom calls will not go on Automatic Hold.
CONFERENCE CALLS
You may conference up to five parties (you and four others) with a
maximum of 2 external parties (eg. outside lines or remote
extensions) in any order.
• While engaged in a conversation, press the CONF key (or dial
TRSF 46) and receive conference tone.
• Make another call, either intercom or outside, press the CONF
key (or TRSF) and receive conference tone.
• Make another call or press the CONF key (or TRSF) to join all
parties.
• Repeat last step until all parties are added.
NOTE: When attempting to add another party to the conference and
you are not able to reach the desired person, hang up and
press the C O N F key again to return to your previous
conversation.
To drop a party from your conference call:
1. Press CONF and dial the extension or line number of the party to
be dropped.
2. Press CONF again to reestablish the conference.
If you wish to leave outside lines connected together in a trunk to
trunk conference.
• Press the CONF key and dial your extension number.
• Press CONF to rejoin a trunk to trunk conference.
15
»£¡÷«‚USER-
∫ª πÆ 98.7.16 12:52 PM
∆‰¿Ã¡ˆ16
FORWARDING CALLS
You may forward your calls to another station, group of stations or an
external telephone number. If you have FWD ALL, FWD BUSY, and
FWD NO ANSWER keys, a steady red light reminds you what
forward condition is activated.
To clear all call forwards:
• Dial 600.
FORWARD ALL CALLS
To forward all your calls to another station:
• Dial 601 plus the extension or group number.
• Receive confirmation tone and hang up.
• The FWD ALL key or the TRSF key will light to indicate Forward
All has been set
NOTE: The station that receives a Forwarded call can transfer the
call back to the forwarding station.
FORWARD BUSY
To forward calls to another station when you are on the phone:
• Dial 602 plus the extension or group number.
• Receive confirmation tone and hang up.
FORWARD NO ANSWER
To forward calls to another station when you do not answer:
• Dial 603 plus the extension or group number.
• Receive confirmation tone and hang up.
FORWARD BUSY/NO ANSWER
If you have both a Forward on Busy destination and a Forward No
Answer destination programmed, you may set both of these at the
same:
• Dial 604.
• Receive confirmation tone and hang up.
16
»£¡÷«‚USER-
∫ª πÆ 98.7.16 12:52 PM
∆‰¿Ã¡ˆ17
FORWARD FOLLOW ME
When you want all calls to your extension forwarded to the extension
you are now at:
• Dial 605 plus your extension number.
• Receive confirmation tone and hang up.
FORWARD TO AN EXTERNAL
NUMBER
To forward outside calls to a number outside of your business, you
must have a FWD EXTERNAL button on your keyset.
• While on-hook, press TRSF and then dial 102.
• Dial 5.
• Dial the outside line access code followed by the telephone
number that you wish to forward your calls to.
• Press TRSF to store.
• Press FWD EXTERNAL to turn the feature on and press it
again to turn the feature off.
NOTE: External Call Forward will cancel all other call forwarding
instructions.
STATION CALL PICKUP
To pick up (answer) a call ringing at another station:
• Lift your handset and dial 65 plus the extension number of the
ringing phone.
OR
• Press the flashing DSS key
GROUP CALL PICKUP
To pick up (answer) a call ringing in any pickup group,
• Lift your handset and dial 66 plus the desired group number
01-20
OR
• Press the flashing GROUP PICKUP key.
NOTE: A group pickup key can have an extender for a specific
pickup group.
17
∫ª πÆ 98.7.16 12:52 PM
»£¡÷«‚USER-
∆‰¿Ã¡ˆ18
DIALLING FEATURES
SPEED DIALLING
You can dial a preprogrammed telephone number stored in the
system-wide speed dial list of numbers (500-999 for the DCS or 500699 for the DCS Compact) or from your personal list of numbers 0019:
• With handset on-hook, press SPD or dial 16.
• Dial the desired speed dial number location.
OR
• Press the relevant SPD key
• The telephone number is automatically dialled for you.
PROGRAMMING PERSONAL SPEED
DIAL NUMBERS
To store telephone numbers in your personal speed dial list.
•
•
•
•
While on-hook, press TRSF and then dial 105 .
Dial a speed dial number (00-49).
Dial a line or line group access code .
Dial the telephone number to be stored (18 digits maximum).
It can include #, ✱, FLASH or PAUSE.
• Press TRSF to store number.
NOTE: A station may be assigned up to fifty numbers, 00-49. See
your System Administrator to determine the number assigned
to your station.
For the purposes of programming speed dial numbers, the last 6
programmable keys of the right hand row are known as A, B, C, D, E
and F and are defined below.
•
•
•
•
The A key is not used.
The B key inserts a flash.
The C key inserts a pause.
The D key is used change the dialling type from pulse to tone
dialling. Pressing D will cause all subsequent digits to be dialled
as DTMF tones.
18
»£¡÷«‚USER-
∫ª πÆ 98.7.16 12:52 PM
∆‰¿Ã¡ˆ19
• The E key is used to hide digits. Press E and all subsequent
digits will be hidden. Press E again to begin displaying digits.
• The F key is used to enter a name. See Personal Speed Dial
Names under Display Features below.
• Use the HOLD key to clear a speed dial number.
ONE TOUCH SPEED DIALLING
You may assign any speed dial number to an already existing one
touch speed dial button for quick and easy dialling of frequently used
numbers. (See your System Administrator for details)
• While on-hook, press TRSF and then dial 107.
• Press a One-touch speed dial button.
• Dial the speed dial number (00-19 or 500-999 or 699) that you
want assigned to this button.
• Press TRSF to store your selection.
To call this telephone number, just press the SPD button.
LAST NUMBER REDIAL
To redial the last outside telephone number you dialled:
• Press the REDIAL key or dial 19.
NOTES: Redial does not apply to intercom calls.
SAVE NUMBER WITH REDIAL
To save the number you just dialled for later use:
• press the SNR key before hanging up.
To redial this saved number at any time:
• press the SNR key or dial 17.
NOTES: The saved telephone number is stored in memory until you
save another number.
CHAIN DIALLING
You may manually dial additional digits following a speed dial number
or chain as many speed dial numbers together as required:
After the first speed dial number is dialled,
• Press another SPD key or MEMORY and dial another speed
19
»£¡÷«‚USER-
∫ª πÆ 98.7.16 12:52 PM
∆‰¿Ã¡ˆ20
number location
OR
• Manually dial additional digits after the speed dial number.
AUTOMATIC REDIAL/RETRY
When you are making an outside call and you receive a busy signal,
The system can automatically redial the number for you. It will
automatically redial at a pre-programmed interval for up to 2 attempts
or if connected to the ISDN network up to 9 attempts.
On hearing a busy signal:
• press the RETRY button.
• The system will automatically redial the same number for you.
You will hear the call being made through the keyset speaker.
• When the called party answers, you can lift the handset begin
speaking.
NOTES: 1. If you make another call, auto-redial is canceled.
2. To cancel a auto-redial, lift and replace the handset.
PULSE TO TONE CHANGEOVER
When making an outside call on a pulse (decadic) line:
• Press # and all subsequent digits dialled will be sent as tones.
VOICE DIALLER
Voice Dialler gives you the ability to record a voice pattern into a
digital format and store it to an addressable location. It allows the
calling party to speak a name into the handset and have the system
automatically place a call.
Before using the Voice Dial feature:
• Change your station passcode (see below).
• Ensure your System Administrator has assigned you a voice
dial channel.
• Assign personal speed dial numbers.
20
∫ª πÆ 98.7.16 12:52 PM
»£¡÷«‚USER-
∆‰¿Ã¡ˆ21
RECORDING A VOICE DIAL NAME
•
•
•
•
•
Lift the handset.
Press the VREC key or dial 682.
Enter your station passcode.
Enter the personal speed dial bin number, eg. 05
After the short tone burst, clearly speak the name into the
mouthpiece of the handset.
NOTE: The name should be spoken as one word (eg. John Citizen,
pronounced Johncitizen). Avoid like names such as Ted and
Fred.
• If you are successful, you will hear a short tone burst confirming
the name recording. If you hear error tone, record the name
again following the above procedure.
PLACING A VOICE DIAL CALL
•
•
•
•
Lift the handset.
Press the VDIAL key or dial 681.
Speak the desired name into mouthpiece of the handset.
If you are successful, the call will be placed. If you hear error
tone, repeat the procedure.
POSSIBLE CAUSES FOR VOICE
DIALLER FAILURE
•
•
•
•
The desired name is not recorded.
The personal speed dial bin you have selected is empty.
All outside lines are busy.
You are denied access to the Voice Dialler feature.(See your
System Administrator)
• Background noise interfered when the name was recorded or
when the name was spoken to place the call.
21
∫ª πÆ 98.7.16 12:52 PM
»£¡÷«‚USER-
∆‰¿Ã¡ˆ22
PAGING AND MESSAGING
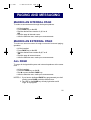
MAKING AN INTERNAL PAGE
To make an announcement through the keyset speakers:
• Lift the handset.
• Press PAGE key or dial 55.
• Dial the desired zone number 1, 2, 3 or 4.
OR
• Dial 0 to page all internal zones.
• After the attention tone, make your announcement.
MAKING AN EXTERNAL PAGE
To make an announcement through connected external paging
speakers:
• Lift the handset.
• Press PAGE key or dial 55.
• Dial the desired zone number 5, 6, 7 or 8.
OR
• Dial 9 to page all external zones.
• After the attention tone, make your announcement.
ALL PAGE
To page all designated keysets and external speakers at the same
time:
•
•
•
•
Lift the handset.
Press the PAGE key or dial 55.
Dial ✱ or press the ALL PAGE key.
After the attention tone, make your announcement.
NOTES: 1. If you have a dedicated PAGE key programmed you don't
need to press PAGE or dial the desired zone.
2. The LED on the PAGE key will only light when an All
Page is in progress.
22
∫ª πÆ 98.7.16 12:52 PM
»£¡÷«‚USER-
∆‰¿Ã¡ˆ23
MEET ME PAGE
•
•
•
•
•
•
•
Lift the handset.
Press the MEET ME PAGE (MMPG) key or dial 54.
Dial the desired zone number.
After the attention tone, instruct the paged person to dial 56.
Press WAIT or TRSF.
Remain off-hook until the person dials 56 from any phone.
The paged person will be automatically connected with you.
CALL PARK AND PAGE
When you have a call for someone who is not at their desk, you can
park the call and page the required party:
• While in conversation, press the PAGE button. the call is
automatically parked at your station.
• Dial the desired page zone and announce "park" and your
extension number or the line number.
• Hang up.
To retrieve a parked call:
• Press a PARK key or dial 10 plus the line or extension number
announced.
• You will be connected to the parked call.
NOTES: 1. If the parked call is not received within a pre-programmed
period of time, it will recall your keyset and have a slow
flashing amber light.
2. You cannot park and page intercom calls.
SETTING A MESSAGE INDICATION
To leave a message at another station or station when no one
answers or you receive a busy signal:
• Press the MSG key or dial 43 and receive confirmation tone.
• Hang up.
(The MSG key on the called station or on all of the stations in the
group will light. Standard telephones receive special dial tone as a
message indication.)
NOTE: A station can have up to five message indications.
23
»£¡÷«‚USER-
∫ª πÆ 98.7.16 12:52 PM
∆‰¿Ã¡ˆ24
CANCELLING MESSAGES
To cancel a message indication that you left at another station:
• Dial 42 plus the extension number of the station at which you
left a message.
To cancel all message indications left at your keyset:
• Dial 42 plus your extension. Your MSG light will go out.
RETURNING MESSAGES
• Press the MSG key or dial 43. The first station that left you a
message will be called automatically.
• Repeat until all messages have been returned in the order
received.
• Your MSG button light will turn off when all messages have
been returned.
NOTES: 1. Display keyset users can view message indications and
return them in any order. See Viewing Message
Indications under Display Features.
2. f a message has been left at your keyset by a keyset in
Auto Answer mode, you must manually cancel the
message light after the message has been returned.
24
∫ª πÆ 98.7.16 12:52 PM
»£¡÷«‚USER-
∆‰¿Ã¡ˆ25
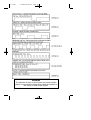
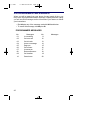
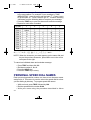
PROGRAMMED MESSAGES
When you will be away from your phone for any length of time, you
may leave a programmed station message. Display stations calling
you will see this message and be informed of your status or follow
your instructions.
• Dial 48 plus any of the message codes 01-20 listed below.
• To cancel this message, dial 48 plus 00.
PROGRAMMED MESSAGES
No.
01
02
03
04
05
06
07
08
09
10
25
Messages
In a meeting
Out on a call
Out to lunch
Leave a message
Page me
Out of town
In tomorrow
Return afternoon
On Vacation
Gone home
No.
11
12
13
14
15
16
17
18
19
20
Messages
»£¡÷«‚USER-
∫ª πÆ 98.7.16 12:52 PM
∆‰¿Ã¡ˆ26
CONVENIENCE FEATURES
DO NOT DISTURB
Use this feature when you want to block calls to your keyset.
• While on-hook, press the DND key or dial 401. The DND key
flashed to remind you of this mode.
To cancel DND:
• Press the DND key again or dial 400. The DND light turns off.
You can make calls while in the DND mode.
NOTES: 1. If you place your keyset in DND mode and you do not
have a DND key, your ANS/RLS key will flash to indicate
DND status.
2. The system can be programmed so that direct in dial
calls will override DND (See you Service Company)
ONE TIME DND
If you are on a call and you do not wish to be interrupted while on that
call, you can press the DND key and place your station in DND.
When you end the call the DND will be automatically cancelled.
MUTE
You can mute the handset transmitter or the microphone during any
conversation:
• Press MUTE key. It will light red.
• To resume speaking, press the MUTE button again. The light
turns off.
BACKGROUND MUSIC
When a music source is supplied, you may listen to music through
the speaker in your keyset:
• While on-hook, press the HOLD button to hear music.
• Press the HOLD button again to turn music off.
26
»£¡÷«‚USER-
∫ª πÆ 98.7.16 12:52 PM
∆‰¿Ã¡ˆ27
APPOINTMENT REMINDER/ALARM
CLOCK
Two types are available TODAY ONLY or DAILY. You can set up to
three alarms for each type.
When the alarm rings, you will hear three short rings repeated three
times. Lift the handset to answer the alarm. If you do not, the alarm
will alert you two more times at five minute intervals.
To set alarms:
• Dial TRSF 112.
• Dial the alarm number 1, 2 or 3.
• Dial the time you want the alarm to sound. Enter the time as
HHMM (hours & minutes) using a 24 hour clock.
• Dial 1 (TODAY ONLY) or 2 (DAILY) to select alarm type.
• Press TRSF to save.
• Repeat for each alarm as needed.
To cancel individual alarms:
• Press TRSF 112.
• Dial alarm number 1, 2 or 3.
• Press the HOLD key.
NOTE: Display keysets can have a reminder message. See Alarm
Reminder Messages under Display Features.
ANSWERING THE DOOR PHONE
When you are programmed to receive calls from a door phone:
• Lift the handset or press ANS/RLS and you will be connected to
the door phone.
• If an electric door lock release is installed, dial 13 to unlock the
door.
27
»£¡÷«‚USER-
∫ª πÆ 98.7.16 12:52 PM
∆‰¿Ã¡ˆ28
CALLING THE DOOR PHONE/ROOM
MONITOR
You may call the door phone and listen to what may be happening
outside or in another room.
• Dial the extension number of the door phone
• You will be connected to the door phone and you can listen or
have a conversation.
EXECUTIVE/SECRETARY HOT LINE
If programmed, an executive and a secretary can have a hot line
between them. When the executive station is in the DND mode, all of
its calls will ring the secretary station.
• Either person can press the HOT LINE key to make a voice call
to the other station.
• Using the hot line will override DND at the other station. This
key will light red when the other station is in use.
GROUP LISTENING
When engaged on a call and using the handset, you may want other
people to hear the distant party's voice over the speaker:
• Press the LISTEN key to turn on the speaker.
• Press LISTEN again to turn the speaker off and resume private
conversation.
ACCOUNT CODES
When equipped with optional Call Management software your
SAMSUNG DCS system will allow calls to be charged to a specific
account:
• During any outside call, press the account (ACCT) key.
• Enter the account code (maximum 12 characters including ✱ and #).
• Press the ACCT key again. Your conversation will not be
interrupted.
NOTE: If you make an error before you complete the account code,
press the ACCT key twice and redial the correct code. Only
the last account code dialed will be printed.
28
∫ª πÆ 98.7.16 12:52 PM
»£¡÷«‚USER-
∆‰¿Ã¡ˆ29
LOCKING YOUR KEYSET
You can allow/disallow incoming/outgoing calls from your keyset
using this option. There are three possible levelst:
1. Unlocked - you can use your keyset without restriction,
2. Locked all - prevents anyone from making or receiving calls from
your keyset.
3. Locked out - prevents anyone from making an external call but
allows incoming calls as normal.
• While on-hook, press TRSF and then dial 100.
• Dial your four digit station passcode.
• Dial
0 for Unlock,
1 for Locked out.
2 for Locked all,
• Press TRSF to store your selection.
NOTE: According to the status of your keyset, the following visual
indication will be provided:
Unlock
as normal
Locked out
the HOLD key light will flash slowly.
Locked all
the HOLD key light will be on steady
OFF-HOOK VOICE ANNOUNCING
(OHVA)
Keysets may receive a voice announcement while on another call.
The calling station must be a display Keyset or have an OHVA key.
The OHVA feature will work with all types of call.
To make an off-hook voice announcement:
•
•
•
•
Dial the extension number or press the DSS key.
When you receive a busy signal, press the OHVA key.
After the attention tone, begin speaking.
Finish the call by replacing handset or pressing the ANS/RLS
key.
NOTES: 1. When you are voice announcing to a station close to you,
use the handset to avoid an echo effect.
2. You cannot off-hook voice announce to single line
telephones or Keysets in DND.
29
»£¡÷«‚USER-
∫ª πÆ 98.7.16 12:52 PM
∆‰¿Ã¡ˆ30
When you receive an off-hook voice announcement, you will hear the
announcement in the handset receiver or over the keyset speaker
while continuing to speak to the original party.
To answer the OHVA:
• Press the flashing CALL button on your keyset. The original
party is placed on hold allowing you to talk to the announcing
party.
• To return to your first party, press the key corresponding to your
original call. This will disconnect the OHVA call.
OHVA BLOCK
Your keyset can be programmed with an OHVA Block (OHBLK) key.
Pressing this key will prevent anyone from making and OHVA to you
until you press the button again and cancel the blocking.
OHVA REJECT
Your keyset can be programmed with an OHVA Reject (REJECT)
key. Pressing this key while receiving an OHVA call will disconnect
the voice announcement and return you to your original call.
IN GROUP/OUT OF GROUP
If your keyset is assigned to a station ring group, you can temporarily
remove your keyset from the group. While you are out of the group,
you can receive calls to your extension number but not calls to the
group number.
• Press the IN/OUT key. It will light red when your keyset is in the
group.
• Press the IN/OUT key again to exit the group and turn the light
off. Repeat as necessary.
If you do not have an IN/OUT key:
• Dial 53 plus the group number, e.g., 503, followed by 0 to exit
the group or 1 to enter the group.
• Repeat as necessary.
30
»£¡÷«‚USER-
∫ª πÆ 98.7.16 12:52 PM
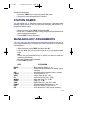
∆‰¿Ã¡ˆ31
CUSTOMISING YOUR KEYSET
SELECT RING TONE
Each keyset user can select any one of eight ring frequencies:
• While on-hook, press TRSF followed by 111.
• Dial 1-8 or press the UP and DOWN keys to hear each tone.
• When you hear the tone that you prefer, press TRSF to save it.
CHANGE YOUR PASSCODE
At installation, your station passcode is 1234. You can change your
station passcode whenever you desire.
• While on-hook, press TRSF followed by 101.
• Dial your old passcode.
• Dial a new passcode (must be four characters). You can use
0-9, ✱ and #.
• Dial your new passcode to verify. If successful, you will hear two
beeps. Four beeps indicate an incorrect code. (enter the code
again.)
• Press TRSF to store new passcode.
SET ANSWER MODE
You can receive internal calls in one of three modes (see Answering
Intercom Calls under Intercom Calls for descriptions):
• While on-hook, press TRSF followed by 103.
• Dial 0 for Ringing, 1 for Auto Answer or 2 for Voice Announce.
• Press TRSF to store your selection.
AUTOMATIC HOLD
While on a outside call, pressing a line key, route key or a flashing
CALL button will automatically put your call on hold and connect you
to the next call. This feature can be turned on or off at your keyset.
• While on hook, press TRSF followed by 110.
• Dial 01 to turn Automatic Hold on or 00 to turn it off.
• Press TRSF to store your selection.
31
»£¡÷«‚USER-
∫ª πÆ 98.7.16 12:52 PM
∆‰¿Ã¡ˆ32
HEADSET OPERATION
Keyset users can switch between headset mode and handset mode.
When using headset mode, press the ANS/RLS key to answer and
release calls.
• While on-hook, press TRSF followed by 110.
• Dial 21 to use the headset or 20 to use the handset.
• Press TRSF to store your selection.
NOTES: 1. When you are in headset mode, your speakerphone is
disabled.
2. When you place your keyset in headset mode, the
ANS/RLS key will light steady to indicate headset mode.
HOT KEYPAD
Hot Keypad allows the user to activate features without the need to
lift the handset or press SPEAKER first
To activate this feature.
• While on-hook, press TRSF followed by 110.
• Dial 31 to turn the Hot Keypad on or 30 to turn it off.
• Press TRSF to store your selection.
KEY CONFIRMATION TONE
A short beep (confirmation tone) each time you press a button on the
dial pad. This tone can be turned on or off.
• While on-hook, press TRSF followed by 110.
• Dial 40 to turn tones off or 41 to turn tones on.
• Press TRSF to store your selection.
REJOINING A PAGE
Allows keyset users to hear the remaining portion of an ongoing
internal page after completing a call.
To enable this feature:
• While on-hook, press TRSF followed by 110.
• Dial 51 to turn this feature on or 50 to turn it off.
• Press TRSF to store your selection.
32
»£¡÷«‚USER-
∫ª πÆ 98.7.16 12:52 PM
∆‰¿Ã¡ˆ33
RING PREFERENCE
This feature sets the keyset to automatically answer ringing calls by
lifting the handset or pressing the ANS/RLS key. Calls will always be
answered in the order they arrived at your keyset. The alternative is
to press the flashing button to answer a call allowing you to answer
calls in the order you choose.
• While on-hook, press TRSF followed by 110.
• Dial 61 to turn ring preference on or 60 to turn it off.
• Press TRSF to store your selection.
33
»£¡÷«‚USER-
∫ª πÆ 98.7.16 12:52 PM
∆‰¿Ã¡ˆ34
DISPLAY FEATURES
INTERACTIVE DISPLAY KEYS
The three keys below the display are substitutes for dedicated feature
keys and access codes. Pressing one of these keys has the same
effect as pressing a programmed key. These "soft" keys are context
sensitive and their functions change to present you with the best
options for a particular call condition.
The SCROLL key is used to display options available to the user at a
particular time or during a specific procedure. Press this key once
while in the idle state to view the three main categories available.
201: STN NAME
CALL OTHER ANS
ANSWER : Guides you through the options to answer calls.
OTHER : Guides you through features other than making or
answering calls.
CALL
: Guides you through the options to make a call.
Select one of the main categories: C A L L, O T H E R or A N S
(ANSWER). Press the SCROLL key to display additional options
available under each of the three main categories. The symbol ->
displayed as the last character on the lower line of the display
indicated that there are additional options. Press the SCROLL key to
display these additional options.
User instructions will be displayed in lower case letters. Options
assigned to soft keys are in upper case letters.
DIRECTORY INFORMATION
An 11 character name can be assigned to each extension number.
Display keysets can view the name of the called or calling station
before answering. The Display will be:
Call from XXX
NAME
where XXX is the extension no.
the calling extensions name
Each outside line can have an 11 character name. Incoming calls can
be easily identified and answered with different greetings.
34
»£¡÷«‚USER-
∫ª πÆ 98.7.16 12:52 PM
∆‰¿Ã¡ˆ35
Each station group can have an 11 character name Outside and
internal calls ringing to a station group will display [CALL NAME]. This
allows you to answer calls directed to you differently than calls
directed to your station group.
DIAL BY DIRECTORY
Each station or speed dial number can have an associated directory
name and can be selected by scrolling alphabetically through the
directory name list. This on-line "phone book" allows the user to look
up and dial any station or speed dial number in seconds.
To dial by directory:
• Press the DIR key (DIRECTORY).
• Select the directory you wish to use: PERS (personal speed dial
numbers), SYS (system speed dial numbers) or STN (station
names).
• Press the dial key to select the first letter of the name you wish
to search for.
• Use the UP and DOWN arrows to scroll through the names.
• Press the DIAL soft key to dial number.
DISPLAY NUMBER DIALLED
Display keysets begin showing digits as they are dialled. They will
stay in the display until the call duration timer comes on automatically
or the TIMER button is pressed. If the call duration timer is not used,
the number dialled is displayed until the call is released, transferred
or put on hold.
CALL DURATION TIMER
The system can time outside calls either automatically or manually.
Call duration times are displayed in minutes and seconds.
AUTO TIMER
Display keyset users may have the timer automatically start when
they answer incoming calls or after a short delay on an outgoing call.
• While on-hook, press TRSF followed by 110.
• Dial 11 to turn the auto timer on or 10 to turn it off.
• Press TRSF to store your selection.
35
∫ª πÆ 98.7.16 12:52 PM
»£¡÷«‚USER-
∆‰¿Ã¡ˆ36
MANUAL TIMER
Display phone users may use this feature to time an incoming or
outgoing call or as a simple stopwatch.
•
•
•
•
Press the TIMER button to start timing.
Press the TIMER button again to stop timing.
Read the elapsed time in the display.
Lift the handset and replace it to idle.
CALL COST
Display keyset users may have the call charge automatically
displayed if metering is available.
• While on-hook, press TRSF followed by 110.
• Dial 71 to turn the call cost on or 70 to turn it off.
• Press TRSF to store your selection.
VIEWING MESSAGE INDICATIONS
You can view all your message indications before you return them:
• While on-hook, press the flashing MSG key.
• The first station that left a message indication is displayed.
• Press the UP and DOWN arrows to scroll through the stations
that left message indications. Use the soft keys to reply, clear or
advance to the next message.
• Press the ANS/RLS key to return to the idle condition.
ALARM REMINDER MESSAGES
When you use the alarm/appointment reminder feature, you can
create a 16 character reminder message. When the alarm rings, The
message will appear when the alarm rings.
To program reminder messages:
• Press TRSF followed by 116.
• Dial the alarm number 1, 2 or 3.
• Dial the time you want the alarm to go off. Enter the time as
HHMM (hours & minutes) using the 24 hour clock.
• Dial 0 (NOT SET), 1 (TODAY) or 2 (DAILY) to select alarm type.
• Write your message using the dial pad keys. Each press of a
36
∫ª πÆ 98.7.16 12:52 PM
»£¡÷«‚USER-
∆‰¿Ã¡ˆ37
key selects a character. Pressing the next key moves the cursor
to the next position. For example: if your message is “TAKE
MEDICATION” , press 8 once to get the letter “T” . Press 2 once
to get the letter “A” . Press 5 twice to get “K” . Continue selecting
characters from the folllowing table to complete your message.
• Press the TRSF key to store the alarm and reminder message.
• Repeat for each alarm if needed.
COUNT
1
2
3
4
5
&
DIAL 0
(
)
.
0
DIAL 1
space
?
,
!
1
DIAL 2
A
B
C
@
2
DIAL 3
D
E
F
#
3
DIAL 4
G
H
I
$
4
DIAL 5
J
K
L
%
5
DIAL 6
M
N
O
^
6
DIAL 7
P
Q
R
S
7
DIAL 8
T
U
V
✱
8
Z
DIAL 9
W
X
Y
9
[
]
DIAL *
:
=
✱
The # key can be used for the following special characters: #, space,
&, !, :, ?, ., %, $, -, /, [, ], @ , ^, , ), _, +, {, }, ;, |, “ and ~.
NOTE: When the character you want appears on the same dial pad
key as the previous character, press UP to move the cursor
one space to the right.
To cancel an individual alarm and reminder message:
•
•
•
•
Press TRSF and then dial 112.
Dial alarm number 1, 2 or 3.
Press the HOLD key.
Press the TRSF key to storey.
PERSONAL SPEED DIAL NAMES
Each personal speed dial number can have a ten character name
assigned to it. This name is used to select the speed dial bin when
you are dialling by directory. To program speed dial names:
• While on hook, press TRSF followed by 106.
• Dial the speed dial bin number 00-49.
• Write your name using the procedure described in A l a r m
37
»£¡÷«‚USER-
∫ª πÆ 98.7.16 12:52 PM
∆‰¿Ã¡ˆ38
Reminder Messages.
• Press the TRSF key to store the speed dial name.
• Repeat for each speed dial bin if needed.
STATION NAMES
You can assign an 11 character name to your keyset. This allow other
display keyset users to call you using the directory dial feature. To
program a station name
• While on hook, press TRSF followed by 104.
• Enter the 11 character name using the procedure described in
alarm reminder messages.
• Press TRSF to store the name.
MANAGING KEY ASSIGNMENTS
You can view your key assignments and add extenders to some of
your programmed keys for easy one touch operation of frequently
used features.
• While on-hook, press TRSF and then dial 107.
• Use the VOL keys to scroll through all of your programmable
keys.
OR
Press the programmable key to which you want to add the
extender.(see below)
• Dial the corresponding extender.
• Press TRSF to store.
KEY
EXTENDER
BOSS ...................................Boss and Secretary (1 - 4)
DP.........................................Direct Pickup (extension or station group
number)
DS.........................................Any extension or station group number
FWRD...................................Call Forward (0 - 5)
GPIK.....................................Group Pick-up (01 - 20)
IG ..........................................In/Out of Group (501 - 529)
MMPG ..................................Meet Me Page (0 - 9, ✱)
PAGE....................................Page (0 - 9, ✱)
SPD ......................................Speed Dial (00 - 49, 500 - 999)
FSMG ...................................Programmable Message (01 - 20)
DIR .......................................SYS (0), PERS (1) or STN (2)
SP.........................................UCD supervise ( UCD group number)
38
»£¡÷«‚USER-
∫ª πÆ 98.7.16 12:52 PM
∆‰¿Ã¡ˆ39
NOTE: Confirm that the cursor is placed correctly before you enter the
extender.
SELECTING YOUR CLIP DISPLAY
You can decide if you want to see the CLIP name or CLIP number in
the display. Regardless of which one is selected, you can press the
NND key to view the other pieces of CLIP information.
To select the CLIP information:
• While on-hook, press TRSF followed by 119.
• Dial 0 if you do not wish to view CLIP information, 1 to view the
NUMBER first or 2 to view the NAME first.
• Press TRSF to store your selection.
VIEWING THE NEXT CLIP CALL
If you have a call waiting or a camped-on call at your keyset, you can
press the NEXT key to display the CLIP information associated with
the next call.
To view CLIP information:
Press the NEXT key. If your keyset does not have a NEXT key, press
the CLIP key and then the NEXT soft key.
SAVING THE CLIP NUMBER
At any time during an incoming call that provides CLIP information,
you may press the SAVE key to save the CLIP number. If your keyset
does not have a SAVE key, press the CLIP key, the SCROLL key and
then the SAVE soft key.
REDIALLING A SAVED CLIP NUMBER
To redial a number that has been saved:
• Press the SAVE key or dial 19.
STORING A CLIP NUMBER
At any time during an incoming call that provides CLIP information,
you may save the CLIP number as a speed dial number in your
personal speed dial list.
39
»£¡÷«‚USER-
∫ª πÆ 98.7.16 12:52 PM
∆‰¿Ã¡ˆ40
To store a CLIP number:
• Press the STORE key. The system displays the speed dial bin
in which the number was stored.
OR
• Press the CLIP key and then press SCROLL key.
• Press the STORE soft key.
• The system displays the speed dial bin in which the number was
stored.
INQUIRE CLIP PARK/HOLD INFO
If you are informed that an incoming call is on hold or has been
parked for you, you may view the CLIP information before you
retrieve the call.
From an idle keyset:
• Press the INQUIRE key.
OR
• Press the CLIP key and then dial the INQUIRE soft key.
• Dial the trunk number.
• Answer the call by pressing ANS or use NND to view more
information about this call.
OR
• Return to the idle condition by pressing IGNORE.
If you are on a call:
• Press the INQUIRE key. Your existing call will go on hold.
OR
• Press the CLIP key and then the INQUIRE soft key to place the
first call on hold.
• Dial the trunk number.
• You may now answer the call by pressing ANS or use NND to
view more information about this call.
OR
• You can return to the idle condition by pressing IGNORE.
NOTES: 1. If you are on an intercom call or you have Automatic Hold
turned off, you must finish the existing call or place it on
hold before inquiring.
2. If you are inquire about an outgoing call, you will receive
a [call no longer available] display.
40
»£¡÷«‚USER-
∫ª πÆ 98.7.16 12:52 PM
∆‰¿Ã¡ˆ41
REVIEWING PAST CLIP CALLS
Allows you to review CLIP information for 10-50 calls in a first-in, firstout basis. The list includes calls that you answered and calls that
rang your keyset but that you did not answer. When reviewing this
list, you can press one button to dial the person back.
To access the CLIP information stored in your REVIEW list:
• Press the REVIEW key.
OR
• Press the CLIP key and then dial the REVIEW soft key.
• If you have entries in your review list, the oldest call will be
shown first.
• You can now CLEAR this entry.
OR
• Use NND to view more information about this call.
OR
• Press DIAL to call this person back.
OR
• Press SCROLL and then press STORE to save this number in
a personal speed dial bin.
NOTES: Each keyset defaults with 10 review bins. Please see your
System Administrator to determine the number of bins
assigned to your keyset.
LCR WITH CLEAR
When you are making an outside call using LCR and dial an incorrect
digit, you can press the CLEAR soft key to cancel the digit and
continue dialling the telephone number.
This feature does not operate if you have ISDN connected to your
system..
41
»£¡÷«‚USER-
∫ª πÆ 98.7.16 12:52 PM
∆‰¿Ã¡ˆ42
ADD-ON MODULE
WITH KEYSET
The add-on module (AOM) is used when you need more
programmable keys. The extra programmable keys are used exactly
as are the ones on your keyset. Make them DSS/BLF keys, line keys,
One Touch Speed Dial buttons or any combination of these and other
feature keys. A maximum of two AOMs can be added to any keyset.
42
»£¡÷«‚USER-
∫ª πÆ 98.7.16 12:52 PM
∆‰¿Ã¡ˆ43
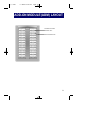
PERSONAL SPEED DIAL NUMBERS
CODE
00
01
02
03
04
05
06
07
08
09
10
11
12
13
14
15
16
17
18
19
20
21
22
23
24
43
NAME
TELEPHONE NUMBER
»£¡÷«‚USER-
∫ª πÆ 98.7.16 12:52 PM
∆‰¿Ã¡ˆ44
PERSONAL SPEED DIAL NUMBERS
CODE
NAME
TELEPHONE NUMBER
25
26
27
28
29
30
31
32
33
34
35
36
37
38
39
40
41
42
43
44
45
46
47
48
49
44
»£¡÷«‚USER-
∫ª πÆ 98.7.16 12:52 PM
∆‰¿Ã¡ˆ45
MEMO
45