1
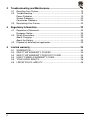
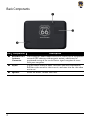
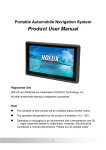
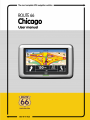
Trademarks
All brand and product names are trademarks or registered trademarks of their
respective companies.
Note
The information in this manual is subject to change without notice.
Table of Contents
1
Getting Started................................................................................ 1
1.1
1.2
1.3
1.4
1.5
1.6
2
Understanding Hardware Components................................................ 1
Front Components ............................................................................... 1
Back Components ................................................................................ 2
Right-Side Components ....................................................................... 3
Top Components.................................................................................. 3
Bottom Components ............................................................................ 4
Performing the Initial Start Up .............................................................. 4
Charging the Battery via the USB Cable.............................................. 5
Using Your Device in a Vehicle............................................................ 6
Using the Car Holder............................................................................ 6
Connecting the Car Charger ................................................................ 7
Connecting the TMC Antenna.............................................................. 7
Operating Basics .................................................................................. 9
Turning On and Off .............................................................................. 9
Using the Stylus ................................................................................... 9
Inserting a SD/MMC Card .................................................................. 10
Audio Player.................................................................................. 11
2.1
2.2
2.3
2.4
2.5
2.6
2.7
2.8
Introduction......................................................................................... 11
Preparing the Audio Files for Your Device......................................... 12
Playing Audio Files............................................................................. 12
Playback Controls .............................................................................. 13
Displaying Lyrics ................................................................................ 14
Preparing the Lyrics Files for your Device ......................................... 14
Playing Songs with Lyrics .................................................................. 14
Using the Play Lists............................................................................ 15
Creating a Play List ............................................................................ 15
Opening a Play List ............................................................................ 16
Equalizer ............................................................................................ 17
Settings .............................................................................................. 18
i
3
Troubleshooting and Maintenance.............................................. 19
3.1
3.2
3.3
4
Regulatory Information ................................................................ 22
4.1
4.2
4.3
5
Regulations Statements ..................................................................... 22
European Notice ................................................................................ 22
Safety Precautions ............................................................................. 23
About Charging .................................................................................. 23
About the Battery ............................................................................... 23
Disposal of old electrical appliances .................................................. 23
Limited warranty........................................................................... 24
5.1
5.2
5.3
5.4
5.5
5.6
ii
Resetting Your System ...................................................................... 19
Troubleshooting ................................................................................. 19
Power Problems ................................................................................. 19
Screen Problems................................................................................ 20
Connection Problems......................................................................... 20
Maintaining Your Device .................................................................... 20
WARRANTOR.................................................................................... 24
WHAT THIS WARRANTY COVERS ................................................. 24
WHAT THIS WARRANTY DOES NOT COVER ................................ 24
HOW TO MAKE A WARRANTY CLAIM ............................................ 25
YOUR LEGAL RIGHTS...................................................................... 25
LIMITATION OF LIABILITY................................................................ 26
1
Getting Started
1.1 Understanding Hardware Components
NOTE: Depending upon the specific model purchased, the color of your device may not
exactly match the device shown in this manual.
Front Components
Ref
Component
Touch Screen
Description
Displays the output of your device. Tap the screen with your
stylus to select menu commands or enter information.
Charge Indicator Glows bright amber to indicate that the battery is charging,
and turns green when the battery is fully charged.
1
Back Components
Ref
Component
Description
External GPS This connector (under rubber dust cover) allows use of an optional
Antenna
Connector
Stylus
Speaker
2
external GPS antenna with magnetic mount, which may be
positioned on top of the car for better signal reception in areas
with poor reception.
Tap the touch screen to make selections and enter information.
Pull the stylus out of its slot to use it, and store it in the slot when
not in use.
Sends out music, sounds and voice.
Right-Side Components
Ref
Component
Description
Power Button
Navigation Button
Turns on and off the device.
Opens the navigation menu.
Top Components
Ref
Component
SD/MMC Slot
Description
Accepts a SD (Secure Digital) or MMC (MultiMediaCard) card
for accessing data such as MP3 music.
3
Bottom Components
Ref
Component
Description
Reset Button
Restarts your device (soft reset).
Headphone
Connects to stereo headphones.
Connects to stereo headphones or the TMC (Traffic
Message Channel) antenna for receiving TMC
information.
Connects to the charger or USB cable.
Connector(ROUTE
66 Chicago)
Headphone/TMC
Connector (ROUTE
66 Chicago TMC)
Mini-USB Connector
1.2 Performing the Initial Start Up
1. Make sure that power is supplied to your device. (See the next section.)
2. For the initial start up, press the power button for 6 seconds to turn on your
device.
NOTE: For normal operation, briefly press the power button to turn on and off your device.
4
1.3 Charging the Battery via the USB Cable
When charging the battery for the very first time, you should charge it for at least
8 hours.
1. Turn on the computer.
2. Connect the mini-USB end of the USB cable to the bottom of your device and
the other end to a USB port on your computer.
The charge indicator glows amber when charging is in progress. Do not
disconnect your device until the battery is fully charged, when the charge
indicator turns green. This will take a couple of hours.
CAUTION: For optimal performance of the lithium battery, take note of the following:
Do not charge the battery where the temperature is high (e.g. in direct sunlight).
There is no need to fully discharge the battery before charging. You can charge the battery
before it is discharged.
If you will not use the product for a long period of time, be sure to fully charge the
battery at least once every two weeks. Over discharge of the battery can affect the
charging performance.
5
1.4 Using Your Device in a Vehicle
A car holder and a car charger are supplied with your device.
Using the Car Holder
CAUTION:
Select an appropriate location for the car holder. Never place the holder where the driver’s
field of vision is blocked.
If the car’s windshield is tinted with a reflective coating, an external antenna (optional) may
be needed to route the antenna to the top of the car through a window. When closing the
car window, be careful not to pinch the antenna cable
The car holder consists of a bracket and a stand. Use the car holder to fix your
device in a vehicle. Make sure that the GPS antenna has a clear view of the sky.
6
Connecting the Car Charger
The car charger supplies power to your device when you are using the device in a
car.
CAUTION: To protect your device against sudden surges in current, connect the car charger
only after the car engine has been started.
1. Connect one end of the car charger to the
power connector of your device.
2. Connect the other end to the cigarette
lighter in the car to power and charge
your device. The indicator on the car
charger lights in green to indicate that
power is being supplied to your device.
Connecting the TMC Antenna
ROUTE 66 Chicago TMC
7
ROUTE 66 Chicago
The TMC receiver and antenna are purchased separately.
8
1.5 Operating Basics
Turning On and Off
Briefly press the power button to turn on and off your device
When you press the power button to turn off the unit, your
device actually enters a suspend state and the system stops
operating. Once you turn on the system again, it resumes.
NOTE: In case you turn off the power by pressing the power button for
6 seconds, you will need to press the power button for 6 seconds again
for turning on. You will then see the initial start up screen.
Using the Stylus
The stylus is your input device. You use it to navigate and select objects on the
screen. Pull the stylus out of the slot and extend it for ease of use. Store it in the
slot when not in use. You can use the stylus for the following actions:
Tap
Touch the screen once with the stylus to open items or select options.
Drag
Hold the stylus on the screen and drag up/down/left/right or across the screen.
Tap and hold
Tap and hold the stylus until an action is complete, or a result or menu is
shown.
9
1.6 Inserting a SD/MMC Card
Your device has a SD/MMC slot where you can
insert an optional Secure Digital or
MultiMediaCard storage card.
To use a SD/MMC card, insert it into the slot, with
the connector pointing to the slot and its label
facing the front of the device.
To remove a card, first make sure that no
application is accessing the card, then slightly
push the top edge of the card to release it and pull
it out of the slot.
NOTE:
Make sure that no foreign objects enter the slot.
Keep a SD or MMC card in a well-protected box to avoid dust and humidity when you are
not using it.
10
2
Audio Player
2.1 Introduction
Audio Player features:
Playback of MP3/WAV/WMA files
Basic playback controls such as play, pause, stop, next and previous
Playback includes single selection playback, repeat, single repeat, sampling
playback, normal sequence and random sequence.
11 preset equalizer audio profiles
Play list support
Lyrics display
When you start the program, the control panel appears on the screen where you
can easily control the player by tapping the control buttons.
To exit the program, tap
.
11
2.2 Preparing the Audio Files for Your Device
Before using the program, have the files ready on either your device’s My Flash
Disk\My Audio folder or on a storage card.
Use ActiveSync to copy files from your computer to the correct location. Install
ActiveSync using the CD supplied. When the “Set up partnership” screen appears,
select No and Next to connect as a guest device. You can then use the Explorer
function of ActiveSync to transfer files between your computer and your device.
2.3 Playing Audio Files
1. If your files are in a storage card, insert the card into your device.
2. Start the program.
3. The program will search for the supported audio files in your device and in the
storage card. When files are detected, they will be added to the play list.
NOTE: You can create your own play lists for future playback. (See section 2.6 for details.)
4. To start the playback, tap
buttons as described later.
. To control the playback, use the control
The information area displays the current status such as play/pause/stop
status, the elapsed time, the power status, the playback mode, the filename,
and the volume level.
NOTE: During the playback, the screen backlight will automatically shut off if you haven’t
tapped the screen within the preset time (5 minutes by default).The backlight will restore
when you press the power or Menu button or when the playback of the current play list has
ended.
12
2.4 Playback Controls
Control Button
Name
Description
Play/Pause
Play or pause the playback.
Stop
Stop the playback.
Previous/
Next
Play the previous or next file.
Volume
Increase or decrease the volume.
The indicator on the panel shows the current
volume level.
Switch to the next mode:
/
/
/
Playback
Mode
Repeated playback of the current file.
Repeated playback of all files in the current play
list in sequence.
Playback of all files in the current play list in
random order.
Sampling (10 seconds) playback of all files in the
current play list in random order.
Playback of all files in the current play list in
sequence.
Lyrics
Play List
Open the lyrics display. Available only if the
current song is with lyrics. (See Section 2.5 for
more information.)
Open play list. (See Section 2.6 for more
information.)
Equalizer
Open the equalizer panel.
(See Section 2.7 for more information.)
Settings
Open the Settings screen for setting up power
saving mode and accessing help. (See Section 2.8
for more information.)
Introduce the function and operation of each
button. Tap a button to see a description line at the
bottom of the screen.
Close the program and return to the Home screen.
Help
Exit
13
2.5 Displaying Lyrics
The Audio Player allows you to display the real-time lyrics on the screen while
playing songs. This feature is especially handy for you to sing along with the
songs.
Preparing the Lyrics Files for your Device
To display the lyrics, you need to have the lyrics files (.lrc) ready on your device’s
\My Flash Disk\My Audio\Lyric\ folder or the \Lyric\ folder on your storage
card.
NOTE: You can search and download these .lrc files from the internet.
Use ActiveSync to copy files from your computer to the correct location. When
copying a lyrics file to your device, be sure to use the same filename as the audio
file. For example, if a MP3 file is named My Love.mp3, the lyrics filename must
be My Love.lrc.
NOTE: When playing songs with lyrics, the backlight shut off feature will be disabled.
Playing Songs with Lyrics
The
button is available when you’re playing a song with lyrics. Tap this
button to view the lyrics.
As the song plays, the lyrics scroll line by line on the screen, with the current line
highlighted by a different color. The background image changes in turn at a
specific time interval.
14
To close the lyrics screen and go back to the control panel, tap anywhere on the
screen.
2.6 Using the Play Lists
You can create your own play lists for future use.
Creating a Play List
1. Tap
on the control panel to open the play list screen. The screen shows
the current play list.
Back
Play the
selected file.
Save the play list.
Add song
Remove the selected
song from the list or from
the storage media.
2. To add a song to the play list, tap
Open the list of play lists.
Clear all songs from the current
play list. (No files are deleted.)
.
3. A screen appears displaying all the audio files. Tap the song(s) you wish to
add and then tap
.
15
Back
Add the selected song(s)
to the play list.
4. To save the play list, tap
Select all songs.
.
5. The keyboard screen appears where you can change the default name of the
play list. Rename the play list if you want. Tap
when finished.
6. To return to the control panel, tap
.
Opening a Play List
To open one of the play lists that you have created:
1. Tap
2. Tap
16
on the control panel.
to display all the play lists you have created.
3. Tap the play list you want to open and tap
.
Back
Rename the
selected play list.
Open the selected play list.
Delete the
selected play list.
4. To return to the control panel, tap
Delete all play lists.
.
2.7 Equalizer
The program provides 11 preset audio profiles. Tap
panel.
to open the equalizer
Tap
or
to cycle through the available options: Normal, Hall, 3D,
Soft, Disco, Heavy, Dance, Classic, Jazz, Pop and Rock.
17
Tap
to save your selection and return to the control panel.
To select the Default profile, tap
.
2.8 Settings
Tap
on the control panel. The Settings screen appears.
Tap the check box (√) to turn on the power saving mode. Tap the up/down button
to set the timer to 10 seconds, 30 seconds, 1 minute, or 5 minutes. During the
playback, the screen backlight will automatically shut off if you haven’t tapped
the screen within the preset time (5 minutes by default).The backlight will restore
when you press the power or Menu button or when the playback of the current
play list has ended.
Tap
18
to save any changes you have made.
3
Troubleshooting and
Troubleshooting and Maintenance
Maintenance
3.1 Resetting Your System
Occasionally, you may need to reset your device. For example, you should reset
your system when it stops responding; or appears to be “frozen” or “locked up.”
Insert a small rod, such as a straightened paperclip, into the reset button on the
bottom of your device. This is called a “soft reset.”
3.2 Troubleshooting
Power Problems
Power does not turn on when using battery power
The remaining battery power may be too low to run your device. Charge the
battery.
19
Screen Problems
Screen responds slowly
Make sure that your device is not running out of battery power. If the problem
still exists, reset your system.
Screen freezes
Reset your system.
Screen is hard to read
Make sure that the backlight of the display is on.
Move to a location with more light.
Inaccurate response to taps
Recalibrate the touch screen.
Connection Problems
Cable Connection Problems
Make sure that your device and your computer are both turned on before
trying to establish a connection.
Make sure that the cable is securely plugged into the USB port on your
computer and on the device. Connect the USB cable directly to your
computer—do not run the cable through a USB hub.
Reset your device before connecting the cable. Always disconnect your
device before you restart your computer.
3.3 Maintaining Your Device
Taking good care of your device will ensure trouble-free operation and reduce the
risk of damage to your device.
20
Keep your device away from excessive moisture and extreme temperatures.
Avoid exposing your device to direct sunlight or strong ultraviolet light for
extended periods of time.
Do not place anything on top of your device or drop objects on your device.
Do not drop your device or subject it to severe shock.
Do not subject your device to sudden and severe temperature changes. This
could cause moisture condensation inside the unit, which could damage your
device. In the event of moisture condensation, allow the device to dry out
completely before use.
Take care not to sit on the device. We advise not to carry the device in one’s
back pocket for that reason.
The screen surface can easily be scratched. Avoid touching it with sharp
objects. Non-adhesive generic screen protectors designed specifically for use
on portable devices with LCD panels may be used to help protect the screen
from minor scratches.
Never clean your device with it powered on. Use a soft, lint-free cloth
moistened with water to wipe the screen and the exterior of your device.
Do not use paper towels to clean the screen.
Never attempt to disassemble, repair or make any modifications to your
device. Disassembly, modification or any attempt at repair could cause
damage to your device and even bodily injury or property damage and will
void any warranty.
Do not store or carry flammable liquids, gases or explosive materials in the
same compartment as your device, its parts or accessories.
21
4
Regulatory Information
NOTE: Marking labels located on the exterior of your device indicate the regulations that
your model complies with. Please check the marking labels on your device and refer to the
corresponding statements in this chapter. Some notices apply to specific models only.
4.1 Regulations Statements
European Notice
Products with the CE marking comply with Radio & Telecommunication
Terminal Equipment Directive (R&TTE) (1999/5/EEC), the Electromagnetic
Compatibility Directive (89/336/EEC) and the Low Voltage Directive
(73/23/EEC) – as amended by Directive 93/68/ECC - issued by the Commission
of the European Community.
Compliance with these directives implies conformity to the following European
Standards:
EN301489-1: Electronic compatibility and Radio spectrum Matters (ERM),
ElectroMagnetic Compatibility (EMC) standard for radio equipment and services;
Part 1: Common technical requirements
EN301489-3: Electronic compatibility and Radio spectrum Matters (ERM),
ElectroMagnetic Compatibility (EMC) standard for radio equipment and services;
Part 3: Specific conditions for Short-Range Devices (SRD) operating on
frequencies between 9 kHz and 40 GHz
EN55022: Radio disturbance characteristics
EN55024: Immunity characteristics
EN6100-3-2: Limits for harmonic current emissions
EN6100-3-3: Limitation of voltage fluctuation and flicker in low-voltage supply
system
EN60950 / IEC 60950: Product Safety
The manufacturer cannot be held responsible for modifications made by the User
and the consequences thereof, which may alter the conformity of the product with
the CE Marking.
22
4.2 Safety Precautions
Prolonged listening of music in maximum volume can damage the ears.
About Charging
Use only the charger supplied with your device. Use of another type will
result in malfunction and/or danger.
This product is intended to be supplied by a LISTED Power Unit marked with
“LPS”, “Limited Power Source” and output rated + 5 V dc / 1.0 A”.
Use a specified battery in the equipment.
About the Battery
Use a specified charger approved by the manufacturer.
CAUTION: This unit contains a non-replaceable internal Lithium Ion battery. The battery can
burst or explode, releasing hazardous chemicals. To reduce the risk of fire or burns, do not
disassemble, crush, puncture, or dispose of in fire or water.
Important instructions (for service personnel only)
Caution: Risk of explosion if battery is replaced by an incorrect type.
Dispose of used batteries according to the instructions.
Replace only with the same or equivalent type recommended by the
manufacturer.
The battery must be recycled or disposed of properly.
Use the battery only in the specified equipment.
4.3 Disposal of old electrical appliances
The European Directive 2002/96/EC on Waste Electrical and Electronic
Equipment (WEEE), requires that old household electrical appliances must not be
disposed of in the normal unsorted municipal waste stream. Old appliances must
be collected separately in order to optimise the recovery and recycling of the
materials they contain and reduce the impact on human health and the
environment. The crossed out "wheeled bin" symbol on the product reminds you
of your obligation, that when you dispose of the appliance it must be separately
collected. Consumers should contact their local authority or retailer for
information concerning the correct disposal of their old appliance.
23
5
Limited warranty
5.1 WARRANTOR
Non-U.S. and non-Canadian purchases: If you have made your purchase outside
the United States and Canada, this Limited Warranty is granted by and this
Limitation of Liability is stipulated for the benefit of ROUTE 66 Geographic
Information Systems B.V., Brouwerstraat 36, NL-2984 AR Ridderkerk (The
Netherlands).
5.2 WHAT THIS WARRANTY COVERS
1) ROUTE 66 Geographic Information Systems B.V. (“ROUTE 66”) warrants to
you that the Hardware will be free from defects in workmanship and materials
under normal use (“Defects”) for a period of two (2) years from the date that the
Hardware was first purchased by you (“Warranty Period”). During the Warranty
Period the Hardware will be repaired or replaced at ROUTE 66’s choice
(“Limited Warranty”) without charge to you for either parts or labour. This
Limited Warranty covers the replacement of the Hardware only. If the Hardware
is repaired after the Warranty Period has expired, the Warranty Period for the
repair will expire six (6) months after the date of repair.
5.3 WHAT THIS WARRANTY DOES NOT COVER
2) The Limited Warranty does not apply to normal wear and tear, does not apply
when the Hardware is opened or repaired by someone not authorized by
ROUTE 66 and does not cover repair or replacement of any Hardware or part
thereof damaged by: misuse, moisture, liquids, proximity or exposure to heat and
accident, abuse, non-compliance with the instructions supplied with the
Hardware, neglect or misapplication. The Limited Warranty does not cover
physical damage to the surface of the Hardware. This Limited Warranty does not
cover any software that may accompany or be installed on the Hardware.
24
5.4 HOW TO MAKE A WARRANTY CLAIM
3) In order to make a claim of a Defect, you must contact ROUTE 66 by email
during the Warranty Period via www.66.com to explain the Defect and to obtain
an RMA number (Return Materials Authorization) if necessary. You must return
the Hardware during the Warranty Period, along with an explanation of the
Defect, to the address provided to you by ROUTE 66. If a defect arises and a valid
claim under this Limited Warranty is received by ROUTE 66 after the first one
hundred and eighty (180) days of the Warranty Period, ROUTE 66 is entitled to
charge you for any reasonable shipping and handling costs made in connection
with the repair or replacement of the Hardware. You must comply with any other
return procedures stipulated by ROUTE 66, if any.
5.5 YOUR LEGAL RIGHTS
4) Some countries may not allow the exclusion or limitation of damages. If any
part of this Limited Warranty is held to be invalid or unenforceable, the remainder
of the Limited Warranty shall nonetheless remain in full force and effect.
5) This Limited Warranty is the only express warranty made to you and is
provided in lieu of any other express warranties or similar obligations (if any)
created by any advertising, documentation, packaging, or other communications.
6) Except for the Limited Warranty and to the maximum extent permitted by
applicable law, ROUTE 66 and its suppliers provide the Hardware “AS IS AND
WITH ALL FAULTS”, and hereby disclaim all other warranties and conditions,
whether express, implied or statutory, including, but not limited to, any (if any)
implied warranties, duties or conditions of satisfactory quality, of fitness for a
particular purpose, of reliability or availability, of accuracy or completeness of
responses, of results, of workmanlike effort, of lack of viruses, and of reasonable
care and skill, all with regard to the Hardware, and the provision of or failure to
provide support or other services, information, software, and related content
through the Hardware or otherwise arising out of the use of the Hardware. Also,
there is no warranty or condition of quiet enjoyment, quiet possession, or
non-infringement with regard to the Hardware. This exclusion does not apply to
(i) any implied condition as to title and (ii) any implied warranty as to conformity
with description.
7) This Limited Warranty does not affect any legal rights under applicable
national legislation governing the sale of consumer goods.
25
8) This Limited Warranty cannot be transferred to any other person.
5.6 LIMITATION OF LIABILITY
9) Neither ROUTE 66 nor its suppliers shall be liable to you or to any third party
for any damages either direct, indirect, incidental, consequential or otherwise
(including in each case, but not limited to, damages for the inability to use the
equipment or access data, loss of data, loss of business, loss of profits, business
interruption or the like) arising out of the use of or inability to use the Hardware
even if ROUTE 66 has been advised of the possibility of such damages.
10) Notwithstanding any damages that you might incur for any reason whatsoever
(including, without limitation, all damages referenced herein and all direct or
general damages in contract or anything else), the entire liability of ROUTE 66
and any of its suppliers shall be limited to the amount actually paid by you for the
Hardware.
11) ROUTE 66 shall not be liable for (i) any fraud on the part of its employees
and/or agents; or (ii) any fraudulent misrepresentation on the part of its employees
and/or agents.
12) Notwithstanding the above, neither party’s liability for death or personal
injury resulting from its own negligence shall be limited.
26