1
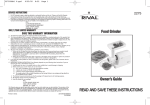
1042-WN05EM1.qxd
5/18/05
1:47 PM
Page 1
SERVICE INSTRUCTIONS
1. Do NOT attempt to repair or adjust any electrical or mechanical functions on this unit. Doing so will void the Warranty.
2. If you need to exchange the unit, please return it in its original carton, with a sales receipt, to the store where you purchased it. If you are
returning the unit more than 30 days after the date of purchase, please see the enclosed Warranty.
3. If you have any questions or comments regarding this unit’s operation or believe any repair is necessary, please write to our Consumer
Service Department or visit our website at www.rivalproducts.com
RIVAL
c/o THE HOLMES GROUP, INC.
CONSUMER SERVICE DEPARTMENT
13052 JURUPA AVENUE
FONTANA, CA 92337
Fold Up Food Slicer
ONE (1) YEAR LIMITED WARRANTY
SAVE THIS WARRANTY INFORMATION
A. This Warranty applies only to the original purchaser of this product.
B. This Warranty applies ONLY to repair or replacement of any supplied or manufactured parts of this product that, upon inspection by The Holmes Group, Inc. authorized personnel, is shown to have failed in normal use due to defects in material or workmanship. The Holmes Group will determine whether to repair or replace the unit. This Warranty does not apply to installation
expenses.
C. Operating this unit under conditions other than those recommended or at voltages other than the voltage indicated on the unit,
or attempting to service or modify the unit, will render this WARRANTY VOID.
D. Unless otherwise proscribed by law, The Holmes Group shall not be liable for any personal injury, property or any incidental or
consequential damage of any kind resulting from malfunctions, defects, misuse, improper installation or alteration of this product.
E. All parts of this product are guaranteed for a period of 1 year as follows:
1. Within the first 30 days from date of purchase, the store from which you purchased your product should replace this product if it is defective in material or workmanship (provided the store has in-stock replacement.) * If you intend to assert any
claim in connection with the product, please follow the instructions in paragraph F.
2. Within the first twelve months from date of purchase, The Holmes Group will repair or replace the product if it is defective
in material or workmanship, subject to the conditions in paragraph G.
F. If you have any other problem or claim in connection with this product, please write to our Consumer Service Department.
G. IMPORTANT RETURN INSTRUCTIONS. Your Warranty depends on your following these instructions if you are returning the unit
to The Holmes Group, Inc.:
1. Carefully pack the item in its original carton or other suitable box to avoid damage in shipping.
2. Before packing your unit for return, be sure to enclose:
a) Your name, full address with zip code and telephone number,
b) A dated sales receipt or PROOF OF PURCHASE,
c) A check for return prepaid shipping and handling, and
d) The model number of the unit and the problem you are having. (Enclose in an envelope and tape directly to the unit before the
box is sealed.)
3. The Holmes Group recommends you ship the package U.P.S ground service for tracking purposes.
4. All shipping charges must be prepaid by you.
5. Mark the outside of your package:
RIVAL
c/o THE HOLMES GROUP, INC.
13052 JURUPA AVENUE
FONTANA, CA 92337
This Warranty gives you specific legal rights, and you may have other rights which vary from state to state. The provisions of this
Warranty are in addition to, and not a modification of, or subtraction from, the statutory warranties and other rights and remedies contained in any applicable legislation. To the extent that any provision of this Warranty is inconsistent with any applicable law, such provision shall be deemed voided or amended, as necessary, to comply with such law.
Printed in China
1042-WN/9100290000042
1042WN05EM1
1042-WN
Owner’s Guide
READ AND SAVE THESE INSTRUCTIONS
1042-WN05EM1.qxd
5/18/05
1:47 PM
Page 3
IMPORTANT SAFEGUARDS
SAVE THESE INSTRUCTIONS
When using electrical appliances, basic safety precautions should
always be followed, including the following:
1. READ ALL INSTRUCTIONS BEFORE USING.
2. To protect against risk of electrical shock, do not put power unit in
water or other liquid.
3. Close supervision is necessary when any appliance is used by or near
children.
4. Unplug from outlet when not in use, before putting on or taking off
parts, and before cleaning.
5. Avoid contacting moving parts. Never feed food by hand. Always
use completely assembled slicer with food tray and food pusher.
6. Do not operate any appliance with a damaged cord or plug, after
the appliance malfunctions, or is dropped or damaged in any manner.
7. The use of attachments not recommended or sold by Rival may
cause fire, electric shock or injury.
8. Do not use outdoors.
9. Do not let cord hang over edge of table or counter or touch hot surfaces.
10. Do not use appliance for other than intended use.
11. Blade is sharp. Handle carefully when cleaning.
This appliance is for HOUSEHOLD USE ONLY. No serviceable parts inside.
Do not attempt to service this product.
-2-
-3-
POLARIZED PLUG
This appliance has a polarized plug (one blade is wider than
the other). To reduce the risk of electric shock, this plug is
intended to fit into a polarized outlet only one way. If the
plug does not fit fully into the outlet, reverse the plug. If it
still does not fit, contact a qualified electrician.
Do not attempt to modify the plug in any way. If the plug fits loosely into
the AC outlet or if the AC outlet feels warm do not use that outlet.
1042-WN05EM1.qxd
5/18/05
1:47 PM
Page 5
KNOW YOUR SLICER
1.
2.
3.
4.
5.
6.
7.
Adjustment Plate
Thickness Adjustment Knob(on back of unit)
Food Pusher
Feeder
Blade
5
Safety Switch
On/Off Switch
USING YOUR SLICER
1
3
4
HOW TO ASSEMBLE:
1. Position slicer on a clean, dry, smooth surface. Unfold platform.
2. Hold platform parallel with base. Insert right
Fig. 1
tab into base followed by the left tab. Pull
platform down to lock into place (Fig 1).
3. Attach feeder to front edge of platform (Fig
2). Slide tray furthest from blade. Allow tab
(under tray) to lock into slot.
4. Slide food pusher onto the top of feeder.
5. Set thickness control knob for desired thickness. Turn knob clockwise for thicker slices
Fig. 2
and counterclockwise for thinner slices.
7
6. Slip a plate into recessed area to catch food.
TO SLICE:
CAUTION: Always use feeder and food pusher.
Before using for the first time, disassemble and
wash slicer. See Care and Cleaning.
1. Plug into 120 volt AC outlet.
2. Pull food away toward you. Place food on
tray.
3. Press safety button and keep depressed. Then push ON/OFF button.
Motor will only operate when both buttons are pushed.
4. Hold food pusher with left hand, keeping thumb protected behind
thumb guard as shown. Slide food pusher forward toward blade.
Move tray back and forth steadily. Keep food gently pressed against
guide for even slices.
5. When finished slicing, unplug unit. For safety and blade protection
when storing, turn knob to align thickness guide with blade.
-4-
-5-
6
1042-WN05EM1.qxd
5/18/05
1:47 PM
Page 7
USING YOUR SLICER
CARE AND CLEANING
SLICING TIPS
• To slice meats wafer thin, chill thoroughly before slicing.
• Meats should be boneless. Fruits should be free of seeds.
• Foods with an uneven texture – like fish and thin steaks-are often
difficult to slice. Partially freeze before slicing.
Hot Roasts: Beef, Pork, Lamb, Turkey, Ham
When slicing warm boneless roasts, remove from oven and let set 15-20
minutes before slicing. They will retain more natural juices and slice evenly
without crumbling. Cut the roast if necessary, to fit on food tray. If roast
is tied, turn off motor and remove strings one at a time as strings near
blade.
• Never use steel wood or scouring powder on any part of slicer. Do not
wash any part of slicer in the dishwasher.
• Motor is concealed in housing. Never submerge in water. Motor never
needs oiling
1. Unplug slicer from outlet.
2. Remove all slicing parts for thorough cleaning. Wash with a soft cloth
or sponge and a mild soap. Rinse and dry.
Fig. 3
3. For easier cleaning, remove parts in order
shown below. Wash as directed and replace
in reverse order.
4. Slide food pusher off and lift food tray from
platform.
5. Fold up platform. Using one leg as a handle,
swing platform out from slot A and remove
from slot B (Fig 1).
6. Turn blade hatch counterclockwise and lift Fig. 4
out carefully. To replace, align both tabs of
blade latch with slots of motor housing and
turn clockwise to secure. Be sure gears
engage (Fig 3).
NOTE: Always align thickness guide with
blade for safety and blade protection during
storage.
7. With blade removed, turn thickness control knob counterclockwise
until thickness guide disengages. Use your other hand to help ease it
out. To replace, set guide in position with hand in center of guide. Turn
knob to indicated position . Apply light, steady pressure to the
guide while turning knob clockwise to position O .(Fig 4)
TO STORE:
1. Align thickness guide with blade.
2. Fold up platform.
Extra-Thin Sliced Corned Beef or Fresh Beef Brisket
Chill cooked brisket overnight in cooking liquid. Before slicing, drain and
reserve meat drippings from brisket. Pat dry with paper towels. Remove
excess fat. Slice well-chilled brisket to desired thickness. To serve hot,
place slices on heatproof platter and moisten with small amount of
reserved meat drippings. Heat in 150°C (300°F) oven for 30 minutes.
Cheese
Chill thoroughly before slicing. Cover with foil to keep moist. Before serving, allow cheese to reach room temperature-this enhances the natural
flavor.
Cold Cuts
Cold cuts keep longer and retain flavor if sliced as needed. For best
results, chill first. Remove any plastic or hard casings before slicing. Use a
constant, gently pressure for uniform slicing.
Breads, Cakes and Cookies
Freshly baked bread should be cooled before slicing. Use day old or
slightly stale bread for extra thin slices for toasting. Your slicer is ideal for
all types of party breads, pound cake and fruit cake.
-6-
-7-