1
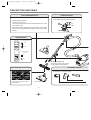
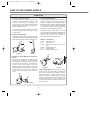
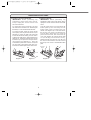
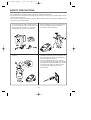
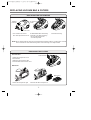
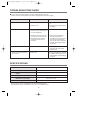
R1500P(EN-TACONY)-9.32004.9.39:55AM
2
R1500P(EN-TACONY)-9.32004.9.39:55AM
3
IMPORTANT SAFETY INSTRUCTIONS
Read All Instructions Carefully Before Using This Appliance
When using an electrical appliance, basic precautions should always be followed, including the
following :
WARNING - To reduce the risk of fire, electric shock, or injury :
11. Do not leave appliance when plugged in. Unplug from outlet when not in use and before
servicing.
12. Do not use outdoors or on wet surfaces.
13. Do not allow to be used as a toy. Close attention is necessary when used near children.
14. Use only as described in this manual. Use only manufacturer's recommended attachments.
15. Do not use with damaged cord or plug. If appliance is not working as it should, has been
dropped, damaged, left outdoors, or dropped into water, return it to a service center.
16. Do not pull or carry by cord, use cord as a handle, close a door on cord, or pull cord around
sharp edges or corners. Do not run appliance over cord.
Keep cord away from heated surfaces.
17. Do not unplug by pulling on cord. To unplug, grasp the plug, not the cord.
18. Do not handle plug or appliance with wet hands.
19. Do not put any object into openings. Do not use with any opening blocked:
keep free of dust, lint, hair, and anything that may reduce air flow.
10. Keep hair, loose clothing, fingers, and all parts of body away from openings and moving parts.
11. Turn off all controls before unplugging.
12. Use extra care when cleaning on stairs.
13. Do not use to pick up flammable or combustible liquids such as gasoline or use in areas where
they may be present.
14. This appliance is intended for household use only and not for commercial or industrial use.
15. Do not operate the vacuum if :
- the power cord is damaged.
- the hose shows visible signs of damage.
16. Do not use without vacuum bag and/or filters in place.
17. Hold plug when rewinding the cord into cord reel. Do not allow plug to whip when rewinding.
18. The hose contains electrical wires. Do not use if damaged, cut or punctured.
Avoid picking up sharp objects.
19. To reduce the risk of electric shock, this appliance has a polarized plug.
20. Do not pick up anything that is burning or smoking, such as cigarettes, matches, or hot ashes.
21. Always turn off this appliance before connecting or disconnecting motorized nozzle.
22. Use only with motorized nozzle model RPB-220.
SAVE THESE INSTRUCTIONS
2
R1500P(EN-TACONY)-9.32004.9.39:55AM
4
CONTENTS
DESCRIPTION AND USING ............................................. 4~5
HOW TO POWER NOZZLE .............................................. 6~9
SAFETY PRECAUTIONS .................................................... 10
REPLACING BAGS & FILTERS .......................................... 11
TROUBLESHOOTING GUIDE ............................................ 12
3
R1500P(EN-TACONY)-9.32004.9.39:55AM
5
DESCRIPTION AND USING
FULL BAG INDICATOR
HOSE ADAPTER
How to check the FULL BAG INDICATOR:
• When separating the hose from the body, pull the
hose adapter while pressing the buttons.
• If the red indicator appears:
- Empty the vacuum bag.
- If the vacuum bag isn’t full and the full bag indicator is red, check
the hose for a clog.
• When cleaning with a tool (dusting brush,upholstery nozzle,crevice
tool,floor tool), the red indicator may appear. In this case, continue
cleaning.
HOSE HANDLE
SUCTION CONTROL
HIGH
LOW
POWER NOZZLE
SWITCH
ON
OFF
• 3n1 multi-purpose tool
Insert end of wand into either end of
tool for multiple cleaning functions.
HARD SURFACE FLOOR TOOL
CLEANING TOOLS
Dusting Brush
• For use on tile, hard wood, and
linoleum floors
Power Nozzle
4
Upholstery Nozzle
R1500P(EN-TACONY)-9.32004.9.39:55AM
ADAPTER
6
CORD REWIND
ON/OFF SWITCH
hose from the body, pull the
essing the buttons.
Adapter button
POWER CONTROL
MAX
Power control is
on the canister body
not the handle
STOP
CLEANING TOOLS
stery Nozzle
Crevice Tool
STORAGE
• Insert the brush holder
on the neck of the wand
into the groove.
5
R1500P(EN-TACONY)-9.32004.9.39:55AM
7
HOW TO USE POWER NOZZLE
OPERATION
1. Turning on the Power Nozzle
The power nozzle can only be turned on if the
canister is also turned on (canister on / off
switch is located on the main body). The
power nozzle on / off switch is located on the
handle. Simply press the switch forward to
engage the power nozzle.
4. Carpet Height Adjustment
Your power nozzle has six different settings to
clean a variety of carpet types and floor
surfaces. To adjust the carpet height setting of
the power nozzle, press the right pedal located
on the back of the power nozzle (see diagram
6). Each press of this pedal will adjust the
height to the next carpet height position.
To achieve best cleaning results, slowly pass
the power nozzle back and forth over the
carpet or floor.
To determine which setting you are currently
on, locate and look through the height indicator
window on the top of the unit (see diagram 7).
You will see one of the six settings as
mentioned earlier and detailed below:
2. Using the Power Nozzle
After turning on the canister and power nozzle,
release the wand by pressing the left pedal on the
back side of the power nozzle (see diagram 3)
Setting: Intended Use:
1. XHI
2. HI
3. Auto
4. MED
5. LO
6. XLO
Diagram 3
Very plush carpet
Plush carpet
General carpet thickness or bare
floors
Medium pile carpet
Low pile carpet
Indoor/Outdoor carpet
Diagram 4
3. Remove / Insert the Wand From The Power
Nozzle
Removing the wand from the power nozzle
allows you, for example, to use cleaning tools
for baseboard or ceiling cleaning. To do this,
first turn the power nozzle and canister off.
Then, press the wand release collar (see
diagram 5) and pull the wand out. To reinsert
the wand into the power nozzle, simply press
the wand back into the neck of the power
nozzle. The wand will then "click" back into
place.
Diagram 6
Diagram 7
Carpet Height Notes: When using the power
nozzle, start on the "auto" setting. If pushing the
power nozzle forward feels sluggish or hard to
push, then adjust to a higher setting (i.e. HI or
XHI). If the power nozzle feels very easy to push,
you may want to lower the power nozzle for more
effective cleaning. The "Auto" setting is the
recommended setting for hard floor surfaces (i.e.
tile, vinyl, wood).
Diagram 5
6
R1500P(EN-TACONY)-9.32004.9.39:55AM
8
OPERATION
5. Warning Light
Your power nozzle comes equipped with a
circuit breaker safety system that protects it
from a jammed power nozzle situation.
Common items that cause jammed brushrolls
include socks, excessive threads, corners of
area rugs, etc. The warning indicator light on
top of the unit (see diagram 8) will change from
green to red should this condition occur.
Warning Light
Diagram 8
If the circuit breaker trips:
a. Turn off the vacuum cleaner and power brush
then unplug the power cord.
b. Remove the object preventing the brushroll
from turning.
c. Locate the circuit breaker switch on the back of
the power nozzle and press it to reset the
breaker (see diagram 9).
d. When the unit is turned back on, the warning
light should be green and ready to go. If the
breaker trips again, repeat steps a-c again to
Circuit Breaker Switch
correct the problem.
If this does not correct the problem, contact
your authorized vacuum cleaner retailer for
further assistance.
Diagram 9
MAINTENANCE AND CARE
1. Removing the Brushroll
IMPORTANT: Before performing any
maintenance work on the power nozzle,
always unplug the vacuum cleaner and
disconnect the wand.
To reinstall the brushroll, reinsert the brushroll
back into the unit (make sure the belt is
attached properly). Next, insert the belt cover
guard. Then, place the metal bottom plate
back onto the unit (insert the front end of the
bottom plate first). Re-insert the two bottom
plate screws and secure.
Your brushroll may need to be removed at
times, for example, to cut threads that have
become tangled around the brushroll or to
replace the belt (see "Replacing the Belt").
Bottom
Plate Screws
To remove the brushroll, turn the unit over and
lift off the metal bottom plate by first
unscrewing the two bottom plate screws
located by the rear wheels (see diagram 10).
Pull out the belt cover guard (see diagram 11)
and pull the brushroll out.
Diagram 10
7
Diagram 11
R1500P(EN-TACONY)-9.32004.9.39:55AM
9
MAINTENANCE AND CARE
2. Replacing the Power Nozzle Belt
IMPORTANT: Before performing any
maintenance work on the power nozzle,
always unplug the vacuum cleaner and
disconnect the wand.
3. Replacing the Bulb
IMPORTANT: Before performing any
maintenance work on the power brush, always
unplug the vacuum cleaner and disconnect the
wand.
To replace the power nozzle belt, you must
first remove the brushroll (see "Removing the
Brushroll"). Locate and discard broken belt.
Turn the power brush over and remove the
bottom plate by first unscrewing the two
bottom plate screws located by the rear
wheels (see diagram 10). Locate and remove
the two top cover screws (see diagram 14).
Turn the power brush back over, push the
power brush neck flat, and remove the top
cover (see diagram 15). Simply pull the bulb
out (no twisting) and reinsert a factoryauthorized bulb. Place the top cover back on
the unit, turn the machine over and re-insert
the two top cover screws. Reinstall the bottom
plate.
To install new belt, locate the power nozzle
motor pulley and loop the belt around it (see
diagram 12). Place the other end of the belt
around the brushroll making sure the belt is
seated in the "belt groove" of the brushroll (see
diagram 13). Insert the brushroll back into the
brushroll tray and place the belt guard back
into position (see diagram 11). Place the
metal bottom plate back onto the unit (insert
the front end of the bottom plate first). Reinsert the two bottom plate screws and secure.
Top Cover
Screw
Belt
Diagram 12
Diagram 13
Diagram 14
8
Diagram 15
R1500P(EN-TACONY)-9.32004.9.39:55AM
10
DIAGRAM 1 REAR VIEW OF POWER WAND AND NOZZLE ASSEMBLY
DIAGRAM 2 FRONT VIEW OF POWER WAND AND NOZZLE ASSEMBLY
9
R1500P(EN-TACONY)-9.32004.9.39:55AM
11
SAFETY PRECAUTIONS
This vacuum cleaner should be used for normal, dry household dust and dirt.
The manufacturer cannot be held responsible for any damage caused by use or operation of the vacuum
contrary to these instructions.
If the vacuum is wrongly operated for a purpose other than that for which it is intended, no liability can be
accepted for any possible damage.
• Do not vacuum areas which contain moisture
or water, flammable matter, needles, pins, razor
blades, matches, cigarettes, etc., since they
may damage the vacuum or vacuum bag.
• When rewinding the power cord, hold the plug
before pressing the cord rewind button to
prevent the cord from whipping.
• Make sure a vacuum bag and filters are always
inserted.
• This product is equipped with a polarized
alternating current line plug (a plug having one
blade wider than the other). This plug fits into
the power outlet only one way.
This is a safety feature. If you are unable to
insert the plug fully into the outlet, try reversing
the plug. If the plug should still fail to fit, contact
an electrician to replace the obsolete outlet.
Do not defeat the safety purpose of the
polarized plug.
10
R1500P(EN-TACONY)-9.32004.9.39:55AM
12
REPLACING VACUUM BAG & FILTERS
REPLACING THE VACUUM BAG
Vacuum bag
Holder
Full Bag
Indicator
Dust Cover
• Turn canister off, remove
• Pull the shutter of the vacuum bag.
hose and open the dust cover. • Hold the cover while removing
the vacuum bag from the
vacuum bag holder.
• Insert the new bag.
NOTE: We recommend the vacuum bag is changed when indicator is RED or suction power is weak.
Dust cover will not close without a bag in the unit or if the bag is not fully inserted.
REPLACING THE FILTERS
Charcoal Filter
Charcoal Filter
• Switch off and open the cover.
• Remove filter.
• Shake the dust out of the filter.
• Insert the filter and close the cover.
HEPA Filter
HEPA Filter
• Switch off and open the grill
• Remove the filter and replace it
11
R1500P(EN-TACONY)-9.32004.9.39:55AM
13
TROUBLESHOOTING GUIDE
■ Please check each item below if you have trouble with your vacuum.
Before checking, ensure that the vacuum is unplugged from the power supply.
Problem
• Suction power is weak.
Check Point
Note
• Vacuum bag
• If vacuum bag is full, replace
it.
• If clogged or blocked, remove
the object.
• Wand or hose
• The vacuum does not work.
• Is the hose adapter inserted
into the suction opening of the
vacuum completely?
• Insert it completely.
• When the vacuum bag is full
or any of the accessories are
blocked, the over-heating
protection for the motor is
activated.
• Switch off and unplug the
vacuum and check the
vacuum bag and accessories
and remove any blockages.
The vacuum can be switched
on again after approximately
20 minutes.
• Power cord does not rewind.
• Power cord
• Pull the power cord out a little
and press the cord rewind
button again.
• Power cord won't pull out of
the vacuum.
• Power cord
• Do not pull it by force. Rewind
it a little by pressing the cord
rewind button and try pulling it
out again.
SPECIFICATIONS
Model
1500P
Rating
120V/60Hz
Amps
9.5A / 12A (with Power Nozzle)
Weight
15.5 Pounds
19" x 12.5" x 9.3"
Dimension (L X W X H)
18 feet
Cord Length
• Specifications can be changed for improvement without notice.
For assistance please visit www.Riccar.com or call 1-888-6-Riccar.
12
R1500P(EN-TACONY)-9.32004.9.39:54AM
1