1
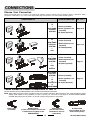
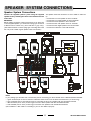
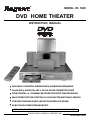
® MODEL HT- 5OO DVD HOME THEATER INSTRUCTION MANUAL INCLUDES 1 POWERFUL SUBWOOFER & 5 SURROUND SPEAKERS PLAYS DVDs, AUDIO CDs, MP-3, CD-R & CD-RW FORMATTED DISCS DOLBY DIGITAL 5.1 CHANNEL DECODER FOR CRISP THEATER SOUND MULTI-SPEED PICTURE CONTROLS, PLUS CHAPTER AND TRACK SEARCH VCR PASS THROUGH AUDIO JACKS FOR SUPER VCR SOUND EASY COLOR-CODED SPEAKER SETUP ® NOTE: YOUR TV SET MUST HAVE A VIDEO INPUT JACK TO USE THIS SYSTEM PLEASE READ CAREFULLY BEFORE USE IB-HT500-WM-E-080202 SAFETY INSTRUCTIONS WARNING FCC NOTE TO PREVENT FIRE OR SHOCK HAZARD, DO NOT USE THE PLUG WITH AN EXTENSION CORD, RECEPTACLE OR OTHER OUTLET UNLESS THE BLADES CAN BE FULLY INSERTED TO PREVENT BLADE EXPOSURE. TO PREVENT FIRE OR SHOCK HAZARD, DO NOT EXPOSE THIS APPLIANCE TO RAIN OR MOISTURE. WARNING RISK OF ELECTRIC SHOCK DO NOT OPEN The lightning flash with arrowhead symbol, within an equilateral triangle, is intended to alert the user to the presence of uninsulated dangerous voltage within the products enclosure that may be of sufficient magnitude to constitute a risk of electric shock to persons. WARNING: TO REDUCE THE RISK OF ELECTRIC SHOCK, DO NOT REMOVE COVER (OR BACK). NO USER SERVICEABLE PARTS INSIDE. REFER SERVICING TO QUALIFIED SERVICE PERSONNEL. The exclamation point within an equilateral triangle is intended to alert the user to the presence of important operating and maintenance (servicing) instructions in the literature accompanying the appliance. IMPORTANT SAFETY INSTRUCTIONS 1. Read these instructions. 2. Keep these instructions. 3. Heed all warnings. 4. Follow all instructions. 5. Do not use this apparatus near water. 6. Clean only with dry cloth. 7. Do not block any ventilation openings, install in accordance with the manufacturers instructions. 8. Do not install near any heat sources such as radiators, heat registers, stoves, or other apparatus (including amplifiers) that produce heat. 9. Do not defeat the safety purpose of the polarized or grounding-type plug. A polarized plug has two blades with one wider than the other. A grounding type plug has two blades and a third grounding prong. The wide blade or the third prong are provided for your safety. If the provided plug does not fit into your outlet, consult an electrician for replacement of the obsolete outlet. 10.Protect the power cord from being walked on or pinched particularly at plugs, convenience receptacles, and the point where they exit from the apparatus. 11.Only use attachments/accessories specified by the manufacturer. 12.Unplug this apparatus during lightning storms or when unused for long periods of time. 13.Refer all servicing to qualified service personnel. Servicing is required when the apparatus has been damaged in any way, such as power-supply cord or plug is damaged, liquid has been spilled or objects have fallen into the apparatus, the apparatus has been exposed to rain or moisture, does not operate normally or has been dropped. 14.This appliance shall not be exposed to dripping or splashing water and that no object filled with liquid such as vases shall be placed on the apparatus. Do not apply oil or petroleum products or solvents to any part of this set. 1 This equipment has been tested and found to comply with the limits for a Class B digital device, pursuant to Part 15 of the FCC rules. These limits are designed to provide reasonable protection against harmful interference in a residential installation. This equipment generates, uses and can radiate radio frequency energy and, if not installed and used in accordance with the instructions, may cause harmful interference to radio communications. However, there is no guarantee that interference will not occur in a particular installation. If this equipment does cause harmful interference to radio or television reception, which can be determined by turning the equipment off and on, the user is encouraged to try to correct the interference by one or more of the following measures. - Reorient or relocate the receiving antenna. - Increase the separation between the equipment and receiver. - Connect this equipment into an outlet on a circuit different from that to which the receiver is connected. - consult the dealer or an experienced radio/ TV technician for help. CAUTION FCC Regulations state that unauthorized changes or modifications to this equipment may avoid the users authority to operate it. NOTE This product incorporates copyright protection technology that is protected by method claims of U.S. patent numbers 4,631,603; 4,577,216; 4,819,098 and 4,907,093, and other intellectual property rights owned by Macrovision Corporation and other rights owners. Use of this copyright protection technology must be authorized by Macrovision Corporation, and is intended for home and other limited viewing uses only, unless otherwise authorized by Macrovision Corporation. Reverse engineering or disassembly is prohibited. CAUTION Use of controls or adjustments or performance of procedures other than those specified herein may result in hazardous radiation exposure. Do not open covers and do not repair yourself. Refer servicing to qualified personnel. This DVD VIDEO player is classified as a CLASS 1 LASER PRODUCT as stated on the back of the set. IB-HT500-WM-E-080202 INTRODUCTION Thank you for purchasing this DVD Home Theater System. This deluxe theater system includes everything you need to experience movie theater quality digital video and audio in the comfort of your own home. The only thing you need to add is your own TV. We have designed this system to be easy to set up, but please, review this manual before you operate your system. Please have it handy while you are setting the system up; and keep it available for future reference, or in the unlikely event that you encounter any unexpected questions or problems. We have tried to keep this manual as simple as possible. It begins with how to connect the speakers, your TV, and other optional devices. It also includes instructions on how to position the speakers for the most natural surround sound, and finally how to operate the DVD/CD player. If you follow the instructions carefully you can have the system set up and start playing in less than an hour. DVD players (and discs) have many features which are not available on any other movie playback medium (such as VHS or even original films themselves). In addition to the software on a disc being physically much smaller and easier to store than the older VHS format, the life span of a DVD disc is much longer than a VHS tape and able to retain the movie for many more years. Additionally, the main point of DVDs is to allow you to view the movies in your own customized way. The options are almost limitless for customized viewing from languages to angles to scenes to speeds to sounds and playing orders, etc. This system was designed to provide you with many years of reliable operation with a minimum of care and maintenance. Every component in your system was perfect when it left our factory. If you experience any problem with the set up or operation of this system, please review the Trouble Shooting Guide at the end of this manual before you contact the Customer Service Department at 1-800-315-5885. All of the optional adjustable system settings have been preset at our factory for correct operation of the system in North America and Canada. All you have to do is to insert a disc, sit back, and enjoy a great home theater experience. Eventually you may want to change some of the optional settings like speaker balance or equalizer settings. A description of all the optional settings, and instructions for changing them, are found later in this manual. Features & Benefits of DVD movies and players: 1. Sharper, clearer pictures with greatly enhanced digital sound. You will immediately notice the improvement over the older VHS movie format. 9. Scene Repeat You can easily program your player to see a scene over and over again without damaging the movie media. 2. Dolby Digital This DVD player (and most discs) is Dolby Digital compatible, which allows very sharp and crisp sound reproduction in your home, especially useful, is the surround sound feature. 10. Fast Play This DVD Player can play at very high speeds (backwards or forwards). This is very useful for quickly locating your favorite scenes. 3. Multi-language compatible Setup and subtitles can be displayed in many different languages. 11. MP-3 compatibility This DVD Player can also play MP-3 encoded discs (most formats are supported). 4. Parental Controls Parents can lock out movies (by ratings) from being viewed by children even if the parents are not at home. 12. Audio CD compatibility This DVD Player can also play audio (music) CDs thereby saving the expense of buying a separate CD player. 5. Freeze Frame and frame by frame play This is very useful for sporting events. Also slow motion play is possible with this set. 13. VCD format Some small local stores may carry a VCD format of foreign produced videos (this VCD format is not as sharp or versatile as DVD disc movies). Our set can play many of these foreign VCD disc movies. 6. Zoom feature allows you to zoom into a scene and still maintain reasonable picture clarity (depending on the disc). 7. Time Search This DVD player can locate an exact scene with a time search, for example, you can go to a scene which is 15 minutes and 12 seconds into the movie directly. 14. Regional Codes This prevents discs designed for use only in some countries from being played in other countries. The DVD Forum assigned region numbers for different countries. USA and Canada are Region 1 (this set can only play Region 1 DVD movies). 8. Directors Cuts View special directors cuts and comments on some discs. Many of these discs give a narration of what the director was thinking about when he was filming a scene, as well as the scene itself. 15. JPEG Compatibility This DVD HOME THEATER system also allows you to view JPEG files or picture CDs. 2 IB-HT500-WM-E-080202 TABLE OF CONTENTS Getting Started: • Settings & Adjustments: Setting the TV Display -------------------------------------------------27 Setting OSD Language -------------------------------------------------- 28 Speaker Setup -------------------------------------------------------------- 29 Audio Setup ----------------------------------------------------------------30 Preference Setup: Getting Your System into the Stop Mode------------ 31 Setting AUDIO Language -----------------------------------31 Setting SUBTITLE language ------------------------------32 Setting DISC MENU language ----------------------------32 Setting PARENTAL ratings ----------------------------------33 Setting PASSWORD ------------------------------------------34 Returning to the Original Factory Default Settings--34 Safety Instructions--------------------------------------------------------1 Introduction-------------------------------------------------------------------2 Connections: Choose Your Connection---------------------------------------4 Cables Needed to Connect Components to Your TV ----------------------------------------------------------4 Speaker system connections: Speaker system connections--------------------------------5,6 Speaker Positioning Information----------------------------7,8 TV Connection - Normal ---------------------------------------9 TV Connection - S-Video ------------------------------------10 TV + VCR Connections --------------------------------------11 TV / VCR Combination Connections---------------------12 TV + VCR + Satellite Receiver Connections----------13 AUX IN Connections -------------------------------------------14 Location of Controls-------------------------------------------------15,16 Remote Control Operation -------------------------------------------17 Notes on Discs -----------------------------------------------------------18 Precautions-----------------------------------------------------------------19 • Special Functions: Zoom Play-------------------------------------------------------------------35 Slow-Motion Play---------------------------------------------------------35 Viewing from a Desired Angle----------------------------------------36 Audio Language Selection (Directors cuts or Narration)---36 Subtitle (Caption) Language Selection ------------------------------37 Selecting the Sound Equalizer Effect -------------------------------37 Adjusting Audio Mode -----------------------------------------------------38 Using the Sleep Timer -----------------------------------------------------38 • Basic System Setup How to Find Your TVs Video Input Channel--------------------20 General Setup-------------------------------------------------------------20 Adjusting the Volume of Each Speaker---------------------------- 21 Adjusting Surround Sound ------------------------------------------------21 • Other Functions: Playing Video CDs with PBC -------------------------------------------39 Displaying DISC Information ---------------------------------------------40 Viewing JPEG Files / Picture CDs ------------------------------------41 MP3 CD Operation ---------------------------------------------------------42 Playing Discs: Basic Playback 1---------------------------------------------------------22 Trouble Shooting -----------------------------------43,44,45 Basic Playback 2---------------------------------------------------------23 Search & Skip Functions----------------------------------------------24 Pause Function and Step Play--------------------------------------24 Repeat Play------------------------------------------------------------------25 Programmed Play----------------------------------------------------------26 Playing a Specific Track or Chapter-------------------------------26 Glossary ------------------------------------------------------------46 Specifications --------------------------------------------------47 Manufactured under license from Dolby Laboratories. Dolby and the double-D symbol are trademarks of Dolby Laboratories. Confidential Unpublished works. ©1992-1997 Dolby Laboratories, Inc. All rights reserved. 3 IB-HT500-WM-E-080202 CONNECTIONS Choose Your Connection There are several ways to connect your DVD Home Theater System. Please use the following chart to determine which connection is the best for you. Turn to the appropriate page and connect your DVD Home Theater System. COMPONENTS CABLES NEEDED TV + DVD HOME THEATER SYSTEM TV + DVD HOME THEATER SYSTEM + VCR TV + DVD HOME THEATER SYSTEM + VCR + Satellite DVD HOME THEATER SYSTEM + TV or S-VHS VCR or AM/FM TUNER Video (included) Audio (optional, not GO TO ... Page 9,10 included) S-Video (optional) Video (included) Audio (optional, not included) Page 11,12 S-Video(optional) Video (included) Audio (optional, not included) Page 13 S-Video (optional) Video (included) Audio (optional, not included) Page 14 S-Video (optional) Cables Needed to Connect Components to Your TV The pictures below show the cables needed for the connections represented in this booklet. NOTE: Audio cables are usually sold as a bundled set, but the connection sketches in this booklet show each cable separately for better visibility. Audio cables are only needed if you want to connect your VCR audio or tape player to the DVD HOME THEATER SYSTEM. Most people will only need a TV set with a video input jack and no extra cables. Video cable (included) Speaker Wires (6 sets are included, and one set is attached on the back of the SUBWOOFER) 4 Audio cables (not included, most installations will not need these) S-Video cable (not included, for TVs with S-Video jacks) IB-HT500-WM-E-080202 SPEAKER SYSTEM CONNECTIONS Speaker System Connections The speaker wires and connectors are color coded for easier set up. Connect the Front Left speaker to the FL terminals. Connect the Front Right speaker to the FR terminals. Connect the Center speaker to the C terminals. Connect the Rear Left speaker to the RL terminals. Connect the Rear Right speaker to the RR terminals. Connect the Subwoofer to the SUB terminals. Connect the supplied speaker system using the supplied speaker cords by matching the colors of the terminals to those of the cords. IMPORTANT: Before making connections, make sure the power is off. At the rear of each supplied speaker you will find two spring type connectors in different colors: a black one (-) and a red, blue or gray one(+). (The Subwoofer does not have spring type connecting tabs at the rear, only a set of black & green speaker wires from its back.) NOTE In your package you will find 6 sets of colored wire pairs for connecting your Home Theater to the 6 different speakers included: 1 green and black pair of wires for the SP-6 subwoofer which comes out of the back of the subwoofer (12 1/2 feet long). 2 gray and black pairs of wires (26 feet long) for connecting the SP-5 rear speakers with gray and black terminals. 1 blue and black pair of wires (13 feet long) for the SP-5 center speaker with blue and black terminals. 2 red and black pairs of wires (13 feet long) for the SP-5 front speakers with red and black terminals. (also included is 1 video cable for connecting to your TV sets Video Input jack) 5 IB-HT500-WM-E-080202 SPEAKER SYSTEM CONNECTIONS Tips for connecting the speaker wires To avoid short-circuiting the speakers Make sure the stripped end of each speaker wire does not Push and hold the Speaker terminal tab down to insert each wire. Release the tab to lock the wire into the terminal. Make sure the wire is fully inserted, but the insulation is not covering the inserted part of the speaker wires. touch another speaker terminal or the stripped end of another speaker wire. Examples of poor connection of the speaker wires Stripped speaker wire is touching another speaker terminal. Make sure not even 1 strand of wire touches the other wire! • Stripped wires are touching each other due to excessive removal of insulation. Do not allow the above to happen on your set or speakers. NOTE: Be sure to match the speaker wire to the appropriate terminal on the components: (+) to (+) (color), and (-) to (-) (black). If the wires are reversed, the sound will be distorted and will lack some tones. Follow the color codes of each speaker. 6 IB-HT500-WM-E-080202 SPEAKER POSITIONING INFORMATION Your system is supplied with 5 compact sized satellite speakers and one large subwoofer. The satellite speakers reproduce only the mid range and higher frequencies. All of the low frequency (bass) sounds are produced by the subwoofer. Proper positioning and placement of the speakers is important in order to provide the best surround sound experience. We understand that due to the size and shape of your listening room, and the location of your furniture, you may not be able to set up the speakers exactly as per the diagrams that follow. However these simple guidelines will help you maximize your home theater experience. Your Usual Seat Note the speaker levels are preset at the factory and most people will not need to fine tune the sound of each speaker. We suggest you skip this part at first and go to Page 22. Later on you can fine tune the sound level of each speaker. See Page 21. Although all 5 satellites are the same size, the speakers inside the POSITION ALL 5 SPEAKERS APPROXIMATELY AT THE SAME DISTANCE FROM YOUR LISTENING POSITION. cabinets are different. The speaker terminals on the back of the cabinets are color coded, as are the speaker wires and the speaker terminals on the back of the main unit. Refer to the connection diagram on page 5. Be sure you are using the correct satellite speaker in each location, front, rear and center. Please follow the colors for best results. This is especially important for the center speaker. For best surround sound effects, all 5 of the satellite speakers TYPICAL SPEAKER SETUP should be roughly at the same distance from your usual listening position. All 5 satellite speakers should be placed approximately the same distance from your listening position. The center speaker should be placed directly above (or below) TV set. Left and right front speakers should be approximately at the same height as the center speaker. The rear speakers should be either in line with, or behind listening position, approximately at ear level, or slightly above. The subwoofer should be on the floor near the TV, or in any corner, facing your listening position. All speakers must be visible. Do not hide them behind curtains, furniture, etc, as this will affect the sound. 7 IB-HT500-WM-E-080202 SPEAKER POSITIONING INFORMATION SATELLITE SPEAKERS • The center speaker, as well as the other 4 satellites, can be positioned either vertically or horizontally. • The left front, right front, and center speakers should be placed at roughly the same height. The center speaker reproduces most of the dialog spoken by the actors on the TV screen, therefore it should be placed either directly above or below the center of the TV set. Once you position the center speaker, try to position the left front and right front speakers at the same height. It is not recommended to place any of the satellite speakers on the floor. Many people prefer to place the center speaker horizontally above the TV set. • The left rear and right rear speakers can be placed in line with your listening position or behind your listening position. Ideally they should be placed slightly above your ear level when you are seated in your normal listening position. • We have provided 2-way keyhole openings on the backs of all the satellite speakers that allow the satellite speakers to be wall mounted in either a vertical or horizontal position. • The subwoofer will provide the most dramatic bass effects (low frequency sounds) when it is placed on the floor. Do not place the subwoofer on a stand or table. The subwoofer should be placed in the front of the room so that it is facing toward your listening position. It can be placed on either side of the TV or even in the corner of the room, as far away as the cable will allow. The bass sounds from the subwoofer are non-directional. You will not really be able to tell where the bass is coming from. SUBWOOFER • LONG ROOMS - In case your room is unusually long, you may buy speaker wires from your dealer for adding wire length to your speakers. Be careful not to allow the plus + minus - wires to touch each other. Use electrical tape or plastic connectors to insulate the wires. 8 IB-HT500-WM-E-080202 TV CONNECTION - Normal DVD Home Theater System + TV with a Video Input Jack NOTE: Your TV set must have a VIDEO INPUT jack for you to be able to connect and enjoy this DVD HOME THEATER SYSTEM. CONNECT ALL SPEAKERS AS SHOWN ON PAGE 5 (OR THE QUICK SETUP DIAGRAM). YELLOW VIDEO CABLE (INCLUDED) NOTE: On some TVs, this jack is in the front. IF YOUR TV HAS AN S-VIDEO JACK, SEE PAGE 10 FOR INSTRUCTIONS ON CONNECTING THIS 1. Connect the 5 satellite speakers and subwoofer as shown on Page 5 (or the QUICK SETUP DIAGRAM packed with the set). 2. Insert the video cable (yellow) into the VIDEO OUT jack on the back of your DVD HOME THEATER SYSTEM, and into the VIDEO IN jack on your TV. This connection will allow you to enjoy video images of normal quality. 3. Insert the AC power cord into an AC outlet. 4. Press the POWER button on the main unit (not the REMOTE) to turn on the main power of the set. Later you should press the POWER button on the REMOTE to turn the set on (or off). 5. Go to Page 22 for playing DVDs (discs). NOTE: Your cable or antenna connection to the television will not be affected by this connection. Connect your antenna cable to your television as you normally would. You may need to consult your television manual for details, but no changes will be made to your current antenna connections. 9 IB-HT500-WM-E-080202 TV CONNECTION - S-Video DVD Home Theater System + TV with Audio/Video Input Jacks and S-Video Jack NOT USED AUDIO CABLES (not included) R L YOUR TV SET 1. NOTE: Yellow plug and wire are not used when using S-Video. If your TV has no S-Video jack, use the VIDEO IN jack and cable as shown on Page 9. Insert the audio cables into the AUDIO OUT L (left=white) and R (right=red) jacks on the back of your TV set, and into the corresponding AUX IN jacks on your DVD HOME THEATER. This will enable you to hear your regular TV shows through your DVD HOME THEATER SYSTEM when not playing DVDs. (This is optional, you do not need to do this step if your TV set has good sound.) NOTE: On some TVs, the AUDIO OUTPUT jacks may have no signal. On those TVs, you may activate these jacks by using your TVs REMOTE (not the CABLE or SATELLITE remote) and selecting the correct AUDIO OUT (on some TVs, select AUDIO OUT to fixed). Please see your TVs manual for details. NOTE: The TV sound will come out of 5 speakers plus subwoofer since the factorys default setting for the sound output is PRO LOGIC. Press the SURROUND button if you want to return back to STEREO sound output, and the sound will only come out of 2 speakers plus subwoofer. 2. Insert the S-Video cable into the S-VIDEO OUT jack on the back of your DVD HOME THEATER SYSTEM and to the S-VIDEO jack on your TV. This connection will allow you to enjoy higher quality images. If your TV doesnt have S-VIDEO, use the basic video connection listed on Page 9 (yellow plugs: VIDEO IN or OUT, are not needed for S-Video, but needed only if your TV set does not have an S-Video jack). 3. Insert the AC power cord into an AC outlet. 4. Press the POWER button on the main unit. 5. Go to Page 22 for playing DVDs (discs). NOTE: Your cable or antenna connection to the television will not be affected by this connection. Connect your antenna cable to your television as you normally would. You may need to consult your television manual for details, but no changes will be made to your current antenna connections. 10 IB-HT500-WM-E-080202 TV + VCR CONNECTIONS (unchanged, same as before) AUDIO CABLES (not included) ANT IN NOTE: If your TV set has an S-Video jack, you may connect it as shown on Page 10. 1. Insert a set of stereo audio cables (optional, not included) into the VCR AUDIO INPUT L (left=white) and R (right=red) jacks on the back of your DVD HOME THEATER SYSTEM, and into the corresponding AUDIO OUT jacks on your VCR, this will allow your VCRs sound to play through your HOME THEATER SYSTEM. NOTE: Your VCR stereo sound will come out of 5 speakers plus subwoofer since the factorys default setting for the sound output is PRO LOGIC. Press the SURROUND button if you want to return back to STEREO sound output, and the sound will only come out of 2 speakers plus subwoofer. 2. Insert the video cable (yellow) into the VIDEO OUT jack on the back of your VCR player, and into the VIDEO IN jack on your TV. This connection will allow you to enjoy standard quality video images. 3. OR connect your VCR with your TV using a coaxial antenna cable. 4. Connections of your other antenna cables are not changed when you add your DVD HOME THEATER SYSTEM. 5. Insert the AC power cord into an AC outlet. 6. Press the POWER button on the main unit. 7. Go to Page 22 for playing DVDs (discs). 11 IB-HT500-WM-E-080202