1
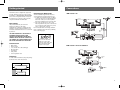
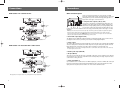
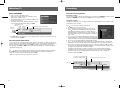
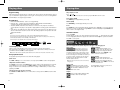
DRC8030_EN
8/15/06
10:30 AM
Page 2
u s e r
m a n u a l
guide de l’utilisateur
manual de usuario
IMPORTADOR
Comercializadora Thomson de México, S.A. de C.V.
Álvaro Obregón No. 151. Piso 13.
Col. Roma. Delegación Cuauhtémoc
C.P. 06700. México, D.F.
Telefono: 52-55-11-020360
RFC: CTM-980723-KS5
EXPORTER
Thomson Inc.
P.O. Box 1976
Indianapolis, IN 46206-1976
© 2006 Thomson Inc.
Trademark(s) ® Registered
Marca(s) ® Registrada(s)
DRC8030N
Marque(s) ® Deposée(s)
5636 0230 (EN/F/E)
www.rca.com
Printed In China / Impreso en China
It is important to read this instruction book prior to using your new product for the first time.
Nous vous recommandons de lire ce manuel d’instructions avant d’utiliser votre nouveau produit pour la première fois.
Es importante leer este manual antes de usar por vez primera su euipo.
DRC8030_EN
8/15/06
10:30 AM
Page 4
Safety information
EN
Safety information
FCC information
For your safety
Technical specification
For your records
This device complies with Part 15 of the FCC Rules.
Operation is subject to the following two
conditions: (1) This device may not cause harmful
interference, and (2) this device must accept any
interference received, including interference that
may cause undesired operation.
In accordance with FCC requirements, changes or
modifications not expressly approved by Thomson
Inc. could void the user’s authority to operate this
product.
This device generates and uses radio frequency
(RF) energy, and if not installed and used
properly, this equipment may cause interference
to radio and television reception.
If this equipment does cause interference to radio
or television reception (which you can determine
by unplugging the unit), try to correct the
interference by one or more of the following
measures:
• Re-orient the receiving antenna (that is, the
antenna for the radio or television that is
“receiving” the interference).
• Move the unit away from the equipment that
is receiving interference.
• Plug the unit into a different wall outlet so
that the unit and the equipment receiving
interference are on different branch circuits.
If these measures do not eliminate the
interference, please consult your dealer or an
experienced radio/television technician for
additional suggestions. Also, the Federal
Communications Commission has prepared a
helpful booklet, "How To Identify and Resolve
Radio TV Interference Problems." This booklet is
available from the U.S. Government Printing
Office, Washington, DC 20402. Please specify stock
number 004-000-00345-4 when ordering copies.
This product complies with DHHS Rules 21 CFR
Subchapter J. Applicable at the date of
manufacture.
The AC power plug is
polarized (one blade is wider
than the other) and only fits
into AC power outlets one
way. If the plug won’t go into
the outlet completely, turn the
plug over and try to insert it the other way. If it
still won’t fit, contact a qualified electrician to
change the outlet, or use a different one. Do not
attempt to bypass this safety feature.
Product: DVD Player and Recorder
Brand: RCA
Model: DRC8030N
In the event that service should be required, you
may need both the model number and the serial
number. In the space below, record the date and
place of purchase, and the serial number:
Model No.
Remote Control No.
Date of Purchase
Place of Purchase
Serial No.
This Class B digital apparatus complies with
Canadian ICES-003.
Cet appareil numérique de la class B est
conforme à la norme du NMB-003 du Canada
Main plug is used as the disconnect device, it shall
remain operable and should not be obstructed
during intended used.To be completely
disconnected the apparatus from supply mains,
the main plug of the apparatus shall be
disconnected from the mains socket outlet
completely.
Electrical consumption:
Power Supply: 120V~60Hz
Power consumption: 30 Watts
IMPORTER
Comercializadora Thomson de México, S.A. de C.V.
Álvaro Obregón No. 151. Piso 13.
Col. Roma. Delegación Cuauhtémoc
C.P. 06700. México, D.F.
Telefono: 52-55-11-020360
RFC: CTM-980723-KS5
Service information
This product should be serviced only by those
specially trained in appropriate servicing
techniques. For instructions on how to obtain
service, refer to the warranty included in this
Guide.
CAUTION: TO PREVENT ELECTRIC SHOCK,
MATCH WIDE BLADE OF PLUG TO WIDE SLOT,
FULLY INSERT.
CAUTION
RISK OF ELECTRIC SHOCK
DO NOT OPEN
THE LIGHTNING
FLASH AND ARROWHEAD WITHIN THE
TRIANGLE IS A
WA R N I N G S I G N
ALERTING YOU OF
"DANGEROUS
VOLTAGE" INSIDE
THE PRODUCT.
CAUTION: TO REDUCE THE
RISK OF ELECTRIC SHOCK,
DO NOT REMOVE COVER
(OR BACK). NO USERS E RV I C E A B L E PA R T S I N S I D E . R E F E R S E RV I C I N G
TO QUALIFIED SERVICE
PERSONNEL.
THE EXCLAMATION
POINT WITHIN THE
TRIANGLE IS A
WARNING
SIGN
ALERTING YOU OF
I M P O R TA N T
INSTRUCTIONS
A C C O M PA N Y I N G
T H E P R O D U C T.
SEE MARKING ON BOTTOM / BACK OF PRODUCT
WARNING: TO PREVENT FIRE OR ELECTRICAL
SHOCK HAZARD, DO NOT EXPOSE THIS PRODUCT
TO RAIN OR MOISTURE.
The descriptions and characteristics given in this document are given as a general indication and not as a guarantee.
In order to provide the highest quality product possible, we reserve the right to make any improvement or
modification without prior notice. The English version serves as the final reference on all products and operational
details should any discrepancies arise in other languages.
EN
DRC8030_EN
8/15/06
10:30 AM
Page 6
Safety information
EN
Contents
Safety precautions
Important battery information
• Never open the cabinet under any
circumstances. Any repairs or internal
adjustments should be made only by a trained
technician.
• Never operate this product with the cabinet
removed.
• Do not use your System immediately after
transporting it from a cold place to a warm
place, as condensation may cause the system
to malfunction.
• Keep your unit away from humid areas and
abnormally hot places.
• Do not touch the player with wet hands. If
any liquid enters the player cabinet, take the
player to a trained technician for inspection.
• This compact disc player uses a laser to read
the music on the disc. The laser mechanism
corresponds to the cartridge and stylus of a
record player. Although this product
incorporates a laser pick-up lens, it is
completely safe when operated according to
directions.
• Discs rotate at high speed inside the player.
Do not use damaged, warped, or cracked
discs.
• Do not touch the pick-up lens which is located
inside the disc compartment. To keep dust
from collecting on the pick-up lens, do not
leave the compartment door open for an
extended period of time. If the lens becomes
dirty, clean it with a soft brush, or use an air
blower brush designed for camera lenses.
• The apparatus shall not be exposed to
dripping or splashing and that no objects
filled with liquids, such as vases, shall be
placed on the apparatus.
• Minimum distances around the apparatus for
sufficient ventilation .
• The ventilation should not be impeded by
covering the ventilation opening with items,
such as newspaper,table-cloths,curtains,etc.
• No naked flame sources,such as lighted
candles,should be placed on the apparatus.
• Attention should be drawn to the
environmental aspects of battery disposal .
• Remove the batteries to avoid leakage if you
do not use your remote control for more than
one month.
• Discard leaky batteries immediately as leaking
batteries may cause skin burns or other
personal injuries. Dispose of batteries in the
proper manner, according to provincial and
local regulations.
• Any battery may leak electrolyte under the
following circumstances:
- if mixed with a different battery type,
- if inserted incorrectly,
- if all batteries are not replaced at the same
time,
- if disposed of in fire, or
- if an attempt is made to charge a battery
not intended to be recharged.
Safety information
Contents
Getting started . . . . . . . . . . . . . . . 1
Content of box
Installation
Connecting your DVD recorder
Before throwing any batteries away, consult your
distributor who may be able to take them back
for specific recycling.
Basic playback features
Information banner . . . . . . . . . . . . . . . . . . . . .18
Disc menu . . . . . . . . . . . . . . . . . . . . . . . . . . . . .21
Playing image and audio . . . . . . . . . . . . . . . . .22
Setup . . . . . . . . . . . . . . . . . . . . . . .23
General controls . . . . . . . . . . . . . . . 5
Disc options
Recording options
Languages
Parental control . . . . . . . . . . . . . . . . . . . . . . . .24
Installation . . . . . . . . . . . . . . . . . . . . . . . . . . . . .25
Initial setup . . . . . . . . . . . . . . . . . . .7
More information . . . . . . . . . . . . .26
Connections . . . . . . . . . . . . . . . . . . .2
Display . . . . . . . . . . . . . . . . . . . . . .10
Watching TV . . . . . . . . . . . . . . . . . 11
Recording . . . . . . . . . . . . . . . . . . . .12
Please respect the environment!
Playing discs . . . . . . . . . . . . . . . . . 17
Recording current program
Stop recording . . . . . . . . . . . . . . . . . . . . . . . . .13
Timer recording
Recordable discs . . . . . . . . . . . . . . . . . . . . . . . .14
Library . . . . . . . . . . . . . . . . . . . . . .15
Picture in picture . . . . . . . . . . . . . . . . . . . . . . .16
Recommendations and information
concerning discs (12cm)
Troubleshooting
DVD copy protections . . . . . . . . . . . . . . . . . . .29
Technical data
Limited warranty . . . . . . . . . . . . .30
EN
DRC8030_EN
8/15/06
10:30 AM
Page 8
Getting started
Connections
Your DVD recorder is a digital video player and
recorder. Thanks to its tuner you can record TV
programmes on DVD R/RW (DVD +R/-R/+RW/-RW)
discs or on the integrated hard disc. It can play
the majority of 8 cm and 12 cm discs, with the
exception of DVD Ram and DVD audio.
EN
Don’t infringe
This product should only be used for the
purposes for which it is sold, that is,
entertainment, violating no copyright law. Any
attempts to use this product for which it is not
intended is unlawful and therefore not condoned
by Thomson.
THIS DVD RECORDER LETS YOU RECORD TV
PROGRAMS IN DIGITAL QUALITY AND
ARCHIVE YOUR OWN VIDEOS FROM VIDEO
CAMERAS OR VHS CASSETTES TO DVD DISCS.
YOU CANNOT COPY PRE-RECORDED FILMS TO
DVD IF THEY HAVE BEEN COPY PROTECTED.
Contents of box
•
•
•
•
•
•
•
DVD recorder
Remote control
1 set of audio video cables (RCA-type)
RF Coaxial cable
User manual
Safety leaflet
owner registration card
Installation
Connecting your DVD recorder
The RF coaxial cable supplied with this unit is
only for passing the antenna signal to the TV.
1. To watch your new DVD recorder, you MUST
connect the unit to the TV with the supplied
audio video cables (color-coded red, white
and yellow) in addition to the antenna cable.
2. Turn on the TV and tune it to the correct
Video Input Channel (if you do not know how
to access the video input channel on your TV,
refer to “Initial Setup” for help).
For more details about connecting to different
types of equipment and connection possibilities,
refer to following pages.
These are the audio/video
cables. The yellow cable
carries the video signal, and
the red and white cables
carry the audio signal.
DVD recorder + TV
EN
AV cables
Antenna
cable
DVD recorder
DVD recorder + TV + basic cable box
Antenna
cable
AV cables
To ensure sufficient ventilation, keep the spacings
shown below free from other surfaces:
4”
4”
front view
DVD recorder
4”
Cable box
2“
Antenna
cable
4“
side view
1
2
DRC8030_EN
1/3/07
9:58 AM
Page 10
Connections
Connections
DVD recorder + TV + satellite receiver
Other connection options
There are several ways in which you can incorporate your DVD
player into an Audio-Video system. This depends on the sockets and
other appliances you have. Sound and image quality depend to a
large extent on the types of connections used.
EN
AV cables
Antenna
cable
1. Component video outputs (Y, Pb, Pr) (YUV)
The Y, Pb, Pr sockets deliver an optimum image quality due to the
separation of the video signal into three separate components. To
obtain the best image quality possible, use very high quality cables
for connections. Your dealer can provide YUV cables that are sold
together and come in the standard colour codes (red, green and blue) used for these types of sockets
and cables.
Note: if you use the Component sockets Y, Pb, Pr (also called YUV), you must configure the output video signal so
that these sockets deliver either an interlaced YUV signal (component interlaced) or a progressive PS signal
(component progressive) by pressing VIDEO OUT on the remote control. Do not forget to also connect the audio
cables, because Component cables only transmit images, and not sound.
DVD recorder
AV cables
EN
Antenna
cable
Satellite receiver
2. Coaxial audio output (digital sound)
The digital sound of a DVD Video disk when played is permanently available on the coaxial socket of
your player. Use this socket by connecting it to a decoder or Dolby Digital amplifier.
3. S-Video output
The S-Video jack provides better picture quality than a composite video jack (sometimes labeled VIDEO
and color-coded yellow on TVs) because S-Video keeps the color part of the picture separate from the
black and white part of the picture. An S-Video cable is required for connection with a TV.
DVD recorder + TV + basic cable box + audio receiver
Note: remember to connect the left and right audio cables or coaxial audio cable because S-Video cable carries only
the picture signal, not the sound.
4. Auxiliary audio input (AUDIO IN)
Antenna
cable
Video cable
DVD recorder
Audio cables
Audio receiver
5. AV input (INPUT 1)
These jacks receive audio and video from a compatible component, such as a satellite receiver. Another
set of input jacks are on the front of the DVD recorder for temporarily connecting components such as
a camcorder or a video game unit.
6. S-Video input (INPUT 1)
If your satellite receiver or cable box has an S-VIDEO output jack, connect the S-VIDEO cable to this jack
because it provides better picture quality than standard video (the yellow jack). Besides the S-Video
input jack at the rear panel, there is another one on the front of the DVD recorder.
Antenna
cable
Cable box
Note: graphics are for representation only and may differ from your actual units.
3
4
DRC8030_EN
8/15/06
10:30 AM
Page 12
General controls
General controls
Remote control
Main unit
EN
EN
On / Off button
Opens / closes the disc tray
Channel selection,
Numerical value inputs,
Device selection (INPUT button)
Accesses play mode
Accesses the edit menu
Accesses the settings menu
Selects PS (progressive scan) output
E
Displays the recorder or disc MENU
Hides the menu
Menu and info banner activation and
navigation keys
Live view,
View a channel while
playing a title
IN
FO
1. On / Off button
8. Change channel or skip chapter.
Accesses the library
2. Playback or freeze frame.
9. The Audio-Video jacks for external input
Change channel
Skip forward / backward
3. Stops the playback or recording.
Information display
/
GO BACK = Returns to
the previous menu
/
Playback Keys
ADVANCE = Skip Forward,
AGAIN = Skip Backward,
REV= Slow, Fast Rewind,
PLAY = Play,
FWD = Slow, Fast Forward,
REC = Record,
STOP = Stop,
PAUSE = Temporary stop
Note: View the images using the INPUT key.
4. DVD REC - To record to a DVD R/RW.
AUDIO = Audio language
ANGLE = Camera angle
ZOOM = Image enlargement
SUBTITLE = DVD subtitle language
10. S-Video socket (input) to connect a camcorder
or any other S-Video device.
5. HDD REC - To record to the hard disc.
Note: do not forget to connect the audio cables since
the S-Video socket handles only images and not
sound. View the images using the INPUT key.
6. Open and close the disc tray.
Note: 9 & 10 are labeled as INPUT 2
TV functions for compatible devices
Inserting the batteries
7. To select the audiovisual sources (appliances
connected to the AV sockets):
LIVE INPUT 1 - Appliance (satellite received,
decoder, etc.) connected to INPUT 1 sockets
(rear panel).
LIVE INPUT 2 - Appliance connected to INPUT
2 sockets on the front panel.
LIVE AUDIO - Appliance connected to AUDIO
IN (rear panel)
11. Displays your DVD recorder’s modes of
operation.
12. Disc tray.
• Respect the polarities. Do not mix different types of batteries or new and old batteries. Do not use rechargeable
batteries. Do not expose batteries to excessive heat, do not incinerate them and do not recharge them. Do not try
to open them as they may leak or explode. Remove the batteries from the remote control unit if you are not going
to use it for several weeks. Immediately remove any leaking batteries. Take care in doing this, as leaking batteries
may cause burns to the skin or other physical injury.
• Please respect the environment and prevailing regulations! Before you dispose of batteries ask your dealer
whether they are subject to special recycling and if he accepts to take them back.
5
6
DRC8030_EN
8/15/06
10:30 AM
Page 14
Initial setup
Initial setup
Turn on the TV and DVD recorder
4) Channel list
The channel list contains the channels you tune to
when you press CH+ or CH– on the remote control.
From the channel list screen, you can delete
channels you rarely watch. You will still be able to
tune to the “deleted” channels directly by using the
number buttons, but the DVD recorder will not
tune to a channel when you press CH+ or CH–.
1. Turn on the DVD recorder by pressing ON/STANDBY.
2. Turn on the TV and select the input mode connected with the DVD recorder output signal. To do so,
you usually press the AV button on the TV remote control until you get to the video input channel
that matches how the DVD recorder is connected to the TV. When you are on the right channel,
you can see the DVD recorder menu for language selection (see below).
EN
Note: since access to a TV’s video input channel varies from one manufacturer to the next, it is difficult to provide
specific instructions for your particular brand. Please consult the user manual of your TV.
Interactive setup
• Use the remote control to follow the on-screen instructions. Use navigation keys (
move the on-screen highlight in the corresponding directions on the screen.
• Press OK to select a highlighted item.
) to
Note: You can access the setup screen from the player menu. If you move, get a different program provider for TV
shows, or change your connections, you will need to complete the interactive setup again.
1) Select on-screen menu language
2) Select the signal that is connected to the
CABLE/ANTENNA input jack
Press (right key) to access the choices (CableAntenna or Antenna only) and then press
to
highlight “Done” and press OK.
Note: turn on the cable box or satellite receiver before
completing this step.
EN
Use the navigation keys (
) to scroll
through the channels. A checkmark in the box next
to the channel means it has been stored in the
channel list. Highlight the channel and press OK to
check or uncheck the box. You can also label
channels by pressing INFO.
To skip editing the channel list, press STOP.
5) Select your time zone
6) Daylight saving time
If you select “Yes”, the recorder’s internal clock will
automatically advance the time by 1 hour in the
spring and set the clock back by 1 hour in the fall.
3) Channel search
Automatic channel search starts. When the search
reaches 100%, press OK (the channel list appears).
If the channel list does not appear, check the
ANTENNA/CABLE input jack to make sure the cable
is connected properly.
7
8
DRC8030_EN
EN
8/15/06
10:30 AM
Page 16
Initial setup
Display
7) Time and date
The DVD recorder has an automatic clock, but it
may take awhile for it to find the correct channel
for the clock. You might want to set up the clock
manually here.
Main messages on the display
EN
Use the number keys on the remote to enter year,
date and time. To change AM/PM setting when
entering the time, press .
Note: the clock automatically keeps time accurate. If
there is problem, simply turn off the auto clock function.
8) Interactive setup finished
Press OK to continue.
-
Main menu of the recorder on the screen (device
stopped). No function selected.
-
TV channel 3 being watched.
-
Start of the recording.
-
Images from a device connected to the INPUT 1
socket (rear panel).
-
Images from a device connected to the INPUT 2
socket (front panel).
-
Audio from a device connected to the AUDIO IN
socket (rear panel).
Screen menus and banners
9) Return to main menu
Select one of the desired function.
• Disc menus – each DVD video disc offers menus for accessing more disc features. The disc menu is
usually displayed on the screen when a DVD disc is loaded. You can also, at any time, display the
main menu of the disc by pressing MENU. Availability of some functions (e.g. angle, subtitle)
depend on the disc’s manufacturer.
• Player banners – while a disc is playing you can display or hide banners by pressing INFO. The
banners appear as a list of icons at the top of the screen.
• Player menus – your DVD recorder has menus enabling you to use functions that are not
accessible using the remote control keys. Press SETUP / MENU to access the player menus.
Move around in the menus using the navigation keys (
) and confirm your selections by
pressing OK.
Note:
- If a menu item or icon appears in “grey” it means that the function is not available.
- When this symbol
key used is incorrect.
is displayed, it indicates that the function you are requesting is not available or that the
- If the RCA logo appears, the screen saver may have been triggered, press OK to quit screen saver mode.
9
10
DRC8030_EN
EN
8/15/06
10:30 AM
Page 18
Watching TV
Recording
Watch TV PROGRAMS
Record the current programme
1. Turn on your TV set and DVD recorder.
After a few seconds the main menu of the DVD recorder
appears on the television screen.
2. The watch TV function is already selected. Press OK to tune to
the last channel watched.
• Information on the current channel shows briefly on the TV
screen. To display this information again, press INFO.
Immediate recording
You can start recording at any time by pressing twice, on the unit’s front, DVD REC to record to a DVD
R/RW disc or HDD REC to the hard disc (or press REC twice on the remote control).
Channel being watched:
(delayed)
(live)
Channel number and name currently watching
Current time or
delayed time
Audio mode
3. Press CH+ / CH- to change channel. To select viewing a device connected to your DVD recorder (e.g.
satellite receiver) press INPUT.
Take a break (Time shift function)
Your recorder can save in its memory images of the last 60 or 120 minutes (see “Buffer Length” in the
“Setup” section) of the programme being viewed. When you have to stop watching a programme for a
while like answering a phone call, you can press REV to rewind to the point where you have just
missed and then press PLAY (or FWD if you want to skip recorded images) to continue watching the
rest without missing a scene.
The
symbol in the information banner indicates that you are watching a delayed programme.
The delay between the images being watched and the live images is indicated to the left of the
banner. You can return to the live broadcast by pressing LIVE.
EN
Configured recording
Configured recording lets your record the programme after a quick adjustment of the duration, quality
and destination to be recorded.
Press
to proceed to the next step (from step 2-5).
1. Press REC once on the remote control.
2. Choose a duration by pressing (right key). Each time you
2
press the duration is increased by 30 minutes up until the
3
maximum time remaining on the disc is attained. When the
maximum duration is reached, pressing again to display “--h-4
min” which indicates the precise time remaining, for example 1
5
hour 12 min.
6
3. Press to select a recording quality. The time remaining on the
disc is indicated next to it. If you modify the quality you will also
modify the duration, which may be useful with a DVD R/RW disc which has little space.
4. Press to select recording destination (default: DVR hard disc).
5. Press to select whether using the save buffer (Yes) or not (No). With the help of the time shift
function, this lets you record a programme to the DVR hard disc even if you missed the start of it.
6. Press to select “Start” to start recording or “Cancel” to give up recording. Press OK to confirm
the selection. The indication REC (RECORD) is displayed for a few moment and the red lamp on the
front lights up. It confirms that recording has started.
• Changing the channel during recording is not possible. To watch another channel during the
recording session, select it directly on the television set, using its own remote control handset.
• Information on the current recording status shows briefly on the TV screen. To display this
information again, press INFO.
Note: the recorder must be turned on for using the time shift function.
Recording to the hard disc (DVR)
Recording to a disc (DVD R/RWW)
Channel number and name currently recorded
Time elapsed
Recording quality selected
11
Recording in progress and time
remaining on the disc
12
DRC8030_EN
EN
8/15/06
10:30 AM
Page 20
Recording
Recording
Stop recording
7. Store your program by selecting “Keep Timer” and then press OK.
8. Return to the main menu by pressing MENU in order to continue using your DVD recorder or turn
it off by pressing ON•OFF.
Press STOP twice.
If you only press STOP once, the confirmation menu appears. Press a second time to completely stop
the recording or select to continue or pause by pressing
and OK.
Note: With a DVD R disc, if you do not have another recording to make, you need to “finalize” the disc for reading
by other DVD R compatible players. If you do not finalize a DVD R disc, it will still be possible to make other
recordings on it later on, providing there is enough disc space. You may also erase recordings but the corresponding
duration will be lost. You may not record other titles in their place.
Timer recording
Your DVD recorder lets you schedule recordings or transfers. It can memorize the parameters of 16
different programmings, or 15 timer recordings and 1 transfer. In the case of double programming, a
warning message is displayed.
To access the timer menu:
Player menu > Select “Timer” > Press OK > Select
“Add Timer” or “Set Transfer” > Press OK
EN
To program a transfer:
Press
to proceed to the next step (from step 1-3).
1. Name - Press INFO to access the keyboard table.
Enter the name of the recording letter by letter
and confirm.
2. Day(s) - Use the numeric keys on the remote
control to type in the date.
3. Start Time - Use the numeric keys on the remote
control to type in the time.
4. Store your program by selecting “Keep Timer”
and then press OK.
1
2
3
4
Recordable discs
To program timer recording:
Press
to proceed to the next step (from step 1-6).
1
1. Name - Press INFO to access the keyboard table.
2
Enter the name of the recording letter by letter
3
and confirm.
2. Channel - a) Enter the channel number by using 4
the numeric keys on the remote control or by
5
pressing CH+/CH-.
6
b) Or select one of the Audio-Video (LIVE INPUT
1, LIVE INPUT 2, LIVE AUDIO) inputs to which a
device is connected (e.g. satellite receiver) by
7
pressing (right key).
3. Day(s) - Use the numeric keys on the remote control to type in the date, if the recording is not
made the same day, and / or select a period by pressing .
Once: to record the selected programme according to the parameters you have defined.
Each Tue: to record the same programme the same day every week starting from today (supposing
today is Tuesday).
MON-FRI: to record the same programme, everyday at the same time from Monday to Friday.
4. Start Time / Stop Time - Use the numeric keys on the remote control to type in the recording start
time and then the stop time.
If you want to record PROGRAMS from satellite receivers, you must:
- either program the satellite receiver with the same beginning and end times, then switch off the
DVD recorder and the receiver,
- or leave the satellite receiver switched on, on the channel to record, program the DVD recorder,
then switch it off.
5. Record Destination - Select the location where the programme will be recorded (DVD R/RW or
internal DVR) by pressing .
6. Record Quality - Choose a recording quality by pressing . The lower the quality, the longer the
time available on the disc. For example, the time available with a clean 4.7 Gb disc with “Low”
quality will be approximately 8 hours while in “Best” quality the time will be approximately 60
minutes.
13
• DVD R/RW - The majority of DVD R (write once) and DVD RW (re-recordable) has 4.7 Gb capacity.
• This recorder is not compatible with DVD RAM discs.
• The DVD discs are certified for certain recording speeds. These speeds must correspond to the
capabilities of your player, i.e.:
Disc
Recording
speed
14
DRC8030_EN
EN
8/15/06
10:30 AM
Page 22
Library
Library
Library
Disc library (DVD R/RW)
The library lets you locate the various recordings present on the DVR hard disc or the different DVD
R/RW discs in your DVD library.
The disc library archives the names of all the titles recorded to different DVD R/RW discs in your DVD
collection. Depending on the duration of the recordings, the library can save around 400 title names.
Press
while a title in the disc library is highlighted and then press
to select sorting by title
name or date to further assist you to find a title.
The recordings are distributed according to the title and the nature of the files in four sub-libraries.
Each one will let you access functions specific to the nature of the recordings. The contents of the
library are not lost even if the recorder is no longer connected to the power supply for a while.
To access the library:
Player menu > Select “Library” > Press OK
You may also press LIBRARY on the remote control
to access library directly. The library screen appears.
It lets you access the 4 sub-libraries (video library, disc Library, music library & picture library) and the
export function. Depending on the recording you are looking for, select the library and confirm with
OK. The screen specific to the library appears.
Video library (on the hard disc)
Select a title (recorded program) with
EN
Managing titles
Press OK to access more functions when a title in the disc library is highlighted. Press
to highlight
an item and OK to make selection. Functions available are: rename title, play all chapters, delete title,
clear chapters and copy to DVR
Music library (on the hard disc)
The music library archives the names of all the mp3 or WMA files recorded on the hard disc. When the
music library screen is displayed, you can play a title or file, create or edit playlists, rename a title,
delete or sort titles.
Picture library (on the hard disc)
and press PLAY to start playback.
Managing titles
Press OK to access more functions when a title in the video library is highlighted. Press
to
highlight an item and OK to make selection.
• Play Title - to play the title, except the hidden chapters*.
• Play All Chapters - to play the title, even the hidden chapters.
• Rename Title - to name the title.
• Delete Title - to remove unwanted titles.
• Lock Title (or unlock it) - to avoid (or enable) title erasure.
• Copy to Disc** - to archive a title to a DVD R/RW disc. Jpeg, mp3 and wma files cannot be copied
using this function.
• Clear Chapters - to delete all the chapter markers*** assigned automatically at regular intervals.
• Sort by title name or date - press
(right key) while a title in the video library is highlighted
and then press
to select sorting by title name or date to further assist you to find a title.
Note:
*Hidden chapters - with the help of the edit menu (see “Edit menu” in “Playing discs” section), you can insert
chapter markers in a title and hide some of the unwanted scenes.
The picture library lets you look for and view photos one by one or through a slideshow. The library
displays thumbnails of the last six photos recorded. Earlier photos can be accessed by pressing the
navigation keys (
) and confirm with OK or start a slideshow with PLAY.
Export
You can copy one or more titles to a DVD R/RW disc.
With the SmartRecord function turned on, you can copy titles which were recorded with very high
quality (example *1: Best), from the DVR hard disc to a DVD R/RW with adapted quality (example *3:
Good) so that the title can “fit” on the disc. For details, see “SmartRecord” in “Setup” section.
Picture in picture
While a video title (from a video DVD, DVD R/RW or DVR hard disc) is playing, you can superimpose
live TV pictures by pressing LIVE. This will let you monitor PROGRAMS on a channel while you are
watching a video recording. You can change channel by pressing CH+/CH-.
**Copy to disc - the type of disc (DVD R/RW 4x, 8x or 16x) has no effect on the copying speed (rate expressed in
Mbits) or time. The copying speed depends on the recording quality selected for the DVD R/RW. The copying time
depends on the length (duration) of the title to be copied from the hard disc to the DVD R/RW disc.
***Chapter markers - when recording a title, the recorder can create chapters of 5 or 10 minutes in length by
inserting chapter markers. This then allows you to browse your recordings by jumping from chapter to chapter with
/
(see “Chapter Markers” in “Setup” section for details).
15
16
DRC8030_EN
EN
8/15/06
10:30 AM
Page 24
Playing discs
Playing discs
Regional coding
Skip a chapter or track
Press
/
.
Both the DVD recorder and the discs are coded by region. These regional codes must match in order for
a pre-recorded DVD to play. This player’s code is region 1. However, discs you use for recording (DVD+R
and DVD+RW) are not assigned region numbers.
Readable discs
• DVD+/-R and DVD+/-RW discs - used to record programming.
• DVD video discs - contain picture and sound (DVD+/-R, DVD+/-RW discs and DVD ROM are
compatible with this player). DVD+/-R discs must be finalized.
• CDs (CD-R, CD-RW) - audio CDs contain musical or sound content only. mp3 discs are CDs that
contains mp3 files. This player is also capable of playing CDs that contain jpeg files and multisession
CDs.
• Video CD discs - like DVD video discs, VCDs contain picture and sound content. The difference is the
amount of information that can be stored on the disc. VCDs typically have lower picture and sound
quality than DVD discs.
Note:
You cannot record on the following types of discs: CD-R, CD-RW, DVD-RAM and dual layer discs.
You cannot play the following types of discs: Laserdiscs, CD-I, CD-ROM (computer only discs), discs recorded using
other broadcast standards (i.e. PAL or SECAM), or DVD-RAM discs.
Note: Forward or backward skips can also be made by using the CH+ / CH- on the DVD recorder.
EN
Scene Again™ (DVD)
Press AGAIN (go back approximately 10 seconds).
Advance (DVD)
Press ADVANCE (go forward approximately 30 seconds).
Zoom
Press ZOOM. Move the enlarged image with the navigation keys (
) to see a specific part of it.
If this does not work, try again after pressing PAUSE. To resume normal playback press ZOOM several
times to return to the original format.
Information banner
Access: press INFO
From the banner, you can access certain functions directly by pressing
while playing a disc. When
an icon is highlighted, small arrows appear above and below it indicating more options are available.
Press
to select options.
Some discs may not be compatible due to laser pickup and disc design.
DVD+Rewritable
The icons displayed in the banner depend on the type of disc being played.
Load and play a disc
Switch on your TV set and DVD recorder. It may be necessary to turn off other appliances.
If the player menu is not displayed on TV screen, select the TV input mode to which you connected
your DVD recorder. Press PLAY to start disc playback.
Note: the disc label must face upwards (double sided discs have a small label on both sides around the centre).
Basic playback features
The playback options depend on the discs and/or files being played.
Quick search
Press FWD or REV (press one or more times to select speed). Press PLAY to resume normal playback.
Still picture and frame advance
Press PAUSE to freeze frame. Press PAUSE again to go into “frame” mode (the PAUSE icon is replaced
by the FRAME icon on the TV screen). Press FWD (or REV for recording on DVR hard disc) to view
images one after the other forward (or backward for recording on DVR hard disc). To resume normal
playback, press PLAY.
Slow motion (in Pause mode on an image)
Press PAUSE then FWD or REV. Press one or more times to select speed. Press PLAY to resume normal
playback.
17
Time counter
Direct access to a scene or a
musical passage by keying in
the starting time. Select the time elapsed icon
and use the numeric keys on the remote control
to access the place from which you want to play
back. Use two digits for each field. For instance, if
you enter 01:35:12, you will access the sequence
beginning 1 hour, 35 minutes and 12 seconds
after the start of the title.
Note: for VCDs, the timer refers to the track currently
being played.
Title or track
Most DVD discs only contain one title.
However some discs may contain several
titles and further divided into several
chapters within each of title.
Subtitle language
Select the subtitle language if it is
available on the disc. The name of the
language selected appears under the
banner. You may also press SUBTITLE on the
remote control to access this icon.
Audio language
Select the audio language if it is
available on the disc. The name of the
language selected appears under the
banner. You may also press AUDIO on the remote
control to access this icon.
For VCD playback, select stereo, mono left or
mono right channel output.
Chapter
Select a chapter within a DVD disc. Most
DVD discs contain several chapters.
18
DRC8030_EN
8/15/06
10:30 AM
Page 26
Playing discs
Playing discs
EN
Disc play mode
Select one of the several play modes
available that depend on the type of disc
being played: standard playback; repeat
between 2 points (A-B), repeat a disc or repeat a
title. You may also press PLAY MODE on the
remote control to access this mode.
Repetition between 2 points A and B:
A-B Repeat mode allows you to select exactly the
sequence you wish to repeat.
1. Select A-B repeat mode and press OK confirm
to store the start of the sequence you wish to
repeat.
2. Wait a few seconds before pressing OK again
to mark the end of the scene to be repeated
(point B). To stop repeat, select another mode
using
, or by pressing STOP.
Note: repeat functions remain active until you turn
them off, open the disc tray or turn off the power.
Repeat play only works with discs that show the
elapsed time on the display. This may not work
correctly with certain discs (Video CDs in PBC mode).
Camera angle
A few DVD discs contain scenes shot
from various different angles. If a disc
being played back offers different
camera angles the icon in the banner will show
the number of the angle on the screen. You may
also press ANGLE on the remote control to access
this icon.
Index (VCD)
Select index on a VCD disc.
PBC - playback control menu (VCD)
This function enables you to make
interactive selections of some scenes or
information through an on-screen menu.
Play mode for audio CDs
Several play modes available for audio
CDs: standard play; random play; repeat
play which includes repeat A-B, repeat
track, repeat disc, and repeat inactivated.
19
IntroScan
Press OK to enable you to listen to the
first few seconds of each track of an
audio CD. When the first few seconds of
all tracks have been played the player starts
playback from track one.
Rotate an image (JPEG discs)
Use this function to display a jpeg image
correctly (90° - 180° - 270° rotation).
Edit menu (DVD RW disc and DVR hard disc)
The edit menu can be accessed from the
information banner while you are playing a
title on a DVD R/RW disc or on the
internal DVR. Select the edit menu icon and press
OK. You can also access the edit menu by pressing
EDIT on the remote control.
Note: the edit menu cannot be accessed while
playing a title or chapter playlist. To delete the
playlist being played, eject the disc or delete the list.
Zoom (JPEG discs)
Enlarge photo images: 1/2, 1, 2 or 3
times.
• New Title Image (DVD R/RW and internal
DVR)
Replaces the title image (on the play menu)
displayed by your DVD recorder with an
image of your choice.
• Split Title (internal DVR)
To access this function you must first select
“Play all chapters” in the video library title
menu (see “Library”) before you can divide a
title on the DVR, no chapter must be hidden.
With this function you may:
- Cut a title in two and then rename the each
title with different themes.
- Delete the end of a recording which is too
long and free up some space on a disc.
EN
Slideshow speed (JPEG discs)
Adjust slideshow speed: normal, fast or
slow.
• Insert Chapter Marker (DVD RW and
internal DVR)
To position marks in order to easily find your
favorite passages. Since it is not possible to
delete a passage in a title, you can use this
function to mark the start and end of
undesirable scenes (e.g. advertising) in order
to mask it from being played using the hide
chapter function (see further on).
• Delete Chapter Marker (DVD RW and
internal DVR)
To delete undesirable markers in order to
form longer chapters within a title, or to
redefine the position of the markers to your
own requirements.
• Hide Chapter (DVD RW and internal DVR)
To mask the chapter being played (the
passage between two markers) in order not to
play an undesirable passage (e.g. advertising,
violent scenes). If you do not wish to play the
masked chapters, you must select “Play Title”
in the title menu (see “Library”). If you wish
to play all the chapters, including those you
have masked, select “Play All Chapters” in the
title menu. With this function, you can, for
example, hide chapters on a title present on
the DVR before copying the title to a DVD
RW. In this way, only chapters which are not
hidden will be copied to the DVD RW.
20
DRC8030_EN
EN
8/15/06
10:30 AM
Page 28
Playing discs
Playing discs
Disc menu
Disc Actions (DVD R/RW)
Select one of the actions below with
To access the disc menu:
Player menu > Select “Disc” > Press OK > Select one
of the items below > press OK
With DVD video discs you directly access the disc
menu, the availability of language, chapter, play order varies with the contents on each disc.
Play Disc
To start playing a disc from the beginning, press OK.
Note: this function allows the playing of the last title on a DVD R/RW disc. If your DVD recorder is locked (small
padlock displayed), a message appears asking you to enter your password.
Disc Title Menu (DVD R/RW)
This menu allows you to access recordings that you have made on your DVD R/RW discs, or those
carried out by other DVD recorders if they are compatible with your player. In the disc title menu,
select a title with
and press OK to access more functions as below:
and press OK:
• Rename Disc - to change the name chosen by the DVD recorder for a name of your choice.
• Erase Disc - to delete all the titles on the disc.
• Lock Disc (or Unlock Disc) - to protect the disc against accidental recording. This choice is not final,
you may unlock the disc if necessary.
• Finalize Disc / Make Compatible (depending on the DVD R/RW disc loaded) To close the disc session and prepare a home screen made up from images representing each
recorded title.
You need to make a DVD RW disc compatible if you have added or deleted chapter markers so that
the disc can be played on other DVD players.
• Copy to DVR - to copy titles and files to your recorder’s hard disc.
EN
Copy to DVR
To copy titles and files to your recorder’s hard disc.
Playing image and audio (jpeg, mp3 and wma)
• Rename Title - using a character table your DVD recorder
allows you to change the names of discs or titles encoded
when the recording was made. Erase the default name by
highlighting “DEL” and then pressing OK. Compose the name
by highlighting letters and confirm with OK. When the name
is complete, select “Done” and press OK.
• Play Title - to play the title except the hidden chapters (see
“Edit menu” in “Playing discs” section).
• Play All Chapters - to play all the chapters of the selected title, even those you have masked using
hide chapter function in the Edit menu (see “Edit menu” in “Playing discs” section)).
• Delete Title - to delete recording.
• Clear Chapters - to delete all the chapter markers assigned to the recording. This function deletes
the markers automatically positioned by your DVD recorder (see “Chapter Markers” in “Setup”
section) and those that you may have added.
• Copy to DVR - to copy the selected title to the hard disc. COPYING is displayed while copying is in
progress.
Note: The available functions may differ depending on the type of disc.
Playlist
To customize the playing order of titles and/or chapters on DVD, DVD R and RW discs, or the play order
of music tracks on Audio CDs.
• To move a chapter, title or track to the playlist, highlight it with
and press OK.
• To start playback of the list, press PLAY.
• To delete the list, press STOP and confirm with
(to select “Yes” ) and then OK.
21
To access music or picture files on a disc:
Player menu > Select “Disc” > Press OK > Select
“Music” or “Pictures” > press OK
Sound:
• Select a folder or a title and press OK. Choose a
play mode with
and confirm with OK (Play,
Play all, random all, random, repeat folder,
repeat file and restart).
• Playback of files begins with the file selected and
continues with the following files. Sub-folders in
the folder are also played.
• Playback then moves to the next folder at the
same level in the file directory.
• Stop playback by pressing STOP.
Choose playmode
Select file
Images:
• Your player can play jpeg files with a resolution of up to five million pixels. However beyond
400,000 pixels there is no perceptible improvement in the quality of pictures displayed on your TV
screen.
• Select an image or start the slideshow from the selected image. Choose a play mode with
and
confirm with OK (Play, Play all, Random, Random all).
• Press
or
to change images. The change may take several seconds according to the file
size.
• Stop playback by pressing STOP.
22
DRC8030_EN
EN
8/15/06
10:30 AM
Page 30
Setup
Setup
To access the setup menu:
Player menu > Select “Setup” > Press OK > Select
one of the menu items > press OK
(or press SETUP on the remote control to access this
menu directly.)
Parental control
Your DVD recorder has a child lock function which enables you to restrict access to certain DVDs. The
discs whose content may be deemed unsuitable for your children will therefore not be visible unless a
password that you have chosen is entered.
EN
The padlock tells you whether or not the DVD recorder is locked.
Disc options
(Locked) you must enter the password to play the discs whose
rating limits exceed the limit you have allocated.
Disc Autoplay
Select autoplay on, if you want the disc to be played automatically once the DVD recorder tray is
closed.
(Unlocked) you don't need the password to play the discs, even if
you have set a rating limit.
Screen Format - (DVD / VCD)
Depending on the format of the DVD disc being played, select the image format that corresponds best
to the format of your television screen - cinema screen 16 x 9, classic screen 4 x 3 (Letter Box or
Standard). On certain DVDs, the picture format cannot be changed.
Lock and unlock
1. The “Lock” option is already highlighted in the parental control
menu, press OK.
• If no password has been chosen, your DVD recorder asks you to
create one.
2. Type four digits with the numeric keys and confirm with OK to
either turn on or off the lock function.
• If your password is newly created, type again after step 2 for
confirmation and then confirm with OK.
Caution: the Automatic Format function of certain television sets may malfunction in 16x9. Set the Auto-Format of
your television to Off in order to avoid conflicts.
Recording options
Buffer Length (video memory)
Your recorder may save the last 60 or 120 minutes of TV PROGRAMS in its memory (even if you have
not pressed the record key). You can define this duration here.
Note: choose a four-digit number that you will be able to remember easily or note it down.
Default Record Quality
Your DVD recorder may record several hours of TV PROGRAMS or video sequences from a device
connected to DVD R/RW discs or the internal DVR hard disc. This capacity depends on the space
available and the quality set in this menu.
Changing password
1. To change the password, you must deactivate the lock function first by following the steps above in
“Lock and unlock”.
2. Exit the parental control menu fully by pressing
a number of times.
3. Enter the parental control menu again, press OK while “Lock” is selected, follow “Lock and unlock”
above to create a new password.
SmartRecord™
By activating the SmartRecord™ function of your DVD recorder it will adapt the quality of your
programmed recordings to one of the 6 settings so that you can record the entire desired programme
on a disc that has already been partially recorded.
Ratings limits
This menu makes it possible to restrict viewing of certain DVD discs by
assigning a restriction limit on your DVD recorder. This function can only
be used with DVD discs provided with the function. In the menu, set the
restriction level with
and confirm with OK.
Note: deactivate this function if you want to divide a title while playing it from the video library (via the edit
menu).
Chapter Markers
When recording a title, the recorder can create chapters of 5 minutes in length by inserting chapter
markers. This then allows you to browse your recordings by jumping from chapter to chapter with
. You may select chapter lengths to 10 minutes or decide not to create chapters by selecting OFF
(function de-activated).
/
Languages
You can change the default languages in display, disc menu, audio and subtitles from this menu.
Unrated titles
Certain commercially available DVD video discs do not have restrictions.
You can however restrict viewing of such discs by this menu so that a
password will be requested before playing any DVD disc. You may also
restrict your own discs that you have recorded yourself by checking the
“Apply to DVD +R, +RW” box. In this case, the code will be requested
for all the discs you have recorded.
For audio and subtitle languages on a DVD video disc, you may also change from information banner
by pressing INFO during playback or pressing AUDIO or SUBTITLE on the remote control for respective
setting. You may also change the default disc menu language from the DVD video disc menu.
23
24
DRC8030_EN
EN
8/15/06
10:30 AM
Page 32
Setup
More information
Installation
Recommendations and information
concerning discs (12 cm)
Interactive setup
The first time you turned on the the DVD recorder, you had to complete an interactive setup so your
DVD recorder could have the information it needs to function properly. Refer to “Initial Setup” for
details. To go through this procedure again to change settings, highlight this option and press OK.
Channel search
If you have changed program providers (cable and/or satellite), selecting this option will automatically
search the signal and put the latest channels in the recorder’s channel list. This step is also gone
through in the interactive setup.
Channel list
To change what channels are accessed when you press CH+/ CH-.
Clock setup
If the clock is incorrectly set or you skipped this step during the interactive setup, you can set the clock
by selecting this option in the menu. In order for timer recording to work, you must set the clock to
the correct time and date.
Choice of CD-R / CD-RW discs
This player can play most CD-R and CD-RW discs.
However, depending on the recorder of your
personal computer, the type of disc and recording
method used, it may be that some discs cannot
be played, or that the performance does not
meet the expected standard of quality. When
playing a CD-R disc, it is completely normal for
the unit to take up to 30 seconds to recognize
the disc before starting to play. If the disc is not
recognized after a period of 120 seconds, remove
the disc, and then insert it again.
• Whatever the actual recording capacity of a
disc, do not fill it to maximum capacity.
• Use CD-R discs rather than CD-RW (rerecordable CDs), as replay of CD-RWs may
sometimes not work properly.
• Use a reliable and good quality recording
software.
• Before recording on a disc, close all
applications on you personal computer in
order to optimize the quality and reliability of
recordings on the disc.
Video CD (VCD) discs
VCD (Video Compact Disc) discs enable up to 74
minutes of VHS quality video associated with still
pictures, audio tracks and interactive menus to be
recorded on a CD.
About DVD R/RW discs:
Choose good quality discs.
Disc formatting - When you insert a DVD RW disc
for the first time, your DVD recorder must format
the disc. This operation will take several minutes,
but you may begin recording onto the disc
shortly after the formatting process starts
(around 10 to 20 seconds). During these few
seconds, the display indicates FORMAt DSC.
proper guide area. Always use a soft cloth to
clean discs if necessary, wipe from the centre to
the border. Always put discs back into their cases
after playing and store in a vertical position.
Never use record cleaning sprays, benzine, static
electricity liquids or any other solvent, if the disc
surface is dirty. Wipe gently with a soft damp
(water only) cloth, never wipe the disc in a
circular motion, since circular scratches are likely
to occur and could cause noise during playback.
EN
Image files and CD-R / CD-RW discs
To view your JPEG images on a TV set you do not
need to record your photographs with a
resolution above 400,000 pixels (which
corresponds to an image format of about 720 x
576 dots), for television screens do not allow a
higher quality given their limited characteristics.
In this case ensure that you reduce the quality of
your photographs before recording on a disc in
order not to impede the proper running of your
player. This is because excessively loaded pictures
would slow down or might prevent the proper
functioning of the slide show during playback on
your player. Compatibility of JPEG files depends
on the software on which they were created and
on the size of files expressed in pixels. Some JPEG
files, including Progressive JPEG files (display in
stages) cannot be played on this appliance.
Audio files and CD-R / CD-RW discs
In the case of discs that include mp3 files, follow
not only the general recommendations for CD-R
and CD-RW discs, but also the following specific
recommendations:
• The format of your mp3 files must be ISO
9660 or JOLIET. These files are compatible
with DOS and Windows applications, as well
as with Mac OS.
• Your mp3 files must have a name no longer
than 12 characters as well as the suffix
“.mp3”. They must be recorded in the form:
title.mp3. Ensure that you do not leave spaces
or use special characters such as ( . , / , \ , = ,+)
in the name..
Disc maintenance - Always handle your discs with
care. Hold a disc with fingers on the border or
hole. Always place disc with the label facing
upward (in case of a single-sided disc). Always
place the disc properly into the tray using the
25
26
DRC8030_EN
8/15/06
10:30 AM
Page 34
More information
More information
EN
• Use a decompression transfer rate of at least
128 kb/sec (kilobytes/second) when recording
mp3 files. Sound quality with mp3 files
basically depends on the rate of
compression/decompression you choose. To
obtain sound quality equivalent to that of an
audio CD, use files for which the sampling
rate during conversion from analogue audio
to mp3 format is between 128 kbps and 160
kbps. Higher compression rates, such as 192
kbps or more, will only rarely improve sound
quality. Conversely, files with sampling rates
below 128 kb/sec will not be played properly.
• Do not attempt to record protected mp3 files.
Such files are coded and protected.
Important notice: The above recommendations
cannot be taken as a guarantee that the DVD
player will play mp3 recordings, or as an
assurance of sound quality. You should note that
certain technologies and methods for mp3 file
recording on CD-Rs prevent optimal playback of
these files on your DVD player (that is degraded
sound quality and even, in some cases, inability of
the player to read the file or files).
Using the remote control unit correctly
When you use remote control, point the unit at
the appliance you want to control (DVD recorder,
TV set or satellite receiver). Ensure that there is
no obstacle between the remote control unit and
the appliance, otherwise the infrared signal
carrying the remote control commands will be
blocked. To control your DVD recorder, ensure
that the remote control unit is in DVD mode by
pressing once on the DVD key before using any
other keys.
Recording
Your DVD recorder has recording functions similar
to a video recorder. It lets you record PROGRAMS
to a disc in the DVD family DVD (DVD R/RW) or to
the internal hard disc (DVR or HDD). For the same
disc, the recording time depends on the quality
settings that you can adjust according to the time
left on the disc. The recording may be immediate
or deferred.
27
Troubleshooting
Remote control
The remote control doesn’t work
• Point the remote control at the front of your
DVD recorder, not at your TV set.
• The operating range of the remote control is
up 20 to 25 feet. It gradually decreases as the
batteries wear down. This is a good indicator
of the state of the batteries.
• Make sure no objects (or animals) are in the
path of the infrared beam between the
remote control and your DVD recorder. They
may block the beam and thereby cause a
malfunction of your DVD recorder.
• The recorder is in copy mode. COPYING
appears on the display.
• Some DVD players made by the Thomson
group react to the same remote control codes.
To avoid this inconvenience you can modify
your DVD recorder's setting by setting it to
the A or B password (press the PLAY and AV
buttons on the front at the same time).
The remote control and the DVD recorder
don’t work anymore: everything seems
blocked
• Unplug your DVD recorder from the mains for
a few moments and plug it back in.
Image problems
You don’t see any picture
• Turn on your TV set and your DVD recorder.
• On your TV set, select the socket which
receives the signals from your DVD recorder
(AV1, TV1, AUX1, etc., depending on the
make, if connected.
• Make sure that all the connectors are correctly
pushed into the various sockets.
• In STOP mode, press several times the VIDEO
OUT button on the remote control in order to
switch the video signal to the correct format
accordingly to the socket used for TV
connection.
The colors aren’t natural
• Check that the cables are correctly pushed
into the sockets of the various devices.
The image format doesn’t match the screen
format of your TV set
• The image format is adjustable. With certain
discs the format is imposed and cannot be
changed.
Sound problems
No sound
• Check that the audio settings are suited to the
specifications of the device connected to the
digital audio sockets (coaxial).
The sound is very low or inaudible
• The sound of the TV set has been cut or set at
a very low level. Press the MUTE key on your
TV set’s remote control and/or adjust the
volume on your TV set (or amplifier, if such is
the case).
You can’t change the camera angle
• Most DVDs do not have multiple viewing
angles. When this option is available, it
usually only applies to a few scenes.
There is no sound with the image
• Is the volume turned down?
Playing problems
The DVD doesn’t play, even when you press
the PLAY button
• The disc rating is higher than the limit that
you have set.
Fast forward or rewind doesn’t work
• Some discs have scenes which do not allow
fast forwarding, rewinding or chapter skips.
When a command is prohibited or is not
available for the current section or operating
mode, a prohibition sign appears on-screen
for a few moments.
Recording problems
You cannot record on the disc
• If a message is displayed on the screen, press
the EXIT key of the remote control to remove
it.
• Check that you are using a DVD R/RW disc.
• Perhaps the DVD R disc is temporarily locked
or definitively locked. If it is definitively
locked you can no longer record on it. If it is
locked you can unlock it.
• You cannot record on the same disc both
video images and JPEG photos or mp3 music.
Use different DVD R/RW discs for each type of
recording.
• Dirt and finger prints may affect the recording
and playback.
Other operating problems
Your DVD recorder doesn’t switch on
• Is the mains socket to which you DVD recorder
is connected receiving current? Check the
corresponding fuse in your house’s fuse box.
The menus or subtitles do not appear in the
language you want
• With a DVD: the DVD menus are not displayed
in your language. Check the disc jacket to see
which languages are available. Choose the
language of your choice, if available.
• With a DVD: there are no subtitles. Check the
disc jacket to see whether subtitles are
available. Choose the ones you want.
• The preferred language for DVD dialogues
and subtitles was set upon initial installation
of your DVD recorder.
• You can also change the language while a disc
is playing by pressing the INFO key and
selecting the audio or subtitle icon.
The display or reading of digital images in
JPEG format is slow
• Image display can take a fairly long time,
depending on the size of the images. If the
images are too “bulky”, your DVD recorder
may not be able to display them correctly.
28
EN
DRC8030_EN
8/15/06
10:30 AM
Page 36
Limited warranty (US)
More information
EN
The menus of your DVD recorder do not
appear in the language you want
• Check that your language is available in the
settings menu. If not, choose another
language.
You can’t access the selected menu, even
when you press OK
• If the name of the menu appears on a
transparent background, it means that the
corresponding menu or function is not
available. The Disc, Titles and Playlist menus
are contextual menus: they depend on
operations performed beforehand such as:
- Disc is only accessible if there is a disc in the
disc tray of your DVD recorder.
- Titles is only accessible once you have
recorded a TV program or video sequence
(from an external device).
Your DVD recorder menu disappears
• As with computers, your DVD recorder has a
screen saver which replaces the fixed menu by
a mobile RCA logo. Press on a navigation key
to bring back the fixed menu.
You can’t switch channels
• During the recording of a TV program (or
video sequence from a connected device),
switching channels is impossible. To change
channels, you have to stop the recording
completely.
In quiet moments, you hear a slight hum
coming from your DVD recorder
• Your DVD recorder is equipped with a fan. It
switches on as soon as your DVD recorder is
turned on and produces a slight hum.
Other problems
If you forget your password
• Open the player’s disc tray and ensure that
there is no disc on it. Close the tray. The
player menu is now displayed on the TV
screen. Now press the STOP key on your player
and hold the STOP key on the remote control
unit down for 3 seconds. The password that
you chose for parental control is cancelled.
The close padlock on your recorder’s display
disappears.
29
DVD copy protections
In accordance with the DVD standard, your DVD
recorder is equipped with a Copy Protection
system, which can be triggered on and off by the
DVD disc itself, in order to make any recording of
the concerned DVD disc onto a videotape of very
poor picture quality, or even impossible. “This
product incorporates copyright protection
technology that is protected by method claims of
certain U.S. patents and other intellectual
property rights owned by Macrovision
Corporation and other rights owners. Use of this
copyright protection technology must be
authorized by Macrovision Corporation, and is
intended for home use only unless otherwise
authorized by Macrovision Corporation. Reverse
engineering or disassembly is prohibited.”
Technical data
Power requirements 120V - 60 Hz
Net weight: 5 kg (11 lbs)
Power consumption:
• Operating: < 30 W
• Standby: < 3 W
Hard disc capacity: 80Gb
Functioning conditions: 5°C to 35°C (41°F to 95°F)
surrounding humidity: 80 % maximum
Playback system 2 Laser diodes Wave length: 655 / 780 nm,
Laser power CLASS 2
Nominal Specification - THOMSON reserves the right
to change the specifications without notice. The
characteristics and aspect of the product may be
changed without prior notification. The colour and
aspect of the product may differ from that
represented in this manual.
What your warranty covers:
• Defects in materials or workmanship.
For how long after your purchase:
• One year from date of purchase for labor and
parts
• The warranty period for rental units begins
with the first rental or 45 days from date of
shipment to the rental firm, whichever comes
first.
What we will do:
• Pay any Authorized RCA Audio Service Center
the labor charges to repair your unit.
• Pay any Authorized RCA Audio Service Center
for the new or, at our option, refurbished
replacement parts required to repair your
unit.
How you get service:
• Take your unit to any Authorized RCA Audio
Service Center. To identify your nearest
Authorized RCA Audio Service Center, ask
your dealer, look in the Yellow Pages, or call
1-800-336-1900.
• Show the Authorized Service Center
Representative your evidence of purchase
date or first rental.
• Pick up your unit when repairs are completed.
• Proof of purchase in the form of a bill of sale
or receipted invoice which is evidence that the
product is within the warranty period must
be presented to obtain warranty service. For
rental firms, proof of first rental is also
required.
What your warranty does not cover:
• Customer instruction. (Your Owner’s Manual
describes how to install, adjust, and operate
your unit. Any additional information should
be obtained from your dealer.)
• Installation and related adjustments.
• Signal reception problems not caused by your
unit.
• Damage from misuse or neglect.
• Cleaning of audio heads.
• Batteries.
• A unit that has been modified or incorporated
into other products or is used for institutional
or other commercial purposes.
• A unit purchased or serviced outside the
U.S.A.
• Acts of nature, such as but not limited to
lightning damage.
Product Registration:
• Please complete and mail the Product
Registration Card packed with your product.
It will make it easier to contact you should it
ever be necessary. The return of the card is
not required for warranty coverage.
EN
Limitation of Warranty:
• THE WARRANTY STATED ABOVE IS THE ONLY
WARRANTY APPLICABLE TO THIS PRODUCT.
ALL OTHER WARRANTIES, EXPRESS OR
IMPLIED (INCLUDING ALL IMPLIED
WARRANTIES OF MERCHANTABILITY OR
FITNESS FOR A PARTICULAR PURPOSE) ARE
HEREBY DISCLAIMED. NO VERBAL OR
WRITTEN INFORMATION GIVEN BY THOMSON
INC., ITS AGENTS OR EMPLOYEES SHALL
CREATE A GUARANTY OR IN ANY WAY
INCREASE THE SCOPE OF THIS WARRANTY.
• REPAIR OR REPLACEMENT AS PROVIDED
UNDER THIS WARRANTY IS THE EXCLUSIVE
REMEDY OF THE CONSUMER. THOMSON INC.
SHALL NOT BE LIABLE FOR INCIDENTAL OR
CONSEQUENTIAL DAMAGES RESULTING FROM
THE USE OF THIS PRODUCT OR ARISING OUT
OF ANY BREACH OF ANY EXPRESS OR IMPLIED
WARRANTY ON THIS PRODUCT. THIS
DISCLAIMER OF WARRANTIES AND LIMITED
WARRANTY ARE GOVERNED BY THE LAWS OF
THE STATE OF INDIANA. EXCEPT TO THE
EXTENT PROHIBITED BY APPLICABLE LAW,
ANY IMPLIED WARRANTY OF
MERCHANTABILITY OR FITNESS FOR A
PARTICULAR PURPOSE ON THIS PRODUCT IS
LIMITED TO THE APPLICABLE WARRANTY
PERIOD SET FORTH ABOVE.
How State Law relates to warranty:
• Some states do not allow the exclusion nor
limitation of incidental or consequential
damages, or limitations on how long an
implied warranty lasts, so the above
limitations or exclusions may not apply to you.
• This warranty gives you specific legal rights,
and you also may have other rights that vary
from state to state.
If you purchased your unit outside the
United States:
• This warranty does not apply. Contact your
dealer for warranty information.
Service calls which do not involve defective
materials or workmanship are not covered by this
warranty. Costs of such service calls are the sole
responsibility of the purchaser.
30
DRC8030_EN
8/15/06
10:30 AM
Page 38
Limited warranty (Canada)
What your warranty covers:
• Defects in materials or workmanship.
EN
For how long after your purchase:
• One year from date of purchase for labor and
parts
• The warranty period for rental units begins
with the first rental or 45 days from date of
shipment to the rental firm, whichever comes
first.
What we will do:
• Pay any Authorized RCA Audio Service Center
the labor charges to repair your unit.
• Pay any Authorized RCA Audio Service Center
for the new or, at our option, refurbished
replacement parts required to repair your
unit.
How you get service:
• Take your unit to any Authorized RCA Audio
Service Center. To identify your nearest
Authorized RCA Audio Service Center, ask
your dealer, look in the Yellow Pages, or call
1-800-336-1900 / 1-866-723-6486.
• Show the Authorized Service Center
Representative your evidence of purchase date
or first rental.
• Pick up your unit when repairs are completed.
• Proof of purchase in the form of a bill of sale
or receipted invoice which is evidence that the
product is within the warranty period must be
presented to obtain warranty service. For
rental firms, proof of first rental is also
required.
What your warranty does not cover:
• Customer instruction. (Your Owner’s Manual
describes how to install, adjust, and operate
your unit. Any additional information should
be obtained from your dealer.)
• Installation and related adjustments.
• Signal reception problems not caused by your
unit.
• Damage from misuse or neglect.
• Cleaning of audio heads.
• Batteries.
• A unit that has been modified or incorporated
into other products or is used for institutional
or other commercial purposes.
31
• A unit purchased or serviced outside Canada.
• Acts of nature, such as but not limited to
lightning damage.
Product Registration:
• Please complete and mail the Product
Registration Card packed with your product.
It will make it easier to contact you should it
ever be necessary. The return of the card is
not required for warranty coverage.
Limitation of Warranty:
• THE WARRANTY STATED ABOVE IS THE ONLY
WARRANTY APPLICABLE TO THIS PRODUCT.
NO VERBAL OR WRITTEN INFORMATION
GIVEN BY THOMSON MULTIMEDIA LTD., ITS
AGENTS OR EMPLOYEES SHALL CREATE A
GUARANTY OR IN ANY WAY INCREASE THE
SCOPE OF THIS WARRANTY.
• REPAIR OR REPLACEMENT AS PROVIDED
UNDER THIS WARRANTY IS THE EXCLUSIVE
REMEDY OF THE CONSUMER. THOMSON
MULTIMEDIA LTD. SHALL NOT BE LIABLE FOR
INCIDENTAL OR CONSEQUENTIAL DAMAGES
RESULTING FROM THE USE OF THIS PRODUCT.
EXCEPT TO THE EXTENT PROHIBITED BY
APPLICABLE PROVINCIAL LAW, ANY IMPLIED
WARRANTY OF MERCHANTABILITY OR
FITNESS FOR A PARTICULAR PURPOSE ON THIS
PRODUCT IS LIMITED TO THE APPLICABLE
WARRANTY PERIOD SET FORTH ABOVE.
How Provincial Laws relates to warranty:
• This warranty gives you specific legal rights
which are in addition to statutory warranties
that may vary from Province to Province.
If you purchased your unit outside Canada:
• This warranty does not apply. Contact your
dealer for warranty information.
Service calls which do not involve defective
materials or workmanship are not covered by this
warranty. Costs of such service calls are the sole
responsibility of the purchaser.