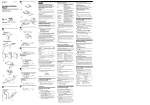
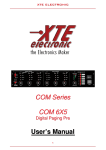
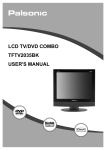
1
The Dolby Digital* Setup Menu Dolby -- Dolby Digital Setup -Dynamic Full 3/4 1/2 1/4 OFF Sound problems • • • • Dynamic This feature monitors the audio track and controls the different sound levels via dynamic compression. It minimizes sudden volume increases such as when a commercial starts. Select a range using the andbuttons and press OK. • With a DVD: the disc menus are not displayed in your language. Read the disc jacket to see what languages are available on that disc. Choose one that suits you, if possible. • With a DVD: there are no subtitles. Read the disc jacket to see if subtitles are available on that disc. Choose subtitles in a language that suits you if possible. • If the player’s setup menus are not displayed in the language you want, check that your language is among those listed in the MENU LANG menu. If necessary, choose another language. • To clear a menu from the screen, pressbutton or repeatedly press SETUP. The menu gives you options to change some aspects of your DVD player to fit your personal preferences. Audio: Selects the dialogue language: English, Preferences French or Spanish. Subtitle: Selects the subtitle language: English -- Preferences Setup Page -French or Spanish. Audio Eng English Disc Menu: Selects the disc’s menu language: Subtitle Eng English English, French or Spanish. Disc Menu Eng English 1 Kid Safe Change The invalid icon ( Install Batteries in the Remote DVD Player User’s Guide DRC246N Menu problems The Preferences Setup Menu Ratings Password Setup and Connections Adjust the volume control. If a TV is used, check whether the sound is muted or turned down low. You may need to readjust the settings in the AUDIO menu. Sound is muted during still, frame advance, or slow-motion play. Insert two AA batteries, matching the polarities indicated inside the battery compartment. Notes: Do not mix different types of batteries or new and old batteries. Do not use rechargeable batteries. Dispose of batteries in the proper manner, according to federal, state, and local regulations. Connection: DVD +TV Ratings problems • If you forget your password, go to “Forget Password” information in this section. • The default language for dialogues and subtitles may be preset by the DVD. Also, if the language isn’t available on the disc you’re playng the disc’s default language will be chosen. If the disc wasn’t created with subtitles, you won’t be able to use the Subtitle feature. Red What your warranty covers: WARNING What we will do: Note:There is a lock feature on your DVD player if you want to prevent your child from watching DVDs (don’t forget to remove the remote control). Follow the directions for locking and unlocking in the Troubleshooting section. During the initial 90 days: • Provide you with a new, or at our option, a refurbished unit. The exchange unit is under warranty for the remainder of the original product’s warranty period. After the 90 days and within one year: Provide you with a new, or at our option, a refurbished unit. The exchange unit is under warranty for the remainder of the original product’s warranty period. We will bill you a flat exchange charge to replace a defective unit. This charge covers the labor cost for its repair. Troubleshooting How to make a warranty claim: You can correct most problems you have with your product by consulting the Troubleshooting list that follows. • Properly pack your unit. Include any cables, etc., which were originally provided with the product. We recommend using the original carton and packing materials. • Proof of purchase in the form of a bill of sale or receipted invoice which is evidence that the product is within the warranty period must be presented to obtain warranty service. For rental firms, proof of first rental is also required. • Also print your name and address and a description of the defect. Send via standard UPS or its equivalent to: Thomson Inc., 11721 B Alameda Avenue, Socorro,Texas 79927 • Pay any charges billed to you by the Exchange Center for service not covered by the warranty. • Insure your shipment for loss or damage. Thomson accepts no liability in case of damage or loss en route to Thomson. • A new or refurbished unit will be shipped to you freight prepaid. Note: If you prefer, we can provide you with the name of an Authorized Service Representative who will visit your home for a fee to install your electronic entertainment system and to instruct you in its operation. For details about this service, call 1-888-206-3359. For additional assistance while using your RCA product, please visit www.rca.com/customersupport. Player won’t work or no power • Try unplugging the AC power cord, wait two minutes, and plug it back in. The remote control does not work • Remember to point the remote control at the front of your player (towards the infrared remote sensor). Make sure there are no objects between the remote and the player. • Maybe the batteries in the remote are weak, dead, or installed incorrectly. Replace the batteries and make sure the polarity of the terminals (+ and -) is correct. • Operate the remote control at a distance of no more than 20 feet. What your warranty does not cover: • • • • Acts of nature, such as but not limited to lightning damage. Adjustment of customer controls. Damage from misuse or neglect. A unit that has been modified or incorporated into other products or is used for institutional or other commercial purposes. • Batteries. • Units purchased or serviced outside the U.S.A. • Shipping damage if the unit was not packed and shipped in the manner prescribed by Thomson. Disc won’t play • Insert a disc with the label side facing up. • Check the type of disc you put into the disc tray. Refer to Compatible Disc section. • Make sure the regional code of the disc is Region No. 1. Product Registration: Please complete the online Product Registration on www.rca.com/productregistration or complete and mail the Product Registration Card packed with your unit. It will make it easier to contact you should it ever be necessary. The return of the card is not required for warranty coverage. Forgot password Limitation of Warranty: • Open the tray and press CLEAR, 0,0,0,0,1. Turn off DVD player and then turn it on by pressing the ON/OFF key, or you can unplug the unit, wait a few seconds and plug it in again. • THE WARRANTY STATED ABOVE IS THE ONLY WARRANTY APPLICABLE TO THIS PRODUCT. ALL OTHER WARRANTIES, EXPRESS OR IMPLIED (INCLUDING ALL IMPLIED WARRANTIES OF MERCHANTABILITY OR FITNESS FOR A PARTICULAR PURPOSE) ARE HEREBY DISCLAIMED. NO VERBAL OR WRITTEN INFORMATION GIVEN BY THOMSON INC., ITS AGENTS OR EMPLOYEES SHALL CREATE A GUARANTY OR IN ANY WAY INCREASE THE SCOPE OF THIS WARRANTY. • REPAIR OR REPLACEMENT AS PROVIDED UNDER THIS WARRANTY IS THE EXCLUSIVE REMEDY OF THE CONSUMER. THOMSON INC. SHALL NOT BE LIABLE FOR INCIDENTAL OR CONSEQUENTIAL DAMAGES RESULTING FROM THE USE OF THIS PRODUCT OR ARISING OUT OF ANY BREACH OF ANY EXPRESS OR IMPLIED WARRANTY ON THIS PRODUCT. THIS DISCLAIMER OF WARRANTIES AND LIMITED WARRANTY ARE GOVERNED BY THE LAWS OF THE STATE OF INDIANA. EXCEPT TO THE EXTENT PROHIBITED BY APPLICABLE LAW, ANY IMPLIED WARRANTY OF MERCHANTABILITY OR FITNESS FOR A PARTICULAR PURPOSE ON THIS PRODUCT IS LIMITED TO THE APPLICABLE WARRANTY PERIOD SET FORTH ABOVE. Lock/Unlock DVD player • To lock player, open tray and press SETUP, 0, 0, 0, 8, 3 (an on-screen message, “Key Lock On” is displayed). • To unlock, press SETUP, 0, 0, 0, 8, 3. Play starts, but then stops immediately • The disc is dirty. Clean it. • Condensation has formed. Allow player to dry out. Picture format does not match the screen format. • The picture format is adjustable, refer to SETUP menu section. Some discs dictate the format, in which case no adjustment is possible. How state law relates to warranty: • Some states do not allow the exclusion nor limitation of incidental or consequential damages, or limitations on how long an implied warranty lasts, so the above limitations or exclusions may not apply to you. • This warranty gives you specific legal rights; you also may have other rights that vary from state to state. Picture is distorted • The disc might be damaged. Try another disc. • When using FORWARD or REVERSE buttons, it is normal for some distortion while scanning. 4 ©2004 Thomson, Inc Trademark(s) ®Registered, Marca(s) Registrada(s) OPTICAL RISK OF ELECTRIC SHOCK. DO NOT OPEN. White TV INPUT L This symbol indicates important instructions accompanying the product. AUDIO R VIDEO Note: Whenever you are connecting your system cables, turn off the power and make certain that the power cord has been removed from the wall outlet. 1. Connect the audio cables to the AUDIO OUT L and R jacks on the back of your • 90 days from date of purchase - Unit exchange, which includes parts and labor. • 91 days to 1 year from date of purchase - Unit exchange, which includes parts only; you pay the labor. • The warranty for rental units begins with the first rental or 45 days from date of shipment to the rental firm, whichever comes first. Password: Password is not defined until you set it. Should you select a password and then forget it, go to the Troubleshooting section for instructions on resetting. COAXIAL To reduce risk of electrical shock, do not remove cover or back (no user serviceable parts inside). Refer servicing to qualified personnel. • Defects in materials or workmanship. For how long after your purchase: Note: In order for the Rating Limits to be enforced, the disc you’re playing must contain a movie (or a title) that is rated. DIGITAL OUT Yellow This symbol indicates “dangerous voltage” inside the product that presents a risk of electric shock or personal injury. Limited Warranty Ratings: Lets you determine what types of discs can be played in the player, and what types of discs will require a password to override the rating limit that you’ve set. The system ranks the ratings from 1 to 8 in order to accommodate the rating systems used in other countries. (Level 1 is considered material that is least offensive and appropriate for young audiences. Level 8 is considered the most offensive.) S-VIDEO R • The action cannot be completed at this time for one of the following reasons: the disc’s software restricts it; the disc’s software doesn’t support that feature (e.g., angles); the feature is not available at the moment; you’ve requested a title or chapter number that is out of range. Notes: Discs are created differently.The DVD player can’t override some language preferences. If a disc’s software was created to play the movie (title) in a perferred language, the preference you set might be ignored. VIDEO OUT Changing Entertainment. Again. ) appears on screen DVD Player AUDIO OUT L Printed in China TOCOM 16500260 DVD player and to the corresponding AUDIO INPUT jacks on your TV. WARNING: Handling the cord on this product or cords associated with accessories sold with this proudct, will expose you to lead, a chemical known to the State of California to cause birth defects or other reproductive harm. Wash hands afer handling. 2. Connect the video Cable. 2a. Basic connection – Connect the video cable to the VIDEO OUT jack on the back of the your DVD player, and to the VIDEO INPUT jack on your TV. -OR2b. S-Video (not shown) – If your TV has an S-Video jack, connect the S-Video cable (not provided) to the S-VIDEO on the DVD to the S-VIDEO of your TV. FCC INFORMATION This equipment has been tested and found to comply with the limits for a Class B digital device, pursuant to Part 15 of the FCC rules. These limits are designed to provide reasonable protection against harmful interference in a residential installation. This equipment generates, uses and can radiate radio frequency energy and, if not installed and used in accordance with the instructions, may cause harmful interference to radio communications. However, there is no guarantee that interference will not occur in a particular installation. If this equipment does cause harmful interference to radio or television reception, which can be determined by turning the equipment off and on, the user is encouraged to try to correct the interference by one or more of the following measures. • Reorient or relocate the receiving antenna. • Increase the separation between the equipment and receiver. • Connect this equipment into an outlet on a circuit different from that to which the receiver is connected. • Consult the dealer or an experienced radio/TV technician for help. This class B digital apparatus meets all requirements of the Canadian Interference--Causing Equipment Regulations. The Shock Hazard Marking and Associated Graphical Symbol is provided on the bottom panel of unit. Refer to the identification/rating label located on the back panel of your product for its proper operating voltage. Caution: To prevent electric shock, match wide blade of plug towide slot, fully insert. Attention: Pour éviter les chocs électriques, introduire la lame la plus large de la fiche dans la borne correspondante de la prise et pousser jusqú au fond. Note: If your TV doesn’t have Audio and Video Input Jacks and only has an RF jack, you need to connect an RF modulator (not provided). Other Connection Options COMPONENT VIDEO OUT Y PB PR Component Video Cables CLASS 1 LASER PRODUCT ON Product Registration: Please fill out the product registration card (packed separately) and return it immediately. For U.S. customers:Your RCA Consumer Electronics product may also be registered at www.rca.com/productregistration. Registering this product allows us to contact you if necessary. OFF PROGRESSIVE SCAN Keep your sales receipt to obtain warranty parts and service and for proof of purchase. Attach it here and record the serial and model numbers in case you need them. The numbers are located on the back of the player. Model number: Serial Number: Purchase date: Dealer address and phone: WARNING: To reduce the risk of fire or shock hazard, do not expose this DVD player to rain or moisture. No objects filled with liquids, such as vases, shall be placed on the apparatus. CAUTION: FCC Regulations state that unauthorized changes or modifications to this equipment may void the user’s authority to operate it. Note: This device is protected by U.S. patent numbers 4,631,603 and 4,577,216 and 4,819,098 and other intellectual property rights. The use of Macrovision’s copy protection technology in the device must be authorized by Macrovision and is intended for home and other limited pay-per-view uses only, unless otherwise authorized in writing by Macrovision. Reverse engineering or disassembly is prohibited. Note: Remember to connect the audio cables because the component cable carries only the picture signal, not the sound. PROGRESSIVE SCAN ON/OFF Switch If you connect the DVD Player to a TV that is capable of using progressive scan technology, you need to use the Y, Pb, Pr jacks and video cables. It is essential to turn the PROGRESSIVE SCAN switch to the ON position. If you use S-VIDEO OUT or VIDEO OUT jacks for your connection, leave the switch in the OFF position. Note: If your TV or monitor has progressive scanning capability, you need to turn the switch on the back of the DVD player to the PROGRESSIVE SCAN ON position. DIGITAL OUT CAUTION: THIS PRODUCT UTILIZES A LASER. USE OF CONTROLS OR ADJUST-MENTS OR PERFORMANCE OF PROCEDURES OTHER THAN THOSE SPECIFIED HEREIN MAY RESULT IN HAZARDOUS RADIATION EXPOSURE. DO NOT OPEN COVERS AND DO NOT REPAIR YOURSELF. REFER SERVICING TO QUALIFIED PERSONNEL. COAXIAL OPTICAL Digital Out Digital Out Optical Cable Coaxial Cable This DVD player is designed and manufactured to respond to the Region Management Information. If the Region number of a DVD disc does not correspond to the Region number of this DVD player, this DVD player cannot play the disc. The Region number for this DVD player is Region No 1. Apparatus shall not be exposed to dripping or splashing and that no objects filled with liquids, such as vases, shall be placed on the apparatus. COMPONENT VIDEO OUT (Y, Pb, Pr) Jacks The Y, Pb, Pr, jacks provide optimum picture quality because the video signal is separated into three parts. To ensure maximum picture quality, use three video-grade cables (yellow) for the connection.You can also buy bundled component video cables that are color-coded to match the Y, Pb, Pr jacks (red, green, and blue) DIGITAL OUT COAXIAL/OPTICAL (Audio) Use one of these jacks to connect your DVD player to a Dolby Digital* receiver or decoder. Some receivers have either the COAXIAL or OPTICAL type of Digital Audio Input jack and some have both. Under most conditions, optical and coaxial connections work equally well––the only difference is the type of cable you connect to the jack. Note: If the DVD player is connected to a DTS** receiver through DIGITAL OUT and DTS track is selected, there will be no sound. *Manufactured under license from Dolby Laboratories. “Dolby” and the double-D symbol are trademarks of Dolby Laboratories. Confidential unpublished works. © 1992-1997 Dolby Laboratories, Inc. All rights reserved. **DTS is a registered trademark of Digital Home Theater Systems, Inc. 1 Front of the DVD Player (buttons appear left to right below) Program Playback (all discs except WMA and mp3) Playing Discs Compatible Discs DVD+Rewritable 1 Card Slot 1 2 Card Slot 2 3 4 5 6 7 8 9 Display Area Remote Sensor Standby Light OPEN/CLOSE PLAY SELECT STANDBY/STOP 1 2 3 4 5 6 7 8 9 Accepts cards: Only Multi-Media Card (MMC); Secure Digital (SD); Memory Stick (MS) or Smart Media (SM) Accepts cards: Compact Flash (CF) Type 1; or Compact Flash (CF) Type 11 Receives the remote control signal. Lights when DVD player is turned off. Opens and closes disc tray. Begins disc play. Switches between memory card Slot 1, Slot 2 and disc tray. Turns the DVD player on and off. During playback, places disc in stop mode. In stop mode, press and hold to put DVD player in standby mode. Card Readers The Card reading formats for slot playback are mp3, WMA, and JPEG. When using a memory card, the file name must be seven characters in order to be displayed, unlike the file name of a disc. 1. Insert a compatible memory card (type described above) into Slot 1 or Slot 2. 2. Press the SELECT button to choose Card 1; press again to choose Card 2. Repeatedly pressing the SELECT button switches between the Card 1, Card 2, and disc tray. 3. Use the navigation buttons (,,,) to move up, down, left, or right through the folders; press OK to select the highlighted folder or item. Note:To play all of the files in a folder, highlight the first file and press PLAY. 4. Press PLAY to begin playback. 5. Press STOP to stop playback. 6. To remove the information from the screen, repeatedly press the SELECT button or remove the card. Remote Control ,,, Navigates through the menus. Number entry. Accesses the A-B repeat playback mode. ANGLE Accesses the camera angle. AUDIO Selects the audio language. BOOKMARK Accesses the bookmark feature. CLEAR Clears some functions. DISC MENU Accesses the disc’s menu (if available). DISPLAY Provides playback status. FORWARD Searches forward through the disc. MUTE Lowers and restores the volume. OK Selects item highlighted in menu. ON/OFF Turns the player on and off. OPEN/CLOSE Opens and closes the tray. PAUSE Freezes frame, frame advance, and slow motion. PLAY Starts playing a disc or card. PREVIEW Previews contents of disc. PROGRAM Accesses the Program playback mode. RANDOM Starts the Random playback mode. REPEAT Accesses the Repeat playback mode. REVERSE Searches back through the disc. SETUP Accesses and exits the General Setup main) menu. SKIP Advances to the next/ preceding chapter or track. STOP Stops playback. SUBTITLE Turns the subtitle on and off. TITLE MENU Accesses the title of the disc and turns Playback Control PBC) for VCDs only on and off. ZOOM Accesses the Zoom feature 2 (if available). 0-9 A-B This DVD Player is capable of playing the following types of discs: DVDs, Audio CDs,Video CDs, and CDs with mp3 files, WMA files (Windows Media Audio), and JPEG files on them. Before you put a disc in the player, make sure it is compatible. You can’t play the following types of discs: Laserdiscs, CD-I, CD-ROM (computer-only discs), DVD-ROM, or discs recorded using other broadcast standards (i.e., PAL or SECAM); CD-G discs. Notes: Some discs may not be compatible due to laser pickup, recording formats, and software used. Some technologies and methods used for mp3 file recording on CD-Rs can prevent optimal playback of these files on your DVD player by degrading the sound quality and/or the ability of the player to read the file. Regional Coding Both the DVD Player and the discs are coded by region. These regional codes must match in order for the disc to play. This player’s code is Region 1. Turn on the DVD Player 1. Plug the power cord into the outlet once the DVD player is connected to your TV. 2. Turn on the TV and tune to its Video Input Channel, if necessary. 3. Press the STANDBY/STOP on the DVD player or the ON/OFF button on the 4. 5. 6. 7. remote control to turn it on. Press the OPEN/CLOSE button on the front of the player or remote control to open the disc tray. Place a disc gently into the tray with the disc’s label facing up (double-sided discs have content on both sides, so you can place the disc with either side up.) Press OPEN/CLOSE again to close the disc tray. Play starts automatically. If a menu appears, one of its options can be selected to start playing the disc. Highlight it and press OK. Press STOP to stop playback. The player remembers the point where disc was stopped. If you press PLAY again, playback resumes from this point. To stop playback completely or to start again from the beginning, press STOP twice. If the player is left in STOP mode for more than one minute without any user interaction, the screen saver is activated. Basic Playback Options Search - To search a disc, you can use the FORWARD button or REVERSE button. You can also use the following search features: Picture Scan - When you’re playing a disc, each time you press FORWARD or REVERSE, your DVD player scans the disc faster until you reach the fastest scan speed. To resume normal playback, press PLAY or continue to press FORWARD or REVERSE. Freeze Frame and Frame Advance – While a disc is playing, press PAUSE to freeze the picture. To advance one frame at a time, press PAUSE repeatedly. To resume normal playback, press PLAY. Note: After approximately one minute in PAUSE with no user interaction, the player goes into screeen saver mode. Slow Motion – While a disc is playing, press PAUSE. Press REVERSE or FORWARD (each time you press reverse or forward, the slow motion will get even slower until you reach the slowest speed). To resume normal playback, press PLAY. Chapter/Track Advance – While a disc is playing, you can skip forward or backward a chapter or track at a time by pressing the SKIP | and SKIP . Note: Use the numeric buttons to directly access a specific track or chapter number. For single digit tracks or chapters, enter a 0 before single digit numbers; for example, enter 0, then 3 for chapter/track 3. Zoom – While a disc is playing, press ZOOM (the player zooms in on the image). Each time you press ZOOM, the picture is magnified even more (until you get to the maximum zoom level). To see other parts of the picture when you’ve zoomed in on the image, try pressing the ,, and buttons to go in corresponding directions. This feature is called pan and scan. Playback Modes Repeat Playback While the disc is playing, press REPEAT button repeatedly to select a play mode: DVD play modes: Title repeat, Chapter repeat, A-B repeat; CD play modes: All tracks repeat, Track repeat, A-B repeat; Playback of mp3, WMA, or JPEG files With this option you choose and program the playback order. 1. Insert a disc. 2. In Stop mode, press the PROGRAM button. The Program menu appears. 3. Use the number buttons to enter the title and/or chapter number (for DVD) or track number (for VCD and Audio CD). Repeat Step 3 as often as necessary. 4. Use the ,, and buttons to select Start. 5. Press the PLAY button to start playback. Tracks are played in the order of the playback list. Playback stops once all tracks have been played. 6. Press the STOP button to stop program playback. Press the STOP button twice or the OPEN/CLOSE button to cancel program playback. Playing mp3, WMA, or JPEG files mp3 is an audio file format which compresses recorded music. It was developed by Fraunhofer Gesellschaft in collaboration with Thomson Inc. The main advantage of the mp3 format is the ability to store CD-quality music tracks on a personal computer in a user-friendly, compressed files. WMA (Windows Media Audio) is another audio file format, developed by Microsoft. JPEG files are image files (make sure they have a resolution of less than 5 megapixels.) Note: The time taken for the contents of the disc to be displayed varies according to the size and number of JPEG files actually on the disc. If nothing is displayed after a few minutes, it is likely that certain files are too large. In this case, reduce the files’ resolution to less than 5 megapixels and write another disc. Notes: The playback list remains until the disc is removed from the player. Press PROGRAM repeatedly to take you back to the beginning or toggle between the lists. Before inserting a disc, check that it is compatible with the player: 1. Turn on the DVD and open the disc tray by pressing OPEN/CLOSE. 2. Place the disc in the tray with the printed side facing up and close the tray. 3. Select a folder using the andbuttons on the remote control; press OK to see the folder’s contents. 4. Select a track using the andbuttons on the remote control; press OK to start playback. 5. Press the STOP button to stop playback. 6. To go back to the folder list, press the button in stop mode. Random Playback (VCD and audio CD only) All the tracks are played in a random order (chosen by the DVD player) 1. Insert a disc. 2. In Stop mode, press the RANDOM button (Random appears). 3. Press the PLAY button to start random playback. Once 20 tracks have been randomly played, the player automatically stops playback. 4. Press the RANDOM button again to stop playback (Random disappears). Repeat Play Modes 1. Press the REPEAT button repeatedly to select a play mode: Advanced Playback Features Repeat One: Repeats the current track until the STOP button is pressed. Repeat Folder: Repeats the current folder until the STOP button is pressed. 2. To cancel the repeat playback mode, press the REPEAT button until FOLDER appears on the TV screen. Audio (DVD,VCD and CD) Some discs have several audio tracks used for different languages or different audio formats. To change the language or audio format during play, press the AUDIO button one or more times to select one of the available audio formats or languages. Note:This option is only available if the disc offers a number of languages or formats. JPEG / mp3 Bookmarks To play all mp3 or JPEG files in a folder, highlight the first file in the folder and press PLAY. Also, you can play JPEG and mp3 files simultaneously by starting the music first and then using the menu to select a photo. The Bookmark feature lets you mark a point on the disc so you can quickly start playing the disc from that location. The player stores bookmarks as long as the disc remains in the player and the unit remains on. 1. Press the BOOKMARK button during playback (a menu is displayed). 2. To create a bookmark, select a empty bookmark using the andbuttons and press the PLAY button. 3. Repeat Step 2 as often as necessary. 4. To start playback from a bookmark, press the BOOKMARK button, select the bookmark using the andbuttons and press the PLAY button. 5. To delete a bookmark, press the BOOKMARK button, select the bookmark using the andbuttons and press the CLEAR button. 6. Exit the Bookmark feature, by pressing the BOOKMARK button. Program Playback (WMA and mp3) You can choose and create a playback list: 1. Highlight the song that you want added to the play list and press BOOKMARK. (add to playlist appears at bottom of screen). 2. Repeat step one until you have the list of specific songs that you want to play. 3. Press BOOKMARK to delete a song from the playlist. 4. Press PROGRAM to display the playlist and press PLAY. Notes: The playback list remains until the disc is removed from the player. Press PROGRAM repeatedly to take you back to the beginning or toggle between the lists. Menu System Display The Display appears across the top of the screen when you press the DISPLAY button on the remote while playing a disc. Press the DISPLAY button repeatedly to scroll through playback information. The DVD Player Menu System The DVD player menu system is not the same as the disc menu. The DVD player menu appears when there’s no disc playing. Preview Setup The Preview feature enables you to view contents of the disc on the screen. To preview the disc: 1. Press the PREVIEW button during playback. 2. Highlight the preview selection. • Digest: shows all the available contents. Input the number of the item you want to play using the numeric buttons and press OK to confirm. • Interval: shows all tracks in 10-minute intervals. Input the number corresponding to the interval where you want to start playback from and press OK to confirm. 3. Select NEXT to view the next page, MENU to return to the Select Disc Type menu, or START to begin playback. Preferences -- General Setup Page -TV Display Menu Lang • • • • Introscan (Audio CDs only) Use this feature to preview the first few seconds of each track on a CD. Press PREVIEW button on the remote control to start the Introscan. PS English To access the DVD player menus: • Press the SETUP button to display the main menu. • Select a menu icon using the and buttons. • Use the andbuttons to select one of the options in the menu. • Press the button to access the submenu. Use the andbuttons select one of the options in the submenu. Press OK to confirm your selection. Return to a previous menu using the button. To exit from the player menus, press the SETUP button repeatedly. The General Setup Menu (shown above) Playback Control (PBC) TV Display You can choose a display that affects how a disc’s content appears on your TV screen. Normal/PS (4:3 Standard): reproduces a 4:3 picture with some distortion, Normal/LB (4:3 Letterbox): gives best reproduction of pictures recorded in this format (i.e., with horizontal bands at the top and bottom of the screen), Wide (16:9 Widescreen): reproduces 16:9 format films in full, on a 16:9 screen. The Playback Control feature is available only on Video CDs. Press the TITLE MENU button to turn the PBC feature on and off. The Playback Control feature supports the menus of the VCD format similar to a DVD menu. A-B Repeat To repeat a segment between two points (A and B), press the A-B button at the beginning of the segment you want to repeat. Allow the disc to play to the end of the segment or use FORWARD to advance to the end point (B). Press the A-B button again at the end of the segment. The segment plays repeatedly until you press A-B to resume normal playback. Dolby Menu Lang (Language) The Menu Lang feature enables you to set the preferred on-screen menu language: English, Spanish, or French. 3 continued on next page