1
Register your product and get support at
www.philips.com/welcome
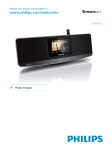
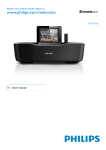
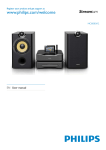
NP3900/12
EN User manual
Contents
1 Important
Safety
Environmental notices
2 Your NP3900
Introduction
What’s in the box
Overview
4
4
5
7
7
7
8
3 Prepare
14
Install batteries into the remote control 14
Connect external audio devices
14
Connect an iPod / iPhone dock
14
Connect power supply
15
4 First-time setup
16
Connect to home Wi-Fi/wired network 17
5 Play from home Wi-Fi/wired
network
Stream from a UPnP server
Play Internet radio stations
Stream from online music services
Search for music
6 Use your Smartphone as a virtual
remote control
Download the application
Access the smartphone application
Use the virtual remote control
7 Multiroom Music
24
24
27
31
31
Sound settings
Display settings
Slideshow settings
Album art
Clicker sound
Clock settings
Network settings
Location and time zone
Language
Device information
Check for software upgrades
Demo mode
Restore factory settings
36
37
37
37
38
38
40
41
41
41
41
41
41
10 Register NP3900 with Philips
42
42
43
43
Register NP3900
Unregister NP3900
Check registration information
11 Maintenance
44
44
Cleaning
12 Technical data
45
13 Troubleshooting
48
14 Contact information
49
33
33
33
33
34
8 Play from an external audio device
(AUX)
35
Play from an external audio device
9 Settings
Play modes
35
36
36
EN
3
1 Important
h Do not remove the casing of this product.
Safety
j Keep this product away from direct
Information for Europe:
k Do not install near any heat sources
such as radiators, heat registers, stoves,
or other electrical equipment (including
Know these safety symbols
i Only use this product indoors. Do
not expose the product to dripping /
splashing water, rain or high humidity.
l Do not place any other electrical
equipment on the product.
m Do not place any sources of danger
on the product (e.g. objects containing
liquids, burning candles).
n This product may include batteries.
Please refer to safety and disposal
instructions for batteries in this user
manual.
The ‘exclamation mark’ calls attention to
features for which you should carefully read
the supplied literature to prevent operating
and maintenance problems.
The ‘lightening bolt’ symbol indicates
uninsulated components within the product
that can cause an electric shock.
"
not expose the product to rain or moisture
#$"
such as vases, on the product.
a Read these instructions.
b Keep these instructions.
c Heed all warnings.
d Follow all instructions.
o This product may contain lead and
mercury. Disposal of these materials
may be regulated due to environmental
considerations. Please refer to disposal
instructions in this user manual.
Warning
Never remove the casing of this apparatus.
Never lubricate any part of this apparatus.
Never place this apparatus on other electrical
equipment.
Keep this apparatus away from direct sunlight,
Ensure that you always have easy access to the
power cord, plug or adaptor to disconnect this
apparatus from the power.
Where the mains plug or an appliance coupler
is used as the disconnect device, the disconnect
device shall remain readily operable.
e Do not use this product near water.
f Clean only with dry cloth.
g Do not block any ventilation openings.
Install in accordance with the
manufacturer’s instructions.
4
EN
Risk of overheating! Never install this
a space of at least four inches around this
apparatus for ventilation. Ensure curtains or
other objects never cover the ventilation slots
on this apparatus.
Hearing Safety
Listen at a moderate volume:
Using headphones at a high volume can impair
your hearing. This product can produce
sounds in decibel ranges that may cause
hearing loss for a normal person, even for
exposure less than a minute. The higher
decibel ranges are offered for those that may
have already experienced some hearing loss.
Sound can be deceiving. Over time your
hearing ‘comfort level’ adapts to higher
volumes of sound. So after prolonged listening,
what sounds ‘normal’ can actually be loud and
harmful to your hearing. To guard against this,
set your volume to a safe level before your
hearing adapts and leave it there.
Environmental notices
This product complies with the radio
interference requirements of the European
Community.
This product complies with the requirement
of the 1999/5/EC directive.
Class II equipment symbol:
To establish a safe volume level:
Set your volume control at a low setting.
Slowly increase the sound until you can hear it
comfortably and clearly, without distortion.
This symbol indicates that this product has a
double insulation system.
Listen for reasonable periods of time:
Prolonged exposure to sound, even at
normally ‘safe’ levels, can also cause hearing
loss.
%&'
manufacturer may void user’s authority to
operate this product.
Be sure to use your equipment reasonably and
take appropriate breaks.
Be sure to observe the following guidelines
when using your headphones.
Listen at reasonable volumes for reasonable
periods of time.
Your product is designed and manufactured
with high quality materials and components,
which can be recycled and reused.
Be careful not to adjust the volume as your
hearing adapts.
Do not turn up the volume so high that you
can’t hear what’s around you.
You should use caution or temporarily
discontinue use in potentially hazardous
situations.
When this crossed-out wheeled bin symbol
is attached to a product it means that the
product is covered by the European Directive
2002/96/EC.
EN
5
Please inform yourself about the local separate
collection system for electrical and electronic
products.
Please act according to your local rules and
do not dispose of your old products with your
normal household waste. Correct disposal of
your old product helps to prevent potential
negative consequences for the environment
and human health.
Your product contains batteries covered by
the European Directive 2006/66/EC, which
cannot be disposed with normal household
waste.Please inform yourself about the local
rules on separate collection of batteries
because correct disposal helps to prevent
negative consequences for the environmental
and human health.
Information about the use of batteries:
Caution
)(*+
batteries. Do not mix new and used batteries.
Do not mix different brands of batteries.
Observe correct polarity. Remove batteries
from products that are not in use for a longer
period of time. Store batteries in a dry place.
Risk of injury: Wear gloves when handling
leaking batteries. Keep batteries out of reach
of children and pets.
Risk of explosion: Do not short circuit
batteries. Do not expose batteries to
excessive heat. Do not throw batteries into
;('
batteries. Do not recharge non-rechargeable
batteries.
6
EN
The making of unauthorized copies of copyprotected material, including computer
(""'
recordings, may be an infringement of
copyrights and constitute a criminal offence.
This equipment should not be used for such
purposes.
2 Your NP3900
Congratulations on your purchase, and
<='
support that Philips offers, register your product
at www.philips.com/welcome.
What’s in the box
Check and identify the contents of your
package:
Main unit
Remote control with batteries
AC power adapter
Introduction
Software suite on a CD-ROM
Quick Start Guide
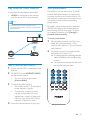
This unit can
Wall mounting template
connect to the existing home Wi-Fi/
wired network, which can consist of
computers and UPnP devices;
connect the existing audio systems
and MP3 players;
connect an iPod/iPhone dock.
With these connections, you can
play Internet radio stations and
*online music services over the
Internet;
play music stored on a computer/
UPnP server;
play music from an audio system/
portable media player through the
speakers.
charge or play your iPod/iPhone
through this unit.
Tip
*Online services are available in some
countries only.
EN
7
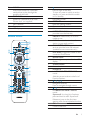
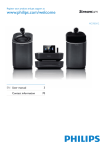
Overview
Front and rear view
a
b
c
d
e
f
g
h
i
j
k
4.
1.
Press to turn on the unit.
To turn off, press to switch to active
standby; or, press and hold to switch to
Eco standby.
Exit Demo mode.
2.
3.
8
Mute or unmute sound.
- VOLUME +
Increase or decrease volume.
EN
5.
ETHERNET
Socket for the Ethernet cable that
connects this unit with the home WiFi/wired network, if you want a wired
connection to the home Wi-Fi/wired
network.
DC IN
Socket for the AC power adapter.
6.
3.5 mm headphone jack.
7.
8.
9.
10.
11.
AUX IN
Audio input socket for a portable
media player to play through the
speakers on this unit.
DOCKING
Socket for connection of an iPod/
iPhone dock (not supplied).
Wi-Fi antenna
IR sensor
LCD display
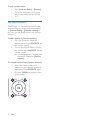
1.
2.
3.
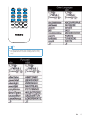
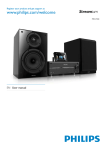
Remote control
a
b
z
y
c
d
e
f
g
4.
5.
x
h
w
v
6.
i
j
k
u
t
s
r
q
l
m
n
o
p
7.
Press to turn on the unit;
To turn off, press to switch to active
standby; or, press and hold to switch
to Eco standby.
Exit Demo mode.
SETTINGS
Enter the settings menus.
Source selector
Select a media source:
INTERNET RADIO: Radio services
provided over the Internet;
LIBRARY: Media library on a UPnP
media server;
AUX: Connected external audio
device (e.g. an audio system);
ONLINE SERVICES: Supported music
services provided over the Internet
(available in some countries only);
DOCKING: Supported media on the
connected iPod/iPhone.
BRIGHTNESS
Select brightness options for the LCD
display.
ALARM MENU
Access the alarm menu.
FAVORITE
In LIBRARY/INTERNET RADIO
mode:
Add the current station to the list of
Favorite Stations.
/ / /
Navigation buttons
Press to navigate through menus.
/
In LIBRARY/INTERNET RADIO
mode:
Superscroll: In a long list of options,
press and hold to start Superscroll.
)#
starting with current alphabet/number.
OK
J
EN
9
8.
9.
10.
11.
12.
13.
14.
10
/
Search buttons on the play screen
In LIBRARY mode:
Press to skip to the previous/next
chapter/track.
15.
Start/pause/resume play;
In LIBRARY mode: Start to play the
Z[<\]
/ALARM OFF
Stop play;
Exit Demo mode;
Turn off alarm.
NOW PLAYING
Return to play screen.
RATE
In ONLINE SERVICES mode:
Increase/decrease rating* of current
music.
Alphanumeric
buttons
For text entry
In INTERNET RADIO mode:
On the radio play screen, press and
hold a numeric button to store current
station in the location as a preset
station.
In LIBRARY/INTERNET RADIO
mode:
Quickjump: In a long list of options
that are sorted in an alphabetical
order, press once or repeatedly to
select an alphabet, and jump to the
alphabet.
CLEAR
Press to delete the previous entry;
Press and hold to delete all entries.
NEUTRAL
Enable/disable the Direct Source
sound effect.
SOUND MENU
Enter the menu for sound effect
adjustment.
18.
EN
16.
17.
19.
20.
21.
22.
SNOOZE
Stop alarm sound for a period of time.
SLEEP
Set the sleep timer.
REPEAT
Select a repeat play option.
SHUFFLE
Enable/disable random order play.
LIVING SOUND
Enable/disable the Living Sound effect.
FULL SOUND
Enable/disable the Full Sound effect.
a/A
Switch between lower and upper
cases.
VOL
Increase/decrease the volume.
23.
Mute/restore sound.
24.
BACK: Go back to previous screen.
25.
26.
HOME: Return to Home screen (main
menu).
SEARCH
Start search/browse based on
alphanumeric entry.
CLOCK
View the clock.
Note
* Rating current music is available only for
music services that support rating, and is
available only in some countries.
.
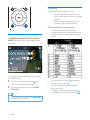
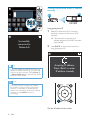
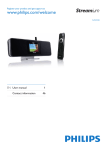
Touch screen
On NP3900, you enter Home screen after the
^
NP3900 is equipped with a touch screen.
To select a music source, or
enterthe[Settings]menu
AII songs
AII songs
Playlists
Playlists
Artists
Artists
AIbums
AIbums
If necessary, tap on the screen to
show functional buttons;
Tap on the buttons to select
corresponding functions;
Tap on an option to select.
On Home screen, tap on / to
navigate through icons. Tap on the
corresponding icon to select.
Or, press / /OK on the remote
control to select the desired source.
Home screen
To go back to previous screen
Press
BACK.
To return to Home screen
Press
HOME.
EN
11
Text entry
To enter text and symbols, you can:
tap on the text box and enter text
and symbols with the pop-up keypad
directly.
press corresponding alphanumeric
buttons on the remote control.
Text entry with the remote control
To enter letters/numbers/symbols
corresponding to the same alphanumeric
'"'
button.
To enter symbols, press
To enter space, press
To switch between lower and upper
.
cases, press
To delete previous character, press
To delete all entries, press and hold
Play screen
In LIBRARY/INTERNET RADIO/ONLINE
SERVICES mode, Play screen appears when
play starts.
To navigate through menus during music play,
do the following:
1
On the remote control, press
and
then, use the Navigation buttons.
2
To return to Play screen, press NOW
PLAYING.
Tip
On Play screen, you can also press
repeatedly to select songs.
12
EN
and
repeatedly.
.
.
.
Tip
For languages other than English, letters that
an alphanumeric button corresponds to may
vary.
EN
13
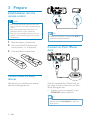
3 Prepare
Install batteries into the
remote control
Caution
Risk of explosion! Keep batteries away from
"_'
Risk of decreased battery life! Never mix
different brands or types of batteries.
Risk of product damage! When the remote
control is not used for long periods, remove
the batteries.
1
2
Open the battery compartment.
3
Close the battery compartment.
Insert two AAA R03 batteries with
correct polarity (+/-) as indicated.
Note
When the connection is ready, press AUX to
switch to the external device.
Connect an iPod / iPhone
dock
DOCKING
Connect external audio
devices
With this unit, you can listen to an external
audio device through this unit.
With the connected iPod / iPhone dock, you
can charge or listen to music from your iPod /
iPhone through this unit.
Connect a dock (not supplied) to the
DOCKING socket on this unit.
Tip
To listen to music from the docked iPod /
<"DOCKING to select the
dock source.
14
EN
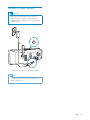
Connect power supply
Warning
Risk of product damage! Ensure that the
power supply voltage corresponds to the
voltage printed on the back or the underside
of the product.
Connect this unit to the power supply.
Note
The type plate information is located at the
bottom of the unit.
EN
15
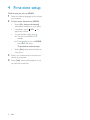
4 First-time setup
!!
1
Select the desired language on the screen
as prompted.
2
To learn major functions on NP3900,
Select [Yes, show me the demo],
when asked whether to view demo;
If necessary, press
adjust the volume;
To exit the demo play, press .
» The unit is switched to Eco
standby.
VOL
to
» Press again to turn on NP3900,
and restart the setup.
To proceed to network setup,
Select [No], when asked whether to
view demo.
3
Select your location and time zone from
the list as prompted.
4
Select [Yes], when asked whether to set
up network connection.
16
EN
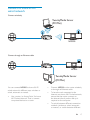
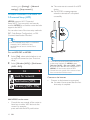
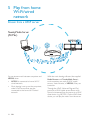
Connect to home Wi-Fi/
wired network
Connect wirelessly
TwonkyMedia Server
(PC/Mac)
NP3900
Connect through an Ethernet cable
NP3900
TwonkyMedia Server
(PC/Mac)
You can connect NP3900 to home Wi-Fi/
wired network in different ways: wireless or
wired, automatic or manual.
Connect NP3900 to the router wirelessly
or through an Ethernet cable.
To have the unit connected to the
Internet over home Wi-Fi/wired network,
ensure that the router connects to
the Internet directly and no dial-up is
required on the computer.
To switch between different connection
methods (wireless or wired, automatic
or manual), or switch between different
Use a router (or Access Point) for home
Wi-Fi/wired network. That is, connect
computers/devices to a router.
EN
17
» The router starts to search for a WPS
device.
routers, go to [Settings] > [Network
settings] > [Setup network].
» On NP3900, a message appears
when the connection is completed
successfully.
Wireless connection: One-touch WiFi Protected Setup (WPS)
NP3900 supports Wi-Fi Protected
Setup(WPS). You can quickly and securely
connect NP3900 to a wireless router that also
supports the WPS.
You can select one of the two setup methods:
<JZ<J(]"<{_
Z<{_']
Tip
Wi-Fi Protected Setup(WPS) is a standard
created by Wi-Fi Alliance for easy
establishment of secure wireless home
network.
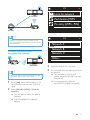
Turn on WPS-PBC on NP3900
1
2
Select [Yes], when asked whether to set
up network connection (see ‘First-time
setup’).
Select [Wireless (WiFi)] > [Push button
(WPS – PBC)].
2/3
Look for network
Push button (WPS...
Pin entry (WPS - PIN)
Add NP3900 on the router
Consult the user manual of the router to
learn how to add a WPS device to the
router. For example:
press and hold the WPS push button.
18
EN
Tip
<{_Z<{_']
as the setup method: On NP3900, select
[Wireless (WiFi)] > [Pin entry (WPS – PIN)],
and write down the PIN that is displayed on
NP3900; On the router, enter the PIN.
Consult the user manual of the router to learn
how to enter the PIN the router.
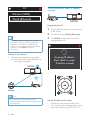
Connect to the Internet
Connect to the Internet as prompted.
» }~^
time setup is complete.
1/3
Look for network
NP3900
Push button (WPS...
Pin entry (WPS - PIN)
Internet
Note
1/4
Make sure that the router connects to the
Internet directly and no dial-up is required on
the computer.
Network A
Network B
Wireless connection: Enter
encryption key manually
Network C
Other ...
NP3900
Tip
Before you start the network setup, have the
encryption key to your router ready.
1
Select [Yes], when asked whether to set
up network connection (see ‘First-time
setup’).
2
Select [Wireless (WiFi)] > [Look for
network].
» The unit starts to search for wireless
networks.
3
4
Select the desired Wi-Fi network.
As prompted, enter the encryption key to
the network.
» The unit starts to acquire an IP
address assigned by the Wi-Fi network
automatically.
» A message appears when the
connection is completed successfully.
» A list of available Wi-Fi networks
appears.
EN
19
WEP key 1
Wireless connection: Enter IP address
manually
NP3900
Stop getting Auto IP
Successfully
connected to
Network A
Tip
If you have hidden the SSID of the router (e.g.
disable the SSID broadcasting), go to the end
of the list of Wi-Fi network. Select [Other...]
> [Manual SSID entry]. In the text box, enter
the name of the router.
1
Search for the home Wi-Fi network,
and then, connect to the home Wi-Fi
network.
» The unit starts to acquire an IP
address assigned by the Wi-Fi network
automatically.
2
Press BACK on the remote control to
stop getting auto IP.
Acquiring IP address...
Press <Back> to enter
IP address manually
Note
The router may fail to assign an IP address,
;~J<Z;~J(
Protocol) is unavailable or disabled on the
router. You may need to enter the IP address
manually, or press BACK to start reconnecting.
Get the IP address of the router
20
EN
Consult the user manual of the router.
Or, to check for the settings of the router,
enter the IP address (e.g. 192.168.1.1) in
the web browser (e.g. Internet Explorer)
of the computer, and then, get the
desired information in the setup page.
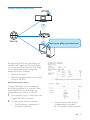
Wired connection
NP3900
Enter the IP address manually
On the NP3900, enter an IP address that
allows the unit to be in the same subnet
as the router.
For example, if the router has
IP address: 192.168.1.1, Subnet mask:
255.255.255.000;
Then, enter the following on the unit:
IP address: 192.168.1.XX (where XX
denotes a number), Subnet mask:
255.255.255.000.
Connect to the router by using the Ethernet
cable
1
Select [Yes], when asked whether to set
up network connection (see ‘First-time
setup’).
2
Use an Ethernet cable to connect the unit
to the router.
12V=1A
To Modem
LAN4
LAN3
LAN2
LAN1
Reset
Connect to the home Wi-Fi/wired network
Press /
location;
repeatedly to select the entry
To enter the desired digits, use the
alphanumeric buttons on the remote
control; or press / repeatedly.
On the unit, select [Wired (Ethernet)].
» The unit starts to acquire an IP address
assigned by the network automatically.
» A message appears when the
connection is completed successfully.
Note
Ensure that you never enter an IP address that
is already assigned to a computer/device on
the network.
EN
21
Wired connection: Enter IP address
manually
2/2
Wireless (WiFi)
Wired (Ethernet)
NP3900
Stop getting Auto IP
Tip
1
Use an Ethernet cable to connect the unit
to the router.
2
3
On the unit, select [Wired (Ethernet)].
The router may fail to assign an IP address,
Press BACK on the remote control to
stop getting auto IP.
;~J<Z;~J(
Protocol) is unavailable or disabled on the
router. You may need to enter the IP address
manually, or press BACK to start reconnecting.
Connect to the Internet
Acquiring IP address...
Press <Back> to enter
IP address manually
Connect to the Internet as prompted.
» }~^
time setup is complete.
NP3900
Internet
Note
Ensure that the router connects to the
Internet directly and no dial-up is required on
the computer.
22
EN
Get the IP address of the router
Consult the user manual of the router.
Or, to check for the settings of the router,
enter the IP address (e.g. 192.168.1.1) in
the web browser (e.g. Internet Explorer)
of the computer, and then, get the
desired information in the setup page.
Assign the IP address manually
On the NP3900, enter an IP address that
allows the unit to be in the same subnet
as the router.
For example, if the router has
IP address: 192.168.1.1, Subnet mask:
255.255.255.000;
Then, enter the following on the unit:
IP address: 192.168.1.XX (where XX
denotes a number), Subnet mask:
255.255.255.000.
Press /
location;
To enter the desired digits, use the
alphanumeric buttons on the remote
control; or press / repeatedly.
repeatedly to select the entry
Note
Ensure that you never enter an IP address that
is already assigned to a computer/device on
the network.
EN
23
5 Play from home
Wi-Fi/wired
network
Stream from a UPnP server
TwonkyMedia Server
(PC/Mac)
NP3900
Wireless Modem PC
You can stream music between computers and
NP3900, when
NP3900 is connected to home Wi-Fi/
wired network;
Music sharing is set up on the computers,
other UPnP servers that are also
connected to the home Wi-Fi/wired
network.
24
EN
Power
With the music sharing software (the supplied
Media Browser and TwonkyMedia Server),
such computers can work as UPnP media
servers (music libraries) of NP3900, if they are
turned on.
Through the UPnP (Universal Plug and Play)
protocols, a UPnP media server allows music
'<<
client device (e.g. NP3700). On the UPnP client
device, you can play the music from the server.
Library on a UPnP server
On the computers (UPnP servers), the
supplied software Media Browser or
TwonkyMedia Server can access music
libraries that are organized by different media
management software, including Windows
Media Player 11 and iTunes.
iTunes is the a trademark of Apple Inc.,
registered in the U.S. and other countries.
Stream from a UPnP server
On NP3900, play a music library that is
streamed from a UPnP server (a computer on
the home Wi-Fi/wired network).
1
Ensure that the UPnP server is connected
to the home Wi-Fi/wired network.
2
On NP3900, press LIBRARY on the
remote control.
3
4
5
Or, from Home screen, select
[Media Library].
Select a music library.
» You can see the categories by which
the music is sorted (e.g. Artist, Album,
Genre).
Select your desired track or album.
Press
to start play.
Play starts from the beginning of the
album, if you press
on an album.
Play screen appears when play starts
(see ‘Your NP3900’->’Overview’>’Play screen’).
6
To stop play, press .
Play favorite songs
On NP3900, you may wish to listen to certain
songs from different artists, albums, and
genres. Add the songs to [Favorites].
1
2
3
Go to a list of songs.
On the remote control, press FAVORITE
to add current song to [Favorites].
Or, press FAVORITE when listening
to a song.
A list of favorite songs is created
under [Media Library] > [Favorites].
("
HOMEon the remote control.
» "
favorite songs under [Media Library]>
[Favorites].
To remove a favorite song from
[Favorites]
» Select the song in [Media Library] >
[Favorites]. Press FAVORITE on the
remote control.
EN
25
NP3900
Play photos
/
to rotate the picture;
Press
Press /
picture;
Press
to start playing all pictures in
slideshow mode.
to move to previous/next
3
4
External control from a PC
Through the home Wi-Fi/wired network, the
Media Browser on a PC (UPnP server) allows
you to control NP3900.
On the computer, you can click the
buttons to
Adjust the volume;
Select previous/next songs if you
have dragged more than one songs
to NP3900. See the Step 2 above.
Fast search forward or backward;
Play/pause and resume.
On NP3900, do the following to exit the
external control.
on the remote control;
Press
Press a source selector on the
remote control;
Press
Press HOME.
;
Note
The external control is stopped if the sleeper
timer is turned on after the set time duration.
1
On the PC desktop, launch Media
Browser by double clicking the icon.
2
In Media Browser, select songs to be
played on NP3900. Drag the songs to the
icon of NP3900.
» A green “+” appears if the songs are in
supported formats.
26
EN
Play Internet radio stations
Store preset stations
To play Internet radio stations, ensure that
On NP3900, you can store up to 10 preset
stations. Each preset station corresponds to
a numeric button on the remote control. On
the radio play screen, press a numeric button,
you quickly switch to the corresponding
preset station.
NP3900 is connected to the Internet
over the home Wi-Fi/wired network.
Note
Ensure that the router connects to the
Internet directly and no dial-up is required on
the computer.
By default, preset stations are pre-loaded to
NP3900 according to the location that you
(^
or change the location, go to [Settings] >
[Location and time zone].
To store preset station
1
Play the desired station (see ‘Play from
home Wi-Fi/wired network’->’Play
Internet radio stations’->’Tune to Internet
radio stations’).
2
On the play screen, press and hold the
desired numeric button (0-9).
» A message appears, indicating that the
station is added to the corresponding
location.
NP3900
Internet
Tune to Internet radio stations
1
Ensure that NP3900 is connected to the
Internet.
2
On NP3900, press INTERNET RADIO
on the remote control.
3
4
» The new preset replaces the old one if
'
Or, from Home screen, select
[Internet Radio].
To search for radio stations,
Go to [All stations] > [Locations] to
locate stations by region;
To search for a station by name,
use the remote control to start
alphanumeric search or Superscroll
(see ‘Play from home Wi-Fi/wired
network’->’Search for music’).
Select the desired station to start play.
EN
27
To play a preset station
Go to [Internet Radio] > [Presets].
Or, on the radio play screen, press
the corresponding numeric button
(0-9).
Edit favorite stations
On NP3900, you can mark an Internet radio
station as favorite. All the stations are added
to [Internet Radio] > [Favorite stations]. In
this way, you can quickly access your favorite
stations.
To add a station to [Favorite stations]
On a list of stations, select the
desired station. Press FAVORITE on
the remote control.
Or, play the desired station. On the
play screen, press FAVORITE on the
remote control.
» A message appears, indicating that
the station is added to [Favorite
stations].
To remove a station from [Favorite stations]
28
Select the station in the list of
stations; or, go to the play screen of
the station. Press FAVORITE again.
Or, press CLEAR on the play screen
of the station.
EN
Manage Internet radio online
NP3900
Internet
http://www.philips.com/welcome
By registering NP3900 on www.philips.com/
welcome (see ‘Register NP3900 with Philips’),
you can log in to Club Philips. On Club Philips,
you can do the following to manage the
Internet Radio on a computer:
Edit favorite stations;
Manually add stations that you are unable
_<
{
"
Under [Favorite], check the box
corresponding to the station.
» The station is marked as favorite.
Edit favorite stations online
Through Club Philips, you can manage the
list of favorite stations on a computer. When
connecting NP3900 to the Internet, you
update the favorite stations on NP3900.
1
On a computer, log in to Club Philips (see
‘Register NP3900 with Philips’).
2
To mark/unmark stations as favorite:
Click [Streamium management] >
[Favorites] > [Browse];
EN
29
To unmark, uncheck the box
corresponding to a station.
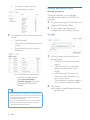
Manually add stations online
Manually add stations
Through Club Philips, you can manually
add Internet radio stations to NP3900 on a
computer.
3
On a computer, log in to Club Philips (see
‘Register NP3900 with Philips’).
2
To add a station, click [Streamium
management] > [My media] > [Music].
3
In [Music], enter station information in
the text boxes:
To change the order of favorite stations in
the list:
Click [Prioritize];
Click on the row of the station to be
moved;
Drag and drop the row upward or
downward.
» +_<"
stations in the desired order
under [Internet Radio] >
[Favorite stations], if you have
connected NP3900 to the
Internet.
Tip
In the list of favorite stations, to put a favorite
"
#'(
To put a station behind the last one, make the
station just ahead of the last one; drag and
drop the last station upward.
30
1
EN
4
{)
"'
station;
{_
"
appears as station name in [My
media];
{;
"^
description about the station, e.g.
music, sports, news.
The description is used as a category
to sort stations under [My media].
Click [Save].
» A station is manually added the below
the edit boxes.
To edit an added station
Search for music
In a list of options, you can do one of the
following to search for what you need.
Tip
When searching in the following ways, ensure
that NP3900 is in [Media Library] or [Internet
Radio] mode.
As shown, click the station.
» '"(
the information about the station.
Click the text boxes to edit the
information.
Use the navigation keys , , , .
Start quick search by using the
alphanumeric search, Superscroll, and
Quickjump.
Note
Alphanumeric search, Superscroll and
Quickjump are available only when you enter
a long sorted list of options (excluding the
home screen and lists of menus).
Stream from online music
services
On NP3900, you can enjoy the online music
services.
With the online music services, you can access
their online music libraries.
Create a user account to use the services.
To access some features, you may need to
subscribe services.
Alphanumeric search
In a long list of options, start alphanumeric
search by entering characters that an item
starts with or contains.
1
Press SEARCH on the remote control, if
necessary.
» A text box appears.
2
Enter characters by using the remote
control (see ‘Your NP3900’->’Overview’>’Text entry’).
Note
Online services are available in some countries
only.
1
On NP3900, press ONLINE
SERVICESon the remote control.
Or, from Home screen, go to
[Online services].
2
On the list of online services, select the
desired option. Press OK
3
To start play, press
.
To stop play, press .
EN
31
3
Press OK after completing text entry.
» Search starts.
Superscroll
» }
the characters.
In a long list of options, Superscroll allows you
to start a search in an alphabetical order. You
$
the selected alphabet.
» }
no item that contains the character.
1
Press and hold / to start Superscroll.
» A pop-up text box appears. Letters are
displayed repeatedly in an alphabetical
order, starting from current letter.
2
Release / when you reach the
desired letter.
» }
the letter.
Quickjump
You can also use Quickjump for alphanumeric
search.
"
certain letter
On the button corresponding to the
letter, press once or repeatedly until
the letter appears.
"
next letter
Press .
"
previous letter
32
EN
Press .
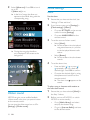
6 Use your
Smartphone as
a virtual remote
control
You can turn your Smartphone into a virtual
remote control to operate this device.
Access the smartphone
application
Access the MyRemote application from your
iPhone or Android enabled Smartphone, and
then identify your network music player on the
home network.
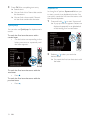
1
Tap MyRemote on your iPhone or
Android enabled Smartphone.
» The Smartphone searches your home
network. Your network music player
and the other compatible devices on
the network are displayed on your
Smartphone.
2
Tap your network music player on the
Smartphone.
» The home screen of the virtual
remote control is displayed on the
Smartphone.
3
If your network music player is not found,
check the network connection.
Then, tap the Devices (Devices) tab on
your Smartphone to search again.
4
To exit the application, press the home
button on your Smartphone.
What you need
An iPhone or Android enabled
Smartphone
A wireless home network
Before you start
Connect NP3900 to your home network
(see ‘First-tim setup - Connect to home
Wi-Fi/wired network’).
Connect your iPhone or Android enabled
Smartphone to the same home network.
For details, see your Smartphone’s user
manual.
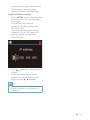
Download the application
Download the Philips application MyRemote
(my remote control) from Apple’s App Store or
Android Market Place. This application is free.
1
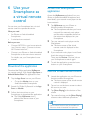
Use the virtual remote control
1
Launch the application on your iPhone or
Android enabled Smartphone.
» The home screen of the virtual remote
control is displayed.
2
Tap an icon on the home screen to select
the source you want.
3
Tap [Now Playing] at the bottom of the
screen.
4
Tap control buttons on the [Now Playing]
screen to select different operations.
Tap the App Store icon on your iPhone.
Or tap the Market icon on your
Android enabled Smartphone.
2
Search for ‘Philips MyRemote’ in the App
Store or Market.
3
Follow the instructions on your
Smartphone to download the application.
» The Philips MyRemote icon is
added to the home screen of your
Smartphone.
Note
Some control functions are not available on
iPhone or Android enabled Smartphones.
EN
33
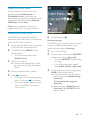
7 Multiroom
Music
NP3900
MCi8080
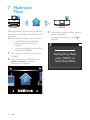
With the Multiroom Music feature, you can play
the same song on MCi8080 and NP3900 at the
same time.
Before you enable this feature, make sure that:
both MCi8080 and NP3900 are
connected to the home Wi-Fi
network;
you are playing songs from the HDD
connected to MCi8080.
1
Play a song from the HDD connected to
MCi8080.
2
From Home screen of MCi8080, select
[Multiroom Music] to enable the
Multiroom Music feature.
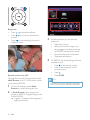
34
EN
3
Wait until the Multiroom Music feature is
enabled successfully.
To cancel simultaneous play, press
MCi8080.
Startfng Party Mede.
press <STOP> to
cancel Party Mode.
on
8 Play from an
external audio
device (AUX)
With the MP3 LINK socket and AUX mode,
NP3900 allows you to play an external audio
device (e.g. a portable media player) through
the speakers of NP3900.
Play from an external audio
device
1 Ensure that the external audio device
is properly connected to NP3900 (see
‘Connect’->’Connect external audio
devices’).
2
3
On NP3900, select the AUX mode.
From Home screen, select [MP3
Link].
Or, press AUX on the remote
control.
On the external audio device, start music
play.
For the music play, you can use the
sound settings on NP3900 (see
‘Settings’->’Sound settings’).
EN
35
9 Settings
1
From Home screen, go to [Settings] >
[Sound settings] > [Bass / Treble].
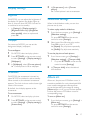
Play modes
2
When playing music, you can choose to play
repeatedly, play in random order, or play one by
one. Select a play mode as desired.
Or, press SOUND MENU on the
remote control to enter the menu of
sound settings.
Press / repeatedly to increase/
decrease the level.
Press CLEAR to select the neutral
level.
To select a play mode for music play
Before or during music play,
From Home screen, go to [Settings]
> [Play mode]; Or,
Press REPEAT or SHUFFLE on the
remote control.
- Play all songs in current folder
»
repeatedly;
»
»
Full sound
[FullSound] restores the sonic details that
music compression loses (e.g. MP3, WMA).
Turn on or off [FullSound] in [Settings]
>[Sound settings].
Or press FULL SOUND on the remote
control.
- Play current song repeatedly;
- Play all songs in current
folder randomly.
Sound settings
Living sound
LivingSound allows you to enjoy truly
immersive music over a wider area.
On NP3900, you can select different sound
settings in [Settings] > [Sound settings].
1
From Home screen, go to [Settings] >
[Sound settings].
2
Or, press SETTINGS on the remote
control to enter [Settings].
Select the option. Press OK to turn it on
or off.
Or,
On the remote control, press SOUND
MENU to enter the menu of sound
settings.
To exit the menu of sound settings,
press
BACK.
Press LIVING SOUND on the remote
control to enable/disable the LivingSound
effect.
Direct Source
With [Direct source], you can turn off the
settings of sound effects on NP3900, including
[FullSound] and [Bass / Treble].
Thus, music plays in an original way, without
the sound effects from NP3900.
Turn on or off [Direct source] in
[Settings] > [Sound settings].
Or press NEUTRAL on the remote
control.
Tip
Bass and treble
The sound effect settings are retained and
enabled when [Direct source] is off.
Use [Bass / Treble] to adjust the low (bass) or
high (treble) range of musical notes.
36
EN
Display settings
3
In [Screen saver], select [Current
picture].
» Current picture is set as screensaver.
Brightness
On NP3900, you can adjust the brightness of
the display. As desired, the display lights up,
dims or turns off when NP3900 is turned on
or switched to active standby.
Slideshow settings
To select a play mode for slideshow
In [Settings] > [Display settings] >
[Brightness when on] or[Brightness
when standby], select an option and
press OK.
When in the slideshow mode, you can view
pictures one by one.
1
From the home screen, go to [Settings] >
[Slideshow settings].
Or, press SETTINGS on the remote
control to enter [Settings].
2
For menus on NP3900, you can set the
background display (wallpaper).
Select one of the following play modes.
Press OK to turn it on or off.
» [Repeat]: Play all pictures repeatedly;
To set wallpaper
» #$%&: Play all pictures randomly.
Wallpaper
1
2
3
On NP3900, select and play a photo.
To set the play time of each picture
Press SETTINGS on the remote control
to select [Settings] > [Display settings] >
[Wallpaper].
1
In [Wallpaper], select [Current picture].
» Current picture is set as wallpaper.
From Home screen, go to [Settings] >
[Slideshow settings] > [Time per slide].
2
Or, press SETTINGS on the remote
control to enter [Settings].
In [Time per slide], select the desired
time duration.
Screensaver
On NP3900, the screensaver is turned on
when NP3900 is switched to active standby.
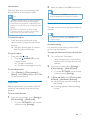
Album art
When turned on, the selected screensaver
appears. The clock is shown on the lower right
corner of the screen.
Album art (the picture of CD/album cover) is
sometimes available for music downloads. With
some media management software, album
art can be inserted for the songs. By turning
[Album art] on or off, you can choose whether
to show the picture of CD/album cover for
corresponding songs.
By default, clock display appears as the
screensaver.
To set screensaver
1
2
On NP3900, select and play a picture.
Press SETTINGS on the remote control
to select [Settings] > [Display settings] >
[Screen saver].
To turn on [Album art]
1
From the home screen, go to [Settings] >
[Album art].
Or, press SETTINGS on the remote
control to enter [Settings].
EN
37
2
Select [Album art]. Press OK to turn it
on or off.
If [Album art] is on,
» In the list of songs, the album art
appears as thumbnail along with the
corresponding song.
Clock settings
Alarm
Set the alarm
1
Ensure that you have set the clock (see
‘Settings’->’Date and time’).
2
From Home screen, go to [Settings] >
[Clock settings] >[Alarm].
3
» During the song play, the album
art is displayed in full screen as the
background.
4
Or, press SETTINGS on the remote
control to enter [Settings].
Or, press ALARM MENU on the
remote control.
To set the source of alarm sound,
Select [Music];
» At the set alarm time, last played
song starts/resumes, or you tune
to the last played Internet radio
station.
Select [Buzzer].
» At the set alarm time, the buzzer
sounds.
To set the alarm time,
Press and hold / , or press /
repeatedly until you reach the
desired digits. Press OK
Or, enter the desired digits by using
the alphanumeric buttons on the
remote control.
» The alarm icon appears on the
screen.
To play a song or Internet radio station as
the next alarm sound
Clicker sound
NP3900 can give you an audible feedback
(clicker sound) every time you press a button
on the remote control.
You can turn the clicker sound on or off in
[Settings] >[Clicker sound].
38
EN
1
Ensure that you have selected [Music] in
the Step 3 above;
2
Before you turn off NP3900, or switch
NP3900 to active standby,
Go to [Media Library], and select
and play the desired song;
Or, go to [Internet Radio], and tune
to the desired station.
Use the alarm
2
At the set alarm time, music/Internet radio
plays as desired, or the buzzer sounds.
Select an option. Press OK to turn it on.
Tip
You can also press SLEEP on the remote
Note
control repeatedly to set the time duration.
The alarm sounds even if you have switched
NP3900 to active standby or Eco standby.
The buzzer sounds instead, if NP3900 fails to
connect to a music library or an Internet radio
station.
NP3900 is unmuted if it has been muted.
The alarm sounds in a higher volume if the
volume level is lower than minimum.
Press and hold
Tip
emote control.
Press any button on the unit or the
remote control (except for the volume
buttons).
» The alarm sounds again 15 minutes
later. The alarm icon remains.
Automatic setting
For automatic clock setting, use the online
service over the Internet.
Through the online service over the Internet
To stop the alarm
The date and time can be set automatically or
manually.
To view the set clock, press CLOCK on the
To snooze the alarm
Date and time
or .
1
Or press /ALARM OFF on the
remote control.
» The alarm is stopped.
» The alarm sounds again next day.
Turn on the unit, if necessary.
2
Ensure that the unit is connected to
the home Wi-Fi/wired network and
Internet.
To turn off the alarm
From Home screen, select [Settings] >
[Clock settings] > [Date and time].
Go to [Settings] > [Clock settings] >
[Alarm]. Select [Alarm off] and press OK
on the remote control.
Sleep timer
With the sleep timer, you can have NP3900
turned off automatically after the set timer
duration.
3
Or, press SETTINGS on the remote
control to enter [Settings].
In [Date and time], select [Current date
and time] > [Automatic (Internet)].
» The unit starts auto time setting over
the Internet.
» A message appears when the setting
is done.
To set the time duration
1
From the home screen, go to [Settings] >
[Clock settings] > [Sleep timer].
Or, press SETTINGS on the remote
control to enter [Settings].
EN
39
1/3
Automatic (Internet)
Manual
1
2
Follow Step 1-2 under “Manual setting”.
In [Date and time], go to [Time format]
or [Date format] to select options.
Network settings
Setup network
^"(
how NP3900 connectsto home Wi-Fi/wired
network:
Tip
Switch between different connection
methods (wireless or wired,
automatic or manual);
Switch between different routers.
To do so, do the following:
According to the location and time zone you
select, the unit can have the clock time set
and adjusted automatically through the online
service over the Internet.
To check and change current location and time
zone, go to [Settings] > [Location and time
zone].
1
Manual setting
1
2
Turn on the unit, if necessary.
Or, press SETTINGSon the remote
control to enter [Settings].
3
In [Date and time], select [Current date
and time] > [Manual].
4
To enter date and time,
Press or
location;
to select the entry
Use the alphanumeric buttons to
enter desired digits;
Press OK
You can also press or
repeatedly, or press and hold or
until the desired digit appears.
Set date/time format
Select how date and time are displayed in the
clock.
40
2
From Home screen, select [Settings] >
[Clock settings] >[Date and time].
EN
From Home screen, go to [Settings] >
[Network settings] > [Setup network].
Or, press SETTINGS on the remote
control to enter [Settings].
Connect NP3900 as you did in the
^Z^^
>’Connect to home Wi-Fi/wired
network’).
Device name
In [Device name], you can name/rename your
NP3900. On a connected UPnP server/client,
the NP3900 can be found as named.
1
From Home screen, go to [Settings] >
[Network settings] > [Device name].
2
In [Device name], press / to select
the entry location; press / repeatedly
to select desired letters.
Location and time zone
Demo mode
^"(
selected location and time zone when moving
to a new location or time zone.
^"
demo again.
According to the selected location and time
zone, NP3900 can
Set clock automatically over the
Internet (see ‘Settings’->’Date and
time’);
1
From Home screen, go to [Settings] >
[Demo mode].
» Demo play starts.
2
To exit the demo play, press .
» The unit is switched to Eco standby.
Pre-load preset Internet radio
stations automatically.
Restore factory settings
Language
^"(
language selection in [Settings] > [Language].
Device information
From the home screen, go to [Settings] >
[Device ID and information]. You can learn
about information about NP3900, including
model number, name to be shown on a UPnP
server/client, software version and network
settings.
You can restore NP3900 to factory settings. All
your settings are removed, including the settings
of network, sound, display, clock, alarm and
language.
1
Go to [Settings] > [Restore factory
settings].
2
As prompted, select [Yes].
» The unit is turned off.
» The unit is turned on again
automatically when the factory settings
are restored.
» [^
Check for software upgrades
On the NP3900, you can check for software
upgrades. After you click to agree to the terms
and conditions, the downloading and installation
of new upgrades start automatically.
1
Ensure that NP3900 is connected to the
Internet.
2
From Home screen, go to [Settings] >
[Check for software upgrades].
EN
41
10 Register
NP3900 with
Philips
To get the product model number
Look at the packaging box of the
device or the product label. You can
'
the packaging box or product label
(e.g. NP3900).
'
By registering NP3900 on www.philips.com/
welcome, you can
Get free software upgrades;
Manage your own favorite radio stations;
Receive Streamium newsletters.
Note
Registration of NP3900 requires a valid email
address.
To get the product registration ID
Register NP3900
Use a valid email address as the account when you
register NP3900 on www.philips.com/welcome.
On NP3900, go to [Settings] >
[Device ID and information]. Press
[Product
Registration ID].
You can complete the registration directly on
www.philips.com/welcome. Or, use an email
address to register on the device, and then,
complete the registration through the web site
link that you received in the email.
Register on the device
Register on the web site
1
To register NP3900 directly on www.philips.
"(
information as prompted during registration:
Ensure that NP3900 is connected to the
Internet.
2
To register with www.philips.com/
welcome,
A valid email address as the registration
account;
Product model number;
Product registration ID.
42
EN
Use an email address to register on the
device, and then, complete the registration
through the web site link that you received in
the email.
On NP3900, select [Settings] >
[User registration] > [Register now]
> [Register on the device];
As prompted, enter your valid
email address (see ‘Your NP3900’>’Overview’->’Text entry’).
» You receive an email message
from [email protected].
On a computer, use the web site link
in the email to complete registration.
Tip
To log in to Philips online services later,
use the web site link in the email, and the
password.
Unregister NP3900
When registering with www.philips.com/
welcome, you can only use one account for one
unit (e.g. NP3900). For each account, you can
maintain a set of favorite stations and manually
added stations.
To use another account for registration, you
need to unregister current one.
To unregister an account
1
On NP3900, select [Settings] > [User
registration] >[Unregister].
2
"
unregistering the account.
Tip
When re-registering the account, you can
recover the Internet radio stations that you
maintained with Philips online services.
Check registration
information
You can check whether you have registered
the NP3900, and what account you have
used for registration. To check the information,
go to [Settings] > [User registration] >
[Registration status].
EN
43
11 Maintenance
This chapter tells you how to care for NP3900.
Cleaning
Note
Avoid moisture and abrasion.
1
Clean NP3900 only with a soft dry cloth.
44
EN
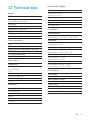
12 Technical data
General
AC Power
The voltage information is printed on the
power adaptor (backside).
DC Power
12 V / 3 A (center positive)
Dimensions (L x W x H)
345.5 x 106 x 116 mm
Weight (net)
Main unit: ~ 1.5 kg
Power consumption
On
< 40 W
Standby (active / connected to network)
<4W
ECO (passive) standby
Audio output
Headphones
1x 3.5 mm jack
40 - 18,000 Hz
Signal to noise ratio (headphones)
typically 85 dBA (IEC)
Distortion (headphones)
<1%
Audio input
Aux in (line in)
1 x 3.5mm jack
Input sensitivity
800mV
Input impedance
*;=
Output power
Front LS: 2 x 9 W
Side LS: 2 x 6 W
Frequency response
63 Hz - 18,000 Hz (3 dB points)
Signal to noise ratio
Z{J]
Loudspeakers
Power handling
Front speakers: 10 W (RMS) / 15 W (MPO)
Side speakers: 6 W (RMS) / 9 W (MPO)
Impedance
*
[*
Sensitivity
Front speakers: 80 dB / 1 m / W
Side speakers: 83 dB / 0.5 m / W
Dimensions
Front speakers: 2.5 inch
Side speakers: 1.5 inch
Frequency response
Front speakers: 80 Hz - 20 kHz
Side speakers: 150 Hz - 20 kHz
Sound features
FullSound®
Yes (on / off)
BASS/TREBLE control
Yes (+/- 10 steps)
Living Sound
Yes (on / off)
=;
Yes (on / off)
EN
45
Wireless
Decoding capabilities
Wireless standard
802.11n, backwards compatible to 802.11b/g
Wireless security
WEP (64 or 128 bit),
WPA/WPA2 (8-63 characters)
Frequency range
2412 - 2462 MHz (CH1-CH11) (for /79, /37,
/55, /97)
2412 - 2472 MHz (CH1-CH13) (for /12, /05)
Antenna
1 x vertical, polarized (IT/IR)
Wireless protected setup (WPS)
Yes
MP3
8 - 320 kbps (CBR / VBR)
WMA
32 - 192 kbps (CBR / VBR)
AAC (M4A)
16 - 320 kbps (CBR / VBR)
PCM (L - PCM)
1 x (1.4 Mbps)
FLAC
Yes, supported
Real Audio (*. ra)
No, not supported
Wired (LAN / Ethernet)
Wired standard
802.3 / 802.3 u
Speed
10 / 100 MBit/s
Mode
half / full duplex
Crossover detection (Auto MDIX)
Yes (Auto MDIX)
Note
The wired and wireless network interfaces
cannot be turned on at the same time.
Internet services
Internet radio
Radio Time
My Media *
Internet services
Rhapsody Direct** (for /37, /17)
Napster Direct** (for /12, /05, only in
Germany/UK)
* This service requires registration with Club
Philips.
** Both services require user registration with
Rhapsody and Napster respectively.
46
EN
Playlist support
*.m3u, *.wpl
Yes
iTunes, Rhapsody
Yes (via by-packed UPnP Server)
Display / Clock
Resolution
Dotmatrix, 320 x 240 dots (QVGA), color
TFT
Size
3.5 inch
Backlight
Can be turned on/off, or dimmed
Touch screen
Yes
Clock / date display
Yes
Automatic time setting via the Internet
(NPT)
Yes, enabled
Sleep timer
Yes
Internal (key) clicker
Yes
Alarm
Yes (once, Daily, Day of the week)
Docking
9-pole MiniDIN socket
Compatible with Philips DCK3060 (external
dock; not included)
5V / 500mA
Others
UPnP
DMP (Local renderer, Local control point)
ECP (Controllable via an external control
point)
DLNA
Yes, Version 1.5 (DMP, DMR)
Smart phone control
Yes, compatible with MyRemote App
available at Apple App Store, Android
Market Place
Philips Multiroom
Yes (station only)
Note
[
subject to changes without notice.
EN
47
13 Troubleshooting
I cannot hear any sound or the sound is poor,
what do I do?
J
Press + VOL - to increase the volume.
J
Press the MUTE button again to
reactivate the sound output.
Is there a maximum distance of transmission
between a wireless router and NP3900 for
effective streaming?
Yes. The maximum distance of Wi-Fi
transmission is 250m measured in open
spaces. However, in a home environment,
where solid obstacles such as walls and
doors are present, the effective transmission
distance is reduced to 50-100m. Reposition
the devices if you experience transmission
problems.
I have not received any registration email from
[email protected].
J
Check that the email address that is
entered in the user registration section is
valid and spelled correctly.
J
Check that the PC has an active Internet
connection.
J
The Internet server may be busy, try
again later.
J
Check if the email was redirected to the
spam folder.
How do I avoid Wi-Fi interferences from
other devices that operate in the same
(2.4GHz) frequency spectrum, such as Dect
phones or bluetooth devices?
J
Move NP3900 at least 3m away from
such devices.
J
Use a WEP/WPA encryption key when
you create the wireless connection your
PC / home network.
J
Change the operating channel on the
interfering devices.
J
Turn the devices in different directions to
minimize interference.
48
EN
14 Contact
information
Argentina
Australia
Austria
Belgium
Belarus
Brazil
Bulgaria
Canada
Chile
China
Colombia
Croatia
Czech Republic
Denmark
Estonia
Finland
France
Germany
Greece
Hong Kong
Hungary
India
Ireland
Israel
Italy
Japan
Korea
Latvia
Luxembourg
Malaysia
Mexico
Netherlands
New Zealand
Norway
(54-11) 4544-2047
1300 363 391
0810 000 205
78250145
882000110068
0800 701 02 03 (all
except Sao Paulo)(11)
2121-0203 (Sao Paulo
only)
8001154424
1-888-744-5477
600 744 5477 (600PHILIPS)
4008 800 008
01 800 700 7445
800222778
800142840
35258759
8000100288
923113415
805025510
8000007520
80031221280
852-2619 9663
680018189
1860-180-1111
16011777
9600900-09
800088774
0570-07-6666
080-600-6600
80002794
4066615644
1800 880 180
01 800 504 6200
8000230076
0800 658 224
22708111
Pakistan
Peru
Philippines
Poland
Portugal
Romania
Russia Federation
Singapore
Slovakia
South Africa
Spain
Sweden
Switzerland
Taiwan
Thailand
Turkey
Ukraine
United Kingdom
United States
Uruguay
Venezuela
051 580 902-3
0800 00100
(63 2) 667 9000
8003111318
800780903
800894910
(495)961-1111 (local
rate)8-800-200-0880
(mobile phone - free)
65 6882 3999
800004537
(011) 471-5194
900800655
857929100
844800544
0800 231 099
66 2 652 8652
0800 261 3302
8-800-500-69-70
8003316015
1-888-744-5477
(598-2) 619 6666
0800 100 4888
EN
49
Streamium terms and conditions
Terms and Conditions of Use of your Philips Streamium-enabled Device
Congratulations on your purchase of a Philips Streamium-enabled Device (“Device”). These Terms and
Conditions of Use give you the rights to use certain features on your Device relating to the streaming of
content. You must agree to these Terms and Conditions of Use before using the Device. Your use of the Device
constitutes your agreement to be bound by these Terms and Conditions of Use and will give you the right to
access these features. If you do not agree to these Terms and Conditions of Use, you may return your Device to
the point of purchase. These Terms and Conditions of Use supplement, and do not replace, any terms, conditions
or disclaimers which were provided with your purchase of the Device. All such terms, conditions and disclaimers
remain in full force and effect.
Eligibility for Registration.
You must be at least 14 years of age to assume the responsibilities of these Terms and Conditions of Use. If you
are under 14 years of age, you may not use the Device unless one of your parents or legal guardians assumes
the responsibilities of these Terms and Conditions of Use. Your use of the Device constitutes your
representation that you are either 14 years of age or, if you are under 14 years of age, that your parent or legal
guardian has assumed the responsibilities of these Terms and Conditions of Use.
Restrictions on Modification of your Device
Your Device provides access to certain streams of content. As a condition of obtaining access to those streams
through the Device, you agree not to tamper with or otherwise modify or attempt to modify the Device in any
way (including through the use of software or by making physical alterations to the Device). You agree that you
will not circumvent or attempt to circumvent technological measures employed to control access to, or the
rights in, any content. You agree that you will not circumvent or attempt to circumvent any copy management
system by any means. You agree that you will not decipher or attempt to decipher cryptographic keys or
otherwise defeat or attempt to defeat any security features implemented in the Device or in the content
streams. You agree that you will not use the Device for any unauthorized purpose or in contravention of any law
or regulation.
Disclaimers Regarding Content
The streams of content which are accessible through your Device are not controlled or programmed by Philips.
Rather, they are provided by third parties. Think of your Device (in addition to its other features) as a form of
“tuner” which allows you to receive the content broadcast by many others outside of your local area. Since the
content is provided by others, PHILIPS HAS NO EDITORIAL CONTROL OVER ANY OF THAT CONTENT
RECEIVED THROUGH YOUR DEVICE AND, THEREFORE IS NOT LIABLE FOR CONTENT OR ITS NATURE
OR DELIVERY. PHILIPS DOES NOT ENDORSE ANY OPINIONS EXPRESSED IN ANY CONTENT RECEIVED
THROUGH YOUR DEVICE. PHILIPS DOES NOT GUARANTEE THE TRUTHFULNESS, ACCURACY,
RELIABILITY, COMPLETENESS OR TIMELINESS OF CONTENT. YOU AGREE THAT ANY RELIANCE ON
CONTENT IS AT YOUR OWN RISK.
Limitations on Access to Streams.
Philips does not guarantee access to any particular stream or to the content contained in any stream. Philips
may, in its discretion, add or remove access to any specific stream or content at any time. Some streams are
accessible through arrangements with online service providers which determine which streams are listed on
their directories. Although Philips will strive to provide a good selection of online service providers, Philips does
not guarantee continued access to any specific online service provider. Philips may, in its discretion, add or
remove access to any specific online service provider.
Rights in Content
Content may be protected by copyright laws or other intellectual property or proprietary laws. In some
situations, such as use of the Device in a commercial environment, it may be necessary for you to obtain, at your
own risk, a license or other authorization to use such content. You agree that, in the event such a license or
authorization is necessary, it is your responsibility to obtain any such license or authorization. You agree that you
are solely liable for any damages you may incur resulting from your failure to obtain the proper license or
authorization for use of the content accessible through the Device. You agree that Philips will have no liability to
you with regard to your use of the content.
Changes in Features
Philips may, in its discretion, change the features of the Device, including adding features to, or removing features
from, the Device. Some new features may require changes to these Terms and Conditions of Use. Your use of
those new features will constitute your agreement to the revised Terms and Conditions of Use.
Software and Intellectual Property Rights
You may need to use certain software programs to use or have full access to certain features of the Device. You
received certain software with the purchase of the Device and may receive other software from time to time in
the future. Most of that software is contained in the Device and is not accessible to you. Some of that software
is owned by Philips and some is owned by others. Your use of software owned by Philips is subject to these
Terms and Conditions of Use and any applicable license agreement. Your use of software owned by others is
governed by their applicable license agreements. Your use of software does not transfer any title or ownership
rights in the software to you. Philips retains all its rights in software and other intellectual property, including
copyrights, patent rights, and rights in its trademarks and trade names. You agree that you will not disassemble,
decompile, create derivative works of, reverse engineer, modify, sublicense, distribute the software or use the
software for any unauthorized purpose or in contravention of any law or regulation.
Warranty Disclaimer
PHILIPS MAKES NO REPRESENTATION OR WARRANTY, EXPRESS OR IMPLIED, THAT THE DEVICE WILL
MEET YOUR REQUIREMENTS OR THAT THE USE OF THE DEVICE WILL BE UNINTERRUPTED, TIMELY,
SECURE OR FREE FROM ERRORS. PHILIPS MAKES NO WARRANTY AS TO THE CONTENT CARRIED IN
ANY STREAM. PHILIPS MAKES NO REPRESENTATION OR WARRANTY, EXPRESS OR IMPLIED, AS TO THE
INFORMATION OR CONTENT ACCESSED THROUGH YOUR DEVICE OR TO YOUR RELIANCE ON, OR
USE OF, ANY INFORMATION OR CONTENT ACCESSED THROUGH YOUR DEVICE. SPECIFIC
WARRANTIES WERE PROVIDED WITH YOUR PURCHASE OF YOUR DEVICE AND THOSE WARRANTIES,
INCLUDING ANY DISCLAIMERS TO THOSE WARRANTIES, CONTINUE TO APPLY. Because some
jurisdictions do not permit the disclaimer of implied warranties, such disclaimers may not apply to you.
Limitation of Liability
PHILIPS WILL NOT BE LIABLE TO YOU OR TO ANY OTHER PARTY FOR ANY INDIRECT, INCIDENTAL,
PUNITIVE, SPECIAL OR CONSEQUENTIAL DAMAGES (INCLUDING LOST PROFITS OR LOST SAVINGS)
OR FOR LOSS OF DATA OR BUSINESS INTERRUPTION ARISING OUT OF OR RELATING TO YOUR USE
OF THE DEVICE WHETHER OR NOT SUCH DAMAGES ARE BASED ON TORT, WARRANTY, CONTRACT
OR ANY OTHER LEGAL THEORY - EVEN IF PHILIPS HAS BEEN ADVISED, OR IS AWARE, OF THE
POSSIBILITY OF SUCH DAMAGES. IN NO EVENT WILL PHILIPS CUMULATIVE LIABILITY FOR DAMAGE
(FROM ANY CAUSE WHATSOEVER) EXCEED THE AMOUNT YOU PAID FOR YOUR DEVICE.
Miscellaneous
“This agreement will be governed by the laws of the jurisdiction in which the Device was sold and you hereby
consent to the non-exclusive jurisdiction of courts in the relevant country. If any provision of this agreement is
invalid or unenforceable under applicable law, such provision will be deemed modified to the extent necessary
to render such provision valid and enforceable and the other provisions of this agreement will remain in full
force and effect. These Terms and Conditions of Use will not be governed by the United Nations Convention of
Contracts for the International Sale of Goods, the application of which is hereby expressly waived.”
BY USING YOUR DEVICE, YOU REPRESENT THAT YOU HAVE READ AND UNDERSTOOD THESE TERMS
AND CONDITIONS OF USE AND THAT YOU ACCEPT THEM.
NOTICE
SOFTWARE END USER LICENSE AGREEMENT
THIS SOFTWARE END USER LICENSE AGREEMENT (“THIS AGREEMENT”) IS A LEGAL AND BINDING
AGREEMENT BETWEEN YOU (EITHER AN INDIVIDUAL OR ENTITY) AND PHILIPS CONSUMER
ELECTRONICS B.V. A DUTCH LIMITED LIABILITY COMPANY, WITH ITS PRINCIPAL OFFICE AT GLASLAAN
2, 5616 LW EINDHOVEN, THE NETHERLANDS AND ITS SUBSIDIARY COMPANIES (INDIVIDUALLY AND
COLLECTIVELY “PHILIPS”). THIS AGREEMENT GIVES YOU THE RIGHT TO USE CERTAIN SOFTWARE (THE
“SOFTWARE”) INCLUDING USER DOCUMENTATION IN ELECTRONIC FORM WHICH MAY HAVE BEEN
PROVIDED SEPARATELY OR TOGETHER WITH A PHILIPS PRODUCT (THE “DEVICE”) OR A PC. BY
DOWNLOADING, INSTALLING OR OTHERWISE USING THE SOFTWARE, YOU ACCEPT AND AGREE TO
BE BOUND BY ALL OF THE TERMS AND CONDITIONS OF THIS AGREEMENT. IF YOU DO NOT AGREE
TO THESE TERMS AND CONDITIONS, DO NOT DOWNLOAD, INSTALL OR OTHERWISE USE THE
SOFTWARE. IF YOU ACQUIRED THE SOFTWARE IN TANGIBLE MEDIA E.G. CD WITHOUT THE
OPPORTUNITY TO REVIEW THIS LICENSE AND DO NOT ACCEPT THESE TERMS, YOU MAY RECEIVE A
FULL REFUND OF THE AMOUNT, IF ANY, THAT YOU PAID FOR THE SOFTWARE IF YOU RETURN THE
SOFTWARE UNUSED WITH PROOF OF PAYMENT WITHIN 30 DAYS FROM THE DATE OF PURCHASE.
1. Grant of License. This Agreement grants you a non-exclusive, nontransferable, non-sub licensable license
to install and use, on the Device or a PC, as applicable, one (1) copy of the specified version of the Software in
object code format as set out in the user documentation solely for your personal use. The Software is “in use”
when it is loaded into the temporary or permanent memory (i.e. RAM, hard disk, etc.) of the PC or the Device.
2. Ownership. The Software is licensed and not sold to you. This Agreement grants you only the right to use
the Software, but you do not acquire any rights, express or implied, in the Software other than those specified
in this Agreement. Philips and its licensors retain all right, title, and interest in and to the Software, including all
patents, copyrights, trade secrets, and other intellectual property rights incorporated therein. The Software is
protected by copyright laws, international treaty provisions, and other intellectual property laws. Therefore,
other than as expressly set forth herein, you may not copy the Software without prior written authorization of
Philips, except that you may make one (1) copy of the Software for your back-up purposes only. You may not
copy any printed materials accompanying the Software, nor print more than one (1) copy of any user
documentation provided in electronic form, except that you may make one (1) copy of such printed materials
for your back-up purposes only.
3. License Restrictions. Except as provided otherwise herein, you shall not rent, lease, sublicense, sell, assign,
loan, or otherwise transfer the Software. You shall not, and you shall not permit any third party, to reverse
engineer, decompile, or disassemble the Software, except to the extent that applicable law expressly prohibits
the foregoing restriction. You may not remove or destroy any product identification, copyright notices, or other
proprietary markings or restrictions from the Software. All titles, trademarks, and copyright and restricted
rights notices shall be reproduced on your back up copy of the Software. You may not modify or adapt the
Software, merge the Software into another program or create derivative works based upon the Software.
4. Termination of certain functionality. The Software may contain components of certain licensed software
including software licensed from Microsoft Corporation (“Microsoft”) which implements Microsoft’s digital
rights management technology for Windows Media. Content providers are using the digital rights management
technology for Windows Media (“WM-DRM”) to protect the integrity of their content (“Secure Content”) so
that their intellectual property, including copyright, in such content is not misappropriated. Your Device may also
use WM-DRM software to transfer or play Secure Content (“WM-DRM Software”). If the security of such
WM-DRM Software is compromised, Microsoft may revoke (either on its own or upon the request of the
owners of Secure Content (“Secure Content Owners”)) the WM-DRM Software’s right to acquire new licenses
to copy, store, transfer, display and/or play Secure Content. Revocation does not alter the WM-DRM Software’s
ability to play unprotected content. A list of revoked WM-DRM Software is sent to your PC and/or your Device
whenever you download a license for Secure Content. Microsoft may, in conjunction with such license, also
download revocation lists onto your Device on behalf of Secure Content Owners, which may disable your
Device’s ability to copy, store, display, transfer, and/or play Secure Content. Secure Content Owners may also
require you to upgrade some of the WM-DRM components distributed with this Software (“WM-DRM
Upgrades”) before accessing their content. When you attempt to play Secure Content, WM-DRM Software built
by Microsoft will notify you that a WM-DRM Upgrade is required and then ask for your consent before the
WM-DRM Upgrade is downloaded. WM-DRM Software built by Philips may do the same. If you decline the
upgrade, you will not be able to access Secure Content that requires the WM-DRM Upgrade; however, you will
still be able to access unprotected content and Secure Content that does not require the upgrade. WM-DRM
features that access the Internet, such as acquiring new licenses and/or performing a required WM-DRM
Upgrade, can be switched off. When these features are switched off, you will still be able to play Secure Content
if you have a valid license for such content already stored on your Device. However, you will not be able to use
certain of the WM-DRM Software features that require Internet access such as the ability to download content
that requires the WM-DRM Upgrade. All title and intellectual property rights in and to the Secure Content is
the property of the respective Secure Content owners and may be protected by applicable copyright or other
intellectual property laws and treaties. This Agreement grants you no rights to use such Secure Content. To
summarize, if the Software contains Microsoft WM-DRM components – Secure Content you
desire to download, copy, store, display, transfer, and/or play is protected by the Microsoft
WM-DRM components of the Software. Microsoft, Secure Content Owners, or Secure Content
distributors may deny you access, or restrict your access, to Secure Content even after you have
paid for, and/or obtained, it. Neither your consent nor the consent or approval of Philips is
necessary for any of them to deny, withhold or otherwise restrict your access to Secure Content.
Philips does not guaranty that you will be able to download, copy, store, display, transfer, and/or
play Secure Content.
5. Open Source Software. (a) This software may contain components that are subject to open-source terms,
as stated in the documentation accompanying the Device. This Agreement does not apply to this software as
such. (b) Your license rights under this Agreement do not include any right or license to use, distribute or create
derivative works of the Software in any manner that would subject the Software to Open Source Terms. “Open
Source Terms” means the terms of any license that directly or indirectly (1) create, or purport to create,
obligations for Philips with respect to the Software and/or derivative works thereof; or (2) grant, or purport to
grant, to any third party any rights or immunities under intellectual property or proprietary rights in the
Software or derivative works thereof.
6. Termination. This Agreement shall be effective upon installation or first use of the Software and shall
terminate (i) at the discretion of Philips, due to your failure to comply with any term of this Agreement; or (ii)
upon destruction of all copies of the Software and related materials provided to you by Philips hereunder.
Philips’s rights and your obligations shall survive the termination of this Agreement.
7. Upgrades. Philips may, at its sole option, make upgrades to the Software available by general posting on a
website or by any other means or methods. Such upgrades may be made available pursuant to the terms of this
Agreement or the release of such upgrades to you may be subject to your acceptance of another agreement.
8. Support Services. Philips is not obligated to provide technical or other support (“Support Services”) for
the Software. If Philips does provide you with Support Services, these will be governed by separate terms to be
agreed between you and Philips.
9. Limited Software Warranty. Philips provides the Software ‘as is’ and without any warranty except that
the Software will perform substantially in accordance with the documentation accompanying the Software for a
period of one year after your first download, installation or use of the Software, whichever occurs first. Philips’
entire liability and your exclusive remedy for breach of this warranty shall be, at Philips’ option, either (i) return
of the price paid by you for the Software (if any); or (b) repair or replacement of the Software that does not
meet the warranty set forth herein and that is returned to Philips with a copy of your receipt. This limited
warranty shall be void if failure of the Software has resulted from any accident, abuse, misuse or wrongful
application. Any replacement Software will be warranted for the remainder of the original warranty period or
thirty (30) days, whichever is longer. This limited warranty shall not apply to you if theif the Software was
provided to you free of charge on an evaluation only basis.
10. NO OTHER WARRANTIES. EXCEPT AS SET FORTH ABOVE, PHILIPS AND ITS LICENSORS DO
NOT WARRANT THAT THE SOFTWARE WILL OPERATE ERROR FREE OR UNINTERRUPTED, OR WILL
MEET YOUR REQUIREMENTS. YOU ASSUME ALL RESPONSIBILITIES FOR SELECTION OF THE SOFTWARE
TO ACHIEVE YOUR INTENDED RESULTS, AND FOR THE INSTALLATION OF, USE OF, AND RESULTS
OBTAINED FROM THE SOFTWARE. TO THE MAXIMUM EXTENT PERMITTED BY APPLICABLE LAW,
PHILIPS AND ITS LICENSORS DISCLAIM ALL WARRANTIES AND CONDITIONS, WHETHER EXPRESS OR
IMPLIED, INCLUDING BUT NOT LIMITED TO THE IMPLIED WARRANTIES OF MERCHANTABILITY, FITNESS
FOR A PARTICULAR PURPOSE, AND ACCURACY OR COMPLETENESS OF RESULTS WITH RESPECT TO
THE SOFTWARE AND THE ACCOMPANYING MATERIALS. THERE IS NO WARRANTY AGAINST
INFRINGEMENT. PHILIPS DOES NOT WARRANT THAT YOU WILL BE ABLE TO DOWNLOAD, COPY,
STORE, DISPLAY, TRANSFER, AND/OR PLAY SECURE CONTENT.
11. LIMITATION OF LIABILITY. UNDER NO CIRCUMSTANCES WILL PHILIPS OR ITS LICENSORS BE
LIABLE FOR ANY CONSEQUENTIAL, SPECIAL, INDIRECT, INCIDENTAL OR PUNITIVE DAMAGES
WHATSOEVER, INCLUDING, WITHOUT LIMITATION, DAMAGES FOR LOSS OF PROFITS OR REVENUES,
BUSINESS INTERRUPTION, LOSS OF BUSINESS INFORMATION, LOSS OF DATA, LOSS OF USE OR OTHER
PECUNIARY LOSS, EVEN IF PHILIPS OR ITS LICENSORS HAVE BEEN ADVISED OF THE POSSIBILITY OF
SUCH DAMAGES. IN NO EVENT SHALL PHILIPS’ OR ITS LICENSORS’ AGGREGATE LIABILITY FOR
DAMAGES ARISING OUT OF THIS AGREEMENT EXCEED THE GREATER OF THE PRICE ACTUALLY PAID
BY YOU FOR THE SOFTWARE OR FIVE TEN POUNDS STERLINGUS DOLLARS (510.00).
12. Trademarks. Certain of the product and Philips names used in this Agreement, the Software, and the
printed user documentation may constitute trademarks of the Philips, its licensors or other third parties. You
are not authorized to use any such trademarks.
13. Export Administration. You agree that you will not directly or indirectly, export or re-export the
Software to any country for which the United States Export Administration Act, or any similar United States law
or regulation requires an export license or other U.S. Government approval, unless the appropriate export
license or approval has first been obtained. By downloading or installing the Software you agree to abide by this
Export provision.
14. Governing law. This Agreement is governed by the laws of your country of residence ,residence, without
reference to its conflict of laws principles. Any dispute between you and Philips regarding this Agreement shall
be subject to the non-exclusive jurisdiction of the courts of your country of residence.
15. General. This Agreement contains the entire agreement between you and Philips and supersedes any prior
representation, undertaking or other communication or advertising with respect to the Software and user
documentation. If any part of this Agreement is held invalid, the remainder of this Agreement will continue in
full force and effect. This Agreement shall not prejudice the statutory rights of any party dealing as a consumer.
© 2011 Koninklijke Philips Electronics N.V.
All rights reserved.
NP3900_UM_12_EN_wk1151.3