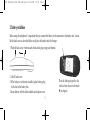
1
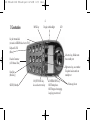
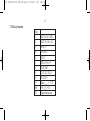
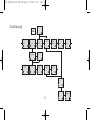
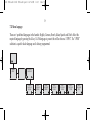
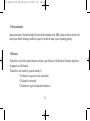
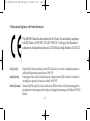
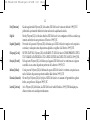
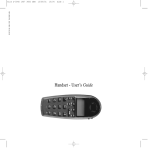
1402 1600-ed11:1402 1600-ed11.qxd
11-07-2008
14:38
Side 1
Polycom® KIRK 3040
User Guide
1402 1600-ed11:1402 1600-ed11.qxd
11-07-2008
14:38
Side 2
Congratulations on your new KIRK 3040 handset
Your new KIRK 3040 handset will provide you with the greatest possible degree of flexibility and mobility due to
high battery capacity, practical weight, size and design.
1402 1600-ed11:1402 1600-ed11.qxd
11-07-2008
14:38
Side 3
Contents:
1.
2.
3.
4.
5.
6.
Construction ..........................................................................
Battery installation ................................................................
Charging .................................................................................
Key functions .........................................................................
Turning the handset ON/OFF............................................
Making a call..........................................................................
6.1 Receiving calls .................................................................
6.2 During conversation ......................................................
6.2.1 Volume regulation.................................................
6.2.2 Microphone mute ..................................................
6.2.3 Transferring the call to another handset............
7. Menu structure ......................................................................
7.1 Using the alphanumeric keyboard...............................
7.2 The key functions............................................................
7.3 Profile set up ....................................................................
7.4 Profile functions ..............................................................
7.5 Menu subscription and login ........................................
7.5.1 Create subscription ...............................................
7.5.2 Login........................................................................
7.5.3 Auto login...............................................................
7.5.4 Remove subscription.............................................
7.5.5 Change startup text...............................................
7.6 Battery capacity ...............................................................
7.7 Redial ................................................................................
7.8 Book...................................................................................
7.9 External services..............................................................
7.10 MSF Functions ...............................................................
7.11 Mail/Textmessages.......................................................
7.12 Menu language..............................................................
8. Shortcuts .................................................................................
9. Information ............................................................................
9.1 Error tree ..........................................................................
9.2 Error information ............................................................
9.3 Warranty...........................................................................
9.4 Technical information.....................................................
9.5 International Regulatory and Product Information ..
9.5.1 Important Safety Instructions..............................
9.5.2 Limited Warranty ..................................................
4
5
6
7
9
10
12
13
13
13
13
14
15
16
17
19
20
21
3
22
23
24
24
25
26
28
30
31
32
36
37
38
38
39
39
40
41
42
48
1402 1600-ed11:1402 1600-ed11.qxd
11-07-2008
14:38
Side 4
4
1. Construction
MENU key
Display with backlight
LED
Key for internal calls
(not used on KIRK Wireless Server 1500)
Keyboard LOCK
(Menu*)
Left arrow key, Redial menu
from standby text
Headset Connector
(ACS Stratus Ultra)
Right arrow key, save number.
Telephone book menu from
standby text
Recall key
(MAIL key)
SILENT (Menu#)
ON/OFF HOOK keyalso used as turn on key
CONFIRMATION key MUTE microphone.
MUTE ringer when ringing.
Long key press turns off.
Volume up/down
1402 1600-ed11:1402 1600-ed11.qxd
11-07-2008
14:39
Side 5
2. Battery installation
Before using the telephone it is important that you connect the battery to the connector in the battery box. Assemble the back cover as described below and place the handset into the charger.
1. Push the back cover 5 mm towards the headset plug using your thumbs.
2. Lift off back cover.
3. If the battery is not already installed, place battery plug
in the slot in the battery box.
4. Insert battery with the label readable and replace cover.
5
Place the battery plug in the slot
with red wire closest to the mark
✱ (see figure)
1402 1600-ed11:1402 1600-ed11.qxd
11-07-2008
14:39
Side 6
6
3. Charging
It takes approximately 3 1/2 hours to charge the handset from fully discharged to its full capacity. Place the handset in the charger. The display shows the charging status in line 3. For correct charging the room temperature has
to be between 0°C and 25°C and the handset must therefore not be placed in direct sunshine. The battery has a
built-in heat sensor which will stop charging if the battery temperature is too high.
It is necessary to recharge the battery when the display shows “BATTERY LOW”, or if it can not be turned on. The
LED flashes at a low frequency while charging and lights constantly when the charging is finished. The display
goes back to normal mode when fully charged.
KIRK
. . . .
When the handset is placed in the charger it will not vibrate, and B-answer is inactive. If the battery is fully discharged, up to 10 min. may pass before charging begins (display lights up). When charging begins the charging
status is shown in the 3rd line of the display and the LED flashes slowly.
1402 1600-ed11:1402 1600-ed11.qxd
11-07-2008
14:39
Side 7
4. Key Functions
The handset has 21 keys:
Two keys are placed at the right side for volume control. Press upper or lower key to change the volume. Each
key-press turns volume one step up/down.
“MENU”
- Go to menu structure or exits the menu structure. (Escape or »NO«)
” < ”, “REDIAL” - Menu: left, Cursor left, after a digit: delete last digit. Long press: delete all
From standby text: Redial menu.
” > ”, “BOOK”
- Menu: right, Cursor right, After a digit: Store number in telephone book.
From standby text: Telephone book read.
“✓”, “MUTE”
- Confirmation (»YES«) or jump to next level in the menu. In off hook: Mute.
Long key press turns the handset OFF.
7
1402 1600-ed11:1402 1600-ed11.qxd
11-07-2008
14:39
Side 8
8
“INT”
- If residential systems: Internal calls off hook, and internal recall if already offhook.
(not used on KIRK Wireless Server 1500 and 500)
“R”
- If offhook: Recall. If onhook: Read message.
“
”
- On hook/off hook and turn ON.
”✱”
- * (Change from pulse to DTMF on KIRK Wirelss Server), Long = pause (-), extra long: change
from pulse to DTMF (a ”T” appears in the display, GAP standard).
“0-9”
- Digits or letters in alphanumeric mode (names and messages)
“#“
- #, Choose uppercase or lowercase letters in alphanumeric mode.
1402 1600-ed11:1402 1600-ed11.qxd
11-07-2008
14:39
Side 9
5. Turning the handset ON/OFF
ON: Press
key for 1/2 second.
When the handset is turned on the
symbol is shown in the lower left corner of the display, if the handset is
subscribed to a system. (For subscription, see 7.5.1)
OFF: Press the “✓” (MUTE) key for 3 seconds.
Please note: When the handset has been outside the coverage area, it can take up to 30 seconds before the handset
is back on the system after re-entering the coverage area.
9
1402 1600-ed11:1402 1600-ed11.qxd
11-07-2008
14:39
Side 10
10
6. Making a call
For making or receiving calls the handset has to be subscribed to a system (
shown in display) (see chap. 7.5.1)
Press the
key, the
icon in the display will flash until connection is established
Dial the number
Pre-dial:
Press the number to dial (long press on »*« will make a pause, if necessary)
Press the
key, the
icon will flash until the connection is established
Telephone book:
Press the > -key (book-key) to enter the telephone book
Search for the number either by using the < -key or the > -key or by pressing the first letter in the name by using
the digits 1 – 9 (see chap. 7.2)
Press the
key, the
icon will flash until the connection is established
1402 1600-ed11:1402 1600-ed11.qxd
11-07-2008
14:39
Side 11
Redial:
Redial / CLIP (CLIP = Calling Line Identification Presentation) stack:
Press the < -key (redial-key) to enter the redial/CLIP stack
Search for the number by using the < -key or the > -key, redial numbers are marked with redial or name and clip
numbers are marked either with clip or the name of the person who called and the LED is on.
Press the
key, the
icon will flash until the connection is established.
Using the handset in residential systems: (not on KIRK Wireless Server 1500 and 500)
Internal call post-dial:
Press the INT-key, the
icon in the display will flash
Dial the number of another handset on the base station, the
icon will flash until the connection is established
Internal call pre-dial: (not on KIRK Wireless Server 1500 and 500)
Press the number of another handset on the base station
Press the INT-key, the
icon will flash until the connection is established.
11
1402 1600-ed11:1402 1600-ed11.qxd
11-07-2008
14:39
Side 12
12
6.1. Receiving calls
If the phone rings, the call can be answered by pressing the
key.
When ringing the LED flashes fast, and the display shows the CLIP (if presented). If it is an external call (or if no
CLIP) the display shows “INCOMING CALL”
It is possible to stop the ring signal without answering the call. Press MUTE (✓) and the ring signal is muted.
Display shows: »RINGER MUTED«
1402 1600-ed11:1402 1600-ed11.qxd
11-07-2008
14:39
Side 13
6.2 During conversation
6.2.1 Volume regulation:
Use the two keys placed at the right side of the handset for volume control.
6.2.2 Microphone mute:
Press the ✓-key (mute-key), mic. muted is showed in the display.
Press the ✓-key (mute-key) to enable the microphone again.
6.2.3 Transferring the call to another handset:
Press R, and dial new number.
Press the
key and the call is transferred to the other handset.
13
1402 1600-ed11:1402 1600-ed11.qxd
11-07-2008
14:40
Side 14
14
7. Menu structure
Pressing the MENU-key, enters or exits the menu structure. It has to be used if a “NO” or “CLEAR” is wanted in
the menu structure.
Pressing the ✓-key, jumps to a lower level in the menu. When the lowest menu level is reached, it will store the
setting and jump to a higher level. It has to be used if a “YES” is wanted.
KIRK
MENU
LOGIN
MENU
MSF FUNCTION
PROFILE
SET UP
MENU
MENU
EXT. SERVICE
MENU
BATTERY
MENU
PHONE BOOK
MENU
REDIAL
MENU
MAIL
The phonebook and redial menu can be accessed directly. The phone book by pressing the > -key (book-key) and
the redial menu by pressing the < -key (redial-key).
1402 1600-ed11:1402 1600-ed11.qxd
11-07-2008
14:40
Side 15
7.1 Using the alphanumeric keyboard
The normal dialling keys (0-9) are used for writing the name to be placed in the telephone book. By pressing the
keys a certain number of times the related letters or digits will appear in the display. Spaces are made by using the
0-key. Key # changes between uppercase and lowercase letters. The arrows will move the cursor. Left arrow is also
used for deleting (hold for 1 sec.) = delete. New letters can be inserted.
Change of key press and pauses lasting more than 1 second automatically moves the cursor to next position.
15
1402 1600-ed11:1402 1600-ed11.qxd
11-07-2008
14:40
Side 16
16
7.2 The key functions
Key
1
2
3
4
5
6
7
8
9
0
✱
#
ÆØÅ@ÄÖßÜ1
ABC@ÄÁÀÂ2
DEF3
GHIÏÎ4
JKL5
MNOÖÓÒ6
PQRSß7
TUVÜÚÙÛ8
WXYZ9
Space . , _ - + : ? ! 0
*#/\()=&
Upper/lower-case
1402 1600-ed11:1402 1600-ed11.qxd
11-07-2008
14:40
Side 17
7.3 Profile set-up
To set-up the handset press “MENU”. You are now able to switch between the different settings. Press “” when
you find the setting you wish to change (or see). Change the setting according to your needs, confirm with “”
and you automatically go to the next setting. Press “Menu” to finalize profile setup.
17
1402 1600-ed11:1402 1600-ed11.qxd
11-07-2008
14:41
Side 18
18
Profile set-up (fig)
KIRK telecom
PROFILE
SET UP
SET PROFILE
BACKLIGHT
SET PROFILE
RINGER TONE
SET PROFILE
RINGER VOL
SET PROFILE
KEY CLICK
SET PROFILE
VIBRATOR
SET PROFILE
B-ANSWER
SET PROFILE
START VOL
SET PROFILE
OUT OF RANGE
SET PROFILE
AUTO KEYLOCK
SET PROFILE
LANGUAGE
BACKLIGHT
ON/OFF
RINGER TONE
1,2.........
RINGER VOL
KEY CLICK
- - -
VIBRATOR
ON/OFF
B-ANSWER
ON/OFF
START VOL
OUT OF RANGE
TONE ON/OFF
AUTO KEYLOCK
ON/OFF
SELECT
LANGUAGE
ENGLISH
1402 1600-ed11:1402 1600-ed11.qxd
11-07-2008
14:41
Side 19
7.4 Profile functions
Backlight: Can be turned on/off using the > and <. Confirm with (✓).
Ringertone: Scroll through the 9 different ringertones using > and <. Confirm with (✓).
Ringer vol: Turn the volume up and down using > or <. Confirm with (✓).
Key click: Turn the volume up and down using the > and <. Confirm with (✓).
Vibrator: Can be turned on/off using the > and <. Confirm with (✓).
B-answer: Can be turned on/off using the > and <. Confirm with (✓). When turned on, the telephone automatically
goes off hook when ringing. If subscribed to a KIRK solution it automatically goes on hook when calls are terminated.
Remark: Automatic on-hook is only reliable under defined conditions related to the interface settings between the
KIRK Wireless Server and the PBX.
Start vol: Start volume can be adjusted using the > and <. Confirm with (✓).
Out of range: The out of range indication can be turned on/off using the > and <. Confirm with (✓). With the out
of range indicator turned on, a beep will appear when the telephone is moving out of range of the base station, and
“OUT OF RANGE” will appear in the display.
Auto keylock: The auto keylock function can be turned on/off using the > and <. Confirm with (✓). With auto keylock turned on the handset will automatically lock the keys after 60 seconds. Press MENU ✱ to activate the keys again.
Language: See page 36.
19
1402 1600-ed11:1402 1600-ed11.qxd
11-07-2008
14:42
Side 20
20
7.5 Menu subscription and login
SUBSCRIPTION
REMOVE
MENU
LOGIN
REMOVE?
PASSWORD
_ _ _ _ _
MENU
SELECT LOGIN
SUBSCRIPTION
CREATE
LOGIN
SYSTEM1*
CREATE
SEARCH ID:
123456789012
REMOVE
SYSTEM 4
123456789015
SUBSCRIPTION
REMOVE
SUBSCRIPTION
REMOVE
REMOVE
SYSTEM 1
REMOVE
SYSTEM 1*
123456789012
REMOVE
SYSTEM 2
123456789013
REMOVE
SYSTEM 3
123456789014
Password is factory set 0000
1402 1600-ed11:1402 1600-ed11.qxd
11-07-2008
14:42
Side 21
7.5.1 Create subscription
To make subscriptions, the system must allow subscriptions to be made. Some systems also require an Access
Code (AC). If more than one system currently permits subscription, you will need to know the ID of the system to
which you wish to subscribe. Access Codes and system ID’s will be provided by the system administrator.
Choose the SUBSCRIPTION CREATE meny to subscribe to a new system. (see 7.5/7.5.4)
Use the < and > keys to scroll between the ID’s of the different systems available.
During subscription the handset will search for free positions and perform subscription on the first free position.
An alternative position can be choosen using < or >. Give in the AC (if required) using the keyboard, and press ().
If the subscription was successful, the startup text will be replaced by the standby text given into the system by the
system administrator and
is shown in the display. If not, the subscription has failed and the procedure must
be retried.
If the handset is already subscribed to 10 systems, you will have to remove a subscription before creating a new
subscription (see 7.5.3)
21
1402 1600-ed11:1402 1600-ed11.qxd
11-07-2008
14:42
Side 22
22
7.5.2 Login
The handset can be subscribed to 10 different systems enabling you to use the same handset on 10 different systems.
If you would like to change to another system, use the login menu to connect to another system number.
The actual chosen system is shown with the red LED on.
To change to another system use < or > and press to confirm.
To be able to log on to a system, subscription to the system has to be established. (See 7.5.1).
Under LOGIN/SELECT LOGIN only subscriptions will be shown. Free positions will not be shown.
1402 1600-ed11:1402 1600-ed11.qxd
11-07-2008
14:42
Side 23
7.5.3 Auto login
The handset can be subscribed to 10 different systems. If Auto login is chosen from the menu, the handset automatically selects a system. The selected system is marked with an “A”.
MENU
SELECT LOGIN
SUBSCRIPTION
CREATE
SUBSCRIPTION
REMOVE
SELECT LOGIN
SYSTEM 1
123456789015
SELECT LOGIN
SYSTEM 2A
123456789012
SELECT LOGIN
SYSTEM 3
123456789013
SELECT LOGIN
SYSTEM 4
123456789014
SELECT LOGIN
AUTO
Please note: Auto login should only be used in separate systems without overlaps.
23
1402 1600-ed11:1402 1600-ed11.qxd
11-07-2008
14:42
Side 24
24
7.5.4 Remove subscription
Subscriptions can be removed from the system in use and from the 9 other systems (if connected). Removing a subscription requires a password. Password is factory set at 0000. If the system in use is removed, it is necessary either
to select one of the remaining systems or to subscribe to a new one. If one of the systems not chosen is removed,
the handset remains connected to the system in use.
7.5.5 Change startup text
The startup text is predefined as i.e. ”KIRK telecom” as factory default. This can be changed by using the following
procedure: Press ✱✱✱✱, BOOK, () and give in the new startup text by the keyboard followed by (). It is possible
to give in 24 characters.
1402 1600-ed11:1402 1600-ed11.qxd
11-07-2008
14:42
Side 25
7.6 Battery capacity
In the battery menu it is possible to see the remaining battery capacity. For reading the correct capacity, the handset has to be removed from the charger for at least one hour. Press “Menu” and use the > or < keys to reach the
Battery Menu. Press “” to enter the menu, and you can see the current status of the battery capacity. Press “” to
return to the menu system or press “Menu” to quit.
The indication on the display is not necessarily an exact reflection on the remaining speech time, but only an indication of the voltage on the battery.
KIRK
MENU
BATTERY
BATTERY
CAPACITY
25
1402 1600-ed11:1402 1600-ed11.qxd
11-07-2008
14:42
Side 26
26
7.7 Redial
The handset has maximum 10 redial numbers and 10 Caller ID’s placed in the same stack. Each number is only
represented once. Enter the redial menu by pressing ”< ”(Redial) from the standby text. Repeated presses at the
“<” button turn backward through the dialled numbers and CLIP numbers (from newest to the oldest). Right
arrow moves in the opposite direction. It is also possible to reach the redial menu in the main menu. Numbers are
named “REDIAL”, ”CLIP” or with the name.
The LED will flash slowly if a new number (unanswered call) has arrived in the CLIP stack. If no number (no clip)
is represented by a call only the LED will flash slow afterwards.
If you want to delete a ”CLIP” or a ”REDIAL” you scroll to the name/number and press ”” twice.
The name/number is now deleted. If number is stored, it is moved to the telephone book.
It is possible to edit the CLIP or redial numbers. Find the number you wish to edit and press the digits you want to
add to the number, e.g. prefix = O.
1402 1600-ed11:1402 1600-ed11.qxd
11-07-2008
14:43
Side 27
The Redial and CLIP stack Menu (fig)
KIRK
<
REDIAL
CLIP
BILL GATES
75602850
898
899
DELETE?
899
STORE NO.?
899
DELETE ALL?
NAME:
27
1402 1600-ed11:1402 1600-ed11.qxd
11-07-2008
14:43
Side 28
28
7.8 Book
Storing a number (max. 24 digits) in the telephone book is done by pressing the number to be stored (in on hook),
then press the “>”- key followed by the “” key. The book can store up to 80 numbers with name. Typing of the
name and a confirmation is required. After storing the telephone will go back to standby mode. If the display
shows “MEMORY FULL”, it is necessary to delete one or
KIRK TELECOM
more numbers from the telephone book.
(See menu structure page 29)
75602850
75602850
BOOK
>
STORE NO.?
75602850
NAME:
KIRK TELECOM
1402 1600-ed11:1402 1600-ed11.qxd
11-07-2008
14:43
Side 29
Read BOOK numbers: The telephone book is entered by pressing ”>”(book). For quick-search: press the first letter
of the name (using 1-9)(see chap. 7.2). Call the displayed person by pressing the
key. It is also possible to reach
the telephone book menu in the main menu. Viewing and editing the telephone book can also be done while in
conversation.
BOOK
KIRK TELECOM
>
bILL JENSEN
CARL NIELSEN
899
7561XXXX
PHILIP
HANSEN
8614XXXX
CLAUS
PEDERSEN
134
DELETE?
7561XXXX
EDIT NO.?
7561XXXX
EDIT NAME?
CARL NIELSEN
29
1402 1600-ed11:1402 1600-ed11.qxd
11-07-2008
14:43
Side 30
30
7.9 External services
External services are facilities placed in the main system, and only available if the handset is subscribed to a KIRK
solution. Under External services can be found. Clip stack, Delete clip stack and local Phone book. The Local Phone
book is a comman Phone book for all handsets subscribed to the actual system, and all handsets subscribed to the
system are listed in the Phone book. Aditional numbers can be added to the Phone book by the system administrator.
1402 1600-ed11:1402 1600-ed11.qxd
11-07-2008
14:43
Side 31
7.10 MSF Functions
MSF Functions are special functions, which are based on MSF (Message Service Function). The functions require
special software in the main system.
31
1402 1600-ed11:1402 1600-ed11.qxd
11-07-2008
14:43
Side 32
32
7.11 Mail/Text Messages
Available in systems configured with the possibility of sending text messages
At the reception of a text message the envelope icon
appears in the display. The envelope icon is indicating
one or more unread messages.
The text message is shown in the display, and when the message is read the envelope icon will disappear.
If the message contains a callback number, this will be displayed on the bottom line of the display. As long as the
callback number is in the display, it is possible to activate the number by pressing the
-key.
1st letter in the display, in front of the timestamp, shows the message status: read (R), unread (N) or locked (L).
Mails include a maximum of 72 letters or digits (2 display screens of 36 each). Call back no. is max 24 digits (or letters for E-mail).
14 messages can be ”stored” in the handset. When receiving a new message, the oldest unlocked will be deleted.
Locked messages will not automatically be overwritten, but can manually be deleted. Maximum 7 messages can be
locked.
1402 1600-ed11:1402 1600-ed11.qxd
11-07-2008
14:43
Side 33
Read a mail
Press the ”R”- (MAIL) key followed by the -key or enter the mail menu (in on hook condition).
If the message includes more than 36 letters or digits, the message will run over 2 display screens.
Use the > -key to scroll. To see the sender of the mail, press the -key. To leave the mail, press the MENU-key.
Reply a mail
Open the mail by pressing the R-key followed by the -key, press the -key again and use the < >-keys to find the reply feature, press the -key and you are then able to reply the mail. After writing your reply press the -key to confirm.
Forward a mail
Open the mail by pressing the R-key followed by the-key, press the -key again and use the < >-keys to find the forward feature, press the -key twice and you are then able to write the number on the receiver. Confirm with the -key.
Delete all mail
Open the mail stack by pressing the R-key followed by the -key, press the -key again and use the < >-keys to find
the delete feature, press the -key and all mails are deleted.
33
1402 1600-ed11:1402 1600-ed11.qxd
11-07-2008
14:43
Side 34
34
Delete a mail
Open the mail by pressing the R-key followed by the -key, press the -key again and use the < >-keys to find the
delete feature, press the -key and the mail is deleted.
Lock/unlock a mail
Open the mail by pressing the R-key followed by the -key, press the -key again and use the < >-keys to find the
lock/unlock feature, press the -key and the mail is locked/unlocked.
Write a mail
To write a new mail press the R (mail)-key, confirm with the -key and write your message. To send the mail
press the -key, type the number of the receiver and confirm with the -key.
If one or more mails are stored do as followed: Press the R (mail)-key followed by the >-key confirm with the key and write your message. Press the -key, type the number of the receiver and confirm with the -key. The
message is send.
Note
In case a sent message is not received, the sender will get a message in the display.
1402 1600-ed11:1402 1600-ed11.qxd
11-07-2008
The Mail Menu (fig)
14:44
Side 35
KIRK telecom
MAIL
N25-01 04.38
308
Temp 45° ..
L26-01 14.32
319
Hello, its me..
N28-01 15.46
236
FIRE ALARM..
Hello it’s me.
Yo can meet me
at 15
o’clock if you
want to.
DELETE
MAIL?
SENDER:
(UN)LOCK
MAIL?
WRITE NEW
MAIL?
REPLY
MAIL?
√19-01 09.56
htj@kirktelec
I am working..
√20-01 10.13
319
Call me..
N
206
Meet me at 9 ..
FORWARD
MAIL?
319
----
PHONENO:
236
35
E-MAIL:
[email protected]
1402 1600-ed11:1402 1600-ed11.qxd
11-07-2008
14:45
Side 36
36
7.12 Menu language
There are 6 predefined languages in the handset: English, German, French, Italian, Spanish and Dutch. Select the
required language by pressing the -key. If a 7th language is present this will be shown as ”OPEN”. The ”OPEN”
selection is a specific dealer language and is factory programmed.
z
PROFILE
SET UP
SET PROFILE
LANGUAGE
SELECT
LANGUAGE
ENGLISH
SELECT
LANGUAGE
GERMAN
SELECT
LANGUAGE
FRENCH
SELECT
LANGUAGE
ITALIAN
SELECT
LANGUAGE
SPANISH
SELECT
LANGUAGE
DUTCH
SELECT
LANGUAGE
OPEN
1402 1600-ed11:1402 1600-ed11.qxd
11-07-2008
14:45
Side 37
8. Shortcuts
”SILENT”: Press: MENU #. (No sounds) (Display shows SILENT)
”KEY LOCKED”: Press: MENU ✱. (Display shows KEY LOCKED)
“PHONE BOOK”: Press >(BOOK) key in standby.
Name search in telephone book: Press the first letter in name and > (book) afterwards.
Store a number: Press >(BOOK) after the number (in on hook).
“REDIAL ”and “CLIP”: Press <(REDIAL) key in standby.
“MAIL”: Press R(MAIL) key in on hook.
MUTE temporarily the ringer: Press “”(MUTE) when the telephone is ringing.
MUTE the microphone: Press “”(MUTE) when the telephone is off hook.
RECALL: Press the INT key if residential system, else press the “R”-key.
Pause(-): Hold * for one second.
Change from pulse to DTMF(T): Hold ✱ for 2 seconds.
37
1402 1600-ed11:1402 1600-ed11.qxd
11-07-2008
14:45
Side 38
38
9. Information
9.1 Error tree
Problem
Check
The telephone freezes.
Remove and replace the battery pack. Press
The telephone does not ring.
Check whether the ringer is SILENT or RINGER VOL. is OFF.
The telephone cannot find a system ID at
“SUBSCRIPTION CREATE”.
Check whether the system is set to allow subscriptions.
The telephone cannot subscribe even if
system ID has been found.
Check if Access Code is necessary.
Not possible to turn on the telephone
Check if battery is connected. If yes, charge the battery.
The telephone turn off when recieving a call
and going off-hook
Charge the battery. If still a problem change the battery as it might
be defective.
to turn on the telephone.
1402 1600-ed11:1402 1600-ed11.qxd
11-07-2008
14:45
Side 39
9.2 Error information
Improper function of the handset might be related to the installation of the KIRK solution or failures related to the
main system. Before declaring a handset for repair be sure that the main system is operating properly.
9.3 Warranty
The handset is covered by a normal warranty-solution, except the battery. The lifetime of the battery depends on
the general use of the handset.
The handset is not covered by a general warranty if:
• The handset is exposed to water or metal dust
• The handset is mistreated
• The handset is exposed to unauthorised break-in
39
1402 1600-ed11:1402 1600-ed11.qxd
11-07-2008
14:45
Side 40
40
9.4. Technical information
Approvals
Acoustics:
Electrical:
Access profile:
EMC:
EN 301 406
EN 60950-1
EN 301 489-1
EN 301 489-6
EN 50371
EN 61000-3-2
EN 61000-3-3
TBR 10
TBR 6 (DECT RF)
TBR 22 (GAP)
ETS 300 329 (CE labelling)
Size and weight
Size:
Weight:
143 x 48 x 26 mm
121 g including battery ± 10 g
Capacity
Active talking time
Stand-by time
12 hours
120 hours
1402 1600-ed11:1402 1600-ed11.qxd
11-07-2008
14:45
Side 41
9.5 International Regulatory and Product Information
This KIRK 3040 Handset has been marked with the CE mark. This mark indicates compliance
with EEC Directives 89/336/EEC, 73/23/EEC 1999/5/EC. A full copy of the Declaration of
conformity can be obtained from Polycom Ltd, 270 Bath Road, Slough, Berkshire, SL1 4DX, UK.
Česky [Czech]:
Dansk [Danish]:
Deutsch [German]:
Polycom (UK) Ltd tímto prohlašuje, že tento KIRK 3040 handset je ve shodě se základními požadavky a
dalšími příslušnými ustanoveními směrnice 1999/5/ES.
Undertegnede Polycom (UK) Ltd erklærer herved, at følgende udstyr KIRK 3040 handset overholder de
væsentlige krav og øvrige relevante krav i direktiv 1999/5/EF.
Hiermit erklärt Polycom (UK) Ltd, dass sich das Gerät KIRK 3040 handset in Übereinstimmung mit den
grundlegenden Anforderungen und den übrigen einschlägigen Bestimmungen der Richtlinie 1999/5/EG
befindet.
41
1402 1600-ed11:1402 1600-ed11.qxd
11-07-2008
14:45
Side 42
42
Eesti [Estonian]:
English:
Español [Spanish]:
Ελληνική [Greek]:
Français [French]:
Italiano [Italian]:
Íslenska (Icelandic):
Latviski [Latvian]:
Käesolevaga kinnitab Polycom (UK) Ltd seadme KIRK 3040 handset vastavust direktiivi 1999/5/EÜ
põhinõuetele ja nimetatud direktiivist tulenevatele teistele asjakohastele sätetele.
Hereby, Polycom (UK) Ltd. declares that this KIRK 3040 handset is in compliance with the essential requirements and other relevant provisions of Directive 1999/5/EC.
Por medio de la presente Polycom (UK) Ltd declara que el KIRK 3040 handset cumple con los requisitos
esenciales y cualesquiera otras disposiciones aplicables o exigibles de la Directiva 1999/5/CE.
ΜΕ ΤΗΝ ΠΑΡΟΥΣΑ Polycom (UK) Ltd ΔΗΛΩΝΕΙ ΟΤΙ KIRK 3040 handset ΣΥΜΜΟΡΦΩΝΕΤΑΙ ΠΡΟΣ
ΤΙΣ ΟΥΣΙΩΔΕΙΣ ΑΠΑΙΤΗΣΕΙΣ ΚΑΙ ΤΙΣ ΛΟΙΠΕΣ ΣΧΕΤΙΚΕΣ ΔΙΑΤΑΞΕΙΣ ΤΗΣ ΟΔΗΓΙΑΣ 1999/5/ΕΚ.
Par la présente Polycom (UK) Ltd déclare que l'appareil KIRK 3040 handset est conforme aux exigences
essentielles et aux autres dispositions pertinentes de la directive 1999/5/CE.
Con la presente Polycom (UK) Ltd dichiara che questo KIRK 3040 handset è conforme ai requisiti essenziali ed alle altre disposizioni pertinenti stabilite dalla direttiva 1999/5/CE.
Hér með lýsir Polycom (UK) Ltd yfir því að KIRK 3040 handset er í samræmi við grunnkröfur og aðrar
kröfur, sem gerðar eru í tilskipun 1999/5/EC
Ar šo Polycom (UK) Ltd deklarē, ka KIRK 3040 handset atbilst Direktīvas 1999/5/EK būtiskajām prasībām un citiem ar to saistītajiem noteikumiem.
1402 1600-ed11:1402 1600-ed11.qxd
11-07-2008
14:45
Side 43
Lietuvių [Lithuanian]: Šiuo Polycom (UK) Ltd deklaruoja, kad šis KIRK 3040 handset atitinka esminius reikalavimus ir kitas
1999/5/EB Direktyvos nuostatas.
Nederlands [Dutch]: Hierbij verklaart Polycom (UK) Ltd dat het toestel KIRK 3040 handset in overeenstemming is met de
essentiële eisen en de andere relevante bepalingen van richtlijn 1999/5/EG.
Malti [Maltese]:
Hawnhekk, Polycom (UK) Ltd, jiddikjara li dan [il-mudel tal-prodott] jikkonforma mal-ħtiġijiet essenzjali u ma provvedimenti oħrajn relevanti li hemm fid-Dirrettiva 1999/5/EC.
Magyar [Hungarian]: Alulírott, Polycom (UK) Ltd nyilatkozom, hogy a KIRK 3040 handset megfelel a vonatkozó alapvetõ
követelményeknek és az 1999/5/EC irányelv egyéb elõírásainak.
Norsk [Norwegian]: Polycom (UK) Ltd erklærer herved at utstyret KIRK 3040 handset er i samsvar med de grunnleggende
krav og øvrige relevante krav i direktiv 1999/5/EF.
Polski [Polish]:
Niniejszym Polycom (UK) Ltd oświadcza, że KIRK 3040 handset jest zgodne z zasadniczymi wymaganiami oraz innymi stosownymi postanowieniami Dyrektywy 1999/5/WE.
Português [Portuguese]: Polycom (UK) Ltd declara que este KIRK 3040 handset está conforme com os requisitos essenciais e
outras disposições da Directiva 1999/5/CE.
Slovensko [Slovenian]: Polycom (UK) Ltd izjavlja, da je ta KIRK 3040 handset v skladu z bistvenimi zahtevami in ostalimi relevantnimi določili direktive 1999/5/ES.
43
1402 1600-ed11:1402 1600-ed11.qxd
11-07-2008
14:45
Side 44
44
Slovensky [Slovak]:
Suomi [Finnish]:
Svenska [Swedish]:
Polycom (UK) Ltd týmto vyhlasuje, že KIRK 3040 handset spĺňa základné požiadavky a všetky príslušné
ustanovenia Smernice 1999/5/ES.
Polycom (UK) Ltd vakuuttaa täten että KIRK 3040 handset tyyppinen laite on direktiivin 1999/5/EY oleellisten vaatimusten ja sitä koskevien direktiivin muiden ehtojen mukainen.
Härmed intygar Polycom (UK) Ltd att denna KIRK 3040 handset står I överensstämmelse med de väsentliga egenskapskrav och övriga relevanta bestämmelser som framgår av direktiv 1999/5/EG.
The WEEE Marking on this equipment indicates that the product must not be disposed of
with unsorted waste, but must be collected separately.
1402 1600-ed11:1402 1600-ed11.qxd
11-07-2008
14:45
Side 45
9.5.1 Important Safety Instructions
Before using your telephone equipment, you should always follow basic safety instruction to reduce the risk of fire, elec-trical
shock and injury to persons, and damage to property.
1. Read and understand all instructions.
2. Follow all warnings and instructions including those marked on the prod-uct.
3. Unplug this product before cleaning. Do not use liquid cleaners or aerosol cleaners. Use damp cloth for cleaning.
4. Do not install the telephone equipment in the bathroom or near a wash bowl, kitchen sink, or laundry tub, in a wet basement, or near a swimming pool.
5. Slots or openings in the equipment are provided for ventilation to protect it from over-heating. These openings must not be
blocked or covered.
6. The product should be operated only from the type of power source indi-cated on the instructions. If you are not sure of the
type of power supply, consult your dealer or local power company.
7. Do not overload wall outlets and extension cords as this can result in fire or electrical shock.
8. Never push objects of any kind into this product through cabinet slots as they may touch dangerous voltage points or short
out parts that could result in fire, electrical shock, or injury. Never spill liquid of any kind into this product.
9. To reduce the risk of electrical shock or burns, do not disassemble this product. Opening or removing covers may expose
you to dangerous volt-ages, dangerous electrical current, or other risks. Incorrect reassemble can cause electrical shock when
the appli-ance is subsequently used. If the product need repair, consult your dealer.
10. Refer servicing to qualified service personnel.
45
1402 1600-ed11:1402 1600-ed11.qxd
11-07-2008
14:45
Side 46
46
11. Avoid using telephone during an electrical storm. There may be a risk of electrical shock from lightning.
12. Do not use the telephone to report a gas leak in the vicinity of the leak.
13. Do not place the base or charger near microwave ovens, radio equipment, or non-ground connected televisions. These
appliances may cause electrical interference to the base or handset.
14. The charger must be placed on a hard, flat surface and connected to a functional power source.
15. This telephone will not operate in the event of a blackout. Please keep a backup phone for emergencies.
16. Installation must be performed in accordance with all relevant national wiring rules.
17. Plug acts as Disconnect Device - The socket outlet to which this apparatus is connected must be installed near the equipment and must always be read-ily accessible.
Intrinsic safety
Do not use the handset in conditions where there is a danger of electrically ignited explosions.
Exposure to sunlight, heat and moisture.
Do not expose the wireless phone to direct
sunlight for long periods. Keep the wire-less phone away from excessive heat and moisture.
Spare parts and accessories
Use only approved spare parts and accessories. The operation of non- approved parts cannot be guaranteed and may even cause damage.
Power failure
In the event of a power failure or flat bat-tery, you cannot use the handset to make or receive calls.
1402 1600-ed11:1402 1600-ed11.qxd
11-07-2008
14:45
Side 47
Battery Precautions
1. Periodically clean the charge contacts on both the charger and handset.
2. Exercise care in handling batteries in order not to short the batteries with conducting materials such as rings, bracelets, and
keys. The batteries or conducting material may overheat and cause burns or fire.
3. Do not open or mutilate the batteries. Released electrolyte is corrosive and may cause damage to the eyes or skin. The electrolyte may be toxic if swal-lowed.
4. During charging batteries heat up. This is normal and not dangerous.
5. Lithium cell installation Caution -Danger of Explosion if Battery is incorrectly replaced. Replace only with the same or equivalent type rec-ommended by the manufacturer. Dispose of used batteries according to the manufacturer's instructions.
Note: This equipment has been tested and found to comply with the limits for a class B digital device, pursuant to local regulations.
These limits are designed to provide reasonable protection against harmful interference in a residential installation. This equipment
generates, uses and can radiate radio frequency energy and, if not installed and used in accordance with the instructions, may cause
harmful interference to radio communications. However, there is no guarantee that interference will not occur in a particular installation. If this equipment does cause harmful interference to radio or television reception, which can be determined by turning the
equipment off and on, the user is encouraged to try to correct the interference by one or more of the following measures:
— Reorient or relocate the receiving antenna.
— Increase the separation between the equipment and receiver.
— Connect the equipment into an outlet on a circuit different from that to which the receiver is connected.
— Consult the dealer or an experienced radio/TV technician for help.
47
1402 1600-ed11:1402 1600-ed11.qxd
11-07-2008
14:45
Side 48
48
FCC Note: This device complies with part 15 of the FCC rules. Operation is subject to the following two conditions: (1) This
device may not cause harmful interference, and (2) this device must accept any interference received, including interference that
may cause undesired operation. In accordance with part 15 of the FCC rules, the user is cautioned that any changes or modifications not expressly approved by Polycom Inc. could void the user’s authority to operate the equipment.
SAR: Device has been tested for SAR compliance for head and body worn configurations. The highest reported SAR values are:
head 0.023 W/kg and body worn 0.01 W/kg.
IC Note: Operation is subject to the following two conditions: (1) This device may not cause interference, and (2) this device
must accept any interference, including interference that may cause undesired operation of the device. The Term "IC": before
the certification/ registration number only signifies that the Industry Canada technical specifications were met.
Privacy of communications may not be ensured when using this telephone.
This Class [B] digital apparatus complies with Canadian ICES-003.
Cet appareil numérique de la classe [B] est conforme à la norme NMB-003 du Canada.
Power Outage: In the event of a power outage, your wireless telephone will not operate. The wireless telephone requires electricity for operation. You should have a telephone which does not require electricity available for use during power outages.
Information to user: The users manual or instruction manual for an intentional or unintentional radiator shall caution the user
that changes or modifications not expressly approved by the party responsi-ble for compliance could void the user's authority
to operate the equipment.
1402 1600-ed11:1402 1600-ed11.qxd
11-07-2008
14:45
Side 49
NOTE EMC: Cet appareil a été soumis à un essai et jugé conforme aux normes régissant les limites établies pour un dis-positif
numérique de classe B, conformé-ment aux règlements locaux.Ces limites visent à assurer une protection raisonna-ble contre
des interférences pouvant nuire a l'appareil utilisé dans un secteur rési-dentiel. Cet équipment génère et utilise des radiofréquences, et peut en émettre. S'il n'est pas installé et utilisé selon les directives fournies, il risque de perturber les radiocommunications. L'exploitation de cet appareil dans un secteur particulier est toutefois susceptible de produire des interférences nuisibles.
Si cet équipement provoque des interférences lors de la réception des radiofréquences ou des fréquences de télévision, ce qui
peut être vérifié en mettant l'appareil hors tension, puis en le remettant sous tension, l'utilisa-teur doit prendre l'une des mesures suiv-antes pour corriger la situation:
— réorienter ou relocaliser l'antenne de réception;
— augmenter la distance entre l'appareil et 1 antenne de réception;
— brancher l'appareil à une prise d'un circuit différent de celui auquel l'antenne est branchée;
— consulter le détaillant ou un technicien en radiotélévision d'expérience pour obtenir de l'aide.
49
1402 1600-ed11:1402 1600-ed11.qxd
11-07-2008
14:45
Side 50
50
9.5.2 Limited Warranty
This limited, non-transferable warranty is provided to the original purchaser. The product is warranted to be free from defects
in materials and workmanship under normal installation, use and service for a period of one (1) year from the date of purchase
as shown on the purchaser's receipt. Our obligation under this warranty is limited to repair or replacement (at our option) of
the product or any part(s) which are defective provided that the product is returned to the original place of purchase or an
authorized service location during the warranty period. Products returned must be accompanied by a copy of the purchase
receipt. In the absence of a purchase receipt, the warranty period shall be one (1) year from the date of manufacture. Repair or
replacement of the product is your sole and exclusive remedy.
If the product is repaired, reconditioned component parts or materials may be used. If the product is replaced, we may replace
it with a new or reconditioned product of the same or similar design. The repaired product will be warranted for either (a) 90
days or (b) the remainder of the original one (1) year warranty period, whichever is longer.
This warranty does not apply to the defects outside of our control, including but not limited to acts of God, fire, flood and
damage while in transit to service facility. We do not warranty that the product will be compatible with any telephone equipment, systems or party lines.
This warranty shall be void if the product is damaged as a result of defacement, misuse, abuse, neglect, accident, destruction or
alteration of the serial number, improper electrical voltages or currents, repair, alteration or maintenance by any person or party
other than our authorized service facility, or any violation of instructions furnished by us.
This warranty is also void if this product is removed from the country in which it was purchased by the original purchaser, if it
1402 1600-ed11:1402 1600-ed11.qxd
11-07-2008
14:45
Side 51
is used in a country in which it is not registered for use, or if it is used in a country for which it was not designed. Due to variations in telephone systems and communications laws, this product may be illegal for use in some countries. We assume no
responsibilities for damages or penalties incurred resulting from
the use of this product in a manner or location other than that for which it was intended.
THIS LIMITED WARRANTY IS IN LIEU OF ALL OTHER WARRANTIES EXPRESS OR IMPLIED. ANY IMPLIED WARRANTIES INCLUDING BUT NOT LIMITED TO THE IMPLIED WARRANTIES OF MERCHANTABILITY AND FITNESS FOR A
PARTICULAR PURPOSE, SHALL BE LIMITED TO THE DURATION OF THIS WRITTEN LIMITED WARRANTY. WE DISCLAIM ANY LIABILITY FOR DAMAGES FOR LOSS OF USE OF THE PRODUCTS, LOSS OF TIME, INCONVENIENCE, INJURY TO ANY PERSON, OR DAMAGE TO PROPERTY CAUSED BY THE PRODUCT, LOSS OF REVENUE OR PROFIT OR
DAMAGES FOR ANY FAILURE TO PERFORM. IN NO EVENT SHALL WE BE LIABLE FOR ANY SPECIAL, INCIDENTAL,
PUNITIVE OR CONSEQUENTIAL DAMAGES EVEN IF WE ARE ADVISED OF THE POSSIBILITY OF SUCH DAMAGES.
Some states do not allow limitations on how long an implied warranty lasts, so the above limitations may not apply to you.
This warranty is the sole and exclusive warranty provided for the product. There are no other express warranties. This warranty gives you specific legal rights, and you may also have other rights, which vary from state to state.
51
©2007 Polycom, Inc. All rights reserved.
Specifications subject to change without notice.
Polycom (Denmark)
Langmarksvej 34
DK-8700 Horsens
Tel. +45 7560 2850
Fax +45 7560 2851
[email protected]
www.polycom.com
11-07-2008
Polycom Headquarters
4750 Willow Road
Pleasanton
CA 94588 (T)
1402 1600-HD . ED11 . A. Rasmussens Bogtrykkeri, Ringkøbing
1402 1600-ed11:1402 1600-ed11.qxd
14:45
Side 52