1
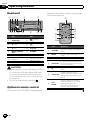
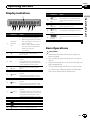
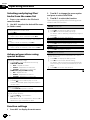
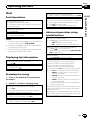
Operation Manual
CD RDS RECEIVER
DEH-7300BT
English
Section
01
Before You Start
Thank you for purchasing this PIONEER
product.
To ensure proper use, please read through this
manual before using this product. It is especially important that you read and observe
WARNINGs and CAUTIONs in this manual.
Please keep the manual in a safe and accessible
place for future reference.
If you want to dispose this product, do not mix
it with general household waste. There is a separate collection system for used electronic
products in accordance with legislation that requires proper treatment, recovery and recycling.
Private households in the member states of
the EU, in Switzerland and Norway may return
their used electronic products free of charge
to designated collection facilities or to a retailer (if you purchase a similar new one).
For countries not mentioned above, please
contact your local authorities for the correct
method of disposal.
By doing so you will ensure that your disposed
product undergoes the necessary treatment,
recovery and recycling and thus prevent potential negative effects on the environment
and human health.
In case of trouble
Should this unit fail to operate properly, please
contact your dealer or nearest authorized
PIONEER Service Station.
About this unit
The tuner frequencies on this unit are allocated for use in Western Europe, Asia, the
2
En
Middle East, Africa and Oceania. Use in other
areas may result in poor reception. The RDS
(radio data system) function only operates in
areas with broadcasting RDS signals for FM
stations.
CAUTION
This product is a class 1 laser product classified under the Safety of laser products, IEC
60825-1:2007, and contains a class 1M laser
module. To ensure continued safety, do not remove any covers or attempt to gain access to
the inside of the product. Refer all servicing to
qualified personnel.
CAUTION—CLASS 1M INVISIBLE LASER
RADIATION WHEN OPEN, DO NOT VIEW
DIRECTLY WITH OPTICAL INSTRUMENTS.
CAUTION
! Do not allow this unit to come into contact
with liquids. Electrical shock could result.
Also, damage to this unit, smoke, and overheating could result from contact with liquids.
! The Pioneer CarStereo-Pass is for use only in
Germany.
! Always keep the volume low enough to hear
outside sounds.
! Avoid exposure to moisture.
! If the battery is disconnected or discharged,
any preset memory will be erased.
Notes
! Function setting operations are completed
even if the menu is cancelled before the operations are confirmed.
! In this manual, iPod and iPhone will be referred to as “iPod”.
Section
Before You Start
01
Before You Start
Demo mode
Important
! Failure to connect the red lead (ACC) of this
unit to a terminal coupled with ignition switch
on/off operations may lead to battery drain.
! Remember that if the feature demo continues
operating when the car engine is turned off, it
may drain battery power.
The demo automatically starts when the ignition switch is set to ACC or ON while the unit
is turned off. Turning off the unit does not cancel demo mode. To cancel the demo mode, operate the function in the initial setting menu.
Operating the demo while the ignition switch
is set to ACC may drain battery power.
En
3
Section
02
Operating this unit
Head unit
Operation is the same as when using the buttons on the head unit.
12 3 4
78 9 a
5
6
b
c
Part
8
(phone/on
hook)
2
h (eject)
9
(Back/display/
scroll)
a
a/b/c/d
(list)
i
1
j
Part
Operation
f
VOLUME
Press to increase or decrease volume.
g
MUTE
Press to mute. Press again to unmute.
4
MULTI-CONTROL
(M.C.)
b
TA/NEWS
5
Disc loading slot
c
1 to 6
6
USB port
d
AUX input jack (3.5
mm stereo jack)
h
AUDIO
Press to select an audio function.
7
B (BAND/ESC)
e
Detach button
i
DISP/SCRL
Press to select different displays.
Press and hold to scroll through
the text information.
j
e
Press to pause or resume playback.
k
FUNCTION
Press to select functions.
Press and hold to recall the initial
setting menu when the sources
are off.
l
LIST/
ENTER
Press to display the disc title,
track title, folder, or file list depending on the source.
While in the operating menu,
press to control functions.
CAUTION
! Use an optional Pioneer USB cable (CD-U50E)
to connect the USB audio player/USB memory as any device connected directly to the
unit will protrude out from the unit and may
be dangerous.
! Do not use unauthorized products.
Optional remote control
The remote control CD-R320 is sold separately.
4
k
Part
S (SRC/OFF)
g
a
h
7
l
d e
1
3
f
En
Section
Operating this unit
02
Display indication
2 3 6 8 9 ab d f
45 7
c e
Indicator
2
3
Main display section
!
Tuner: band and frequency
RDS: program service name,
PTY information and other literal information
Built-in CD, USB storage device and iPod: elapsed playback time and text
information
c
An upper tier of the folder or
menu exists.
d
A lower tier of the folder or menu
exists.
This flashes when a song/album
related to the song currently playing is selected from the iPod.
4
(list)
The list function is being operated.
5
(artist)
The disc (track) artist name is displayed.
Artist search refinement of the
iPod browsing function is in use.
6
(disc)
The disc (album) name is displayed.
Album search refinement of the
iPod browsing function is in use.
(song)
The track (song) name is displayed.
A playable audio file has been selected during operation of the list.
Song search refinement of the
iPod browsing function is in use.
7
8
LOC
c
(random/shuffle)
Random play is on.
The iPod source is selected and
the shuffle or shuffle all function
is on.
d
(auto
answer)
Shows when the automatic answering function is on.
e
(Bluetooth indicator)
Connected to a Bluetooth device.
State
!
!
1
State
f
(sound retriever)
The sound retriever function is
on.
Operating this unit
1
Indicator
Basic Operations
Important
! Handle gently when removing or attaching
the front panel.
! Avoid subjecting the front panel to excessive
shock.
! Keep the front panel out of direct sunlight and
high temperatures.
! To avoid damaging the device or vehicle interior, remove any cables and devices attached
to the front panel before detaching it.
Local seek tuning is on.
9
(TA)
TA function is on.
a
(TP)
A TP station is tuned in.
b
(repeat)
Track or folder repeat is on.
En
5
Section
02
Operating this unit
Removing the front panel to protect your unit from
theft
1 Press the detach button to release the front
panel.
2 Push the front panel upward and pull it toward
you.
Note
When this unit’s blue/white lead is connected to
the vehicle’s auto-antenna relay control terminal,
the vehicle’s antenna extends when this unit’s
source is turned on. To retract the antenna, turn
the source off.
Using Bluetooth telephone
Important
3 Always keep the detached front panel in a protection device such as a protection case.
Re-attaching the front panel
1 Slide the front panel to the left.
Make sure to insert the tabs on the left side of the
head unit into the slots on the front panel.
2 Press the right side of the front panel until it is
firmly seated.
If you cannot attach the front panel to the head
unit successfully, make sure that you are placing
the front panel onto the head unit correctly. Forcing the front panel into place may result in damage to the front panel or head unit.
Turning the unit on
1 Press S (SRC/OFF) to turn the unit on.
Turning the unit off
1 Press and hold S (SRC/OFF) until the unit turns
off.
Selecting a source
1 Press S (SRC/OFF) to cycle between:
TUNER (tuner)—CD (built-in CD player)—USB
(USB)/iPod (iPod)—AUX (AUX)
Adjusting the volume
1 Turn M.C. to adjust the volume.
CAUTION
For safety reasons, park your vehicle when removing the front panel.
6
En
! Since this unit is on standby to connect with
your cellular phone via Bluetooth wireless
technology, using it without the engine running can drain the battery power.
! Operations may vary depending on the kind of
cellular phone.
! Advanced operations that require attention
such as dialing numbers on the monitor,
using the phone book, etc., are prohibited
while driving. Park your vehicle in a safe place
when using these advanced operations.
Setting up for hands-free phoning
Before you can use the hands-free phoning
function you must set up the unit for use with
your cellular phone.
1 Connection
Operate the Bluetooth telephone connection
menu. Refer to Connection menu operation on
page 13.
2 Function settings
Operate the Bluetooth telephone function menu.
Refer to Phone menu operation on page 14.
Basic Operations
Making a phone call
1 Refer to Phone menu operation on page 14.
Answering an incoming call
1 When a call is received, press M.C.
Ending a call
1 Press
.
Section
Operating this unit
Rejecting an incoming call
1 When a call is received, press
02
Tuner
.
Basic Operations
Switching between callers on hold
1 Press M.C.
Selecting a band
1 Press B (BAND/ESC) until the desired band (F1,
F2, F3 for FM or MW/LW) is displayed.
Canceling call waiting
1 Press
.
Manual tuning (step by step)
1 Press c or d.
Adjusting the other party’s listening volume
1 Press a or b while talking on the phone.
Seeking
1 Press and hold c or d, and then release.
You can cancel seek tuning by briefly pressing c
or d.
While pressing and holding c or d, you can skip
stations. Seek tuning starts as soon as you release c or d.
Turning private mode on or off.
1 Press B (BAND/ESC) while talking on the phone.
Switching the information display
1 Press
while talking on the phone.
! Press and hold
to scroll.
Notes
! If private mode is selected on the cellular
phone, hands-free phoning may not be available.
! The estimated call time appears in the display
(this may differ slightly from the actual call
time).
Operating this unit
Answering a call waiting
1 When a call is received, press M.C.
Note
This unit’s AF (alternative frequencies search)
function can be turned on and off. AF should be
off for normal tuning operation (refer to page 9).
Storing and recalling stations
for each band
Using preset tuning buttons
Menu operations identical
for function settings/audio
adjustments/initial
settings/lists
1 When you find a station that you want
to store in memory, press one of the preset
tuning buttons (1 to 6) and hold until the
preset number stops flashing.
2 Press one of the preset tuning buttons
(1 to 6) to select the desired station.
Returning to the previous display
Returning to the previous list (the folder one level
higher)
1 Press .
# You can also recall stored radio stations by
pressing a or b during the frequency display.
Returning to the main menu
Returning to the top tier of list
1 Press and hold .
Switching the RDS display
Returning to the ordinary display
Canceling the initial setting menu
1 Press B (BAND/ESC).
Returning to the ordinary display from the list
1 Press B (BAND/ESC).
RDS (radio data system) contains digital information that helps search for the radio stations.
% Press .
Program service name—PTY information—
Frequency
# PTY information and the frequency appear on
the display for eight seconds.
En
7
Section
02
Operating this unit
PTY list
NEWS/INFO
NEWS (News), AFFAIRS (Current affairs), INFO (Information), SPORT (Sports), WEATHER (Weather), FINANCE (Finance)
POPULAR
POP MUS (Popular music), ROCK MUS (Rock
music), EASY MUS (Easy listening), OTH MUS
(Other music), JAZZ (Jazz), COUNTRY (Country
music), NAT MUS (National music), OLDIES (Oldies
music), FOLK MUS (Folk music)
CLASSICS
L. CLASS (Light classical), CLASSIC (Classical)
OTHERS
EDUCATE (Education), DRAMA (Drama), CULTURE
(Culture), SCIENCE (Science), VARIED (Varied), CHILDREN (Children’s), SOCIAL (Social affairs), RELIGION
(Religion), PHONE IN (Phone in), TOURING (Travel),
LEISURE (Leisure), DOCUMENT (Documentaries)
Advanced operations using
special buttons
Receiving traffic announcements
Regardless of the source you are listening to, you can
receive traffic announcements automatically with TA
(traffic announcement standby).
1 Tune in to a TP or enhanced other network’s TP
station.
2 Press TA/NEWS to turn traffic announcement
standby on or off.
3 Use M.C. to adjust the TA volume when a traffic
announcement begins.
The newly set volume is stored in the memory
and will be recalled for subsequent traffic announcements.
4 Press TA/NEWS while a traffic announcement is
being received to cancel the announcement.
The tuner returns to the original source but remains in the standby mode until TA/NEWS is
pressed again.
Using news program interruption
When a news program is broadcast from a PTY code
news station, the unit automatically switches to the
news broadcast station. When the news program
ends, reception of the previous program resumes.
1 Press and hold TA/NEWS to turn news program
interruption on or off.
A news program can be canceled by pressing TA/
NEWS.
Function settings
1
Press M.C. to display the main menu.
2 Turn M.C. to change the menu option
and press to select FUNCTION.
3 Turn M.C. to select the function.
After selecting, perform the following procedures to set the function.
# If MW/LW band is selected, only BSM or
LOCAL is available.
BSM (best stations memory)
BSM (best stations memory) automatically stores the
six strongest stations in the order of their signal
strength.
1 Press M.C. to turn BSM on.
To cancel, press M.C. again.
REGION (regional)
8
En
Section
Operating this unit
CD/CD-R/CD-RW and USB
storage devices
Basic Operations
LOCAL (local seek tuning)
Local seek tuning lets you tune in to only those radio
stations with sufficiently strong signals for good reception.
1 Press M.C. to display the setting mode.
2 Turn M.C. to select the desired setting.
FM: OFF—LEVEL 1—LEVEL 2—LEVEL 3—LEVEL
4
MW/LW: OFF—LEVEL 1—LEVEL 2
The highest level setting allows reception of only
the strongest stations, while lower levels allow the
reception of weaker stations.
3 Press M.C. to confirm the selection.
PTY SEARCH (program type selection)
You can tune in to a station using PTY (program type)
information.
1 Press M.C. to display the setting mode.
2 Turn M.C. to select the desired setting.
NEWS/INFO—POPULAR—CLASSICS—OTHERS
3 Press M.C. to begin the search.
The unit searches for a station broadcasting that
type of program. When a station is found, its program service name is displayed.
For PTY (program type ID code) information, refer
to the previous page.
The program of some stations may differ from
that indicated by the transmitted PTY.
If no station is broadcasting the type of program
you searched for, NOT FOUND is displayed for
about two seconds and then the tuner returns to
the original station.
Playing a CD/CD-R/CD-RW
1 Insert the disc into the disc loading slot with the
label side up.
Ejecting a CD/CD-R/CD-RW
1 Press h.
Playing songs on a USB storage device
1 Open the USB connector cover and plug in the
USB storage device using a USB cable.
Operating this unit
When AF is used, the regional function limits the selection of stations to those broadcasting regional programs.
1 Press M.C. to turn the regional function on or off.
02
Stopping playback of files on a USB storage device
1 You may disconnect the USB storage device at
any time.
Selecting a folder
1 Press a or b.
Selecting a track
1 Press c or d.
Fast forwarding or reversing
1 Press and hold c or d.
! When playing compressed audio, there is no
sound during fast forward or reverse.
Returning to root folder
1 Press and hold B (BAND/ESC).
Switching between compressed audio and CD-DA
1 Press B (BAND/ESC).
Note
Disconnect USB storage devices from the unit
when not in use.
TA (traffic announcement standby)
1 Press M.C. to turn traffic announcement standby
on or off.
AF (alternative frequencies search)
1 Press M.C. to turn AF on or off.
NEWS (news program interruption)
1 Press M.C. to turn the NEWS function on or off.
Displaying text information
Selecting the desired text information
1 Press .
Scrolling the text information to the left
1 Press and hold .
Notes
! Depending on the version of iTunes used to
write MP3 files to a disc or media file types, incompatible text stored within an audio file
may be displayed incorrectly.
! Text information items that can be changed
depend on the media.
En
9
Section
Operating this unit
02
Selecting and playing files/
tracks from the name list
2 Turn M.C. to change the menu option
and press to select FUNCTION.
1 Press
to switch to the file/track
name list mode.
3 Turn M.C. to select the function.
After selecting, perform the following procedures to set the function.
2 Use M.C. to select the desired file name
(or folder name).
Changing the file or folder name
1 Turn M.C.
Playing
1 When a file or track is selected, press M.C.
REPEAT (repeat play)
1 Press M.C. to display the setting mode.
2 Turn M.C. to select a repeat play range.
For details, refer to Selecting a repeat play range on
this page.
3 Press M.C. to confirm the selection.
Viewing a list of the files (or folders) in the selected
folder
1 When a folder is selected, press M.C.
RANDOM (random play)
Playing a song in the selected folder
1 When a folder is selected, press and hold M.C.
PAUSE (pause)
1 Press M.C. to turn random play on or off.
1 Press M.C. to pause or resume.
Advanced operations using
special buttons
Selecting a repeat play range
to cycle between the following:
1 Press 6/
CD/CD-R/CD-RW
! DISC – Repeat all tracks
! TRACK – Repeat the current track
! FOLDER – Repeat the current folder
USB audio player/USB memory
! ALL – Repeat all files
! TRACK – Repeat the current file
! FOLDER – Repeat the current folder
Playing tracks in random order
to turn random play on or off.
1 Press 5/
Tracks in a selected repeat range are played in
random order.
Pausing playback
1 Press 2/PAUSE to pause or resume.
Enhancing compressed audio and restoring rich
sound (sound retriever)
1 Press 1/S.Rtrv to cycle between:
OFF (off)—1—2
1 is effective for low compression rates, and 2 is
effective for high compression rates.
Function settings
1
10
Press M.C. to display the main menu.
En
S.RTRV (sound retriever)
Automatically enhances compressed audio and restores rich sound.
1 Press M.C. to display the setting mode.
2 Turn M.C. to select the desired setting.
For details, refer to Enhancing compressed audio
and restoring rich sound (sound retriever) on this
page.
3 Press M.C. to confirm the selection.
Section
Operating this unit
iPod
Playing songs on an iPod
1 Open the USB connector cover.
2 Connect an iPod to the USB cable using an iPod
Dock Connector.
Selecting a track (chapter)
1 Press c or d.
Fast forwarding or reversing
1 Press and hold c or d.
Playing a song in the selected category
1 When a category is selected, press and hold M.C.
Searching the list by alphabet
1 When a list for the selected category is displayed,
press
to switch to alphabet search mode.
2 Turn M.C. to select a letter.
3 Press M.C. to display the alphabetical list.
Advanced operations using
special buttons
Selecting a repeat play range
1 Press 6/
to cycle between the following:
! ONE – Repeat the current song
! ALL – Repeat all songs in the selected list
Notes
! The iPod cannot be turned on or off when the
control mode is set to CTRL AUDIO.
! Disconnect headphones from the iPod before
connecting it to this unit.
! The iPod will turn off about two minutes after
the ignition switch is set to OFF.
Playing all songs in random order (shuffle all)
1 Press 5/
to turn shuffle all on.
! When the control mode is set to CTRL iPod/CTRL
APP, shuffle play is on.
Displaying text information
Pausing playback
1 Press 2/PAUSE to pause or resume.
Selecting the desired text information
1 Press .
Scrolling the text information to the left
1 Press and hold .
Browsing for a song
1 Press
to switch to the top menu of
list search.
2
Use M.C. to select a category/song.
Changing the name of the song or category
1 Turn M.C.
Playlists—artists—albums—songs—podcasts—
genres—composers—audiobooks
Playing
1 When a song is selected, press M.C.
Operating this unit
Basic Operations
02
Playing songs related to the currently playing song
You can play songs from the following lists.
• Album list of the currently playing artist
• Song list of the currently playing album
• Album list of the currently playing genre
1 Press and hold M.C. to switch to link play mode.
2 Turn M.C. to change the mode; press to select.
! ARTIST – Plays an album of the artist currently being played.
! ALBUM – Plays a song from the album currently being played.
! GENRE – Plays an album from the genre currently being played.
The selected song/album will be played after the
currently playing song.
The selected song/album may be canceled if you operate functions other than link search (e.g. fast forward and reverse).
Depending on the song selected to play, the end of
the currently playing song and the beginning of the
selected song/album may be cut off.
Viewing a list of songs in the selected category
1 When a category is selected, press M.C.
En
11
Section
Operating this unit
02
Operating this unit’s iPod function from your iPod
You can listen to the sound from your iPod applications using your car's speakers, when CTRL APP is selected.
This function is not compatible with the following
iPod models.
! iPod nano 1st generation
! iPod 5th generation
APP mode is compatible with the following iPod
models.
! iPhone 3GS (software version 4.0 or later)
! iPhone 3G (software version 4.0 or later)
! iPhone (software version 3.0 or later)
! iPod touch 3rd generation (software version 4.0 or
later)
! iPod touch 2nd generation (software version 4.0
or later)
! iPod touch 1st generation (software version 3.1.3
or later)
1 Press 4/iPod to switch the control mode.
! CTRL iPod – This unit’s iPod function can be
operated from the connected iPod.
! CTRL APP – Play back the sound from your
iPod applications.
! CTRL AUDIO – This unit’s iPod function can
be operated from this unit.
Enhancing compressed audio and restoring rich
sound (sound retriever)
1 Press 1/S.Rtrv to cycle between:
OFF (off)—1—2
1 is effective for low compression rates, and 2 is
effective for high compression rates.
Function settings
1
Press M.C. to display the main menu.
SHUFFLE (shuffle)
1 Press M.C. to display the setting mode.
2 Turn M.C. to select your favorite setting.
! SONGS – Play back songs in the selected list
in random order.
! ALBUMS – Play back songs from a randomly
selected album in order.
! OFF – Cancel random play.
3 Press M.C. to confirm the selection.
SHUFFLE ALL (shuffle all)
1 Press M.C. to turn shuffle all on.
To turn off, set SHUFFLE in the FUNCTION menu
to off.
LINK PLAY (link play)
1 Press M.C. to display the setting mode.
2 Turn M.C. to change the mode; press to select.
For details about the settings, refer to Playing
songs related to the currently playing song on the
previous page.
PAUSE (pause)
1 Press M.C. to pause or resume.
AUDIO BOOK (audiobook speed)
1 Press M.C. to display the setting mode.
2 Turn M.C. to select your favorite setting.
! FASTER – Playback at a speed faster than normal
! NORMAL – Playback at normal speed
! SLOWER – Playback at a speed slower than
normal
3 Press M.C. to confirm the selection.
S.RTRV (sound retriever)
2 Turn M.C. to change the menu option
and press to select FUNCTION.
3 Turn M.C. to select the function.
After selecting, perform the following procedures to set the function.
REPEAT (repeat play)
1 Press M.C. to display the setting mode.
2 Turn M.C. to select a repeat play range.
For details, refer to Selecting a repeat play range on
the previous page.
3 Press M.C. to confirm the selection.
12
En
Automatically enhances compressed audio and restores rich sound.
1 Press M.C. to display the setting mode.
2 Turn M.C. to select the desired setting.
For details, refer to Enhancing compressed audio
and restoring rich sound (sound retriever) on this
page.
3 Press M.C. to confirm the selection.
Notes
! Switching the control mode to CTRL iPod
pauses song playback. Operate the iPod to resume playback.
Section
Operating this unit
Bluetooth Telephone
Connection menu operation
Important
Be sure to park your vehicle in a safe place and
apply the parking brake when performing this operation.
1 Press and hold
nection menu.
to display the con-
# You cannot operate this step during a call.
2 Turn M.C. to select the function.
After selecting, perform the following procedures to set the function.
DEVICELIST (connecting or disconnecting a cellular
phone from the device list)
1 Press M.C. to display the setting mode.
2 Turn M.C. to select the name of a device you want
to connect/disconnect.
! Press and hold M.C. to switch the BD address
and device name.
3 Press M.C. to connect/disconnect the selected
cellular phone.
If the connection is established, * is indicated on
the device name.
DEL DEVICE (deleting a cellular phone from the device list)
1 Press M.C. to display the setting mode.
2 Turn M.C. to select the name of a device you want
to delete.
! Press and hold M.C. to switch the BD address
and device name.
3 Press M.C. to display DELETE YES.
4 Press M.C. to delete a cellular phone information
from the device list.
! While this function is in use, do not turn off the
engine.
ADD DEVICE (connecting a new cellular phone)
1 Press M.C. to start searching.
! To cancel, press M.C. while searching.
2 Turn M.C. to select a device from the device list.
! If the desired device is not displayed, select
RE-SEARCH.
3 Press and hold M.C. to switch the BD address
and device name.
4 Press M.C. to connect the selected cellular
phone.
! To complete the connection, check the device
name (DEH-7300BT) and enter the link code
on your cellular phone.
! PIN code is set to 0000 as the default. You
can change this code. Refer to PIN CODE (PIN
code input) on this page.
! If five devices are already paired, DEVICEFULL
is displayed and it is not possible to perform
this operation. In this case, delete a paired device first.
Operating this unit
! The following functions are still accessible
from the unit even if the control mode is set to
CTRL iPod/CTRL APP.
— Pausing
— Fast forward/reverse
— Track up/down
— Repeat play (ONE/ALL/OFF)
— Random play (shuffle)
(list) to use iPod menu
—
— a to turn the iPod click wheel to the left
— b to turn the iPod click wheel to the right
! When the control mode is set to CTRL iPod,
operations are limited as follows:
— The function settings are not available.
— The browse function cannot be operated
from this unit.
02
SPCL. DEV. (setting a special device)
Bluetooth devices that are difficult to establish a connection with are called special devices. If your Bluetooth device is listed as a special device, select the
appropriate one.
1 Press M.C. to display the setting mode.
2 Use M.C. to select a special device.
Turn to change the menu option. Press to select.
! If five devices are already paired, DEVICEFULL
is displayed and it is not possible to perform
this operation. In this case, delete a paired device first.
3 Turn M.C. to display this unit’s device name, BD
address and pincode.
4 Use a cellular phone to connect to this unit.
! To complete the connection, check the device
name (DEH-7300BT) and enter the link code
on your cellular phone.
! PIN code is set to 0000 as the default. You
can change this code. Refer to PIN CODE (PIN
code input) on this page.
En
13
Section
Operating this unit
02
A. CONN (connecting to a Bluetooth device automatically)
1 Press M.C. to turn automatic connection on or
off.
VISIBLE (setting the visibility of this unit)
To check the availability of this unit from other devices, Bluetooth visibility of this unit can be turned
on.
1 Press M.C. to turn the visibility of this unit on or
off.
! While setting SPCL. DEV., Bluetooth visibility
of this unit is turned on temporarily.
PIN CODE (PIN code input)
To connect your cellular phone to this unit via Bluetooth wireless technology, you need to enter a PIN
code on your phone to verify the connection. The default code is 0000, but you can change it with this
function.
1 Press M.C. to display the setting mode.
2 Press a or b to select a number.
3 Press d to move the cursor to the next position.
4 After inputting PIN code, press and hold M.C.
The PIN code can be stored in the memory.
! After inputting 8 digits PIN code, press d to
store in memory.
! After inputting, pressing M.C. returns you to
the PIN code input display, and you can
change the PIN code.
DEV. INFO (BD (Bluetooth device) address display)
MISSED (missed call history)
DIALED (dialed call history)
RECENT (received call history)
1
2
3
4
PHONE BOOK (phone book)
!
!
1
2
3
4
5
6
1 Press M.C. to display the setting mode.
2 Turn M.C. left to switch to the BD address.
Turning M.C. right returns to the device name.
Phone menu operation
Important
Be sure to park your vehicle in a safe place and
apply the parking brake when performing this operation.
1
Press
to display the phone menu.
2 Turn M.C. to select the function.
After selecting, perform the following procedures to set the function.
14
En
Press M.C. to display the phone number list.
Turn M.C. to select a name or phone number.
Press M.C. to make a call.
When you find a phone number that you want to
store in memory, press and hold one of the preset
tuning buttons (1 to 6).
! Press one of preset buttons 1 to 6 to recall the
desired preset number.
7
The phone book in your cellular phone will be
transferred automatically when the phone is connected to this unit.
Depending on the cellular phone, the phone book
may not be transferred automatically. In this case,
operate your cellular phone to transfer the phone
book. The visibility of this unit should be on. Refer
to VISIBLE (setting the visibility of this unit) on this
page.
Press M.C. to display SEARCH (alphabetical list).
Turn M.C. to select the first letter of the name you
are looking for.
! Press and hold M.C. to select the desired
character type.
Press M.C. to display a registered name list.
Turn M.C. to select the name you are looking for.
Press M.C. to display the phone number list.
Turn M.C. to select a phone number you want to
call.
! When you find a phone number that you want
to store in memory, press and hold one of the
preset tuning buttons (1 to 6).
! Press one of preset buttons 1 to 6 to recall the
desired preset number.
Press M.C. to make a call.
PRESET (preset phone numbers)
1 Press M.C. to display the setting mode.
2 Use M.C. to select the desired preset number.
Turn to change the menu option. Press to select.
! You can also press one of the preset number
buttons 1 to 6 to select a number.
3 Press M.C. to make a call.
PHONE FUNC (phone function)
You can set A. ANSR and R.TONE from this menu.
For details, refer to Function and operation on the next
page.
Section
Operating this unit
Function and operation
2 Press M.C. to display the function
menu.
3 Turn M.C. to select the function.
After selecting, perform the following procedures to set the function.
A. ANSR (automatic answering)
1 Press M.C. to turn automatic answering on or off.
R.TONE (ring tone select)
1 Press M.C. to turn the ring tone on or off.
Audio Adjustments
1
Press M.C. to display the main menu.
2 Turn M.C. to change the menu option
and press to select AUDIO.
3 Turn M.C. to select the audio function.
After selecting, perform the following procedures to set the audio function.
FAD/BAL (fader/balance adjustment)
1 Press M.C. to display the setting mode.
2 Press M.C. to cycle between fader (front/rear) and
balance (left/right).
3 Turn M.C. to adjust speaker balance.
! When the rear output and RCA output setting are
SW, you cannot adjust front/rear speaker balance.
Refer to SW CONTROL (rear output setting) on
the next page.
TONE CTRL (equalizer adjustment)
!
Adjusted equalizer curve settings are stored in
CUSTOM.
1 Press M.C. to display the setting mode.
2 Press M.C. to select BASS (bass)/MID (mid)/TREBLE (treble).
3 Turn M.C. to adjust the level.
Adjustment range: +6 to -6
LOUDNESS (loudness)
Loudness compensates for deficiencies in the lowand high-frequency ranges at low volume.
1 Press M.C. to display the setting mode.
2 Turn M.C. to select the desired setting.
OFF (off)—LOW(low)—HIGH (high)
3 Press M.C. to confirm the selection.
Operating this unit
1 Display PHONE FUNC.
Refer to PHONE FUNC (phone function) on the
previous page.
02
SUBWOOFER1 (subwoofer on/off setting)
This unit is equipped with a subwoofer output which
can be turned on or off.
1 Press M.C. to display the setting mode.
2 Turn M.C. to select the desired setting.
NORMAL (normal phase)—REVERSE (reverse
phase)—OFF (subwoofer off)
3 Press M.C. to confirm the selection.
SUBWOOFER2 (subwoofer adjustment)
The cut-off frequency and output level can be adjusted when the subwoofer output is on.
Only frequencies lower than those in the selected
range are outputted from the subwoofer.
1 Press M.C. to display the setting mode.
2 Press M.C. to cycle between the cut-off frequency
and output level of the subwoofer.
Cut-off frequency (Cut-off frequency display
flashes.)—Output level (Output level display
flashes.)
3 Turn M.C. to select the desired setting.
Cut-off frequency: 50HZ—63HZ—80HZ—100HZ
—125HZ
Output level: -24 to +6
EQUALIZER (equalizer recall)
1 Press M.C. to display the setting mode.
2 Turn M.C. to select the equalizer.
DYNAMIC—VOCAL—NATURAL—CUSTOM—
FLAT—POWERFUL
3 Press M.C. to confirm the selection.
En
15
Section
02
Operating this unit
SLA (source level adjustment)
AUTO-PI (auto PI seek)
SLA (Source Level Adjustment) lets you adjust the volume level of each source to prevent radical changes
in volume when switching between sources.
! Settings are based on the FM volume level, which
remains unchanged.
! The MW/LW volume level can also be adjusted
with this function.
! When selecting FM as the source, you cannot
switch to SLA.
1 Press M.C. to display the setting mode.
2 Turn M.C. to adjust the source volume.
Adjustment range: +4 to –4
3 Press M.C. to confirm the selection.
The unit can automatically search for a different station with the same programming, even during preset
recall.
1 Press M.C. to turn Auto PI seek on or off.
Initial Settings
Important
PW SAVE (power saving) is cancelled if the vehicle battery is disconnected and will need to be
turned back on once the battery is reconnected.
When PW SAVE (power saving) is off, depending
on connection methods, the unit may continue to
draw power from the battery if your vehicle's ignition doesn't have an ACC (accessory) position.
1 Press and hold S (SRC/OFF) until the
unit turns off.
2 Press S (SRC/OFF) and hold until function name appears in the display.
3 Turn M.C. to select the initial setting.
After selecting, perform the following procedures to set the initial setting.
16
AUX (auxiliary input)
Activate this setting when using an auxiliary device
connected to this unit.
1 Press M.C. to turn AUX on or off.
USB (plug and play)
This setting allows you to switch your source to USB/
iPod automatically.
1 Press M.C. to turn the plug and play function on
or off.
ON – When a USB storage device/iPod is connected, depending on the type of device, the
source is automatically switched to USB/iPod
when you turn on the engine. If you disconnect
your USB storage device/iPod, this unit’s source
is turned off.
OFF – When a USB storage device/iPod is connected, the source is not switched to USB/iPod
automatically. Please change the source to USB/
iPod manually.
SW CONTROL (rear output setting)
The rear speaker leads output can be used for fullrange speaker or subwoofer connection.
If you switch to REAR-SP:SW, you can connect a rear
speaker lead directly to a subwoofer without using an
auxiliary amp.
Initially, REAR-SP is set for rear full-range speaker
connection (FUL).
1 Press M.C. to display the setting mode.
2 Turn M.C. to change the setting.
REAR-SP: FUL—SW
3 Press M.C. to confirm the selection.
DEMO (demo display setting)
FM STEP (FM tuning step)
1 Press M.C. to turn the demo display on or off.
Normally, the FM tuning step employed by seek tuning is 50 kHz. When AF or TA is on, the tuning step
automatically changes to 100 kHz. It may be preferable to set the tuning step to 50 kHz when AF is on.
! The tuning step remains at 50 kHz during manual
tuning.
1 Press M.C. to display the setting mode.
2 Turn M.C. to select the FM tuning step.
50 KHZ (50 kHz)—100 KHZ (100 kHz)
3 Press M.C. to confirm the selection.
SCROLL (scroll mode setting)
En
When ever scroll is set to ON, recorded text information scrolls continuously in the display. Set to OFF if
you prefer the information to scroll just once.
1 Press M.C. to turn the ever scroll on or off.
TITLE (multi-language)
Section
Operating this unit
S/W UPDATE (updating the software)
This function is used to update this unit with the latest software. For information on the software and updating, refer to our website.
! Never turn the unit off while the software is being
updated.
1 Press M.C. to display the data transfer mode.
Follow the on-screen instructions to finish updating the software.
PW SAVE (power saving)
Switching this function on enables you to reduce the
consumption of battery power.
! Turning on the source is the only operation allowed when this function is on.
1 Press M.C. to turn the power save on or off.
BT CLEAR (resetting the Bluetooth wireless technology module)
Bluetooth telephone data can be deleted. To protect
personal information, we recommend deleting this
data before transferring the unit to other persons. The
following settings will be deleted.
! phone book entries on the Bluetooth telephone
! preset numbers on the Bluetooth telephone
! registration assignment of the Bluetooth telephone
! call history of the Bluetooth telephone
! information of the connected Bluetooth telephone
1 Press M.C. to show the confirmation display.
YES is displayed. Clearing memory is now on
standby.
If you do not want to reset phone memory, press
. The display reverts.
2 Press M.C. to clear the memory.
CLEARED is displayed and the settings are deleted.
! While this function is in use, do not turn off
the engine.
Operating this unit
This unit can display the text information of a compressed audio file even if they are embedded in a
Western European or Russian language.
! If the embedded language and the selected language setting are not the same, text information
may not display properly.
! Some characters may not be displayed properly.
1 Press M.C. to display the setting mode.
2 Turn M.C. to select the desired setting.
EUROPEAN (European)—RUSSIAN (Russian)
3 Press M.C. to confirm the selection.
02
Using an AUX source
1 Insert the stereo mini plug into the
AUX input jack.
2 Press S (SRC/OFF) to select AUX as the
source.
Note
AUX cannot be selected unless the auxiliary setting is turned on. For more details, refer to AUX
(auxiliary input) on the previous page.
VER INFO (Bluetooth version display)
You can display the system versions of this unit and
of Bluetooth module.
1 Press M.C. to display the information.
En
17
Appendix
Additional Information
Troubleshooting
Built-in CD Player
Message
Symptom
Cause
Action
The display
automatically
returns to the
ordinary display.
You did not per- Perform operation
form any opera- again.
tion within about
30 seconds.
Select the repeat
The repeat play Depending on
play range again.
range changes the repeat play
unexpectedly. range, the selected range may
change when another folder or
track is being selected or during
fast forwarding/
reversing.
A subfolder is
not played
back.
Subfolders cannot be played
when FOLDER
(folder repeat) is
selected.
The display is
illuminated
when the unit
is turned off.
Demo mode is
on.
! Press
to cancel demo mode.
! Turn off the
demo display setting.
The unit is malfunctioning.
There is interference.
You are using a
device, such as a
cellular phone,
that transmits
electric waves
near the unit.
Move electrical devices that may be
causing the interference away from
the unit.
Error messages
When you contact your dealer or your nearest
Pioneer Service Center, be sure to note the
error message.
18
En
Action
Clean the disc.
Replace the disc.
ERROR-10, 11, There is an elec- Turn the ignition
12, 15, 17, 30, trical or mechan- switch OFF and
back ON, or switch
ical error.
A0
to a different
source, then back
to the CD player.
ERROR-15
The inserted disc Replace the disc.
is blank
ERROR-23
Unsupported CD Replace the disc.
format
FRMT READ
Sometimes there
is a delay between the start of
playback and
when you start to
hear any sound.
NO AUDIO
The inserted disc Replace the disc.
does not contain
any playable
files.
SKIPPED
The inserted disc Replace the disc.
contains DRM
protected files.
PROTECT
Replace the disc.
All the files on
the inserted disc
are embedded
with DRM.
Select another repeat play range.
Switch the display
NO XXXX ap- There is no embedded text infor- or play another
pears when a
track/file.
display is chan- mation.
ged (NO TITLE,
for example).
Cause
ERROR-11, 12, The disc is dirty.
17, 30
The disc is
scratched.
Wait until the message disappears
and you hear
sound.
USB storage device/iPod
Message
Cause
Action
NO DEVICE
When plug and
play is off, no
USB storage device or iPod is
connected.
! Turn the plug
and play on.
! Connect a compatible USB storage device/iPod.
FRMT READ
Sometimes there
is a delay between the start of
playback and
when you start to
hear any sound.
Wait until the message disappears
and you hear
sound.
Appendix
Additional Information
Cause
Action
Message
Cause
Action
There are no
songs.
Transfer the audio
files to the USB
storage device and
connect.
CHECK USB
The USB connector or USB cable
has shortcircuited.
The connected
USB storage device has security
enabled
Follow the USB
storage device instructions to disable the security.
Check that the
USB connector or
USB cable is not
caught in something or damaged.
SKIPPED
The connected
USB storage device contains
files embedded
with Windows
Mediaä DRM 9/
10
Play an audio file
not embedded with
Windows Media
DRM 9/10.
The connected
USB storage device consumes
more than 500
mA (maximum
allowable current).
Disconnect the
USB storage device and do not
use it. Turn the
ignition switch to
OFF, then to ACC
or ON and then
connect only compliant USB storage
devices.
PROTECT
All the files in the
USB storage device are embedded with
Windows Media
DRM 9/10
Transfer audio files
not embedded with
Windows Media
DRM 9/10 to the
USB storage device and connect.
N/A USB
The connected
USB storage device is not supported by this
unit.
! Connect a USB
Mass Storage
Class compliant
device.
! Disconnect your
device and replace
it with a compatible USB storage
device.
Make sure the conThe iPod operates correctly but nection cable for
does not charge the iPod has not
shorted out (e.g.,
not caught in
metal objects).
After checking,
turn the ignition
switch OFF and
back ON, or disconnect the iPod
and reconnect.
ERROR-19
Communication
failed.
! Perform one of
the following operations.
–Turn the ignition
switch OFF and
back ON.
–Disconnect the
USB storage device.
–Change to a different source.
Then, return to the
USB source.
! Disconnect the
cable from the
iPod. Once the
iPod's main menu
is displayed, reconnect the iPod and
reset it.
iPod failure
Disconnect the
cable from the
iPod. Once the
iPod's main menu
is displayed, reconnect the iPod and
reset it.
En
Additional Information
Message
NO AUDIO
19
Appendix
Additional Information
Message
Cause
Action
ERROR-23
USB storage device was not formatted with
FAT12, FAT16 or
FAT32
USB storage device should be formatted with FAT12,
FAT16 or FAT32.
The iPod firmware version is
old
Update the iPod
version.
iPod failure
Disconnect the
cable from the
iPod. Once the
iPod's main menu
is displayed, reconnect the iPod and
reset it.
ERROR-16
STOP
Select a list that
There are no
songs in the cur- contains songs.
rent list.
NOT FOUND
No related songs Transfer songs to
the iPod.
Bluetooth Telephone
Message
Cause
Action
ERROR-10
The power failed
for the Bluetooth
module of this
unit.
Turn the ignition
switch OFF and
then to ACC or ON.
If the error message is still displayed after
performing the
above action,
please contact
your dealer or an
authorized Pioneer
Service Station.
Handling guidelines
Discs and player
Use only discs that feature either of the following two
logos.
Use 12-cm discs. Do not use 8-cm discs or an adapter
for 8-cm discs.
Use only conventional, fully circular discs. Do not use
shaped discs.
Do not insert anything other than a CD into the CD
loading slot.
Do not use cracked, chipped, warped, or otherwise
damaged discs as they may damage the player.
Unfinalized CD-R/CD-RW discs cannot be played
back.
Do not touch the recorded surface of the discs.
Store discs in their cases when not in use.
Do not attach labels, write on or apply chemicals to
the surface of the discs.
To clean a CD, wipe the disc with a soft cloth outward
from the center.
Condensation may temporarily impair the player’s
performance. Let it rest for about one hour to adjust
to a warmer temperature. Also, wipe any damp discs
off with a soft cloth.
Playback of discs may not be possible because of
disc characteristics, disc format, recorded application, playback environment, storage conditions, and
so on.
Road shocks may interrupt disc playback.
20
En
Appendix
Additional Information
USB storage device
Connections via USB hub are not supported.
Do not connect anything other than a USB storage
device.
Depending on the USB storage device, the following
problems may occur.
! Operations may vary.
! The storage device may not be recognized.
! Files may not be played back properly.
! The device may generate noise in the radio.
iPod
Compressed audio
compatibility (disc, USB)
WMA
File extension: .wma
Do not leave the iPod in places with high temperatures.
Bit rate: 48 kbps to 320 kbps (CBR), 48 kbps to 384
kbps (VBR)
To ensure proper operation, connect the dock connector cable from the iPod directly to this unit.
Sampling frequency: 32 kHz, 44.1 kHz, 48 kHz
Firmly secure the iPod when driving. Do not let the
iPod fall onto the floor, where it may become jammed
under the brake or accelerator pedal.
About iPod settings
! When an iPod is connected, this unit changes the
EQ (equalizer) setting of the iPod to off in order to
optimize the acoustics. When you disconnect the
iPod, the EQ returns to the original setting.
! You cannot set Repeat to off on the iPod when
using this unit. Repeat is automatically changed
to All when the iPod is connected to this unit.
Incompatible text saved on the iPod will not be displayed by the unit.
Additional Information
Firmly secure the USB storage device when driving.
Do not let the USB storage device fall onto the floor,
where it may become jammed under the brake or accelerator pedal.
Frequent loading and ejecting of a DualDisc may result in scratches on the disc. Serious scratches can
lead to playback problems on this unit. In some
cases, a DualDisc may become stuck in the disc loading slot and will not eject. To prevent this, we recommend you refrain from using DualDisc with this unit.
Please refer to the information from the disc manufacturer for more detailed information about
DualDiscs.
Windows Media Audio Professional, Lossless, Voice/
DRM Stream/Stream with video: Not compatible
MP3
File extension: .mp3
Bit rate: 8 kbps to 320 kbps (CBR), VBR
Sampling frequency: 8 kHz to 48 kHz (32 kHz, 44.1
kHz, 48 kHz for emphasis)
Compatible ID3 tag version: 1.0, 1.1, 2.2, 2.3, 2.4 (ID3
tag Version 2.x is given priority over Version 1.x.)
M3u playlist: Not compatible
MP3i (MP3 interactive), mp3 PRO: Not compatible
DualDiscs
DualDiscs are two-sided discs that have a recordable
CD for audio on one side and a recordable DVD for
video on the other.
Since the CD side of DualDiscs is not physically compatible with the general CD standard, it may not be
possible to play the CD side with this unit.
WAV
File extension: .wav
Quantization bits: 8 and 16 (LPCM), 4 (MS ADPCM)
Sampling frequency: 16 kHz to 48 kHz (LPCM), 22.05
kHz and 44.1 kHz (MS ADPCM)
En
21
Appendix
Additional Information
Supplemental information
CAUTION
Only the first 32 characters can be displayed as a file
name (including the file extension) or a folder name.
Do not leave discs or a USB storage device in any
place that is subject to high temperatures.
Russian text to be displayed on this unit should be encoded in one of the following character sets:
! Unicode (UTF-8, UTF-16)
! A character set other than Unicode that is used in
a Windows environment and is set to Russian in
the multi-language setting
iPod compatibility
This unit may not operate correctly depending on the
application used to encode WMA files.
There may be a slight delay at the start of playback of
audio files embedded with image data or audio files
stored on a USB storage device that has numerous
folder hierarchies.
Disc
Playable folder hierarchy: up to eight tiers (A practical
hierarchy is less than two tiers.)
Playable folders: up to 99
Playable files: up to 999
File system: ISO 9660 Level 1 and 2, Romeo, Joliet
Multi-session playback: Compatible
Packet write data transfer: Not compatible
Regardless of the length of blank sections between
the songs from the original recording, compressed
audio discs play with a short pause between songs.
USB storage device
This unit supports only the following iPod models.
Supported iPod software versions are shown below.
Older versions may not be supported.
! iPhone 3GS (software version 4.0)
! iPhone 3G (software version 4.0)
! iPhone (software version 3.1.3)
! iPod nano 5th generation (software version 1.0.2)
! iPod nano 4th generation (software version 1.0.4)
! iPod nano 3rd generation (software version 1.1.3)
! iPod nano 2nd generation (software version 1.1.3)
! iPod nano 1st generation (software version 1.3.1)
! iPod touch 3rd generation (software version 4.0)
! iPod touch 2nd generation (software version 4.0)
! iPod touch 1st generation (software version 3.1.3)
! iPod classic 160GB (software version 2.0.4)
! iPod classic 120GB (software version 2.0.1)
! iPod classic (software version 1.1.2)
! iPod 5th generation (software version 1.3)
Depending on the generation or version of the iPod,
some functions may not be available.
Operations may vary depending on the software version of iPod.
When using an iPod, an iPod Dock Connector to USB
Cable is required.
A Pioneer CD-IU50 interface cable is also available.
For details, consult your dealer.
Playable folder hierarchy: up to eight tiers (A practical
hierarchy is less than two tiers.)
About the file/format compatibility, refer to the iPod
manuals.
Playable folders: up to 500
Audio Book, Podcast: Compatible
Playable files: up to 15 000
Playback of copyright-protected files: Not compatible
Partitioned USB storage device: Only the first partition
can be played.
There may be a slight delay when starting playback of
audio files on a USB storage device with numerous
folder hierarchies.
CAUTION
Pioneer accepts no responsibility for data lost on
the iPod, even if that data is lost while this unit is
used.
Sequence of audio files
The user cannot assign folder numbers and
specify playback sequences with this unit.
22
En
Appendix
Additional Information
Example of a hierarchy
01
02
D: C
D: C
D: C
D: C
:Х
:Ц
:Ч
: Ш, Щ
:Ъ
:Ы
:Ь
:Э
:Ю
:Я
05
Level 1 Level 2 Level 3 Level 4
: Folder
: Compressed
audio file
01 to 05: Folder
number
1 to 6: Playback
sequence
Disc
Folder selection sequence or other operation
may differ depending on the encoding or writing software.
USB storage device
Playback sequence is the same as recorded
sequence in the USB storage device.
To specify the playback sequence, the following method is recommended.
1 Create a file name that includes numbers that
specify the playback sequence (e.g., 001xxx.
mp3 and 099yyy.mp3).
2 Put those files into a folder.
3 Save the folder containing files on the USB
storage device.
However, depending on the system environment, you may not be able to specify the playback sequence.
For USB portable audio players, the sequence
is different and depends on the player.
Bluetooth profiles
! In order to use Bluetooth wireless technology, devices must be able to interpret certain profiles. This unit is compatible with
the following profiles.
— GAP (Generic Access Profile)
— SDP (Service Discovery Protocol)
— OPP (Object Push Profile)
— HFP (Hands Free Profile)
Additional Information
D: Display C: Character
03
04
D: C
Copyright and trademark
Bluetooth
The Bluetoothâ word mark and logos are registered trademarks owned by Bluetooth SIG, Inc.
and any use of such marks by Pioneer
Corporation is under license. Other trademarks and trade names are those of their respective owners.
iTunes
Apple and iTunes are trademarks of Apple
Inc., registered in the U.S. and other countries.
Russian character chart
D: C
D: C
D: C
D: C
D: C
:А
:Б
:В
:Г
:Д
: Е, Ё
:Ж
:З
: И, Й
:К
:Л
:М
:Н
:О
:П
:Р
:С
:Т
:У
:Ф
En
23
Appendix
Additional Information
MP3
Supply of this product only conveys a license
for private, non-commercial use and does not
convey a license nor imply any right to use
this product in any commercial (i.e. revenuegenerating) real time broadcasting (terrestrial,
satellite, cable and/or any other media), broadcasting/streaming via internet, intranets and/
or other networks or in other electronic content distribution systems, such as pay-audio or
audio-on-demand applications. An independent license for such use is required. For details, please visit
http://www.mp3licensing.com.
WMA
Windows Media and the Windows logo are trademarks or registered trademarks of Microsoft
Corporation in the United States and/or other
countries.
This product includes technology owned by
Microsoft Corporation and cannot be used or
distributed without a license from Microsoft
Licensing, Inc.
iPod & iPhone
iPhone, iPod, iPod classic, iPod nano, and
iPod touch are trademarks of Apple Inc., registered in the U.S. and other countries.
“Made for iPod” and “Made for iPhone” mean
that an electronic accessory has been designed to connect specifically to iPod or
iPhone, respectively, and has been certified by
the developer to meet Apple performance
standards.
Apple is not responsible for the operation of
this device or its compliance with safety and
regulatory standards.
Specifications
General
Power source ............................. 14.4 V DC (10.8 V to 15.1 V
allowable)
Grounding system ................... Negative type
Maximum current consumption
..................................................... 10.0 A
Dimensions (W × H × D):
DIN
Chassis ..................... 178 mm × 50 mm × 165
mm
Nose ........................... 188 mm × 58 mm × 17 mm
D
Chassis ..................... 178 mm × 50 mm × 165
mm
Nose ........................... 170 mm × 46 mm × 17 mm
Weight .......................................... 1.2 kg
Audio
Maximum power output ....... 50 W × 4
Continuous power output ... 22 W × 4 (50 Hz to 15 000
Hz, 5 % THD, 4 W load, both
channels driven)
Load impedance ...................... 4 W (4 W to 8 W allowable)
Preout maximum output level
..................................................... 2.0 V
Tone controls:
Bass
Frequency ................ 100 Hz
Gain ............................ ±12 dB
Mid
Frequency ................ 1 kHz
Gain ............................ ±12 dB
Treble
Frequency ................ 10 kHz
Gain ............................ ±12 dB
Subwoofer (mono):
Frequency .......................... 50/63/80/100/125 Hz
Slope .................................... –18 dB/oct
Gain ...................................... +6 dB to –24 dB
Phase .................................. Normal/Reverse
CD player
System .......................................... Compact disc audio system
Usable discs .............................. Compact disc
Signal-to-noise ratio ............... 94 dB (1 kHz) (IEC-A network)
Number of channels .............. 2 (stereo)
WMA decoding format ......... Ver. 7, 7.1, 8, 9, 10, 11, 12
(2ch audio)
(Windows Media Player)
MP3 decoding format ........... MPEG-1 & 2 Audio Layer 3
24
En
Appendix
Additional Information
WAV signal format .................. Linear PCM & MS ADPCM
(Non-compressed)
USB
Additional Information
USB standard specification
..................................................... USB 2.0 full speed
Maximum current supply .... 500 mA
USB Class ................................... MSC (Mass Storage Class)
File system .................................. FAT12, FAT16, FAT32
WMA decoding format ......... Ver. 7, 7.1, 8, 9, 10, 11, 12
(2ch audio)
(Windows Media Player)
MP3 decoding format ........... MPEG-1 & 2 Audio Layer 3
WAV signal format .................. Linear PCM & MS ADPCM
(Non-compressed)
FM tuner
Frequency range ...................... 87.5 MHz to 108.0 MHz
Usable sensitivity ..................... 9 dBf (0.8 µV/75 W, mono,
S/N: 30 dB)
Signal-to-noise ratio ............... 72 dB (IEC-A network)
MW tuner
Frequency range ...................... 531 kHz to 1 602 kHz
Usable sensitivity ..................... 25 µV (S/N: 20 dB)
Signal-to-noise ratio ............... 62 dB (IEC-A network)
LW tuner
Frequency range ...................... 153 kHz to 281 kHz
Usable sensitivity ..................... 28 µV (S/N: 20 dB)
Signal-to-noise ratio ............... 62 dB (IEC-A network)
Bluetooth
Version .......................................... Bluetooth 2.0 certified
Output power ............................ +4 dBm Max.
(Power class 2)
Note
Specifications and the design are subject to modifications without notice.
En
25
26
En
En
27
PIONEER CORPORATION
1-1, Shin-ogura, Saiwai-ku, Kawasaki-shi,
Kanagawa 212-0031, JAPAN
PIONEER ELECTRONICS (USA) INC.
P.O. Box 1540, Long Beach, California 90801-1540, U.S.A.
TEL: (800) 421-1404
PIONEER EUROPE NV
Haven 1087, Keetberglaan 1, B-9120 Melsele, Belgium/Belgique
TEL: (0) 3/570.05.11
PIONEER ELECTRONICS ASIACENTRE PTE. LTD.
253 Alexandra Road, #04-01, Singapore 159936
TEL: 65-6472-7555
PIONEER ELECTRONICS AUSTRALIA PTY. LTD.
178-184 Boundary Road, Braeside, Victoria 3195, Australia
TEL: (03) 9586-6300
PIONEER ELECTRONICS OF CANADA, INC.
300 Allstate Parkway, Markham, Ontario L3R 0P2, Canada
TEL: 1-877-283-5901
TEL: 905-479-4411
PIONEER ELECTRONICS DE MEXICO, S.A. de C.V.
Blvd.Manuel Avila Camacho 138 10 piso
Col.Lomas de Chapultepec, Mexico, D.F. 11000
TEL: 55-9178-4270
先鋒股份有限公司
台北市內湖區瑞光路407號8樓
電話: (02) 2657-3588
先鋒電子(香港)有限公司
香港九龍尖沙咀海港城世界商業中心
9樓901-6室
電話: (0852) 2848-6488
Published by Pioneer Corporation.
Copyright ã 2010 by Pioneer Corporation.
All rights reserved.
<KKMZX> <10I00000>
<YRB5184-A> EW