1
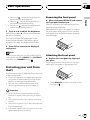
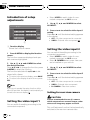
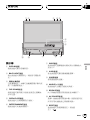
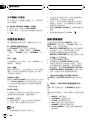
English Operation Manual 7 inch Wide AV System Display Español AVX-7650 Português (B) - Contents Thank you for buying this Pioneer product. Please read through these operating instructions so you will know how to operate your model properly. After you have finished reading the instructions, keep this manual in a safe place for future reference. Precautions IMPORTANT SAFEGUARDS 3 To ensure safe driving 3 To avoid battery exhaustion 3 Before You Start About this unit 4 About this manual 4 Precautions 4 To protect the LCD screen 4 For viewing LCD comfortably 4 Resetting the microprocessor 4 Use and care of the remote control 5 Whats What Display unit 6 Remote control 7 Basic Operations Turning the unit on and selecting a source 8 Turning the unit off 8 Opening and closing the LCD panel 8 Changing the wide screen mode 9 Adjusting the picture adjustment 10 Protecting your unit from theft 11 Other Functions Introduction of setup adjustments 12 Setting the video input 1 12 Setting the video input 2 12 Switching the warning tone 13 Setting the automatic open function 13 Setting the clock 13 Switching the background display 14 Additional Information Troubleshooting 15 Using the display correctly 16 2 En Specifications 18 Section 01 Precautions IMPORTANT SAFEGUARDS 1 Read this manual fully and carefully before operating your display. 2 Keep this manual handy as a reference for operating procedures and safety information. 3 Pay close attention to all warnings in this manual and follow the instructions carefully. 4 Do not allow other persons to use this system until they have read and understood the operating instructions. 5 Do not install the display where it may (i) obstruct the drivers vision, (ii) impair the performance of any of the vehicles operating systems or safety features, including air bags, hazard lamp buttons or (iii) impair the drivers ability to safely operate the vehicle. 6 As with any accessory in your vehicles interior, the display should not divert your attention from the safe operation of your vehicle. If you experience difficulty in operating the system or reading the display, please park safely before making adjustments. 7 Do not attempt to install or service your display by yourself. Installation or servicing of the display by persons without training and experience in electronic equipment and automotive accessories may be dangerous and could expose you to the risk of electric shock or other hazards and can cause damage to the system that is not covered by warranty. 8 Please remember to wear your seat belt at all times while operating your vehicle. If you are ever in an accident, your injuries can be considerably more severe if your seat belt is not properly buckled. 9 Never use headphones while driving. WARNING ! LIGHT GREEN LEAD AT POWER CONNECTOR IS DESIGNED TO DETECT PARKED STATUS AND MUST BE CONNECTED TO THE POWER SUPPLY SIDE OF THE PARKING BRAKE SWITCH. IMPROPER CONNECTION OR USE OF THIS LEAD MAY VIOLATE APPLICABLE LAW AND MAY RESULT IN SERIOUS INJURY OR DAMAGE. ! To avoid the risk of accident and the potential violation of applicable laws, the front DVD or TV feature should never be used while the vehicle is being driven. Also, rear displays should not be in a location where it is a visible distraction to the driver. ! In some countries or states the viewing of images on a display inside a vehicle even by persons other than the driver may be illegal. Where such regulations apply, they must be obeyed. English Please read all of these instructions regarding your display and retain them for future reference. To ensure safe driving This unit detects whether your vehicles parking brake is engaged or not, and prevents you from watching a DVD or TV on the front display while driving. When you attempt to watch a DVD or TV, the warning VIDEO VIEWING IS NOT AVAILABLE WHILE DRIVING will appear on the front display. To watch a DVD or TV on the front display, park your vehicle in a safe place and apply the parking brake. To avoid battery exhaustion Be sure to run the vehicle engine while using this unit. Using this unit without running the engine can result in battery drainage. WARNING Do not use with vehicles that do not feature an ACC position. En 3 Section 02 Before You Start About this unit To protect the LCD screen NTSC/PAL compatibility ! Do not allow direct sunlight to fall on the display when this unit is not being used. Extended exposure to direct sunlight can result in LCD screen malfunction due to the resulting high temperatures. ! When using a portable phone, keep the antenna of the portable phone away from the display to prevent disruption of the video by the appearance of spots, colored stripes, etc. This unit is NTSC/PAL system compatible. When connecting other components to this unit, be sure components are compatible with the same video system otherwise images will not be correctly reproduced. About this manual This unit features a number of sophisticated functions ensuring superior reception and operation. All the functions have been designed for the easiest possible use, but many are not self-explanatory. This operation manual will help you benefit fully from this units potential and to maximize your listening enjoyment. We recommend that you familiarize yourself with the functions and their operation by reading through the manual before you begin using this unit. It is especially important that you read and observe precautions noted on this page and in other sections. Precautions ! Keep this manual handy as a reference for operating procedures and precautions. ! Always keep the volume low enough so that you can hear sounds from outside the vehicle. ! Protect this unit from moisture. ! If the battery is disconnected or discharged, the preset memory will be erased and must be reprogrammed. ! If this unit does not operate properly, contact your dealer or nearest authorized Pioneer Service Station. 4 En For viewing LCD comfortably Due to its construction, the view angle of the LCD screen is limited. The viewing angle (vertical and horizontal) can be increased, however, by using BRIGHT to adjust the black density of the video. When using for the first time, adjust the black density in accordance with the viewing angle (vertical and horizontal) to adjust for clear viewing. DIMMER can also be used to adjust the brightness of the LCD screen itself to suit your personal preference. Resetting the microprocessor The microprocessor must be reset under the following conditions: ! Prior to using this unit for the first time after installation ! If the unit fails to operate properly ! When strange or incorrect messages appear on the display Section 02 Before You Start RESET button Use and care of the remote control Installing the battery Slide the tray out on the back of the remote control and insert the battery with the plus (+) and minus () poles pointing in the proper direction. ! Do not store the battery with metallic materials. ! In the event of battery leakage, wipe the remote control completely clean and install a new battery. ! When disposing of used batteries, please comply with governmental regulations or environmental public institutions rules that apply in your country/area. English % Press RESET with a pen tip or other pointed instrument. Using the remote control Point the remote control in the direction of the front panel to operate. ! The remote control may not function properly in direct sunlight. Important ! Do not store the remote control in high temperatures or direct sunlight. ! Do not let the remote control fall onto the floor, where it may become jammed under the brake or accelerator pedal. WARNING Keep the battery out of the reach of children. Should the battery be swallowed, immediately consult a doctor. CAUTION ! Use only one CR2025 (3 V) lithium battery. ! Remove the battery if the remote control is not used for a month or longer. ! Do not recharge, disassemble, heat or dispose of the battery in fire. ! Do not handle the battery with metallic tools. En 5 Section 03 Whats What 12 3 45 6 7 8 d c b Display unit 1 DISPLAY button Press to display various informations. 2 BACK LIGHT button Press and hold to turn the backlight off. Press again to turn the backlight on. 3 Ambient light sensor Senses ambient light. This system automatically adjusts the brightness of the display to compensate for ambient light. 9 7 WIDE button Press to select a desired mode for enlarging a 4:3 picture to a 16:9 one. 8 V.ADJ button Press and hold to display the picture adjustment menu. 9 Signal receptor Receives signals from a remote control. a ANGLE (+/) button Press to change the LCD panel angle. 4 FLIP DOWN button Press to turn the LCD panel horizontal temporarily from upright position. b RELEASE button Move downward to remove the front panel from this unit. 5 OPEN/CLOSE button Press to open or close the LCD panel. c AV SOURCE button This unit is turned on by selecting a source. Press to cycle through all the available sources. 6 ENTERTAINMENT button Press to switch between the background displays. 6 a En d RESET button Press to return to the factory settings (initial settings). Section 03 Whats What 1 j i 7 6 c English j A.MENU button Press to display MENU. Also used for selecting functions. TV mode operation e f g a h Remote control e a/b/c/d buttons Press to control functions. f BACK button Press to return to the previous display. g MODE button Press and hold to switch the operation mode between AVX and TV modes. Normally, set to AVX. ! AVX For common operation of this unit ! TV Only for TV tuner operation For details, refer to TV mode operation on this page. To operate the TV, switch the mode to TV. In this case, a, b, c, d and A.MENU buttons operation is changed for TV. ! For details concerning operation, refer to the TV tuners operation manuals. % When you want to operate the following functions, switch the mode to TV: ! When performing manual or seek tuning by pressing c or d. ! When recalling preset stations by pressing a or b. ! When selecting the country group by pressing A.MENU and then pressing c or d. (This function can be operated only when connecting a TV tuner (e.g. GEX-P6450TVP) featuring the country setting.) Note With the mode switched to TV, you cannot use ESC, BACK and DISPLAY buttons. h CH CALL button Press to display the TV reception information such as the channel and band. i ESC button Press to cancel the control mode of functions. En 7 Section 04 Basic Operations Turning the unit on and selecting a source 1 1 Source icon Shows which source has been selected. % Press AV SOURCE to select a video source. Press AV SOURCE repeatedly to switch between the following sources: AV-1 (video input 1)AV-2 (video input 2) AV (video of currently selected source) Notes ! Equipment which is connected to AV-BUS input can be selected as AV source. You can watch video from connected equipment which is selected as a source by a head unit. ! In the following cases, the sound source will not change: When there is no unit corresponding to the selected source connected to this unit. When AV INPUT1 (video input 1) and/or AV INPUT2 (video input 2) are not set to VIDEO (refer to page 12). Turning the unit off % Press AV SOURCE and hold until the unit turns off. 8 En Opening and closing the LCD panel The LCD panel will be opened or closed automatically with the turning of the ignition switch on or off. You can turn off the automatic close/open function. (Refer to page 13.) ! Do not close the LCD panel with hands by force. That cause malfunction. ! The automatic close/open function will operate the display as follows. When the ignition switch is turned OFF while the LCD panel is opened, the LCD panel will close after six seconds. When the ignition switch is turned ON again (or turned to ACC), the LCD panel will be opened automatically. Removing or attaching the front panel will automatically close or open the LCD panel. (Refer to page 11.) ! When the ignition switch is turned OFF after the LCD panel has been closed, turning the ignition switch ON again (or turning it to ACC) will not open the LCD panel. In this case, press OPEN/CLOSE to open the LCD panel. ! When closing the LCD panel, check to make sure that it has closed completely. If the LCD panel has stopped halfway, leaving it like this could result in damage. % Press OPEN/CLOSE to open the LCD panel. # To close the LCD panel, press OPEN/CLOSE again. Adjusting the LCD panel angle Important ! If you can hear the LCD panel knocking against your vehicles console or dashboard, press ANGLE () to move the LCD panel a little forward. Section 04 Basic Operations % Press ANGLE (+/) to adjust the LCD panel to an easily viewable angle. The LCD panel angle continues changing as long as you press ANGLE (+/) and hold. # The adjusted the LCD panel angle will be memorized and automatically returned to the next time the LCD panel is opened. Turning the LCD panel horizontal When the LCD panel is upright and it hinders the operation of the air conditioner, the panel can be turned horizontal temporarily. % Press FLIP DOWN to turn the LCD panel horizontal. # To return to original position, press FLIP DOWN again. # The LCD panel returns to the original position automatically with beeping sound 10 seconds after operation. Changing the wide screen mode You can select a desired mode for enlarging a 4:3 picture to a 16:9 one. % Press WIDE to select the desired setting. Press WIDE repeatedly to switch between the following settings: FULL (full)JUST (just)CINEMA (cinema) ZOOM (zoom)NORMAL (normal) FULL (full) A 4:3 picture is enlarged in the horizontal direction only, giving you a 4:3 TV picture (normal picture) without any omissions. English ! When adjusting the LCD panel angle, be sure to press ANGLE (+/). Forcibly adjusting the LCD panel by hand may damage it. JUST (just) The picture is enlarged slightly at the center and the amount of enlargement increases horizontally to the ends, enabling you to enjoy a 4:3 picture without sensing any disparity even on a wide screen. CINEMA (cinema) The picture is enlarged by the same proportion as FULL or ZOOM in the horizontal direction and by an intermediate proportion between FULL and ZOOM in the vertical direction; ideal for a cinema-sized picture (wide screen picture) where captions lie outside. ZOOM (zoom) A 4:3 picture is enlarged in the same proportion both vertically and horizontally; ideal for a cinema-sized picture (wide screen picture). NORMAL (normal) A 4:3 picture is displayed as it is, giving you no sense of disparity since its proportions are the same as that of the normal picture. Notes ! Different settings can be memorized for each video source. ! When video is viewed in a wide screen mode that does not match its original aspect ratio, it may appear different. ! Remember that using the wide mode feature of this system for commercial or public viewing purposes may constitute an infringement on the authors rights protected by the Copyright Law. En 9 Section 04 Basic Operations ! Video will appear grainy when viewed in CINEMA or ZOOM mode. ! The rear view camera picture is always FULL. Adjusting the picture adjustment You can adjust BRIGHT (brightness), CONTRAST (contrast), COLOR (color) and HUE (hue) for each source and rear view camera. ! The adjustments of BRIGHT and CONTRAST are stored separately for light ambient (daytime) and dark ambient (nighttime). A sun or moon is displayed to the left of BRIGHT and CONTRAST, respectively, as the ambient light sensor determines brightness or darkness. ! You cannot adjust HUE for PAL video. ! You cannot adjust COLOR or HUE for the audio source. ! This unit detects whether your vehicles parking brake is engaged or not, and prevents you from adjusting the picture adjustment while driving. When you attempt to adjust the picture adjustment, the warning YOU CANNOT USE THIS FUNCTION WHILE DRIVING will appear on the display and indicate that the picture adjustment cannot be used. 1 Press V.ADJ and hold to display PICTURE ADJUST. Press V.ADJ until PICTURE ADJUST appears in the display. 2 Use a, b and A.MENU to select the function to be adjusted. Press a/b to change the function; press A.MENU to select the function. The adjustment function names are displayed and adjustable ones are highlighted. ! BRIGHT Adjust the black intensity 10 En ! CONTRAST Adjust the contrast ! COLOR Adjust the color saturation ! HUE Adjust the tone of color (red is emphasized or green is emphasized) ! DIMMER Adjust the brightness of display ! BACK-CAMERA Switch to the picture adjustment display for the rear view camera ! SOURCE Return to the picture adjustment display for each source # You can adjust the picture adjustment for rear view camera only when B. CAMERA is turned on. (Refer to Setting for rear view camera on page 12.) # SOURCE will appear in the display instead of BACK-CAMERA when you select BACK-CAMERA. # With some rear view cameras, picture adjustment may not be possible. 3 Press c or d to adjust the selected item. Each press of c or d increases or decreases the level of selected item. +24 24 is displayed as the level is increased or decreased. 4 Press ESC to return to the display of each source. Adjusting the dimmer The adjustment of DIMMER is stored separately for each ambient light; daytime, evening and nighttime. The brightness of LCD screen will be adjusted to optimum level automatically in accordance with the ambient light based on the setting values. 1 Press V.ADJ and hold to display PICTURE ADJUST. Press V.ADJ until PICTURE ADJUST appears in the display. 2 Press a or b to select DIMMER. The ambient light level used as the standard for adjusting DIMMER appears above the level bar. Section 04 Basic Operations 3 Press c or d to adjust the brightness. Each press of c or d moves yellow towards the left or the right. The level indicates the brightness of the screen being adjusted. The farther yellow moves to the right, the brighter the screen. Removing the front panel % Move downward RELEASE and remove the front panel toward you. The LED indicator will flash while the front panel is being detached. Take care not to grip it too tightly or to drop the front panel and protect it from contact with water or other fluids to prevent permanent damage. English ! Yellow sun Adjust the brightness for bright ambient light (daytime) Adjust the brightness for in! Red sun termediate brightness (evening) ! Blue moon Adjust the brightness for dark ambient light (nighttime) 4 Press ESC to return to the display of each source. Note The icons indicating the current ambient brightness used for adjusting BRIGHT and CONTRAST may differ from DIMMER slightly. Protecting your unit from theft The front panel can be detached from this unit to discourage theft. ! If the front panel is not detached from this unit within five seconds of turning off the ignition, a warning tone will sound. ! You can turn off the warning tone. See Switching the warning tone on page 13. Attaching the front panel % Replace the front panel by clipping it into place. Align the groove on the bottom of the front panel with the guide on the display unit. ! Press RELEASE until the front panel clicks into place. Important ! Never use force or grip the display and the buttons too tightly when removing or attaching. ! Avoid subjecting the front panel to excessive shocks. ! Keep the front panel out of direct sunlight and high temperatures. ! If removed, replace the front panel on the unit before starting up your vehicle. En 11 Section 05 Other Functions Introduction of setup adjustments ! Select VIDEO to watch video of a connected component as AV-1 source. 1 Use a, b, c, d and A.MENU to select AV INPUT1. 2 Press c or d to select the video input 1 setting. Press c or d until the desired setting appears in the display. 1 1 Function display Shows the function names. 1 Press A.MENU to display the function names. The function names are displayed and operable ones are highlighted. 2 Use a, b, c, d and A.MENU to select the desired function. Press a/b/c/d to change the function; press A.MENU to select the function. The function selected with a/b/c/d is displayed with a frame. # To return to the previous display, press BACK. # To return to the display of each source, press ESC. Note If you do not operate the setup function within about 30 seconds, the display is automatically returned to the source display. ! OFF No video component is connected ! VIDEO External video component Setting the video input 2 You can switch the setting according to the connected component. ! Select VIDEO to watch video of a connected component as AV-2 source. ! Select B. CAMERA when a rear view camera is installed on your vehicle. 1 Use a, b, c, d and A.MENU to select AV INPUT2. 2 Press c or d to select the video input 2 setting. Press c or d until the desired setting appears in the display. ! OFF No video component is connected ! VIDEO External video component ! B. CAMERA Rear view camera Setting for rear view camera CAUTION Setting the video input 1 You can switch the setting according to the connected component. 12 En Pioneer recommends the use of a camera which outputs mirror reversed images, otherwise screen image may appear reversed. This unit features a function that automatically switches to the rear view camera video Section 05 Other Functions 1 Use a, b, c, d and A.MENU to select AV INPUT2. 2 Press c or d to select B. CAMERA. 3 Press b to select POLARITY. 4 Press c or d to select an appropriate setting for polarity. Each press of c or d switches between the following polarity: ! BATTERY When the polarity of the connected lead is positive while the gear shift is in REVERSE (R) position ! GND When the polarity of the connected lead is negative while the gear shift is in REVERSE (R) position 2 Press a to turn warning tone on. # To turn warning tone off, press b. English (VIDEO 2/BACK CAMERA INPUT jack) when a rear view camera is installed on your vehicle. When the gear shift is in REVERSE (R) position, the video automatically switches to a rear view camera video. (For more details, consult your dealer.) ! Confirm the setting immediately whether the display changes to a rear view camera video when the gear shift is moved to REVERSE (R) from another position. ! When the display changes to a rear view camera video during normal drivings, switch to another setting. ! To return to the source display, press V.ADJ. Setting the automatic open function To prevent the display from hitting the shift lever of an automatic vehicle when it is in P (park) position, or when you do not wish the display to open/close automatically, you can set the automatic open function in the manual mode. Furthermore, to adjust the LCD panel slide position, you can turn the set back on or off. 1 Use a, b, c, d and A.MENU to select FLAP SET. 2 Press a and the LCD panel slides to the back. # Press b and the LCD panel slides to the front. 3 Press c or d to select the display to open/close automatically or manually. Press c to select MANUAL, and you have to press OPEN/CLOSE to open/close the display. Press d to select AUTO, and the display automatically opens/closes when power to this unit is turned on. Setting the clock Switching the warning tone Use these instructions to set the clock. If the front panel is not detached from this unit within five seconds of turning off the ignition, a warning tone will sound. You can turn off the warning tone. 1 Use a, b, c, d and A.MENU to select CLOCK ADJ. 1 Use a, b, c, d and A.MENU to select DT. WARNING. 2 Press c or d to select OFF and then press A.MENU to turn the clock display on. ON will appear in the display instead of OFF. Clock display is now on. En 13 Section 05 Other Functions # To turn the clock display off, press c or d to select ON and then press A.MENU. 3 Press c or d to select the segment of the clock display you wish to set. Each press of c or d selects one segment of the clock display: HourMinute As you select segments of the clock display the segment selected will be highlighted. 4 Press a or b to set the clock. Pressing a will increase the selected hour or minute. Pressing b will decrease the selected hour or minute. Notes ! You can match the clock to a time signal by pressing c or d to select JUST and then pressing A.MENU. If the minute is 0029, the minutes are rounded down. (e.g., 10:18 becomes 10:00.) If the minute is 3059, the minutes are rounded up. (e.g., 10:36 becomes 11:00.) ! Even when the sources are off, the clock display appears on the display. Switching the background display You can switch background displays while listening to each source. 14 En % Press ENTERTAINMENT. Each time you press ENTERTAINMENT the display changes in the following order: Video of currently selected sourceBGV (background visual) # When this unit is turned off, you cannot use ENTERTAINMENT. Note When the selected source is an audio source, when you select the video of currently selected source, nothing is displayed on the display. Appendix Additional Information Troubleshooting Symptom Cause Action (See) Power doesnt turn on. The unit doesnt operate. Leads and connectors are incorrectly connected. Confirm once more that all connections are correct. The fuse is blown. Rectify the reason for the fuse blowing, then replace the fuse. Be very sure to install the correct fuse with the same rating. English Common Noise and other factors are causing Press RESET. (Page 4) the built-in microprocessor to operate incorrectly. Operation with the remote con- The remote control operation mode trol isnt possible. is incorrect. The unit does not operate corBattery power is low. rectly even when the appropriate remote control buttons are pressed. There is no picture. Switch to the correct remote control mode. (Page 7) Load new battery. (Page 5) The parking brake cord is not connected. Connect a parking brake cord, and apply the parking brake. The parking brake is not applied. Connect a parking brake cord, and apply the parking brake. There is audio and video skipping. The unit is not firmly secured. Secure the unit firmly. When the ignition switch is turned ON (or turned to ACC), the motor sounds. The unit is confirming whether a disc is loaded or not. This is a normal operation. Nothing is displayed. The rear view camera is not connected. B. CAMERA is at incorrect setting. Connect a rear view camera. Press V.ADJ to return to the source display and then select the correct setting for B. CAMERA. (Page 12) En 15 Appendix Additional Information Using the display correctly CAUTION ! If liquid or foreign matter should get inside this unit, turn off the power immediately and consult your dealer or the nearest authorized PIONEER Service Station. Do not use the unit in this condition because doing so may result in a fire, electric shock, or other failure. ! If you notice smoke, a strange noise or smell, or any other abnormal signs from the display, turn off the power immediately and consult your dealer or the nearest authorized PIONEER Service Station. Using this unit in this condition may result in permanent damage to the system. ! Do not disassemble or modify this unit, as there are high-voltage components inside which may cause an electric shock. Be sure to consult your dealer or the nearest authorized PIONEER Service Station for internal inspection, adjustments or repairs. Handling the display ! When the display is subjected to direct sunlight for a long period of time, it will become very hot resulting in possible damage to the LCD screen. When not using this unit, close the display and avoid exposing it to direct sunlight. ! The display should be used within the temperature ranges shown below. Operating temperature range: 10 to +50 °C Storage temperature range: 20 to +80 °C At temperatures higher or lower than the operating temperature range the display may not operate normally. ! The LCD screen of this unit is exposed in order to increase its visibility within the vehicle. Please do not press strongly on it as this may damage it. 16 En ! Do not place anything on the display when it is opened. Also, do not attempt to carry out angle adjustment, or open/close the display by hand. Applying strong force to the display may damage it. ! Do not push the LCD screen with much force as this may scratch it. ! Be careful not to place anything between the display and the main body when the display is opening or closing. If an object gets between the display and main body, the display may stop working. ! Be careful of fingers, long hair, and loose articles of clothing which could possibly get caught between the display and the main body and cause serious injury. Liquid crystal display (LCD) screen ! If the display is near the vent of an air conditioner when it is opened, make sure that air from the air conditioner is not blowing on it. Heat from the heater may damage the LCD screen, and cool air from the cooler may cause moisture to form inside the display resulting in possible damage. Also, if the display is cooled down by the cooler, the screen may become dark, or the life span of the small fluorescent tube used inside the display may be shortened. ! Small black dots or white dots (bright dots) may appear on the LCD screen. These are due to the characteristics of the LCD screen and do not indicate a problem with the display. ! At low temperatures, the LCD screen may be dark for a while after the power is turned on. ! The LCD screen will be difficult to see if it is exposed to direct sunlight. ! When using a portable phone, keep the antenna of the portable phone away from the display to prevent disruption of the video by Appendix Additional Information English the appearance of spots, colored stripes, etc. Keeping the display in good condition ! When removing dust from the screen or cleaning the display, first turn the system power off, then wipe with a soft dry cloth. ! When wiping the screen, take care not to scratch the surface. Do not use harsh or abrasive chemical cleaners. Small fluorescent tube ! A small fluorescent tube is used inside the display to illuminate the LCD screen. The fluorescent tube should last for approximately 10,000 hours, depending on operating conditions. (Using the display at low temperatures reduces the service life of the fluorescent tube.) When the fluorescent tube reaches the end of its useful life, the screen will be dark and the image will no longer be projected. If this happens, consult your dealer or the nearest authorized PIONEER Service Station. En 17 Appendix Additional Information Specifications General Rated power source ............... 14.4 V DC (allowable voltage range: 12.0 14.4 V DC) Grounding system ................... Negative type Max. current consumption ..................................................... 3.0 A Dimensions (W × H × D): DIN Chassis ............................... 178 × 50 × 160 mm Nose ..................................... 188 × 58 × 30 mm D Chassis ............................... 178 × 50 × 165 mm Nose ..................................... 170 × 46 × 25 mm Weight .......................................... 1.7 kg Display Screen size/aspect ratio ....... 7 inch wide/16:9 (effective display area: 154 × 87 mm) Pixels ............................................. 336,960 (1,440 × 234) Type ................................................ TFT active matrix, transmissive type Color system .............................. NTSC/PAL compatible Operating temperature range ..................................................... 10 +50 °C Storage temperature range ..................................................... 20 +80 °C Angle adjustment .................... 50 110° (initial settings: 110°) Infrared remote control Wavelength ................................. 945 nm Output ........................................... typ; 10 mw/sr per Infrared LED Note Specifications and the design are subject to possible modifications without notice due to improvements. 18 En î àüHÒ"Á Ë(ªøåã,_cºÍ\¹ÕbË¥ÝXå åà è Íhª½ 60 ºÝhÕÛ 60 2bû`á 60 Ë(KM ܼ,_ 61 ܼ,ªø 61 è 61 ÝwLCD¢U 61 iÀLCDå 61 Ín®Uh 61 Y§hK(Ý 61 ý o:U 63 Y§h 64 - ú,Í\ _,_xÇ> 65 Ü,_ 65 SÜLCDb 65 9ì¢U! 66 ¿ÀÏ¿t 66 ,_K2Ü 67 vÖý -n¿ÀKË9 68 -;8e1 68 -;8e2 68 ÛfJó 69 -êÕSý 69 -B 69 ÛÌoo: 69 D Ç Ed 70 cº(o:U 71 < 72 Zhtw 59 À 01 è Íhª½ Ëo:UÜ:&v6Ï¥vå åà 1 Í\o:UKMËt±,ª ø 2 Ë,ªøÝX¼¨KïÖKUåå ±Í\e_ÊhÇ 3 Ëy%è,ªø-@fJ&´< ug:Í\ 4 Öº*±ã,ªøKMËÿv Í\,_ 5 Ëÿo:UÝ(1¨ø_Ú 2qÿÊûUÍ\ûqhÝn ì#ÊqªfJÈI'ý3q ÿø_hÕÛMn 6 cÊgvÖMö #o:UÉc hÕÛèÍ\,_Ào: UúþðãËÊ\}\¿t 7 ËÿêLÝîo:Uå*ûP}ÊMö¹bùwøÜ å\Ws¿6Ýîo:UG |qªôøûvÖE& _ hÞ(ÝúK 8 ÕÊBËû}h6å| EBh6*c}*-ó 9 ÿ(ÕÛB(-43_ ºÝhÕÛ fJ ! û¥ãUú rÚ-(¼u,Ê \>ÀKÅv#¥óK^ÊÜû trÚå#¥(vUÍi( Õ&ô´Íº«·³_hÞ ! º2búþE&MUÍi(Õ ÿ(LÊB(MDVDû__ýd o:UÉÝ(ïýcø_è Mn ! (жÞsø_åX¢å( ÊgNo:UÀqϦUÕ(æL #Õ0¹ÅÕg¦ 60 Zhtw ,_ïu,}ÊK^Ê/&_(&2b¨( ÕÛBNMo:UÀDVDûÀîå ¨fÀDVDûÀîfJVIDEO VIEWING IS NOT AVAILABLE WHILE DRIVING(Mo:U úþ NMo:UÀDVDûÀîBËÊ Ê(hMn&ÉwK^Ê 2bû`á (,_BËÙÅ_Õ}ÊÎ(*_Õ} ÊÎB(,_ û`>û fJ Ëÿ(*MACCMnÊ À 02 Ë(KM ܼ,_ iÀLCDå NTSC/PAL|¹' LCDàvË vÒ×0·PF/N (BRIGHT¿À;Ѧï'Ò4 sô¹!(¢UBÉ9Ú Ò4sô¹¿ÀѦårp qÏDIMMER¦ï(¼9ÚºO¿À LCD,«®¦ ,_|¹NTSC/PAL6(vÖ-#¥ó ,_Br-ÙÅ|¹ø;ûq& GqÏïý!Õc8þ ܼ,ªø ,_w ûØýåºÝ¥6H Í\'ýñs@ýGºáïý¹¿ (-Fv-x*ê6ª,( ªø©¨E|î,_'ýr s}º«× úp¨(Ë(,_KMH,ª øvýåÊøÜÍ\$ºÍ/ ±&uª,åÊvÖàÀ-Kè Ín®Uh ®Uh(åÅbÅÍn ! Ý,_!(KM ! ,_!Õc8å\ ! vo:U úþp8cº oB % (FvÖ)åwÓRESET ! Ë,ªøÝX¼¨KïÖKUå å±Í\e_Êè ! ËÙÅÝ(ivóÏåý}Ê rÿº ! Ëè,_2n ! û`*¥ûÏ(-¶ «¹»ÅÍ°è ! ,_!Õc8å\Ë·F1 ÑHÒ ÙÙok - è RESET Y§hK(Ý Ýû` ÝwLCD¢U Y§hÌÑúû`§6cºcu u¹Òeû` ! v,_*(BËÿo:Uô }IwB(ô}I LCD¢U àØ«|E ! (KÐûqBÉv)Ú`âo: UåM;àê±ÞirIúþ ×0rþ Zhtw 61 À 02 Ë(KM fJ Ëû``âRåû`«vËËs 1« à ! ËÅ( ÀCR2025 (3 V)ðû` ! Y§hó (BËÖúû` ! Ëÿû`EûvÆ㠱ļk - ! Ëÿ(ÑlåwÍ\û` ! Ëÿ(ÑlPÝXû` ! úþû`²ËY§h¹íè& Ý °û` ! U(Nû`BËuª´´0@ ?Õ°lqDT (Y§h Y§hWMb2LÍ\ ! Y§h(ô}Iïý!Õc8å\ Í ! ËÿY§hÝX(Ø«öô}I ! ËÿY§h=(0 &Gïý a(^ʹK 62 Zhtw À 03 ý 12 3 45 6 7 8 d c b o:U 2 BACK LIGHT OrïÜÌIGï_Ì I 3 °I³h É°I,_ïêÕ¿Ào:U® ¦åÜ°I 9 7 WIDE rïxÇiv!4:3Ï>' 016:9 8 V.ADJ Orïo:Ï¿tx® 9 á_¥6h ¥6Y§há_ a ANGLE (+/) rï9LCDbÒ¦ 4 FLIP DOWN rï«BLCDbôMnIº 4sMn b RELEASE ûÕrïMb,_x 5 OPEN/CLOSE rïSÜLCDb c AV SOURCE xÇ >ï_,_rï( @ï(>Kª°Û 6 ENTERTAINMENT rïÛÌoo: - 1 DISPLAY rïo:.Ç a d RESET rïb©à-Ë Zhtw 63 À 03 ý TV!Í\ c 1 j e f i 7 6 g a h Í\û_BË!ÛºTV(. ÅÁabcdA.MENUº û_Í\@( ! ÜÍ\sÅËÃûç¿h( ªø % Í\åýBË!ÛºTV ! vNcd÷LKÕ¿;B ! vNab¿ú-ûúB ! vNA.MENU6cdxǶ DB,ýÅï(#¥w¶- GEX-P6450TVPûç¿hB H è v!ÛºTVBESCBACKDISPLAY !Õ( Y§h e a/b/c/d rï§6ý f BACK rïÔÞM o:kb g MODE Orï(AVXTV!KÛÍ \!8ÅÁÉv-(AVX ! AVX(¼,_ ,Í\ ! TVÅ(¼ûç¿hÍ\ ÜsÅËÃ, TV!Í\ h CH CALL rïo:û¥6Ç ;S âµ i ESC rïÖý§6! j A.MENU rïo:MENU¦ï(¼xÇ ý 64 Zhtw À 04 ú,Í\ _,_xÇ> 1 1 >: o:òxÇ> % AV SOURCExÇ;> ÍAV SOURCEï(å>K Û AV-1;8e1AV-2;8e2 AVvM@x>; è % OPEN/CLOSESLCDb # ÜLCDbBË!OPEN/CLOSE ¿ÀLCDbÒ¦ Í ! }0LCDbʧ6ð h° rÉANGLE ()LCDbeºMû ! ¿ÀLCDbÒ¦BËÙÅ ANGLE (+/)7L(K¿ÀLCDbïý v Þ - ! #¥óAV-BUS8eï-ïxºAV> qÏïN1;_xº>ò#¥ -À ! (ÅÁBó9 v,_*#¥@x>øÉÝnB vAV INPUT1;8e1 AV INPUT2;8e2*-ºVIDEO ËÃ,68B ! êÕÜSýÍ\o:U vLCDbSBåÞkÜÜLCD b(mÒÜ vÞkÜ!_ÕI0ACCM nBLCDbêÕS ÆÝMbêÕÜSLCDb ËÃ,67 ! LCDbÜåÞkÜÜ!_Õ ÞkÜI0ACCMnSLCD bdBÉOPEN/CLOSEåSLCD b ! ÜLCDbBÉÙÅvÜÊ LCDb*ÜÊv Þ % ANGLE (+/)LCDb¿À0¹¿À Ò¦ êOANGLE (+/)LCDbÒ¦1 Ü,_ % OAV SOURCEôó,_Ü SÜLCDb ¨WÞkÜ_ÕÜLCDbêÕS ÜdêÕÜSýïÜ ËÃ,69 ! Ëÿ(K(ÜLCDb£ôE # LCDb¿ÀÒ¦«¶LCDb ( !SBêÕÔÞrÒ¦ Zhtw 65 À 04 ú,Í\ 4sIÕLCDb # ÔÞMBË!FLIP DOWN # Í\10ÒLCDb4¨örêÕÔÞ M ! å(vË¢UÔ ôì¢U! À;ïýúþîp ! ËOå(,_ì¢U!ý Fmlq> ïýË×H Õ ÝwW\ µ¯ ! ;(CINEMAZOOM!ÀBúþ ÜÞ ! ø_ÏËB-ºFULL 9ì¢U! ¿ÀÏ¿t åLCDbôËB¨·¨_å\ï«B v4sIÕ % FLIP DOWN4sIÕLCDb ¨ïxÇiv!4:3Ï>'016:9 % WIDExÇ@ - ÍWIDEï(å-KÛ FULLtJUST¾ºCINEMA ûqZOOM.>NORMALc 8 FULLt 4:3ÏÅ(4s¹>'4:3ûÏc 8Ï ½!z JUST¾º Ï-.eº>'>'Ï(4s¹iï ^4:3Ïs(ì¢U _ä ºßº0ûUîp CINEMAûq ÏFULLZOOMøÔ(4s¹> 'FULLZOOM-Ô(ô¹> ' i(L(ÏKûq<Ï ì¢UÏ ZOOM.> 4:3Ï(4sô¹øÔ>' i(ûq<Ïì¢UÏ NORMALc8 4:3Ï#o:1¼vÔc8Ïø àd人0ûUîp è ! ;>ï¶- 66 Zhtw >ø_BRIGHT®¦ CONTRASTÔ¦COLOROr HUEr¦ï2L¿À ! BRIGHTCONTRAST¿À%X2(¼ }®})Ñ (°I³hÉ®¦¦B BRIGHTCONTRASTæt%o:*} ® ! PAL;HUE!Õ¿À ! ó;>COLORHUE!Õ¿À ! ,_ïu,}ÊK^Ê/&_(&2b ¨(ÕÛB2LÏ¿tå¨f2L Ï¿tfJYOU CANNOT USE THIS FUNCTION WHILE DRIVING(o:UúþÐý(Ï¿tý 1 OV.ADJåo:PICTURE ADJUST V.ADJôóPICTURE ADJUST(o:U-ú þ 2 (abA.MENUxÇ¿À ý abï9ýA.MENUGxÇ ý ¿tý1o:Bï¿À1Ø®o : ! ! ! ! ! ! BRIGHT¿ÀѦ CONTRAST¿ÀÔ¦ COLOR¿ÀOrý¦ HUE¿Àr¿OO DIMMER¿Ào:U®¦ BACK-CAMERAÛóø_Ï ¿to: À 04 ú,Í\ ! SOURCEÔÞ>Ï¿to: # ø_Ï¿tÅï(B. CAMERA_ B¿ÀËÃ,68 ø_K- # vBACK-CAMERAxBSOURCE/ BACK-CAMERA(o:U úþ # ¼Ðø_Ï¿tïý!Õ2 L 3 cd¿À@xî Ï !cds'@xî4 s+24-24¨W4s'o: 4 øxESCÔÞ>o: ¿Ào:U®¦¿t DIMMER¿À%°I})Z X2LCD¢U®¦9Ú°I<êÕ¿À0 s4s 1 OV.ADJåo:PICTURE ADJUST V.ADJôóPICTURE ADJUST(o:U-ú þ ! Ãr*} )®¦ ! r*} Z ! Ír® Í ! ! ! ! ÆÝBÿo½(Oo:U ËMMb×0ÈÊ ËMb`âô}IØ« MbòxË(_ÕÊKv ÝÞM ÆxMb % ûÕRELEASE6xMb vMb(xBLED:h ËÃMbNÊv= É2b4vÖ²Ô¥øåM 8 EÞ ¿À®°I} ¿À-®¦®¦ ¿ÀÑ°I®¦ 3 cd¿À®¦ Ï !cdÃræóûÕ 4s::¢Uc(¿À®¦Ãró ûÕ¢U® 4 Mbï,_xåM«Ü ! ÞkÝnÜÒgMb, _xfJóÿw ! fJóïÜËÃ,69 ÛfJ ó - 2 abxÇDIMMER ¿ÀDIMMER@(°I4s(4s : úþ ,_K2Ü ÝMb % >ÞMbvaO0M ËMbèùýo:UÌJ øxESCÔÞ>o: è (¼¿ÀBRIGHTCONTRAST:vM° ®¦ïýDIMMEReº ! RELEASEôóMbÒ r0M Zhtw 67 À 05 vÖý -n¿ÀKË9 -;8e2 ,-ï9Ú#¥-2LÛ ! xÇVIDEOAV-2>À@#¥- qÏ ! vÊ Ýø_BËxÇ B. CAMERA 1 (abcdA.MENUxÇ AV INPUT2 1 2 cdxÇ;8e2- cdôó@ -(o:U-úþ ! OFF*#¥;- ! VIDEOè;- ! B. CAMERAø_ 1 ýo: o:ý1 1 A.MENUïo:ý1 ý1o:BïÍ\1Ø®o: 2 (abcdA.MENUxÇ@ ý abcdï9ýA.MENUG xÇý (abcdxýo:6¹F # ÔÞM o:kbBËBACK # ÔÞ>Ko:BËESC è (30ÒKgÍ\-nýo:Uê ÕÔÞ>o: -;8e1 ,-ï9Ú#¥-2LÛ ! xÇVIDEOAV-1>À@#¥- qÏ Ã HÒúp(8úÍÏø_&G¢U qÏïý[ vÊ Ýø_B,_ïêÕÛó ø_;VIDEO 2/BACK CAMERA INPUTÒTv}Ê(REVERSE RMnB;êÕÛºø_ ;ÜôÇ Ë·Fb ! ËÊBº-}ÊvÖMn Û0REVERSERBo:U/&Û óø_; ! (}Êc8LÛBo:UÛó ø_;Ë9- ! ÔÞ>o:BËV.ADJ 1 (abcdA.MENUxÇ AV INPUT2 1 (abcdA.MENUxÇ AV INPUT1 2 cdxÇB. CAMERA 3 bxÇPOLARITY 2 cdxÇ;8e1- cdôó@ -(o:U-úþ 4 cdxÇcºu'- Ï !cdsÛåu' ! OFF*#¥;- ! VIDEOè;- 68 ø_K- Zhtw ! BATTERYv}Ê(REVERSER MnB#¥Úºcu ! GNDv}Ê(REVERSERMn B#¥Úº u À 05 vÖý ÛfJó ÞkÝnÜÒgMb,_x fJóÿwfJóïÜ B vBo:Ðè«xB@xèØ®o : 1 (abcdA.MENUxÇ DT. WARNING 2 a_fJó # ÜfJóBËb -êÕSý º2bo:U(}ÊU¼PK^ÊM nB°0Ëvo:UêÕS ÜBïêÕSý-ºKÕ! ¿ÀLCDbÑÕMnBï-Í °_Ü 1 (abcdA.MENUxÇ FLAP SET 2 aLCDbÑ0b # bLCDbÑ0Mb -B Ëg:-B 1 (abcdA.MENUxÇ CLOCK ADJ 2 cdxÇOFF6A.MENU_B o: ON/OFF(o:U-úþBo: þ(_ è ! NcdxÇJUST6A.MENUï BBá_9M xº0029GÖt 10:18º10:00 xº3059G Öt 10:36º11:00 ! s>ÜBo:Í(o:Uúþ - 3 cdxÇo:UêÕKÕSÜ cïxÇMANUALdBÅ OPEN/CLOSEMýSÜo:Udï xÇAUTOdBå,_û¥o:U êÕSÜ 4 ab-B a'@xBxb @xBx ÛÌoo: 6}>BïÛÌoo: % ENTERTAINMENT Ï !ENTERTAINMENTo:Uå vM@x>;BGVÌoº # v,_ÜBENTERTAINMENT!Õ( è v@x>ºó;>BåxÇvM@x >;o:U !ûUo: # ÜBo:BËcdxÇON6 A.MENU 3 cdxÇ@ -KBo:è Ï !cdsxÇBo: è Zhtw 69 D D Ç Ed 8E ÇÀ à ª½ (ËÃ) û!Õ¥ ,_!ÕÍ\ Ú#¥h#¥v !º@#¥/&cº ݪr· þcݪr·à6ôÛݪr ÝM<øcºÝªr Ü åÊvÖà hKIv ôgn®U !Õ(Y§h2LÍ\ Y§Í\!v scºY§h, û`ûÏ*N _¦c8å\ !Ï 70 RESET (, 61 ) ÛócºY§! (, 64 ) Ý°û` (, 61 ) K^ÊÉ"*#¥ #¥K^ÊÉ"&ÉwK^Ê K^Ê*Éw #¥K^ÊÉ"&ÉwK^Ê ó;;|ó ,_*Ýbú ú,_ vÞkÜI0ONACCM nB¬Tÿw ,_c(ºG/&Ýe /c8þa !ûUg¹o: ø_*#¥ B. CAMERA-v #¥ø_ V.ADJÔÞ>o:6ºB. CAMERAxÇcº- (, 68 ) Zhtw D D Ç cº(o:U à ! ²Ôpi2e_gÉËsÜû &·F1ÑKHÒ ÙÙ bËÿ(dö(,_àïý wk}øûvÖE ! |þo:UY|úpÿps úþûUvÖp8þaÉËsÜû &·F1ÑKHÒ ÙÙb (dö(,_ïýwûq8E Þ ! ËÿÆã9Ý,_&G_gØÓèö ïýôøûÜ_g¢å¿Àî ËÙÅ·F1ÑKHÒ ÙÙb Í\o:U ! o:USB`Ñz¿_¨TÉ ÿvWz¿_¨¨_±¨ ÞLCD¢U·¨_·¨Gô o:Ugèb¼# Þ æo:U(·¨_M«v¢U o:Ugè¢I¡(ý} ¦ïý.í ! LCD¢U ïýúþÑÞ}Þ® Þ/1LCD¢Uy'@ô&h :o:UúþE ! (N«Bû¥LCD¢Uïý( Bg| ! LCD¢U(ô}Iãå ! (KÐûqBÉv)Ú`âo: UåM;àê±ÞirIúþ ×0rþ wo:U ! (d¢U puTo:UBÉ HÜûqû6(Ôß~æ í ! (æí¢UBÉÃ.Þvhb Ëÿ(:À'è'xT - ! åo:UwBn¼ô}I |ÙïýÞLCD¢U(,_ BÉ o:U&Mô}Ig ! o:UÉ(嫦Äg( å\«¦Ä10ó+50°C ÝX«¦Ä20ó+80°C (ؼN¼å\«¦ÄBo:Uï ý!Õc8å\ ! ,_LCD¢U2úåÐØv(Êgï 'ËÿÈàÓ&Gv Þ ! vo:UUBËÿ( bñnûUi Ô#Ëÿ(K¿ÀvÒ¦(K SÜo:Uo:U(N v Þ ! Ëÿ(¨LCD¢U&G( bY. Õ ! vo:USÜBv;ÔK C,ñnûUiÔKX (ûUiÔo:Uïý\bå\ ! ËÃKw|ci cþÁ åMv«>(o:U;_K ´Í·³ ²vLCD¢U ¢I¡ ! ¢I¡((o:UgèºLCD¢UÐ g ¢I¡Éï(10000BFÉ å\öp(N«ö(o :U.í¢I¡(ý} v¢I¡(ý}P_B¢U !qÏdBË· F1ÑKHÒ ÙÙb Zhtw 71 D D Ç < , Mû ......................................14.4 V DC ¹1ûÓÄ 12.0 14.4 V DC ¥0ûq ...................................... u 'ûA ............................3.0 A :øì×Ø×ñ DIN _« ......................................178×50×160 ës Mïè ............................188×58×30 ës D _« ......................................178×50×165 ës Mïè ............................170×46×25 ës ÍÏ ................................................1.7 l¤ o: ¢U:ø¢UÔ .............7 ì16:9 Ho:bM154 × 87 mm Ï ................................................336,9601,440 × 234 ^ ................................................TFT Active Matrix riûq ......................................NTSC/PAL|¹ å\«¦Ä ............................10+50°C ÝX«¦Ä ............................20+80°C Ò¦¿t ......................................50110° Ë-110° âw ................................................945 nm 8ú ................................................typÏÚ LED 10 mw/sr è à"Á92<Ê-åôUæL å 72 Zhtw PIONEER CORPORATION 4-1, MEGURO 1-CHOME, MEGURO-KU, TOKYO 153-8654, JAPAN PIONEER ELECTRONICS (USA) INC. P.O. Box 1540, Long Beach, California 90801-1540, U.S.A. TEL: (800) 421-1404 PIONEER EUROPE NV Haven 1087, Keetberglaan 1, B-9120 Melsele, Belgium TEL: (0) 3/570.05.11 PIONEER ELECTRONICS ASIACENTRE PTE. LTD. 253 Alexandra Road, #04-01, Singapore 159936 TEL: 65-6472-1111 PIONEER ELECTRONICS AUSTRALIA PTY. LTD. 178-184 Boundary Road, Braeside, Victoria 3195, Australia TEL: (03) 9586-6300 PIONEER ELECTRONICS OF CANADA, INC. 300 Allstate Parkway, Markham, Ontario L3R OP2, Canada TEL: 1-877-283-5901 PIONEER ELECTRONICS DE MEXICO, S.A. de C.V. Blvd.Manuel Avila Camacho 138 10 piso Col.Lomas de Chapultepec, Mexico, D.F. 11000 TEL: 55-9178-4270 HÒ¡ýPlø =lø : ð-qïµ44_13 ûq : (02) 2521-3588 HÒûP/Plø /]w/ÎLFm-à 9901-6¤ ûq : (0852) 2848-6488 Published by Pioneer Corporation. Copyright © 2004 by Pioneer Corporation. All rights reserved. Printed in Japan <KMMZF> <04C00000> <CRD3871-A> ES