1
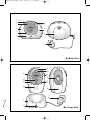
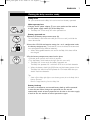
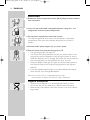
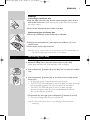
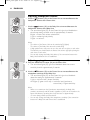
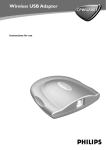
SC484_book.qxd 23-09-2004 17:50 Pagina 1
baby monitor
Instructions for use
English 4
Instructions pour l’utilisation
Français 16
Modo de empleo
Español 28
Bedienungsanleitung
Deutsch 40
Gebruiksaanwijzing
Nederlands 52
Istruzioni per l’uso
Italiano 64
Instruções de uso
Português 76
88
Bruksanvisning
Svenska 100
Vejledning
Dansk 112
Bruksanvisning
Norsk 124
Käyttöohje
Suomi 136
SBC
SC484 DECT
SC484_book.qxd 23-09-2004 17:50 Pagina 2
2
☎
Helpline (www.p4c.philips.com)
België & Luxemburg/
Belgien & Luxemburg/
Belgique & Luxembourg
(Belgium & Luxembourg)
Tel: 070 222303
Nederland (Netherlands)
Phone: 0900 8406
Danmark (Denmark)
Tlf: 808 82814
Österreich (Austria)
Phone: 0810 001203
Deutschland (Germany)
Phone: 0180 53 56 767
Portugal
Phone: 2416 3033
España (Spain)
Phone: 902 11 33 84
Schweiz/ Suisse/ Svizzera
(Switzerland)
Tel.: 0844 800 544
France
Phone: 08 25 88 97 89
(Greece)
Phone: 00800 3122 1280
Ireland
Phone: 01 764 0292
Italia (Italy)
Phone: 199118899
Norge (Norway)
Phone: 2274 8250
Suomi (Finland)
puh. 09 615 80 250
Sverige
Phone: 08 598 522 50
UK (United Kingdom)
Phone: 0870 9009070
SC484_book.qxd 23-09-2004 17:50 Pagina 3
3
1
2
3
!
0
4
9
5
8
6
@
7
A) Baby Unit
∞
#
$
%
^
≤
£
™
¡
)
(
&
*
B) Parent Unit
SC484_book.qxd 23-09-2004 17:50 Pagina 4
4
ENGLISH
Your baby monitor
SBC SC484
Philips is dedicated to producing caring, reliable products that new moms
and dads really need. Products whose reliability and operating quality bring
reassurance.You can trust this Philips baby monitor to provide round-theclock support by ensuring you can always hear your baby clearly, no matter
where you are in the house.The 100% Digital DECT 'cordless telephone
technology' guarantees you hear only your own baby without any distracting
noise.
Philips Baby Care,Taking care together
Important information
Please read this guide carefully before using the baby monitor, and keep it
for future reference.This baby monitor is intended as an aid. It is not a
substitute for responsible and proper adult supervision and should not be
used as such.
• Make sure the Baby Unit and adapter cable are always out of reach of the
baby, at least one metre away.
• Never place the Baby Unit inside the baby ’s bed or playpen!
• Never cover the baby monitor (with a towel, blanket, etc.).
• Clean the baby monitor with a damp cloth.
• Never use the baby monitor near water.
• Dispose of used batteries in an environmentally friendly manner.
Safety precautions
• Check if the voltage indicated on the type plate of the adapters
correspond to the local mains voltage before connecting to the mains
power supply.
• Do not use the set in moist places or close to water.
• Do not expose the set to extreme heat or light (eg. direct sunlight).
• To prevent electric shock, do not open the cabinets of the Baby Unit,
Parent Unit and charger.
• Avoid metallic contact (e.g. metal clips, keys) between the battery
contacts and the contacts in the charging base.
• Risk of explosion if battery is replaced by an incorrect type.
Never use non-rechargeable batteries for the parent unit.
• NiMH batteries must be disposed of in accordance with applicable waste
disposal regulations.
SC484_book.qxd 23-09-2004 17:50 Pagina 5
ENGLISH
Environmental information
No unnecessary packaging material has been used. We have tried to make
the packaging easy to separate into two mono-materials cardboard (box),
and polyethylene.
Please observe the local regulations regarding the diposal of
packing materials, exhausted batteries and old equipment.
Contents
Help line 2
General 4
Important information 4-5
Functional overview 5-6
Getting the baby monitor ready 7-9
Monitoring your baby 9-11
Explanation of features 11-12
Problem solving 13
Technical specifications 14
Resetting to default factory settings 14-15
Functional overview
A)Baby Unit
Legend of product
illustration on inside flap.
1 Page button
pages the Parent Unit in case you need to locate it.
2 Night light button ( )
switches on the nightlight.
3 DECT SYSTEM LINK light
lights orange:
unit switched on
blinks red:
no connection for more than 30 seconds,
the system check alarm on the Parent Unit beeps
blinks green slowly: searching for connection
blinks green fast:
transmitting sound when TALK button pressed
lights green:
connection OK
4 Night lights
5 ON/OFF button (A)
switches the Baby Unit On and Off.
6 Microphone (MIC)
7 AC power adapter
8 Battery compartment cover
9 Loudspeaker
10 Battery check light (
)
lights up red when battery power is low.
11 VOLUME Up/Down buttons ( + – )
adjust the Baby Unit volume.
12 DC power supply socket
ɨ
5
SC484_book.qxd 23-09-2004 17:50 Pagina 6
6
ENGLISH
B) Parent Unit
+ –
13 Volume Up/Down buttons ( + )
adjust the Parent Unit volume.
14 Sensitivity button
adjusts the sensitivity of the Baby Unit speaker.
15 DECT SYSTEM LINK light
lights orange:
unit switched on
blinks red:
no connection for more than 30 seconds,
the system check alarm on the Parent Unit beeps
blinks green slowly: searching for connection
blinks green fast:
transmitting sound when TALK button pressed
lights green:
connection OK
16 Loudspeaker
17 Charging base
18 Charging light
19 AC power adapter
20 Battery compartment cover
21 Battery check light (
)
lights up red when battery power is low.
22 Belt clip
23 ON/OFF button (A)
switches the Parent Unit On and Off.
24 TALK button
talks to your baby via the Baby Unit.
25 Sound-level lights
– indicate that sound is detected by the Baby Unit.
– indicate the sensitivity level of the Baby Unit microphone.
– indicate the volume level of both Baby Unit and Parent Unit
loudspeaker.
SC484_book.qxd 23-09-2004 17:50 Pagina 7
ENGLISH
7
Getting the baby monitor ready
Baby Unit
For your convenience the Baby Unit can be mains or battery operated.
Mains operated use
• Connect the AC power adapter (7) to a mains socket and the cord to
the DC power supply socket (12) of the Baby Unit.
> The Baby Unit is now ready for mains operated use.
Battery operated use
1 Remove the battery compartment cover (8).
Turn the Battery Lock knob to the left (for this use a coin) and slide the
cover downwards.
+
+
+
+
+
+
+
+
+
+
++
+
2 Insert four 1.5V, AA size batteries noting the + and - configuration inside
the battery compartment. (The batteries are not included; we recommend
non-rechargeable Philips Alkaline batteries).
> When rechargeable batteries are used in the Baby Unit, these will be
not charged.
3 Put the battery compartment cover back in place.
• Slide the cover upward until it clicks in position.
• Turn the Battery Lock knob to the right (for this use a coin).
> The Baby Unit is now ready for battery operated use.
The Baby Unit operates for a minimum of 25 hours on fresh batteries
> When the battery check light (10) flashes red, the battery power is low.
The Baby Unit should now still operate for 15 minutes. After that you
should install new batteries.
Tips:
– Switch off the Baby night light to save battery power, when the Baby Unit is
battery operated.
– Remove empty batteries from the Baby Unit.
Battery back-up
As soon as the batteries are inserted battery back-up will be activated.
In case of mains failure during mains operated use, the unit will
automatically switch to battery operated use. As soon as the mains supply
is back on the unit switches to mains operated use again.
SC484_book.qxd 23-09-2004 17:50 Pagina 8
8
ENGLISH
Parent Unit
1 Remove the battery compartment cover (20) by lifting the cover outward
from the bottom.
2 Insert the two enclosed AA rechargeable batteries, noting the + and configuration inside the battery compartment.
+
++
++
+
+
++
++
+
3 Put the battery compartment cover back in place.
First slide the upperside of the cover into the recesses in the battery
compartment.Then press the underside downwards until it clicks in
position.
4 Connect the AC power adapter (19) to a mains socket.
5 Place the Parent Unit inside the charging base (17).
> The red charging light (18) lights up.
> The Parent Unit can be operated now, but you should leave it in the
charging base until the batteries are fully charged (at least 16 hours).
When the batteries are fully charged, the Parent Unit can be taken out
of the charging base and used cordlessly for up to 16 hours.
> When the battery check light (21) lights up red, the battery power is
low. Place the Parent Unit inside the charging base to recharge the
batteries.
> If the rechargeable batteries begin to lose their effectiveness, replace
them with two new rechargeable batteries.
Note: For the parent unit, use rechargeable batteries only!
Never operate the Parent Unit with other types of batteries!
Disposal of batteries
• Dispose of used batteries in an environmentally friendly manner.
• Do not mix old and new batteries, or different types of batteries.
• Remove Baby Unit batteries if the baby monitor is not to be used for
long periods.
SC484_book.qxd 23-09-2004 17:50 Pagina 9
ENGLISH
9
Beltclip
Connecting to the Parent Unit
1 Slide the wider side of the clip into the small rectangular recess on the
back of the Parent Unit. Make sure the pins on the underside are above
the circular recess.
2 Press the clip downwards until it clicks in position.
Disconnecting from the Parent Unit
1 Place a flat screwdriver under the belt clip as indicated.
(1)
2 Gently press the screwdriver's point against the visible pin (1) in the
circular recess.
3 Press the pin until the clip comes off.
Note: Do not use excessive force when pressing the pin! This could damage the
clip and you might injure yourself with the screwdriver.
Monitoring your baby
Switching on the units
1 Position the Baby Unit at least one metre away from your baby.
Never place the Baby Unit inside the baby ’s bed or playpen.
2 Press and hold the A button (5) on the Baby Unit to switch on the Baby
Unit.
3 Press and hold the A button (23) on the Parent Unit to switch on the
Parent Unit.
> All lights light up for 2 seconds and then turn off again.
> The DECT SYSTEM LINK lights (3 and 15) of both units light up orange
then start blinking (green).The units now search for connection.
> The DECT SYSTEM LINK lights (3 and 15) of both units light
continuously (green) when the units have established connection.
You can now monitor your baby.
• To switch off the units again press and hold the A buttons (5 and 23).
> The units will beep when they are switched off.
Note:The Parent Unit beeps when it is (accidentally) switched off while
monitoring.
SC484_book.qxd 23-09-2004 17:51 Pagina 10
10
ENGLISH
Adjusting
+ – loudspeaker volume
• Use the
+ buttons (13) on the Parent Unit to increase/decrease the
loudspeaker volume of the Parent Unit.
• Use the + – buttons (11) on the Baby Unit to increase/decrease the
loudspeaker volume of the Baby Unit.
> The sound-level lights (25) on the Parent Unit give visual feedback on
the volume settings on both units for approximately 2 seconds:
0 lights = Parent Unit volume switched off;
1 light = monitoring baby silently;
5 lights = maximum.
Notes:
– The volume of the Parent Unit can be switched off (0 lights).
The volume of the Baby Unit cannot be switched off.
– A high pitched noise may occur in case the units are too close to each other.
To avoid this you should switch the Parent Unit volume off before placing the
units close to each other.
– You can only change the Baby Unit volume if the connection between the
Baby Unit and Parent Unit is established.
Adjusting microphone sensitivity
1 Press the SENSITIVITY button (14) on the Parent Unit.
> The sound-level lights (25) give visual feedback about the current
sensitivity level for approximately 2 seconds.
+ –
+ buttons (13) on the Parent Unit to increase/decrease the
2 Use the
microphone sensitivity of the Baby Unit.
> The sound-level lights (25) on the Parent Unit give visual feedback
about the setting for approximately 2 seconds.
1 light = minimum level / lowest sensitivity
All 8 lights (5 green and 3 red) = maximum level (continuous
transmission) / highest sensitivity
Notes:
– When set to maximum level (continuous transmission), the Baby Unit
monitors continuously and all sounds, regardless of level, can be heard on the
Parent Unit. Battery operating time may decrease to approximately
12 hours during continuous transmission.
– You can only change the Baby Unit microphone sensitivity if the connection
between the Baby Unit and Parent Unit is established.
SC484_book.qxd 23-09-2004 17:51 Pagina 11
ENGLISH
11
Talking back to comfort your baby
1 On the Parent Unit, press and hold the TALK button (24) until the DECT
SYSTEM LINK lights (3 and 15) of both units blink (green). Then talk
clearly into the loudspeaker grill.
> While the TALK button on the Parent Unit is being pressed, no sounds
from the Baby Unit can be heard on the loudspeaker of the Parent Unit.
2 Release the TALK button when finished or when you wish to hear your
baby again.
Explanation of features
Monitoring baby silently
+ –
• Adjust the volume of the Parent Unit to the lowest level, using the
+
buttons (13).
> The sound-level lights (25) visually alert you to baby’s sounds.
The more sound your baby makes, the more lights light.
> When no sound is detected, all lights will be off.
> If the volume of the Parent Unit is set to Off, the Parent Unit will beep
as soon as the second sound-level-light (25) lights red.
Checking that the units have established a
connection
• Check that the DECT SYSTEM LINK light (15) on the Parent Unit lights
continuously (green) to confirm that the connection between both units
is reliable.
> When losing the link it will take about 8 seconds before the system link
led starts blinking. After another 30 seconds, the led blinks read and the
alarm sound is heard on the parent unit. When re-establishing the link it
takes maximally 30 seconds to confirm the link again.
SC484_book.qxd 23-09-2004 17:51 Pagina 12
12
ENGLISH
Switching the night lights on and off
ɨ button (2) on the Baby Unit to switch on the night lights.
• Press the ɨ button again to switch off the night lights.
• Press the
> The nightlights dim and gradually switches off.
Note: Switch off the night lights when operating the Baby Unit on batteries to
conserve power.
Paging the Parent Unit
If the Parent Unit is misplaced and the volume is switched off, you can use
the Page button on the Baby Unit to locate the Parent Unit.
• Press the page button (1) on the Baby Unit.
> The Parent Unit will automatically reset to medium volume level and
paging alert will sound.
• To stop the paging alert, press the Page button again or any button on
the Parent Unit.
Operating range
• The SBC SC484 baby monitor has an open air operating range of up to
300 metres.Walls, ceilings, large objects and even glass will decrease the
operating range. Depending on your local circumstances, the operating
range can decrease down to approximately 50 metres (maximum).When
approaching the outer range boundary, the Parent Unit may produce a
scratching or interrupting sound.The system check function (lights 4, 15
and beeping sound on the Parent unit) will in principle indicate to you the
reliability of the connection between the Parent unit and Baby unit and
whether you are out of range.
SC484_book.qxd 23-09-2004 17:51 Pagina 13
ENGLISH
13
Problem solving
If a fault occurs, first check the points listed below. If you are unable to
remedy a problem by following these hints, contact the helpline or consult
your dealer.
Under no circumstances should you try to repair the set yourself as this will
invalidate the guarantee.
Problem
Possible cause
Solution
DECT SYSTEM
LINK light does
not light
Parent Unit: unit is not turned on.
Baby Unit: unit is not turned on.
Batteries are low.
Power adapter is not plugged in or
batteries are exhausted.
Rechargeable batteries not inserted
into Parent Unit.
Press the A button (23).
Press the A button (5)
Replace/recharge batteries.
Plug in power adapter or replace batteries.
High pitched noise
Units are too close to each other.
Volume too high.
Move Parent Unit away from Baby Unit.
Decrease the Parent Unit volume.
Parent Unit
batteries do not
charge
Battery life is at an end.
Replace rechargeable batteries,
using only NiMH rechargeable batteries.
Fit battery in correct polarity position.
Clean Charger contact with soft dry cloth.
No sound/ Cry of
baby is not heard
Volume on Parent Unit is set too low.
Increase Parent Unit volume.
Sensitivity setting on Parent Unit too low. Adjust sensitivity level of Parent Unit.
Units are out of range.
Move Parent Unit closer to Baby Unit.
Parent unit reacts
on other ambient
sounds
Ambient sounds other than the baby,
trigger the transmission.
Battery check light
lights (Baby Unit) or
blinks (Parent Unit)
Batteries are low or empty.
Parent Unit:
Baby Unit:
DECT SYSTEM
LINK light (flashing
red)/ System check
alarm beeps on
Parent Unit
Units too far away from each other.
Batteries are low.
Units cannot establish a connection,
even when close to each other.
Battery polarity misfitted.
Poor contact between Unit and
Charger.
No power to one of both units.
Place rechargeable batteries.
Move the Baby Unit closer to the baby
and try lowering the sensitivity on the
Parent Unit.
Recharge or replace batteries.
Replace or remove battery.
Decrease distance between units.
Replace/recharge batteries.
Try solving the problem by using the factory
initialisation mode. For this see chapter
‘Factory Initialisation mode’.
Check A button (23) on Parent Unit
and A button (5) on Baby Unit.
SC484_book.qxd 23-09-2004 17:51 Pagina 14
14
ENGLISH
Technical specifications
Power supply:
Operating range:
– 2x AA rechargeable batteries (1.5V, NiMH)
for Parent Unit (included)
– Optional batteries 4x 1.5V; AA for Baby Unit
(not included)
– AC power adapter 230V AC, 50 Hz.
Only use the 9 Volt DC/ 300 mA AC power
adapter included.
Up to 300 metres in ideal conditions.
Range will be affected by walls, doors, etc.
Indoors the range may decrease to
50 meters (maximum)
Operating temperature: 0 °C to 40 °C
Standard:
Digital Enhanced Cordless
Telecommunications (DECT)
Resetting to default factory settings
Factory Initialisation mode
With this mode both units can be reset to the default factory settings.
Factory Initialisation can be used if problems occur which can not be solved
by following the suggestions in chapter ‘Problem solving’. Resetting must be
done separately for each unit.
1 Press and hold the A button (5 and 23) to switch on the unit.
SC484_book.qxd 23-09-2004 17:51 Pagina 15
ENGLISH
–
2 When the lights on the unit light up,+immediately
press and hold the
volume down button+( – - 11 and
-13).
> The unit has now been reset to the default factory settings.
Note: By executing the factory initialisation mode Parent Volume, Baby Volume
and Baby Sensitivity are automatically reset to their factory default
settings. Personal preferences need to be set again.
Factory default settings are:
– Parent Unit Volume: level 1 (1 light)
– Baby Unit Volume: level 3 (3 lights)
– Baby Unit Sensitivity: level 5 (5 lights)
Need Help?
In case you have any questions about the SBC SC484, please contact our
helpline for assistance! You can find the number in the list on page 2.
Before you call, please read this manual carefully.
You will be able to solve most of your problems.
The model number of the baby monitor is SBC SC484.
Date of purchase:
_____
day
/_____
/month
/______
/year
15
SC484_book.qxd 23-09-2004 17:53 Pagina 149
SC484_book.qxd 23-09-2004 17:53 Pagina 150
Guarantuee certificate
Garantiebewijs
Certificado de garantia
Garantibevis
1
Type:
Certificat de garantie
Certificado de garantia
(
Garantibevis
Garantieschein
Certificato di garanzia
Garanticertifikat
Takuutodistus
year warranty
année garantie
Jahr Garantie
jaar garantie
año garantia
anno garanzia
%
år garanti
år garanti
år garanti
vuosi takuu
año garantia
SBC SC484
Serial nr: _____________________________________________________________
Date of purchase - Date de la vente - Verkaufsdatum - Aankoopdatum - Fecha de compra - Date d’acquisito Data da adquirição - G## - Inköpsdatum - Anskaffelsesdato - Kjøpedato - Oatopäivä -
Dealer’s name, address and signature
Nom, adresse et signature du revendeur
Name, Anschrift und Unterschrift des Händlers
Naam, adres en handtekening v.d. handelaar
Nombre, direccion y firma del distribudor
Nome, indirizzo e firma del fornitore
##, %$ #. #$
Återförsäljarens namn, adress och signatur
Forhandlerens navn, adresse og unterskrift
Forhandlerens navn, adresse og unterskrift
Jälleenmyyjän nimi, osoite ja allekirjoitus
Nome, morada e assinature da loja
6 month guarantee on rechargeable batteries
6 mois de garantie sur les piles rechargeables
6 meses de garantía para las pilas recargables
6 Monate Garantie auf wiederaufladbare Batterien
6 maanden garantie op oplaadbare batterijen
Garanzia di 6 mesi sulle batterie ricaricabili
Pilhas recarregáveis com 6 meses de garantia
E% 6 # # #
6 månaders garanti på laddningsbara batterier
6 måneders garanti på genopladelige batterier
6 måneders garanti på de oppladbare batteriene
Ladattavilla akuilla on 6 kuukauden takuu
www.philips.com
This document is printed on chlorine free produced paper
Data subject to change without notice
Printed in China
0682