1
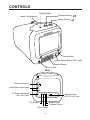
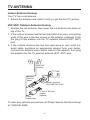
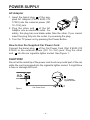
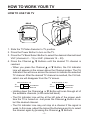
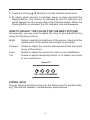
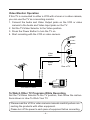
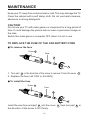
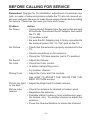
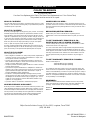
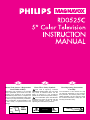
1
2
3
Return Your Owner’s Registration
Card Within 10 Days.
Know These Safety Symbols.
Read Operating Instructions
Carefully.
This “bolt of lightning” indicates
Registering your purchase is an essential uninsulated material within your unit which
step to guarantee you’ll receive all of the may cause an electrical shock. For the
benefits you’re entitled to as a PHILIPS safety of everyone in your household,
MAGNAVOX product owner. Complete and please do not remove the product covering.
mail your Owner’s Registration Card today
The “exclamation point” calls attention
to ensure your right to warranty verification, to features for which you should read the
owner confirmation, model registration, plus enclosed literature closely to prevent
a wide variety of special services and operating and maintenance problems.
savings.
U.S.
MAIL
OE
HN D HE
CAUTION
RISK OF ELECTRIC SHOCK
DO NOT OPEN
ATTENTION: RISQUE DE CHOC ÉLECTRIQUE NE PAS OUVRIR
The information in this manual can help
you take full advantage of your product’s
many features, and ensure years of safe,
reliable operation. So don’t miss out. Read
the enclosed instructions, safety tips, and
warranty information today.
INSTRUC
TIONS
INTRODUCTION
Congratulations on the purchase of your new Color TV. The best way
to familiarize yourself with your set is to read the operating instructions
carefully. They will explain the operations and features of your set, the
warranty, and safety procedures.
Positioning the TV
To obtain a picture with good contrast, position your TV in such a way
that no direct sunlight strikes the screen.
Ventilation
To prevent overheating, do not cover the ventilation holes on the TV.
Never place your TV close to a heat source.
The Model and Serial Numbers are on the back of this TV. Please record these
numbers and the purchase date in the spaces below. Refer to them whenever you ask
your dealer about this TV.
Model No.
Purchase Date
Serial No.
CAUTION
RISK OF ELECTRIC SHOCK
DO NOT OPEN
ATTENTION : RISQUE DE CHOC ELECTRIQUE-NE PAS OUVRIR
CAUTION: TO REDUCE THE RISK OF ELECTRIC SHOCK, DO NOT
REMOVE COVER (OR BACK). NO USER-SERVICEABLE PARTS INSIDE.
REFER SERVICING TO QUALIFIED SERVICE PERSONNEL.
The lightning flash with arrowhead symbol,
within an equilateral triangle, is intended to alert
the user to the presence of uninsulated “dangerous voltage” within the product’s enclosure
that may be of sufficient magnitude to constitute a risk of electric shock to persons.
The exclamation point within an equilateral triangle is intended to alert the user to the presence of important operating and maintenance
(servicing) instructions in the literature accompanying the appliance.
WARNING: TO REDUCE THE RISK OF FIRE OR ELECTRIC
SHOCK, DO NOT EXPOSE THIS APPLIANCE TO RAIN OR MOISTURE.
–1–
CONTROLS
Display Button
Channel Buttons
Indoor Rod Antenna
Volume Buttons
ACD^ C
R TV
T COLO
COMPAC
ME
VOLU
NEL
CHAN
Y
DISPLA
1
1
9
7 60
0
5
F
VH
F
UH
2
4
1
4
0
2
6
0
3
3
1
3
8
0
7
.
H
C
.
H
C
R
WE
PO
U
V
0
4
Power Button
E
ON
PH
TV Band Select Button (UHF, VHF)
Channel Scales
Phone Jack
REAR
TV
TV/Video Selector
INPUT
VIDEO
VIDEO
Audio/Video Input Jacks
AUDIO
TV External Antenna
(Ext. Ant.) Jack
DC
EXT.ANT.
12 – 15V
External Power
(DC 12–15V) Jack
TINT COLOR CONTR BRIGHT
Bright Control
Contrast Control
Tint Control
Color Control
–2–
TV ANTENNA
Indoor Antenna Hookup
Your TV has a rod antenna.
1. Extend the antenna and rotate it until you get the best TV picture.
VHF/UHF Outdoor Antenna Hookup
* Shorten the rod antenna, then lower the rod antenna into place on
top of the TV.
1. If the outdoor antenna has flat twin lead (300 ohm) wire, connect the
ends of this wire to the two screws on the adaptor (supplied). Push
the plug of this adaptor into the TV external antenna (EXT. ANT.)
jack.
2. If the outdoor antenna has two twin lead wires or one round (coaxial) cable, purchase an appropriate adaptor from your dealer.
Connect the antenna wires and/or cable to the adaptor, then plug
the adaptor into the TV external antenna (EXT. ANT.) jack.
UHF/VHF
Antenna
EXT.ANT.
TINT COLOR
300 ohm
Flat Twin
Leads
Adaptor (supplied)
Part # 4835 142 17005
or
75 ohm
Coaxial Cable
75 ohm to 300 ohm
Adaptor
(optional)
To order any optional accessories call Philips Service Solutions Group
at 1-800-851-8885.
–3–
POWER SUPPLY
AC Adaptor
1. Insert the barrel plug 1 of the supplied AC Adaptor (Part # 4835 272
17023) into the external power (DC
12–15V) jack.
1
2. Plug the other end 2 of the AC
2
Adaptor into an electrical outlet. For
safety, this plug has one blade wider than the other. If you cannot
insert the plug fully into the outlet, try reversing the plug.
3. Turn the TV power on by pressing the Power Button.
How to Use the Supplied Car Power Cord
Connect the barrel plug 1 of the Car Power Cord (Part # 4835 015
57024) to the external power (DC 12–15V) jack. Plug the other
end 2 into the car cigarette lighter socket. See Figure 1.
CAUTION!
Do not let the metal tip of the power cord touch any metal part of the car
while the cord is plugged into the cigarette lighter socket. It might blow
a fuse or damage the cord.
DC
+
12 – 15V
2
CONTR BRIGHT
–
1
Figure 1
Car Power Cord
–4–
To Cigarette
Lighter Socket
HOW TO WORK YOUR TV
HOW TO USE THE TV
4
5
6
OR
PACT COL
AC^DC COM
L
TV
VOLUME
CHANNE
REAR
Y
DISPLA
TV
1
INPUT
VIDEO
VIDEO
AUDIO
DC
EXT.ANT.
12 – 15V
1
1
TINT COLOR CONTR BRIGHT
3
1
3
8
9 70
7 60
0
5
F
VH
F
UH
6
E
ON
PH
2
4
1
4
0
2
6
0
3
.
H
C
.
H
C
WER
PO
U
V
0
4
2
3
1. Slide the TV/Video Selector to TV position.
2. Press the Power Button to turn on the TV.
3. Press the TV Band Select Button to select the desired channel band
VHF (channels 2 – 13) or UHF (channels 14 – 83).
4. Press the Channel ▲ ▼ Buttons until the desired TV channel is
reached.
• When you press the Channel ▲ or ▼ Button, the CH Indicator
Line will appear on the screen above the Channel scales. The CH
Indicator Line will move across the screen to indicate the selected
TV channel. After the desired TV channel is reached, the CH Indicator Line will disappear from the TV screen.
VHF (channels 2–13)
TV
CH Indicator
Screen
Red Line
UHF (channels 14–83)
TV
CH Indicator
Screen
Green Line
• Holding down the Channel ▲ or ▼ Button will scan through all of
the available channels (in the selected band).
• The CH Indicator Line will be at the left side of the screen each
time the TV is turned on. Just press the Channel ▲ Button to select the desired channel.
• The CH Indicator Line may not stop at a channel if the signal is
weak. In this case, adjust the Indoor Rod Antenna and try to select
the channel again by pressing the Channel ▲ ▼ Buttons.
–5–
5. Press the Volume ▲ ▼ Buttons to set the desired sound level.
6. To check which channel is selected, press or press and hold the
Display Button. The channel is indicated by the CH Indicator Line
which appears on the screen above the Channel scales. When the
Display Button is released, the CH Indicator Line will disappear.
HOW TO ADJUST THE COLOR FOR THE BEST PICTURE
Occasionally, you may want to adjust the color to your satisfaction by
using the following controls:
Bright
: Rotate to adjust the brightness of the picture. Adjust until the
darkest parts of the picture are as bright as you prefer.
Contrast : Rotate to adjust the contrast between the black and white
tones of the picture.
Color
: Rotate to adjust the amount of color to your satisfaction.
Tint
: Rotate to adjust natural skin tones, or to adjust color tones
to your preference.
Rear of TV
TINT COLOR CONTR BRIGHT
PHONE JACK
Plug an optional earphone plug into the Phone jack for private listening. The internal speaker is automatically disconnected.
–6–
AUDIO AND VIDEO INPUT JACKS
Video Operation
You can use your TV to play programs directly from a VCR or video
camera. Audio and Video Input jacks are provided for direct hookup to
your video equipment.
1. Connect Audio and Video cables from the Audio and Video output
jacks of a VCR or video camera to the Audio and Video Input jacks
on the TV.
2. Set the TV/Video Selector to Video position. You can now view what
is being played on the VCR or video camera.
*
TV
2
INPUT
VIDEO
VIDEO
AUDIO
Video Input
Audio Input
Rear of TV
1
Audio Output
Video Output
VCR
NOTE: When you set the TV/Video Selector to the Video position, you
will be unable to watch normal TV broadcasts.
After enjoying the VCR or video camera playback, set the TV/Video
Selector to the TV position in order to resume normal TV viewing.
to VCR or video camera instruction manuals for playback in* Refer
structions.
–7–
Video Monitor Operation
If this TV is connected to either a VCR with a tuner or a video camera,
you can use the TV as a recording monitor.
1. Connect the Audio and Video Output jacks on the VCR or video
camera to the Audio and Video Input jacks on the TV.
2. Set the TV/Video Selector to the Video position.
3. Press the Power Button to turn the TV on.
4. Start recording with the VCR or video camera.
TV
2
or
Video
Input
INPUT
VIDEO
VIDEO
Audio
Input
AUDIO
Rear of TV
1
Audio Output
Video Output
or
VCR With A Tuner
Video Camera
To Watch Other TV Programs While Recording
Set the TV/Video Selector to the TV position, then follow the instructions shown in How To Work Your TV.
Please read the VCR or video camera manuals carefully when connecting the products with other equipment.
Please turn off the power to each piece of equipment before connecting.
–8–
MAINTENANCE
Keep your TV away from extreme heat or cold. This may damage the TV.
Clean the cabinet with a soft damp cloth. Do not use harsh cleaners,
abrasives or strong detergents.
CAUTION!
Do not use your TV with video games or computers for a long period of
time. It could damage the picture tube or leave a permanent image on
the tube.
Switch the video game or computer OFF when it is not in use.
TO REPLACE THE FUSE OF THE CAR BATTERY CORD
● To remove the fuse
Cover C
Fuse
B
A
1. Turn part A in the direction of the arrow to remove it from the cover C .
2. Replace the fuse (4A-125V or 4A-250V).
● To install the fuse
Cover C
Fuse
B
A
Insert the new fuse and part B into the cover C , then turn part A in
the direction of the arrow to fix it firmly.
–9–
BEFORE CALLING FOR SERVICE
Remember! Charges for TV installation, adjustment of customer controls, or repair of antenna systems outside the TV are not covered under your warranty. Be sure to make these simple checks before calling
for service. These tips can save you time and money.
Problem
No Power
Action
• Unplug the AC Adaptor from the wall outlet and wait
60 seconds. Reconnect the AC Adaptor and switch
the TV ON.
• Try another outlet.
• Be sure the AC Adaptor plug is firmly connected to
the external power (DC 12–15V) jack on the TV.
No Picture
• Check that the antenna is properly connected to the
TV.
• Check connections on the antenna.
• Check the TV/Video selector (set to TV position).
No Sound
• Adjust the Volume.
No Color
• Check the Color control.
• Is station transmitting color?
• Try another channel.
Wrong Color
• Adjust the Color and Tint controls.
See HOW TO ADJUST THE COLOR FOR THE
BEST PICTURE section.
Picture too light • Adjust the Bright and Contrast controls.
or too dark
Picture interference
• Check the antenna for shorted or broken wires.
• Reposition the antenna.
• Possible station trouble or local interference (electric motors, etc.). Try another channel or adjust the
antenna.
• Press the Channel Buttons to retune the channel.
– 10 –
LIMITED WARRANTY
COLOR TELEVISION
90 Days Free Labor
One Year Free Replacement of Parts (Two Years Free Replacement on Color Picture Tube)
This product must be carried in for repair.
WHO IS COVERED?
MAKE SURE YOU KEEP...
You must have proof of purchase to receive warranty service. A sales
receipt or other document showing that you purchased the product is
considered proof of purchase.
Please keep your sales receipt or other document showing proof of
purchase. Attach it to this owner’s manual and keep both nearby. Also
keep the original box and packing material in case you need to return
your product.
WHAT IS COVERED?
Warranty coverage begins the day you buy your product. For 90 days
thereafter, all parts will be repaired or replaced free, and labor is free.
From 90 days to one year from the day of purchase, all parts will be
repaired or replaced free, but you pay for all labor charges. From one
to two years from the day of purchase, you pay for the replacement or
repair of all parts except the picture tube, and for all labor charges.
After two years from the day of purchase, you pay for the replacement or repair of all parts, and for all labor charges.
All parts, including repaired and replaced parts, are covered only for
the original warranty period. When the warranty on the product expires, the warranty on all replaced and repaired parts also expires.
WHAT IS EXCLUDED?
Your warranty does not cover:
• labor charges for installation or setup of the product, adjustment of
customer controls on the product, and installation or repair of antenna systems outside of the product.
• product repair and/or part replacement because of misuse, accident, unauthorized repair, or other cause not within the control of
Philips Consumer Electronics Company.
• reception problems caused by signal conditions or cable or antenna
systems outside the unit.
• a product that requires modification or adaptation to enable it to
operate in any country other than the country for which it was designed, manufactured, approved, and/or authorized, or repair of
products damaged by these modifications.
• incidental or consequential damages resulting from the product.
(Some states do not allow the exclusion of incidental or consequential damages, so the above exclusion may not apply to you. This includes, but is not limited to, prerecorded material, whether copyrighted or not copyrighted.)
• a product used for commercial or institutional purposes.
WHERE IS SERVICE AVAILABLE?
Warranty service is available in all countries where the product is officially distributed by Philips Consumer Electronics Company. In countries where Philips Consumer Electronics Company does not distribute the product, the local Philips service organization will attempt to
provide service (although there may be a delay if the appropriate
spare parts and technical manual(s) are not readily available).
BEFORE REQUESTING SERVICE...
Please check your owner’s manual before requesting service.
Adjustments of the controls discussed there may save you a service
call.
TO GET WARRANTY SERVICE IN U.S.A.,
PUERTO RICO OR U.S. VIRGIN ISLANDS...
Contact a Philips factory service center (see enclosed list) or authorized service center to arrange repair.
(In U.S.A., Puerto Rico and U.S.Virgin Islands, all implied warranties,
including implied warranties of merchantability and fitness for a particular purpose, are limited in duration to the duration of this express
warranty. But, because some states do not allow limitations on how
long an implied warranty may last, this limitation may not apply to
you.)
TO GET WARRANTY SERVICE IN CANADA...
Please contact Philips at:
1-800-661-6162 (French Speaking)
1-800-363-7278 (English Speaking)
(In Canada, this warranty is given in lieu of all other warranties. No
other warranties are expressed or implied, including any implied warranties of merchantability or fitness for a particular purpose. Philips is
not liable under any circumstances for any direct, indirect, special, incidental, or consequential damages, howsoever incurred, even if notified
of the possibility of such damages.)
REMEMBER...
Please record the model and serial numbers found on the product
below. Also, please fill out and mail your warranty registration card
promptly. It will be easier for us to notify you if necessary.
MODEL #
SERIAL #
Philips Service Solutions Group, P.O. Box 2976, Longview, Texas 75606
(903) 242-4800
IB8057E002
1111-2871M180 F9911-1
Printed in Malaysia