1
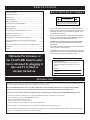
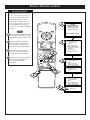
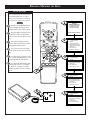
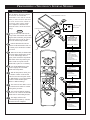
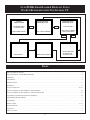
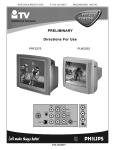
SMARTLOADER
Clon99-BK
Instructions for use
3135 015 14061
TABLE OF CONTENTS
KNOW THESE SAFETY SYMBOLS
Table of Contents ..................................................................2
Safety/Precautions.................................................................2
Introduction...........................................................................2
t
Getting Started ......................................................................3
Battery Installation................................................................3
CAUTION
RISK OF ELECTRIC SHOCK
DO NOT OPEN
s
CAUTION: TO REDUCE THE RISK OF ELECTRIC SHOCK, DO NOT
REMOVE COVER (OR BACK). NO USER-SERVICEABLE PARTS
INSIDE. REFER SERVICING TO QUALIFIED SERVICE PERSONNEL.
Connecting the Clon99-BK Box...........................................4
Erasing Memory ...................................................................5
Reading Memory ..................................................................6
t This “bolt of lightning” indicates uninsulated material
within your unit which may cause an electrical shock. For
the safety of everyone in your household, please do not
remove product covering.
Programming (Writing) Memory to a TV ............................7
Running a System Test .........................................................8
Exiting the Menu System .....................................................9
s The “exclamation point” calls attention to features for
which you should read the enclosed literature closely to
prevent operating and maintenance problems.
Programming with the On-Set Keyboard ...........................10
On-Screen Displays for Non-Global TV using the
Transmitter ..........................................................................11
WARNING: TO PREVENT FIRE OR SHOCK HAZARD,
DO NOT EXPOSE THIS EQUIPMENT TO RAIN OR
MOISTURE.
On-Screen Displays for Non-Global TV using the On-Set
Keyboard.............................................................................12
CAUTION: To prevent electric shock, match wide blade of
plug to wide slot, and fully insert.
Index ...................................................................................12
ATTENTION: Pour éviter les chocs électrques, introduire
la lame la plus large de la fiche dams la borne correspondante de la prise et pousser jussssqu'au fond.
Optimum Performance of
the Clon99-BK SmartLoader
box is obtained by plugging it
into an ITV set that is
already turned on.
For Customer Use:
Enter below the Serial No. which is located on
the product. Retain this information for future reference.
Model No
Serial No.
INTRODUCTION
Assembling and operating your Philips Clon99-BK SmartLoader is designed to be an easy process. The purpose is to allow you to
more easily program a number of televisions using just a few simple steps.
The Clon99-BK SmartLoader replaces the RL-5180CK model. The Clon99-BK SmartLoader is compatible with all Philips
SmartPort and ClonPort TV sets including Global 1999 models from the PL9XXX, PC9XXX, and PA9XXX series.
Please be sure that you have the following material before beginning any procedures with the Clon99-BK SmartLoader box.
•
•
•
•
•
A television capable of sending and receiving Clon99-BK SmartLoader information on TV settings.
One 9-volt battery (for the Clon99-BK SmartLoader).
Remote Control RG4172BK (T374AH).
Three AA batteries for the remote control.
Cable (6-conductor included with the Clon99-BK SmartLoader)
Please thoroughly read all the procedures listed within this booklet before starting any process.
Clon99™, SmartCard™, SmartLoader™, SmartPort™ ClonPort™ are registered trademarks of the Philips Consumer Electronics
Company. © 1999 Philips Consumer Electronics Company.
2
GETTING STARTED
CAUTION:
Failure to follow these instructions
may result in product damage. Please
read all instructions before beginning.
Clon99-BK SmartLoader Battery Installation
Battery installation
Clon99-BK SmartLoader
Before operating the Clon99-BK
SmartLoader, load a 9-volt battery
into the compartment in the bottom
of the Clon99-BK SmartLoader.
Slide the Battery Cover off the bottom
of the Clon99-BK SmartLoader
1
BEGIN
Slide the compartment lid in the
direction indicated by the triangle.
Attach and insert a 9 volt battery
Plug the battery into the battery
cable, then place the battery in the
compartment.
Replace the compartment lid.
2
Battery installation
RG4172BK (T374AH)
Remote Control
Replace the Battery Cover
Before operating the Remote
Control, please load the three AA
batteries into the compartment in the
bottom of the Remote Control.
3
BEGIN
Press the tab on the battery lid
and lift off the remote.
Following the diagrams inside the
Remote Control, load the batteries.
Then replace the battery lid. Point
the Remote Control at the TV and
see if it turns on the TV. If it does
not, repeat this step.
RG4172BK (T374AH) Remote Control Battery Installation
SMART HELP
Remember. Always be sure
to check the polarity of the batteries before inserting them in the
Clon99-BK SmartLoader or the
RG4172BK (T374AH) Remote
Control.
Press the tab on the Battery
Cover and lift it off.
3
Load 3 “AA” volt batteries
Replace the Battery Cover
CONNECTING THE CLON99-BK SMARTLOADER
Optimum Performance of the
Clon99-BK SmartLoader box
is obtained by plugging it into
an ITV set that is already
turned on.
Clon99-BK SmartLoader Connection
1
Power button on the front of an ITV.
BEGIN
Press the POWER button to turn
the ITV ON.
Plug one end of the cable into the
jack provided on the Clon99-BK
SmartLoader.
Plug the other end into the jack
provided on the back of the TV. The
TV’s jack is next to the Antenna
Input terminal and may be labeled
various ways such as; Smart Port,
Clone Port, etc.
POWER
Clon99-BK
SmartLoader
EXTERNAL
SPEAKER
75Ω
ANT/
CABLE
SMART
PLUG
2
Push the Slide Switch to the ON
position. The red LED should light.
(If the TV is turned off, it should
turn on within 15 seconds.)
EXTERNAL
SPEAKER
Rear jack panel
of ITV
75Ω
ANT/
CABLE
SMART
PLUG
Within 20 seconds, the Clon99BK SmartLoader on-screen display
should appear. If the display does not
appear, check the connections and
push the Slide Switch to the ON
position again. If there is still no
response from the SmartLoader,
replace its 9-volt battery.
3
Cable
4
Once the Clon99-BK
SmartLoader on-screen display
appears, press the POWER button on
the RG4172BK (T374AH) Remote
Control. The SmartLoader Setup
Menu should appear.
LED
Clon99-BK SmartLoader
ON/OFF slider switch
5
6
Clon99-BK SmartLoader
Setup Menu
Clon99-BK SmartLoader
On-Screen Display
PHILIPS
SMARTLOADER 99
Copyright PCEC 1999
System Version D.0
PN 3135 019 01681
Philips SmartLoader 99
System Version D.0
SLEEP
CT
SELE
!
M
~
CH
A/CH
1 - Read TV
2 - Write TV With Settings
VOL
D
E
MUT
C
A
F
E
6 - Exit SmartLoader
Stored Memory Type 01, 04
4
3
2
1
5
4
T
RESE
5 - System Test
6
G
B
3 - Write TV Without Settings
4 - Erase SmartLoader Memory
PRESS POWER TO BEGIN
Press the POWER button
on the remote control.
T
A LL
RLIECGH
6
8
7
9
0
CC
TV
E
CDGD
P
TV
ER
POW
T
GUES
SETU
DCM
P
SETU
ERASING MEMORY OR DATA
ERASE MEMORY
To read and save the television memory, it is first necessary to erase any
currently saved data in the Clon99BK SmartLoader. If the “Stored
Memory Type” indicates no data is
saved currently, you may bypass the
ERASE MEMORY operation and
move directly to the READ MEMORY
operation.
1
PHILIPS
SMARTLOADER 99
Copyright PCEC 1999
System Version D.0
PN 3135 019 01681
BEGIN
RECALL
SLEEP
With the Clon99-BK SmartLoader
on-screen display showing, press the
POWER button on the remote control
The Setup Menu will appear.
Press the Number 4 button on the
Remote Control to select the 4th
option “Erase SmartLoader Memory.”
PRESS POWER TO BEGIN
SELECT
-
+
M
2
A/CH
VOL
CH
Philips SmartLoader 99
System Version D.0
1 - Read TV
2 - Write TV With Settings
MUTE
3 - Write TV Without Settings
4 - Erase SmartLoader Memory
A
The screen will ask “Erase?”
Press the 0 button on the remote to
confirm and begin the procedure.
RESET
The screen will indicate “Memory
Erased” when the data has been
erased for the Clon99-BK
SmartLoader.
B
C
D
E
F
G
1
2
3
4
5
6
7
8
9
5 - System Test
6 - Exit SmartLoader
2
Stored Memory Type 01, 04
3
CC
CH GDE
Philips SmartLoader 99
System Version D.0
1 - Read TV
2 - Write TV With Settings
0
3 - Write TV Without Settings
4 - Erase SmartLoader Memory
POWER
TV
TV
DCM
GUEST
SETUP
SETUP
5 - System Test
6 - Exit SmartLoader
Erase? Press 0 to confirm
3
1
Philips SmartLoader 99
System Version D.0
1 - Read TV
2 - Write TV With Settings
3 - Write TV Without Settings
4 - Erase SmartLoader Memory
4
5
5 - System Test
6 - Exit SmartLoader
Memory Erased
READING MEMORY OR DATA
READ MEMORY
Once the memory has been erased, the
Clon99-BK SmartLoader is ready to
read a television’s memory. Follow the
steps below to complete the procedure.
1
BEGIN
With the Clon99-BK SmartLoader
on-screen display showing, press the
POWER button on the remote control.
Copyright PCEC 1999
System Version D.0
PN 3135 019 01681
RECALL
SLEEP
The Setup Menu will appear. Press
the Number 1 button on the Remote
Control to select the first option “Read
TV.”
PRESS POWER TO BEGIN
SELECT
-
+
M
2
A/CH
The on-screen display will ask,
“Read?” Press the 0 button to confirm
and begin the Read procedure.
VOL
CH
Philips SmartLoader 99
System Version D.0
1 - Read TV
2 - Write TV With Settings
MUTE
3 - Write TV Without Settings
4 - Erase SmartLoader Memory
A
The on-screen menu will reading
blocks of data on the bottom of the display.
RESET
Once the “Read” procedure is complete, “Finished Reading Memory” will
appear at the bottom of the display.
Disconnect the SmartLoader cable
from the back of the TV to complete
the “Read TV” operation or another
Numbered button to choose a different
option.
PHILIPS
SMARTLOADER 99
2
B
C
D
E
F
G
1
2
3
4
5
6
7
8
9
CC
5 - System Test
6 - Exit SmartLoader
Stored Memory Type 01, 04
3
3
Philips SmartLoader 99
System Version D.0
1 - Read TV
CH GDE
0
2 - Write TV With Settings
3 - Write TV Without Settings
4 - Erase SmartLoader Memory
POWER
TV
TV
DCM
GUEST
SETUP
SETUP
5 - System Test
6 - Exit SmartLoader
Read? Press 0 to confirm
1
4
Philips SmartLoader 99
System Version D.0
1 - Read TV
2 - Write TV With Settings
3 - Write TV Without Settings
4 - Erase SmartLoader Memory
5 - System Test
6 - Exit SmartLoader
Reading Block 23 of 63
6
EXTERNAL
SPEAKER
75Ω
ANT/
CABLE
5
Philips SmartLoader 99
System Version D.0
1 - Read TV
2 - Write TV With Settings
3 - Write TV Without Settings
SMART
PLUG
4 - Erase SmartLoader Memory
5 - System Test
6 - Exit SmartLoader
Finished Reading Memory
6
PROGRAMMING A TELEVISION’S INTERNAL MEMORY
WRITING TV MEMORY
After the Memory has been read from
one television, the Clon99-BK
SmartLoader is now ready to write the
memory to other televisions. This memory can be written with or without certain settings. These settings include:
Picture Adjustment, Minimum and
Maximum Volume, and the On Volume
settings.
Clon99-BK SmartLoader Box
1
EXTERNAL
SPEAKER
75Ω
ANT/
CABLE
ON/OFF Slide Switch
Typical rear jack
panel of ITV
SMART
PLUG
BEGIN
Plug one end of the cable into the
jack provided on the SmartLoader. Then
plug the other end into the jack provided
on the back of the TV. The TV jack is
next to the Antenna Input terminal.
Push the Slide Switch to the ON
position on the SmartLoader. If the TV
is currently off, it should turn on within
15 seconds.
Within 20 seconds, the SmartLoader
on-screen display should appear on the
TV screen. If the display does not
appear, check connections and push the
Slide Switch to the ON position again.
If there is still no response from the
SmartLoader, replace its 9-volt battery.
2
3
PHILIPS
SMARTLOADER 99
Copyright PCEC 1999
System Version D.0
PN 3135 019 01681
PRESS POWER TO BEGIN
LED
Philips SmartLoader 99
System Version D.0
1 - Read TV
2 - Write TV With Settings
3 - Write TV Without Settings
4 - Erase SmartLoader Memory
RECALL
SLEEP
5 - System Test
6 - Exit SmartLoader
SELECT
-
Press the POWER button on the
remote to display the Clon99-BK
SmartLoader Setup Menu.
Stored Memory Type 01, 04
+
M
Philips SmartLoader 99
System Version D.0
A/CH
VOL
CH
1 - Read TV
MUTE
2 - Write TV With Settings
3 - Write TV Without Settings
With the Setup Menu visible, press
the Number 2 button on the Remote
Control to select the 2nd option “Write
TV With Settings” or press the Number
3 button to select the third option
“Write TV Without Settings.”
The screen will ask “Write?” Press
the 0 button on the remote to confirm
and begin the procedure.
A
B
C
D
E
F
G
4 - Erase SmartLoader Memory
5
5 - System Test
6 - Exit SmartLoader
Write? Press 0 to confirm
RESET
1
2
3
4
5
6
7
8
9
7
CC
CH GDE
Philips SmartLoader 99
System Version D.0
1 - Read TV
0
2 - Write TV With Settings
3 - Write TV Without Settings
POWER
The screen will indicate “Writing
Block 24 of 63” while the Clon99-BK
SmartLoader is downloading the data.
TV
TV
DCM
GUEST
SETUP
SETUP
4
The display will then read
“Finished Writing Memory” when the
procedure has been completed.
4 - Erase SmartLoader Memory
5 - System Test
6
6 - Exit SmartLoader
Writing Block 23 of 63
8
Philips SmartLoader 99
System Version D.0
1 - Read TV
2 - Write TV With Settings
3 - Write TV Without Settings
4 - Erase SmartLoader Memory
5 - System Test
6 - Exit SmartLoader
Finished Writing Memory
7
RUNNING A SYSTEM TEST
SYSTEM TEST
A System Test of the Clon99-BK
SmartLoader can be preformed by following the steps below.
PHILIPS
SMARTLOADER 99
Copyright PCEC 1999
System Version D.0
PN 3135 019 01681
BEGIN
RECALL
SLEEP
With the Clon99-BK SmartLoader
on-screen display showing, press the
POWER button on the remote control
SELECT
-
PRESS POWER TO BEGIN
+
M
4
The Setup Menu will appear.
Press the Number 5 button on the
Remote Control to select the 5th
option “System Test.”
Philips SmartLoader 99
System Version D.0
A/CH
VOL
CH
1 - Read TV
MUTE
The screen will ask “Test?” Press
the 0 button on the remote to confirm
and begin the procedure.
5
3 - Write TV Without Settings
4
A
RESET
As the System Test proceeds, the
display will prompt the user to press
the Number 1 button or the A/CH
button to continue or skip to the next
part of the test.
2 - Write TV With Settings
B
C
D
E
F
G
1
2
3
4
5
6
7
8
9
4 - Erase SmartLoader Memory
5 - System Test
6 - Exit SmartLoader
2
Stored Memory Type 01, 04
CC
CH GDE
Philips SmartLoader 99
System Version D.0
1 - Read TV
0
2 - Write TV With Settings
3 - Write TV Without Settings
POWER
When the display shows “Test
Finished,” press the Number 1 button
to return to the Clon99-BK
SmartLoader Setup Menu.
TV
TV
DCM
GUEST
SETUP
SETUP
4 - Erase SmartLoader Memory
5 - System Test
3
6 - Exit SmartLoader
Test? Press 0 to confirm
1
*
*
*
*
*
*
*
*
*
*
*
Display Registration
*
*
12 Rows by 32 Columns
*
*
*
*
*
*
* 0123456789012345678901 *
*
*
*
*
Press 1 to Continue
*
*
*
*
*
*
*
*
*
*
*
*
*
*
*
*
*
*
*
*
*
*
*
*
*
*
*
*
*
*
*
*
*
*
*
*
*
*
IR Test
Press A/CH to Continue
Press 1 to Skip
Character Set Display
!"#$%&'()*+,-./01234
56789:;<=>?@ABCDEF
GHIJKLMNOPQRSTUV
WXYZ abcdefghijklmno
Press 1 to Continue
IR Test
A/CH detected, IR good
Press 1 to Continue
8
*
*
*
*
*
*
*
*
*
*
*
*
*
*
*
*
*
*
SmartLoader 99
System Test
Press 1 to Continue
*
*
*
*
*
*
*
*
*
*
* Check +12V Power Supply
12V Detected
*
*
*
*
*
*
Press 1 to Continue
*
*
*
*
*
*
*
*
*
*
*
*
*
*
*
*
*
*
*
*
*
*
*
*
*
*
*
*
Test Finished
Press 1 to Continue
EXITING THE CLON99-BK SMARTLOADER MENU
EXIT SMARTLOADER
When you have completed all the procedures you wish to preform, exiting
the Clon99-BK SmartLoader and shutting down is simple.
BEGIN
1
With the Clon99-BK SmartLoader
on-screen display showing, press the
POWER button on the remote control
PHILIPS
SMARTLOADER 99
Copyright PCEC 1999
System Version D.0
PN 3135 019 01681
The Setup Menu will appear.
Press the Number 6 button on the
Remote Control to select the 6th
option “Exit SmartLoader.”
RECALL
SLEEP
The screen will ask “Exit?” Press
the 0 button on the remote to confirm
and begin the procedure.
PRESS POWER TO BEGIN
SELECT
-
+
M
2
A/CH
VOL
CH
1 - Read TV
2 - Write TV With Settings
MUTE
The Clon99-BK SmartLoader
will display a screen that reads
“Power Down Mode” then shut itself
off.
Philips SmartLoader 99
System Version D.0
3 - Write TV Without Settings
4 - Erase SmartLoader Memory
A
B
C
D
E
F
G
1
2
3
4
5
6
7
8
9
5 - System Test
6 - Exit SmartLoader
RESET
When finished, unplug the
Clon99-BK SmartLoader from the
rear jack panel of the television.
2
Stored Memory Type 01, 04
3
CC
Philips SmartLoader 99
System Version D.0
1 - Read TV
CH GDE
0
2 - Write TV With Settings
3 - Write TV Without Settings
4 - Erase SmartLoader Memory
POWER
TV
TV
DCM
GUEST
SETUP
SETUP
5 - System Test
6 - Exit SmartLoader
3
Exit? Press 0 to confirm
1
4
5
Power Down Mode
EXTERNAL
SPEAKER
75Ω
ANT/
CABLE
SMART
PLUG
9
PROGRAMMING A TELEVISION WITH THE ON-SET KEYBOARD
WRITING TV MEMORY
WITH THE ON-SET KEYBOARD
After the Memory has been read from
one television, the Clon99-BK
SmartLoader is now ready to write
the memory to other televisions. The
following steps show how to download or “write” memory from one
television to another using the On-Set
Keyboard.
BEGIN
Clon99-BK SmartLoader Box
1
EXTERNAL
SPEAKER
75Ω
ANT/
CABLE
ON/OFF Slide Switch
SMART
PLUG
Plug one end of the cable into the
jack provided on the SmartLoader.
Then plug the other end into the jack
provided on the back of the TV. The
TV jack is next to the Antenna Input
terminal.
Push the Slide Switch to the ON
position on the SmartLoader. If the
TV is currently off, it should turn on
within 15 seconds.
Typical rear jack
panel of ITV
PHILIPS
SMARTLOADER 99
3
Copyright PCEC 1999
System Version D.0
PN 3135 019 01681
PRESS POWER TO BEGIN
LED
Within 20 seconds, the
SmartLoader on-screen display
should appear on the TV screen. If
the display does not appear, check
connections and push the Slide
Switch to the ON position again. If
there is still no response from the
SmartLoader, replace its 9-volt battery.
2
Philips SmartLoader 99
System Version D.0
Press CH/UP to Write TV
STEREO
6
Press Power to Exit System
Stored Memory Type 01, 04
Philips SmartLoader 99
System Version D.0
Press the POWER button on the
front of the TV to display the
Clon99-BK SmartLoader “Write TV”
Menu.
Press CH/UP to Confirm Write
INSTALL /
MENU
– VOLUME +
CHANNEL
Press CH/DN to Abort
POWER
Press Power to Exit System
Stored Memeory Type 01, 04
Press the CH/UP button on the
front of the TV to write the memory
to the television.
The screen will ask “Press
CH/UP to Confirm Write,” “Press
the CH/DN to Abort,” or “Press the
Power to Exit System.” Press the
CH/UP button to confirm and begin
the procedure.
MENU
Philips SmartLoader 99
System Version D.0
– VOLUME +
CHANNEL
POWER
Press CH/UP to Confirm Write
Press CH/DN to Abort
Press Power to Exit System
4
The screen will indicate “Writing
Block XX of XX” while the Clon99BK SmartLoader is downloading the
data.
8
Writing Block 23 of 63
6
5
Philips SmartLoader 99
System Version D.0
Press CH/UP to Confirm Write
Press CH/DN to Abort
The display will then read “Finished
Writing Memory” when the procedure has been completed.
Press Power to Exit System
Finished Writing Memory
Press the Power button on the
front of the TV to EXIT the system.
10
CLON99-BK SMARTLOADER DISPLAYS USING
PROGRAMMING TRANSMITTER FOR NON-GLOBAL TV
Follow these screens when choosing option “0” - EXIT.
PHILIPS
SMART LOADER
TELEVISION TYPE - SAVED DATA TYPE - -
EXIT SMART LOADER SYSTEM
?? ARE YOU SURE??
SYSTEM REVISION D.0
PN 3135 019 01681
PRESS POWER TO BEGIN
0
2
3
4
5
-
EXIT
1- READ TV
WRITE TV - PIC
WRITE TV - NO PIC
ERASE
TV/BUS SYSTEM TEST
1 - EXIT SMART LOADER
0 - RETURN TO MENU
Follow these screens when choosing option “1” - READ TV.
PHILIPS
SMART LOADER
TELEVISION TYPE - SAVED DATA TYPE - -
TELEVISION TYPE - -
TELEVISION TYPE - ?? ARE YOU SURE ??
SYSTEM REVISION D.0
PN 3135 019 01681
PRESS POWER TO BEGIN
0
2
3
4
5
-
EXIT
1- READ TV
WRITE TV - PIC
WRITE TV - NO PIC
ERASE
TV/BUS SYSTEM TEST
1 - READ TV MEMORY
0 - RETURN TO MENU
1 - READ TV MEMORY
0 - RETURN TO MENU
READING BLOCK - -
TV MEMORY READ
AND SAVED
Follow these screens when choosing option “2” or “3” - WRITE TV - PIC, or WRITE TV - NO PIC.
PHILIPS
SMART LOADER
SYSTEM REVISION D.0
PN 3135 019 01681
PRESS POWER TO BEGIN
TELEVISION TYPE - SAVED DATA TYPE - 0
2
3
4
5
-
EXIT
1- READ TV
WRITE TV - PIC
WRITE TV - NO PIC
ERASE
TV/BUS SYSTEM TEST
TELEVISION TYPE - -
TELEVISION TYPE - -
SAVED DATA TYPE - -
SAVED DATE TYPE - -
?? ARE YOU SURE ??
1 - WRITE TV MEMORY
0 - RETURN TO MENU
1 - WRITE TV MEMORY
0 - RETURN TO MENU
WRITING BLOCK - -
MEMORY WRITE COMPLETE
Follow these screens when choosing option “4” - ERASE.
PHILIPS
SMART LOADER
TELEVISION TYPE - SAVED DATA TYPE - -
SAVED DATA TYPE - -
SAVED DATA TYPE - ?? ARE YOU SURE ??
SYSTEM REVISION D.0
PN 3135 019 01681
PRESS POWER TO BEGIN
0
2
3
4
5
-
EXIT
1- READ TV
WRITE TV - PIC
WRITE TV - NO PIC
ERASE
TV/BUS SYSTEM TEST
1 - EARSE MEMORY DATA
0 - RETURN TO MENU
1 - ERASE MEMORY DATA
0 - RETURN TO MENU
DATA ERASURE COMPLETE
Follow these screens when choosing option “5” - TV/BUS SYSTEM TEST.
PHILIPS
SMART LOADER
SYSTEM REVISION D.0
PN 3135 019 01681
PRESS POWER TO BEGIN
TEST DATA TERMINAL POWER
TELEVISION TYPE - SAVED DATA TYPE - 0
2
3
4
5
-
EXIT
1- READ TV
WRITE TV - PIC
WRITE TV - NO PIC
ERASE
TV/BUS SYSTEM TEST
TV/DATA TERMINAL
*DISPLAY REGISITRATION*
SYSTEM TEST SEQUENCE
*
*
1 - CONTINUE TEST
*
0 - RETURN TO MENU
*
*
*
*
* 10 LINES/26 CHARACTERS *
1 - CONTINUE TEST
0 - RETURN TO MENU
NO INTERNAL TELEVISION
ERRORS DETECTED
NO POWER SUPPLY DETECTED
1 - CONTINUE TEST
0 - RETURN TO MENU
1 - TEST COMPLETE
11
DOWNLOAD CHARATER SET
IR DATA LINK TEST
!"#$%^'[]*+,-./0123
456789;^<=>?/ABCDEFG
HIJKLMNOPQRSTUVWXYZ
PRESS A/CH ON TRANSMITTER
1 - CONTINUE TEST
0 - RETURN TO MENU
1 - CONTINUE TEST
0 - RETURN TO MENU
CLON99-BK SMARTLOADER DISPLAYS USING
ON-SET KEYBOARD WITH NON-GLOBAL TV
PHILIPS
SMART LOADER
SYSTEM REVISION D.0
PN 3135 019 01681
PRESS POWER TO BEGIN
TELEVISION TYPE - SAVED DATA TYPE - POWER
TELEVISION TYPE - SAVED DATA TYPE - CH/UP
CH/UP - WRITE TV MEMORY
?? ARE YOU SURE ??
CH/UP - WRITE TV MEMORY
CH/DN - DO NOT WRITE
CH/UP
WRITING BLOCK - -
MEMORY WRITE COMPLETE
CH/DN
NO DATA SAVED FOR
TELEVISION TYPE - TV PRODUCT TYPE - -
INDEX
Battery Installation - Remote . . . . . . . . . . . . . . . . . . . . . . . . . . . . . . . . . . . . . . . . . . . . . . . . . . . . . . . . . . . . . . . . . . . . . . . . . . .3
Battery Installation - Clon99-BK SmartLoader . . . . . . . . . . . . . . . . . . . . . . . . . . . . . . . . . . . . . . . . . . . . . . . . . . . . . . . . . . . . .3
Connections . . . . . . . . . . . . . . . . . . . . . . . . . . . . . . . . . . . . . . . . . . . . . . . . . . . . . . . . . . . . . . . . . . . . . . . . . . . . . . . . . . . . . . .4
Erase Memory . . . . . . . . . . . . . . . . . . . . . . . . . . . . . . . . . . . . . . . . . . . . . . . . . . . . . . . . . . . . . . . . . . . . . . . . . . . . . . . . . . . . . .5
Exiting the Menu . . . . . . . . . . . . . . . . . . . . . . . . . . . . . . . . . . . . . . . . . . . . . . . . . . . . . . . . . . . . . . . . . . . . . . . . . . . . . . . . . . . .9
Introduction . . . . . . . . . . . . . . . . . . . . . . . . . . . . . . . . . . . . . . . . . . . . . . . . . . . . . . . . . . . . . . . . . . . . . . . . . . . . . . . . . . . . . . . .2
On-Set TV Keyboard . . . . . . . . . . . . . . . . . . . . . . . . . . . . . . . . . . . . . . . . . . . . . . . . . . . . . . . . . . . . . . . . . . . . . . . . . . . . .10, 12
On-Screen Displays for Non-Global TV with Transmitter . . . . . . . . . . . . . . . . . . . . . . . . . . . . . . . . . . . . . . . . . . . . . . . . . . . .11
On-Screen Displays for Non-Global TV with On-Set Keyboard . . . . . . . . . . . . . . . . . . . . . . . . . . . . . . . . . . . . . . . . . . . . . . .12
Programming with On-Set Keyboard for Global TV . . . . . . . . . . . . . . . . . . . . . . . . . . . . . . . . . . . . . . . . . . . . . . . . . . . . . . . .10
Programming (Writing) Memory . . . . . . . . . . . . . . . . . . . . . . . . . . . . . . . . . . . . . . . . . . . . . . . . . . . . . . . . . . . . . . . . . . . . . . . .7
Read Memory . . . . . . . . . . . . . . . . . . . . . . . . . . . . . . . . . . . . . . . . . . . . . . . . . . . . . . . . . . . . . . . . . . . . . . . . . . . . . . . . . . . . . .6
Remote Control . . . . . . . . . . . . . . . . . . . . . . . . . . . . . . . . . . . . . . . . . . . . . . . . . . . . . . . . . . . . . . . . . . . . . . . . . . . . . . . . .3, 5-9
Safety/Precautions . . . . . . . . . . . . . . . . . . . . . . . . . . . . . . . . . . . . . . . . . . . . . . . . . . . . . . . . . . . . . . . . . . . . . . . . . . . . . . . . . . .2
System Test . . . . . . . . . . . . . . . . . . . . . . . . . . . . . . . . . . . . . . . . . . . . . . . . . . . . . . . . . . . . . . . . . . . . . . . . . . . . . . . . . . . . . . . .8
Table of Contents . . . . . . . . . . . . . . . . . . . . . . . . . . . . . . . . . . . . . . . . . . . . . . . . . . . . . . . . . . . . . . . . . . . . . . . . . . . . . . . . . . .2
12